

Page 1
Foxit RMS PDF Protection Tool
User Manual
1
Page 2

Foxit RMS PDF Protection Tool
User Manual
Copyright © 2015 Foxit Software Incorporated. All Rights Reserved.
No part of this document can be reproduced, transferred, distributed or stored in any format
without the prior written permission of Foxit.
Anti-Grain Geometry - Version 2.3, Copyright (C) 2002-2005 Maxim Shemanarev
(http://www.antigrain.com).
FreeType2 (freetype2.4.9), Copyright (C) 1996-2001, 2002, 2003, 2004| David Turner , Robert
Wilhelm, and Werner Lemberg.
LibJPEG (jpeg V6b 27-Mar-1998), Copyright (C) 1991-1998 Independent JPEG Group.
ZLib (zlib 1.2.5), Copyright (C) 1995-2003 Jean-loupGailly and Mark Adler.
Little CMS, Copyright (C) 1998-2004 Marti Maria.
Kakadu - Version 4.5.1, Copyright (C) 2001, David Taubman, The University of New South Wales
(UNSW).
PNG, Copyright (C) 1998-2009 Glenn Randers-Pehrson.
LibTIFF, Copyright (C) 1988-1997 Sam Leffler and Copyright (C) 1991-1997 Silicon Graphics, Inc.
Jbig2enc 0.27, Copyright (C) 2006 Google Inc.
Lleptonlib 1.63, Copyright (C) 2001 Leptonica.
Lcms 2.0, Copyright (c) 1998-2010 Marti Maria Saguer.
WCELIBCEX 1.0, Copyright (c) 2006 Mateusz Loskot.
libjpeg-turbo 1, Copyright (C)2011 D. R. Commander.
Microsoft AD RMS SDK 2.0, Copyright (C) 2012 Microsoft Corporation.
Permission to copy, use, modify, sell and distribute this software is granted provided this
copyright notice appears in all copies. This software is provided "as is" without express or
im-plied warranty, and with no claim as to its suitability for any purpose.
2
Page 3

Foxit RMS PDF Protection Tool
User Manual
Content
Pre-installation Information ..................................................................... 4
System requirements ............................................................................... 4
RMS Command Line Tool Commands ....................................................... 4
Examples .................................................................................................. 6
Using the RMS Protection Tool in Conjunction with the Windows Server
File Classification Infrastructure ............................................................... 7
Add Security Dynamic Watermark to the File Encrypted by RMS ........... 17
Contact Us .............................................................................................. 26
3
Page 4

Foxit RMS PDF Protection Tool
User Manual
User Manual
Foxit RMS PDF Protection Tool provides a command-line interface that can decrypt multiple AD
RMS protected PDF files or encrypt multiple PDF files by a predefined official rights-policy
template. This tool can be used to safeguard existing sensitive data on company shares. It also
works in conjunction with the File Classification Infrastructure (FCI) feature in Windows Server
2008/2012 to classify and protect sensitive company data.
Pre-installation Information
To run this tool, you must have the latest version of the AD RMS client installed. If you have an
existing older version of the AD RMS client installed, you will need to uninstall the old version first
and then download and install the latest version of the AD RMS client from below:
For X86:
http://us-request.foxitservice.com/products/redirect.php?title=ad_rms_sdk_x86&language=en_
us
For X64:
http://us-request.foxitservice.com/products/redirect.php?title=ad_rms_sdk_x64&language=en_
us
As for using Windows Azure AD Right Management (AAD RMS), please refer to the Quick Start
for Using Windows Azure AD Right Management.
System requirements
Supported operating systems: Windows 7, Windows 8 Release Preview, Windows Server 2008,
and Windows Server 2008 R2, Windows Vista, Windows Server 2012
The following list identifies client and server platforms that can install Active Directory Rights
Management Services SDK 2.0: • Windows Server 2008 R2 • Windows 7 • Windows Server 2008
with Service Pack 2 (SP2) • Windows Vista with Service Pack 2 (SP2) • Windows Server 2012
RMS Command Line Tool Commands
The following syntax, parameter description, and example sections describe the Foxit RMS
Command Line Tool commands.
4
Page 5

Foxit RMS PDF Protection Tool
Format
Meaning
Monospace
Elements that the user must type exactly as shown.
Between angle brackets < >
Placeholders for values that the user must supply.
Between square brackets [ ]
Optional items.
Parameter
Description
/decrypt <location>
Performs a batch decryption. This will decrypt all of the PDF files that
reside in the location that is specified with this parameter.
/encrypt <location>
</template <name>
[issuer] > [/highstrength]
Performs a batch encryption. This will encrypt all of the PDF files that
reside in the location based on the rights policy template that is
specified along with this parameter.
The <issuer> argument lets you specify an issuer of rights policy
template.
The /highstrength is an updated and enhanced AD RMS cryptographic
implementation.
/revoke
This parameter is used to revoke a document that has been issued, or
revoke a user that has been authorized with access rights. If you want
to use this command, you need to configure the web service first. For
detailed configuration steps, please refer to Web Service
Configuration.
/showencyrption
location
This parameter will show user permission information for the
encrypted files.
/showtemplates [/sync]
The /showtemplates parameter can show the available templates.
The /sync parameter will download the rights policy template from
the server synchronously.
/preserveattributes
This parameter preserves all the original file attributes. These
attributes includes the following: Owner, Creation Time, Modified
Time, and Accessed Time. For example, when this parameter is used
with the File Classification Infrastructure in Windows Server 2008 R2,
User Manual
Syntax
RMSProtector [/decrypt <location>]
[/encrypt <location> </template <name> [issuer]> [/highstrength]
[/revoke] [/MicrosoftIRMV1]]
[/encrypt <location> </user <name> /rights <rights> [issuer]>
[/highstrength] [/revoke] [/MicrosoftIRMV1]]
[/showtemplates [/sync]] [/preserveattributes]
[/showencryption <location>]
[/log <log_file> [/append] [/simple]] [/silent]
Parameters
5
Page 6

Foxit RMS PDF Protection Tool
there can be a rule in place to delete all files that were not modified
or accessed in the last 10 years. This option preserves all these
original attributes.
/log <log_file> [/append]
[/simple]
Performs an output to a log file. The log file contains a header that
will show the status during the prerequisite stage and a footer that
will shows the summary of the run. The log file will also show the file
count information.
The /simple flag allows the header, footer, and file numbering
information to be left out of the log file. This is useful when the tool is
used together with File Classification Infrastructure, because it will let
you append the log file without the header, footer, and file numbering
information.
The /append flag will add the new information to a pre-existing log
file. By default, if the /simple or /append flag is not specified when
you are using a pre-existing log file, the log file will be overwritten.
/silent
This parameter disables console logging.
/MicrosoftIRMV1
This parameter is used to encrypt PDFs with Microsoft IRM Protection
Version 1, which is a Microsoft extension to the PDF format to support
Microsoft IRM protection. The extension allows PDFs to be encrypted
by Microsoft IRM technology that is implemented by Microsoft’s
Active Directory Rights Management Server as well as by Azure Rights
Management. If not defined, Microsoft IRM Protection Version 2
(PPDF) will be used.
User Manual
Examples
The following shows an example of decrypting files on a network share:
RMSProtector.exe /decrypt \\Share\Folder /log RMSProtector.log
The following shows an example of encrypting local files:
RMSProtector.exe /encrypt C:\Documents\Folder /template TemplateName /log
C:\Logs\RMSProtector.log
The following shows an example of encrypting an individual file on a network share.
RMSProtector.exe /encrypt \\Share\file.pdf /template TemplateName IssuerName /log
C:\Logs\RMSProtector.log /append /simple/preserveattributes
The following shows an example of directly encrypting files:
RMSProtector.exe /encrypt C:\Documents\Folder /user user01@frms.com,user02@frms.com
/rights VIEW,ANNOTATE /revoke
User Rights include the following:
ALL: Full control
6
Page 7

Foxit RMS PDF Protection Tool
User Manual
VIEW: View document
PRINTLOW: Print with low resolution
PRINTHIGH: Print with high resolution
FILLFORM: Fill in a form
ANNOTATE: Comment in the document
ASSEMBLE: Manage pages and bookmarks
MODIFY: Modify document
EXTRACTACCESS: Content copying for accessibility
EXTRACT: Extract the contents of the document
RUNJAVASCRIPT: Run JavaScript
Using the RMS Protection Tool in Conjunction with the Windows
Server File Classification Infrastructure
The following steps will guide you through setting up the RMS Command Line Tool and FCI.
1. Unzip installation package to the specified directory.
a. Log on to the FCI Server as Administrator.
b. Unzip command line tool to: C:\Windows\SysWOW64
c. If you have purchased the product, please place the key file in this directory.
2. Grant FCI Machine Account Read and Execute Permissions.
a. Log on to the AD RMS Server as an Administrator.
b. Navigate to C:\Inetpub\wwwroot\_wmcs\Certification, right-click on
ServerCertification.asmx and select Properties.
c. On the ServerCertification.asmx properties, select the Security tab, and then click Edit.
d. On the Permissions for ServerCertification.asmx screen, click Add.
e. On the Select Users, Computers, or Groups screen, to the right, click the Object Types…
button.
f. On the Object Types screen, place a check in Computers and click Ok.
g. On the Select Users, Computers, or Groups screen, under Enter the object names to select,
type <domain>\<machinename> and then click Check Names. This should validate the
machine with an underline. Click Ok.
h. On the Permissions for ServerCertification.asmx screen, select the newly added
machinename and verify it has a check in Read & execute. Click Apply and then OK.
i. On the ServerCertification.asmx properties, click Ok.
3. Grant AD RMS Service Group Read and Execute Permissions
a. On the Select Users, Computers, or Groups screen, under Enter the object names to select,
enter ADRMS\AD RMS Service Group and click Check Names. This should resolve with an
underline. Click Ok.
7
Page 8
Foxit RMS PDF Protection Tool
4. To create the Shared Folder
a. Log on to FCI Server as Administrator
b. Click Start, click Computer, and then double-click Local Disk (C:).
c. Click File, point to New, and then select Folder.
d. Type SharedFolder for the new folder's name, and then press ENTER.
e. Right-click SharedFolder, click Share with, and then click Specific people.
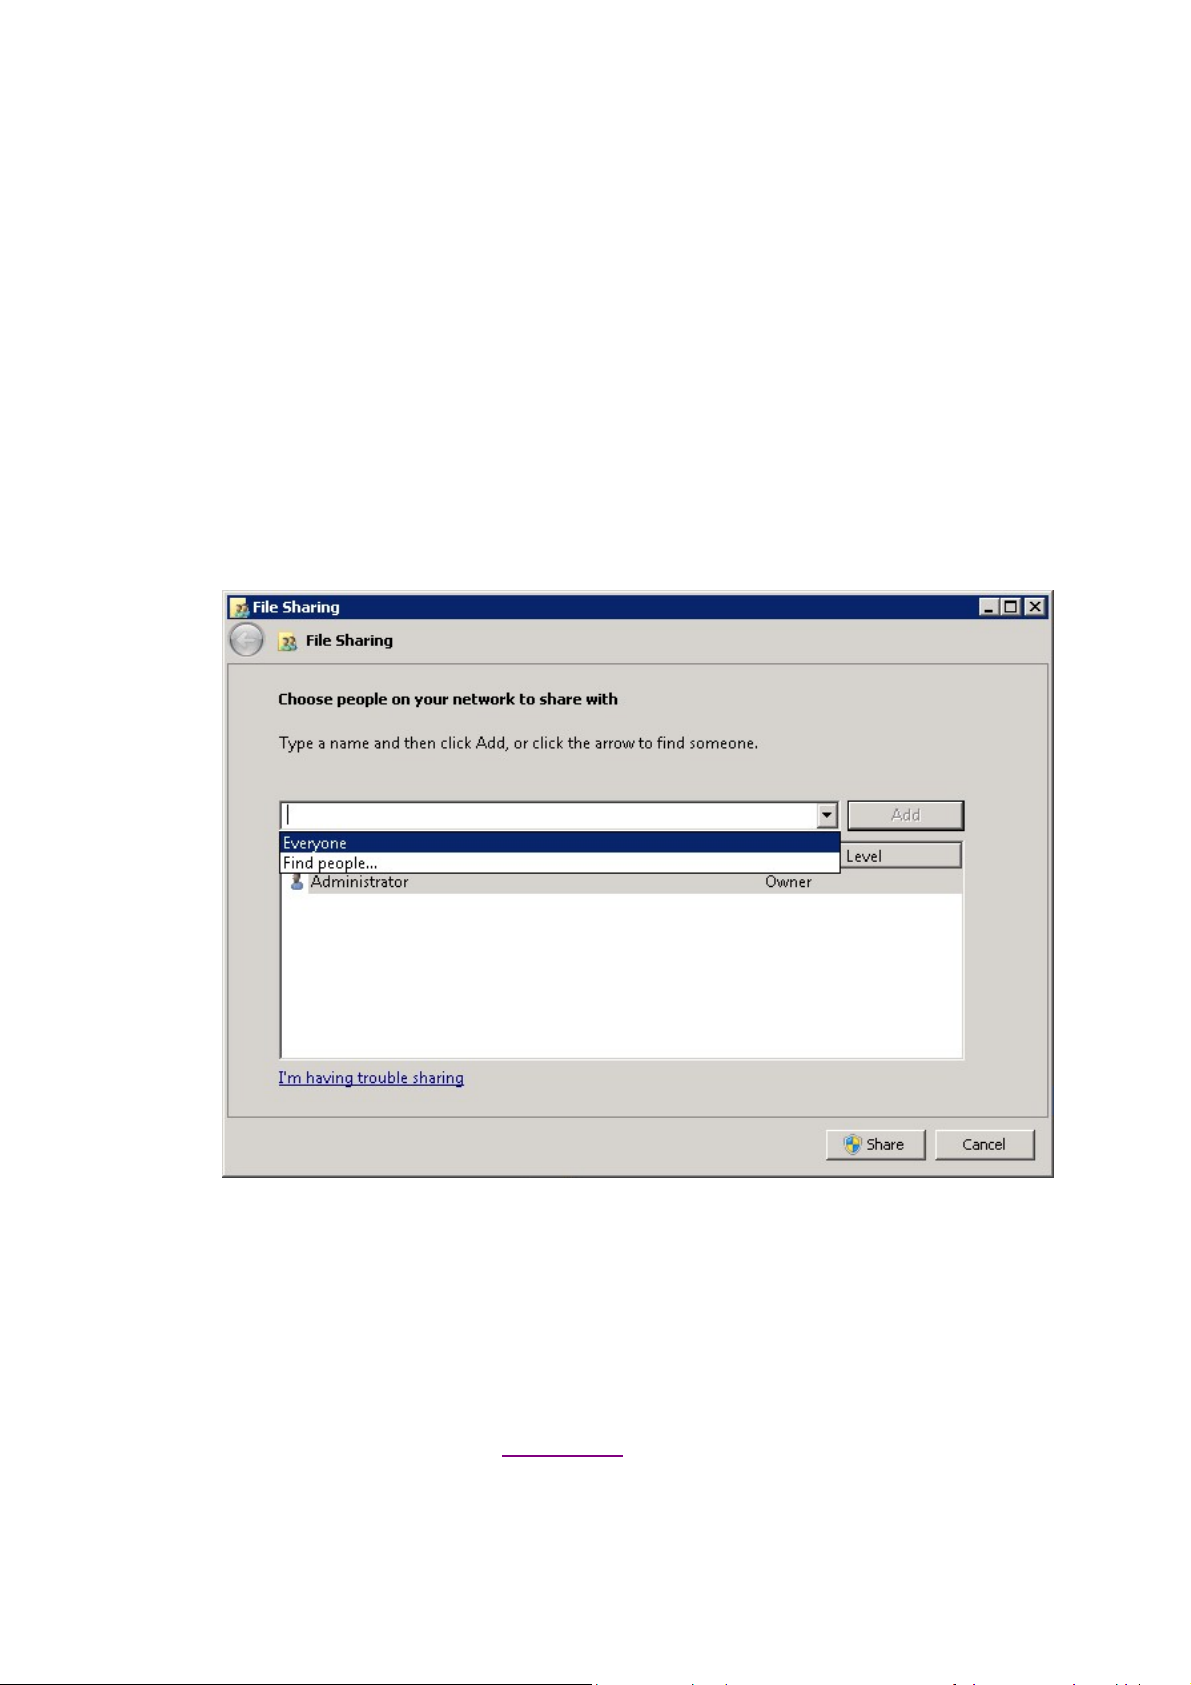
f. On the File Sharing window, in the box under Type a name and then click Add, or click the
arrow to find someone select Everyone, then and click Add.
The Everyone group should now appear in the box below. Under Permission Level, select
Read/Write.
g. Click Share. The window should change and you should now see Your folder is shared.
h. Click Done.
a. Log on to FCI server as Administrator
b. Copy the script from Appendix 1 into notepad and save it as
c:\windows\system32\FoxitProtect.ps1.
c. Click Start, click Administrative Tools, and click File Server Resource Manager.
User Manual
b. On the Permissions for ServerCertification.asmx screen, select the newly added AD RMS
Service Group and verify it has a check in Read & execute. Click Apply and then Click Ok.
c. On the ServerCertification.asmx properties, click Ok.
d. Restart the AD RMS server.
5. Restrict Files
8
Page 9

Foxit RMS PDF Protection Tool
d. In the File Server Resource Manager, on the left, right-click File Management Tasks,
and select Create File Management Task. This will bring up the Create File Management
Task window.
e. Under Task name: enter Restrict files.
f. Under Description, enter Apply Confidential rights policy.
g. Under Scope, click Add and then browse to SharedFolder.
h. At the top, click the Action tab.
i. Under Type, select Custom from the drop-down.
j. Under Executable, select Browse and navigate to
c:\windows\system32\WindowsPowerShell\v1.0\powershell.exe.
k. Under Arguments, enter -File c:\windows\system32\FoxitProtect.ps1 [Source File Path].
l. Under Run the command as:, select Local System.
m. At the top, click the Condition tab.
n. Click Add. This will bring up the Property Condition window.
o. On the Property Condition window, make sure Property: is set to Business Impact, set the
Operator: to Equals, and for the Value: select Low from the drop-down. Click OK.
User Manual
9
Page 10

Foxit RMS PDF Protection Tool
Note: If you could not find Business Impact under Property, please follow the steps below
to create Business Impact Classification Property first.
a) Log on to FCI server as Administrator.
b) Click Start, click Administrative Tools, and click File Server Resource Manager.
c) In the File Server Resource Manager, on the left, expand Classification Management,
and right-click Classification Properties, and select Create Property. This will bring up
the Create Classification Property Definition window.
d) Under Property name, enter Business Impact.
e) Under Description, enter Describes the impact to the business if this file were to be
disclosed to the public. Valid values are High and Low.
f) Under Property type, enter Ordered List.
g) Down under Value enter High. This will add a row below the value we just entered.
h) Under the High value we just added, enter Low.
i) Click OK.
p. Click Add. This will bring up the Property Condition window.
q. On the Property Condition window, make sure Property: is set to dateEncrypted, and
select not exist for the condition. Click OK.
Note: If you could not find dateEncrypted under Property, please follow the steps below to
create dateEncrypted Classification Property first.
a) Log on to FCI server as Administrator.
b) Click Start, click Administrative Tools, and click File Server Resource Manager.
c) In the File Server Resource Manager, on the left, expand Classification Management,
and right-click Classification Properties, and select Create Property. This will bring up
the Create Classification Property Definition window.
d) Under Property name, enter dateEncrypted.
e) Under Description, enter When this document was encrypted.
f) Under Property type, enter Date-Time.
g) Click OK.
r. At the top, click the Notification tab.
s. Click Add. This will bring up the Add Notification window.
t. Set the Number of days before the task is executed to send notification to 0, and
configure E-mail Message or Event log, then press OK.
u. At the top, click the Schedule tab.
v. On the Schedule tab, click Create. This will bring up the Schedule window.
w. Configure the time you want to schedule the script to run and then press OK.
User Manual
Note:
1. After the installation of PowerShell, the execution of scripts is disabled by default. You must
10
Page 11

Foxit RMS PDF Protection Tool
User Manual
enable your system to run the scripts. This can be done by using the following command:
Set-Executionpolicy Unrestricted.
2. The CLI running in FCI is in server mode. So the policy template is stored in another folder
different from the client mode, usually in C:\Users\All Users\Microsoft\MSIPC\Server\Templates.
When running the CLI in FCI, you can use the following FCI script to sync templates and encrypt
files.
$encryptfile = '"' + $args[0] + '"'
$r = start-process -Wait -PassThru -FilePath C:\Windows\SysWOW64\RMSProtector.exe
-ArgumentList "/showtemplates", "/sync"
$r = start-process -Wait -PassThru -FilePath C:\Windows\SysWOW64\RMSProtector.exe
-ArgumentList "/encrypt", $encryptfile, "/template", '"RMS SVR TemplateA"', "/log",
"C:\SharedFolder\RmsLog.log", "/append"
Appendix 1
The following Windows Powershell script is used to create the file management task to restrict
files
# execute bulk tool
$encryptfile = '"' + $args[0] + '"'
$r = start-process -Wait -PassThru -FilePath C:\Windows\SysWOW64\RMSProtector.exe
-ArgumentList "/encrypt", $encryptfile, "/template", "[TemplateName]", "/log",
"C:\SharedFolder\RmsLog.log", "/append", "/preserveattributes"
if ($r.ExitCode -eq 0)
{
$c = new-object -com Fsrm.FsrmClassificationManager
$d = (get-date).toFileTimeUTC()
$d = $d - ($d % 10000000)
$c.SetFileProperty($args[0], "dateEncrypted", $d.ToString())
}
Note:
1. [TemplateName] in the script should be filled out with real information. If [TemplateName]
includes spaces, for example, the template name is “security audit mechanism”, the script should
be written as "/template", '"security audit mechanism"'.
2. To encrypt a document by custom templates, please create custom template first (for how to
create a custom template, please refer to Create Template), and then copy “Foxit Software”
folder under C:\Users\User name (the current user of the operation system)\AppData\Roaming
to C:\Users\Default\AppData\Roaming.
11
Page 12

Foxit RMS PDF Protection Tool
User Manual
Custom Template
Foxit RMS PDF Protection Tool allows users to encrypt documents by custom templates. You can
create custom templates by Configuration Tool, call “showtemplates” command to display the
custom templates and then encrypt documents by the created template via “encrypt” command.
Also, you can manage the custom templates with the Protection Tool. Please refer to the
instructions below for details.
Create Template
To create a custom template, please see the following steps:
1. Run the file “Foxit Configuration Tool.exe” in the unzipped folder and choose Custom Template
tab.
2. Click Create.
3. Click Add in the Create Custom Rights Policy Template dialog box.
12
Page 13

Foxit RMS PDF Protection Tool
User Manual
4. Choose the language and edit template name and description. Click OK. The template name
and description will be shown in the Template Identification list. You can type the name and
description with different languages for the template you want to create via clicking Add.
5. Click Next to turn to Add User Rights.
6. Click Add button to simply add users you would like to assign the rights.
Input e-mail addresses in the field under “The e-mail addresses of users or groups” option or
click Browser button to select email addresses from Outlook.
13
Page 14

Foxit RMS PDF Protection Tool
User Manual
Select Anyone to allow all the users to work with the encrypted PDF files.
Click OK to finish adding.
7. Check PDF permissions for the above users. You can set the permissions for all of the users or
set different permissions for different users.
8. User can request additional permissions from: if users want to apply for any permission, the
application will launch the email client and list the email addresses you typed into the text in the
Recipient's Address automatically. You can type a URL as well.
9. Click Next to set the expiration policy.
Content expiration
Never expires: the PDF content can be viewed indefinitely.
Expires on the following date: the PDF content will expire on a given date.
Expires after the following duration (days): the PDF content will expire after the desired days
selected.
14
Page 15

Foxit RMS PDF Protection Tool
User Manual
Use license expiration
Requires user to re-verify permissions with the server after the following duration (days): users
need to apply for a new license to open the encrypted PDFs several days (the number you type
into) later.
10. Click Next to specify extended policy.
Security Watermark
To add security watermark, please check Security Watermark first, and then follow the steps
specified in Add a required watermark.
Only allow access by this IP range:
Check the option and specify an IP range that is allowed to access a document.
Only allow access to these pages:
Check the option and specify the page number(s) that a user is allowed to access.
Number of accesses:
Check the option and specify the number of times that a user is allowed to access a document.
Number of prints:
Check the option and specify the number of times that a user is allowed to print a document.
11. Click Finish to complete creating the template.
15
Page 16

Foxit RMS PDF Protection Tool
User Manual
Note: If you want to control “Number of accesses” or “Number of prints” in an on-premise
environment, you need to configure the web service first. For detailed configuration steps, please
refer to the attached Web Service Configuration.
Manage Custom Template
You can edit and delete the custom templates you created by Foxit Configuration Tool.
To edit a template, please follow the steps below:
1. Run the file “Foxit Configuration Tool.exe” in the unzipped folder and choose Custom Template
tab.
2. Choose the template you want to edit and click Edit to open Edit Custom Rights Policy
Template.
3. Edit the template as required. For the instructions on how to edit the template, please refer to
Create Template for details.
To delete a template, select the template you want to delete, and click Delete and Yes.
16
Page 17

Foxit RMS PDF Protection Tool
User Manual
Security Dynamic Watermark
Create and manage dynamic watermarks
Dynamic security watermarks automatically display viewer identity information on protected PDF
files to protect against compromise from screen shots and cameras.
Create dynamic watermarks
1. Unzip the installation package on RMS server.
2. Run the file “Foxit Configuration Tool.exe” in the unzipped folder and choose Security
Watermark tab to open Security Watermark Management.
3. Add a required watermark.
17
Page 18

Foxit RMS PDF Protection Tool
User Manual
i.Click New Profile to create a profile and name it.
ii.Select a profile you created and click Add to add watermarks in the profile.
iii.Type the watermark’s name.
iv.Type the watermark’s content in the text box and set the font, size, color, underline, and
alignment.
Note: you can only set text as watermark.
v.Choose the Dynamic Text. When any PDF reader opens the file, the watermark will show
the current document information dynamically and you can use multiple texts at the same time.
Content ID: shows the content ID of the current document.
Document Title: shows the current document title.
Author: shows the author of the current document.
Current User: shows the current user who is reading the document.
Date: shows the current system date when opening the document.
Day: shows the current system day when opening the document.
Month: shows the current system month when opening the document.
Year: shows the current system year when opening the document.
Time: shows the current system time when opening the document.
Hour: shows the current system hours when opening the document.
Minute: shows the current system minutes when opening the document.
Second: shows the current system seconds when opening the document.
vi.Set the appearance by choosing the rotation degree and the opacity. You also have the
option to make the scale relative to target page.
vii.Set the vertical and horizontal distance between the target page and the watermark.
viii.Choose the page range to play the watermark. You can select the different page range
options via clicking the right items in the subset list.
18
Page 19

Foxit RMS PDF Protection Tool
User Manual
ix.Preview the watermark in the right pane.
x.Click OK to finish it.
Manage dynamic watermarks
Edit a Watermark
i.Open the Security Watermark Management and select a watermark you want to edit.
ii.Click Edit to open the Create Security Watermark dialog box.
iii.Begin editing the watermark, please refer to “Add a required watermark”.
iv.Click OK to finish the operation.
Delete a Watermark
i.Open the Security Watermark Management and select a watermark you want to delete.
ii.Click Delete to remove the selected watermark.
Add dynamic security watermarks to a custom template
To add dynamic security watermarks to a custom template, select the dynamic security
watermarks as needed while creating the custom template.
Add dynamic security watermarks to an official template
To add dynamic security watermarks to an official template, you need to use Foxit Configuration
Tool (for RMS server). Steps are as follows:
19
Page 20

Foxit RMS PDF Protection Tool
User Manual
1. Log on to the RMS server.
2. Download the Foxit Configuration Tool from:
For X86:
http://cdn01.foxitsoftware.com/pub/foxit/rms/configtool/FoxitConfigurationTool_32.zip
For X64:
http://cdn01.foxitsoftware.com/pub/foxit/rms/configtool/FoxitConfigurationTool_64.zip
3. Unzip and run the Foxit Configuration Tool.
4. Click Template Extended Policy. Select a template to edit.
20
Page 21

Foxit RMS PDF Protection Tool
User Manual
5. Click Select, and then follow the steps specified in Add a required watermark to add
watermarks to official templates.
Dynamic Revocation
Revocation is a mechanism that revokes a PDF document that has been issued, or revoke a user
that has been authorized with access rights. For example, you can remove access to a document
when it becomes out of date, or remove rights for an individual when he is no longer authorized.
To revoke a PDF document or user in an on-premises environment, please refer to the attached
Web Service Configuration to configure the web service first.
Revoke a PDF Document
1. Log on to the RMS server.
2. Download the Foxit Configuration Tool from:
For X86:
http://cdn01.foxitsoftware.com/pub/foxit/rms/configtool/FoxitConfigurationTool_32.zip
For X64:
http://cdn01.foxitsoftware.com/pub/foxit/rms/configtool/FoxitConfigurationTool_64.zip
3. Unzip and run the Foxit Configuration Tool.
21
Page 22

Foxit RMS PDF Protection Tool
User Manual
4. Click Document Revocation.
5. Select the PDF document you want to revoke, click Add button to add the document to the
Revocation List. Or you can click Browse to select a document from a lcoal drive to add to the
22
Page 23

Foxit RMS PDF Protection Tool
User Manual
Revocation List.
Revoke a User
1. Log on to the RMS server.
2. Run the Foxit Configuration Tool.
3. Click User Revocation.
23
Page 24

Foxit RMS PDF Protection Tool
User Manual
4. Click Add button to add a user to the User Revocaton List.
Quick Start for Using Windows Azure AD Right Management
Enable Windows Azure AD Rights Management for your organization:
Download the Windows Azure AD Rights Management administration module
(WindowsAzureADRightsManagementAdministration.exe) for Windows PowerShell
from here.
In the local folder where you downloaded and saved the Rights Management
installer file, double-click the file
WindowsAzureADRightsManagementAdministration.exe to launch installation of
the Rights Management administration module.
Open Windows PowerShell.
Type the following commands:
Import-Module AADRM
Connect-AadrmService -Verbose
24
Page 25

Foxit RMS PDF Protection Tool
User Manual
Enter your Office 365 credentials when prompted, for
example“user@company.onmicrosoft.com”.
Type the following commands:
Enable-Aadrm
Disconnect-AadrmService
25
Page 26

Foxit RMS PDF Protection Tool
Office Address:
Foxit Software Incorporated
42840 Christy Street. Suite 201
Fremont CA 94538
USA
Mailing Address:
Foxit Software Incorporated
42840 Christy Street. Suite 201
Fremont CA 94538
USA
Sales:
1-866-680-3668 (24/7)
Support:
1-866-MYFOXIT or 1-866-693-6948 (24/7)
Fax:
1-510-405-9288
Website:
www.foxitsoftware.com
E-mail:
Sales and Information - sales@foxitsoftware.com
Technical Support - Input a trouble ticket online
Marketing Service - marketing@foxitsoftware.com
User Manual
Contact Us
Feel free to contact Foxit should you need any information or have any problems with our
products. We are always here, ready to serve you better.
26
 Loading...