


 Loading...
Foxit PhantomPDF
User Manual
1
Foxit PhantomPDF
User Manual
© Foxit Software Incorporated. All Rights Reserved.
No part of this document can be reproduced, transferred, distributed or stored in any format without the prior written permission of Foxit.
Anti-Grain Geometry - Version 2.4
© Maxim Shemanarev (http://www.antigrain.com)
Portions of this product Copyright [2001-2019] Solid Documents
Permission to copy, use, modify, sell and distribute this software is granted provided this copyright notice appears in all copies. This software is provided "as is" without express or implied warranty, and with no claim as to its suitability for any purpose.
2
|
Foxit PhantomPDF |
|
User Manual |
Contents |
|
Contents ............................................................................................................... |
3 |
Chapter 1 – Introduction ....................................................................................... |
6 |
PhantomPDF Overview ..................................................................................................................... |
6 |
What’s New? ..................................................................................................................................... |
7 |
About the User Manual..................................................................................................................... |
9 |
Quick Installation Guide.................................................................................................................... |
9 |
Online Help ....................................................................................................................................... |
9 |
Foxit Plug-In Platform...................................................................................................................... |
10 |
GPO ................................................................................................................................................. |
11 |
Using Foxit Setup Customization Tool ............................................................................................. |
12 |
Chapter 2 – Get Started........................................................................................ |
13 |
Workspace Basics............................................................................................................................ |
13 |
Customize the Skin.......................................................................................................................... |
18 |
Set Preferences ............................................................................................................................... |
18 |
Chapter 3 – Read.................................................................................................. |
37 |
Open PDFs....................................................................................................................................... |
37 |
Save PDFs ........................................................................................................................................ |
38 |
Close a PDF...................................................................................................................................... |
39 |
Export PDFs ..................................................................................................................................... |
40 |
View PDFs........................................................................................................................................ |
41 |
View 3D Content in PDFs................................................................................................................. |
59 |
Select & Copy .................................................................................................................................. |
60 |
Word Count..................................................................................................................................... |
62 |
Chapter 4 – Create ............................................................................................... |
63 |
Create a PDF in Different Ways ....................................................................................................... |
63 |
Create and Customize a PDF Portfolio ............................................................................................ |
81 |
OCR PDFs and PDF Portfolios .......................................................................................................... |
81 |
Create a table of contents from bookmarks ................................................................................... |
84 |
Industry Standard Validation and Creation..................................................................................... |
84 |
Chapter 5 – Edit ................................................................................................... |
85 |
Undo and Redo ............................................................................................................................... |
85 |
Links ................................................................................................................................................ |
85 |
Bookmarks ...................................................................................................................................... |
91 |
Destinations .................................................................................................................................... |
93 |
File Attachments ............................................................................................................................. |
94 |
Images............................................................................................................................................. |
97 |
PDF Optimizer ............................................................................................................................... |
103 |
Action Wizard (Business Edition Only) .......................................................................................... |
104 |
Work with Video & Audio ............................................................................................................. |
106 |
Search and Replace Text................................................................................................................ |
109 |
3
|
Foxit PhantomPDF |
|
User Manual |
Paragraph Editing .......................................................................................................................... |
110 |
Objects .......................................................................................................................................... |
111 |
Articles .......................................................................................................................................... |
134 |
Spelling Check ............................................................................................................................... |
137 |
Working with Layers...................................................................................................................... |
137 |
PDF Properties .............................................................................................................................. |
141 |
Chapter 6 – Organize.......................................................................................... |
144 |
Insert Pages................................................................................................................................... |
144 |
Rotate, Move, Swap and Delete Pages.......................................................................................... |
147 |
Extract, Duplicate and Replace Pages ........................................................................................... |
149 |
Split PDFs into multiple files.......................................................................................................... |
151 |
Crop Pages..................................................................................................................................... |
151 |
Flatten Pages ................................................................................................................................. |
153 |
Header & Footer, Watermark & Background to PDFs ................................................................... |
153 |
Bates Numbering (Business Edition Only)..................................................................................... |
155 |
Adding Format Page Numbers ...................................................................................................... |
156 |
Chapter 7 – Comments....................................................................................... |
157 |
Commenting Commands............................................................................................................... |
157 |
Change the Appearance of Comments ......................................................................................... |
171 |
Managing Comments.................................................................................................................... |
172 |
Chapter 8 – Share PDFs ...................................................................................... |
182 |
Email Documents .......................................................................................................................... |
182 |
Send to Evernote........................................................................................................................... |
182 |
Send to OneNote........................................................................................................................... |
183 |
SharePoint Integration .................................................................................................................. |
183 |
Shared Review and Email Review.................................................................................................. |
185 |
NetDocuments Integration ........................................................................................................... |
188 |
iManage Work Integration ............................................................................................................ |
190 |
OpenText eDOCS Integration ........................................................................................................ |
192 |
OpenText Documentum Integration ............................................................................................. |
193 |
OpenText Content Suite Integration.............................................................................................. |
194 |
Worldox Integration ...................................................................................................................... |
195 |
Epona DMSforLegal Integration .................................................................................................... |
196 |
Chapter 9 – Forms.............................................................................................. |
198 |
Interactive Form and Non-interactive form .................................................................................. |
198 |
Fill in PDF Forms............................................................................................................................ |
199 |
Comment on Forms....................................................................................................................... |
201 |
Manage Form Data........................................................................................................................ |
201 |
Form Fields.................................................................................................................................... |
203 |
JavaScript ...................................................................................................................................... |
226 |
Chapter 10 – Security ......................................................................................... |
229 |
Check PDF Security........................................................................................................................ |
229 |
Password Protection & Certificate Protection .............................................................................. |
229 |
AD RMS Protection (Business Edition Only) .................................................................................. |
234 |
4
Foxit PhantomPDF |
|
User Manual |
|
Remove Hidden Data .................................................................................................................... |
247 |
Redaction (Business Edition Only)................................................................................................. |
247 |
Windows Information Protection (WIP)........................................................................................ |
251 |
FIPS mode ..................................................................................................................................... |
254 |
Chapter 11 – ConnectedPDF ............................................................................... |
256 |
Chapter 12 – Signature....................................................................................... |
257 |
Digital Signature............................................................................................................................ |
257 |
Sign PDFs with DocuSign®.............................................................................................................. |
268 |
Quick PDF Signature...................................................................................................................... |
269 |
Chapter 13 – Accessibility................................................................................... |
272 |
Accessibility Check and Fixes ........................................................................................................ |
272 |
Accessible reading and navigation through accessibility preference setting and shortcut keys... |
281 |
Create accessible PDFs (Business only) ......................................................................................... |
282 |
Chapter 14 – Print .............................................................................................. |
294 |
Print PDF documents..................................................................................................................... |
294 |
The Print dialog box ...................................................................................................................... |
295 |
Set Foxit PhantomPDF Printer Properties ..................................................................................... |
298 |
Chapter 15 – Appendices.................................................................................... |
303 |
Quick Installation Guide................................................................................................................ |
303 |
GPO Manual.................................................................................................................................. |
312 |
SharePoint Configuration .............................................................................................................. |
326 |
Web Service Configuration............................................................................................................ |
328 |
Work with PhantomPDF via VBA scripts in Excel .......................................................................... |
339 |
Keyboard Shortcuts....................................................................................................................... |
342 |
Single-key Accelerators ................................................................................................................. |
346 |
Command Lines............................................................................................................................. |
351 |
Contact Us ......................................................................................................... |
352 |
5
Foxit PhantomPDF
User Manual
Chapter 1 – Introduction
PhantomPDF Overview
Welcome to Foxit PhantomPDF™- Business Ready PDF! Award-winning Foxit PhantomPDF provides the right features at the right price, allowing you to produce great looking PDF document and forms quickly, affordably, and securely. Foxit PhantomPDF comes in two editions: Foxit PhantomPDF Standard to fit the small and medium sized businesses, and Foxit PhantomPDF Business to fit the large enterprises.
Foxit PhantomPDF Standard
Foxit PhantomPDF Standard enables businesses to create, edit, and secure reliable PDF documents quickly, easily, and at a cost you can afford.
XFA Form Filling
Direct Editing
Read out Loud
Robust Document Security
Form Fields
Optical Character Recognition (OCR)
Export PDF to Image
Industry Validation
PDF Optimizer
SharePoint Integration
DocuSign
Participate in a Shared Review
Foxit PhantomPDF Business
Foxit PhantomPDF Business provides business the security that ensures regulatory compliance and corporate governance of their important documents and archives and to ensure documents don’t change after they are approved. It stands up to the demands of large enterprises but lightweight enough to easily deploy to thousands of users without exhausting resources. Supports the right features at the right price with the quality and support you expect from an enterprise solution.
Redaction
Document Certification
XFA Form Filling
Bates Number
6
Foxit PhantomPDF
User Manual
Read out Loud
Microsoft® Active Directory® Rights Management Service Protector and Policy Manager
High Compression
SharePoint Integration
DocuSign
Send for Shared Review
What’s New?
What’s new in Foxit PhantomPDF 9.5?
New features:
Epona DMSforLegal Integration
Use PhantomPDF to directly open/check out PDF files from Epona DMSforLegal and after making changes save/check them in to Epona DMSforLegal.
Accessibility Features
Offer a visual and more efficient way to change reading order directly in the document view by drawing areas around the desired content and setting the reading order for the areas.
Tag content as note, reference, and background/artifact with the Reading Order command. Create a link tag automatically when creating link annotation from the context menu of the selected text in a tagged PDF.
Viewing Article in PDF
Define a navigational path (or an article thread) for articles that arrange text content in multiple columns and pages, so that users can skim through the PDF like in a print newspaper or magazine, focusing on a specific article and ignoring the rest.
Smooth Line Art
Provide an option to smooth lines when viewing a PDF that include CAD drawings, which also makes it faster to open the PDF.
The Whiteout Tool
Allow user to simply and securely erase any content permanently to white background from a PDF with one click like an eraser, leaving no trace behind.
Add pen and touch support to PhantomPDF for Microsoft Surface Pro.
7
Foxit PhantomPDF
User Manual
Enhancements in Foxit PhantomPDF 9.5:
Find & Search optimization
Search and replace all the results instantly with the replacement text.
Add additional criteria (document properties) in Advanced Search for searches across multiple PDFs and PDF indexes.
Sort instances in the search results by date modified, filename, or location when searching files in a folder.
Signatures and stamps enhancements
Customize the appearance of digital signatures by drawing or importing a PDF file of your handwritten signature.
Add an option to set the current size of the signature as default when placing a signature with the PDF Sign feature and the ability to place a signature or stamp by simply dragging a rectangle and filling in with the selected signature or stamp proportionally.
Improvements in comparing files
Provide a much more clear and accurate compare result after comparison.
For a PDF digitally signed several times, with the capability to view each signed version of the PDF, you can also view the changes made to each signed version, and compare a signed version to the current version you have.
Enhance the HTML to PDF feature to directly create tagged PDF files by carrying over tags and other accessible information such as alt-text for images from the HTML file.
Add shortcut keys for switching quickly between files in the multi-tab reading mode.
Move and resize redaction markups before applying redactions.
Insert entire PDF files including the file attachments to a document.
Add an option to auto-detect portrait/landscape when printing PDFs.
Remember last settings when organizing pages including rotating, extracting, and splitting.
Add JavaScript APIs in more usage scenarios including modifying the user interface, creating/modifying PDFs, and printing.
Some other user-friendly enhancements.
8
Foxit PhantomPDF
User Manual
About the User Manual
This user manual covers all features included in Foxit PhantomPDF.
Quick Installation Guide
To get installation, registration, uninstallation and update instructions step by step, please refer to Foxit PhantomPDF Quick Installation Guide.
Online Help
You can get online help about how to read and work with PDF files from within Foxit PhantomPDF using the Help Center and Content-sensitive Help features. (The online help is only available in English version.)
Help Center
Help Center helps you navigate top help topics and get help online. To access the Help Center, please click Help tab > Help > Help Center. In the Help Center, you can input a keyword in the
Search box to search for any desired topic. While reading the help contents, you can click 
to move back to the previous view, or click  to return to the Home Page of the Help Center.
Content-sensitive Help
Content-sensitive Help assists users by providing help based on a specific task they perform. This enables users to get specific information about whatever feature of the application they are using at the given moment.
To access Content-sensitive Help:
Hover your mouse over a button, and you will see the tip which gives you the basic instruction of the feature. If Foxit PhantomPDF contains additional help about the feature, you can click Tell me more to learn more about it in Help Center.
9

Foxit PhantomPDF
User Manual
Foxit Plug-In Platform
For flexible and convenient management of plugins, Foxit PhantomPDF offers a Plug-in Platform, in which you can view the plug-in status, learn the information about the plugins installed, as well as manage the plug-ins as needed.
To open Foxit Plug-in Platform, please choose Help > Product > Foxit Plug-Ins.
Plug-in Status
Certified: Shows whether the signature of the plug-in is valid or not. Loaded: Shows whether the plug-in has been loaded successfully or not.
Note: Some plug-ins are not loaded immediately (i.e. the Certified and Loaded items are unchecked). These plug-ins will be loaded and certified after you use the related features.
Plug-in Information
In addition to plug-in status, you can learn more information about the plug-in installed, including the name, date, description and legal copyright.
To learn the details of a plug-in, please click More… under the general description of the plug-in in the Foxit Plug-in Platform.
Plug-in Management
Within Foxit Plug-in Platform, you can manage the plug-ins as needed, including installing, enabling, disabling and uninstalling plug-ins.
Installing a Plug-in
To install a plug-in, please follow the steps below:
Select Help > Product > Foxit Plug-Ins to open Foxit Plug-In Platform;
Click Install Plugin > choose the plug-in file (in .xml format) > click Open.
Then Foxit PhantomPDF will verify whether the signature of the plug-in to be installed is valid or not. If it is valid, Foxit PhantomPDF will load the plug-in directly; if not, a prompt message will pop up (as shown below), and the installation will be terminated.
10
Foxit PhantomPDF
User Manual
Note: The .xml and .fpi files of a plug-in to be installed should be placed in the same folder, otherwise, installation will fail.
Disabling a Plug-in
To disable a plug-in, please follow the steps below:
Select Help > Product > About Foxit Plug-Ins to open Foxit Plug-in Platform.
Select the plug-in you want to disable, and click the Disable button  to disable it.
Enabling a plug-in
To enable a plug-in, please follow the steps below:
Select Help > Product > About Foxit Plug-Ins to open Foxit Plug-in Platform.
Select the plug-in to be enabled, and click the Undo Disable button  to enable it.
Uninstalling a custom plug-in
To uninstall a custom plug-in (not built by Foxit), please follow the steps below:
Select Help > Product > About Foxit Plug-Ins to open Foxit Plug-in Platform.
Select the plug-in to be uninstalled, and click the Uninstall button  to uninstall it.
Note:
1.All the operations to the plug-ins will take effect after you restart Foxit PhantomPDF.
2.Foxit PhantomPDF includes plug-ins that are necessary for the realization of its functionalities or are necessarily required for maintenance. To ensure normal operation, you are not allowed to disable or uninstall these plug-ins (such as Foxit Updater plugin, Foxit Plug-in Platform plugin, etc.)
GPO
Group Policy (GPO), a feature of the Microsoft Windows NT family of operating systems, is a set of rules that control the working environment of user and computer accounts. It offers the centralized
11
Foxit PhantomPDF User Manual
management and configuration of operating systems, applications, and users' settings in an Active Directory environment.
For instructions to use group policy of Foxit PhantomPDF, please refer to Foxit PhantomPDF GPO Manual.
Using Foxit Setup Customization Tool
You can use the Foxit Setup Customization Tool to configure the installer prior to deployment for organizations or businesses. For example, you can license the product on a volume scale with the Foxit Setup Customization Tool to prevent the need to register and personalize each copy of the installation. Foxit PhantomPDF will retain all your configuration settings when you upgrade it to a new version.
To configure Foxit PhantomPDF with the Foxit Setup Customization Tool, please follow the steps below:
Open the Foxit Setup Customization Tool.
Click File > Open to open the application (MSI file) that you want to customize.
Open the following panels to customize the related settings in Foxit PhantomPDF.
General: Customize the default location and other common settings.
Features: Specify which features will be installed by default.
Shortcuts: Choose whether to create a specific shortcut.
Add File: Add your own files into the MSI package.
Click File > Save to save the customization. The customized package will be saved as an MST file.
Use the following command to apply the MST file during deployment:
msiexec /i Setup.msi TRANSFORMS=xxx.mst
Note:
1.The customized MST file needs to be deployed with the original MSI file.
2.Foxit Setup Customization Tool is only available for Foxit PhantomPDF & Reader 7.3 and newer versions. To ensure successful customization, the version of the Foxit Setup Customization Tool should be the same as that of Foxit Reader & PhantomPDF.
12

Foxit PhantomPDF
User Manual
Chapter 2 – Get Started
The Foxit PhantomPDF workspace is packed with commands that help make working with PDF files easier, and is organized into a document pane, a navigation pane, toolbar pane menu bar and status bar. A good way to get up to speed in using Foxit PhantomPDF is by familiarizing yourself with its workspace.
Workspace Basics
Foxit PhantomPDF provides an intuitive user interface with a menu bar, a toolbar, a navigation pane, work area and status bar.
About Start Page
The Start Page appears when you first start Foxit PhantomPDF and shows the recent documents opened, helpful product tutorials, and more. You can click any document you recently opened from the recent document list or choose one tutorial for any feature to learn about our product.
The Start Page will continue to appear every time you start the program until you uncheck the
Show Start Page at File > Preferences > General > Application Startup.
Toolbar
The toolbar displays the File page (the backstage view like Office 2013) and other tabs with different commands. You can easily and quickly find the command you need by clicking in the Tell
me what you want to do… box (or press Alt +Q) near a bubble  on the menu bar and typing
the name or description of the command you need. Then Foxit PhantomPDF will display a list of matching commands from which you can select and activate the desired feature.
Toolbar under the Home Tab
Note: Position the pointer over a command to see a description of the command.
Click File to create, open, save to manage your PDF files.
13

Foxit PhantomPDF
User Manual
File Page
Show/Hide Toolbar
To show/hide all toolbars, please do the following:
To hide the toolbar, please click the arrow located on the lower-right corner of the ribbon. To show the toolbar, choose a tab and click the pushpin icon
  located on the lower-right corner of the ribbon.
Right-click toolbar and check Minimize the Ribbon option to hide the ribbon toolbar and uncheck the option to have the ribbon displayed.
Set Favorite Toolbar
The Ribbon is designed to help you find the commands in an easy and convenient way. Foxit PhantomPDF gives you the capability to personalize and fine-tune the Ribbon in the way you want. With this feature, you can customize the default Ribbon, and create custom tabs or groups with your favorite commands.
To customize the Ribbon, you can right click the Ribbon, choose Customize the Ribbon from the context menu to bring out the Customize Tools dialog box first, and then follow the steps below.
14
Foxit PhantomPDF User Manual
Create a new tab
To create a new tab, please do one of the following:
Select the tab after which you want to add the new tab, and then click New Tab.
(Alternatively) Right-click the tab after which you want to add the new tab, and then choose New Tab from the context menu.
Add a new group to a tab
To add a new group to a tab, please do one of the following:
Select the tab to which you want to add the group, and then click New Group.
(Alternatively) Right-click the tab to which you want to add the group, and then choose New Group from the context menu.
Rename a tab or group
Select the tab or group to be renamed, and click Rename.
(Alternatively) Right-click the tab or group to be renamed, and choose Rename from the context menu.
In the Rename dialog box, input the new name and click OK.
For a custom group, you can also choose the display symbol from the Rename dialog box.
Add commands to a group
Select the group under which you want to add a command.
Choose the command category and the desired command from the Choose command from list.
Click Add to add the selected command to the desired group.
Remove a tab, group or command
To remove a tab, group or command, please do one of the following:
Select the tab, group or command to be removed, and click Remove.
(Alternatively) Right-click the tab, group or command to be removed, and choose Delete from the context menu.
Reorder the tabs or groups
To reorder the tabs or groups, please do one of the following:
15
Foxit PhantomPDF
User Manual
Select the tab or group you want to reorder, then click the Up  or Down
  arrow to move accordingly.
(Alternatively) Right-click the tab or group you want to reorder, and then select Move Item Up or Move Item Down to move accordingly.
Reset the Ribbon
Click Reset in the Customize Tools dialog box to reset the Ribbon to the default settings.
Import a customized Ribbon
Click Import.
In the Open dialog box, select the Ribbon customization file (.xml file), and click Open.
Note: After importing a Ribbon customization file, you will lose all the arrangements you have customized previously. If you want to revert to the customization you currently have, it is easier to export the customized Ribbon before importing any customization.
Export a customized Ribbon
Click Export.
In the Save As dialog box, specify the file name and path and click Save.
Note:
1.After customization, you need to click OK in the Customize Ribbon tab to save and apply your customizations to the Ribbon.
2.To help you distinguish a default tab or group from the customized ones, the custom tabs or groups in the Customize the Ribbon list are tabbed with “(Custom)” after the name (like this:
 ), but the word “(Custom)” will not appear in the Ribbon.
3.The commands in the default group under a default tab are displayed in grey, and they cannot be renamed, reordered, or removed.
4.You cannot remove default tabs in Foxit PhantomPDF.
Mouse/Touch Mode
Foxit PhantomPDF adds a Mouse/Touch Mode button on the Quick Access toolbar. In Touch Mode, the buttons within the Ribbon and Quick Access toolbar will appear with more space surrounding them onscreen, making it easier to work on touch devices. To toggle between Mouse Mode and
Touch Mode, please click the  button on the Quick Access toolbar.
16

Foxit PhantomPDF
User Manual
Navigation Panels
Show or hide the navigation panels
The buttons on the left side of the navigation pane provides easy access to various panels, such as
the Bookmarks panel button and the Pages thumbnails button
 . After right-clicking the
navigation pane, you can select and open more panels.
To show the navigation panels, use keyboard shortcut F4, or click View > View Setting >
Navigation Panels  > Show Navigation Panels, or right-click on the page and choose
Show Navigation Panels.
To hide the navigation panels, use keyboard shortcut F4, or click View > View Setting >
Navigation Panels  > Hide Navigation Panels, or right-click on the page and choose Hide
Navigation Panels.
To open a navigation panel, click its button on the left side of the navigation pane. To close a navigation panel, click its button on the left side of the navigation pane.
Adjust the navigation pane
Like the toolbars, the navigation pane can be docked in the navigation pane or float anywhere in the workspace. You can choose to hide or close the panels that you don't need and open the ones you do. What’s more, you can also adjust the width of the navigation pane easily.
1.Viewing a panel in the navigation pane
By default, all the panels dock in the navigation pane with a set of panel buttons appearing on the left side of the work area. Do the following:
Select the button for the panel on the left side of the navigation pane.
2. |
Changing the display area for navigation pane |
|
|
To change the view area of the navigation pane, drag its right border to adjust the width. |
|
|
To minimize or maximize the navigation pane, click on the button / |
at the top right |
|
corner of the navigation pane. |
|
3. |
Docking or floating a navigation pane |
|
|
To float a navigation panel, drag the panel button into the document pane. |
|
To move a panel, drag it by its panel button to another location.
To dock a floating panel, double-click its title bar.
17
Foxit PhantomPDF
User Manual
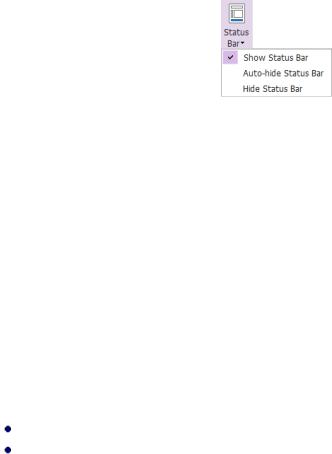
Status Bar
The status bar is an area of the workspace that displays the page number where you are, the number of total pages, page transition buttons, zoom buttons, etc. for view setting. The status bar is open by default when you open a PDF. In the View ribbon, the items on the View Setting tab help you to show or hide the status bar.
Show Status Bar: If you check it, the status bar will appear in the bottom of the workspace.
Auto-hide Status Bar: If you check it, the status bar is hidden. But if you put the cursor near the bottom of the page, the status bar will appear.
Hide Status Bar: If you check it, the status bar will be hidden.
Customize the Skin
There are five kinds of skin, Classic, Black, Blue, Orange and Purple that allow the user to change the look of the software.
To change the skin of the workspace, please do the following:
Go to File > Change Skin.
Check the skin you like and click OK.
Set Preferences
Many program settings are specified in the Preferences dialog box, including settings for File Associations, Forms, Full Screen, General, History, JavaScript, Languages, OCR, Page Display, PDF/A, Reading, RMS Setting, Security, Signature, and Trust Manager. Once you set preferences, they remain in effect until you change them.
1.Choose File > Preferences.
2.Select the type of preference you want to change under the list of categories.
18

Foxit PhantomPDF
User Manual
Accessibility
Document Colors Options
Replace document colors: Check to activate other options to change the document colors.
A.Use Windows color scheme: Sets document colors according to the color scheme of your Windows preferences.
B.Use High-Contrast colors: Choose the high-contrast color combination for page background and document text to improve readability.
C.Custom color: Changes the color of Page Background and Document Text.
D.Only change the color of black text: Change only the black text and leave the colored text unchanged when you replace document colors.
E.Change the color of text or black line art: Change the color of text or black line arts when
you replace document colors.
Override Page Display
A.Always use Page Layout Style: Set a page layout as default for all PDF documents and override other page display settings.
B.Always use Zoom Setting: Specify a default zoom setting for all PDF documents and
override other page display settings.
Other Accessibility Options
A.Use document structure for tab order when no explicit tab order is specified: Improve the navigation of form fields and links in documents that don’t specify a tab order.
B.Always display the keyboard selection cursor: Select this option and the Select Text and Image command will be selected automatically when you open a PDF. If you are using a screen magnifier, it’s recommended to select this option.
C.Always use the system selection color: Override the default selection color (blue) with a color that the system specified.
D.Show Portfolios in Files mode: Display PDF Portfolio component files and file details in a list. Please note that if you set the default view for PDF portfolios in Portfolio > View > Default view setting, that default view setting will prevail over this accessibility setting.
Accessibility Checker Option
Show accessibility checker options dialog when the checker start: check this option to show the Accessibility Checker Options dialog box when you run Full Check.
Commenting
Viewing Comments
A.Pop-up opacity: Sets the opacity of popup notes for annotation commands.
B.Print notes and pop-ups: Specify whether or not to print sticky notes and pop-up notes associated with comments in PDF as they appear on the page. Please note that if you want to print the pop-up notes associated with comments, you should open the pop-up notes that you want to print in the PDF file, and adjust their placement on the page before
19

Foxit PhantomPDF User Manual
printing to ensure that they don’t overlap or spill off the page. While printing, make sure that you select the Document and markups option in Print What group in the Print dialog box.
C. Ensure that pop-ups are visible as the document is scrolled: Ensure that the pop-up boxes float along with the page as the document is scrolled. This option is checked by default.
Making Comments
A.Always use User Name of the log-in account for Author name: Use the user name of the log-in account as the author name while making comments. If a user does not set the user name for the Foxit log-in account, the prefix of the email address will be used as the author name instead.
B.Copy selected text into Highlight, Squiggly Underline, Underline, and Strikeout comment pop-ups: Check this option to copy and paste the selected text to comment pop-up notes automatically when you highlight, squiggly underline, underline, or strikeout annotation
in PDF documents.
Pencil Setting:
A.Enable to select pencil annotation when drawing: when the Pencil command is selected, the cursor changes into a pencil  . If this option is selected, the pencil changes into an arrow
  when you put it over a pencil annotation, and you can click the annotation to select it. If the option is not selected, the pencil will not change into an arrow.
B.Click to create annotations: if selected, you start to draw with the pencil when you click on the page, and in other words, only one click creates a pencil annotation; if not selected, you do not start to draw until you click and drag the pencil.
C.Set Timeout: specifies a period of time within which all of the drawings/plans completed
is one pencil annotation, after which what you draw is another pencil annotation.
Editing: Sets the text direction for text comments, including left to right and right to left.
ConnectedPDF
Data Collection
Allow usage data to be used in ConnectedPDF features: If this option is checked, the document usage data will be shared with Foxit servers when you are using ConnectedPDF features. This data will be used for development purposes and enhancing user experience only. You can click here to learn about the privacy policy.
Use ConnectedPDF Format
1.Automatically save PDF files in ConnectedPDF format (including those created from plugins) only when signed in: If this option is checked, Foxit PhantomPDF will automatically convert the files into ConnectedPDF format when creating or saving PDF files.
20
Foxit PhantomPDF
User Manual
2.Automatically convert Office files to Connected when converting to PDF via Office add-in: If this option is checked, after converting the Office document to ConnectedPDF format, the Office document will become connected, and you will then be able to view the document homepage of the converted ConnectedPDF by clicking the Document Homepage button under the FOXIT PDF tab in Microsoft Office.
How to show web pages
When using ConnectedPDF, Foxit PhantomPDF will display ConnectedPDF-related information (such as the Document Homepage and Personal Homepage) in web pages. You can choose to display the web pages in the tabs within the application, or in your default browser.
Default Permissions
Document owners can restrict some features, including Register New Version and Start Connected Review, to better control documents by adding default permission settings. By default, Started Connected Review is restricted and other users who want to start a Connected Review session will need to apply to the document owner.
Create PDF
Create PDF feature allows users to set the Page Size of PDF to be created.
A.Fixed size: Sets the size and direction of PDF through drop-down list.
B.Custom: Customizes the Page Size of PDF to be created. You can select the units first and then set the width and height of page as needed.
C.Insert printed PDFs into previously generated documents, except those created by Foxit PhantomPDF: Check it to append newly generated PDF files to a previously generated one which are created by Print command in other application using Foxit PhantomPDF Printer.
D.Allow pop up alert when creating PDF: Check this option to show message when converting PDFs in Microsoft Office by the Foxit PDF add-in.
Documents
The Document of the Preferences dialog provides several ways to browse PDF documents.
Open Settings
1.Allow multiple instances: Creates a new Foxit PhantomPDF window when double-clicked to open a PDF file.
2.Alert user when documents request Full Screen: A message box will pop up to confirm the
21

Foxit PhantomPDF User Manual
operation when opening a PDF which has been defined to be opened in full screen mode.
3.In Web Browser, display PDF in Read Mode by default: Opens a PDF in Read Mode automatically in web browser.
4.In Foxit PhantomPDF, please choose the mode for Display PDF Mode: Display the PDFs in Read Mode or Full Screen Mode or normal way automatically when opening PDFs with Foxit PhantomPDF.
Prompt Messages
1.Display a prompt before closing all tabs: When you close a window with multiple tabs, Foxit PhantomPDF will ask you to confirm your choice. This prevents you from accidentally closing the whole window when you intend to close only the current tab.
2.Automatically save document as e-mail attachment: Automatically save the changes you made to a document and attach the modified document to your email system for sending.
3.Allow to choose the page range when attaching the tab to a new email message: If this option is selected, you can specify the page range you want to send when emailing the current PDF file to others.
PDF/A View mode
Sets to view documents in PDF/A view mode (i.e. read-only mode) to prevent modifications to the documents.
1.Never: Never open documents in PDF/A view mode.
2.Only for PDF/A documents: Switch to read-only mode automatically when a PDF/A document is opened.
Save Setting
Configure the time intervals for when the document will be automatically saved. Check Save As optimizes for Fast Web View to save documents as linearized PDFs that can be opened and viewed from web browsers even before the whole file is downloaded.
Preferred Save As Location
If you have configured a preferred save as location, when prompted to specify a location to save a document, the configured location will be automatically chosen in the Save As dialog box. To add a preferred save as location, click Browse to select the location, or input the location in the Preferred Save As Location field. If you need to remove the configured output location, just delete the directory path in the Preferred Save As Location field.
Redaction
22
Foxit PhantomPDF User Manual
After applying redaction, you can save the redacted file as a new file with the preconfigured name automatically. To configure the name, select Adjust filename when saving applied redaction marks, and input text in the Prefix and Suffix boxes to configure the name.
ECM Integration
NetDocuments
Users who open PDFs on NetDocuments through a browser instead of ndOffice, can return to the legacy NetDocuments integration by checking the option Use NetDocuments integration through browser instead of ndOffice.
SharePoint
Choose a method to open a document when you try to open a document on SharePoint. You can choose just to open the document, check it out when opening, or ask you when opening a document.
iManage
By default, a document is checked out when you open it from PhantomPDF. You can change the setting as needed.
Editing
Show changed text in: Select a color the modified text will appear in when using the Edit Text command.
Alert when there’s no editable text when using ‘Edit Text’ tool: An alert will pop up notifying the user when there’s no editable text while using the Edit Text command.
File Associations
This option allows you to set the default PDF Viewer.
Make Foxit PhantomPDF the default PDF viewer:
Advanced
1.Include browser when setting default PDF viewer: check this option to set Foxit PhantomPDF as the default PDF viewer in browser.
2.Include preview when setting default PDF viewer: check this option to set Foxit PhantomPDF
23

Foxit PhantomPDF User Manual
as the default PDF viewer in preview.
3.Include thumbnail when setting default PDF viewer: check this option to set Foxit PhantomPDF as the default PDF viewer in thumbnail view.
4.Use Foxit PhantomPDF to open embedded Acrobat files and embedded Foxit Reader PDF files in Microsoft Office if Acrobat and Foxit Reader is not installed: check this option to set Foxit PhantomPDF as the default PDF viewer in Microsoft Office for opening embedded Acrobat files and Foxit Reader PDF files.
Restore file associations: Restores settings in File Associations.
Always perform check when starting Foxit PhantomPDF: If the default PDF viewer is not Foxit PhantomPDF, a message box will appear for the options to set it as your default viewer every time you run Foxit PhantomPDF.
Forms
The form tab enables you to set the preferences of the interactive form display.
Always hide document message bar: You can decide whether to show or hide the document message bar that appears below the toolbar area when opening an interactive PDF form. Highlight all fields: Checking this option allows you to highlight all form fields in the PDF document. You can click the color palette to change the highlight color for ordinary fields as well as required fields.
Enable autocomplete: If you enable the autocomplete feature, the entries you type into an interactive form field will be stored. When filling an interactive PDF form, this feature will suggest keywords that match your typing in the field.
Open Properties box after creating field: The properties box appears when creating a form field.
Run form recognition when creating PDF in Foxit PhantomPDF: Foxit PhantomPDF will run form recognition automatically when a PDF is created and opened in Foxit PhantomPDF. Email: You can edit the default subject and contents which will be sent with the PDF form.
Full Screen
Full Screen Navigation
A.Select to show Scroll bar, Status bar, Tab bar or Navigation Panels in Full Screen mode.
B.Show Exit button – Check or uncheck this option to show or hide Exit button in Full Screen mode.
24

Foxit PhantomPDF
User Manual
C.One page at a time – Displays a single page at a time in Full Screen mode.
D.Left click to go forward one page; right click to go back one page -- Lets you page through a PDF document by clicking the mouse. You can also page through a document by pressing Space, Shift + Space, or the arrow keys.
Full Screen Appearance
Background – Click the color pane and choose the color you like to be the background color in Full Screen mode.
Full Screen Transitions
Foxit PhantomPDF supports page transition in Full Screen mode. There are 11 transition types: Split, Blinds, Box, Wipe, Dissolve, Glitter, Fly, Push, Cover, Uncover and Fade. Also, you could set the direction for the transition.
A.Ignore all transitions: Check to ignore page transition in Full Screen mode.
B.Default transition –Choose page transition for one document in the drop-down window.
C.Direction - Set the direction for the transition.
D.Navigation control direction: If selected, the direction of page transition will be based on your navigation direction in the document. For instance, if you turn to the next page, the page will transition from top to bottom; to the previous page, the page will transition from bottom to top. For some transitions without directions, the option is not available.
General
The General Preferences setting provides options on Basic Tools, Tab Bar, Status Bar, and Application Startup, etc.
Basic Tools
A.Use single-key accelerators to access tools: Enable single-key accelerators to select some commands and perform some actions with single-key shortcuts. Please refer to SingleKey Accelerators for more details.
B.Use fixed resolution for snapshots - Sets the resolution used to copy the image captured with the Snapshot command. Automatically uses 72 pixels as default resolution.
C.Create links from URLs - Detects the text links in PDF documents and change the nonclickable links into clickable ones.
D.Minimize to system tray - You can save space on your task bar by minimizing Foxit PhantomPDF to the system tray. Check this selection to minimize Foxit PhantomPDF to the system tray when clicking the Minimize button.
E.Screen word-capturing - Check it to turn on this function that enables you to use your mouse to capture words inside a PDF file and have it translated if you are using dictionary
25

Foxit PhantomPDF User Manual
software.
F.Make Hand Tool select text - Check it to enable the Hand command to become text selection tool when moving it to the selectable content.
G.Make Hand Tool read articles – Check it to enable the navigation of an article with the help of the pointer. After you start the article viewing mode, with the Hand tool selected, the pointer will automatically change to a Hand tool with an arrow in it when over an article thread. Then the clicks with the pointer will follow the article thread, making the article navigation effective. See also View articles. The option is checked by default.
Tab Bar
A.Max tab size: Allows you to specify a maximum tab size.
B.Double-click to close Tab: Checking this option allows you to close tabs by double-clicking.
C.Use recent order when switching tabs with Ctrl + Tab: In multi-tab reading, use Ctrl + Tab to switch through open tabs in recent order you viewed them. With the option unselected, using Ctrl + Tab to switch the tabs in the order they appear in the application window.
D.Quickly switch between tabs by using mouse wheel: In multi-tab reading, switch through open tabs by scrolling the mouse in the tab bar. Scroll up to the previous tab, and down to the next tab.
Status Bar
A.Auto-hide Status Bar – Hides the status bar when opening a PDF, and enables it to float at the bottom of the page only when the cursor is moved to the bottom.
B.Show scroll lock button: Displays the scroll lock icons in the status bar.
Notification Messages
Notification messages appear at the top right corner of the document pane when you work with interactive PDF forms, PDF/A files, or PDF files under shared review or email review, etc. You can configure the notification message settings as required:
A.Show the message which affects the next step, such as: “OCR”: Specify whether or not to show the procedure-related notification messages which usually contain action buttons for you to move forward to the next step. This option is checked by default. And it is recommended to keep the option checked so that you can work on documents during OCR, Shared Review, or Email Review normally.
B.Show the notification related message: Specify whether or not to show the notification related messages which inform you that a PDF file contains such elements as interactive form fields, 3D contents, etc.
C.Show PDF/A message again: Specify whether or not to show the message when opening a PDF/A document.
Tip: You can also change the notification message settings by clicking the gear icon  on
on
26

Foxit PhantomPDF User Manual
the message shown on the document pane. The changes of settings you made in the notification message will be applied accordingly in the Notification Message preferences.
User Experience Improvement
Turn on or off data collection. The collected data will be used to improve the user experience only.
Features which Require Internet Connection
Specify whether to disable all features that require Internet connection. The setting will take effect after you restart the application.
Application Startup
A.Show Start Page: Check this option to show the start page when running Foxit PhantomPDF.
B.Disable ConnectedPDF features: If checked, all of the ConnectedPDF features will be unavailable and all related commands will disappear in the ribbon.
C.Show floating promotion page: Check this option to show the latest promotion offering from Foxit if you have not activated Foxit PhantomPDF.
D.Launch in debug mode: This option is unchecked by default. Checking this option will enable Foxit PhantomPDF to be launched in debug mode and log file will be generated during your operation. Log file will be saved in “%userprofile%\AppData\Local\Foxit PhantomPDF\glog”. When you encounter issues while using Foxit PhantomPDF, you can send the log file to Foxit and the log file will be used for checking and solving your issues only.
History
History
A.Restore last section when application starts: Determines whether documents start automatically with the last viewed section.
B.Restore last view settings when reopening: Determines whether documents open automatically with the last viewed settings.
C.Maximum number of documents in history list: Sets the maximum number of PDF documents you read in history list. The default is 50 PDF documents.
D.Maximum number of documents in Recent Documents list: Sets the maximum number of PDF documents you have viewed recently in the File page. The default setting is 10 PDF documents.
27

Foxit PhantomPDF
User Manual
E.Show this number of unpinned Recent Folders: Set the number of unpinned recent folders listed in File > Open > Computer or SharePoint/OneDrive for Personal or Business/Google Drive/Dropbox. The default setting is 10 folders.
Note: Foxit PhantomPDF allows users to set “maximum number of documents in history list”, “maximum number of documents in Recent Documents list”, and the “number of unpinned Recent Folders” to 0.
Identity
Shows the identity of your application, including Login Name, Name, Title, Organization Name, Organization Unit, and Email Address. The identify information is quite useful in PDF reviews. It will help other review participants recognize your comments easily. The Login Name is set by default (using the username of the current operation system) and cannot be changed. Except for Login Name, you can change or complete your identity information in Identify Preferences.
Languages
Foxit PhantomPDF provides the commonly used languages to meet customers’ needs to the upmost. Usually, Foxit PhantomPDF will automatically choose the language applied to your OS as its default during your installation. But changing languages after installation is supportable.
To change language after installation, please follow the steps below:
Choose File > Preferences > Languages. Select Choose custom language.
Select the language in either Official Language or Translated by Community.
Click the website in the pop-up window to download the language package and Foxit PhantomPDF will automatically install the language.
Click OK in the Preferences dialog box, and then choose Restart in the pop-up window to apply the language.
Default Reading Direction: Choose a default reading direction when you’re reading a document in
Facing or Continuous Facing mode. Select Infer direction from document option from the dropdown list to apply the binding direction specified in document’s property settings when reading the document. Please note that if you set the default reading direction in the application’s preferences and the binding direction in file’s properties at the same time, the binding direction for the document specified in File > Properties > Advanced will prevail.
Layout Grid
You can also customize the grid appearance.
28

Foxit PhantomPDF User Manual
Width/Height between lines: sets the spacing between grid lines.
Grid offset from left/top edge: sets the origin of the grid.
Subdivisions: sets the number of subdivisions within each grid square. Subdivision lines are lighter than grid lines.
Grid line color: sets the color of grid lines.
Measuring
Measurement Units
Sets unit of page dimensions given in the status bar and print dialog.
Measurement Label
Choose to use the default measurement label or specify your own label.
Measurement Markup
Use Default Leader for Distance Measurement: Specify whether to show the line leader on both sides of the measurement points or not while measuring the distance.
Multimedia (Legacy)
Do not use QuickTime Player for multimedia items: This option is checked by default. As Apple does not provide security updates for its legacy QuickTime for Windows software any more, it is recommended to keep this option checked for security purpose. When checked, Foxit PhantomPDF will invoke a multimedia player other than QuickTime Player in your Windows system to run the multimedia inserted in PDF files, but will not play the video if it has been specified to use QuickTime as the required player.
Page Display
The Page Display panel of the Preferences dialog box includes the following options:
Default Layout and Zoom
A.Navigation tab: specifies the panel to be displayed in the opening view.
a)Use Initial View: minimizes the Navigation panel and hides all panels.
b)Page Only: displays Pages panel by default in opening view.
c)Bookmarks Panel and Page: displays Bookmarks panel by default in opening view.
29

Foxit PhantomPDF
User Manual
d)Pages Panel and Page: displays Pages panel by default in opening view.
e)Attachments Panel and Page: displays Attachments panel by default in opening view.
f)Layers Panel and Page: displays Layers panel by default in opening view.
B.Default page layout: You can view PDFs in following layouts:
a)Automatic: With this option selected, in a multi-page document, displays pages in Continuous mode, or in Single mode if the page width is larger than the page height. If you change the page display in the View tab, the document will display in the page layout the last time you set.
b)Single Page -- Displays one page at a time, with no portion on other pages visible.
c)Continuous -- Displays pages in a continuous vertical column that is one page wide.
d)Facing -- Displays each two-page spread with no portion of other pages visible.
e)Continuous Facing -- Displays facing pages side by side in a continuous vertical column.
See also “Changing the Page layout”.
C.Zoom: Sets the magnification level for PDF documents when they are first opened. This value overrides document settings. The default uses the settings of the PDF document.
D.Custom facing: The Default Facing for page layout is 2 pages. You can check the Custom Facing box and set the facing layout to your own preference.
E.Custom margin: Sets the margins between different pages with Facing or Continuous Facing page layout. The default is a margin of 8 pixels.
Rendering
A.Smooth text: Optimally adjusts text display that best suits your monitor.
B.Smooth line art: Removes the abrupt angles in lines to make them smoother.
Page Content
A.Display transparency grid: Displays a grid behind transparent objects.
B.Use logical page numbers: Open PDFs with the logical page numbers.
Forbid the change of the current Zoom factor during execution of ‘Go to Destination’ actions (these actions can be launched from bookmarks): Check to forbid user to change the current Zoom factor during execution of ‘Go to Destination’.
See also “Adjust Page Magnification”.
PDF Sign
Flatten the document when applying all signatures: Flattening the document when applying all signatures will make all the signatures, forms, and annotations become one whole object of the PDF page.
30
Loading...