

Page 1

Foxit PhantomPDF Standard
User Manual
1
Page 2

Foxit PhantomPDF Standard
User Manual
Copyright © 2004-2015 Foxit Software Incorporated. All Rights Reserved.
No part of this document can be reproduced, transferred, distributed or stored in any format without the prior
written permission of Foxit.
Anti-Grain Geometry - Version 2.4
Copyright (C) 2002-2004 Maxim Shemanarev (http://www.antigrain.com)
Permission to copy, use, modify, sell and distribute this software is granted provided this copyright notice appears
in all copies. This software is provided "as is" without express or implied warranty, and with no claim as to its
suitability for any purpose.
1
Page 3

Foxit PhantomPDF Standard
User Manual
Contents
Contents .......................................................................................................... 2
Chapter 1 – Introduction ......................................................................... 5
PhantomPDF Overview ..................................................................................................... 5
What’s New? ......................................................................................................................... 6
About the User Manual ..................................................................................................... 8
Quick Installation Guide ................................................................................................... 9
Foxit Plug-In Platform ....................................................................................................... 9
Chapter 2 – Get Started........................................................................... 12
Workspace Basics ............................................................................................................. 12
Customize the Workspace ............................................................................................. 20
Set Preferences ................................................................................................................. 21
Chapter 3 – Read ........................................................................................ 22
Open & Close & Save PDFs ........................................................................................... 22
Bundle with IFilter ............................................................................................................ 24
Standards Validation ....................................................................................................... 25
Read ....................................................................................................................................... 25
Select & Copy ..................................................................................................................... 46
Check the Accessibility of PDFs ................................................................................... 47
Others ................................................................................................................................... 49
Chapter 4 – Create ..................................................................................... 51
Create a PDF in Different Ways ................................................................................... 51
Create and Customize a PDF Portfolio ...................................................................... 64
Create a table of contents from bookmarks .......................................................... 66
Chapter 5 – Edit .......................................................................................... 67
Undo and Redo .................................................................................................................. 67
Header & Footer, Watermark & Background to PDFs .......................................... 67
Adding Format Page Numbers ..................................................................................... 71
Links ...................................................................................................................................... 72
File Attachments ............................................................................................................... 76
Bookmarks .......................................................................................................................... 79
Images .................................................................................................................................. 82
2
Page 4

Foxit PhantomPDF Standard
User Manual
PDF Optimizer .................................................................................................................... 88
Work with Video & Audio ............................................................................................... 89
Objects ................................................................................................................................. 95
Spelling Check ................................................................................................................. 104
Chapter 6 – Organize .............................................................................. 106
Insert Pages ...................................................................................................................... 106
Delete Pages ..................................................................................................................... 109
Extract Pages ................................................................................................................... 110
Replace Pages .................................................................................................................. 111
Swap Two Pages .............................................................................................................. 112
Duplicate Pages ............................................................................................................... 112
Move Pages ....................................................................................................................... 113
Split Document ................................................................................................................ 113
Crop Pages ........................................................................................................................ 114
Rotate Pages .................................................................................................................... 115
Flatten Pages .................................................................................................................... 116
Chapter 7 – Comments .......................................................................... 117
Use Different Comments Tools .................................................................................. 117
Change the Appearance of Comments ................................................................... 132
Work on Comments ....................................................................................................... 135
Chapter 8 – Share PDFs ......................................................................... 144
Email Documents ............................................................................................................ 144
Send to Evernote ............................................................................................................ 144
SharePoint Integration ................................................................................................. 145
Shared Review and Email Review ............................................................................ 151
Chapter 9 – Forms ................................................................................... 155
Interactive Form and Non-interactive form .......................................................... 155
Fill in PDF Forms ............................................................................................................. 156
Comment on Forms ....................................................................................................... 158
Manage Form Data ......................................................................................................... 158
Form Fields........................................................................................................................ 160
JavaScript .......................................................................................................................... 182
Chapter 10 – Security ............................................................................. 186
Check PDF Security ....................................................................................................... 186
Password Protection & Certificate Protection ....................................................... 186
3
Page 5

Foxit PhantomPDF Standard
User Manual
AD RMS Protection ......................................................................................................... 191
Remove Hidden Data .................................................................................................... 197
Chapter 11 – Signature ......................................................................... 198
Digital Signature ............................................................................................................. 198
Sign PDFs on DocuSign® ............................................................................................. 206
Quick PDF Signature ..................................................................................................... 208
Chapter 12 – Print.................................................................................... 210
Print a PDF document ................................................................................................... 210
Print Dialog Box .............................................................................................................. 211
Set Foxit PhantomPDF Printer Properties .............................................................. 214
Chapter 13 – Appendices ...................................................................... 220
Quick Installation Guide ............................................................................................... 220
GPO Manual ...................................................................................................................... 231
SharePoint Configuration ............................................................................................. 244
Quick Start for Azure Active Directory Rights Management .......................... 245
Shortcut Keys ................................................................................................................... 246
Command Lines............................................................................................................... 250
Contact Us ................................................................................................... 251
4
Page 6

Foxit PhantomPDF Standard
User Manual
Chapter 1 – Introduction
PhantomPDF Overview
Welcome to Foxit PhantomPDF™- Business Ready PDF! Award-winning Foxit PhantomPDF
provides the right features at the right price, allowing you to produce great looking PDF
document and forms quickly, affordably, and securely. Foxit PhantomPDF comes in two editions:
Foxit PhantomPDF Standard to fit the small and medium sized businesses, and Foxit
PhantomPDF Business to fit the large enterprises.
Foxit PhantomPDF Standard
Foxit PhantomPDF Standard enables businesses to create, edit, and secure reliable PDF
documents quickly, easily, and at a cost you can afford.
XFA Form Filling
Direct Editing
Read out Loud
Robust Document Security
Form Fields
Optical Character Recognition(OCR)
Export PDF to Image
Industry Validation
PDF Optimizer
SharePoint Integration
DocuSign
Participate in a Shared Review
Foxit PhantomPDF Business
Foxit PhantomPDF Business provides business the security that ensures regulatory compliance
and corporate governance of their important documents and archives and to ensure documents
don’t change after they are approved. It stands up to the demands of large enterprises but
lightweight enough to easily deploy to thousands of users without exhausting resources.
Supports the right features at the right price with the quality and support you expect from an
enterprise solution.
Redaction
Document Certification
XFA Form Filling
5
Page 7

Foxit PhantomPDF Standard
User Manual
Bates Number
Read out Loud
Microsoft® Active Directory® Rights Management Service Protector and Policy Manager
High Compression
SharePoint Integration
DocuSign
Send for Shared Review
What’s New?
What’s New in Foxit PhantomPDF 7.2?
New Features
Cloud-based Shared Review
Supports to download/track/reply comments on Foxit Cloud.
Improvements
Set Enhanced Security Settings in Preferences
Supports to specify trusted locations and files in preferences to provide more secured PDF
workflow.
PDF Edition and Conversion from Right-click Menu
Adds two more options to PDFs’ context menu for users to start editing a PDF or converting it
to Microsoft Office files by just right-clicking the PDF.
Pattern Search
Adds an option to Advanced Search box to search for a pattern in a PDF such as phone
numbers.
Supports to edit the properties of the same type of objects in batch.
What’s New in Foxit PhantomPDF 7.1?
New Features
Scanned PDF Optimization
Reduces the file size of scanned PDFs before distributing or archiving to save transfer time
and disk space.
Auto-straightens scanned PDF documents.
Allows users to link to a bookmark/specific page within a web pdf in a web browser using
URL parameters.
6
Page 8

Foxit PhantomPDF Standard
User Manual
Supports line spacing setting when designing text fields.
Provides printing templates when creating files to PDF and supports lossless compression.
Supports Greek language in OCR engines.
Supports adding bullet lists in Typewriter/Callout/Textbox/Note annotations and the
availability of annotation rotation.
Improvements
Extends the Usage of GPO Templates
Supports more settings using the GPO templates, including forbidding all auto-connecting to
server, setting to hide document message bar in preferences, and more.
Shared Review Enhancement
Allows configuration of the interval to check new comments during shared review and
notifies users by flashing the PhantomPDF icon in the taskbar if any.
Supports to save custom colors in annotation properties and then all the annotations can
share the custom colors.
Streamlines the workflow when scanning paper to PDF.
Optimizes the way to name form fields after running form field recognition.
Enhances the edit capabilities of scanned and OCRed PDF documents.
Shows the preview of ink signatures and stamps when the mouse cursor hovering over the
document area after users select them.
Provides an option to apply a stamp to multiple pages.
What’s New in Foxit PhantomPDF 7.0?
New Features
Shared Review for Desktop and Mobile Users
Allows document owners to share a document with others to gather feedback/comments
from reviewers through internal server, emails or SharePoint.
Portfolio Creation and Editing
Supports to create PDF portfolios and edit PDFs and properties in portfolios.
Free-form Annotation with PSI (Pressure Sensitive Ink)
Supports to use the Pencil tool from Surface Pro or Wacom tablet to add free-form
annotations with PSI in PDFs.
Document Sanitization
Enable users to remove comment data and other sensitive information that can be hidden or
not immediately apparent from PDFs by one-click.
Create PDFs from Your Outlook
Supports to create PDFs from email messages or folders directly with the Foxit Outlook
Add-in, located in the Foxit PDF tab in Outlook ribbon.
2D Barcode Displaying
7
Page 9

Foxit PhantomPDF Standard
User Manual
Supports to display 2D barcode that contains form data in the PDF forms with Ultraform
technology.
Bi-directional Language Support
Supports to search and input Hebrew and Arabic in commenting and editing.
Optimized PCL Printing
Provides an option to auto-detect printers that support PCL for PCL optimization to improve
the printing speed.
Friendly Ribbon Customization
Supports to customize the Ribbon, enabling users to rearrange the buttons, or create a new
tab with their favorite buttons.
Streamlined Text Editing by Linking
Supports to link text boxes to a new paragraph ready for paragraph editing in a page to keep
better text reflow.
Supports to create and verify signatures on dynamic XFA forms created by Adobe LiveCycle.
Support to export PDF to Word in Faeroese.
Improvements
Improved Paragraph Editing UX
Retains better text reflow and display after editing with Edit Text tool to improve user
experience.
Creator Add-in Improvement in PPT, Excel & Word
Adds more options in Foxit PDF tab in the ribbon of the aforementioned applications.
Instant PDF or PDF Portfolio Creation
Improves the “drag and drop” and “copy and paste” features to create PDFs or PDF portfolios
quickly.
More Secured Digital Signature
Supports to add password encryption to your digital certificates to avoid unauthorized use.
GPO Improvement
Ensures the configurations in GPO template to work in both Classic and Ribbon Mode, adds
settings of language in XML and GPO template, and more.
SharePoint Network Drive Support
Enable users to open and check out PDFs from SharePoint mapped drive with Foxit
PhantomPDF’s Open dialog.
Text Copy with Formatting Maintained
Improve the “Copy and Paste” feature to allow users to copy and paste text with styles,
including font, font size, font style, font color, etc.
About the User Manual
This user manual covers all features included in Foxit PhantomPDF Standard.
8
Page 10

Foxit PhantomPDF Standard
User Manual
Quick Installation Guide
To get installation, registration, uninstallation and update instructions step by step, please refer
to Foxit PhantomPDF Quick Installation Guide.
Foxit Plug-In Platform
For flexible and convenient management of plugins, Foxit PhantomPDF offers a Plug-in Platform,
in which you can view the plug-in status, learn the information about the plugins installed, as
well as manage the plug-ins as needed.
To open Foxit Plug-in Platform, please choose Help > Product > About Foxit Plug-Ins , and
Foxit Plug-in Platform will show up as below.
Foxit Plug-in Platform
Plug-in Status
Certified: Shows whether the signature of the plug-in is valid or not.
Loaded: Shows whether the plug-in has been loaded successfully or not.
Plug-in Information
9
Page 11

Foxit PhantomPDF Standard
User Manual
In addition to plug-in status, you can learn more information about the plug-in installed,
including the name, date, description and legal copyright.
To learn the details of a plug-in, please click More… under the general description of the plug-in
in the Foxit Plug-in Platform. Then a dialog box showing the details of the plug-in will pop up (as
shown below).
Detailed Information about Foxit Updater Plugin
Plug-in Management
Within Foxit Plug-in Platform, you can manage the plug-ins as needed, including installing,
enabling, disabling and uninstalling plug-ins.
Installing a Plug-in
To install a plug-in, please follow the steps below:
Select Help > Product > About Foxit Plug-Ins to open Foxit Plug-In Platform;
Click Install Plugin > choose the plug-in file (in .xml format) > click Open.
Then Foxit PhantomPDF will verify whether the signature of the plug-in to be installed is valid or
not. If it is valid, Foxit PhantomPDF will load the plug-in directly; if not, a prompt message will
pop up (as shown below), and the installation will be terminated.
Note: The .xml and .fpi files of a plug-in to be installed should be placed in the same folder,
otherwise, installation will fail.
10
Page 12

Foxit PhantomPDF Standard
User Manual
Disabling a Plug-in
To disable a plug-in, please follow the steps below:
Select Help > Product > About Foxit Plug-Ins to open Foxit Plug-in Platform.
Select the plug-in you want to disable, and click the Disable button to disable it.
Enabling a plug-in
To enable a plug-in, please follow the steps below:
Select Help > Product > About Foxit Plug-Ins to open Foxit Plug-in Platform.
Select the plug-in to be enabled, and click the Undo Disable button to enable it.
Uninstalling a plug-in
To uninstall a plug-in, please follow the steps below:
Select Help > Product > About Foxit Plug-Ins to open Foxit Plug-in Platform.
Select the plug-in to be uninstalled, and click the Uninstall button to uninstall it.
Note:
1. All the operations to the plug-ins will take effect after you restart Foxit PhantomPDF.
2. Foxit PhantomPDF includes plug-ins that are necessary for the realization of its functionalities
or are necessarily required for maintenance. To ensure normal operation, you are not allowed to
disable or uninstall these plug-ins (such as Foxit Updater plugin, Foxit Plug-in Platform plugin,
etc.)
11
Page 13

Foxit PhantomPDF Standard
User Manual
Chapter 2 – Get Started
The Foxit PhantomPDF workspace is packed with tools that help make working with PDF files
easier, and is organized into a document pane, a navigation pane, toolbar pane menu bar and
status bar. A good way to get up to speed in using Foxit PhantomPDF is by familiarizing yourself
with its workspace.
Workspace Basics
Foxit PhantomPDF provides an intuitive user interface with a menu bar, a toolbar, a navigation
pane, work area and status bar.
About Start Page
The Start Page appears when you first start Foxit PhantomPDF and shows the recent documents
opened, helpful product tutorials, and more. You can click any document you recently opened
from the recent document list or choose one tutorial for any feature to learn about our product.
The Start Page will continue to appear every time you start the program until you uncheck the
Show Start Page at FILE > Preferences > General > Application Startup.
Menu Bar and Context Menus
Ordinarily, it is a good idea to keep the menu bar visible so that they are available as you work. It
is possible to hide them, in classic toolbar mode, using the View > uncheck Menu Bar or press F9.
12
Page 14

Foxit PhantomPDF Standard
User Manual
Of course, you can temporarily display the Menu Bar again by right-clicking toolbar and checking
Menu Bar. By default, the toolbar mode is set to Ribbon Mode when you open a PDF document.
Foxit PhantomPDF has numerous context-sensitive menus. These menus appear when you
right-click an object in the workspace. A context menu displays commands that relate to the item
or area clicked.
Toolbar
The toolbar displays the FILE page (the backstage view like Office 2013) and other tabs with
different tools.
Toolbar under HOME Tab
Note: Position the pointer over a tool to see a description of the tool.
Click FILE to create, open, save to manage your PDF files.
FILE Page
13
Page 15

Foxit PhantomPDF Standard
User Manual
Show/Hide Toolbar
To show/hide all toolbars, please do the following:
In Classic Toolbar Mode,
Choose View > Toolbars > show/hide Toolbars.
In Ribbon Mode, please do either of the following:
To collapse/expand the toolbar, please click or in the upper right corner.
Right-click toolbar and check Minimize the Ribbon option to hide the ribbon toolbar and
uncheck the option to show it.
Set Favorite Toolbar
The Ribbon is designed to help you find the commands in an easy and convenient way. Foxit
PhantomPDF gives you the capability to personalize and fine-tune the Ribbon in the way you
want. With this feature, you can customize the default Ribbon, and create custom tabs or groups
with your favorite commands.
To customize the Ribbon, you can right click the Ribbon, choose Customize the Ribbon from the
context menu to bring out the Customize Tools dialog box first, and then follow the steps below.
Context Menu
14
Page 16

Foxit PhantomPDF Standard
Customize Tools Dialog Box
User Manual
Create a new tab
To create a new tab, please do one of the following:
Select the tab after which you want to add the new tab, and then click New Tab.
(Alternatively) Right-click the tab after which you want to add the new tab, and then choose
New Tab from the context menu.
Add a new group to a tab
To add a new group to a tab, please do one of the following:
Select the tab to which you want to add the group, and then click New Group.
(Alternatively) Right-click the tab to which you want to add the group, and then choose New
Group from the context menu.
Rename a tab or group
Select the tab or group to be renamed, and click Rename.
(Alternatively) Right-click the tab or group to be renamed, and choose Rename from the
context menu.
In the Rename dialog box, input the new name and click OK.
For a custom group, you can also choose the display symbol from the Rename dialog box.
15
Page 17

Foxit PhantomPDF Standard
User Manual
Add commands to a group
Select the group under which you want to add a command.
Choose the command category and the desired command from the Choose command from
list.
Click Add to add the selected command to the desired group.
Remove a tab, group or command
To remove a tab, group or command, please do one of the following:
Select the tab, group or command to be removed, and click Remove.
(Alternatively) Right-click the tab, group or command to be removed, and choose Delete
from the context menu.
Reorder the tabs or groups
To reorder the tabs or groups, please do one of the following:
Select the tab or group you want to reorder, then click the Up or Down arrow
to move accordingly.
(Alternatively) Right-click the tab or group you want to reorder, and then select Move Item
Up or Move Item Down to move accordingly.
Reset the Ribbon
Click Reset in the Customize Tools dialog box to reset the Ribbon to the default settings.
Import a customized Ribbon
Click Import.
16
Page 18

Foxit PhantomPDF Standard
User Manual
In the Open dialog box, select the Ribbon customization file (.xml file), and click Open.
Note: After importing a Ribbon customization file, you will lose all the arrangements you have
customized previously. If you want to revert to the customization you currently have, it is easier to
export the customized Ribbon before importing any customization.
Export a customized Ribbon
Click Export.
In the Save As dialog box, specify the file name and path and click Save.
Note:
1. After customization, you need to click OK in the Customize Ribbon tab to save and apply your
customizations to the Ribbon.
2. To help you distinguish a default tab or group from the customized ones, the custom tabs or
groups in the Customize the Ribbon list are tabbed with “(Custom)” after the name (like this:
), but the word “(Custom)” will not appear in the Ribbon.
3. The commands in the default group under a default tab are displayed in grey, and they cannot
be renamed, reordered, or removed.
4. You cannot remove default tabs in Foxit PhantomPDF.
To set favorite toolbar in Classic Toolbar Mode:
Choose View > UI Options > Customize Toolbars, and the Customize Tools dialog box pops
up.
In the Favorite Toolbar tab, please do the following:
Add - Select your preferred tools from the left “Command” pane, click Add and see
them appear in the right “Favorite Toolbar” pane.
Remove - Select the tools you accidently added to the right “Favorite Toolbar” pane,
click Remove, and see them disappear from the right pane.
Reset - Reset the Favorite Toolbar pane to the default settings.
Click Up/Down button on the right side to adjust the position of your favorite toolbars, and
click OK.
To show/hide Favorite Toolbars, you can either right-click toolbars to check/uncheck Favorite
or go to View > Toolbars > check/uncheck Favorite.
Move toolbars in Classic Toolbar Mode
Any toolbars can float or be docked. Docked toolbars appear in the toolbar area. Floating toolbars
appear as independent palettes that you can move anywhere in the work area. Each toolbar has
a grabber bar at the left edge of the toolbar.
17
Page 19

Foxit PhantomPDF Standard
User Manual
To rearrange the docked toolbars, use the toolbar grabber bars to drag them from one
position to another.
To float a docked toolbar, drag it by its grabber bar from the toolbar area.
To move a floating toolbar, drag it by its title bar to another location in the work area.
To dock a floating toolbar, double-click its title bar or drag it by its title bar to the toolbar
area.
To move all floating toolbars to the toolbar area, choose View> Toolbars > Reset Toolbars.
Note: No need to move toolbars in Ribbon mode, where all tools are displayed under each ribbon.
Return toolbars to their default configuration in Classic Toolbar Mode
Choose View > Toolbars > Reset Toolbars or right-click to choose Reset Toolbars.
Press the hotkey Alt+F8 on your keyboard.
Navigation Panels
Show or hide the navigation panels
The buttons on the left side of the navigation pane provides easy access to various panels, such
as the Bookmarks panel button and the Pages thumbnails button .
To show the navigation panels, use keyboard shortcut F4, or click VIEW > View Setting >
Navigation Panels > Show Navigation Panels.
To hide the navigation panels, use keyboard shortcut F4, or click VIEW > View Setting >
Navigation Panels > Hide Navigation Panels.
To open a navigation panel, click its button on the left side of the navigation pane.
To close a navigation panel, click its button on the left side of the navigation pane.
Adjust the navigation pane
Like the toolbars, the navigation pane can be docked in the navigation pane or float anywhere in
the workspace. You can choose to hide or close the panels that you don't need and open the
ones you do. What’s more, you can also adjust the width of the navigation pane easily.
1. Viewing a panel in the navigation pane
By default, all the panels dock in the navigation pane with a set of panel buttons appearing
on the left side of the work area. Do the following:
18
Page 20

Foxit PhantomPDF Standard
A
B
User Manual
Select the button for the panel on the left side of the navigation pane.
2. Changing the display area for navigation pane
To change the view area of the navigation pane, drag its right border to adjust the width.
To minimize or maximize the navigation pane, click on the button / at the top right
corner of the navigation pane.
3. Docking or floating a navigation pane
To float a navigation panel, drag the panel button into the document pane.
To move a panel, drag it by its panel button to another location.
To dock a floating panel, double-click its title bar.
Working with Layers
A layer or as it is more formally known Optional Content Groups (OCG) is a dictionary
representing a collection of graphics that can be made visible or invisible dynamically by users of
viewer applications. In a PDF file, each layer may hold any portion of the document's objects, and
layers may be made visible or invisible, showing or hiding their contained objects, in any
combination.
With Foxit PhantomPDF, you can control the display of PDF layers with the Layer panel. For
example, you may divide background imagery, main content areas, and advertisements amongst
their own top-level layers, and easily hide the layers that you don't want others to view.
Show or hide PDF layers
In a PDF, information can be stored on different layers. To show or hide related content stored in
a variable number of separate layers, you can simply refer to the Layer panel on the left side of
the work area. Please note that you cannot create or edit layers in Foxit PhantomPDF. However,
you can view layers and choose to show or hide the content associated with each layer.
Layer Panel
A. A checkmark indicates a displayed layer B. Hidden layer
19
Page 21

Foxit PhantomPDF Standard
User Manual
1. Open the Layer panel, and then do one of the following:
To hide a layer, uncheck the layer.
To show a hidden layer, click the empty box and a checkmark will appear.
2. From the Option menu at the top right corner of the Layer panel, choose one of the following:
List Layers for All Pages - Shows every layer across every page of the document.
List Layers for Visible Pages - Shows layers only on the visible pages.
Reset to Initial Visibility - Resets layers to their default state.
Expand All – Expands all layers.
Collapse All - Collapses all of the current layers in the view.
Status Bar
The status bar is an area of the workspace that displays the page number where you are, the
number of total pages, page transition buttons, zoom buttons, etc. for view setting. The status
bar is open by default when you open a PDF. In the VIEW ribbon, the items on the View Setting
tab help you to show or hide the status bar.
Show Status Bar: If you check it, the status bar will appear in the bottom of the workspace.
Auto-hide Status Bar: If you check it, the status bar is hidden. But if you put the cursor near the
bottom of the page, the status bar will appear.
Hide Status Bar: If you check it, the status bar will be hidden.
Customize the Workspace
As you get acquainted with workspace of Foxit PhantomPDF, you can set up your work
environment at your desire.
Customize the Skin and the Interface Style
Skin and Interface Style
There are five kinds of skin, Classic, Black, Blue, Orange and Purple that allow the user to change
20
Page 22

Foxit PhantomPDF Standard
User Manual
the look of the software. There are also two kinds of interface styles, Classic Toolbar Mode and
Ribbon Mode, which change the interface of the software.
To change the skin of the workspace, please do the following:
Go to FILE > Change Skin.
Check the skin you like and click OK.
To change the interface style of the workspace, please do the following:
Go to FILE > Change Toolbar Mode > Check Classic Toolbar Mode or Ribbon Mode.
Set Preferences
Many program settings are specified in the Preferences dialog box, including settings for File
Associations, Forms, Full Screen, General, History, JavaScript, Languages, OCR, Page Display,
PDF/A, Reading, RMS Setting, Security, Signature, and Trust Manager. Once you set preferences,
they remain in effect until you change them.
1. Choose FILE > Preferences.
2. Select the type of preference you want to change under the list of categories.
21
Page 23

Foxit PhantomPDF Standard
User Manual
Chapter 3 – Read
After getting acquainted with the workspace and the basic tools, you can start the journey of PDF
reading. You can open a PDF, reach a specific page easily, adjust the view of a document, read
pure texts by text viewer tool, view documents while listening to them, and more. Foxit
PhantomPDF also provides a new feature to view PDF portfolios.
Open & Close & Save PDFs
Open PDFs
Open PDFs in Foxit PhantomPDF
Do one of the following:
Choose FILE > Open, or click the Open button on Quick Access toolbar. In the Open
dialog box, select the file name, and click Open. PDF documents are usually identified
with .pdf extension.
Open the Foxit PhantomPDF window, drag and drop the PDF file into the Foxit PhantomPDF
window.
Note: You can open more than one PDF document within the same Foxit PhantomPDF application.
When you open more than one file at a time, you can navigate the PDF files easily by
clicking the corresponding tabs or file names under the Window menu.
Open PDFs from Desktop or within Other Applications
If you set Foxit PhantomPDF as your default viewer for PDF files, you are able to launch and open
PDF files in the following applications:
Email Application: in your email applications, you can double-click the attachment icon to
open the document.
Web Application: you can open a PDF document by clicking on the PDF file link in your web
browser. Also, you can view the PDF content embedded in the HTML.
File System: double-click the PDF file icon in your file system.
Open a secured PDF document
If you receive a PDF that is protected by security features, you may need a password to open the
document. Some protected documents have other restrictions that prevent you from printing,
22
Page 24

Foxit PhantomPDF Standard
User Manual
editing, copying, etc.
When opening a protected PDF, you will be prompted to enter the password.
When trying to copy or edit a secured PDF, you will be notified that you are prohibited to do
it without the owner’s permission.
If you open a PDF that is encrypted by AD RMS feature of PhantomPDF, please refer to AD
RMS Protection.
Retrieve recently opened documents from within Foxit PhantomPDF
Under the “FILE” pull-down menu, you will be able to instantly retrieve recently opened
documents. Foxit PhantomPDF provides a list of recently opened PDF documents. Choose FILE >
Open > Recent Documents.
Note: To customize the number of document in the recently used list, please choose FILE >
Preferences > History.
Save PDFs
When saving or saving as PDFs, Foxit PhantomPDF will optimize PDFs by removing redundant
data including deleted pages, objects, and annotations.
Save a copy of a PDF
1. Choose FILE > Save As.
2. In the Save As dialog box, enter the filename and location, and click Save.
Save a PDF as a TXT
1. Choose FILE > Save As.
2. Choose the extension name from the Files of Type Option in the Save As dialog box.
3. Enter the filename and location, and click Save.
Close a PDF
Do the following:
If you are in multi-tab browsing, to close the current PDF file you must click the file’s Close button
in the tab bar (instead of the Foxit PhantomPDF application window), or double-click the tab, or
click FILE > Close. To close all PDF files, click the Close button in the Foxit PhantomPDF application
window.
If you are in the single document interface mode, just click the Close button on the PDF file, or
23
Page 25

Foxit PhantomPDF Standard
User Manual
click FILE > Close.
Export PDFs
Export PDF to Office, RTF, Excel, PPT or HTML file
1. Select FILE > Export, or click CONVERT > Export.
2. (Optional) To convert a PDF to Word, you can directly right-click the file and choose Convert
to Microsoft Office with Foxit PhantomPDF.
3. Select the format you want to convert the PDF to.
4. You can select the language used in the PDF from “Settings” in the Save As dialog box before
saving the file.
Export a PDF as an image
1. Select FILE > Export to Image, or click CONVERT > Export.
2. Specify the file type of images and the page range (all pages, current page, a range of pages),
and click OK.
3. You can set the quality, color space, and resolution from “Settings” in the Save As dialog box
before you save the file. Click OK to continue.
4. Click Save.
Export all images in the PDFs
With one click of “Export All Images”, Foxit PhantomPDF enables you to export all images in your
document to separate image files. Please click CONVERT > Export > Export All Images, and
configure the settings before exporting via the Export to Images dialog box.
Bundle with IFilter
Foxit PhantomPDF has been bundled with Foxit PDF IFilter– Desktop, which allows users to index
a large amount of PDF documents and then quickly find text within these documents on the
desktop system. You can trigger Foxit PDF IFilter in the installation directory of Foxit PhantomPDF.
For more information, please refer to the user manual of Foxit PDF IFilter .
Note: Please go to FILE > Preferences > Trust Manager to disable the safe reading mode first,
and then double click the File Attachment icon to open the attached user manual of Foxit
PDF IFilter.
24
Page 26

Foxit PhantomPDF Standard
Tab Bar
User Manual
Standards Validation
With the Industry Standard of Foxit PhantomPDF, you can detect and fix problems for different
usage. Foxit PhantomPDF has the PDF/A, PDF/E and PDF/X compliance validation as the industry
standards. Click CONVERT > Compliance > Industry Standard button , and select one of the
compliances and click Analyze or Analyze and Fix in the pop-up dialog box.
Read
Foxit PhantomPDF enables you to retrieve recently opened documents, as well as provides
different ways for you to read PDF files: multi-tab reading and single document reading.
Multi-tab Reading & Single Document Reading
Multi-tab Reading
The multi-tab browsing feature enables you to open multiple files in a single instance. Newly
opened PDFs will be displayed in tabs.
To enable tabbed browsing, go to FILE > Preferences > Documents > Open Setting > uncheck
Allow Multiple Instances.
Single Document Reading
Create a new window when you double-click to open a new PDF file.
To enable single document interface mode, go to FILE > Preferences > Documents > Open
Setting > check Allow Multiple Instances.
25
Page 27

Foxit PhantomPDF Standard
User Manual
Read Contents
Go to Specified Page
Click the First Page, Last Page, Previous Page and Next Page in the Go To ribbon under the View
menu or in the status bar to view your PDF file. You can also input the specific page number to go
to that page. The Previous View lets you return to the previous view and Next View goes to the
next view.
Read with Bookmark
To jump to a topic using bookmarks, click the Bookmark button on the left Navigation pane.
And then click the bookmark or right-click the bookmark and choose “Go to Bookmark”. Click the
plus (+) or minus (-) signs to expand or collapse the bookmark contents.
Read with Page Thumbnail
To jump to a page with page thumbnails, click the Page Thumbnails button on the left
Navigation pane and click its thumbnail. To move to another location on the current page, drag
and move the red box in the thumbnail. To resize a page thumbnail, right-click on the thumbnail
and choose “Enlarge Page Thumbnails” or “Reduce Page Thumbnails”.
26
Page 28

View PDF Portfolios
Foxit PhantomPDF Standard
User Manual
PDF portfolios are a combination of files with different formats such as Word Office files, text
documents and Excel files. Foxit PhantomPDF provides viewing and printing PDF portfolios, as
well as searching keywords in PDFs in the portfolio.
A Sample PDF Portfolio
27
Page 29

Foxit PhantomPDF Standard
User Manual
Download a Sample PDF portfolio (preferably with files in different formats).
Open it in Foxit PhantomPDF by right clicking and “Open with Foxit PhantomPDF”.
You can view the coversheet, details and layout of the portfolio. To open and read the
files in the portfolio, please do any of the following:
Double-click a file.
Select a file and click button in the upper right corner of the document area.
Right-click a file and choose Open File in Native Application.
Right-click a document in the portfolio and choose Show Information or click the
button in the upper right corner of the document area to view the properties of the
document.
Search in portfolio by typing keywords in Search box or using shortcut keys CTRL+ Shift
+ F.
Search & Index in PDFs
Find Text
To quickly find text you are looking for, follow the steps below:
Select the Find Field on the menu bar. Click to set the search
criteria.
A. Whole words only -- limits the search to match only whole words. For example, if you
search for the word Read, the word Reader will not be found.
B. Case-Sensitive -- makes the search case-sensitive. For example, if you search for the word
text, the words Text and TEXT will not be found.
C. Include Bookmarks -- enables you to search for a word in the whole text, including
bookmarks.
D. Include Comments -- enables you to search for a word in the whole text, including
comments.
E. Include Form Data – enables you to search for a word in the whole text, including form
data.
Type the text in the field and press the Enter button. Foxit PhantomPDF jumps to the first
instance of the search term, which appears highlighted.
Click and or press shortcut keys Shift+F3 and F3 to find previous or next result, or
press Enter to find the next result.
Foxit PhantomPDF supports the advanced search function, which enables you to do the following:
search a string in a single PDF file, multiple PDF files under a specified folder, or PDFs in a PDF
28
Page 30

Foxit PhantomPDF Standard
User Manual
portfolio. When the search finishes, all occurrences will be listed in a tree view. This will allow
you to quickly preview the context and jump to specific locations.
To do the advanced searching, do as below:
Click the search button , and select a document or folder you want to search in the
Search Panel. Then in the Searching box, type the text you want to search for and click the
button to set the search criteria. See also Search Criteria.
Check the item Patterns and select a pattern. The patterns vary with different countries.
Choose Country based on the file you are using.
Click Search button. Foxit PhantomPDF jumps to the first instance of the search term, which
appears highlighted. And all occurrences will be listed in a tree view, allowing you to quickly
preview the contexts and jump to specific locations.
Press New Search in the search panel to start a new search or press the close button in the
top of the search panel to finish the search.
Move and Resize Search Box
The advanced search box can float or be docked. You can also resize the box with ease.
To float the docked search box, please double-click the title bar.
To move the floating search box, drag it by its title bar to another location in the work area.
To resize the search box, drag any corner point to adjust.
To dock the floating search box, double-click on the title bar.
OCR Function
Optical Character Recognition, or OCR, is a software process that enables images or printed text
to be translated into machine-readable text. OCR is most commonly used when scanning paper
documents to create electronic copies, but can also be performed on existing electronic
documents (e.g. PDF).
Recognize text
Foxit PhantomPDF can detect whether a PDF file is scanned or image-based and make
corresponding suggestions to initiate OCR when opening a scanned or image-based PDF as
below:
To recognize image-based or scanned text in a file, perform one of the following:
29
Page 31

Foxit PhantomPDF Standard
User Manual
Click HOME > Convert > OCR > Current File, in the Select OCR Engine dialog box, specify the
range you need.
1. Choose the language used in your document. You can select multiple languages as well.
2. In the output type, check Searchable Text Image to make the image text searchable, or
check Editable Text to enable the image text to be edited with Foxit PhantomPDF. Click OK
to recognize the text.
3. A recognition text process bar will pop up to show the progress.
4. Do the search function, the text on your image or scanned document will be searchable.
You can also recognize text from an opened image-based or scanned PDF document.
To recognize text in multiple files:
1. Click HOME > Convert > OCR > Multiple Files.
2. In the OCR Multiple Files dialog box, click Add Files to add files or folders. Use Move up,
Move down, and Remove to adjust the order of the files and click OK.
3. In the Output Options dialog box, select the destination folder and choose to name the new
file or overwrite an existing one.
4. Click OK. After recognition, a message box will pop up to prompt you the recognition is
30
Page 32

Foxit PhantomPDF Standard
User Manual
finished.
See also “To recognize text in a file”
Note: When you are using the CJK OCR engine for the first time, the system will remind you to
download and install the engine from the Foxit server.
Find and Correct OCR Suspects
After recognizing image-based or scanned texts in the PDF file, you can pick out and correct the
texts or characters that are uncertain as the steps below:
1. Click HOME > Convert > OCR > Suspect Results > First Suspect. A pop-up Find OCR Suspects
dialog box appears with a Foxit PhantomPDF box appearing to prompt you with Find
Completed.
Find OCR Suspects dialog box
Note: By default, the suspect results are based on the Search Document. You can also select
Search Page to find suspects on the current page and redo this step.
2. The Find OCR Suspects dialog box shows both the original document text and the OCR text.
You can edit text in the OCR text box directly if needed. If the highlighted text is incorrectly
identified, click Not Text. Click Find Next to find the next suspect or click Accept and Find to
accept the suspect and find next.
3. If you choose HOME > Convert > OCR > Suspect Results > All Suspects. The Find OCR
Suspects dialog box also pops up and all the OCR suspects will be highlighted with red boxes
as below:
31
Page 33

Foxit PhantomPDF Standard
User Manual
Original Document Text in the PDF file
Suspect Results of the OCRed Text
You can check the highlighted text by clicking any highlighted parts. Click the place where it is
incorrect and input the correct text in the OCR text box in the Find OCR Suspects dialog box.
4. Click Close to exit the Find OCR Suspects dialog box.
Adjust Page View
Foxit PhantomPDF provides multiple tools that help you adjust the view of your PDF documents,
such as the page magnification and the display of pages.
Adjust Page Magnification
Do one of the following procedures:
1. Click the Zoom In tool or Zoom Out tool in HOME > View.
2. Right-click the document pane and select Zoom In or Zoom Out.
3. Select or input a magnification percentage in the Zoom To Area on the
same tab.
4. Adjust a magnification percentage in the Magnification Percentage Area
on the status bar.
5. Using the Marquee tool
Choose the Marquee tool in VIEW > Assistant.
The cursor changes into , drag a rectangle on the page or just click on the page to
32
Page 34

Foxit PhantomPDF Standard
User Manual
increase the magnification by one preset level, centering on the point where you clicked.
Choose the Marquee tool, the cursor changes to as Ctrl-click on the page. Drag a
rectangle on the page or just click on the page to decrease the magnification
6. Using the Loupe tool
Choose the Loupe tool in VIEW > Assistant.
Move the loupe tool to the places you want to view, you will see the amplificatory or
decreased objects in the Loupe Tool dialog box.
(Optional) Select the Lock option in the Loupe Tool dialog box. Click the area of the
document you want to view in closer detail. A red rectangle appears in the document,
corresponding to the area shown in the Loupe Tool window. You can drag or resize the
rectangle to change the Loupe tool view.
To change the scale ratio of the Loupe Tool, you can either enter a value in the zoom text
box, or drag the slider in the Loupe Tool dialog box.
Using the Magnifier tool
You can easily magnify areas of the PDF files as you work on Foxit PhantomPDF with this
free tool. It is especially useful for visually impaired people with some functional vision.
Magnifier Fisheye Magnifier
Choose the Magnifier in VIEW > Assistant > Magnifier.
Move the Magnifier to the places you want to view.
To switch between Magnifier and Fisheye Magnifier, press the left mouse button.
To change the size of magnifier window, press the right mouse button.
To turn off the Magnifier, choose any other tools.
33
Page 35

Foxit PhantomPDF Standard
User Manual
Resizing a Page to Fit the Window
There are four types for you to choose:
To resize the page to fit entirely in the document pane, click the Fit Page button
in HOME > View, or right-click the Document Pane and choose Fit Page.
To resize the page to fit the width of the window, click the Fit Width button in
HOME > View, or right-click the Document Pane and choose Fit Width. Part of the page may
be out of view.
To resize the page to its actual size, click the Actual Size in HOME > View, or right-click
the Document Pane and choose Actual Size.
To resize the page to fit the visible width of the window, removing the margins, click the Fit
Visible button in HOME > View.
Adjust the Page Display
To change the Page Orientation, do one of the following:
Click the Rotate View button in VIEW > Page Display.
Click the Rotate Left button or the Rotate Right button in HOME > View.
Right-click the document pane and choose the Rotate Right tool.
Note: You can change the page view in 90-degree increments, but the change only affects screen
display instead of its actual orientation. You cannot save the changes in page view.
To change the page display, Foxit PhantomPDF provides the following page layouts:
Single Page - Displays one page in the document pane at a time.
Continuous - Arranges the pages in the document pane in a continuous vertical column.
Facing - Arranges the pages side by side, displaying only two pages at a time.
Continuous Facing - Arranges the pages side by side in a continuous vertical column.
Show Cover Page During Facing -If a document has more than two pages, the first page
34
Page 36

Foxit PhantomPDF Standard
User Manual
can be displayed alone on the right side of the document pane in Facing and Continuous
Facing views.
Split - View a PDF with the document pane divided into two panes (Split command)
or four panes (Spreadsheet Split command).
Note: To restore single-pane view, choose VIEW > deselect Split/Spreadsheet Split.
With Split view, you can scroll, change the magnification level, or turn to a different page in the
active pane without affecting the other pane.
The Spreadsheet Split view is useful if you want to keep column headings and row labels visible
while scrolling through a large spreadsheet or table. In this mode, changing the magnification in
one pane changes the magnification in all panes. Also, scrolling is coordinated between the panes.
Scrolling a pane horizontally scrolls the pane above or below it; scrolling vertically also scrolls the
pane to the left or right of that pane.
View Mode
Read Mode
User interface settings, such as the navigation pane, toolbar, and status bar, will be hidden when
a PDF is displayed in Read Mode. The document pane is enlarged, reducing wasted reading space
while leaving the menu bar available for necessary operations.
To view a document in Read Mode, please choose one of the following:
Click the Read Mode button in VIEW > Document Views.
Press the shortcut key “Ctrl + H” on the keyboard.
Right-click the document pane and select Read Mode.
In Read Mode, a basic toolbar will float when the cursor is put at the bottom of the screen. This
offers basic tools, such as save, print, zoom in/out, etc.
If you open multiple PDFs, please press “Ctrl + Tab” on the keyboard to switch through them in
Read Mode.
To exit the Read Mode, please do any of the following:
Click the Read Mode button in VIEW > Document Views.
Press the shortcut key “Ctrl + H” on the keyboard.
Click the Read Mode button on the floating basic toolbar at the bottom of the screen.
35
Page 37

Foxit PhantomPDF Standard
User Manual
Full Screen Mode
In Full Screen mode, Foxit PhantomPDF Document Pane fills the entire screen, with Menu Bar,
Toolbar, Status bar, and Bookmarks pane hidden behind. The mouse pointer remains active in Full
Screen mode so that you can click links.
1. To set Full Screen preferences, please go to FILE > Preferences > Full Screen.
2. To enter Full Screen mode, please do one of the following:
Right-click the Document Pane and select Full Screen.
Press the shortcut key F11.
3. To adjust the view in Full Screen mode, right-click the document and work with the Context
Menu.
Note: This feature will not be available unless you clear Left click to go forward one page; right
click to go back one page checkbox in the Preference > Full Screen.
4. To exit Full Screen mode:
Press Esc key.
Press the shortcut key F11.
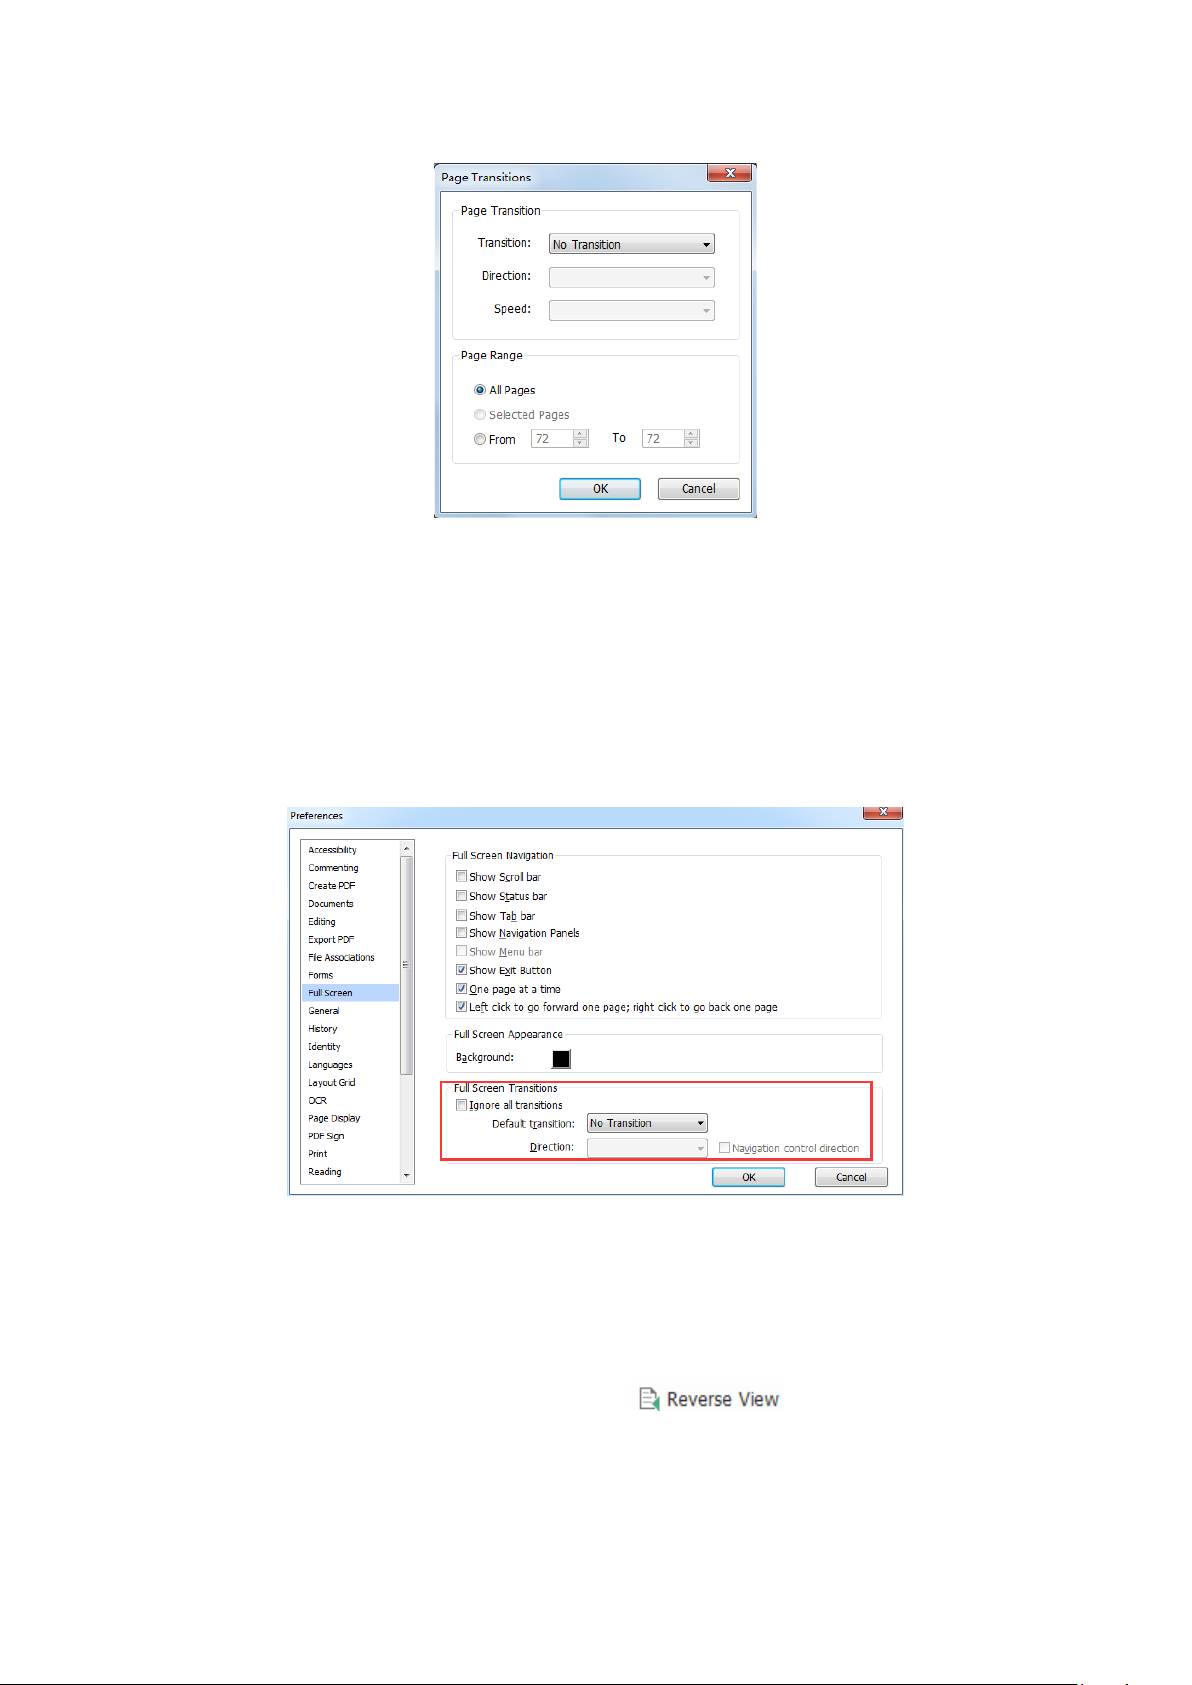
5. Page Transition in Full Screen
Foxit PhantomPDF supports page transition to turn pages in Full Screen mode. It helps you to
turn pages as the transition feature in Microsoft Power Point. There are 10 transition types: Split,
Blinds, Box, Wipe, Dissolve, Glitter, Push, Cover, Uncover and Fade. Also, you could set the
direction, speed and page range for the transition.
To edit page transition, click the Page Transitions in VIEW > Page Display.
36
Page 38
Foxit PhantomPDF Standard
User Manual
Note:
This change only works for the current PDF.
The pages will be turned in the same way the next time you open and view the document in
full screen mode.
If you want to set page transition to all PDF documents opened by Foxit PhantomPDF, please
choose FILE > Preferences > Full Screen.
Reverse View
To read documents in a backward order, please do one of the following:
Choose VIEW > Document Views >Reverse View .
Right-click on the document pane and choose Reverse View.
37
Page 39

Foxit PhantomPDF Standard
User Manual
Text Viewer
With Foxit Text Viewer, you can work on all PDF documents in pure text view mode. It allows you
to easily reuse the texts scattered among images and tables, and acts like Notepad. Also, you can
adjust some settings to meet your needs.
To Enter Text View mode, do one of the following:
Choose VIEW > Document Views > Text Viewer .
Press the shortcut key Ctrl + 6.
Customizing Text Viewer
As soon as Text Viewer is activated, you can use the Font Setting Tools to customize your own
work area. Right-click the text area to select Font Setting.
1. To change text font when reading with Text Viewer
Right-click and choose Font Setting > Font….
Choose Font name, Font Style, Font Size, Effects, Color and Script from respective fields in
Font dialog box. The suggested font for best screen display is Courier New.
2. Toggle between regular style and Bold style, choose Font Setting > Bold.
3. Toggle between regular style and Italic style, choose Font Setting > Italic.
4. Change the text color and the background color
Right-click and choose Font Setting > Color….
Text Viewer Colors dialog box pops up.
38
Page 40

Foxit PhantomPDF Standard
User Manual
Drag respective sliders or type the value to change the Foreground (Font) Color and
Background (page) Color. You can preview the changes in the box with a word “Sample”.
Click OK to complete the procedure, or click Cancel to abandon the changes.
5. Change Text Viewer settings
Right click the text area > select Setting…
The text Viewer Settings dialog box pops up.
Below are the text viewer settings:
A. Set page width at three different levels: Current page width, Current document width
and System default width.
B. Minimal width – the valid value for this field is 0-1024. It is set to 78 by default.
C. Keep Column – for PDF tables or text columns, you can check Keep Column to retain
39
Page 41

Foxit PhantomPDF Standard
User Manual
appropriate column in text viewer mode. It is checked by default.
D. Auto Width – for PDF tables or text columns, you can check Auto Width to keep
proper width between texts automatically. It is checked by default.
E. Auto Rotate – you can check Auto Rotate to ensure consistent orientation with that
of the printer. It is checked by default.
Navigating in text viewer mode
1. To go to next or previous page, do one of the following:
Choose VIEW > Go To > Previous Page or Next Page .
Click the Previous Page icon or Next Page icon on the Status Bar.
Put the cursor in the Document pane, press the Left or Right Arrow on keyboard to move
the pages up or down.
2. To go to the first or last page, do one of the following:
Choose VIEW > Go To > First Page or Last Page .
Click the First Page icon or Last Page icon on the Status Bar.
Press the Home or End keys.
3. To go to a specific page, do one of the following:
Choose VIEW > Go To > input the specific page number > press Enter.
Input or select the specific page number on the Current Page Number Box
on Status Bar, and press Enter.
Changing the magnification level of a document
Do one of the following procedures:
1. Click the Zoom Out button or the Zoom In button on the status bar.
2. Choose HOME > View > Zoom In or Zoom Out .
Note: The Zoom To box is unavailable in Text Viewer mode.
Finding text in Text Viewer mode
40
Page 42

Foxit PhantomPDF Standard
User Manual
To find text you are looking for, please refer to Find Text.
Copying and pasting text in Text Viewer mode
1. Select text
Select a word: Double-click the word you want to select.
Select a line of text: Click and drag the cursor on the line of text you want to select.
Select all the text: Press Ctrl + A or right-click the Document Pane > choose Select All.
2. Copying text, do one of the following:
Right-click the selected text > choose Copy.
Select the text and then press shortcut key Ctrl + C.
3. Pasting text
To paste the selected text on Clipboard to another application, please follow the paste command
of the specific application.
Read Out Loud
What’s Read Out Loud?
Read Out Loud is a Text-to-Speech (TTS) tool. This tool can read the text in comments and
alternate text descriptions for images and fillable fields. With this feature, you can obtain
information without having to view the page, helping to effectively relieve eyestrain. It also
enables you to view other materials while listening to a PDF’s content.
To use the Read Out Loud, please do as below:
Choose VIEW > Assistant > Read > Read Current Page/Read from Current Page.
Setting Reading Preferences
Please go to FILE > Preferences > Reading.
Page vs Document:
1. Only read the currently visible pages - Read the visible page displayed on the current
window.
2. Read the entire document - Read every page of the document in order.
3. For large documents, only read the currently visible pages - If you open a large PDF, the
system will only read the current, visible page.
41
Page 43

Foxit PhantomPDF Standard
User Manual
4. Minimum number of pages in a large document - Set a minimum number of pages to define
a PDF as a “large document”.
Reading Actions
In Read Out Loud Mode, some simple actions are offered for users to control the reading status,
including read this page, read this document, pause, resume, rate up, rate down and stop.
1. In Normal Mode, choose an action in VIEW > Assistant.
2. In Classic Toolbar Mode, a simple reading toolbar will be floated on the user interface after
you click View > Toolbars > check Read.
Read Out Loud uses the available voices installed on your system. If you have SAPI 5 voices
installed from text-to-speech or other language applications, you can choose to have them read
your PDFs.
Note: Read Out Loud isn’t a screen reader. Some operating systems may not support it.
Rulers, Guides, Grids & Line Weights
Using Rulers & Guides
Foxit PhantomPDF provides horizontal and vertical ruler guides to help you align and position text,
graphics or other objects on the page. They can also be used to check the size and margins of
your documents.
42
Page 44

Foxit PhantomPDF Standard
Rulers & Guides
A. Rulers B. Guides
To show or hide rulers/guides, select VIEW > check or uncheck Rulers/Guides.
To create ruler guides, follow the steps below:
User Manual
Drag down the horizontal ruler to create a horizontal guide, or drag to the right of the
vertical ruler to create a vertical guide.
Double-click a location on the horizontal ruler to create a vertical guide, or double-click a
location on the vertical ruler to create a horizontal guide.
To move ruler guides, select the Hand tool, click and hold the guide, and then drag it to a new
location.
To change the unit of measurement, right-click the horizontal ruler or the vertical ruler, and select
a measurement system for the rulers.
To delete ruler guides, please do one of the following:
To delete a guide, click the guide to select it, and then press the Delete key.
To delete all guides on a certain page, scroll to the page, right-click the ruler area and
choose Clear Guides on Page.
To delete all guides, right-click in the ruler area and choose Clear All Guides.
Grids
You can use grids to line up form fields in a PDF document. When you create or move a form field,
Snap to Grid can align the form field with the nearest grid line.
To show or hide the grid, navigate to VIEW > Page Display > and check/uncheck Grid.
To turn on or off the Snap to Grid option, navigate to VIEW > Page Display > and check/uncheck
Snap to Grid.
43
Page 45

Foxit PhantomPDF Standard
User Manual
You can also customize the grid appearance from FILE > Preferences > Layout Grid.
Width/Height between lines: sets the spacing between grid lines.
Grid offset from left/top edge: sets the origin of the grid.
Subdivisions: sets the number of subdivisions within each grid square. Subdivision lines
are lighter than grid lines.
Grid line color: sets the color of grid lines.
Line Weights View
In Line Weights View, the lines will be displayed with the weights defined in the PDF file. When
Line Weights View is turned off, the lines will be displayed with the constant stroke width (1 pixel),
regardless of zoom. The following screenshots show the comparison of the PDF file displayed in
Line Weights View and Non-Line Weights View.
PDF in Line Weights View PDF in Non-Line Weights View
To enter Line Weights View, please choose VIEW > Page Display, and then check Line
Weights option.
To exit Line Weights View, please choose VIEW > Page Display, and then uncheck Line
Weights option.
Compare PDF Files
The Document Compare feature lets you see the difference in two versions of a PDF, as well as
select the type of differences you’re looking for to verify that the appropriate changes have been
made. The Document Compare feature does not compare comments in the PDF.
Comparing a revised PDF to an earlier version
Choose VIEW tab > Compare group > Compare .
44
Page 46

Foxit PhantomPDF Standard
User Manual
Compare PDF Files dialog box
Specify the two documents to be compared. Click Choose… to select the file and choose the
specific pages you want to compare by dragging the slider or clicking the list box to select
the page number.
Type of Comparison:
Page by page visual differences – Compares by visual differences, including texts, images,
annotations, etc.
Textual differences – Compares texts only between the two documents. Check Include font
information (style, size, typeface) if needed. You can also set to highlight differences when
documents differ by less than a percentage to easier find out the differences.
Include page reassembled changes – If you check this option, the application will
automatically ignore the textual differences of the pages that were replaced or inserted and
will indicate that the pages will be inserted in the comparison result.
You can preview pages after you check Show preview option. Choose the specific page you
want to preview by dragging on the page range bar or select the page number by clicking
the list box near the range bar.
Click OK. And then a PDF document named “The result of Comparison.pdf*” will be
automatically created and opened with PhantomPDF. The first page shows a summary of
the comparison results and the differences will be classified with different colors.
45
Page 47

Foxit PhantomPDF Standard
Select & Copy
With Foxit PhantomPDF, you can copy texts and images to other applications.
Select and Copy Text
User Manual
The Select Text tool lets you select horizontal and vertical text or columns of text in a PDF.
PhantomPDF sets each ribbon with the hand tool and Select tools for user’s convenience. To
copy text, click Select Text Tool and do the following:
Select text
Select a line of text: Drag the cursor toward a line of text you want to select.
Select a column of text: Put the cursor between the lines, drag the cursor toward a
column of text you want to select.
Select a word: Double-click the word you want to select.
Select multiple paragraphs through pages: Click at the start of the selection, scroll to the end
of the selection without releasing your mouse.
Select all the text: Press Ctrl + A, or select some text, right-click it and then choose Select All.
Deselect all the text: Click any area of the text.
Copy text
After selecting the text, do one of the following:
Right-click the selected text > choose Copy.
Press shortcut key Ctrl + C.
Tip: The style (including font, bold, color, etc.) of the text will be copied to the clipboard as well
when you copy text in PDF.
Paste text
46
Page 48

Foxit PhantomPDF Standard
User Manual
To paste the selected text on Clipboard to another application, please follow the paste command
of the specific application.
Copy Content Using Snapshot Tool
You can use the snapshot tool to copy individual images or selected content (text,
images, or both) to the clipboard or other applications. Text and images will be copied as an
image.
To copy an image or a combination of text and images, do the following:
Select the Snapshot tool by choosing HOME > Snapshot.
The cursor changes into a Cross automatically.
Click and drag the mouse to draw a rectangle around the content you want to copy.
You will be prompted that the selected area has been copied to the clipboard. To deselect it,
click anywhere on the page.
(Optional) Right-click the selected area, and then choose Copy Select Graphic.
Paste the selected image to desired destinations.
Note:
1. The selected area will be highlighted in blue.
2. With the snapshot tool, click anywhere or right-click anywhere in the page and choose “Select
All” to copy the entire page.
3. You can also copy the selected area and paste it to a PDF document as a stamp annotation.
Check the Accessibility of PDFs
A document is accessible if it can be used by people with disabilities, such as visually impaired
people. Foxit PhantomPDF allows users to evaluate the accessibility of your documents and
identify areas that may be in conflict with Foxit’s interpretations of referenced guidelines with
Accessibility Checker.
Use Accessibility Full Check to check whether a PDF is compliant with accessibility standards of
Section 508. You can choose which kinds of accessibility items to check for and how to view the
results.
To check accessibility with Full Check, please do as below:
1. Choose FILE > Accessibility Checker > Accessibility Full Check .
2. In the Accessibility Check dialog box, select options you need to check for.
47
Page 49

Foxit PhantomPDF Standard
User Manual
3. In Report Options section, check Create Accessibility Report option if needed to save the
results as an HTML file and specify its Save Path.
4. Click Options button and specify the page range to do a full check.
5. Click Start Checking.
6. When the check is completed, the accessibility report appears in the Accessibility report
panel in the left Navigation Pane. And the result report file is also created in the
specified folder.
The report includes the name of the PDF document, Detailed Report and Summary.
Detailed Report displays if there are any areas with problems. Summary clearly lists one
of the following statuses for each item check:
Passed automatic verification - The item is accessible.
Needs manual verification by user - The Full Check feature couldn’t check the item
automatically. Please verify the item manually.
Not applicable - There is no applicable content for this item.
The items with problems are totaled. For detailed information, please refer to
Detailed Report.
Note: Because some content types are difficult to be distinguished clearly by the checker,
some issues reported may not affect readability. It would be better to review all issues to
definitely decide which ones are not accessible.
7. (Optional) If you didn’t choose to create a report in Step 3, you can click button in
the Accessibility report panel to save the results. You can also open a report by clicking
48
Page 50

Foxit PhantomPDF Standard
User Manual
button.
To view Full Check results:
1. Choose FILE > Accessibility Checker > Open Report .
2. In the Open dialog box, select the report file from the folder where you saved the report file
and click Open.
3. The report file will be opened with the associated PDF.
Others
Asian Languages
If you try opening PDF files directly that contain Eastern Asian Languages such as Traditional and
simplified Chinese, Japanese, and Korean, you can open them with Foxit PhantomPDF directly
now. The add-on of Eastern Asian Language has been integrated into the Foxit PhantomPDF
package, so you won’t be prompted to download and install the required language font kits. Foxit
PhantomPDF lets you view, search, and print PDF documents with Asian language text.
Note: To update the Eastern Asian Language font kits, users still have to go to HELP > Check for
Update to download and HELP > Install Update to install the updated version.
PDF Properties
To view the PDF properties, please choose FILE > Properties. You can acquire all relevant
information as follows:
Description
This tab shows some basic information about the document. The person who created the
document in the source application may have set the title, subject, author, and keywords. You can
easily edit the document information within the PDF document, a useful way for searching and
indexing files.
Initial View
When a user opens your PDF document, they see the initial view of the PDF. You can set the
initial view to the magnification level, page and page layout that you want. If your PDF is a
presentation, you may want to set the initial view to Full Screen Mode. After you define the initial
view of the PDF, you can add page transitions to selected pages of the entire document.
49
Page 51

Foxit PhantomPDF Standard
User Manual
Define the initial view as Full Screen mode
When setting the initial view of a PDF to Full Screen mode, you must define how the document
opens.
1. Choose FILE > Properties.
2. In the Document Properties dialog box, select Initial View.
3. For best results, do the following:
Choose Page Only from the Navigation tab menu.
Choose Single Page from the Page layout menu.
Set Open to page to the page on which you want to start the presentation.
4. Select Open in Full Screen mode to open the document without the menu bar or toolbar
displayed. Click OK. (You have to save and reopen the file to see the effects.)
Note: Users can exit Full Screen mode by pressing Esc if their preferences are set this way.
However, in Full Screen mode, users cannot apply commands and select tools unless they know
the keyboard shortcuts. You may set up page actions in the document to provide this
functionality.
Security
This tab describes security permissions and what functionality is allowed within a PDF. All the
security information is listed here if a password has been applied to the PDF.
See also “Checking PDF Security”
Fonts
The Fonts tab lists the fonts and the font types used in the original document, as well as the
encoding used to display the original fonts.
GPO
Group Policy (GPO), a feature of the Microsoft Windows NT family of operating systems, is a set
of rules that control the working environment of user and computer accounts. It offers the
centralized management and configuration of operating systems, applications, and users' settings
in an Active Directory environment.
For instructions to use group policy of Foxit PhantomPDF, please refer to Foxit PhantomPDF GPO
Manual.
50
Page 52

Foxit PhantomPDF Standard
User Manual
Chapter 4 – Create
Up to 3 times faster than other PDF tools, Foxit PhantomPDF makes creating PDF and PDF/A
documents simple and streamlined. With a click you can quickly convert virtually any kind of file
to PDF without having to open the source application.
Create a PDF in Different Ways
With Foxit PhantomPDF, you can easily create PDFs from files in other formats.
One-click PDF Creation from Any File
Foxit PhantomPDF can create any kind of printable files to PDF simply by dragging the file into
the program window; alternatively, you can use Foxit PhantomPDF to quickly convert files to PDF
directly from within Windows® Explorer.
To create a PDF with one click:
Drag the document you want to convert on to the Foxit PhantomPDF desktop icon .
If the Foxit PhantomPDF is open, drag the file directly into the application window.
Right click the document icon you want to convert and choose Convert to PDF in
PhantomPDF.
Create PDFs in the Foxit PhantomPDF Application Window
Create a PDF from a File
You can create a PDF from Office, email, a web site, or from any file that prints.
1. Launch Foxit PhantomPDF, choose FILE > Create > From File, or choose CONVERT > Create >
From Files > From File.
2. In the Open dialog box, select a file. You can browse all file types when you select All
Supported Files (*.xls, *.xlt, …) from the File type menu.
3. Select a file you want to convert and click Open to convert the file to a PDF.
4. Type a filename and specify a location in the pop-up Save dialog box.
Note: Depending on the type of file being converted, a progress dialog box appears and Foxit
51
Page 53

Foxit PhantomPDF Standard
User Manual
PhantomPDF opens automatically.
Create a PDF from multiple files
You can easily merge files of different types into a single PDF.
1. Choose FILE > Create > From Multiple Files, or choose CONVERT > Create > From Files >
From Multiple Files, or right-click a file you want to convert to PDF and choose Combine files
in Foxit PhantomPDF….
2. In the Convert Multiple Files dialog box, click Add Files… to select the files you want to
combine.
3. Adjust the order of files as desired by using Move Up/Down, click the title of the table or
drag and drop to change the file order.
4. Choose a type of converted PDF file and click Convert:
Convert multiple files to PDF files – All the files will be converted to different PDF files.
Merge multiple files into a single PDF file – All the files will be converted to a single PDF file
Tip: Foxit PhantomPDF uses original filename as a bookmark as default when combining multiple
files into a single PDF.
Create a PDF from a blank page
You can create a PDF from a blank page rather than beginning with a file, a clipboard image, or
scanning.
1. Choose FILE > Create >Blank, or choose CONVERT > Create > Blank.
2. Choose EDIT > Edit Content > Add Text tool or COMMENT > Typewriter > Typewriter.
3. Click on the blank page to start typing the text you want to add to the blank page.
4. As needed, select other tools and options that you want to apply to the PDF.
5. Choose FILE > Save, and select a name and location for the PDF file.
Create a PDF from Clipboard
You can create a PDF directly from your clipboard.
1. Choose FILE > Create > From Clipboard, or choose CONVERT > Create > From Clipboard.
2. The texts or images in the clipboard will be converted to a new PDF file.
Create a PDF in Other Applications
Foxit PhantomPDF enables you to create professional and secure PDF files from other
applications such as Microsoft Office (Word, Excel, PowerPoint and Outlook), automatically
keeping bookmarks, links, hyperlinks, outline and more of the source files in the created PDF.
52
Page 54

Foxit PhantomPDF Standard
User Manual
Microsoft Office (Word, Excel, PowerPoint and Outlook)
In Microsoft Office 2007/2010/2013, Foxit PhantomPDF appears as a tab, allowing you to quickly
create PDF files and change your conversion settings with just a few clicks.
Microsoft Word, Excel and PowerPoint
Microsoft Word 2010 Foxit PDF Tab
To create a PDF in Microsoft Word, Excel and PowerPoint, please do as below:
Open a file in Microsoft Word, Excel or PowerPoint, click Foxit PDF tab and do one of the
following:
To create a PDF using the current settings, click Create PDF button. Then enter the file
name, specify the location and click Save.
To create and email a PDF using the current settings, click Create PDF and Email button.
Then enter the file name, specify the location and click Save. The created PDF file will be
attached to your mail system automatically for you to send out.
To customize your PDF conversion settings before creating PDF, check the desired options in
the General Settings group.
View PDF Results – Once the conversion is finished, the converted PDF will be opened with
PhantomPDF automatically. This option is checked by default.
Prompt for File Name – Before conversion, the PDF file will prompt you with a dialog box to
name the file being created. This option is checked by default.
Preserve Document Properties – Keeps the document properties of the source file in the
converted PDF during the conversion. This option is checked by default.
For more settings, click the Advanced button and the Foxit PhantomPDF Add-in dialog
box pops up.
For the Settings tab:
53
Page 55

Foxit PhantomPDF Standard
User Manual
Support PDF/A-1b Standard – Creates a PDF that is compliant with the PDF/A-1b
standard.
Create Bookmarks – Keeps the bookmarks of the source file in the converted PDF.
(Word Only) This option is checked by default.
For more information on the Watermarks, Headers/Footers, and Security tabs, please see
Setting Foxit PhantomPDF Printer Properties.
Microsoft Outlook
Foxit PhantomPDF helps you quickly to create a PDF file or PDF portfolio from the selected email
message(s) or folder(s).
Microsoft Outlook 2010 Foxit PDF Tab
To create a new PDF or PDF portfolio from the selected message(s), please select the
message(s) you want to convert and click Selected Message > Create New PDF…, or
right-click the selected message(s) and choose Convert to Foxit PDF. Then specify the name
and the location of the created PDF or PDF portfolio to begin the conversion.
Note:
1) To create a new PDF portfolio, the Output PDF Portfolio option should be checked in
General Settings group. Each message will be converted to a single PDF.
2) If the Output PDF Portfolio option is not checked, the selected message(s) will be
merged into one continuous PDF according to the time of each message was sent or
received, i.e. the latest message is on the first page.
3) The default name of the created PDF or PDF portfolio will be the title of the selected
message or the folder name of the selected messages.
To create a new PDF or PDF portfolio from the selected folder(s), please click Selected
Folder > Create New PDF…, or right-click a folder and choose Convert to Foxit PDF. Select
folders you want to convert in the pop-up Convert folder(s) to PDF dialog box. Then specify
the name and the location of the created PDF or PDF portfolio to begin the conversion.
54
Page 56

Foxit PhantomPDF Standard
User Manual
Note:
1) To create a new PDF portfolio, the Output PDF Portfolio option should be checked in
General Settings group. Each message will be converted to a single PDF and then the
created PDF will be put into corresponding folders in the portfolio.
2) If the Output PDF Portfolio option is not checked, all messages in the selected folders
will be merged into one continuous PDF. If you create a PDF file from one folder, the
latest email message will be arranged on the first pages of the created PDF file. If you
create from multiple folders, the order is based on the order how each folder is
displayed on the Convert folder(s) to PDF dialog box first and then the time each
message was sent or received.
To append to an existing PDF or PDF portfolio from the selected message(s), please select
the message(s) you want to convert and click Selected Message > Append to Existing PDF…,
or right-click the selected message(s) and choose Append to Foxit PDF. Select the existing
PDF or PDF portfolio you want to append to and click Open. The selected message(s) will be
appended to the end of the existing PDF. If the existing PDF is a PDF portfolio, the selected
messages will be created to single PDF files and then put into corresponding folders in the
existing PDF portfolio.
To append to an existing PDF or PDF portfolio from the selected folder(s), please click
Selected Folder > Append to Existing PDF…, or right-click a folder and choose Append to
Foxit PDF. Select folders you want to convert in the pop-up Convert folder(s) to PDF dialog
box. Select the existing PDF or PDF portfolio you want to append to and click Open. All
messages of the selected folder(s) will be appended to the end of the existing PDF. If the
existing PDF is a PDF portfolio, each message of the selected folders will be created to single
PDF files and then put into corresponding folders in the existing PDF portfolio.
55
Page 57

Foxit PhantomPDF Standard
User Manual
To customize your PDF conversion settings before creating PDF, check desired options in
General Settings group.
View PDF Result – Once the conversion finishes, the converted PDF will be opened with
PhantomPDF automatically.
Output PDF Portfolio – Creates a new PDF portfolio from the selected email message(s)
or folder(s) and keeps the folder information of the selected folders in the created PDF
portfolio (i.e., the location path information of the folder in your email system). If you don’t
want to keep the folder information during conversion, please click the Advanced button
and uncheck Convert folder information option in the Settings tab. For instructions on how
to modify a PDF portfolio, please refer to Customize PDF Portfolios.
Include Attachment – Keeps the attachments of the selected email messages or folders
as the created PDF’s attachments, with the file types of the attachments unchanged.
Support PDF/A-1b Standard – Creates a PDF that is compliant with PDF/A-1b standard.
For more settings, click Advanced button and a Foxit PhantomPDF Add-in dialog box
pops up. You can add headers/footers, watermarks, security, etc. See also Setting Foxit
PhantomPDF Printer Properties.
Foxit PhantomPDF supports automatic email archiving based on your settings. Click Automatic
Archival button and check Enable Automatic Archival option in the pop-up Automatic
Archival dialog box to do archival settings:
56
Page 58

Foxit PhantomPDF Standard
User Manual
Specify the frequency and the time of the day to do the automatic archiving.
(Optional) Enable “Maintain Log of Archival” to create a record for each archiving. Click
Choose File … to name the log file and specify its storage location.
In Choose Folders for Automatic Archival box, click Add to select email folders you
need to archive and specify the name and location of the archived email PDF. You can also
click Delete to remove folders from the list or click Change Archive File… to modify the
name and location of the archived email PDF.
(Optional) You can start archiving email right after you choose the folders for automatic
archival by clicking Run Archival Now button in the top right corner of the Automatic
Archival dialog box.
Click OK to complete setting.
Note: All archived email PDFs are PDF portfolios.
Windows Notepad
1. Open a .txt file.
2. Select File > Print from main menu.
Internet Explorer
1. Run your Windows web browser, open a website or stay on a web page.
2. Select File > Print from main menu.
3. Select Foxit PhantomPDF Printer from the Pinter list;
57
Page 59

Foxit PhantomPDF Standard
User Manual
4. If you need to deploy printing settings, click the Preferences button on the right (Refer to
Setting Foxit PhantomPDF Printer Properties).
5. Click OK;
6. A dialog box will pop up for you to specify the folder and file name of the PDF document to
be generated, after done, click Save button.
Outlook Express
1. Run your Email client software and open an e-mail by clicking its title.
2. Select File> Print from main menu.
3. Select Foxit PhantomPDF Printer from the Printer list.
4. If you need to deploy printing settings, click the Preferences button on the right (Refer to
Setting Foxit PhantomPDF Printer Properties).
5. Click OK.
6. A dialog box will pop up for you to specify the folder and file name of the PDF document to
be generated, after done, click the Save button.
Create a PDF using the Print command
Foxit PhantomPDF Printer works like a standard printer, so you can use it to print your files from
any windows applications as if you would print to a real printer.
1. Open the file in its authoring application.
2. Choose FILE > Print.
3. Select the printer named Foxit PhantomPDF Printer, and click the Print button. Specify the
name and the storage location in the pop-up dialog box and click Save to start printing. After the
printing is finished, the generated PDF file will be opened directly.
4. You can click FILE > Save to save the PDF file. Specify the name of the PDF file and where to
store. Click Save.
5. Or you can just close the generated PDF and click No in the pop-up message to prompt you
whether to save the PDF file.
Foxit PhantomPDF supports to append newly generated PDF files to a previously generated one
which are created by Print command in other application using Foxit PhantomPDF Printer. More
details please refer to the steps below.
1. Do some settings to Foxit PhantomPDF. Run and open the application window. Click FILE >
Preferences > Documents > uncheck Allow Multiple Instances, if it is checked. And click FILE >
Preferences > Create PDF > check Insert printed PDF into previous generated one, exclude the
58
Page 60

Foxit PhantomPDF Standard
User Manual
PDF files created from PhantomPDF application.
2. Open the file you want to convert to PDF and use the Print command to generate a new PDF.
The generated PDF file will be opened automatically with PhantomPDF. A Print Job pane appears
in navigation pane and the name of the file will be displayed on the pane. Do not close and save
the PDF file.
3. Open another file you want to append to the PDF file generated on Step 2. Convert the file
with Print command to PDF.
4. You will see that the name of the file in Step 3 is also added to the Print Job pane. That is to
say, the generated PDF file on Step 3 is appended to the generated PDF file on Step 2.
59
Page 61

Foxit PhantomPDF Standard
User Manual
5. Click FILE > Save. In the pop-up Save As dialog box, specify the name and location and click
Save.
Create a PDF using Print to Evernote
Foxit PhantomPDF adds a new printer “Print to Evernote” after installation. This feature enables
the user to send the PDF file as an attachment to Evernote, as well as the option to create a PDF
the same as Foxit’s PDF printer does.
To create a PDF using Print to Evernote, see below:
1. Install the Evernote application and sign in to an Evernote account.
2. Open the file you want to convert to PDF, and choose File > Print > Print to Evernote.
3. Set the print properties and then click Print. Name the PDF file and specify the storage
location.
4. You will see that the PDF file is created and also attached in Evernote.
Create a PDF using Scanner
Foxit PhantomPDF allows you to create a PDF directly from a paper document using your scanner.
You can scan a document to PDF directly with custom settings or by using preset preferences
that you configured before.
60
Page 62
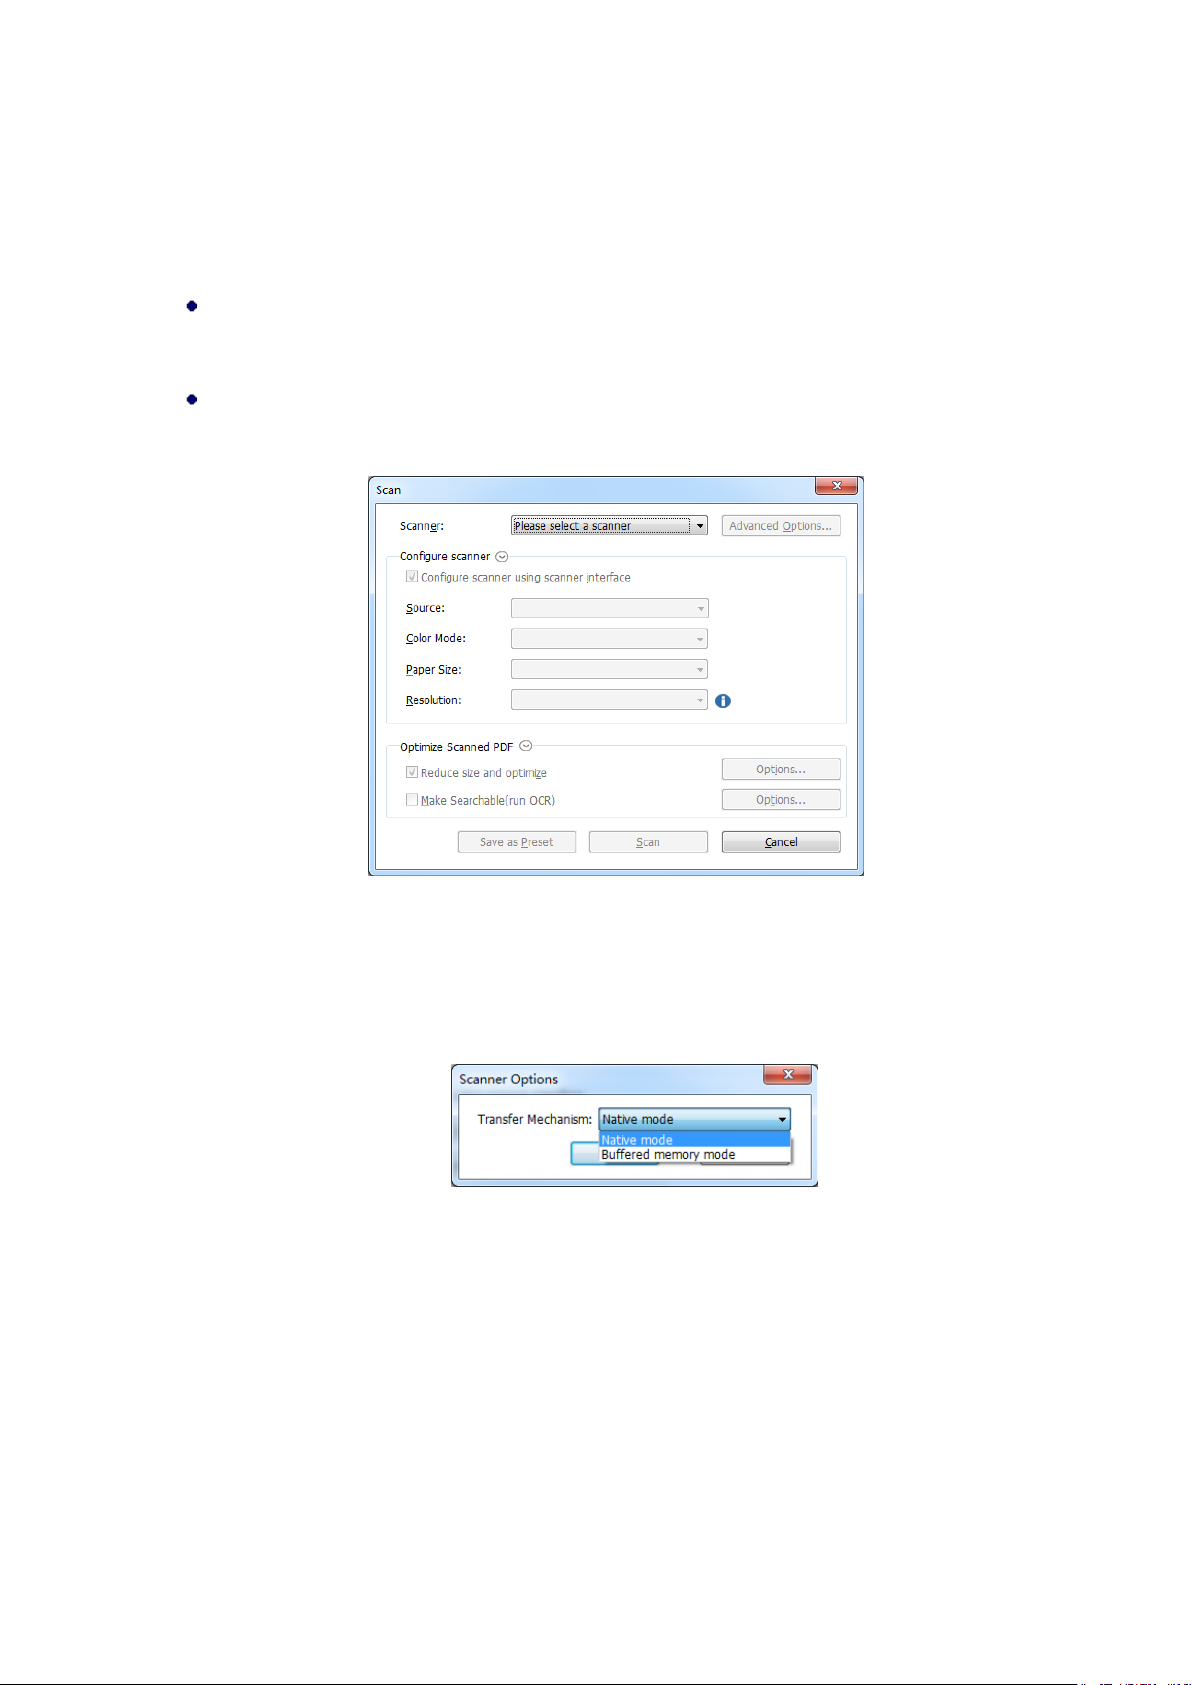
Foxit PhantomPDF Standard
User Manual
Scan with custom settings
To scan a document to PDF with custom settings, please follow as below:
Choose FILE > Create > From Scanner > the From Scanner… button, or choose CONVERT >
Create > From Scanner, or choose HOME tab > Convert group > Scan button > Scan
command.
Select a scanner and related options in Scan dialog box.
Note: You must have the manufacturer’s scanning software installed on your computer.
Scan dialog box
Advanced Options (Windows only): clicks to open the Scanner Options dialog box.
(Available only after you select a scanner.)
Transfer Mechanism: Native mode transfers data by default in your scanner. Buffered
memory mode scans in resolutions of over 600DPI.
Configure scanner:
Configure scanner using scanner interface: Checks this option and directly use the
scanner interface to scan. Then the following items (i.e. Source, Color Mode, Paper Size
and Resolution) will not be available and the settings in the scanner interface will not be
able to saved as a preset.
Source: Chooses one paper source supported by your scanner.
Color Mode (Windows only): selects a basic color mode (Black and White, Grayscale,
Color or Auto Detect) supported by your scanner.
Paper Size (Windows only): selects a paper size.
Resolution (Windows only): selects a resolution supported by your scanner.
61
Page 63

Foxit PhantomPDF Standard
User Manual
Optimize Scanned PDF:
Reduce size and optimize: checks this item and clicks Options to customize compression
and filtering. The Optimization Options dialog box for image settings controls how
scanned images are compressed for the PDF. Default settings are suitable for a wide
range of document pages, but you may want to customize settings for higher quality
images and smaller file sizes.
Color/Gray settings: when scanning color or gray pages, select JPEG,
JPEG2000(Lossless) or JPEG2000(Lossy) to apply JPEG compression to the entire
gray or RGB input page.
Low/High Quality: drags the slider to set the balance point between file size and
quality.
Monochrome: when scanning black-and-white or monotone images, select one of
the following:
JBIG 2(Lossless)/ JBIG2(Lossy): apply an image compression standard for
bi-level images which is suitable for lossless or lossy compression.
CCITT Group 4: applies CCITT Group 4 compression to black-and-white input
page images.
Deskew: chooses On to automatically rotate any page so that the text is vertically
aligned, which is of great use for cleaning up scanned PDFs.
Make Searchable(run OCR): checks this item and clicks Options to run OCR in scanned
PDFs. See also “Recognize Text”.
Save as Preset: saves the current scanning settings as a preset with which you can quickly
start a scan next time. In the pop-up Save Preset dialog box, rename the preset as needed
and click Save.
Click Scan.
After completing scanning, the scanned PDF will appear with a new tab named “POST-SCAN
OPTIONS” and two messages in the message bar.
62
Page 64

Foxit PhantomPDF Standard
User Manual
POST-SCAN OPTIONS tab:
Optimize Scanned PDF: optimizes the scanned PDF for a smaller size and better display
effect. See also “Custom Scan”.
OCR Current File: runs OCR in the current scanned PDF after saving the document. See
also “Recognize Text”.
Edit Document Information: modifies the scanned document information including
Author, Title and File name.
Close button: clicks this button to close the POST-SCAN OPTIONS tab.
In the Message Bar:
You can click Continue Scan to continue scanning more pages or click Recognize Text (Make
searchable/editable) to run OCR in the current scanned PDF after saving the document (See
also “Recognize Text”).
Choose FILE > Save, and specify a name and location for the scanned PDF file.
Scan with a Configured Preset (Windows)
You can configure scan parameters or options and save three sets of scan preset. When you are
ready to scan you can choose one of them with just one click. To scan a paper document to PDF
using a configured preset, please choose HOME tab > Convert group > Scan button > select a
63
Page 65

Foxit PhantomPDF Standard
User Manual
preset to scan documents. See also “Custom Scan”.
Configure presets
To configure a new preset, please do as the following:
Click HOME tab > Convert group > Scan button > select a custom preset. The Configure Scan
Presets dialog box pops up.
Specify the name of the preset, select a scanner and then complete the settings (See also
“Custom Scan”).
Click Save. Or click Save and Scan to save the preset and then start a scan with the preset.
Note: To modify or delete a configured preset, please re-configure the settings in Scan dialog box
to overwrite it.
Optimize Scanned PDF
Foxit PhantomPDF supports the size optimization of scanned PDFs during PDF creation from a
scanner or by choosing FILE > Optimize Scanned PDF in an existing scanned or image-based PDF.
See also “POST-SCAN OPTIONS tab”.
Create and Customize a PDF Portfolio
You can use Foxit PhantomPDF to quickly create a blank PDF portfolio or a new PDF portfolio
from any file. After creation, you can also add more files/folders, create folders, delete
files/folders and more within the PDF portfolio.
64
Page 66

Foxit PhantomPDF Standard
User Manual
To create a blank PDF portfolio, please click CONVERT > Create > PDF Portfolio > Create a blank
PDF portfolio, or click FILE > Create > PDF Portfolio > Create a blank PDF Portfolio. In the ribbon
appears the PORTFOLIO tab with buttons to add files/folders and create folders.
To create a new PDF portfolio from a file, please click CONVERT > Create > PDF Portfolio > Create
a new PDF portfolio, or click FILE > Create > PDF Portfolio > Create a new PDF Portfolio from
existing files. Select the files you want to attach to a PDF portfolio and click Open. You can also
add more files or folders after creation.
Tip: To quickly add files/folders, you can also copy-and-paste or drag-and-drop files/folders to the
portfolio.
To customize a PDF portfolio, you can edit PDF files in the portfolio using PhantomPDF’s tools as
needed and do any of the following:
To delete a file, select it and click button in the upper right corner of the document
area, or right-click it and choose Delete.
To extract a file from the portfolio, select it and click button in the upper right corner of
the document area, or right-click the file and choose Extract from Portfolio…. Then specify
the name and location of the extracted file.
Tip: You can do more actions by right-clicking a file in the portfolio.
65
Page 67

Foxit PhantomPDF Standard
User Manual
Create a table of contents from bookmarks
You may want to conveniently create a table of contents from existing bookmarks for a hierarchy
structure when viewing a PDF file. Foxit PhantomPDF offers two ways to create a table of
contents. The new table of contents page will be inserted as the first page of the PDF.
To create a table of contents when merging multiple files into a single PDF file, please select
“Add a new table of contents page converted from bookmarks” in the Convert Multiple Files
dialogue box. The table of contents page will be created from the filenames of the selected
files.
To create a table of contents in a current PDF, please click the button on the
bookmark panel. The table of contents page will be created from the bookmarks of the
current PDF.
66
Page 68

Foxit PhantomPDF Standard
User Manual
Chapter 5 – Edit
Foxit PhantomPDF provides not only general editing features to create bookmarks, add links,
attach files, add images, play and insert multimedia files on PDF files, but also advanced editing
features to select, insert, modify, remove and rotate texts, images, graphics and shadings. You
can go to the EDIT tab directly to use different editing features to easily and efficiently change
contents in any existing PDF files.
Right-click any PDF file and choose Edit with Foxit PhantomPDF, then the PDF will be opened
with the toolbar automatically navigating to the EDIT tab, ready for your editing.
Undo and Redo
When making quick adjustments to your document, you may want to undo or redo the most
recent action performed. You can undo and redo up to 10,000 actions in Foxit PhantomPDF.
Undo your last action
Click Undo on the Quick Access toolbar of Foxit PhantomPDF window.
Press Ctrl + Z.
Note: Some actions can’t be undone, such as clicking any command on the File menu. If you can’t
undo an action, the Undo command will be grayed out .
Redo actions
Click Redo on the Quick Access toolbar of the Foxit PhantomPDF window.
Press Shift + Ctrl + Z.
Header & Footer, Watermark & Background to PDFs
Add Header/Footer, Watermark/Background to PDFs with Text, image and PDF, making your PDFs
more professional and easy to view, navigate watermark and place marks on documents.
Header & Footer
To add a new header & footer, please do the following:
1. Choose ORGANIZE > Page Marks > Header &Footer > Add.
67
Page 69

Foxit PhantomPDF Standard
User Manual
2. Edit the text of header & footer in the “Add Headers and Footers” dialogue box.
Add Headers and Footers Dialog Box
3. (Optional) Click Save Settings at the top of the dialog box to save the current settings as a
profile that can be applied directly to future documents.
4. Click OK to activate the operation.
To update the header & footer, please do the following:
1. Choose ORGANIZE > Page Marks > Header &Footer > Update.
2. Update the content in the “Update Headers and Footers” dialogue box.
3. Click OK to activate it.
To remove the header & footer, please do the following:
1. Choose ORGANIZE > Page Marks > Header &Footer > Remove.
2. Click “Yes” in the pop-up message box.
Background
To add a new background, please do the following:
1. Choose ORGANIZE > Page Marks > Background > Add.
2. Edit the background in the “A dd Background” dialogue box.
Choose one color as the background, or add the file from your computer via clicking
the browse button. If the file has many pages, you can select one of them.
Set the appearance by choosing the rotation degree, the opacity. You also can choose
to make the scale relative to the target page or not. Click “Appearance Options” to set
68
Page 70

Foxit PhantomPDF Standard
User Manual
when to display the background.
Set the vertical and horizontal distance between the target page and the background.
Choose the page range to play the background. You can select all pages or specify the
page range, or choose even pages or odd pages via clicking the right items in the
subset list.
Check or uncheck the Show Preview option to preview the changes or not.
3. (Optional) Click Save Settings at the top of the dialog box to save the current settings as a
profile that can be applied directly to future documents.
4. Click OK to activate it.
To update the background, please do the following:
1. Choose ORGANIZE > Page Marks > Background > Update.
2. Update the content in the “Update Background” dialogue box.
3. Click OK to activate it.
To remove the background, please do the following:
1. Choose ORGANIZE > Page Marks > Background > Remove.
2. Click “Yes” in the pop-up message box.
Watermark
69
Page 71

Foxit PhantomPDF Standard
User Manual
To add a new watermark, please do the following:
1. Choose ORGANIZE > Page Marks > Watermark > Add.
2. Edit the watermark in the “Add Watermark” dialogue box.
Input the text as the background and choose the font, size and the color, or add the file
from your computer via clicking the browser button. If the file has many pages, you can
select one of them.
Set the appearance by choosing the rotation degree and the opacity. You can also
choose to make the scale relative to target page or not. Click “Appearance Options” to
set when to display the watermark.
If you choose the “appear behind page”, the page content will obstruct your view
of some part of the watermark.
If you choose the “appear on the top of page”, the watermark will cover some
content, but you can adjust it via setting the opacity of the watermark.
Set the vertical and horizontal distance between the target page and the watermark.
Choose the page range to play the watermark. You can select all pages or specify the
page range, or choose even pages or odd pages via clicking the right items in the
subset list.
Check or uncheck the Show Preview option to preview the changes or not.
70
Page 72

Foxit PhantomPDF Standard
User Manual
3. Click Save Settings at the top of the dialog box to save your current settings as a profile that
can be applied to other documents directly next time.
4. Click OK to activate it.
To update the watermark, please do the following:
1. Choose ORGANIZE > Page Marks > Watermark > Update.
2. Update the content in the “Update Watermark” dialogue box.
3. Click OK to activate it.
To remove the watermark, please do the following:
1. Choose ORGANIZE > Page Marks > Watermark > Remove.
2. Click “Yes” in the pop-up message box.
Adding Format Page Numbers
If your PDF file contains front matter likes document cover and copyright page, the page numbers
on the document pages (i.e. printed page number) may not start from the document cover but
from the body pages. You may need to synchronize the page numbers displayed below the page
thumbnails (i.e. format page number) with printed page numbers. Foxit PhantomPDF enables
users to add format page numbers to meet different needs.
To add custom format page number, please do as below:
1. Click ORGANIZE > Page Marks > Format Page Numbers . Or right-click a page
thumbnail and select Format Page Numbers….
2. In the Page Numbers dialog box, specify a range of pages you want to number and set the
style of page number and the number you want to start at. You can also add a prefix to the
number, like adding a letter “P” before the number. You can preview the result viewing the
Sample at the bottom of the dialog box.
3. If you need to continue the numbering sequence from previous pages without interruption,
please check Extend numbering used in preceding section to selected pages.
4. Click OK to finish.
71
Page 73

Links
Foxit PhantomPDF Standard
User Manual
Page Numbers dialog box
This function helps you to lead the readers to related articles, references, or the intended web
page.
Generally speaking, there are three options of links for you: rectangle link tool , Web
Links and Bookmark in Foxit PhantomPDF.
Rectangle Link
Add a rectangle link
Rectangle Link tool enables you to add a link with the shape of rectangle on the PDFs.
To add a rectangle link, please do the following:
Choose EDIT > Links > Link .
Position the cursor on the place you want to add the link, hold and drag your mouse button
to draw a rectangle.
Tip: To draw a square link, press Shift key when you hold and drag your mouse button.
Pops up Create Link dialog box. Specify the appearance and destination of the link.
Appearance
72
Page 74

Foxit PhantomPDF Standard
User Manual
A. Thickness – the thickness of the four sides of the rectangle. The higher of the value, the
thicker of the sides. You can choose the thickness from 0-12, while the default is 1.
B. Border Style – the style of the rectangle’s border. There are three types of the border
styles:
Solid: the border is solid, but not hollowed out.
Dashed: the border is drawn as a dashed line.
Underline: the sides are visible except the underline.
Solid Style Dashed Style Underline Style
Three types of border style
C. Highlight - the effect when you click the rectangle link. There are four types of the
highlighting effects:
None: doesn’t change the appearance of the link.
Invert: changes the link’s color to its opposite.
Outline: changes the link’s outline color to its opposite.
Inset: creates the appearance of an embossed rectangle.
None Invert Outline Inset
Four types of highlight
D. Color - the border color of the rectangle. Click the color button to choose any colors you
like, or you may choose Other Color to add a customized color. The default color is red.
73
Page 75

Foxit PhantomPDF Standard
User Manual
Choose the color
Destination
The destination refers to any point or location, for example, a web page, a named file or
position the link goes to. There are four options for you to choose:
A. Go to a page view – designate the link to a specific page view. Not only can you designate
the link to a page in the current PDF, but you can also set the link to the page in another
PDF. Also, you may change the current zoom setting and then set the position.
To go to a page view, choose this option, click the Next button and do one of the following:
Set the position in current document – scroll the current document, go to a new
position where you want to set and click Set this position.
Set the position in another PDF document – click the Open button on the Quick
Access toolbar of the application window > select the PDF you want to set position to >
scroll this document and go to a position where you want to set > click Set this
position.
Note: The new PDF document should be opened in the existing window but not a new
window.
Change the view magnification -- scroll in the current document or another document >
go to a new position where you want to set > change the magnification of the position >
click Set this position.
Click Cancel to cancel out of your operation.
B. Go to a named position – designate the link to a named position that has been set by the
creator of the current document.
To go to a named position, choose this option and click the Next button > select a named
position for the pop-up list > click OK.
Note: An empty pop-up list indicates that no position has been named by the document’s
creator.
74
Page 76

Foxit PhantomPDF Standard
User Manual
C. Open/execute a file – designate the link to open another file. To do this, please follow the
steps below:
Choose Open/execute a file > click the Next button > select the destination file and
click Select.
D. Open a web page – designate the link to open a web page. Do the following:
Choose Open a web page > click the Next button > enter the URL of the destination
web page or click the drop-down button to select a web site you have opened before.
E. Others (use action property page) – add an action to the link. Please refer to “Actions tab
for the button properties” for more details.
Move or resize a link
You can move and resize the link after you create it.
Select one of the link tools or the Annotation Selection Tool , and then move the
cursor over the link until the cursor turns into an arrow .
Then do one of the following:
A. To move the link, drag it to the desired area.
B. To resize the link, drag any corner point to adjust.
Delete a link
Select one of the link tools or the Annotation Selection Tool , and then move the
cursor over the link until the cursor turns into an arrow .
Select the link you want to delete.
Press the Delete key.
Web Links
Foxit PhantomPDF allows users to check URLs in the PDF document automatically and add link
annotations directly to the related URLs.
Create web links from URLs
To create web links, please do as following:
75
Page 77

Foxit PhantomPDF Standard
User Manual
1. Click EDIT > Links > Create links from URLs . A message box will pop up to prompt you
whether to proceed because the operation cannot be undone. Click Yes to continue.
2. In the pop-up Create web links dialog box, choose All to create links from all URL in the
document, or choose From …To and enter a page range to create links on selected pages. Click
OK.
3. A message box will pop up to prompt you how many web links were added to the document.
To remove all web links, choose EDIT > Links > Remove all links .
Bookmark
Please refer to “Add a bookmark”.
File Attachments
You can attach PDF files and other types of files to a PDF. There are two options for you to add an
attachment: attaching a file as a comment and attaching a file to the entire PDF. An attached file
as a comment will appear in the page with the File Attachment icon by default, while the
attached file to the PDF file acts invisible and only can be seen when you click the Attachment
panel in the navigation pane.
Add a file as a comment
1. Choose COMMENT > Pin > File.
2. Position the cursor to the place where you want to attach a file as a comment > click the
selected position.
3. In the Open dialog box, select the file you want to attach, and click Open.
4. The File Attachment Icon appears at the place you designated in the PDF file.
Work on the attachment comment
You can open the attachment, add a description, move and delete it, and set the preferences.
Open an attachment
Select the Hand Tool or Annotation Selection Tool and do the following:
76
Page 78

Foxit PhantomPDF Standard
User Manual
1. Double-click the File Attachment icon .
2. In Open file attachment dialog box, select one of the three options and click OK.
Open file attachment dialog box
A. Open the file attachment – open this file attachment and the dialog box will always pop
up when you double-click the File Attachment icon.
B. Always open file attachments of this type – open this file attachment and the files of
this type will be opened automatically when you double-click the File Attachment Icon
next time.
C. Never open file attachments of this type – forbid to open the file attachments of this
type. Whenever you double-click the File Attachment Icon, the files of this type will be
forbidden to open and you’ll be prompted that “File attachment of this type cannot be
opened because of your security settings”.
See also “Doing security settings”.
Note: If you are in Safe Reading Mode, you cannot choose the way to open the attached file.
Please go to FILE > Preferences > Trust Manager to uncheck the Enable Safe Reading Mode
option.
Move a file attachment icon
Select the Hand Tool or Annotation Selection Tool , click and drag the File Attachment
Icon to move it to other place.
Delete an attachment comment
Select the Hand Tool or Annotation Selection Tool , and do one of the following:
Right-click the File Attachment icon and choose Delete.
Click the File Attachment icon and press Delete key.
77
Page 79

Foxit PhantomPDF Standard
User Manual
More options with an attachment comment
You are able to work on the attachment comment just like an ordinary comment, including set
status, mark with checkmark, open popup note and add some descriptions, reply to the
comment, and change the icon’s appearance. For all the operations, please refer to “Chapter 7 –
Comment”.
Add a file to the entire PDF as an attachment
1. Click the attachment button on the navigation pane and click Add button , or choose
EDIT > Insert > File Attachment .
2. In the FILE Attachment dialog box, click the Add Files… button.
3. Select the file you want to attach in the pop-up dialog box, and click Open.
4. Click OK after adding the desired files.
5. The added document will be displayed in the attachment panel.
Tip: An easy method to add a file attachment to PDFs, you can just drag and drop the file you
want to attach to the attachment panel. Foxit PhantomPDF will pop up a window to ask you
whether to attach the selected file to current PDF document. Click OK to complete the operation.
Check “Always attach file when dragging files to the attachment panel” option and the next time
the file will be attached directly without this pop-up window.
Work on the attachments
You can open, save, edit descriptions, delete and do settings to the attachments. Click the
attachment button on the navigation pane > Open button /Save button /Add button
/Edit Description button /Settings /Delete button .
Security settings
Attachments Panel
78
Page 80

Foxit PhantomPDF Standard
User Manual
To change the security settings you have set when you open the attachment file as a comment,
Click the Settings button in the Attachment Panel and do one of the following:
To add a new extension, click the Add button to input the file extension in the Security
Settings dialog box.
To delete an extension, click one of the existing extensions and click the Delete button.
To change the settings of how to open the attachments of the type, choose one of the three
options listed.
Bookmarks
Bookmarks are navigational tools that make your PDF files easier to read. They are usually
generated automatically during the PDF creation.
Bookmarks are useful for users to mark a place in a PDF file so users can return to it with ease. Or
you may like to have your own bookmark structure and new bookmark names. With Foxit
PhantomPDF, you can easily nest, edit, or delete bookmarks in a PDF file if the security settings
allow.
Add a bookmark
1. Go to the page where you want the bookmark to link to.
2. (Optional) If there is no bookmark in the document, click EDIT > Links > Bookmark , or click
the New Bookmark icon at the top of the Bookmarks panel.
3. Select the bookmark after which you want to place the new bookmark. If you don’t select a
bookmark, the new bookmark is automatically added at the end of the bookmark list. Click
79
Page 81

Foxit PhantomPDF Standard
User Manual
EDIT > Links > Bookmark, or click the New Bookmark icon at the top of the Bookmarks
panel, or right-click the selected bookmark and choose Add Bookmark.
4. Type or edit the name of the new bookmark, and press Enter.
Move a bookmark
Select the bookmark (named “Bookmark A”) you want to move, and then do one of the
following:
Hold the mouse button down and then drag “Bookmark A” icon directly to the desired
place. The Line icon shows the place where the icon will be located.
Right-click “Bookmark A” icon and choose the Cut option > right-click the
bookmark(named “Bookmark B”) under which you want to place “Bookmark A”, choose
“Paste after Selected Bookmark” if you want to put “Bookmark A” after “Bookmark B”,
which will be in the same hierarchy with “Bookmark A”; or choose “Paste under Selected
Bookmark” if you want to put “Bookmark A” under the “Bookmark B”, which will be the
parent bookmark.
Note: The bookmark links to its original destination in the document although it is moved.
Organize a bookmark hierarchy
A bookmark hierarchy is an outline or stratified structure that places some bookmarks within
others. In Foxit PhantomPDF, multilevel bookmark hierarchy can be defined by properly dragging
the bookmark icon in the Bookmark panel.
To nest a bookmark or move a bookmark out of nested position, please refer to Move a
bookmark.
80
Page 82

Foxit PhantomPDF Standard
User Manual
To expand or collapse a bookmark
Click the plus sign (+) next to the bookmark icon to show any children. Click the minus sign (-) to
collapse the list. Or click to collapse all bookmarks.
Edit a bookmark
In Foxit PhantomPDF, you are able to rename a bookmark, reset a bookmark’s destination, or
customize the text appearance of a bookmark with ease if the security settings allow.
To rename a bookmark
Right-click the bookmark you want to rename in the Bookmarks panel > Rename> type the new
bookmark name. Or you double click the bookmark you want to rename and then type the new
name.
To reset a bookmark’s destination
In the document pane, move to the location you want to specify as the new destination.
(Optional) Adjust the view magnification.
Right-click the bookmark, choose Set Destination and select Yes.
To customize the text appearance of a bookmark
In the Bookmarks panel, right-click the bookmark > choose Properties.
In the Bookmark Properties dialog box, click the Appearance tab, and select the font style
and color for the text.
Note: After defining a bookmark’s appearance, you can set it as bookmarks’ default property by
right-clicking the bookmark and then selecting the option of Use Current Appearance as New
Default.
To add an action to a bookmark
Right-click a bookmark, and choose Properties.
In the Bookmark Properties dialog box, click Actions.
Choose an action from the Select Action menu and click Add, and then refer to the section
of “Actions tab for the button properties”.
To delete a bookmark, please do one of the following:
Select the bookmark you want to delete and click the Delete button at the top of the
Bookmarks panel.
81
Page 83

Foxit PhantomPDF Standard
User Manual
Right-click the bookmark you want to delete and choose Delete.
Note: Deleting a bookmark deletes all the bookmarks that are subordinate to it.
Images
You can specify a rectangle on any part of a PDF page and then insert an image into that
rectangle. This feature is helpful when you want to explain or show something more dynamically.
Add an image
You can add an image to a PDF with the Image Annotation tool . After you insert a new
image, you can adjust its size and position, change the appearance and other settings, etc.
To add an image, do the following:
Choose EDIT > Insert > Image Annotation .
Drag a rectangle on the page to define the canvas area for the image.
In the Add Image dialog box, click the Browse button to select the image that you want to
insert and click the Open button. You will see the URL of this image has been added to the
Location field.
Click the Advanced… button to edit the setting of the image.
Image Placement dialog box
A. When to scale – choose when to scale the image you insert.
82
Page 84

Foxit PhantomPDF Standard
User Manual
B. Scale – choose to scale the image non-proportionally or proportionally. This option will be
disabled when you select Never in the field of When to scale.
C. Border – drag and move the scroll bar to change image’s position in the rectangle. The
coordinates change when you move the scroll bar.
Click OK for your changes to take effect, or click Reset to reset the data to the original
settings.
Click OK.
Apply an image to other pages
After adding an image, you may want to place the same image on additional pages while
maintaining the original location and settings.
To apply an image to other pages, please do the following:
1. Right click on the image you wish to apply to other pages.
2. Choose the option Place on Multiple Pages in the menu.
3. Specify the page range.
4. Click OK.
Move and resize an image
To move an image, please do the following:
1. Select the Annotation Selection Tool or the Image Tool , put the cursor over the image
and the cursor changes into an arrow .
2. Click and drag the image to another place you like.
To resize an image, please do the following:
1. Select the Annotation Selection Tool or the Image Tool , put the cursor over the
image and the cursor turns into an arrow , and then click the image.
2. Place the cursor on any corner point. The cursor changes into the cursor showing the
direction at which the rectangle will be resized.
83
Page 85

Foxit PhantomPDF Standard
User Manual
To resize the image
3. Drag the cursor outside, it will increase the size of the rectangle proportionally. Drag the
cursor inside and it will decrease the size of the rectangle proportionally.
Set properties of an image
1. Double-click the image or right-click it and select Properties….
2. In the Appearance tab, do any of the following:
Annotation is hidden from view – The image annotation will be invisible in Hand tool mode.
Border – Select the border width of the image and the border’s style and color.
Locked – When selected, prevents any further changes to any image properties.
Close – Applies and saves the current properties, and closes the image properties
dialog box.
3. In the Settings tab, follow the steps in “To add an image”.
4. For the Actions tab, Please refer to “Actions tab for the button properties”.
Delete an image
1. Select the Annotation Selection Tool or the Image Tool , put the cursor over the
image and the cursor turns into an arrow , and then click the image.
2. Press Delete or right-click the image > Delete.
Select multiple images
1. Select the Annotation Selection Tool or the Image Tool .
2. Press and hold Shift or Ctrl and click the images you want to edit.
Align images
Select two or more images that you want to align.
Click EDIT tab > Arrange group > Arrange button > select a type of alignment, or right-click
84
Page 86

Foxit PhantomPDF Standard
A. Suppose that you want to set A
as the anchor image.
B. Select these two images >
right-click A and choose Align >
Left. You will see the other
image is placed to the left edge
of A.
A
User Manual
the anchor > Align, and then choose a command as follows:
A. To align a column of images, choose Left, Right, or Vertically to align them respectively to
the left edge, right edge, or vertical axis of the anchor image.
B. To align a row of images, choose Top, Bottom, or Horizontally to align them respectively
to the top edge, bottom edge, or horizontal axis of the anchor image.
Note: When you right-click or Ctrl-click one of the selected images, it will be highlighted in red,
indicating that it’s the anchor image. The align menu commands move the other selected images
to line up with the edges of the anchor image.
Below is an example:
Center images
This function enables you to center the rectangle enclosed by the images you select vertically,
horizontally or both.
Below is an example:
85
Page 87

Foxit PhantomPDF Standard
A. Select two images. You can see
these two images consist of an
area with the shape of rectangle
(marked with red).
B. Right-click one of the images >
Center > Vertically. You will
find that the red rectangle is
centered vertically in the page.
User Manual
Distribute images
This function will be available when selecting three or more images.
To distribute the images evenly between the topmost and bottommost images, choose
Distribute > Vertically.
To distribute the images evenly between the leftmost and rightmost images, choose
Distribute > Horizontally.
Below is an example:
86
Page 88

Foxit PhantomPDF Standard
A. Select three images A, B and C. A
is the topmost image and C is
the bottommost image.
A
B
C
B. Right-click any one of the images >
Distribute > Vertically. And you
will see that B is distributed evenly
between A and C.
A B C
User Manual
Resize images
You can adjust multiple images with the same height, width, or both. Select one of the images as
the anchor, and the rest of the images will be resized with the same height or width as that of the
anchor image.
Below is an example:
87
Page 89

Foxit PhantomPDF Standard
A. Select images A and B. Suppose
that you want to set A as the
anchor image.
A
B
A
B
B. Right-click A > Size > Height. And
you will see that the height of B
is resized to be the same as that
of A.
User Manual
Setting properties of multiple images
Select multiple images > right-click one of them > Properties…
A dialog pops up with an Appearance tab. Follow the steps specified in “Setting properties of
an image”.
PDF Optimizer
With the PDF optimizer, users can compress the images, clear out the data redundancy of PDF
objects and update your PDFs.
Choose FILE > PDF Optimizer.
Setting the properties in the PDF Optimizer dialogue box.
88
Page 90
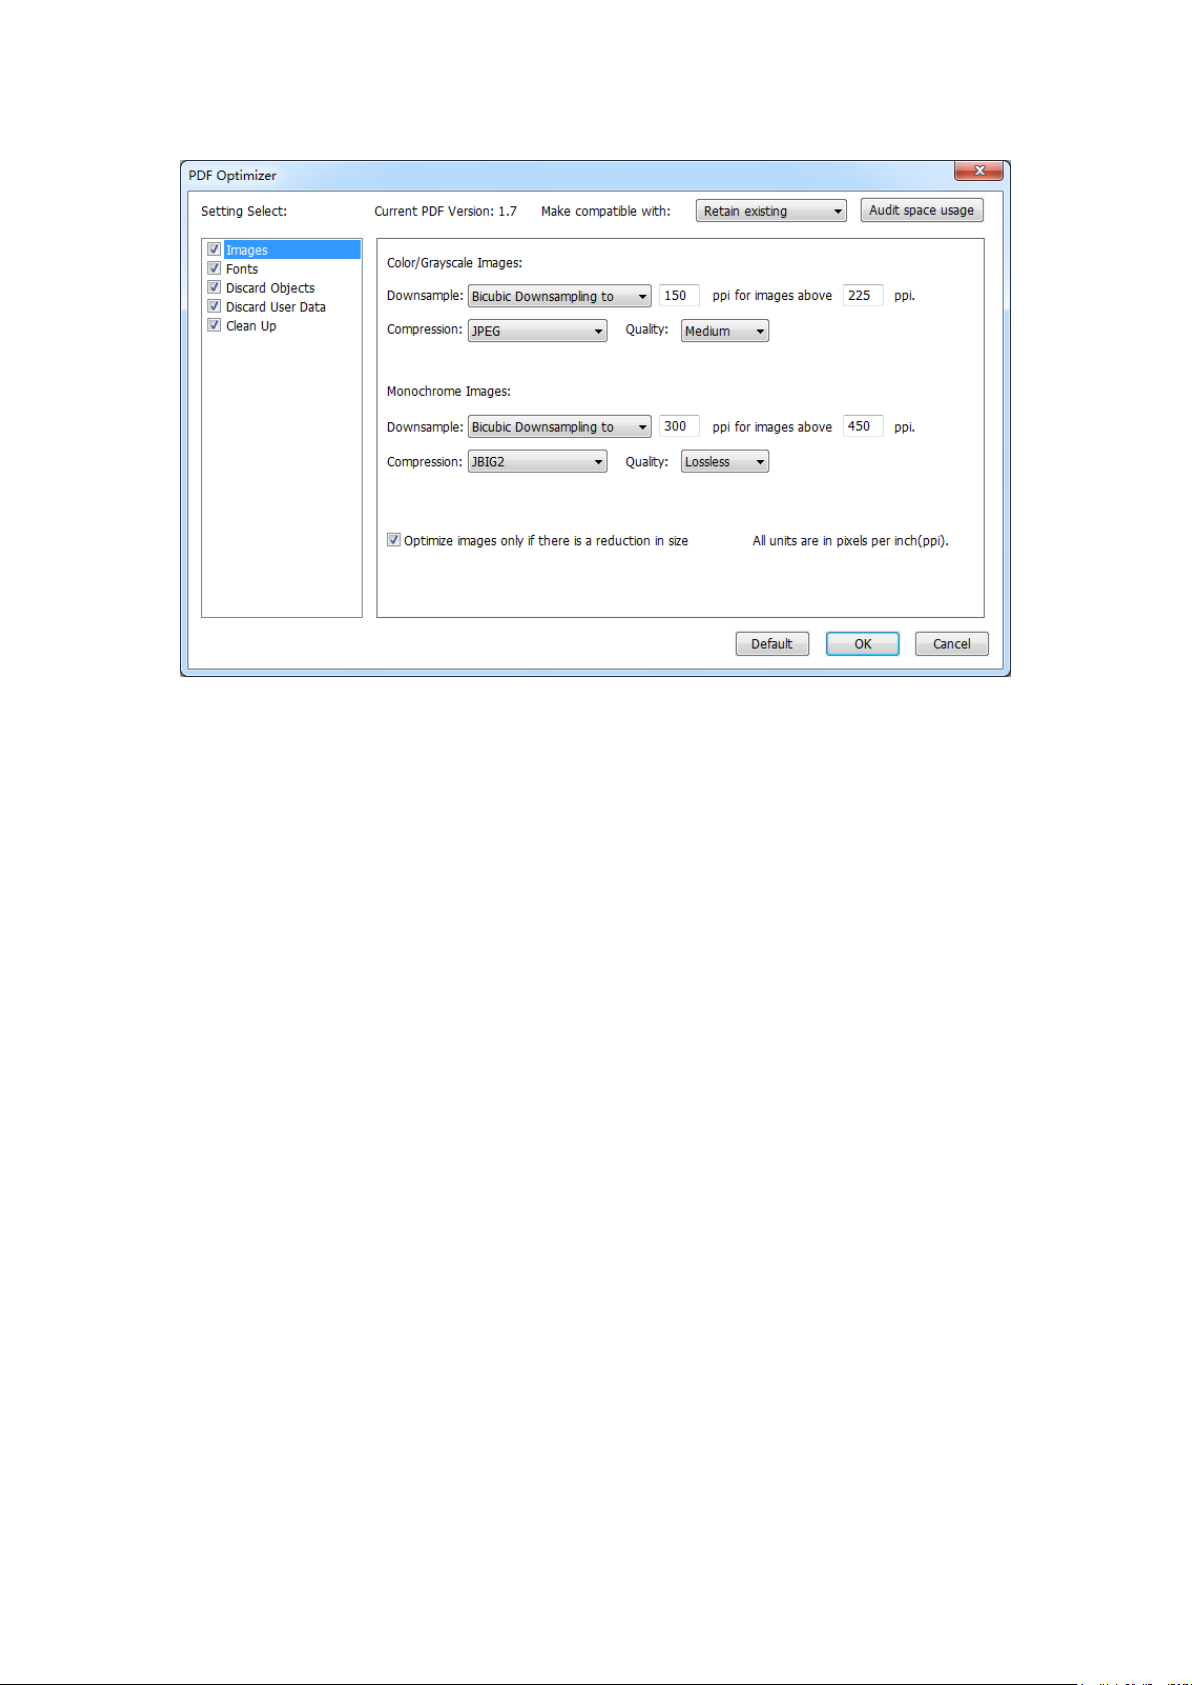
Foxit PhantomPDF Standard
User Manual
PDF Optimizer Dialog Box
Select the compatibility level to save the current PDF file in the list box of Make compatible
with item.
Click Audit space usage to see the space usage of the current PDF file and then you can
decide which items are needed to be optimized.
For Images, you can specify color/grayscale and monochrome image settings, including
image downsampling and image compression. Choose the appropriate down sampling
method in the Downsample list box (including average the downsampling, subsampling and
the bicubic downsampling) or you can choose the Off item to turn off the option. Set the
right pixels and image compression (including retaining existing, JPEG and JPEG2000).
Note: If you check the option “Optimize images only if there is a reduction in size”, the images will
not be optimized when there are no reductions.
For Fonts, move the embedded fonts to the right list to lift to embed.
For Discard Objects, please check the objects settings you want to discard.
For Discard User Data, please check the user related information you want to discard.
For Clean Up, please check the Cleanup settings you want to optimize the document.
Click OK button and save the optimized PDF file.
Work with Video & Audio
Foxit PhantomPDF does not only support playing videos and audios in PDFs, but only allows users
to add and edit multimedia files to a PDF.
89
Page 91

Foxit PhantomPDF Standard
User Manual
Play a Movie or a Sound Clip
Some PDF files may be multifaceted with multimedia, including sound, music, and video clips.
Each movie and sound file usually includes a play area from which the media can be activated.
The play area typically appears on the PDF page as an image or a blank rectangle, but can also be
invisible. To play the media files, please make sure you have the necessary media player installed
on your computer.
To play a movie or a sound, please do the following:
Select the Hand tool , and click the play area of the movie or sound file.
Note: To protect your computer from viruses, Foxit PhantomPDF pops up a dialog box soliciting
your approval before playing multimedia files.
Do not show this message until this document is closed – check this option to apply this setting
to the media content which can be played directly without this dialog box pop-up the next time
you click to play the media content.
Adding a movie or a sound clip
Adding movies or sounds to PDFs is as easy as inserting an image. "Movies" are desktop video
files with formats such as FLV, AVI, QuickTime, and MPEG, and file extensions such
as .avi, .wmv, .mov, .qt, .mpg, and .mpeg. An animated GIF file always has a .gif file extension,
while “Sounds” are like midis, wavs, and mp3 files.
Note: If an alert message tells you that no media handler is available, you must install the
appropriate player before you can add clips to the PDF. For example, you must install QuickTime if
you want to embed an MOV file in a PDF.
Adding movies or sounds
1. Choose EDIT > Insert > Video & Audio .
2. Press and hold mouse button down, drag to select an area on the page where you want the
movie or sound to appear. For movies, the play area is the exact size of the movie frame.
3. In the pop-up Add Video & Audio dialog box, you will see some options listed below:
90
Page 92

Foxit PhantomPDF Standard
User Manual
Embed content in document: includes the media file into the PDF file. This option will
increase the file size of the PDF. It is selected by default. If the check box is cleared, you will
not be able to play it if you open this PDF file on other computers.
Poster Settings: choose whether to display an image in the play area when the movie isn’t
playing. You can choose to use no poster, or create poster from file.
Edit the play area
To move, resize, align, center or distribute a multiple clip, please refer to “Images”.
Set Video & Audio properties
In Foxit PhantomPDF, you can specify properties for the multimedia files you added, such as the
appearance of a movie’s play area, whether the movie plays once or continuously, create
alternate renditions, etc.
To set video & audio properties, please do the following:
1. Select the Video & Audio tool , or the Annotation Selection Tool .
2. Double-click the play area or right-click the play area > Properties.
3. For the Appearance tab, please refer to “Setting properties of an image”.
Note: If you select Locked on any tab, it will lock all options for this multimedia file, but not just
the options on that tab.
4. In the Settings tab, there are many options listed below:
91
Page 93

Foxit PhantomPDF Standard
User Manual
Annotation Title -- Type the title of the movie or sound in the Annotation Title box. This title
does not determine which media file is played.
Alternate Text -- Type a description of the media file in the Alternate Text box.
Renditions – Allows you to create alternate or other renditions to ensure that users can play
the movie or sound clip on their systems.
A. List Renditions for Event -- You can assign different renditions to different actions but
Mouse Up is chosen by default. Mouse Up means that when the mouse button is clicked
and released, the rendition is played.
B. Add Rendition – There’re three ways for you to choose: Use a File, Use a URL, By Copying
an Existing Rendition
C. Edit Rendition – When clicking the Edit Rendition button, the Rendition Settings dialog box
appears, which allows you to specify the playback location, and other settings to
differentiate it from other renditions.
Media Settings -- Specifies the general properties for the movie or sound clip:
92
Page 94

Foxit PhantomPDF Standard
User Manual
Rendition Name: Enter the name for the rendition, which will appear in the list of
renditions. (This name does not determine which media file is played.)
Media Clip Location: Specify the clip by typing or navigating to it.
Content Type: Will be selected automatically when you specify the clip location.
Changing the Content Type setting may cause problems playing the media.
Embed content in document: Includes the media file into the PDF file. This option
will increase the file size of the PDF. It is selected by default. If the check box is
cleared, you will not be able to play it if you open this PDF file on other computers.
Rendition Alternate Text: Type a description of the rendition.
Allow temp File: Specify whether writing a temp file is allowed and when. Some
media players write a temp file when they play a movie or sound clip. If you want to
prevent users from easily copying the media content in a secure document, you may
want to disallow the creation of temp files. However, selecting this setting may
prevent the movie from being played by media players that require the use of temp
files.
Playback Settings – Use this tab to determine how the movie or sound clip is played.
Keep Player Open: Select whether you want the player to close after it plays the
movie or sound clip.
Volume: Lets you specify how loud the movie will be played.
Show Player Controls: Select to display a controller bar at the bottom of the play
area allowing users to stop, pause, or play the media, provided the media player
supports player controls.
Repeat: Lets you replay a clip two or more times, or continuously.
Player List: Click Add to specify a player and the settings that are required, preferred,
or disallowed to play the movie or sound clip. Select the name of the player and the
status. If you set the status of more than one player to Required, only one of the
required players may be used to play the rendition. If you set the status of players to
93
Page 95

Foxit PhantomPDF Standard
User Manual
Preferred, these players are selected over nonpreferred players (but not over
required players). If you set the status of players to Disallowed, they are not used to
play the rendition.
Add/Edit/Delete button: Allows you to add a new player, as well as edit or delete
the selected player in the Player List.
Playback Location – Determines whether a movie or sound clip is played in the PDF,
remains hidden while played (recommended for sound clips), is played in a floating window,
or is played full screen. The options for Floating Window Settings are unavailable except
when you choose Floating Window.
Playback Location: Selects the location for playing a movie or sound clip.
Background Color: Selects the background color for the media player.
Show title bar: Selects to show or hide title bar when playing the media in a floating
window.
Show control closing window: Selects to show or hide the close button at the top
right corner in a floating window.
Title Text: Adds a title for the media that will be showed on the title bar when
playing the media in a floating window.
Resize: Determines to allow or forbid users to resize the floating window. There’re
three options for you to choose: Don’t allow user to resize window, Allow user to
resize window but maintain original aspect ratio, or Allow user to resize window.
Window Position: The window position is determined relative to the document
window, application window, the virtual desktop or document monitor.
Width/Height: Specifies the width and height of the floating window.
If Window is Off-screen: Selects to play, do not play, or move window onto screen to
play the media file if the floating window is off-screen.
D. Delete Renditions – Deletes the selected renditions.
94
Page 96

Foxit PhantomPDF Standard
User Manual
E. Up/Down – Arranges the order of the renditions. If the first rendition cannot be played, the
next available rendition is played.
5. Actions tab for the Video & Audio properties
Please refer to “Actions tab for the button properties”.
Objects
When reading a PDF, you may need to frequently edit text, image, or other objects in this PDF file.
With Foxit PhantomPDF, you can add and edit text content as well as editing objects.
Add Text Objects
To add text objects, please do the following:
Select EDIT > Edit Content > Add Text tool .
Click on the specific page you want to input the text and type new text in the position where
the cursor is blinking. You can also paste or delete the text you input.
You can choose the text font format as you want in the Font group. In Paragraph group, you
can also align the text and set other paragraph formats including word spacing, character
scale, line spacing, etc.
Paragraph Editing
With Edit Text tool , you can edit texts in a paragraph like Microsoft Office Word as well as
changing their font, font size and color.
To edit texts in a paragraph, please do the following:
Select EDIT > Edit Content > Edit Text tool .
Click on the desired paragraph to start editing. Foxit PhantomPDF will automatically change
a line when the text comes to the margin of it. You can also start a new line by pressing
Enter.
95
Page 97

Foxit PhantomPDF Standard
User Manual
You can set the font and paragraph in the EDIT > Font/Paragraph. More editing features
please refer to Edit Objects.
Note: Clicking on a scanned or image-based PDF with Edit Text tool, you’ll be prompted to run
OCR or convert this file to other format. To not show the prompted message again, you can go to
FILE > Preference > Editing > uncheck the option “Alert when there’s no editable text when using
‘Edit Text’ tool”.
Link and Join Text Objects
To make editing easier, Foxit PhantomPDF supports linking multiple text blocks together or
connecting separate text blocks into one single paragraph.
Link and Unlink Text Objects
Using Link tool, you can link multiple text blocks together and then editing text in these blocks
will be treated as editing one paragraph. Text will reflow in these linked blocks and will not cover
the page contents that are located among these blocks.
To link text blocks, please do the following:
Click EDIT > Edit Content > Link & Join Text and a FORMAT tab appears in the ribbon. Select
text blocks you need to link together and the selected blocks will be marked with numbers
as you click them (See the example as below.).
96
Page 98

Foxit PhantomPDF Standard
User Manual
Click Link tool in the FORMAT tab, or right-click the selected blocks and choose Link
Text Boxes. Then the three blocks will be linked together.
Then when you add or edit text in these blocks with Edit Text tool , the text will reflow
in these linked blocks and will not cover the image among them. And when the text added
exceeds the final block, content followed the linked blocks will be covered because they
have not been linked together.
97
Page 99

Foxit PhantomPDF Standard
User Manual
To unlink a text block, please click EDIT > Edit Content > Link & Join Text, select the text block you
need to unlink and then click Unlink tool in the FORMAT tab. You can also right-click the
selected block and choose Unlink Text Blocks.
Note:
1. You can select and link text blocks which are discontinuous or in different columns, or that
are not arranged from top to bottom or from left to right on the page.
2. All selected blocks should be on the same page.
Join and Split Text Objects
With Join tool, you can connect blocks of text into one single paragraph in a block to improve text
reflow. Blocks of text may be joined together when you need to join text as one object.
Otherwise, a block of text can be divided up into several parts with the Split tool.
To join text blocks, do the following:
1. Click EDIT > Edit Content > Link & Join Text button.
2. Click the text blocks you want to join. The text blocks you selected will be numbered.
3. Click Join tool in the FORMAT tab, or right-click the selected blocks and select Join Text
Boxes. Then the selected blocks will be joined together as one block.
To split a text block, please click EDIT > Edit Content > Link & Join Text button and click the text
98
Page 100

Foxit PhantomPDF Standard
User Manual
block you want to split. Click Split tool in the FORMAT tab, or right-click the selected block
and select Split Text Boxes. Then the selected block will be divided.
Note: All selected blocks should be on the same page.
Edit Objects
A selected object is usually outlined by a bounding box. And the corresponding FORMAT or
ARRANGE tab in the ribbon will appear after you select objects. With the tools in FORMAT or
ARRANGE tab, you can modify and arrange objects.
Select EDIT > Edit Content > Edit Object tool > select All/Text/Image/Shape/Shading, and
do one of the following:
1. To select one or multiple objects, please do one of the following:
Click the object to select it, or press Ctrl/Shift and select more objects.
Hold the pointer over the objects and drag a rectangle around them.
Press Ctrl + A on keyboard. All objects on the current page are selected.
Note: To deselect all the objects, click any blank area in the document.
2. Move and resize an object
To move an object, select the object and drag the object to the desired place. Or
right-click the object and choose Cut from the context menu and then right-click the
desired place and choose Paste.
To resize an object, drag a handle of the object. Drag the handles of the four corners to
retain the original aspect ratio.
3. Rotate an object
To rotate an object, put the cursor over the selected object, the cursor will change to , then
do one of the following:
In ARRANGE tab, click Rotate group > Rotate > Clockwise/Counter-clockwise by
90 degrees.
Click and drag to rotate the image as you need.
Right-click the selected and choose Rotate.
4. Arrange objects
99
 Loading...