

Page 1
Page 2

Foxit PDF Secure RMS Protector
2
User Manual
Copyright © 2014 Foxit Software Incorporated. All Rights Reserved.
No part of this document can be reproduced, transferred, distributed or stored in any format
without the prior written permission of Foxit.
Anti-Grain Geometry - Version 1.1
Copyright (C) 2002-2005 Maxim Shemanarev (http://www.antigrain.com)
Permission to copy, use, modify, sell and distribute this software is granted provided this
copyright notice appears in all copies. This software is provided "as is" without express or implied
warranty, and with no claim as to its suitability for any purpose.
Page 3

Foxit PDF Secure RMS Protector
3
To add SPS-SRV to Local Intranet ............................................................................................. 16
To add SPS-SRV to the AD·RMS Certification Pipeline ............................................................. 17
To activate Information Rights Management in Office SharePoint Server 2007 ..................... 17
To restrict permissions using AD·RMS ..................................................................................... 17
To add SPS-SRV to Local Intranet ............................................................................................. 18
To add SPS-SRV to the AD·RMS Certification Pipeline ............................................................. 18
To activate Information Rights Management in Office SharePoint Server 2010 ..................... 19
To restrict permissions using AD·RMS ..................................................................................... 19
To add SPS-SRV to Local Intranet ............................................................................................. 19
To add SPS-SRV to the AD·RMS Certification Pipeline ............................................................. 19
To activate Information Rights Management in Office SharePoint Server 2013 ..................... 20
To restrict permissions using AD·RMS ..................................................................................... 20
To add the domain user to SharePoint site ............................................................................. 21
To set the group permission in SharePoint site ....................................................................... 21
To restrict the print permissions using RMS ............................................................................ 23
To add the domain user to SharePoint site ............................................................................. 25
To set group permission in SharePoint site ............................................................................. 26
To restrict the print permissions using RMS ............................................................................ 28
To add the domain user to SharePoint site ............................................................................. 30
To set group permission in SharePoint site ............................................................................. 31
To restrict the print permissions using RMS ............................................................................ 33
User Manual
Contents
Chapter 1 - Overview ............................................................................................ 5
Chapter 2 - For SharePoint .................................................................................... 6
Getting Started ............................................................................................................... 6
System Requirements ........................................................................................................ 6
Corresponding permissions of Foxit Reader and MOSS .................................................... 7
Installing Foxit PDF Secure RMS Protector on a SharePoint Server .................................. 7
View and Manage Event Logs of Foxit PDF Secure RMS Protector ................................. 13
Check the version of Foxit PDF Secure RMS Protector ................................................... 15
Editing Wrapper Content................................................................................................. 16
Configuring AD RMS to Work with SPS-SRV ................................................................... 16
For MOSS 2007 ....................................................................................................... 16
For MOSS 2010 ....................................................................................................... 18
For MOSS 2013 ....................................................................................................... 19
Working with Foxit PDF Secure RMS Protector .............................................................. 21
For MOSS 2007 ....................................................................................................... 21
For MOSS 2010 ....................................................................................................... 25
For MOSS 2013 ....................................................................................................... 30
Page 4

Foxit PDF Secure RMS Protector
4
User Manual
Chapter 3 - For Exchange ...................................................................................... 35
Getting Started ............................................................................................................. 35
System Requirements ...................................................................................................... 35
Corresponding permissions of Foxit Reader and Exchange .................................................... 36
Installing Foxit PDF Secure RMS Protector on an Exchange Server ................................ 36
Uninstalling Foxit PDF Secure RMS Protector ................................................................. 38
Check the version of Foxit PDF Secure RMS Protector ................................................... 41
Editing Wrapper Content................................................................................................. 42
Configuring AD·RMS to Integrate with Exchange Server in a Single Forest ....................... 42
To register a service connection point ............................................................................ 42
To give Exchange servers permissions to access the server certification pipeline ......... 42
To set up the Exchange Server super users group .......................................................... 43
To set InternalLicensingEnable true by ExchangeManagement Shell ............................. 43
Working with Foxit PDF Secure RMS Protector .............................................................. 44
For Exchange 2010 .................................................................................................................. 44
For Exchange 2013 .................................................................................................................. 47
Chapter 4 - Watermark Configuration Tool ........................................................... 50
Creating Profile ............................................................................................................ 50
Adding Watermark ....................................................................................................... 51
Editing or Deleting Watermark ...................................................................................... 52
Importing or Exporting Watermark ............................................................................... 52
Chapter 5 - FAQ.................................................................................................... 54
Contact Us ........................................................................................................... 55
Page 5

Foxit PDF Secure RMS Protector
5
User Manual
Chapter 1 - Overview
Traditionally, sensitive information can only be controlled by limiting access to the networks or
computers where the information is stored. After access is given to users, however, there are no
restrictions on what can be done with the content or to whom it can be sent. Microsoft
Information Rights Management (IRM) enables you to create a persistent set of access controls
that live with the content, rather than a specific network location, which will help you control
access to files even after they leave your direct control.
Foxit PDF Secure RMS protector extends all the benefits of AD RMS to any PDF document. In
addition, Foxit PDF Secure RMS protector provides creation and control of rights to unique PDF
features.
Microsoft’s Active Directory Rights Management (AD·RMS) solves security problems for
enterprise documents created in Microsoft Office. With the inclusion of AD RMS in Windows
Server2008, AD RMS has quickly become the default standard for document rights protection.
For the enterprises, they can enforce security policies easily to protect sensitive information, as
well as enable each PDF document with additional features such as forms fill out and
annotations.
Page 6

Foxit PDF Secure RMS Protector
6
Computer
Operating System
Requirement
RMS Server/ ADRMS
Server
Windows Server·2003 with
Service Pack·1
(SP1)/Windows
Server·2008 with Service
Pack·1 (SP1)
RMS, Internet Information Services (IIS)
6.0, World Wide Web Publishing
Service, Message Queuing (also known
as MSMQ), and Microsoft SQL
Server™·2005 Standard Edition
DC
Windows Server·2003 with
SP1
Active Directory, Domain Name System
(DNS)
ADRMS-DB
Windows·Server·2003 with
SP1
Microsoft SQL Server™·2005 with
Service Pack·2 (SP2)
SharePoint Server
Such as named SPS-SRV
Windows Server·2003 with
SP1
Office SharePoint Server·2007 with RMS
Client installed, and has been added
this Server to DC
Computer
Operating System
Requirement
ADRMS Server
Windows Server·2008 with
Service Pack·1 (SP1)
RMS, Internet Information Services (IIS)
6.0, World Wide Web Publishing
Service, Message Queuing (also known
as MSMQ)
DC
Windows Server·2003 with
SP1
Active Directory, Domain Name System
(DNS)
ADRMS-DB
Windows·Server·2008 with
SP1
Microsoft SQL Server™·2008 R2
SharePoint Server
Such as named SPS-SRV
Windows Server·2008 with
SP2
Office SharePoint Server·2010 and has
been added this Server to DC
User Manual
Chapter 2 - For SharePoint
Getting Started
This section provides system requirements, install and uninstall instructions for the RMS
Protector.
System Requirements
System Requirements for MOSS 2007
System Requirements for MOSS 2010
System Requirements for MOSS 2013
Page 7

Foxit PDF Secure RMS Protector
7
Computer
Operating System
Requirement
ADRMS Server
Windows Server·2008 with
Service Pack·1 (SP2)
RMS, Internet Information Services (IIS)
6.0, World Wide Web Publishing
Service, Message Queuing (also known
as MSMQ)
DC
Windows Server·2008 with
SP2
Active Directory, Domain Name System
(DNS)
ADRMS-DB
Windows·Server·2008 with
SP1
Microsoft SQL Server™·2008 R2
SharePoint Server
Such as named SPS-SRV
Windows Server·2012
Office SharePoint Server·2013 and has
been added this Server to DC
Level
Rights of Foxit Reader
Full control
View, Copy, Modify, Print, View Data, Access, Annotate, Fill Form,
Assemble
Change
View, Copy, Modify, Access, Annotate, Fill Form, Assemble
Read
View
Corresponding permissions of Foxit Reader and MOSS
SharePoint service provides three levels rights: Full control, Change, and Read.
User Manual
The user only can print the document if its library IRM settings have been configured to allow
document printing.
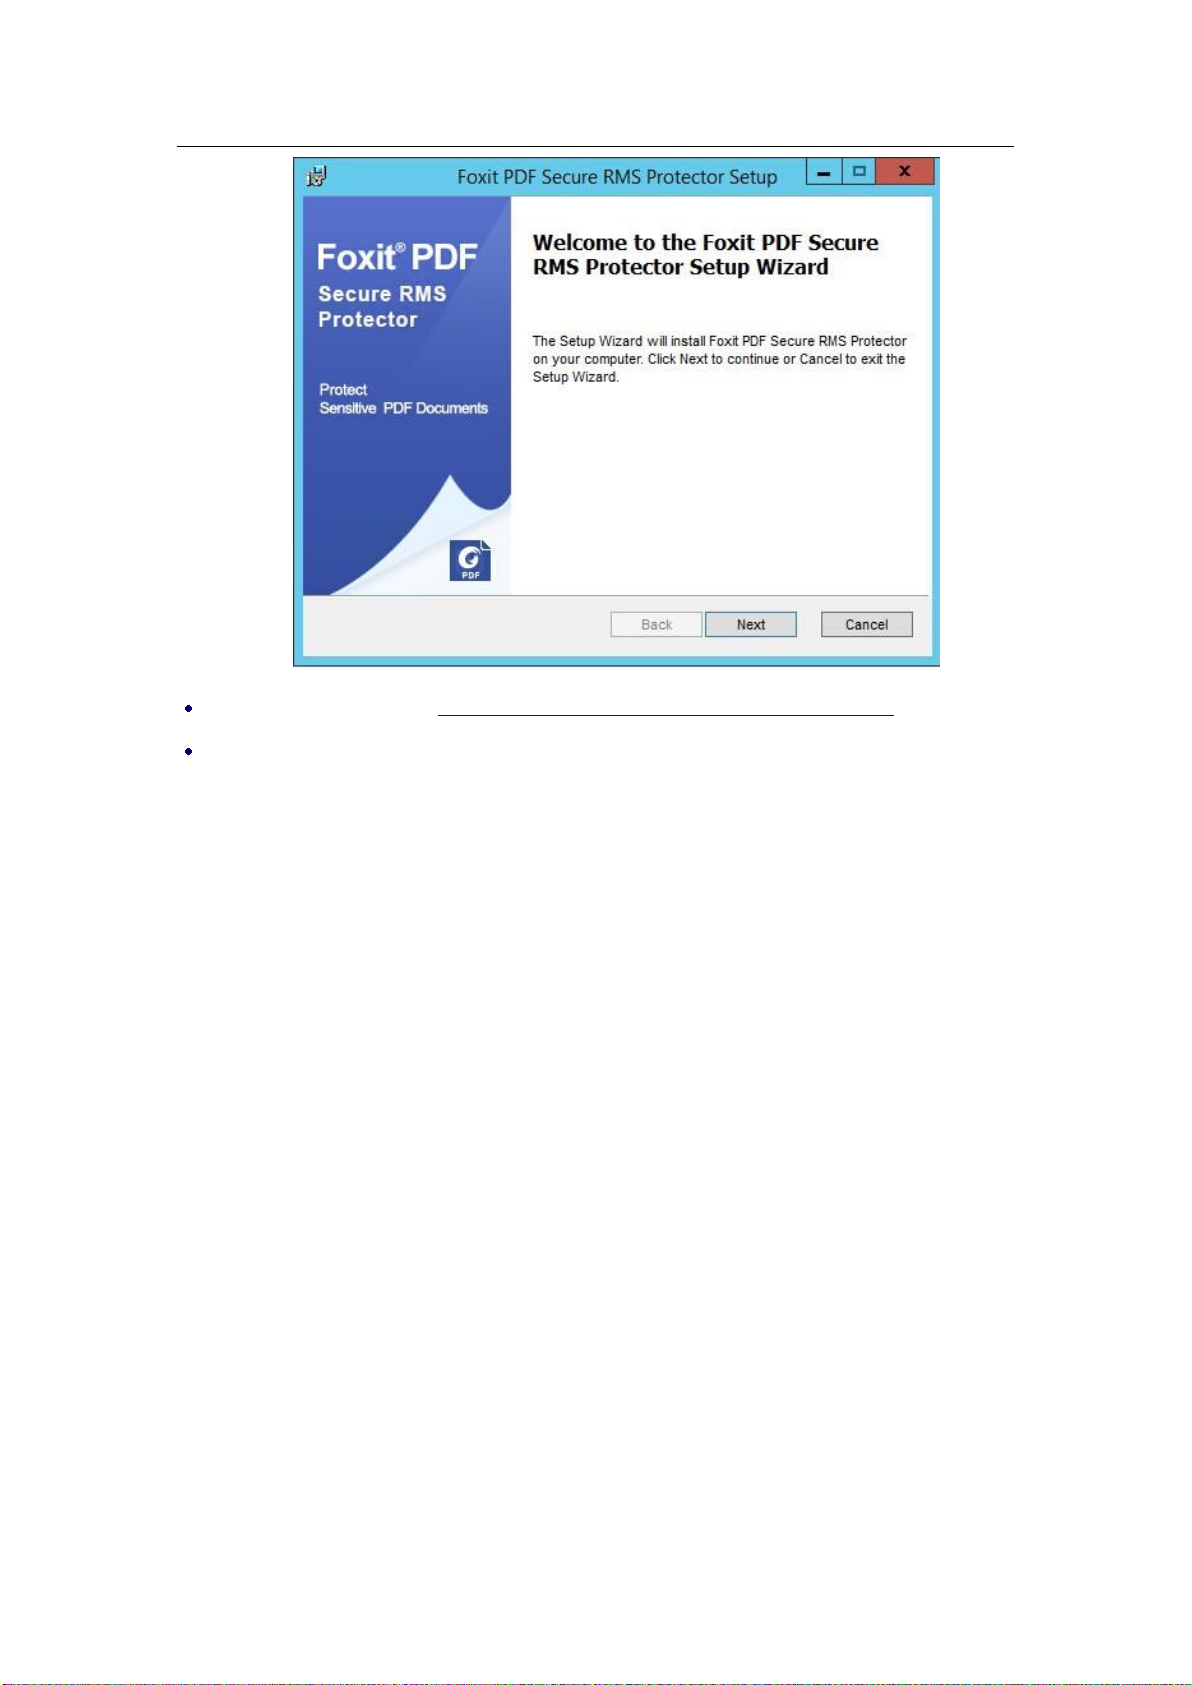
Installing Foxit PDF Secure RMS Protector on a SharePoint Server
To install Foxit PDF Secure RMS Protector:
Stop the IIS Admin service: Start > Settings > Control Panel > Administrator Tools > Services >
IIS Admin Service > Stop. Then Close the window.
Run the Foxit PDF Secure RMS Protector Setup program to install the protector on the
server.
Page 8
Foxit PDF Secure RMS Protector
8
User Manual
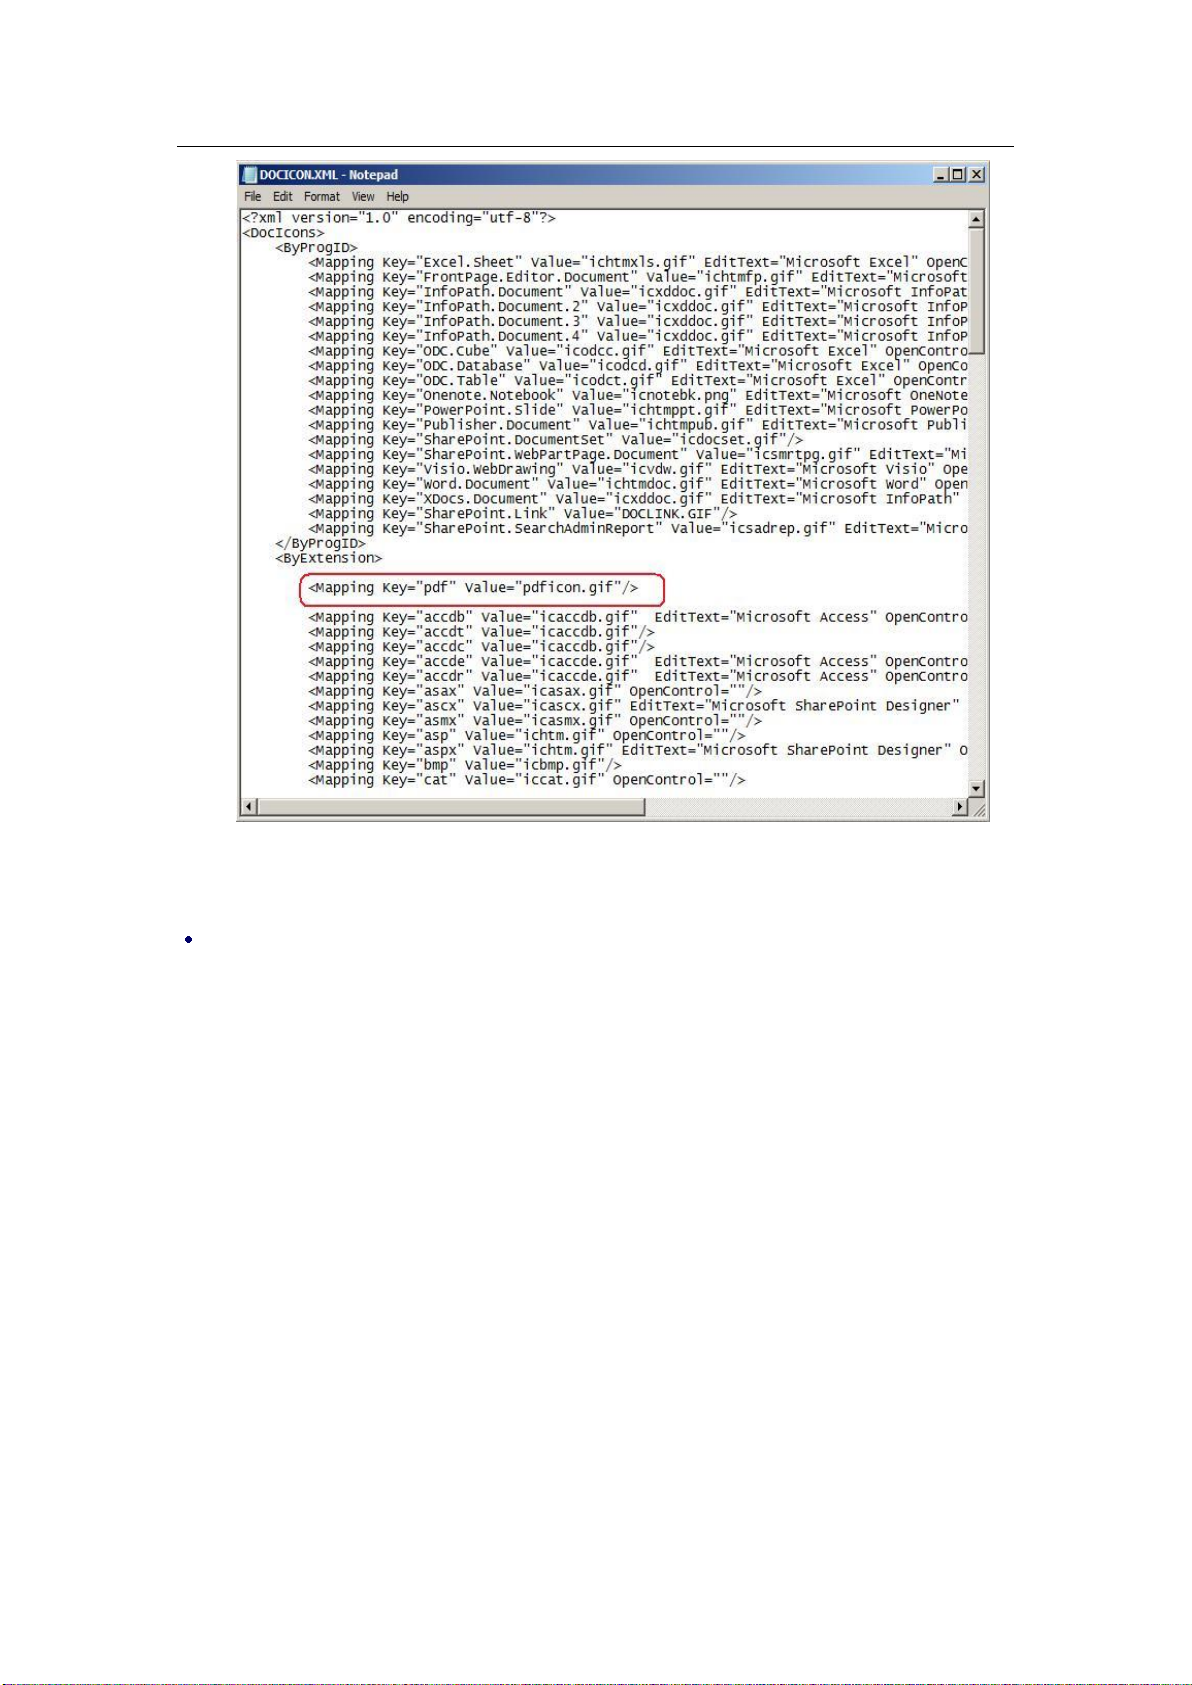
Download PDF icon from http://www.foxitsoftware.com/images/icons/pdficon.gif.
For MOSS 2007
1. Copy the downloaded.GIF file to "Drive: \Program Files\Common Files\Microsoft
Shared\Web Server Extensions\12\Template\Images".
2. Edit the file “Drive:\Program Files\Common Files\Microsoft Shared\Web server
extensions\12\Template\Xml\DOCICON.XML”:
a. Right-click DOCICON.XML file > click Open With > select Notepad.
b. Add an entry for the .pdf extension as the file’s name. For example, type the ICPDF as
the name of the .gif file:
<Mapping Key="pdf" Value="pdficon.gif"/>
Page 9
Foxit PDF Secure RMS Protector
9
User Manual
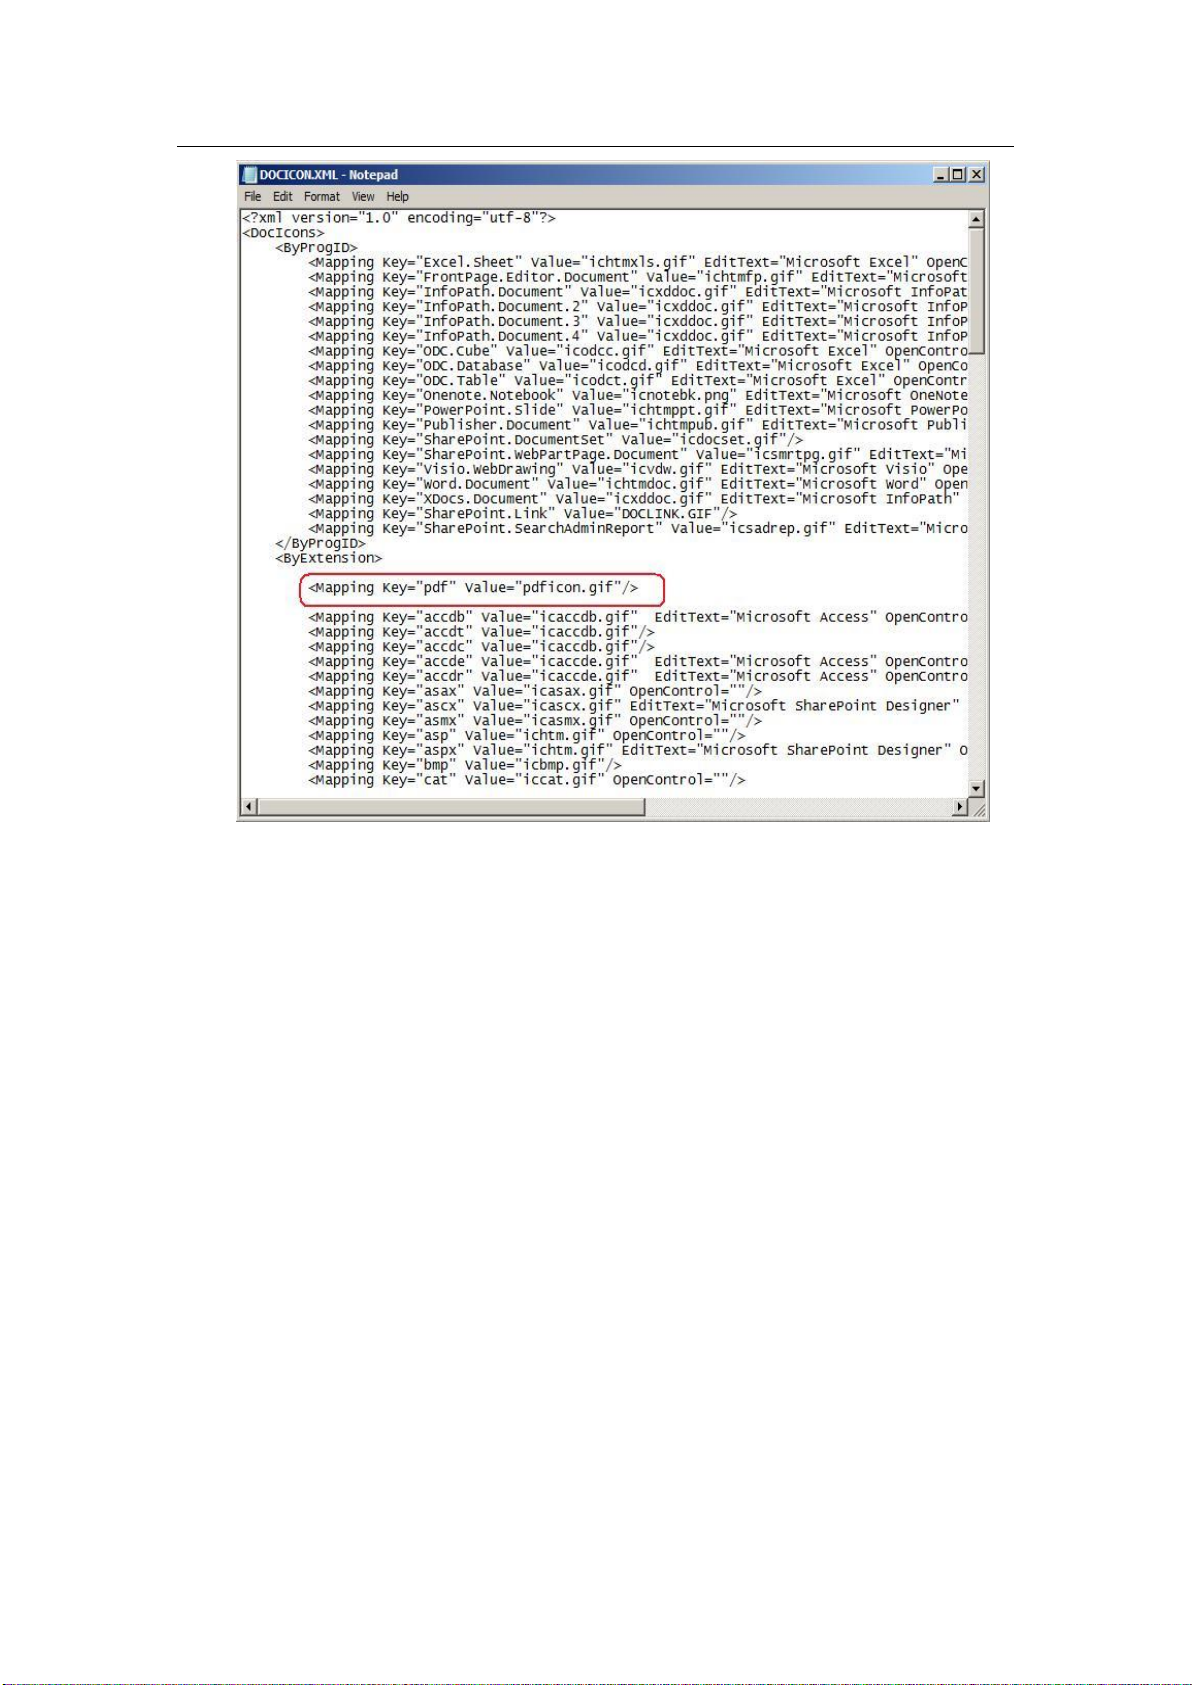
c. Click Save on the File menu, and then quit Notepad.
For MOSS 2010
1. Copy the downloaded.GIF file to "Drive:\Program Files\Common Files\Microsoft
Shared\Web Server Extensions\14\Template\Images"
2. Edit the file “Drive:\Program Files\Common Files\Microsoft Shared\Web server
extensions\14\Template\Xml\DOCICON.XML”:
a. Right-click DOCICON.XML file > click Open With > select Notepad.
b. Add an entry for the .pdf extension as the file’s name. For example, type the ICPDF as
the name of the .gif file:
<Mapping Key="pdf" Value="pdficon.gif"/>
Page 10

Foxit PDF Secure RMS Protector
10
User Manual
c. Click Save on the File menu, and then quit Notepad.
For MOSS 2013
1. Copy the downloaded.GIF file to "Drive:\Program Files\Common Files\Microsoft
Shared\Web Server Extensions\15\Template\Images"
2. Edit the file “Drive:\Program Files\Common Files\Microsoft Shared\Web server
extensions\15\Template\Xml\DOCICON.XML”:
a. Right-click DOCICON.XML file > click Open With > select Notepad.
b. Add an entry for the .pdf extension as the file’s name. For example, type the ICPDF as
the name of the .gif file:
<Mapping Key="pdf" Value="pdficon.gif"/>
Page 11
Foxit PDF Secure RMS Protector
11
User Manual
c. Click Save on the File menu, and then quit Notepad.
3. Delete the following registry for Microsoft PDF Protector in SharePoint 2013
a) HKEY_LOCAL_MACHINE/Software/Microsoft/Shared Tools/Web Server
Extensions/15.0/IrmProtectors
“{FC93F6CC-D367-4FC9-B3F6-E0933A24A8C8}” =
“Microsoft.Office.Irm.PdfIrmProtector”
b) HKEY_LOCAL_MACHINE\SOFTWARE\Microsoft\Shared Tools\Web Server
Extensions\15.0\IrmProtectors\PdfIrmProtector
"Extensions"="PDF"
"Product"="PdfIrmProtector"
"Version"="15"
4. Add the following registry for Foxit PDF Secure PDF Protector in SharePoint 2013
a) HKEY_LOCAL_MACHINE/Software/Microsoft/Shared Tools/Web Server
Extensions/15.0/IrmProtectors
“{2B86FB4A-D503-4040-8843-A2195C1E1D7E} ” = “PDFProtector”
b) HKEY_LOCAL_MACHINE/Software/Microsoft/Shared Tools/Web Server
Extensions/15.0/IrmProtectors/PDFProtector
Page 12
Foxit PDF Secure RMS Protector
12
User Manual
"Extensions"="pdf"
"Product"=" PDFProtector"
"Version"="2"
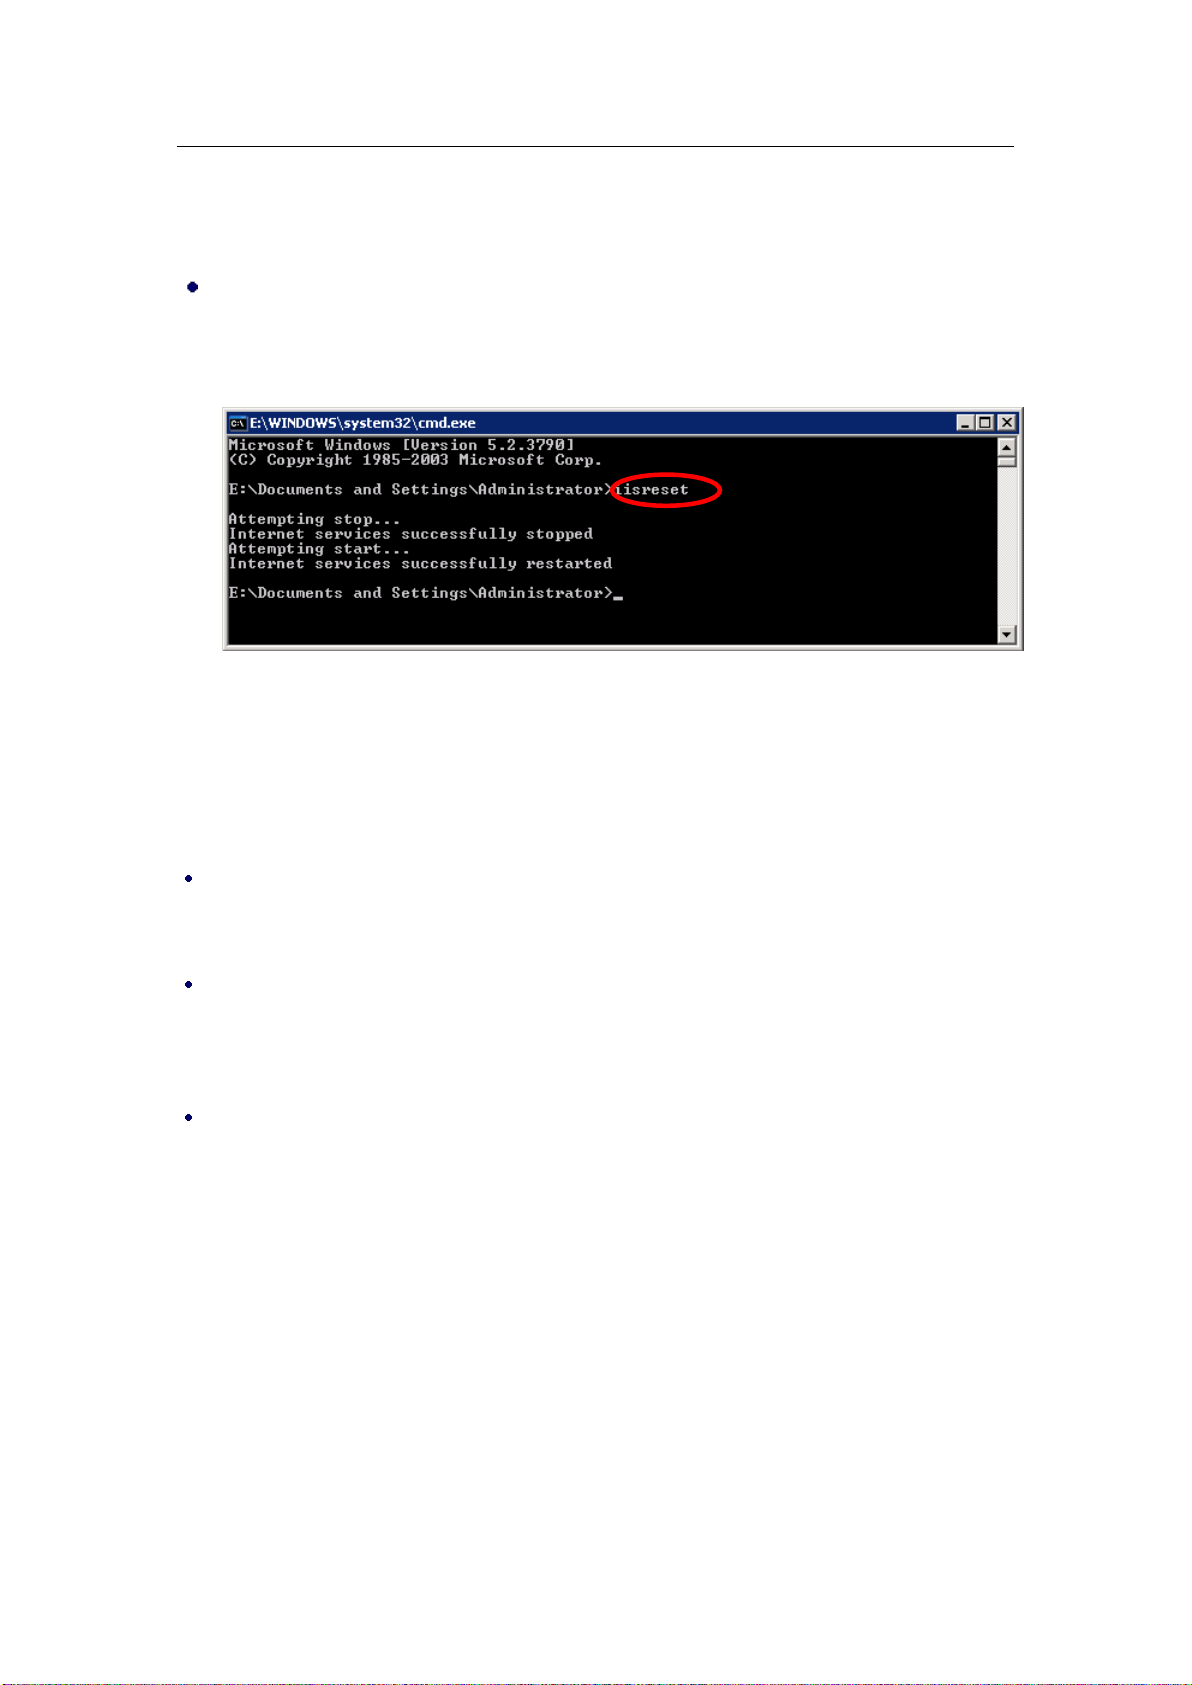
Perform an iisreset
1. Click Start > Run > type “cmd” in the Open dialog box> click OK > type “iisreset” at the
command prompt > Enter.
2. Close the windows.
Uninstalling Foxit PDF Secure RMS Protector
To uninstall, please select one of the followings:
Open the Start Menu > Settings > select “Control Panel” > click the “Add or Remove
Programs” tab > click the “Foxit PDF Secure RMS Protector” record and then click the
“Remove/Uninstalled” button to uninstall it.
Open the Start Menu > Programs > select “Foxit PDF Secure RMS Protector” > click Uninstall.
Or you can double-click the SharePointPDFProtector.msi setup file that you have used to install
Foxit PDF Secure RMS Protector, and perform the following:
In the Foxit PDF Secure RMS Protector dialog box, select Remove Foxit PDF Secure RMS
Protector
Page 13

Foxit PDF Secure RMS Protector
13
User Manual
Click Finish button to complete removal.
Click Start > Run > type “cmd” in the Open dialog box> click OK > type “iisreset” in the
command prompt > Press Enter.
Close the windows.
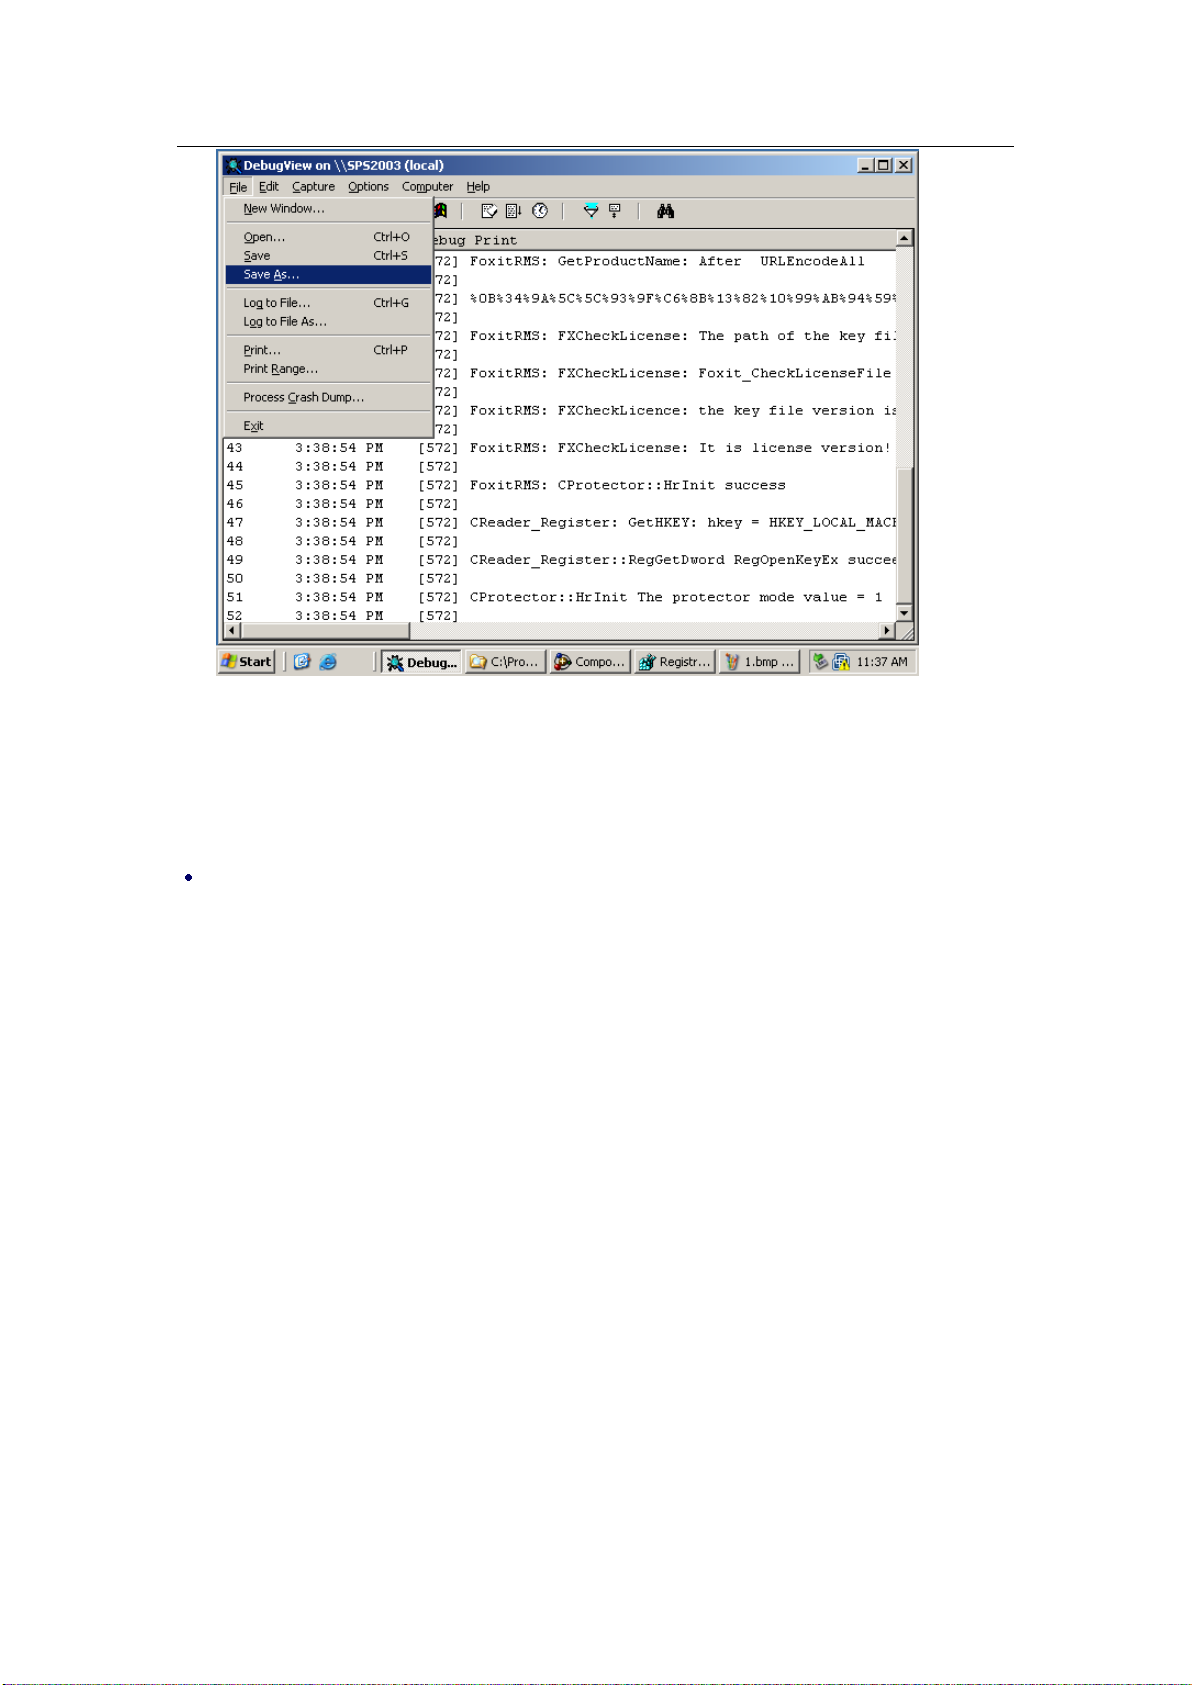
View and Manage Event Logs of Foxit PDF Secure RMS Protector
To view and save the log information of the Protector, please do the following steps:
1. Add a registry entry.
With Administrator’s Right:
HKEY_LOCAL_MACHINE/Software/Foxit Software/FXRMS/FXSPProtector
Name:trace
Page 14
Foxit PDF Secure RMS Protector
14
User Manual
Type:REG_DWORD
Data:1
Without Administrator’s Right:
HKEY_CURRENT_USER/Software/Foxit Software/FXRMS/FXSPProtector
Name:trace
Type:REG_DWORD
Data:1
Note: if the value of trace is 1, the log feature will be activated; if the value of trace is 0, the
log feature will be disabled.
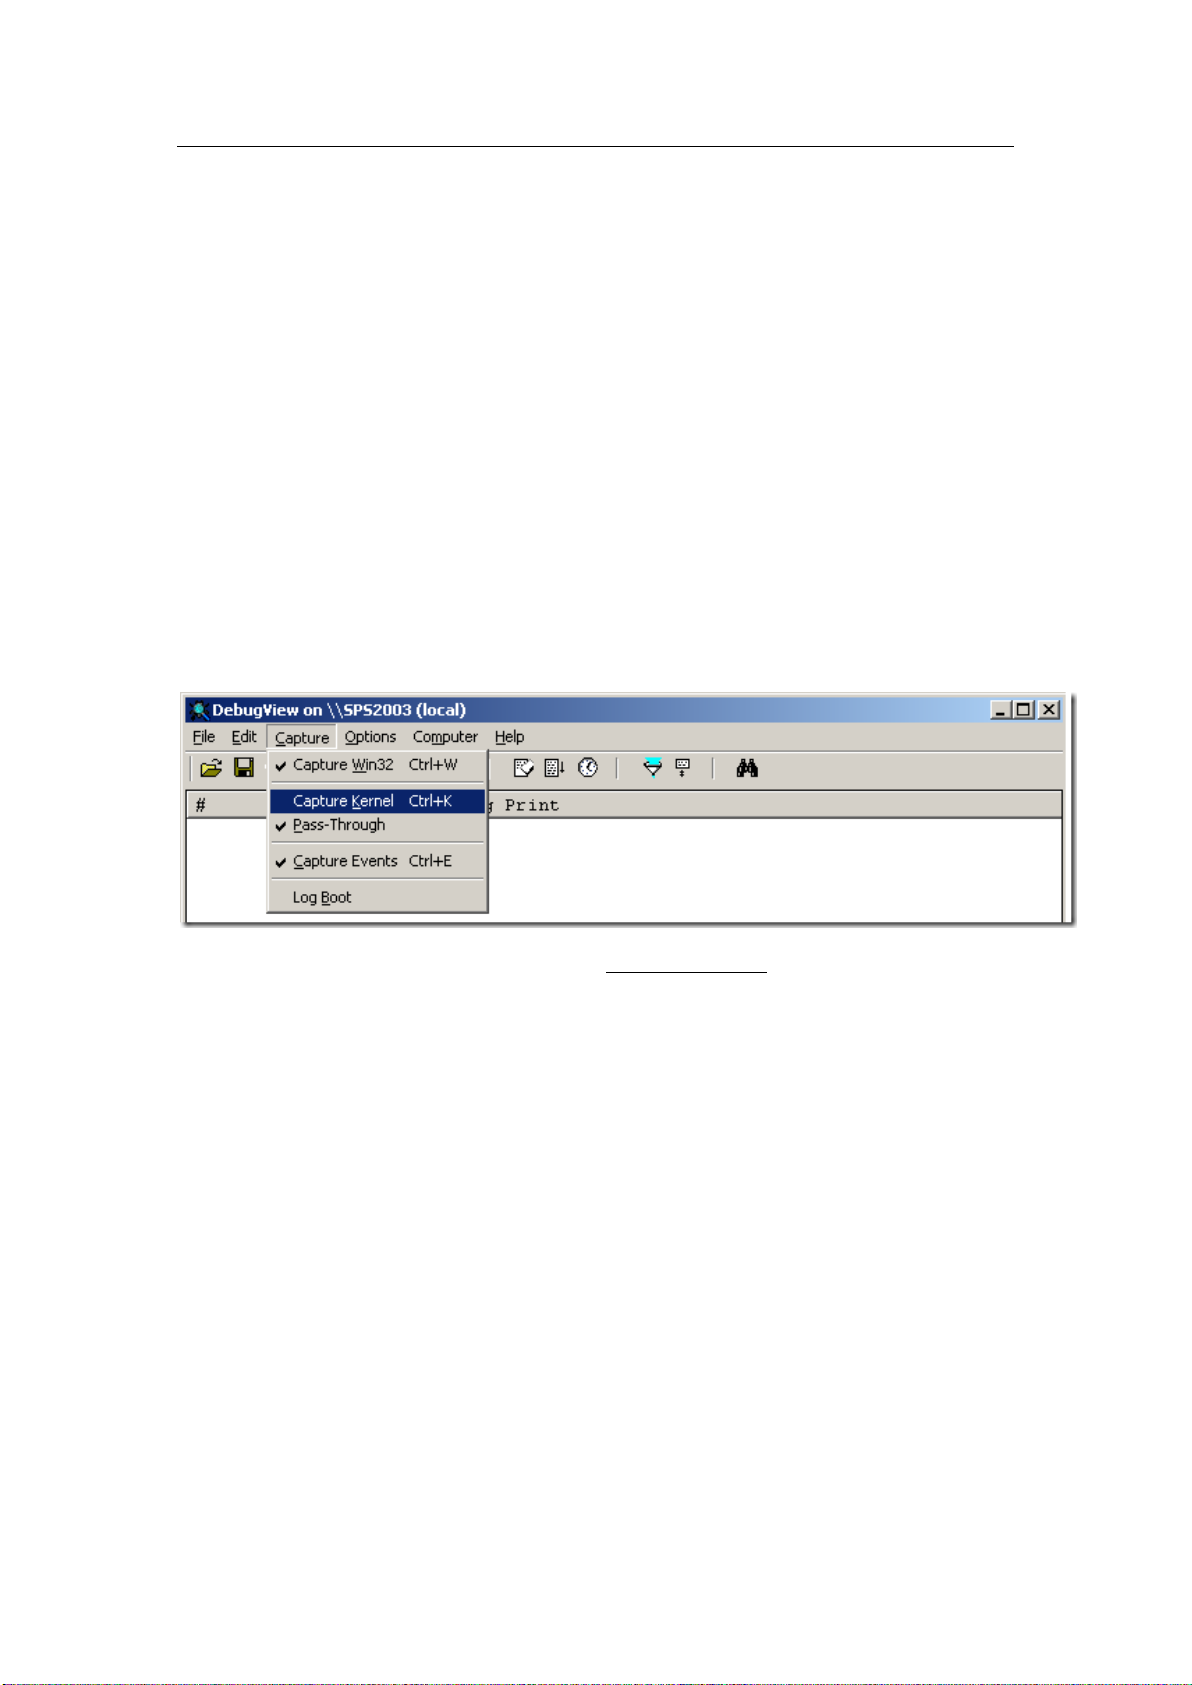
2. Download the DebugView tool from the following link and run it.
http://technet.microsoft.com/en-us/sysinternals/bb896647.aspx
Open the tool and disable Capture Kernel feature from the “Capture” menu to avoid
capturing unnecessary information.
3. Perform an iisreset command (Please refer to Perform an iisreset), and you will be able to see
the related log information now. The log information can be saved as a .txt file.
Page 15
Foxit PDF Secure RMS Protector
15
User Manual
4. If you want to disable the log feature, please set the value of trace to 0 and perform an
iisreset.
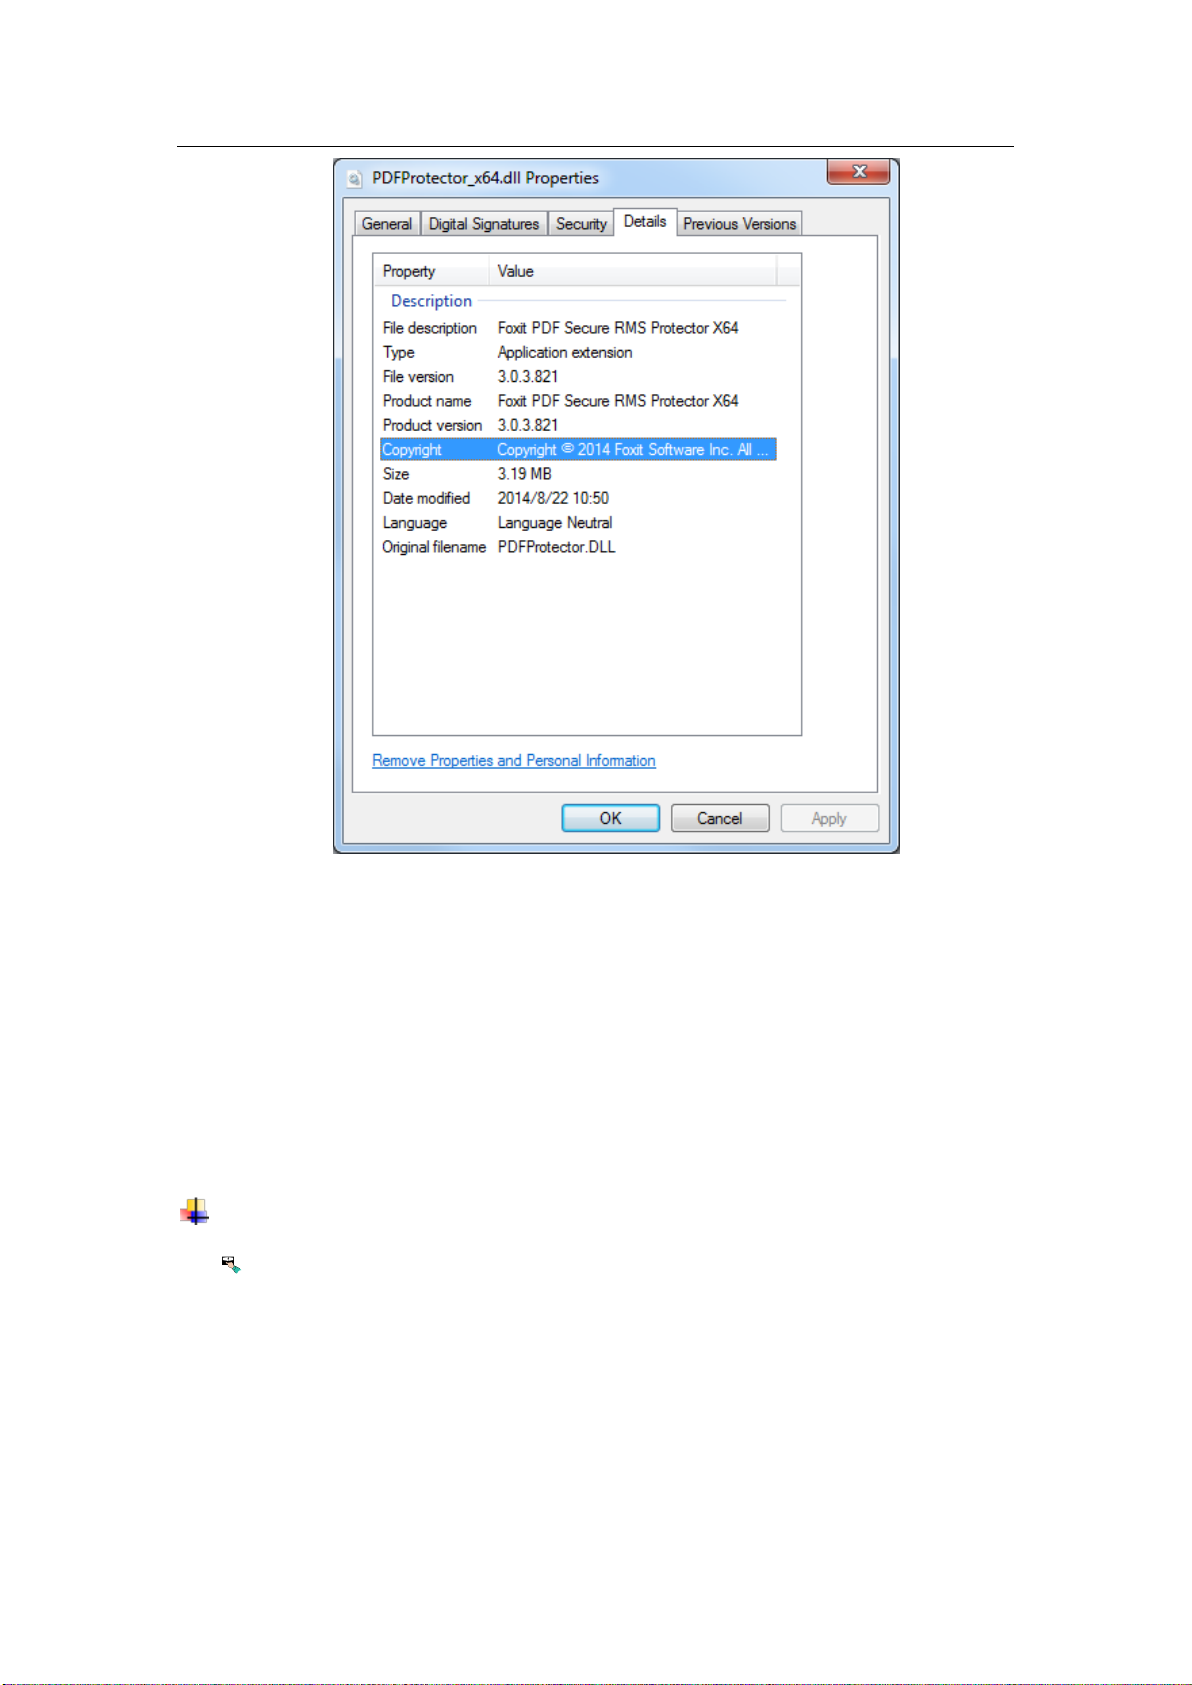
Check the version of Foxit PDF Secure RMS Protector
Please navigate to the folder where Foxit PDF Secure RMS Protector installed. Right-click
PDFProtector.dll > choose Properties > click the Details tab, then you can examine the
version information of Foxit PDF Secure RMS Protector:
Page 16
Foxit PDF Secure RMS Protector
16
User Manual
Editing Wrapper Content
If you open a PDF which is encrypted by Foxit RMS Protector with other PDF programs, a wrapper
(which is actually a PDF page) will prompt you to download Foxit PhantomPDF/Reader to open
the PDF. If you want to edit the wrapper content, please save the updated content as a PDF file
named as “wrapperPDF” and place it within the RMS Protector’s installation directory.
Configuring AD RMS to Work with SPS-SRV
Note: If you have configured AD·RMS when you were installing SharePoint, please skip
this chapter.
For MOSS 2007
To add SPS-SRV to Local Intranet
1. Log on SPS-SRV as domain administrator, e.g., WIONS\administrator.
Page 17

Foxit PDF Secure RMS Protector
17
User Manual
2. Click Start. Point to Control Panel, and then click Internet Options.
3. Click the Security tab, and choose Local Intranet, and then click the Sites button
4. Type http://SPS-SRV, and then click Add. Note: SPS-SRV is the computer’s name of MOSS
server.
5. Click Close, and then choose OK
To add SPS-SRV to the AD·RMS Certification Pipeline
1. Log on ADRMS-SRV as CPANDL\Administrator.
2. Click Start, and then click Computer.
3. Navigate to C:\Inetpub\wwwroot\_wmcs\Certification.
4. Right-click ServerCertification.asmx, and choose Properties, and then click the Security tab.
5. Click Advanced>Edit, and select the check box Include inheritable permissions from this
object's parent. Then click OK two times.
6. Click Edit, and then click Add.
7. Click Object Types, and select the check box Computers, then click OK.
8. Type the computer’s name of MOSS server, such as SPS-SRV, and then click OK.
9. Click OK to close the ServerCertification.asmx Properties sheet.
The default Read & Execute and Read permissions are configured for the SPS-SRV computer
account object and other accounts’ are all inherited from the parent folder.
10. Click Start, and then click Command Prompt.
11. Type iisreset, and then press ENTER.
To activate Information Rights Management in Office SharePoint Server 2007
Please do the following:
1. Log on SharePoint Server as the administrator.
2. Click Start, and point to Administrative Tools, then click SharePoint 3.0 Central
Administration.
3. Click Operations, and choose Information Rights Management.
4. Click Use the default RMS server specified in Active Directory.
5. Click OK.
To restrict permissions using AD·RMS
Page 18

Foxit PDF Secure RMS Protector
18
1. Log on as CPANDL\administrator.
2. Click Start, point to All Programs, and then click Internet Explorer.
3. Type http://SPS-SRV in the address bar, and then click Go.
4. Click Shared Documents, and choose Library page, and then click Library Settings button.
5. Under the Permissions and Management heading, click Information Rights Management.
6. Select the check box Restrict permission to documents in this library on download.
7. Type CPANDL Protected in the Permissions policy title box.
8. Type Restrict CPANDL employees from printing in the Permission policy description box.
9. Click OK.
For MOSS 2010
To add SPS-SRV to Local Intranet
Log on SPS-SRV as domain administrator, e.g., CPANDL\administrator.
Click Start, and point to Control Panel, then choose Internet Options.
User Manual
Click the Security tab, and choose Local Intranet, and then click the Sites button.
Type http://SPS-SRV, and then click Add. Note: SPS-SRV is the computer’s name of
MOSS2010 server.
Click Close, and then click OK.
To add SPS-SRV to the AD·RMS Certification Pipeline
Log on ADRMS-SRV as CPANDL\Administrator.
Click Start, and then click Computer.
Navigate to C:\Inetpub\wwwroot\_wmcs\Certification.
Right-click ServerCertification.asmx, and click Properties, then choose the Security tab.
Click Advanced and choose the Edit. Select the check box Include inheritable permissions
from this object's parent, and then click OK two times.
Click Edit, and then click Add
Click Object Types, select the check box Computers, and then click OK
Type the computer’s name of MOSS server, such as SPS-SRV, and then click OK
Click OK to close the ServerCertification.asmx Properties sheet. The default Read & Execute
and Read permissions are configured for the SPS-SRV computer account object and other
accounts are all inherited from the parent folder.
Click Start, and then click Command Prompt.
Type iisreset, and then press ENTER
Page 19

Foxit PDF Secure RMS Protector
19
Log on as CPANDL\administrator.
Click Start, point to All Programs, and then click Internet Explorer.
Type http://SPS-SRV in the address bar, and then click Go.
Click Shared Documents, and choose Library page, and then click Library Settings button.
Under the Permissions and Management heading, click Information Rights Management.
Select the check box Restrict permission to documents in this library on download.
Type CPANDL Protected in the Permissions policy title box.
Type Restrict CPANDL employees from printing in the Permission policy description box.
Click OK.
User Manual
To activate Information Rights Management in Office SharePoint Server 2010
Please do the followings:
Log on SharePoint Server as administrator.
Click Start, and point to Administrative Tools, then click SharePoint 2010 Central
Administration.
Click Security (on the left), and then click Configure Information Rights Management under
the Information policy heading.
Click Use the default RMS server specified in Active Directory.
Click OK.
To restrict permissions using AD·RMS
For MOSS 2013
To add SPS-SRV to Local Intranet
Log on SPS-SRV as domain administrator, e.g., MOSS\administrator.
Click Start, and go to Control Panel, then choose Internet Options.
Click the Security tab, and choose Local Intranet, and then click the Sites button.
Type http://SPS-SRV, and then click Add. Note: SPS-SRV is the computer’s name of
MOSS2013 server.
Click Close, and then click OK.
To add SPS-SRV to the AD·RMS Certification Pipeline
Log on ADRMS-SRV as MOSS\Administrator.
Page 20

Foxit PDF Secure RMS Protector
20
Log on as MOSS\administrator.
Click Start, go to All Programs, and then click Internet Explorer.
Type http://SPS-SRV in the address bar, and then click Go.
Click Documents, and choose Library page, and then click Library Settings button.
Under the Permissions and Management heading, click Information Rights Management.
Select the check box Restrict permission on this library on download.
Type CPANDL Protected in the Create a permissions policy title box.
User Manual
Click Start, and then click Computer.
Navigate to C:\Inetpub\wwwroot\_wmcs\Certification.
Right-click ServerCertification.asmx, and click Properties, then choose the Security tab.
Click Advanced and choose the Edit. Select the check box Include inheritable permissions
from this object's parent, and then click OK two times.
Click Edit, and then click Add
Click Object Types, select the check box Computers, and then click OK
Type the computer’s name of MOSS server, such as SPS-SRV, and then click OK
Click OK to close the ServerCertification.asmx Properties sheet. The default Read & Execute
and Read permissions are configured for the SPS-SRV computer account object and other
accounts are all inherited from the parent folder.
Click Start, and then click Command Prompt.
Type iisreset, and then press ENTER
To activate Information Rights Management in Office SharePoint Server 2013
Please do the followings:
Log on SharePoint Server as administrator.
Click Start, and point to Administrative Tools, then click SharePoint 2013 Central
Administration.
Click Security (on the left), and then click Configure Information Rights Management under
the Information policy heading.
Click Use the default RMS server specified in Active Directory.
Click OK.
To restrict permissions using AD·RMS
Page 21

Foxit PDF Secure RMS Protector
21
Type Restrict CPANDL employees from printing in the Add a permission policy description
box.
Click OK.
Working with Foxit PDF Secure RMS Protector
For MOSS 2007
To add the domain user to SharePoint site
In the same Office SharePoint Server 2007 site, click Home.
Click Site Actions and point to Site Settings, and then click People and Groups.
Click New, and then choose Add Users.
User Manual
Type domain users’ names, such as lnd1@cpandl.cn;lnd2@cpandl.cn in the Users/Groups
box, and then click OK. A list of users who have the permission to use the SharePoint will be
displayed.
To set the group permission in SharePoint site
Navigate to the Documents page, log on as administrator@cpandl.com, clicking the Settings
drop-down box and select Document Library Settings.
Page 22

Foxit PDF Secure RMS Protector
22
User Manual
Click Permissions for this document library under Permissions and Management on the
Customize Documents page.
Please click Home Members on “Permissions: Documents” page.
Please choose the permission you need, for example, you can choose the Contribute-Can
view, add, update, and delete. Then click OK.
Return to Documents page, log on as lnd1@cpandl.com, to download a PDF file to your
host.
Page 23

Foxit PDF Secure RMS Protector
23
User Manual
Open the download PDF file by Foxit Reader, and left-click View Permission to see the RMS
Right.
To restrict the print permissions using RMS
In the same Office SharePoint Server 2007 site, click Home.
Click Document Center, and then click Documents.
On the Documents page, left-clicking the Settings drop-down box and select Document
Library Settings.
Page 24

Foxit PDF Secure RMS Protector
24
User Manual
On settings page, choose Information Rights Management under Permissions and
Management.
Choose Allow users to print documents, and then click OK.
Return to Documents page, for example log on as lnd1@cpandl.cn, right-click a pdf file and
choose Save Target AS… to save a PDF file to the local host.
Open the download PDF file by Foxit Reader. Left-click View Permission to view the RMS
Right of this file. Please see the following picture.
Page 25

Foxit PDF Secure RMS Protector
25
User Manual
For MOSS 2010
To add the domain user to SharePoint site
Click Start, and point to All Programs, then click Internet Explorer.
Type http://SPS-SRV in the address bar, and then click Go. This operation will open the
default Office SharePoint Server 2010 site that was created during installation.
Click Site Actions, and point to Site Settings, and then click People and Groups under the Users
and Permissions heading.
Click New, and then click Add Users.
Type domain users’ names, such as lnd1@cpandl.cn;lnd2@cpandl.cn in the Users/Groups
box, and then click OK. A list of users who have the permissions to use the SharePoint will be
displayed.
Page 26

Foxit PDF Secure RMS Protector
26
To set group permission in SharePoint site
Log on as CPANDL\Administrator.
Click Start, and point to All Programs, and then click Internet Explorer.
User Manual
Type http://SPS-SRV in the address bar, and then click Go.
Click Shared Documents and Library page, then click Library Settings button.
Click Permissions for this document library under Permissions and Management on
Customize Documents page.
Page 27

Foxit PDF Secure RMS Protector
27
User Manual
Return to Shared Documents page, log on as lnd1@cpandl.com(one of ADRMS test
Members), to download a PDF file to your load host.
Open the download PDF file by Foxit Reader, and left-click View Permission to see the RMS
Right.
Page 28

Foxit PDF Secure RMS Protector
28
User Manual
To restrict the print permissions using RMS
In the same Office SharePoint Server 2010 site, click Home.
Click Shared Documents and Library page, then click Library Settings button.
On the settings page, choose Information Rights Management under Permissions and
Management.
Choose Allow users to print documents, and click OK.
Page 29

Foxit PDF Secure RMS Protector
29
User Manual
Return to Shared Documents page, for example log on as lnd1@cpandl.com, and right-click
a pdf file and choose Save Target AS… to save a PDF file to the local host.
Open the download PDF file by Foxit Reader. Left-click View Permission to view the RMS
Right of this file. Please see the following picture.
Page 30

Foxit PDF Secure RMS Protector
30
User Manual
For MOSS 2013
To add the domain user to SharePoint site
Click Start, and go to All Programs, then click Internet Explorer.
Type http://SPS-SRV in the address bar, and then click Go. This operation will open the
default Office SharePoint Server 2013 site that was created during installation.
Click Setting, and go to Site Settings, and then click People and Groups under the Users and
Permissions heading.
Click New, and then click Add Users.
Type domain users’ names, such as rms01@moss.com;rms02@moss in the Users/Groups
box, and then click OK. A list of users who have the permissions to use the SharePoint will be
displayed.
Page 31

Foxit PDF Secure RMS Protector
31
To set group permission in SharePoint site
Log on as MOSS\Administrator.
Click Start, and go to All Programs, and then click Internet Explorer.
Type http://SPS-SRV in the address bar, and then click Go.
Click Documents and Library page, then click Library Settings button.
User Manual
Click Permissions for this document library under Permissions and Management on
Customize Documents page.
Page 32

Foxit PDF Secure RMS Protector
32
User Manual
Return to Documents page, log on as rms01@moss.com (one of ADRMS test Members), to
download a PDF file to your load host.
Open the download PDF file by Foxit Enterprise Reader, and left-click View Permission to
see the RMS Right.
Page 33

Foxit PDF Secure RMS Protector
33
User Manual
To restrict the print permissions using RMS
In the same Office SharePoint Server 2013 site, click Home.
Click Documents and Library page, then click Library Settings button.
On the settings page, choose Information Rights Management under Permissions and
Management.
Choose Allow viewers to print, and click OK.
Page 34

Foxit PDF Secure RMS Protector
34
User Manual
Return to Documents page, for example log on as rms01@moss.com, and right-click a pdf
file and choose Save Target AS… to save a PDF file to the local host.
Open the download PDF file by Foxit Reader. Left-click View Permission to view the RMS
Right of this file. Please see the following picture.
Page 35

Foxit PDF Secure RMS Protector
35
Computer
Operating System
Requirement
ADRMS Server
Windows Server 2008 R2
RMS, Internet Information Services (IIS)
6.0, World Wide Web Publishing
Service, Message Queuing (also known
as MSMQ)
DC
Windows Server 2003 with
SP1
Active Directory, Domain Name System
(DNS)
ADRMS-DB
Windows Server 2003 with
SP1
Microsoft SQL Server™ 2005
Exchange Server 2010
Such as named EX01
Windows Server 2008 with
SP2 or
Windows Server 2008 R2
Exchange Server 2010 and has been
added this Server to DC
Client
Win7
Client , Outlook 2010
System requirements for Exchange2013
Computer
Operating System
Requirement
ADRMS Server
Windows Server 2008 R2
RMS, Internet Information Services (IIS)
6.0, World Wide Web Publishing
Service, Message Queuing (also known
as MSMQ)
DC
Windows Server 2008 with
SP1
Active Directory, Domain Name System
(DNS)
ADRMS-DB
Windows Server 2012
Microsoft SQL Server™ 2012
Exchange Server 2013
Such as named
QA2012-EXC
Windows Server2012
Exchange Server 2013 and has been
added this Server to DC
Client
Win7
Client , Outlook 2013
User Manual
Chapter 3 - For Exchange
Getting Started
This section provides everything about getting started with Foxit PDF Secure RMS Protector
you’ll need to know, including its system requirements, install and uninstall instructions.
System Requirements
System requirements for Exchange2010
Page 36

Foxit PDF Secure RMS Protector
36
Level
Rights of Foxit Reader
Full control
View, Copy, Modify, Print, View Data, Access, Annotate, Fill Form,
Assemble
Change
View, Copy, Modify, Access, Annotate, Fill Form, Assemble
Read
View
User Manual
Corresponding permissions of Foxit Reader and Exchange
Exchange service provides there levels rights: Full control, Change, Read.
The user can only print the document if the document library IRM settings have been configured
to allow document printing.
Installing Foxit PDF Secure RMS Protector on an Exchange Server
To install Foxit PDF Secure RMS Protector:
Stop the IIS Admin service: Start > Settings > Control Panel > Administrator Tools > Services >
IIS Admin Service > Stop. Close window.
Run the Foxit PDF Secure RMS Protector Setup program to install the protector on the
server.
After installing
For Exchange2010
restart IIS, MSExchangeTransport, msftesql-Exchange:
Page 37

Foxit PDF Secure RMS Protector
37
User Manual
1. Click Start > Run > type “cmd” in the Open line> click OK, and execute the following
commands:
net stop MSExchangeTransport
net start MSExchangeTransport
net stop msftesql-Exchange
net start msftesql-Exchange
net start MSExchangeSearch
iisreset
Page 38

Foxit PDF Secure RMS Protector
38
User Manual
2. Close the windows.
For Exchange2013
Restart IIS, MSExchangeTransport, MSExchangeFastSearch:
1. Restart MSExchangeTransport: Start > Settings > Control Panel > Administrator Tools >
Services > MSExchangeTransport > Restart.
2. Restart MSExchangeFastSearch: Start > Settings > Control Panel > Administrator Tools >
Services >MSExchangeFastSearch > Restart. Then Close the window
3. Restart IIS: Click Start > Run > type “cmd” in the Open dialog box> click OK > type “iisreset” at
the command prompt > Press Enter.
4. Close the windows.
Uninstalling Foxit PDF Secure RMS Protector
To uninstall, please select one of the followings:
Open the Start Menu > Control Panel->Programs->Programs and Features, and then click the
“Foxit PDF Secure RMS Protector” record and then click the “Uninstall” button to uninstall it.
Open the Start Menu > Programs > “Foxit PDF Secure RMS Protector” > Uninstall.
Or you can double-click the PDFProtector.msi setup file that you have used to install Foxit PDF
Secure RMS Protector, and then do the followings:
In the Foxit PDF Secure RMS Protector dialog box, select Remove Foxit PDF Secure RMS
Protector
Page 39

Foxit PDF Secure RMS Protector
39
User Manual
Click Next button to uninstall it completely.
For Exchange2010
Restart IIS, MSExchangeTransport, msftesql-Exchange:
1. Click Start > Run > type “cmd” in the Open line> click OK, and execute the following
commands:
net stop MSExchangeTransport
net start MSExchangeTransport
net stop msftesql-Exchange
net start msftesql-Exchange
net start MSExchangeSearch
iisreset
Page 40

Foxit PDF Secure RMS Protector
40
User Manual
2. Close the windows.
For Exchange2013
Restart IIS, MSExchangeTransport, MSExchangeFastSearch:
1. Restart MSExchangeTransport: Start > Settings > Control Panel > Administrator Tools >
Services > MSExchangeTransport > Restart.
2. Restart MSExchangeFastSearch: Start > Settings > Control Panel > Administrator Tools >
Services >MSExchangeFastSearch > Restart. Then Close the window
3. Restart IIS: Click Start > Run > type “cmd” in the Open dialog box> click OK > type
“iisreset” at the command prompt > Press Enter.
Page 41

Foxit PDF Secure RMS Protector
41
User Manual
4. Close the window.
Check the version of Foxit PDF Secure RMS Protector
Please navigate to the folder where Foxit PDF Secure RMS Protector installed. Right-click
PDFProtector.dll > choose Properties > click the Details tab, then you can examine the
version information of Foxit PDF Secure RMS Protector ,as shown:
Page 42

Foxit PDF Secure RMS Protector
42
User Manual
Editing Wrapper Content
If you open a PDF which is encrypted by Foxit RMS Protector with other PDF programs, a wrapper
(which is actually a PDF page) will prompt you to download Foxit PhantomPDF/Reader to open
the PDF. If you want to edit the wrapper content, please save the updated content as a PDF file
named as “wrapperPDF” and place it within the RMS Protector’s installation directory.
Configuring AD·RMS to Integrate with Exchange Server in a
Single Forest
Note: If you have configured AD·RMS when you were installing Exchange, please skip this
operation.
To register a service connection point
1. Log on ADRMS server as CPANDL\ADRMSADMIN in the cluster on which you want to
register an SCP.
2. Open the Active Directory Rights Management Services console.
3. Right-click the AD·RMS cluster, and then click Properties.
4. Click the SCP tab.
5. Select the Change SCP check box.
6. Click the Set the SCP to current certification cluster option, and then click OK.
7. Click Yes to confirm.
To give Exchange servers permissions to access the server certification pipeline
1. Log on an ADRMS server as CPANDL\administrator in the AD·RMS cluster.
2. Click Start, and then click Computer.
3. Navigate to %systemdrive%\Inetpub\wwwroot\_wmcs\Certification.
4. Right-click ServerCertification.asmx, and then click Properties.
5. In the ServerCertification.asmx Properties dialog box, click the Security tab.
6. Click the Continue button or the Edit button.
Page 43

Foxit PDF Secure RMS Protector
43
User Manual
7. In the Permissions for ServerCertification.asmx dialog box, click Add.
8. In the Select User, Computer, Service Account, or Group dialog box, click Object Types,
and select the Computers check box, then click OK.
9. Type Exchange Servers to add the Exchange Servers group, or type the names of the
Exchange servers that you want to add, separated by semicolons.
10. Click Check Names, and then click OK.
11. Under Allow, make sure that the Read & execute and the Read check boxes are
selected.
12. Click OK.
13. If the AD·RMS Service Group does not appear in the Group or user names list, repeat the
steps 6–11 to add it.
14. Click OK to close all dialog boxes.
15. Repeat the steps 1–14 on all other servers in the AD·RMS cluster.
To set up the Exchange Server super users group
1. Log on AD·RMS server as CPANDL\ADRMSADMIN, and open the Active Directory Rights
Management Services console and expand the AD RMS cluster.
2. In the console tree, expand Security Policies, and then click Super Users.
3. In the Actions pane, click Enable Super Users.
4. In the results pane, click Change Super User Group to open the Super Users properties
sheet.
5. In the Super user group box, type the e-mail address of the designated super users
group, or click Browse to navigate through the defined users and groups in the
directory.(Such as SuperRMSAdmin@cpandl.com)
6. Click OK.
To set InternalLicensingEnable true by ExchangeManagement Shell
1. Log on as CPANDL\Administrator to Microsoft Exchange Server
Page 44

Foxit PDF Secure RMS Protector
44
User Manual
2. Navigate to Start->All Programs->Microsoft Exchange Server ->Exchange Management Shell
3. Type "Get-IRMConfiguration"
4. Type " Set-IRMConfiguration -InternalLicensingEnable $true" to enable licensing.
5. Type " Get-IRMConfiguration " again ,to check InternalLicensingEnalbe is true.
Working with Foxit PDF Secure RMS Protector
For Exchange 2010
1. Log on as CPANDL\Administrator to EX01
2. Open the Exchange Management Shell.
3. Enter the following task and parameters:
Page 45

Foxit PDF Secure RMS Protector
45
User Manual
New-TransportRule -Name “Test Transport Rule for Encryption” -Enabled $true -
SubjectOrBodyContainsWords “secret” -ApplyRightsProtectionTemplate “Do Not Forward”
4. Log on as CPANDL\test to Client, and open Microsoft Outlook 2010, new an Email (for example,
send an e-mail to emily1@cpandl.com). The Email includes the PDF attachment.
And then click Send.
5. Log off and log on as CPANDL\emily1 to the Client
6. Open Microsoft Outlook 2010. In the inbox, we can see the email which has been tested to
send.
Page 46

Foxit PDF Secure RMS Protector
46
User Manual
7. Double click the email. We can see the email did not get forwarded. View the permission, and
the detail permission is displayed as shown below-----My Permission.
8. Double click the PDF attachment to open it. We can see the permission shown below: not
allowed to be printed, copied, or accessed.
Page 47

Foxit PDF Secure RMS Protector
47
User Manual
For Exchange 2013
1. Log on as QA2012\Administrator to QA2012-EXC
2. Open the Exchange Management Shell.
3. Enter the following task and parameters:
New-TransportRule -Name “Test Transport Rule for Encryption” -Enabled $true -
SubjectOrBodyContainsWords “secret” -ApplyRightsProtectionTemplate “Do Not Forward”
4. Log on as QA2012\Administrator to Client, and open Microsoft Outlook 2013, new an Email
(for example, send an e-mail to rms1@qa2012.com). The Email includes the PDF attachment.
Page 48

Foxit PDF Secure RMS Protector
48
User Manual
And then click Send.
5. Log off and log on as QA2012\rms1 to the Client
6. Open Microsoft Outlook 2013. In the inbox, we can see the email which has been tested to
send.
7. Double click the email. We can see the email did not get forwarded. View the permission, and
the detail permission is displayed as shown below-----My Permission.
Page 49

Foxit PDF Secure RMS Protector
49
User Manual
8. Double click the PDF attachment to open it. We can see the permission shown below: not
allowed to be printed, copied, or accessed.
Page 50

Foxit PDF Secure RMS Protector
50
User Manual
Chapter 4 - Watermark Configuration Tool
Watermark configuration tool allows you add, edit, delete, import, and export security
watermark to the files protected by RMS technology to improve the security and protect
copyright of the author. This chapter will introduce the steps of using the tool.
The watermark configuration tool will pop up after finishing the installation or you can
double-click the icon on desktop to open it.
Creating Profile
Before adding a watermark, you should create a profile first. The application will apply all of the
watermarks in the profile to a PDF.
Note: you can only choose a profile but not a certain watermark to use. Please create the
watermarks you want to add to one PDF in the same profile.
Open the watermark configuration tool and check the option “Show the security watermark
in protected PDF document.”
Click Select to open the Security Watermark Management.
Click New Profile to create a profile and name it.
Page 51

Foxit PDF Secure RMS Protector
51
User Manual
Note: Users can use the dynamic security watermark feature to better protect PDF files from
unauthorized duplication. The PDF file protected by dynamic security watermark will be saved in
Foxit protected PDF format and can only be opened by Foxit products.
Adding Watermark
To add a new watermark, please do the following:
Open the Security Watermark Management, select a profile you created and click Add to
add watermarks to the profile.
Name the watermark in the Name field.
Type the watermark’s content in the text box and set the font, size, color, underline, and
alignment.
Note: you can only set text as watermark.
In the Dynamic text, you can select the option as needed to show the dynamic security
watermark.
Select dynamic variable: show the current document information dynamically and multiple
text are available at the same time.
Content ID: shows the content ID of the current document.
Document Title: show the current document title.
Author: show the author of the current document.
Current User: show the current user who is reading the document.
Date: show the current system date when opening the document.
Day: show the current system day when opening the document.
Month: show the current system month when opening the document.
Year: show the current system year when opening the document.
Time: show the current system time when opening the document.
Hour: show the current system hours when opening the document.
Page 52

Foxit PDF Secure RMS Protector
52
User Manual
Minute: show the current system minutes when opening the document.
Second: show the current system seconds when opening the document.
Set the appearance by choosing the rotation degree and the opacity. You also have the
option to select the scale relative to the target page.
Set the vertical and horizontal distance between the target page and the watermark.
Choose the page range to display the watermark. You can choose to display the watermark
for all pages in rage, even pages only or odd pages only in the subset list.
Preview the watermark in the right pane.
Click OK to finish it.
Editing or Deleting Watermark
Editing a Watermark
Open the Security Watermark Management and select a watermark you want to edit.
Click Edit to open the Edit Security Watermark dialog box.
Start to edit the watermark, please refer to “Adding Watermark”.
Click OK to finish the operation.
Deleting a Watermark
Open the Security Watermark Management and select a watermark you want to delete.
Click Delete to remove the selected watermark.
Importing or Exporting Watermark
Importing a Watermark
Open the Security Watermark Management and click Import.
Page 53

Foxit PDF Secure RMS Protector
53
User Manual
Choose a watermark with .xml format.
Click Open.
Exporting a Watermark
Open the Security Watermark Management and select a watermark you want to export.
Click Export and choose a file type and location to save.
The watermark will be exported as an .xml file or encoded file according to your choice. It
can be integrated into AD RMS policy template and applied to the PDF files by Foxit Phantom
PDF.
Note:
1. If you want to integrate the watermark to a common policy template, please export it as
an .xml file and add it to the template by Phantom PDF directly.
2. If you want to integrate the watermark to an official policy template, please export it as an
encoded file (.txt format) and integrate it into the template by AD RMS Scripting API
Architecture. Then you can import the template and apply it to PDFs by PhantomPDF.
(Please click here to see the example and use the value of “appData.Name” and
“appData.Value” in the exported encoded file.)
Page 54

Foxit PDF Secure RMS Protector
54
User Manual
Chapter 5 - FAQ
1. In the SharePoint environment, do we need to perform iisreset after installing the Foxit
PDF Protector?
Yes. Foxit PDF Protector will not work immediately when it is installed. Please perform
iisreset to ensure that the SharePoint server invokes Foxit PDF Protector.
2. Why is the PDF downloaded from the SharePoint Document Library still unprotected after
installing the Foxit PDF Protector?
First, check that the IRM protection rules have been configured in the SharePoint Document
Library. For example, ([Library Name]->Setting->Information Rights Management
Settings->Restrict permission to documents in this library on downloads).
Then, clear your browser’s Temporary Internet Files. For example, (IE8: Internet
Options->General->Delete->check Temporary Internet files->click delete).
3. Why doesn’t the Foxit PDF Protector work after being used for some period of time?
Because that you can only use the Free Trial version for 30 days. If you want to continue
using the Foxit PDF Protector, please contact us by sending an email to
sales@foxitsoftware.com to get the formal product license.
4. I got the authorized license file. How can I use it?
Please copy the license file to the same folder where you installed Foxit PDF Protector.
Note: Please ensure that all the users in the domain have the basic permission to “Read” and
“Read & Execute”, or the license file may not work.
Page 55

Foxit PDF Secure RMS Protector
55
Office Address:
Foxit Software Incorporated
42840 Christy Street. Suite 201
Fremont CA 94538
USA
Mailing Address:
Foxit Software Incorporated
42840 Christy Street. Suite 201
Fremont CA 94538
USA
Sales:
1-866-680-3668 (24/7)
Support:
1-866-MYFOXIT or 1-866-693-6948(24/7)
Fax:
510-435-9288
Website:
www.foxitsoftware.com
E-mail:
Sales and Information - sales@foxitsoftware.com
Technical Support - Input a trouble ticket online
Marketing Service - marketing@foxitsoftware.com
User Manual
Contact Us
Feel free to contact us should you need any information or have any problems with our products.
We are always here, ready to serve you better.
 Loading...