

Page 1

Foxit MobilePDF for iOS
Quick Guide
1
Page 2

Foxit MobilePDF
Quick Guide
Contents
Chapter 1 Description ........................................................... 3
Chapter 2 Main Menu ............................................................ 5
Chapter 3 File Management .................................................. 7
Chapter 4 Viewing PDF Files ................................................. 8
Chapter 5 Annotation ......................................................... 13
Chapter 6 Signatures .......................................................... 18
Chapter 7 Text to Speech ................................................... 19
Chapter 8 Cloud Storage and File Sharing .......................... 21
Chapter 9 Fill Out PDF Forms .............................................. 25
Chapter 10 Photo to PDF .................................................... 27
Chapter 11 More Features .................................................. 28
Chapter 12 Settings ............................................................ 30
Contact Us .......................................................................... 32
2
Page 3

Foxit MobilePDF
Quick Guide
Chapter 1 Description
Foxit MobilePDF enables you to view and annotate PDF documents on the go, allowing you to
work on your PDF documents anytime, anywhere.
View PDF files
§ Open PDF files from iTunes, Email, Safari, and Cloud services
§ Supports different page layouts: Single page, Continuous, Facing or Thumbnail mode
§ File navigation by outlines, bookmarks, or search results
§ Supports zooming in/out and locking the zoom control
§ Preview MS Word, Excel, PowerPoint, TXT and image files
§ Supports iOS dictionary to provide definition for selected content (for iOS 5 and above)
§ Supports read out loud function (for iOS 7 and above)
Modify PDF files
§ Annotate documents using feature rich annotation tools
§ Add stamps to PDF files
§ Add and edit bookmarks
PSI signature integration
§ Sign PDF files with your own handwriting using Pressure Sensitive Ink technology support
Fill out PDF forms
§ Quickly fill out and save PDF forms
§ Import, export and send form data
File Protection
§ Protect or unprotect PDF files with a password
§ Specify the permissions to restrict specific operations to PDF files (copy, print, etc.)
§ Restrict access to application by password lock
§ Prevent unauthorized access to PDF files from the third party tools through the data protection
system
Organize PDF files
§ Easily reorder or remove pages in Thumbnail view
§ Quickly rename, move, copy or delete PDF files in document manager
§ Zip and unzip files
Share, store and synchronize PDF files
§ Capture and share screen captures
3
Page 4

Foxit MobilePDF
Quick Guide
§ Share PDF files via Facebook, Twitter, Sina Weibo, Tencent Weibo, AirDrop, Evernote, and
WeChat.
§ Share multiple files across your desktop and iOS device via Wi-Fi
§ Save, synchronize and access PDF files through popular cloud storages like Google Drive and
Dropbox. Open and read the PDF files stored in the iCloud Drive.
§ Send PDF files as attachments via Message or Mail
Convert images to PDFs--an In-App Purchase feature
§ Create PDFs from camera and photo library
4
Page 5
Foxit MobilePDF
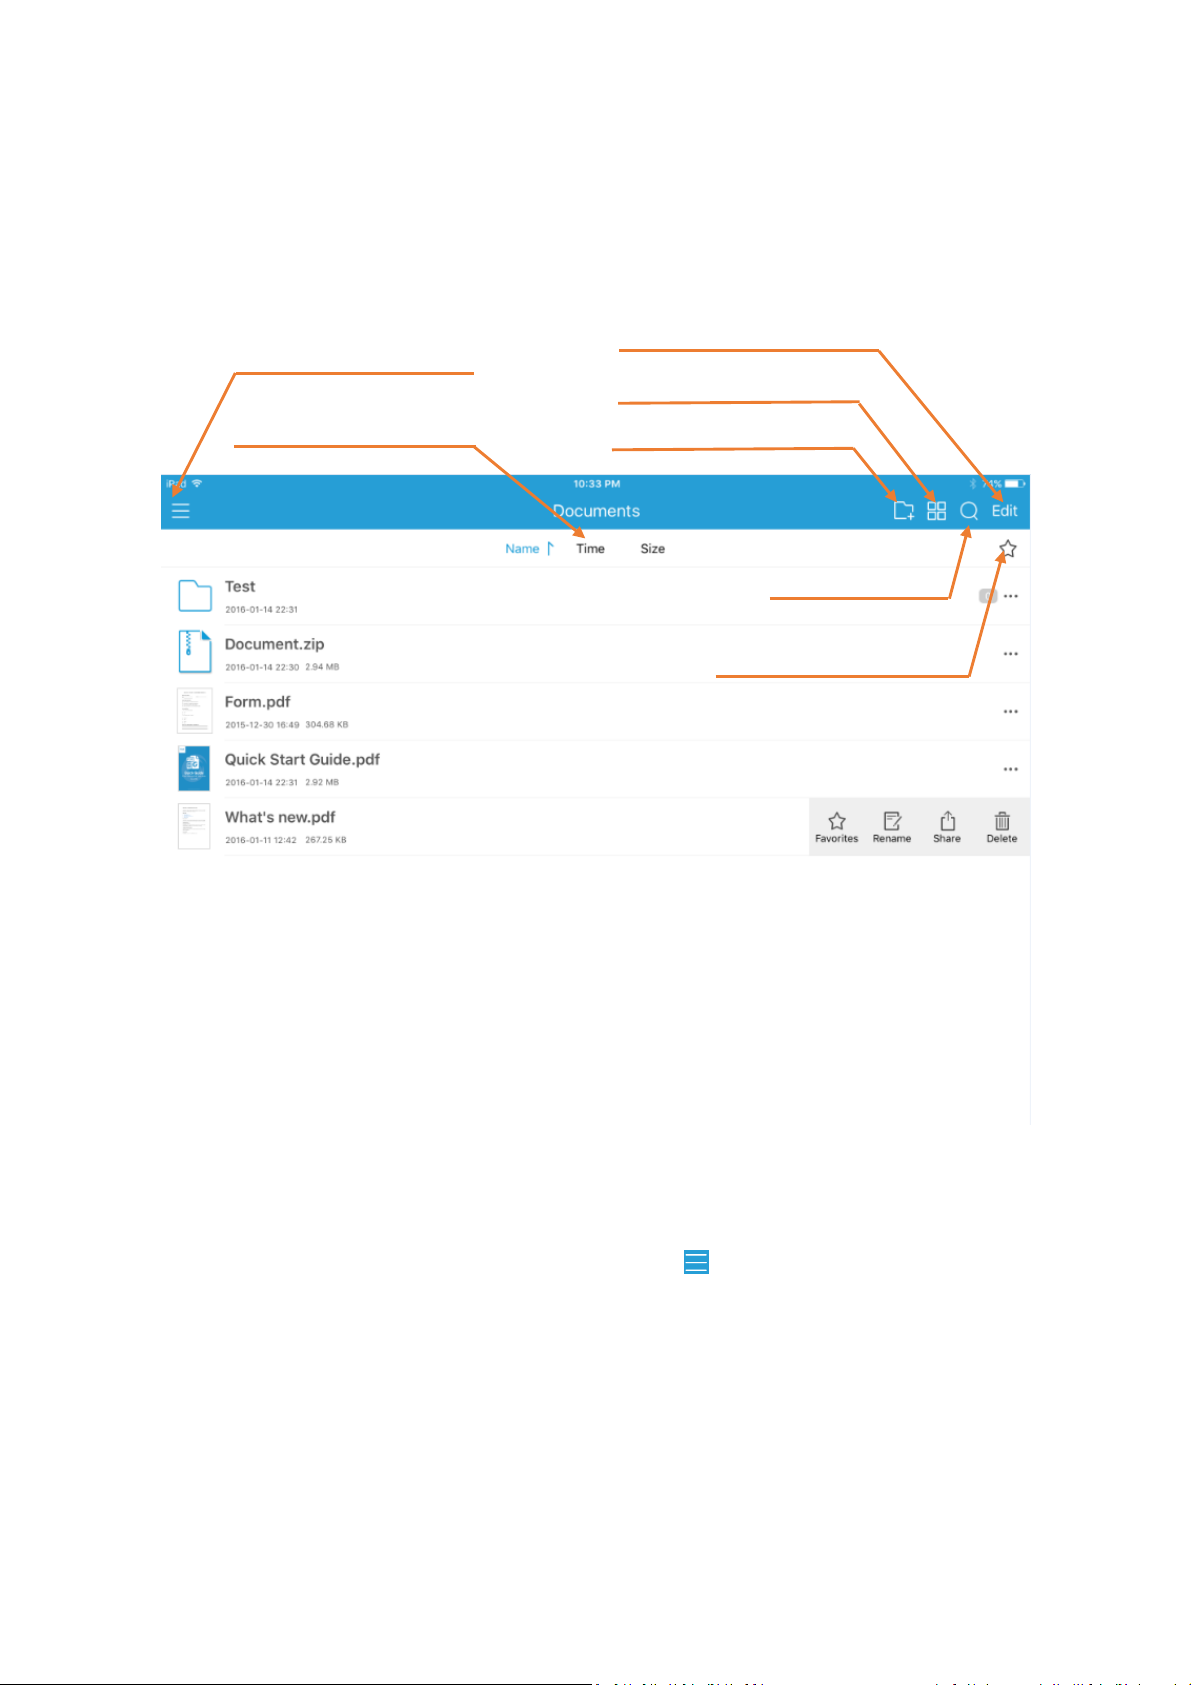
Sort files by file name, size
or last modified time
Create a new folder
Search files
View the favorite files
Manage files
Open the Tool Switcher
Change file display mode
Quick Guide
Chapter 2 Main Menu
Foxit MobilePDF offers a clean and clear user interface, presenting a friendly user experience.
With a rich set of tools, Foxit MobilePDF allows you to view, transfer, and convert PDF files.
Toolsets are available from the Tool Switcher. You can tap to open the Tool Switcher.
Main Workspace
5
Page 6

Foxit MobilePDF
Learn the copyright information
and send feedback about the app
Set the preferences
Tool Switcher
View recently opened files
Access and manage cloud
services
Transfer files with Wi-Fi
Convert images to PDF
View local files
Quick Guide
6
Page 7
Foxit MobilePDF
To:
Do:
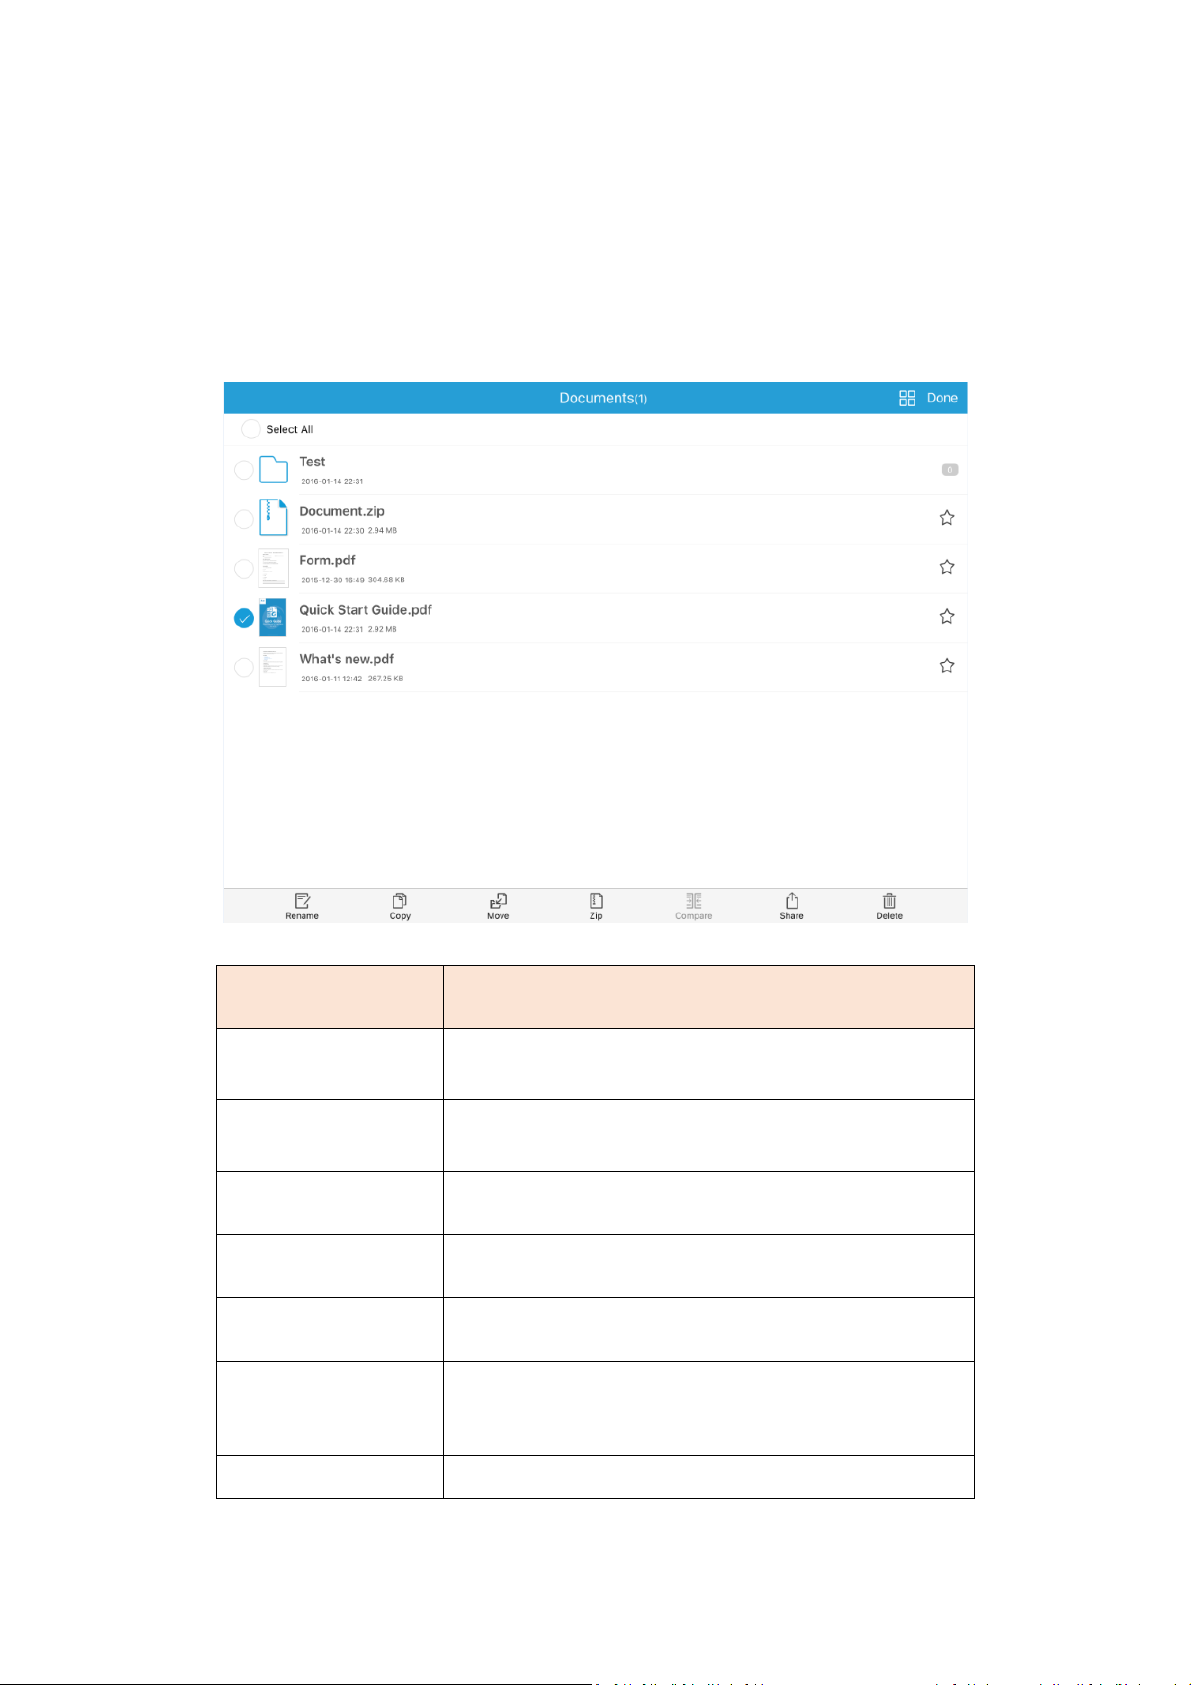
Rename
Select the file or folder to be renamed, tap “Rename”, and
input the name for the file or folder.
Copy
Select the file or folder to be copied, tap “Copy”, and select
the target folder.
Move
Select the file or folder to be moved, tap “Move”, and
select the target folder.
Zip
Select the files (or folders) to be zipped, tap “Zip”, and then
input the file name for the zip file.
Compare
Select two files that you want to compare, tap “Compare”
to compare the files on the same interface.
Share
Select the file to be shared, tap “Share”, input the email
address and tap “Send” to mail out the PDF as an
attachment.
Delete
Select the file or folder to be deleted, tap “Delete”.
Quick Guide
Chapter 3 File Management
Foxit MobilePDF allows you to manage files easily. You can rename, move, copy, delete, share,
zip, or compare the files in File Manager. Just tap “Edit” in the upper right corner of the main
menu, select the files or folders to be edited, and then tap the relevant option as needed.
7
Page 8

Foxit MobilePDF
Quick Guide
Chapter 4 Viewing PDF Files
Foxit MobilePDF provides a set of powerful tools for you to view and work with PDF files in a
convenient way. While reading a PDF file with Foxit MobilePDF, you can tap anywhere on the
document to show or hide the toolbar.
Open a PDF
Open a PDF file in the Foxit MobilePDF application:
1) Tap on any file in the “Documents” list to view local files.
2) Tap “Recent” to view the recently opened files.
3) Tap icon to show the favorites list and open one of the favorite files.
All the files saved in Foxit MobilePDF are displayed in the “Documents” list. To upload PDF
files to Foxit MobilePDF, please choose one of the methods below:
1) From Desktop iTunes
Connect your device to your computer;
Open iTunes from your computer, and select your device;
Click “Apps” from the “Settings” menu;
Scroll down until you find the “File Sharing” list, and then select “Foxit PDF” under the
“File Sharing” list;
Drag and drop the PDF files from your computer to the “Foxit PDF Documents” area right
beside the Apps list; or click “Add File” and choose the PDF file;
Click “Sync”. The PDF files will be synced to Foxit MobilePDF and will be displayed in the
“Documents” list.
2) Wi-Fi File Transfer
Enable Wi-Fi file transfer and upload the PDF files to Foxit MobilePDF by visiting the IP
address of your iOS device from your computer. Please refer to “File Sharing” for more
details.
Open a PDF file from other applications:
Email
Open the email containing the PDF attachment;
Long press the PDF file, and tap “Open in Foxit PDF”.
Safari or browser
Tap the PDF file to access the “Open in" menu;
8
Page 9

Foxit MobilePDF
Quick Guide
Tap “Open in” and choose “Open in Foxit PDF”.
Cloud services
Log in the cloud service, and then tap the PDF file directly. For more instructions on how
to add cloud services and synchronize PDF files, please refer to “Cloud Storage”.
Zoom
1) Use the two-finger pinch gesture.
2) Double tap to zoom in instantly.
View Mode
Page display mode:
1) Single page: Display one page at a time. Slide from right to left to turn to the next page.
2) Continuous page: Display pages continuously. Swipe up to view the following pages.
3) Facing: Display two pages side by side or one page at a time based on the orientation of
your iPad: two pages side by side when your iPad is rotated to landscape view, and one page
at a time when your iPad is in portrait view.
4) Thumbnail: View PDF files in thumbnails.
5) Reflow: View PDF files in plain text mode.
6) Speak: Read the PDF file out loud.
7) Crop mode: Remove unnecessary document margins automatically for a better reading
experience.
8) Screen Lock: Lock the page orientation in Landscape or Portrait mode. When this option is
enabled, the page will remain in the locked orientation even if your device orientation
changes.
9) Lock zoom: Lock the current zoom status to view the whole PDF in your desired zoom ratio.
Zoom in or out the page as required first, then tap the “Lock zoom” option, and you will be
able to view the whole PDF in the current zoom ratio.
10) Regulated Drag: Lock your drag direction. Enabling this option will allow you to drag the
page in one general direction (horizontally or vertically), instead of both at the same time.
11) Auto-Brightness: Adjust the brightness of the screen based on the system’s brightness.
12) Brightness: Adjust the brightness manually. This is only available when you disable
Auto-Brightness.
13) Night mode: Switch between Day Mode and Night Mode.
File display mode:
9
Page 10

Foxit MobilePDF
Quick Guide
Foxit MobilePDF supports displaying a series of PDF files in list or thumbnail view in the File
List. You can switch between list view and thumbnail view by tapping on the main
menu.
1) List view: Display the files as a list.
2) Thumbnail view: Display the files with thumbnails in large icons.
Navigate PDF files with outlines, bookmarks, annotations, or
search results
Tap “List” on the document pane to open the Navigation panel. In the Navigation panel, you
can tap the “Outline” or “Annotation” icons to switch to the Outline or Annotations panel.
1) Outline: display the list of outlines for the PDF file.
2) Bookmark: provide rename, delete, and jump to view functions for fast positioning.
3) Annotation: list all annotations in the document along with their type, date created, and
author.
Search text
1) Search within a PDF file
10
Page 11

Foxit MobilePDF
Quick Guide
Tap in the toolbar at the top.
Type the word or phrase you’d like to find in the search box, and then tap “Search”.
Tap on any item in the list to jump to the corresponding page.
While in the document pane:
Tap “Previous” or “Next” in the toolbar at the bottom to jump to the
previous or next search results respectively.
Tap in the toolbar at the bottom to show or hide the search result panel.
2) Search in Google or Wikipedia
Input the text you want to find in the search box, tap , and then choose “Search in Google”
or “Search in Wikipedia” to search in Google or Wikipedia respectively.
11
Page 12

Foxit MobilePDF
Quick Guide
Zip and unzip files
Foxit MobilePDF allows you to zip files to save storage space or to share them easily. You can
also unzip files with just one tap.
1) Zip the files
Tap “Edit” in the upper-right corner of the document pane;
Select the files (or folders) to be zipped;
Tap “Zip”;
Input a name for the zip file and tap “OK”.
2) Unzip the files
Tap the zip file directly, and then the zip file will be unzipped automatically.
Compare two files
With Foxit MobilePDF, you can view two files side by side. This helps you compare two
documents in an easy and convenient way.
To compare two files, please follow the steps below:
Tap “Edit” in the upper-right corner of the document pane;
Select two files to be compared;
Tap “Compare”.
The two files you selected will be displayed in the same document panel for easy
comparison.
Note: Currently, Foxit MobilePDF only supports comparing no more than two files at a time.
12
Page 13

Foxit MobilePDF
Button
Tool Name
Description
Highlight Text Tool
Tap to highlight text.
Underline Text Tool
Tap to underline text.
Squiggly Text Tool
Tap to draw a squiggly line under the text.
Strikeout Text Tool
Tap to strikeout text.
Line Tool
Tap to draw a line.
Rectangle Tool
Tap to draw a rectangle.
Circle Tool
Tap to draw a circle.
Arrow Tool
Tap to draw an arrow.
Pencil Tool
Tap to draw free-form shapes.
Eraser Tool
Tap to erase drawings made by Pencil Tool.
Typewriter Tool
Tap to add text to the document.
Note Tool
Tap to add a Note comment.
Signature Tool
Tap to create signature.
Stamp Tool
Tap to add stamps in the document.
Quick Guide
Chapter 5 Annotation
Foxit MobilePDF provides a full set of annotation tools to help you comment on PDFs.
Annotation tools include Text Markup tools, Drawing Markup tools, Typewriter tool, Note tool,
Signature tool, and Stamp tool.
Choose the annotation tool
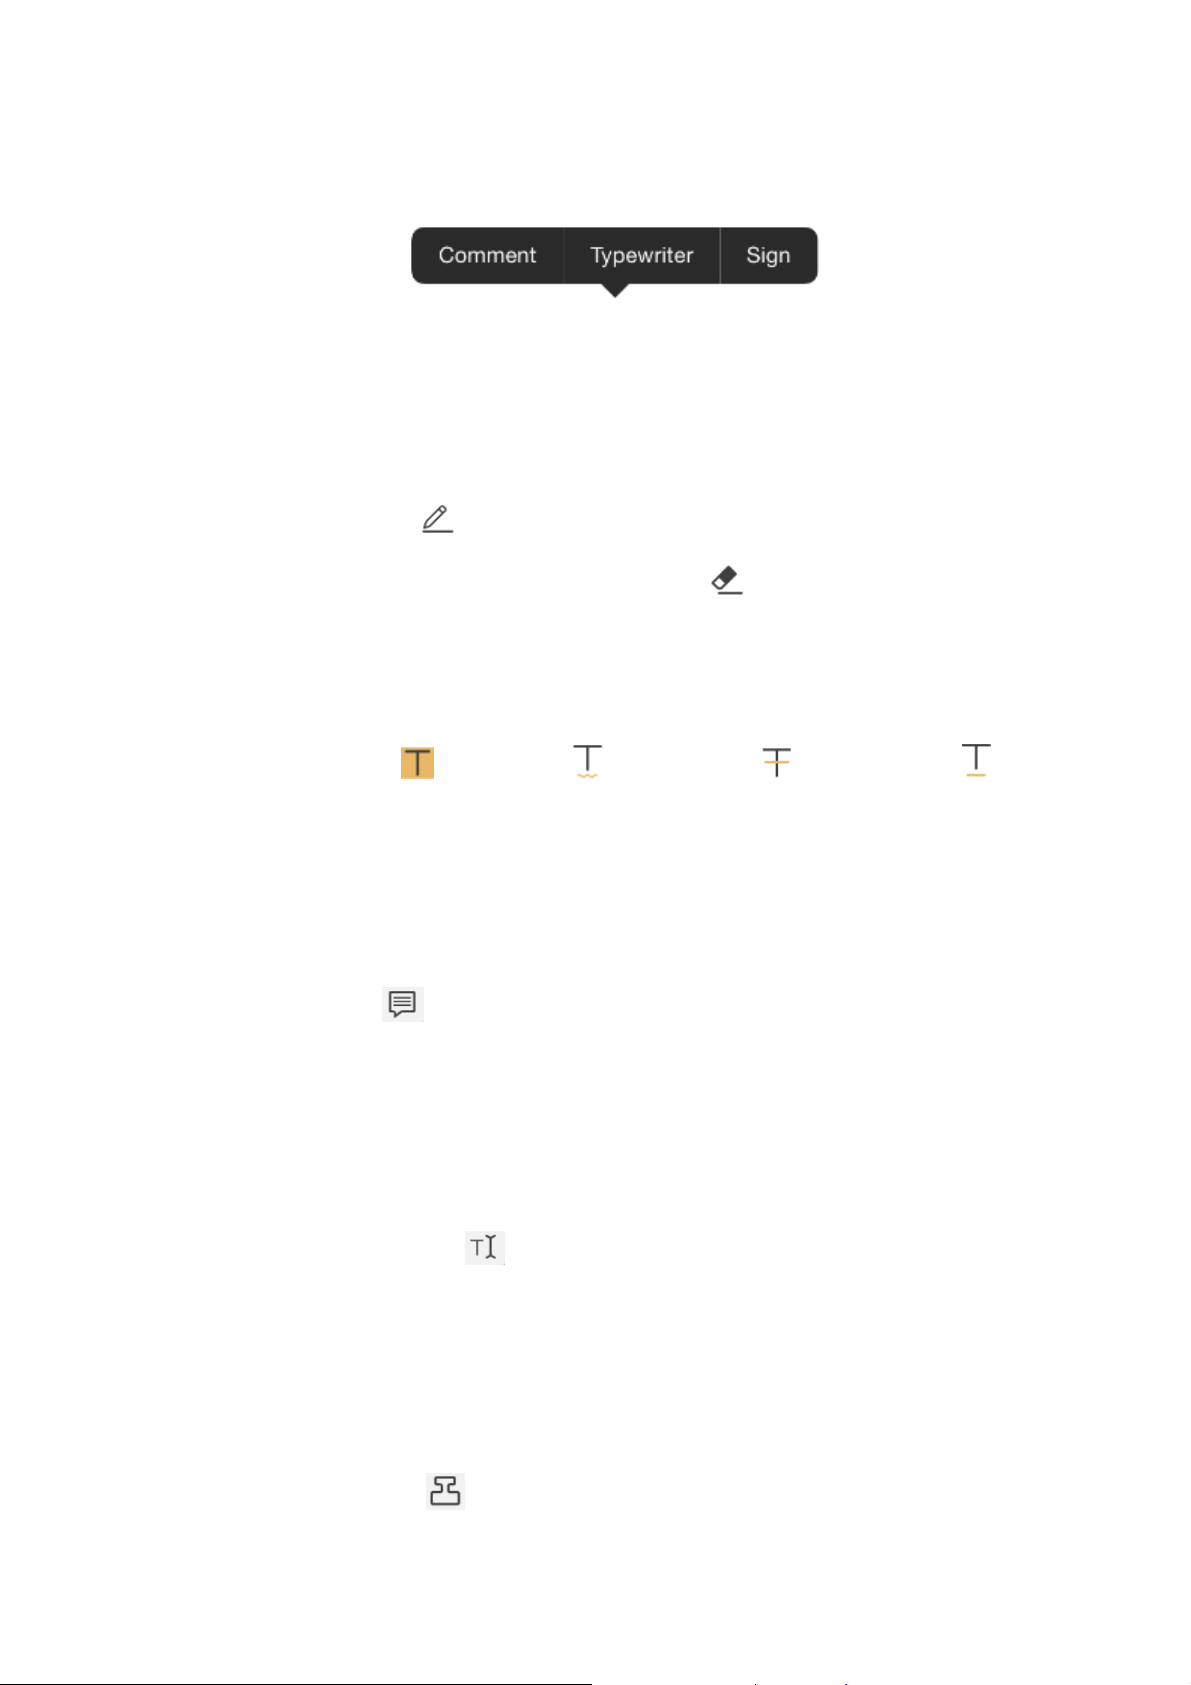
Tap
“Comment”
annotation tools, and then choose the specific tool as needed.
to reveal the annotation toolbar. You can tap to display all the
13
Page 14
Foxit MobilePDF
Quick Guide
To bring out the Note tool, Typewriter tool or Signature tool, you can just tap and hold
anywhere on the PDF file, and then choose a tool from the pop-up menu (as shown below).
Add drawing markups
Choose the drawing markup tool as needed from the annotation toolbar;
Drag across the area where you want to add the markup.
You can choose Pencil tool to draw free-form shapes.
For markups made by Pencil tool, you can tap the Eraser tool to remove the drawings.
Highlight, squiggle, strike out or underline text
Tap Highlight tool , Squiggly tool , Strikeout tool ,or Underline tool as
required from the annotation toolbar;
Drag over the text you’d like to annotate.
Add Note comments
Tap the Note tool from the annotation toolbar;
Tap on the document where you’d like to add the note;
Input the comment in the pop-up box, and tap “Save”.
Add text comments
Choose the Typewriter tool from the annotation toolbar;
Tap on the document where you’d like to add text;
Input text as needed.
Add stamps
Choose the Stamp tool from the annotation toolbar;
14
Page 15

Foxit MobilePDF
Quick Guide
Select a stamp from the preset list;
Tap on the document where you want to add the stamp;
After adding the stamp, you can tap the added stamp and choose “Open” from the pop-up
menu to input a comment.
Add signatures
Foxit MobilePDF supports creating and adding signatures to your PDF file. For detailed steps,
please follow the instructions in Chapter 6.
Change the appearances of annotations
1) Change the appearances of existing annotations
Tap the existing markup that you want to change the appearance of;
Choose “Appearance” from the pop-up menu;
Choose a color, opacity or thickness as desired.
Tip: For Note comments, you should tap and hold the Note icon to bring out the pop-up
menu.
2) Change the appearances of annotation tools
Tap and hold on the annotation tool that you want to change the appearance of;
Tap , and pick a color, opacity, or thickness as desired. Choose the desired options.
The new appearance will be applied when you add a new annotation.
Tips:
1. Options may vary according to the type of annotation tools. You can change the color and
opacity for all annotations. For Drawing Markup tools, you can also set the thickness; for Note
tool, you can change the note icon as well; and for Typewriter tool, you can also change the font
and font size.
2. You cannot change the appearance of stamp annotations.
15
Page 16

Foxit MobilePDF
Quick Guide
Appearance Settings for Drawing Markup Tools Appearance Settings for Typewrite Tools
Appearance Settings for Note tool Appearance Settings for Text Markup tool
Move the markups
Tap the markup and then drag to move it.
Tip: For Note annotations, you should tap and hold the Note icon first, and then move it.
Resize the markups
Tap the markup to be resized first, and then drag any of the handles to resize it.
Tip: Note annotations cannot be resized.
Delete the markups
Tap the markup to be deleted first, and then choose “Delete” from the pop-up menu.
16
Page 17

Foxit MobilePDF
Quick Guide
Tip: For Note annotations, you should tap and hold the Note icon and then choose “Delete” from
the pop-up menu.
Import and export annotations
1) Import annotations
Tap , and choose “Import Annotations”;
Select the file (.fdf file) to be imported, and tap “Select”. Then the annotations will be
imported to the current PDF file.
2) Export annotations
Tap , and choose “Export Annotations”;
Select the folder in which you want to save the exported annotation file, and tap
“Select”;
In the pop-up dialog box, input the file name, and tap “OK”. Then the annotations in the
current PDF file will be exported and saved as an FDF file in the file folder you selected.
17
Page 18

Foxit MobilePDF
Quick Guide
Chapter 6 Signatures
With Foxit MobilePDF, you can sign a PDF document by placing your personal signature on the
appropriate place in a document.
Tap in the annotations toolbar to create a signature and save it in Foxit MobilePDF. You can
place the signature on any document if the document permission allows.
Tap the signature and choose “Edit Saved Signature” to edit a current signature or to create new
ones.
18
Page 19

Foxit MobilePDF
Quick Guide
Chapter 7 Text to Speech
Foxit MobilePDF supports reading the text of the PDF out loud (available for iOS7 and above).
Foxit MobilePDF will identify and choose the speaking language intelligently and automatically
according to the language of the text, and will allow you to control speaking through the Quick
Control Panel when your iOS device is locked.
Read the whole page out loud
Tap “View” in the toolbar at the bottom;
Tap .Foxit MobilePDF will start speaking from the current page.
Read the selected text out loud
Select the text first and then choose “Speak” from the pop-up menu.
Adjust the speaking rate
1) Speed up the speech: Tap on the Speech interface.
2) Slow down the speech: Tap on the Speech interface.
Suspend or stop speaking
1) Suspend speaking: Tap to suspend speaking. You can tap to continue speaking.
19
Page 20

Foxit MobilePDF
Quick Guide
2) Stop speaking: Tap .
Speak the previous page or next page
Tap the previous page button or the next page button respectively in the Speech
interface.
Continue speaking when Foxit MobilePDF is running in
background mode
Please enable “Background Speech” in “Settings”.
Control speaking through Quick Control Panel
Open your iOS device, and then you can adjust the speaking volume, suspend the speaking, or
turn to the next or previous page through the Quick Control Panel.
20
Page 21

Foxit MobilePDF
Quick Guide
Chapter 8 Cloud Storage and File Sharing
Cloud Storage
Foxit MobilePDF supports most popular cloud storage services, including: Dropbox, Google Drive,
OneDrive, Box, FTP, SFTP, WebDAV, and iCloud Drive. With Foxit MobilePDF, you can store and
download files and folders directly from cloud storage services.
Note: For iCloud Drive, Foxit MobilePDF only supports opening PDF files already stored in iCloud
Drive.
Connect to cloud storage services (using OneDrive as an example)
• Tap to open the Tool Switcher;
• Tap “Cloud”;
Tap “Add Cloud”;
•
Select “OneDrive”;
•
Enter the account name and password to log in to OneDrive;
•
After authorization, your OneDrive account will be saved under the “Cloud Storage” list. Tap
•
it to view your OneDrive files.
Download PDF files from cloud storage
Tap on any file to download and open it.
•
To download several files:
•
1) Tap “Edit”;
21
Page 22

Foxit MobilePDF
Quick Guide
2) Select the files or folders as needed;
3) Tap “Download”;
4) The files and folders will be copied to the download folder in Foxit MobilePDF
“Documents” list.
Synchronize PDF files
Connect to the cloud storage service first;
Tap in the upper- right corner of the interface;
In the pop-up dialog, tap “Sync” to confirm synchronization.
Once the sync is completed, the full copy of the file/folder will be available from the
“Documents” list.
22
Page 23

Foxit MobilePDF
Quick Guide
Foxit MobilePDF will synchronize all the stored contents if you tap “Sync” in the root folder of
your account. It is recommended to sync with one specific folder to make the sync fast and
reliable.
Auto Sync
Auto Sync is enabled by default, but you can disable it under “Setting”. You can also choose to
synchronize your information using Wi-Fi only or via Wi-Fi and Cellular Network.
File Sharing
Foxit MobilePDF allows you to share files across your desktop and iOS device via Wi-Fi, to deliver
a smooth and convienent sharing workflow. Steps are as follows:
Enable Wi-Fi file transfer on Foxit MobilePDF first by the following steps:
Tap to open the Tool Switcher;
Tap “Wi-Fi”;
Tap “Enable file transfer”;
(Optional) Tap in the upper-right corner of the interface, and then tap the
“Require Password” option to set a username and a password if you need to restrict
network access to your iOS device;
Open a web browser from your computer, then input the address of your iOS device;
Input the username and password if you have set a password for network access;
Click “Browse” at the buttom and select the files to be uploaded to your iOS device;
Click “Upload” at the buttom, and then the selected files will be uploaded to your iOS
device.
23
Page 24

Foxit MobilePDF
Quick Guide
24
Page 25

Foxit MobilePDF
Quick Guide
Chapter 9 Fill Out PDF Forms
Foxit MobilePDF provides PDF form support. You can fill out PDF forms, reset form fields, import,
and export form data with ease.
Fill out PDF forms
Tap the fillable form field and input the text;
Once completed, tap on the upper right corner of the document pane, and choose
“Save”.
Import and export form data
1) Import form data
Tap , and choose “Import Form Data”;
Choose the form data file (.fdf file) to be imported, and tap “Select”; Then the form data will
be imported to current PDF form.
2) Export form data
Tap , and choose “Export Form Data”;
Select a folder in which you want to save the exported form data file, and tap “Select”.
25
Page 26

Foxit MobilePDF
Quick Guide
In the pop-up dialog box, input the file name and tap “OK”. Then the form data in current
PDF form will be exported and saved as an FDF file in the folder you selected.
Reset form fields
Tap , choose “Reset Form Fields”, and tap “Yes” to confirm your operation.
Change the highlight color for form fields
For PDF forms, Foxit MobilePDF will highlight the interactive form fields (in yellow by default) for
easy recognition. To change the highlight color, please tap “Setting” and then choose a color
from the color palette for the “Highlight Form Field” item.
26
Page 27

Foxit MobilePDF
Quick Guide
Chapter 10 Photo to PDF
Converting PDF is one of the In-App Purchase features, which allows you to convert images to
PDF. Foxit MobilePDF will remind you to enable the “Photo to PDF” function through a paid
license if it is disabled. After you purchased the license, the following two options (i.e. Camera
and Album) will be activated after tapping .
1) Camera: take a picture and convert it to PDF.
2) Album: pick pictures from your photo library and convert them to PDF.
27
Page 28

Foxit MobilePDF
Quick Guide
Chapter 11 More Features
Brightness: Tap “View” to open the View
Mode panel, and then drag the brightness
slider to adjust the brightness of the screen as
desired.
Wireless Print: Tap , and choose
“Wireless Print”. The “Printer Options” dialog
will pop up to let you select your printer and
set the number of copies you want to print.
Share: Tap , choose “Share”, and then
tap the sharing platform that you want to use
to share your PDF.
Screen Capture: Tap , and choose
“Screen Capture”. Capture the screen you
want to share and then choose the sharing
platform.
Note: Screen Capture is available for iOS 6
and above.
28
Page 29

Foxit MobilePDF
Quick Guide
Open in: Tap ,and choose “Open in”.
You can open the original document in other
apps like Adobe Reader.
File Encryption: Tap ,and choose “File
Encryption”. The Encryption dialog will pop
up to let you set your encryption options.
Save: Tap , and choose “Save”. You can
save or discard changes to the current PDF
file.
29
Page 30

Foxit MobilePDF
Quick Guide
Chapter 12 Settings
Foxit MobilePDF provides an easy way for you to customize your application. You can set the
preferences for Foxit MobilePDF under Setting; this includes security, document viewing, auto
sync, and more.
General Settings
Password lock allows you to protect document from being viewed by another person. Once set,
the application will ask for the password on each launch.
PDF View
Remember Last Position: Remember the last viewing position for you to pick up where you left
•
off.
Highlight Links: Enabling this option highlights the hyperlink text in PDF files. You can choose a
•
highlight color from the color palette.
Highlight Form Field: Highlight the interactive form field in PDF files. You can change the
•
highlight color from the color palette.
Auto Turn Page When Speaking: Automatically turn to the currently spoken page during
•
speech. No action is executed if you are editing the PDF.
Background Speech: Continue speaking if the application is running in background mode.
•
Continuously Add Annotation: Allows you to add annotations with the same comment tool
•
continuously.
Annotation Author: The name of annotator showed in your PDF.
•
Share
Link to Evernote: Login Evernote with your Evernote account so that you can share PDFs via
Evernote.
Auto Sync
Disabled: Disable Auto Sync.
•
Wi-Fi Only: Automatically sync your information wirelessly using Wi-Fi only.
•
Wi-Fi + Cellular Network: Automatically sync your information via Wi-Fi and Cellular Network.
•
30
Page 31

Foxit MobilePDF
Quick Guide
Product Improvement Program
Allow Tracking: Collect anonymous usage data about the functions and send it back to Foxit for
•
product improvement purposes only. The data will not be open to the public and will only be
sent via Wi-Fi network.
31
Page 32

Foxit MobilePDF
Quick Guide
Contact Us
Feel free to contact us should you need any information or have any problems with our products.
We are always here, ready to serve you better.
Office Address:
Foxit Software Incorporated
42840 Christy Street. Suite 201
Fremont CA 94538
USA
Sales:
1-866-680-3668 (24/7)
Support:
1-866-MYFOXIT or 1-866-693-6948 (24/7)
Fax:
1-510-405-9288
Website:
www.foxitsoftware.com
E-mail:
Sales and Information - sales@foxitsoftware.com
Technical Support - Input a trouble ticket online
Marketing Service - marketing@foxitsoftware.com
32
 Loading...