

Page 1

RAID User Guide
Edition
V1.0 P/N: 91-187C51GME0-00
Trademarks
All brand or product names mentioned are trademarks or registered trademarks of their respective holders.
PDF created with pdfFactory Pro trial version www.pdffactory.com
Page 2

NVIDIA RAID........................................................................................1
RAID Arrays...............................................................................................................1
Install Hard Disks....................................................................................................3
Basic Configuration Instructions...........................................................................3
Setting Up the BIOS.................................................................................................4
Entering the RAID BIOS Setup...............................................................................5
NVIDIA RAID Utility Installation...............................................................................9
Initializing and Using the Disk Array...................................................................12
Using The NVRAIDMAN Utility.............................................................................13
Win2K Limitation with Bootable RAID................................................................19
Contents
PDF created with pdfFactory Pro trial version www.pdffactory.com
Page 3
1
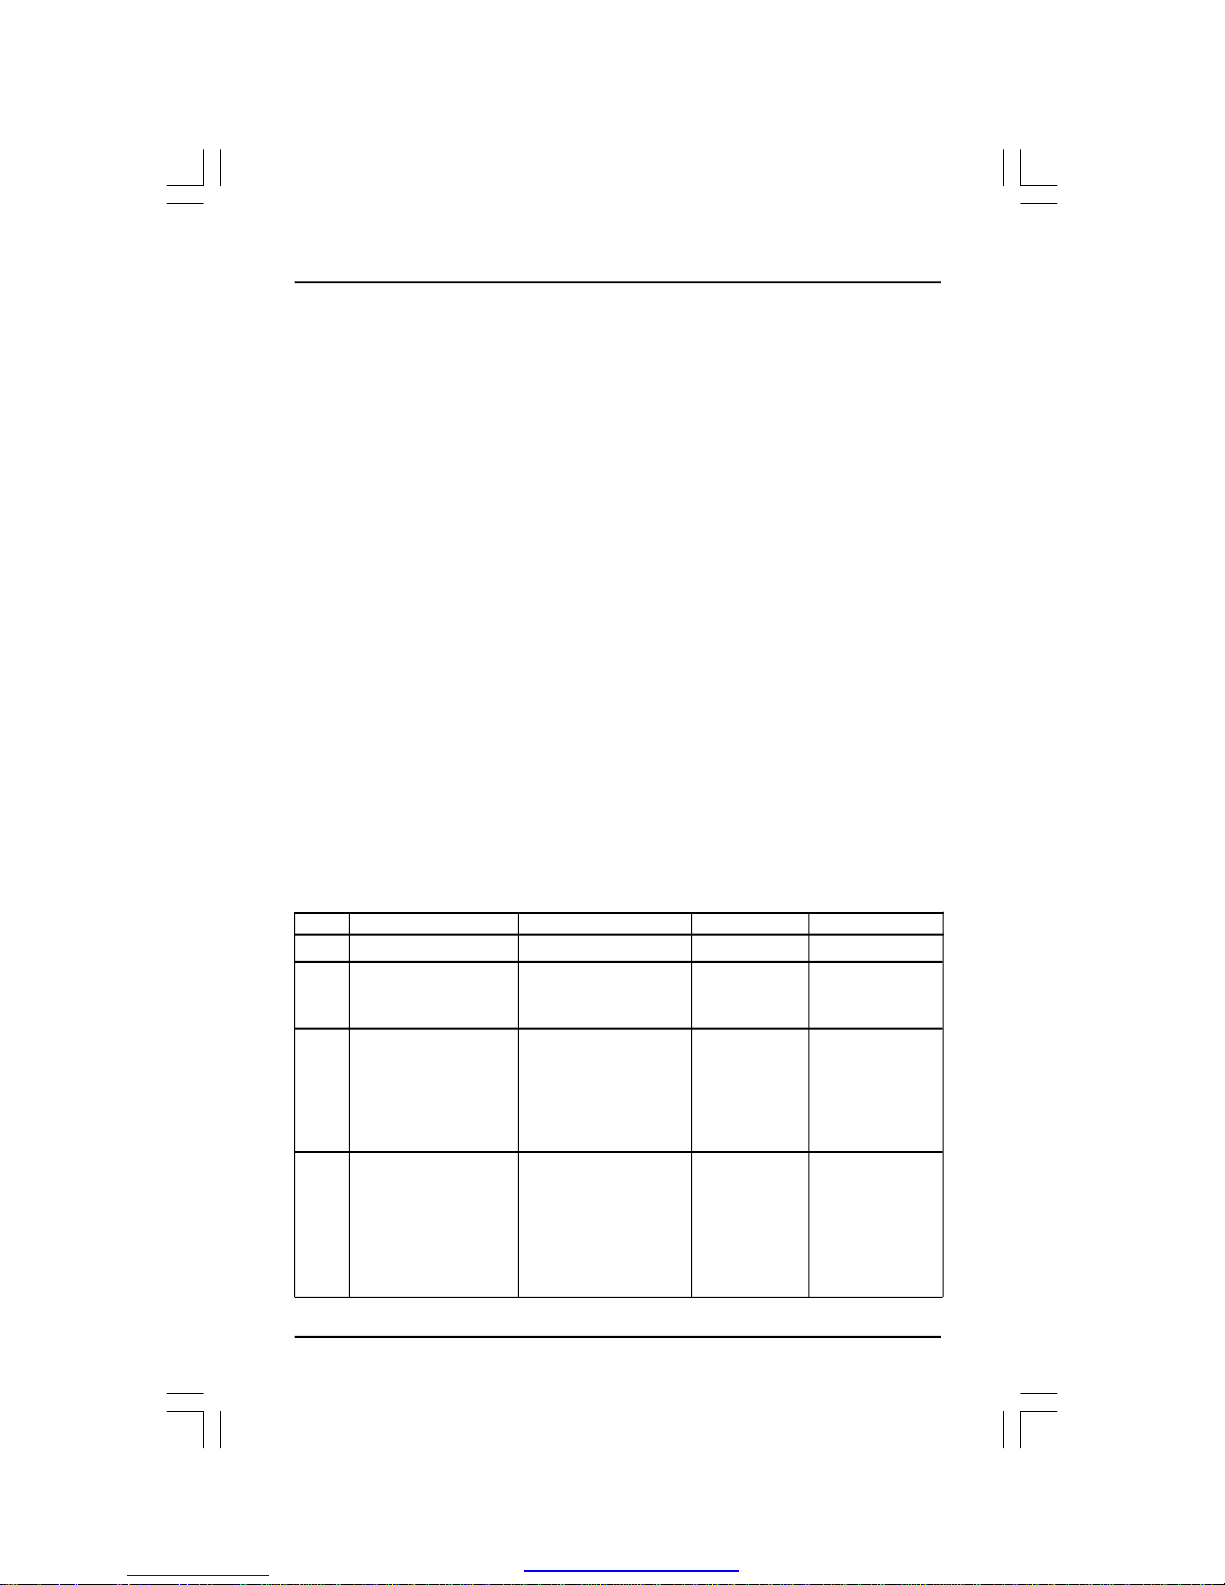
Summary of RAID Configurations
RAID Arrays
This section describes the following types of RAID arrays that NVIDIA RAID
supports:
• RAID 0
RAID 0 defines a disk striping scheme that improves the disk read and write
times for many applications.
• RAID 1
RAID 1 defines techniques for mirroring data.
• RAID 0+1 (optional)
RAID 0+1 combines the techniques used in RAID 0 and RAID 1 arrays.
•RAID 5 (optional)
RAID 5 Provides data striping at the byte level and also stripe error correction
information. This results in excellent performance and good fault tolerance. Level
5 is one of the most popular implementations of RAID.
Array
RAID 0
RAID 1
RAID
0+1
RAID 5
Advantages
High data throughput.
100% data
redundancy.
Optimized for both
100% data redundancy and
performance. Allows
spare disks.
Fault tolerance and
better utilization of disk
space.
Drawbacks
No fault tolerance.
Requires two drives
for the storage space
of one drive.
Requires two drives
for the storage space
of one drive—the
same as RAID level 1.
Decreased write performance due to parity
calculations.Requires
at least three drives.
# Hard Disks
multiple
2
4+
3+
Fault Tolerance
None
Yes
Yes
Yes
NVIDIA RAID
PDF created with pdfFactory Pro trial version www.pdffactory.com
Page 4

2
NVIDIA RAID offers the following additional features:
• Free Disk and Dedicated Spare Disk
A Free Disk or Dedicated Disk can be automatically used in case one drive of a faulttolerant array fails. NVIDIA RAID defines a fault-tolerant array as either RAID 1 or
RAID 0+1 or RAID5 . A free disk can be used by any available fault-tolerant array,
while a dedicated disk can be used only by the array to which it is assigned.
• Bootable RAID
NVIDIA RAID can be configured in a way to make it bootable. For example, two hard
drives can be configured as a bootable mirrored RAID array.
• RAID on Multiple Disk Controllers
Unlike other RAID solutions that limits the user to a dedicated RAID controller,
NVIDIA RAID software can use a drive on one RAID controller and another drive on
a second RAID controller.
• Morphing
Morphing is the ability to convert from one RAID mode to another RAID mode. This
allows the user to upgrade their current disk or array for better performance, higher
security, and increased capacity. More importantly, this is accomplished without
having to go through multiple steps. The morphing feature gives the user an
upgradeable option to manage storage easily.
• Hot Plug Array
Hot plug, with respect to RAID, is the ability to add a disk to a system safely and
without causing problems for the RAID software. For example, when a drive in a
mirrored array fails, a user can launch the Hot Plug Array Wizard which instructs the
user as to when a drive can be added safely to the system. As soon as the drive is
added, the user can then finish running the RAID wizard and the drive becomes
useable by the system.
PDF created with pdfFactory Pro trial version www.pdffactory.com
Page 5

3
Install Hard Disks
Install SATA hard disks:
STEP 1: Install one SATA hard disk into one drive bay.
STEP 2:Connect one end of the SATA data cable to the motherboard’s one of
SATA connectors.
STEP 3: Connect the other end of the SATA data cable to the SATA hard disk.
STEP 4: Connect the power cable to the SATA hard disk.
STEP 5: Following step 1/2/3/4 to install the other SATA hard disks.
Basic Configuration Instructions
The following are the basic steps for configuring NVIDIA RAID:
Non-Bootable RAID Array
1. Choose the hard disks that are to be RAID enabled in the system BIOS.
2. Specify the RAID level, either Mirroring (RAID 1), Striping (RAID 0), Stripe Mirroring
(RAID 0+1), or RAID5 and create the desired RAID array.
3. Install the operating system on one hard disk, then reboot the computer.
4. Run the Windows nForce Setup application and install the RAID driver.
5. Initialize the NVRAID Array.
Bootable RAID Array
1. Choose the hard disks that are to be RAID enabled in the system BIOS.
2. Specify the RAID level, either Mirroring (RAID 1), Striping (RAID 0), Mirrored Striping (RAID 0+1), or RAID5 and create the desired RAID array.
3. Boot from the Windows CD, then press F6 when the Windows Setup appears.
4. Insert the RAID driver floppy to Install the nForce RAID driver.
5. Initialize the NVRAID Array.
PDF created with pdfFactory Pro trial version www.pdffactory.com
Page 6

4
Setting Up the BIOS
1. Start up the computer, then press Delete to enter the BIOS setup. Use the arrow
keys to select Integrated Peripherals, then press Enter.
2. Use the arrow keys to select the RAID Config/ RAID Configuration , then press
Enter.
3. From the RAID Config/ RAID Configuration window, enabled the RAID Enable,
the other items would be light, then you can enable the disk that you want to use as
RAID disks.
4. Press F10 to save the configuration and exit.
PDF created with pdfFactory Pro trial version www.pdffactory.com
Page 7
5
Entering the RAID BIOS Setup
1. After rebooting your PC, wait until you see the RAID software prompting you to
press F10. The RAID prompt appears as part of the system POST and boot process
prior to loading OS.
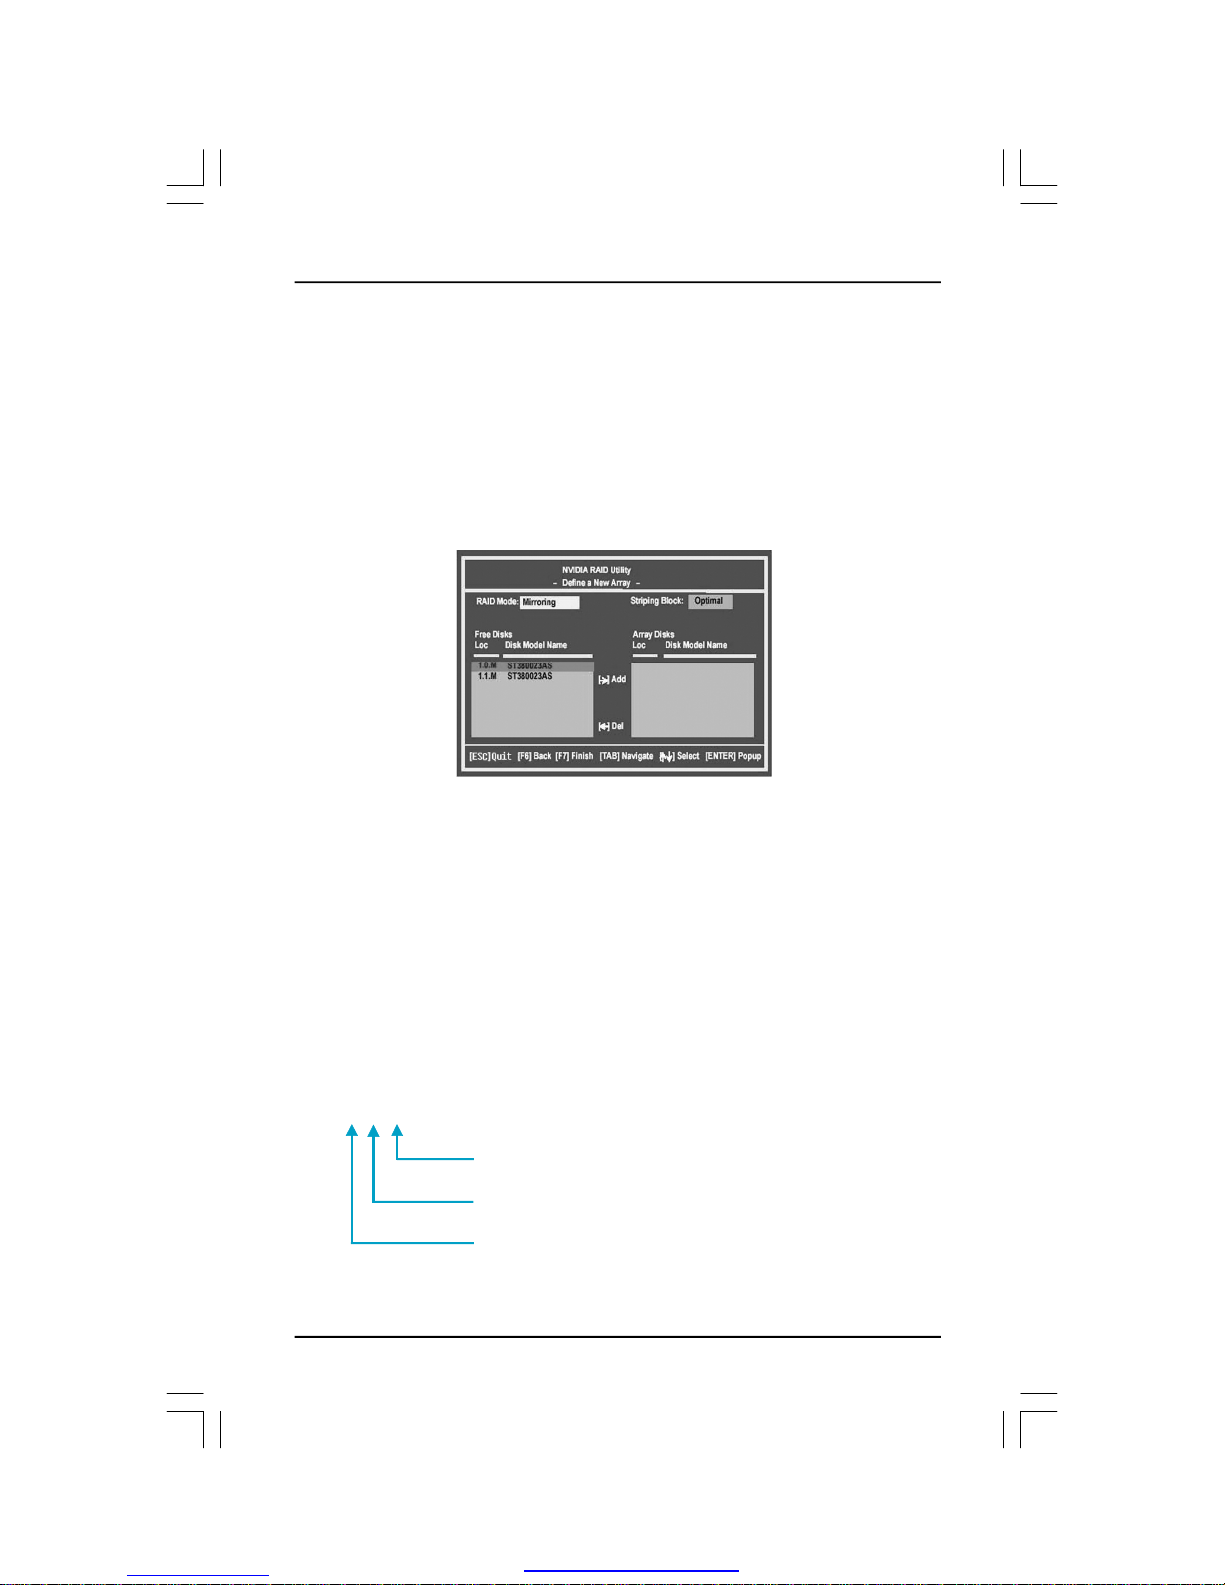
2. Press <N>, and the NVIDIA RAID Utility --- Define a New Array window will appear.
The default RAID Mode is set to Mirroring and the default Striping Block is set to
Optimal.
Understanding the “Define a New Array” Window
Use the Define a New Array window to
• Select the RAID Mode
• Set up the Striping Block
• Specify which disks to use for the RAID Array
Depending on the platform used, the system have one or more channels. In a
typical system there are usually one controller and multiple channels, and each
channel have a slave and a master.
The channel/controller/master/slave status of each hard disk is given in the Loc
(location) columns of the Free Disks and Array Disks lists.
1. 0. M
M: Master
0: Channel
Adapter - adapter 1 is used for SATA drives
PDF created with pdfFactory Pro trial version www.pdffactory.com
Page 8

6
In the example above, 1.0.M means the hard drive is attached to Adapter 1,
Channel 0, and the drive is set to Master. The following is a list of all possible
combinations:
Serial ATA
1.0.M Adapter 1, Channel 0, Master
1.1.M Adapter 1, Channel 1, Master
2.0.M Adapter 2, Channel 0, Master (optional)
2.1.M Adapter 2, Channel 1, Master (optional)
Note: There is no such thing as Slave drive in Serial ATA. All drives are considered to be Master since there is a one to one connection between the drive and
the controller.
Using the Define a New Array Window
If necessary, press the tab key to move from field to field until the appropriate field is
highlighted.
• Selecting the RAID Mode
By default, this is set to [Mirroring]. Change to a different RAID mode, press the
down arrow keys until the mode that you want appears in the RAID Mode box—
either [Mirroring], [Striping], [RAID5], or [Stripe Mirroring].
• Selecting the Striping Block Size
Striping Block size is given in kilobytes, and affects how data is arranged on the
disk. It is recommended to leave this value at the default [Optimal], which is 32KB,
but the values can be between [4 KB] and [128 KB].
PDF created with pdfFactory Pro trial version www.pdffactory.com
Page 9

7
• Assigning the Disks
The disks that you enabled from the RAID Config BIOS setup page appear in the
Free Disks block. These are the drives that are available for use as RAID array.
To designate a free disk to be used as a RAID array:
1. Tab to the Free Disks section. The first disk in the list is selected.
2. Move it from the Free Disks block to the Array Disks block by pressing the right
arrow key (→). The first disk in the list is moved, and the next disk in the list is
selected and ready to be moved.
3. Continue pressing the right-arrow key (→) until all the disks that you want to use
as RAID array appear in the Array Disks block.
Completing the RAID BIOS Setup
1. After assigning your RAID array mode, press F7. The Clear disk data windows
prompt appears.
It shows that two disks have been assigned as RAID1 array disks in the figure
above.
PDF created with pdfFactory Pro trial version www.pdffactory.com
Page 10

8
2. Press Y if you want to wipe out all the data from the RAID array, otherwise press
N. You must choose Yes if the drives were previously used as RAID drives.
The Array List window appears, where you can review the RAID arrays that you
have set up.
3. Use the arrow keys to select the array that you want to set up, then press Enter.
The Array Detail window appears.
4. If you want to mark this disk as empty and wipe out all its contents then press C.
5. At the prompt, press Y to wipe out all the data, otherwise press N.
6. Press Enter again to go back to the previous window and then press [Ctrl+X] to
exit the RAID setup.
PDF created with pdfFactory Pro trial version www.pdffactory.com
Page 11

9
2. Select the modules that you want to install. Select the relative options that you
have configured.
3. Click Next and then follow the instructions.
4. After the installation is completed, be sure to reboot the PC.
5. After the reboot, initialize the newly created array.
Installing the NVIDIA RAID Software Under Windows (for Non-bootable RAID Array)
This section describes how to setup the application and install the RAID software
which will upgrade the Windows IDE driver and install the RAID driver.
1. Start the nForce Setup program to open the NVIDIA Windows nForce Drivers
page.
NVIDIA RAID Utility Installation
PDF created with pdfFactory Pro trial version www.pdffactory.com
Page 12

10
Installing the RAID Driver (for bootable RAID Array)
1. After you complete the RAID BIOS setup, boot from the Windows CD, and the
Windows Setup program starts.
2. Press F6 and wait for the Windows Setup screen to appear.
3. Specify the NVIDIA drivers:
(1) Insert the floppy that has the RAID driver, press S, then press Enter. The Windows Setup screen appears as below:
(2) Select “NVIDIA RAID CLASS DRIVER” and then press Enter.
(3) Press S again at the Specify Devices screen, then press Enter.
(4) Select “NVIDIA NForce Storage Controller” and then press Enter. The following
Windows Setup screen appears listing both drivers:
PDF created with pdfFactory Pro trial version www.pdffactory.com
Page 13

11
4. Press Enter to continue with operating system Installation. Be sure to copy the
files from the floppy is complete, then take out the floppy.
5. Follow the instructions on how to install operating system. During the GUI portion
of the installation you might be prompted to click Yes to install the RAID driver. Click
Yes as many times as needed in order to finish the installation. This will not be an
issue with a signed driver.
Note: Each time you add a new hard drive to a RAID array, the RAID driver will have
to be installed under Windows once for that hard drive. After that, the driver will not
have to be installed.
PDF created with pdfFactory Pro trial version www.pdffactory.com
Page 14

12
Initializing and Using the Disk Array
The RAID array is now ready to be initialized under Windows.
1. Launch Computer Management by clicking “Start” → “Settings” → “Control
Panel” then open the “Administrative Tools” folder and double click on “Computer
Management”.
The actual disks listed will depend on your system, and the unallocated partition is
the total combined storage of two hard disks. You must format the unallocated disk
space in order to use it.
3. Format the unlocated disk space. Right click “Unallocated space”, select “New
Partition…” and follow the wizard. After the drive has been formatted, it is ready for
use.
2. Follow screen instructions to install. While finished, the “Computer Management” window appears.
PDF created with pdfFactory Pro trial version www.pdffactory.com
Page 15

13
Using The NVRAIDMAN Utility
About the NVIDIA RAID Management Utility
The NVIDIA RAID software ships with an application called NVRAIDMAN. This
chapter describes the NVRAIDMAN tasks in the following sections:
• Viewing RAID Array Configurations
View an array configuration (mirrored, striped, mirrored-striped, RAID5
• Setting Up a Spare RAID Disk
• View free and/or dedicated free disks
• Designate a free disk to a particular array
• Rebuilding a RAID Array
• Rebuild a broken mirrored array
• Watch the progress of rebuilding of an array
Viewing RAID Array Configurations
To view your RAID configuration from Windows, launch the NVIDIA RAID Management utility by double-clicking NVRAIDMAN that in the driver cd.
The RAID configuration information appears in the right-side pane, as shown in
following picture:
PDF created with pdfFactory Pro trial version www.pdffactory.com
Page 16

14
Setting Up a Spare RAID Disk (optional)
You can designate a hard drive to be used as a spare drive for a RAID 1, RAID 5
or RAID 0+1 array. The spare drive can take over for a failed disk. NVIDIA RAID
supports two types of spare drives:
• Free Disk
A free disk is a disk that is not part of any RAID array, but can be used by any
available RAID 1, RAID5 or RAID 0+1 array that requires a particular disk when
one of its disks crashes or becomes unusable. The process is automatic and
doesn’t require any user interaction.
For example, if you have a system with four hard disks where one disk is used
to boot the OS, two hard drives are set up in a mirrored array, and a fourth hard
disk is set up as a free disk, then if one of the mirrored array drives fails, the free
disk will be automatically assigned to the mirrored array to be used instead of
the failed disk.
• Dedicated Disk
A dedicated free disk is a disk that is assigned to a RAID 1, RAID 5 or RAID 0+1
array and that disk is used by that array only when needed, for example during a
system crash where a RAID mirrored drive is broken. The dedicated disk can be
used only by the array that it is assigned to and not by any other array, unlike a
free disk which can be used by any available RAID 1, RAID 5 or RAID 0+1 array.
Note: You must have at least two RAID arrays to use this feature.
PDF created with pdfFactory Pro trial version www.pdffactory.com
Page 17

15
Assigning a Free Disk (optional)
To mark a disk as free, or not a part of any array,
1. Enter the system BIOS setup and make sure that the drive that you want to mark
as free is RAID enabled.
2. Enter the RAID BIOS and make sure that the drive is not part of any array (if one
exists).
3. Boot into Windows and run the NVRAIDMAN program. The drive appears under
the Free Disk section.
Assigning a Dedicated Disk
To mark a disk as dedicated, or reserve it for use by a specific array, you must have
at least one free disk and you must also have at least two RAID 1 or RAID 0+1 arrays
created. In this example, there are four SATA drives which are RAID enabled. Two
SATA drives are used to create mirrored arrays, while two SATA drives are used as
free disks.
Step 1: Mark the Disk as a Free Disk
1. Enter the system BIOS setup and make sure that the drive that you want to mark
as free is RAID enabled.
2. Boot into Windows and run the NVRAIDMAN program. If the disk is not part of any
RAID array, then it will appear under the Free Disk section of the RAID GUI.
PDF created with pdfFactory Pro trial version www.pdffactory.com
Page 18

16
Step 2: Dedicate the Free Disk to an Array
While running NVRAIDMAN, dedicate a free disk to an array by doing the following:
1. Right click one of the available free disks under the Free Disk section.
2. Select Designate Spare from the menu to launch the Spare Disk Allocation Wizard.
3. Click Next. The RAID Array Selection page appears.
4. From the RAID Array Selection page, select one of the arrays from the list. This is
the array to which you want to allocate the dedicated free disk.
5. Click Next. The Completing the NVIDIA Spare Disk Allocation page appears.
6. Click Finish.
Removing a Dedicated Disk
Once a dedicated disk has been assigned to a particular array, it can be removed at
any time. To remove the disk, right click on the dedicated disk and select the option
to remove it.
PDF created with pdfFactory Pro trial version www.pdffactory.com
Page 19

17
Rebuilding a RAID Array
Rebuilding is the process of recovering data from one hard drive to another. All data
is copied from one hard drive to another and then the data is synchronized between
the two hard drives. This applies only to RAID 1, RAID5 and RAID 0+1 arrays.
Rebuilding Instructions
After creating a mirrored array, you can rebuild the array using the following steps:
1. Go to Windows and run the NVIDIA RAID Management utility. Below picture shows
an example of a system with one mirrored array and two free disks.
2. Right-click on Mirroring. The pop-up menu appears.
3. From the popup menu, click Rebuild Array. The NVIDIA Rebuild Array Wizard
appears.
4. Click Next. The Disk Selection page appears.
5. Select the drive that you want to rebuild by clicking it from the list, then click Next.
The Completing the NVIDIA Rebuild Array page appears.
6. Click Finish.
The array rebuilding starts after a few seconds, and a small pop-up message
appears towards the bottom right corner of the screen. When the rebuilding process is finished you will see the pop up box.
During the rebuilding process, the NVIDIA RAID Management utility screen shows
the status under the System Tasks and Details sections.
PDF created with pdfFactory Pro trial version www.pdffactory.com
Page 20

18
More About Rebuilding Arrays (optional)
• Rebuilding Occurs in the Background
The rebuilding process takes some time to complete, and occurs in the background so as not to affect the performance of the system.
• Rebuilding Applies Only to RAID 1,RAID 5 or RAID 0+1 Arrays
Rebuilding an array works only when using RAID 1, RAID 5 or RAID 0+1. Rebuilding
does not apply to RAID 0 arrays.
• Rebuilding applies to a degraded fault tolerant array
You can rebuild a degraded mirrored array using any available Free Disk or Dedicated Disk.
For example, below picture shows a mirrored array using two 34.48 GB drives while
having two Free Disks each 55.90 GB large.
To use one of these available free disks to rebuild your array, follow the same steps
as explained in “Rebuilding a RAID Array” except when prompted to select a disk,
choose one of the two available free disks.
PDF created with pdfFactory Pro trial version www.pdffactory.com
Page 21

19
In Windows 2000 (Service Pack 2 or previous versions), the end user cannot install
this operating system to a bootable RAID volume.
There are two solutions to resolve this issue.
I) Use the NVRAID Tool to convert the boot volume to a RAID array.
Here are the detailed step by step instructions:
1. Install Windows 2000 on a selected hard drive.
2. Download and install Windows 2000 Service Pack 4 from Microsoft’s website.
3. Reboot the system, press the DEL key as the system is rebooting to enter into the
system BIOS.
4. Select Integrated Peripherals →RAID Config.
5. Enable RAID Config for the selected drive (the one containing the Windows 2000
operating system). Then press F10 to exit and save settings in the system BIOS
(This action reboots the System).
6. Press F10 as the system is rebooting to go into the RAID ROM(The system
directs you into the NVIDIA RAID Utility).
7. Select Striping under RAID Mode. Press TAB to go into the Free Disk menu. You
can use the Right Arrow key to add the desired disk.
8. After that, Press F7 to finish. Select N (NO) when asked to Clear Disk Data.
9. Then Press Ctrl-X to exit. The system reboots into Windows 2000.
10. Install the NVIDIA nForce Driver Package while in Windows 2000. Then reboot
the system.
11. Go to START>Programs>NVIDIA Corporation and select NVRAID Manager.
You should see the single disk RAID array (in striping mode) that was created from
the boot disk.
12. Select the single boot disk RAID Array by clicking on it.
13. Select Convert Array under the System Tasks. The Convert Array wizard is
displayed. Then Select Next.
14. Select the desired type of RAID array you want to convert. Then Select Next.
Win2K Limitation with Bootable RAID
PDF created with pdfFactory Pro trial version www.pdffactory.com
Page 22

20
15. You are prompted to select the desired Free Disk(s) to add to the bootable RAID
array. Click Finish.
At this point, NVRAID starts converting the single disk RAID array into a multi-disk
RAID array in a bootable format.
Note: Conversion may take 1-2 hours depending on disk size.
II) The user must create a combination installation CD that includes Windows
2000 and SP3 or SP4 fixes integrated in. To create the combination installation
CD, refer to the following website:
http://www.microsoft.com/windows2000/downloads/servicepacks/sp4/HFdeploy.
htm
Note: If the end user chooses not to install Windows 2000 Service Pack 3 or 4, RAID
is still supported on Windows 2000. However, the end user will not be able to create
a bootable RAID volume.
PDF created with pdfFactory Pro trial version www.pdffactory.com
 Loading...