

Page 1
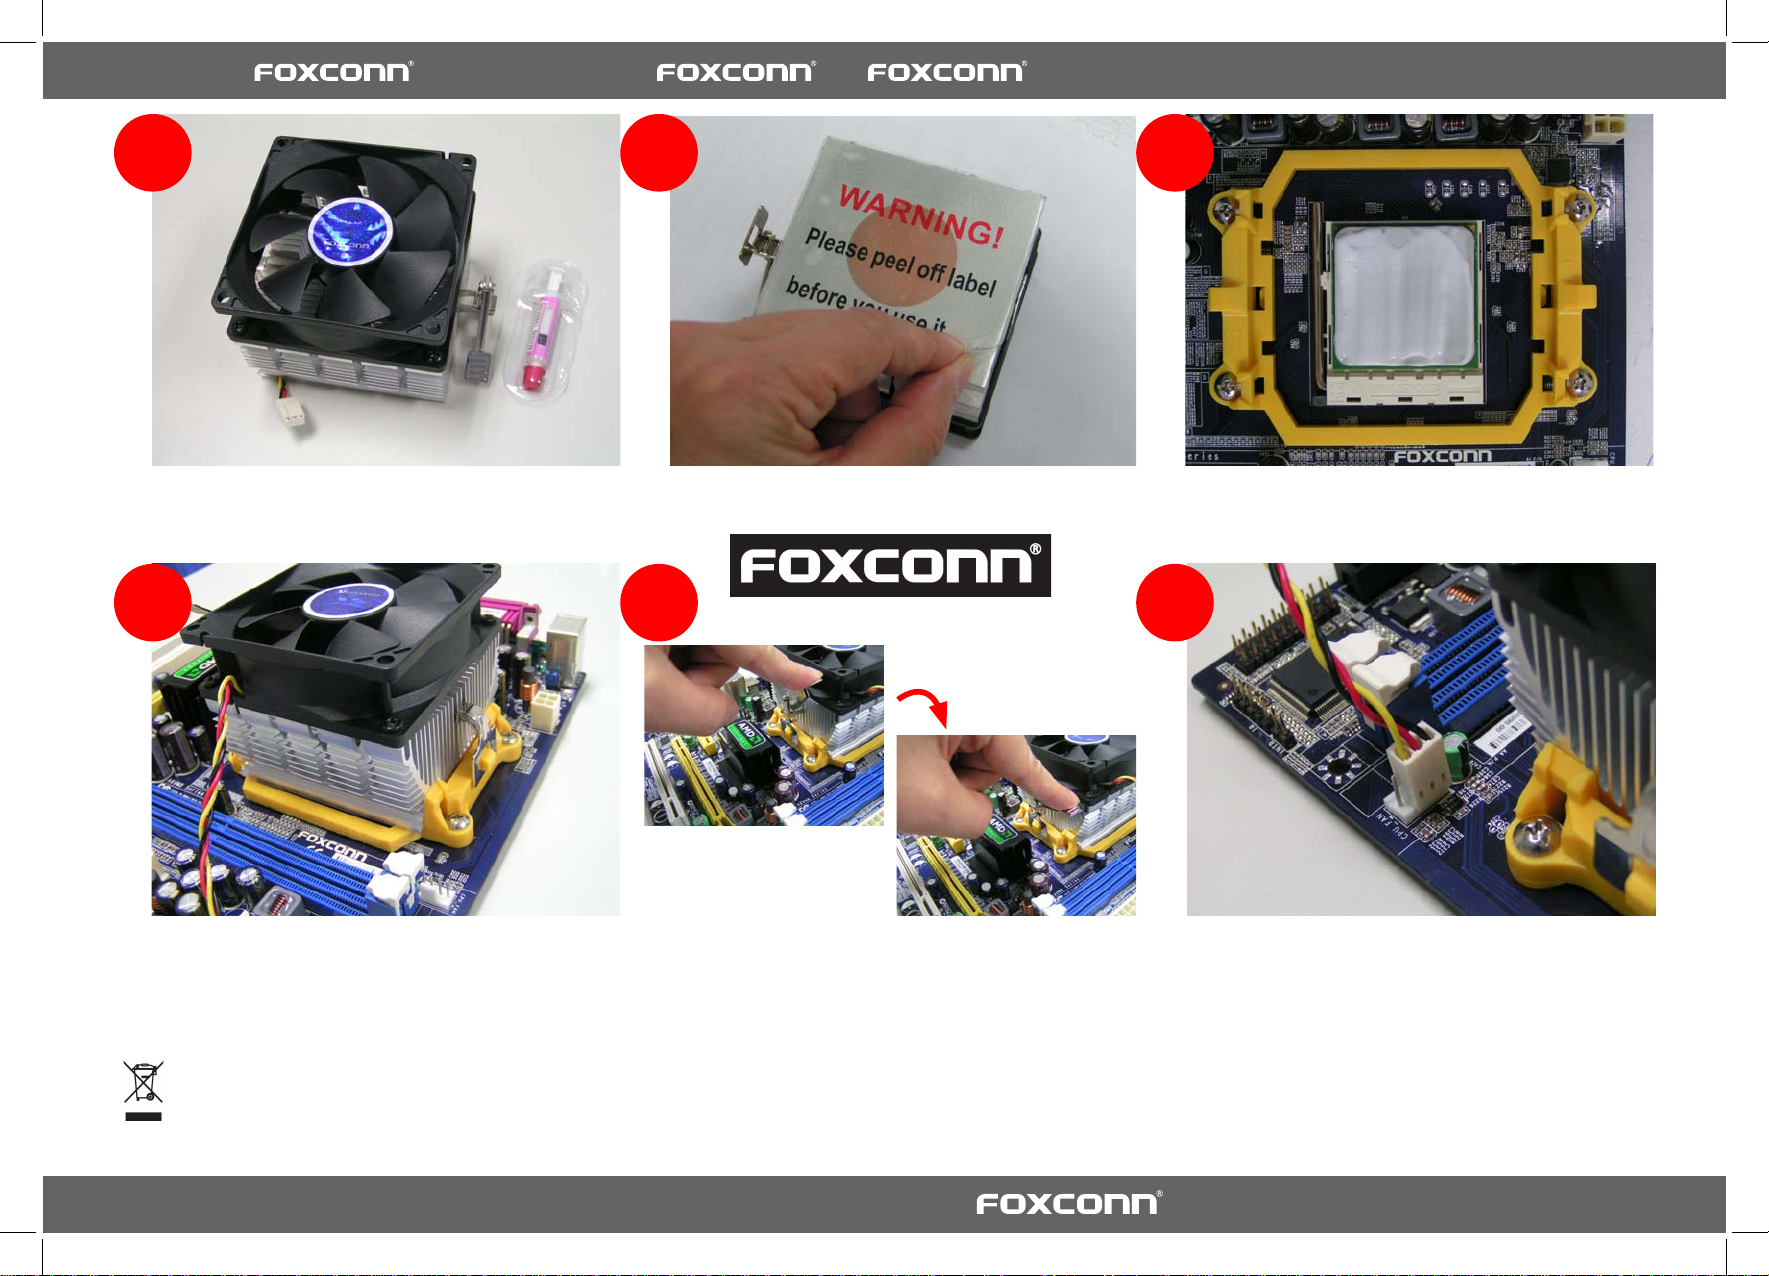
Buckle the heatsink rmly at one side of the stand. Buckle the heatsink at another side, and press the
fasten lever down to tightly seat the cooler.
Attach the 3-wire power connector of the cooler to
the CPU FAN socket on the motherboard.
1
654
32
Apply and spread an even thermal grease on the
surface of the CPU.
Remove protective lm.The package contains a CPU cooler and an injector (
or syringe).
All images are for reference only, please refer to the physical CPU cooler for specic features.
. All rights reserved. , the logo is a trademark of Hon Hai Precision Industry Co. Ltd.
WEEE: The use of the symbol indicates that this product may not be treated as household waste. By ensuring this product is disposed of correctly, you will help prevent
potential negative consequences for the environment and human health, which could otherwise be caused by inappropriate waste handling of this product. For more detailed
information about recycling of this product, please contact your local city ofce, your household waste disposal service or the shop where you purchased the product.
CPU Cooler User's Guide - For Intel LGA775 Series. - No 1. CPU Cooler Maker in the world
Page 2

Product Warranty Card
1. User Name :
2. Contact Info. :
3. Product Model #:
4. Purchase Date :
5. Serial Number :
6. Reseller :
1. 包装内含一颗CPU散热风扇及一支散热膏针筒.
2. 移除散热风扇保护膜, 露出铜面。
3. 挤散热膏针筒在CPU表面均涂上散热膏。
4. 将散热器牢固地扣在脚座的一边。
5. 扣住散热器的另一边,并按下加固杆来固定散
热器。
6. 将风扇电源线连接至主板CPU_FAN插座。
1. В комплект поставки входят вентилятор процессора
и шприц.
2. Снимите защитную пленку.
3. На поверхность процессора равномерно нанесите
теплопроводную пасту.
4. Изогните радиатор с одной стороны стойки.
5.Прижмите радиатор к другой стороне, затем
нажмите и закрепите рычаг, чтобы окончательно
установить вентилятор.
6. Подсоедините 3-жильный кабель питания
вентилятора к разъему вентилятора процессора на
материнской плате.
1. Das Paket enthält einen CPU-Lüfter und eine
Einspritzvorrichtung.
2. Entfernen Sie die Schutzfolie.
3. Tragen Sie einen gleichmäßigen
Thermopastenschicht auf die Oberäche der CPU auf.
4. Hängen Sie den Kühlkörper an einer Seite der
Halterung ein.
5.Hängen Sie den Kühlkörper an der anderen Seite ein,
drücken Sie den Hebel zum Fixieren des Kühlers hinab.
6. Verbinden Sie den 3-poligen Stromanschluss des
Lüfters mit dem Anschluss "CPU FAN" am Motherboard.
1. Cette boîte contient un dispositif de refroidissement
pour unité centrale et un injecteur.
2. Enlevez le lm protecteur.
3. Veuillez appliquer une couche homogène de graisse
thermique sur la surface de l’unité centrale.
4. Attachez fermement le radiateur sur un côté du
support.
5.Attachez fermement le radiateur de l'autre côté et
enfoncez le levier de serrage pour asseoir fermement le
refroidisseur.
6. Veuillez brancher le connecteur d’alimentation à
3 ls du dispositif de refroidissement sur la prise du
ventilateur de l’unité centrale sur la carte mère.
1. パッケージには、CPUクーラーとインジェクタが含
まれています。
2. 保護フィルムを取り除きます。
3. CPU表面に熱グリースを均等に広げて塗ります。
4. ヒートシンクをスタンドの一方の側にしっかり留め
ます。
5.ヒートシンクを別の側に留め、レバーをしっかり留め
てカバーを取り付けます。
6. クーラーの3線の電源コネクタを、マザーボードの
CPU FANソケットに取り付けます。
1.L
a caja contiene un refrigerador de cPu y un inyector.
2.r
etire La PeLícuLa Protectora.
3.aPLique y disPerse uniformemente La grasa térmica
sobre La suPerficie de La cPu.
4.asegure eL disPador firmemente en un Lado deL soPorte.
5.asegure eL disiPador en eL otro Lado y PresióneLo hacia
abajo Para asentar bien eL ventiLador.
6.coLoque eL conector de aLimentación de 3 conductores
deL refrigerador en eL conector cPu fan de La PLaca
base.
1.ϦϗΎΣϭ ΔϳΰϛήϤϟ ΔΠϟΎόϤϟ ΓΪΣϮϟ ΩήΒϣ ϰϠϋ ΓϮΒόϟ ϩάϫ ϱϮΘΤΗ.
2.ϲϗϮϟ ˯Ύθϐϟ Δϟί·.
3.ΔϳΰϛήϤϟ ΔΠϟΎόϤϟ ΓΪΣϭ τγ ϰϠϋ ϱέήΣ ϢΤη ήθϧϭ ϊοϮΑ Ϣϗ.
4.ϞϣΎΤϟ ΐϧϮΟ ΪΣ ϲϓ ϱέήΤϟ ΖΘθϤϟ ςΑέ ϢϜΣ.
.5ϰϠϋ ςϐο ϢΛ ˬήΧ ΐϧΎΟ ϲϓ ϱέήΤϟ ΖΘθϤϟ ςΑέ ϢϜΣωέΫϟ˱ΪϴΟ
ΩήΒϤϟ ήϘΘδϳ ϲϜϟ ϞϔγϷ ΖϴΒΜΘ.
.6ϙϼγ ΔΛϼΜϟ Ϋ ΔϗΎτϟ ϞλϮϣ ϞλϭιΎΨϟΩήΒϤϟΎΑβΒϘϤΑΔΣϭήϤϟΔλΎΨϟΓΪΣϮΑΔΠϟΎόϤϟΩϮΟϮϤϟϰϠϋ
ΔΣϮϠϟϡϷ.
Page 3

Foxconn reserves the right to revise this policy and to make changes without prior notice.
Dear User,
Thank you for purchasing of the Foxconn CPU cooler. To protect your rights, please read the following
information carefully before using this product.
■ 7 days Return Policy :
Within seven days after your purchase (including the day you purchased), if product failed, you may return
the product with a full refund based on the original receipt from Foxconn's representives, all free of charge.
■ 15 days Exchange for new product :
If product failed, you may return the product with a brand new replacement, but no refund is available.
■ Within One year, refurbished replacement policy :
You may contact Foxconn's representives for a similar product replacement. If product was phased out, you
may exchange for a Foxconn CPU cooler with the same or higher performance.
■ Terms and Regulations of Warranty Services :
Please keep the warranty card properly since it is the only record for warranty services. Products may only
be replaced with a proof of the warranty card.
1. Please use a correct CPU in its normal operation. Any human-made damage will be excluded from
warranty services and a service fee will be charged on its repairment.
2. Foxconn will not be responsible for the damages caused during the shipping and handling.
3. Product disassembly only can be done through Foxconn authorized representives, no warranty service is
available for any disassembled prodcut.
4. Foxconn will not be responsible for any property or personal damages caused by improper use of the
product.
Please ll out the warranty card completely and return it back to Foxconn representives. The warranty
will become effective only after the card is registered.
Cher client :
Merci d’avoir acheté ce dispositif de refroidissement pour unité centrale de Foxconn. An de protéger vos droits,
veuillez lire attentivement cette section avant d’utiliser ce produit.
■ Politique de retour de 7 jours :
Vous pouvez, dans les sept jours qui suivent l’achat de ce produit (y-compris le jour d’achat) et si ce produit
mal fonctionne, retourner le produit pour un remboursement complet et gratuit, qui sera basé sur le
ticket original du représentatif de Foxconn.
■ Echange pour un nouveau produit dans les 15 jours :
SI le produit mal fonctionne, vous pouvez le renvoyer pour obtenir un remplacement neuf ; aucun
remboursement ne sera offert.
■ Politique de remplacement par un produit remis à neuf d'un an :
Vous pouvez contacter les représentatifs de Foxconn pour obtenir un remplacement par un produit similaire.
Si le produit n’est plus fabriqué, vous pouvez échanger le dispositif de refroidissement pour unité centrale de
Foxconn par un produit similaire ou supérieur.
■ Termes et conditions des services de garantie :
Veuillez garder cette carte de garantie dans un endroit sûr car elle est la seule preuve valable pour les
services de garantie. Les produits ne peuvent pas être remplacés sans cette carte de garantie.
1.Veuillez utiliser une unité centrale en bon état et de la bonne manière. Tout dommage causé par une faute
humaine sera exclu des services de garantie et un frais sera imposé pour toute réparation.
2.Foxconn ne sera pas tenu responsable de tout dommage survenu pendant le transport ou l’installation.
3.Le démontage du produit ne doit être fait que par les représentatifs agréés de Foxconn ; les services de
garantie ne seront pas applicables si le produit a été démonté.
4.Foxconn n’assume aucune responsabilité pour les dégâts matériel ou personnel causés par une utilisation
incorrecte de ce produit.
Veuillez remplir la carte de garantie et la renvoyer immédiatement à l’un des représentatifs de Foxconn.
La garantie ne prendra effet qu’après l’enregistrement de la carte.
Lieber Benutzer,
Wir bedanken uns, dass Sie sich für den CPU-Lüfter von Foxconn entschieden haben. Um Ihre Rechte
sicherzustellen, lesen Sie bitte sorgfältig die folgenden Informationen, bevor Sie beginnen, das Produkt zu
verwenden.
■ Rücksendung innerhalb von 7 Tagen:
Innerhalb von sieben Tagen nach dem Kauf (inklusive des Kauftags) können Sie das Produkt
zurückschicken, falls das Produkt Mängel hat. Sie erhalten von dem Handelsvertreter von Foxconn in
diesem Fall die volle Rückerstattung gemäß der Originalquittung. Das Verfahren ist für Sie kostenfrei.
■ Austausch gegen ein neues Produkt innerhalb von 15 Tagen:
Falls das Produkt Mängel aufweist, können Sie das Produkt zum Umtausch mit einem neuen Produkt
zurückschicken. Eine Rückerstattung ist in diesem Fall ausgeschlossen.
■ Austausch gegen ein erneutes Produkt innerhalb von einem Jahr:
Sie können mit dem Handelvertreter von Foxconn Kontakt aufnehmen, um das Produkt gegen ein
ähnliches Produkt auszutauschen. Falls das Produkt bereits aus dem Verkehr gezogen wurde, können
Sie einen Austausch gegen ein CPU-Lüfter von Foxconn mit der gleichen oder höheren Leistung in
Anspruch nehmen.
■ Bestimmungen und Bedingungen der Gewährleistungen:
Bitte bewahren Sie die Garantiekarte auf, weil sie der einzige Beleg für Gewährleistungen ist. Die
Produkte können nur bei Vorliegen der Garantiekarte ausgetauscht werden.
1. Bitte verwenden Sie sachgemäß eine passende CPU. Ein von Menschen verursachter Schaden ist
von Gewährleistungen ausgeschlossen. In diesem Fall wird eine Bearbeitungsgebühr für eine
Reparatur in Rechnung gestellt.
2. Foxconn haftet nicht für Schäden, die durch Transport und Verladung entstanden sind.
3. Das Produkt darf nur von einem von Foxconn beauftragten Vertreter auseinander gebaut werden.
Die Gewährleistung erlischt, wenn das Produkt auseinander gebaut wurde.
4. Foxconn haftet weder für Sachschäden noch Personenschäden, die durch eine unsachgemäße
Verwendung des Produkts entstanden sind.
Bitte füllen Sie die Garantiekarte komplett aus und schicken sie an den Handelvertreter von Foxconn
zurück. Die Garantie wird nur dann wirksam, wenn die Karte registriert wurde.
Уважаемый пользователь.
Благодарим за приобретение вентилятора процессора Foxconn. Для защиты ваших прав перед
эксплуатацией данного изделия необходимо внимательно ознакомиться с приведенной ниже
информацией.
■ Возврат в течение 7 дней
В случае неисправности изделия в течение семи дней с даты его приобретения (включая
день приобретения) прибор можно вернуть, на основании оригинального чека представителя
компании Foxconn, с полным возмещением его стоимости без дополнительной оплаты.
■ Обмен на новое изделие в течение 15 дней
В случае неисправности изделия возможен обмен прибора на новый без возмещения его
стоимости.
■ Замена изделия на восстановленное в течение года
Для замены изделия на аналогичное обратитесь к представителю Foxconn. Если изделие было
снято с производства, доступна замена на вентилятор процессора Foxconn с аналогичными
или более высокими параметрами.
■ Условия и положения гарантийного обслуживания
Храните гарантийный талон надлежащим образом, так как он является единственной записью о
гарантийном обслуживании. Замена изделия осуществляется только при подтверждении
наличия гарантийного талона.
1. Используйте подходящий процессор в нормальных условиях эксплуатации. Гарантийное
обслуживание не распространяется на повреждения изделия в результате действий
пользователя, в таких случаях за ремонт будет взиматься плата.
2. Foxconn не несет ответственности за повреждения изделия при транспортировке и
эксплуатации.
3. Разборка изделия может выполняться только авторизированными представителями
компании Foxconn, в противном случае гарантия будет аннулирована.
4. Foxconn не несет никакой ответственности в случаях каких-либо телесных повреждений или
повреждения имущества, вызванных нарушением правил эксплуатации данного изделия.
Полностью заполните гарантийный талон и верните его представителям Foxconn. Гарантийное
обслуживание осуществляется только при наличии зарегистрированного гарантийного талона.
Page 4
“O”表示该有毒有害物质在该部件所有均质材料中的含量均在中国信息产业部颁布的《电子信息产品有
毒有害物质的限量要求》(标准号:SJ/T11363-2006)规定的限量要求以下。
“X”表示该有毒有害物质至少在该部件某一均质材料中的含量超出SJ/T11363-2006标准规定的限量要
求,不过其含量超出是因为目前业界还没有成熟的可替代的技术。
备注:此产品所标示之环保使用期限,系指在一般正常使用状况下。
电子信息产品污染控制标示:图中之数字为产品之环保使用期限。仅指电子信息产品中含有的
有毒有害物质或元素不致发生外泄或突变从而对环境造成污染或对人身、财产造成严重损害的期限。
有毒有害物质或元素的名称及含量说明标示:
部件 有毒有害物质或元素
名称 铅(Pb) 汞(Cd)
镉(Hg) 六价铬(Cr6+) 多溴联苯(PBB) 多溴联苯醚(PBDE)
扇框
X O X O X X
扇叶
X O X O X X
导线
X O O O X X
ユーザー各位
Foxconn CPUクーラーをお買い上げ頂き、ありがとうございます。お客様の権利を保護するために、本製品を
使用する前に次の情報を良くお読みください。
■ 7日間の返品条件:
お買い上げ後7日以内(購入日を含む)に、製品が故障した場合、製品を返品すれば、Foxconnの代理人が発行
した領収書に基づき全額払い戻しを受けることができます。
■ 15 日の新製品との交換
製品が故障した場合、製品を返品すれば新品の製品と交換できますが、払い戻しは受けられません。
■ 1年以内の、修復品交換条件:
Foxconnの代理店に連絡し、同等製品の交換を求めてください。製品が製造中止になっている場合、同等ま
たはそれ以上の性能のFoxconn CPUクーラーと交換することができます。
■ 保証サービスの条件と既製:
保証書を正しく保管してください。保証書は、保証サービスの唯一の記録です。製品は保証書の提示によっ
てのみ交換できます。
1.正常に作動する正しいCPUをお使いください。人為的にできた損傷は保証サービスから除外され、その修理
に対して修理代を請求いたします。
2.Foxconnでは、輸送中または出荷作業中にできた損傷に責任を負いません。
3.製品の分解はFoxconnの公認代理店を通してのみ行うことができます。分解された製品に対する保証サービ
スはありません。
4.Foxconnは、製品の不適切な使用に起因する製品の損傷または人的負傷に対して責任を負いません。
保証書に必要事項をすべて記入し、Foxconn代理店に返送してください。保証はカードが登録された後での
み有効になります。
Estimado usuario,
Gracias por adquirir el refrigerador de CPU Foxconn. Para proteger sus derechos, lea detenidamente la
siguiente información antes de utilizar este producto.
■ Política de devolución a 7 días:
Antes de siete días a partir de la fecha de compra (incluyendo el día de la compra), si el producto fallase,
puede devolverlo y recibir un reembolso completo igual al importe del recibo original por medio de cualquier
representante de Foxconn, sin coste alguno.
■ 15 días de cambio por otro producto:
Si el producto fallase podrá devolverlo recibiendo otro nuevo. No se emitirán reembolsos.
■ Antes de un año, política de cambio y reparación:
Puede ponerse en contacto con los representantes de Foxconn para cambiar su producto por otro similar.
Si el producto está obsoleto, puede cambiarlo por un refrigerador de CPU Foxconn del mismo rendimiento o
superior.
■ Términos y normas de los servicios de garantía:
Conserve en buen estado la tarjeta de garantía. Es el documento válido para recibir servicios de garantía. Los
productos sólo podrán cambiarse si existe una tarjeta de garantía válida.
1.Por favor, utilice una CPU correcta en funcionamiento normal. Cualquier daño realizado por un humano
queda excluido de la garantía, pudiendo cargarse un coste por la reparación derivada de la reparación
correspondiente.
2.Foxconn no se hará responsable de los daños provocados durante el transporte y la manipulación.
3.El desmontaje del producto sólo puede ser realizado por un representante autorizado por Foxconn. Los
productos desmontados no tienen derecho a garantía.
4.Foxconn no se hará responsable de ningún daño personal o a la propiedad, causado por un uso incorrecto
del producto.
Rellene completamente la tarjeta de garantía y devuélvala a los representantes de Foxconn. La garantía
será efectiva después de registrar la tarjeta.
ϱΰϳΰϋˬϡΪΨΘδϤϟ
˱ήϜηϰϠϋϚήηΩήΒϤϟΓΪΣϭΔѧΠϟΎόϤϟΔѧϳΰϛήϤϟϦѧϣFoxconn.ΔѧϳΎϤΤϟˬϚѧϗϮϘΣ˯ΎѧΟήϟΓ˯ήѧϗΕΎѧϣϮϠόϤϟΔѧϴϟΎΘϟΔѧϳΎϨόΑϞѧΒϗϡΪΨΘѧγάѧϫ
ΞΘϨϤϟ.
Ŷ
ϡΎϳ ΔόΒγ ϝϼΧ ωΎΟέϹ ΔγΎϴγ
:
Ϫήη Ϧϣ ϡΎϳ ΔόΒγ ϝϼΧ ΞΘϨϤϟ ϞτόΗ Ϋ·)˯ήθϟ ϡϮϳ ϚϟΫ ϲϓ ΎϤΑ(Οέ· ϚϨϜϤϳ ˬϲϠλϷ ϝΎμϳϺϟ ˱ΎϘϓϭ ϞϣΎϜϟΎΑ ϚϟϮϣ ΩΩήΘγϭ ΞΘϨϤϟ ωΎ
ϲϠΜϤϣ Ϧϋ έΩΎμϟFoxconnϞΑΎϘϣ ϱ ϥϭΩ ϚϟΫϭ.
Ŷ
ϝϼΧ ΪϳΪΟ ΞΘϨϣ ϝΪΒΘγ15˱ΎϣϮϳ
:
ϚϟϮϣ ΩΩήΘγ ϚϨϜϤϳ ϻ ϦϜϟ ˬ˱ΎϣΎϤΗ ΪϳΪΟ ΞΘϨϤΑ ϪϟΪΒΘγϭ ϪϋΎΟέ· ϚϨϜϤϳ ˬΞΘϨϤϟ ϞτόΗ Ϋ·.
Ŷ
ϼΧ Ϧ˷δΤ˵ϣ ΞΘϨϤΑ ϝΪΒΘγϻ ΔγΎϴγΪΣϭ ϡΎϋ ϝ:
ϚϨϜϤϳϝΎμΗϻϲϠΜϤϤΑFoxconnϝΪΒΘγϼϟΞΘϨϤΑϞΛΎϤϣ .Ϋ·ϭϥΎϛΪϗϢΗ˯Ύϐϟ·ˬΞΘѧϨϤϟΪѧϘϓϚѧϨϜϤϳϪϟΪΒΘѧγΩήѧΒϤΑΓΪѧΣϭΔѧΠϟΎόϣΔѧϳΰϛήϣ
FoxconnϪϟβϔϧ˯ΩϷϭ˯ΩϰϠϋ.
Ŷ
ϥΎϤπϟ ΕΎϣΪΧ Ϯϟϭ ρϭήη:
˯ΎΟήϟυΎϔΘΣϻΔϗΎτΒΑϥΎϤπϟϞϜθΑϴΤѧλΚѧϴΣΎѧϬϧ·ϞΠδѧϟΪѧϴΣϮϟΕΎϣΪѧΨϟϥΎϤπѧϟ.ϻϭϦѧϜϤϳϝΪΒΘѧγΕΎѧΠΘϨϤϟϻ·ΕΎѧΒΛΈΑΔѧϗΎτΑ
ϥΎϤπϟ.
1.˯ΎΟήϟϡΪΨΘγΓΪΣϭΔΠϟΎόϤϟΔϳΰϛήϤϟΔΤϴΤμϟϲѧϓϊѧοϭϞϴϐθѧΘϟϱΩΎѧόϟ.ϢΘϴѧγ˯ΎϨΜΘѧγϱϒѧϠΗϱήθѧΑϦѧϣΕΎϣΪѧΧϥΎϤπѧϟ
ϢΘϴγϭνήϓϡϮγέΔϣΪΧήϴψϧϪΣϼλ·.
2.Δϛήη ϞϤΤΘΗ ϦϟFoxconnϴϔϠΘϟ ΔϴϟϭΆδϣΔϟϭΎϨϤϟϭ ϦΤθϟ ˯ΎϨΛ ΔΠΗΎϨϟ ΕΎ.
3.ϲϠΜϤϣ ϞΒϗ Ϧϣ ϻ· ΞΘϨϤϟ ϚϔΑ ϡΎϴϘϟ ϦϜϤϳ ϻFoxconnΎϬϜϓ ϢΘϳ ϲΘϟ ΕΎΠΘϨϤϠϟ ϥΎϤπϟ ΕΎϣΪΧ Ϧϣ ϱ ΡΎΘΗ ϻϭ ˬϦϳΪϤΘόϤϟ.
4.Δϛήη ϞϤΤΘΗ ϦϟFoxconnΞΘϨϤϠϟ ϢϼϤϟ ήϴϏ ϡΪΨΘγϻ ΔΠϴΘϧ ιΎΨηϷ ϭ ΕΎϴϜϠϤϟΎΑ ϖΤϠΗ ΕΎϴϔϠΗ Δϳ ΔϴϟϭΆδϣ.
˯ΎΟήϟ˯ϞϣΔϗΎτΑϥΎϤπϟϞϣΎϜϟΎΑΎϬϋΎΟέ·ϭϰϟ·ϲϠΜϤϣ
Foxconn
.ϻΒμϳϥΎϤπϟ˱ΎϳέΎγϻ·ΪόΑϞϴΠδΗΔϗΎτΒϟ.
敬爱的使用者:
感谢您购买富士康CPU散热风扇, 为保障您的权益, 请仔细研读下列事项 :
■ 七日内无偿退费政策 :
购买后七日内 (包括购买日) 产品不良, 可凭原始发票至购买经销商处, 无偿全额退费。
■ 十五日内更换新品政策 :
购买后十日内 (包括购买日) 产品不良, 可至原购买经销商处, 更换新品, 但不可退费。
■ 一年内更换良品政策 :
购买后一年内 (包括购买日) 产品不良, 可至原购买经销商处, 换取相同产品良品。 如产品已停
止生产, 可换取同等级或高一阶产品。
■ 保证政策与条款 :
请保留保证卡以保障您的维修权益, 没有保证卡将丧失您的维修权益。
1.请配合使用正确CPU, 任何人为过失造成产品损害, 并不在我们的保证范围。 如有上述情况发
生, 产品送修, 我们将酌收一笔维修费用。
2.富士康无法保证产品在运送或经手过程中, 造成的产品损害。
3.产品拆解只能透过富士康合格经销商来做, 任何人为不当拆解将丧失您的维修权益。
4.对于产品不当使用所衍生的财产或个人损失, 富士康不负任何法律责任。
请详细填写保证卡, 并在经销商处注册, 以保障您的权益。
CPU Cooler User's Guide - For Intel LGA775 Series. - No 1. CPU Cooler Maker in the world
 Loading...