

Page 1

Owner’s manual
Model
4CH DIGITAL MIXER WITH DSP EFFECTS
Introduction
Thank you very much for having purchased the Fostex VM04.
This unit is a digital mini-mixer so the internal signal processing is all done digitally.
Its input section consists of four analog input channels including two that can take a
microphone. The output section, in addition to normal analog outputs like two channel
stereo outputs and a headphone output, also has an S/P DIF digital output via an optical
format with a 44.1kHz sampling frequency and a 20 bit resolution.
Its internal Buss consists of a two channel Stereo L/R and also an independent Effect Buss.
The VM04 also incorporates an internal high quality digital effect (1in/ 2out) employing
the A. S. P. (Fostex Advanced Signal Processing Technology)*, which is newly developed by
Fostex. It can provide a wide variety of Effect sounds. You can also store all the mix settings
you have made in the Scene Memories and recall them instantly.
The VM04 is a light and compact piece of precision sound technology which offers high
quality sound performance and considerable scope for experimentation.
To fully exploit all of its many useful features and functions, we recommend you read this
manual first before you start using the VM04.
* See page 18 for more details of the A. S. P. (Fostex Advanced Signal Processing Technology).
Page 2
VM04 Owner’s manual
CAUTION
RISK OF ELECTRIC SHOCK
DO NOT OPEN
CAUTION: TO REDUCE THE RISK OF ELECTRIC SHOCK,
DO NOT REMOVE COVER (OR BACK).
NO USER - SERVICEABLE PARTS INSIDE.
REFER SERVICING TO QUALIFIED SERVICE PERSONNEL.
"WARNING"
"TO REDUCE THE RISK OF FIRE OR ELECTRIC
SHOCK, DO NOT EXPOSE THIS APPLIANCE TO RAIN
OR MOISTURE."
SAFETY INSTRUCTIONS
1. Read Instructions - All the safety and operating instructions
should be read before the appliance is operated.
2. Retain Instructions - The safety and operating instructions should
be retained for future reference.
3. Heed Warnings - All warnings on the appliance and in the
operating instructions should be adhered to.
4. Follow Instructions - All operating and use instructions should
be followed.
5. Water and Moisture - The appliance should not be used near
water - for example, near a bathtub, washbowl, kitchen sink,
laundry tub, in a wet basement, or near a swimming pool, and
the like.
6. Carts and Stands - The appliance should be used only with a
cart or stand that is recommended by the manufacturer.
An appliance and cart combination should be moved with care.
Quick stops, excessive force, and uneven surfaces may cause
the appliance and cart combination to overturn.
7. Wall or Ceiling Mounting - The appliance should be mounted to
a wall or ceiling only as recommended by the manufacturer.
8. Ventilation - The appliance should be situated so that its location
or position dose not interfere with its proper ventilation. For
example, the appliance should not be situated on a bed, sofa,
rug, or similar surface that may block the ventilation openings;
or, placed in a built-in installation, such as a bookcase or cabinet
that may impede the flow of air through the ventilation openings.
9. Heat - The appliance should be situated away from heat sources
such as radiators, heat registers, stoves, or other appliances
(including amplifiers) that produce heat.
10. Power Sources - The appliance should be connected to a power
supply only of the type described in the operating instructions or as
marked on the appliance.
CAUTION:
TO PREVENT ELECTRIC SHOCK, MATCH WIDE BLADE
OF PLUG TO WIDE SLOT, FULLY INSERT.
ATTENTION:
POUR EVITER LES CHOCS ELECTRIQUES,
INTRODUIRE LA LAME LA PLUS LARGE DE LA FICHE
DANS LA BORNE CORRESPONDANTE DE LA PRISE
ET POUSSER JUSQU' AU FOND.
The lightning flash with arrowhead symbol,
within an equilateral triangle, is intended to alert
the user to the presence of uninsulated
"dangerous voltage" within the product's
enclosure that may be of sufficient magnitude
to constitute a risk of electric shock to persons.
The exclamation point within an equilateral
triangle is intended to alert the user to the
presence of important operating and
maintenance (servicing) instructions in the
literature accompanying the appliance.
11. Grounding or Polarization - The precautions that should be taken
so that the grounding or polarization means of an appliance is not
defeated.
12. Power Cord Protection - Power supply cords should be routed so
that they are not likely to be walked on or pinched by items placed
upon or against them, paying particular attention to cords at plugs,
convenience receptacles, and the point where they exit from the
appliance.
13. Cleaning - The appliance should be cleaned only as recommended
by the manufacturer.
14. Nonuse Periods - The power cord of the appliance should be
unplugged from the outlet when left unused for a long period of
time.
15. Object and Liquid Entry - Care should be taken so that objects do
not fall and liquids are not spilled into the enclosure through
openings.
16. Damage Requiring Service - The appliance should be serviced by
qualified service personnel when:
A. The power supply cord or the plug has been damaged; or
B. Objects have fallen, or liquid has been spilled into the appliance;
or
C. The appliance has been exposed to rain; or
D. The appliance does not appear to operate normally or exhibits
a marked change in performance; or
E. The appliance has been dropped, or the enclosure damaged.
17. Servicing - The user should not attempt to service the appliance
beyond that described in the operating instructions.
All other servicing should be referred to qualified service personnel.
18. The appliance should be situated away from drops of water or
spray of water.
19. Objects conaining liquid such as vase must not be put on the
appliance.
20. The appliance is not completely isolated from the power supply
even if the power switch is at off position.
2
Page 3

VM04 Owner’s manual
T able of Contents
Precautions..............................................................................3
Let’s examine the VM04 in more detail...........................4
1. Input Section................................................................5
2. Buss Section..................................................................6
3. Master Section.............................................................6
4. Effect Section................................................................7
1. Names and Functions...................................................8
2. Before Use.....................................................................10
2-1. Remove the insulation paper.............................10
2-2. Caution when powering ON...............................10
2-3. Reset........................................................................10
2-4. Internal battery for the memory back up........10
3. Applications...................................................................11
4. Initial Setting..................................................................13
5. Normal Mix Mode.........................................................14
6. Channel Edit Mode.......................................................15
6-1. PAN setting.............................................................15
6-2. EQ Lo setting...........................................................16
6-3. EQ Hi settint............................................................16
6-4. EFFECT SEND setting............................................17
6-5. EFFECT POST/PRE setting...................................17
7. Effect Mode....................................................................18
7-1. EFFECT TYPE setting.............................................19
7-2. EFFECT PARAMETER setting...............................20
Reverb Level setting.................................................21
Reverb Time setting.................................................21
Pre-Delay Time setting............................................21
High Dump setting...................................................21
Early Reflection Balance setting.............................22
8. Scene Memory..............................................................22
8-1. Scene Store.............................................................22
8-2. Scene Recall............................................................23
8-3. Fader Adjust mode...............................................24
8-4. Scene Direct Recall................................................24
Precautions (please read before use)
Power supply
* When unplugging the AC adaptor from the outlet,
be sure to grasp the adaptor. Attempting to unplug
it by pulling on the AC cable may damage the
wiring.
* It is dangerous to use any power cable that is cut
or frayed. If the power cable is damaged,
immediately stop using it, and have it repaired.
* Do not plug in or unplug the AC adaptor with wet
hands. Doing so may result in dangerous electric
shock.
* Do not open the unit or touch any parts inside.
Doing so may result in a dangerous electric shock,
and could damage the unit.
* Do not let water or other liquids, flammable
materials, or metal objects such as pins get inside
the unit. These things may cause electrical shock
or short circuit the VM04, and damage it.
If the VM04 should become wet, unplug the AC
adaptor from the AC outlet, and contact your
authorized service station.
Location
* Avoid using the VM04 in the following locations:
* Locations of extreme low or high temperatures, or
extreme changes in temperature.
* Locations with excessive moisture or dust.
* Locations where direct sunlight falls for an
extended time, or near a stove or other source of
heat.
* Locations where electrical voltage varies.
* Unstable locations or where there is heavy
vibration.
* Near strong magnetic fields (on top of a television
or speaker).
9. SETUP Mode.................................................................25
10. Other Modes...............................................................26
10-1. Software Version Check....................................26
10-2. Battery Check......................................................26
Specifications..............................................................................27
3
Page 4
VM04 Owner’s manual
Let’s examine the VM04 in more detail.
The basic rationale of an audio mixer is to be able to add more than two sounds together. The size
of the mixer depends on the number of input and output channels it has, but the mixer’s role
remains basically the same. There are various types of mixers depending on their purposes, e.g.,
recording mixers and P.A. mixers (Public Address system for live performances). These mixers have
some additional features for the convenience of their practical use. For instance, the recording mixer
has a Recorder IN socket in each input channel to cater for the audio mixing reproduction of the
Multi Track Recorder. There are also large P.A. mixers which have sub Master sections so that the
different mixing can be sent to various different monitor systems at the same time. The VM04 can
adapt to both type of mixers. It can also be used as a sub mixer in large systems as you can see from
the Application sections in the manual.
As far as the size is concerned, the VM04 is a very compact audio mixer with a capacity of 4 in/2
out (4 channel audio can be mixed into 2 channel stereo buss). Although small, it has the beauty of
a digital mixer in the high sound quality available and the variety of functions it can perform. The
unit has a Stereo output via a pair of phone jacks as well as an optical S/P DIF digital output. The S/
P DIF ( Sony Philips Digital Interface) is the standard digital audio signal. And the VM04 is capable of
transferring the mixed audio signal in digital to other digital equipment like the Fostex D-5 DAT
recorder. The digital audio signal that the VM04 handles is a 44.1kHz sampling frequency, which is
common to the audio CD and 20 bit resolution of the AD/DA conversion( Analog to Digital and
Digital to Analog conversion). This is superior to the 16 bit audio CD. The VM04 also uses a 24 bit
resolution in its internal buss for the audio mixing process so that the sound deterioration is kept to
a minimum.
The VM04 incorporates the newly developed high quality digital Effect inside its light and compact
body. This means you can enjoy mixing audio with a variety of sound effects without using an
external Effect unit and awkward connections.
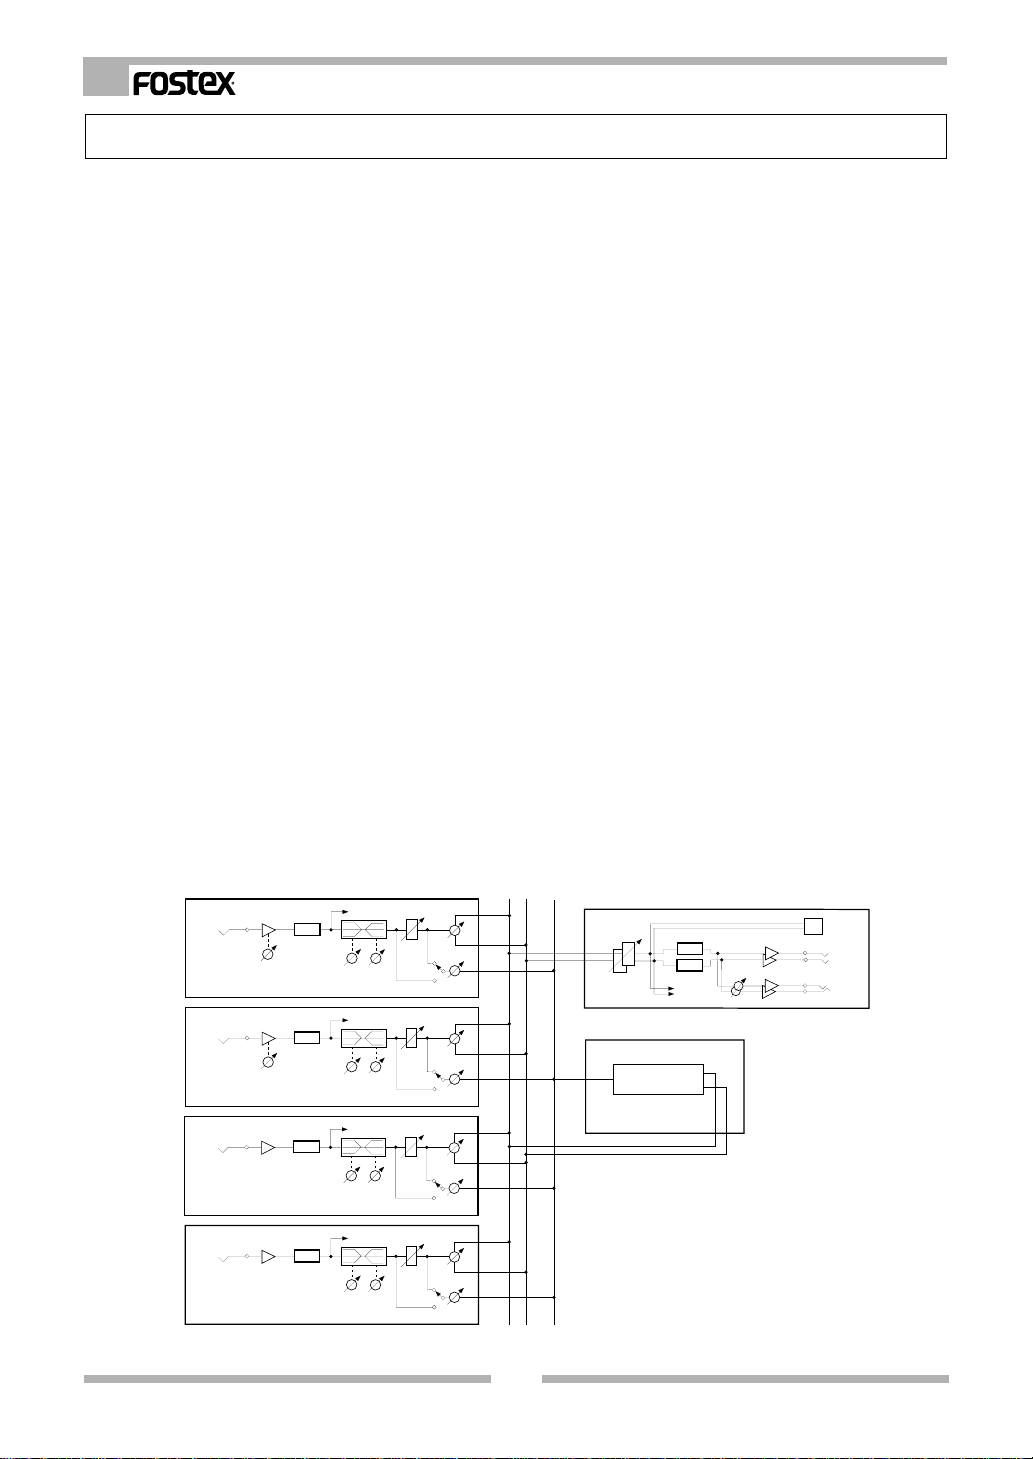
A block diagram is always available in an audio mixer manual. The most efficient way to use an
audio mixer is to get familiar with the block diagram. How to read the block diagram is always the
same, however big the mixer size is. There are many professional sound engineers who can do the
task by just reading the block diagram. Take note of the importance of the block diagram.
L
R
CH1
INPUT 1
(-10dBV~-50dBV)
CH2
INPUT 2
(-10dBV~-50dBV)
CH3
INPUT 3
(-10dBV)
CH4
INPUT 4
(-10dBV)
METER
100Hz
A/D
TRIM
A/D
TRIM
A/D
A/D
10kHz
HI
LO
METER
100Hz
10kHz
HI
LO
METER
100Hz
10kHz
HI
LO
METER
100Hz
10kHz
HI
LO
FADER
FADER
FADER
FADER
PRE/POST
PRE/POST
PRE/POST
PRE/POST
PAN
EFFECT
SEND
PAN
EFFECT
SEND
PAN
EFFECT
SEND
PAN
EFFECT
SEND
EFFECT
MASTER
MASTER FADER
EFFECT
EFFECT
METER
D/A
D/A
PHONES
S/P DIF OUT
L
R
PHONES
OUTPUT
(-10dBV)
4
Page 5
VM04 Owner’s manual
1. Input Section
As Channel 1 and 2 are identical in the VM04, let’s take Channel 1 as an example. In the VM04
block diagram, the input is on the left and output is on the right, i.e., the audio signal goes from left
to right. First, look below where it says INPUT 1. You will see (-10dBV~-50dBV) written there. This
is the signal voltage level that the input phone jack terminal can take. It is a range of voltage from as
low as a microphone (-50dBV) to line level (-10dBV). The sound source that has line level is an
ordinary Keyboard, CD player or electric guitar with pre amp.
CH1
INPUT 1
(-10dBV~-50dBV)
A/D
TRIM
100Hz
METER
LO
10kHz
HI
FADER
PRE/POST
PAN
EFFECT
SEND
The next point on the diagram is a triangle, which is directing the signal towards the right. It is a
kind of amp sometimes called a “buffer”. Underneath the triangle, there is a circle with an arrow
with TRIM written below it. This is the input gain adjust TRIM pot on the rear panel. This TRIM will
adjust the gain to adapt a wide range of incoming signals. The TRIM is for lifting up the level of the
low voltage input so that the MIC level audio and Line level audio can be handled equally at the
INPUT FADER. If you turn the TRIM pot clockwise, the gain will increase to accommodate the low
signal level.
A rectangle with A/D written in it follows. This is the circuit for converting the analog signal into
digital. From this point, the audio signal will be processed digitally until it is converted back again in
the D/A which is discussed later. The analog audio signal is converted to a 44.1kHz, 20 bit digital
audio signal because the VM04 undertakes all its mixing and operates all its controls in digital.
At the next point on the diagram, there is an arrow pointing upwards and to the right and labeled
METER. The VM04 extracts the signal level at this point and displays it in the Channel 1 level meter
on the LCD Display (Liquid Crystal Display). This point is sometimes called Pre-Fader or Pre-EQ.
Move on to the next section (EQ). You will see a rectangle labeled “>100Hz” and “<10kHz”. There
are controls for LO and HI underneath the rectangle. These are the Shelving Type Equalizations.
You can adjust the Bass tone below 100Hz using the LO EQ and the Treble tone above 10kHz using
the HI EQ. The VM04 controls these EQ’s by entering the CHANNEL EDIT MODE. There is no
independent control POT available unlike an analog mixer.
After the EQ, you will see a rectangle and arrow labeled FADER. This is the INPUT FADER to adjust
the audio level on the channel. There is one FADER for each channel and they are slide POTs so that
you can move them up and down to control the volume of each channel.
Now, we need to talk about the relationship between the TRIM function mentioned above and the
FADER. The TRIM is for adjusting the gain so that the input can take a wide range of signal voltages
from MIC to Line level. In other words, the TRIM aligns the various different incoming signals from
various sound sources, so that they become more or less the same level before reaching the FADER.
This is to make the mixing easier.
For example, if you had a design of mixer that had no TRIM function, but the INPUT FADER had a
very wide adjustment range, then, to make a well balanced mix, the microphone channel might have
to have the FADER extremely high, while the keyboard channel might have to have the FADER very
low. This would make mixing the sounds together very awkward. The TRIM enables you to handle
differing sound sources as though they are at the same level on the INPUT FADER.
5
Page 6
VM04 Owner’s manual
Before and after the FADER, there are two lines pointing downwards and to the right. These are
the selector switches. In the diagram the line after the FADER has an arrow touching it. The line
before the FADER is labeled PRE. The line after the FADER is labeled POST. With these switches, you
can decide whether to send the audio signal to the internal EFFECT either before or after the FADER.
If you choose “PRE”, the audio will be sent to the EFFECT even if you turn down the FADER. As a
result only the Effect sound will go out via the STEREO OUT without the dry source sound (i.e., the
original raw sound, vocal or instrumental). If you choose “POST”, the INPUT FADER will control the
entire audio level including the Effect sound. The VM04 does not have dedicated switches for this
purpose, but you select it by entering the CHANNEL EDIT mode.
If you look at the second line after the FADER, you will see that the base of arrow touching it is
connected to the EFFECT SEND volume control. This control adjusts the audio level to be sent to the
EFFECT in each channel. This control is not available on the VM04 control panel, but you can set it
by entering the CHANNEL EDIT mode.
The final part of the INPUT section is labeled “PAN”. With this control, you can individually allocate
the audio signal to either the left or the right of the stereo, e.g., the keyboard will be in the right while
the guitar will be in the left. The PAN control is also not available on the VM04 control panel. But
you can set it by entering the CHANNEL EDIT mode.
We said that the channel 2 input is exactly the same as the channel 1. So what about channels 3
and 4? They have the same structure as Channels 1 and 2 except the TRIM part has been deleted.
INPUTs 3 and 4 are labeled (-10dBV) . This means they can only take the Line level audio signal. You
cannot directly connect a microphone to INPUTs 3 and 4 as the MIC level is too low for them.
2. Buss Section
To the right of Channels 1,2,3 and 4 on the block diagram, you will see three vertical lines. These
are the Buss lines. They are the main audio signal streams which flow between the input and output
sections. In the VM04 there are two Buss lines for STEREO L/R and another one for the Effect Buss.
You can see these labeled in the block diagram. The audio signal assigned to the PAN control is
known as the stereo signal. It will go to both L and R Buss lines. The signal level adjusted by the
EFFECT SEND will go to the Effect Buss line. All four channel input signals will go to these Buss lines
after the INPUT section.
L
R
EFFECT
MASTER
PAN
EFFECT
SEND
OST
3. Master Section
The audio signal that has come through the L/R Buss lines will now go to the Master section. As
they are already divided into two channel stereo, the signal from this point will be handled as two
channels together at once. So the parts discussed in the Master section consist of two channels in a
pair. At the beginning of the MASTER section, there are two rectangles bisected with an arrow and
labeled “MASTER FADER”. The MASTER FADER can control both L/R channel audio at the same
time.
MASTER FADER
6
Page 7

VM04 Owner’s manual
After the MASTER FADER, there are two arrows pointing downwards and to the right labeled
“METER”. The VM04 will extract the signal level at this point and display it in the LCD Display L/R
level meters. In the opposite direction, upwards and to the right, there are two lines leading to the
S/P DIF output square. This square sends out the digital signal via the optical output. The digital
signal for the VM04 output is a 44.1kHz, 20 bit signal.
Next in line are two rectangles labeled D/A. These will convert the digital audio signal back to
Analog. After the D/A rectangles, you will see two sets of triangles pointing to the right. These direct
the signal flow and are kinds of amps (buffers). These refine the analog audio signal for the STEREO
OUT L/R. The STEREO OUT L/R has (-10dBV) written below it. This means that the output line level
of the VM04 is (-10dBV).
If you look after the D/A rectangles again, you will see two lines moving downwards to the right.
These connect with two circles bisected with an arrow. They are the Headphone amps and Headphone
level volume controls. This is the VM04’s monitor section. Some large mixers may have a selector
switch so that it is possible to choose which part of the signal flow will be monitored. In the case of
the VM04, the monitor output will always send exactly the same signal to the STEREO OUT as to the
Headphones.
MASTER
D/A
D/A
MASTER FADER
METER
PHONES
S/P DIF OUT
L
OUTPUT
(-10dBV)
R
PHONES
4. Effect Section
The destination of the signal from the Effect Buss line is the Effect section. You can treat the Effect
section as if it is an independent (1 in / stereo out) Effect unit. After the audio signal has been
through the Effect process, it will become a STEREO signal and return to the L/R Buss lines. Then, the
Effect sound will be mixed with the dry sound coming from each Input channel and will head back
into the MASTER section. Don’t forget the POST/PRE selector switch. If you set the switch to “PRE”
and INPUT FADER to MIN, only the Effect sound will go out via the STEREO OUT without dry sound.
Again, if used this way, the VM04 Effect section is acting as an independent Effect unit.
The Effect section is very adaptable. For example, if you are recording the vocal in your home studio,
by using the reverb you can record the sound as if you are recording in a large hall. You can also
change the original source sound completely by using the delay or chorus.
EFFECT
EFFECT
The types of Effect the VM04 provides are Reverb, Delay, Chorus and Flanger. Some combinations
of these are also available. See EFFECT mode (page 18) for more details of the Effect and how to use
it.
7
Page 8
VM04 Owner’s manual
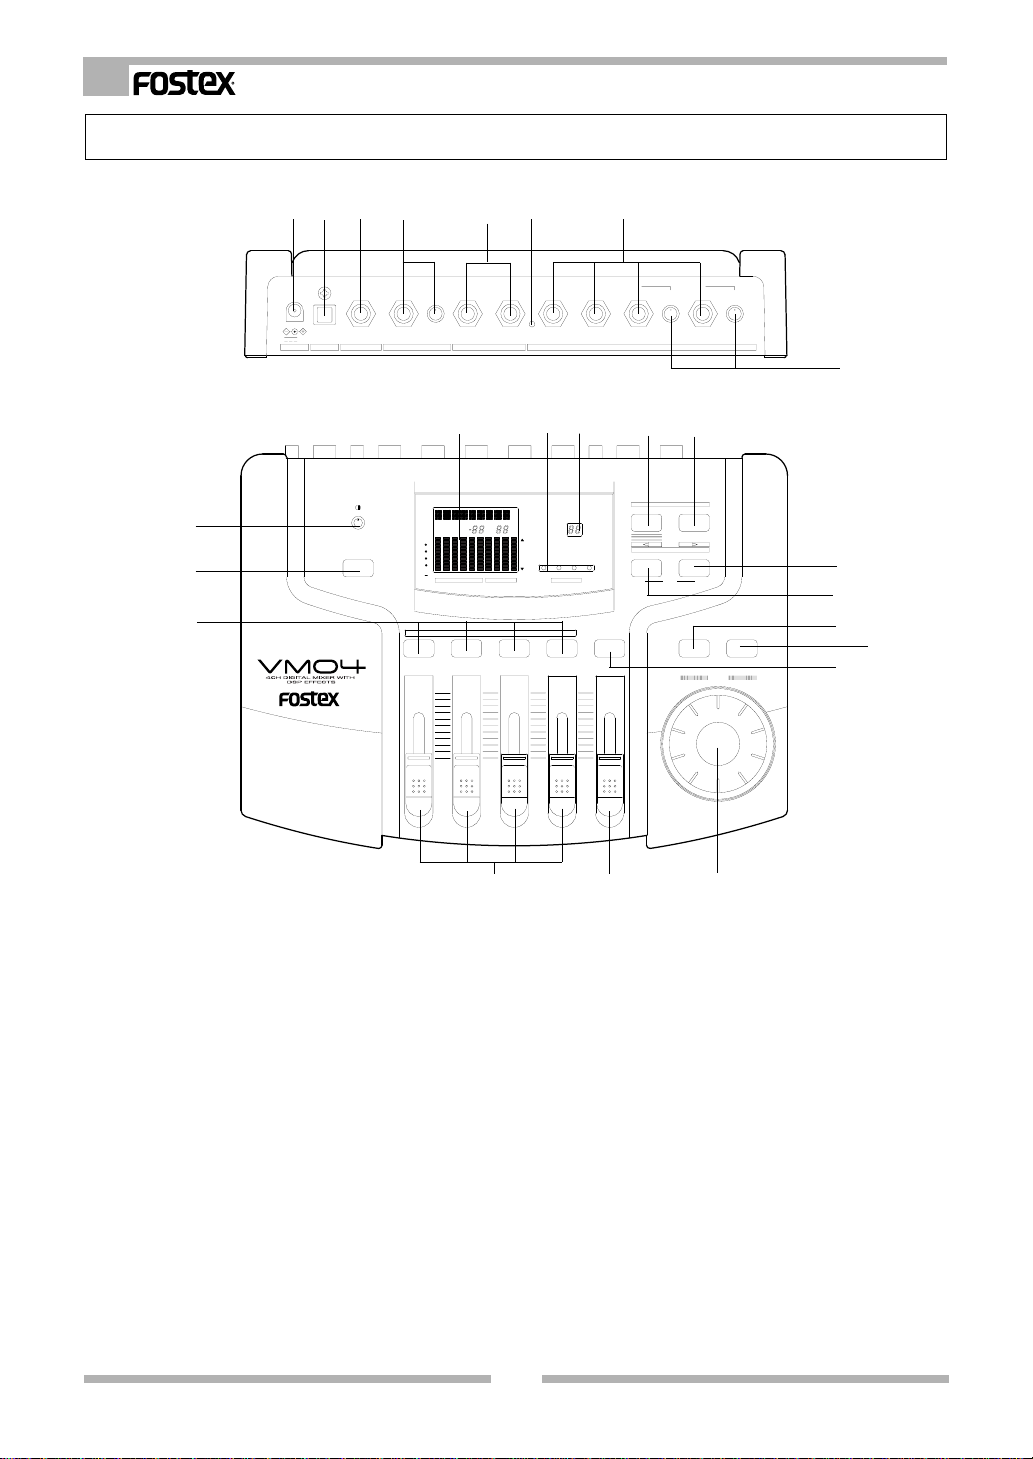
1. Names and Functions
21
20
19
12
OUT
9V
S/P DIF
DC IN
3
FADER ADJUST
4
PHONESFOOT SW
MIN MAX
OUTPUT
22
CH
OL
0
6
12
24
48
1234LR1234
CHANNEL EDIT
MAX
MIN
56
LR
RESET
23
MASTER
MAX
R
L
MIN
VIEWLEVEL
MAX
MAX
MIN
MIN
24
SCENE No
EQ
EQ
7
32 14
INPUT
TRIMTRIM
-10-50
-10-50
8
9
10
SCENE
STORERECALL
EFFECT
EFFHILOPAN
PARAMETERTYPE
SETUP
11
12
VIEW
ENTEREXIT
13
14
MASTER4321
MAX
MIN
DATA
15
1. DC INLET connector
To connect the standard accessory AC adaptor to
power up the VM04.
2. S/P DIF optical output connector
You can obtain the same audio signal as the
STEREO OUT L/R, but in S/P DIF digital and optical
format.
3. Foot SW jack
Connect a Foot SW, such as the Fostex Model 8051,
to recall the Scene Memories. See SCENE MEMORY
(page 22).
4. Headphone jack and its volume control
Connect a pair of headphones to the socket and
control the volume level by using the control knob.
161718
5. STEREO OUT L/R jacks
(6mm Phone Jack, Un-Balance)
To send a mixed audio signal to other equipment,
such as an MTR, Stereo Monitor system or another
mixer.
6. RESET SW
To reset the internal CPU. See the “Before Use”
section for more details.
7. INPUT jacks
(6mm Phone Jack, Un-Balance)
To connect the audio source into the jack. Inputs
1 and 2 can take either mic or line level signals,
while Inputs 3 and 4 are designed for the line
level only.
8
Page 9

VM04 Owner’s manual
8. TRIM knobs
These volume knobs control the input gain of
INPUT 1 and 2 according to the incoming signal
level. Range: -10dBV~-50dBV. When you turn it
clockwise, the gain will increase so that the Input
socket can take low level signal inputs.
9. SCENE RECALL key
Use this to recall the Scene Memories. See SCENE
MEMORY (page 22).
10. SCENE STORE key
Use this to store your own settings in the Scene
memories. See SCENE MEMORY (page 22).
11. EFFECT PARAMETER key
Use this to set the Effect Parameters. See EFFECT
MODE (page 18).
12. EFFECT TYPE key
Use this to set the Effect Type. See EFFECT MODE
(page 18).
13. EXIT key
Use this key to quit the current mode.
See CHANNEL EDIT MODE (page 15), EFFECT
MODE (page 18), SCENE MEMORY (page 22),
FADER ADJUST MODE (page 23) and SETUP MODE
(page 25).
19. CHANNEL EDIT key
Press this key to enter the CHANNEL EDIT MODE.
See CHANNEL EDIT MODE (page 15).
20. FADER ADJUST key
When you have recalled a Scene, if the Fader
position is different from the Scene setting, this
key will flash. Then, press this key to enter the
FADER ADJUST MODE (page 24).
21. Contrast control knob
Use this to control the contrast on the LCD display.
22. LCD Display
This LCD shows various kinds of essential
information. It consists of the Character part, Level
display part, View display part, Channel Fader
display part and Master Fader display part.
23. VIEW Status Indicator
Use this to confirm which mode you are setting
when in the CHANNEL EDIT MODE. You can
choose the mode by pressing the VIEW key. See
CHANNEL EDIT MODE (page 15).
24. SCENE Number display
This shows the SCENE Number that has been
recalled. See SCENE MEMORY (page 22).
14. ENTER key
Use this key to accept the current setting.
See EFFECT MODE (page 18), SCENE MEMORY
(page 22), and SETUP MODE (page 25).
15. VIEW key
Use this key to choose which function to adjust
and display on the LCD Display and VIEW Status
Indicator.
16. DA T A ENCODER
Use this dial to set the various values in each mode.
17. MASTER FADER
Use this to adjust the output level at the STEREO
OUT jack.
18. INPUT FADERs
Use this to adjust the input level on the individual
channel.
9
Page 10

VM04 Owner’s manual
2. Before Use
2-1. Remove the insulation paper
The VM04 employs a memory back up battery
inside the unit. When you have newly purchased
the unit, you will find a piece of insulation paper
attached to avoid voltage dissipation in transit.
So, when you start using the unit for the first time,
turn ON the power and then remove the insulation
paper in that order.
2-2. Caution when powering ON
As the VM04 does not have a power switch,
switching the power ON is done by connecting
the AC adaptor. So, keep the input volume at 0 on
the monitor amp or power it OFF when you plug
in the AC adaptor in order to avoid damaging
any connected equipment such as loud speakers.
Insulation paper
DC IN
OUT
9V
S/P DIF
FOOT SW
To the AC outlet
2-3. Reset
The internal CPU may crash very occasionally due
to the powering ON/OFF timing or some electromagnetic noise such as thunder and lightning. IF
the unit does not power up properly even after
several attempts to power ON, press the RESET
SW to reset the CPU. If you want to clear all the
Scenes stored in the past, you can use the same
OUT
S/P DIF9VDC IN
method here. All the memories and Setup contents
will return to the factory default setting by
pressing the SW.
2-4. Internal battery for the memory back up
The internal battery has a life expectancy of about
two years. When the battery runs out and its
voltage falls below a certain level, the warning
message “BattEmpty” will appear on the display.
You need to replace the battery. If you carry on
using the unit without a new battery, your stored
memories will be lost when powering OFF. Please
ask your Fostex distributor or an authorized
service station. Do not open the unit yourself as
there are no user-serviceable parts inside.
OL
0
6
12
24
48
1234LR1234
LEVEL
MIN MAX
PHONESFOOT SW
CH
LR
RESET
OUTPUT
RESET switch
MASTER
MAX
R
L
VIEW
MIN
PAN
32 14
INPUT
SCENE NO.
LO
TRIMTRIM
-10-50
-10-50
HI
EFF
EQ
<Useful info>
The VM04 employs an internal battery voltage display function. See Item10 The other mode (page 26) for more details.
10
Page 11

VM04 Owner’s manual
3. Applications
Application 1: To expand the Analog channel input for recording
You will be able to record up to 4 Analog
channels on the FD-8 at once by connecting
the VM04 S/P DIF output to the FD-8 DATA
IN.
You can also take advantage of the high
quality internal digital effect functions while
recording.
OL
0
6
FADER ADJUST
12
24
1234LR1234
CHANNEL EDIT
VM04
DIGITAL MINI MIXER
MAX
MAX
MIN
S/P DIF
SCENE
STORERECALL
SCENE No
MAX
[ R ]
EFFECT
PARAMETERTYPE
EQ
[ L ]
MIN
EFFHILOPAN
EQ
VIEWLEVEL
SETUP
ENTEREXIT
VIEW
MASTER4321
DATA
MAX
MAX
MIN
MIN
MIN
VM04
Application 2: To use as a Mono In/Stereo Out Effecter
You can use the internal digital effect as an
independent high quality effect unit., e.g.,
by connecting the VM04 between the AUX
SEND and AUX RTN of other MTR’s such as
the FD-8.
INPUT
VM04
DIGITAL MINI MIXER
FADER ADJUST
LR
SCENE No
MAX
OL
[ R ]
0
6
12
EQ
24
[ L ]
MIN
1234LR1234
EFFHILOPAN
EQ
VIEWLEVEL
CHANNEL EDIT
MAX
MAX
MAX
MAX
MIN
MIN
MIN
MIN
SCENE
STORERECALL
EFFECT
PARAMETERTYPE
SETUP
ENTEREXIT
VIEW
MASTER4321
DATA
VM04
Application 3: As a Sub Mixer for a Live Keyboard Player
S/P DIF
DATA IN
FD-8
Analog IN
AUX SEND AUX RTN L/R
FD-8
You can use the VM04 as a sub mixer to mix
the sound of the Keyboard and Sound
Module for the main mixer. You can also use
the Foot SW, Fostex Model 8051, to change
Scenes that you prepared in advance.
Application 4: Brief installation Mixer
You can recall prepared Scenes in sequence
for various different settings, e.g.,
Mic only -> Mic & Music -> Mic only.
VM04
VM04
11
Keyboard &Sound Module
6
FADER ADJUST
12
24
VM04
DIGITAL MINI MIXER
1234LR1234
MAX
MIN
EFFECT
PARAMETERTYPE
EQ
[ L ]
MIN
EFFHILOPAN
EQ
VIEWLEVEL
SETUP
CHANNEL EDIT
MAX
MIN
ENTEREXIT
VIEW
MASTER4321
DATA
MAX
MAX
MIN
MIN
SCENE
STORERECALL
SCENE No
MAX
OL
[ R ]
0
8051
PA Mixer
CD Player
SCENE
STORERECALL
SCENE No
MAX
OL
[ R ]
0
6
FADER ADJUST
12
24
VM04
DIGITAL MINI MIXER
1234LR1234
MAX
MIN
EFFECT
PARAMETERTYPE
EQ
[ L ]
MIN
EFFHILOPAN
EQ
VIEWLEVEL
SETUP
CHANNEL EDIT
MAX
MIN
ENTEREXIT
VIEW
MASTER4321
DATA
MAX
MAX
MIN
MIN
SPA11
Page 12

VM04 Owner’s manual
Application 5: For one take live studio recording
You can use the VM04 to send the mixed
digital audio via the S/P DIF to a DAT or PC
with Digital In. You can also add the internal
digital effect when mixing audio.
FADER ADJUST
VM04
DIGITAL MINI MIXER
VM04
Application 6: To produce original Remix
OL
0
6
12
24
1234LR1234
MAX
MIN
Keyboard
PC audio board
OR
S/P DIF
w/digital IN
S/P DIF
POWER
DISP
TIME
ON
DISP
LEVEL
OFF
MARGIN
RESET
OPEN/
CLOSE
PNO
LOC
D-15 DIGITAL MASTER RECORDER
MEM LOC
PHONES
START ID SEARCH
AUTO
BLANK
INSTANT
CUE
SET UP
SEARCH
START
MIN MAX
F FWD
STOP PLAY
RECORD
REWIND
789
1023
9P-REMOTE
REMOTE
RAM
JOG
PREVIEW
SCRUB
/SHTL
/REPEAT
QUIT
INPUT
CHASE
MONITOR
AUTO-ID
WRITE
/RCL
ERASE
654
EXECUTE
ID
AUTO
OFFSETRENUM
MUTE
START
/SET
SELECT
REC
SKIP
END
CAL
CAL
CH2
CH1
EXT
48kHz
OPTICALON
DIGITAL
44.1kHz
OFFLOCAL
INTANALOG
DAT
INPUT
INPUTGPI
MIN MAX
MIN MAX
SAMPLING FREQCLOCK
LEVEL
SCENE
STORERECALL
SCENE No
MAX
[ R ]
EFFECT
PARAMETERTYPE
EQ
[ L ]
MIN
EFFHILOPAN
EQ
VIEWLEVEL
SETUP
CHANNEL EDIT
MAX
MIN
ENTEREXIT
VIEW
MASTER4321
DATA
MAX
MAX
MIN
MIN
You can send the remixed sound of the
Sampler and CD Player with the internal digital
effect to a DAT recorder via the S/P DIF.
S/P DIF
SCENE
STORERECALL
SCENE No
MAX
OL
[ R ]
0
VM04
6
FADER ADJUST
12
24
VM04
DIGITAL MINI MIXER
1234LR1234
MAX
MIN
EFFECT
PARAMETERTYPE
EQ
[ L ]
MIN
EFFHILOPAN
EQ
VIEWLEVEL
SETUP
CHANNEL EDIT
MAX
MIN
ENTEREXIT
VIEW
MASTER4321
DATA
MAX
MAX
MIN
MIN
Application 7: To do your own Sound Track V ideo Editing
You can add your favorite background music,
original sound effects and narration when
editing videos.
VM04
SCENE No
MAX
OL
[ R ]
0
6
FADER ADJUST
12
EQ
24
[ L ]
MIN
1234LR1234
EFFHILOPAN
EQ
VIEWLEVEL
CHANNEL EDIT
VIEW
VM04
DIGITAL MINI MIXER
MASTER4321
MAX
MAX
MAX
MAX
MIN
MIN
MIN
MIN
Audio
SCENE
STORERECALL
EFFECT
PARAMETERTYPE
SETUP
ENTEREXIT
DATA
Application 8: As a practise aid for your musical instruments
PAN PLAYBACK LEVEL
1
You can use the VM04 to practice your musical
instruments with added effects on top of
backing tracks recorded on MTR’s such as the
X-14.
VM04
RL
2
L
R
3
L
R
4
L
R
FADER ADJUST
VM04
DIGITAL MINI MIXER
Sampler
CD Player
POWER
DISP
TIME
ON
DISP
LEVEL
OFF
MARGIN
RESET
OPEN/
CLOSE
PNO
LOC
D-15 DIGITAL MASTER RECORDER
MEM LOC
PHONES
START ID SEARCH
AUTO
BLANK
INSTANT
CUE
SEARCH
START
MIN MAX
F FWD
STOP PLAY
RECORD
REWIND
DAT
RAM
JOG
PREVIEW
SCRUB
/SHTL
789
SET UP
1023
9P-REMOTE
REMOTE
/REPEAT
QUIT
INPUT
CHASE
MONITOR
AUTO-ID
WRITE
/RCL
ERASE
654
EXECUTE
ID
AUTO
OFFSETRENUM
MUTE
START
/SET
SELECT
REC
SKIP
END
CAL
CAL
CH2
CH1
EXT
48kHz
OPTICALON
DIGITAL
44.1kHz
OFFLOCAL
INTANALOG
INPUT
INPUTGPI
MIN MAX
MIN MAX
SAMPLING FREQCLOCK
LEVEL
Video
Camera
Video Signal
VTR
RL
STANDBY ON
DC IN
/LINE OUT
12V
RESET
000
OL
0
6
12
24
1
2
3
4
OFF
4
REC
SEL
3
1234LR1234
MAX
MIN
MAXMIN
POWER
REC
+
6
3
0
5
10
-
INT
MIC
1
2
REC PLAY PAUSESTOPFFREW
MAX
[ R ]
[ L ]
MIN
VIEWLEVEL
CHANNEL EDIT
MAX
MAX
MIN
MIN
X-14
multitracker
X-14
SCENE
STORERECALL
SCENE No
EFFECT
PARAMETERTYPE
EQ
EFFHILOPAN
EQ
SETUP
ENTEREXIT
VIEW
MASTER4321
DATA
MAX
MIN
AMP
12
Page 13

VM04 Owner’s manual
4. Initial Setting
When you first power up the VM04, the LCD Display will show the following initial setting.
Scene Number display
Character section of the LCD Display
It will show <FOSTEX>, <VM04> then,
“Init.Mix”.
Channel Fader display
This section will numerically
indicate the INPUT Fader
position of the channel you
choose in the CHANNEL
EDIT MODE on a range
from 0 to 99. But, there will
be no numbers showing at
the initial setting. See
CHANNEL EDIT MODE
(page 15).
OL
0
6
12
24
48
1234LR1234
Master Fader display
This part will numerically indicate the
Master Fader position on a range from
00 to 99. The initial setting will show as
00.
CH
MASTER
MAX
R
L
MIN
LEVEL
VIEW
PAN
LO
This section will numerically indicate
the Scene Memory number on a
range from 00 to 20. The initial
default setting will be displayed as
00.
SCENE NO.
HI
EFF
EQ
Level display
Channel 1 to 4 will indicate the incoming signal
level at the pre-fader position, i.e., it shows the
level regardless of the INPUT Fader setting.
Input channels 1 and 2 have a TRIM
potentiometer (pot) to adjust the gain to cater
for a small signal input such as a MIC. Y ou can
set the appropriate TRIM pot position by
watching the level indicator.
Channels L and R will indicate the outgoing
signal levels at the STEREO OUT L and R
respectively. But, no level indication will be
displayed because you have not yet raised the
VIEW display
This will show each input channel
setting such as PAN, EQ,
EFFECT SEND and EFFECT
PRE/POST, which you can
choose by pressing the VIEW
key. The setting is also displayed
on the VIEW Status Indicator. In
the initial setting, PAN will be
displayed in the middle of the bargraph by two illuminated dots.
See CHANNEL EDIT MODE
(page 15).
MASTER Fader at this stage.
If you want the VM04 to return to the factory
default setting completely, follow the
instructions in Item 2-3. RESET.
VIEW status indicator
When the content to be shown in
the VIEW display is selected with
the VIEW key , the selected dot for
PAN, LO EQ, HI EQ or EFF will
be lit. For details, refer to
"CHANNEL EDIT MODE" in later
page (page 15).
<Useful info>
When the -10dBV nominal signal level is coming in, the
channel 1 to 4 level meter will indicate -12dB. Also, when the
-10dBV nominal signal level is going out, the channel L and
R level meter will indicate -12dB on the scale.
<Useful info>
Y ou can store your favorite Scene setting on Scene Numbers
from 01 to 20. However, as the Scene Number 00 has been
pre-set by the manufacture. Y ou cannot alter this setting.
13
Page 14

VM04 Owner’s manual
5. Normal Mix Mode
This is the mode in which only the INPUT and MASTER Faders will work. Raise both the INPUT Fader
of the channel that has the incoming signal connected and the MASTER fader. The audio signal will
start coming out at the STEREO OUT L and R and S/P DIF Optical output. If you have a pair of
headphones connected to the Headphone Jack, you can hear the same audio signal here as well.
Also, you can adjust the headphone level with the volume knob next to the Jack.
The LCD Display will show the following:
Character section
This will show “Iint.Mix ”. The stands for Edit and means one or more settings have changed from
the initial setting. In this case, the Fader position is different from the initial setting.
Level display
The channel L and R levels will
be indicated on the bar-graph
according to the MASTER
Fader position.
<Useful info>
* When you move the INPUT
and MASTER Faders, their
numerical positions will be
digitally indicated. And the
actual sound will increase or
CH
OL
0
6
12
24
48
1234LR1234
LEVEL
CHANNEL EDIT
MAX
MAX
MASTER
VIEW
SCENE NO.
MAX
R
L
MIN
HI
LO
PAN
MAX
EFF
EQ
MASTER4321
MAX
Master Fader display
This will numerically indicate the current
MASTER Fader position on a range from
00 to 99. When the indicator is showing 80,
the MASTER Fader will be at the nominal
setting.
Caution
VIEW
If the FADER FIX Mode is set to ON in the
SETUP Mode, no sound will come out even
if you move the Faders. See SETUP Mode
(page 25) for more details.
decrease smoothly without
any clicking or stepping noise
interference.
* The relationship between the
Fader position and real gain
is 0 = -∞, 80 = 0dB,
99 = +6dB.
MIN
MIN
MIN
MIN
OUT
S/P DIF9VDC IN
FOOT SW
Adjusts the volume level of
the headphones .
32 14
LR
MIN MAX
RESET
OUTPUT
PHONES
Monitor headphone
TRIMTRIM
-10-50
-10-50
INPUT
<Caution>
When powering ON, it is possible that the FADER ADJUST key will start flashing. This will occur if each Fader
position after powering ON is different from their settings the last time you powered OFF. With regard to the
audio, the audio level is recalled according to the Fader setting the last time you powered OFF. As the VM04
Faders do not move automatically, this is the way the VM04 indicates that it has detected some discrepancy
between the physical Fader position now and the position the last time you powered OFF. See Fader Adjust
mode (page24).
If it is not necessary to match the fader positions, the FADER ADJUST key blinking will be extinguished when
all faders are moved and then, returned to the normal mix mode.
The sound you have obtained up to this stage is so called “dry sound”. All the settings are neutral; the
PAN is in the center, there is flat EQ and no Effect. Let’s move on to the next CHANNEL EDIT Mode.
14
Page 15

VM04 Owner’s manual
6. Channel Edit Mode
This mode is used to set the PAN, EQ, EFFECT SEND and EFFECT POST/PRE on each input channel.
The CHANNEL EDIT key on each input channel has exactly the same mode of operation. Therefore, we will
discuss their functions using Channel 1 as an example. Press the Channel 1 CHANNEL EDIT Key. The key
itself will light up so that you will be able to confirm you have entered into the CHANNEL EDIT MODE. The
LCD display will show the following message.
Character section
This will display “1-Pan: C”. This
means that you can now adjust the
Channel 1 PAN setting. At this point
the setting will be at the center
position between left and right. This
is related to the VIEW Status
Indicator as its dot is at the PAN
position. You can use the VIEW
key to change the item you want to
adjust; PAN -> EQ Lo -> EQ Hi ->
EFF -> POST/PRE -> PAN.
Press the CHANNEL EDIT key 1.
Press the EXIT key to quit
the CHANNEL EDIT MODE.
You can go back to the
Normal Mix mode.
Channel Fader display
This will numerically indicate the current Channel 1 INPUT Fader position on a
range from 00 to 99. When the indicator is showing 80, the INPUT Fader will be at
the nominal setting.
CH
OL
0
6
12
24
48
1234LR1234
LEVEL
CHANNEL EDIT
MAX
MIN
MASTER
VIEW
MAX
MIN
SCENE NO.
MAX
R
L
MIN
HI
LO
PAN
MAX
MIN
EFF
EQ
VIEW
MASTER4321
MAX
MIN
VIEW display
The two digits at the center of the
bar-graph will start flashing on
Channel 1 from being continuously
lit on the initial setting.
<Useful info>
The VIEW key works in reverse if
you keep pressing it for a while rather
than hitting it once; PAN -> POST/
PRE -> EFF -> EQ Hi -> EQ Lo ->
PAN.
6-1. P AN setting
1. Rotate the DATA ENCODER.
If you turn it clockwise, the character display will
change to R1 -> R10 and the sound will gradually
move to the right. At the same time, the PAN
indication on the VIEW display will change to a
single dot and move upwards (to R).
Similarly, if you turn the dial counter-clockwise,
the display will change to L1 -> L10, the sound will
move to the left and the indicator will move
downwards (to L).
<Useful info>
When turning the DATA ENCODER, the position display
will read L10 ~ C ~ R10 with a 21 step digital indication. And
the actual sound will move smoothly without any clicking or
stepping noise interference.
OL
0
6
12
24
48
A dot moving up and down.
15
Indicates L1 ~ L10 or R1 ~ R10.
CH
MASTER
MAX
1234LR1234
LEVEL
VIEW
MIN
PAN dot is flashing.
SCENE NO.
R
L
PAN
HI
LO
EFF
EQ
Page 16

VM04 Owner’s manual
6-2. EQ Lo Setting
1.Press the VIEW key so that the LO dot is flashing
on the VIEW Status Indicator.
The LCD Display will show the following message:
Character section
This will display “1-Lo: 0”. This means that you can
now adjust the Channel 1 EQ Lo setting. At this
point the setting is zero, flat.
CH
OL
0
6
12
24
48
1234LR1234
LEVEL
Flashing
MASTER
VIEW
SCENE NO.
MAX
R
L
MIN
HI
LO
PAN
EFF
EQ
<Useful info>
The specification of the EQ Lo is the Shelving Type
Equalization and its control frequency is 100Hz, +/-18dB.
2.Rotate the DA TA ENCODER.
If you turn it clockwise, the display on the Character
section will change to +1dB -> +18dB from 0dB
and the bass sound will become louder. At the same
time, the two dots on the EQ Lo indicator at the
center of the bar-graph will become a single dot
and move upwards (to MAX). Similarly, if you turn
the dial counter-clockwise, the display will show 1dB -> -18dB, the bass sound will become quieter
and the indicator will move downwards (to MIN).
Indicates +1dB ~ +18dB or -1dB ~ -18dB.
CH
OL
0
6
12
24
48
1234LR1234
LEVEL
MASTER
VIEW
MAX
R
L
MIN
LO dot is flashing.A dot moving up and down.
SCENE NO.
HI
LO
PAN
EFF
EQ
6-3. EQ Hi setting
1.Press the VIEW key so that the HI dot is flashing
on the VIEW Status Indicator.
The LCD display will show the following message.
Character section
This will display “1-HI: 0”. This means that you can
now adjust the Channel 1 EQ HI setting. At this
point the setting is zero, flat.
CH
MASTER
OL
0
6
12
24
48
1234LR1234
LEVEL
VIEW
Flashing
<Useful info>
The specification of the EQ HI is the Shelving Type
Equalization and its control frequency is 100Hz, +/-18dB.
SCENE NO.
MAX
R
L
MIN
HI
LO
PAN
EFF
EQ
2.Rotate the DA TA ENCODER.
If you turn it to clockwise, the display on the
Character part will change to +1dB -> +18dB from
0dB and the treble sound will become louder.
At the same time, two dots of the EQ Hi indicator
at the center of the bar-graph will become a single
dot and move upwards (to MAX). Similarly, if you
turn the dial counter-clockwise, the display will
show -1dB -> -18dB, the treble sound will become
quieter and the indicator will move downwards
(to MIN).
Indicates +1dB ~ +18dB or -1dB ~ -18dB.
CH
OL
0
6
12
24
48
1234LR1234
LEVEL
MASTER
VIEW
MAX
R
L
MIN
LO dot is flashing.A dot moving up and down.
SCENE NO.
HI
LO
PAN
EFF
EQ
16
Page 17

6-4. EFFECT SEND setting
VM04 Owner’s manual
1. Press the VIEW key so that the EFF dot is flashing
on the VIEW Status Indicator.
The LCD Display will show the following message:
Character section
This will display “1-Eff: 0”. This means that you
can now adjust the Channel 1 EFFECT SEND
setting. At this point the setting is zero, dry.
CH
OL
0
6
12
24
48
1234LR1234
LEVEL
MASTER
VIEW
SCENE NO.
MAX
R
L
MIN
HI
LO
PAN
EFF
EQ
VIEW display
Nothing will show here as the EFFECT SEND level
is set to Nil at the moment.
<Useful info>
When turning the DA TA ENCODER, the position display
will read 0 ~ 99 with a 100 step digital indication. But, the
actual EFFECT SEND level is -∞ ~ +6dB.
6-5. EFFECT POST/PRE setting
2.Rotate the DA TA ENCODER clockwise.
The display on the Character section will change
to 00 ~ 99 and the Effect sound will become louder.
At the same time, a flashing dot will appear on the
Channel 1 VIEW display and move upwards.
Indicates 0 ~ 99.
CH
OL
0
6
12
24
48
1234LR1234
LEVEL
A dot moving up and down.
MASTER
VIEW
MAX
R
L
MIN
EFF dot is flashing.
SCENE NO.
HI
LO
PAN
EFF
EQ
See EFFECT MODE (page 18) for more details of
the internal digital Effect.
1. Press the VIEW key just once more at the previous
EFFECT SEND setting.
There will be no change on the VIEW Status
Indicator but the LCD Display will show the
following message:
Character section
This will display “1-P/P: Pst”. This means that you
can now choose the Channel 1 EFFECT SEND in
either the Post-Fader or Pre-Fader position. At this
point the setting is Post-Fader.
CH
OL
0
6
12
24
48
1234LR1234
LEVEL
MASTER
VIEW
SCENE NO.
MAX
R
L
MIN
HI
LO
PAN
EFF
EQ
VIEW display
The bottom three dots will flash on the bar-graph.
See EFFECT MODE (page 18) for more details of
the internal digital Effect.
2.Rotate the DA TA ENCODER clockwise.
The display on the Character section will change
from “Pst” to “Pre” and the EFFECT SEND point
setting will switch over to the Pre Fader position.
Also, the VIEW display will change and the top three
dots will start flashing.
Indicates Pst or Pre.
R
LO
PAN
EFF dot is flashing.
SCENE NO.
HI
EQ
EFF
CH
MASTER
OL
0
6
12
24
48
1234LR1234
LEVEL
VIEW
Moves up or down at each 3rd digit.
MAX
L
MIN
<Useful info>
The setting indication on the VIEW display will remain as a
dot even after quitting the CHANNEL EDIT MODE, e.g.,
PAN, EQ Lo, EQ Hi, EFFECT SEND and EFFECT POST/
PRE. So you can easily confirm the setting of all four
channels at once in the Normal Mix mode. Press the VIEW
key to choose the setting by referring to the VIEW Status
Indicator.
17
Page 18

VM04 Owner’s manual
7. Effect Mode
The VM04 carries 20 types of internal digital effects. You can also alter their parameter settings in detail. We will
discuss the digital effects here. To fully understand their versatile effect functions, we recommend that you
listen to the actual sound while reading the explanations below.
The DSP effect section inside the VM04 employs the A.S. P. (Fostex Advanced Signal Processing Technology)*,
which is exclusively developed by Fostex, and obtains high quality ambient effects almost equivalent to a
professional reverb unit.
*A. S. P. (Fostex Advanced Signal Processing
Technology)
The A. S. P. is an exclusive new digital effect processing
technology designed by Fostex. This method extracts
maximum efficiency from the limited DSP power. It
achieves an overwhelmingly high density Early
Reflection sound and wonderfully smooth High
Dump response through the H. F. A. (Harmonic
Feedback Algorithm). Also, it carries out an elaborate
reverb simulation with clear sounds through the H.
D. L. P. (Hi-Density Logarithmic Processing), which
eliminates the mutual interference between the
numerous integrated delay modules and reduce the
impurity and grit of the sound.
*H. F . A. (Harmonic Feedback Algorithm)
There is one of indispensable elements in the natural
echo called “Early Reflection sound”, which is usually
sacrificed in commercial reverb products in order to
reduce costs. (In practice, the Early Reflection sound
means the very first reverberated sound that bounces
back from walls, floors and ceilings of concert halls).
The entire reverb sound quality depends on this Early
Reflection sound and how closely it can resemble
the real echo. The H. F. A. is an algorithm that enables
the effect unit to reproduce a clear and natural Early
Reflection sound by applying an ideal harmonic
feedback to each delay module.
*H. D. L. P. (Hi-Density Logarithmic Processing)
The reverb sounds consist of lots of small delay
elements combined in a complex way, which are
produced by many delay modules inside the effect
unit. In order to obtain smooth and comfortable
reverb sounds, it is very important to efficiently
organize the relationship between each delay module
and minimize negative mutual interference.
The H. D. L. P. is a technology which applies efficient
logarithmic processing to each delay module, so that
they can work in the most efficient way in order to
eliminate harmful reverb elements and roughness.
This makes it possible to establish high density and
transparent sounds.
Before operating the EFFECT MODE, let’s briefly discuss
the Reverb, Delay, Chorus and Flanger effect functions
which are integrated in the VM04.
Reverb
The Reverb effect consists of various reflection (echo)
sounds mixed together. Just as when you clap your hands
in a tunnel, for example, you hear the sound lingering
after you have stopped clapping your hands. This is the
Reverb. The sounds we normally hear in everyday life
are made up of three kinds of sound mixed together:
“Direct sound”, “Early Reflection sound” and “Late
Reflection sound”. The Direct sound refers to sound
which reaches the ears directly from the sound source,
as the name suggests. The Early Reflection sound refers
to sound which has rebounded off a wall only a few
times. And the Late Reflection sound refers to sound
which continues rebounding long after the Direct sound
has disappeared. Our ears normally hear the Direct
sound, Early Reflection sound and Late Reflection sound
in that order. The Reverb on the VM04 can be set to the
following parameters:
* Reverb Time: Sets the length of time the sound reverberates.
* Pre-Delay Time: Sets the time lapse between the direct sound
and the reverb sound.
* High Dump: Sets the decay rate of high frequency reflected
sound. The decay rate refers to the amount of time it takes a
sound to disappear.
* Early Reflection Balance: Sets the audio level of the Early
Reflection sound.
Delay
This is the effect obtained by adding a delayed sound to
the original sound. You can obtain a richer sound or
completely change the original source sound by using
the Delay. The Delay on the VM04 can be set to the
following parameters:
* Delay Level: Sets the volume of the Delay sound.
* Delay Time: Sets the time between the original sound and the
delay sound.
* Feedback Level: Sets the level of the delay sound to be returned
to the delay input.
Chorus
The Chorus is used to widen or thicken the original
sound. The Chorus on the VM04 can be set to the
following parameters:
* Chorus Level: Sets the volume of the Chorus sound.
* Modulation Rate: Sets the Chorus modulation frequency.
* Depth: Sets the depth of sound available on the Chorus.
Flanger
This is to use to create a sound like a jet airplane taking
off or landing. The Flanger on the VM04 can be set to
the following parameters:
* Flange Level: Sets the volume of the Flanger sound.
* Modulation Rate: Sets the Flanger modulation frequency.
* Feedback Level: Sets the volume of the Flanger sound feedback.
The type of Effect the VM04 provides can be set
individually in the way described above. Some
combinations of these are also available. These are
explained on the next page.
18
Page 19

7-1. EFFECT TYPE setting
FADER ADJUST
OL
0
6
12
24
48
1234LR1234
VM04 Owner’s manual
SCENE
CH
SCENE No
MASTER
MAX
R
EQ
L
MIN
EFFHILOPA N
EQ
VIEWLEVEL
STORERECALL
EFFECT
PARAMETERTYPE
SETUP
4
MAX
1
MIN
1. Raise the MASTER Fader and INPUT Fader of the
Channel you have the incoming audio signal
connected to in the NORMAL MIX MODE (Item 5.)
so that you can hear the audio.
2. In the EFFECT SEND Level setting (Item 6-4.), turn
the DA TA ENCODER clockwise to set a reasonable
sound level, e.g., Eff: 60.
You will now start hearing the Effect sound.
CH
OL
0
6
12
24
48
1234LR1234
LEVEL
MASTER
VIEW
MAX
MIN
R
L
SCENE NO.
HI
LO
PAN
EFF
EQ
3. Press the EXIT key to come out of the EFFECT
SEND Level setting mode.
4. Press the EFFECT TYPE key once.
The key will light up and also the LCD Display will
read “HallRev 1”. For your information, you can
enter the EFFECT MODE from whatever mode you
are in, such as NORMAL MIX MODE and CHANNEL
EDIT MODE.
CH
OL
0
6
12
24
48
1234LR1234
LEVEL
MASTER
VIEW
MAX
MIN
R
L
SCENE NO.
HI
LO
PAN
EFF
EQ
CHANNEL EDIT
VIEW
MAX
MIN
MASTER4321
MAX
MAX
MIN
MIN
ENTEREXIT
6
DATA
3, 7
2, 5
5. Rotate the DATA ENCODER clockwise.
You can see the following Effect types one after
another. Only the indicators are changing at this
stage. You can choose just one type from among
them at any one time.
1:Hall Rev1 11:Stadium1
2:Hall Rev2 12:Stadium2
3:Hall Rev3 13:Delay
4:Hall Rev4 14:Delay+Rev
5:Room Rev1 15:L-R Delay
6:Room Rev2 16:L-R+Rev
7:Room Rev3 17:Chorus
8:Room Rev4 18:Cho+Rev
9:Plate Rev1 19:Flanger
10:Plate Rev2 20:Fla+Rev
6. Press the ENTER key after you have decided which
one you want to choose.
Your choice will be effective now and will be shown
on the display. The parameter of the type you
have chosen will be the default setting.
7.Press the EXIT key to quit the EFFECT MODE.
Caution
The audio may momentarily disappear or some clicking
noises may appear when you decide the Effect type by
pressing the ENTER key. This is not a fault, but is due to the
VM04 resetting its internal circuit (DSP).
19
Page 20

VM04 Owner’s manual
7-2. EFFECT P ARAMETER setting
You can alter the parameter setting according to the Effect type.
The parameters available in each Effect type.
The available parameters differ according to the Effect type. These are discussed here.
1. Reverb related Effects
The 12 Effects from 1:HallRev1 to 12:Stadium2
are the Reverb related Effects.
They have five parameters:
1.Reverb Level (RevLv : 0~99)
2.Reverb Time (RevT im: 0.1~9.9 Sec)
3.Pre Delay Time (PreDl: 0~150 mSec)
4.High Dump (HiDmp: 0~10)
5.Early Reflection Balance (ErBal: 0~99)
2. Delay related Effects
13:Delay and 15:L-R Delay are the Delay
related Effects. They have three parameters:
1. Delay Level (DlyLv: 0~99)
2. Delay Time (DlyTm: 5~995 mSec, also 1.0~1.4
Sec)
3. Feedback Level (FBack:-99~0~99, the negative
numerals indicate the reverse phase)
3. Combined Delay/Reverb Effects
14:Delay+Rev and 16:L-R+Rev are the Effects
you get when Delay and Reverb are combined
together. They have five parameters:
1. Delay Level (DlyLv:0~99)
2. Delay Time (DlyTm: 2~500 mSec)
3. Feedback Level (FBack:-99~0~99, the negative
numerals indicate the reverse phase)
4. Reverb Level (RevLv: 0~99)
5. Reverb Time (RevTm: 0.1~9.9 Sec)
5. Combined Chorus/Reverb Effect
18:Cho+Rev is the Effect you get when Chorus
and Reverb are combined together.
This has five parameters:
1. Chorus Level (ChoLv: 0~99)
2. Modulation Frequency (Rate: 0.1~9.9 Hz)
3. Chorus Depth (Depth: 0~99)
4. Reverb Level (RevLv: 0~99)
5. Reverb Time (RevTm: 0.1~9.9 Sec)
6. Flanger related Effect
19:Flange is the Flanger related Effect.
This has three parameters:
1. Flange Level (FlaLv: 0~99)
2. Modulation Frequency (Rate: 0.01~0.99 Hz)
3. Feedback Level (FBack: -99~0~99, the negative
numerals indicate the reverse phase)
7. Combined Flanger/Reverb Effect
20:Fla+Rev is the Effect you get when Flanger
and Reverb are combined together.
This has five parameters:
1. Flange Level ( FlaLv: 0~99)
2. Modulation Frequency (Rate: 0.01~0.99 Hz)
3. Feedback Level (FBack: -99~0~99, the negative
numerals indicate the reverse phase)
4. Reverb Level (RevLv: 0~99)
5. Reverb Time (RevTm: 0.1~9.9 Sec)
4. Chorus related Effect
17:Chorus is the Chorus related Effect.
This has three parameters:
1. Chorus Level (ChoLv: 0~99)
2. Modulation Frequency (Rate: 0.1~9.9 Hz)
3. Chorus Depth (Depth: 0~99)
20
Page 21

VM04 Owner’s manual
To show you how the EFFECT PARAMETER KEY functions we will use “Hall Rev 1” as an example.
The “Hall Rev 1” has the following five parameter settings:
1. Reverb Level
2. Reverb Time
3. Pre-Delay Time
4. High Dump
5. Early Reflection Balance
1. Reverb Level setting
Press the EFFECT P ARAMETER key.
The key will light up and the character section will
read “RevLv: 80”. This means you can now adjust
the Reverb Level. Its current setting will be 80 which
is the default setting of the “Hall Rev 1”.
CH
OL
0
6
12
24
48
1234LR1234
LEVEL
MASTER
VIEW
MAX
MIN
R
L
SCENE NO.
HI
LO
PAN
EFF
EQ
T urn the DA TA ENCODER clockwise.
The sound effect will become louder on the actual
audio bigger on the display. The adjustment range
is from 00 to 99.
Caution
The EFFECT SEND Level adjustment discussed in Item 6.4.
adjusts the signal level being sent from the INPUT Channel
to the Effect. The level set in this EFFECT PARAMETER is
like the Input Level adjustment for an independent effect unit.
2. Reverb Time setting
Press the EFFECT PARAMETER key once again.
The character section will read “RevTm:3.5”. This
means you can now adjust the Reverb Time. Its
current setting will be 3.5 second which is the
default setting of the “Hall Rev 1”.
CH
MASTER
VIEW
MAX
R
L
MIN
OL
0
6
12
24
48
1234LR1234
LEVEL
T urn the DA TA ENCODER clockwise.
The reverb time value will increase on the display
and also the reverb sound on actual audio will
become longer. The adjustment range is from 0.1
Sec to 9.9 Sec.
SCENE NO.
HI
LO
PAN
EQ
3. Pre-Delay Time setting
Press the EFFECT P ARAMETER key once again.
The character section will read “PreDl:0” . This
means you can now adjust the Pre Delay Time. Its
current setting will be 0 mSec. which is the default
setting of the “Hall Rev 1”.
CH
OL
0
6
12
24
48
1234LR1234
LEVEL
MASTER
VIEW
MAX
R
L
MIN
SCENE NO.
HI
LO
PAN
EFF
EQ
T urn the DATA ENCODER clockwise.
The Pre Delay time value will increase on the
display and the time between the source sound
and Reverb sound will become longer.
The adjustment range is from 0 mSec to 150 mSec.
4. High Dump setting
Press the EFFECT P ARAMETER key once again.
The character section will read “HiDmp:7” . This
means you can now adjust the High Dump. Its
current setting is 7 which is the default setting of
the “Hall Rev 1”.
CH
MASTER
VIEW
MAX
R
L
MIN
OL
0
6
12
24
48
1234LR1234
LEVEL
T urn the DATA ENCODER clockwise.
EFF
The High Dump value will increase on the display
and so will the high frequency region of the reverb
sound. The adjustment range is from 0 to 10. When
the High Dump setting is 10, the high and low
frequency contents of the reverb will decay at the
same time.
SCENE NO.
HI
LO
PAN
EFF
EQ
21
Page 22

VM04 Owner’s manual
5. Early Reflection Balance setting
Use this to adjust the initial echo level of the reverb.
T urn the DATA ENCODER clockwise.
The Early Reflection Balance value will increase on
the display and the initial echo level Reverb sound
Press the EFFECT P ARAMETER key once again.
The character section will read “ErBal:50”. This
means you can now adjust the Early Reflection
Balance. Its current setting is 50 which is the default
setting of the “Hall Rev 1”.
CH
OL
0
6
12
24
48
1234LR1234
LEVEL
MASTER
VIEW
MAX
R
L
MIN
SCENE NO.
HI
LO
PAN
EFF
EQ
will become louder. The adjustment range is from
0 to 99.
<Useful info>
If you hold the EFFECT PARAMETER key for a while, rather
than hitting it once, the menu will be reversed; ReLv -> ErBal
-> HiDmp -> PreDl -> RevTm -> RevLv.
Caution
Only the last effect parameter setting you made will be kept
after powering OFF . If you want to keep additional settings,
store them in the Scene Memories discussed later.
8. Scene Memory
The VM04 has 21 Scene Memories. Scene number 00 is the “Initial Mix” preset scene and you cannot
alter its setting. But, you can store your favorite scenes on Scene numbers from 01 to 20.
The contents you can store are all the settings you make in the Normal Mix Mode, Channel Edit Mode
and Effect Mode. Also you can name the Scenes using up to eight alphabetical and numerical
characters.
8-1. Scene Store
1.Press the SCENE STORE key when you want to
store the setting that you have made.
The key will light up and the Scene number display
will start flashing. You can enter the Scene Store
Mode from whichever mode you are in.
For example, Normal Mix Mode, Channel Edit Mode
or Effect Mode.
Scene number will blink.
OL
0
6
12
24
48
CH
1234LR1234
MASTER
VIEWLEVEL
SCENE No
MAX
R
EQ
L
MIN
EFFHILOPAN
EQ
2.Rotate the DA TA ENCODER and choose a Scene
number from 01 to 20, on which you want to store
the setting.
3.Press the ENTER key or STORE key .
The Scene number display will stop flashing and
at the same time, the EFFECT TYPE key and EFFECT
PARAMETER key will start flashing instead.
Also, the digit furthest to the left on the character
section will start flashing.
Lights up (red)
SCENE
STORERECALL
EFFECT
PARAMETERTYPE
SETUP
This indicates that you are now able to edit the
name by entering a letter where the digit is flashing.
Note the cursor description “<“ and ”>” above the
EFFECT TYPE key and EFFECT PARAMETER key.
The first digit will blink.
CH
OL
0
6
12
24
48
1234LR1234
MASTER
VIEWLEVEL
SCENE No
MAX
R
EQ
L
MIN
EFFHILOPAN
EQ
Lights up
SCENE
EFFECT
SETUP
Flashing
STORERECALL
PARAMETERTYPE
4.Rotate the DA TA ENCODER either clockwise or
counter-clockwise. The characters will appear one
after another. Also by pressing either the EFFECT
TYPE key or EFFECT P ARAMETER key, the cursor
will move to the left or right accordingly , so that
you can select a letter in the required position.
Name the Scene using these functions and a
maximum of eight characters.
The characters you can use to name the Scene
Memories are:
A~Z, a~z, 0~9 + - * / # ! ? ( ) [ ] < > : . , <- -> _
22
Page 23

VM04 Owner’s manual
If you want to quit the Scene Store in the middle of
its process, press the EXIT key. You can return to
the Normal Mix mode any time.
5.Press the ENTER key after you have named your
Scene.
The character section will momentarily show
“-STORE-” and return to the Normal Mix mode.
The store process has been completed. The stored
Scenes are kept even after powering OFF.
<Useful info>
Y ou can press the STORE key instead of the ENTER key to
store the Scene. If you do this, you won’t quit the Scene
Store mode, i.e., you won’t return to the Normal Mix mode.
So, you can carry on storing more Scenes one after another
8-2. Scene Recall
This is the mode to recall the Scenes. All the stored settings will be recalled. Regarding the Fader
setting, the stored audio level will be perfectly recalled. However, the difference between the stored
Fader position and actual Fader position will only be indicated by the flashing FADER ADJUST key.
<Note>
The recall content will differ depending on the setting of the later explained setup modes “Channel fader recall” and
“Master fader recall.” Refer to page 25 for details on the “SETUP mode.”
1.Press the SCENE RECALL key .
The key will light up and the Scene number display
will start flashing. You can enter the Scene Recall
mode from whichever mode you are in.
For example, Normal Mix mode, Channel Edit mode
or Effect mode.
Scene No will blink
SCENE
EFFECT
SETUP
STORERECALL
PARAMETERTYPE
OL
0
6
12
24
48
CH
1234LR1234
MASTER
VIEWLEVEL
SCENE No
MAX
R
EQ
L
MIN
EFFHILOPAN
EQ
Lights up (green)
2. Rotate the DAT A ENCODER and choose the Scene
number you want to recall from 00 to 20.
If you want to quit the Scene Recall mode now,
press the EXIT key. You can return to the Normal
Mix mode any time.
3.Press the ENTER key .
The character section will show “-Recall-”
momentarily and then the stored Scene name will
appear. The recall has been completed. As far as
audio is concerned, the audio level has also been
recalled according to the stored Fader setting.
However, at the same time, the FADER ADJUST key
will start flashing.
As the VM04 Faders do not move automatically,
this is the way the VM04 indicates that it has
detected some discrepancy between the physical
Fader position now and when the Scenes were
stored. At this stage, as the VM04 is already in the
Normal Mix mode, you can operate the Faders.
Then, if you move all the faders, the FADER ADJUST
key light will switch off and a letter will appear
in the character section next to the Scene name.
This stands for Edit and means the Fader position
is different from the stored setting. Even if you
move the Faders, it won’t change the Fader setting
stored in the Scenes.
Finally, if you want to recall a Scene including the
physical Fader position, see Fader Adjust mode.
<Useful info>
Y ou can also press the RECALL key again instead of the
ENTER key to recall the Scenes. In this case, as the VM04
won’t quit the Scene Recall mode, you will be able to keep
recalling Scenes, one after another. This is very useful, for
instance, if you are trying to recall a Scene, but you don’t
remember its Scene number. You can search for it by
listening to the sound.
FADER ADJUST
Flashing
OL
0
6
12
24
48
CH
1234LR1234
MASTER
VIEWLEVEL
SCENE No
MAX
R
EQ
L
MIN
EFFHILOPAN
EQ
23
Page 24

VM04 Owner’s manual
8-3. Fader Adjust mode
When you recall a scene, all the settings will be recalled including the audio level according to the Fader
setting that was stored in each Scene. However, the physical Fader position won’t be recreated. The Fader
Adjust mode is used to correct these discrepancies manually.
The fader adjust mode will also function in the normal mix mode, in addition to scene recall. In the normal mix
mode, the FADER ADJUST key will blink to indicate that the fader position at switching on power is different from
that prior to switching off power.
1.Press the flashing FADER ADJUST key.
The key will stop flashing and the character section
will read “Fader Adj”. Also the level indicator
section will show two dots in each Channel. The lit
dot is to indicate the current Fader position and
the blinking dot is to indicate the recalled Fader
position which was stored in the Scene memory.
Blinking
2.Adjust the Fader so that the lit dot meets the
blinking dot.
The MASTER Fader will adjust both L and R dots at
the same time. When this happens, the actual audio
level will not change even though you have moved
the Faders. If the current Fader position matches
the stored setting, only one lit dot will remain in
each channel display. When you finish adjusting
all faders, so that all six dots are lit, press the EXIT
key. The FADER ADJUST key light will turn off.
Now the Scene Recall is complete and includes the
physical Fader position.
Caution
If you have set the Fader Fix to ON in the SETUP mode,
you won’t be able to enter the Level Adjust mode. And the
character section will read “FaderFixMode” as a warning
message. See SETUP mode (page 25).
FADER ADJUST
Lights up
OL
0
6
12
24
48
CH
1234LR1234
Lights up
MASTER
VIEWLEVEL
SCENE No
MAX
R
EQ
L
MIN
EFFHILOPAN
EQ
<Useful info>
Level Adjust mode
If you keep holding the Flashing FADER ADJUST key, the character section will show “LevelAdj?”. This is the Level Adjust mode.
This allows you to compulsorily override the recalled Fader position with the current setting. When you use this mode, the result
will be exactly the same as moving all the Faders after pressing the ENTER key in the Scene Recall. See Item 8-2-3.
Press the ENTER key. The character section will momentarily show “LevelAdj!”, then, recall the Scene name with E next to it. The
flashing FADER ADJUST key will go off. This E means the current Fader position is now dif ferent from the stored setting. Even if
you move each Fader at this stage, it will not change the stored Fader setting in the Scene.
8-4. Scene Direct Recall
There is one more way to recall the Scenes in addition to the method discussed in Scene Recall (8-2).
This mode will recall the Scenes in numerical order.
1. Press the SCENE RECALL key and keep holding it.
Lights up
The key will light up and at the same time, the
EFFECT TYPE key and EFFECT PARAMETER key will
start flashing. Note the cursor description “<“ and
“>” above the EFFECT TYPE key and EFFECT
PARAMETER key. If you press the EFFECT TYPE
key,the Scene numbers will count down. And if
you press the EFFECT PARAMETER key, the Scene
numbers will count up. Each time you press either
key, the character section will momentarily read
“-Recall-”, then the stored Scene will be directly
recalled.
OL
0
6
12
24
48
CH
1234LR1234
MASTER
VIEWLEVEL
SCENE No
MAX
R
EQ
L
MIN
EFFHILOPAN
EQ
SCENE
EFFECT
SETUP
Blinking
STORERECALL
PARAMETERTYPE
24
Page 25

You can enter the Scene Direct Recall mode from
EQ
VIEW
CHANNEL EDIT
MASTER4321
MAX
MIN
SCENE No
0
6
12
24
OL
1234LR1234
MIN
[ L ]
[ R ]
MAX
EFFHILOPAN
EQ
VIEWLEVEL
FADER ADJUST
ENTEREXIT
DATA
STORERECALL
SCENE
PARAMETERTYPE
EFFECT
SETUP
MAX
MIN
MAX
MIN
MAX
MIN
CH
MASTER
whichever mode you are in , e.g., Normal Mix mode,
Channel Edit mode or Effect mode.
Caution
The Scenes that you can recall are from 01 to 20. Y ou cannot
recall the preset Scene number 00 in the Scene Direct Recall
mode.
2. Press the EXIT key to quit the mode after you have
recalled the Scene that you want.
You will return to the Normal Mix mode.
VM04 Owner’s manual
Caution
The audio may momentarily disappear or some clicking
noises be heard when you recall the Scenes using any of
the methods described above. This is not a fault. It is due to
the VM04 resetting its internal circuit (DSP) according to the
Effect type stored in the Scenes.
<Useful info>
Scene Direct Recall with Foot Switch
Y ou can also use a non-latching type Foot Switch, such as Fostex
Model 8051 to recall the Scenes directly. Connect it to the Foot SW
jack and each time you operate the Switch, the Scene number will
count up and recall the Scenes one after another. This function is
useful when you want to change the Scenes in one go by stepping
on the Foot Switch during a live performance.
9. SETUP Mode
The VM04 has a Setup mode. This is described in detail here.
2.Rotate the DA TA ENCODER.
The character section will show the following
flashing mode names one after another so that you
can choose the mode to set.
FADER ADJUST
OL
0
6
12
24
1234LR1234
MAX
MIN
CH
CHANNEL EDIT
SCENE
SCENE No
MASTER
MAX
[ R ]
EQ
[ L ]
MIN
EFFHILOPAN
EQ
VIEWLEVEL
MAX
MAX
MAX
MIN
MIN
MIN
STORERECALL
EFFECT
PARAMETERTYPE
SETUP
VIEW
MASTER4321
DATA
1
5
ENTEREXIT
3
2, 4
Foot Switch
1.Press the EFFECT TYPE key and EFFECT
PARAMETER key together.
Both keys will light up and the VM04 will enter the
Setup mode. You can enter the Setup mode from
whichever mode you are in, e.g., the Normal Mix
mode, Channel Edit mode or Effect mode.
Blink
OL
0
6
12
24
48
1234LR1234
CH
LEVEL
MASTER
VIEW
MAX
MIN
Fader Fix (FdFix)
OFF : Default setting
ON
If you set this mode to ON, none of the Faders will
function in any mode. This is used to avoid an
accidental Fader operation caused by a mistake
or an external vibration, especially when you recall
the Scenes.
R
L
25
Page 26

VM04 Owner’s manual
Channel Fader Recall (chRCL)
ON : Default setting
OFF
If you set this mode to OFF when recalling the
Scenes, the INPUT Channel Faders will not recall
their stored positions, but their settings before
recalling the Scene will remain effective. The
INPUT Faders will work normally in all modes
including the Scene Store mode, regardless of
whether this setting is ON or OFF.
3.Press the ENTER key after having confirmed the
mode you want is shown on the character section.
The mode name will stop flashing and either ON
or OFF will start flashing instead.
4.Rotate the DA TA ENCODER to choose the ON or
OFF setting.
If you turn the dial clockwise, ON will appear. And
if you turn the dial counter-clockwise, OFF will
appear.
5.Press the EXIT key after you have decided which
Master Fader Recall (MsRCL)
ON : Default setting
OFF
If you set this mode to OFF, when recalling the
Scenes, the Master Fader will not recall its stored
position, but its setting before recalling the Scene
will remain effective. The Master Fader will work
normally in all mode including the Scene Store
mode, regardless of this setting whether this
setting is ON or OFF.
setting you want: either ON or OFF.
This completes the set up and the VM04 will return
to the Normal Mix mode. The Setup will be kept
even after powering OFF.
10. Other modes
Here we discuss some additional modes on the VM04, although these are not directly connected
with ordinary usage. There are two modes available: “Software Version Check” and “Battery Check”.
10-1. Software V ersion Check
Press the EFFECT TYPE key while holding the EXIT key and ENTER key together.
The character display will display the Software Version of your VM04 for a second, and then return
to the Normal Mix mode.
CH
MASTER
FADER ADJUST
OL
0
6
12
24
48
1234LR1234
MAX
MIN
CHANNEL EDIT
SCENE No
MAX
R
EQ
L
MIN
EFFHILOPAN
EQ
VIEWLEVEL
MAX
MAX
MAX
MIN
MIN
MIN
SCENE
STORERECALL
EFFECT
PARAMETERTYPE
SETUP
VIEW
MASTER4321
ENTEREXIT
DATA
Press the EFFECT TYPE
key while holding the EXIT
key and ENTER key.
10-2. Battery Check
Press the EFFECT PARAMETER key while holding the EXIT key and the ENTER key together.
The character section will show the voltage of the memory backup battery inside your VM04 for a
second, and then return to the Normal Mix mode. If the voltage falls below 2.2V, the message
“BattEmpty” will appear when powering ON.
26
Page 27

VM04 Owner’s manual
CH
MASTER
FADER ADJUST
OL
0
6
12
24
48
1234LR1234
CHANNEL EDIT
MAX
MIN
SCENE No
MAX
R
EQ
L
MIN
EQ
VIEWLEVEL
MAX
MAX
MAX
MIN
MIN
MIN
SCENE
STORERECALL
EFFECT
EFFHILOPAN
VIEW
MASTER4321
PARAMETERTYPE
SETUP
ENTEREXIT
DATA
Press the EFFECT
PARAMETER key while
holding the EXIT key
and ENTER key.
Specifications
<Mixer Section>
INPUT 1, 2
Connector: ø6 mm Phone Jack/Un-balanced
Input Impedance: 20kΩ or more
Input Level: -50dBV ~ -10dBV
INPUT 3, 4
Connector: ø6 mm Phone Jack/Un-balanced
Input Impedance: 20kΩ or more
Input Level: -10dBV
OUT PUT (L/R)
Connector: ø6 mm Phone Jack/Un-balanced
Load Impedance: 10kΩ or more
Output Level: -10dBV
PHONES OUT
Connector: ø6 mm Stereo Phone Jack
Load Impedance: 16Ω or more
Output Level: 100 mW MAX (at 32Ωload)
S/P DIF OUT
Connector: Optical
Format: IEC 60958 (S/P DIF)
FOOT SWITCH
Connector: ø6 mm Phone Jack
<OTHERS>
EQUALIZER
HI (Shelving Type): 10kHz, +/-18dB
LO (Shelving Type): 100Hz, +/-18dB
FREQUENCY RESPONCE
: 20Hz ~ 20kHz (TYPICAL)
DYNAMIC RANGE
: 90dB (TYPICAL)
A/D converter
: 20bit, 64 times Over Sampling Enhanced Dual
Bit, Delta-Sigma
D/A converter
: 20bit 128-time, Over Sampling, Delta-Sigma
SAMPLING FREQUENCY
: 44.1kHz
DIGITAL OUTPUT
: 44.1kHz/16 bit linear
TOTAL HARMONIC DISTORTION
: 0.01% (TYPICAL)
CROSSTALK
: 70dB or more @1kHz
<GENERAL>
DC IN
: DC9V, 650 mA (the Center Positive), AD-9B
DIMENSIONS
: 254 (W) x 50 (H) x 186 (D) mm
WEIGHT
: Approx. 1.1 kg
* Specifications and appearance are subject to change
without notice for product improvement.
27
 Loading...