

Page 1
8588 004 200
(352069)
VF08 Owner’s Manual
<V2.0 Supplement>
The VF08 software has been upgraded to
v2.0, which supports the new "internal mas-
tering function", as well as expands the function of save/load using a "SCSI" CD-RW drive.
You can now record mastered materials onto
a CD-RW/CD-R disc with the standard audio CD format.
This supplement only handles instructions
for the internal mastering function and
save/load using a CD-RW/CD-R disc.
See “Save/Load of song data” on the main
manual about details for save/load using
SCSI and S/P DIF digital signal.
<Note>
To saving/loading song data using a CD-RW
drive, the optional Model 8340 SCSI card must
be installed to the VF08.
See page 115 of the main manual for details
about how to install the option.
For the detailed information about the Model
8340 SCSI card, contact your local Fostex distributor.
Page 2

2
Page 3

Table of Contents
Internal Mastering Function...............................................................................................................3
Please read this first before carrying out operations in the internal mastering mode!..................4
Rehearsing internal mastering................................................................................................................5
Performing internal mastering...............................................................................................................6
About Start and End points...........................................................................................................7
Save/Load using CD-RW/CD-R............................................................................................................8
Please read this first!.................................................................................................................................8
Caution on CD-RW drive................................................................................................................8
Care and handling of CD-RW/CD-R discs...................................................................................8
About writing and reading speeds...............................................................................................8
Save/load of song data using a CD-RW drive...........................................................................9
Saving data using a CD-RW drive (Backup)........................................................................................10
Loading backup data from a CD-RW drive..........................................................................................12
Making an audio CD...............................................................................................................................14
Loading from an audio CD.....................................................................................................................17
<Glossary>
CD-RW (Compact Disc Rewritable)
A disc media that can be re-written as many
times as you like. New data is written after
the previously recorded data is erased.
CD-R (Compact Disc Recordable)
A disc media that can be written only once.
Unlike a CD-RW disc, you cannot write data
onto a recorded CD-R disc. If any error happens during recording to a CD-R disc, the
disc cannot be used anymore.
CD-DA (Compact Disc Digital Audio)
The standard for compact disc for audio.
A compact disc recorded by this format can
be played back by a CD-ROM player built in
a personal computer, as well as an audio CD
player.
SCSI (Small Computer System Interface)
An interface standard for computer peripherals standardized by ANSI (American National Standard Institute).
Up to 7 peripherals, such as a hard-disk
drive, MO drive and zip drive, can be daisychained.
Protect (Copy Protect)
A bit for indicating whether the digital copy
is permitted or not.
If the copy protect bit of an audio CD is
“on”, you can make a digital copy once but
cannot make a copy from the copied material.
3
Page 4

Internal Mastering Function
The "mastering mode" of the VF08 mixes tracks 1 through 6 down to tracks 7/8, and plays back them
with the dedicated mastering effects so that you can record them to an external (analog or digital)
master recorder (see figure 1).
The “internal mastering function”, a newly added function for the VF08, expands the mastering mode,
which allows transferring a mix-down material on tracks 7/8 to another (new) program on the current
drive with adding the mastering effects.
You can, therefore, produce a high quality final master within the VF08, with no need for an external
master recorder (see figure 2).
Furthermore, thanks to the save function using a CD-RW/CD-R disc, you can make an original audio
CD by recording materials internally mastered using the internal mastering function to a CD-RW/CDR disc. See "Making an audio CD" on page 14 for details.
<Conventional mastering mode>
Digital Master Recorder
S/P DIF OUT
Mastering Effect
Tracks 7 & 8
ST OUT
L
Analog Master Recorder
R
VF08
<Figure-1>
<Newly added internal mastering function>
Mastering Effect
New Program
Tracks 7 & 8
Tracks 1 & 2
VF08
<Figure-2>
The internal mastering function allows you
to carry out all operations using the VF08
only.
<Please read this first before carrying out operations in the internal mastering mode!>
After executing internal mastering, a new program which saves a mastering material is automatically created on the current drive, whose program number is set to one greater than the current greatest program
number.
For example, if there are 8 programs (P01 through 08) on the current drive, after mastering a desired
program data using the internal mastering function, a new program (P09) is automatically created and the
mastering signals produced by the mastering function are recorded on tracks 1 and 2 of P09.
Note that if the VF08 is under either of the following conditions, you cannot carry out internal mastering.
1. There are 99 programs already existed on the current drive even though there is enough
recording space.
If you try to carry out internal mastering, "Can't New PGM!" is shown and the operation is ignored.
To carry out internal mastering, delete an unnecessary program.
2. There is not enough remaining space even though there are less than 99 programs on the current
drive.
If you try to carry out internal mastering, "Over Time!" is shown and the operation is ignored.
To carry out internal mastering, erase unnecessary song data or delete an unnecessary program.
See "Deleting a program" on page 57 and "Erasing track data" on page 61 in the VF08 owner's manual.
4
Page 5
Rehearsing internal mastering
Before performing the internal mastering, you can rehearse it as many times as you like, while adjusting the track 7/8 level and sound effects.
In the following description, we assumes that a bounced material is recorded on tracks 7/8 of the
playback program. Headphones for monitoring are connected to the [PHONES] jack.
INPUT A
BAL
GUITAR
LINE MIC LINE MIC MIN MAX
UNBAL
CH ON/OFF
TRACK STATUS
+6
0
-10
-20
-30
-40
-
∞
UNBAL
CH ON/OFF
PEAK
RED
2 3 4
+6
+6
0
0
-10
-10
-20
-20
-30
-30
-40
-40
-
∞
-
∞
[PHONES]
5
GUITAR
PHONES
TRIMTRIM
PEAK
REC
GREEN
+6
+6
0
0
-10
-10
-20
-20
-30
-30
-40
-40
-
∞
-
∞
INPUT B
BAL
TRACK STATUS / TRACK SEL
[TRACK EDIT]
1
ST OUT
LR
TRACK
EDIT
PGM
BOUNCE MODE
OFF
PLAY
5 6
7/8 2TRK1
+6
+6
0
-10
-10
-20
-20
-30
-30
-40
-40
-
∞
-
∞
FOOT SW
MIX PARAMETER
FADER
2TRK MODE
MASTERING TRAINING
MUTE
MASTER
+6
0
0
-10
-20
-30
-40
-
∞
[MASTERING]
3
SCENE SEQ.SCENE
MAP
EFFECTEQPAN
ON/OFF
STATUS
/SEL
SETUP
F1
AUTO
PUNCH
EDIT
DIGITAL MULTITRACKER
F1
CURSOR
EXIT
/NO
ENTER
/YES
UNDO
TIMEBASE
/REDO
SEL
F3
F2
VARI
LOOP PITCH SCRUB
EDIT EDIT
LOCATE ABS 0
LOCATE REC END
[ENTER/YES]
1
F2 F3
EJECT
SHIFT
WAVE FORM
ACCESS
PHANTOM
JOG
SHUTTLE
1
[JOG]
1[SHIFT]
LOCATE
DELETE
MARK
F FWDREWINDPLAYSTOPRECORD
7[STOP] + [REWIND]
5
[7/8 FADER]
1. Select the desired program for mastering.
To select the desired program, while stopped, press the
[TRACK EDIT/PGM] key while holding down the [SHIFT]
key, and select the program using the [JOG] dial, then
press the [ENTER/YES] key.
2. Set the [MASTER] fader to the "0" position.
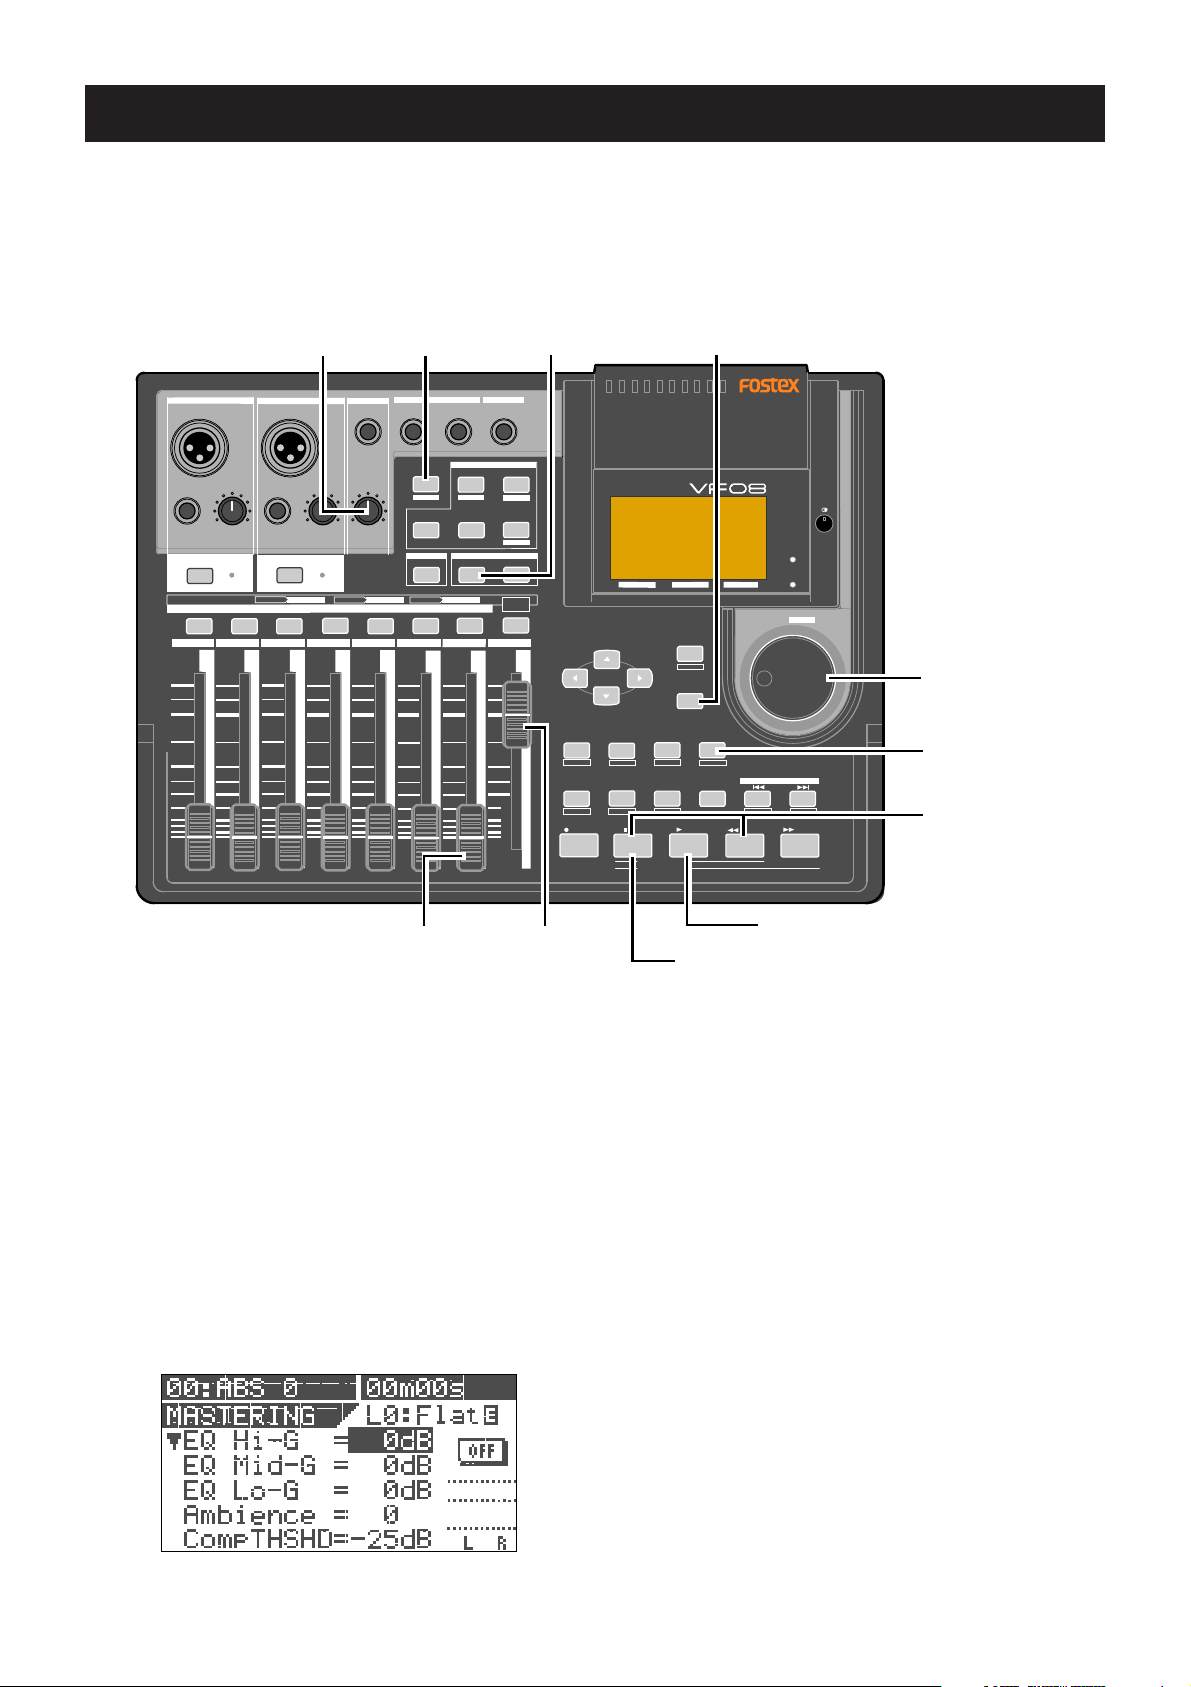
3. press the [MASTERING] key.
The VF08 enters the mastering mode and the display
shows the mastering screen in which you can adjust the
mastering effects.
The [MASTERING] key lights up in red, while the [TRACK
ST ATUS/TRACK SEL] keys of tracks 7/8 and the master
channel light up in green.
<screen for adjusting the mastering effects>
[MASTER FADER]
2
4[PLAY]
6[STOP]
4. Press the [PLAY] key to start playback from the
beginning of the selected program.
The VF08 starts playback, while the display keeps
showing the screen for adjusting the mastering effects.
Tracks 1 and 2 are internally set to "input monitor",
allowing you to check over-level via the peak LED
indicators.
You can monitor the mastering sound through
headphones by raising the track 7/8 fader and/or
[PHONES] level control. The mastering levels are shown
on the level meters at the right on the screen.
5. During playback, adjust track 7/8 levels using the
7/8 fader, as well as EQ and ef fect settings if
necessary .
Set the levels properly so that the PEAK LED indicators
do not flash or light frequently.
Note that levels may increase by changing EQ or
compressor parameters. When controlling the sound
characters and level, you should not only monitor the
level meters and listen to the sound, but also monitor the
PEAK LED indicators.
To adjusting the mastering effect parameters on the
mastering screen, use the [CURSOR] (up/down) keys to
select a parameter and the [JOG] dial to change the
parameter value.
5
Page 6

<Hint>
On the mastering screen, you can tailor the
sound by adjusting EQ settings (HI, MID and
LOW), as well as the ambiance and compressor.
See page 71 in the VF08 Owner's Manual for
details about the mastering effects.
<Note>
In the internal mastering function, the
(Copy Protect) setting, which is one of the mastering effect items, does not affect the internally record
material. The copy protect setting affects materials
recorded on a CD-RW/CD-R disc, described later.
See "Making an audio CD" on page 14.
6. After completing all the adjustments, press the
[STOP] key to stop the VF08.
"CpProtect"
Performing internal mastering
7. Press the [REWIND] key while holding down the
[STOP] key to locate the beginning of the program.
The VF08 locates the beginning of the program
immediately and "00m 00s" is shown at the top right of
the screen.
Keep showing the same mastering screen after stopping
the VF08 and locating the beginning of the program.
To repeat the rehearsal, perform steps 4 and 5
repeatedly after making the VF08 locate the beginning
of the program.
After completing the rehearsal satisfactorily, make sure
to locate the beginning of the program.
<Note>
After completing the rehearsal, be careful not to move
the track 7/8 and master faders and change the mastering effect parameters.
If you wish to do another job after the rehearsal, you
should save the settings (fader positions and parameter settings) to a scene memory. See page 47 in the
owner's manual for details about the scene memory
function.
Please read the following notes carefully before performing internal mastering.
<Note: There is no need for selecting recording tracks.>
In the internal mastering function, unlike the normal recording, you do not have to select recording tracks.
When recording a take in the internal mastering function according to the following procedure, the VF08 automatically arms Tracks 1 and 2.
Therefore, the
1 and 2 never light up in red during recording.
[TRACK ST ATUS/TRACK SEL]
keys for tracks
1. Press the [PLAY] key while holding down the
[RECORD] key . (You cannot perform the auto punchin function.)
When mastering starts, a new program is automatically
created and the material is recorded onto track 1 and 2
of the program. The ABS time at which mastering starts
is registered with the "Start point" of the new program.
2. When completing mastering, press the [STOP] key
to stop.
<Note>
Internal mastering cannot be performed if rec-protected.
If the
"Rec Protected"
"ON"
, you cannot perform internal mastering.
If you try to perform it, a warning message (
appears on the display. If this message appears, set the
"Rec Protected"
mastering.
See page 106 in the owner's manual for details about the
setup mode.
setting of the setup mode is set to
setting to
"OFF"
before performing internal
"Protected!"
<Note: You cannot undo an internal mastering take.>
You cannot undo an internal mastering take.
If you are not satisfied with the result, try again from the
beginning.
If you do not need a previously recorded program, delete the program according to the procedure described
in
"Erasing a Program"
of the owner's manual.
)
"Please wait" appears on the display for a few seconds,
and the internal mastering mode quits, while the VF08
locates the beginning (ABS 0) of the newly created
program. The ABS time at which you press the [STOP] key
is registered with the "End point" of the new program.
The following screen example shows that a title named
"Song Data-1" is mastered onto a new program named
"P09". As shown in the example below, "Mst<-" is prefixed
to a mastered program title, so that you can distinguish
mastered programs from other programs. The screen can
show up to the first 12 characters of a title name.
A title example recorded using the internal mastering mode
<Note: The vari-pitch setting is not effective.>
When recording a take in the internal mastering function, the vari-pitch setting is not effective and the take is
always recorded at the normal speed.
3. Playback the newly created program (P09, in the
example above) to check the result.
You can adjust the playback levels of mastered tracks
using track faders 1 and 2.
Read the following "Hint" carefully before making an
original audio CD from mastered materials.
6
Page 7

<About Start and End points>
As described earlier, the starting and ending times of internal mastering are automatically registered as "Start point" and "End point" respectively, which can be used for track editing (copy, move
and erase) for the newly created program (see the illustrations below).
This function is very convenient for making an audio CD from mastered materials, because data
between "Start point" and "End point" is automatically transferred to a CD-RW/CD-R disc.
Note that you cannot make an audio CD using the VF08 save function (described later) without
setting these two points.
Data transferred to a CD-RW/CD-R disc
New program (Tracks 1 & 2)
Original program (Tracks 7 & 8)
Start point of internal mastering End point of internal mastering
Start point
(automatically registered)
Internal mastering
End point
(automatically registered)
The "Start point" and "End point" which have been automatically set can be checked after completing
mastering by the following procedure.
1. Press the [TRACK EDIT/PGM] key while the VF08
is stopped.
The display shows the screen for track editing, where
"Copy Paste" flashes.
flashing
<Note>
You can edit the
fore creating an audio CD, allowing adjustment
of intervals between songs.
We recommend to set the
of the new program created by the inter-
point"
nal mastering to desired times before creating
an audio CD.
"Start point"
and
"End point"
"Start point"
and "
be-
End
2. Press the [ENTER/YES] key .
The display shows the screen for selecting an original
and destination tracks for copy/paste.
3. Press the [ENTER/YES] key again.
The display shows the screen for selecting edit points,
in which you can check "Start" and "End" points that
hold the beginning and end points of the recording
respectively (pointed by arrows below).
4. After checking the "Start" and "End" points, press
the [EXIT/NO] key to quit the track edit mode.
The display returns to the previous screen before
performing step 1.
See page 14 about how to make an audio CD from
mastered materials.
<Hint>
When recording more than one song continuously to a CD-RW/CD-R disc, the VF08 automatically record an approximately 2-second
silence after each END point.
Start point
End point
Start point
1
Silence (about 2 seconds)
Start point
End point
2
End point
3
7
Page 8

Save/Load using CD-RW/CD-R
Please read this first!
<Check compatibility of CD-RW drive!>
A CD-RW drive to be used for saving/loading VF08 song data or making audio CD from VF08 data
must be compatible with the VF08. If you use a drive that is not operation-confirmed by Fostex,
you may have a problem. You can check operation-confirmed CD-RW drive by the following
ways.
<Customers who are accessible to Fostex internet web site>
Confirm the model number and manufacturer of operation-confirmed CD-RW drive by accessing
the following URL.
<http://www .fostex.co.jp/int/pages/sets/faqset.htm>
<Customers who are not accessible to Fostex internet web site>
Contact your local Fostex distributor.
<Care and handling of CD-RW/CD-R discs>
With a CD-RW drive, you can use not only CD-RW discs but also CD-R discs. Note that CD-R discs
has some restrictions as shown below.
CD-RW disc
Y ou can save (record) data to a disc as many times required.
Note that when saving new data, it is recorded after the previously recorded data is erased. In other words, every time
you save new data, all disc data is rewritten. (See “Saving
data” described later.)
<Note>
A CD-RW/CD-R disc on which VF08 data is recorded can only be played by Fostex machines.
Do not play it by non-Fostex devices. The drive or system used may be damaged.
However, a CD-RW/CD-R disc with audio CD format created by the Fostex machine can be
played by general machines such as audio CD players.
it can be played back only by a player that supports CD-RW playback. You cannot playback such a disc by a
conventional CD player that does not support CD-RW playback.)
CD-R disc
You can save (record) data to a disc only once.
Y ou cannot save data to a recorded disc. Y ou can, of course,
load data as many times as required.
(If an audio CD is made using a CD-RW disc,
<About data writing and reading speeds for data save/load>
The writing and reading speeds for data save and load of the VF08 are automatically set as below.
• Writing speed: according to a CD-RW drive used, however the maximum speed is 8 times.
• Reading speed: according to a CD-RW drive used.
The writing speed depends on a CD-RW drive but it is limited to 8 times.
For save/load of the VF08 data, use discs that can be written at 4 times or higher speed. Do not use discs that
only can be written at real-time or twice speed.
8
Page 9

Save/load of Song Data Using a CD-RW drive
Using a CD-RW drive, in addition to make backup of song data as with other SCSI devices such as
zip and MO drives, you can also make an audio CD.
• Save
You can only a single selected program data to a
disc regardless of the program data amount.
You cannot save more than one program data even
if there are enough disc space.
However, you can save a program data to more than
one disc if the data amount is larger than a disc
space.
As shown on the right, you can save almost all necessary information such as song data of all tracks
(real and additional tracks) and mixer scene data,
as with using other SCSI devices.
Trk 1 & 2 & 3 & 4 & 5 & 6 &7
& 8 & 9 & 10 & 11 & 12 & 13
& 14 & 15 & 16 & 17 & 18 &
19 & 20 & 21 & 23 & 24
Program 1 (P01)
Current drive of the VF08
Program 2 (P02)
Save
Program 99 (P01)
• Load
Unlike data load using other SCSI drives, data loading using a CD-RW drive is taken place after a “new
program” is created in the current drive (the load
destination). You cannot overwrite an existing program with the loaded data.
The newly created program is numbered the next
number to the highest existing program number.
Program 1 (P01)
Current drive of the VF08
Program 2 (P02)
Trk 1 & 2 & 3 & 4 & 5 & 6 &7
& 8 & 9 & 10 & 11 & 12 & 13
& 14 & 15 & 16 & 17 & 18 &
19 & 20 & 21 & 23 & 24
Load
New Program
<Note>
You can save or load data using a CD-RW drive only with the FDMS-3 (Fostex Digital Management System-
3) format and CD-DA format. Note that, unlike other SCSI devices, you cannot save or load data with the
WAV file format. See the main manual for saving/loading a WAV file.
• Creating an audio CD
You can make an audio CD by recording sound data of tracks 1 and 2 between the “Start point” and “End point”
to a CD-RW/CD-R disc. It is also possible to record some mastered materials continuously.
• Loading an audio CD data
You can load a material on a (commercial or created) audio CD to a program of the VF08.
Audio data is loaded to a “new program” automatically created by the VF08, which is the same way as
backup data loading. The VF08 never overwrites the existing program.
<Notes for using a CD-RW drive>
• Use a high-impedance SCSI cable for connection between the VF08 and a CD-RW drive.
The cable length should be as short as possible.
• Only a single SCSI device can be connected to the VF08 SCSI port. Attach an active terminator to the
CD-RW drive used. If you attach a terminator that is not active, you may not be able to save or load data
correctly.
VF08
CD-RW
High impedance SCSI cable
Attach an active
terminator
Installed the Model 8340
Half pitch 50-pin type connector
9
Page 10

Saving data using a CD-RW drive (Backup)
In the following procedure, we assume that a CD-RW
drive is connected to the SCSI port of the Model 8340
installed in the VF08 and a non-recorded CD-RW/CDR disc is used.
<Note>
Do not carry out any VF08 key operation until the access
process to the CD-RW/CD-R disc is completed.
1. After turning on both the VF08 and the CD-RW drive
connected, insert a disc to the CD-RW drive.
2. Press the [SETUP] key of the VF08 to enter the setup
mode.
The display shows the screen for selecting the setup menu.
3. Use the [JOG] dial to select (highlight) “Save PGM” and
press the [ENTER/YES] key.
The display shows the screen for selecting a save device,
where “SCSI” is flashing.
5. While “BkUp” flashing, press the [ENTER/YES] key .
The display shows the screen for selecting a program to
be saved (the program number of the selected program
flashes).
flashing
By rotating the [JOG] dial, you can select a desired program number/title from among available programs in
the VF08 current drive. The recorded space of the selected program is also shown.
If you select a program which requires more than one
disc for saving, the display shows the required number
of discs (see the screen example below).
number of
discs
recorded
space
6. After selecting a program, press the [ENTER/YES] key.
The display shows the screen as below.
4. While “SCSI” is flashing, press the [ENTER/YES] key.
After briefly showing the model name of the connected
CD-RW drive, the display shows the screen for selecting a
save mode, where “BkUp” (backup) is flashing.
To save (backup) song data, select “BkUp”.
To make an audio CD, select “CD-DA” or “Setup”.
This procedure describes how to save song data, so we
select “BkUp” here.
See “making an audio CD” described later for details about
how to make an audio CD.
flashing
flashing
In the example above, the selected program data will be
saved to a CD-RW/CD-R disc with the backup number
“B01”. The program title is copied to the backup title
(you can not edit it).
By rotating the [JOG] dial when the above screen is shown,
you can also select “Eject”, besides “B01”.
If you select “Eject” and then press the [ENTER/YES] key,
the disc will be ejected.
7. While “B01” is shown, press the [ENTER/YES] key .
The VF08 starts the save operation. The recorded space
shown on the display is counted down while the save
operation progresses. It will take some time for saving all
data. The following display example shows that the data
of the selected program number is being saved to the
backup number “B01”.
flashing
When completing the save operation, “Save Completed!”
appears on the display (as shown below) and the VF08
stops access to the drive, while the disc in the CD-RW
drive is automatically ejected.
10
Page 11

When saving data to more than one disc, the first disc
will be ejected when it is full (i.e. there is no more recording space on the disc), while “Insert Disk!” appears on the
screen. After inserting the second disc, the VF08 automatically resumes the save operation.
After completing the save operation, the final disc is
ejected and the above screen appears. (See <Note> below).
<Note>
You cannot abort the save operation before completed. Especially during the save operation to
more than one disc, if you happen to press the
[EXIT/NO]
key while removing or inserting a disc,
you have to redo the save operation from the
beginning with the first disc.
<Note for saving data to more than one disc>
If you save data to more than one disc, we recommend to put a number on each disc in the
saving order (such as DISC-1, DISC-2, etc.) so that
you will easily know the order for inserting discs
when loading data.
<Hint 1>
In the description for saving data above, we assume to use a non-recorded CD-RW/CD-R disc.
If you use a recorded disc (including a disc on
which computer data is recorded), also note the
following.
By performing step 5 in the save operation procedure shown above (“While “BkUp” is flashing, press
the [ENTER/YES] key”.) When a recorded disc is
inserted, the display shows a warning message,
followed by the confirmation screen (where “Sure?”
flashes).
With this screen, you can choose whether erasing
the recorded data or ejecting the disc.
flashing flashing
8. Press the [EXIT/NO] key (or the [STOP] key) to exit the
Setup mode.
<About save error>
If an error occurs for some reason during the
save operation, the error message as below appears. If it appears, press the [EXIT/NO] key.
The display returns to the previous screen before performing the save operation.
Note that saved data before the error message
appears is all invalid.
<Note>
If the message above appears while saving
data to a CD-R disc, you can no longer use the
disc.
• To erase the existing (recorded) data
Press the [ENTER/YES] key while both “ERASE” and
“Sure?” are flashing.
The display shows the screen below and the VF08
starts erasing the disc.
As the erase process progresses, the number of
flashing “ * ” increases from left to right.
flashing
Increases as the process progresses.
flashing
11
Immediately after completing erasing the disc, the
display shows the same screen (for selecting a program to be saved) which appears after step 5 is
performed. Hereafter, perform the same procedure
as described above.
Page 12

• To eject the disc
Use the [JOG] dial to highlight “Eject” (flashing) and
press the [ENTER/YES] key.
The disc is ejected while the display shows “Insert
Disk!”.
By inserting a disc, you can start the save operation again from the beginning.
Loading backup data from a CD-RW drive
<Hint 2>
If you try to save data to a recorded CD-R disc, the
display shows a warning message saying “Not Writ-
able”, followed by a message saying “Insert Disk” as
below.
In the following procedure, we assume that a CD-RW
drive is connected to the SCSI port of the Model 8340
installed in the VF08 and a CD-RW/CD-R disc to which
data has been saved is prepared.
<Note>
Do not carry out any VF08 key operation until the
access process to the CD-RW/CD-R disc is completed.
1. After turning on both the VF08 and the CD-RW drive
connected, insert the disc to the CD-RW drive.
<Note>
If you load song data which is saved to more than
one disc, set DISC-1 first.
If you set the other disc and go on the following
procedure, the VF08 automatically recognized
that the disc order is not correct and the display
shows
“Wrong Disk”
tarily, and the disc is automatically ejected.
2. Press the [SETUP] key to enter the setup mode.
The display shows the screen for selecting the setup menu.
, followed by
“Illegal No!”
momen-
flashing
4. While “SCSI” is flashing, press the [ENTER/YES] key .
After briefly showing the model name of the connected
CD-RW drive, the display shows the screen for selecting a
load mode, where “BkUp” (backup) is flashing.
To load song data saved, select “BkUp”.
To load a material from an audio CD, select “CD-DA”.
This procedure describes how to load song data, so we
select “BkUp” here.
See “Loading from an audio CD” described later for details
about how to load a material from an audio CD.
3. Use the [JOG] dial to select (highlight) “Load PGM” and
press the [ENTER/YES] key.
The display shows the screen for selecting a load device,
where “SCSI” is flashing.
flashing
5. While “BkUp” is flashing, press the [ENTER/YES] key .
The display shows the backup number and title, as well
as recorded space.
12
Page 13

flashing
By rotating the [JOG] dial, you can select a desired program number/title from among available programs in
the VF08 current drive. You can also select “Eject”.
If you select “Eject” and press the [ENTER/YES] key, the
disc is ejected.
When you load song data which is saved to more
than one disc, the display also shows the disc number currently set. The example below shows DISC-1
is set.
flashing
light up
6. While the desired backup number/title is shown on the
display , press the [ENTER/YES] key.
The display shows the screen for creating a new program
on the current drive, to which data will be loaded (“New
PGM” lights).
flashing
light up
<Display example for loading>
<Note>
If there is not enough available space for loading on
the current drive, the display shows
display returns to the previous screen.
When completing the load operation, “Load Completed!”
appears on the display (as shown below) and the VF08
stops access to the drive, while the disc in the CD-RW
drive is automatically ejected.
When loading data from more than one disc, the first
disc will be ejected immediately after all disc data has
been loaded, while “Insert Disk!” appears on the screen.
After inserting the second disc, the VF08 automatically
resumes the load operation.
After completing loading all the discs, the above screen
appears.
“Disk Full!”
and the
As described earlier, when loading data from a CD-RW
drive, the VF08 creates a new program on the current
drive, which is the load destination.
Therefore, “New PGM” is shown on the right of the flashing program number.
The program number for the newly created destination
program is the next number to the highest existing program number.
For example, if there are 8 existing programs (“P01”
through “P08”) on the current drive, the newly created
program is numbered “P09”.
<Note>
If you rotate the
(
“Destn PGM Select”
ing program on the current drive as the destination.
However, as mentioned earlier, when loading data
using CD-RW you cannot actually load data to the existing program by overwriting the program data.
If you press the
while selecting an existing program as the destination, the display shows
the operation.
7. While “New PGM” is shown, press the [ENTER/YES] key.
The VF08 starts the load operation. The recorded space
shown on the display is counted down while the load
operation progresses. It will take some time for loading
all data. The following display example shows that the
data of the backup number “B01” is being loaded to “P08”
which is newly created on the current drive.
[JOG]
dial while the above screen
) is shown, you can select an exist-
[ENTER/YES]
key (see the next step)
“Void!”
and the VF08 ignores
<Note>
You cannot abort the load operation before completed.
8. Press the [EXIT/NO] key (or the [STOP] key) to exit the
setup mode.
<About load error>
If an error occur for some reason during the load
operation, the error message as below appears.
If it appears, press the [EXIT/NO] key.
The display returns to the previous screen before performing the load operation.
Note that loaded data before the error message
appears is all invalid.
13
Page 14

Making an audio CD
The following procedure describes how to record mastered songs (using the internal mastering function) to a CDRW/CD-R disc to make an audio CD (CD-DA format).
The “Save PGM” menu in the Setup mode, which is used for saving song data, is also used for making an audio CD.
<Basic information>
INPUT A
BAL
GUITAR
LINE MIC LINE MIC MIN MAX
UNBAL
CH ON/OFF
PEAK
TRACK STATUS
2 3 4
+6
+6
0
0
-10
-10
-20
-20
-30
-30
-40
-40
-
∞
-
∞
UNBAL
CH ON/OFF
RED
+6
0
-10
-20
-30
-40
-
∞
INPUT B
BAL
GUITAR
TRIMTRIM
PEAK
REC
TRACK STATUS / TRACK SEL
+6
0
-10
-20
-30
-40
-
∞
VF08
ST OUT
FOOT SW
PHONES
LR
MIX PARAMETER
TRACK
SCENE SEQ.SCENE
EDIT
DIGITAL MULTITRACKER
PGM
FADER
MAP
EFFECTEQPAN
ON/OFF
BOUNCE MODE
2TRK MODE
MASTERING TRAINING
GREEN
OFF
MUTE
PLAY
STATUS
/SEL
7/8 2TRK1
5 6
MASTER
+6
+6
+6
+6
0
0
0
0
-10
-10
-10
-10
-20
-20
-20
-20
-30
-30
-30
-30
-40
-40
-40
-40
-
∞
-
∞
-
∞
-
∞
SETUP
AUTO
PUNCH
EDIT
F1
CURSOR
TIMEBASE
SEL
F2F3SHIFT
LOOP PITCH SCRUB
EDIT EDIT
ACCESS
PHANTOM
F1
F2 F3
JOG
SHUTTLE
EXIT
/NO
EJECT
ENTER
/YES
UNDO
/REDO
LOCATE
WAVE FORM
VARI
DELETE
MARK
F FWDREWINDPLAYSTOPRECORD
LOCATE ABS 0
LOCATE REC END
CD-RW/CD-R disc
<Figure-1>
When making an audio CD using the VF08, internal mastering materials on the current drive are
recorded to a CD-RW/CD-R disc (by the CD-DA format).
As we explain in “Save/load of Song Data using a
CD-RW drive” on page 9, you can record not only a
single song but also multiple songs continuously.
When recording more that one songs continuously,
the VF08 automatically inserts a 2-second silent
space between songs.
Start point
End point
Start point
1
2
End point
Start point
End point
3
Silence (about 2 seconds)
<Figure-2>
In the following procedure, we assume that one or
more mastering programs exist and a CD-RW drive is
connected to the SCSI port of the Model 8340 installed
in the VF08 and a non-recorded CD-RW/CD-R disc is
used.
<Note>
Key operations of the VF08 should be done after
completing access to a CD-RW/CD-R disc.
1. After turning on the power of both the VF08 and a
connected CD-RW drive, load a non-recorded disc to the
CD-RW drive.
2. Press the [SETUP] key to enter the Setup mode.
<Note>
If an audio CD is made using a CD-RW disc, it
can be played back only by a player that supports CD-RW playback. You cannot playback such
a disc by a conventional CD player that does not
support CD-RW playback.
4. Press the [ENTER/YES] key while “SCSI” flashes.
After showing the model name of the connected CD-RW
drive, the display shows the screen for selecting the save
mode, in which “BkUp” flashes.
To carry out making an audio CD, select “CD-DA”.
If you need to change the copy protection setting (the
default setting is “OFF”), select “Setup” (for setting
writing conditions). If you make an audio CD without
changing the copy protection setting, skip steps 5 and 6
below and go to step 7.
flashing
3. Use the [JOG] dial to select (highlight) the “Save PGM”
menu and press the [ENTER/YES] key.
The display shows the screen for selecting the device to
which the data is saved. “SCSI” flashes.
flashing
5. Use the [JOG] dial (or the [CURSOR] < > key) to select
“Setup” and press the [ENTER/YES] key.
The display shows the “CD-DA Setup” screen, on which
you can select the copy protection setting (see the next
page).
14
Page 15

Copy protection setting
You can restrict the disc copy (duplication) capability of an audio CD you are going to make.
“ON” A disc you made can be copied to other digital
device once.
“OFF” A disc you made can be copied to other digital
device as many times as required (default).
To change the setting, press the [ENTER/YES] key when
the “CD-DA Setup” screen is shown.
The current setting starts flashing, showing it can be edited. While flashing, use the [JOG] dial to select “ON” or
“OFF”, then press the [ENTER/YES] key to confirm.
6. After setting the copy protection, press the [EXIT/NO]
key.
The display returns to the screen for selecting the save
mode, in which “CD-DA” now flashes.
9. Use the [JOG] dial to select a desired program and press
the [ENTER/YES] key.
The selected program is set to the first track.
flashing
• To record a single song to a CD-RW/CD-R disc, select a
program and press the [ENTER/YES] key, and then go
to step 10.
• To record more than one song to a CD-RW/CD-R disc,
repeat the procedure for selecting a program
described above (i.e. use the [JOG] dial to select a
program and press the [ENTER/YES] key) until
selecting all desired programs, and then go to step 10.
flashing
7. While “CD-DA” is flashing, press the [ENTER/YES] key .
After showing “Please Wait!”, the display shows the screen
for selecting the program(s) to be record.
In the screen, a number such as “01” or “02” shows the
track number, while “NON” shows that no program is
assigned to the track.
flashing
8. Press the [ENTER/YES] key again.
The display shows the screen in which the last program
number of the current drive flashes. Its program title and
recording time are also shown, while the total time of
songs is shown at the top of the screen.
Data between the "Start point" and "End point" is
transferred to an audio CD. Before executing recording,
we recommend you to confirm that the actual audio in
the program starts just after the "Start point" and ends
just before "End point".
flashing
<Note>
If the program time shows
ing a program as the screen example below, the
“Start”
and
“End”
points are not correctly set.
In other words, in the following conditions,
the “Start” and “End” points are not regarded
as being correctly set.
“Start point” = “End point”
“Start point” > “End point”
If you press the
such a program, the warning message as below
appears on the display and you cannot select
the program.
[ENTER/YES]
“00: 00”
when select-
key after selecting
“Void In!”, “Void Out!”, or “V oid Data!”
<Note>
It is possible to select a program that is not
internal mastering if it holds the correct
and
“End”
points.
However, if you record such a program to a
CD-RW/CD-R disc with the audio CD format,
only track 1 and 2 can be recorded.
So, make sure that you select programs properly when making an audio CD.
“Start”
15
Page 16

<Notes for selecting more than one program>
When recording more than one program to a CD-RW/
CD-R disc, do not skip any track when assigning programs to tracks.
If you skip any track, you cannot record data to the
subsequent tracks. In the following example, track 03
is skipped when assigning programs.
So only tracks 01 and 02 will be recorded. Tracks 03
and subsequent tracks can not be recorded.
<Note>
When making an audio CD, if you select a program
which consumes more disc space than the recordable
space of a CD-RW/CD-R disc,
display and you cannot select the program.
10. After specifying the program(s), press the [ENTER/YES]
key while holding down the [RECORD] key.
The VF08 starts recording to the disc, while the display
shows the following screen.
“Disk Full!”
appears on the
<Hint>
When a CD-RW disc on which any data is recorded
is set, if you perform step 7 above (i.e. pressing the
[ENTER/YES] key when “CD-DA” is flashing), “Not
Empty!” appears on the display, followed by the
screen for selecting whether erasing recorded data
or ejecting the disc.
flashing
flashing
• If you erase recorded data:
Press the [ENTER/YES] key while “ERASE” and “Sure?”
are flashing.
After the key press, the display changes as follows
and the VF08 starts erasing the data. As the erasing process is going on, the number of flashing
“ * ” increases.
When the recording ends, “Save Completed!” appears on
the screen, while the disc is automatically ejected from
the CD-RW drive.
1 1. When completed, press the [EXIT/NO] key to quit the
Setup mode.
<Hint>
Some of our operation-confirmed CD-RW drives
can playback audio CDs and feed audio sound
from their headphones jack or line outputs.
In such a case, you can monitor the sound either from headphones connected to the headphone jack of a drive or from the monitor system connected with the VF08. In the latter way,
connect the line outputs of the CD-RW drive to
the inputs of the VF08 and route the playback
signals to the headphone outputs via the VF08
track faders.
flashing
flashing
Increases as the process progresses.
When erasing is completed, the display shows the
same screen which appears when pressing the [EN-
TER/YES] key after selecting “CD-DA” on step 7
above. So follow the same procedure from step 8
on page 15.
• If you eject the disc:
Use the [JOG] dial to make “Eject” flashing and then
press the [ENTER/YES] key.
The disc is ejected, while “Insert Disk!” appears on
the screen.
When inserting a blank disc, you can go on the
next step (see the procedure described above).
16
Page 17

Loading from an audio CD
You can load a desired song to the VF08 from an audio CD you created by recording on a CD-RW/CD-R disc.
When a desired song is loaded, the VF08 automatically creates a new program on the current drive, and the
song are recorded on tracks 1 and 2 of the program. Loading data from an audio CD is operated via the “Load
PGM” menu in the Setup mode, which is the same way as loading backup data.
VF08
INPUT B
BAL
GUITAR
TRIMTRIM
CH ON/OFF
PEAK
REC
TRACK STATUS / TRACK SEL
+6
0
-10
-20
-30
-40
-
∞
ST OUT
FOOT SW
PHONES
LR
MIX PARAMETER
TRACK
SCENE SEQ.SCENE
EDIT
PGM
BOUNCE MODE
GREEN
OFF
MUTE
PLAY
7/8 2TRK1
5 6
+6
+6
+6
0
0
0
-10
-10
-10
-20
-20
-20
-30
-30
-30
-40
-40
-40
-
∞
-
∞
-
∞
FADER
2TRK MODE
MASTERING TRAINING
DIGITAL MULTITRACKER
MAP
EFFECTEQPAN
ON/OFF
STATUS
/SEL
CURSOR
MASTER
+6
0
TIMEBASE
SETUP
SEL
F1
F2F3SHIFT
-10
AUTO
LOOP PITCH SCRUB
PUNCH
-20
-30
EDIT EDIT
EDIT
-40
-
∞
ACCESS
PHANTOM
F1
F2 F3
JOG
SHUTTLE
EXIT
/NO
EJECT
ENTER
/YES
UNDO
/REDO
LOCATE
WAVE FORM
VARI
DELETE
MARK
LOCATE ABS 0
LOCATE REC END
F FWDREWINDPLAYSTOPRECORD
CD-RW/CD-R disc (or commercially available audio CD)
After showing the model name of the connected CD-RW
drive, the display shows the screen for selecting the load
mode, in which “BkUp” flashes.
To carry out loading a song from an audio CD, select
“CD-DA”.
flashing
INPUT A
BAL
GUITAR
LINE MIC LINE MIC MIN MAX
UNBAL
UNBAL
CH ON/OFF
PEAK
RED
TRACK STATUS
2 3 4
+6
+6
+6
0
0
0
-10
-10
-10
-20
-20
-20
-30
-30
-30
-40
-40
-40
-
∞
-
∞
-
∞
<Important note for copyright>
You can also load a material from a commercially
available audio CD in the same manner, however,
never use a material for which a copyright is reserved for a commercial purpose.
Any unauthorized use will constitute infringement
of such copyright and will render the infringer liable to an action at low.
In the following description, we assume that a CDRW drive is connected to the SCSI port of the Model
8340 installed in the VF08 and an audio CD created
is prepared.
<Note>
Do not carry out any VF08 key operation until the access
process to the CD-RW/CD-R disc is completed.
1.After turning on the power of both the VF08 and a
connected CD-RW drive, load a recorded audio CD disc
to the CD-RW drive.
2.Press the [SETUP] key to enter the Setup mode.
3.Use the [JOG] dial to select (highlight) the “Load PGM”
menu and press the [ENTER/YES] key.
The display shows the screen for selecting the device from
which the data is loaded. “SCSI” flashes.
5. Use the [JOG] dial (or [CURSOR] < > key) to select
(highlight) “CD-DA”, then press the [ENTER/YES] key.
A warning message for copyright appears.
You can scrolls the message to read all message by
rotating the [JOG] dial.
<Warning message>
The warning message for copyright shown on
the screen is as follows.
flashing
4. Press the [ENTER/YES] key while “SCSI” flashes.
Warning!
You are responsible for use of this digital device. Be sure to abide by the copyright conditions of the source material.
Press “Enter/Yes” key if you agree with the
above.
17
Page 18

<Hint>
When loading data using the S/P DIF digital signal,
the same message also appears after selecting the
load device to “SP DIF” and pressing the [ENTER/YES]
key.
<Note>
If you do not agree with the warning message contents, press the
The display briefly shows
ing”
, then returns to the mode select screen.
If you agree with the warning message contents, go
to the next step to continue the operation.
[EXIT/NO]
key to quit loading.
“Set Disable”
and “
Can’t Load-
6. If you agree to the message contents, press the
[ENTER/YES] key.
After showing “Set Enable!”, the display shows the screen
for selecting the song(s) to be loaded.
If there is more than one track recorded on the audio
CD, “ ” flashes, showing that you can select a desired
track. If there is only one track recorded on the audio
CD. “ ” is not shown on the screen.
To load more than one track, repeat steps 7 through 8
above.
The following screen example shows that tracks 1 and 2
will be loaded to program 05 and 06 respectively.
The track time is also shown to the left of each program
number.
<Note>
When loading from a audio CD, no title is shown when
selecting the track.
<Hint>
If you are going to load tracks 1 and 3 in the example
above, instead of tracks 1 and 2, track 3 will be loaded
to program 06 (see the screen example below).
<When only one track is recorded>
<When more than one track is recorded>
7. Use the [JOG] dial to select a track number to be loaded
and press the [ENTER/YES] key.
The destination program number starts flashing, which
is one greater than the highest program number among
those available on the current drive. This means a track
is going to be loaded to a new program.
For example, if there are 4 programs available on the
current drive, the destination program number(s) on
the current drive and then perform step 7 above again.
If there are already 99 programs on the current drive,
“Disk Full!” appears and no destination program
number is shown. In such a case, delete the
unnecessary program(s) on the current drive and then
perform step 7 above again.
flashing
By rotating the [JOG] dial, you can select “NON”, as weel
as a “Program”. When performing the load operation,
tracks that are set to “NON” are not loaded.
8. While the program number is flashing, press the
[ENTER/YES] key.
The flashing program number changes to light solidly,
showing that the first track is ready to be loaded to the
program.
However, if you select track 2 after selecting tracks 1
and 3, the VF08 automatically reassigns track 2 to
program 06 and track 3 to program 07 (see the screen
example below).
9. After specifying track(s) to be loaded, press the
[ENTER/YES] key while holding down the [RECORD] key.
The VF08 starts loading tracks to the current drive.
The following screen example shows that track 1 is now
being loaded to program 08 on the current drive.
When the loading ends, “Load Completed!” appears on
the screen, while the disc is automatically ejected from
the CD-RW drive.
10. Press the [EXIT/NO] key to quit the Setup mode.
The display returns to the Normal display that was shown
last time before entering the Setup mode.
18
Page 19

Memo
19
Page 20

FOSTEX CORPORATION
3-2-35 Musashino, Akishima-shi, Tokyo, Japan 196-0021
FOSTEX AMERICA
15431 Blackburn Ave., Norwalk, CA 90650, U. S. A.
© PRINTED IN JAPAN APR. 2001 8588 004 200 FX
352069
 Loading...