

8289665000
(499595)
Model UR-2 supplementary manual
<for version 1.20>
With the software upgrade of the Model UR-2 to version
1.20, the following functions are added or enhanced.
Among these functions, the newly added auto cue and
auto ready functions will help you a lot when you use the
UR-2 in the audio system for a stage or studio.
This supplement only describes the new functions of the
new software version. See also the UR-2 owner's manual.
The auto cue and auto ready functions are added.
The chain play list is enhanced.
You can now scrub audio when you edit a CUE point.
You can now customize the available options
for play mode selection.
The "EP-CT1 mode" item, which selects the mode of
the instant start controller (available soon), is added
to the "Parallel setup" menu item in the "REMOTE
SET" menu of the MENU mode.

Contents
Newly added auto cue function .......................................................................................................3
Enabling the auto cue function ..............................................................................................................3
Setting the auto cue level .................................................................................................... ........................4
Newly added auto ready function ............................................................................................... ......5
Enhanced chain play list ....................................................................................................................6
Newly added scrub function f or CUE point editing .......................................................................8
Customizing the play mode options ................................................................................................9
Newly added “EP-CT1 mode” item in the “Parallel setup” menu item .......................................10
2
Newly added auto cue function
About the auto cue function
When the auto cue function is enabled, selecting a file using the file selection screen (or using the / keys)
automatically puts the unit in standby mode at the first point in a file where the signal exceeds a certain threshold or at the
"BS$START" point in the cue list.
Using the "Auto cue" menu item in the "PLAY SETUP" menu of the MENU mode, y ou can select auto cue "Off", auto cue at
the first audio point in a file, or auto cue at the "BS$START" point (b y default, the auto cue function is "Off").
The audio detection threshold (used for auto cue at the first audio point) is set at the "-54" (dB) by default, which can be
changed using the newly added "Auto cue lvl" menu item in the "PLAY SETUP" men u. In addition, the upgraded UR-2 can
fine-adjust the "BC$START" and "BC$END" points using the digital scrub function that has been newly added to the CUE
editing screen (see page 8 of this supplement).
* The "BC$STAR T" point is the label of the CUE you set for the first time, while the "BC$END" point is the label of the CUE you set
for the second time. Both CUE labels are reserved f or the BWF-J standard. Each label is automatically giv en when you set the CU E
for the first or second time. For details how to set a CUE, see page 35 of the owner's manual.
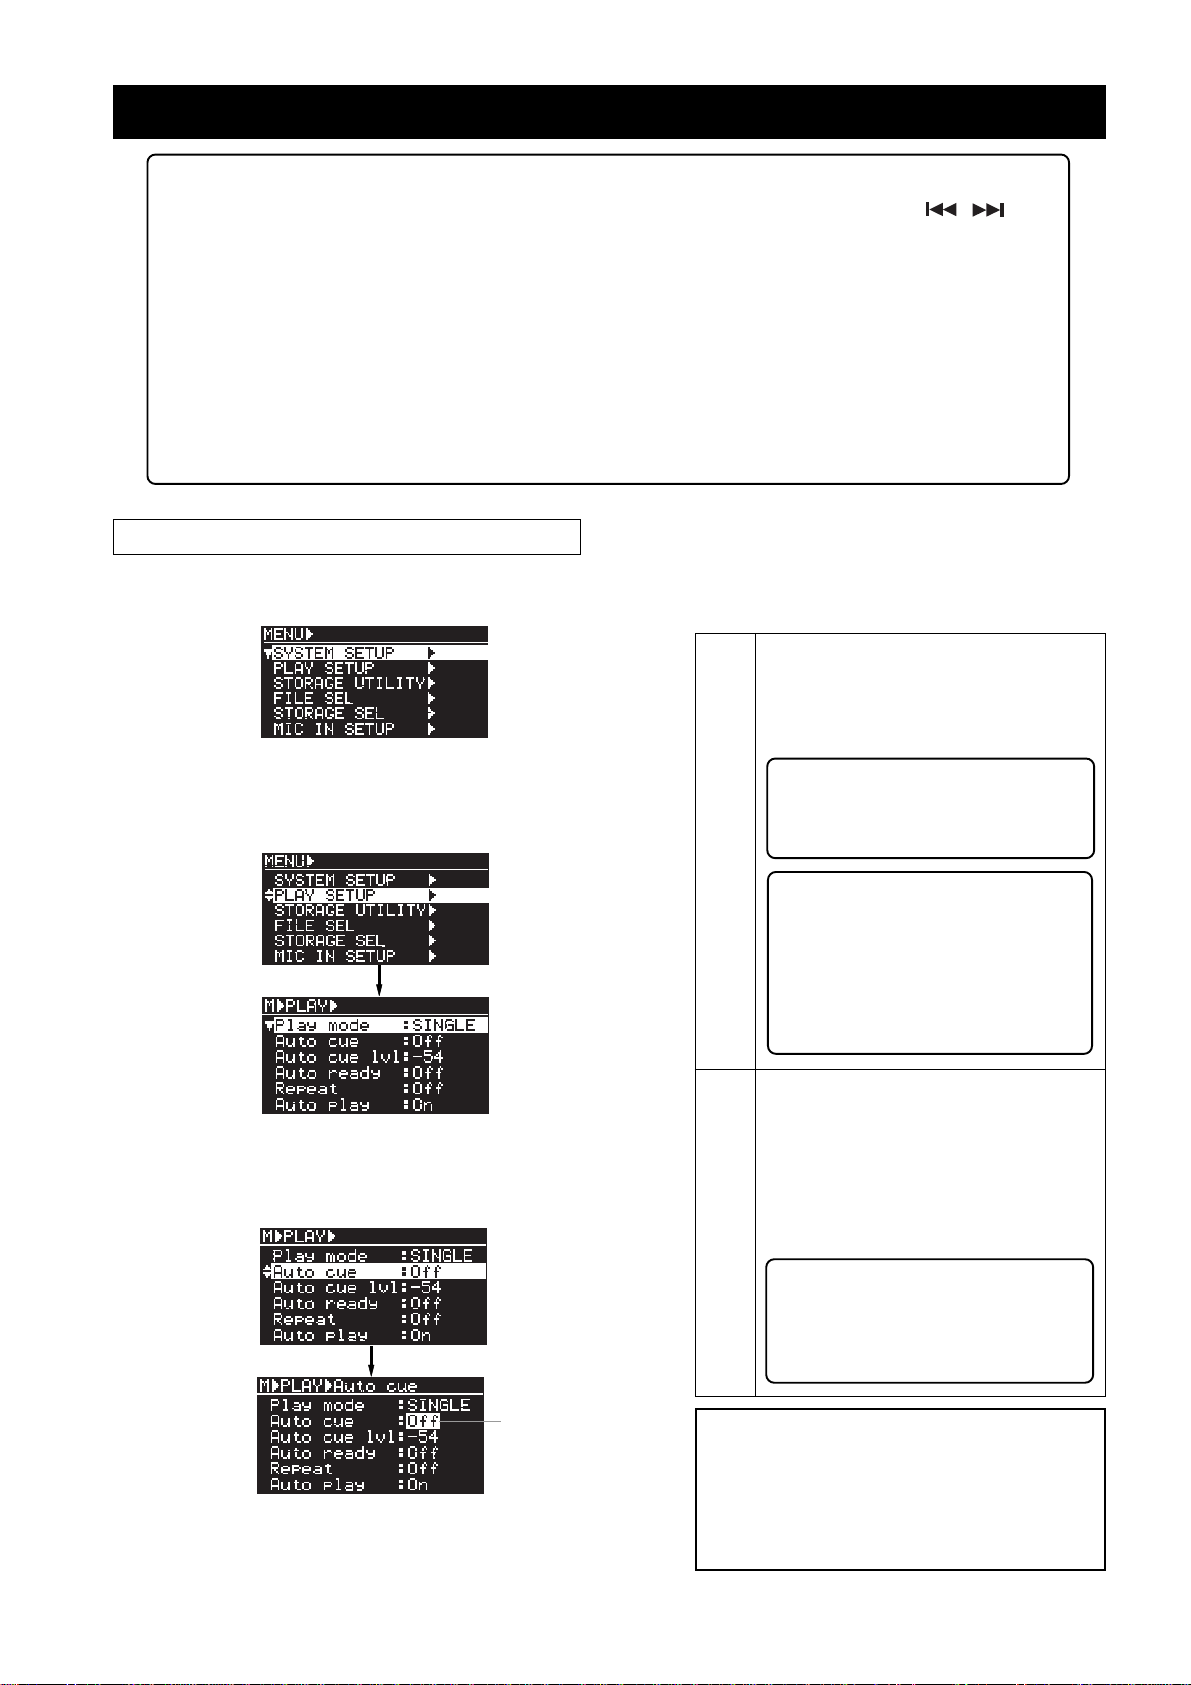
Enabling the auto cue function
(1) While the unit is stopped (or during playback), press
the [ENTER] key to enter the MENU mode.
(2) Use the [MENU] dial to highlight the "PLAY SETUP"
and press the [ENTER] key.
Now you can select a menu item in the "PLAY SETUP"
menu.
(3) Use the [MENU] dial to highlight the "Auto cue" item
and press the [ENTER] key.
The current auto cue setting starts flashing (by
default, "Off" starts flashing)
You can enable the auto cue function by selecting
"LVL" or "CUE". The auto cue function is performed
in the following manner depending on the selection.
When you select a file, the unit enters standby
mode at the first point in a file where the signal
exceeds a certain threshold. Pressing the [PLAY]
key instantly starts playback of audio (see the
memos below).
<Memo>: When you set the "Auto cue" item
to "L VL", y ou can choose the audio threshold
level. See "Setting the auto cue level" in the
LVL
next page for details.
<Memo>: By connecting a USB keyboard
to the unit, you can select between "LVL" and
"Off" from the keyboard without the need of
entering the MENU mode. When the "Auto
cue" item is set to "Off", pressing the [F2] key
switches from "Off" to "LVL". When the "Auto
cue" item is set to "L VL", pressing the [SHIFT]
and [F2] keys switches from "LVL" to "Off".
When you select a file, the unit enters standby
mode at the "BS$START" point specified in the
CUE list. If you press the [PLAY] k e y in this condition, the unit starts playback from the
"BC$START" point to the "BC$END" point, and
then automatically skips back to the "BC$ST AR T"
point and enters standby mode (see also the
CUE
<Note> below).
Flashing
(4) Use the [MENU] dial to select "LVL" or "CUE" and
press the [ENTER] key to confirm the selection.
3
<Memo>: You can fine-adjust the
"BC$START" and "BC$END" points specified to each file using the digital scrub function that has been newly added to the CUE
editing screen (see page 8 for details).
<Note>:
therefore, if the auto cue function is set to "LVL" or "CUE",
selecting a file automatically starts playback. Therefore,,
if you want to put the unit in standby mode after you select a file, disable the auto play function (see page 57 of
the owner's manual for details about how to disable the
auto play function).
By default, the auto play function is enabled,
(5) To exit the MENU mode after enabling the auto cue
function, press the [EXIT] key.
<Note>:
off the unit. However, if you initialize the system memory
using the "SYS. initial memory" menu item in the "SYSTEM SETUP" menu of the MENU mode, the setting returns to "Off" (the default).
The "Auto cue" setting remains even if you turn
<Memo>: If you e xit the MENU mode after setting the "Auto cue"
menu item to "LVL" or "CUE", the appropriate icon is shown on
the Home screen.
When the "Auto cue" item is set to "LVL";
“A.LVL” icon
When the "Auto cue" item is set to "CUE";
“A.CUE” icon
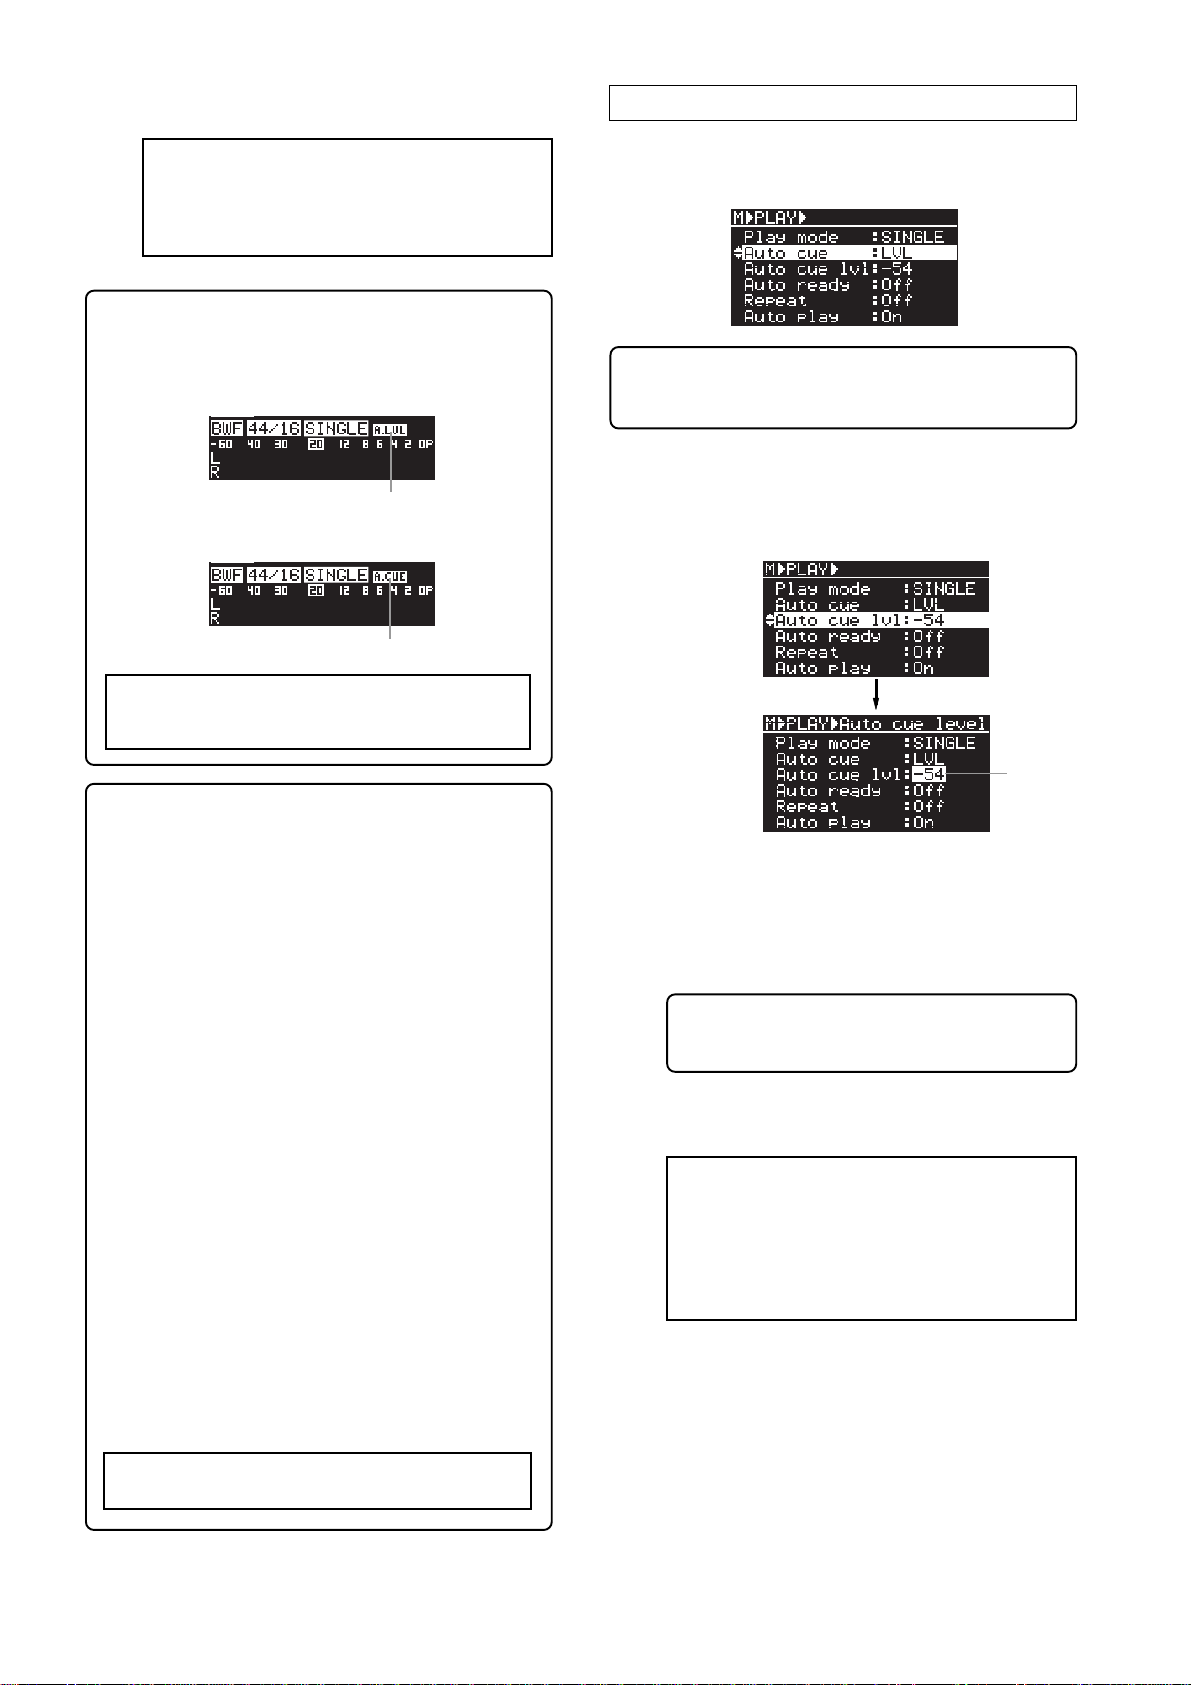
Setting the auto cue level
In the following description, it is assumed that the "Auto
cue" menu item is set to "LVL" and the following screen
(PLAY SETUP menu) is shown.
<Memo>: If the unit is not in the MENU mode, perform steps (1)
and (2) of "Enabling the auto cue function" on page 3 to bring up
the screen above.
(1) Use the [MENU] dial to highlight the "Auto cue lvl"
item and press the [ENTER] key .
The current auto cue level setting starts flashing
(by default, "-54" starts flashing).
<Note>:
mode is set to "SINGLE". They are not shown in another
play modes.
<Memo>:
while the "Auto cue" menu item is set to "LVL" or "CUE", the unit
acts as follows depending on setting of the "Auto ready" menu
item.
The icons above are shown only when the play
When you press the [PLAY] key after selecting a file
"Auto cue": LVL, "Auto ready": On
The unit starts playback from the first audio in the file.
When it reaches the end of the file, it automatically skip to the
first audio in the next file and enters standby mode.
"Auto cue": LVL, "Auto ready": Off
The unit starts playback from the first audio in the file.
When it reaches the end of the file, it automatically skip back to
the first audio in the file and enters standby mode.
"Auto cue": CUE, "Auto ready": On
The unit starts playback from the "BC$START" point.
When it reaches the "BC$END" point, it automatically skip to
the "BC$ST AR T" point in the ne xt file and enters standby mode .
(If no "BC$START" point is set in the next file, the unit enters
standby mode at the beginning of the next file.)
"Auto cue": CUE, "Auto ready": Off
The unit starts playback from the "BC$START" point.
When it reaches the "BC$END" point, it automatically skip back
to the "BC$START" point in the file and enters standby mode.
By setting the repeat mode to "On" in this condition, you can
repeat playback between the "BC$START" and "BC$END"
points. (See page 54 of the owner's manual for details about
how to set the repeat mode.)
Flashing
You can select the auto cue level from -24, -30, -36,
-42, -48, -54, -60, -66 and -72 (dB).
(2) Use the [MENU] dial to select the desired auto cue
level and press the [ENTER] key to confirm the
selection.
<Memo>:
you can select the desired auto cue level from the keyboard without the need of entering the MENU mode.
By connecting a USB keyboard to the unit,
(3) To exit the MENU mode after selecting the auto cue
level, press the [EXIT] key.
<Note>:
turn off the unit. However, if you initialize the system
memory using the "SYS. initial memory" menu item in
the "SYSTEM SETUP" menu of the MENU mode, the
setting returns to "-54" (the default).
When the "A uto cue" menu item is set to "Off" or "CUE",
the auto cue level setting is ineffective.
The auto cue level setting remains even if you
<Note>:
the "Auto ready" menu item is set to "Off".
You can set the repeat mode to "On" only when
4

Newly added auto read y function
About auto ready function
The auto ready function works only in the single play mode. When the auto ready function is enab led, the unit locates to the
beginning of the next file and enters standby mode after the unit finishes pla ybac k of a file. Note that when the auto ready
function is disabled in the single play mode, the unit locates to the beginning of the current file and enters standby mode
after the unit finishes playback of a file. To enable or disable the auto ready function, use the "Auto ready" men u item newly
added to the "PLA Y SETUP" menu of the MENU mode (by default, it is set to "Off").
1) While the unit is stopped, press the [ENTER] key to
enter the MENU mode.
(5) To exit the MENU mode after enabling the auto cue
(2) Use the [MENU] dial to highlight the "PLAY SETUP"
and press the [ENTER] key.
Now you can select a menu item in the "PLAY SETUP"
menu.
<Note>:
play mode. It does not work in another play mode.
function, press the [EXIT] key.
<Memo>: The "Auto ready" setting remains even if you
turn off the unit.
<Memo>: When you set the "Auto ready" item to "On"
and exit the MENU mode, the display shows the following icons depending on the "Auto cue" setting. See page
4 for details about the unit's behavior when both the auto
ready and auto cue functions are active.
The auto ready function works only in the single
(3) Use the [MENU] dial to highlight the "Auto ready" item
and press the [ENTER] key.
The current auto ready setting starts flashing (by
default, "Off" starts flashing)
Flashing
(4) Use the [MENU] dial to select "On" and press the
[ENTER] key to confirm the selection.
The unit locates to the beginning of the current
Off
file and enters standby mode after the unit finishes playback of a file.
The unit locates to the beginning of the next file
and enters standby mode after the unit finishes
playback of a file.
On
<Note>:
"Off" to "On" while the repeat function is enabled automatically disables the repeat function.
Setting the "Auto ready" item from
When "Auto cue" is set to "Off";
Only the "A.RDY" icon is lit.
When "Auto cue" is set to "LVL";
Both the "A.LVL" and "RDY"
icons are lit.
When "Auto cue" is set to "CUE";
Both the "A.CUE" and "RDY"
icons are lit.
<Note>:
mode is set to "SINGLE". They are not lit when the
play mode is set to another mode.
The icons above are lit only when the play
5

Enhanced chain play list
The chain play list is used for the CHAIN SINGLE, CHAIN ALL or MEMORY play. With the new software version, you
can insert a space file ("<SPACE>") between audio files in the chain play list. By inserting a space file between audio
files, you can prevent the unit from starting unwanted playback by an accidental press of an adjacent numeric key.
Though the details about how to create the chain play list with the previous software version are described on page
46 of the owner's manual, see the following for details about how to create the chain play list with the new software
version.
(1) While the unit is stopped, press the [ENTER] key to
enter the MENU mode.
(2) Use the [MENU] dial to highlight "CHAIN PLAY SET"
and press the [ENTER] key.
The display shows the screen for selecting the list
number ("001" is highlighted on the screen).
For details about displayed items on the screen, see
the table on page 46 of the owner's manual.
(3) While "001" is highlighted, press the [ENTER] key.
You can now select a file you want to set to list
number 001. "<SPACE ENTRY>" is highlighted.
You can now select a file you want to set to list
number 002.
(6) Use the [MENU] dial to highlight a desired file and
press the [ENTER] key.
The selected file is set to list number 002, and the
display again shows the screen for selecting the list
number.
(7) Repeat the steps (5) and (6) above to set files as many
times as required.
<Memo>: To set a space file to the desired list number,
press the [ENTER] key while "<SPACE ENTRY>" is highlighted on the screen for selecting the list number.
On the example screen below, a space file is set to list
number 004.
<Memo>: This "<SPACE ENTRY>" is newly added with
the new upgraded software. It is used to add a space file
to the chain play list.
(4) Use the [MENU] dial to highlight a desired file and
press the [ENTER] key.
If you select file 003, it is set to list number 001,
and the display again shows the screen for
selecting the list number.
(5) Use the [MENU] dial to highlight "002" and press the
[ENTER] key.
(8) After you set all desired files to the chain pla y list,
use the [MENU] dial to highlight "<SA VE>" and press
the [ENTER] key .
The display changes to show the confirmation
screen for saving the play list named
"CHAINLIST.CSV". "?" flashes on the screen.
Flashing
6

(9) Press the [ENTER] key to save the play list.
(T o cancel sa ving the play list, press the [EXIT] key
instead of the [ENTER] key.)
The play list is saved and the display returns to the
Home screen.
<Memo>: The play list is sav ed to the f older in the cur-
rent storage device as the
"CHAINLIST.CSV" file in the CSV (Comma Separated
Value) format. (Note that the play list is o verwritten.)
See page 88 of the owner's manual for details about the
description of the play list.
<Memo>: For details about how to edit or clear the
play list, see page 47 of the owner's manual.
<Memo>: When you switch the play mode to
"MEMORY" while the play list includes space files, the
screen as below appears. In the following screen example, space files are set to list numbers 2, 4, 6 and 8
(i.e. between audio files). This helps preventing the unit
from starting unwanted playback of an audio file by an
accidental press of an adjacent numeric key.
For example, if you attempt to start the "SCENE_003"
file and press the [2] key instead of the [1] key by accident, nothing happens.
<Note>:
keyboard to specify the list number to which a space
file is set, the unit does not perform instant start. See
page 45 of the owner's manual for details about the
MEMORY pla y mode .
Even if you press a numeric key on the USB
<Memo>: If you perform CHAIN-ALL play with the play
list that includes space files, the unit skips each space
file and plays back the audio files in the play list contin uously. See page 44 of the owner's manual for details
about the CHAIN-SINGLE and CHAIN-ALL play modes.
<Note>:
and
the CHAIN-SINGLE or CHAIN-ALL play mode, the
following popup window is shown. (For details about
how to select a file using the
or using the file selection screen, see page 42 of the
owner's manual.)
If you select a space file using the
[ ]
keys (or using the file selection screen) in
[ ]
and
[ ]
[ ]
keys
7

Newly added scrub function f or CUE point editing
The newly added scrub function allows you to fine-adjust a CUE point. While scrubbing, you can monitor the sound
as well as viewing the waveform. This function is useful for editing the "BC$START" or "BC$END" point in the CUE
list. The following describes how to fine-adjust a CUE point using the newly added scrub function. The other editing
functions such as "Editing CUE time data" or "Deleting a CUE point" are described on page 36 of the owner's manual.
In the following description, it is assumed that an audio file, to which CUE points as shown on the example screen
below are set, is loaded. For details about how to set a CUE point, see page 35 of the owner's manual.
(1) While the unit is stopped, press the [CUE/LOCATE]
key to bring up the CUE LIST screen.
It is assumed that the CUE points shown on the
example screen below are set.
The waveform moves as well as the time display
changes.
<Memo>: By pressing the [ ] or [ ] key before
(2) Use the [MENU] dial to select a desired CUE and press
the [ENTER] key.
The display now shows the cue editing screen.
It is assumed that you select CUE 01 (BC$START)
for example. On the screen, "Label" flashes.
you use the scrub function, you can zooms in or out the
waveform in time axis. Pressing the [ ] key zooms in
the waveform while pressing the [ ] key zooms out
the waveform.
Flashing
(3) Use the [MENU] dial to highlight "<Scrub>" and press
the [ENTER] key.
The display now shows the waveform screen.
The “ ” icon on the screen points the selected CUE
point.
Pressing the [ ] keyPressing the [ ] key
Pressing the [ ] keyPressing the [ ] key
Pressing the [ ] keyPressing the [ ] key
While you scrub audio, you can monitor the sound via
headphones.
<Memo>: The "<Scrub>" item is newly added to the ver-
sion 1.20 software.
(4) Fine-adjust the CUE point by rotating the [MENU] dial
left or right to scrub audio.
Rotating the [MENU] dial moves the point
approximately four to ten milliseconds
(depending on the FS and bit rate) per one step.
(5) After fine-adjusting the CUE point, press the [ENTER]
key .
The time of the adjusted position is set to the CUE
point and the display returns to the CUE list screen.
(6) Press the [EXIT] key to exit the CUE list screen.
The display returns to the previous Home screen.
8

Customizing the play mode options
About this function
This function customizes the selectable play mode options for the [PLA Y MODE] key.
By default, pressing the [PLAY MODE] key selects the play mode from the seven a vailable modes in the following order.
With the new software, you can specify the play modes selectable with the [PLAY MODE] key so that the play modes you
never use are not selected. Therefore you can select the desired play mode quicker. This function can be set using the
"Custom play" menu item in the "PLAY SETUP" menu of the MENU mode.
(1) While the unit is stopped, press the [ENTER] key to
enter the MENU mode.
(5) Use the [MENU] dial to select "Off" and press the
[ENTER] key to confirm your selection.
(2) Use the [MENU] dial to highlight the "PLAY SETUP"
and press the [ENTER] key.
The display shows the PLAY SETUP menu.
Flashing
(3) Use the [MENU] dial to highlight "Custom play" at the
bottom and press the [ENTER] key.
The display shows the "CUSTOM" screen on which
each play mode setting is shown.
Rotating the [MENU] dial clockwise finally highlights
"TIMER".
By default, each play mode is set to "On".
(6) Repeat steps (4) and (5) as many times as required.
(7) After you complete setting, press the [EXIT] ke y to
exit the MENU mode.
<Note>:
unit. How e v er , if you initialize the system memory using
the "SYS. initial memory" menu item in the "SYSTEM
SETUP" menu of the MENU mode, the setting returns
to the default.
The setting remains even if you turn off the
<Memo>: For example, if you set only "SINGLE" and
"MEMORY" to "On" while you set the other modes
to "Off", pressing the [PLAY MODE] key switches the
play mode between "SINGLE" and "MEMORY".
<Note>:
"Off" in the "Custom play" menu item using the [PLAY
MODE] key, however, y ou can select it using the "Play
mode" menu item in the "PLA Y SETUP" menu of the
MENU mode. For details about how to select a play
mode using the "Play mode" menu item, see page
56 of the owner's manual. Note that all menu screens
shown in the owner's manual are those of old version software.
You cannot select a play mode that is set to
(4) Use the [MENU] dial to highlight a play mode that you
never use and press the [ENTER] key.
The current setting ("On") starts flashing and you
can now change the setting.
On the example screen below, the "ALL" mode is
selected.
<Note>: If you set all play modes to "Off" in the "Custom play" menu item, the [PLAY MODE] key is disabled
and the play mode is locked to the one selected before
entering the MENU mode.
Howev er, you can select it using the "Play mode" menu
item in the "PLAY SETUP" menu of the MENU mode
even though the [PLAY MODE] key is disabled (see page
56 of the owner's manual).
9

Newly added "EP-CT1 mode" item in the "Parallel setup" menu item
The newly added "EP-CT1 mode" item selects the mode of the instant start controller (available soon) between
"Normal" and "Instant". The instant start controller controls the UR-2 using parallel commands.
Depending on "EP-CT1 mode" item setting, you can remotely perform instant start in the MEMORY play mode or
perform transport controls (for playing back, recording and stopping, etc.). For details about how to use the remote
start controller, see the operation manual of the controller.
<Memo>: The "EP-CT1 mode" item is added to the "Parallel setup" menu item in the
"REMOTE SET" of the MENU mode. The screen below shows the default condition of
the "Parallel setup" screen.
For details about how to access the "Parallel setup" screen, see page 61 of the owner's
manual.
"EP-CT1 mode" item newly
added with the upgraded software.
Model EP-CT1 Instant start controller (available soon)
(The illustration shown above ma y differ from actual product appearance.)
10

11

FOSTEX CO.
3-2-35 Musashino, Akishima-shi, Tokyo Japan, 196-0021
© PRINTED IN JAPAN MAY 2009 8289 665 000 FX
(499595)
 Loading...