

Fortinet FortiWiFi 60CM-3G4G, FortiGate 60C, Fortigate 100D-LENC, Fortigate 100D Quick Start Manual

FortiWiFi 60CM-3G4G
QuickStart Guide

August 20, 2013
19-437-170963-20130820
Copyright© 2013 Fortinet, Inc. All rights reserved. Fortinet®,
FortiGate®, and FortiGuard®, are registered trademarks of Fortinet,
Inc., and other Fortinet names herein may also be trademarks of
Fortinet. All other product or company names may be trademarks of
their respective owners. Performance metrics contained herein were
attained in internal lab tests under ideal conditions, and performance
may vary. Network variables, different network environments and
other conditions may affect performance results. Nothing herein
represents any binding commitment by Fortinet, and Fortinet
disclaims all warranties, whether express or implied, except to the
extent Fortinet enters a binding written contract, signed by Fortinet’s
General Counsel, with a purchaser that expressly warrants that the
identified product will perform according to the performance metrics
herein. For absolute clarity, any such warranty will be limited to
performance in the same ideal conditions as in Fortinet’s internal lab
tests. Fortinet disclaims in full any guarantees. Fortinet reserves the
right to change, modify, transfer, or otherwise revise this publication
without notice, and the most current version of the publication shall
be applicable.

Table of Contents
1 Package Contents
2 Connect Your Device
3 FortiExplorer
4 Configuration Options
5 Configure Network Interfaces
6 Hardware Identification
7 Technical Specifications
8 LED Specifications
9 Register Your Product
10 Technical Documentation and Links
11 Cautions and Warnings
12 Product License Agreement
Thank you for purchasing the FortiWiFi 60CM-3G4G. The
FortiWiFi 60CM-3G4G multi-threat security appliance offers you unmatched
performance, flexibility, and security for your remote, branch, or small office
network.
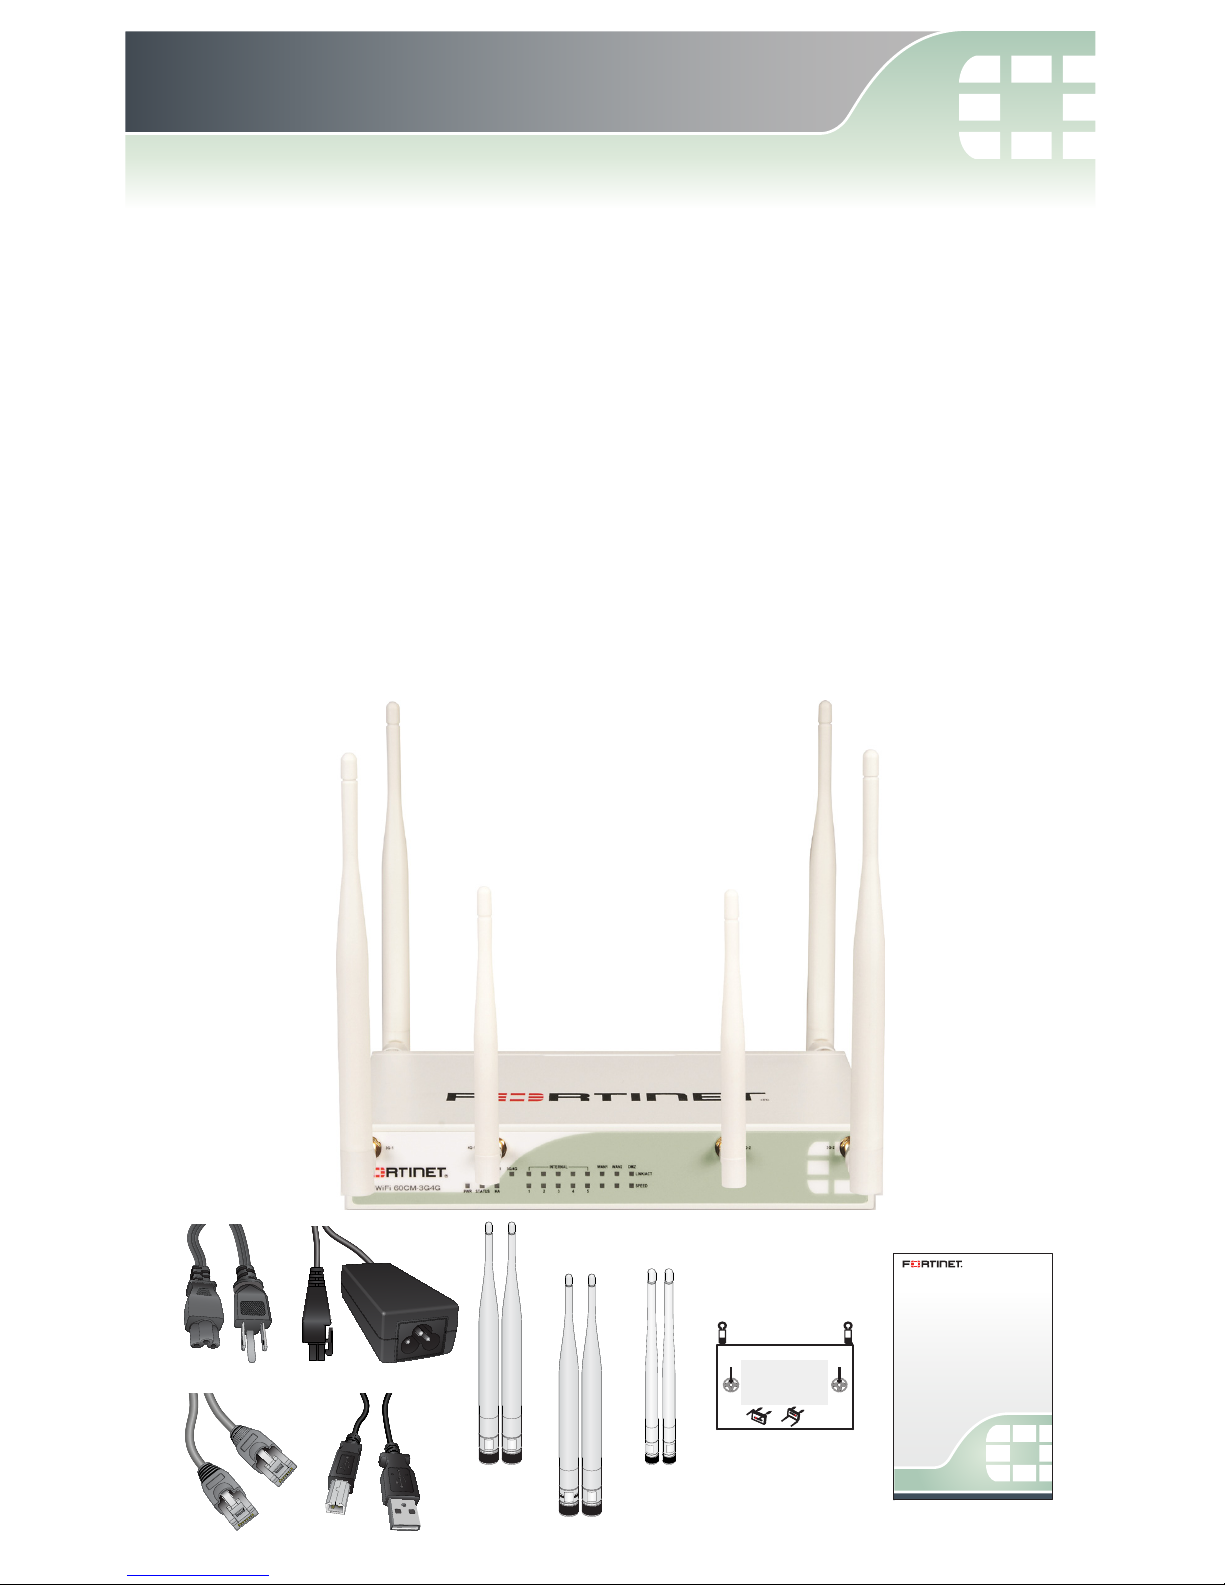
Your box contains the following:
FortiWiFi 60CM-3G4G
QuickStart Guide
USB Cable
Ethernet Cable
Power Cable and Adapter
2 WiFi, 2 3G, and 2 4G Antennae
Wall-mount Template
FortiWiFi-60CM-3G4G
QuickStart Guide
QuickStart Guide
USB Cable
Ethernet Cable
Power Cable
Power Adapter
The unit should be placed farther than 75mm on each side from a heat source. If you
are mounting more than one unit, place them in a vertical row to provide better ventilation.
Required Materials:
Drill bit: Size is determined by the screw size.
Anchors: Two for mounting on dry-wall, plasterboard, or gyprock.
Screws: Two appropriate for anchors. Maximum diamter of 3.5mm.
Instructions:
1. Tape this template to the wall in the desired location.
2. Mark the position of the drill holes on the wall.
3. Drill two holes.
4. Insert anchors into drilled holes.
5. Insert the screws into the anchors. Screws should protrude 5mm out of wall.
6. Place FortiWifi-60C key holes over the screws and slide the unit down into position.
The FortiWifi-60C can be placed in either position shown below.
Wall-Mount Template
FortiWifi-60C
Drill hole Drill hole
Wall-mount
Template
4
G
_
2
4
G
_
1
2 4G
Antennae
W
I
F
I
W
I
F
I
2 WiFi
Antennae
3
G
_
2
3
G
_
1
2 3G
Antennae
1. Package Contents
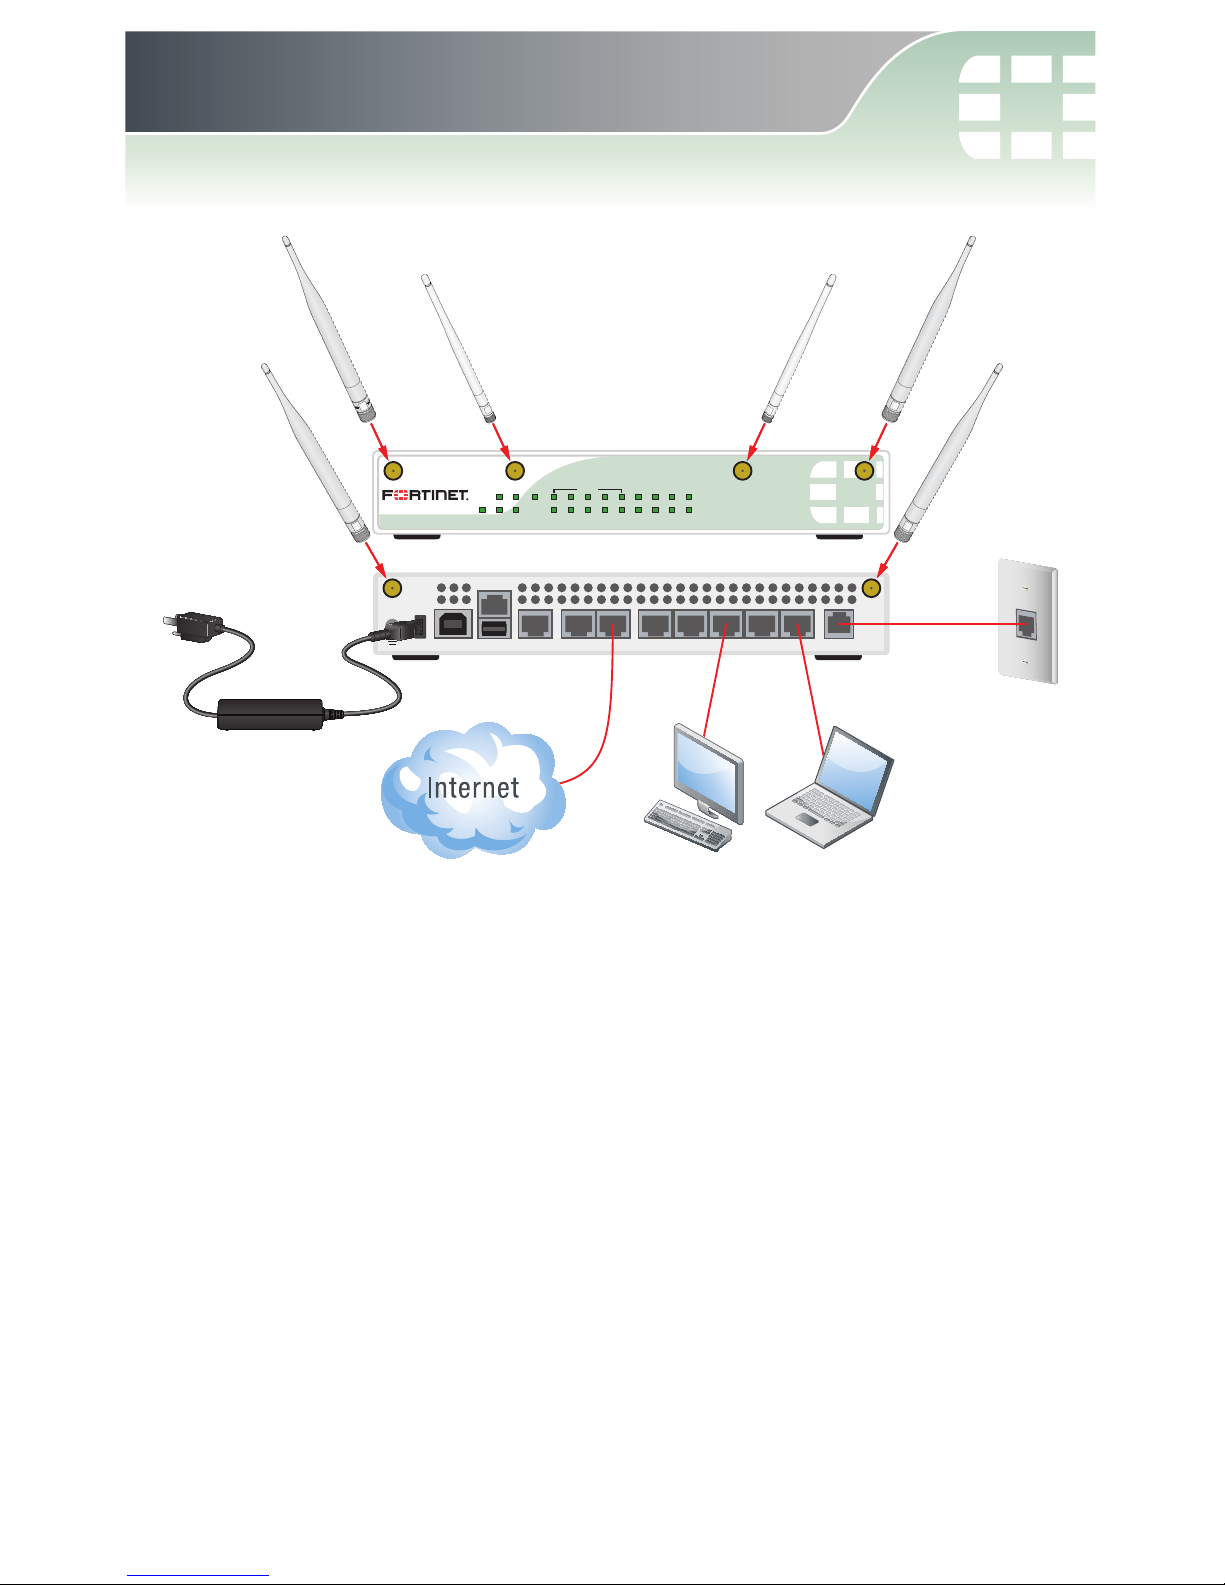
To attach the antennae to the back and front of the FortiWiFi unit, insert the antenna
base firmly into the appropriate antenna mount (see labels on the antennae), and
then tighten the fastening collar securely.
To attach your unit to a wall, refer to the wall mount template.
Ensure the FortiWiFi unit is placed on a stable surface. Connect the following to the
FortiWiFi unit:
1. Connect an Ethernet cable into the port labeled WAN1.
2. Connect the other end of your Ethernet cable to your Internet connection.
3. Connect an Ethernet cable to each workstation or laptop PC you wish to connect
to the FortiWiFi unit.
4. Connect an RJ-11 telephone cable to the MODEM port.
5. Connect the Power Supply to the FortiWiFi unit and plug the cable into an electrical
outlet.
CONSOLE
WAN1DMZ WAN2
USBDC+12V
5 1234
USB MGMT
WiFi
WiFi
MODEM
2
1
4
33
5
3
G
_
2
3
G
_
1
4
G
_
1
W
I
F
I
W
I
F
I
4
G
_
2
PWR STATUS HA
SPEED
LINK/ACT
WAN1 WAN2 DMZINTERNAL
3G/4G
1 2 3 4 5
MODEM
FortiWiFi 60CM-3G4G
3G-1
4G-1 4G-2
3G-2
WIFI
RJ-11
Phone Jack
2. Connect Your Device

FortiExplorer provides a user-friendly tool that you can use to configure
a FortiWiFi unit over a standard USB connection, rather than using a
console cable or Ethernet connection.
Caution: Do not connect the USB cable until after FortiExplorer
has been installed.
Note: When using FortiExplorer for the first time, ensure the FortiWiFi
unit is using its factory default settings.
Installing FortiExplorer
FortiExplorer is available for Microsoft Windows XP, Vista, and 7. It is
also available for Mac OS 10.6 and higher.
Microsoft Windows Install
1. Extract the ZIP file (if downloaded) and double-click the .msi, or .exe
file and follow the instructions on-screen.
2. Connect the USB cable to the FortiWiFi unit and then to the
management computer.
3. The FortiExplorer Easy Configuration Utility opens when the USB
cable is connected. Select Install the hardware automatically and
select Next.
4. After a moment, FortiExplorer will launch.
CONSOLE
WAN1DMZ WAN2
USBDC+12V
5 1234
USB MGMT
WiFi
WiFi
MODEM
USB A to
USB B Cable
USB A cable end into
Management Computer
USB B cable end into
FortiWiFi Unit
3. FortiExplorer
Mac OS Install
1. Double-click the .dmg file and drag the FortiExplorer program file
into the Applications folder.
2. Connect the USB cable to the FortiWiFi unit and then to the
management computer.
3. Double-click the FortiExplorer icon to launch the application.
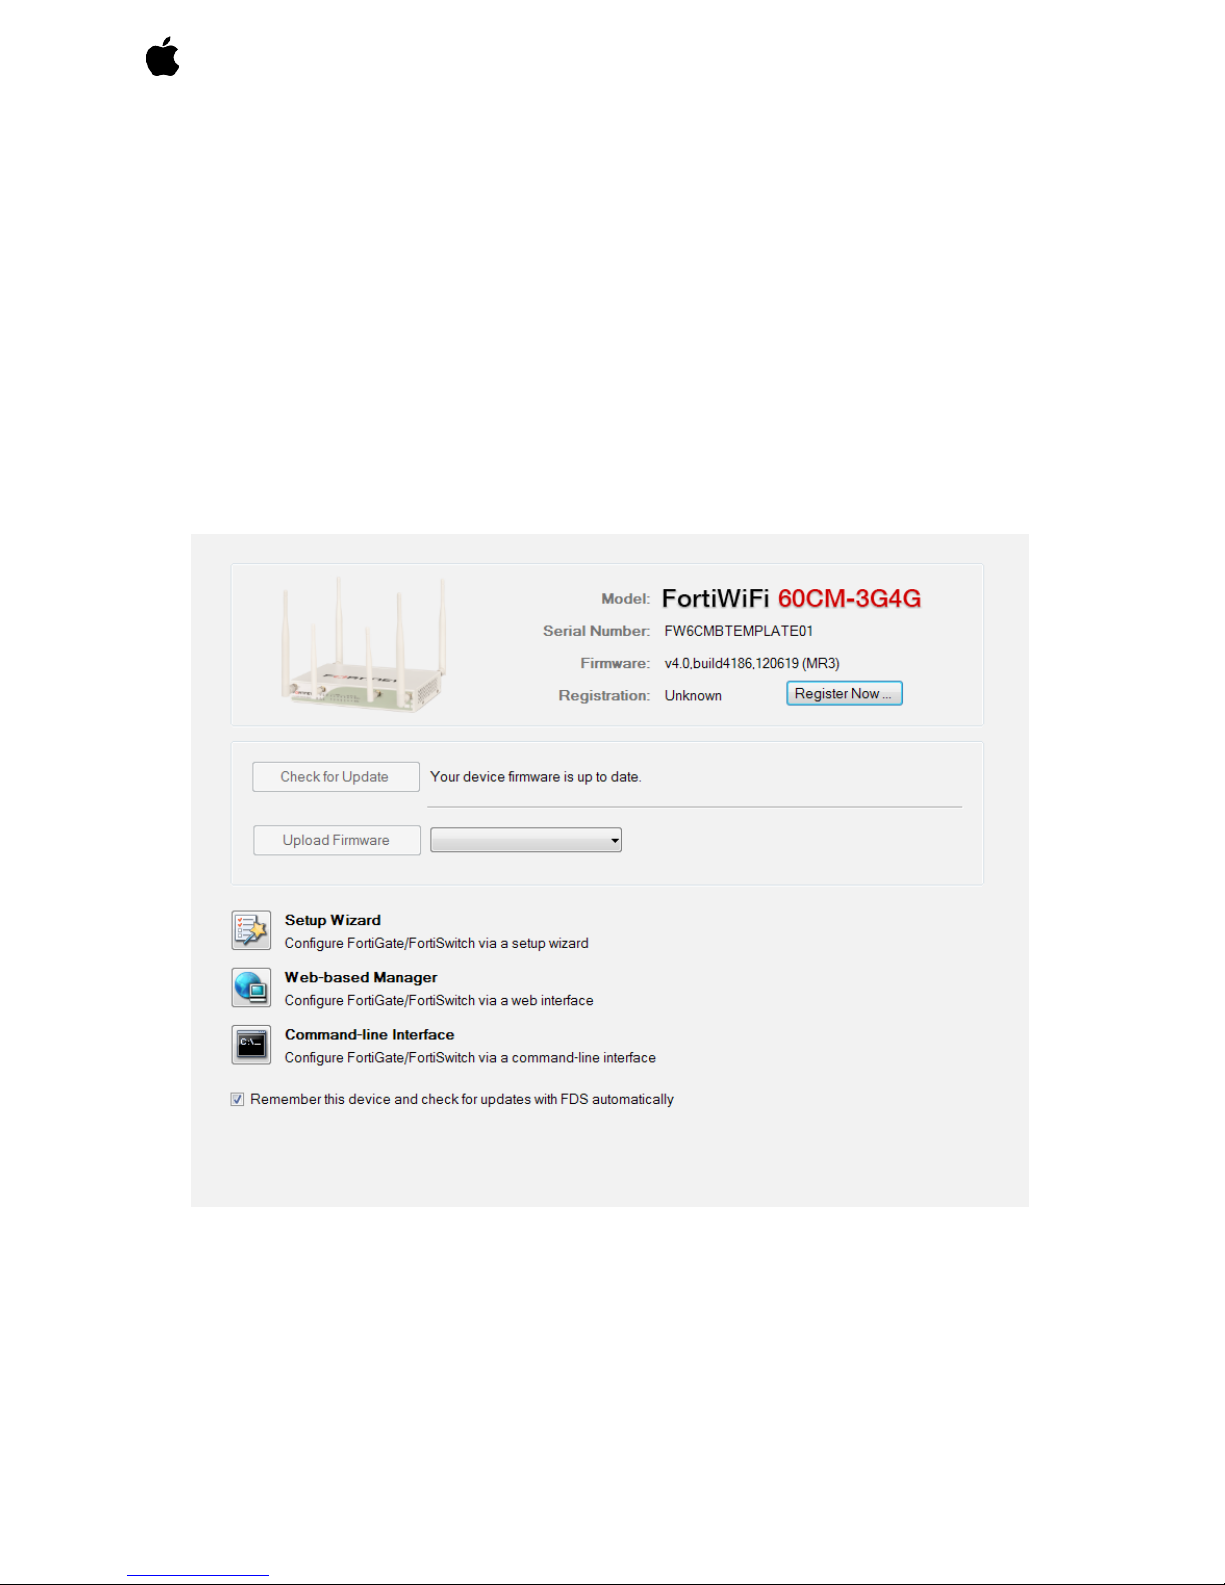
Configuration Options
With FortiExplorer, you are provided a number of options on how to
configure the FortiWiFi unit, depending on your level of comfort with
various interfaces.
The below image shows the FortiExplorer Easy Configuration Wizard.
Updating FortiExplorer and Firmware
FortiExplorer may be automatically updated from time to time.
You can also use FortiExplorer to check for new firmware for a
FortiWiFi unit. To check for new firmware, select the FortiWiFi unit
from the device list and select Check for New Firmware. FortiExplorer
will also monitor firmware updates for your devices and provide an
alert when one is available.

The FortiWiFi unit requires some basic configuration to add it to your
network. These basic steps include assigning IP addresses, DNS
settings, and the default gateway. Until these steps are completed
traffic will not flow through the device.
In addition to FortiExplorer, the FortiWiFi unit can be configured using
the Web-based Manager or the CLI.
This section will step you through both methods of connecting to the
unit. Use whichever method you are most comfortable with.
To Connect to the Web-based Manager:
1. Connect the FortiWiFi unit Port 1 to a management computer
using the provided Ethernet cable.
2. Configure the management computer to be on the same subnet
as the internal interface of the FortiWiFi unit:
a. Browse to the Network and Sharing Center > Change
Adapter Settings > Local Area Connection Properties
> Internet Protocol Version 4 (TCP/IPv4) Properties.
b. Change the IP address of the management computer
to 192.168.1.2 and the netmask to 255.255.255.0.
3. To access the FortiWiFi unit Web-based Manager, start a browser
of your choice and browse to https://192.168.1.99 (remember to
include the “s” in https://).
4. Type admin in the Name field, leave the Password field blank, and
select Login.
You can now proceed with configuring your FortiWiFi unit.
4. Configuration Options

To Connect to the CLI:
You can configure all FortiWiFi configuration options from the CLI
using config commands. The CLI also includes get, show, diagnose,
and execute commands for performing various configuration and
monitoring tasks.
1. Connect the FortiWiFi unit console port to the management
computer using the provided console cable.
2. Start a terminal emulation program on the management computer.
Use the following settings:
• Baud Rate: 9600
• Data bits: 8
• Parity: None
• Stop bits: 1
• Flow Control: None
3. Press Enter on your keyboard to connect to the CLI.
4. Type admin in the Name field, leave the Password field blank, and
press Enter.
You can now proceed with configuring your FortiWiFi unit.
To reset the unit to factory defaults
1. Enter the following commands:
execute factory reset
Note: The device will take approximately nine minutes to complete a
factory reset.
 Loading...