

Fortinet fortivoice Administrator's Manual

FortiVoice™ Enterprise Phone System 4.0.0
Administration Guide

FortiVoice Enterprise Phone System 4.0.0 Administration Guide
February 6, 2015
1st Edition
Copyright© 2015 Fortinet, Inc. All rights reserved. Fortinet®, FortiGate®, FortiCare® and
FortiGuard®, and certain other marks are registered trademarks of Fortinet, Inc., in the U.S. and
other jurisdictions, and other Fortinet names herein may also be registered and/or common law
trademarks of Fortinet. All other product or company names may be trademarks of their
respective owners. Performance and other metrics contained herein were attained in internal
lab tests under ideal conditions, and actual performance and other results may vary. Network
variables, different network environments and other conditions may affect performance results.
Nothing herein represents any binding commitment by Fortinet, and Fortinet disclaims all
warranties, whether express or implied, except to the extent Fortinet enters a binding written
contract, signed by Fortinet's General Counsel, with a purchaser that expressly warrants that
the identified product will perform according to certain expressly-identified performance metrics
and, in such event, only the specific performance metrics expressly identified in such binding
written contract shall be binding on Fortinet. For absolute clarity, any such warranty will be
limited to performance in the same ideal conditions as in Fortinet's internal lab tests. In no event
does Fortinet make any commitment related to future deliverables, features or development,
and circumstances may change such that any forward-looking statements herein are not
accurate. Fortinet disclaims in full any covenants, representations, and guarantees pursuant
hereto, whether express or implied. Fortinet reserves the right to change, modify, transfer, or
otherwise revise this publication without notice, and the most current version of the publication
shall be applicable.
Technical Documentation docs.fortinet.com
Knowledge Base kb.fortinet.com
Customer Service & Support support.fortinet.com
Training Services training.fortinet.com
FortiGuard fortiguard.com
Document Feedback techdocs@fortinet.com

Table of Contents
Introduction....................................................................................................... 8
Registering your Fortinet product............................................................................ 8
Customer service & technical support............................................................... 8
Training .................................................................................................................... 8
Documentation ....................................................................................................... 9
Fortinet Tools & Documentation CD .................................................................. 9
Fortinet Knowledge Base .................................................................................. 9
Comments on Fortinet technical documentation .............................................. 9
Scope....................................................................................................................... 9
Conventions............................................................................................................. 9
IP addresses ...................................................................................................... 9
Cautions and notes.......................................................................................... 10
Typographical conventions.............................................................................. 10
Command syntax conventions ........................................................................ 11
Connecting to the FortiVoice System........................................................... 14
Connecting to the web-based manager or CLI ..................................................... 14
Connecting to the web-based manager .......................................................... 15
Connecting to the CLI...................................................................................... 16
Setting up the system using the wizard................................................................. 18
Testing the setup ................................................................................................... 18
Configuring setups for phone users ...................................................................... 19
Accessing the user web portal......................................................................... 19
Changing the user PIN..................................................................................... 20
Receiving and sending fax............................................................................... 20
Using the operator console.............................................................................. 20
Setting user privileges and preferences .......................................................... 20
Setting the feature codes................................................................................. 20
Monitoring the FortiVoice System ................................................................ 21
Viewing overall system status................................................................................ 21
Viewing the dashboard .................................................................................... 21
Viewing the Call Statistics................................................................................ 24
Using the CLI Console ..................................................................................... 24
Viewing phone system status ................................................................................ 24
Viewing active calls.......................................................................................... 24
Viewing parked calls ........................................................................................ 25
Viewing conference calls ................................................................................. 25
Viewing extension status ................................................................................. 25
Viewing hot desking configurations ................................................................. 26
Viewing trunk status......................................................................................... 27
Viewing unassigned phones ............................................................................ 27
Viewing DHCP client list .................................................................................. 28
Fortinet Technologies Inc. Page 3 FortiVoice Enterprise Phone System 4.0.0 Administration Guide

Viewing call/fax storage......................................................................................... 30
Playing recorded calls...................................................................................... 30
Viewing current fax accounts........................................................................... 30
Viewing archived faxes .................................................................................... 30
Viewing fax queues .......................................................................................... 31
Viewing call records............................................................................................... 31
Viewing generated reports..................................................................................... 31
Viewing log messages ........................................................................................... 32
Displaying and arranging log columns............................................................. 34
Using the right-click pop-up menus ................................................................ 35
Searching log messages.................................................................................. 36
Viewing phone directories ..................................................................................... 37
Configuring System Settings......................................................................... 38
Configuring network settings................................................................................. 38
About IPv6 Support ......................................................................................... 38
About the management IP ............................................................................... 39
About FortiVoice logical interfaces .................................................................. 39
Configuring the network interfaces.................................................................. 40
Configuring static routes.................................................................................. 45
Configuring DNS .............................................................................................. 46
Configuring DHCP server................................................................................. 46
Capturing voice and fax packets ..................................................................... 48
Configuring administrator accounts and access profiles ...................................... 50
Configuring administrator accounts................................................................. 50
Configuring administrator profiles.................................................................... 52
Using high availability ............................................................................................ 53
About high availability ...................................................................................... 53
About the heartbeat and synchronization........................................................ 55
How to use HA................................................................................................. 56
Monitoring the HA status ................................................................................. 57
Configuring the HA mode and group............................................................... 60
Example: Failover scenarios ............................................................................ 67
Configuring system time, system options, SNMP, email setting, and GUI appear-
ance..................................................................................................................... 73
Configuring the time and date ......................................................................... 74
Configuring system options ............................................................................. 75
Configuring SNMP queries and traps .............................................................. 78
Configuring email settings ............................................................................... 84
Customizing the GUI appearance.................................................................... 86
Managing certificates............................................................................................. 88
Managing local certificates .............................................................................. 89
Obtaining and installing a local certificate ....................................................... 90
Managing certificate authority certificates....................................................... 95
Managing the certificate revocation list ........................................................... 96
Fortinet Technologies Inc. Page 4 FortiVoice Enterprise Phone System 4.0.0 Administration Guide

Maintaining the system.......................................................................................... 96
Maintaining the system configuration.............................................................. 96
Downloading a trace file .................................................................................. 97
Configuring Phone System Settings............................................................. 98
Configuring phone system settings ....................................................................... 98
Setting PBX location and contact information................................................. 98
Configuring PBX options.................................................................................. 99
Customizing email history report and notification email templates ............... 102
Configuring advanced phone system settings .................................................... 106
Configuring SIP settings ................................................................................ 106
Configuring SIP phone auto-provisioning...................................................... 108
Adding prompt languages ............................................................................. 110
Managing phone configurations .................................................................... 112
Configuring system capacity ......................................................................... 113
Managing sound files and music on hold ............................................................ 113
Working with FortiVoice profiles .......................................................................... 115
Configuring SIP profiles ................................................................................. 115
Modifying caller IDs ....................................................................................... 117
Scheduling the FortiVoice unit ....................................................................... 118
Configuring phone profiles............................................................................. 119
Configuring LDAP profiles.............................................................................. 122
Configuring user privileges ............................................................................ 129
Configuring Extensions................................................................................ 130
Setting up local extensions.................................................................................. 130
Configuring IP extensions.............................................................................. 130
Modifying analog extension (200D-T model only) ......................................... 139
Setting up remote extensions ........................................................................ 142
Configuring fax extensions ............................................................................ 145
Setting extension user preferences ............................................................... 149
Resetting voice messages ............................................................................. 156
Creating extension groups................................................................................... 156
Creating user groups ..................................................................................... 156
Creating extension departments.................................................................... 157
Creating ring groups ...................................................................................... 157
Creating page groups .................................................................................... 160
Creating pickup groups ................................................................................. 161
Setting up general voice mailboxes..................................................................... 161
Working with virtual numbers .............................................................................. 165
Configuring Trunks....................................................................................... 167
Setting up VoIP trunks ......................................................................................... 167
Testing SIP trunks.......................................................................................... 172
Creating a SIP trunk with FortiCall service .................................................... 173
Fortinet Technologies Inc. Page 5 FortiVoice Enterprise Phone System 4.0.0 Administration Guide

Modifying PSTN/PRI trunks (200D-T and 2000E-T2 only)................................... 174
Configuring the T1/E1 span ........................................................................... 178
Configuring the analog voice trunk................................................................ 182
Configuring office peers....................................................................................... 182
Configuring Call Routing ............................................................................. 186
Configuring inbound dial plans ............................................................................ 186
Configuring direct inward dialing ......................................................................... 190
Mapping DIDs ................................................................................................ 191
Configuring outbound dial plans.......................................................................... 193
Testing outbound dial plans........................................................................... 195
Creating dialed number match ...................................................................... 196
Configuring call handling actions................................................................... 198
Working with Property Management System ............................................ 200
Configuring hotel management settings.............................................................. 200
Configuring hotel room status ............................................................................. 201
Configuring Call Features............................................................................ 203
Configuring auto attendants ................................................................................ 203
Viewing auto attendant hierarchies................................................................ 206
Configuring key actions ................................................................................. 208
Configuring user privileges .................................................................................. 210
Configuring account codes.................................................................................. 215
Mapping speed dials ........................................................................................... 215
Configuring conference calls ............................................................................... 216
Recording calls .................................................................................................... 218
Configuring call recordings............................................................................ 218
Setting the recorded file format ..................................................................... 219
Archiving recorded calls ................................................................................ 220
Creating call queues ............................................................................................ 221
Configuring call parking ....................................................................................... 226
Configuring fax..................................................................................................... 227
Receiving Faxes............................................................................................. 227
Sending faxes ................................................................................................ 229
Configuring other fax settings........................................................................ 235
Archiving faxes............................................................................................... 236
Modifying feature access codes.......................................................................... 237
Configuring Logs and Reports .................................................................... 241
About FortiVoice logging ..................................................................................... 241
FortiVoice log types ....................................................................................... 241
Log message severity levels .......................................................................... 242
Fortinet Technologies Inc. Page 6 FortiVoice Enterprise Phone System 4.0.0 Administration Guide

Configuring logging.............................................................................................. 243
Configuring logging to the hard disk.............................................................. 243
Choosing which events to log........................................................................ 244
Configuring logging to a Syslog server or FortiAnalyzer unit......................... 245
Configuring report profiles and generating call reports....................................... 247
Configuring the report query selection .......................................................... 249
Configuring the report time period................................................................. 250
Configuring report email notifications............................................................ 251
Configuring the report schedule .................................................................... 251
Choosing call rate .......................................................................................... 251
Generating a report manually......................................................................... 252
Setting call rates ............................................................................................ 252
Configuring Station Messaging Detail Record (SMDR) ....................................... 253
Configuring SMDR settings ........................................................................... 253
Setting SMDR formats ................................................................................... 253
Configuring alert email......................................................................................... 254
Configuring alert recipients............................................................................ 255
Configuring alert categories........................................................................... 255
Installing firmware........................................................................................ 257
Testing firmware before installing it ..................................................................... 257
Installing firmware................................................................................................ 259
Reconnecting to the FortiVoice unit............................................................... 261
Restoring the configuration............................................................................ 262
Verifying the configuration ............................................................................. 263
Upgrading ...................................................................................................... 263
Clean installing firmware...................................................................................... 264
Appendix A: Installing Click-to-Dial software............................................ 266
Index .............................................................................................................. 267
Fortinet Technologies Inc. Page 7 FortiVoice Enterprise Phone System 4.0.0 Administration Guide

Introduction
Welcome, and thank you for selecting Fortinet products.
The FortiVoice IP-PBX phone system enables you to completely control your organization’s
telephone communications. Easy to use and reliable, the FortiVoice phone system delivers
everything you need to handle calls professionally, control communication costs, and stay
connected everywhere.
The FortiVoice system includes all the fundamentals of enterprise-class voice communications,
with no additional licenses to buy or cards to install. Auto attendants, voice messaging, ring
groups, conferencing and much more are built-in. In addition, the FortiVoice personal web
portal lets your staff view their call logs, configure and manage their own messaging, and
access other features.
This document describes how to configure and use the FortiVoice phone system. Only the
configuration procedures through the web-based manager are provided. For configuration
procedures through the CLI, see the FortiVoice CLI Reference.
This topic includes:
• Registering your Fortinet product
• Training
• Documentation
• Scope
• Conventions
Registering your Fortinet product
Before you begin, take a moment to register your Fortinet product at the Fortinet Technical
Support web site, https://support.fortinet.com.
Many Fortinet customer services, such as firmware updates and technical support,
require product registration.
For more information, see the Fortinet Knowledge Base article Registration Frequently Asked
Questions.
Customer service & technical support
Fortinet Technical Support provides services designed to make sure that you can install your
Fortinet products quickly, configure them easily, and operate them reliably in your network.
To learn about the technical support services that Fortinet provides, visit the Fortinet Technical
Support web site at https://support.fortinet.com.
You can dramatically improve the time that it takes to resolve your technical support ticket by
providing your configuration file, a network diagram, and other specific information. For a list of
required information, see the Fortinet Knowledge Base article Technical Support Requirements.
Training
Fortinet Training Services provides classes that orient you quickly to your new equipment, and
certifications to verify your knowledge level. Fortinet provides a variety of training programs to
serve the needs of our customers and partners world-wide.
Fortinet Technologies Inc. Page 8 FortiVoice Enterprise Phone System 4.0.0 Administration Guide

To learn about the training services that Fortinet provides, visit the Fortinet Training Services
web site at http://training.fortinet.com, or email them at training@fortinet.com.
Documentation
The Fortinet Technical Documentation web site, http://docs.fortinet.com, provides the most
up-to-date versions of Fortinet publications, as well as additional technical documentation such
as technical notes.
In addition to the Fortinet Technical Documentation web site, you can find Fortinet technical
documentation on the Fortinet Tools and Documentation CD, and on the Fortinet Knowledge
Base.
Fortinet Tools & Documentation CD
Many Fortinet publications are available on the Fortinet Tools and Documentation CD shipped
with your Fortinet product. The documents on this CD are current at shipping time. For current
versions of Fortinet documentation, visit the Fortinet Technical Documentation web site,
http://docs.fortinet.com.
Fortinet Knowledge Base
The Fortinet Knowledge Base provides additional Fortinet technical documentation, such as
troubleshooting and how-to-articles, examples, FAQs, technical notes, a glossary, and more.
Visit the Fortinet Knowledge Base at http://kb.fortinet.com.
Comments on Fortinet technical documentation
Please send information about any errors or omissions in this document to
techdoc@fortinet.com.
Scope
This document describes how to connect the FortiVoice unit to its web-based manager and CLI
and use the web-based manager to configure the FortiVoice unit.
This document does not cover commands for the command line interface (CLI).
Conventions
Fortinet technical documentation uses the following conventions:
• IP addresses
• Cautions and notes
• Typographical conventions
• Command syntax conventions
IP addresses
To avoid publication of public IP addresses that belong to Fortinet or any other organization, the
IP addresses used in Fortinet technical documentation are fictional and follow the
documentation guidelines specific to Fortinet. The addresses used are from the private IP
Fortinet Technologies Inc. Page 9 FortiVoice Enterprise Phone System 4.0.0 Administration Guide

address ranges defined in RFC 1918: Address Allocation for Private Internets, available at
http://ietf.org/rfc/rfc1918.txt?number-1918.
Cautions and notes
Fortinet technical documentation uses the following guidance and styles for cautions and notes.
Warns you about commands or procedures that could have unexpected or undesirable results
including loss of data or damage to equipment.
Highlights useful additional information, often tailored to your workplace activity.
Typographical conventions
Fortinet documentation uses the following typographical conventions:
Table 1: Typographical conventions in Fortinet technical documentation
Convention Example
Button, menu, text
box, field, or check
box label
CLI input config system dns
CLI output FGT-602803030703 # get system settings
Emphasis HTTP connections are not secure and can be
File content <HTML><HEAD><TITLE>Firewall
From Minimum log level, select Notification.
set primary <address_ipv4>
end
comments : (null)
opmode : nat
intercepted by a third party.
Authentication</TITLE></HEAD>
<BODY><H4>You must authenticate to use
this service.</H4>
Hyperlink Visit the Fortinet Technical Support web site,
Keyboard entry Type a name for the remote VPN peer or client, such as
Fortinet Technologies Inc. Page 10 FortiVoice Enterprise Phone System 4.0.0 Administration Guide
https://support.fortinet.com.
Central_Office_1.

Table 1: Typographical conventions in Fortinet technical documentation
Navigation Go to Monitor > Status > DHCP.
Publication For details, see the FortiGate Administration Guide.
Command syntax conventions
The command line interface (CLI) requires that you use valid syntax, and conform to expected
input constraints. It will reject invalid commands.
Brackets, braces, and pipes are used to denote valid permutations of the syntax. Constraint
notations, such as <address_ipv4>, indicate which data types or string patterns are
acceptable value input.
Table 2: Command syntax notation
Convention Description
Square brackets [ ] A non-required word or series of words. For example:
[verbose {1 | 2 | 3}]
indicates that you may either omit or type both the verbose
word and its accompanying option, such as:
verbose 3
Fortinet Technologies Inc. Page 11 FortiVoice Enterprise Phone System 4.0.0 Administration Guide

Table 2: Command syntax notation
Angle brackets < > A word constrained by data type.
To define acceptable input, the angled brackets contain a
descriptive name followed by an underscore ( _ ) and suffix
that indicates the valid data type. For example:
<retries_int>
indicates that you should enter a number of retries, such as 5.
Data types include:
• <xxx_name>: A name referring to another part of the
configuration, such as policy_A.
• <xxx_index>: An index number referring to another part
of the configuration, such as 0 for the first static route.
• <xxx_pattern>: A regular expression or word with wild
cards that matches possible variations, such as
*@example.com to match all email addresses ending in
@example.com.
• <xxx_fqdn>: A fully qualified domain name (FQDN), such
as mail.example.com.
• <xxx_email>: An email address, such as
admin@mail.example.com.
• <xxx_url>: A uniform resource locator (URL) and its
associated protocol and host name prefix, which together
form a uniform resource identifier (URI), such as
http://www.fortinet.com/.
• <xxx_ipv4>: An IPv4 address, such as 192.168.1.99.
• <xxx_v4mask>: A dotted decimal IPv4 netmask, such as
255.255.255.0.
• <xxx_ipv4mask>: A dotted decimal IPv4 address and
netmask separated by a space, such as
192.168.1.99 255.255.255.0.
• <xxx_ipv4/mask>: A dotted decimal IPv4 address and
CIDR-notation netmask separated by a slash, such as such
as 192.168.1.99/24.
• <xxx_ipv6>: A colon( : )-delimited hexadecimal IPv6
address, such as
3f2e:6a8b:78a3:0d82:1725:6a2f:0370:6234.
• <xxx_v6mask>: An IPv6 netmask, such as /96.
• <xxx_ipv6mask>: An IPv6 address and netmask
separated by a space.
• <xxx_str>: A string of characters that is not another data
type, such as P@ssw0rd. Strings containing spaces or
special characters must be surrounded in quotes or use
escape sequences.
• <xxx_int>: An integer number that is not another data
type, such as 15 for the number of minutes.
Fortinet Technologies Inc. Page 12 FortiVoice Enterprise Phone System 4.0.0 Administration Guide

Table 2: Command syntax notation
Curly braces { } A word or series of words that is constrained to a set of
options delimited by either vertical bars or spaces.
You must enter at least one of the options, unless the set of
options is surrounded by square brackets [ ].
Options
delimited by
vertical bars |
Options
delimited by
spaces
Mutually exclusive options. For example:
{enable | disable}
indicates that you must enter either enable or disable, but
must not enter both.
Non-mutually exclusive options. For example:
{http https ping snmp ssh telnet}
indicates that you may enter all or a subset of those options, in
any order, in a space-delimited list, such as:
ping https ssh
To change the options, you must re-type the entire list. For
example, to add snmp to the previous example, you would
type:
ping https snmp ssh
If the option adds to or subtracts from the existing list of
options, instead of replacing it, or if the list is
comma-delimited, the exception will be noted.
Fortinet Technologies Inc. Page 13 FortiVoice Enterprise Phone System 4.0.0 Administration Guide

Connecting to the FortiVoice System
After physically installing the FortiVoice unit, you need to connect to its management tools to
configure, maintain, and administer the unit. You also need to inform your phone users on how
to access the user web portal and use the FortiVoice features.
This topic includes:
• Connecting to the web-based manager or CLI
• Setting up the system using the wizard
• Testing the setup
• Configuring setups for phone users
Connecting to the web-based manager or CLI
There are two methods to connect to the FortiVoice unit:
• use the web-based manager, a graphical user interface (GUI), from within a web browser
• use the command line interface (CLI), an interface similar to DOS or UNIX commands, from a
Secure Shell (SSH) or Telnet terminal
Access to the CLI and/or web-based manager is not yet configured if:
• you are connecting for the first time
• you have just reset the configuration to its default state
• you have just restored the firmware
In these cases, you must access either interface using the default settings.
If the above conditions do not apply, access the web UI using the IP address, administrative
access protocol, administrator account and password already configured, instead of the
default settings.
After you connect, you can use the web-based manager or CLI to configure basic network
settings and access the CLI and/or web-based manager through your network. However, if you
want to update the firmware, you may want to do so before continuing. See “System
Information widget” on page 22.
Until the FortiVoice unit is configured with an IP address and connected to your network, you
may prefer to connect the FortiVoice unit directly to your management computer, or through a
switch, in a peer network that is isolated from your overall network. However, isolation is not
required.
This topic includes:
• Connecting to the web-based manager
• Connecting to the CLI
Fortinet Technologies Inc. Page 14 FortiVoice Enterprise Phone System 4.0.0 Administration Guide

Connecting to the web-based manager
To connect to the web-based manager using its default settings, you must have:
• a computer with an RJ-45 Ethernet network port
• a web browser such as Microsoft Internet Explorer version 6.0 or greater, or a recent version
of Mozilla Firefox
• a crossover network cable
Table 3: Default settings for connecting to the web-based manager
Network Interface port1
URL https://192.168.1.99/admin
Administrator Account admin
Password (none)
To connect to the web-based manager
1. On your management computer, configure the Ethernet port with the static IP address
192.168.1.2 with a netmask of 255.255.255.0.
2. Using the Ethernet cable, connect your computer’s Ethernet port to the FortiVoice unit’s
port1.
3. Start your browser and enter the URL https://192.168.1.99/admin. (Remember to include the
“s” in https://.)
To support HTTPS authentication, the FortiVoice unit ships with a self-signed security
certificate, which it presents to clients whenever they initiate an HTTPS connection to the
FortiVoice unit. When you connect, depending on your web browser and prior access of the
FortiVoice unit, your browser might display two security warnings related to this certificate:
• The certificate is not automatically trusted because it is self-signed, rather than being
signed by a valid certificate authority (CA). Self-signed certificates cannot be verified with
a proper CA, and therefore might be fraudulent. You must manually indicate whether or
not to trust the certificate.
• The certificate might belong to another web site. The common name (CN) field in the
certificate, which usually contains the host name of the web site, does not exactly match
the URL you requested. This could indicate server identity theft, but could also simply
indicate that the certificate contains a domain name while you have entered an IP
address. You must manually indicate whether this mismatch is normal or not.
Both warnings are normal for the default certificate.
4. Verify and accept the certificate, either permanently (the web browser will not display the
self-signing warning again) or temporarily. You cannot log in until you accept the certificate.
For details on accepting the certificate, see the documentation for your web browser.
5. In the Name field, type admin, then click Login. (In its default state, there is no password for
this account.)
Login credentials entered are encrypted before they are sent to the FortiVoice unit. If your
login is successful, the web UI appears. To continue by updating the firmware, see “System
Information widget” on page 22. Otherwise, to continue by following the configuration
wizard.
Fortinet Technologies Inc. Page 15 FortiVoice Enterprise Phone System 4.0.0 Administration Guide

Connecting to the CLI
Using its default settings, you can access the CLI from your management computer in two
ways:
• a local serial console connection
• an SSH connection, either local or through the network
To connect to the CLI using a local serial console connection, you must have:
• a computer with a serial communications (COM) port
• the RJ-45-to-DB-9 serial or null modem cable included in your FortiVoice package
• terminal emulation software, such as HyperTerminal for Microsoft Windows
To connect to the CLI using an SSH connection, you must have:
• a computer with an RJ-45 Ethernet port
• a crossover Ethernet cable
• an SSH client, such as PuTTY
Table 4: Default settings for connecting to the CLI by SSH
Network Interface port1
IP Address 192.168.1.99
SSH Port Number 22
Administrator Account admin
Password (none)
If you are not connecting for the first time, nor have you just reset the configuration to its
default state or restored the firmware, administrative access settings may have already been
configured. In this case, access the CLI using the IP address, administrative access protocol,
administrator account and password already configured, instead of the default settings.
For more information on available CLI commands, see the FortiVoice CLI Reference.
The following procedure uses Microsoft HyperTerminal. Steps may vary with other terminal
emulators.
To connect to the CLI using a local serial console connection
1. Using the RJ-45-to-DB-9 or null modem cable, connect your computer’s serial
communications (COM) port to the FortiVoice unit’s console port.
2. Verify that the FortiVoice unit is powered on.
3. On your management computer, start HyperTerminal.
4. On Connection Description, enter a Name for the connection and select OK.
5. On Connect To, from Connect using, select the communications (COM) port where you
connected the FortiVoice unit.
6. Select OK.
7. Select the following Port settings and select OK.
Fortinet Technologies Inc. Page 16 FortiVoice Enterprise Phone System 4.0.0 Administration Guide

Bits per second 9600
Data bits 8
Parity None
Stop bits 1
Flow control None
8. Press Enter.
The terminal emulator connects to the CLI and the CLI displays a login prompt.
9. Type admin and press Enter twice. (In its default state, there is no password for this
account.)
The CLI displays a prompt, such as:
FortiVoice #
10.Type admin and press Enter twice. (In its default state, there is no password for this
account.)
The CLI displays the following text:
Type ? for a list of commands.
You can now enter commands. For information about how to use the CLI, including how to
connect to the CLI using SSH or Telnet, see the FortiVoice CLI Reference.
The following procedure uses PuTTY. Steps may vary with other SSH clients.
To connect to the CLI using an SSH connection
1. On your management computer, configure the Ethernet port with the static IP address
192.168.1.2 with a netmask of 255.255.255.0.
2. Using the Ethernet cable, connect your computer’s Ethernet port to the FortiVoice unit’s
port1.
3. Verify that the FortiVoice unit is powered on.
4. On your management computer, start your SSH client.
5. In Host Name (or IP Address), type 192.168.1.99.
6. In Port, type 22.
7. From Connection type, select SSH.
8. Select Open.
The SSH client connects to the FortiVoice unit.
The SSH client may display a warning if this is the first time you are connecting to the
FortiVoice unit and its SSH key is not yet recognized by your SSH client, or if you have
previously connected to the FortiVoice unit but it used a different IP address or SSH key. If
your management computer is directly connected to the FortiVoice unit with no network
hosts between them, this is normal.
9. Click Yes to verify the fingerprint and accept the FortiVoice unit’s SSH key. You cannot log in
until you accept the key.
The CLI displays a login prompt.
Fortinet Technologies Inc. Page 17 FortiVoice Enterprise Phone System 4.0.0 Administration Guide

10.Type admin and press Enter twice. (In its default state, there is no password for this
account.)
The CLI displays the following text:
Type ? for a list of commands.
You can now enter commands. For information about how to use the CLI, including how to
connect to the CLI using SSH or Telnet, see the FortiVoice CLI Reference.
Setting up the system using the wizard
The FortiVoice unit’s Configuration Wizard leads you through required configuration steps,
helping you to quickly set up your FortiVoice system. Once the setup is complete, you can make
phone calls through the FortiVoice unit.
While all settings configured by the Configuration Wizard can also be configured through the
web-based manager, the wizard presents each setting in the necessary order.
The wizard is a reusable tool and you can modify the configuration settings. Each time you click
the Next button, the configuration is saved.
To start the wizard, open the web-based manager in a browser and click Wizard in the
top-right button row.
Testing the setup
After a configuration through the Configuration Wizard, you can connect a SIP phone to your
VoIP network and make an internal, external, or office peer test call.
If the SIP phone and the FortiVoice unit (PBX) are on different subnets, proper routing should
be set to make them reachable
If you make a office peer test call, make sure that your FortiVoice unit and the peer office PBX
are mutually registered. For more information, see “Configuring office peers” on page 182.
Depending on the phone you use, the procedure to connect the phone may vary. Refer to the
phone user manuals for instructions.
Generally, you need to configure the following on the phone after powering it up and connecting
it to the network:
• Enter the IP address of the phone if it is not DHCP-enabled.
• Enter the SIP server IP address and port number (5060 by default) of the FortiVoice unit. You
can find the SIP serve IP by the Configuration Wizard and going to System Setting > Network
Setting.
• Enter the extension number and SIP password you have configured and make sure the
extension is enabled. You can find the information by opening the Configuration Wizard and
going to Extension > Import/Add/Edit and double-click an extension.
If you have not imported or added any extensions, do it first. For more information, see
“Configuring IP extensions” on page 130. The extension number on the FortiVoice unit and
your phone should match.
Fortinet Technologies Inc. Page 18 FortiVoice Enterprise Phone System 4.0.0 Administration Guide

Configuring setups for phone users
The FortiVoice system provides a user web portal where phone users can view their call logs,
configure and manage their own messaging, and access other features.
This section contains information that you may need to inform or assist your phone users so
that they can use the FortiVoice features.
This information is not the same as what is included in the help for FortiVoice user web portal. It
is included in this guide because:
• Phone users need to know how to access the FortiVoice user web portal and its online help.
• Phone users need to know the feature codes they can use on the phones.
• Phone users need to know how to change the voicemail password on the web portal and on
the phone.
• Phone users may be confused if they try to enable a feature that you disabled (such as call
waiting or do not disturb).
• You may need to tailor some information to your network or phone users.
This topic includes:
• Accessing the user web portal
• Changing the user PIN
• Receiving and sending fax
• Using the operator console
• Setting user privileges and preferences
• Setting the feature codes
Accessing the user web portal
FortiVoice user web portal is a special web site located on a FortiVoice unit. This web portal
allows a phone user to:
• check your voicemail including playing, deleting, or saving the voicemails
• receive and send fax
• Use the agent console to manage queue calls
• Use the operator console to process company calls
• check your call record for received, placed, or missed calls
• check your recorded calls including playing, deleting, or saving the voicemails
• view your corporate phone directory
• check the feature codes that you can dial on your phone keypad
• configure your extension according to your preferences
• manage calls
• configure phone profiles
• customize sound files
Several modern, popular web browsers are supported, so you can use FortiVoice user web
portal through the web browser of your choice.
Fortinet Technologies Inc. Page 19 FortiVoice Enterprise Phone System 4.0.0 Administration Guide

For the phone users to access the web portal, you need to inform phone users of:
• the web portal URL (same with that of the FortiVoice unit except without /admin in the end)
• their extension numbers, and
• the default user PINs.
With this information, a user can enter the URL in the browser’s location or address bar. The
user can then log into the portal using the extension number as user name and the user PIN as
password.
Once they access the web portal, phone users can click the Help button to learn how to use the
portal.
For information on adding extension numbers and user PINs, see “Configuring IP extensions”
on page 130.
Changing the user PIN
Inform the phone users how to change the default user PIN on the phone. The information for
changing the user PIN on the web portal is in the online help of the portal.
Receiving and sending fax
Inform the phone users that they can receive and send faxes on the user web portal. For more
information, see “Configuring fax” on page 227.
Using the operator console
If you have enabled the operator role for an extension, inform the extension user so that the user
can process corporate calls on the user web portal. For more information, see “Operator role”
on page 211.
Setting user privileges and preferences
The call features each phone user can use is controlled by the user privilege and preferences
settings associated with the user’s extension. You may need to inform users of the features that
they can use.
For information, see “Configuring user privileges” on page 210 and “Setting extension user
preferences” on page 149.
Setting the feature codes
By default, the FortiVoice unit has feature codes for users to access certain features by dialing
the codes. You can go to Service > Feature Code > Feature Code and double-click a feature
name to modify its code and description, but that does not change the mapping between the
code and the feature.
For details, see “Modifying feature access codes” on page 237.
Fortinet Technologies Inc. Page 20 FortiVoice Enterprise Phone System 4.0.0 Administration Guide

Monitoring the FortiVoice System
The Status menu displays system usage, log messages, reports, and other status-indicating
items.
This topic includes:
• Viewing overall system status
• Viewing phone system status
• Viewing call/fax storage
• Viewing call records
• Viewing generated reports
• Viewing log messages
• Viewing phone directories
Viewing overall system status
The Status menu displays system status, most of which pertain to the entire system, such as
service status and system resource.
This topic includes:
• Viewing the dashboard
• Viewing the Call Statistics
• Using the CLI Console
Viewing the dashboard
Status > Dashboard displays first after you log in to the web-based manager. It contains a
dashboard with widgets that each indicates performance level or other statistics.
By default, widgets display the serial number and current system status of the FortiVoice unit,
including uptime, system resource usage, service status, firmware version, system time, and
statistics history.
To view the dashboard, go to Status > Dashboard > Dashboard.
Fortinet Technologies Inc. Page 21 FortiVoice Enterprise Phone System 4.0.0 Administration Guide
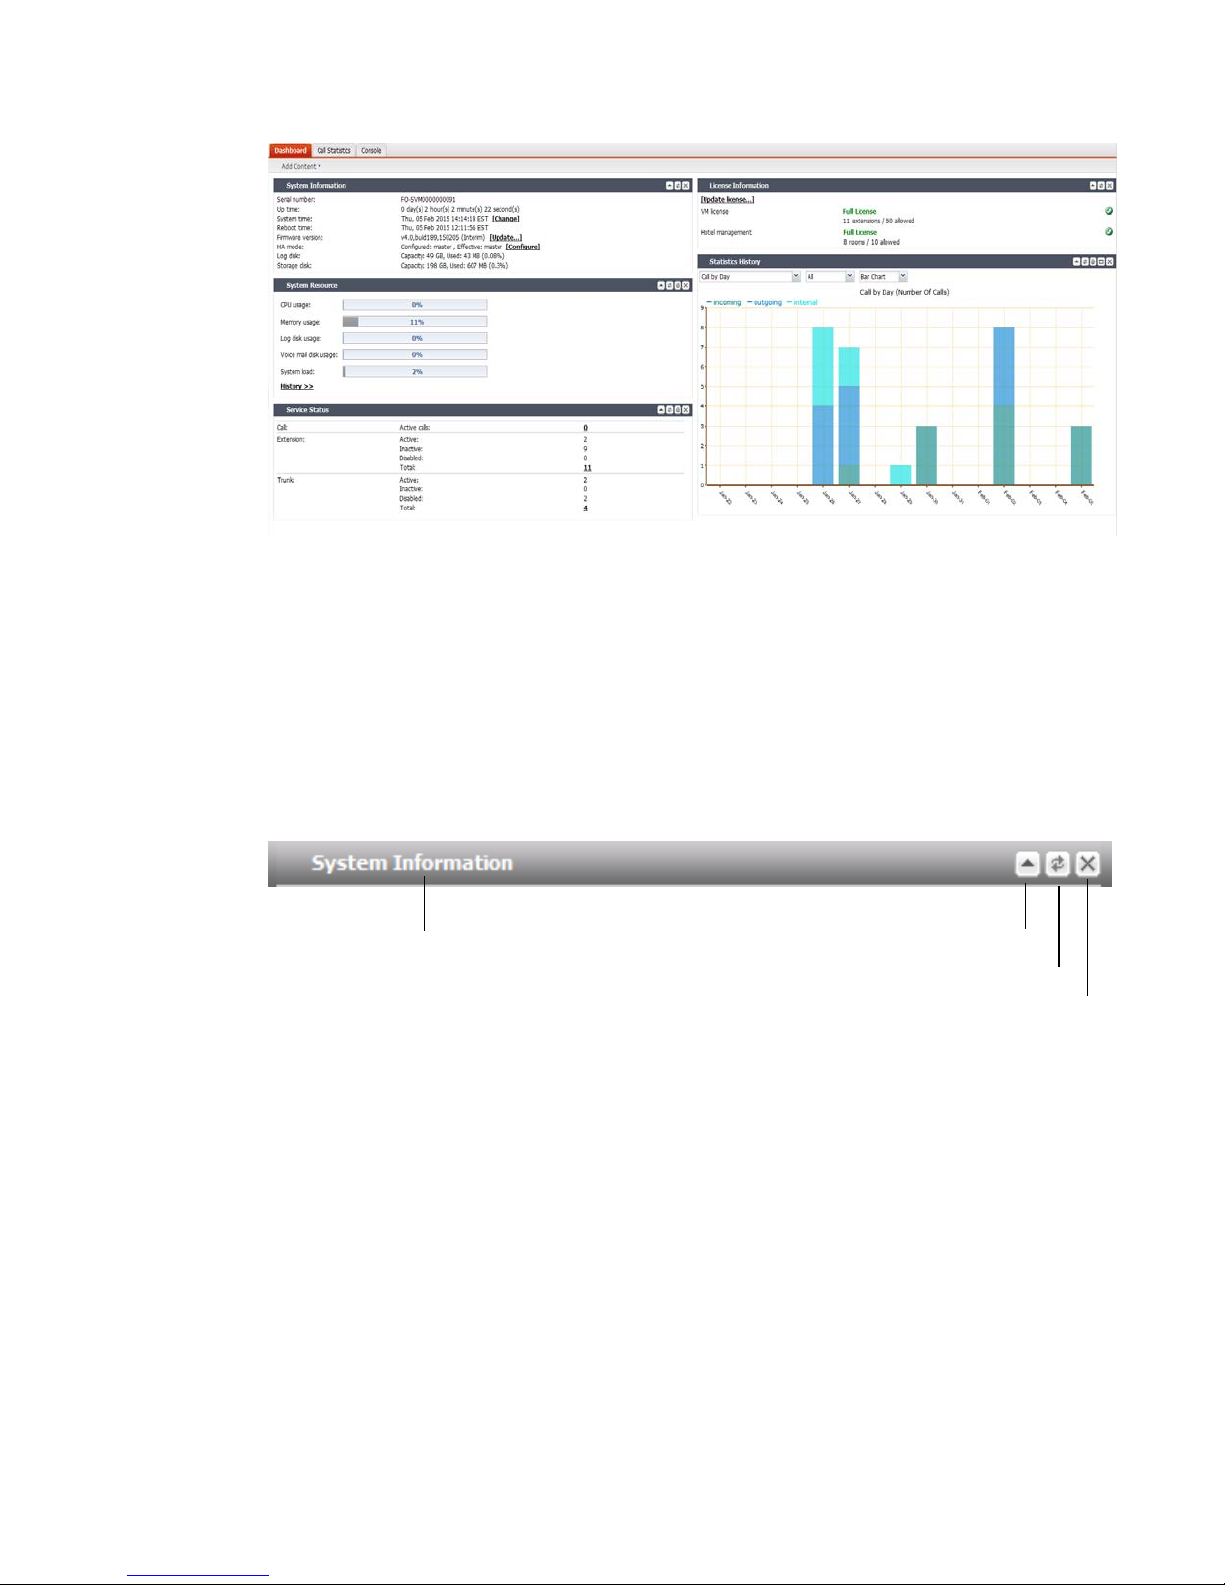
Figure 1: Monitor system status
The dashboard is customizable. You can select which widgets to display, where they are
located on the tab, and whether they are minimized or maximized.
To move a widget, position your mouse cursor on the widget’s title bar, then click and drag the
widget to its new location.
To show or hide a widget, in the upper left-hand corner, click Add Content, then mark the check
boxes of widgets that you want to show.
Options vary slightly from widget to widget, but always include options to close or
minimize/maximize the widget.
Figure 2: A minimized widget on the dashboard
Disclosure arrow
Widget title
Refresh
Close
System Information widget
The System Information widget displays the serial number and basic system statuses such as
the firmware version, system time, and up time.
In addition to displaying basic system information, the System Information widget lets you
change the firmware. To change the firmware, click Update for Firmware version. For more
information, see “Installing firmware” on page 257.
To view the widget, go to Status > Dashboard. If the widget is not currently shown, click Add
Content, and mark the check box for the widget.
License Information widget
The License Information widget displays the last queried license statuses for the number of
extensions supported (if you use FortiVoice VM) and hotel management (if you have purchased
this option).
Depending on the license you have purchased, when you first access the FortiVoice web-based
manager, you need to upload the license to enable the functions you need.
Fortinet Technologies Inc. Page 22 FortiVoice Enterprise Phone System 4.0.0 Administration Guide

To upload the license file, first place the license file to your management computer, then click
Update license and browse for the license file.
A full VMware license is required to upload a hotel management license onto the FortiVoice VM.
To view the widget, go to Status > Dashboard. If the widget is not currently shown, click Add
Content, and mark the check box for the widget.
Service Status widget
The Service Status widget displays the number of current calls, extension status, trunk status,
and device connection status.
To view the widget, go to Status > Dashboard. If the widget is not currently shown, click Add
Content, and mark the check box for the widget.
Device (200D-T and 2000E-T2 models only) displays the connection status of the FortiVoice
physical ports:
• Connected: The port is connected to a device.
• Disconnected: The port is not connected to any device and is ready for use.
• Alarmed: The port has an error and is not usable.
• Occupied: The port is being used.
System Resource widget
The System Resource widget displays the CPU, memory, and disk space usage. It also displays
the system load and current number of IP sessions.
To view the widget, go to Status > Dashboard. If the widget is not currently shown, click Add
Content, and mark the check box for the widget.
The system resources history can also be viewed in this widget by clicking History. The system
resources history contains four graphs. Each graph displays readings of one of the system
resources: CPU, memory, IP sessions, and network bandwidth usage. Each graph is divided by
a grid.
Statistics History widget
The Statistics History widget contains charts that summarize the number of calls in each time
period that the FortiVoice unit recorded.
To view the widget, go to Status > Dashboard. If the widget is not currently shown, click Add
Content, and mark the check box for the widget.
Also see “Viewing the Call Statistics” on page 24.
System Command widget
The System Command widget lets you restart, shut down, or reload the configuration of the
FortiVoice unit.
To view the widget, go to Status > Dashboard. If the widget is not currently shown, click Add
Content, and mark the check box for the widget.
Before rebooting or halting the FortiVoice unit, consider notifying your phone users, as it could
result in temporary interruptions to connectivity.
Fortinet Technologies Inc. Page 23 FortiVoice Enterprise Phone System 4.0.0 Administration Guide

Reloading allows the FortiVoice unit to reload its configuration from its last saved version, and
log you out. Any changes that were in progress but not yet saved, such as GUI pages that were
not applied or CLI commands where you had not yet entered next or end, are lost. If you want
to continue configuring the FortiVoice unit, refresh your browser and log in again.
Recent Calls widget
The Recent Calls widget displays the calls processed by the FortiVoice unit, including phone
numbers, call directions, call starting time and duration, and call status.
To view the widget, go to Status > Dashboard. If the widget is not currently shown, click Add
Content, and mark the check box for the widget.
The maximum call records shown is 8.
Viewing the Call Statistics
The Call Statistics tab contains summaries of the number of calls by time and direction that the
FortiVoice unit recorded.
To view call statistics, go to Status > Dashboard > Call Statistics.
Using the CLI Console
Go to Status > Dashboard > Console to access the CLI without exiting from the web-based
manager.
You can click the Open in New Window at the bottom of the page to move the CLI Console into
a pop-up window that you can resize and reposition.
For more information about CLI commands, see the FortiVoice CLI Reference.
Viewing phone system status
Status > Phone System displays all the ongoing phone calls, parked calls, conference calls,
extensions, trunks, call queues, DHCP clients, and unassigned phones.
This topic includes:
• Viewing active calls
• Viewing parked calls
• Viewing conference calls
• Viewing extension status
• Viewing hot desking configurations
• Viewing trunk status
• Viewing unassigned phones
• Viewing DHCP client list
Viewing active calls
Status > Phone System > Active Calls displays all the ongoing phone calls in realtime, including
the callers and receivers, the trunks through which phone calls are connected, the call status,
and the call duration.
You can stop a phone call by clicking the Hang up icon.
Fortinet Technologies Inc. Page 24 FortiVoice Enterprise Phone System 4.0.0 Administration Guide

The call statuses include:
• Ringing: The receiver’s phone is ringing.
• Connected: Callers are connected. The voice channel is established.
• Voicemail: The call goes to the voicemail.
Viewing parked calls
A parked call is similar to a call that is on hold, except that the parked call can then be picked
up from any extension.
To view parked calls, go to Status > Phone System > Parked Calls.
For more information on call parking, see “Configuring call parking” on page 226.
Viewing conference calls
Status > Phone System > Conference displays the conference call records, including the name
of the conference call, the extension number of the call, the displayed name of the caller, and
the call duration.
You can stop a caller from attending the conference call by selecting the caller and clicking the
Kick icon.
For more information, see “Configuring conference calls” on page 216.
Viewing extension status
Status > Phone System > Extensions displays all the extensions in realtime, including their
statuses, IDs, numbers, display names, types, IPs for SIP extensions, and phone information.
For more information, see “Configuring Extensions” on page 130.
Fortinet Technologies Inc. Page 25 FortiVoice Enterprise Phone System 4.0.0 Administration Guide

Figure 3: Viewing extension status
GUI field Description
Category/Status Select to view the extensions by categories. Each category has its
corresponding statuses.
• All: Displays extensions in all statuses.
• Active: Can display extensions in each of the following statuses once
selected:
• Idle: The extension is not in use.
• In Use: The extension is in use.
• Busy: The extension is busy.
• Ringing: The extension is ringing.
• On Hold: The extension has an on-hold call.
• Other: The status other than the above.
• Inactive: Can display extensions in each of the following statuses once
selected:
• Not registered: The extension is not registered with the FortiVoice
unit and is not in service.
• Unavailable: The extension is not reachable.
• Disable: Displays all disabled extensions.
Deregister Select an extension and click this icon to remove the extension assigned to
the phone.
Status The status of the extension. See “Category/Status” on page 26.
User ID This is the system-generated ID based on the extension number.
Number The extension number.
Display Name The name displaying on the extension. This is usually the name of the
extension user.
Type The type for this extension, such as SIP or analog (for the FortiVoice
200D-T and 2000E-T2 models).
IP The link to the IP address of the phone using the extension number. Click
to interface with the extension and configure it remotely by entering the
login information. See “IP” on page 137.
Phone Info The phone brand and model.
Viewing hot desking configurations
Status > Phone System > Hot Desking displays all of the extensions configured for hot desking,
Fortinet Technologies Inc. Page 26 FortiVoice Enterprise Phone System 4.0.0 Administration Guide

including:
• Status: the status of the hot desking extension: logged in or logged out.
• User ID: the system-generated ID for the hot desking extension.
• Number: the hot desking extension number.
• Display Name: the name displayed on the hot desking extension.
• Host Device: the extension number or MAC address (for a unassigned phone) of the phone
that a hot desking user logs into.
• Last Login: the last login time at the host device.
• Expiry: the login expiry time.
Hot desking enables users to log into another phone. However, unlike using Follow Me or Call
Forwarding which simply redirect a user's calls to another user’s phone, hot desking takes total
control of another phone by applying all of the user's own phone settings to that phone until the
user logs out. Each user can log into another phone by pressing *11 and enter his extension
number and user PIN following the prompts. To log out, a user can press *12.
For information on configuring hot desking, see “Hot-desking” on page 214.
Viewing trunk status
Status > Phone System > Trunks displays all the trunks in realtime, including their names, IPs,
types, statuses, and registration/connection status with the VoIP or PSTN service provider.
The trunk statuses include:
• Not registered: The trunk is not registered with the VoIP or PSTN service provider and is not
in service.
• In service: The trunk is registered with the VoIP or PSTN service provider and is in service.
• Unavailable: The trunk is not reachable.
• Alarm detected: There is a problem with the trunk.
• Admin down: The trunk is disabled.
When you click the IP address of a SIP extension, you can interface with the extension and
configure it remotely.
Registration/Connection indicates if a trunk has been registered with or connected to the VoIP
or PSTN service provider.
You can stop a phone call by clicking the Hang up icon.
For more information, see “Configuring Trunks” on page 167.
Viewing unassigned phones
Status > Phone System> Unassigned Phone lists the supported phones auto-discovered by the
FortiVoice unit but not assigned to any extensions yet.
Once an unassigned phone connects to the FortiVoice unit and is auto-discovered, the
FortiVoice unit assigns an IP address to the phone and sends the basic PBX setup information
to it.
After assigning an extension to the phone, the extension’s full configuration file will be sent to
the phone if the auto-provisioning option is selected in the user privilege applied to the
extension. For details, see “Setting up local extensions” on page 130 and “Configuring user
privileges” on page 210.
Fortinet Technologies Inc. Page 27 FortiVoice Enterprise Phone System 4.0.0 Administration Guide

Figure 4: Unassigned phones
GUI field Description
Action
• Assign to new extension: Select an unassigned phone and click this
option to add an extension and assign this client to the user at the
same time. The phone record disappears from the Unassigned
Phone list. For more information, see “To assign a new extension
user to an unassigned phone” on page 28.
• Apply to existing extension: Select an unassigned phone and click
this option to assign this client to an existing user. The phone record
disappears from the Unassigned Phone list. For more information,
see “To assign an existing extension user to an unassigned phone”
on page 28.
Export Select to save the unassigned phone list in csv format.
MAC The Media Access Control address (MAC address) of the unassigned
phone.
IP The IP address of the unassigned phone assigned by the FortiVoice unit.
Vendor The brand name of the unassigned phone.
Phone Info The phone brand and model.
To assign a new extension user to an unassigned phone
1. Go to Status > Phone System > Unassigned Phone.
2. Select an unassigned phone.
3. Click Action and select Assign to new extension.
4. Configure the extension associated with the unassigned phone following “Configuring IP
extensions” on page 130.
5. Click Create.
To assign an existing extension user to an unassigned phone
1. Go to Status > Phone System > Unassigned Phone.
2. Select an unassigned phone.
3. Click Action and select Assign to existing extension.
4. Select the extension to associate with the unassigned phone.
5. Click Apply to existing extension.
Viewing DHCP client list
Status > Phone System > DHCP displays all the DHCP-enabled devices connected to the
Fortinet Technologies Inc. Page 28 FortiVoice Enterprise Phone System 4.0.0 Administration Guide
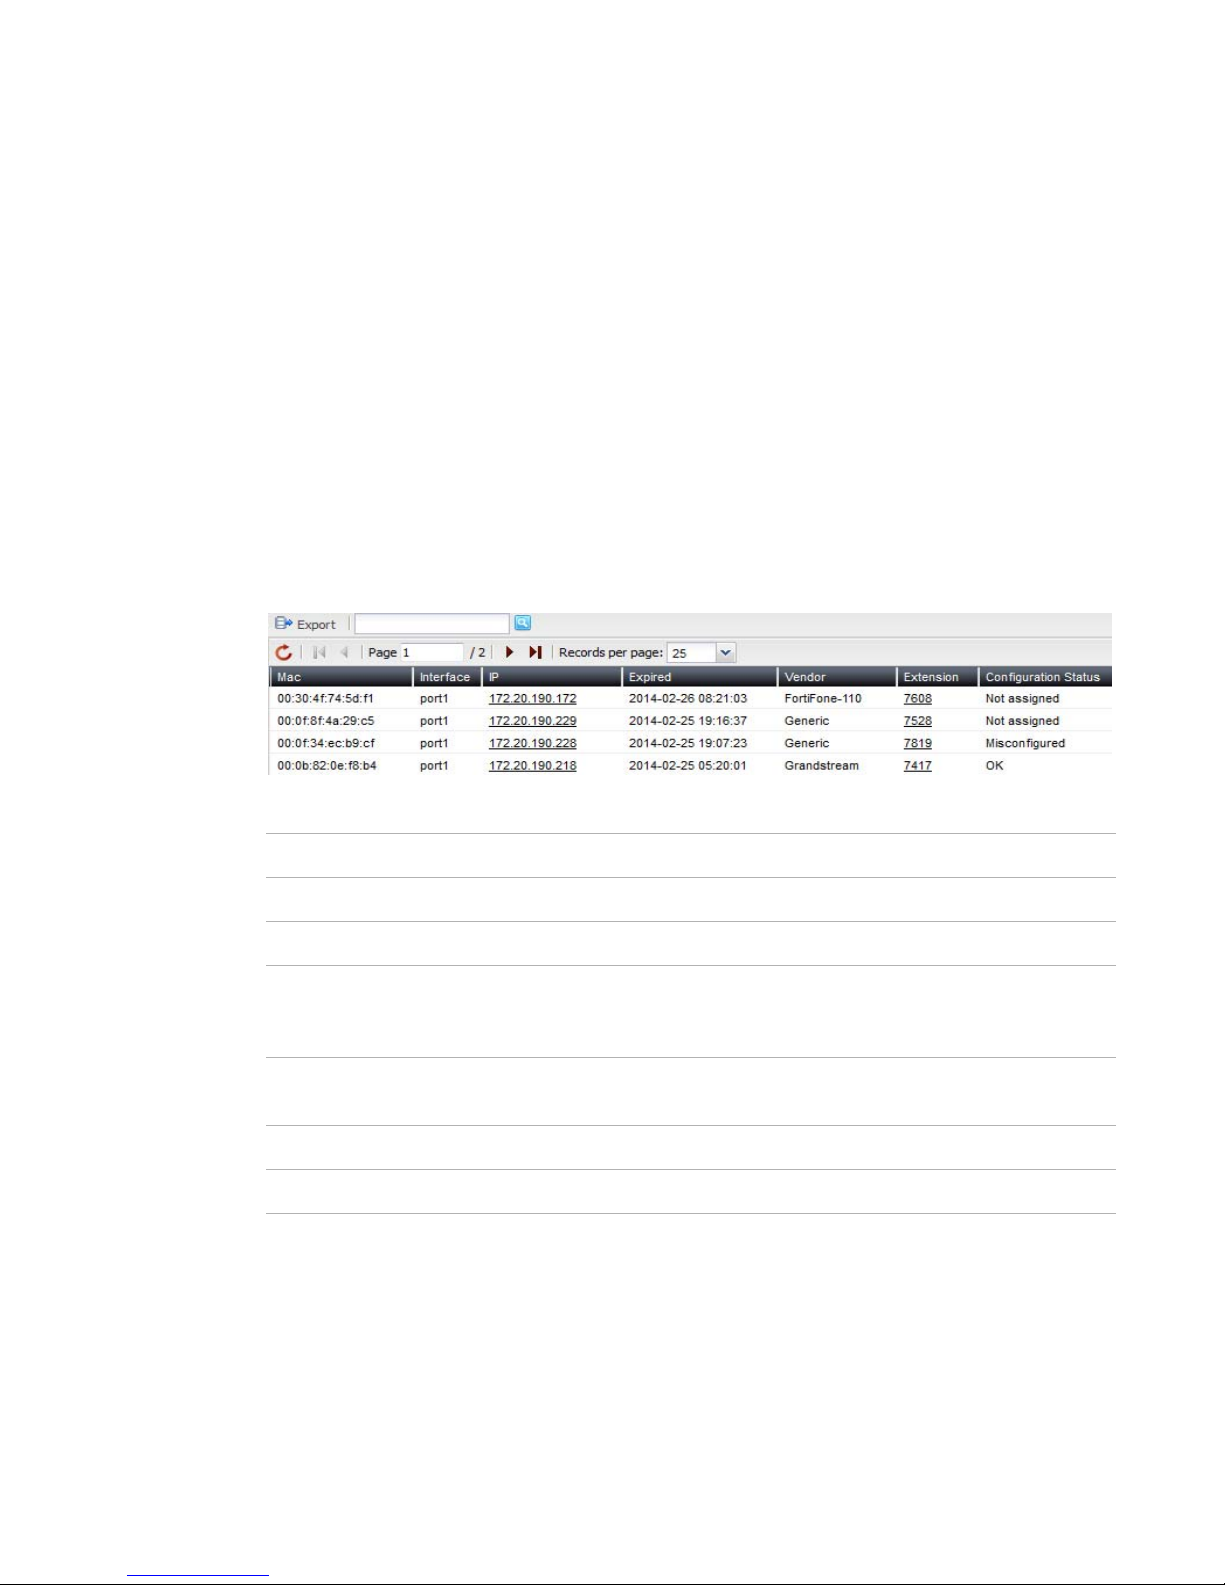
FortiVoice unit in realtime.
Once a DHCP-enabled phone connects to the FortiVoice unit and is auto-discovered, the
FortiVoice unit assigns an IP address to the phone and sends the basic PBX setup information
to it.
For the supported DHCP-enabled phone to connect to the FortiVoice unit:
• In the FortiVoice DHCP server configuration, select DHCP option 66 (an advanced option on
the web-based manager) and include the IP address of the FortiVoice interface connected to
the same network as the SIP phones to be auto-provisioned. For more information, see
“Configuring DHCP server” on page 46.
DHCP server option 66 identifies a TFTP server and includes the IP address of the TFTP
server and downloads the TFTP server identity to the device that gets an IP address from the
DHCP server. DHCP option 66 is defined in RFC 2132.
• If using your own DHCP server, set the DHCP server option 66 to the FortiVoice unit’s TFTP
server (Opt66) value. For more information, see “Configuring DHCP server” on page 46.
• If the FortiVoice unit and the SIP phone with an IP assigned by a DHCP server are on
different subnets, proper route should be set to make them reachable.
Figure 5: DHCP client list
GUI field Description
Export Select to save the DHCP client list in csv format.
MAC The Media Access Control address (MAC address) of the DHCP client.
Interface The FortiVoice unit port to which the DHCP client connects. For
information on FortiVoice interfaces, see “Configuring network settings”
on page 38.
IP The IP address of the DHCP client assigned by the FortiVoice DHCP
server.
Expired The expiration time of the DHCP client IP address.
Vendor The brand names of the DHCP clients.
Fortinet Technologies Inc. Page 29 FortiVoice Enterprise Phone System 4.0.0 Administration Guide

Extension When a DHCP-enabled device connects to the FortiVoice unit, the
FortiVoice unit assigns a temporary ID to the device if it is a supported
device. If an extension number is assigned to the phone, the extension
number appears. For information on assigning extensions, see “Viewing
unassigned phones” on page 27.
Configuration
Status
Viewing call/fax storage
Status > Storage displays the recorded calls, faxes, archived faxes, and faxes in queue.
This topic includes:
• Playing recorded calls
• Viewing current fax accounts
• Viewing archived faxes
• Viewing fax queues
Playing recorded calls
The Recorded Calls tab lists the calls recorded by the FortiVoice unit.
To listen to a call, go to Status > Storage > Recorded Calls and select a call record folder to
open the archived call files. Select a call file and click the Play button.
• OK: The DHCP client is assigned to a new or an existing extension
user.
• Not assigned: The DHCP client is not assigned to a new or an
existing extension user.
• Misconfigured: The DHCP client’s configuration has errors.
To save a recorded call, go to Status > Storage and select a call record folder to open the
archived call files. Select a call file and click the Download button.
To search the locally archived calls, click Search.
For information on configuring recording calls, see “Recording calls” on page 218.
Viewing current fax accounts
The Fax tab lists the fax accounts created on the FortiVoice unit. For more information about
creating fax accounts, see “Configuring fax” on page 227.
To view fax accounts, go to Status > Storage > Fax. The fax accounts are listed with their
names, numbers, display names, storage sizes, and faxes stored.
You can double-click a fax account and view the detailed information on the faxes it stores. You
can also click Download PDF to save a fax.
Viewing archived faxes
The Fax Archive tab lists the faxes sent and received through the FortiVoice unit. For more
information about fax, see “Configuring fax” on page 227.
To view fax configurations, go to Status > Storage > Fax Archive. The fax configurations are
listed with their names, numbers, storage sizes, and faxes stored.
Fortinet Technologies Inc. Page 30 FortiVoice Enterprise Phone System 4.0.0 Administration Guide
 Loading...