

Page 1

670 Series
Bursters
OPERATOR MANUAL
SECOND EDITION
Page 2

Page 3

TABLE OF CONTENTS
DESCRIPTION
Function 1
Model Numbers 1
Accessory Model Numbers 1
Specifications 2
INSTALLATION
Unpacking and Set-up 2
OPERATION
General 3
Safety 3
Control/Feature & Function 5
Form Set-up Procedure With And
Without Tractors 6
Form Set-up Procedure With Imprinter 9
Normal Loading 9
Operating Hints 10
Troubleshooting 11
Vertical Folder 13
Merger/Burster 14
Page 4

Page 5

DESCRIPTION
FUNCTION
BURSTER
Moore 676/680 Burster bursts (breaks apart) single
and multi-part continuous forms and feeds them
sequentially onto the stacker.
SEQUENCE STACKER
Sequence stacker allows continuous runs of
forms without stopping burster to unload stacker
Web belts carry forms from burster output onto a
slanted grill where they are partially jogged for
removal.
SLITTER/TRIM CHOPPER
Slitter/trim chopper operates like the slitter unit
but also chops trim into short pieces, 4 to 5
inches long. The advantage in using the trim.
chopper is that it compacts trim in the
wastebasket.
SLITTER
Slitter enables the operator to remove trim at
same speed forms are being burst.
IMPRINTER
Imprinter unit enables operator to print
signatures at same speed forms are being
burst.
POWER DROP STACKER
Optional power drop stacker collects forms in
one neat stack without need for operator
intervention at ouffeed end of the machine
during processing of each box of forms. The
power drop stacker has automatic, presetable,
shutoff.
BURSTER TABLE
Burster table has casters which allows
freedom of movement. Enclosed in the table
is a wastebasket to catch trim while slitting.
MODEL NUMBERS
FD 676 Burster/Tractor Feed/Slitters/Base
FD 680 Burster/Imprinter/Tractor Feed/Slitters/
CENTER SLITTER
Makes a mid-form cut in forms as they are
burst.
Base
OPTIONAL ACCESSORIES
FD680-06 Imprint Module (8”)
FD630-22 Tri-Color Ink Roller FD680-07 Imprint Module (8-1/2”)
FD630-31 Violet Ink Roller FD680-08 Imprint Module (10”)
FD630-32 Green Ink Roller FD680-09 Imprint Module (11”)
FD630-33 Red Ink Roller FD680-10 Imprint Module (12”)
FD670-10 Power on-off Key Lock FD680-11 Imprint Module (14”)
FD670-18 Last Form Switch FD680-14 Imprint Module (10-1/2”)
FD670-19 Last Form Timed Out FD680-15 Imprint Module (7-1/4”)
FD670-24 Photo Cell Counter FD680-21 Signature Saddle (6”)
FD670-40 Extra Wide Slitter L. FD680-22 Signature Saddle (6-1/2”)
FD670-42 Extra Wide Slitter R. FD680-23 Signature Saddle (6FD670-44 Vertical Folder FD680-24 Signature Saddle (7”)
FD670-70 Margin Trim Chopper FD680-25 Signature Saddle (7-113”)
FD670-77 Center Slitter FD680-26 Signature Saddle (8”)
FD670-80 Power Slacker (17”) FD680-27 Signature Saddle (8FD670-87 Stacker Control Wheel Assy. FD680-28 Signature Saddle (10”)
FD670-88 Infeed Static Eliminator FD680-29 Signature Saddle (11 “)
FD680-01 Imprint Module (6”) FD680-30 Signature Saddle (12”)
FD680-02 Imprint Module (6-1/2”) FD680-31 Signature Saddle (14”)
FD680-03 Imprint Module (6-2/3”)
FD680-04 Imprint Module (7”)
FD680-05 Imprint Module ( 7-1/3”)
2/3”)
1/2”)
1
Page 6
SPECIFICATIONS
FORM SPECIFICATIONS
Variable Speed 30-500 ft/mm (4.6-154 m/mm)
Capacity 1-8 pan forms
Maximum Depth 17 inches (43 cm)
Minimum depth 2 3/4 inches (7cm)
Maximum Width Before Slitting 19 1/4 inches (49cm)
Maximum Width After Slitting 17 inches (43cm)
Form Types Carbon or Carbonless
Form Weights 10 lb. to 140 Ib.
Size-Model FD 676/680
Height 43”(109cm)
Width 31 “(79cm)
Length 56” to 68 1/4”
Actual 142cm to 173cm
Weight 330 lbs(149kg)
INSTALLATION
UNPACKING AND SET-UP
Do not destroy shipping cartons or materials until
machine has been inspected for damage, missing
parts, and proper operation.
1. Remove bands which hold cardboard box to
wooden pallet. Remove cardboard box.
2. Remove burster top supports.
3. Remove (4) carriage bolts: (2) on infeed end of
burster and (2) outfeed end. Hint: Leave carriage
bolts in place on center burster support,
4. Remove (4) foam blocks.
5. With allen wrench supplied, unfasten four
retaining bolts which hold machine to the board
immediately below it.
NOTE: Center burster support is not fastened to
burster.
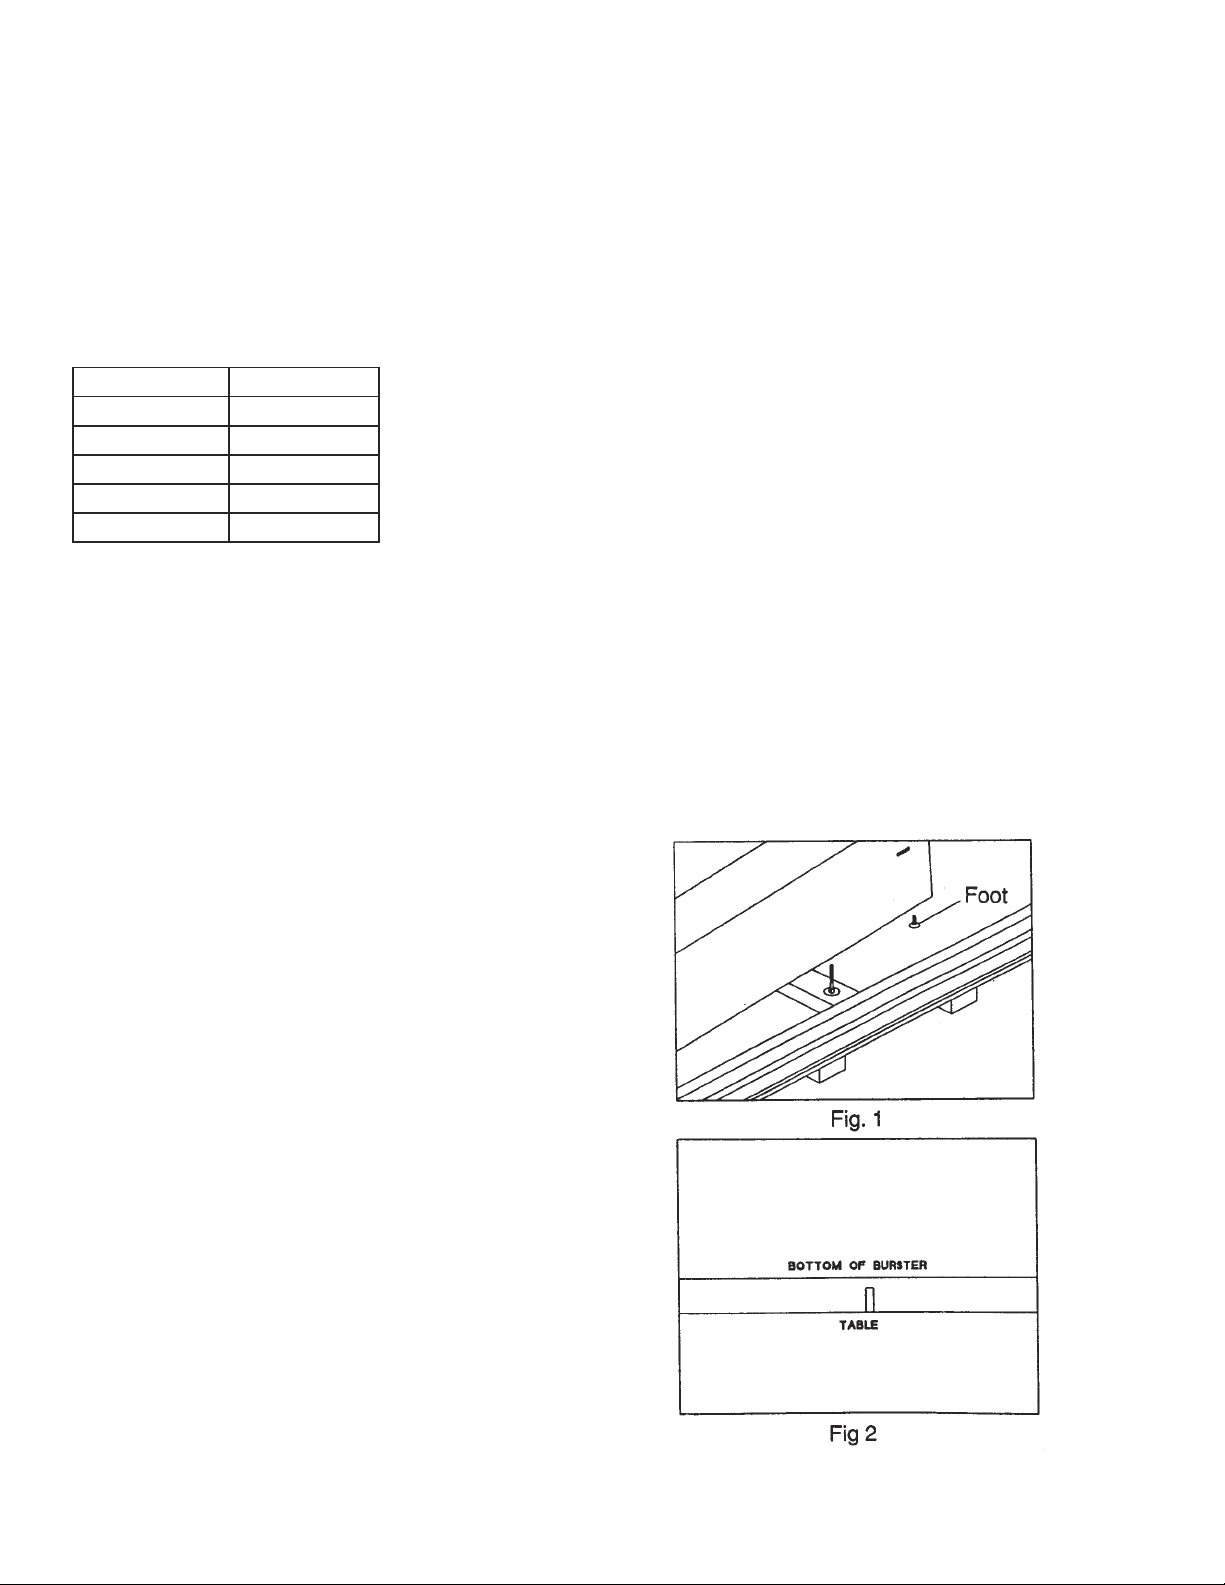
6. Add burster feet to burster. (Fig. 1)
7. Remove burster table from its carton.
NOTE: Location of holes on top of table.
CAUTION: Lifting should not be attempted by
less
than four people.
9. Add 1/4-20 x 1 1/2 locating screws, (included),
to underside of table, screwing up into burster
frame.
8. Set burster on table, lining up holes in table with
holes in burster frame. (Fig.2)
NOTE: Burster will line up evenly on all sides of the
table.
2
Page 7

OPERATION
0 POWER I JOG START STOP MACHINE FORM
SPEED LENGTH
000000000
INTERLOCK RESET NORMAL/ STACKER STACKER
ENABLE VARIABLE SPEED CLEAR
Optional
SAFETY
GENERAL
This section describes controls, features, and normal
operating procedures for this identifies and describes
control devices of machine. Familiarity with these
devices is very important in order to operate this
machine properly.
This section describes built-in safety devices to
protect operator, but these devices do not replace
good operator practices.
-Do not touch any moving parts
-Keep fingers, long hair, jewelry, ties and loose
clothing away from any moving parts.
-Refer servicing to qualified personnel.
3
Page 8

WEDGER
EDGE SLITTERS
SLITTER
ADJUSTMENT SCREW
8 PIN TRACTOR DR.
URGE ROLLER
MAGNETIC STOP
FORM LENGTH SCALE
FIG. 5
URGE ROLLER
CENTER PAPER
GUIDE
LEFT PAPER GUIDE
8 PIN TRACTOR OP.
RIGHT PAPER
GUIDE
OPTIONAL
STACKER GRILL
STACKER ADJUSTMENT
RACK
STACKER WHEEL
ASSEMBLY
FIG. 6
4
Page 9

CONTROLS AND FEATURES
Refer to Figures on previous page for
locations of controls and indicators below.
CONTROL / FEATURE FUNCTION
On/Off Switch Controls power to Burster. Indicator light
lets operator know that power is on.
Start Button Starts Burster
Stop Button Stops Burster
Machine Speed Thumb Wheel Varies Burster Speed
Paper Guides Prevents side to side movement of form while
it is entering Burster during friction feeding.
Jog Switch Enables operator to advance or retract forms
during initial loading.
Interlock Light Lets operator know that jam has occurred at
outfeed end of Burster or that safety covers
are not properly closed.
Stacker Clear Button Clears Stacker at a fast speed.
Stacker Speed Thumb Wheel Varies Stacker speed in variable position.
Stacker Switch Sets mode of Stacker, either normal or variable.
Stacker Wheel Indicator Aids the operator in setting Stacker wheels for
proper form length.
Urge Roller Assists vertical stacking of forms on Stacker grill.
Stacker Grill Provides a surface for forms to vertically stack.
Jam Detector Grill Guides forms onto stacker belts. In event of a j am,
it activates jam detection switch.
Stacker Wheel Assembly Guides forms out of Burster onto stacker belts.
Keeps forms properly aligned.
Stacker Adjustment Rack Holds stacker wheel assembly and enables stacker
wheel assembly to be adjusted.
Form Length Scale Indicator mark to set form length.
Form Length Switch To set form length.
Last Form Switch (Optional) Shuts Machine off after last form leaves the
tractor.
Last Form Defeat Switch Defeats last form switch optlon,(located on
tractor).
the side frame just above the right side
5
Page 10

FORM SET-UP PROCEDURE WITH
AND WITHOUT TRACTORS
1.Turn on machine. Measure form length using form
length scale on sequence stacker. (Fig. 6)
2- Press form length switch to align alignment mark
with form length on form length scale. (Fig. 4)
3. Place form stack on pull down tray on front of
table.
4.If friction feeding use left, right and center paper
guides. If feeding with tractors, use center paper
guide only. (Fig. 7
)
5. Center leading edge of form at i nfeed end of
machine so that outer edges of form extend equally
beyond guide straps on each side. If you find that the
edges come within 1/4” of the guide straps, offset form
in either direction to avoid this condition. (Fig. 5)
NOTE: For friction feeding omit steps 6-10.
6. Position tractors to proper form width by releasing
thumbscrews on top of tractors and sliding tractors to
proper width. Raise tractor gates
7. Lay margin holes of form over feed pins. (Fig. 8)
NOTE: Do not stretch form too tightly between
pins should be centered in margin holes.
8. Close tractor gates and lock tractors by tightening
thumbscrews.
9. If using edge slitters, position alignment mark where
you wish to slit. (Fig. 5)
10. 1f slitting, be sure that slitter blades are
engaged. This is accomplished by rotating wedger
in a counterclockwise direction as far as they will go
without force. (Fig. 5)
11. Lock edge slitters in place by tightening
thumbscrews clockwise. (Fig. 5)
NOTE: If you do not want to slit, push edge slitters
away from form and tighten thumbscrews.
12. By pressing jog switch in forward position,
advance form through feed rollers until snap rollers
grab the form.
13. 1f necessary, adjust form length so that form starts
to burst when perforation is just under tear points.
NOTE: Tear points can be moved to allow operator
to position them at any location along tear bar. Tear
points should be set between perforations that run
vertically the length of the form. (Fig. 10)
pins;
6
Page 11

14. Tear bar is adjustable to accommodate
characteristics of various forms. To adjust height bar
must be pushed to compress spring and lift out. Rotate
180 degrees (turned over) and replaced making sure
that square end of bar locks into brackets. (Fig. 9,
shown in HIGH position)
15. Set stacker wheel assembly so that stacker
wheels come to rest on proper form length indicated
on sequence stacker. (Fig. 6)
NOTE: When running forms at high speed, move
stacker wheels one notch furthertoward stacker grill
on stacker wheel adjustment rack. This will avoid jams
at jam grill.
16. Jog first form into sequence stacker to make
sure that sequence stacker wheels are just ahead of
leading edge of form.
17. Close safety covers. Machine is now ready to
burst. Press start button and adjust machine to
desired speed.
.
7
Page 12

8
Page 13

FORM SET-UP PROCEDURES
WITH IMPRINTER
NOTE: It is recommended that numbered forms or
checks fed into imprinter should be last form first, right
side up.
1. Center leading edge of form at infeed end of
machine so that outer edges of form extend equally
beyond guide straps on each side. If you find that
edges come within about 1/4” of guide straps, offset
form in either direction to avoid this condition.
2. If form length is 3 1/2”, 7”, 10 1/2” or 14”, rollers
must be timed. Time rollers by activating jog switch
until timing marks on the rollers are vertical and in view
in cutouts in feed and snap roller covers.
3. Position tractors by releasing and sliding to proper
form width. Raise tractor gates. Place forms on feed
pins as shown in (Fig. 8). Close tractor gates and
secure in position.
4. Loosen thumbscrews on ink roller unit and slide unit
10. Move timing collar so that mark on collar aligns
with mark on side frame. Tighten setscrews. (Fig. 11)
11. Remove forms from tractors. Install signature
patches on imprint cylinder. (Fig. 12)
12. Move ink roller directly over signature patch on
imprint cylinder. Jog forward, if necessary, so that
imprint cylinder turns to a point where signature patch
should touch ink roller. Adjust ink roll thumbscrews so
ink roll turns when signature patch makes contact.
For darker impression, turn adjustment thumbscrews
clockwise. (Fig. 19)
NOTE: The signature saddle has been factory adjusted
to fit a .092 thick signature patch. If adjustment is
required to lower or raise the height of signature
saddle for a different signature patch thickness,
release imprinter side plates from their locked
positions. Pull back latch finger to release plates. (Fig.
11. Loosen side setscrews to free top setscrew Turn
top setscrew in at half-turn increments until required
height is reached. Tighten side setscrews and slide
imprinter module back into position.
away from signature area on form. (Fig. 12)
5. Loosen setscrew on plate cylinder. if setscrews are
not in view, rotate free wheeling cylinder until they are
in view.) Horizontally align plate cylinder with signature
area on form. Tighten setscrews. (Fig. 12)
6. Loosen setscrews on imprint cylinder. (if setscrews
are not in view, use jog switch to bring them into view.
Fig. 11)
7. With no signature saddles on imprint cylinder, move
forms forward so signature area is centered over plate
cylinder shaft.
8. Center signature cylinder over signature area
(NOTE: Setscrews should be facing you.) and center
signature plate locator pins directly over imprint area
on form. Tighten setscrews.
9. Advance forms forward so that next horizontal
perforation aligns at top edge of plastic tractor or
alignment mark on metal tractor. (Fig. 11)
NORMAL LOADING
NOTE: Imprinter must be timed each time you load a
different form into Burster for imprinting.
1. Jog machine forward until timing collar mark is
aligned with side panel mark. (Fig. 11)
2. Place forms to leading edge of plastic tractors.
On metal tractors place forms leading edge to timing
mark.
3. Advance (jog) forms forward through imprint area.
Stop leading edge of form in front of slitters.
4. Move slitters to trim proper amount of trim
and engage slitter blades by turning wedgers
counterclockwise. Lock down slitters.
5. Advance forms through slitters and check for
proper slitting. Advance on through to Tear Bar.
9
Page 14

6. Set up tear bar as before. (Fig. 9) bar, vary form length setting up to 1/2”
ahead or behind actual form size setting,
7. Set up Stacker Wheel Assembly as and/or put tear bar in low position.
before. (Fig. 6)
5. Multiple part forms with hard glued
8. Jog first form into Sequence Stacker edging can be burst by positioning tear
to make sure that stacker wheels are bar over glued edge.
just ahead of leading edge of form. Put
urge roller in place. 6. Stacker wheel should not stop the
form until form clears snap rollers.
9. Close Safety covers. Machine is now
ready to burst and imprint. Press start 7. Carbonized forms will generally stack
Button and adjust machine speed to better when run with coated side up.
speed desired.
OPERATING HINTS
1. To stop the machine just push on either one of
two stop buttons. Opening safety cover or lifting jam
detection grill will also stop machine.
2. To restart machine start button must be pressed.
CAUTION: Machine will restart at same speed that it
was running at unless speed control thumbwheel is
turned down.
3. Some paper has a natural curve. Sometimes this
curve tends to catch air and sail. If this occurs, try
running them upside down.
4. Perforations vary in strength. If forms are bursting
hard, tearing, or breaking behind tear
TROUBLESHOOTING
Feeding, bursting, and stacking problems are usually
due to improper adjustment of machine to forms of
due to a non-standard or defective form.
Most problems fall into one of three categories,
Electrical, Mechanical, or Form Flow. Electrical
troubles are USUALLY obvious because machine will
not run or respond in a normal manner to its controls.
Mechanical problems are usually accompanied
by noise, slippage, tearing, or binds. If a form flow
problem is present, jamming, mis-stacking, or
intermittent form damage will occur. Problem should
be diagnosed to one of three categories, before
proceeding to pinpoint problem. Best approach is a
logical elimination of possible malfunctions.
10
Page 15

SYMPTOM PROBLEM CAUSE
Burster will not run. Power light on. Safety cover not closed.
Jam detection grill not activating switch.
Last form switch activated (no forms in tractors).
Faulty interlock switch.
Faulty run switch.
Faulty stop switch.
Faulty last form switch.
Faulty jam detection switch.
Faulty cover switch.
Faulty brake resistor.
Faulty speed control.
Faulty motor brush(s) (worn out or stuck).
Faulty motor.
Loose wire.
Faulty mechanical crimp on quick disconnect.
Faulty power-on/power-off key lock.
Burster will not run. No power light Line plug loose or pulled out.
Blown fuse.
Defective power cord.
No line voltage.
Defective on-off switch.
Forms creep to one side. Infeed quides not set property.
Roller tension not uniform across roller.
Burster stalls or tears forms. Tear bar in high position.
Burster not running fast enough.
Incorrect form length setting.
Tear points not adjusted properly across face of form.
Tough form perforations.
Improper stacking. Stacker wheels positioned to close or to far from.
Outfeed.
Stacker wheels not directly over belts.
Stacker wheels binding on axle.
Edge of form not under roller.
Stacker grill not adjusted property.
Static.
Sequence stacker at wrong speed. In variable.
Sequence stacker not running.
Poor slitting. Slitter blades not making contact with one another.
Worn blades.
Edge slitters difficult to slide. Foreign material on shaft.
Burr on shaft.
Blade Slitter Assy. dirty.
Poor cuts on trim chopper. Roller tension not correctly set.
Worn blade.
11
Page 16

SYMPTOM PROBABLE CAUSE
Stacker does not run but Burster does. Broken belt
Loose stacker drive gear/tbroken drive pin.
Faulty stacker motor.
Faulty stacker motor speed control
Faulty stacker switch.
Rollers don’t rotate/machine runs. Broken drive belt, Loose pulley.
Won’t burst properly. Incorrect roller tension.
Carriage not properly positioned.
Tear point not set correctly.
Tear bar not set correctly.
Forms pull out of tractors. Roller timing off.
Incorrect form length setting.
Incorrect feed roller tension.
Tractor drive pulley bound up.
Tractors binding internally.
Tractor pins not centered in margin holes.
Dull slitter blades.
Tractor timing is off.
Uneven inking. Ink roller not adjusted properly.
Ink roller needs replacing.
Signature patch not installed properly.
Patch worn out.
Ink roll not spinning freely.
Signature position moves. Incorrect check length for print cylinder.
Form not in tractors.
Print cylinder loose.
Print cylinder timing incorrect.
Signature patch not positioned correctly.
Large variations in trim accuracy. Paper not centered to slitter feed.
Margin slitter setscrew not tightened down.
Snap roller carriage will NOT move. Defective switch or motor.
Broken carriage drive chain.
Loose setscrew on carriage advance shaft or on motor.
Obstruction on rack.
Obstruction at the pivot arm.
Loop forming between the slitter and Obstruction between the infeed and snap rollers.
the infeed roller. Broken flow strap.
Bent infeed finger.
Tear bar in low position.
Too many tear points.
Need Anti-tenting bracket.
12
Page 17

VERTICAL FOLDER
SET-UP
FUNCTION
Vertical folder provides means for folding two-wide
forms side-to-side prior to their entry into burster.
SET-UP PROCEDURE
1. Place forms on floor at infeed end of burster.
2. Thread forms through folding bale. (Fig. 13) If you
are going to imprint, arrange forms so that side to be
imprinted is facing down.
3. Folding bale should line up with infeed guides so
edge of the form is in a straight line. (Fig. 13)
4. Position the infeed brush to the side of the forms
opposite tractor being used. (Fig. 13)
5. Center perforation of forms in a straight line from
floor to infeed brush.
13
Page 18

MERGER-BURSTER
SET-UP
FUNCTION
FD589 Merger/Burster
Center slits continuous forms and allows forms to be
merged into burster for slitting, imprinting, bursting
and stacking.
SET-UP PROCEDURE
1. Set forms in tractor. (see page 6, Fig. 8)
2. Adjust center slitter to the middle of the
forms. (Fig. 15)
3. Jog forward and guide forms through paper guides
to second set of tractors. Allowing forms to merge
together. (Fig. 16)
4. Adjust slitters to location that forms are to be
trimmed and proceed with form set-up procedure
starting on page 6.
14
 Loading...