

Page 1

FD 6100
Folder/Inserter
OPERATOR MANUAL
FIRST EDITION
Page 2

INTRODUCTION
Your folding and inserting machine enables you to fold documents, insert them into envelopes and seal the envelope flaps.
Small inserts business reply envelopes (BRE) can be added to
folded large format documents, or can be inserted individually,
without folding.
This user-friendly machine operates automatically and efficiently.
It makes short work of dispatching invoices, mass mailings,
payrolls, daily mail, etc.
The information contained in this guide will help you to get the
best use and productivity from your machine.
Its main features are:
- Two automatic feeder trays for large format documents (letter
up to legal)
- An automatic feeder tray for small inserts BRE.
- Easy vertical loading of the trays
- User-friendly, intuitive interface with memory enabling each
user to record and save details of the most frequent jobs.
- Automatic adjustment of the size of the folds.
- Automatic doubles document detection fitted to all feed trays, to
ensuring the security of the contents of the envelope.
- Small footprint enabling the machine to fit neatly into any office
environment.
4125603C/B
10/10/2003
1
SI30-0008-1/B
Page 3

4125603C/B
10/10/2003
2
Page 4

4125603C/B
10/10/2003
This manual cannot be reproduced, registered or transmitted
by any electronic, mechanical or other means, partly or wholly,
without permission of your vendor/reseller.
3
Page 5

OFFICIAL STANDARDS
In order to comply with standards EN60950 and UL1950, this
equipment must be connected to standard installation of the
construction industry. In order to protect the internal wiring, protection against 5A current surges is required. This equipment
complies with norm 55022, Class A.
INSTALLATION
This equipment must be installed close to a grounded electrical
AC outlet, and the plug must be protected with a 16A fuse.
ATTENTION
UNDER NO CIRCUMSTANCES SHOULD AN ATTEMPT BE
MADE TO REMOVE THE COVERS OF THE MACHINE SINCE
THEY PROTECT LIVE ELECTRICAL PARTS.
WARNING: moving parts. Keep fingers, jewelry or loose
clothing away.
4125603C/B
10/10/2003
4
Page 6

TABLE OF CONTENTS
SECTION A: GENERAL PRESENTATION ........... 9
1. MACHINE .......................................................................... 11
2. CONTROL PANEL ...........................................................12
3. OPENING THE MACHINE AND INTERNAL VIEW .........13
SECTION B: FUNCTIONS.................................... 15
1. INSTALLATION AND START-UP.......................................... 17
1.1 Installing the machine ............................................ 17
1.2 Installation and initial start-up ................................ 19
1.3 Entering the unlocking code .................................... 19
1.4 Selecting the language ........................................... 20
1.5 Filling the moistening tray ....................................... 21
1.6 Double Detection Tray C ........................................ 22
4125603C/B
10/10/2003
2. USING THE MACHINE ......................................................... 23
2.1 User Mode ............................................................. 23
2.1.1 Stored job selection....................................... 24
2.1.2 Table of stored jobs ....................................... 24
2.1.3 Starting a job ................................................. 26
2.1.4 Modifying a job .............................................. 26
2.1.5 Locking and unlocking a job .......................... 30
2.1.6 Counter ......................................................... 31
5
Page 7

2.2 Advanced Functions .............................................. 32
2.2.1 Changing the language ................................. 33
2.2.2 Settings for envelope formats and
special documents ......................................... 33
2.2.3 Double Document detection activation/
desactivation (Tray C) .................................... 38
2.3 Other Advanced functions ....................................... 38
2.3.1 Double Document Detection Activation/
Deactivation for trays A and B. ....................... 38
2.3.2 Displaying Job Adjustments ........................... 39
3. LOADING DOCUMENTS ......................................................40
3.1 Loading documents (trays A and B in
automatic mode) .................................................... 40
3.2 Loading documents in manual mode (tray A) ........ 42
3.3 Loading envelopes ................................................ 43
3.4 Loading small inserts and reply
envelopes (tray C) ................................................. 45
4125603C/B
10/10/2003
SECTION C: HELP AND ADVICE ........................ 47
1. HELP GUIDE ......................................................................... 49
1.1 Error messages ..................................................... 49
1.2 Symptoms and remedies ....................................... 55
6
Page 8

2. JAM CLEARING ................................................................... 60
2.1 Clearing the feeders (tray A and B) ....................... 60
2.2 Unjamming the document path.............................. 61
2.3 Unblocking path of small inserts (tray C) ............... 61
2.4 Clearing the envelope tray ..................................... 62
3. CLEANING ............................................................................ 63
3.1 Cleaning the rollers ................................................. 63
3.1.1 Internal rollers ................................................ 64
3.1.2 Envelope Tray Rollers .................................... 65
3.1.3 Tray C Rollers ................................................ 65
3.1.4 A/B Feeder Rollers ........................................ 66
3.2 Cleaning/Replacing moistening brushes ................. 67
3.3 Cleaning the covers of the machine ........................ 67
SPECIFICATIONS ...............................................69
4125603C/B
10/10/2003
7
Page 9

Symbols used
Indicates necessary information
Indicates potential problem area
Indicates an idea or interesting point
Illustration through an example
4125603C/B
10/10/2003
8
Page 10

SECTION A: GENERAL PRESENTATION
1. MACHINE .......................................................................... 11
2. CONTROL PANEL ...........................................................12
3. OPENING THE MACHINE AND INTERNAL VIEW .........13
4125603C/B
10/10/2003
9
Page 11
123 4 5
8
6
17
4125603C/B
10/10/2003
10911 16151415
10
General presentation
7
12 13
Page 12

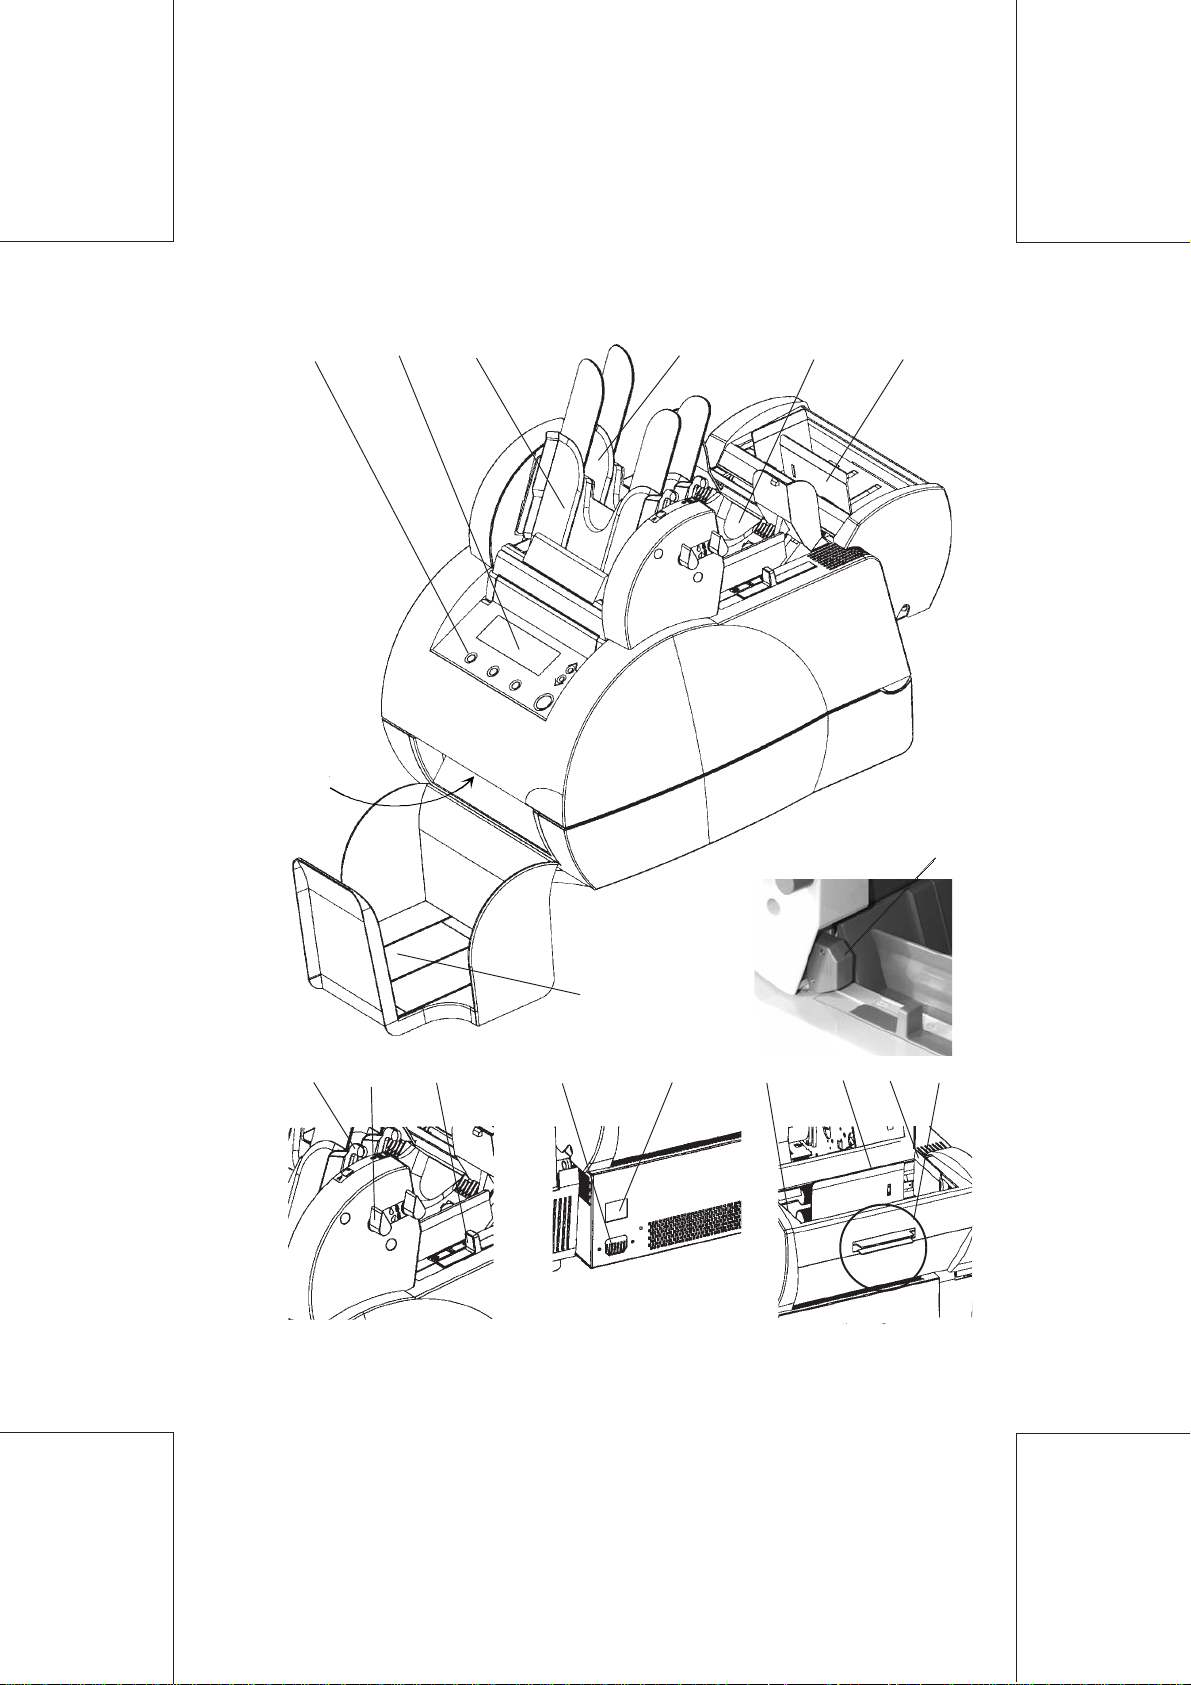
1. MACHINE
1 Control panel
2 Display
3 Tray A (document feeder)
4 Tray B (document feeder)
5 Envelope tray
6 Tray C (small insert or reply envelope feeder)
7 Catch tray
8 Opening handle of the machine
9 Paper side guide locking levers (trays A and B)
10 Locking levers for trays A and B
11 Locking mechanism for envelope guides
12 Power supply socket
13 On/off switch
14 Tray C guides (small inserts)
15 Lateral guides
16 Tray C Opening handle (small inserts)
17 Connector for document feeders
4125603C/B
10/10/2003
General presentation
11
Page 13
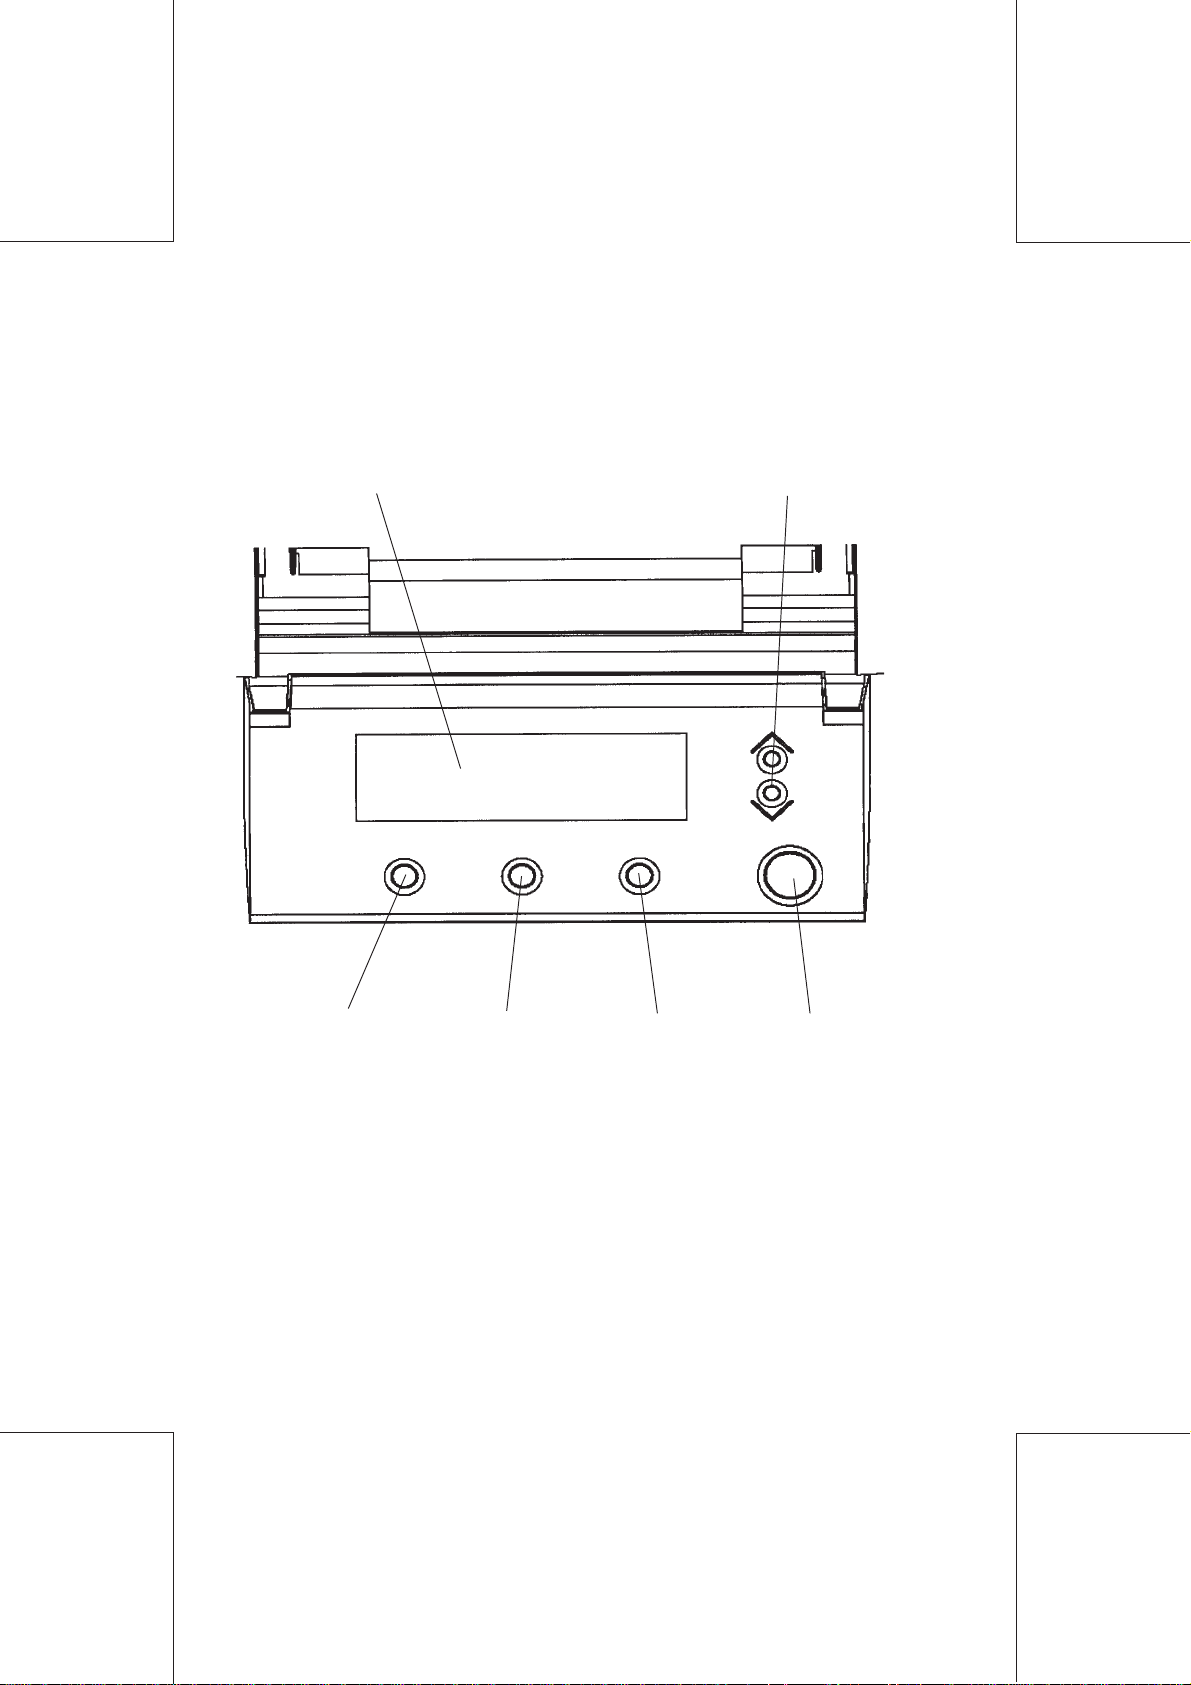
2. CONTROL PANEL
Display panel
Selection
key
Save to
memory
key
Cancellation
key
Control keys
Start and
stop key
4125603C/B
10/10/2003
12
General presentation
Page 14
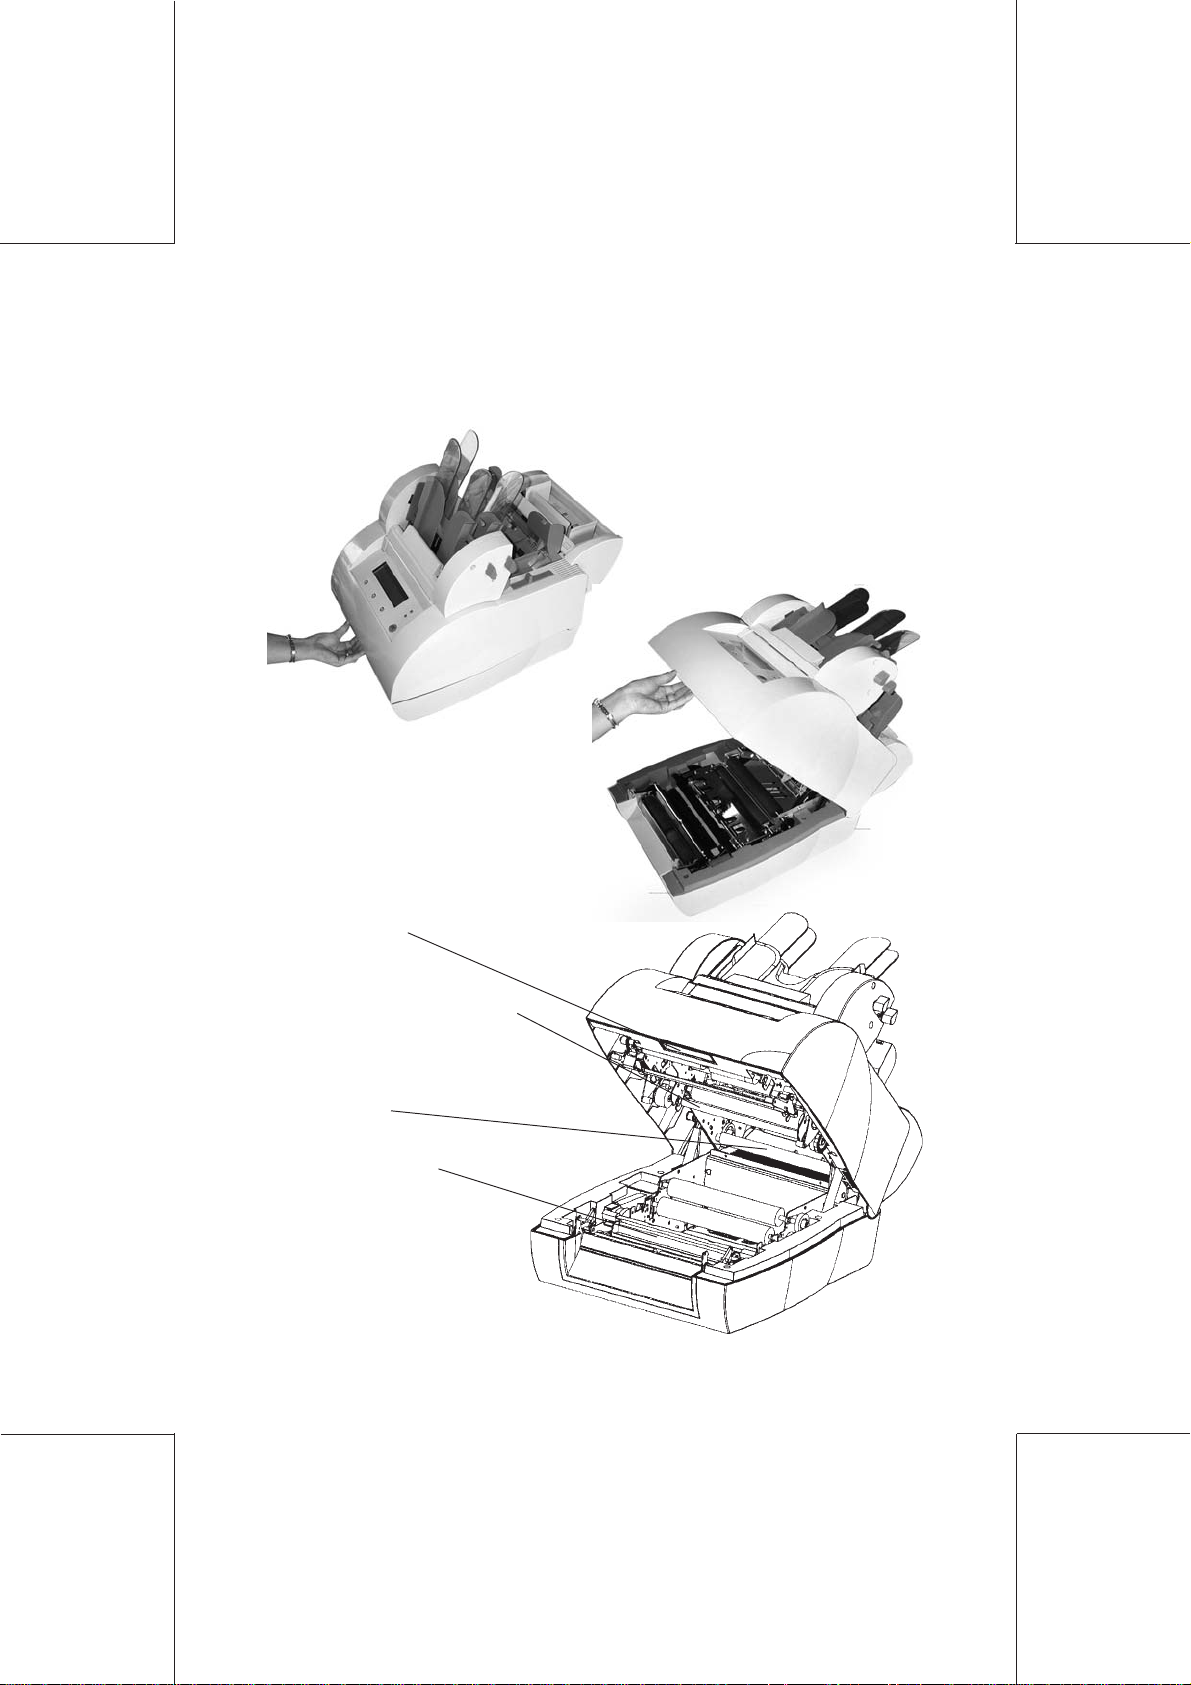
3. OPENING THE MACHINE AND INTERNAL VIEW
To open the machine:
Squeeze the handle
on the front.
Lift the lid of the machine
upwards.
Opening handle of
the machine
4125603C/B
10/10/2003
Envelope exit roller (E)
Shutter (7)
Moistening tray
General presentation
13
Page 15

4125603C/B
10/10/2003
14
Page 16

SECTION B: FUNCTIONS
1. INSTALLATION AND START-UP......................................... 17
1.1 Installing the machine .............................................. 17
1.2 Installation and initial start-up .................................. 19
1.3 Entering the unlocking code .................................... 19
1.4 Selecting the language ........................................... 20
1.5 Filling the moistening tray ....................................... 21
1.6 Double detection tray C .......................................... 22
2. USING THE MACHINE ......................................................... 23
2.1 User Mode ............................................................. 23
2.1.1 Stored job selection....................................... 24
2.1.2 Table of stored jobs ....................................... 24
2.1.3 Starting a job ................................................. 26
2.1.4 Modifying a job .............................................. 26
2.1.5 Locking and unlocking a job .......................... 30
2.1.6 Counter ......................................................... 31
2.2 Advanced Functions .............................................. 32
2.2.1 Changing the language ................................. 33
2.2.2 Settings for envelope formats and
special do-cuments ....................................... 33
2.2.3 Double Document Detection Activation/
Desactivation (tray C) .................................... 38
2.3 Other Advanced functions ....................................... 38
2.3.1 Double Document Detection Activation/
Deactivation for trays A and B. ....................... 38
2.3.2 Displaying Job Adjustments ........................... 39
4125603C/B
10/10/2003
15
Page 17

3. LOADING DOCUMENTS..................................................... 40
3.1 Loading documents (trays A and B in
automatic mode) .................................................... 40
3.2 Loading documents in manual mode (tray A) .......... 42
3.3 Loading envelopes ................................................. 43
3.4 Loading small inserts and reply
envelopes (tray C) .................................................. 45
4125603C/B
10/10/2003
16
Page 18
1. INSTALLATION AND START-UP
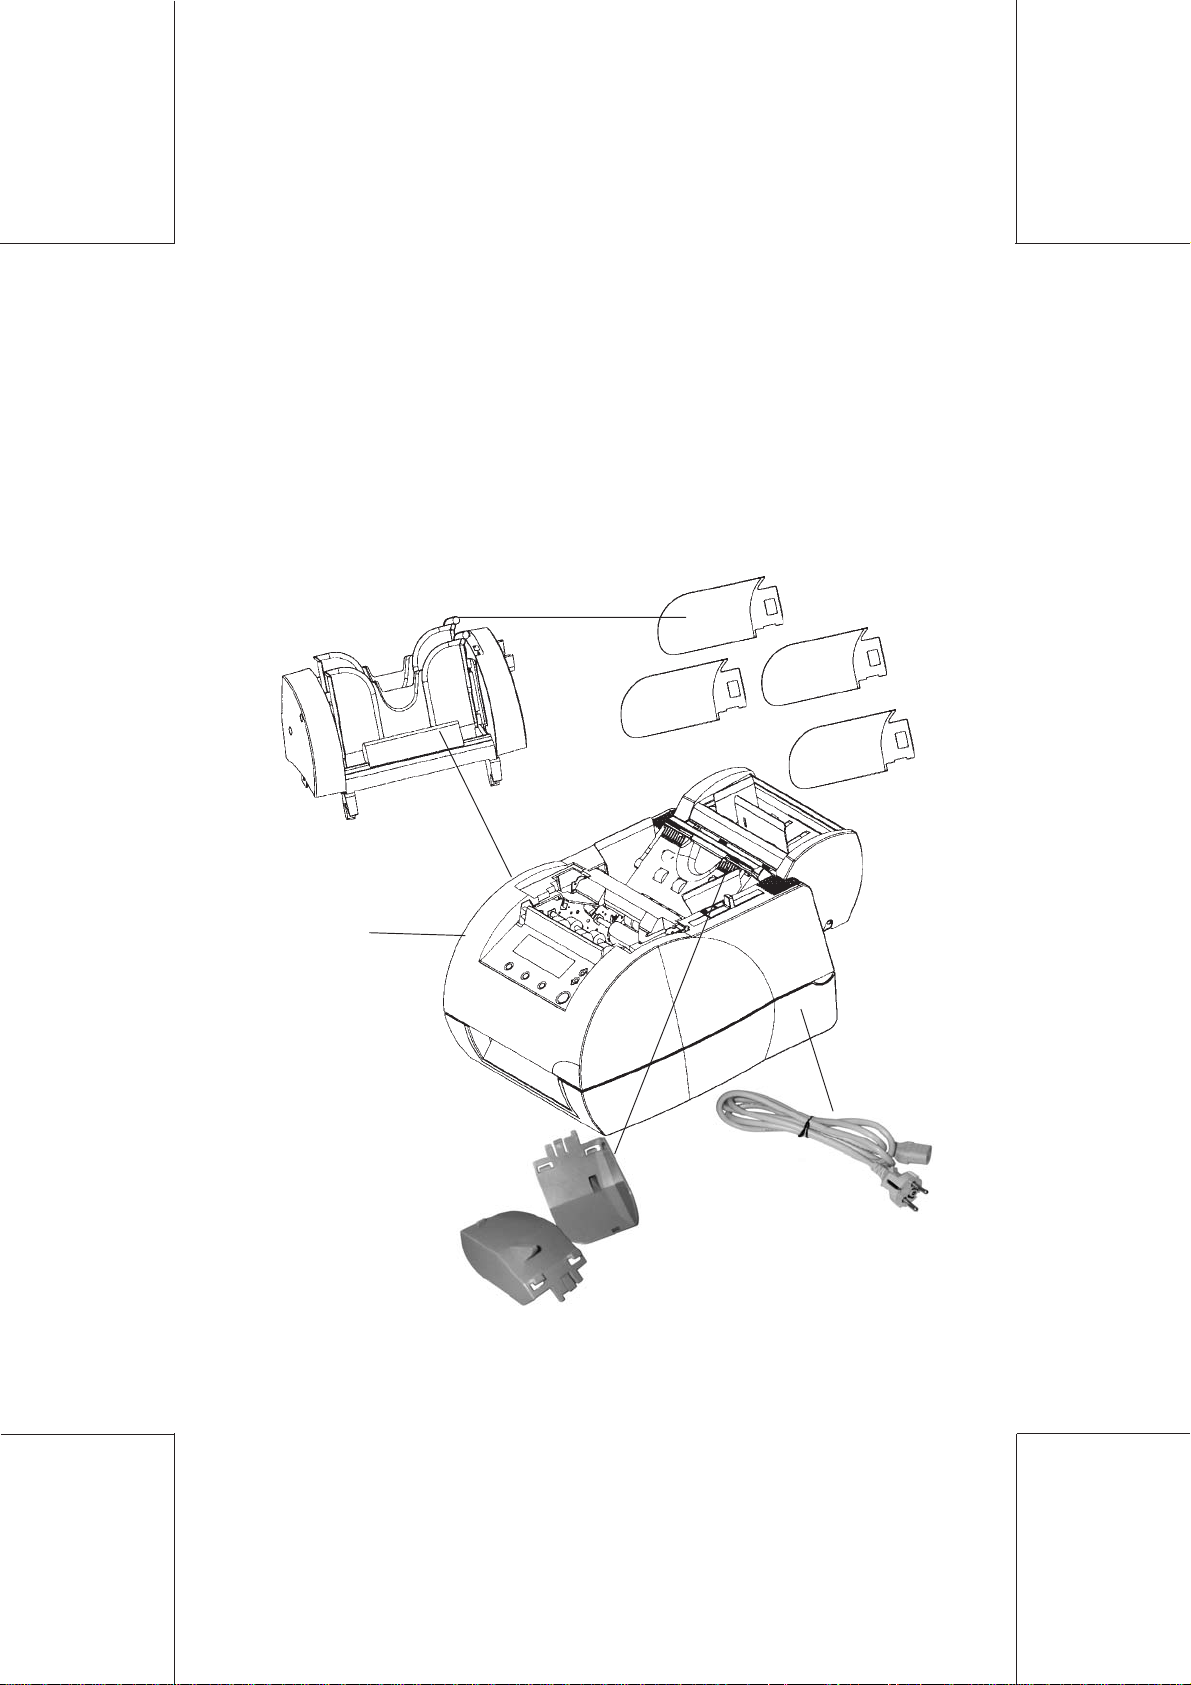
1.1 Installing the machine
Upon receiving the machine, check the content according to
the list below :
Four transparent
document-holders
Document feeders
Trays A and B
Base
4125603C/B
10/10/2003
1 power cord
2 rear guides for
envelope tray
Installation and start-up
17
Page 19
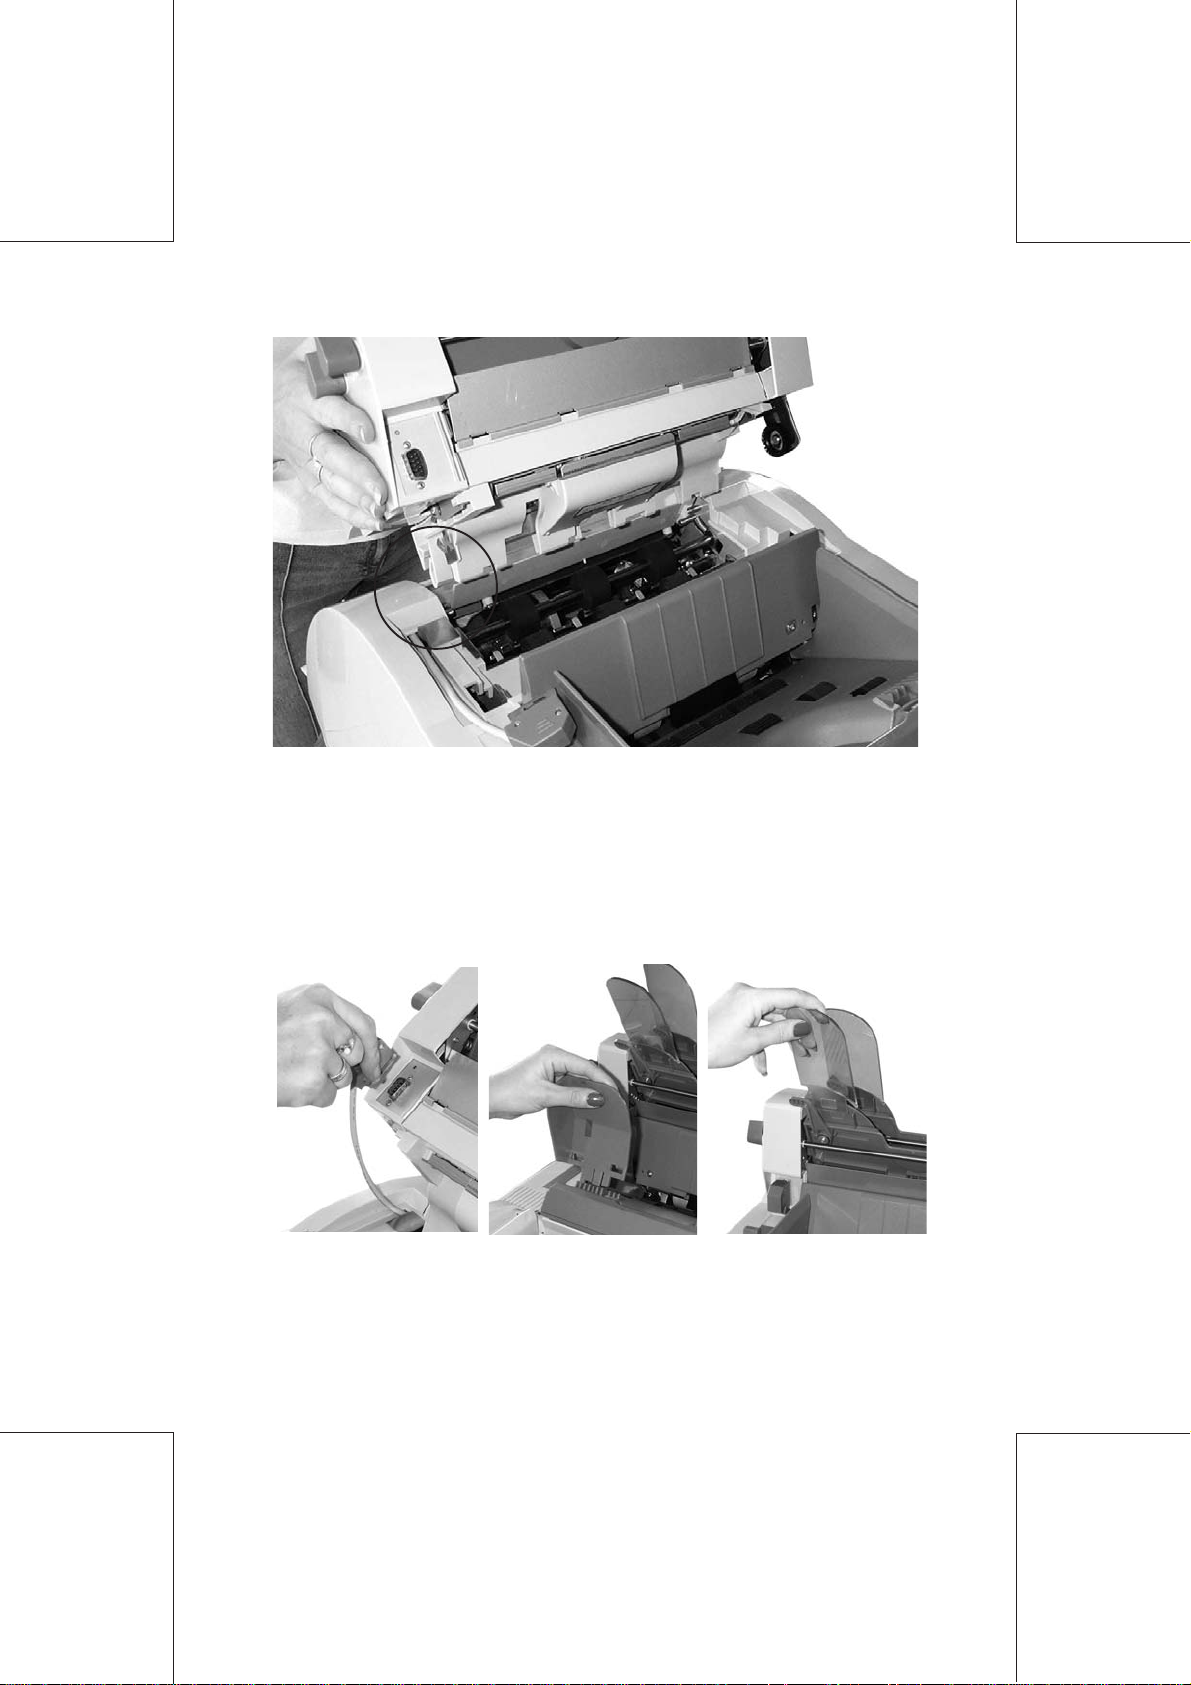
Install the document feeder by inserting its 2 plastic lugs into their
respective slit, located on the base of the machine.
Hold the feeder
towards you, plug
the connector to the
A/B Feeder socket,
then replace the
feeder properly on
Clip the guides onto
the back of
envelope tray : be
careful regarding
the position
Clip-on the transparent document
holders on trays A
and B.
the base.
Connect the power cord to the machine on main and press the
switch : The initialization screen will be displayed for a few
seconds.
18
Installation and start-up
4125603C/B
10/10/2003
Page 20
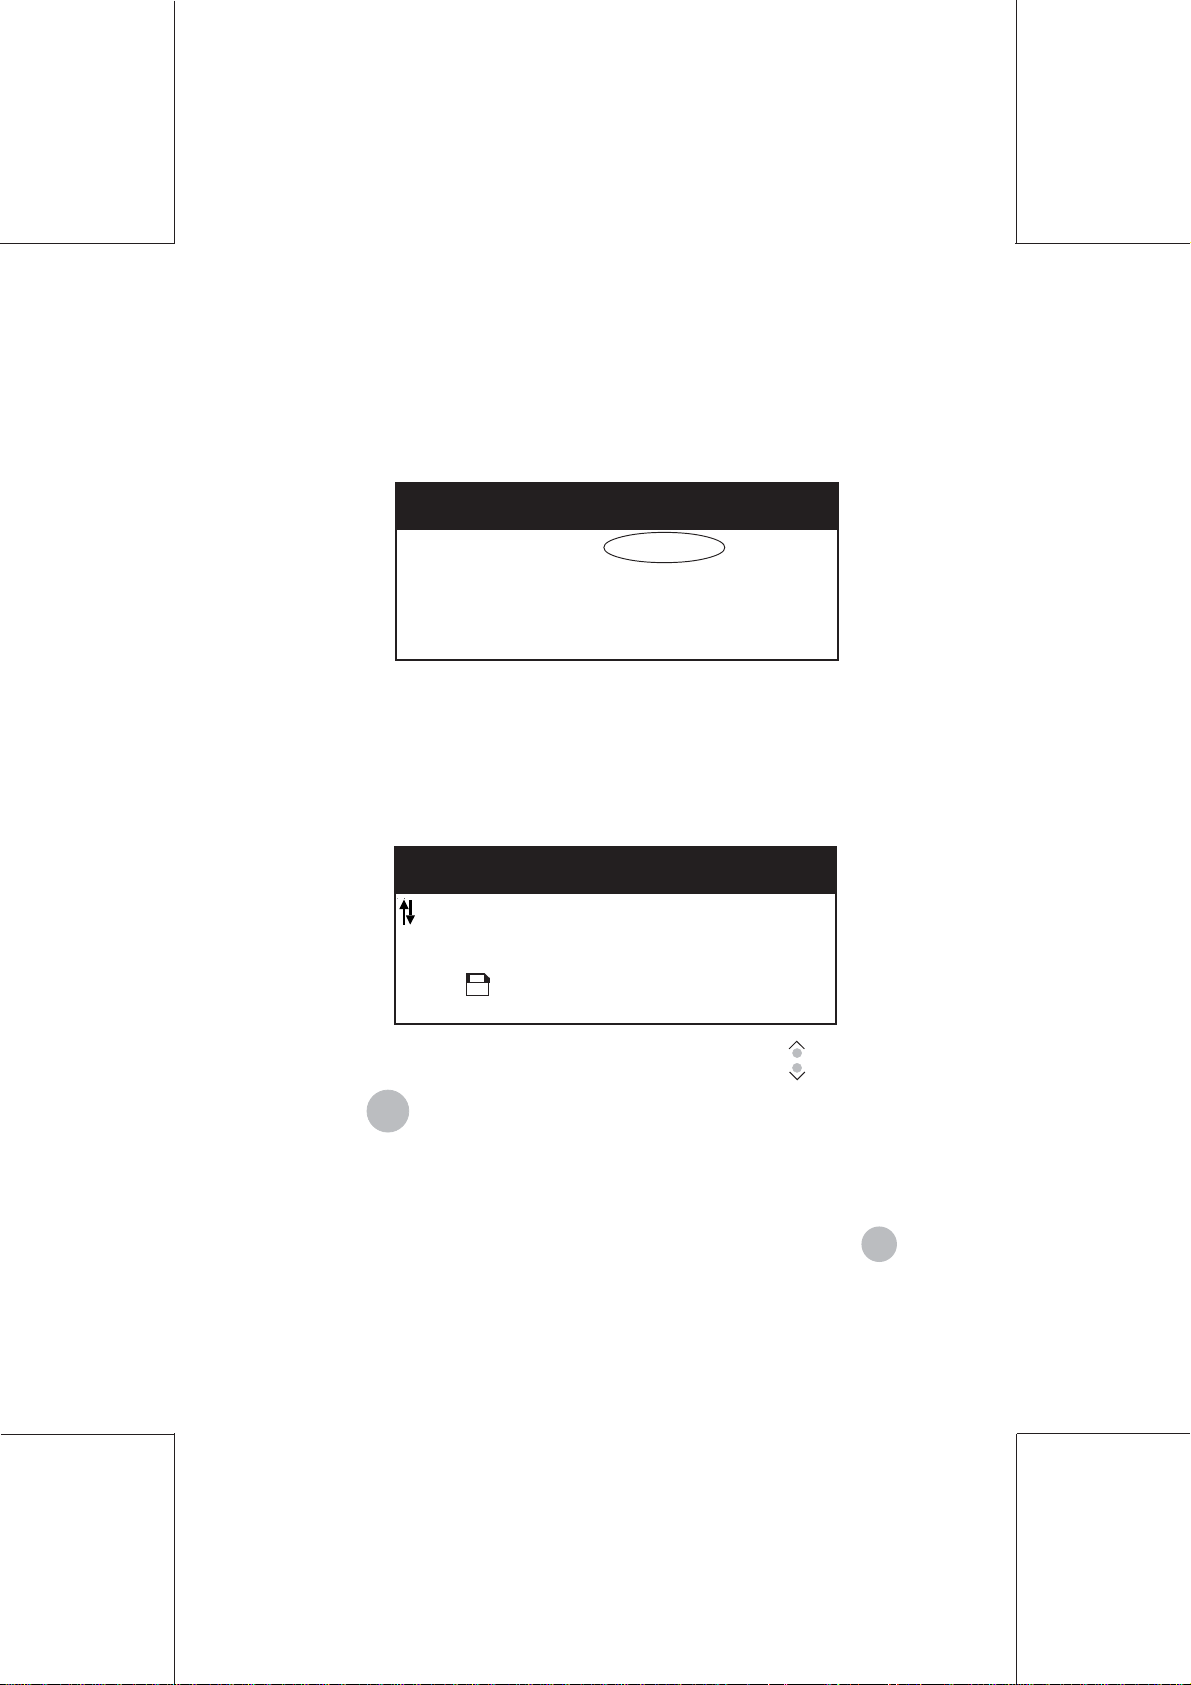
1.2 Installation and initial start-up
When the machine is powered up, the initialization screen will
be displayed for a few seconds. The number displayed is the
total number of cycles the machine has performed, all tasks
included.
INITIALIZATION IN PROGRESS
Total number of cycles : 1234567
(press ESC during
initialization to change the
machine setup)
INITIALIZATION IN PROGRESS
1.3 Entering the unlocking code
This screen will automatically appear at the final step of the
installation procedure.
Enter the code number appearing in section J of your quick startup guide as follows:
INITIALIZATION IN PROGRESS
1. Select a number between 0 and 9, using the keys
2. Press
START
STOP
AUTHORIZATION CODE SET UP
: Select number
START-STOP : Validate number
ESC : exit
Press to confirm
Code : 0000000000
.
to select the number and the cursor should move
automatically to the next position.
3. Repeat these two operations until you have finished entering
(10 digits).
4. If you make a mistake when entering your code, press
ESC
to
delete and start again from the beginning.
Installation and start-up
19
4125603C/B
10/10/2003
Page 21
ESC
ESC
5. Once your code is enter correctly, press
to store it.
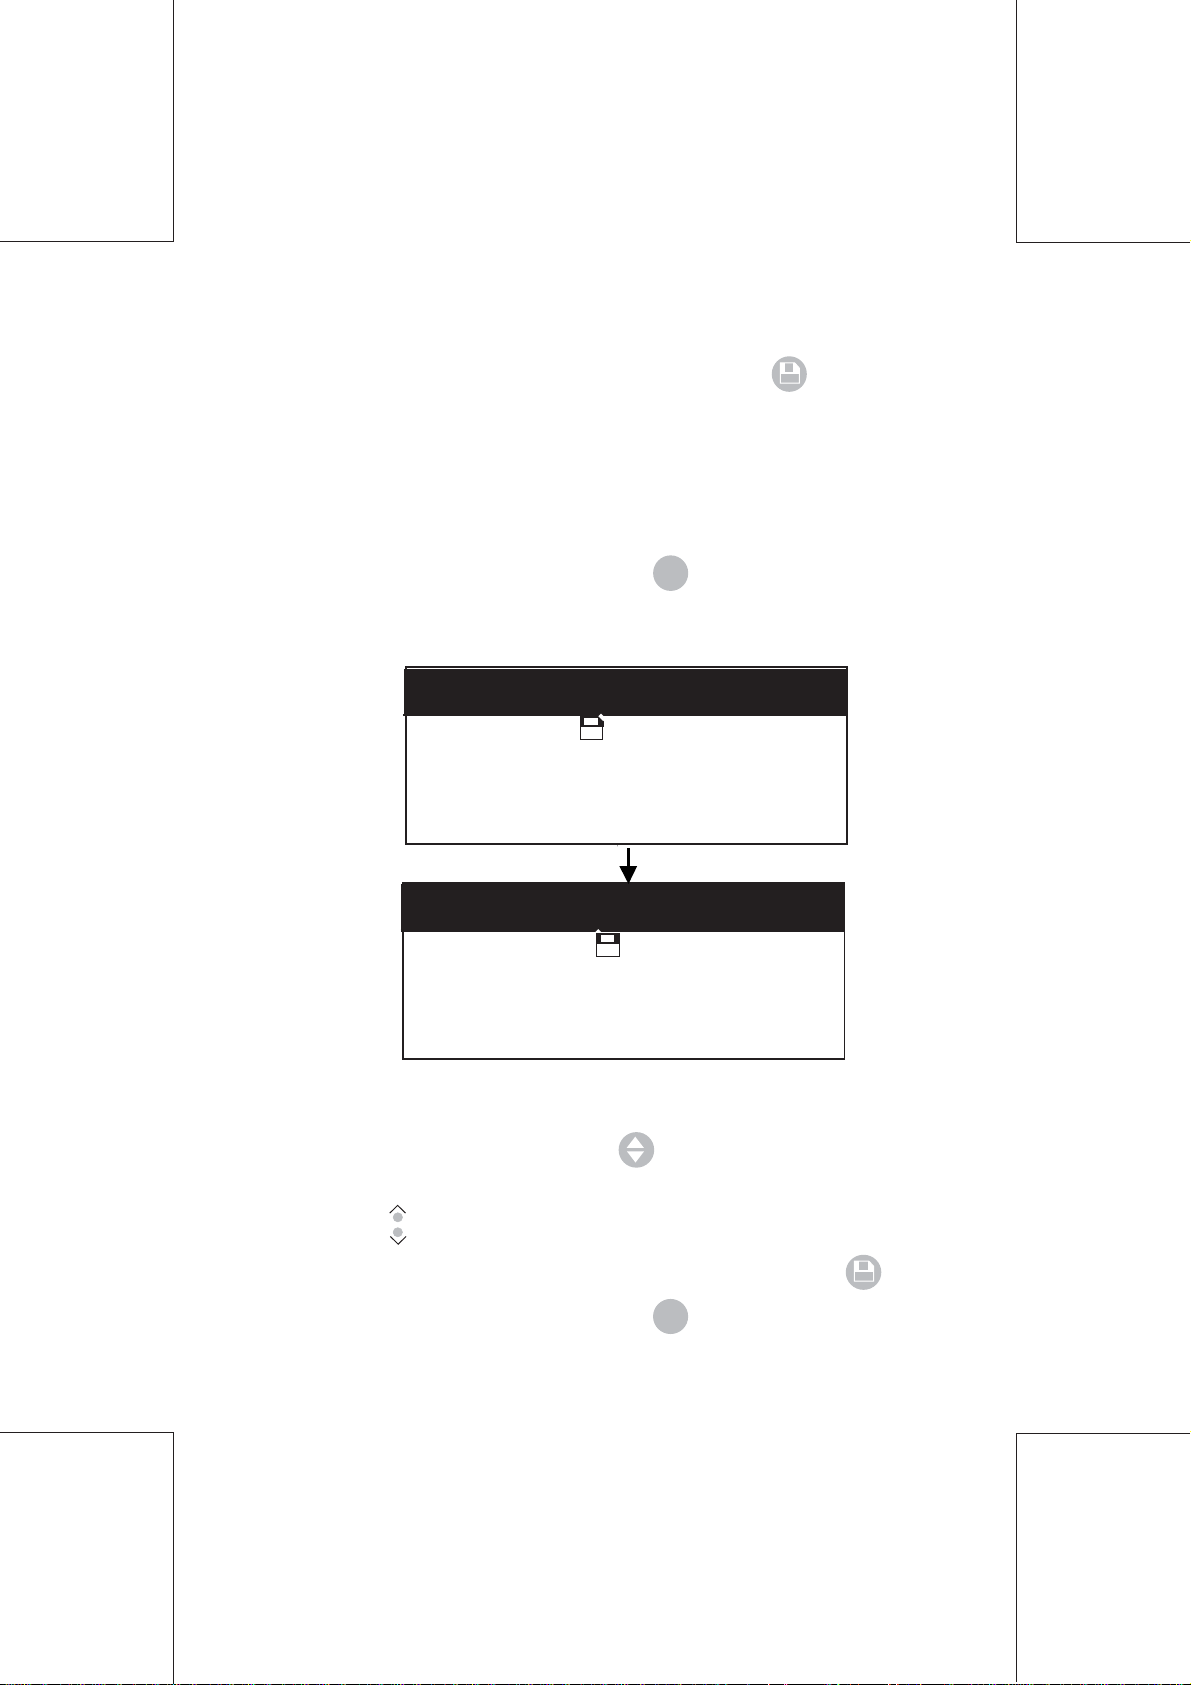
1.4 Selecting the language
The default configuration of your machine is English.
To modify the language:
- If the machine is switched on, switch it off then on again.
- During the initialization phase press
to display the following
screen:
INITIALIZATION IN PROGRESS
Language : ENGLISH
Set : Env. / Doc.
Double Det. Bin C : DISABLE
INITIALIZATION IN PROGRESS
Numéro Machine : 0000000000
Appuyer sur pour continuer
Langue : FRANCAIS
Personnalisation : Env. / Doc.
Det. Double Bac C : DEVALIDER
MACHINE SETUP
Serial Number : 0000000000
Press to confirm
CONFIGURATION MACHINE
- Upon entering this screen, the "language" line indicates the
language used.
- Select this line by pressing the key.
4125603C/B
10/10/2003
- Scroll until you have reached the desired language to select,
using the
- Complete the operation by saving the changes with
- Or by cancelling the changes with
20
Installation and start-up
keys.
.
.
Page 22
1.5 Filling the moistening tray
The moistening tray is a device that enables the machine to
moisten the glue on the envelope flap so that it can be sealed.
This screen appears each time the machine is started up and
remains active for several seconds.
INITIALIZATION IN PROGRESS
Do not do this if you have already done
CHECK WATER LEVEL
Refill water
To fill the moistening tray
1. Open the machine
11
1
11
11
1
11
2. Remove carefully the
moistening tray by its blue handles.
3. Remove the strip of 3 stoppers
and fill the tank with water through
the 3 holes.Ensure the brushes
are properly impregnated with
water
4. Replace the moistening tray
in the machine, with the blue
handles towards you.
5. Close the machine
22
44
2
4
22
44
33
3
33
Installation and start-up
21
4125603C/B
10/10/2003
Page 23

1.6 Double Document Detection Tray C
This option is deactivated by default.
This function enables the machine to detect the presence of two
small inserts passing simultaneously through the insertion circuit.
To activate it, select this function, using
it, using the
key.
INITIALIZATION IN PROGRESS
Language : ENGLISH
Set : Env. / Doc.
Double Det. Bin C : DISABLE
MACHINE SETUP
Serial Number : 0000000000
Press to confirm
and enable/disable
4125603C/B
10/10/2003
22
Installation and start-up
Page 24

2. USING THE MACHINE
To use the machine, the following must be specified:
- type of document
- type of envelope
- feeder trays being trays
This information is saved by the machine as a "job",
corresponding to a specific application. There are nine (9) jobs
which can be stored in memory for later recall.
Fill the tray or trays concerned, depending on the task to be
performed (see section entitled “loading documents”).
2.1 User Mode
When the user menu appears, the machine is ready for use.
READY : START to process a job
or to select line to modify
Counter : 1 2 3 4
Job number : 02
Feeder : AUTO A+B+C
Document : LETTER 11"
Envelope : # 10 SEAL
Address height : +0 mm
4125603C/B
10/10/2003
Selection area Modification area
Using the machine
23
Page 25

2.1.1 Stored job selection
When first entering this screen, no line is active.
Pressing the key activates the "Counter" line, and each
time this key is pressed, the next line will be selected.
Use the
keys to select the job number desired
(The machine is delivered with 9 pre-stored jobs )
READY : START to process a job
or to select line to modify
Counter : 1 2 3 4
Job number : 02
Feeder : AUTO A+B+C
Document : LETTER 11"
Envelope : # 10 SEAL
Address height : +0 mm
2.1.2 Table of stored jobs
In the pre-stored jobs, the default envelope format
is # 10 SEAL. The machine defines automatically
the folding parameters to fit the size of the envelope
chosen.
A pre-stored job will certainly suit your needs. If
not, please consult the section entitled “Modifying
a job”.
4125603C/B
10/10/2003
Job
number
Job 1
Job 2
AUTO
AUTO
A+B+C
24
Using the machine
Trays
A+B
Document Functions
LETTER 11"
LETTER 11"
The 2 trays function together
The 3 trays function together
Page 26

Job 3
AUTO A
LETTER 11"
Trays A and B function
alternately, when one tray is
empty, the machine switches
automatically to the other
Job 4
Job 5
Job 6
Job 7
Job 8
Job 9
AUTO
A+C
AUTO
A
AUTO
A+C
MANUAL
A
MANUAL
A+B
MANUAL
A+C
LETTER 11"
LEGAL 14"
LEGAL 14"
LETTER 11"
LETTER 11"
LETTER 11"
Trays A and B function
alternately, and tray C
functions simultaneously with
whichever tray is operational.
Trays A and B function
alternately, when one tray is
empty, the machine switches
automatically to the other
Trays A and B function
alternately, and tray C functions
simultaneously with whichever
tray is operational.
Tray A functions alone in
manual AutoStart mode. Documents are inserted manually in
tray A.
Tray A functions alone in
manual AutoStart mode and
Tray B is on automatic.
Documents are inserted
manually in tray A.One document from Tray B is added to
the bundle in tray A.
Tray A functions alone in
manual AutoStart mode and
tray C is on Automatic. One
document from tray C is added
to the bundle in tray A.
4125603C/B
10/10/2003
Envelope # 10 : ~ 105 mm
Using the machine
25
Page 27

2.1.3 Starting a job
START
STOP
- Select the line "Job number", with the key.
- Choose a job number with
.
- Load the appropriate trays with your documents.
START
- Press the
key to start the cycle.
STOP
The cycle can be interrupted at any time by pressing the
START
key again.
STOP
An on-line help message is displayed on the
screen
for each job.
If the job selected uses the "Manual" (AutoStart)
function it is not necessary to press the
START
STOP
key.
Tray A starts automatically when inserting a
sheet of paper.
2.1.4 Modifying a job
Jobs already in the memory can be modified:
- Select the line "Job number", with the
key.
- Choose the job number to be modified with
4125603C/B
10/10/2003
- Make the necessary changes, including selection of
trays, document format and envelope format.
- Launch the cycle by pressing the
key.
As long as the icon is flashing, the changes have not
been finalized. Press to save them to the memory.
START
STOP
26
Using the machine
To test the settings quickly, press
machine will perform a single cycle.
twice: the
Page 28

Selecting trays :
To change the tray operating mode in a job.
- Select the "Tray" line using the key
- Select the desired function using the keys
.
.
Tray functions available:
AUTO A+B
AUTO A
AUTO A+B+C
AUTO A+C
AUTO C
MANUAL A
MANUAL A+B
MANUAL A+C
MANUAL A+B+C
Trays A and B enable the insertion of large format documents,
of the LETTER 11" type, that are to be folded. They accept
documents measuring from 11" to 14".
Press to choose feeders
or START to process a job
Counter : 1 2 3 4
or to select line to modify
Job number : 02
Feeder : AUTO A+B+C
Document : LETTER 11"
Envelope : # 10 SEAL
Address height : +0 mm
The largest document format will be taken
into account for folding purposes.
4125603C/B
10/10/2003
Auto: Automatic operating mode, starts after pres-
sing the key
START
STOP
.
The envelope by envelope operating mode starts
with "Autostart" mode (manual insertion of a
sheet of paper or bundle of up to five sheets).
Using the machine
27
Page 29

Selection of document format
To change the format of the main document in a job
- Select the "Document" line using the key .
- Select the desired format using the
keys.
Document formats available
LETTER 11", LEGAL 14"
Press to select format
or START to process a job
Counter : 1 2 3 4
or to select line to modify
Job number : 02
Feeder : AUTO A+B+C
Document : LETTER 11"
Envelope : # 10 SEAL
Address height : +0 mm
Envelope selection
To change the envelope format in a job.
- Select the "Envelope" line using the key .
- Select the desired format using the keys
Envelope formats available
#10 SEAL
#10 NO SEAL
SPECIAL SEAL (see "Advanced functions")
SPECIAL NO SEAL (see "Advanced functions")
C-FOLD ONLY
.
4125603C/B
10/10/2003
28
Using the machine
Press to select format and mode
or START to process a job
Counter : 1 2 3 4
or to select line to modify
Job number : 02
Feeder : AUTO A+B+C
Document : LETTER 11"
Envelope : # 10 SEAL
Address height : +0 mm
Envelope # 10 : ~ 105 mm
Page 30

Changing the height of the address
START
STOP
This setting enables adjustment of the fold position to have the
printed address seen through the envelope window.
- Select the line "Address Height" using the key .
- Change the setting using the keys .
- Perform a test run by pressing the
key twice.
- Once you have the correct setting, start the cycle by pressing the
START
key once.
STOP
Press to move adress in
or START to process a job
Counter : 1 2 3 4
or to select line to modify
Job number : 02
Feeder : AUTO A+B+C
Document : LETTER 11"
Envelope : # 10 SEAL
Address height : +0 mm
The
Mr P. Robert
1, Rue des arbres
75020 PARIS
key moves it upwards
in the window
4125603C/B
10/10/2003
Place the document
in tray A, face up with
the address at the top.
Mr P. Robert
1, Rue des arbres
75020 PARIS
The
key moves it down-
wards in the window
Using the machine
29
Page 31

2.1.5 Locking and unlocking a job
To protect a job, no line should be selected.
If not press
to deselect.
ESC
To lock a job:
- Complete any changes to the settings using the key
ESC
- Keep this key pressed,
- Save to memory using the key ,
- A key-shaped symbol will appear next to the number
of the amended job.
Only the job in progress can be amended (the one with the
current number).
READY : START to process a job
or to select line to modify
Counter : 1 2 3 4
Job number : 02
Feeder : AUTO A+B+C
Document : LETTER 11"
Envelope : # 10 SEAL
Address height : +0 mm
To unlock a job:
- Press the key
ESC
,
,
4125603C/B
10/10/2003
- Keep this key pressed,
- Validate and save the unlocking using the key
- The job is then unprotected, and the key-shaped symbol
beside the job number will disappear.
READY : START to process a job
or to select line to modify
Counter : 1 2 3 4
Job number : 02
Feeder : AUTO A+B+C
Document : LETTER 11"
30
Using the machine
Envelope : # 10 SEAL
Address height : +0 mm
,
Page 32

2.1.6 Counter
The machine has 2 counters.
- The first one can be read on the initialization screen when
the machine is switched on. It indicates the total number
of cycles performed, all jobs included, since the machine
was used for the very first time. It cannot be changed.
- The second counter, which displays on the main screen,
is a meter that monitors activity and it can be returned to
zero. It indicates the total number of cycles performed on
all jobs inclusive since it was last returned to zero.
To return a job meter to zero:
- Select the line "Counter" using the key
- Return it to zero using the keys
Press to reset by zero
or START to process a job
Counter : 1 2 3 4
Job number : 02
Feeder : AUTO A+B+C
Document : LETTER 11"
Envelope : # 10 SEAL
Address height : +0 mm
Press to reset by zero
or START to process a job
Counter : 0000
Job number : 02
Feeder : AUTO A+B+C
Document : LETTER 11"
Envelope : # 10 SEAL
Address height : +0 mm
.
.
4125603C/B
10/10/2003
Using the machine
31
Page 33

2.2 Advanced Functions
ESC
To enter the advanced functions mode:
- During initialization, press the key
The following screen will appear:
INITIALIZATION IN PROGRESS
Language : ENGLISH
Set : Env. / Doc.
Double Det. Bin C : DISABLE
MACHINE SETUP
Serial Number : 0000000000
Press to confirm
4125603C/B
10/10/2003
32
Page 34

2.2.1 Changing the language
The machine’s user default language is set to English. This
can be changed by holding down the
ESC
key while switching
the machine ON from the switch located at the back of the
machine.
1. Select the "language" line using the
2. Use the
3. Press
4. Press
keys to change the language setting,
to store changes,
to return to the user menu.
ESC
INITIALIZATION IN PROGRESS
Language : ENGLISH
Set : Env. / Doc.
Double Det. Bin C : DISABLE
INITIALIZATION IN PROGRESS
Numéro Machine : 0000000000
Appuyer sur pour continuer
Langue : FRANCAIS
Personnalisation : Env. / Doc.
Det. Double Bac C : DEVALIDER
MACHINE SETUP
Serial Number : 0000000000
Press to confirm
CONFIGURATION MACHINE
key,
4125603C/B
10/10/2003
2.2.2 Settings for envelope formats and special documents
This menu allows adjustment for:
- format, size and position of the envelopes,
- position for moistening the glue on the flap,
- Special document formats.
Using the machine
33
Page 35

To perform these adjustments :
INITIALIZATION IN PROGRESS
Language : ENGLISH
Set : Env. / Doc.
Double Det. Bin C : ENABLE
- Select the line "SET. ENV / DOC" using the key
- Enter the manual adjustment menu using the key
SELECT THE ENVELOPE FORMAT
Set Standard envelope :
Set Special envelope :
Set Special document :
- Select the line you want to change, using the key
MACHINE SETUP
Serial Number : 0000000000
Press to confirm
,
,
Press to confirm
,
- Enter the manual adjustment sub-menu using the key ,
STANDARD ENVELOPE SETUP
4125603C/B
10/10/2003
Press to confirm
Envelope height : 105 mmmmSet
Envelope stop position : + 0 mm
Moistening position : 13 mm
- Select the line to be modified, using the key
- Adjust the value using the keys
- Store the adjustment by pressing
- Press
34
to return to previous menu.
ESC
Using the machine
Page 36

Changing the size:
Indicate the height of the envelope or document in millimeters
x mm
x mm
Correcting the stop position of the envelope:
You can correct the position of the envelope in order to insert
folded leaflets correctly. If the settings are incorrect, the envelope
may not be sealed correctly.
Set too high
Set too low
Correcting the moistening position:
This setting makes it possible to adjust the area to be moistened
on the envelope flap.
It may be necessary to adapt the moistening
to the shape of the flap or the thickness of the envelope in order to
ensure optimal adhesion.
Moistening area
Moistening limit
Moistening
position
Using the machine
35
4125603C/B
10/10/2003
Page 37

The settings indicated on the following screens
are the machine’s default settings.
Manual adjustment of standard envelopes
STANDARD ENVELOPE SETUP
Press to confirm
Envelope height : 105 mmmmSet
Envelope position : + 0 mm
Moistening position : 13 mm
Size: 105 mm to 125 mm, manually adjustable
(105, 108, 110, 114, 115, 120 and 125 mm)
Position correction: +7 mm to -8 mm, manually adjustable
(in 1 mm increments)
Moistening position:
13 mm to 45 mm, manually adjustable
(in 1 mm increments)
Manual adjustment of special envelopes
4125603C/B
10/10/2003
SPECIAL ENVELOPE SETUP
Press to confirm
Envelope height : 105 mmmmSet
Envelope position : + 0 mm
Moistening position : 18 mm
Size: 105 mm to 165 mm, manually adjustable
(in 1 mm increments)
Position correction: +7 mm to -8 mm, manually adjustable
(in 1 mm increments)
Moistening position: 13 mm to 45 mm, manually adjustable
(in 1 mm increments)
36
Using the machine
Page 38

Manual adjustment of special documents
SPECIAL DOCUMENT HEIGHT
SETUP
Press to confirm
Size : 178 mm
Size: 177 mm to 356 mm, manually adjustable
(in 1 mm increments)
4125603C/B
10/10/2003
Using the machine
37
Page 39

2.2.3 Double document detection activation/
ESC
desactivation (tray C)
To activate this mode:
- Select the line "Double Det. Bin C", using .
- Activate or deactivate using the keys
- Cancel any changes using the key
ESC
.
- Save changes to memory with the key .
- Exit the mode using the key
INITIALIZATION IN PROGRESS
Language : ENGLISH
Set : Env. / Doc.
Double Det. Bin C : ENABLE
MACHINE SETUP
Serial Number : 0000000000
Press to confirm
mode.
2.3 Other Advanced functions
2.3.1 Double Document Detection Activation/
Deactivation for trays A and B.
The double document detection is activated by
default on both trays A and B. To deactivate it,
use a stylus or paperclip to press a small button
located near the feeder socket. A message will
appear on the control panel screen.
4125603C/B
10/10/2003
38
Page 40

2.3.2 Displaying Job Adjustments
To access this screen:
- You should be in user mode.
- Press the
key and keep it pressed
ESC
- Press the key
The following screen will appear.
INFORMATION
Press ESC to exit
Fold A : 089 mm
Fold B : 097 mm
Envelope height : 105 mm
Counter : 12345
- Exit this screen using the
key to return to user mode.
ESC
4125603C/B
10/10/2003
C-fold
Double parallel fold
Using the machine
39
Page 41

3. LOADING DOCUMENTS
3.1 Loading documents (trays A and B in automatic
mode)
Documents are loaded vertically in the natural direction
of reading. The document containing the address must
always face the user. When both feeders feed
simultaneously (2 documents), the address document
must be in tray A.
1. Release the blue locking levers
Tray B
Lever in locked position.
Tray A
Lever in released position.
4125603C/B
10/10/2003
2. Adjust the lateral guides to the width of the document.
Guide for Trays A and B
in locked position.
40
Loading documents
Guide for Tray A
in unlocked position.
Page 42

3. Adjust the stack of paper by jogging it on a flat surface.
Insert the documents vertically,
facing the user. When feeding 2 documents, the sheet containing the
address must always be loaded into
tray A.
4. Lock the lateral guides and the blue locking levers.
Automatic feeding
- Avoid mixing documents of different sizes and
weights (thickness) in the same tray.
- In case of documents particularly difficult to
handle (uneven, smooth, rough or sticky), use
half of the capacity of the feeder
4125603C/B
10/10/2003
Curled documents:
Some laser printers curl the paper excessively.
We recommend flattening the printed paper
manually before inserting it into the machine.
If the job consists of a single document, tray A
and tray B can be loaded : the second tray will
start automatically when the first one is empty.
Loading documents
41
Page 43

3.2 Loading documents in manual mode (tray A)
Before selecting manual mode, remove any document previously
loaded in tray A.
Check and adjust the lateral guides if necessary.
Insert a document or a set of documents manually into tray A to start
the cycle.
4125603C/B
10/10/2003
Maximum 5 documents of 20 lbs bond (or 3 documents
of 24 lbs bond paper) can be folded and inserted at one
time.
42
Loading documents
Page 44

3.3 Loading envelopes
1. Unlock the lever backward
(to the
position)
"locked" position : forward
"unlocked" position : backward
2. Adjust the lateral envelope guides
3.Place the envelopes in the
envelope tray. The flap should
be closed, facing downwards and
towards the back of the machine.
4125603C/B
10/10/2003
Maximum capacity of the feeder : 65 envelopes
Loading documents
43
Page 45

4. Adjust the lateral guides to the
size of the envelopes, without
squeezing them.
Bottom of the envelope
Top of the envelope
5. Lock the lever forward
44
Loading documents
(in position
It is not necessary to adjust the guides each time
envelopes are loaded, as long as the same type
of envelope is being used.
).
4125603C/B
10/10/2003
Page 46

3.4 Loading small inserts and reply envelopes (tray C)
Slide the lateral envelope guides apart.
Take the stack of small inserts
or reply envelopes and jog it
on a flat surface.
4125603C/B
10/10/2003
Tip the pressure pad backward and holding it there,
insert the stack of small inserts
or reply envelopes into the
tray.
In the case of envelopes, the
flap should be closed, facing
upwards and towards the
user.
Loading documents
45
Page 47

Release the pressure pad
and bring the guides together
against the small inserts or
reply envelopes, without
squeezing them.
4125603C/B
10/10/2003
46
Page 48

SECTION C: HELP AND ADVICE
1. HELP GUIDE ........................................................................ 49
1.1 Error messages ..................................................... 49
1.2 Symptoms and Remedies ...................................... 55
2. JAM CLEARING ................................................................... 60
2.1 Clearing the feeders (trays A and B) ....................... 60
2.2 Unjamming the document path ................................ 61
2.3 Unblocking path of small inserts (tray C) ................. 61
2.4 Clearing the envelope tray ...................................... 62
3. CLEANING ............................................................................63
3.1 Cleaning the rollers ................................................. 63
3.1.1 Internal rollers ................................................ 64
3.1.2 Envelope Tray Rollers .................................... 65
3.1.3 Tray C Rollers ................................................ 65
3.1.4 A/B Feeder Rollers ........................................ 66
3.2 Cleaning/Replacing moistening brushes ................. 67
3.3 Cleaning the covers of the machine ........................ 67
SPECIFICATIONS ...............................................69
47
4125603C/B
10/10/2003
Page 49

4125603C/B
10/10/2003
48
Page 50

1. HELP GUIDE
1.1 Error messages
Screen message
CHECK THE
ENVELOPE TRAY
CHECK THE
DOCUMENT PATH
CHECK THE
CONNECTION OF
THE PAPER TRAYS
Probable
Cause(s)
• No envelope in the
holder.
• No envelope fed up by
the machine.
• Envelope distorted.
• Envelope crumpled
during its progress
through the
machine.
• The document or
envelope did not go out
of the tray:
• document is outside
the specification or
distorted.
• Paper overload.
Paper tray connector
disconnected (Trays A
and B).
Remedy
Reinsert envelopes.
Adjust the guides on tray E,
check that the envelope
path is clear (open the machine if necessary) then
START
or
press
STOP
the menu.
Open the machine, remove
paper and envelopes from
areas 1 to 8 or open shutter
7 then close the machine to
return to the menu.
Reconnect the connector,
open the machine, remove
paper and envelopes from
areas 1 to 8 and close the
machine again. Switch it off,
then on again.
to return to
ESC
4125603C/B
10/10/2003
CLOSE THE
MACHINE
Machine open or not
properly closed.
Close the machine in order
to continue.
Help guide
49
Page 51

Screen message
Probable
Cause(s)
Remedy
DOUBLE
DOCUMENT
DETECTION IN
TRAYS A-B
DOUBLE
DOCUMENT
DETECTION IN
TRAY C
SWITCH
THE MACHINE
OFF AND THEN
ON AGAIN
• Stuck Documents
• Document outside
the specification
• Stuck Documents
• Document outside the
specification
A/B Feeder Socket
disconnected
• Release the blue locking
levers, take out the documents.
• Separate the documents
stuck together. Replace
them in the trays, lock the
levers and press
START
STOP
or
ESC
to return to the menu.
• Open the machine and
remove the document from
the machine. Check its
thickness
• Take out the stack from
Tray C and separate documents stuck together.
START
Press
STOP
or
to return
ESC
to the menu.
• Switch off the machine,
reconnect the socket
and switch on.
• Open the machine,
remove the documents
and envelopes from
areas 1 to 8 and close it
again.
4125603C/B
10/10/2003
OPEN THE
MACHINE AND
CLOSE IT AGAIN
50
Help guide
The machine was
unable to run through
its normal cycle.
• Open the machine,
remove the documents and
envelopes from areas 1 to 8
and close it again.
Page 52

Screen message
Probable
Cause(s)
Remedy
KEYBOARD FAULT
CHECK THE
REAR GUIDE
OF THE
ENVELOPE TRAY
CHECK THE
ENVELOPE PATH
When powered up,
one or more keys on
the keyboard are
depressed.
Envelope size does not
match the position of
the rear guide.
Double envelope
detected.
Envelope jammed in
the machine.
Check if one key is not
stuck.
• Adjust the rear guide of the
envelope tray (tray E)
according to the size of the
envelopes
• Open the machine and
check that the envelope
path is clear.
Open the machine and check
the envelope path
.
4125603C/B
10/10/2003
CHECK THE
WATER TANK
This message is only
a reminder.
Open the machine, check the
water level and fill up the
reservoir if necessary. (See
Chapter "Filling the
moistening tray")
Help guide
51
Page 53

Screen message
Probable
Cause(s)
Remedy
REMOVE THE
DOCUMENTS
FROM THE ENTRY
OF TRAYS A + B
NO DOCUMENT
IN THE TRAY(S)
CHECK THAT DO-
CUMENTS ARE
MOVING
CORRECTLY OUT
OF TRAYS A,B
REMOVE
DOCUMENTS
FROM TRAY A
Document(s) jammed
in the entry of the
feeder A (and/or B)
stopping the cycle.
The machine has not
detected a document
in any tray.
Document jammed in
entry A (and/or B),
preventing the cycle
from running its
course.
The documents in tray
A do not match the job
selected.
Open the entry of the
tray, using the lever,
remove the jammed
document and return
the lever to its locked
position then press
ESC
to return to the
or
START
STOP
menu.
Insert documents in
tray(s) A, B or C.
Open the entry of the
tray, using the lever,
remove the jammed
document and return
the lever to its locked
position then press
to return to the
or
ESC
START
STOP
menu.
Open the entry to tray
A using the lever.
Remove the documents and return the
lever to its locked po-
sition then press
or
to return to the
ESC
START
STOP
menu.
4125603C/B
10/10/2003
52
Help guide
Page 54

START
STOP
Screen message
Probable
Cause(s)
Remedy
DOUBLE
DETECTION,
CHECK
CONTENTS OF
ENVELOPE
CHECK PAPER
PATH OF TRAY C
CHECK THAT DO-
CUMENTS ARE
MOVING
CORRECTLY OUT
OF TRAY C
Stuck Documents
Document outside the
specification or detector
failure.
. Document outside the
specification or
distorted.
. Paper overload.
Document stopped in
insert path (entry C),
preventing the cycle from
completing.
Ensure the remaining documents are not stuck.
Check the contents of the
envelope. If the envelope
does not contain a double
document, remove the documents from the trays, jog
them and put them back in
the trays or switch off the
double detection, then press
or
to return to the
ESC
menu.
Apply the clearing
procedure described in the
chapter "Clearing small
insert path (tray C)"
. Check the document position in the tray C.
.Apply the clearing
procedures described in
the chapters " Clearing
small insert path (tray C)"
and "Clearing document
path".
4125603C/B
10/10/2003
CLOSE TRAY C
. Insert Path is open
. Tray C is open
or improperly closed.
Close path and tray then
START
ESC
to return to
STOP
or
press
the menu.
Help guide
53
Page 55

Screen message
OPEN
THEN CLOSE
THE MACHINE
Probable
Cause(s)
The machine was unable
to run through its normal
cycle.
Remedy
Open the machine, remove
the documents if any are
jammed inside and close
the machine again.
JOB DEFECT
Er3
Minor defect, it has
become impossible to
use this job.
Select another job from the
list.
4125603C/B
10/10/2003
54
Help guide
Page 56

1.2 Symptoms and remedies
Machine jammed
CAUSES
REMEDIES
1/ The authorization code
was not entered.
1/ Enter the
authorization code, see
“Installation and Startup” section.
Envelope not closed or improperly closed
CAUSES
1/ Inadequate moistening
REMEDIES
1/ See Remedy insufficient
moistening
2/ Wrong job selection
2/ Select "SEAL" in the line
"ENVELOPE"
3/ Document/small insert
non-compliant or incompatible
4/ Job non-compliant with
3/ Check document
compliance with job or check
machine specifications
4/ Check job content
documents used
5/ Documents incorrectly
inserted
5/. Check settings of lateral
guides for documents, small
inserts and envelopes . Clean
selection and folding rollers if
necessary, see chapter
"Cleaning the rollers"
4125603C/B
10/10/2003
The content of the letter is wet
CAUSES
1/ Wrong moistening
REMEDIES
1/ See section "Advanced
settings
Functions","Setting
envelope and special
document formats"
Help guide
55
Page 57

2/ Exit roller wet
Faulty fold
2/ Wipe the exit roller, see
section "Cleaning the
rollers"
CAUSES
1/ Side-guides incorrectly
locked or unlocked
REMEDIES
1/
Adjust the document, small
insert and envelope guides,
see "Loading the document"
2/ See the chapter
2/ Dirty rollers
"Cleaning the rollers"
3/ Lock the A/B Feeder
3/ Trays A and/or B
blue levers
incorrectly locked
Keyboard fault
CAUSE
1/ One or more keys stuck
REMEDY
1/ Check to see whether a
key is stuck
Rate slowdown and irregular functioning
CAUSES
1/ Side-guides too tight
against the paper
REMEDIES
1/ Adjust the document,
small insert or envelope
side-guides, see
"Loading the documents"
4125603C/B
10/10/2003
2/ Documents or small
inserts wrong size or not
straight and flat
3/ Dirty rollers
56
Help guide
2/ Check the specifications
or, if necessary, adjust/
correct the shape of the
documents.
3/ Clean the rollers, see
"Cleaning the rollers"
Page 58

4/ Document, small insert
or envelope trays
overloaded
4/ Load fewer documents in
the trays- see
specification
5/ Trays incorrectly locked
5/ Lock the trays
Address incorrectly positioned in the window
CAUSE
1/ Fold in wrong place
REMEDY
1/ Adjust the height of the
address in your job.
Shifted documents in trays A and B
CAUSES
1/
Dirty selection rollers
2/ Tray A or B lateral gui-
des too tight
REMEDIES
1/ See "Cleaning the rollers"
2/ Adjust the lateral guides,
see "Loading the documents"
3/ Trays A and/or B
incorrectly locked
3/ Lock the A/B Feeder blue
levers
4125603C/B
10/10/2003
Double Documents not detected
CAUSE
1/ Mixed documents of
REMEDY
1/ Process different types of
different types or out of
specification documents
2/ Double detection not
2/ Activate Double
activated
paper separately or see
specifications
detection, see "Other
advanced functions"
Help guide
57
Page 59

Documents ejected above/below envelope
CAUSE
1/ Envelopes incorrectly
loaded
2/ Envelope out of
specification
Insufficient moistening
CAUSE
1/ Moistening tray empty
2/ Wrong envelope selection,
open/closed
3/ Dirty moistening brushes
4/ Worn moistening brushes
REMEDY
1/ Correctly position the
envelopes in their tray, see
"Loading the envelopes"
2/ See specification
REMEDY
1/ Fill the moistening tray, see
"Installation and Start-up"
2/ Select "SEAL" in the line
"ENVELOPE"
3/ Clean the brushes, see
Section "Cleaning"
4/ Replace the moistening
brushes, see Section
"Cleaning"
4125603C/B
10/10/2003
5/ Envelope out of
specification
6/ Poor quality envelope
7/ Wrong moistening settings
Jamming
CAUSES
1/ Wrong job selected for
application
58
Help guide
5/ Check the specifications
6/
Check quality of seal by
sealing the envelope
manually
7/ See section "Advanced
Functions"
REMEDIES
1/ Select the job
corresponding to your
documents/application
Page 60

2/ Type or size of fold
unsuited to envelope
2/ See Specifications
3/ Documents or envelopes
outside the specifications
or distorted
4/ Dirty rollers
5/ Lateral guides incorrectly
adjusted and/or
incorrectly locked
6/ Too many documents
inserted simultaneously
7/ Envelopes incorrectly
loaded
8/ Small inserts incorrectly
loaded
9/ Faulty closure of small
insert path
3/ See Specifications
4/See Section "Cleaning the
rollers"
5/ See Section "Loading the
documents"
6/ See specifications
7/ Position the envelopes
correctly in the tray, see
section “Loading
Envelopes”
8/ Position the small inserts
correctly in the tray, see
section "Loading the
documents
9/ Close the small insert
path, see section
"Unblocking path of small
inserts"
4125603C/B
10/10/2003
10/ Unspecified error
10/ Switch the machine off;
clear the documents and
envelopes jammed inside
the machine; switch the
machine on again.
Help guide
59
Page 61

2. JAM CLEARING
2.1 Clearing the feeders (tray A and B)
Switch off the machine.
Tip the feeder forward
and unplug the connector.
Take out the feeder from
the base.
Remove the jammed
document through the
lower part of the feeder.
4125603C/B
10/10/2003
After unjamming, place the
feeder back on the base and
plug in the feeder connector.
60
Jam clearing
Page 62

2.2 Unjamming the document path
88
8
88
EE
E
EE
Open the machine, remove any
documents in areas 1 to 8 and
behind the shutter 7 (to release
the jammed documents, turn
blue flywheel or roller E).
77
7
77
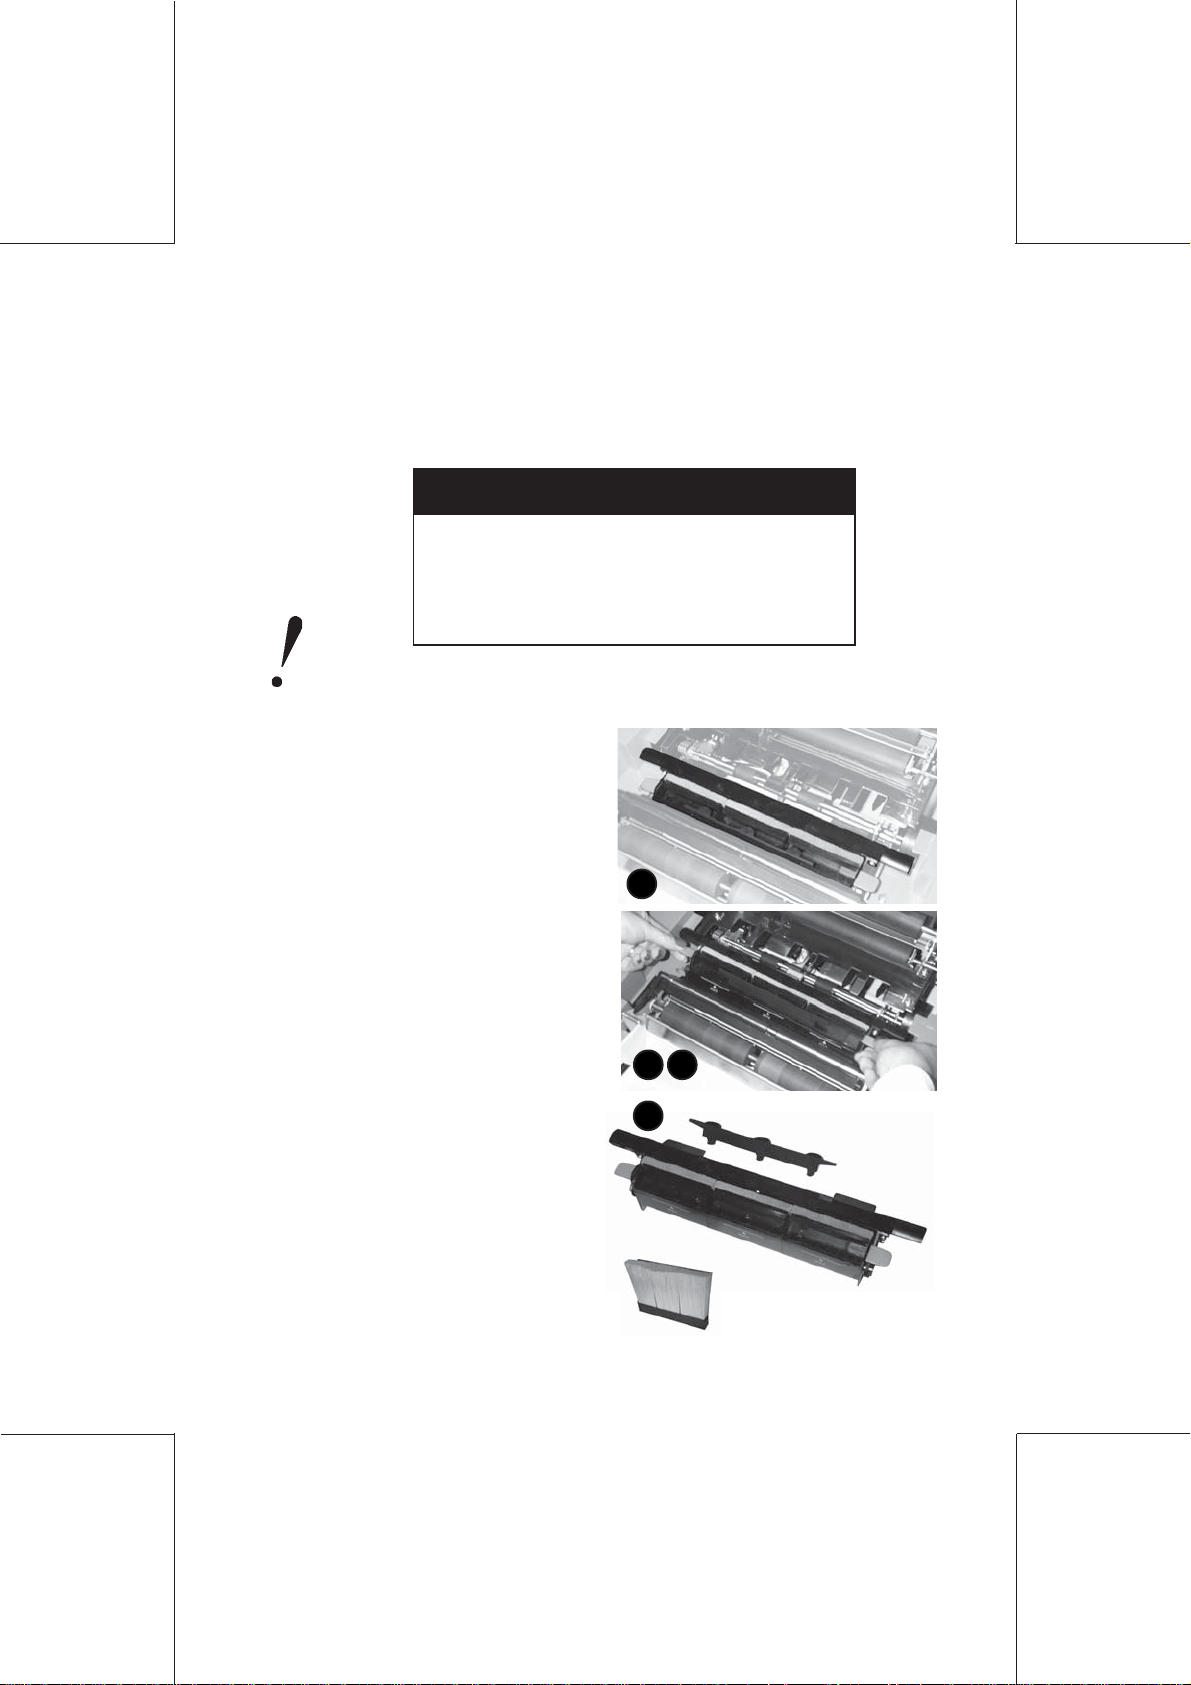
2.3 Unblocking path of small inserts (tray C)
Pinch the opening control
located at the back of tray C:
it will then tip backward.
In the back part of the base,
squeeze the two plates
together and raise the
assembly. The small inserts
path will then become accessible. Remove the
jammed small inserts. Close
by pressing firmly in the center
until the tray locks into place.
Jam clearing
61
4125603C/B
10/10/2003
Page 63

2.4 Clearing the envelope tray
In case of Envelope jamming, perform the following procedure:
- Open the machine, take out the jammed envelope(s) through
the internal paper path.
- if some envelopes are still jammed, close the machine, remove
the envelope stack and take out the last envelope squeezed by
the rollers. For this last envelope, push up the separation plates
while pulling the envelope.
4125603C/B
10/10/2003
62
Jam clearing
Page 64

3. CLEANING
3.1 Cleaning the rollers
The cleaning of the rollers offers the following benefits:
- Improved paper take-up from the document, small insert and
envelope trays,
- Reduced risk of paper jams,
- Preserves the roller material.
To ensure optimal working of the machine, we recommend to
clean all rollers at the same time. This operation will take
approximately ten minutes (time required for the rollers to dry)
It is necessary to remove all the documents from all the trays
(including envelopes) before starting.
4125603C/B
10/10/2003
Cleaning
63
Page 65

3.1.1 Internal rollers
- Open the machine
- Use a cleaning product recommended by your vendor/
reseller and apply it with a lint-free cloth.
Wipe each rubber roller while turning it manually.
Rollers to
be cleaned
4125603C/B
10/10/2003
64
- Close the machine
Cleaning
Page 66

3.1.2 Envelope Tray Rollers
Use a cleaning product recommended by your vendor/reseller
and apply it with a lint-free cloth.
Wipe each rubber roller while turning it manually.
3.1.3 Tray C Rollers
Use a cleaning product recommended by your vendor/reseller
and apply it with a lint-free cloth. The rollers identified by a
yellow arrow (rear view with tray C lowered) are the ones to
be cleaned.
Wipe each rubber roller while turning it manually.
4125603C/B
10/10/2003
Cleaning
65
Page 67

3.1.4 A/B Feeder Rollers
- Power up the machine
- Select feed method "AUTO 1"
- Impregnate 25 mm of the lower part of a 24 lbs bond sheet of
paper with the cleaning product supplied by your service provider.
- Place the sheet of paper in the tray, with the strip impregnated
with the cleaning product at the bottom.
- While holding the sheet with your hand, press the start key
several times, so that the rollers can rub against the sheet. Then
release the sheet so it can engage in the machine, pressing the
START
STOP
key.
- If necessary, you can
repeat the operation
using a new sheet.
- To complete the
cleaning process,
insert two or three
clean, blank sheets in
the normal way, before
resuming normal
documentprocessing.
4125603C/B
10/10/2003
66
Cleaning
Page 68

3.2 Cleaning/Replacing moistening brushes
1. Open the machine
2. Remove the moistening tray by holding it with the
blue handles.
3. Remove the 3 brushes
4. Clean them with a thin trickle of water
5. If these brushes are worn, replace them with new
ones.
6. Put back the brushes in the tray
7. Fill the tray with water and make sure brushes
are properly impregnated
8. Insert the moistening tray in its location (with blue
handles frontwards)
9. Close the machine
3.3 Cleaning the casing of the machine
Clean with a damp cloth and a slightly soapy solu
tion.
4125603C/B
10/10/2003
Cleaning
67
Page 69

4125603C/B
10/10/2003
68
Page 70

SPECIFICATIONS
Feeder (Trays A and B)
Standard documents
A4 (210 x 297mm), LETTER US (8
LEGAL (8
Width 5
Height 3
Coated paper* 24 lbs to 32 lbs
Printed matter, listing paper,
photocopies, offset 20 lbs to 32 lbs
1/2"
x 14")
Other dimensions
In 1 mm increments
Paper quality
In automatic mode
24 lbs to 40 lbs
In manual mode (tray A)
in automatic and manual mode
5/8
1/8"
7/8
" to 8
" (142 to 226 mm)
to 14" (80 to 356 mm)
1/2"
x 11")
4125603C/B
10/10/2003
Capacity of trays
Standard paper 100 sheets weighing 20 lbs
In case of documents particularly difficult to handle (uneven, smooth,
rough or sticky), use half the capacity of the feeder
*perform a test.
Use of this paper requires frequent cleaning of all the
rollers.
Specifications
69
Page 71

Tray B
Size
Width 5
Height 3
5/8
1/8"
" to 8
7/8
" (142 to 226 mm)
to 14" (80 to 356 mm)
Paper quality
Coated paper* 24 lbs to 32 lbs
In automatic mode
Printed matter, listing paper,
photocopies, offset 20 lbs to 24 lbs
in automatic and manual mode
*perform a test.
Use of this paper requires frequent cleaning of all the
rollers.
The insert should always be positioned behind the main
document so that it cannot be seen through the window of
the envelope.
4125603C/B
10/10/2003
70
Specifications
Page 72

Tray C
(enclosed small format documents)
Size
Width 5
Height 3
5/8
1/8"
" to 8
to 5
7/8
" (142 to 226 mm)
7/8"
(80 to 150 mm)
Paper quality
Printed matter, listing paper,
Photocopy paper 24 lbs to 32 lbs
Offset paper, Bristol board,
*Coated paper 24 lbs to 65 lbs
*Coated paper
pre-folded 24 lbs to 45 lbs
Reply envelope 20 lbs to 24 lbs
With or without window
*perform a test.
Use of this paper requires frequent cleaning of the traction
rollers.
4125603C/B
10/10/2003
Capacity of tray 100 reply envelopes
200 inserts of 65 lbs
Specifications
71
Page 73

Envelope Tray
Size
Width 8
Height 3
6/8
1/2
" to 9
" to 4
1/2
" (224 mm to 240 mm)
7/8
" (90 mm to 125 mm)
Folding and insertion capacity
C fold Up to 5 sheets 20 lbs
Up to 3 sheets 24 lbs to 32 lbs
Double parallel fold Up to 3 sheets 20 lbs (hand feed
only)
Up to 2 sheets 24 lbs to 32 lbs
Insertion without folding 1 small insert
Maximal insertion capacity : Up to 5 sheets
72
Specifications
20 lbs to 65 lbs
20 lbs (hand feed)
4125603C/B
10/10/2003
Page 74

USER'S GUIDE
FOLDING
AND
INSERTING MACHINE
4125603C/B
10/10/2003
Page 75

4125603C/B
10/10/2003
4125603C/B - 10/10/2003
 Loading...