

Page 1

FD 4170
Cut Sheet Burster
4/2010
OPERATOR MANUAL
FIRST EDITION
Page 2

Page 3

TABLE OF CONTENTS
TOPIC PAGE
SPECIFICATIONS 1
UNPACKING & SET-UP 1
INPUT SIDE 2
OUTPUT SIDE 3
OUTPUT CONVEYOR (OPTIONAL) 3
CONTROL PANEL 4
POWERING UP 4
ADJUSTING PROCESSING SPEED 4
LCD DISPLAYS FOR SET-UP & OPERATION 5
STEPS OF SET-UP & OPERATION 6
MANUAL SETTING 7
EXAMPLES OF CUT SIZES 7
LOADING PAPER 8
PREPARATION BEFORE OPERATION 9
COUNTER DISPLAY & RESET 10
PRESET MODE 10
PRESET TABLES 11
PRESET SELECTION SETTING 11
TO INPUT FIXED PRESET 12
TO CANCEL FIXED PRESET 12
TO INPUT FREE SIZE PRESET 13
TO CANCEL FREE SIZE PRESET 13
OPTIONAL CONVEYOR OPERATION 14
TROUBLE-SHOOTING 14
ERROR DISPLAY GUIDE 15
CLEARING ERROR MESSAGES 16 - 21
Page 4

Page 5
SPECIFICATIONS
■ Preparation Before Using Machine
1. Remove the setscrew from the right side of the
paper stacker, and insert the axis into the holes
of the machine frame on the both sides.
Then install the paper stacker with the setscrew
removed.
■ Preparation Before Using Machine
1. Remove the setscrew from the right side of the
paper stacker, and insert the axis into the holes
of the machine frame on the both sides.
Then install the paper stacker with the setscrew
removed.
2. Remove the thumb screws in the circles and
attach the columns on the right and left hooks,
and fasten thumb screws.
Speed: 5-level speed adjustment: 42, 64, 89, 114, 140 sheets/minute
Feed Tray Capacity: Up to 400 sheets
Paper Size: 5” - 17” H x 4” - 11” W
Paper must not have staples, clips, adhesive or holes.
Paper Weight: 13# bond - 110# index (58 - 175 gsm)
Min./Max. Burst Length: 2.5” - 9.9”
Dimensions: 32” L x 9” H x 16” D
Weight: 56 lbs.
Voltage: 120V, 60 Hz
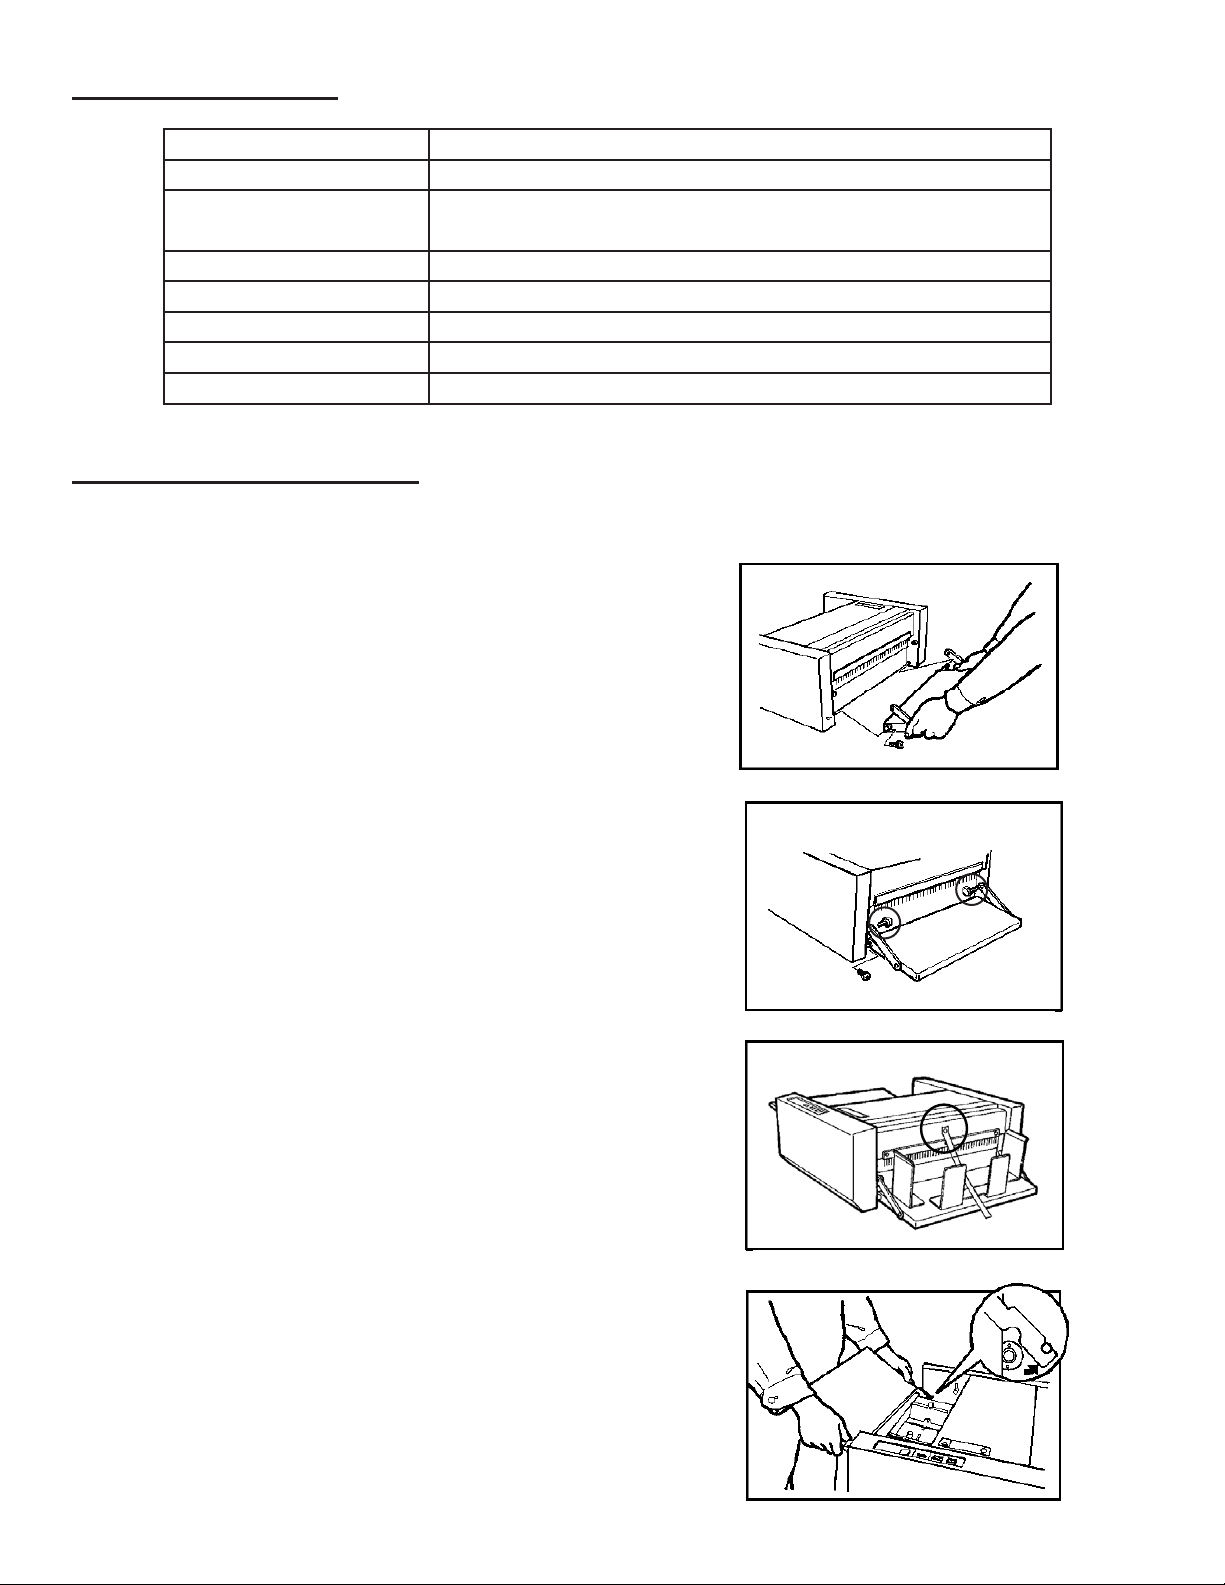
UNPACKING & SET-UP
Check package for shipping damage. If there is shipping damage, do not discard the box.
1. Facing the output side, remove the setscrew from the
right side of the paper stacker, and insert the axis into
the holes of the machine frame on both sides. Then
install the paper stacker with the setscrew removed.
2. Remove the thumb screws (in the circles) and attach
the columns on the right and left hooks, then fasten the
thumb screws.
3. Remove the screw (see circled area, right) and install
the paper holding plate attachment. Set the paper stopper and paper guides as shown in the picture.
4. Insert the edge of the support tray into the right and left
columns of the paper infeed tray. Then set the support
tray downward.
1
Page 6
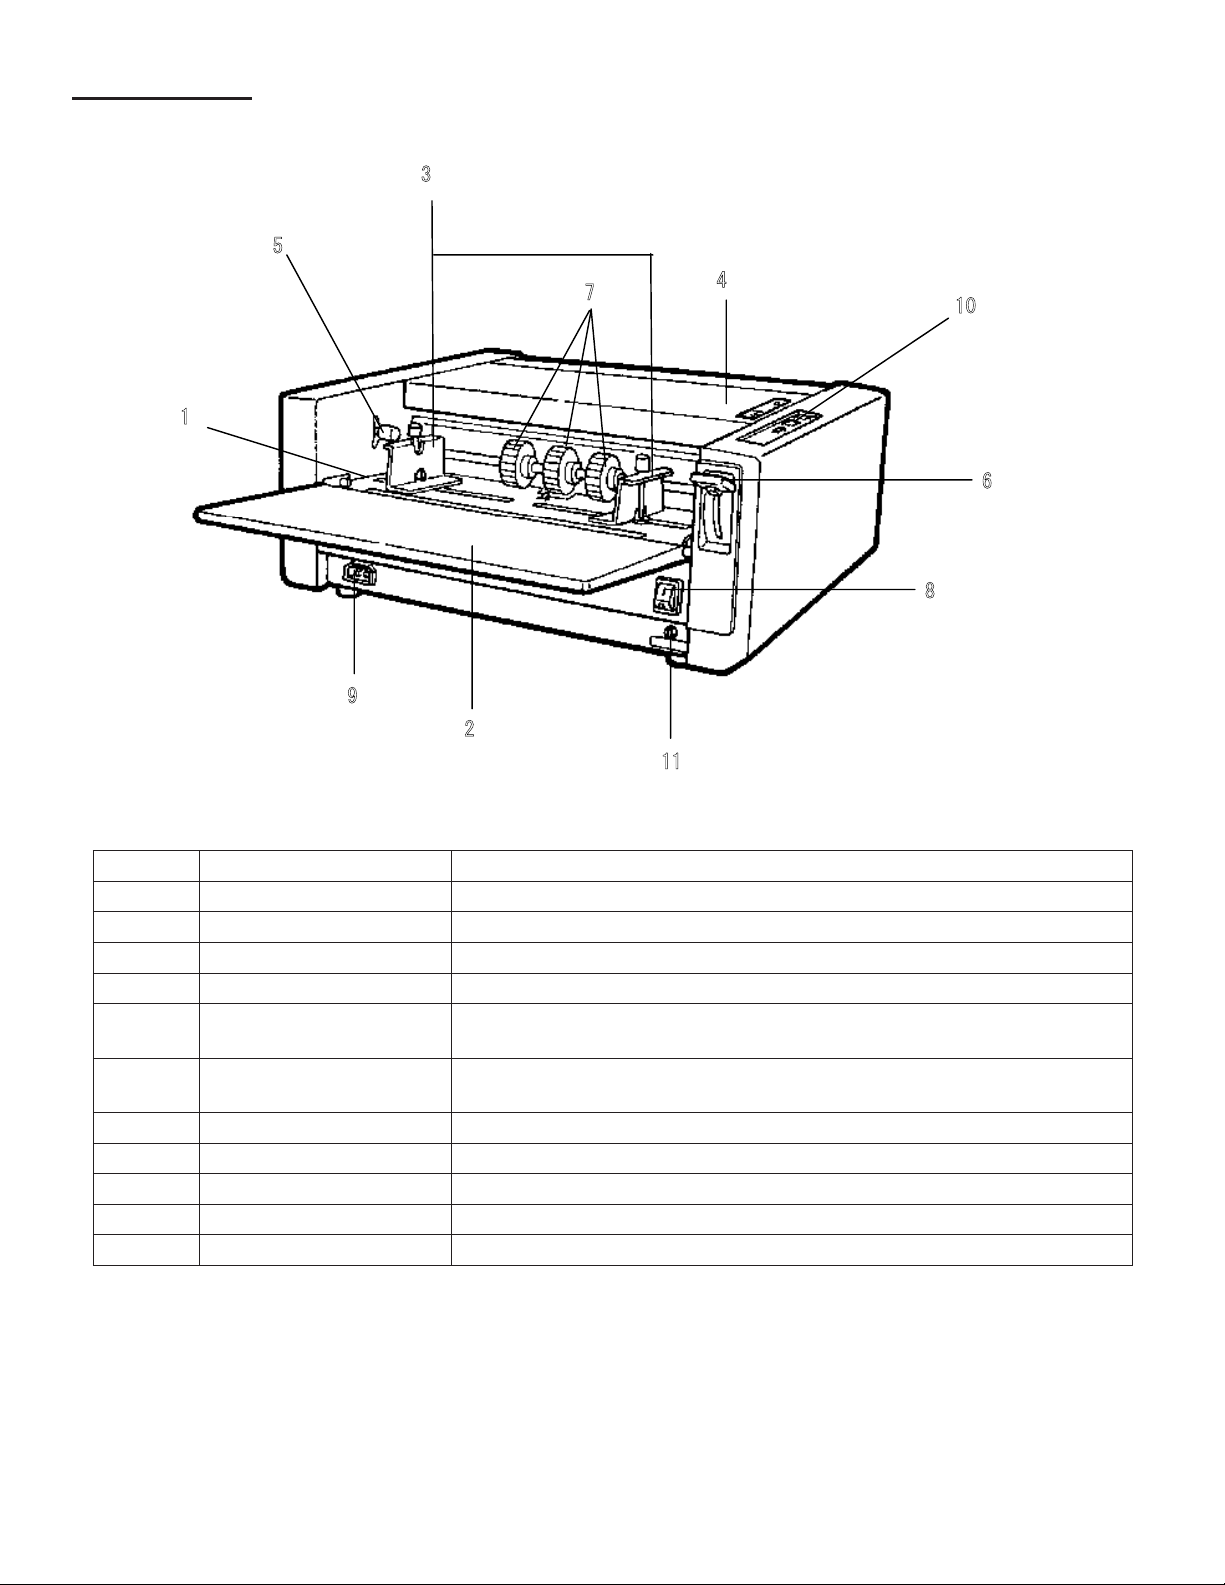
■ Part Names and Their Functions
● Appearance (front side)
INPUT SIDE
5
1
9
3
7
2
4
0
1
6
8
1
1
Number Description Function
1 Paper Feed Tray
2 Support Tray Open this tray prior to operating to support paper.
3 Paper Feed Guides Align and center paper according to width.
4 Safety Cover Must be closed during operation. Burster will not operate with cover open.
5 Paper Feed Pressure
Adjusting Lever
6 Paper Feed Tray
Up/Down Lever
7 Paper Feed Rubber Roller Feeds paper into the bursting area.
8 Power Switch Toggles between ON (I) and OFF (O).
9 Power Cord Inlet Insert power cord here.
10 Control Panel Refer to Control Panel on page 4.
11 Circuit Breaker Shuts down machine in case of overload.
Adjusts paper feed pressure according to paper thickness. Standard setting is “Normal Paper.”
Moves the paper feed tray up and down.
2
Page 7
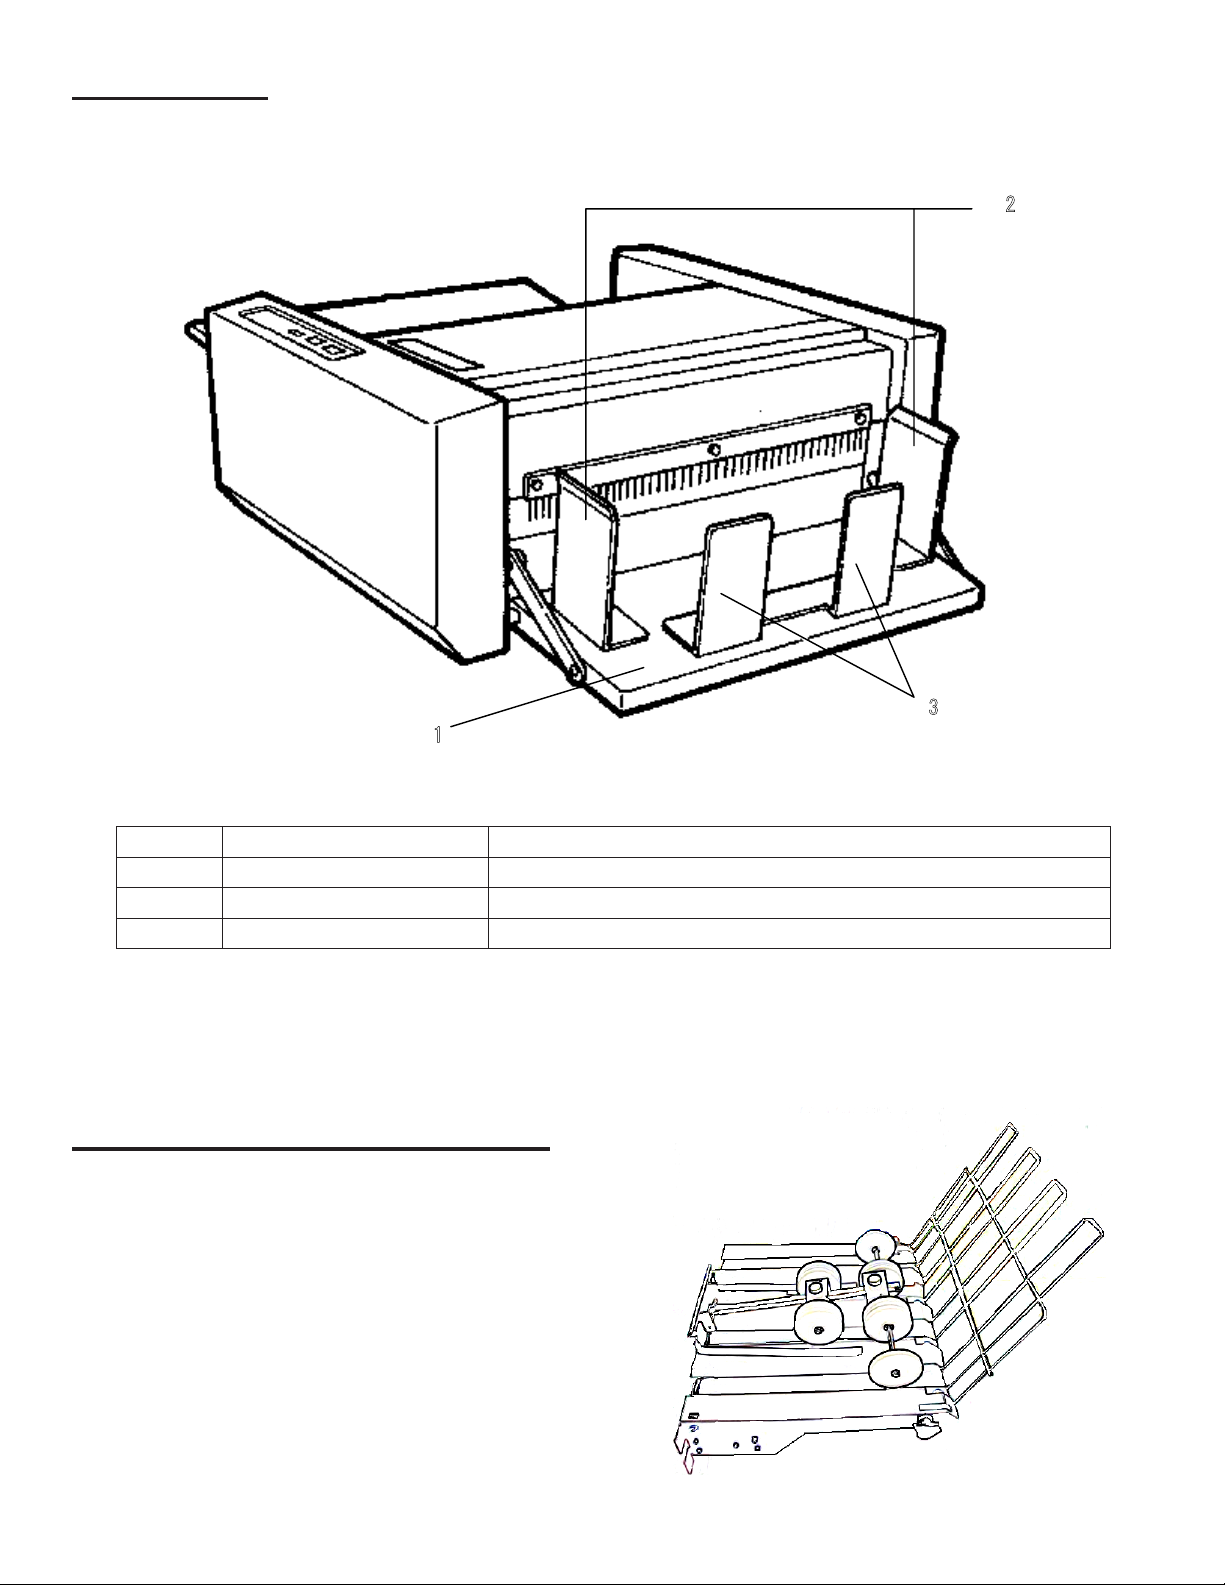
● Appearance (exit side)
OUPUT SIDE
1
3
2
Number Description Function
1 Stacker Burst forms stack here upon exiting.
2 Paper Guide Should be set according to the width of the burst forms.
3 Paper Stopper Should be set according to the length of the burst forms.
OUTPUT CONVEYOR (optional)
With the optional Output Conveyor, burst forms can be
easily removed while the burster is still operating.
3
Page 8
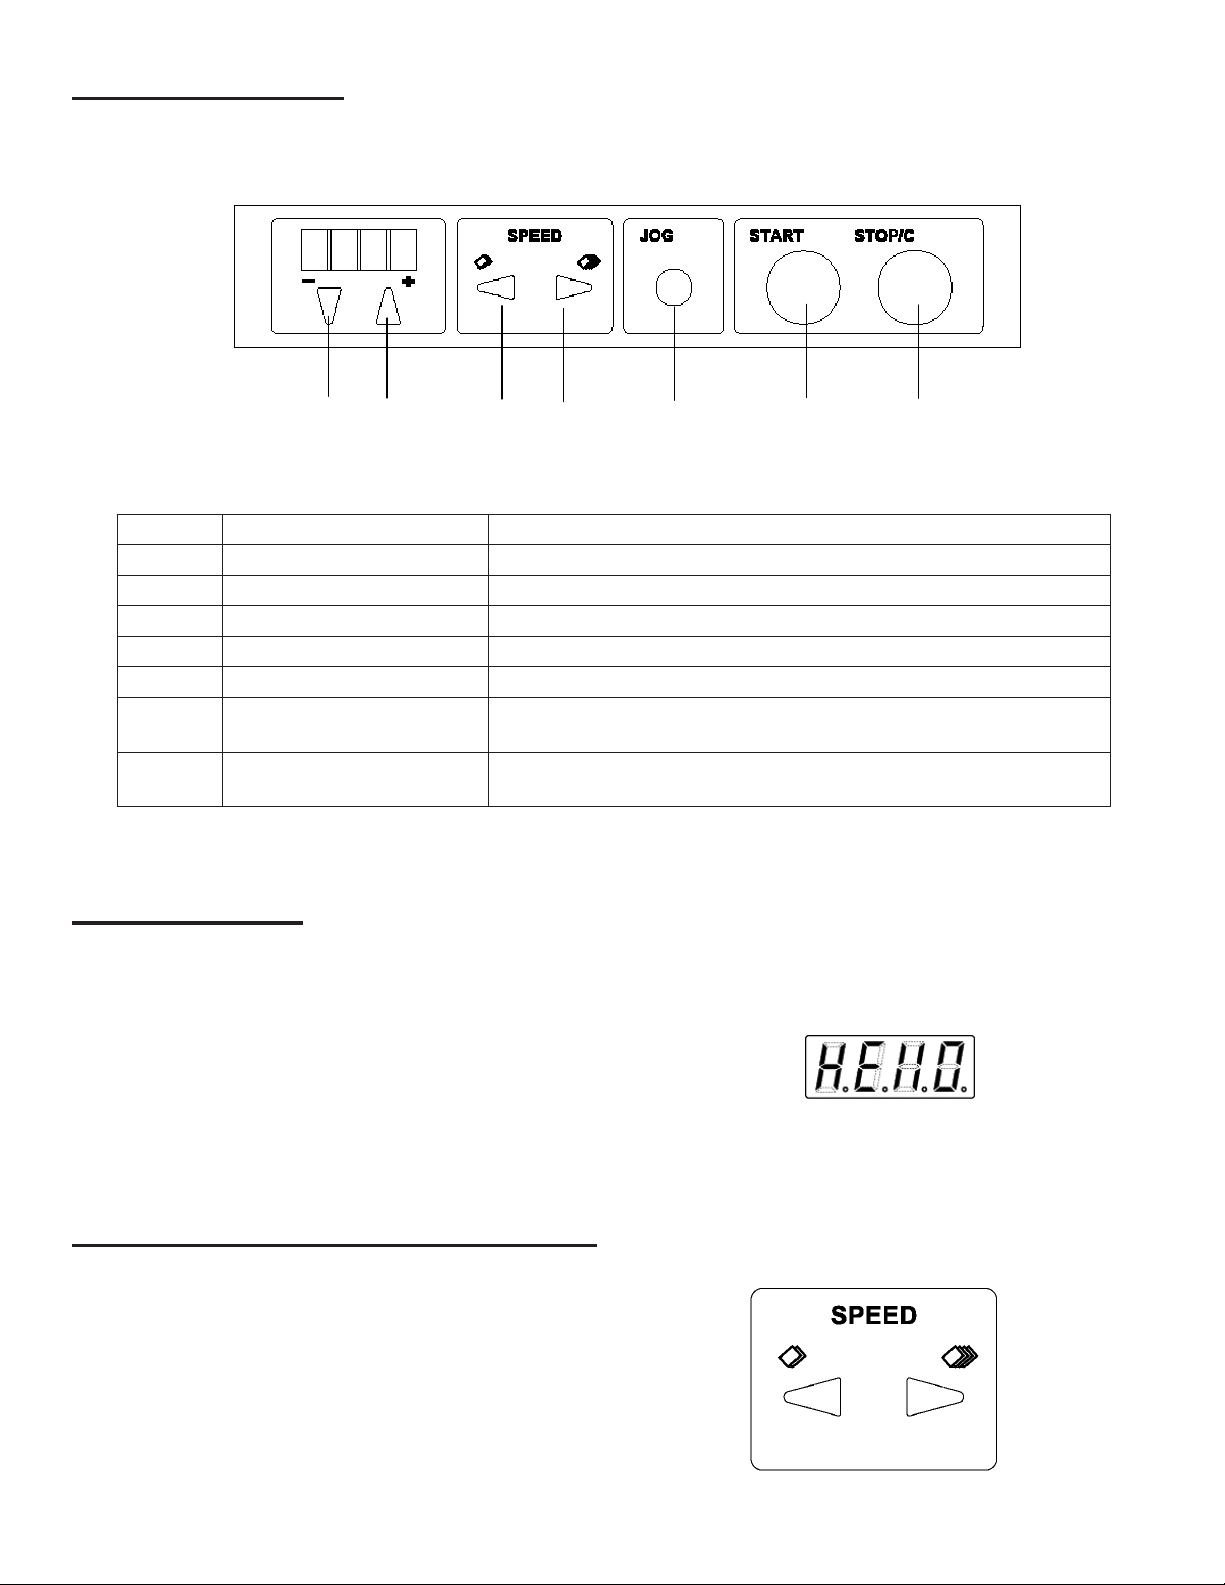
● Operation Panel
CONTROL PANEL
Number Description Function
1 “-” Button Use to decrease cut size on LCD display
2 “+” Button Use to increase cut size on LCD display
3 Decrease Speed Button Decreases processing speed, also used to select Presets
4 Increase Speed Button Increases processing speed, also used to select Presets
5 JOG Button Press this to process one sheet of paper
6 START Button Press to start operation. NOTE: This button is inoperative when an
7 STOP/C Button Press to stop operation. NOTE: When this button is pressed after a
1 2 3 4 5 6 7
error is displayed, or no paper is in the infeed tray.
paper jam is cleared, the indicator will be reset.
POWERING UP
1. Plug power cord into inlet on Infeed Side of burster.
Plug into wall outlet with appropriate power capacity.
2. Press power switch to the “I” position.
3. When the power is turned on, “HEll0” appears in the
LCD area of the control panel.
4. To turn off power, press switch to “O” position.
ADJUSTING PROCESSING SPEED
To adjust between speed levels, press either of the speed
buttons. Speeds include 42, 64, 89, 114, or 140 sheets per
minute.
To decrease speed, press the left SPEED button.
To increase speed, press the right SPEED button.
4
Page 9

LCD DISPLAYS FOR SET-UP AND OPERATION
Selection)
Selection)
Displays preset fixed cut size.
Selection)
Selection)
Displays preset fixed cut size.
Selection)
Displays preset cut size.
Selection)
Displays preset fixed cut size.
Selection)
Displays preset cut size.
Selection)
Displays preset fixed cut size.
Selection)
Displays preset cut size.
Registration)
Registration)
Displays fixed cut size for preset registration/cancel.
registration)
Displays fixed cut size for preset registration/cancel.
key)
Registration)
Displays fixed cut size for preset registration/cancel.
registration)
Registration)
Displays fixed cut size for preset registration/cancel.
registration)
Displays fixed cut size for preset registration/cancel.
Display for Start
Appears when the power is turned on.
Display for Stand-by Status
Appears when Manual Setting is selected.
Appears when Preset Selection Setting is chosen (Fixed Preset Selection).
Displays pre-set xed cut size.
Appears when Preset Selection Setting is chosen (Free Size Preset Selection).
Displays pre-set cut size.
Displays counter (appears by pressing the STOP/C button).
Display for Pre-Set Mode
Display for Bursting
Displays cut speed, Speed 1 - 5 (appears by pressing one of the SPEED buttons).
Displays independent operation of optional unit (appears by pressing the
STOP/C button and JOG button simultaneously).
Appears when preset registration/cancel is executed (Fixed Preset Registration).
Displays xed cut size for preset registration/cancel.
Appears when preset registration/cancel is executed (Free Preset Registration).
Displays xed cut size for preset registration/cancel.
Counter
Bursting speed: Speed 1 -5 (appears by pressing one of the SPEED buttons).
5
Page 10

STEPS OF SETUP AND OPERATION
■ Procedure of Use
(pg 7)
(p.19) Manual Setting: Standard mode inputting cut size on a case-by-case basis
(pg 11)
(p.24) Preset Selection Setting: Convenient function registering frequently used cut size
Manual Setting and Preset Selection Setting cannot be selected simultaneously.
When cut size is registered in Preset Mode (p.25), Preset Selection Setting is automatically
selected.
When you desire to return the setting to manual setting, cancel all preset registrations.
Refer to “■ Fixed Preset Registration/Cancel” or “■ Free Size Preset Registration/Cancel”
on pages 27 - 28 for canceling preset registration.
12-13
■ Preparation Before Using Machine (p.17)
Unpacking & Set-up (page 1)
■ Turning On the Power (p.18)
in advance and easily retrieving the registered cut size
(pg 10)
(page 4)
Register desired size in
Preset Mode. (p.25)
Manual Setting (p.19) Preset Selection Setting (p.24)
Preparation Before Operation (Setting paper stacker, Speed adjustment) (p.22)
(pg 7) (pg 11)
Loading Paper (page 8)
Setting Paper (p.21)
Start operation.
(pg 10)
(pages 1-4)
6
Page 11

● Setting example
MANUAL SETTING
Manual Setting is a standard mode in which each cut size is input individually for each project.
NOTE: When cut size is input as Preset Setting, “Preset Selection Setting” is automatically selected. “Manual Setting” and
“Preset Selection Setting” cannot be selected simultaneously. Cancel all preset inputs to change “Preset Selection Setting” to “Manual Setting.” Refer to Fixed Preset Input/Cancel or Free Size Preset Input/Cancel on pages 12-13 for more
information.
1. Turn on power. Machine is in stand-by mode. Previous cut size will be shown in LCD display.
2. Input cut size.
The value of each digit is increased by pressing the “+” button, decreased by pressing the “-” button.
Refer to the Cut Size Chart below. Abbreviate the value for cut size to the rst decimal place.
NOTE: Setting range is 0, 2.5-9.9 inches. When cut size is set to 0, the paper is fed without bursting.
3. Refer to Preparation Before Operation on page 9.
EXAMPLES OF CUT SIZES
When setting cut size, abbreviate to the rst decimal place.
Paper size Number of
cuts
8.5” x 11” Vertical
8.5” x 11” Horizontal
8.5” x 14” Vertical
11” x 17” Horizontal
2 8.5” x 5.5” 5.5
3 8.5” x 3.67” 3.6
4 8.5” x 2.75” 2.7
2 11” x 4.25" 4.2
3 11” x 2.83” 2.8
2 8.5” x 7.0” 7.0
3 8.5” x 4.67” 4.6
4 8.5” x 3.5” 3.5
5 8.5” x 2.8” 2.8
2 11” x 8.5” 8.5
3 11” x 5.67” 5.6
4 11” x 4.25” 4.2
5 11” x 3.4” 3.4
6 11” x 2.83” 2.8
Finished size (inch) Set value of cut size
(Truncate to first decimal
place)
7
Page 12

LOADING PAPER
1. Fan the sheets to loosen, which will decrease static
electricity and reduce the chance of a paper jam or
misfeed.
2. Lower the up/down lever on the paper feed tray and
place the paper on the tray. Adjust the paper feed
guides on both sides, then tighten the setscrews.
3. Adjust the paper feed pressure adjustment lever to the
thickness of the paper. Usually it is set to “NORMAL.”
If the paper cannot be fed, set the pressure adjust lever
to “HEAVY.”
If double feeding occurs, set the lever to “LIGHT.”
4. Raise the up/down lever.
8
Page 13

Ex.: Speed 1
PREPARATION BEFORE OPERATION
■ Preparation Before Operation
1.Set bursting speed.
Ex.: Speed 1
Setting range: Speed 1 - 5
Speed
Number of sheet processed
[sheet/min.]
(A4 vertical)
1 / JOG 40
2 60
3 84
4 107
5 130
2.Feed the paper by pressing the JOG key to
perform test cut.
* If test cut does not succeed, check the cut size
setting.
3.Adjust the paper stopper and the paper guides
wider by approx. 0.12 inch than burst paper with a
hand.
■ Preparation Before Operation
1.Set bursting speed.
Ex.: Speed 1
Setting range: Speed 1 - 5
Number of sheet processed
Ex.: Speed 1
Ex.: Speed 1
1. Set bursting speed
Number of sheets
Speed
1 / JOG 40
2 60
3 84
4 107
5 130
2. Feed paper by pressing the JOG button to perform a
test cut. If test cut is incorrect, check cut size setting.
processed
[sheet/min.]
(sheets per minute)
(A4 vertical)
Ex.: Speed 1
3. On output side, adjust paper stopper and paper guides
to approximately 0.12 inch wider than the burst paper.
4. Start operation by pressing the START button. Machine
automatically stops after processing.
5. The counter will appear in the LCD display during
processing. The value of the counter is from 0 - 9999.
After 9999, counter will return to 0.
9
Page 14

COUNTER DISPLAY AND RESET
Ex.: Speed 1
Counter Display
1. To display the number of cut sheets after a previous reset, press and hold the STOP/C button in stand-by mode.
2. The counter display disappears by releasing the STOP/C button.
Counter Reset
To reset the counter, press both the STOP/C button and
the “-” button and hold for three seconds or more.
PRESET MODE
Preset Mode is different from Standard Mode and can register cut size selected in Preset Selection Setting in advance.
Registering Preset Mode
1. Turn on power while pressing the STOP/C button on the control panel.
2. To select Preset # press either the speed up or down button. See Preset Table on the following page.
Speed up button: Increases the value of the Preset number.
Speed down button: Decreases the value of the Preset number.
3. Preset is saved by pressing the “+” button and cancelled by pressing the “-” button.
Preset Setting is not available at factory setting.
4. Save/Cancel information is stored by pressing the JOG button.
5. To quit Preset Mode, turn power off and on, or press the STOP/C button for more than 3 seconds. This will make the
Preset Setting available.
10
Page 15

PRESET TABLES
zFixed preset list
No. Display Paper size Number
of cuts
Finished size
(inch)
Cut size
0 “11-2” 2 8.5” x 5.5” 5.5
1 “11-3” 3 8.5” x 3.67” 3.6
2 “11-4”
8.5” x 11” Vertical
4 8.5” x 2.75” 2.7
3 “14-2” 2 8.5” x 7.0” 7.0
4 “14-3” 3 8.5” x 4.67” 4.6
5 “14-4” 4 8.5” x 3.5” 3.5
6 “14-5”
8.5” x 14” Vertical
5 8.5” x 2.8” 2.8
7 “17-2” 2 11” x 8.5” 8.5
8 “17-3” 3 11” x 5.67” 5.6
9 “17-4” 4 11” x 4.25” 4.2
10 “17-5” 5 11” x 3.4” 3.4
11 “17-6”
11” x 17” Vertical
6 11” x 2.83” 2.8
12 “PASS” ----- 0 ----- 0
zFixed preset list
No. Display Paper size Number
0 “11-2” 2 8.5” x 5.5” 5.5
1 “11-3” 3 8.5” x 3.67” 3.6
2 “11-4”
3 “14-2” 2 8.5” x 7.0” 7.0
4 “14-3” 3 8.5” x 4.67” 4.6
5 “14-4” 4 8.5” x 3.5” 3.5
6 “14-5”
7 “17-2” 2 11” x 8.5” 8.5
8 “17-3” 3 11” x 5.67” 5.6
9 “17-4” 4 11” x 4.25” 4.2
10 “17-5” 5 11” x 3.4” 3.4
11 “17-6”
12 “PASS” ----- 0 ----- 0
8.5” x 11” Vertical
8.5” x 14” Vertical
11” x 17” Vertical
of cuts
4 8.5” x 2.75” 2.7
5 8.5” x 2.8” 2.8
6 11” x 2.83” 2.8
Finished size
(inch)
Cut size
zFree size preset list
No. Display Cut size input range
13 “0. *.*”
14 “1. *.*”
15 “2. *.*”
16 “3. *.*”
17 “4. *.*”
18 “5. *.*”
19 “6. *.*”
20 “7. *.*”
21 “8. *.*”
22 “9. *.*”
0, 2.5 - 9.9 inches
When “0” is displayed, preset is cancelled.
PRESET SELECTION SETTING
Frequently used cut sizes can be stored into memory and recalled easily. Preset Selection Setting is available only in
Preset Mode.
NOTE: When cut size is already registered, Preset Selection Setting is automatically selected.
Manual Setting and Preset Selection Setting cannot be selected simultaneously.
Cancel all preset registrations in order to change to Manual Setting.
1. Turn on power. Machine will be in stand-by mode.
2. To choose Fixed Preset or Free Size Preset, use the
“+” and “-” buttons.
+ button increases the Preset #
- button decreases the Preset #
(Non-preset number is not displayed.)
When the machine is turned off and turned on again,
the previous setting is displayed.
3. Select Preset cut size and follow “Preparation Before
Operation” steps on page 9.
11
Page 16

TO INPUT FIXED PRESET
Lights up
* The display blinks while registration is in process. Do not turn off the power.
Lights up
* The display blinks while registration is in process. Do not turn off the power.
Lights up
Example: No. 0 8.5” x 11” Vertical 2-cut
1. Select preset No. 0 by pressing the speed up or speed down button.
* The display blinks before being accepted.
2. Press the “+” button to accept the preset.
To add more presets, repeat steps 1 and 2.
Blinking
3. Fixed/Free Size Preset Setting is saved by pressing the JOG button.
* The display blinks while being accepted. Do not turn off power during this stage.
Lights up
TO CANCEL FIXED PRESET
Example: No. 0 8.5” x 11” Vertical 2-cut
1. Select preset No. 0 by pressing the speed up or speed down button.
2. Press the “-” button to cancel the preset.
To cancel more presets, repeat steps 1 and 2.
3. Fixed/Free Size Preset Setting is cancelled all at once by pressing the JOG button.
* The display blinks while being accepted. Do not turn off power during this stage.
12
Page 17

TO INPUT FREE SIZE PRESET
Lights up
* The display blinks while registration is in process. Do not turn off the power.
Lights up
* The display blinks while registration is in process. Do not turn off the power.
* The display blinks while registration is in process. Do not turn off the power.
Example: No. 13 5.5”
1. Select preset No. 13 by pressing the speed up or speed down button.
2. Input the cut size by pressing the “+” and the “-” buttons.
To add more presets, repeat steps 1 and 2.
Lights up
3. Fixed/Free Size Preset Setting is saved by pressing the JOG button.
* The display blinks while being accepted. Do not turn off power during this stage.
TO CANCEL FREE SIZE PRESET
Example: No. 13
1. Select preset No. 13 by pressing the speed up or speed down button.
2. Set cut size to “0”.
To cancel more presets, repeat steps 1 and 2.
Blinking
3. Fixed/Free Size Preset Setting is cancelled all at once by pressing the JOG button.
* The display blinks while being accepted. Do not turn off power during this stage.
NOTES: When cut size is 2.5 - 9.9 inches: preset is available.
When cut size is 0: preset is cancelled.
To choose non-cut process (just feeding): choose “PASS” in xed preset.
13
Page 18

OPTIONAL CONVEYOR OPERATION
this unit even while the machine is in process of
bursting.
simultaneously.
The optional Output Conveyor can be installed in the paper outfeed of the FD 4170.
The conveyor can be operated independently by following these steps:
1. Turn on power to place burster in Stand-by mode.
2. Start operation by holding down the STOP/C button
and JOG button simultaneously.
LCD operation
3. Independent operation mode nishes by releasing the
JOG button.
TROUBLE-SHOOTING
TROUBLE REMEDY
Power will not turn on, even after pressing “I” side of
power switch
Machine does not operate or stops even after
pressing the START button
Check that power cable is properly connected to the
machine and an appropriate wall outlet
Check the LCD display for an error message. Refer
to Error Displays (on following pages), then complete
the action required.
14
Page 19

ERROR DISPLAY GUIDE
■ Error Display
* 2 error displays appear in turn.
After removing the jammed paper, press the STOP/C key
ess the STOP/C key to clear the
e machine and then turn it on after
Display Status and Solutions
[ FEEd ]→[ Err. ]
[ OPEn ]
[ SEt ]→[ PAPE. ]
Status: Paper jam in the paper feed part
Solutions: Check the paper feed tray and remove jammed paper.
to clear the error display.
Details:
Status: Safety cover is open.
Solutions: Close the safety cover.
Details:
Status: No paper is set.
Solutions: There is no paper in the paper feed tray. Place the paper
Refer to the How to deal with “[ FEEd. ]→[ Err. ]” on
16
page 32.
Refer to the How to deal with “[ OPEn ]” on page 33.
in the paper feed tray or press the STOP/C key.
16
[ PAPE. ]→[ LEFt ]
[ Cut ]→[ Err. ]
[ PASS ]→[ Err. ]
[ Err.1 ]
[ Err.5 ]
Others
Details:
Status: Paper remains inside the machine (cut part).
Solutions: Remove the paper and pr
Details:
Status: Cut error
Solutions: Remove the paper in the cut part or paper ejection part
Details:
Status: Paper jam in the paper ejection part
Solutions: Remove the paper in the cut part or paper ejection part
Details:
Status: Main motor lock (Paper remains in the cut part or paper
Solutions: Remove the paper and press the STOP/C key.
Details:
Status: Overload
Solutions: Turn off the power to the machine and leave it for over 3
Solutions: Turn off the power to th
Refer to the How to deal with “[ SEt ]→[ PAPE. ]” on
17
page 33.
error display.
Refer to the How to deal with “[ PAPE. ]→[ LEFt ]” on
18
page 34.
and, press the STOP/C key to clear the error display.
Refer to the How to deal with “[ Cut ]→[ Err. ]” on page
18
34.
and, press the STOP/C key to clear error display.
Refer to the How to deal with “[ PASS ]→[ Err. ]”
18
page 34.
ejection part.)
Refer to the How to deal with “[ Err.1 ]” on page 35.
hours.
a few seconds. If the same error message is displayed,
note the error content and contact our service person.
on
19
15
Page 20

CLEARING ERROR MESSAGES
■ Clearing Error and How to Deal with Trouble
How to deal with “[ FEEd. ]→[ Err. ]”
● Paper feed part
1. Remove the jammed paper at the entrance of
the machine.
WARNING
Be sure to remove the power plug
from the outlet when working near
movable parts due to paper jam and
so on.
2. Press the STOP/C key to clear the error display.
■ Clearing Error and How to Deal with Trouble
clear the error display.
How to deal with “[ FEEd. ]→[ Err. ]”
● Paper feed part
1. Remove the jammed paper at the entrance of
the machine.
Be sure to remove the power plug
from the outlet when working near
movable parts due to paper jam and
so on.
2. Press the STOP/C key to
● When misfeed has occurred:
1. Adjust the paper feed pressure adjusting lever.
* When double feed has occurred
→ Move the lever to “LIGHT”.
* When paper cannot be fed
→ Move the lever to “HEAVY”.
How to deal with [ OPEn ]
1. Close the safety cover.
* The error display disappears by closing the
safety cover.
WARNING
16
Page 21

How to deal with [ OPEn ]
1. Close the safety cover.
* The error display disappears by closing the
safety cover.
How to deal with [ SEt ]→[ PAPE. ]
ay up/down lever upwards.
1. Move the paper feed tray up/down lever
downwards to place the paper on the paper
feed tray.
2. Move the paper feed tr
* The error display disappears by setting the
paper or pressing the STOP/C key.
17
Page 22

How to deal with [ PAPE. ]→[ LEFt ]
How to deal with [ Cut ]→[ Err. ]
How to deal with[ PASS ]→[ Err. ]
1. Press the “O” side of the power switch to turn
off the power and remove the power plug from
the outlet.
WARNING
Be sure to remove the power plug
from the outlet when working near
movable parts due to paper jam and
so on.
2. Open the safety cover and remove the jammed
paper with tweezers.
* If the paper cannot be removed with tweezers,
do not try to remove it forcefully.
Follow the “● Removing paper using the JOG
key“ on page 36.
20
3. Close the safety cover. Connect the power
plug to the outlet and press the “I” side of the
power switch to turn on the power.
* If “[ PAPE. ]→[ LEFT ]” still appears even after
removing the paper, follow the “● Cleaning
sensor part“ on page 37.
21
18
Page 23

How to deal with [ Err.1 ]
* If an excessive load is applied to the machine
during operation due to paper jam and so on,
the breaker works for safety and the machine
stops.
If this happens, follow the procedures below.
power switch to turn off
ining inside the machine
there is no paper inside the machine
How to deal with [ Err.1 ]
If an excessive load is applied to the burster during operation due to paper jam, etc, the circuit breaker will
shut down the machine. If that happens, follow the instructions below.
1. Press the “O” side of the
the power.
Be sure to remove the power plug
from the outlet when working near
movable parts due to paper jam and
so on.
WARNING
2. Remove the paper rema
if there is any.
3. Confirm that
and press down the breaker button sticking out.
4. Press the “I” side of the power switch to turn on
the power. Now, the machine can restart.
If the burster still does not start, contact your Service
Technician.
19
Page 24

● Removing paper using the JOG key
1. Close the safety cover.
2. Remove the paper from the paper feed tray.
3. Pull out the paper with a hand while feeding
it by holding down the JOG key.
[ IMPORTANT ]
Note for operating the JOG key
NOTE: To use the JOG button, be sure to close the
safety cover. Press the JOG button while watching the
Be sure to close the safety cover.
jammed paper as the jam may get worse.
Press the JOG key while observing the status of
paper jam because paper jam sometimes gets
worse.
WARNING
The driving part contains driving
parts. Care should be taken when
working in it.
4. Set the paper again.
5. Clear the error display by pressing the STOP/C
key.
20
Page 25

● Cleaning sensor part
1. Press the “O” side of the power switch to turn off
the power and remove the power plug from the
outlet.
WARNING
Be sure to remove the power plug
from the outlet when working near
movable parts due to paper jam and
so on.
2. Open the safety cover. Spray the sensor part
Open the safety cover. Spray the sensor with canned
air, or gently clean with a cotton swab to remove paper
with air spray which is available in the market or
dust residue.
gently clean it with a cotton swab to remove paper
powder.
3. Close the safety cover. Insert the power plug
into the outlet and then press the “I” side of the
power switch to turn on the power.
Sensor part
If the burster still does not start, contact your Service
Technician.
21
 Loading...