

Page 1

FORMAX
FD 332
Document Folder
â
Operator Manual
First Edition
1
Page 2

2
Page 3

Introduction
Thank you very much for purchasing the FD 332 Document Folder. This machine
enables users to achieve greater efficiency at work by releasing them from
paper-folding that has manually been performed in the past. Please read the
Operation Manual carefully before using this machine.
Contents
Introduction .............................................................................. 1
Contents ................................................................................... 1
(1) Specifications ....................................................................... 2
(2) Accessories .......................................................................... 3
(3) Description of Parts ............................................................... 4
(4) Designation and Functions of Operation Panel........................... 5
(5) Preparation .......................................................................... 6
(6) Operation Procedure.............................................................. 7
Switching the Power on ......................................................... 7
Setting Fold Plate Positions .................................................... 7
Test Folding ......................................................................... 8
Fold Feed Angle/Skew Adjustment .......................................... 8
Continuous Folding ............................................................... 8
Batch Counting .................................................................... 9
Clearing a Paper Jam .......................................................... 10
Cross Folding ..................................................................... 10
Fine Adjustments for Table 1................................................ 12
Fine Adjustments for Table 2................................................ 13
(7) Daily maintenance .............................................................. 14
(8) Trouble shooting ................................................................. 15
3
Page 4
(1) Specifications
Model FD332
Paper size
Paper quality
Fold type
Fold
dimensions
Paper feed
system
Max. stacking
capacity
Folding speed 10500 sheets/hr (11” Half Fold)
3.5” x 5.0” to 11” x 17”
Smaller size is for single fold only.
High-quality paper, high-quality paper for stencil printing,
medium-quality paper
Single, Letter, Zigzag, Double, Parallel Fold-out
Other special folding twice.
Maximum
Table 1: 13”
Table 2: 9 ½”
Minimum
Table 1: 2”
Table 2: 1 ½”
Three-roller paper feed system
500 sheets 20#
Operation
method
Available
functions
Power
Consumption
Pressing digital keys
Fold skew adjustment, paper jam detection, four digit counter, auxiliary
paper guide for cross folding and Jam map indication
75 W
4
Page 5

Additional
functions:
Skew adjustment memory, paper jam detector, four-digit counter with
addition/subtraction modes, and automatic paper size detector
Auxiliary paper guide for cross fold
A perforator can be installed (optional)
Dimensions
Net weight 80lb
W 29 ½” x D 21 ½” x H 21” (during use)
W 22” x D 21 ½” x H 21” (during storage)
(2) Accessories
Make sure that the following accessories are included in the package after opening
it. Contact your sales agency immediately if there are missing accessories.
Accessories Qty Illustration
Tab le 1
1
Table 2 1
Power cable 1
Paper support guides
(right and left)
Machine cover 1
Operation Manual 1
2
5
Page 6
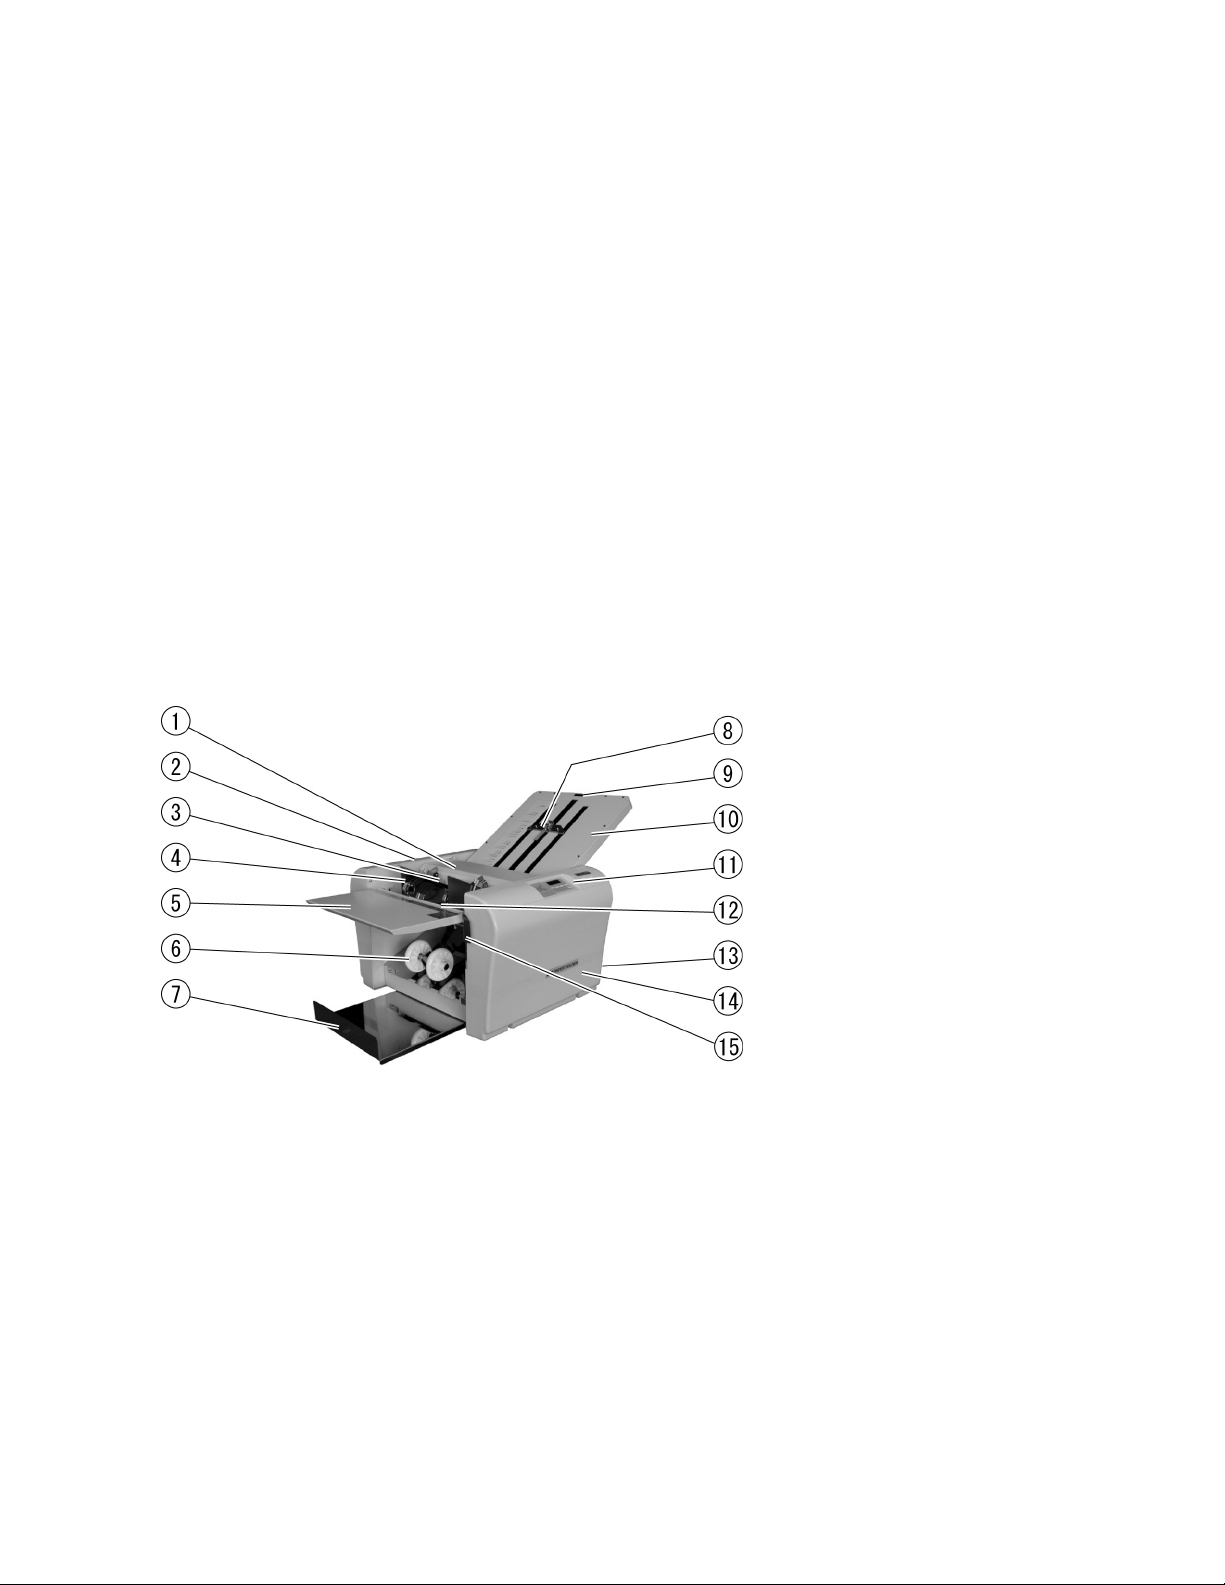
(3) Description of Parts
6
Page 7

Number Name Number Name
1 Roller cover 10 Table 1
2 Left side cover 11 Control panel
3 Paper feed roller 12 Paper feed table
4 Paper guide 13 Table 2
5 Auxiliary feed table 14 Right side cover
6 Paper eject roller 15 Paper feed table lever
7 Paper stacking table 16 Power source switch
8 Stopper plate 17 Inlet
9 Fold position adjustment knob 18 Circuit breaker
(4)Designation and Functions of Operation Panel
7
Page 8

No. Designation/Indication Function
1
2
3
4
5
6
Test key Test folding of two sheets is performed.
Start/Stop key
Clear/Reset key
Numerical key Used for batch counting.
Counter The number of sheets folded.
Check lamp
Operation starts and if pushed again,
The machine stops.
Clearing the indication of the counter
/ resetting an error.
Comes on when paper stock runs short, or indicates a
place where paper feed trouble occurs.
8
Page 9

(5)Preparation
Install Table 1 and 2:
Insert Table 1 on the studs indicated by (a) and (b) as shown
in the picture to the right.
Insert Table 2 on the studs indicated by (c) and (d) as shown
in the picture to the right.
Note:
When setting Table 1, be sure to put its
stopper plate at the center position.
Caution:
Be sure that both Table 1 and 2 properly fit in the positions
of the studs (a), (b), (c) and (d). If they are improperly set,
it may cause an incorrect collation, or the tables may fall out of
the machine.
Setting Paper:
Lift the auxiliary table and pull the paper
stacking table out.
Raise the paper feed table lever.
9
Page 10

Set the paper guide for the appropriate paper size.
Neatly stack the paper on the feed table with its
printed side facing up. (its printed side down in case of fold-out)
Lower the paper feed table lever to set the paper.
Note:
If the paper does not come in contact with the paper feed roller, remove and reinsert.
Curled or wrinkled paper, may cause trouble. Correct it before use.
In case of printed paper, use it only after the ink is dry, otherwise the paper feed rubber
roller, paper separator, fold roller, and other parts of the unit will be stained with ink,
causing trouble.
Setting the paper discharge roller:
The discharge roller should be moved to the proper position
that suits the paper size.
Note:
Refer to the “Roller position indication” label. If ejection
is not performed properly, set to a different position.
Example:
Set the roller to position one when using 8 ½” x 11” paper.
(6)Operation Procedure
10
Roller position indication label
Page 11

Switching the Power on:
Insert the power plug into the outlet.
Set the POWER to ON position.
Note:
Remove the power plug from the outlet after use.
Setting Fold Plate Table Position
Pull the half-nut lever to move the stopper plate to the
desired position on table 1 and 2. Align the arrow on the
stopper plate with the desired fold marks on the tables and
release the half-nut and the stopper plate will be locked in
position.
Test Folding
Press the Test key to feed two sheets of paper.
Check if the paper has been folded correctly by
examining the second of the two folded sheets.
If the fold position is not correct, refer to
“Fine Adjustments” pages 11 & 12
Half nut lever
11
Page 12

Fold Feed Angle/Skew Adjustment:
Turn the feed angle adjustment knob to the right
if the lower side of the folded paper slants to the right.
Turn the knob to the left of the lower side slants to
the left.
Note:
In cases other than single fold, put the folded
paper face down on Table 1 to make a feed angle
adjustment.
Continuous Folding:
Press the Start/Stop key. The machine starts to
fold the sheets continuously.
Press the Start/Stop again, while the machine
is in operation, to stop feeding.
Batch Counting:
As a sheet is folded the number indicated decreases
by one.
12
Page 13

Press the appropriate numerical key to select the
number of forms to be folded.
Example: press the number “10” key twice to select
twenty.
Note:
The batch counting number is cancelled
when the POWER is set to OFF.
Under the following conditions the machine will automatically stop feeding:
(Press the Clear/Reset key to reset after the error has been corrected)
Numerical Key
Conditions
1. When the Start/Stop key is pressed while there is no stock.
2. When the Start/Stop key is pressed while the paper feed lever is at
the upper position.
3. When the stock runs short while folding in the Batch Counting Mode.
1. When paper feed slip occurs
2. When paper jam occurs at Table 1 and Table 2
1. When paper stack table is full.
2. When paper jam occurs at the paper discharge.
Indication on Control panel
Clearing a Paper Jam:
13
Page 14

Should a paper jam occur, set the POWER to the OFF position immediately and remove the
jammed sheets. When the jammed paper is stuck around the fold roller or other parts, it can be
easily removed by detaching the Table 1 and 2 from the unit.
Note:
When the roller cover is opened, the machine will stop operation instantly.
Cross Folding:
Cross folding refers to performing the double
parallel, letter, or other types of folds for the
sheets of paper folded using the single fold
method.
Example:
11”x 17” folded in half and then letter folded to fit
into a standard # 10 envelope.
14
Page 15

Note:
The maximum weight of paper that can be used for
cross folding is 28#.
This requirement, however, varies according to the
following conditions:
Paper type; Paper size;
Whether grains run lengthways or sideways;
Temperature and relative humidity;
Printing condition.
The folding position may be displaced to a greater
extent than when the paper is folded using a
regular fold method, or a corner of the folded
paper may be folded inside as indicated in the
figure. These, however, do not mean that the
machine has broken down.
Note:
Press the crease hard using the hand. Do not
stack too many sheets of paper on the paper feed
table.
Fine Adjustments for Table 1
Fold type Plane (A)
Single
fold
Gate
fold
Table 1 is not used
Long
Short
15
Direction to turn the Table 1
fine adjustment knob
Page 16

Letter
fold
Zigzag
fold
Long
Short
Long
Short
Double
Long
parallel
fold
Short
Long
Fold-ou
t
Short
Fine Adjustments for Table 2
Fold type Plane (B)
Direction to turn the Table 2 fine
adjustment knob
Single
fold
Gate
fold
Long
Short
Long
16
Page 17

Letter
fold
Zigzag
fold
Short
Long
Short
Long
Short
Double
parallel
Long
fold
Short
Long
Fold-ou
t
Short
(4) Daily Maintenance
1 Before cleaning the machine, be sure to set POWER is in the OFF position and pull the
power plug from the outlet.
2 When the unit is not in use, put its cover in place to prevent dust, paper chips, etc. to
accumulating on the paper fold rollers.
3 If paper chips, ink, etc. are accumulated on the paper fold rollers; it may cause trouble
such as wrinkles, or improper folding. To prevent from it, clean them periodically.
17
Page 18

4 If paper chips, ink, etc. are accumulated on the paper feed rubber roller and the paper
separator, paper feed performance deteriorates and the machine becomes liable to paper
jam or slip. Clean the rollers periodically to reduce down time.
5 If black marks occur that correspond with the location of the paper-feed tires, the feed tires
need to be cleaned.
6 Consumable products: Paper feed rubber roller, rubber brake, and paper feed separator.
18
Page 19

g
(5) Trouble Shooting
Trouble Possible Cause Measures
The paper does
not feed properly
The machine does
not operate even
after the Start/Stop
key is pressed.
Paper sticks just after it is
printed
Stains on the paper separator
Stains on the paper feed rubber
roller.
The paper separator is worn out.
The volume of the paper stacked
on the paper feed table is not
enough.
Paper jam inside the unit.
Paper sticks just after it is
printed
Jog the paper sufficiently or feed the paper
after it is dry.
Clean the paper feed separator using
approved cleaner.
Clean the paper chips or ink on the paper
feed roller with approved cleaner.
Replace the paper separator with a new
one.
If the volume on the paper feed table is not
enough, it does not feed since the paper
detection lever is installed.
Stack 20 sheets or more.
Detach Table 1 and 2 and remove the paper
in the unit.
Jog the paper sufficiently or feed the paper
after it is dry.
Wrinkles appear on
the paper.
Improper fold
position
Stains on the paper separator
Stains on the paper feed roller
Stains on four paper fold rollers
Table 1 and 2 are not properly
set.
Paper jam in Table 1 and 2
The total length of the paper is not
standard size.
19
Clean the paper separator usin
approved cleaner.
Clean the paper chips or ink on the paper
feed roller with the approved cleaner.
Clean the stain on four fold rollers using
approved cleaner.
Reset properly.
Detach Table 1 and 2 and remove the
jammed paper out.
Measure the total length of the paper and adjust
using the fine adjustment knob
the
Page 20

Drawing paper
13# or lighter
cannot be folded.
The surface of four fold rollers
are stained with paper chips or
ink (slippery situation)
Low room temperature
Clean away the stain on four fold rollers
using the approved cleaner.
The paper gets stiff and hard to fold at the
low room temperature in winter. Perform
folding after leaving the paper as it is for 3
to 4 hours at the temperature of 53 to 67°F.
20
 Loading...