

Foredom TX User Manual

Owner’s Manual
Assembly, Operation and
Service Manual for
Series
TX
&
LX
Flexible Shaft Power Tools
See Insert with
Special Instructions
for Heavy Duty
Series TXH and
LXH Models
2-Year Warranty
ForY ourOwn Safety
• Please read this Assembly, Operation, and Service Manual
before operating your Foredom power tool.
• Always wear eye protection while using power tools.
•
Always use an accessory which has the same or a higher speed rating than your tool.
Using an accessory with a lower speed rating can result in serious injur y.
• For the TX Series – Only use accessories rated for use at 15,000 RPM or higher.
With the H.35 Handpiece use only accessories rated for 35,000 RPM or higher.
• For the LX Series – Only use accessories rated for use at 5,000 RPM or higher.
®
FOREDOM
www.foredom.net

Contents
Safety Instructions 2, 3
Foredom®Tools 4
Assembly Instructions 5-6
Assembly and Adjustment of Flexible Shaft,
Sheath and Handpiece 5
Connecting Foot or Manual Speed Controls 6
Hanging Motor Installation 6
Foredom Handpieces and Accessories 7-11
Attaching Accessories to Handpieces 8
General Accessory Recommendations 10-11
Operation —General Guidelines 12
Maintenance Procedures 12-14
Routine Cleaning and Lubrication 12-14
Replacement of Worn Shaft and Sheath 13-14
Replacement of Motor Brushes 14
Repair and Storage 14
Recommended Spare Parts and Supplies 15
Motor Hangers 15
2-Year Warranty 16
Contact Information 16
Page
How-To Videos on
www.foredom.net
Click on our homepage link
where Foredom’s National
Sales Manager shows you the
basics of using and maintaining
flexible shaft machines.
Click to View:
1. Intro & Proper Set-up
2. Safety Guidelines
3. Handpieces & Accessories
4. Shaft and Sheath
Maintenance – Grease
and Replace
5. Motor Maintenance–
Remove Dust, Replace
Motor Brushes
We have other product-related
videos embedded throughout
our website. We suggest that
you take the time to watch
these since they help to clarify
product features, differences,
and uses.
Visit Foredom on
www.youtube.com
Safety Instructions
Before using your Foredom power tool,
please read safety instructions.
for your protection and should always be
followed to reduce the risk of personal
injury or damage to the tool.
• Always wear proper eye and face protection.
Wear safety glasses or face shields whenever you operate a Foredom or any power
tool to prevent serious eye or face injuries.
• Secure the work piece or item that you are
working on
device. Holding it with your hand can result
in serious hand injur
• Always use a proper dust collection system or
wear a respirator
dust particles, polishing compounds,or
other debris into the lungs.
• Do not wear loose fitting clothing or jewelry.
Loose clothing or jewelry can become
2
in a vise or other work holding
y
to prevent
They are
.
the inhalation of
entangled in the rotating accessory. Do not
wear items such as neckties, necklaces, or
bracelets when operating power tools. Be
sure to
tie back or secure long hair.
•
Secure power tool to motor hanger or work
Flexible shaft power tools can
surface.
“jump” at start up or vibrate during operation. The tool should be properly secured in
order to prevent it from vibrating off of the
motor hanger or work bench.
•
Never operate any accessory at speeds above
it’s maximum rated speed.
used, all of Foredom's accessories can be
operated at the speed ratings listed in the
Foredom Accessory Catalog or specified on
kits and packages.
manufacturer's speed rating before using
accessories other than those from Foredom.
• For added safety and comfort while using
this power tool for carving or other applications, it is recommended that you wear a
When properly
Always
find out the

heavy canvas or leather apron. It will protect
you from dust, debris and chips as well as
help prevent injury if the handpiece slips off
the workpiece. It will also help prevent loose
clothing from getting caught in a rotating
cutter, bur or other accessory.
• Never use or continue to use any
accessory which appears to be damaged,
loose, vibrating, or out of balance.
Inspect
each accessory for cracks or flaws before
using it. Avoid knots, imperfections in the
wood or metal objects like nails, which
could damage or catch the accessory.
• Always insert the shank or arbor of an
accessory or mandrel into the collet or
chuck of the handpiece as far as possible in
order to provide proper support and tighten
the collet or chuck securely.
• Never use excessive side pressure which
may bend or break the shank or arbor of an
accessory. Let the speed of the accessory
do the work.
• Do not stall the motor by jamming or using
excessive pressure on the accessory. This
can result in damage to the motor or
flexible shaft.
• Never operate the motor with the outer
sheath removed from the flexible shaft.
• Never modify the shielded plug on the
TX or LXH motor cord in order to plug it
into a Non-TX or Non-LX speed control or
AC electrical wall outlet. Use
only TXR,
SXR, or EMX speed controls with all
Series TX, TXH, LX, or LXH motors.
• Always disconnect the power cord before
servicing the motor or removing the flexible
shaft or sheath.
• Never operate your power tool during a
perceptible power decrease. Turn power
tool off and do not use until power is
fully restored.
• Use proper grounding procedures. This tool
should be grounded while in use to protect
the operator from electric shock. The tool is
equipped with an approved 3-conductor cord
and a 3-prong grounding type plug to fit the
proper grounding receptacle. The green (or
green and yellow) conductor in the cord is the
grounding wire. Never connect the green (or
green and yellow) wire to a live terminal. If
your unit is for use on less than 150 volts, it
has a plug that looks like sketch A below.
An adapter (sketches B and C) can be used for
connecting plugs as shown in sketch A to
2-prong receptacles. The green colored rigid
ear, lug, etc., extending from the adapter must
be connected to a permanent ground such as
a properly grounded outlet box.
Some jurisdictions, including Canada, prohibit the use
of 3 to 2 prong adapters. Where prohibited,
they should not be used.
Use only 3-wire
extension cords that have 3-prong grounding
type plugs and 3-pole type plugs and 3-pole
receptacles that accept the tool’s plug. Always
disconnect the power cord before servicing
the tool. Never use in an area where
flammable vapors are present.
3

Foredom®Power Tools in this Manual
You have purchased a fine quality power tool which will perform a wide variety of tasks
difficult to do with any other kind of power tool. Foredom power tools are manufactured to
high standards and will give you years of trouble-free performance with proper use and
regular maintenance.
Series TX Motors Hang-Up and Bench Style
M.TX M.TXB
up to 15,000 RPM
M.TXM
Series LX Hang-Up and Bench Style high torque, low speed motors
with built-in control
up to 5,000 RPM
M.LX M.LXB
M.LXM
with built-in control
Speed Controls –these are dedicated controls specific to Series TX, TXH, LX, and LXH motors
C.TXR Foot Control
in plastic housing
4
C.SXR Foot Control
in metal housing
C.EMX Dial Control
Y
our Series TX or LX flexible shaft power tool consists of a motor, flexible shaft and sheath, speed
control (foot or manual) and a handpiece. Locate and identify all components, parts and accessories
y
ou purchased before discarding the packing list and any materials that came with your power tool.
Assembly Instructions
Always make sure your power tool is
unplugged during assembly!
After identifying all the components of your
power tool, assemble it in the following manner:
Assembly and Adjustment of Flexible
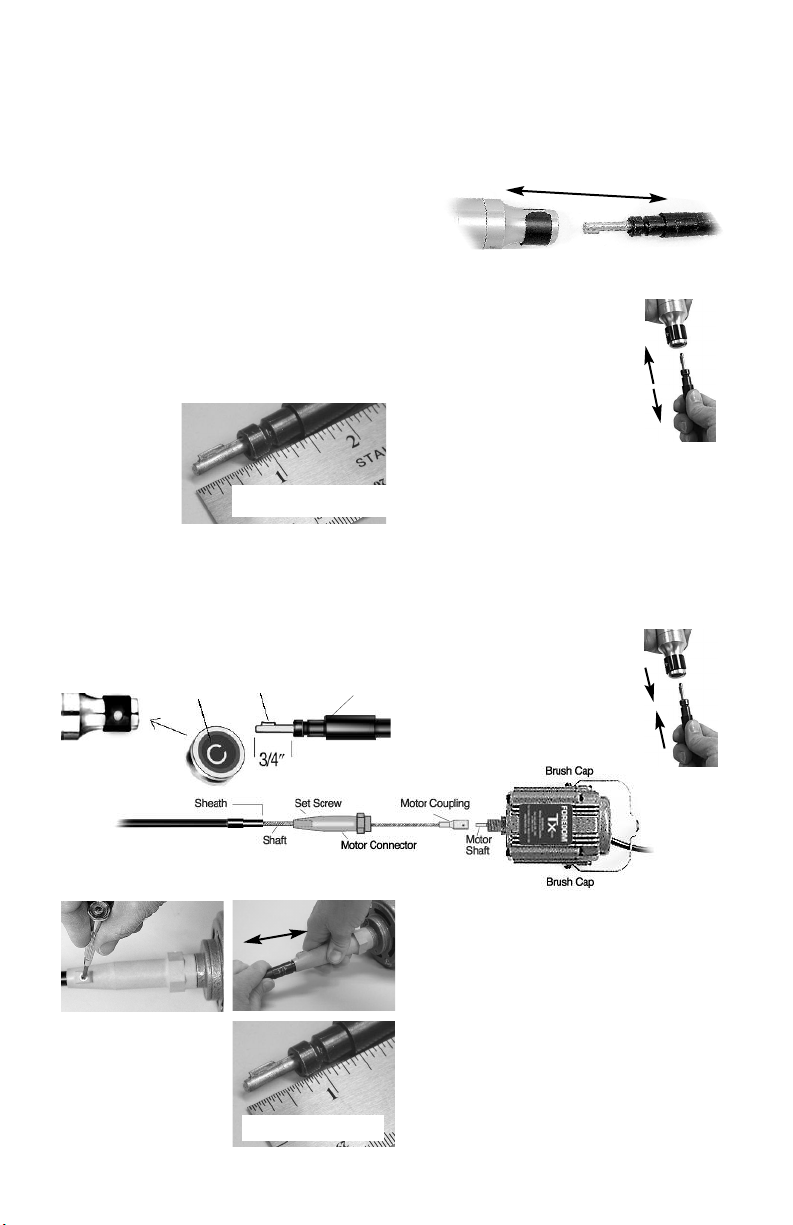
Inner Shaft, Outer Sheath, & Handpiece
Proper assembly and adjustment of the
flexible shaft and sheath are critical for the
correct operation of your Foredom power tool.
The exposed tip
(handpiece end)
of the flexible
shaft (with handpiece removed)
must extend 3/4
(19mm) beyond the sheath.
″
Important Note: The shaft and sheath
should be checked and adjusted (if necessary) even if you received them assembled
and attached to the motor!
keyway
slot
inside,
back end of
handpiece
IMPORTANT!
key tip end of shaft
metal
sheath
tip
Please follow these directions to assemble
and adjust the shaft and sheath.
To check the shaft and sheath you must first
remove the handpiece.
The handpiece is easy to remove
from the flexible shaft.
To remove:
1. First make sure your power
tool is unplugged.
handpiece off the shaft and sheath
with a firm grip.
holding the black colored metal outer sheath tip facing upward, turn on the motor so that it is running
at about half speed
inner key tip is still rotating, grip the handpiece and
push it onto the sheath tip with one firm motion
until it snaps into place (shown below). This
procedure will align the key tip into the keyway slot
(as shown below at left). T
this, insert and tighten an accessor
into collet or chuck, turn on control
to low speed and observe that the
accessory rotates smoothly.
Simply pull the
To Re-attach Handpiece:while
and then turn it off. While the
o verify
y
IMPORTANT!
2. With the handpiece removed, place the entire
unit on a flat sur
extended straight. Loosen the set screw on the
motor connector.
piece end) of the flexible shaft so that it
extends 3/4
done by moving the sheath in or out of the motor
connector (motor end).
3. When the correct adjustment is made,
re-tighten the set screw in the motor connector
and re-attach handpiece onto the flexible shaft.
face with the shaft and sheath
Adjust the exposed tip (hand-
″ (19mm) beyond the sheath. This is
5
 Loading...