


Owner’s Manual
Series
®
for Foredom
Flexible Shaft
Power Tools
& Handpieces
ForYour Own Safety
• Please read this Assembly, Operation,
and Service Manual before operating
your Foredom power tool.
CC
DD
MM
S
SB
SM
• Always wear eye protection while
using power tools.
• Only use accessories rated for use
at the maximum speed (18,000 RPM)
of these power tools except with the
No. 35 Handpiece which requires
accessories rated for 35,000 RPM
or higher.
FOREDOM
www.foredom.com
SR
SRB
SRM
®

Contents
Page
Safety Instructions 2–3
Foredom Power Tools 4, 7
Assembly Instructions 5–6
Assembly & Adjustment of Shaft, Sheath & Handpiece 5
Connecting Foot Control 6
Connecting Table-Top Dial Speed Controls 6
Foredom Handpieces and Rotary Accessories 7, 11
Attaching Accessories to Handpieces 8
Handpiece Lubrication 9
General Accessory Recommendations 10–11
Operation – General Guidelines 11
Special Operation Instructions for SR, SRB & SRM Motors 14
Maintenance Procedures 12–13
Routine Cleaning & Lubrication 12–13
Replacement of Worn Shafts and Sheaths 13
Replacement of Motor Brushes 13
Other Service and Repair 16
Recommended Spare Parts and Supplies 15
Limited Warranty 16
Owner’s Registration Card 3, 16
For More Information 16
Safety Instructions
Before using your Foredom®power tool, please read safety instructions.
your protection and should always be followed to reduce the risk of personal injury or damage
to the tool.
• Always wear proper eye and face protection.
Safety glasses or face shields should be
worn whenever you operate a Foredom or any power tool to prevent serious eye or
face injuries.
• Always use a proper dust collection system or wear a respirator
to prevent
the inhalation of dust particles, polishing compounds, or other debris into the lungs.
• Do not wear loose fitting clothing or jewelry.
Loose clothing or jewelry can become
entangled in the rotating flexible shaft. Do not wear items such as neckties, necklaces, or
bracelets when operating power tools. Be sure to
•
Secure power tool to motor hanger or work surface.
tie back or secure long hair.
Flexible shaft power tools can
vibrate during operation. The tool should be properly secured in order to prevent it from vibrating off of the motor hanger or work bench.
•
Never operate any accessory at speeds above it’
s maximum rated speed.
used, all of Foredom's accessories can be operated at the speed ratings listed in the Foredom
Accessory Catalog or on the accessory kits and packages.
Always
find out the manufacturer's
speed rating before using accessories other than those from Foredom. (Safety requirements
for the use, care and protection of abrasive wheels are contained in ANSI Standards B7.1-1978
which are available from ANSI,1430 Broadway
, New Y
ork, New Y
ork 10018.)
2
They are for
When properly

•
Never
use or continue to use any accessory which appears to be damaged, loose, vibrating,
or out of balance. Inspect each accessory for cracks or flaws before using it. Avoid knots,
imperfections in the wood or metal objects like nails, which could damage or catch the accessory. Let the speed of the tool do the work rather than apply heavy pressure to the accessory.
•
Always
insert the shank or arbor of an accessory or mandrel into the collet or chuck of the
handpiece as far as possible in order to provide proper support and tighten the collet or
chuck securely.
•
Never
use excessive side pressure which may bend or break the shank or arbor of an
accessory. Let the speed of the accessory do the work.
•
Do not
stall the motor by jamming or using excessive pressure on the accessory. This can
result in damage to the motor or flexible shaft.
•
Never
operate the motor with the outer sheath removed from the flexible shaft.
•
Always disconnect
the power cord before servicing the motor or removing the flexible
shaft or sheath.
•
Never
operate your power tool during a perceptible power decrease. Turn power tool off and
do not use until power is fully restored.
• Use proper grounding procedures.
This tool should be grounded while in use to protect
the operator from electric shock. The tool is equipped with an approved 3-conductor cord and
plug to fit the proper grounding receptacle. The green (or green and yellow) conductor in the
cord is the grounding wire. Never connect the green (or green and yellow) wire to a live
terminal. If your unit is for use on less than 150 volts, it has a plug that looks like sketch A in
diagram. An adapter, sketches B and C, can be used for connecting plugs as shown below to
2-prong receptacles. The green colored rigid ear, lug, etc., extending from the adapter must be
connected to a permanent ground such as a properly grounded outlet box. Use only 3-wire
extension cords that have 3-prong grounding type plugs and 3-pole receptacles that accept
the tool’s plug.
A complete Foredom flexible shaft power tool consists of a motor, flexible shaft and sheath,
speed control (foot or manual) and a handpiece. Locate and identify all components, parts and
accessories you purchased before discarding the packing list and packing materials that came
with your power tool.
Owner's Registration Card
An Owner's Registration Card and this Owner's Manual should also accompany each power
tool. Additional copies will be sent to you upon request. Send your Owner's Registration Card
e will keep your card in our Owner's Registration File.
to Foredom right away
. W
3
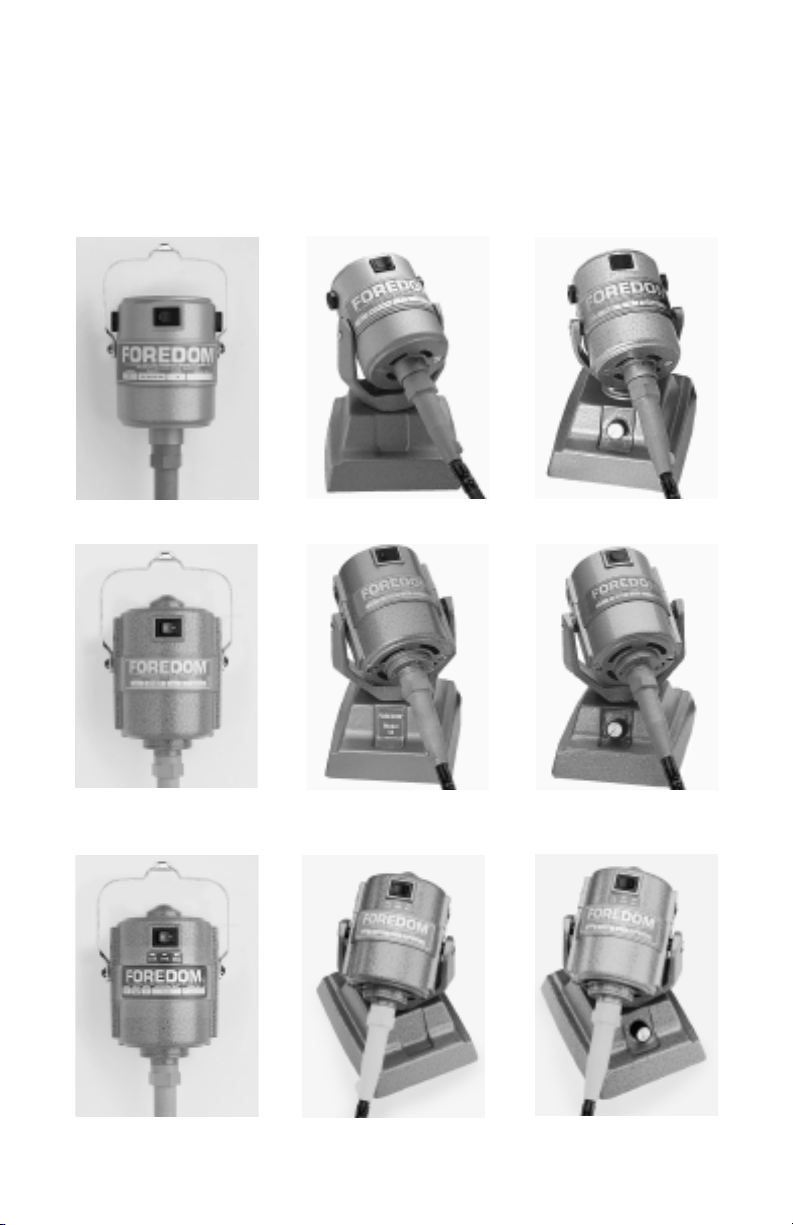
Foredom®Power Tools Covered in this Manual
You have purchased a fine quality power tool which will perform a wide variety of tasks
difficult to do with any other kind of power tool. Foredom power tools are manufactured to
high standards of precision and performance and, with proper use and regular maintenance,
will give you years of trouble-free performance. This instruction manual contains instructions
for the assembly, operation and servicing of the Foredom power tools shown below.
Series CC
Series S
®
DD
SB
MM
SM
Series SR
SRB
SRM
4
Assembly Instructions
Always make sure your power tool is unplugged during assembly!
After identifying all the components of your power tool, it should be assembled in the
following manner:
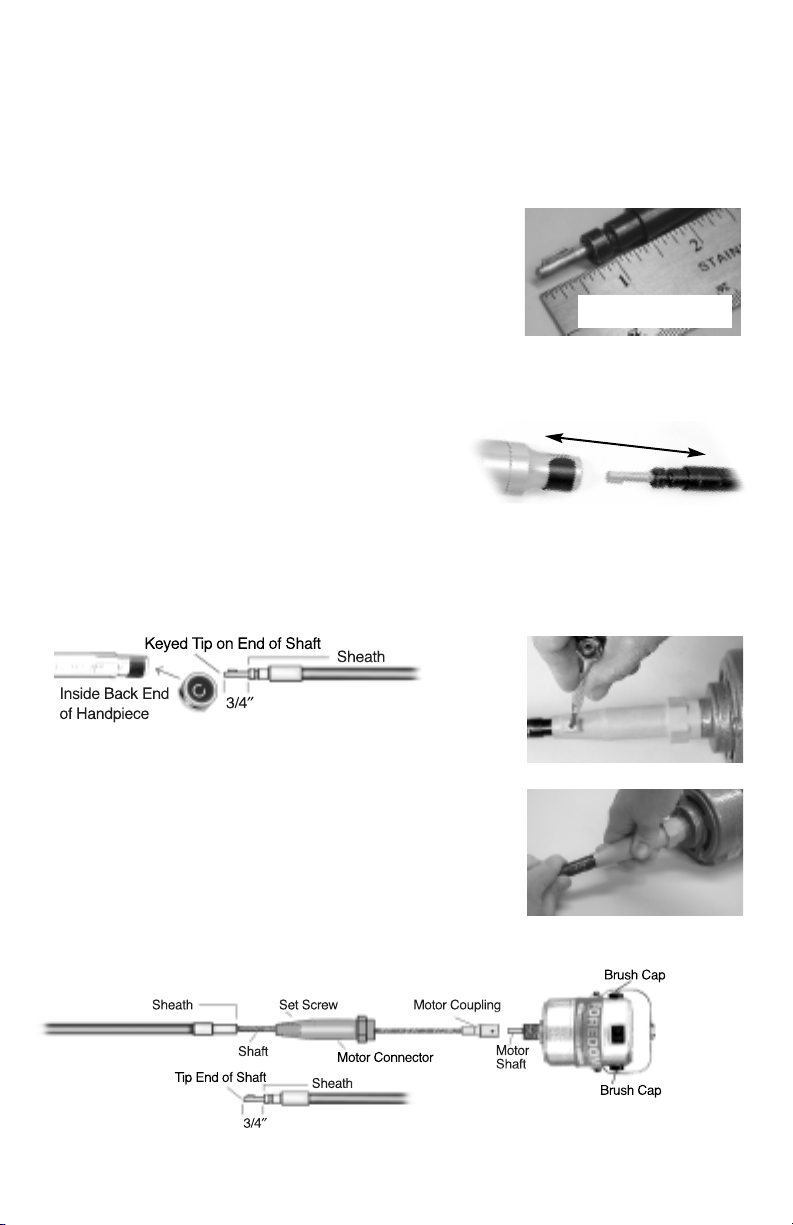
Assembly and Adjustment of Flexible Shaft, Sheath, and Handpiece
Proper assembly and adjustment of the flexible shaft and
sheath are critical for the correct operation of your Foredom
power tool.
(with handpiece removed) must extend 3/4
Important Note: The shaft and sheath should be checked and
adjusted (if necessary) even if you received them assembled
and attached to the motor!
Please follow the directions below to assemble and adjust the shaft and sheath.
To check the shaft and sheath you must first remove
the handpiece.
1.The handpiece is easy to remove from the flexible shaft.
remove, simply pull the handpiece off the shaft and sheath with a firm grip. To re-attach, be
To
sure that the keyed tip of the flexible shaft is properly lined up with the slot in the back end of
the handpiece by looking into the rear of the handpiece before pushing it on. If it is not in line,
turn the shaft tip or the handpiece to the correct position (see illustration below).
The exposed tip (handpiece end) of the flexible shaft
″ beyond the sheath.
IMPORTANT!
2.Place the entire unit on a flat surface with the shaft and sheath
extended straight. Loosen the set screw on the motor connector.
Adjust the exposed tip (handpiece end) of the flexible shaft so
that it extends 3/4
at right. This is done by moving the sheath in or out of the
motor connector.
3.When the correct adjustment is made, re-tighten the set screw in
the motor connector and re-attach handpiece onto the
flexible shaft.
igure 1
F
.
″ beyond the sheath, as shown in illustrations
5

Connecting Foot Speed Control
The electrical specifications for your power tool are listed on the motor name plate. It will
show the proper voltage and currents to use with your power tool.
Be sure to follow the
grounding instructions on page 3 of this manual while attaching either the speed
control or motor to a power outlet.
A 115 Volt, 50/60 cycle (Hz) motor can be used with the models FCT-1 and SCT-1 foot
controls on 115 Volt
AC current only.
(not shown in this manual) can be used on 115 Volt AC or DC current.
Only the CFL carbon pile resistance block foot control
Note: The CFL can only
be used with 115 or 230 volt CC, DD and MM Motors, and should not be connected to any
Series S or SR Motors.
FCT-2 and SCT-2 foot controls on 230 Volt
on 230 Volt AC or DC current.
To connect the foot control to the motor, insert the
3-prong plug on the end of the motor power cord into
The 230 Volt, 50/60 cycle (Hz) motor can be used with the models
AC current only.
The CFL foot control can be used
socket
connector
for motor
plug
the socket connector on the shorter power cord on the
foot control. With the motor on/off switch in the “off”
position, plug the 3-prong plug on the longer power
cord from the foot control into a proper 3-wire power
outlet.
Be sure to follow the proper grounding instruc-
tions described on page 3 of this manual.
When your foot is not depressing the foot control,
3-prong plug
connects to wall outlet
the motor should not be running.
It is also important to hold the handpiece securely before turning the motor on/off switch to the
“on” position. Your foot must maintain steady contact with the pedal during operation. Hold the
handpiece in your right hand and begin with a light touch to keep from going too fast when just
getting started. Finding the right speed for any specific task is a matter of experimentation
and experience.
Connecting Table-Top Dial Speed Control
The motors can also be used with the EM-1 (115 volt) or EM-2 (230 Volt) dial speed control on
AC current. Connect the control to the motor by inserting the 3-prong plug on the end of the
motor power cord into the socket connector on the shorter power cord on the dial control.
With motor on/off switch in the “off” position and the dial indicator arrow also in the “off”
position on the control, plug the 3-prong plug on the longer power cord from the dial control
into a proper 3-wire outlet (see page 3). Making sure that you are holding the handpiece
securely in hand, put the motor on/off switch in the “on” position so that your power tool
is ready for operation.
3-prong plug
connects to
wall outlet
socket
connector
for motor
plug
6

FOREDOM®Handpieces
7A
7AD
8
8D
10
25
25C
28
30
35
®
10D
15
15D
18
18D
44T
52
52D
53
7

Attaching Accessories to Handpieces
Directions for attaching accessories to handpieces vary according to the type of handpiece
being used. Locate the model number of your Foredom handpiece from the illustrations on the
previous page. Attach the accessory according to the following:
Collet Types 8, 8D, 25, 28, 28SJ, 35, 35SJ, 44T, and 44TSJ
General Directions: Be sure to use the correct shank size. The correct shank will fit snugly
inside the collet.
Caution: Never tighten a collet unless an accessory has been inserted. Tightening an empty
collet or inserting an accessory which is too small or too large may damage the collet.
Changing Collets in Nos. 25, 28, 28SJ, 35, 35SJ, 44T, and 44TSJ Handpieces:
1.Insert pin provided into the pilot hole and through the
spindle hole (turn spindle to align holes). Apply wrench and
unscrew chuck nut by turning counter-clockwise.
2.Remove chuck nut to expose collet.
3.Pull collet out of handpiece spindle.
4.Slip new collet in place and screw on chuck nut.
Nos. 8, 8D Handpieces:
Pull back chuck guard sleeve to uncover the lower portion of the spindle hole. Insert the pin
provided into the spindle and chuck nut to loosen spindle with wrench. Loosen chuck nut.
Insert accessory shank as far as possible into the collet. Tighten chuck nut. Test for a secure
hold by pulling on accessory. Pull out pin or release grip on spindle. To release an accessory,
follow the same steps. Accessories can be released when chuck nut is ready to be loosened. If
accessory does not run true, loosen chuck nut, rotate accessory, and retighten.
Nos. 25, 28 and 28SJ, 35, 35SJ, 44T, and 44TSJ Handpieces:
To insert or change accessories, insert pin provided into the pilot hole and through the spindle
hole (turn spindle to align holes). Loosen chuck nut slightly with wrench provided. Insert shank
of accessory into collet. Tighten chuck nut with wrench, keeping pin in pilot hole. Test for a
secure hold by pulling on accessory. Remove pin.
Chuck Type — Nos. 25C, 30
These handpieces have Jacob's®type chucks. Open chuck jaws as far as necessary with key
provided. Insert shank of accessory into the chuck as far as possible. Tighten jaws with chuck
key until accessory is secure and centered. If accessory does not run true, reopen jaws, rotate
accessory and retighten. To release accessory, simply reopen chuck jaws with key and
pull out accessory.
®
, and 30SJ Handpieces:
Hammer Type — Nos. 15, 15D, and 15SJ Handpieces:
These handpieces have a threaded spindle. Thread anvil or stylus into threaded spindle as far as
it will go with clockwise motion. Insert pin provided into cross hole in anvil or stylus. Tighten
and remove pin. To release accessory, insert pin into the cross hole and unthread.
Latch Type — Nos. 55A, 55D, 56A, 56D Handpieces:
These handpieces have simple fi
accessor
the accessory. To release the accessory, slide latch out again and pull out accessory.
Quick Change
y as far as possible. Slide the latch back into place. Test for a secure hold by pulling on
Type
Keep an accessory in these handpieces at all times, during both operation and storage.
nger latches. Slide the latch over and insert the shank of the
7AD, 10, 10D, 18, 18D, 18SJ, 52, 52D, and 52SJ
— 7A,
Pilot/
Spindle Hole
8

Nos. 7A and 7AD Handpieces:
These handpieces have a push-pull collet closer. Pull the handpiece grip back as far as it will go.
Insert accessory shank (size 3/32
″ only) as far as it will go. Push front portion of the handpiece
forward firmly. Test for a secure hold by pulling on the accessory. To release accessory, pull
handpiece grip back with firm pull. Pull out accessory.
Nos. 10 and 10D Handpieces:
These handpieces operate only when a 3/32″ shank bur is inserted. It will lock if bur is not
inserted. To insert bur, move lever 180º clockwise towards the back (shaft connection end) of
handpiece. Insert or change a 3/32
″ shank bur and move lever 180º forward. Make sure lever is
completely locked into the forward position.
Nos. 18, 18D, and 18SJ Handpieces:
These handpieces have a lever on side of handpiece. Push the spring loaded lever in to open
collet and release the shank of accessory (3/32
Never push lever down while handpiece or flexible shaft are rotating.
down.
″ only). Insert accessory while holding the lever
Nos. 52, 52D, and 52SJ Handpieces:
These quick change handpieces have a unique push/pull collet chuck release mechanism for
rapid accessory changing (3/32
″ only in 52 and 52D). Wait for the motor, flexible shaft, and
accessory to come to a full stop before opening the chuck. After accessory has stopped rotating, pull the outer grip forward with one hand while holding the back of the handpiece with the
other. Remove the accessory and insert the shank of the new one at least 1
″ (25mm) into the
chuck. Pull the grip all the way back until the chuck snaps closed.
Handpiece Lubrication (See page 7 for handpiece photos.)
Numbers 7A and 7AD*: Unscrew the front housing which exposes the spindle. Clean the spindle
thoroughly with solvent. Apply several drops of Foredom oil (Part Nos. 10005 or 10010) to the
spindle and spread it over the spindle uniformly. This should be done every 20 hours of operation.
Numbers 8, 8D*, 18, 18D*, 25, 25C, 28, 30®, 35, 44T, 52, and 53:
These handpieces have been permanently lubricated with greased-shielded ball bearings and
should absolutely not be lubricated.
Number 10: Lubrication should not be required for the first 2–3 months of continuous use.
Then, approximately every two weeks, remove the sheath connector (it has a standard right
hand thread) to expose the slotted shaft connector and back of handpiece spindle. Clean off any
dirt or old lubricant. Apply
the slotted shaft. Now replace sheath connector.
Number 10D* Handpiece with Duplex Spring Connection: Approximately every 20 hours of operation apply 1 or 2 drops of Foredom oil into the hole in the duplex spring collar next to the
sheath connector. This will provide sufficient lubrication for both the duplex spring connection
and the handpiece spindle.
Numbers 15 and 15D*: Before disassembling, clean off any dirt to prevent foreign matter from
falling inside the handpiece. Remove the threaded nosepiece assembly carefully with wrench
supplied by turning counterclockwise (right-hand thread). Put two drops of Foredom oil into the
bottom of the threaded hole of the housing and one drop into the nosepiece assembly. Replace
the nosepiece assembly, hold the handpiece upright and run it slowly to distribute the oil.
Lubricate ever
y 100 hours of use.
*Note: All handpieces marked with asterisk have duplex spring connections (fl
middle). These connections must be lubricated once every 20 hours of operation. Apply about
two drops of oil into the hole on the rear of the connection collar
Foredom
®
Hypodermic type oiler (Part No. 10005).
only 1 or 2 drops of Foredom oil to the spindle where it attaches to
exible springs in
. This should be done with
9

General Accessory Recommendations
The wide assortment of Foredom® accessories makes your flexible shaft power tool very versatile.
Grinding, sanding, carving, engraving, brushing, cutting, buffing and polishing can all be easily
accomplished. Choose the right accessory for your applications from the Foredom Accessory
Catalog. You may purchase accessories from your local dealer, or contact: The Foredom Electric
Company, 16 Stony Hill Road, Bethel, CT 06801, (203)792-8622; or on-line at www.foredom.com.
Always let the speed of the power tool do the work. Avoid forcing the tool or applying too much
pressure. Experience will help you choose the right speed for the work you are doing. It's always a
good idea to practice on a scrap piece of the same material you plan to work on to determine the
best accessories and speeds to use.
Always follow the manufacturer’s RPM or speed recommendations when selecting accessories.
Your motor is supplied with a variable speed control so that you can operate it at the most suitable
speed for each job. The motor has a maximum speed rating of 18,000 RPM.
accessory which has the same or a higher rating than your tool. Using an accessory with a
lesser rating can result in serious injury.
1. Abrasive Points, Wheels, and Discs:
Foredom’s unique
ceramic grain and aluminum oxide bonded together. The ceramic grain provides a faster cutting
action and is more durable so that shapes are maintained longer than pure aluminum oxide
stones. They are ideal for use on any hard metal such as steel, stainless steel, and titanium as well
as on wood. Use
such as aluminum or brass. They are ideal for use on any hard metal such as steel, stainless steel,
and titanium, as well as wood. Use
tough materials such as steel and malleable iron. Also use on glass and porcelain, etc.
(white color) points have an extremely fine grit for producing a fine, high finish on high-
Oxide
tensile materials including gem stones, stainless steel, and glass.
are used for removing rust and for polishing with various grits. For best results, use finer
Wheels
grits for finishing at high speeds and coarser grits for stock removal at lower speeds.
2. Burs and Cutters:
Vanadium Steel Cutters
Carbide Burs on wood, plastic and tough alloys. Carbide is generally referred to as the “hardest
man-made metal”.
materials. Generally, use medium speeds for stock removal. Higher speeds are required for finishing work and for the smaller points.
material removal and are specifically made for use on soft and hard woods and plastics
(do not use Typhoon burs on metal).
3. Sanding Drums, Bands, and Discs:
These accessories are used for removing rust, smoothing rough surfaces and for sanding jobs on
wood, plastic and metal. (Avoid using too much pressure which will cause clogging or a build-up
on the work surface.) For best results, use medium speeds for coarser grits and larger diameters.
Use higher speeds for finishing work or with smaller sizes.
4. Cotton or Felt Bobs and Buffs:
Solid Felt Buffs or Bobs
ng and polishing operations on plastic, wood, and metal. They var
buffi
three hardnesses — medium, hard, and rock hard.
delicate work; with precious metal and during polishing operations. Generally
cutting down and buffi
5. Brushes:
Miniature power brushes
ideal for deburring, surface finishing, edge blending, roughening to create a good bonding surface,
CeramCut Blue®Stones
Silicon Carbide
are suitable for all materials except hardened steel and glass. Use
Engraving Burs
are used in combination with gritty or smooth compounds for a variety of
ng. Medium speeds are used for delicate, precise work and for polishing.
(green color) for low-tensile, brittle or “smeary” types of metals
Aluminum Oxide
are used for fine detailed work on metal and other hard
are generally used on metal sur
are made from a mixture of special man-made
(red color) for fast cutting on high-tensile,
Rubber Bonded Abrasive
Typhoon®Carbide Burs
Loosely-stitched Soft Cotton Buffs
10
provide very fast and aggressive
faces and hard-to-reach areas. They are
Always use an
Aluminum
y in shape and come in
are used for
, use high speeds for

General Accessory Recommendations continued
Brushes: continued
and general cleaning. Use high speeds for cleaning and deburring. Medium speeds are needed
when cleaning hard-to-reach areas and edge blending.
6. Diamond Burs:
Diamond Burs
are used to remove stock from extremely hard materials such as tungsten and
tantalum carbide cutting tools, dies and molds, broaches, and for lapping and polishing
synthetic jewels and precious metals, fiberglass and reinforced plastics, PVC and ceramics.
Operation – General Guidelines
Read all the safety instructions in this manual before operating your Foredom
Tool. Proper eye and face protection must be worn to protect you from injuries caused
by flying debris, chips, or sparks which might result from the work being done.
Your Foredom motor may be operated in a vertical or horizontal position, but it should not
be enclosed or confined so as to restrict air circulation. If the motor is hung up above a
workbench, be sure it is fastened securely to the wall or motor hanger. The motor may develop
a high operating temperature (up to 100
o
F + ambient) after prolonged use, and it will be too hot
to hold. This will not harm the motor which is designed to operate at this temperature for
prolonged periods.
Do not bend at tight angle.
Shafts and sheaths last longer when they are used
without sharp bends. If used at angles or loops, wear will
occur at the points of greatest friction. When operating
your power tools
be careful not to bend the flexible
shaft too much at either the handpiece or motor shaft
connections.
Excessive heat and wear will occur
if the bend is too great.
®
Power
Do Not
Do This!
Follow these guidelines for trouble-free use:
as shown below, should be maintained for shafts on
radius,
a 4″ or larger
all motors. In its normal curved position All Foredom CC, S,
and SR Series flexible shaft power tools can tolerate up to
12 lbs. of torque (the Series H 1/4 horsepower can withstand
28 lbs. of torque before breaking). There is no way to avoid
ultimate wear and under normal conditions a flexible shaft
machine may require several replacement shafts and sheaths
Minimum
Operating
Radius
during its lifetime. (Follow shaft and sheath assembly instruction in
the Assembly section of this manual.)
Do not force the tool
Let the speed of the tool do the work. Avoid using too much pressure.
Generally, slower speeds are used for rougher, heavier work or when
greater control over the accessory is required for precise, delicate work.
Higher speeds are used for buffing, cutting and polishing. Read Accessory
Recommendations on page 10 of this manual.
oltage Decreases
V
4″ radius
4″
radius
Never operate a power tool during a perceptible power decrease.
Turn off tool and unplug until full power is restored.
Always wear proper eye and face protection when operating a Foredom power tool.
11

Maintenance Procedures
Always make sure your power tool is unplugged when conducting
maintenance procedures!
It is very important to routinely clean your Foredom®Power Tool and lubricate the shaft (NOT
the motor), especially in areas that generate a lot of dust. Dirt and improper lubrication are
the most common causes of poor operation and excessive wear. Always disconnect power
tool before cleaning or servicing.
Note: Ball Bearing Universal Motors Do Not Require Lubrication.
Routine Cleaning of Motors
Foredom Motors need air circulation through the motor housing
to remove waste heat and cool the windings. Inlet and outlet slots
provide the means for air flow. However, saw dust and conductive
debris (like metal filings or gold dust) can enter in through these
slots. If not cleaned regularly, dust could collect, making a bridge
between parts, causing an electrical short. Therefore,
recommends cleaning the motor every 40 hours of use.
should be removed, cleaned and replaced, and air should be blown through the motor.
Routine Cleaning and Lubrication of Flexible Shaft
The shaft should be checked, wiped clean, and relubricated with grease every 50 hours of use.
With every 200 hours of use, the shaft should be thoroughly cleaned with solvent and lubricated. Use Foredom flex shaft grease (p/n 10006) or high quality white lubricating grease.
in high dust environments, Foredom
To remove dirt/dust buildup, brushes
Exposing the Inner Shaft
1.Remove handpiece
(see page 5).
4.Apply a
5.Replace and adjust sheath so that shaft key tip extends 3/4″
6.Clean exterior of sheath by wiping with a cloth.
7.Hang and run the motor for about 4 to 5 minutes before attach-
8.Re-attach handpiece.
very light coating of lubrication to shaft starting at
the top and working downward to about one inch from the end.
Apply grease with your finger tip or small brush. Don’t overdo,
apply a light film of grease. Once the machine is running, the
shaft itself will spread the grease. If too much grease is applied,
the excess will work its way into the handpiece and eventually
seep out between the handpiece and sheath. For this reason, apply a bit less near the handpiece
end of the shaft.
flexible shaft.
from sheath. Retighten the set screw in motor connector.
ing the handpiece to allow enough time for the grease to warm
up, spread and drain off. Wipe off any excess grease at tip
end of sheath.
Never operate the motor with the outer sheath removed from the
2. Loosen set screw
on connector.
12
3. Slide sheath out
of connector
IMPORTANT!

Always make sure your power tool is unplugged when conducting
maintenance procedures!
Replacement of Worn Shafts and Sheaths
Shafts and sheaths last longer when they are not used at sharp angles or loops, since wear occurs
at the points of greatest friction. There is no way to avoid ultimate wear, and under normal conditions a flexible shaft machine may require several replacement shafts and sheaths during its lifetime.
To expose the inner shaft follow steps 1, 2, and 3 on the previous page.
Next, Remove motor connector with 1″ crescent or adjustable
wrench. Connector has a left hand thread and must be turned
clockwise (right) for removal.
Loosen set screw on the flexible shaft motor coupling and
slide shaft off the motor shaft.
Installation of New Shaft
1.After removing old shaft, loosen set screw on the new flexible
shaft motor coupling and slide coupling onto motor shaft.
2.Tighten set screw securely onto the flat of the motor shaft.
3.Slide motor connector back up over the shaft and tighten to
the left (counter clockwise).
4.Grease shaft prior to putting on the sheath. (See lubrication
instructions on page 12.)
5.Slide sheath over flexible shaft with plain fitting directed
toward the motor and into the motor connector. (Each end of
the sheath has a metal fitting one is plain, the other has a
groove around it to fit the handpiece.)
6.Adjust the shaft (page 5 and below) and tighten sheath set
screw in motor connector.
motor
shaft
motor
coupling
Shaft and Sheath Adjustment:
Place the entire unit on a flat surface with shaft and sheath extended straight. Adjust the
exposed tip of the flexible shaft so that it extends 3/4
done by moving the sheath in or out of the motor connector. When the correct adjustment is
made, tighten the screw in the motor connector.
″ beyond the sheath, as shown. This is
Replacement of Motor Brushes
The motor brushes should be checked for
wear periodically. When new, they are
approximately 3/4
when they have worn to 1/4
brushes, disconnect motor power cord and
unscrew the brush caps. Be sure the curvature or contour of
the motor brush tip matches that of the outside of the
housing cur
″ long. Replace them
ve.
″. To remove
13
New Motor Brush
Motor that needs
Brush
replacement

Recommended Spare Parts and Supplies for Series CC, DD,
MM, Series S, SB, SM, and Series SR, SRB, or SRM
The following parts and supplies are recommended as spares to keep on hand to insure continuous operation of your Foredom power tool. They can be purchased from your Foredom dealer,
from Foredom on-line at: www.foredom.com, or from The Foredom Electric Company by
telephone at 203-792-8622.
For all Series CC, DD, MM, Series S, SB, SM, and Series SR, SRB, or SRM Motors
(115v and 230v)
• 1 flexible shaft (Part No. 93)
• 1 outer sheath (Part No. 77)
• 1 neoprene sheath (Part No. 77N)
• 1 Foredom flexible shaft grease (Part No. 10006)
For Series CC, DD, or MM Motors
• 1 pair motor brushes (Part No. 119P) for 115 volt motors
• 1 pair motor brushes (Part No. 117P) for 230 volt motors
• Foredom MK-9 Maintenance Kit for 115 volt motors, which contains: 1 flexible shaft
(Part No. 93), 1 Foredom flexible shaft grease (Part No. 10006), 1 pair motor brushes
(Part No. 119P), and an instruction manual
• Foredom MK-9A Maintenance Kit for 230 volt motors, which contains: 1 flexible shaft
(Part No. 93),1 Foredom flexible shaft grease (Part No. 10006), 1 pair motor brushes
(Part No. 117P), and an instruction manual
For Series S, SB, SM, SR, SRB, or SRM Motors (115v and 230v)
• 1 pair motor brushes (Part No. 2019P)
• Foredom MK-8 Maintenance Kit, which contains: 1 flexible shaft (Part No. 93),
1 Foredom flexible shaft grease (Part No. 10006), 1 pair motor brushes
(Part No. 2019P), and an instruction manual
Repair Services
Authorized repair service is available at the Foredom factory in Bethel, CT. Send items for repair
to the factory marked “Attention: Repair Department” The Foredom Electric Company,
16 Stony Hill Road, Bethel, CT 06801. Enclose the item(s), a packing list, and information
regarding the problem or repairs required. Estimates of repair cost will be made upon request. It
is our policy not to proceed with a repair without your approval if the cost (labor plus parts) is
more than fifty percent of the cost for a new replacement. You will be notified by mail and
advised of the cost to repair and to purchase a new replacement. Please allow three business
days for an estimate to be done and five to seven business days for repair work to be completed
after we receive your approval to proceed.
Storage
Store your Foredom power tools in a DRY, clean, dust-free area. Store out of the reach
of children.
15

Series SR Reversible Motor Instructions (only)
The assembly, operation and maintenance instructions contained in this Manual apply to the
Series SR Reversible Motor.
should be followed when using the Series SR, SRB, and SRM Reversible Motors:
•
N
ever change motor direction while it is running. Changing motor direction while
running can damage motor or flexible shaft or lead to premature wear.
To turn motor off, remove foot from foot pedal speed control, or turn dial speed control to “off”
position, and set rocker switch to “off” (center) position on motor.
Wait for motor to stop rotating and then put rocker switch into forward or reverse position.
• Always securely tighten chuck nut or chuck jaws of handpiece with wrench or chuck key so
that it will not come loose in the reverse or forward operating directions.
insert the shank of the accessory as far as possible into the collet or chuck to give it
maximum support.
• Use the forward motor direction for fluted burs and cutters. Most will cut efficiently only when
turning in this direction. Mounted abrasive points, sanding bands, tungsten carbide burs,
buffs, and brushes can be used in either direction.
• For added safety and comfort while using this power tool for carving or other applications, it
is recommended that you wear a heavy canvas or leather apron. It will protect you from dust,
debris and chips as well as help prevent injury if the handpiece slips off the workpiece. It will
also help prevent loose clothing from getting caught in a rotating cutter, bur or other accessory.
The following additional operating procedures and precautions
Also, be sure to
Many excellent books on wood carving and power carving techniques and accessories are available from your dealer, woodcarving clubs, and your local library. Foredom offers a large variety
of all types of accessories used by wood, plastic and stone carvers. Request a catalog or visit
Foredom on-line at www.foredom.com. We know that you can look forward to many years of
safe, enjoyable power carving with your new Foredom Series SR, SRB, or SRM power tool.
14

Send your Owner's Registration Card to Foredom right away. We will keep your card in our
Registration and Serial Number File.
Other Service and Repair
All other service and repairs should only be done by a professional repair person or shop.
Your dealer can help you select one or can arrange to have your Foredom equipment
returned to the Bethel, CT factory. (See Repair Service section in this manual.)
LIMITED WARRANTY
Series CC, DD, MM, S, SB, SM, SR, SRB, and SRM Flexible Shaft Power Tools
Foredom warrants the S and CC Series Motors to be free of defects in material or workmanship for a period of 1 year after purchase. During the warranty period, the defective
product will be repaired or replaced without charge or, at our option, the purchase price
will be refunded. This warranty does not cover damage caused in transit or by accident,
misuse, or ordinary wear.
ALL IMPLIED WARRANTIES, INCLUDING BUT NOT LIMITED TO WARRANTIES OF
FITNESS AND MERCHANTABILITY, ARE HEREBY LIMITED IN DURATION TO A PERIOD
ENDING 1 YEAR FROM DATE OF PURCHASE, AND WE WILL NOT BE LIABLE OR
RESPONSIBLE FOR ANY SPECIAL OR CONSEQUENTIAL DAMAGES.
Repair or replacement will be made at our option if the product is returned post-paid to:
The Foredom Electric Company
16 Stony Hill Road
Bethel, CT 06801
All warranty repairs must be done at the factory at the above address. We will not pay
any shipping or transportation charges. The #76 Duplex Spring is not covered by this
warranty since it is especially sensitive to the pressure and stress variables of the individual operator. This warranty only covers the original purchaser of the product. Some
states do not allow limitations on how long an implied warranty lasts or the exclusion
or limitation of incidental or consequential damages so the above limitations may not
apply to you. This warranty gives you specific legal rights, and you may also have other
rights which vary from state to state.
For More Information
For more information on Foredom machines, handpieces or accessories, contact your local
dealer. When no local dealer is available, write, call or fax: The Foredom Electric Company,
16 Stony Hill Road, Bethel, CT 06801 (203)792-8622, Fax: 203-796-7861.
www.foredom.com for the latest information on current products and new product
Visit
introductions. Also, rotary accessories that are not readily available from your retailer may
be found in our online store.
®
FOREDOM
The Foredom Electric Company
Form 1291 n 3/04
, Bethel, CT 06801
Printed in U.S.A.
 Loading...