

Foredom Series H Motors User Manual

Replacement of Motor Brushes
M
otor brushes should be checked for wear periodically.
When new they are approximately 3/4
Replace them when they have worn to 1/4
remove brushes, disconnect motor power cord and
unscrew the brush caps. Remove the worn motor
brushes, replace with new motor brushes, and screw
motor brush caps back on. Be sure to replace both
motor brushes even if one of them seems less worn
than the other.
″ (19mm) long.
″ (6mm). To
Recommended Spare
Parts and Supplies to
keep on hand to insure
continuous operation
MP319P Series TXH and LXH
Pair Motor Brushes
MP132P Series SRH Pair
Motor Brushes
MS10006 Foredom
UA115 3/32″ Hex key
MP2019P Discontinued Series H
A copy of the owner’s manual
for any of these motors can be
downloaded from our website.
Flexible Shaft Grease
Pair Motor Brushes
Also, visit our website for
‘how to’, maintenance and
product feature videos:
www.foredom.net
FOREDOM
The Foredom Electric Company
Bethel, CT 06801
Email:
customerser
www.foredom.net
Form 902H n 5/12
vice@blackstoneind.com
Square Drive Shafts and Sheaths for Series SRH, TXH, LXH
S-10823
S-10801TX
SS10819
S-10816TX
S-10827-NC
S-10801-NC
S-10816-NC
S-10805
S-10802TX
SS10822
S-10804TX
S-10805-NC
S-10802-NC
®
SS10822
S-10804-NC
Square Drive Shafts and Sheaths for Discontinued Series H
S-10805
S-10802A
SS10822
S-10804B
ew Motor Brush Motor Brush that
N
633⁄4″ Square Drive Shaft–Comes supplied on
motors cited above
63″ Heavy Duty Sheath Assembly (includes SS10819)
Comes supplied on motors cited above
Silencer Spring for motors cited above
Prelubricated Complete Assembly (S-10823,
S-10801TX & SS10819)
6313⁄16″ Non-Conductive Square Drive Shaft
631⁄8″ Non-Conductive Heavy Duty Sheath
(includes SS10819 Silencer)
Non-Conductive Prelubricated Complete Assembly
(S-10827-NC, 10801-NC & SS10819)
453⁄4″ Square Drive Shaft
433⁄4″ Heavy Duty Sheath Assembly
(includes SS10822 Silencer)
Silencer Spring
Prelubricated Complete Assembly (S-10805,
S-10802TX & SS10822)
453⁄4″ Non-Conductive Square Drive Shaft
433⁄4″ Non-Conductive Heavy Duty Sheath
(includes SS10822 Silencer)
Silencer Spring
Non-Conductive Prelubricated Complete Assembly
(S-10805-NC, S-10802-NC & SS10822
453⁄4″ Square Drive Shaft
443⁄8″ Heavy Duty Sheaths, includes SS10822
Silencer Spring
Prelubricated Complete Assembly
(10805, 10802A & SS10822)
4
eeds replacement
n
)
®
M.TXH, M.SRH & M.LXH Hang-Up Style
FOREDOM
Special Insert for Assembly,
Operation, and Maintenance of
Series TXH, SRH, LXH, and H Motors
The models shown at right come equipped with longer, square
drive shafts and heavy duty protective sheaths that are different
from those on our standard TX, SR, and LX motors.
As a result, they can only be used with Foredom’s four square
drive style handpieces.
Aside from the assembly and maintenance of these unique items,
all other operating instructions and safety guidelines apply. Please
read manuals carefully and completely.
Square Drive Handpieces for TXH, SRH, LXH,
and H Motors
These handpieces are used with heavy duty “square drive”
shafts ONLY. They are unique products and not part of Foredom’s
system of interchangeable handpieces. They have permanently
lubricated and shielded ball bearings for cool running and
continuous use. H.25H, H.30H, and H.44HT have positive sheath
locking mechanisms (locking rings). The new H.28H attaches
without a locking ring.
H.28H
H.25H
H.30H
H.44HT
H.28H is a slender,
Comes with 1/8″ and 3/32″ collets. 23/32″ dia., 511⁄16″ long.
H.25H comes with 1/8″ and 1/4″ collets and has larger,
double shielded ball bearings. Precision collets from 1/16
and metric sizes are available. 11⁄32″ dia., 61⁄8″ long.
H.30H has a geared 3-jaw #0 chuck with 0-5/32″ (4mm) capacity.
Includes chuck key in molded plastic handle. 1
H.44HT is a collet-type handpiece with 1/8″, 3/32″ and 1/4″
collets. Additional collet sizes from 1/16″ to 1/4″ in 1/32″
increments and metric sizes are available. 1″ dia., 61⁄4″ long.
Refer to Owners Manual or Handpiece Instructions for
information on Attaching Accessories to Handpieces.
collet-type handpiece
with tapered front grip.
″ to 1/4″
″ dia., 513⁄16″ long.
M.TXBH, M.SRBH,
& M.LXBH
Bench Style
M.TXMH, M.SRMH,
& M.LXMH
Bench Style
with built-in
control
Speed Controls
Motors featured in this insert must be used in
combination with the speed controls shown
below. Damage to the motor will result if used
with the wrong control.
directly into an AC electrical wall outlet.
Plastic Metal Table Top
Motor Control Control Control
Foot Foot Dial
Do Not plug the motor
115 Volt
M.TXH
and C.TXR-1 C.SXR-1 C.EMX-1
M.TXBH
M.LXH
and C.TXR-1 C.SXR-1 C.EMX-1
M.LXBH
M.SRH
and C.FCT-1 C.SCT-1 C.EM-1
M.SRBH
M.H
and C.FCH-1 C.SCH-1 C.EMH-1
M.HB
230 Volt
M.LXH
and C.TXR-2 C.SXR-2 C.EMX-2
M.LXBH
M.SRH
and C.FCH-2 C.SCH-2
M.SRBH
M.H
and C.FCH-2 C.SCH-2 C.EMH-2
M.HB
C.EMH-2
Assembly Instructions
Always make sure your power tool
is unplugged during assembly.
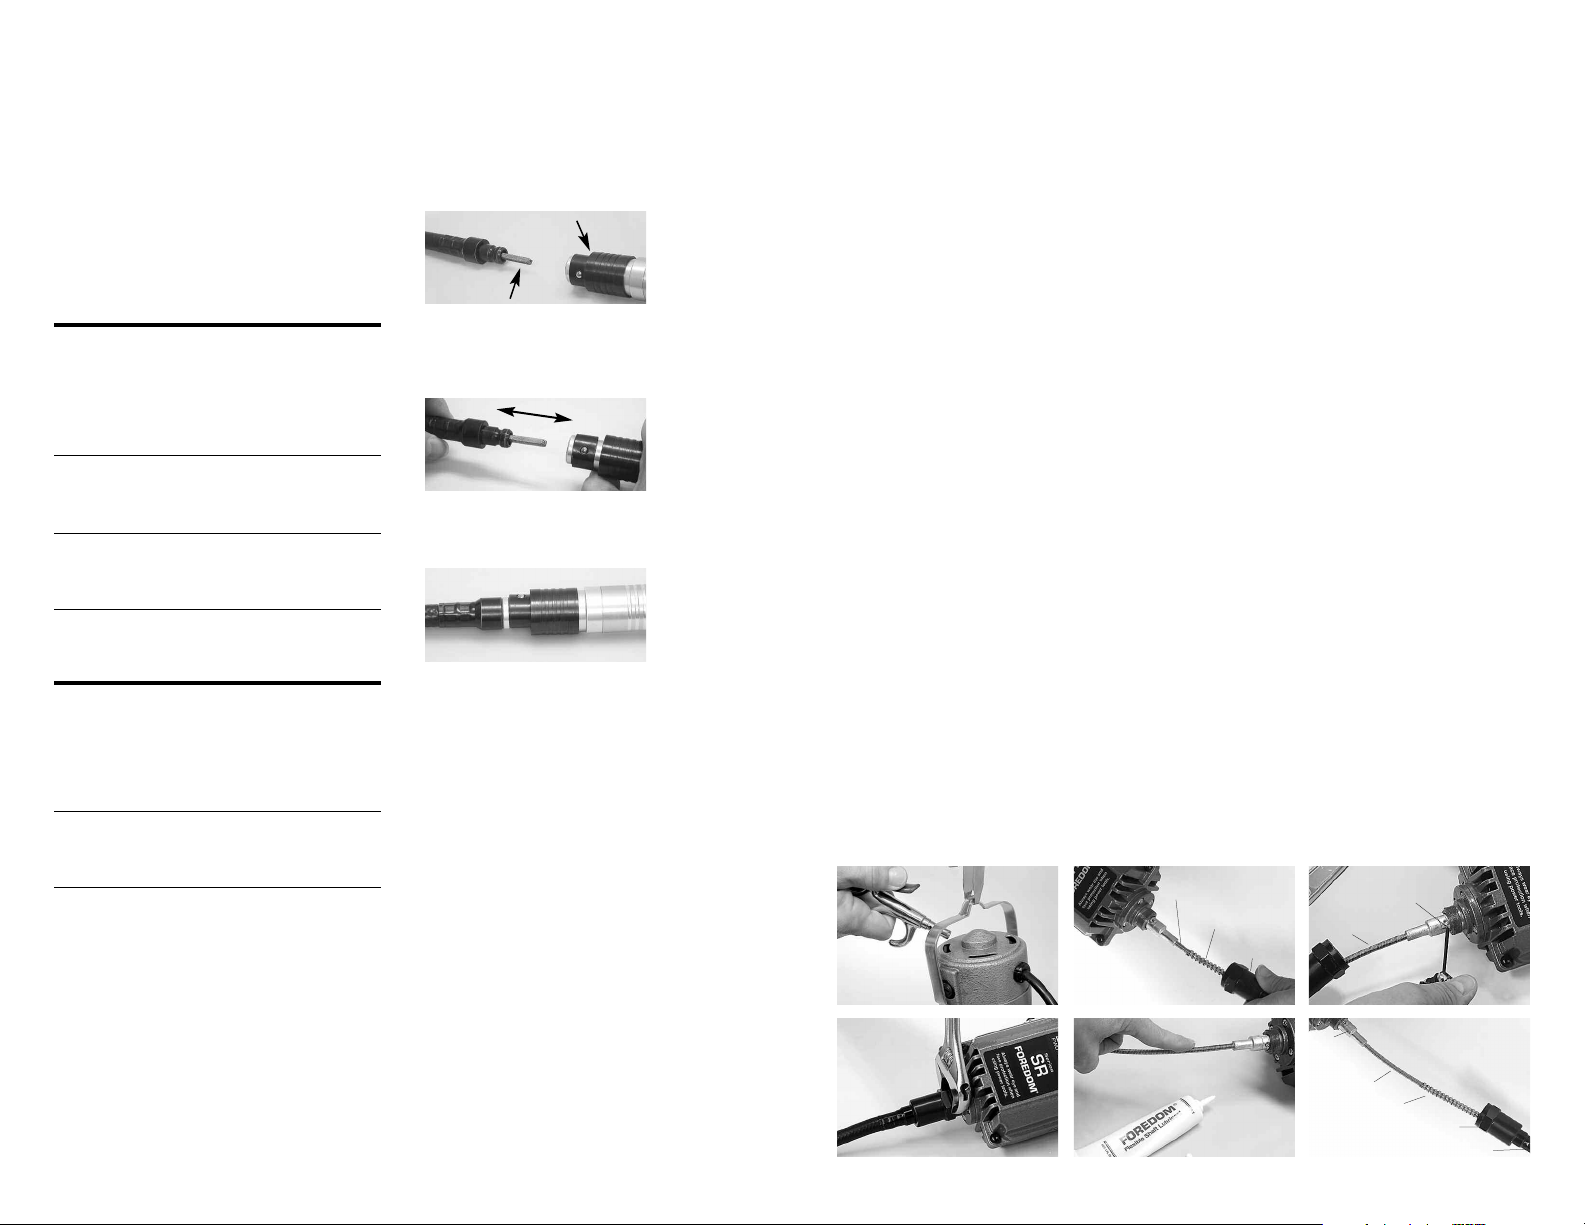
Connecting and Removing square drive
handpieces with locking rings to Series TXH,
SRH, LXH, and H flexible shafts–
handpiece
ocking ring
l
square drive tip on flex shaft
shaft. You may need to rotate the handpiece slightly
until the square shaft tip engages the spindle.
pull handpiece locking ring back
to insert shaft tip
handpiece to shaft connection
1. Pull back
the locking ring
toward the front
end of the
handpiece while
you insert the
tip of the flex
2. Release the
locking ring
when you feel
the shaft
connect to the
handpiece. You
should hear
a click.
3. To remove a
handpiece, pull
back the locking
ring in the same
way and with a
strong action
remove the
shaft and sheath
from the
handpiece.
Maintenance
Always make sure your power tool
is unplugged when conducting
maintenance procedures!
Motor– No lubrication of the motor is required,
however, it is important to keep the motor clean.
Remove any build up of dirt, chips, dust, or other
debris that may have entered through the slots
in the motor housing using a brush or by blowing
air through the motor (shown at right).
important to check for and replace worn motor
brushes periodically –
your manual for instructions.
see page 4 and read
Square Drive Handpieces– No lubrication
is required. Remove any build up of dirt, chips,
dust or other debris from collet seat or chuck.
Read the handpiece instructions for
additional information.
2
It is also
Routine Cleaning and Lubrication
of Flexible Shaft
The shaft should be checked, wiped clean, and
relubricated with grease every 50 hours of use.
With every 200 hours of use, the shaft should be
thoroughly cleaned with solvent and lubricated.
Use Foredom flex shaft grease (MS10006) or
high temperature, quality white lubricating grease.
Exposing the Inner Shaft
1. Remove handpiece
2. Use a 1″ adjustable wrench to remove the
outer sheath.
Sheath nut has a left hand thread and must be
turned clockwise (right) for removal.
3. The inner shaft is threaded through both a
silencer spring and the outer sheath. Slide the flexible shaft out of the outer sheath to lubricate or
replace the it. The silencer spring tends to stay
inside the sheath – so it may not be visible when
you remove the inner shaft.
4. Apply a very light coating of lubrication to shaft
starting at the top and working downward to about a
few inches from the end. Apply grease with your fin
ger tip or small brush. Don’t overdo, apply a very
light film of grease. Once the machine is running,
the shaft itself will spread the grease. If too much
grease is applied, the excess will work its way into
the handpiece and eventually seep out between the
handpiece and sheath. For this reason, apply a bit
less near the handpiece end of the shaft.
5. Replace both spring and sheath and tighten
sheath nut (counterclockwise).
6. Wipe the exterior of sheath with a cloth.
7. Hang and run the motor for about 10 minutes
before attaching the handpiece to allow enough
time for the grease to warm up, spread and drain
keep the
motor clean
Remove
outer
sheath
apply grease with
your finger tip
off. Wipe off any excess grease at tip end of
the sheath.
8.R
e-attach handpiece.
Never operate the motor with
the outer sheath removed from
the flexible shaft.
Replacement of
Worn Shafts and Sheaths
Shafts and sheaths last longer when they are
not used at sharp angles or loops, since wear
occurs at the points of greatest friction. There is
no way to avoid ultimate wear, and under normal
conditions a flexible shaft machine may require
several replacement shafts and sheaths during
its lifetime.
Installing New Shaft
1. Expose and remove the inner shaft following
steps 1, 2, and 3 at left.
2. Loosen 3/32″ hex set screw on the flexible
shaft motor coupling on the shaft. Replace with
new shaft.
-
3. Tighten set screw securely onto the flat of
the motor shaft.
4. Grease shaft prior to putting on the sheath.
Follow lubrication instructions at left.
5. Thread new shaft through sheath
and silencer spring. Tighten sheath nut
clockwise).
(counter
6. Hang and run the motor for about 10
minutes before attaching the handpiece to allow
enough time for the grease to warm up, spread
and drain off. Wipe off any excess grease at tip
end of sheath.
7. Re-attach handpiece.
shaft
silencer spring
3
sheath
motor
coupling
silencer spring
hexagonal
set screw
motor
shaft
shaft
motor connector
sheath
 Loading...