

If this manual has been downloaded or received
as a replacement to go with an older model
(made prior to 2003), the
this manual will not fit. Older bench lathes
require attachments that will fit 1/4″ (6.35mm)
straight motor shafts. Contact your Foredom
dealer or Foredom for bench lathe attachments.
attachments shown in
Maintenance
Lubrication: The Foredom Bench Lathe has
pre-lubricated ball bearings and a dust-proof
motor housing and does not require any
lubrication. The motor is designed to operate
above room temperature which will be warm to
the touch but not harmful to the motor.
Brush Wear: Disconnect power cord before
checking for brush wear. Check for brush
wear periodically (about every 200 hours of
continuous operation). Unscrew the brush tube
caps, check the brush length, and install new
brushes if the old ones are less then 3/16
(4.7mm) in overall length. Be sure that the
radius in the end of the brush is in line and
conforms to the commutator surface.
Replacement brushes (MP262P) are available
from your dealer, the factory, or you may order
them online from
www.foredom.com.
″
Repair Services
Authorized repair service is available at the
Foredom factory in Bethel, CT. Send items
for repair to the factory marked:
“Attention: Repair Department”
The Foredom Electric Company
16 Stony Hill Road, Bethel, CT 06801
Enclose the item(s), a packing list, and
information regarding the problem or repairs
required. Estimates of repair cost will be
made upon request.
Please retain your proof of purchase
for warranty repairs.
Contact Information
If you have a warranty issue with your
Foredom power tool please use the contact
information below. For more information on
Foredom machines, handpieces or accessories, contact your local dealer. When no local
dealer is available contact Foredom at:
The Foredom Electric Company
16 Stony Hill Road, Bethel, CT 06801
Tel.: (203) 792-8622
Email: customerservice@blackstoneind.com
• Fax: (203) 796-7861
®
FOREDOM
Owner’s Manual
LIMITED WARRANTY
The Foredom Electric Co. warrants the Bench Lathe to be free of defects in material or workmanship for a
period of 1 year after purchase. During the warranty period, the defective product will be repaired or replaced
without charge or, at our option, the purchase price will be refunded. This warranty does not cover damage
caused in transit or by accident, misuse, or ordinary wear.
ALL IMPLIED WARRANTIES, INCLUDING BUT NOT LIMITED TO WARRANTIES OF FITNESS AND
MERCHANTABILITY, ARE HEREBY LIMITED IN DURATION TO A PERIOD ENDING ONE YEAR FROM DATE
OF PURCHASE, AND WE WILL NOT BE LIABLE OR RESPONSIBLE FOR ANY SPECIAL OR CONSEQUENTIAL
DAMAGES. Repair or replacement will be made at our option if the product is returned post-paid to:
The Foredom Electric Company
16 Stony Hill Road
Bethel, CT 06801 USA
All warranty repairs must be done at the factory at the above address. We will not pay any shipping or
transportation charges. This warranty only covers the original purchaser of the product. Some states do not
allow limitations on how long an implied warranty lasts, so the above limitations may not apply to you. This
warranty gives you specific legal rights, and you may also have other rights which vary from state to state.
®
FOREDOM
Form 1248 5/10 n
The Foredom Electric Company
Bethel, CT USA 06801
.foredom.com
www
Printed in USA
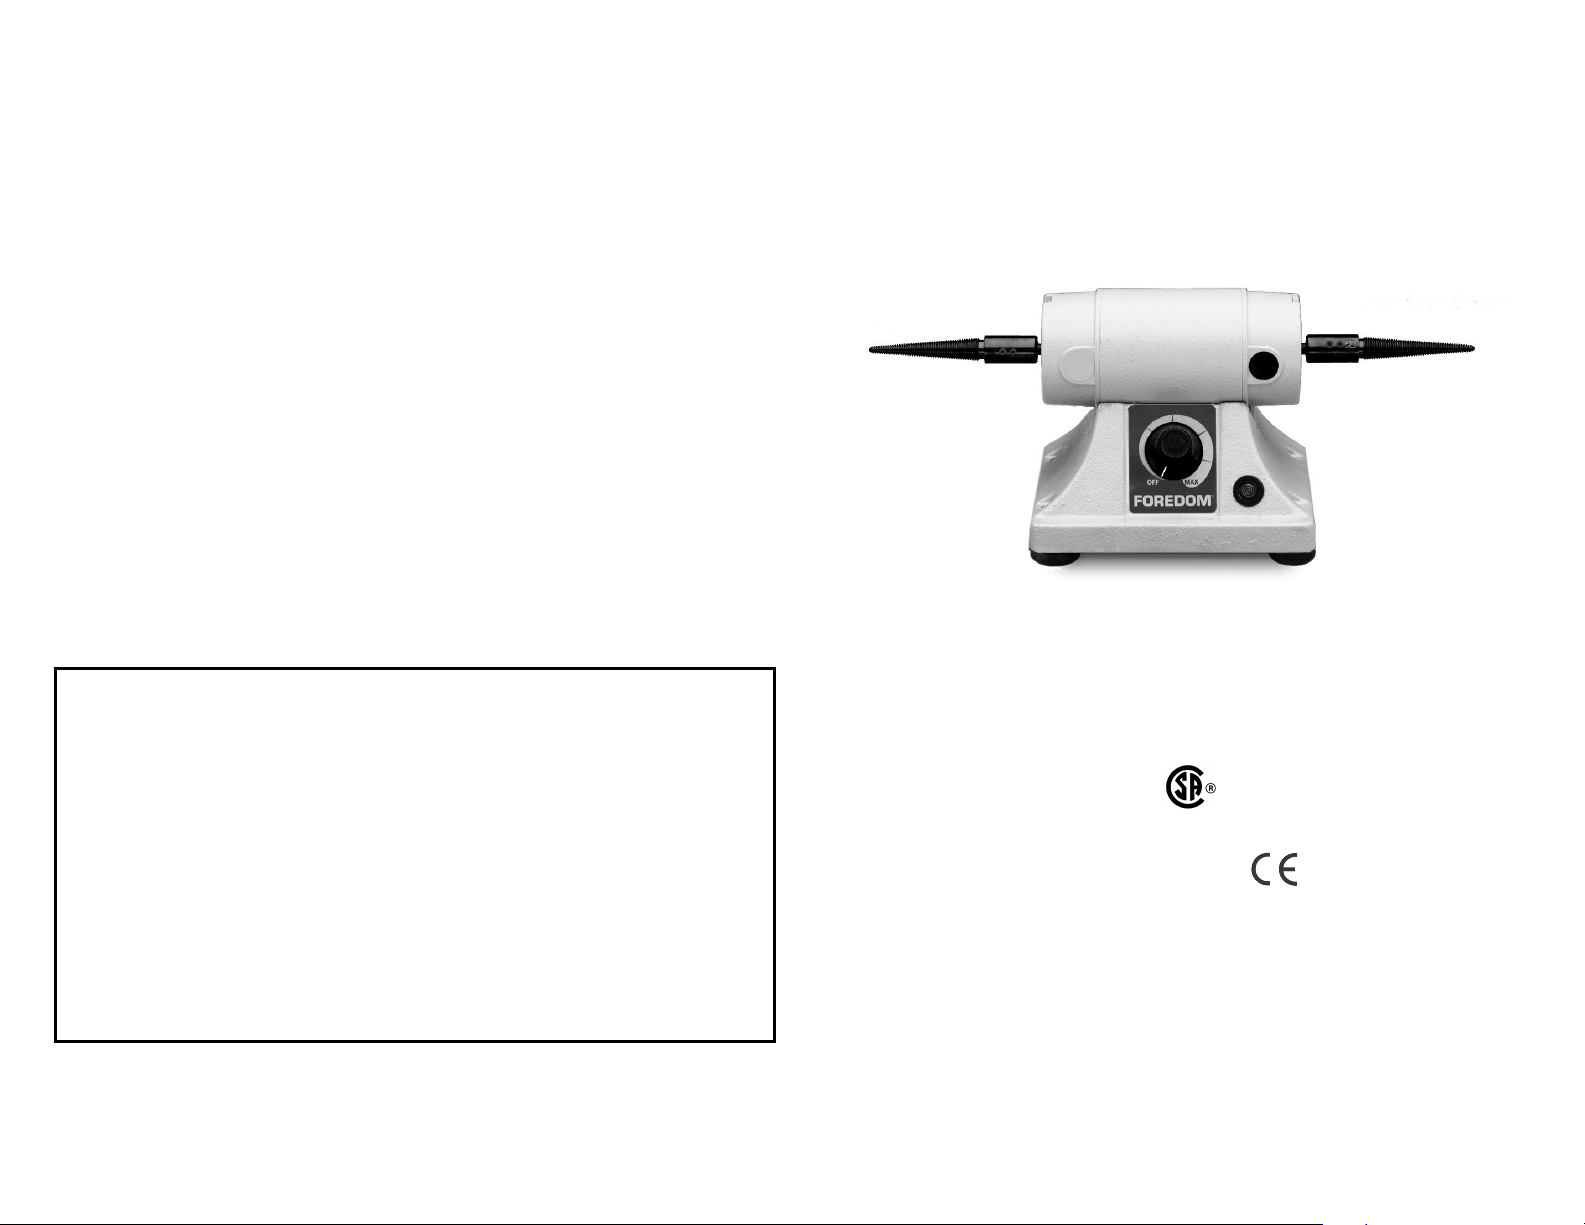
Bench Lathe
M.BL (115v)
M.BL-2CE (230v)
For Your Own Safety–
Read Owner’s Manual before operating
your Foredom Power Tool.
Always wear eye protection while using
the Bench Lathe or other power tools.
You have purchased a fine quality power tool
which will do a wide variety of tasks difficult to
do with any other kind of power tool. Foredom
®
Power Tools are manufactured to high standards
of precision and performance and, with proper
operation and maintenance, will give you many
years of trouble-free use.
Safety Instructions
Before using your Foredom Bench Lathe, please
read all safety instructions.
protection and should always be followed to reduce
the risk of personal injury or damage to the tool.
Always wear proper eye and face protection. Safety
glasses or face shields should be worn whenever
you operate a Foredom or any power tool to
prevent serious eye or face injuries.
loose clothing or jewelry and be sure to
long hair
.
Always use a proper dust collection system or
wear a respirator to prevent the inhalation of dust
particles or other debris into your lungs.
operate an accessory at speeds above its
Never
maximum speed rating. When properly used, all
of Foredom’s accessories can be operated at the
speeds listed in Foredom catalogs or on the
packaging. Only accessories rated for 7,000 RPM
or higher should be used with the Bench Lathe.
Always determine the manufacturer’s speed rating
before using accessories other than Foredom’s.
Never use or continue to use any accessory which
appears to be damaged, loose, vibrating, or out of
balance. Inspect each accessory for cracks or flaws
before using it.
Always insert the shank or arbor of an accessory
or mandrel into the collet (or collet holder chuck or
chuck arbor) as far as possible in order to provide
proper support. Tighten the collet or
chuck securely.
Always make sure that accessory tightening tools
such as the pin and wrench are
lathe is turned on.
Figure 1
They are for your
Do not wear
tie back
removed before the
Never use excessive side pressures which may
tend to bend or break the shank or arbor or an
accessory. Let the speed of the accessory do
the work.
Do not overload the lathe by jamming or using
excessive pressure on the polishing wheel, buff
wheel, or accessory.
continuous loading.
Do not apply long time
This can result in damage to
the lathe.
Never operate your power tool during a perceptible
power decrease. Turn the power tool off and do not
use until power is fully restored.
Use proper fusing procedures. The fuse holder is
located on the rear of the base. If a fuse blows,
make sure lathe is not being overloaded, line voltage is not low, and motor shaft turns freely.
Replace fuse with same type and ampere rating.
Use type 3AG “slow blow” fuses, 3 Amp for model
M.BL and 1.5 Amp for model M.BL-2CE.
Do not use a higher ampere fuse.
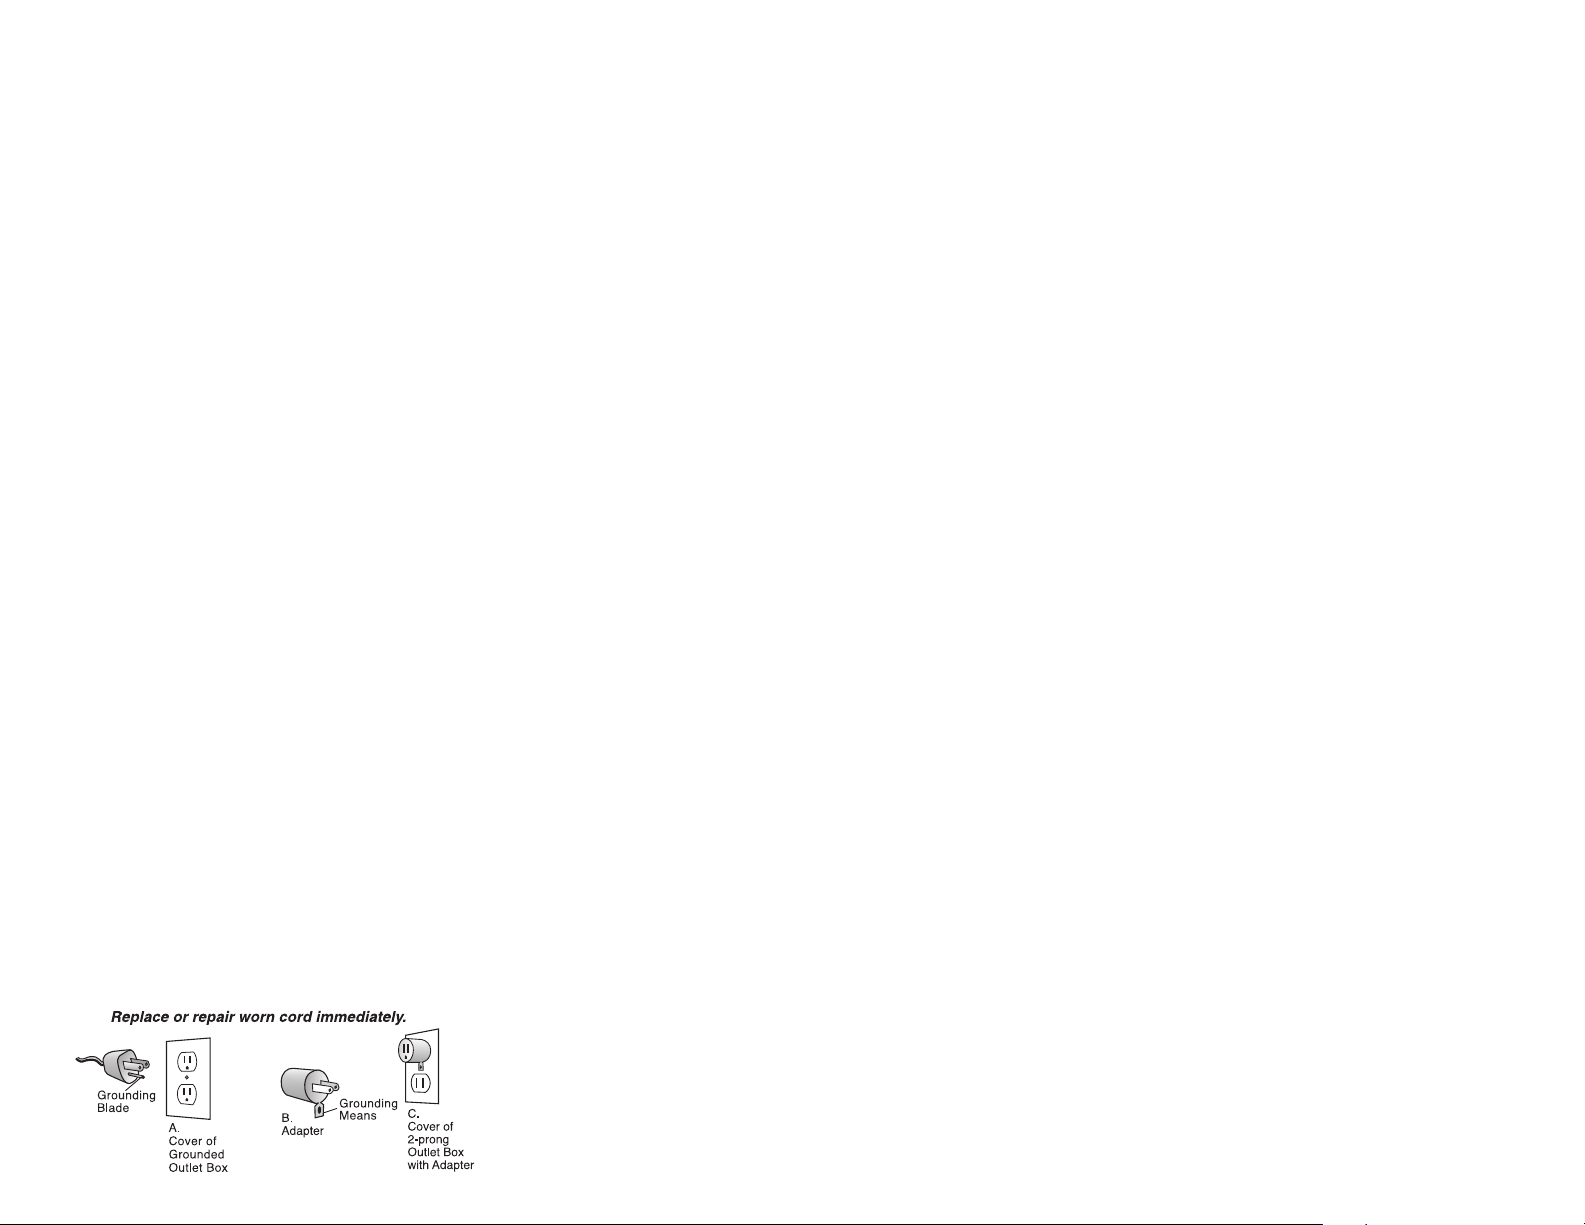
Use proper grounding procedures.
This tool
should be grounded while in use to protect the
operator from electric shock. The tool is equipped
with an approved 3-conductor cord and a 3-prong
grounding type plug to fit the proper grounding
receptacle. The green (or green and yellow)
conductor in the cord is the grounding wire. Never
connect the green (or green and yellow) wire to a
live terminal. If your unit is for use on less than 150
volts, it has a plug that looks like sketch A in Figure
1. An adapter (sketches B and C) can be used for
connecting plugs as shown in sketch A to 2-prong
receptacles. The green colored rigid ear, lug, etc.,
extending from the adapter must be connected to a
permanent ground such as a properly grounded
outlet box.
Some jurisdictions, including Canada,
prohibit the use of 3 to 2 prong adapters. Where
prohibited, they should not be used.
Use only
3-wire extension cords that have 3-prong grounding type plugs and 3-pole type plugs and 3-pole
receptacles that accept the tool’s plug. Always
disconnect the power cord before servicing the
lathe. Never use in an area where flammable
vapors are present.
Assembly Instructions
BL Bench Lathes have 5/16” (8mm) straight motor
shafts and come with A-TM5 (left hand) and A-TM6
(right hand) tapered spindles. These precision
made spindles are suitable for speeds of 500 to
7,000 RPM. Similar spindles, supplied for slower
speed polishing motors, often do not run as true
which can cause vibration and be a potential
Using spindles and other precision
hazard.
accessories supplied for slower speed motors
is not recommended with this bench lathe.
Mounting Base: The Bench Lathe comes with
suction cup feet that help to secure the lathe to a
smooth work surface. To further prevent movement
while pressure is being applied to a buff or wheel,
the base should be bolted or screwed down to a
solid work bench or table. Use the four mounting
holes in the base for this purpose.
Using Attachments: The supplied A-TM6 tapered
spindle, and optional A-CHA-5 collet holder,
A-JCA-2 chuck arbor, A-WM6 wheel mandrel and
S.B0 flexades
intended for use on the right hand side of the lathe
as you face it.
buff, wheel or tool may unscrew under load. The
supplied A-TM5 tapered spindle and optional
A-WM-5 wheel mandrel is intended
left side only
marked with an R or L to indicate left or
right hand.)
Attach the spindles or mandrels by sliding them
onto the motor shaft until there is only a 1/8
between the motor housing and inside edge of the
spindle or mandrel. Be sure that the two set screws
line up with the flat on the motor shaft.
both screws securely with supplied hex key.
See Figure 2 for mounting rubber wheels or other
accessories with 1/4
A-WM-6 wheel mandrel.
Use only 115 Volt AC 60 Hz for M.BL and use only
230 Volt AC 50 Hz for M.BL-2CE. Run the lathe at
slow speed without a buff (or wheel) to see that the
spindles, mandrel, or collet holder on the lathe
are running true.
Never use a buff, brush, abrasive wheel, or any
other accessory that is rated under 7,000 RPM.
Never use one that appears to wobble or vibrate.
It could damage the lathe or injure you.
Never use buffs over 4″ in diameter.
®
are right hand side accessories,
Do not use them on the left side as
for use on the
. (Every spindle and mandrel is
″ space
Tighten
″ diameter center holes on
Never use a grinding wheel over 2
rubber bonded wheels over 3
″ diameter nor
″ in diameter.
Please refer to Figure 2 for the proper mounting
procedure for wheels or brushes on the A-WM-6
(or A-WM-5) mandrel.
Tapered Spindles: For use with cotton, felt,
and chamois buffs with shellac hardened leather or
lead centers. Also for felt inside ring buffs mounted
on wooden mandrels, EXL Wheels, Radial Bristle
Discs (with A-4561 or A-4562 tapered spindle
″
adapters), and any 3
holes up to 7/16
Spindles:
Turn lathe on and run at low speed.
or smaller wheels with arbor
″
. Mounting Wheels onto Tapered
Align arbor hole of accessory with screw-like
threads of tapered spindle. The accessory will self
tighten as it travels up the spindle threads. To
remove, turn lathe off and manually unscrew
your wheel or buff.
Collet Holder: Loosen the two hex or allen screws
on A-CHA-5 Collet Holder and slide onto exposed
motor shaft of BL Lathe. Position screws over the
flat area of the shaft and re-tighten.
Collets and Accessories:
″
with 3/32
, 1/8″and 1/4″collets for use with
The Collet Holder comes
accessories and mandrels with 3/32
″
diameter shanks. The 1/4″collet typically
1/4
Changing
″
, 1/8″ and
comes installed. To switch out a collet and/or an
accessory with a different shank size, insert
supplied pin with safety spring into hole next to
the two set screws. Insert the wrench onto the flats
at the tip of the chuck nut and unscrew nut while
holding pin in place to keep spindle from turning.
Remove chuck nut and switch out collet. This may
require the use of a needle nose pliers. Replace
chuck nut and tighten after installing the shank of
the desired accessory or mandrel.
Never tighten a
chuck nut without an accessory installed, as
damage to the collet may occur.
Chuck Arbor:
Loosen the two hex or allen screws
on A-JCA-2 Chuck Arbor and slide onto exposed
motor shaft of BL Lathe. Position screws over the
flat area of the shaft and re-tighten.
Collets and Accessories:
The A-JCA-2 has a
Changing
geared 3-jaw #0 chuck. Open chuck jaws as far
as necessary with key provided. Insert shank of
accessory fully into the chuck. Tighten each of the
jaws with chuck key until accessory is secure and
centered. If accessor
y does not run true, reopen
jaws, rotate accessory and retighten. To release
accessory, simply reopen chuck jaws with key
and pull out accessor
y.

Bench Lathe Attachments
These are available from your dealer, the
factory, or you may order them online at
www.foredom.com.
Tapered Spindles (Supplied)
A-TM5 Left Hand A-TM6 Right Hand
Precision, true running tapered spindles suitable
for speeds up to 7,000 RPM. Double locking
screws. For use with cotton, felt, and chamois
buffs with shellac-hardened leather, or lead centers.
Also any 3″ or smaller wheels with arbor holes up to
7/16″in diameter and rated for 7,000 RPM or higher.
Use A-TM5 on left side (as you face it) and
A-TM6 on right side of bench lathe.
Tapered
for Scotch-Brite™ Radial Bristle Discs
FX Wheel
A-JCA-2 Chuck Arbor
Adjusts to hold accessories from 0– 5/32″ (3.9mm).
Comes with chuck key with molded plastic handle.
Use on right side only.
Spindle Adapters
Part No. Lathe Diameter
A-4561
A-4562
A-4568
Side of Arbor Hole
Right hand 3/8″
Left hand 3/8″
Adapter for 3M™ FX Polishing Wheels
Both 1″
Attachments shown here fit current models
(2003 and newer) of Foredom’s BL Lathe
which have 5/16
″ diameter straight
motor shafts
Wheel Mandrels
A-WM-5 Left Hand A-WM-6 Right Hand
Mandrels to hold rubber bonded abrasive wheels,
sanding drums, brushes, and other accessories with
1/4
″ mounting holes and rated for maximum speeds
of 7,000 RPM or higher.
HP440 Series collets
P/N Nominal cap.
HP441
A-CHA-5 Collet Holder
Collet holder on arbor includes
3/32″, 1/8″, and 1/4″ collets,
pin and wrench. For use with
all 440 series collets in 1/16″
to 1/4″ and metric sizes.
Use on right side only.
S.B0-516N Flexade
Comes with 5/16″ (8mm) coupling and extra flexible
30″ long neoprene sheath allows you to use any of
Foredom’s interchangeable handpieces. Must be
attached to the right side of the lathe.
Handpiece not included.
HP442 3/32″ (2.3mm)
HP443 1/8″
HP444 5/32″
HP445 3/16″
HP447 1/4″
HP448 3mm
HP449 6mm
®
1/16″
MADCH-1 Dust Collector Hoods
Heavy gauge sheet metal construction with non-skid
pads on the bottom. 21⁄2″ (64mm) adapter fits most
dust collection system hoses.
1
6
Height:
⁄2″ (165mm)
5
⁄8″ (117mm)
Width: 4
5
⁄8″ (219mm) deep
Depth: 8
otor Shaft
Figure 2
A-WM-6
Assemble
M
set screws
all components in
proper sequence.
(A-WM-5 left side
wheel mandrel has
same components in
opposite sequence)
R
ubber
Wheel
Operation
Because of the higher maximum speed
(approximately 7,000 RPM) and variable
speed control, the Foredom
®
Bench Lathe
has several advantages over conventional
single or two speed polishing and
buffing lathes:
1. The same size buffing wheel can
be used to obtain different surface
speeds, as measured in surface feet per
minute (SFPM). 3
can provide the
recommended for polishing
″ or 4″ diameter buffs
1,750 to 3,450 SFPM
and the
3,450 and higher SFPM recommended
for buffing.
The chart below shows the
SFPM obtained with different diameter
wheels at various speeds.
2. The SFPM can be varied while using the
same diameter buff or wheel. This will
give better results on different types
of material.
SPEED SFPM
″ Dia. Buff
1
Full 7,000 RPM 1,750
Med 4,000 RPM 1,000
2″ Dia. Buff
Full 7,000 RPM 3,500
4,000 RPM 2,000
Med
Cotton, chamois or felt buffs over 4″ in diameter should not be used with the Bench Lathe.
3. The 7,000 RPM maximum speed will enable
you to get much higher SFPM with smaller
″ or 2″ buffs or inside ring buffs, than
1
slower single or double speed equipment.
4. 3M Scotch-Brite™Radial Bristle Discs in 2
and 3″ diameters require 5,000 or higher
RPM for optimum performance, making
them perfect for use in the lathe.
5. The maximum speed of 7,000 RPM is also
fast enough to permit the use of small
mounted abrasive points, brushes, cutters,
or other accessories in the A-CHA-5 collet
holder, S.B0-516 flexade or A-JCA-2
chuck holder.
For additional information on buffing and
polishing procedure, wheel selection, and
Foredom buffing and polishing compounds,
please refer to the Foredom Buffing and
Polishing Guide (F-1234).
SPEED SFPM
3
″ Dia. Buff
Full 7,000 RPM 5,250
4,000 RPM
Med
4″ Dia. Buff
7,000 RPM
Full
Med 4,000 RPM 4,000
3,000
7,000
″
 Loading...