

Page 1
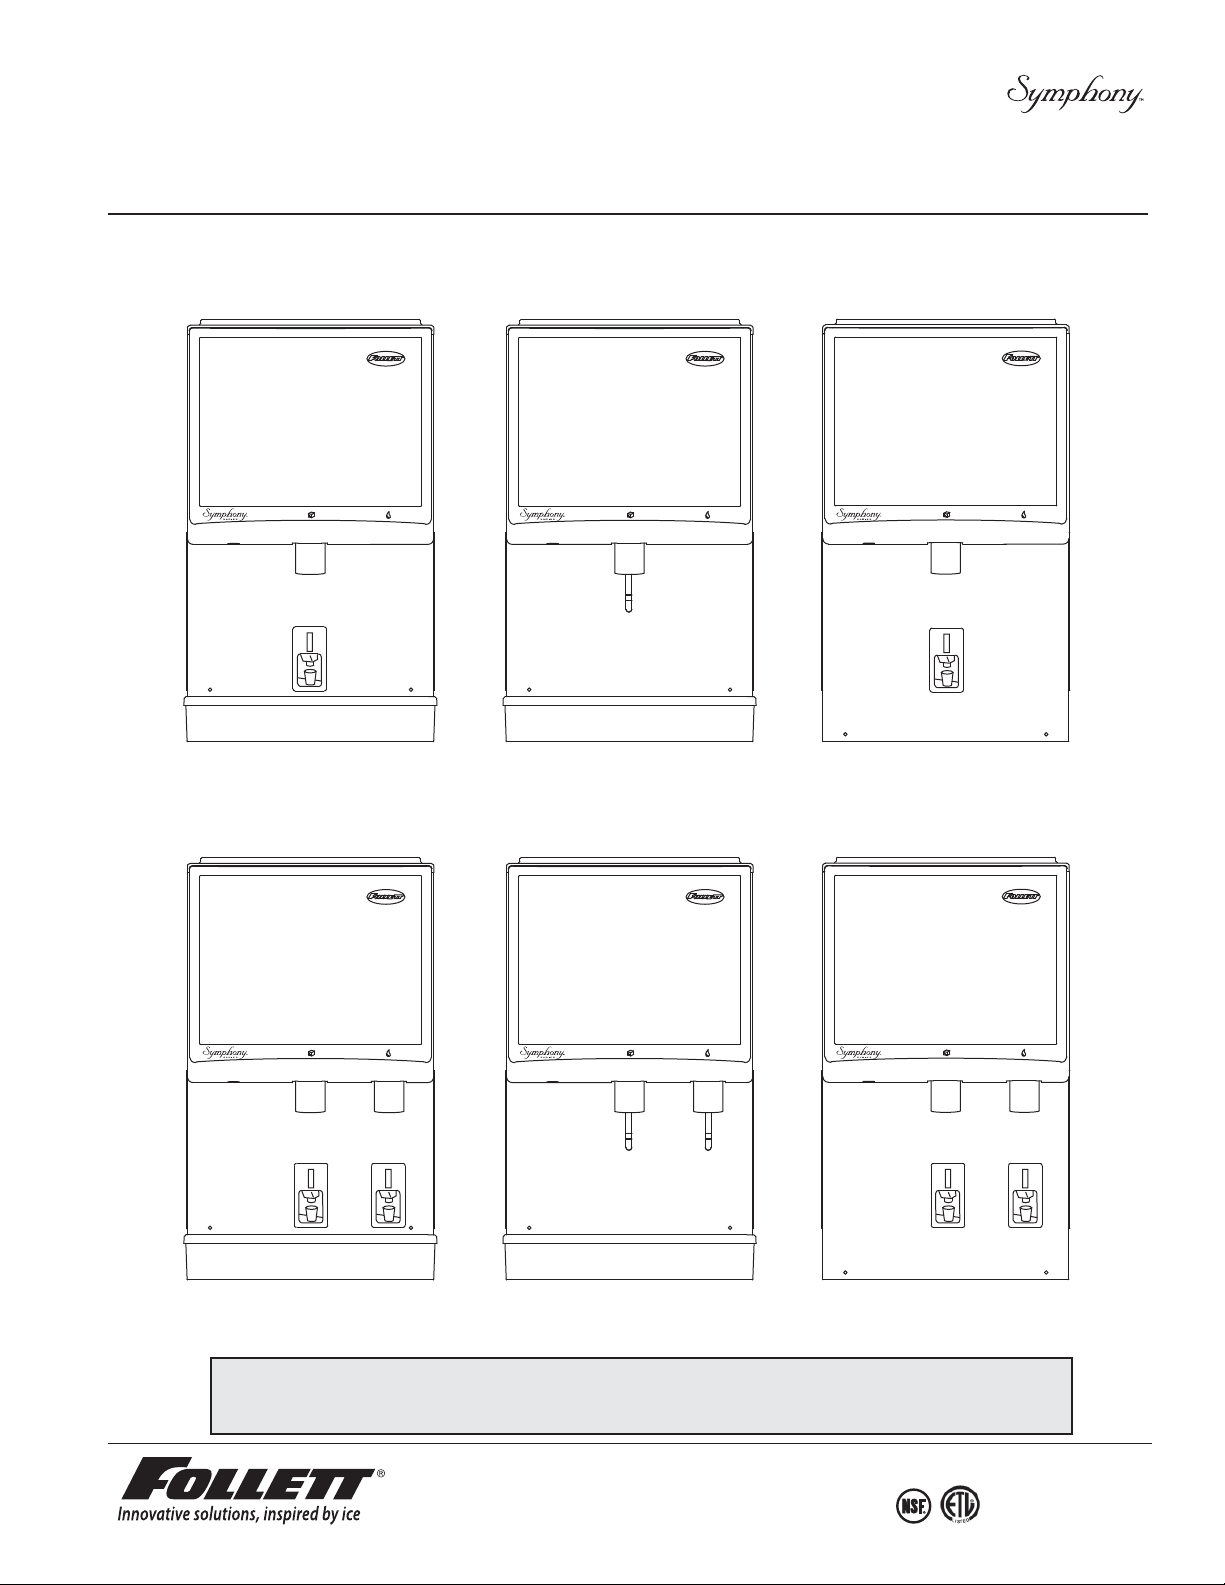
Ice and Water Dispensers
25CI400A/W, 25HI400A, 50CI400A/W, 50HI400A
Order parts online
www.follettice.com
25/50CI400A/W-SI Countertop
Ice-only Dispenser with
SensorSAFE™ Dispensing
Installation, Operation and Service Manual
25/50CI400A/W-LI Countertop Ice-only
Dispenser with Lever Dispensing
25/50HI400A-SI Wall Mount
Ice-only Dispenser with
SensorSAFE Dispensing
25/50CI400A/W-S Countertop Dispenser
with SensorSAFE™ Dispensing
Following installation, please forward this manual
to the appropriate operations person.
801 Church Lane • Easton, PA 18040, USA
Toll free (877) 612-5086 • +1 (610) 252-7301
www.follettice.com
25/50CI400A/W-L Countertop Dispenser
with Lever Dispensing
25/50HI400A-S Wall Mount Dispenser
with SensorSAFE Dispensing
00187153R09
Page 2

Contents
Welcome to Follett . . . . . . . . . . . . . . . . . . . . . . . . . . . . . . . . . . 3
Before you begin . . . . . . . . . . . . . . . . . . . . . . . . . . . . . . . 3
Contact Information . . . . . . . . . . . . . . . . . . . . . . . . . . . . . 3
Speci cations . . . . . . . . . . . . . . . . . . . . . . . . . . . . . . . . . . . . . 4
Electrical . . . . . . . . . . . . . . . . . . . . . . . . . . . . . . . . . . . . . 5
Ambient . . . . . . . . . . . . . . . . . . . . . . . . . . . . . . . . . . . . . . 5
Plumbing . . . . . . . . . . . . . . . . . . . . . . . . . . . . . . . . . . . . . 5
Ventilation and service clearances . . . . . . . . . . . . . . . . . 5
Uncrated weight . . . . . . . . . . . . . . . . . . . . . . . . . . . . . . . . 5
Installation . . . . . . . . . . . . . . . . . . . . . . . . . . . . . . . . . . . . . . . . 6
Before you begin . . . . . . . . . . . . . . . . . . . . . . . . . . . . . . . 6
Installing countertop dispensers with
rear exiting utilities (no legs) . . . . . . . . . . . . . . . . . . . . . . 6
Installing countertop dispensers with
bottom exiting utilities . . . . . . . . . . . . . . . . . . . . . . . . . . . . 6
Installing wall mount dispensers . . . . . . . . . . . . . . . . . . . 8
Cleaning/descaling and sanitizing . . . . . . . . . . . . . . . . . . . . . .10
Weekly . . . . . . . . . . . . . . . . . . . . . . . . . . . . . . . . . . . . . . .10
Monthly . . . . . . . . . . . . . . . . . . . . . . . . . . . . . . . . . . . . . . .10
Semi-Annually . . . . . . . . . . . . . . . . . . . . . . . . . . . . . . . . .11
Service . . . . . . . . . . . . . . . . . . . . . . . . . . . . . . . . . . . . . . . . . .14
Ice machine operation . . . . . . . . . . . . . . . . . . . . . . . . . . .14
The icemaking process . . . . . . . . . . . . . . . . . . . . . .14
Ice harvest system diagram . . . . . . . . . . . . . . . . . . .14
Disassembly and replacement instructions . . . . . . . . . . .15
Dispense wheel removal and installation . . . . . . . . .15
Drive bar removal . . . . . . . . . . . . . . . . . . . . . . . . . . .15
Wheel motor assembly removal . . . . . . . . . . . . . . . .15
Ice transport tube replacement . . . . . . . . . . . . . . . .15
Ice machine removal . . . . . . . . . . . . . . . . . . . . . . . . . . . .16
Evaporator disassembly . . . . . . . . . . . . . . . . . . . . . .18
Evaporator reassembly . . . . . . . . . . . . . . . . . . . . . . .19
Gearmotor replacement . . . . . . . . . . . . . . . . . . . . . .19
Fan removal . . . . . . . . . . . . . . . . . . . . . . . . . . . . . . .19
Electrical systems . . . . . . . . . . . . . . . . . . . . . . . . . . . . . . . . . 20
Electrical component locations . . . . . . . . . . . . . . . . . . . 20
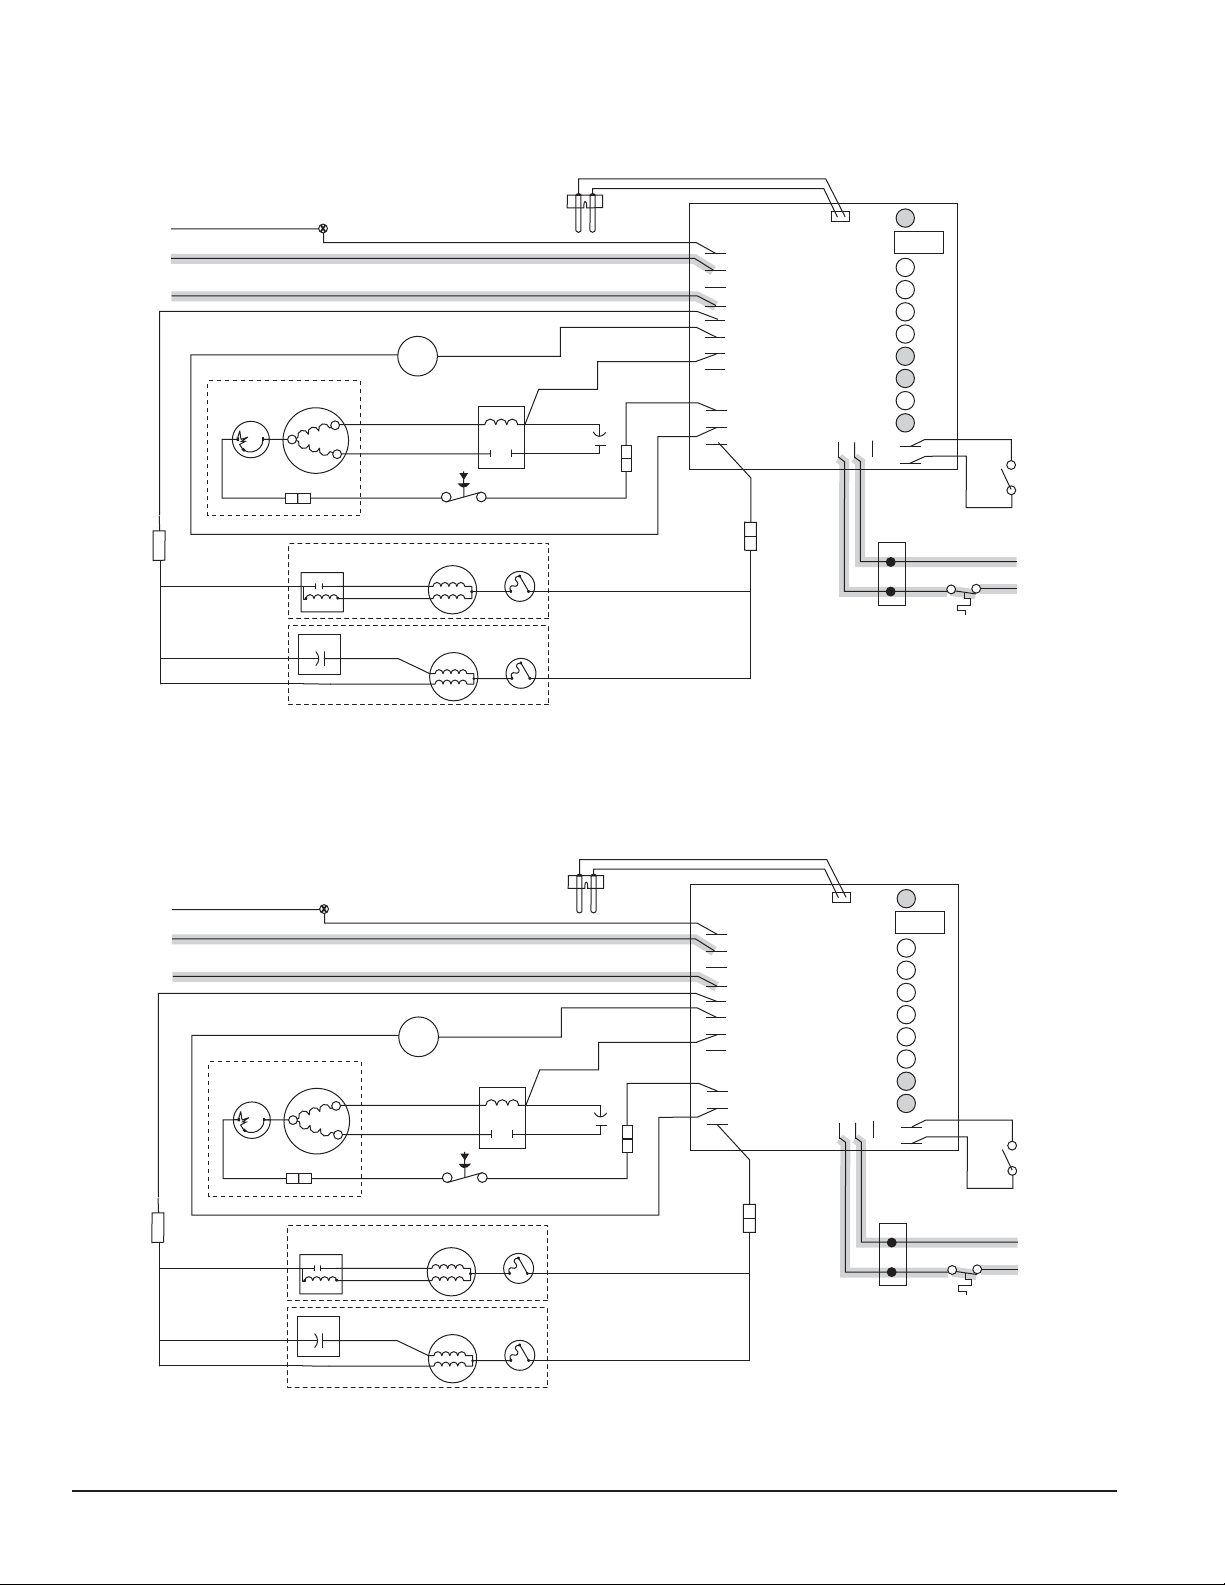
Wiring diagram - lever dispense model . . . . . . . . . . . . . 21
Wiring diagram - SensorSAFE model . . . . . . . . . . . . . . 22
Ice machine operational and diagnostic sequences . . . . . . . 23
Circuitry notes . . . . . . . . . . . . . . . . . . . . . . . . . . . . . 23
Normal operation – Stage 1 . . . . . . . . . . . . . . . . . . 24
Normal operation – Stage 2 . . . . . . . . . . . . . . . . . . 24
Normal operation – Stage 3 . . . . . . . . . . . . . . . . . . 25
Normal operation – Stage 4 . . . . . . . . . . . . . . . . . . 25
Normal operation – Stage 5 . . . . . . . . . . . . . . . . . . 26
Normal operation – Stage 6 . . . . . . . . . . . . . . . . . . 26
Diagnostic sequence – Stage 7 . . . . . . . . . . . . . . . 27
Diagnostic sequence – Stage 8 . . . . . . . . . . . . . . . 27
Diagnostic sequence – Stage 9 . . . . . . . . . . . . . . . 28
Diagnostic sequence – Stage 10 . . . . . . . . . . . . . . 28
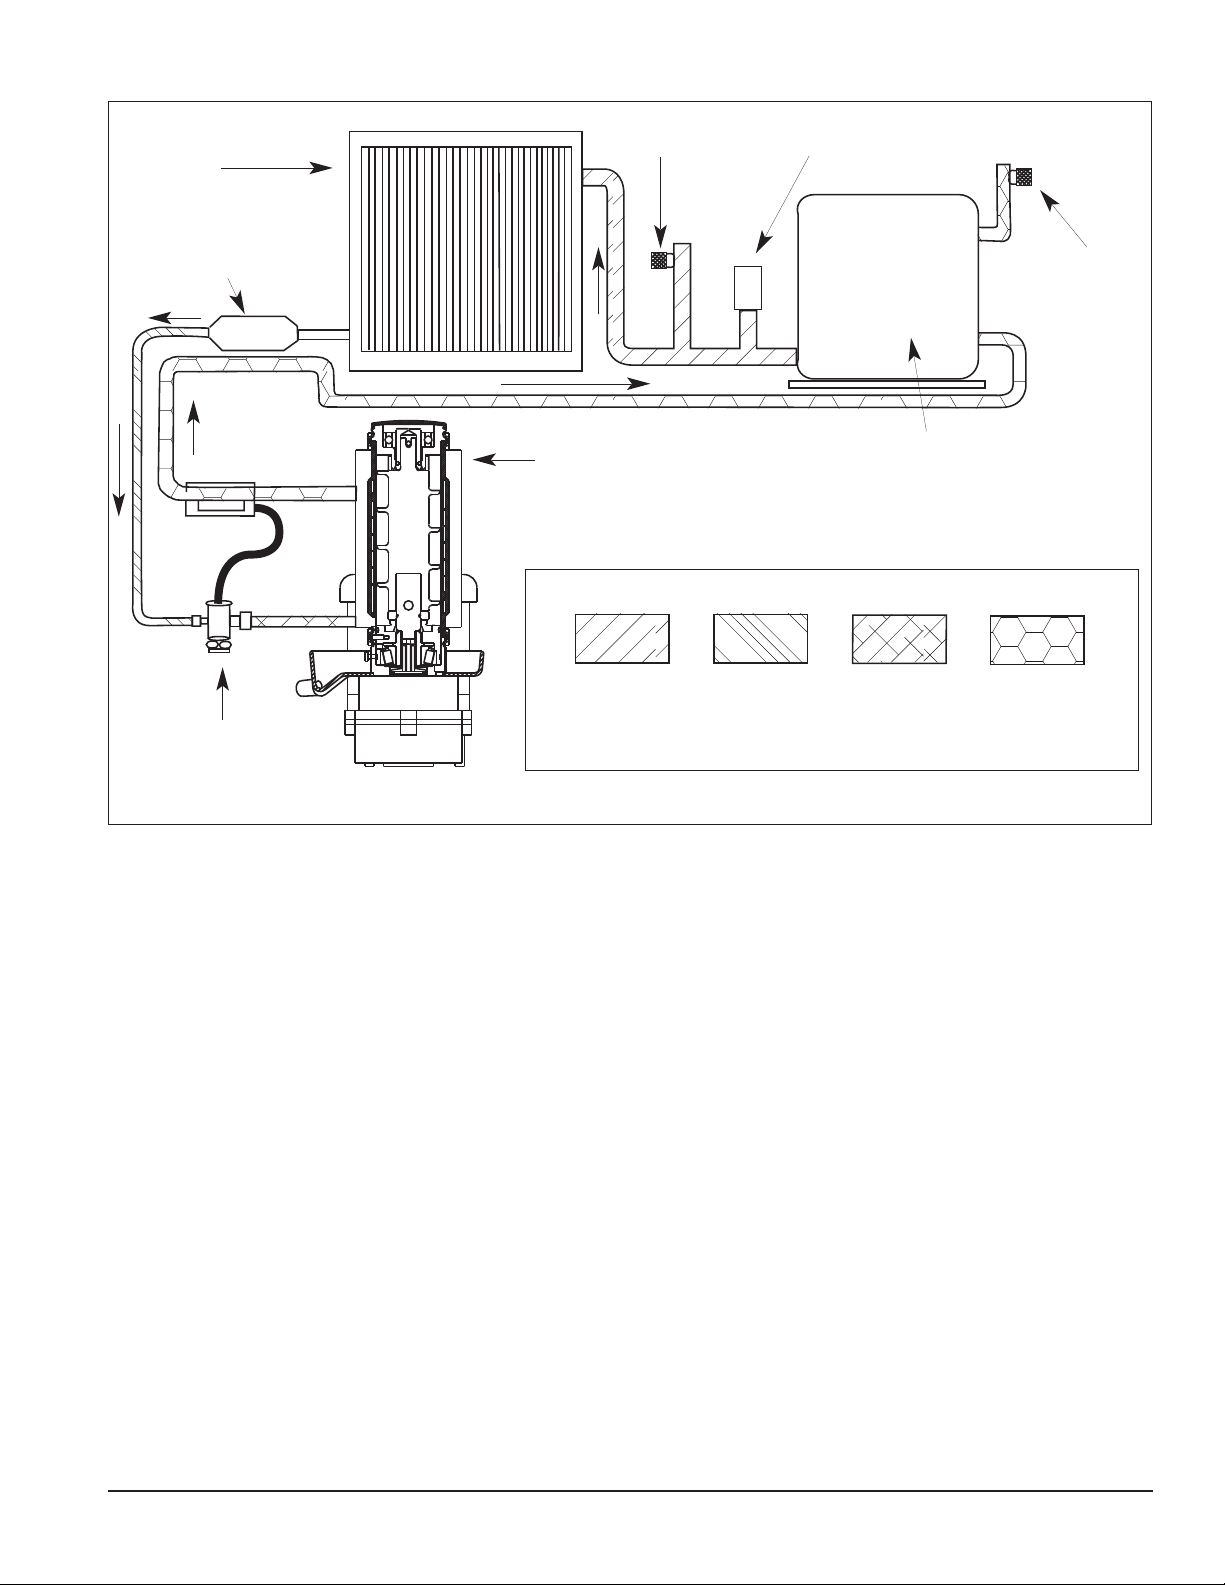
Refrigeration cycle . . . . . . . . . . . . . . . . . . . . . . . . . 29
Refrigeration data . . . . . . . . . . . . . . . . . . . . . . . . . . . . . 30
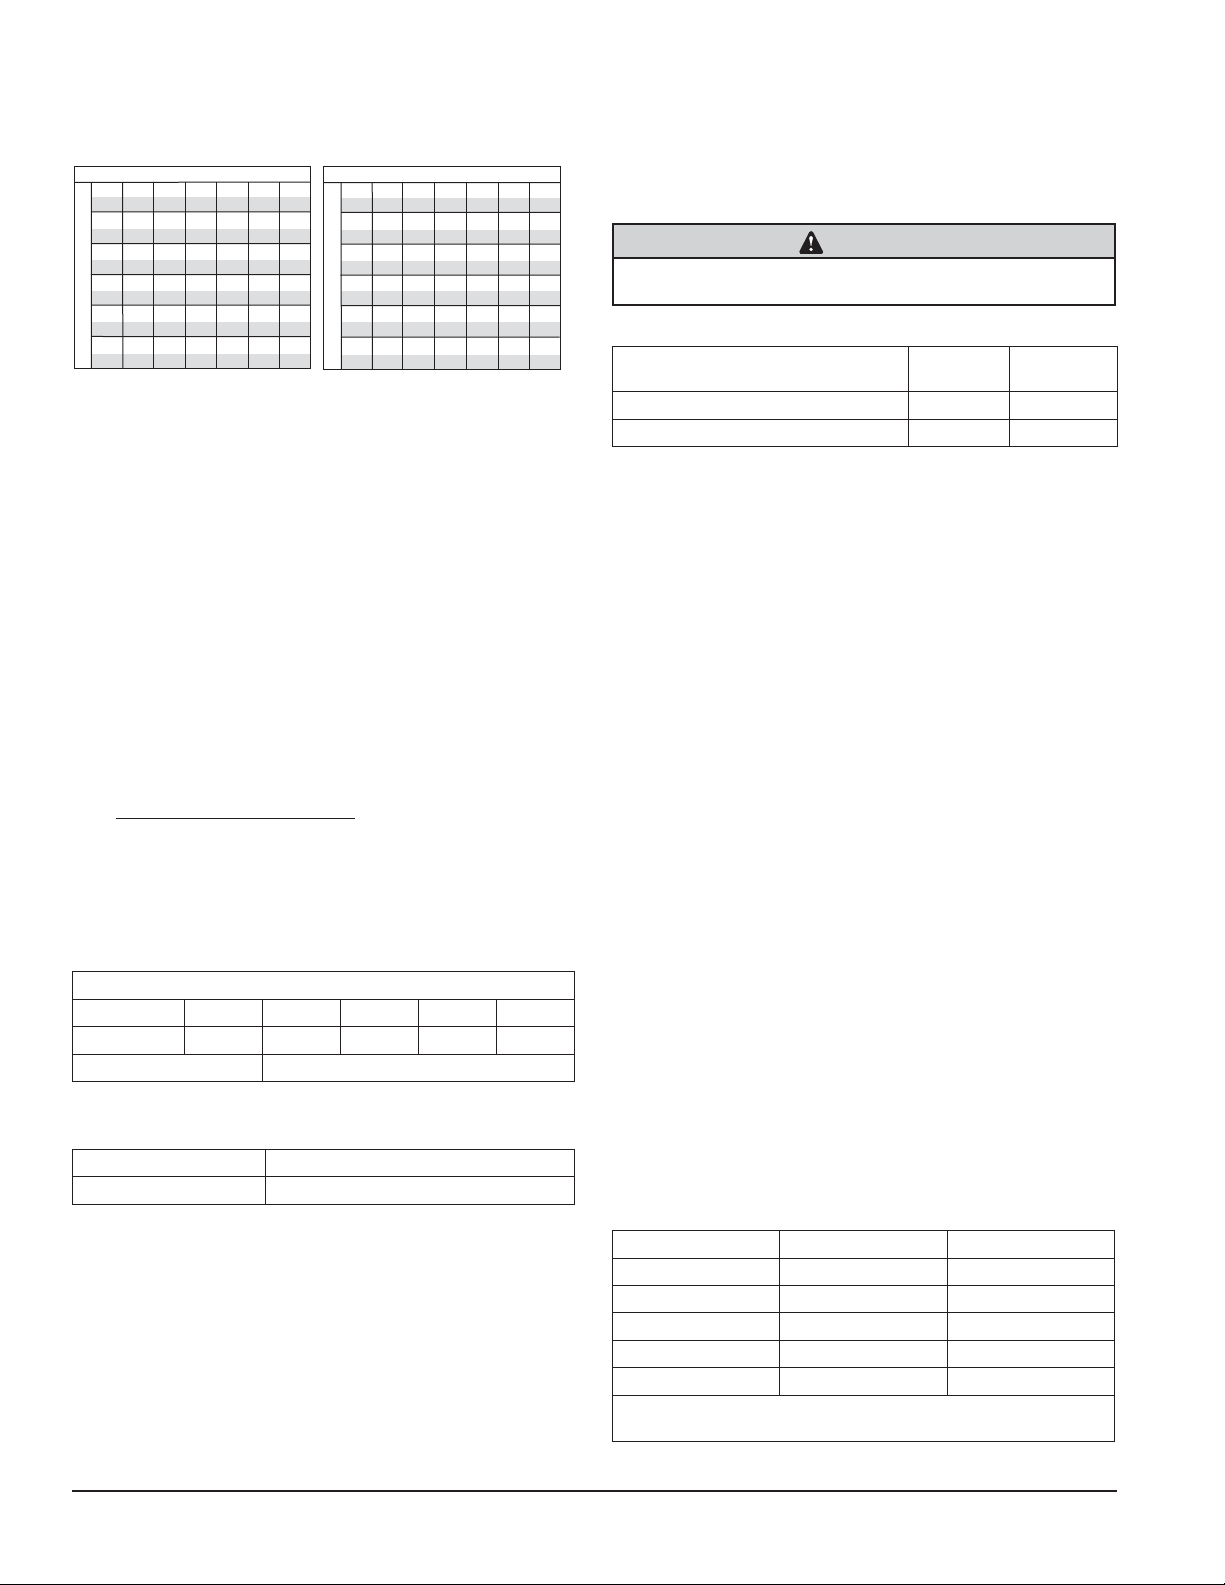
Ice production . . . . . . . . . . . . . . . . . . . . . . . . . . . . . 30
Ice capacity test . . . . . . . . . . . . . . . . . . . . . . . . . . . 30
Compressor current draw . . . . . . . . . . . . . . . . . . . . 30
Gearmotor data . . . . . . . . . . . . . . . . . . . . . . . . . . . 30
Refrigeration system . . . . . . . . . . . . . . . . . . . . . . . . 30
Ice machine charge speci cations . . . . . . . . . . . . . 30
Refrigerant replacement requirements . . . . . . . . . . 30
Evacuation . . . . . . . . . . . . . . . . . . . . . . . . . . . . . . . 30
Ambients . . . . . . . . . . . . . . . . . . . . . . . . . . . . . . . . . 30
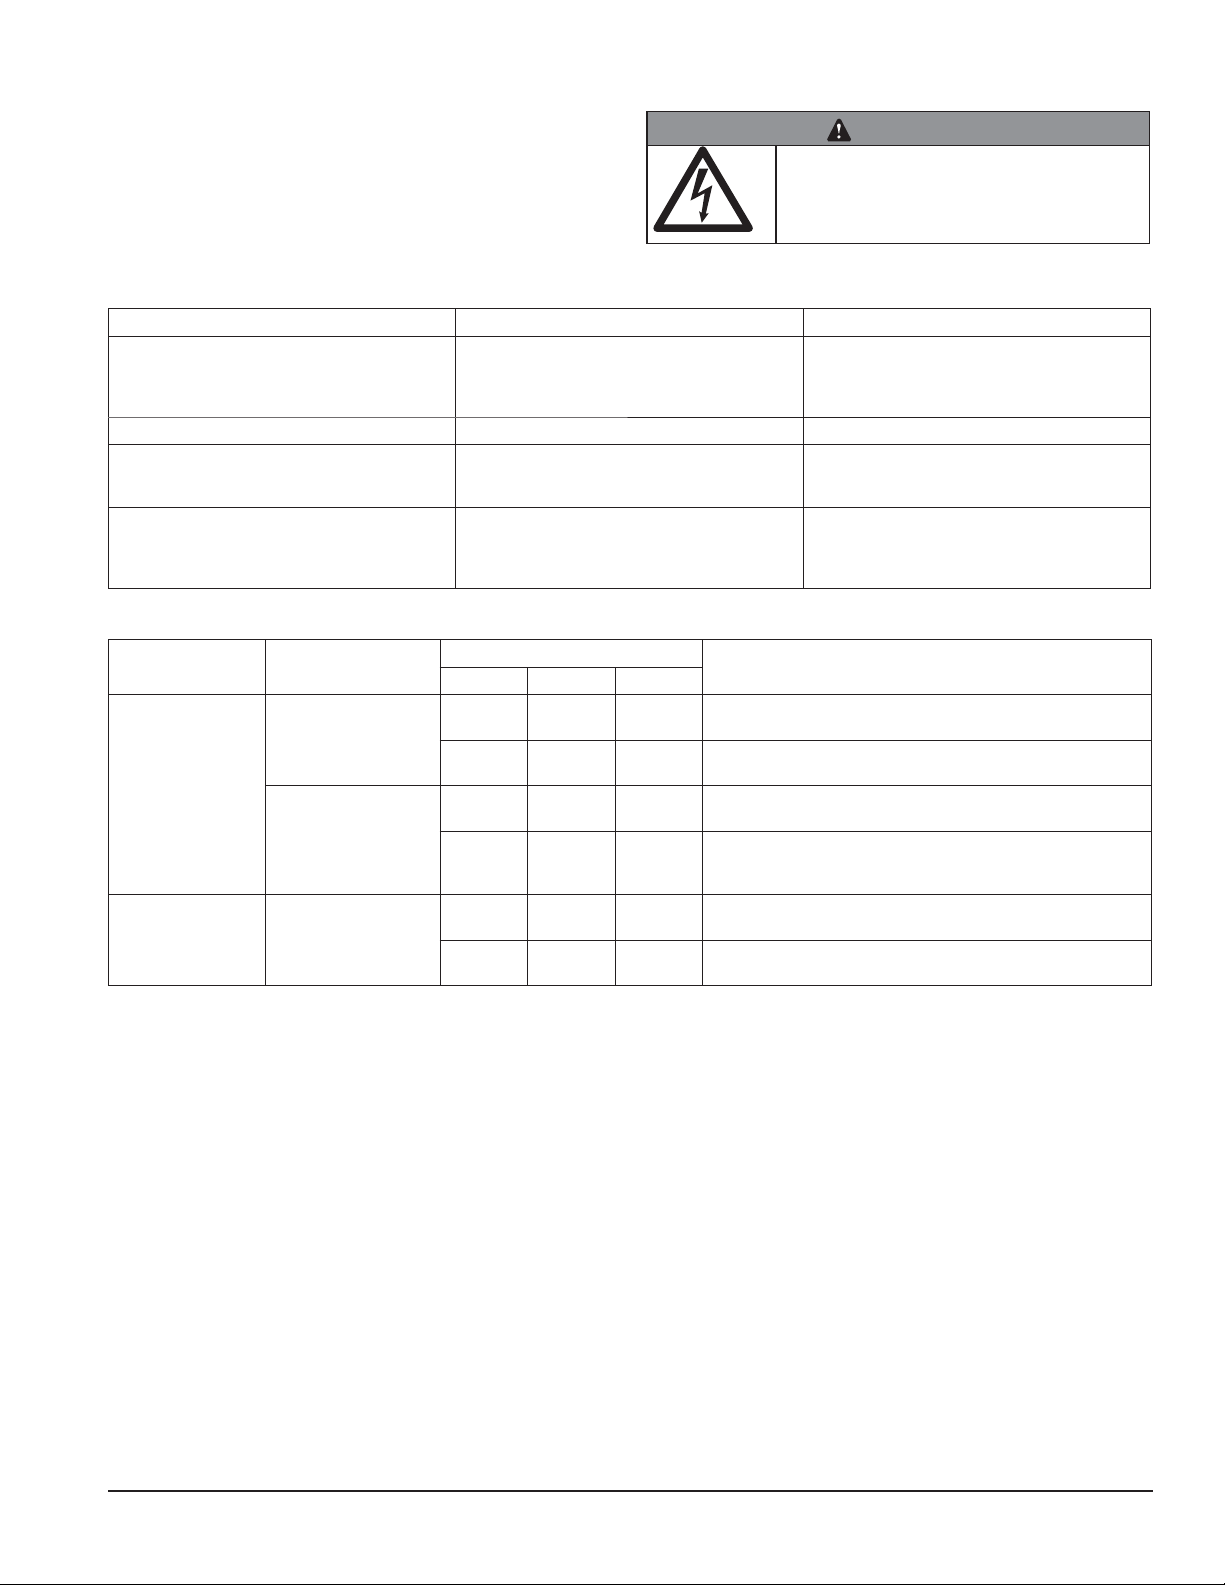
Dispenser troubleshooting . . . . . . . . . . . . . . . . . . . . . . . . . . 31
Before calling for service . . . . . . . . . . . . . . . . . . . . . . . . 31
Lever model troubleshooting guide . . . . . . . . . . . . . . . . 31
SensorSAFE model troubleshooting guide . . . . . . . . . . 31
Board guide . . . . . . . . . . . . . . . . . . . . . . . . . . . . . . 31
Lens/sensor troubleshooting . . . . . . . . . . . . . . . . . 31
Ice machine troubleshooting . . . . . . . . . . . . . . . . . . . . . . . . . 32
Dispenser replacement parts . . . . . . . . . . . . . . . . . . . . . . . . 34
Dispenser exterior . . . . . . . . . . . . . . . . . . . . . . . . . . . . . 34
Dispense chute and splash panel areas
(lever models) – Serial Number D61292 and above . . . 35
Dispense chute and splash panel areas
(lever models) – Serial Numbers below D61292 . . . . . . 36
Dispenser electrical box – lever models . . . . . . . . . . . . 37
Dispense chute and splash panel areas (SensorSAFE
models) Serial Number D61292 and above . . . . . . . . . 38
Dispense chute and splash panel areas (SensorSAFE
models) – Serial Numbers below D61292 . . . . . . . . . . . 39
Dispenser electrical box – SensorSAFE models . . . . . . 40
Wheel motor and drive system . . . . . . . . . . . . . . . . . . . 41
Water and drain . . . . . . . . . . . . . . . . . . . . . . . . . . . . . . . 42
Ice machine replacement parts . . . . . . . . . . . . . . . . . . . . . . . 43
Evaporator . . . . . . . . . . . . . . . . . . . . . . . . . . . . . . . . . . . 43
Air-cooled ice machines . . . . . . . . . . . . . . . . . . . . . . . . . 44
Water-cooled ice machines . . . . . . . . . . . . . . . . . . . . . . 46
Ice machine electrical components . . . . . . . . . . . . . . . . 48
2 25CI400A/W • 25HI400A • 50CI400A/W • 50HI400A
Page 3
Welcome to Follett
Follett equipment enjoys a well-deserved reputation for excellent performance, long-term reliability and outstanding
after-the-sale support. To ensure that this equipment delivers that same degree of service, we ask that you take a
moment to review the installation portion of this manual before beginning to install the unit. Our installation instructions
are designed to help you achieve a trouble-free installation. Should you have any questions or require technical help at
any point, please call our technical service group at (877) 612-5086 or +1 (610) 252-7301.
Note: To expedite assistance, all correspondence or communication MUST include the model number, serial number
and complete and detailed explanation of the problem
Before you begin
After uncrating and removing all packing material, inspect the equipment for concealed shipping damage. If damage
is found, notify the shipper immediately and contact Follett Corporation so that we can help in the ling of a claim, if
necessary.
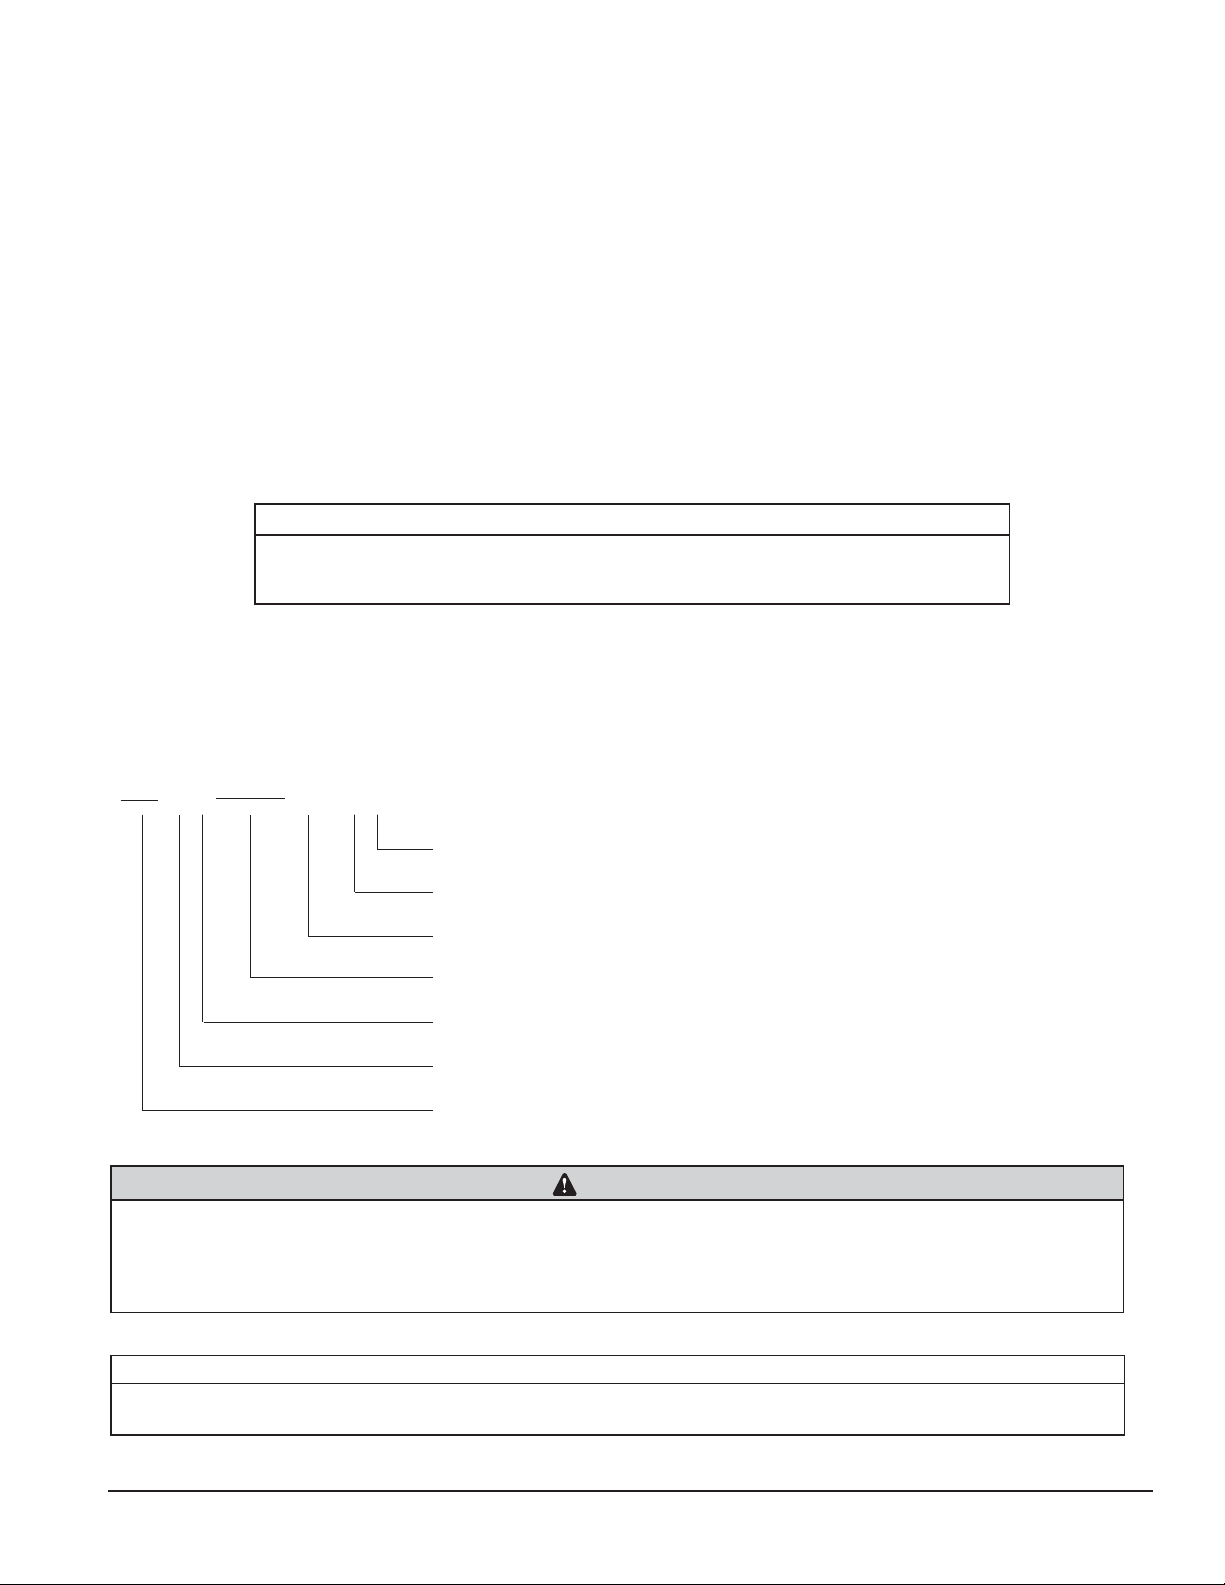
Check your paperwork to determine which model you have. Follett model numbers are designed to provide information
about the type and capacity of Follett ice dispensing equipment. Following is an explanation of the different model
numbers.
IMPORTANT
• Only quali ed technicians should attempt to service or maintain this ice and water dispenser
• No service or maintenance should be undertaken until the technician has thoroughly read this
service manual
Contact Information
FOLLETT CORPORATION, 801 Church Lane, Easton, PA 18040 USA
Phone: toll free (877) 612-5086 or +1 (610) 252-7301
Web site: www.follettice.com
25CI400A-LI
I = ice-only; no water
Dispense actuation, L = lever, S = SensorSAFE
Condenser type, A = air-cooled, W = water-cooled
Ice machine capacity in lbs per day
Ice machine location, I = integral (behind front splash panel)
Dispenser con guration, C = countertop, H = wall mount
Approximate storage capacity in lbs (25 or 50)
CAUTION
• Do not tilt any unit further than 30° off vertical during uncrating or installation
• Dispenser bin area contains mechanical, moving parts. Keep hands and arms clear of this area at all times. If access to this area
is required, power to unit must be disconnected rst.
• Ice is slippery. Be sure counters and oors around dispenser are clean, dry and free of ice.
• Do not block left side air intake or right side air exhaust
IMPORTANT NOTICE
• Follett recommends a Follett water lter system (item# 00130229) be installed in the ice machine inlet water line
• Prior to operation clean and sanitize the dispenser in accordance with instructions found in this manual
25CI400A/W • 25HI400A • 50CI400A/W • 50HI400A 3
Page 4
Speci cations
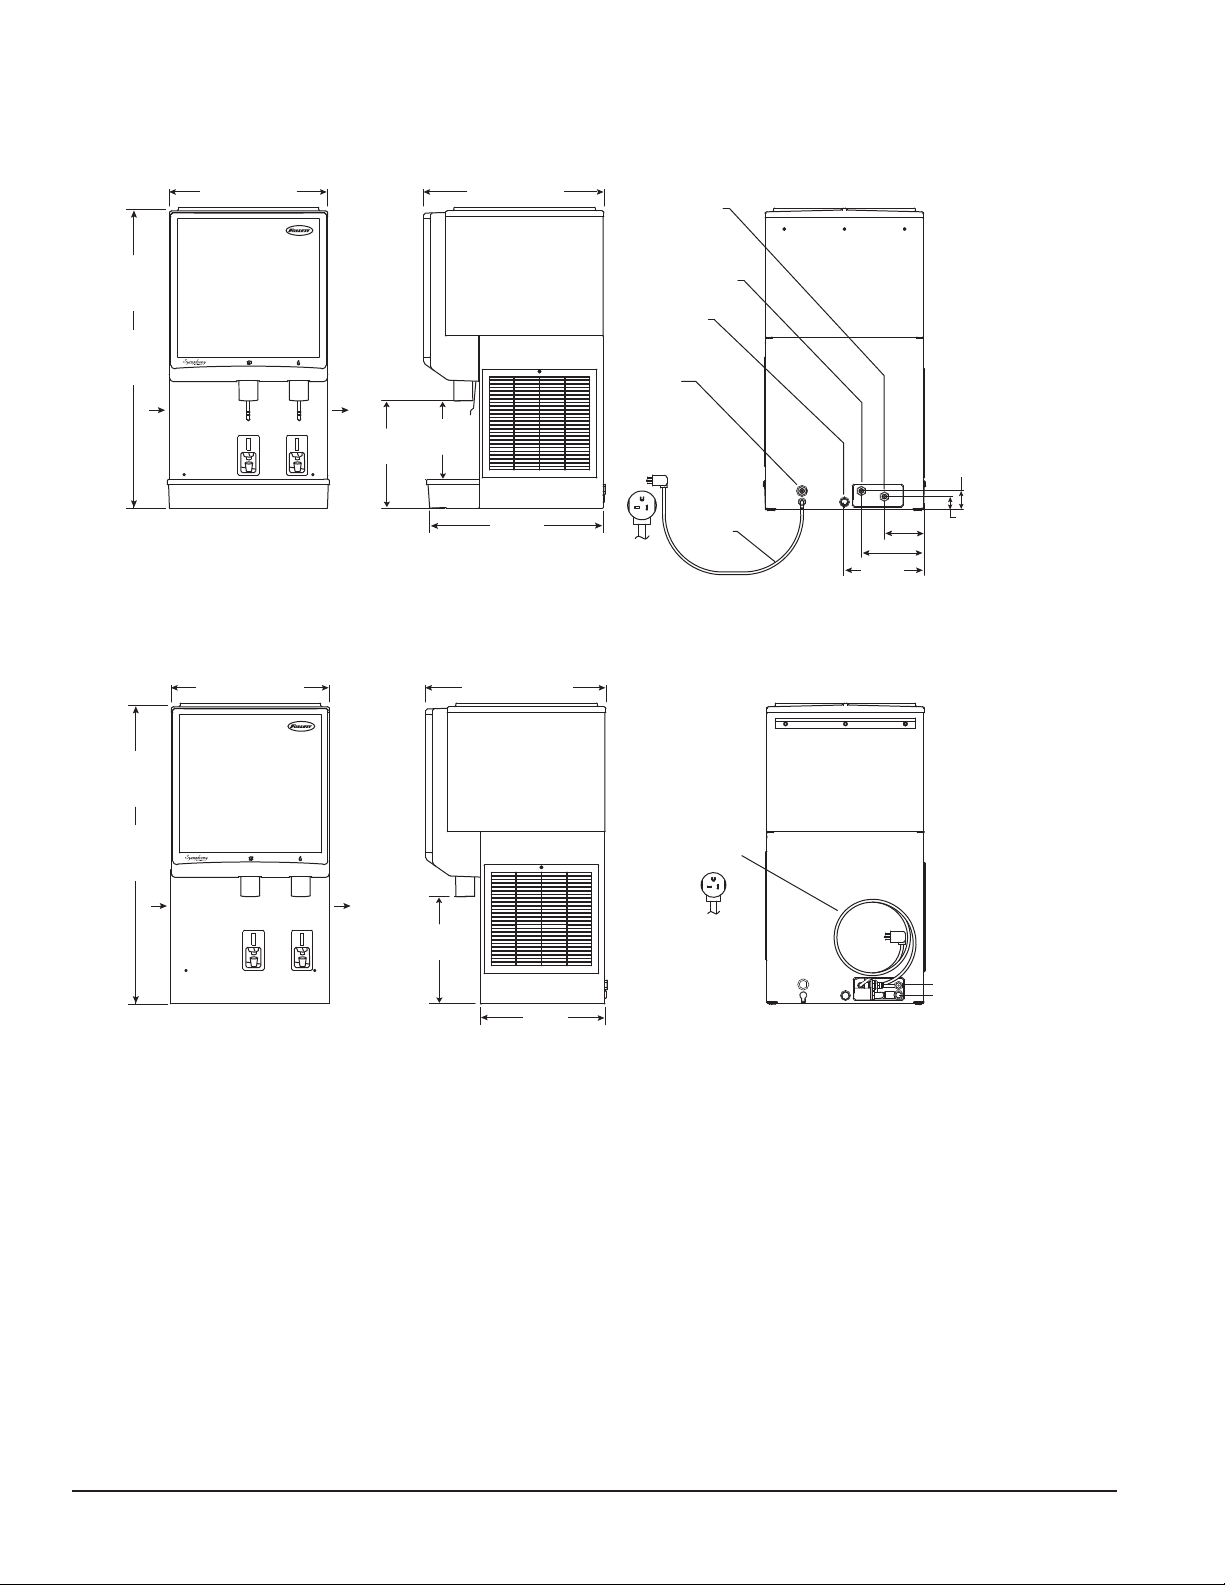
Countertop
25CI400A/W
36"
(91.5 cm)
50CI400A/W
40"
(101.6 cm)
Wall mount
Front View
21" (53.4 cm) 24" (61 cm)
14.25"
(36.2 cm)
AIR INTAKE
AIR EXHAUST
Right Side View Rear View
3/8" FPT
condenser
inlet (watercooled only)
3/8" FPT
condenser
outlet (watercooled only)
3/4" FPT
drain
3/8" water
inlet
10.5"
(26.7 cm)
7' (2.1 m)
power cord
w/5-20 90°
23"
(58.5 cm)
hospital-grade
plug
Front View Right Side View Rear View
21.5" (54.6 cm)
24.5" (62.2 cm)*
10.5"
(26.7 cm)
2.50"
(64 mm)
1.75" (45 mm)
5.18" (13.2 cm)
8.25" (21 cm)
25HI400A/W
36.5"
(92.7 cm)
50HI400A/W
40.5"
(102.9 cm)
AIR INTAKE
* Includes .5” (13 mm) for bracket supplied with unit.
AIR EXHAUST
14.25"
(36.2 cm)
17"
(43.2 cm)
7' (2.1 m)
power cord
w/5-20 90°
hospital-grade
plug
3/8" water inlet
3/4" FPT drain
4 25CI400A/W • 25HI400A • 50CI400A/W • 50HI400A
Page 5
Electrical
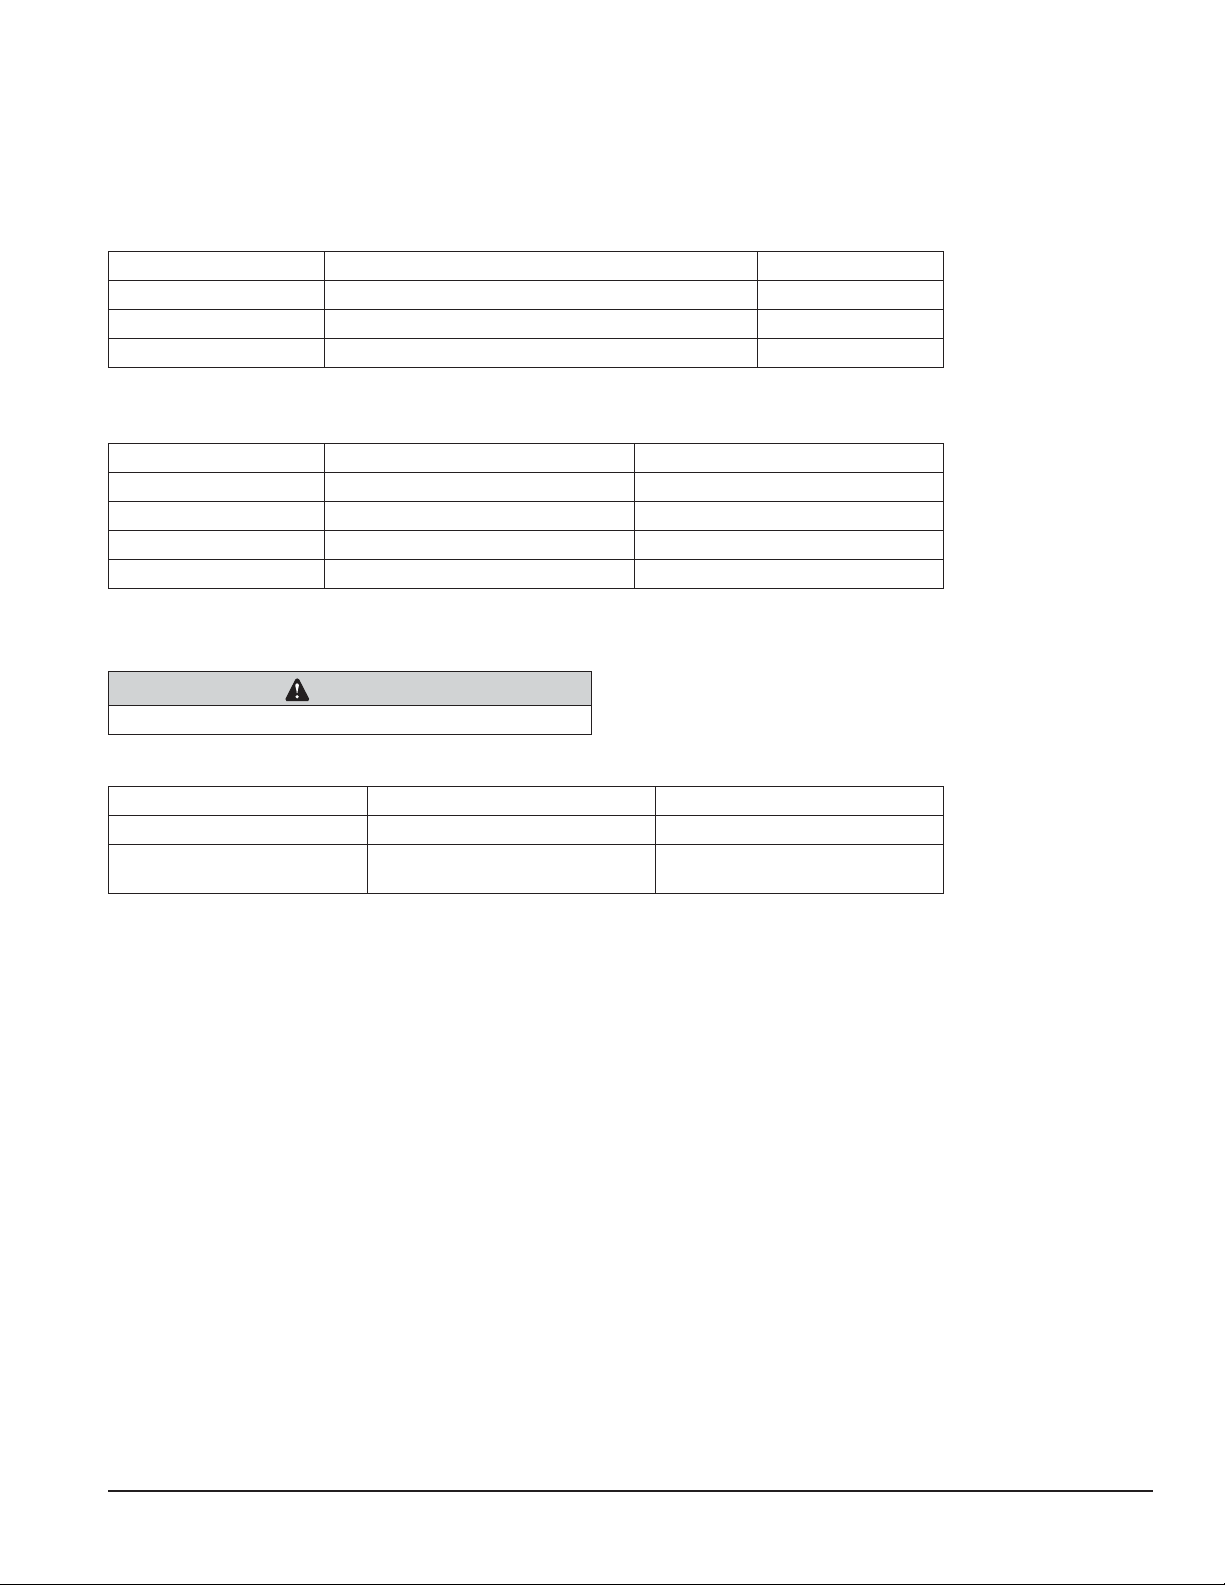
115 V, 60 Hz, 1 phase, 14.0A. Connect to dedicated 20A circuit, fuse or breaker.
Note: It is preferred that circuit be protected by a GFCI.
Furnished with 7 ft (2 m) power cord with a 90° NEMA hospital grade 5-20 plug.
Ambient
Maximum Minimum
Air temp 100 F/38 C (Best performance below 80 F/27 C) 50 F/10 C
Water temp 90 F/32 C (Best performance below 70 F/21 C) 40 F/4 C
Water pressure 70 psi (483 kpa) 10 psi (69 kpa)
Plumbing
Connections – 25/50CI400A/W Rough-ins – 25/50HI400A/
Dispenser drain All – 3/4" FNPT Air-cooled – 3/4" FNPT
Water inlet All – 3/8" FNPT All – 1/2" FNPT
Condenser inlet Water-cooled – 3/8" FNPT N/A
Condenser outlet Water-cooled – 3/8" FNPT N/A
Note: Water shut-off recommended within 10' (3 m) of dispenser. Drain to be hard-piped and
insulated. Maintain at least 1/4" per foot (20 mm per 1 m run) of slope on horizontal runs.
CAUTION
• Do not block left side air intake or right side air exhaust
Ventilation and service clearances
Air-cooled Water-cooled
Required for ventilation 3" (77 mm) each side N/A
Suggested for service 12" (30.5 cm) top,
6"(15.3 cm) left side
Uncrated weight
25/50CI400A/W (countertop) 215 lbs (98 kg)
25/50HI400A (wall mount) 230 lbs (105 kg)
12" (30.5 cm) top
25CI400A/W • 25HI400A • 50CI400A/W • 50HI400A 5
Page 6
Installation
Before you begin
Level dispenser in both directions to ensure proper
operation.
Provide clearances noted in clearances table on page 5.
Countertop models provide the option of taking utilities
out bottom or back of dispenser.
Wall mount model utilities exit through back of
dispenseronly.
Directions for each installation follow.
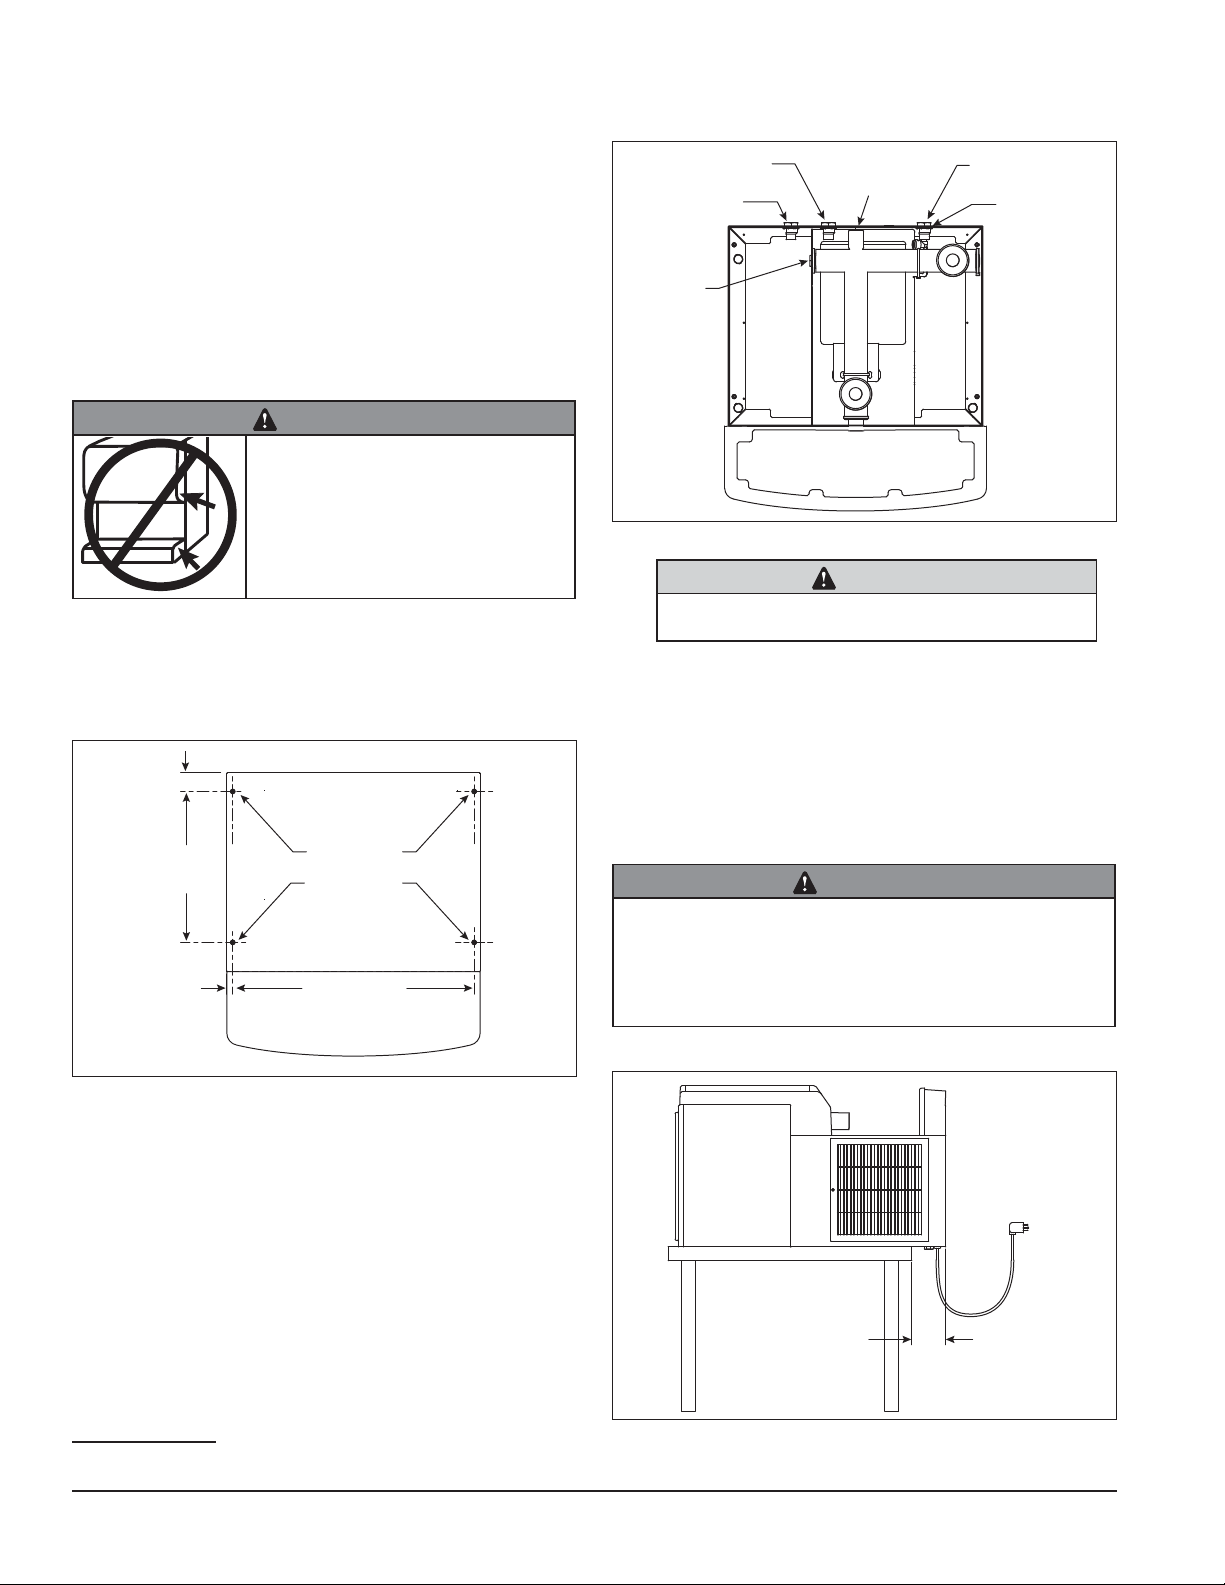
WARNING
• DO NOT LIFT UNIT AT THESE POINTS.
Panels will not support weight of unit
• Failure to follow warning may result in
equipment damage or personal injury
Installing countertop dispensers with rear
exiting utilities (no legs)
Fig. 1
Countertop anchoring locations
1.56"
(40 mm)
4X
12.50"
(31.8 cm)
.50"
(13 mm)
Ø.375"
(10 mm)
hole
20" (50.8 cm)
Fig. 2
Utility connections as viewed
from top for countertop back access
condenser outlet
3/8" FNPT
condenser inlet
3/8" FNPT
drain plug
drain
3/4" FNPT
potable water
3/8" FNPT
3/8"
diameter cord
7. Make utility connections (Fig. 2).
CAUTION
• Do not connect water-cooled condenser outlet line to
the dispenser drain line.
8. Turn on water supply and check for leaks.
9. Clean and sanitize dispenser and ice machine
before putting into service.
10. Turn power on and allow ice machine to produce
ice.
Installing countertop dispensers with
bottom exiting utilities
WARNING
• A sturdy work surface capable of supporting the entire
dispenser must be used
• The work surface must be large enough to accommodate
height of dispenser
• Failure to provide proper support may result in personal
injury
Fig. 3
1. Position dispenser in desired location.
2. Mark dispenser outline on counter and remove
dispenser.
3. Drill four 7/16" holes in counter to anchor dispenser
to counter (Fig. 1).
4. Apply a thick bead approximately 1/4" (7 mm)
diameter of NSF listed silicone sealant (Dow
Corning*1 RTV-732 or equivalent) 1/4" (7 mm) inside
marked outline of dispenser.
5. Reposition dispenser on counter and secure to
counter with four 3/8"-16NCbolts.
6. Smooth excess sealant around outside of dispenser.
5.00"
(12.7 cm)
min.
1. Position dispenser with dispense chutes facing
* Dow Corning is a register trademark of Dow Corning Corporation in the United
States and other countries
upward on sturdy work surface (Fig. 3).
6 25CI400A/W • 25HI400A • 50CI400A/W • 50HI400A
Page 7
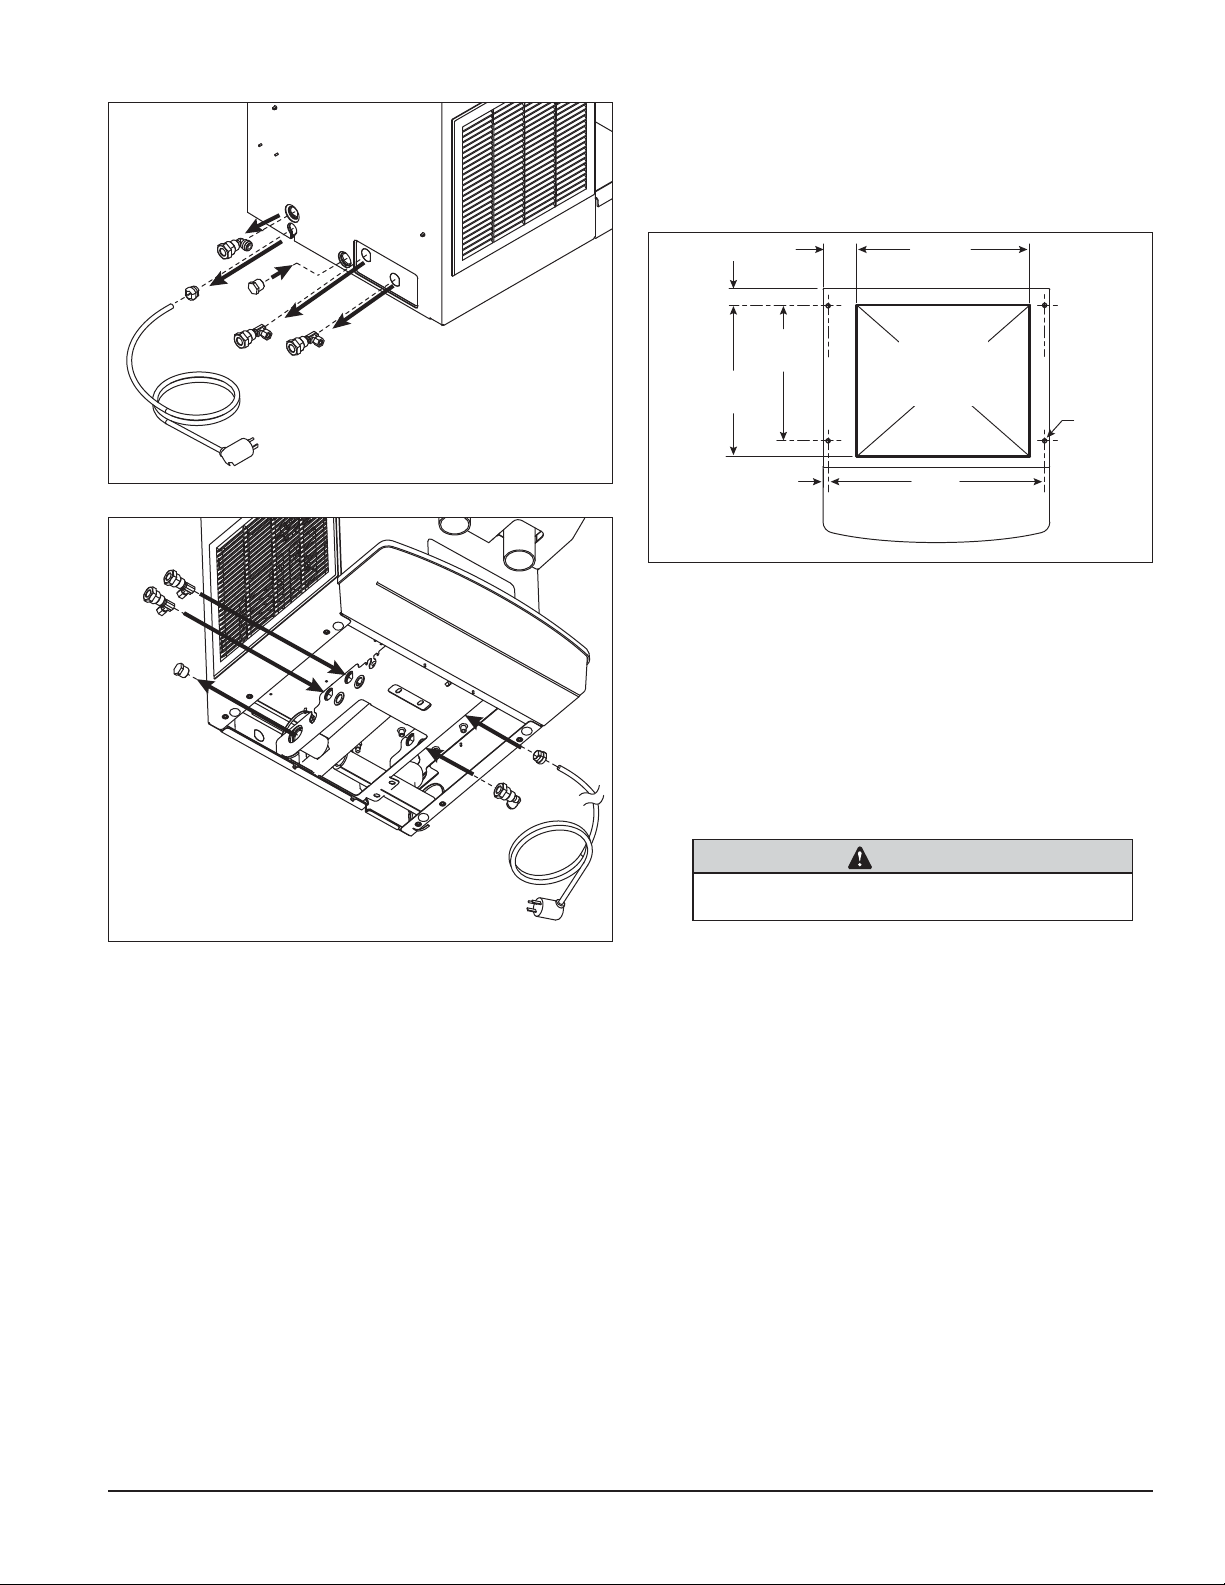
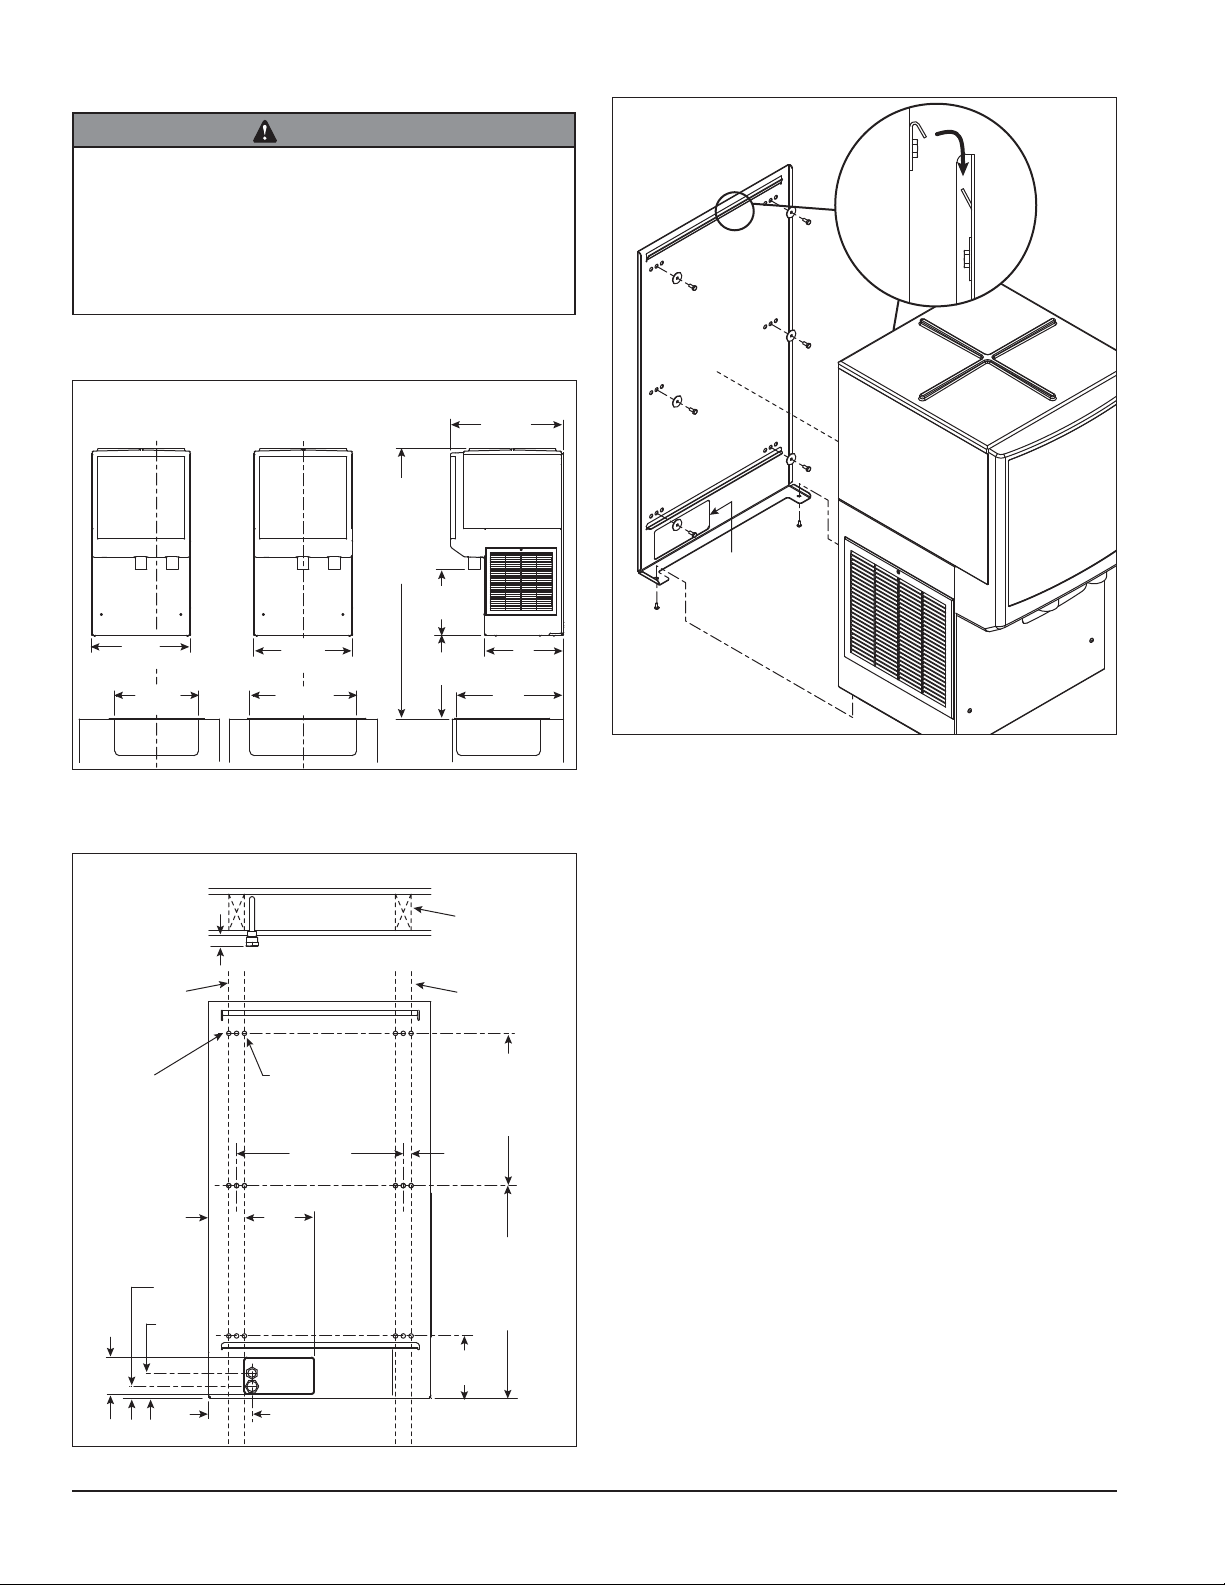
Fig. 4
4.2
4.1
4.4
12. Raise the dispenser upright and position in desired
location.
13. Mark dispenser outline on counter and remove
dispenser.
Fig. 6
Countertop cutout viewed from top
16.00"
(40.7 cm)
1.56"
(40 mm)
3.13"
(80 mm)
Fig. 5
5.3
5.4
4.3
5.1
5.2
(31.8 cm)
14"
(35.6 cm)
(13 mm)
12.50"
.50"
Cutout
connections
through
bottom
20"
(50.8 cm)
4X
Ø.375"
(10 mm)
hole
14. Cut countertop utility opening and drill four 7/16"
holes to anchor dispenser to counter (Fig. 6).
15. Apply a thick bead approximately 1/4" (7 mm)
diameter of NSF listed silicone sealant (Dow
Corning* RTV-732 or equivalent) 1/4" (7 mm) inside
marked outline of dispenser.
16. Reposition dispenser on counter and secure to
counter with four 3/8"-16NCbolts.
17. Smooth excess sealant around outside of dispenser.
18. Make utility connections through countertop cutout.
CAUTION
• Do not connect water-cooled condenser outlet line to
the dispenser drain line.
2. Disconnect the internal water line from the potable
water connection tting.
3. Remove tting from the back wall of the dispenser
(Fig. 4.1).
20. Clean and sanitize dispenser and ice machine
before putting into service.
21. Turn power on and allow ice machine to produce
ice.
4. Relocate tting to internal bulkhead and reconnect
(Fig. 5.1).
6. Remove power cord strain relief (Fig. 4.2).
7. Relocate the cord and strain relief to the internal
bulkhead and reconnect (Fig. 5.2).
8. Water-cooled only. Disconnect internal condenser
water inlet and outlet ttings (Fig. 4.3).
9. Water-cooled only. Relocate water inlet and outlet
ttings and reconnect (Fig. 5.3). Note: The water
inlet is connected to the condenser; the outlet line is
connected to the water regulating valve.
10. Remove the drain plug from the internal drain line
connection point (Fig. 5.4).
11. Relocate to back of dispenser and reconnect
(Fig.4.4).
25CI400A/W • 25HI400A • 50CI400A/W • 50HI400A 7
19. Turn on water supply and check for leaks.
Page 8
Installing wall mount dispensers
WARNING
• Wall mount dispensers are intended to be mounted above a
sink, eliminating the need for a drain pan.
• Before beginning installation verify that the sink size and
location meet the requirements shown in Fig. 7.
• If requirements are not met, a drain pan must be used to
prevent ice and water from falling on counter or oor.
• FAILURE TO TAKE THESE PRECAUTIONS COULD RESULT IN
SLIPS AND FALLS ON WET FLOORS
Fig. 7
Minimum sink requirements (without drain pan)
Fig. 9
9.3
9.1
Front View
Sink centered
below chutes
21.5"
(54.7 cm)
14.25"
(36.2 cm) min.
Front View
Sink centered
below dispenser
21.5"
(54.7 cm)
23"
(58.5 cm) min.
Fig. 8
Wall bracket location guide
Top view
1"
(26 mm)
Front view
0.438" (11 mm)
clearance
16.00"
(40.6 cm)
7"
(17.8 cm)
4.12"
(10.5 cm)
3.50"
89 mm)
(anchor
points)
(87 mm)
(26 mm)
3.4"
1"
2.44"
(62 mm)
Utility
cut-out
25HI
54.5"
(138.5 cm)
50HI
58.5"
(148.6 cm)
14.2 5"
(36.2 cm)
18"
(45.8 cm)
.75"
(20 mm)
(15.3 cm)
Side View
24.5"
(62.3 cm)
17"
(43.2 cm)
23"
(58.5 cm) min.
Wall stud
Wall studWall stud
25HI400A
13" (33.0 cm)
50HI400A
15" (38.1 cm)
25HI400A
19" (48.3 cm)
50HI400A
21" (48.3 cm)
6"
9.2
9.4
1. Using Fig. 8 as a guide, locate wall bracket
mounting position relative to wall studs.
2. Install the supplied wall bracket with six 3/8"
diameter fasteners (Fig. 9.1).
Note: Three holes are available at each fastening
site to allow capture of studs or supports within the
wall.
2. Locate and cut utility hole in wall using Fig. 8
dimensions (9.2).
3. Rough in utilities. Wall mount bracket dimensions
(Fig. 8) can be used as a template.
Water: 1/2" FNPT
Drain: 3/4" FNPT
4. Lift dispenser onto wall bracket positioning unit so
that hook on back of dispenser is captured by wall
bracket support angle (Fig. 9.3).
5. Install two 1/4" X 20 screws through bottom of wall
bracket into bottom of dispenser to secure dispenser
to wall bracket (Fig. 9.4).
6. Install supplied 1/2" MPT X 3/8" push-in adapter
onto 1/2" FNPT water supply.
8 25CI400A/W • 25HI400A • 50CI400A/W • 50HI400A
Page 9
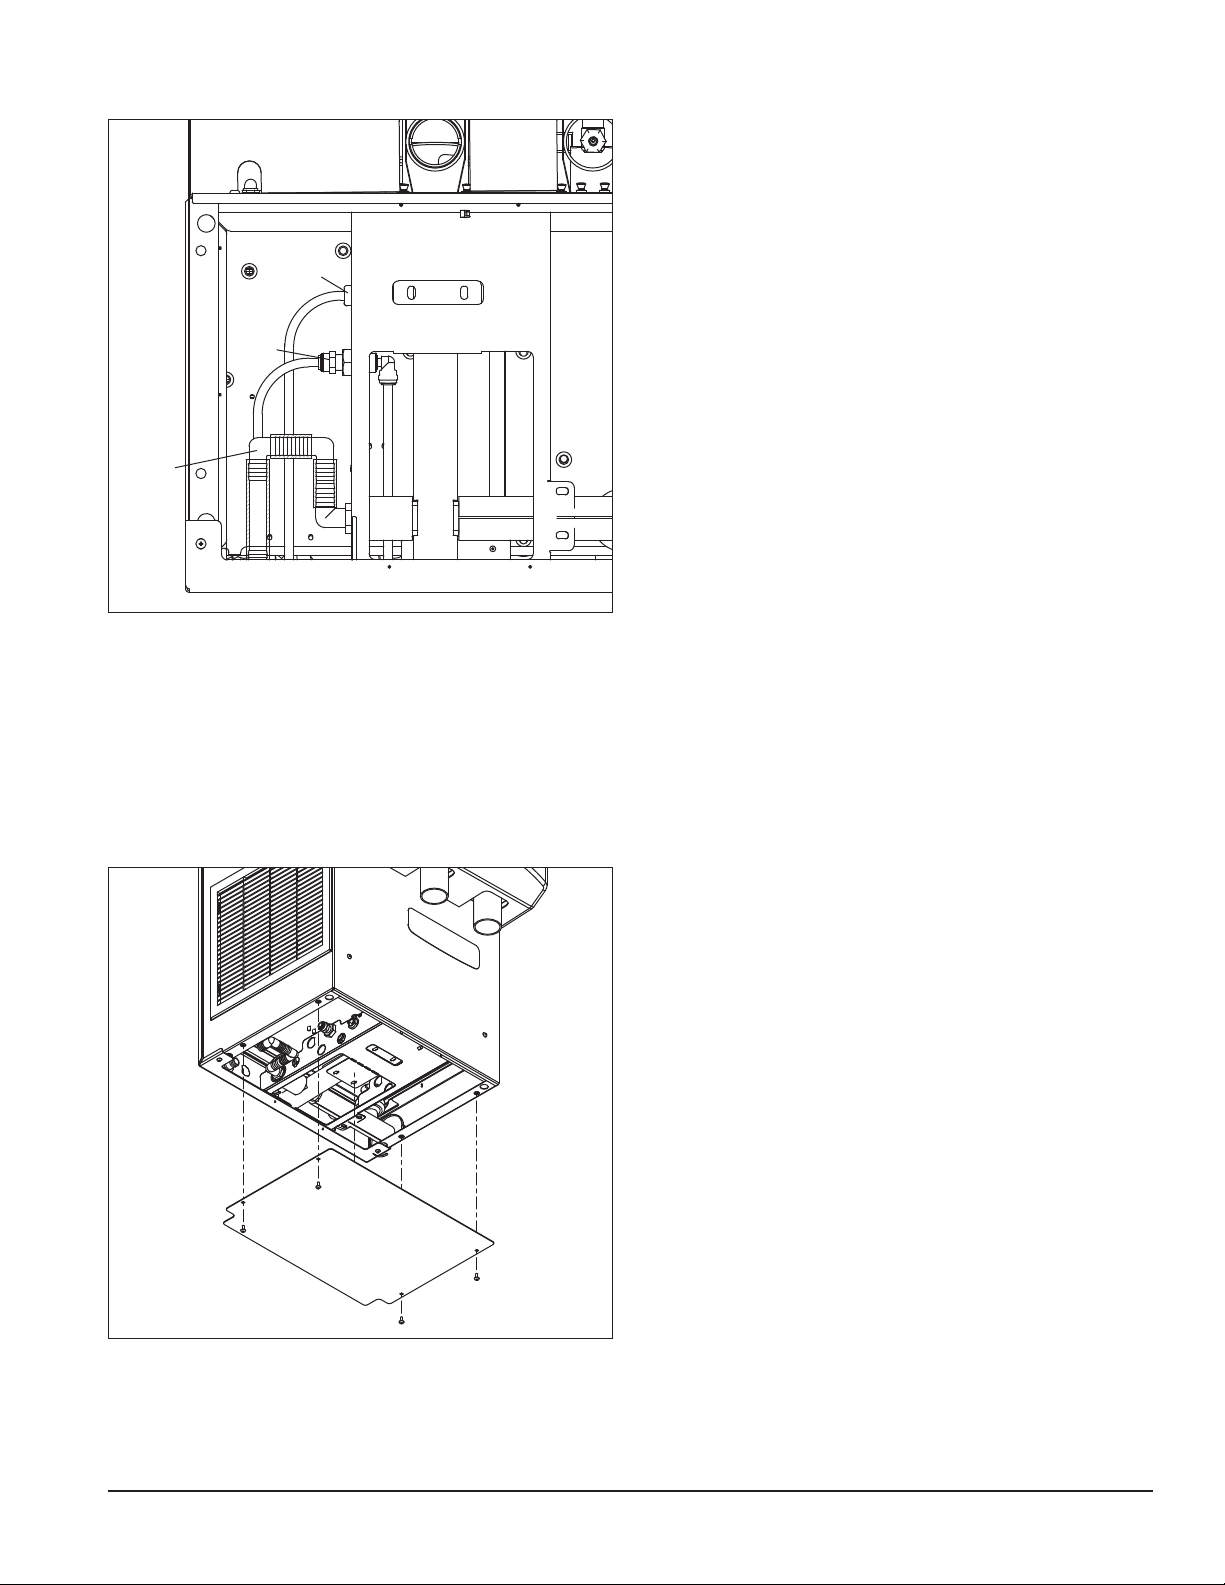
Fig. 10
Dispenser bottom view
10.3
10.1
10.2
7. Connect supplied 3/8" water line between water
supply and water inlet fitting (Fig. 10.1).
8. Using supplied 3/4" drain tubing and barbed fittings,
connect 3/4" barbed drain elbow tting on dispenser
to 3/4" FNPT drain (Fig. 10.2).
9. Route power cord through utility access hole to
power supply (Fig. 10.3).
10. Turn on water supply and check for leaks.
Fig. 11
11. Install bottom panel (Fig. 11).
25CI400A/W • 25HI400A • 50CI400A/W • 50HI400A 9
Page 10
Cleaning/descaling and sanitizing
Periodic cleaning/descaling and sanitizing of Follett’s ice and water dispenser and ice machine system is required
to ensure peak performance and delivery of clean, sanitary ice. The recommended cleaning procedures that follow
should be performed at least as frequently as recommended and more often if environmental conditions dictate.
Cleaning of the condenser can usually be performed by facility personnel. Cleaning/descaling and sanitizing of the
ice machine system should be performed by your facility’s trained maintenance staff or a Follett authorized service
agent. Regardless of who performs the cleaning, it is the operator’s responsibility to see that this cleaning is performed
according to the schedule below. Service problems resulting from lack of preventive maintenance will not be covered
under the Follett warranty.
Recommended cleaning/descaling and sanitizing intervals*
Symphony Frequency
Drain Line weekly
Drain Pan/Drip Pan weekly
Exterior as needed
Air Filter monthly
Condenser monthly (air-cooled only)
Dispenser and Components semi-annually
Ice Machine semi-annually
Transport Tube semi-annually
Ice Storage Area/Bin semi-annually
* Ice machine and dispenser must be cleaned and sanitized prior to start-up.
Weekly
CAUTION!
§ Do not use solvents, abrasive cleaners, metal scrapers or sharp objects to clean any part of the dispenser.
Dispenser drain pan and drain line
1. Pour 1 gal. (3.8 L) of hot tap water into drain pan to ush drains.
Splash panel front, SensorSAFE infrared dispensing
1. Deactivate dispensing by pressing and releasing clean switch located on left side of unit under top front
cover.
2. Clean lens and splash panel front using a soft cloth and mild, non-abrasive, non-chlorine based cleaner.
3. Reactivate dispensing by pressing and releasing clean switch again.
Monthly
CAUTION!
§ Do not use solvents, abrasive cleaners, metal scrapers or sharp objects to clean any part of the dispenser.
Condenser (air-cooled ice machine only)
1. Use a vacuum cleaner or stiff brush to carefully clean condenser coils of lint and debris to ensure optimal
performance.
Air Filter
1. Remove screw at top of louvered panel on left side of unit.
2. Slide panel toward back of dispenser and lift.
3. Remove the air lter located under the louver.
4. Clean with soap and water.
5. Rinse, and replace when completely dry.
10 25CI400A/W • 25HI400A • 50CI400A/W • 50HI400A
Page 11
Semi-Annually (more often if conditions dictate)
§ A cleaning/descaling and sanitizing procedure should always include both the ice machine and dispenser; ice
machine should be cleaned and sanitized rst, followed by the dispenser.
§ Icemaking system can be cleaned/descaled in place.
To ensure that your ice machine and dispenser are cleaned/descaled and sanitized properly, proceed as follows:
1. Clean/descale the ice machine
2. Sanitize the ice machine
3. Clean/descale the dispenser
4. Sanitize the dispenser
CAUTION!
§ Wear rubber gloves and safety goggles (or face shield) when handling cleaner or sanitizer mixtures.
§ Use only Follett approved cleaners.
§ It is a violation of Federal law to use Solution A or Solution B in a manner inconsistent with their labeling.
§ Do not use solvents, abrasive cleaners, metal scrapers or sharp objects to clean any part of the dispenser.
Solution A: Following manufacturer’s instructions, mix cleaning solution of 1 gal. (3.8 L) 120 F (49 C) water
and 7oz. (198 g) (one 7oz. packet) of Follett SafeCLEAN™ ice machine cleaner/descaler
(P/N00132001).
Solution B: Following manufacturer’s instructions, mix a sanitizing solution of 1 gal. (3.8 L) 120 F (49 C) water and
1.6oz. (48 ml) Nu-Calgon IMS-II Sanitizer (P/N 00979674).
Clean/descale ice machine
1. If ice machine was running recently, ensure that the evaporator is completely free of ice before proceeding.
2. Disconnect power to ice machine.
3. Remove any ice machine panels required to gain access to water reservoir and electrical control box.
4. Turn compressor switch on electrical box of ice machine to OFF position.
5. Remove water reservoir cover and close water supply valve (or block up reservoir oat).
6. Drain water from reservoir by releasing evaporator drain tube from oat reservoir bracket, removing plug
from drain tube and releasing (unclamping) pinch clamp (if equipped).
7. Plug drain hose, replace drain line in reservoir bracket and pour part of Solution A into reservoir, lling it
almost to over owing.
8. Remove stainless steel ice compression nozzle and drain lines and submerge in a cup of SolutionA while
cleaning/descaling rest of system. (Flake ice machines have no ice compression nozzle and drain lines.)
CAUTION: To avoid potential pitting, do not soak parts in SolutionA for more than 45 minutes.
9. Restore power to ice machine (gearmotor will run; compressor and fan will not).
10. Inspect evaporator drain pan and drain line and remove any accumulated scale build up.
11. After 15 minutes, turn power OFF; drain solution from reservoir and evaporator.
12. Fill reservoir almost to over owing with clean water to rinse. Drain. Repeat two more times.
13. Rinse ice compression nozzle and drain lines in clean water.
25CI400A/W • 25HI400A • 50CI400A/W • 50HI400A 11
Page 12

Sanitize ice machine
14. Submerge ice compression nozzle and drain lines in a cup of Solution B while following steps 15-21.
15. Connect ice transport tube directly onto evaporator outlet port without ice compression nozzle.
16. Fill reservoir almost to over owing with Solution B.
17. Restore power to ice machine (gearmotor will run; compressor and fan will not).
18. After 10 minutes, turn compressor switch to ON position.
19. As unit starts to make ice, continue to pour Solution B into reservoir, maintaining level just below reservoir
over ow.
20. Continue to make ice with Solution B for 20 minutes.
21. Turn power to ice machine OFF.
22. Disconnect ice transport tube from evaporator outlet port. Rinse ice compression nozzle and drain lines in
clean water and reinstall on evaporator outlet. Reconnect ice transport tube to ice compression nozzle.
23. Drain any remaining Solution B from evaporator.
24. Fill reservoir almost to over owing with 120 F (49 C) clean water to rinse. Drain. Repeat two more times.
Re-clamp pinch clamp, replace drain plug, and re-secure drain tube ensuring that end of drain tube is
above water level in reservoir.
25. Open water supply valve (or unblock oat) and replace reservoir cover; restore power to ice machine and
ensure compressor switch is in ON position. Make ice for at least 15 minutes to ush any remaining
Solution B from system (RIDE
®
ice machines with long ice transport hoses may take longer to ush out).
Discard this ice and all ice made during sanitizing.
Clean/descale dispenser
26. Remove and discard all ice from storage hopper.
27. Ensure power is disconnected. Working inside storage area, remove center thumbscrew from dispense
wheel, tilt wheel up toward back to clear baffle and disengage wheel from motor shaft.
28. Remove dispense chutes.
29. Thoroughly wipe lid, dispense wheel, baffle and dispense chutes with cloth soaked in SolutionA.
30. Wipe all bin surfaces (including the area under dispense wheel) with a damp cloth wrung out in Solution A.
Note: To avoid possible damage to dispense motor assembly, use only a damp cloth to clean the storage bin. Do not
allow water to run through bottom of bin area.
31. Remove grille and wash with Solution A. Rinse thoroughly with clean water.
32. Rinse all above items with damp cloth wrung out in clear water.
Sanitize dispenser
33. Wipe all above items with damp cloth wrung out in Solution B to sanitize. Do not rinse.
34. Reinstall all parts and replace any panels removed prior to cleaning.
35. Pour 1 gal. (3.8 L) of hot tap water into drain pan to ush drains.
36. Turn ice machine ON and begin to make ice (ice machine should start immediately with power and bin
signal supplied).
37. After approximately 30 minutes, test dispenser for proper dispensing.
12 25CI400A/W • 25HI400A • 50CI400A/W • 50HI400A
Page 13

25CI400A/W • 25HI400A • 50CI400A/W • 50HI400A 13
Page 14
Service
auger
compression nozzle
ice transport tube
discharge
port
Ice machine operation
Follett’s ice machine consists of four distinct functional systems:
• Refrigeration system
• Water system
• Harvesting system
• Electrical control system
These four systems work together to accomplish the production and harvesting of ice. A problem in any one of these
systems will result in improper operation of the entire ice production cycle. When troubleshooting the ice machine, it is
important to analyze the entire system operation to determine which system is not functioning properly, then pinpoint
the component within that system that is malfunctioning. Determine what corrective action must be taken before
making any adjustments or replacing any components.
The icemaking process
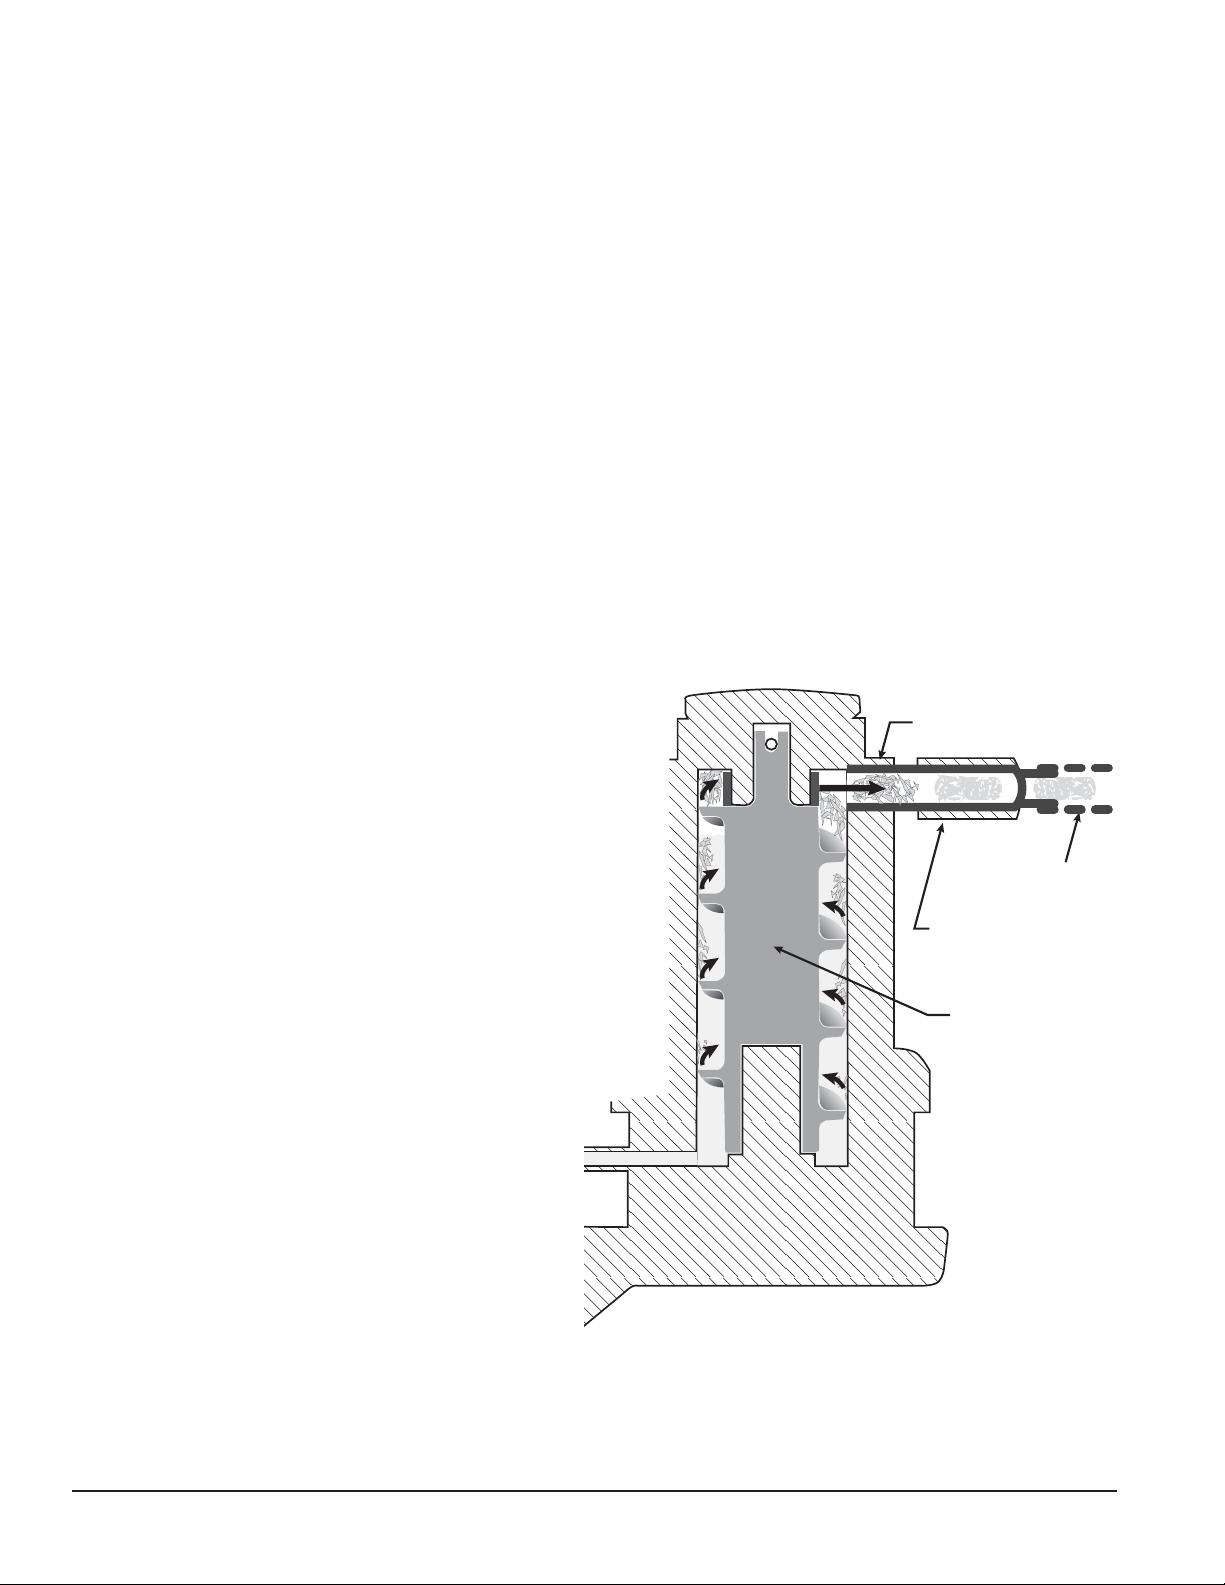
The Follett ice machine uses a stainless steel jacketed evaporator and operates on a continuous freezing cycle.
Water is supplied to the evaporator from the water reservoir where the water level is controlled by a oat valve. This
valve also shuts off the water supply when the ice machine is not running.
When the ice machine is running, a layer of ice forms
on the interior surface of the evaporator. This ice is
continuously removed by a slowly rotating (12 RPM)
auger.
Ice harvest system diagram
The auger carries the ice upward into the cavity formed
by the top bearing housing and the compression loop,
where it is compressed to remove excess water.
When the ice reaches the desired hardness it rotates
within the cavity and is forced through a discharge
port and compression nozzle and into the ice transport
tube. The discharge tube and compression nozzle
are slightly restricted to further compress the ice
and produce the desired hardness. As the formation
of ice continues, ice in the transport tube is pushed
through the tube to the storage compartment in the ice
dispenser.
A solid state control board, located in the electrical box
of the ice machine, controls the normal operation of
the ice machine and monitors gearmotor torque. This
control board will shut down the ice machine should
an over-torque condition occur. It is very important that
you familiarize yourself with the operational sequences
detailed in this manual before attempting to service the
ice machine.
14 25CI400A/W • 25HI400A • 50CI400A/W • 50HI400A
Page 15
engaging
ice
be
Disassembly and replacement instructions
Dispense wheel removal and installation
1. Remove all ice from storage area of dispenser.
2. Remove center thumb nut from dispense wheel.
3. Remove thumb nuts holding baffle inside bin and
remove baffle.
4. Tilt rear of wheel up and lift off motor drive shaft.
5. After reinstalling wheel, secure baffle loosely with
thumb nuts, but do not tighten.
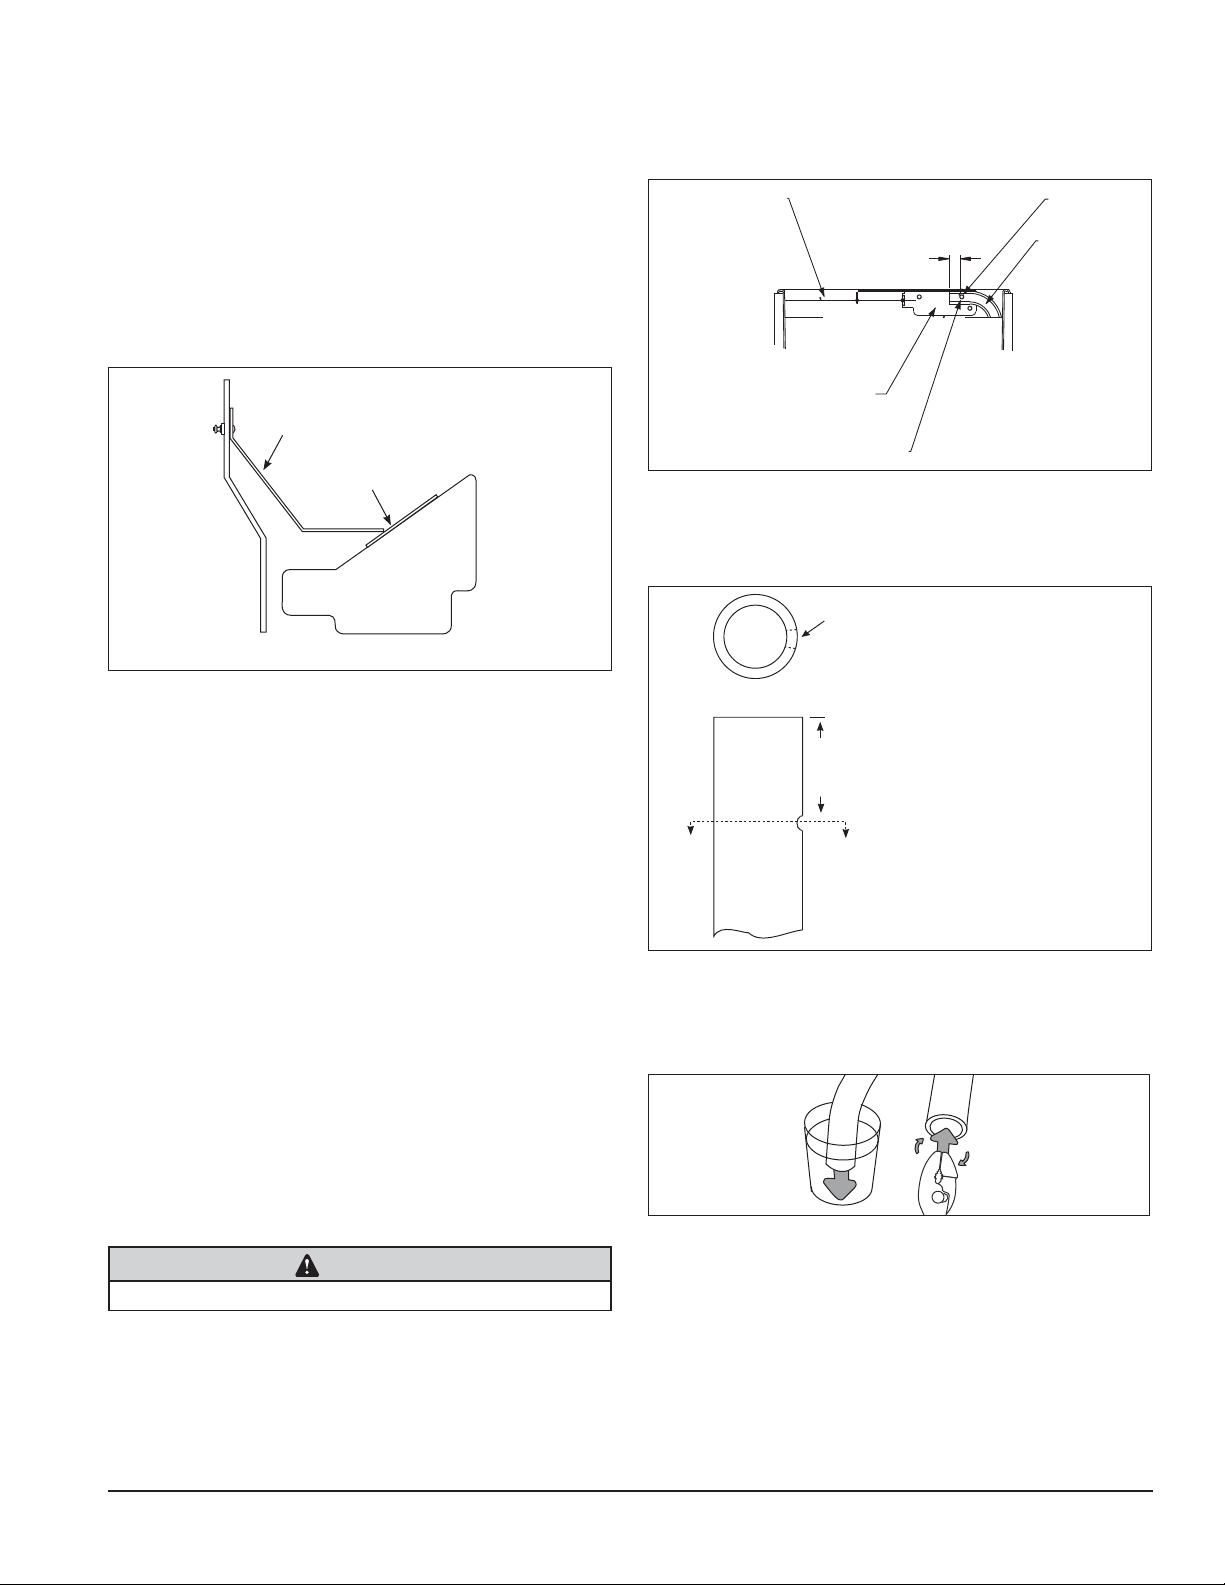
Fig. 12
baffle
dispenser
front
1/8" (3.2 mm)
spacer
3. Disconnect existing ice tube from engaging pin on
transport tube bracket in ice storage bin and pull
tube up through dispenser chase.
Fig. 13
ice level control stat
capillary tube
ice tube mounting bracket
3/16" (5mm) ice tube hole
1"
(26mm)
(26mm)
engaging pin
ice tube
tu
pin
4. Run the new ice transport tube down through chase
making sure that the end with the 3/16" (5 mm) hole
is in the bin (Fig. 13).
side view wheel section
6. Place a 1/8" (3.2 mm) spacer against wheel and
allow baffle to drop until it touches spacer (Fig. 12).
7. Tighten thumb nuts and remove spacer.
Drive bar removal
1. Remove dispense wheel from dispenser
(seeabove).
2. Pull drive bar out of its channel in bottom of wheel.
Wheel motor assembly removal
1. Disconnect power.
2. Remove top cover and dispense wheel.
3. Slide ice machine out of dispenser as described
on page 16, ice machine removal. Ice machine
does not need to be removed completely if there is
sufficient clearance to access the dispenser motor
through the right louvered panel.
4. Disconnect wires on motor.
5. Remove four bolts (7/16" socket) holding motor
assembly to bottom of dispenser.
6. Remove motor assembly.
Fig. 14
.3/16" (5 mm)
dia. hole
Section A – A
1"
(26 mm)
A
A
5. Push the 3/16" (5 mm) hole near end of tube into
pin on ice tube bracket (Fig. 14).
6. Reinstall insulation
Fig. 15
15.1
15.2
Ice transport tube replacement
CAUTION
• Tubing must be supplied by Follett Corporation
7. Heat end of transport tube in cup of 160 F (71 C)
hot water to soften (Fig. 15.1) and spread with pliers
before making connection (Fig. 15.2).
8. Slip supplied hose clamp onto tube and push tube
1. Disconnect power. Remove top and partially slide
ice machine out of dispenser as described on page
16.
2. Disconnect end of tube from ice machine.
onto compression nozzle on exit port of evaporator.
Do not twist tubing when securing to evaporator.
9. Secure tube on port with hose clamp, being sure
that clamp is positioned on evaporator side of
nozzle ange.
25CI400A/W • 25HI400A • 50CI400A/W • 50HI400A 15
Page 16
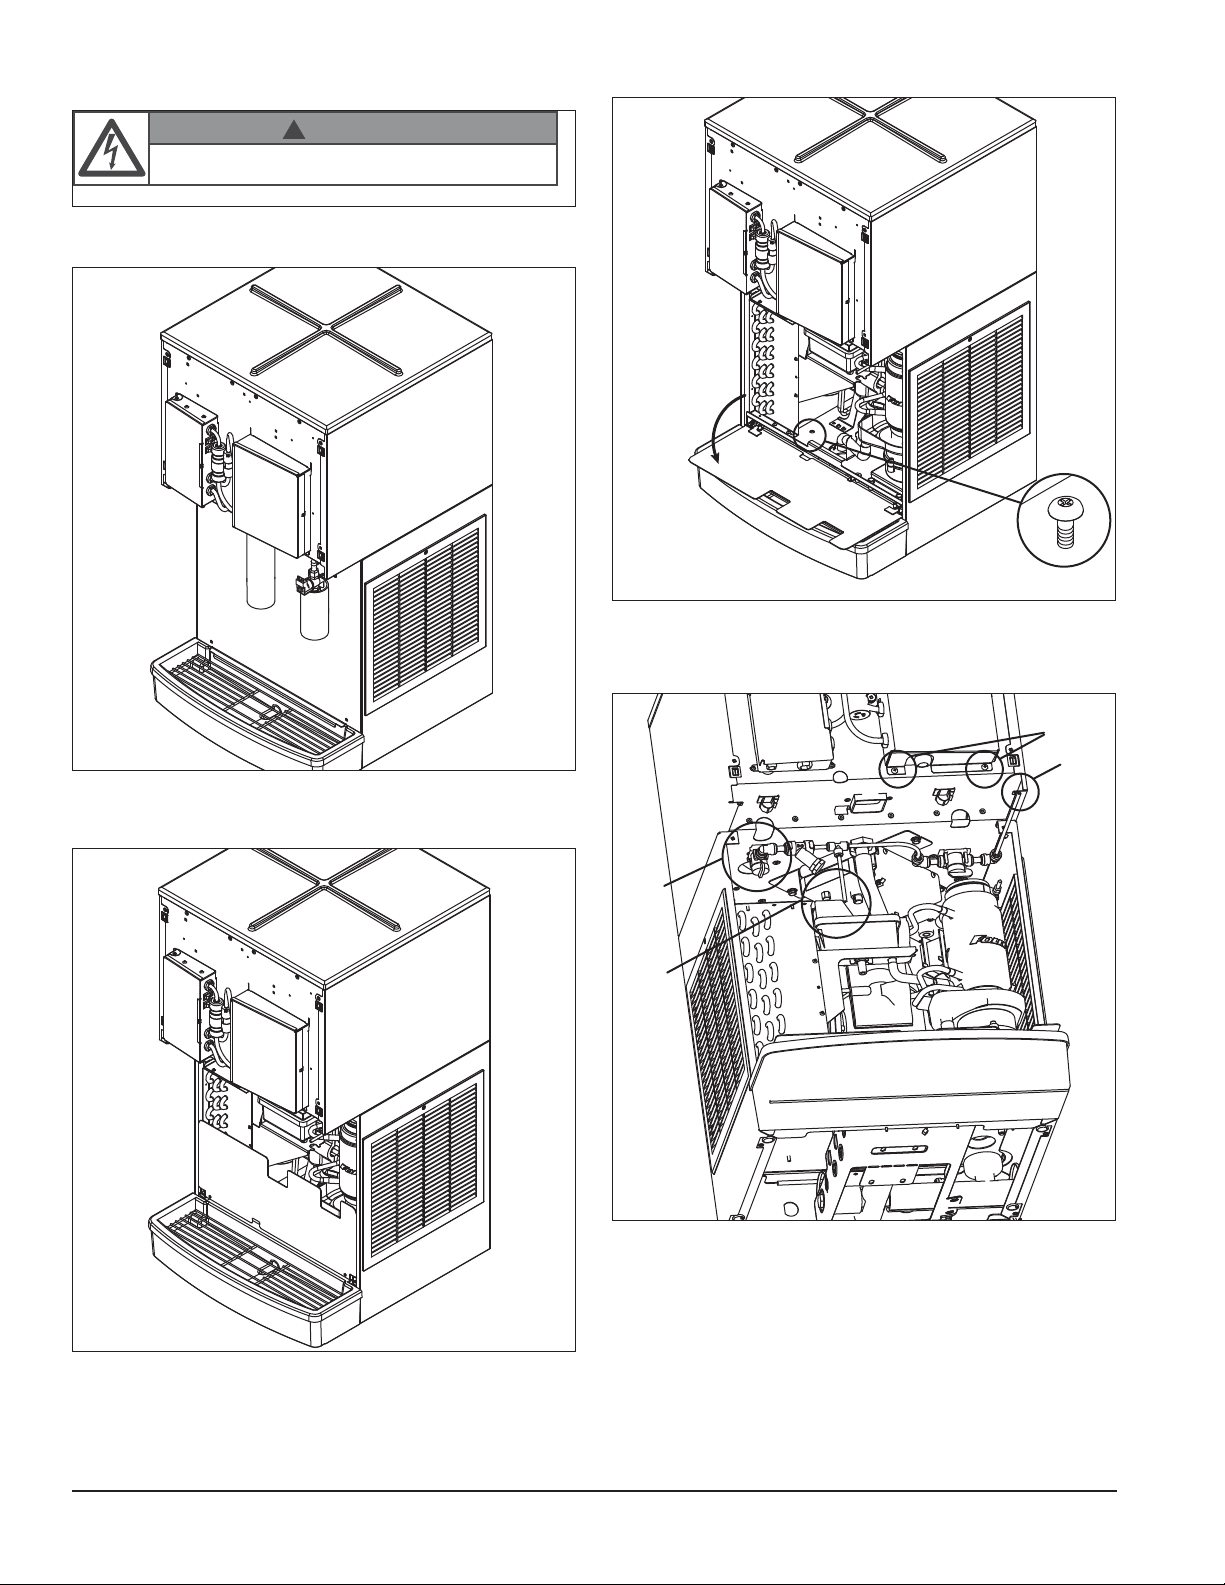
Ice machine removal
!
To reduce risk of shock disconnect power before
servicing.
Fig. 16– All models
Fig. 18 – All models
WARNING
18.1
18.2
3. Lower drain pan protector (Fig. 18.1). Remove and
discard shipping screw (Fig. 18.2).
1. Remove front cover (Fig. 16).
Fig. 17 – All models
2. Remove splash panel (Fig. 17).
Fig. 19 – All models
19.4
19.3
19.1
19.2
4. Close main water shut off valve (Fig. 19.1).
5. Disconnect water line to oat valve (Fig. 19.2).
6. Disconnect water line to solenoid (Fig. 19.3).
7. Remove screws securing bottom of ice machine
electrical box (Fig. 19.4).
16 25CI400A/W • 25HI400A • 50CI400A/W • 50HI400A
Page 17
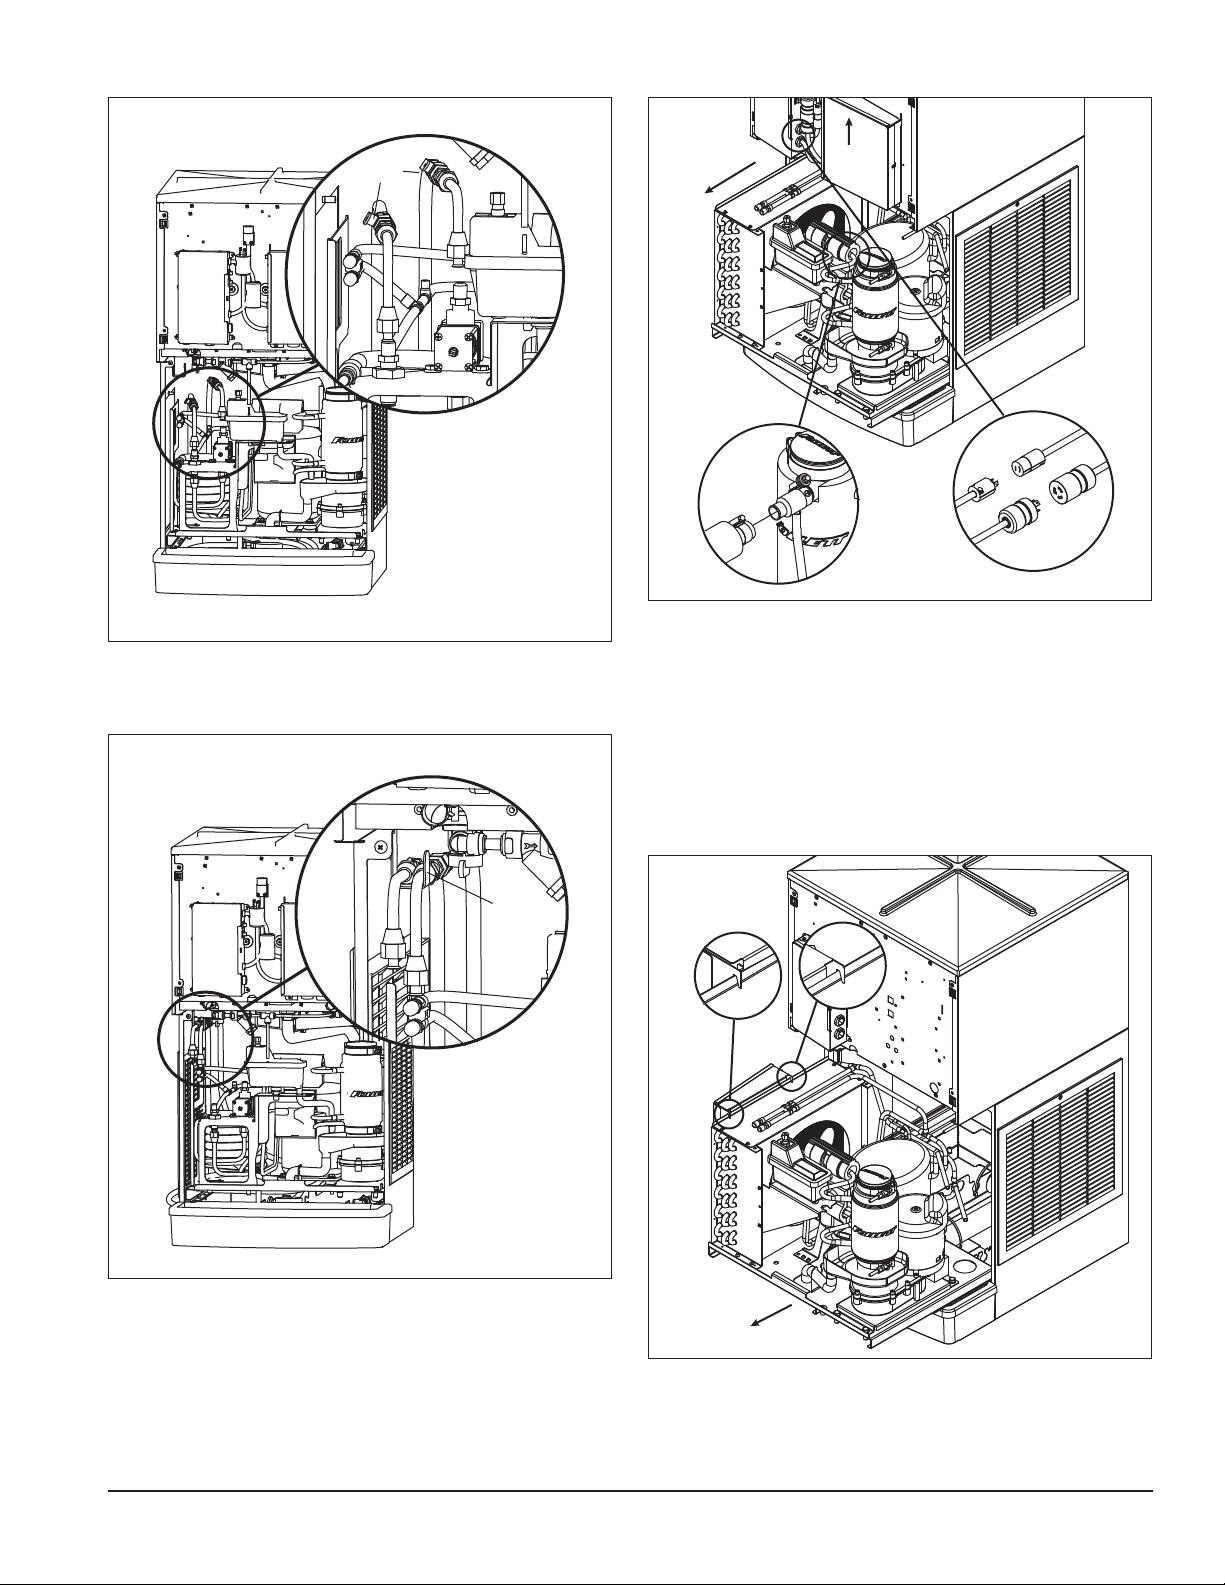
Fig. 20 – Water-cooled only
Fig. 22 – All models
20.1
7. Shut off inlet and outlet valves to water-cooled
condenser and disconnect ttings (Fig. 20.1).
Fig. 21 – Water-cooled only
22.1
22.2
9. Partially slide ice machine from dispenser
(Fig.22.1).
10. Loosen clamp and disconnect ice transport tube
from evaporator (Fig. 22.2).
11. Disconnect power and bin signal twist lock
connectors (Fig. 22.3).
12. Slide ice machine electrical box up and off unit
(Fig.22.4).
22.4
22.3
21.1
8. Lift and position water-cooled lines into hook
(Fig.21.1).
Fig. 23 – Air-cooled only
23.1
23.2
13. Use hooks on ice machine electrical box to hang
box on front of condenser (Fig. 23.1).
14. Remove ice machine from dispenser (Fig. 23.2).
Note warning (Fig.25).
25CI400A/W • 25HI400A • 50CI400A/W • 50HI400A 17
Page 18
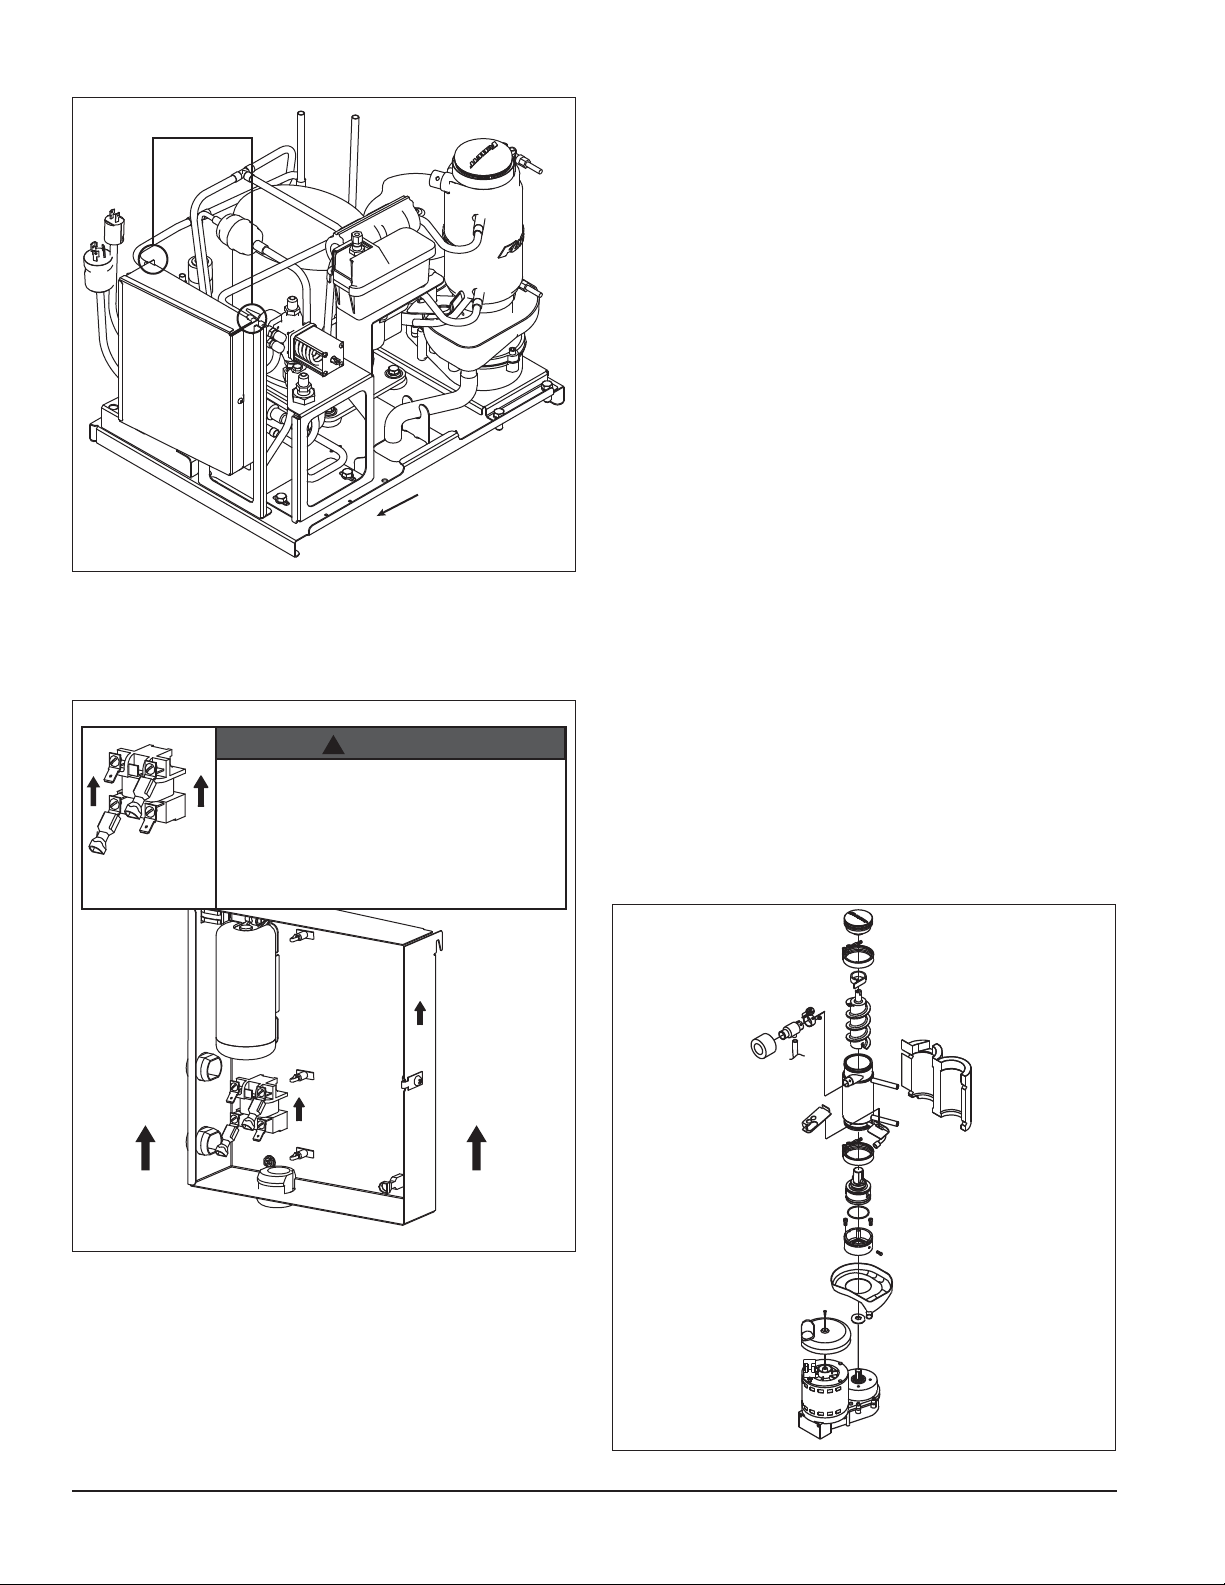
Fig. 24 – Water-cooled only
24.1
24.2
13. Use hooks on ice machine electrical box to hang
box on bracket (Fig. 24.1).
14. Remove ice machine from dispenser (Fig. 24.2).
Fig. 25 – All models
TOP
• Electrical box must be in “UP” position
before supplying power
• Start relay is gravity sensitive, and MUST
be in “UP” position
• Failure to comply may cause equipment
to overheat, resulting in equipment failure,
equipment damage or fire hazard
!
WARNING
Evaporator disassembly
Note: The upper bearing, lower bearing and auger
assemblies must be replaced as assemblies. The bottom
and top bearing assemblies cannot be eld assembled to
factory speci cations (Fig. 26).
1. Disconnect power to ice machine.
2. Shut off water to ice machine.
3. Drain evaporator and oat tank.
4. Disconnect plastic tubing from evaporator water
inlet.
5. Disconnect compression nozzle tubing and reservoir
over ow tubing from secured clip.
6. Remove nut and upper vee-band coupling from top
of evaporator.
7. Lift top bearing assembly straight up with a slight
rotating motion and remove.
8. Remove ice compression loop located at top
ofauger.
9. Lift auger straight up and out of evaporator.
10. Remove nut and lower vee-band coupling from
bottom of evaporator.
11. Lift evaporator to clear bottom bearing assembly.
12. Loosen hex head bolt in side of mounting base with
5/16" wrench and lift lower bearing assembly.
13. Remove condensate shield.
14. Remove four Allen head machine screws holding
mounting base to gearbox.
15. If replacing evaporator, remove compression nozzle
from evaporator port.
Fig. 26
icemaker
electrical box
T
OP
18 25CI400A/W • 25HI400A • 50CI400A/W • 50HI400A
Page 19
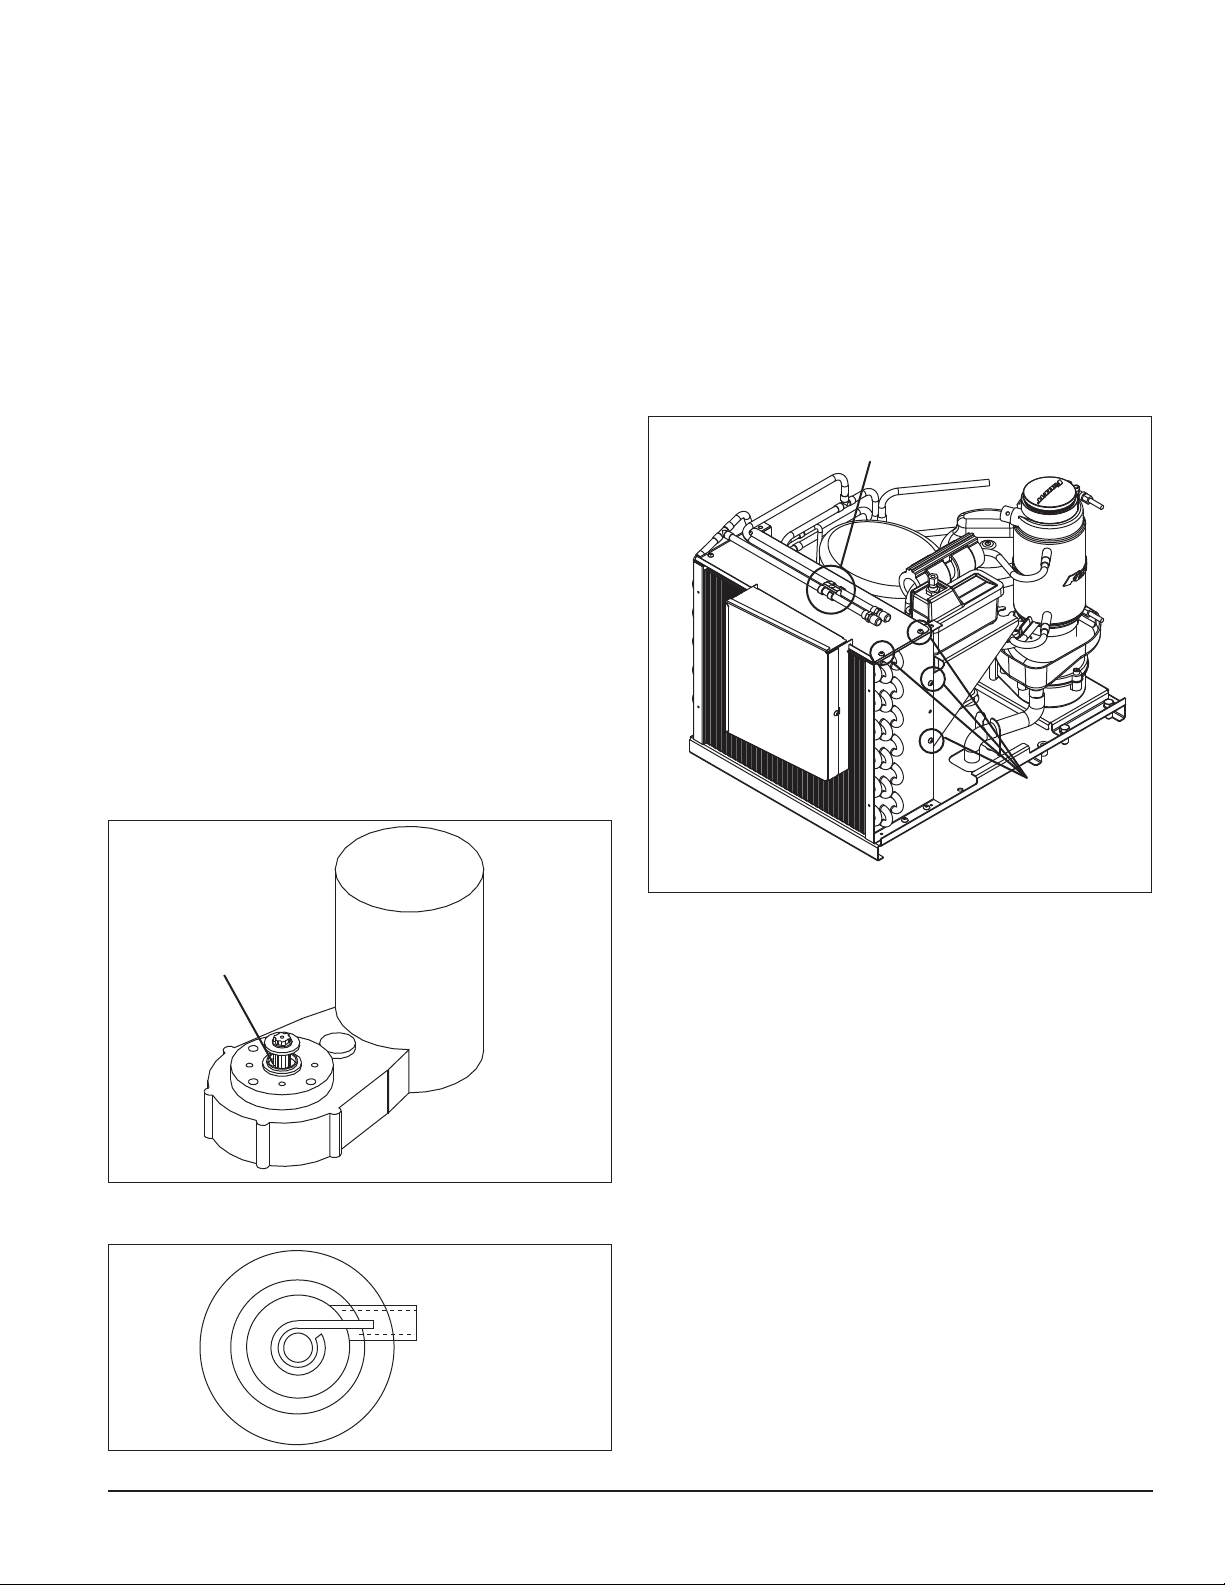
Evaporator reassembly
1. Clean gearmotor boss, output shaft and shaft well.
2. Install drain pan and evaporator mounting base.
3. Fill gear motor shaft well with food grade grease
(Fig. 27.1).
4. Install condensate shield and seat against gear
motor boss.
5. Install bearing O ring in groove in evaporator
mounting base.
6. Lower bottom bearing assembly into evaporator
mounting base.
7. While maintaining a slight downward pressure on
bottom bearing assembly, tighten hex head bolt with
a 5/16" wrench.
8. Position evaporator over lower bearing assembly
and align grooves with pins in bearing assembly.
9. Install vee band clamp and nut to 70 in/lb.
10. Place auger in center of evaporator and rotate to
mate with drive pin.
11. Install ice compression loop, orienting loop as
shown in Fig. 28.
12. Install upper bearing and seal assembly, rotating
bearing to slip pin into auger slot.
13. Install upper vee band clamp and nut to 70 in/lb.
14. If evaporator was replaced, reinstall compression
nozzle on new evaporator.
Fig. 27
Gearmotor replacement
1. Disassemble evaporator as described above.
2. Disconnect the wire connectors.
3. Remove four screws holding gear motor mounting
plate to base of ice machine and lift gearbox and
motor clear of ice machine.
4. Remove machine screws holding mounting plate to
motor.
5. Install new motor in reverse order.
Fan removal
Fig. 29
29.1
29.2
Fig. 28
27.1
1. Remove screw securing refrigerant lines to
condenser shroud (Fig. 29.1).
2. Remove seven screws securing shroud to
condenser (Fig. 29.2).
3. Slide shroud forward against n block to access
fan and motor.
25CI400A/W • 25HI400A • 50CI400A/W • 50HI400A 19
Page 20
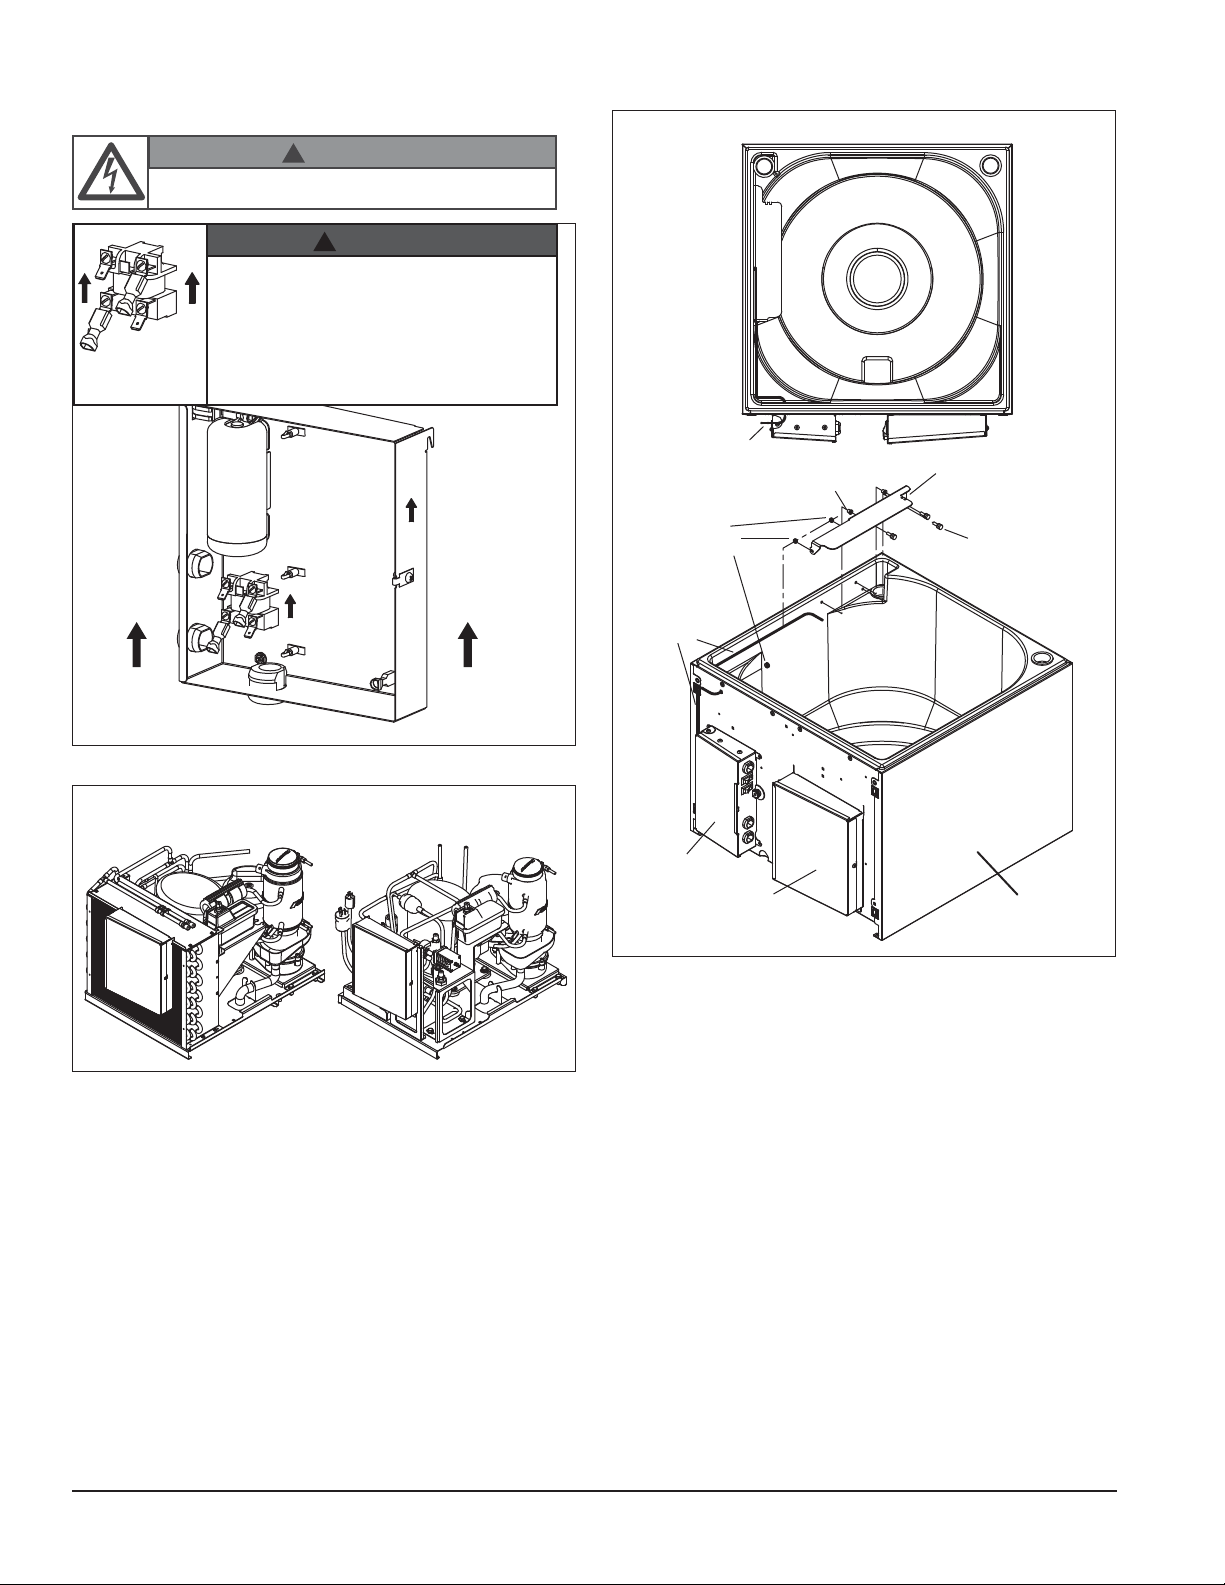
Electrical systems
!
WARNING
To reduce risk of shock disconnect power before
servicing.
Electrical component locations
Top View
TOP
• Electrical box must be in “UP” position
before supplying power
• Start relay is gravity sensitive, and MUST
be in “UP” position
• Failure to comply may cause equipment
to overheat, resulting in equipment failure,
equipment damage or fire hazard
T
O
P
Air-cooled icemaker
!
WARNING
icemaker
electrical box
Water-cooled icemaker
ice level
control stat
rubber
grommet
bin thermostat
capillary tube
well nut
ice tube
mounting bracket
knurled screw
icemaker
electrical
box
icemaker
electrical
box
dispenser
electrical
box
icemaker
electrical
box
hopper
assembly
20 25CI400A/W • 25HI400A • 50CI400A/W • 50HI400A
Page 21
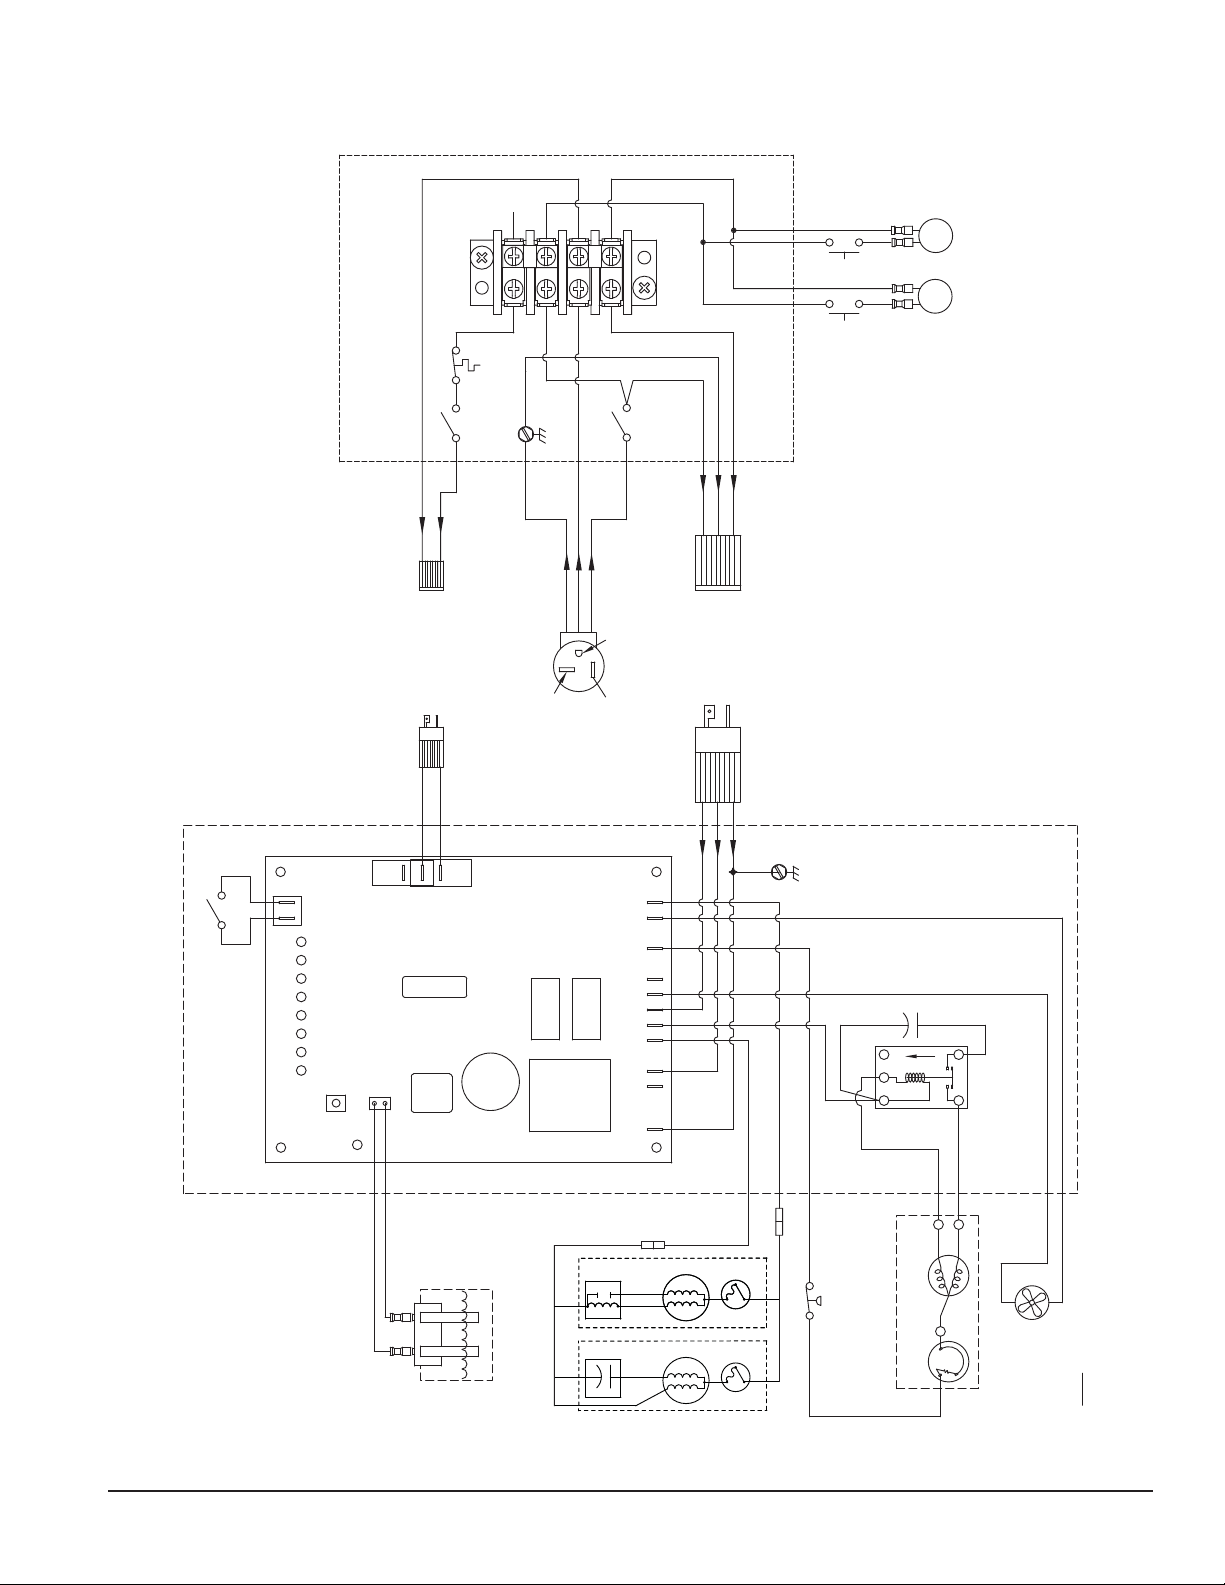
Wiring diagram - lever dispense model
1
T S TAT
(ICE LEVEL)
2
3
4
ICE
SWITCH
WATER
SWITCH
M
S
MOTOR
DISPENSE
WATER
SOLENOID
Lever Dispensing Wiring Diagram
I = COMP ON
O = COMP OFF
COMPRESSOR SWITCH
B-E
B-T
WTR
2ND
60M
20M
C
DR
COMP
SWITCH
DISPENSER ELECTRICAL BOX
ICE MACHINE PCB
RESET
POWER
WHT
BIN SIGNAL
CONNECTION
WHT
VAC
24
SENSOR
WATER
BLK
BLK
I.D.
I.D.
LABEL
SWITCH
BIN SIGNAL
FROM
DISPENSER
24/115 VAC
VAC
LINE
SOFTWARE
SCREW
GROUND
GND-GRN
WHT
L1-BLK
L2-WHT
BLK GRN
PLUG
125VAC 20A
POWER
SWITCH
NEMA 5-20P
ICE MACHINE
DRIVE
FAN
COMP
L2
L2
L2
L2
L2
L1
L1
EARTH
BLK
POWER
CONNECTION
WHT
BLK
GRN
WHT
GRN
GRN
FROM
115 60Hz
DISPENSER BOX
SCREW
GROUND
COMP. START
BLK
(SEE NOTE #2)
START RELAY
COMPRESSOR
SL
WHT
WHT
CAPACITOR
UP
12M
ICE MACHINE ELECTRICAL BOX
WHT
WATER RESERVOIR
BISON
GEAR
MOTOR
OR
LEVEL SENSOR
LINIX
GEAR
MOTOR
START
4
START
2
3
BLACK
YELLOW
GEAR MOTOR
START
RUN
GEAR MOTOR
START
RUN
T.O.L.
T.O.L.
WHT
BLK
BLU
RED
P
HI PRESSURE
SAFETY SWITCH
(SEE NOTE #1)
BLK
RUN
COMPRESSOR
OVER-LOAD
COMPRESSOR
RED
WHT
ORG
S
R
START
C
BLK
FAN
CONDENSER
NOTES:
1. HIGH PRESSURE SAFETY SWITCH
OPENS @ 425psi CLOSES @ 297psi (SNAP SWITCH)
2. COMPRESSOR START RELAY IS GRAVITY SENSITIVE.
SEE LABEL ON RELAY FOR PROPER ORIENTATION.
25CI400A/W • 25HI400A • 50CI400A/W • 50HI400A 21
Page 22
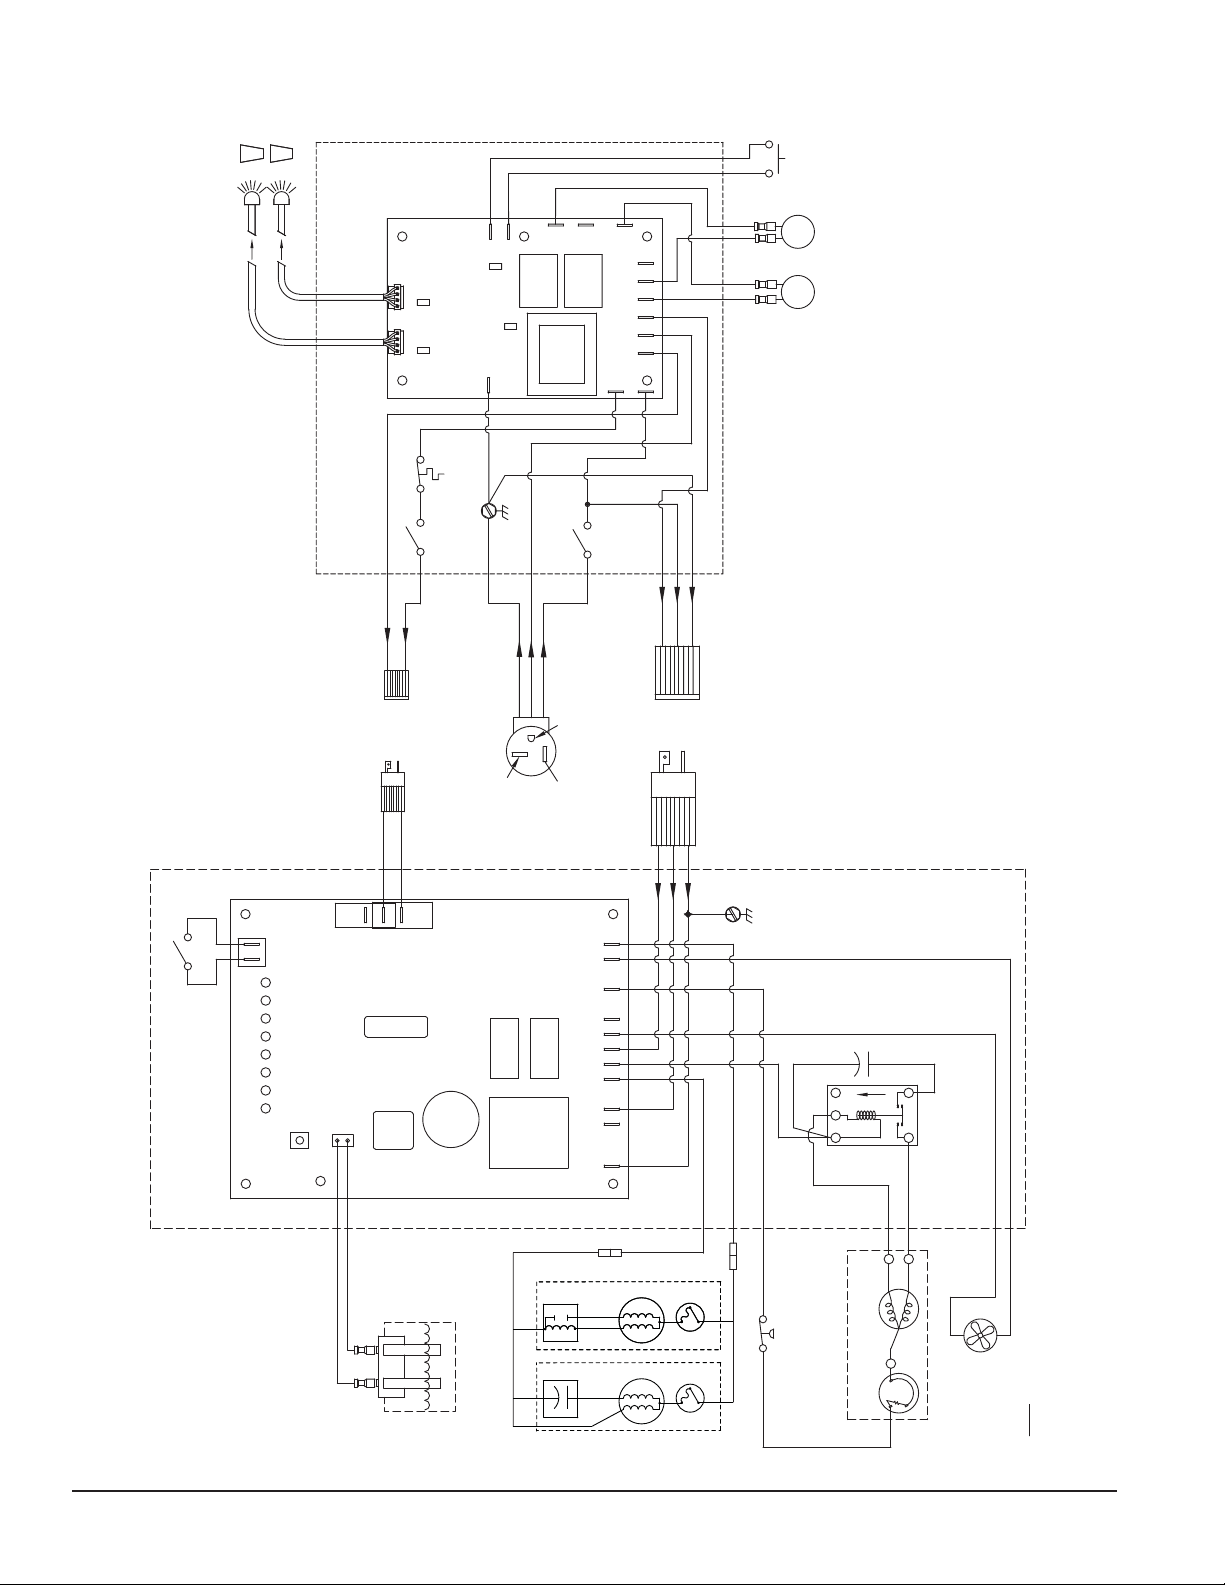
Wiring diagram - SensorSAFE model
CLEAN
SWITCH
ICE SENSOR
WATER SENSOR
DISPENSER ELECTRICAL BOX
BIN SIGNAL
CONNECTION
WHT
WHT
BLK
BLK
WTR
ICE
SWITCH
BIN SIGNAL
FROM
DISPENSER
24/115 VAC
SENSOR SAFE PCB
T S TAT
(ICE LEVEL)
EARTH
CLN
CLN
GROUND
PWR
SCREW
GND-GRN
WHT
L1-BLK
L2-WHT
POWER
BLK GRN
SWITCH
125VAC 20A
SOL WM
PLUG
NEMA 5-20P
WTR
L2
L2
L2
L2
L2
L2
L1
POWER
CONNECTION
ICE MACHINE
WHT
BLK
GRN
FROM
115 60Hz
M
MOTOR
DISPENSE
S
WATER
SOLENOID
DISPENSER BOX
SensorSAFE Dispensing Wiring Diagram
ICE MACHINE ELECTRICAL BOX
I = COMP ON
O = COMP OFF
COMPRESSOR SWITCH
B-E
B-T
WTR
2ND
60M
20M
C
DR
COMP
SWITCH
ICE MACHINE PCB
RESET
POWER
I.D.
I.D.
LABEL
VAC
LINE
SOFTWARE
BISON
GEAR
MOTOR
OR
LEVEL SENSOR
LINIX
GEAR
MOTOR
WHT
START
4
START
2
3
YELLOW
BLACK
DRIVE
FAN
COMP
L2
L2
L2
L2
L2
L1
L1
EARTH
WHT
GEAR MOTOR
START
RUN
GEAR MOTOR
START
RUN
BLK
GRN
GRN
T.O.L.
T.O.L.
WHT
BLK
BLU
GROUND
RED
SCREW
WHT
WHT
P
HI PRESSURE
SAFETY SWITCH
(SEE NOTE #1)
CAPACITOR
UP
12M
COMPRESSOR
OVER-LOAD
COMPRESSOR
RED
COMP. START
BLK
SL
BLK
ORG
S
R
RUN
START
C
(SEE NOTE #2)
START RELAY
COMPRESSOR
WHT
FAN
CONDENSER
BLK
NOTES:
1. HIGH PRESSURE SAFETY SWITCH
OPENS @ 425psi CLOSES @ 297psi (SNAP SWITCH)
2. COMPRESSOR START RELAY IS GRAVITY SENSITIVE.
SEE LABEL ON RELAY FOR PROPER ORIENTATION.
VAC
24
SENSOR
WATER
WATER RESERVOIR
22 25CI400A/W • 25HI400A • 50CI400A/W • 50HI400A
Page 23
Ice machine operational and diagnostic sequences
The wiring diagrams that follow illustrate the circuitry of Follett ice machines. Both normal operation (stages 1 - 6) and
non-normal diagnostic sequences showing torque-out (stages 7 - 10) for use in troubleshooting are shown.
Circuitry notes
The ice machine receives power from two sources – the main power supply and the bin control signal power from the
dispenser. Disconnect both power sources before performing service. When performing electrical service, always use a
meter to determine whether or not the components being serviced are energized.
High pressure cutout opens at 425 pso and closes at 287 psi (auto reset).
Compressor switch should read open in ON position.
Compressor start relay is position sensitive.
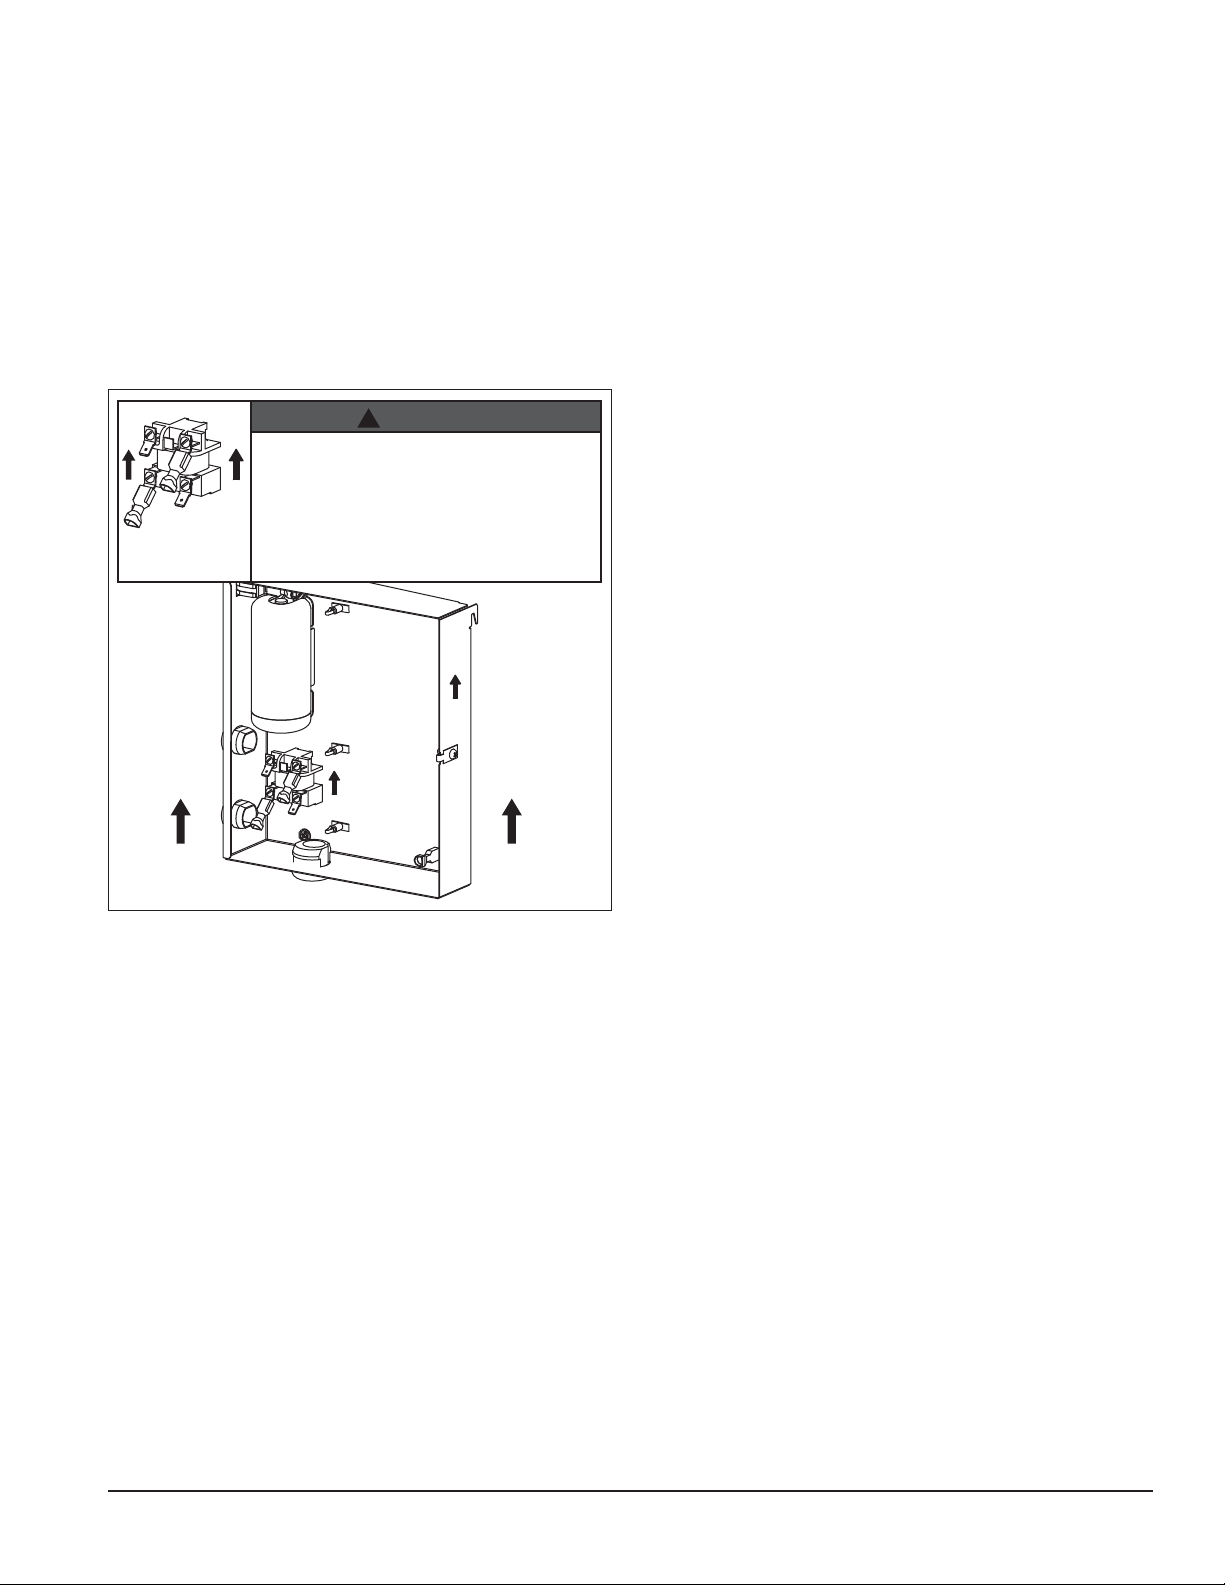
TOP
• Electrical box must be in “UP” position
before supplying power
• Start relay is gravity sensitive, and MUST
be in “UP” position
• Failure to comply may cause equipment
to overheat, resulting in equipment failure,
equipment damage or fire hazard
T
OP
!
WARNING
icemaker
electrical box
Bin signal is 115 V, 60 Hz.
Flashing water LED at any time indicates that water signal to board has been lost for more than one second.
Ten-second delay: There is a 10 second delay in reaction to loss of water (WTR) or bin (B-E) signals. If signals are not
lost for more than 10 seconds, no reaction will occur.
25CI400A/W • 25HI400A • 50CI400A/W • 50HI400A 23
Page 24
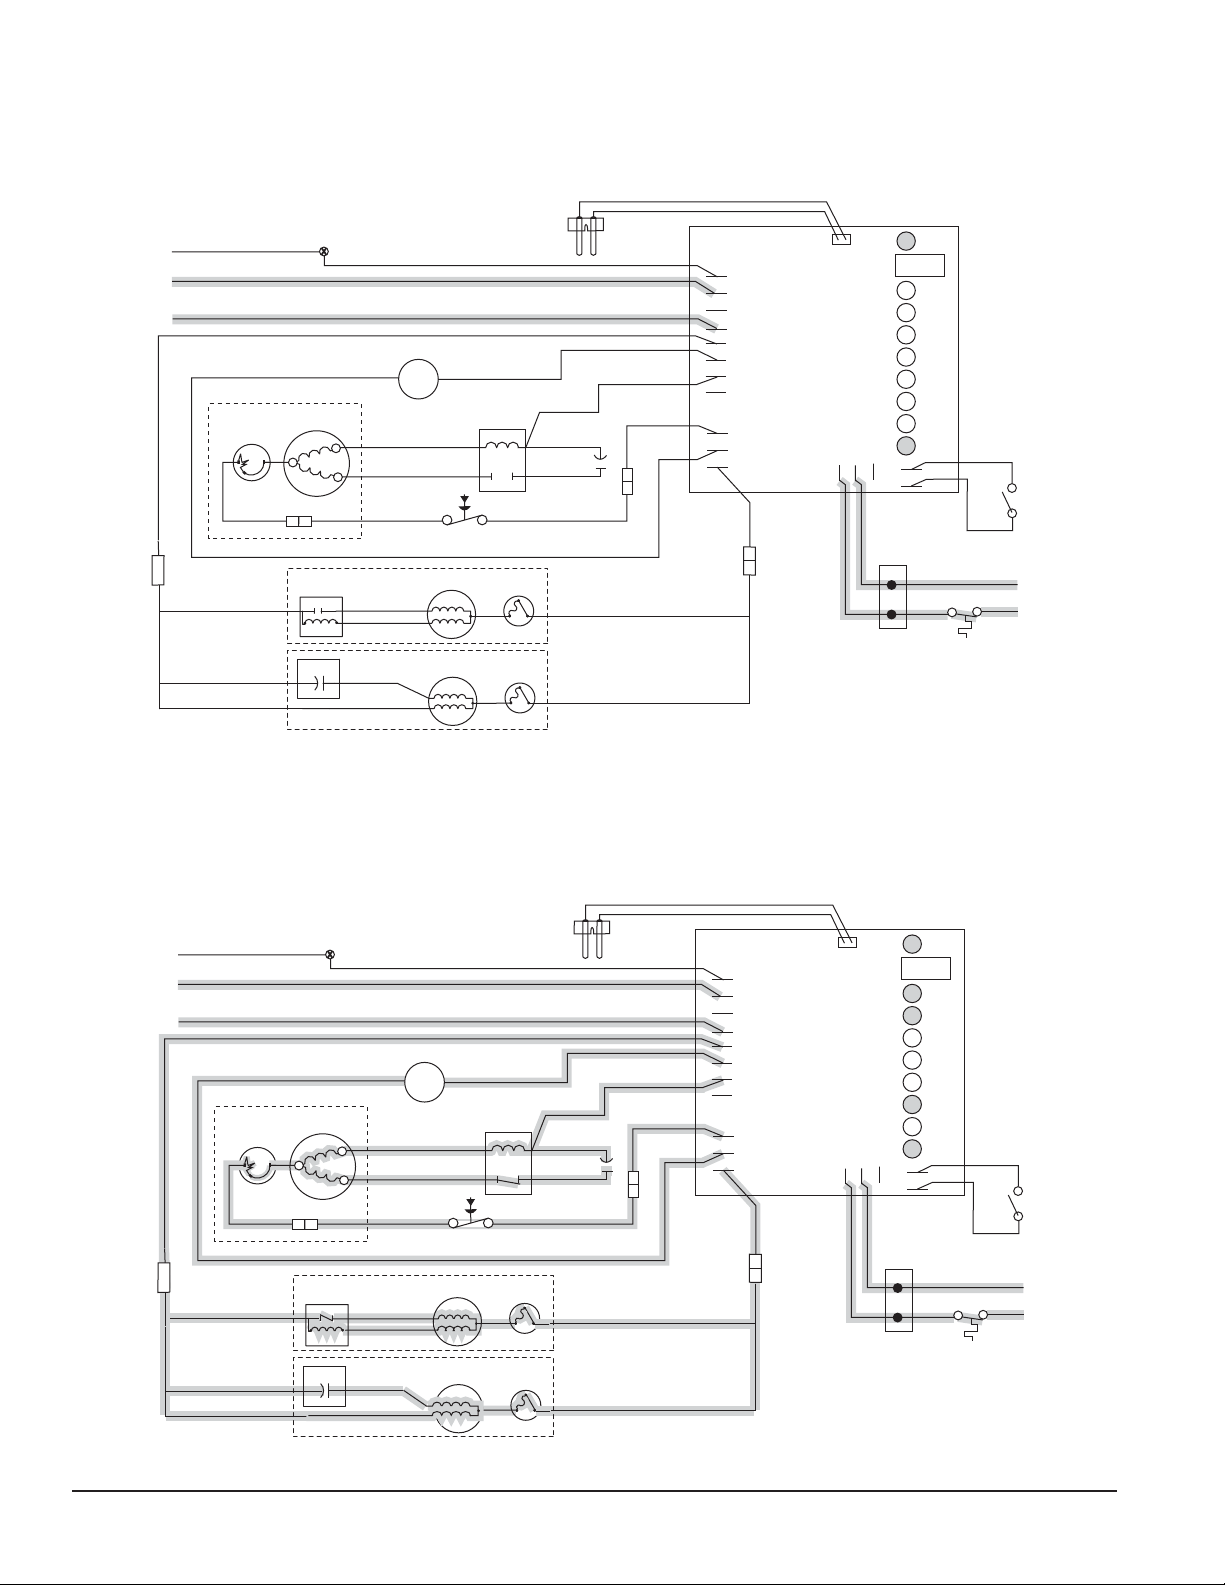
Normal operation – Stage 1
Power is supplied to L1 of the control board. The ice level control in the dispenser is closed and calling for ice,
supplying signal voltage to the control board. The control board will now go through the start-up sequence. Less than
30 seconds will elapse as the water sensor located in the oat reservoir checks for water in the reservoir. The bin
empty LED (B-E) and power LED (PWR) will be on.
INPUT
POWER
G
B
W
WHITE
WHITE
COMPRESSOR
C
T.O.L.
RED
START
RELAY
4
GRD
BLACK
R
S
2
3
BLACK
BLACK
YELLOW
START CAP.
RED
FAN
M
BLACK
ORANGE
HIGH PRESSURE
SAFETY SWITCH
GEAR MOTOR
GEAR MOTOR
M
START
RUN
START
RUN
BLACK
S
1
L
T.O.L.
T.O.L.
BLACK
BLACK
BLACK
BISON GEARMOTOR
LINIX GEARMOTOR
OR
WATER
SENSOR
WHITE
WHITE
RED
GRD
L1
L1
L2
CONTROL
L2
L2
BOARD
L2
L2
COMPRESSOR
FAN
DRIVE
BLACK
BLUE
PWR
RESET
DR
C
20M
60M
24V
WHITE
2ND
WTR
B-T
B-E
COMPRESSOR
WHITE
RED
COMMON
LINE VAC
BLACK
BIN SIGNAL
FROM DISPENSER
JUNCTION BOX
(MCD400A/WVS series –
blk wire is on 24V)
RED
RED
SWITCH
BIN T-STAT
Normal operation – Stage 2
The water sensor veri es water in the oat. The Water OK LED (WTR) comes on. At the same time, the gearmotor,
compressor, and condenser fan motor come on, lighting the Drive LED (DR) and compressor LED (C). The
compressor is started through a current style relay that is pulled in by the initial high current draw of the compressor.
The gearmotor start windings are also energized through a current relay (or start capacitor). The B-E and WTR LED
remain on.
INPUT
POWER
G
B
W
WHITE
WHITE
COMPRESSOR
C
T.O.L.
RED
START
RELAY
4
GRD
BLACK
R
S
2
3
BLACK
BLACK
YELLOW
START CAP.
RED
FAN
M
BLACK
ORANGE
HIGH PRESSURE
SAFETY SWITCH
GEAR MOTOR
GEAR MOTOR
BLACK
M
S
START
RUN
START
RUN
1
L
T.O.L.
T.O.L.
BLACK
BLACK
BLACK
BISON GEARMOTOR
LINIX GEARMOTOR
OR
WATER
SENSOR
WHITE
WHITE
RED
GRD
L1
L1
L2
CONTROL
L2
L2
BOARD
L2
L2
COMPRESSOR
FAN
DRIVE
BLACK
BLUE
PWR
RESET
DR
C
20M
60M
24V
WHITE
2ND
WTR
B-T
B-E
COMPRESSOR
WHITE
RED
COMMON
LINE VAC
BLACK
BIN SIGNAL
FROM DISPENSER
JUNCTION BOX
(MCD400A/WVS series –
blk wire is on 24V)
RED
RED
SWITCH
BIN T-STAT
24 25CI400A/W • 25HI400A • 50CI400A/W • 50HI400A
Page 25
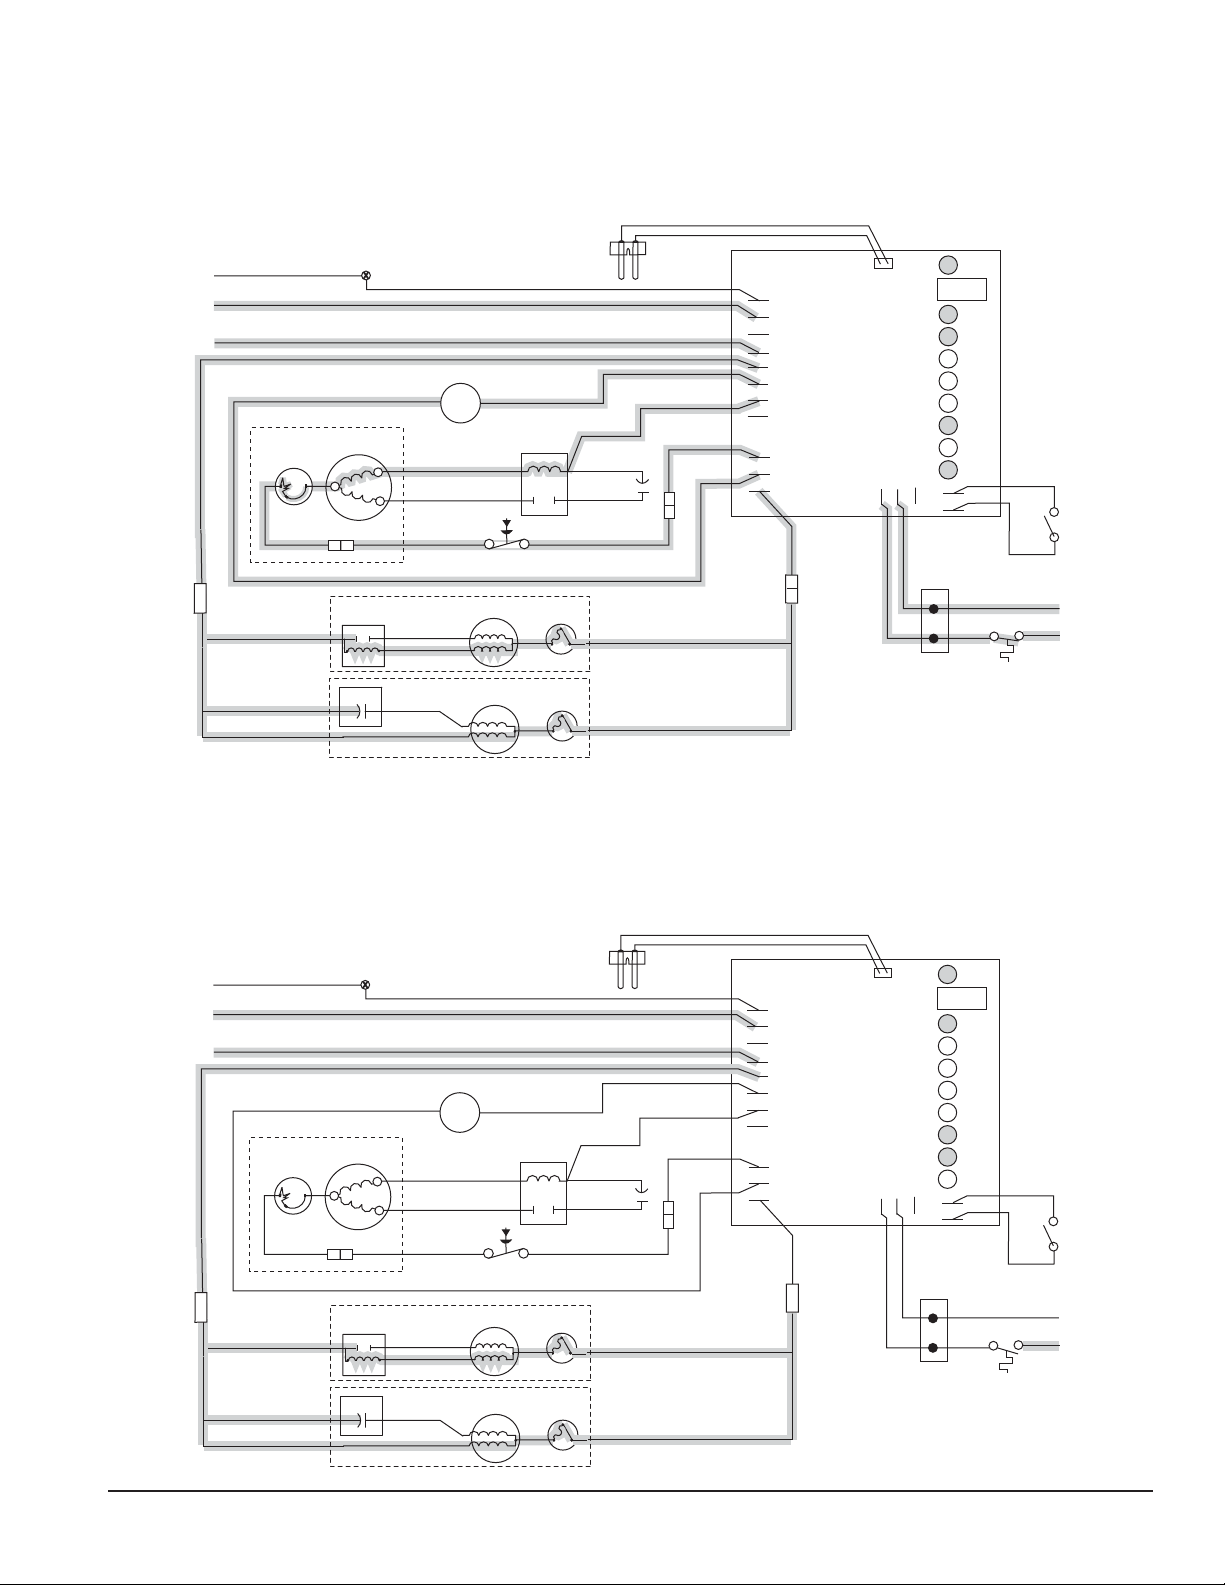
Normal operation – Stage 3
After the initial high current draw drops off, the gearmotor start relay contacts open, dropping out the start winding
(or start capacitor). As the compressor comes up to normal running speed, the compressor start relay contacts also
open, dropping out the start winding of the compressor. The ice machine is now in a normal icemaking mode. The ice
machine will begin to produce ice and continue to produce ice until the bin level control in the ice dispenser is satis ed.
The PWR, B-E, DR, C and WTR LEDs are all on.
INPUT
POWER
G
B
W
WHITE
WHITE
COMPRESSOR
C
T.O.L.
RED
START
RELAY
4
GRD
BLACK
R
S
2
3
BLACK
BLACK
YELLOW
START CAP.
RED
FAN
M
BLACK
ORANGE
HIGH PRESSURE
SAFETY SWITCH
GEAR MOTOR
GEAR MOTOR
BLACK
M
S
START
RUN
START
RUN
1
L
T.O.L.
T.O.L.
BLACK
BLACK
BLACK
BISON GEARMOTOR
LINIX GEARMOTOR
OR
WATER
SENSOR
WHITE
WHITE
RED
GRD
L1
L1
L2
CONTROL
L2
L2
BOARD
L2
L2
COMPRESSOR
FAN
DRIVE
BLACK
BLUE
BIN SIGNAL
FROM DISPENSER
JUNCTION BOX
(MCD400A/WVS series –
blk wire is on 24V)
COMMON
LINE VAC
BLACK
24V
WHITE
PWR
RESET
DR
C
20M
60M
2ND
WTR
B-T
B-E
COMPRESSOR
SWITCH
WHITE
RED
BIN T-STAT
RED
RED
Normal operation – Stage 4
Once the ice level control opens, the B-E LED goes out. After a 10 second delay the compressor LED (C), compressor
and fan motor go off. (Should the ice level control not remain open for 10 seconds, the ice machine will continue to
run.) The gearmotor continues to run and the DR LED remains lighted for 60 seconds. The purpose of this function is
to drive the remaining ice out of the evaporator and to boil off any refrigerant remaining in the evaporator. The bin timer
LED (BT) comes on, starting the twenty minute off cycle time delay.
INPUT
POWER
G
B
W
WHITE
WHITE
COMPRESSOR
C
T.O.L.
RED
START
RELAY
4
GRD
BLACK
R
S
2
3
BLACK
BLACK
YELLOW
START CAP.
RED
FAN
M
BLACK
ORANGE
HIGH PRESSURE
SAFETY SWITCH
GEAR MOTOR
GEAR MOTOR
BLACK
M
S
START
RUN
START
RUN
1
L
T.O.L.
T.O.L.
BLACK
BLACK
BLACK
BISON GEARMOTOR
LINIX GEARMOTOR
OR
WATER
SENSOR
WHITE
WHITE
RED
GRD
L1
L1
L2
CONTROL
L2
L2
BOARD
L2
L2
COMPRESSOR
FAN
DRIVE
BLACK
BLUE
PWR
RESET
DR
C
20M
60M
24V
WHITE
2ND
WTR
B-T
B-E
COMPRESSOR
WHITE
RED
COMMON
LINE VAC
BLACK
BIN SIGNAL
FROM DISPENSER
JUNCTION BOX
(MCD400A/WVS series –
blk wire is on 24V)
RED
RED
SWITCH
BIN T-STAT
25CI400A/W • 25HI400A • 50CI400A/W • 50HI400A 25
Page 26
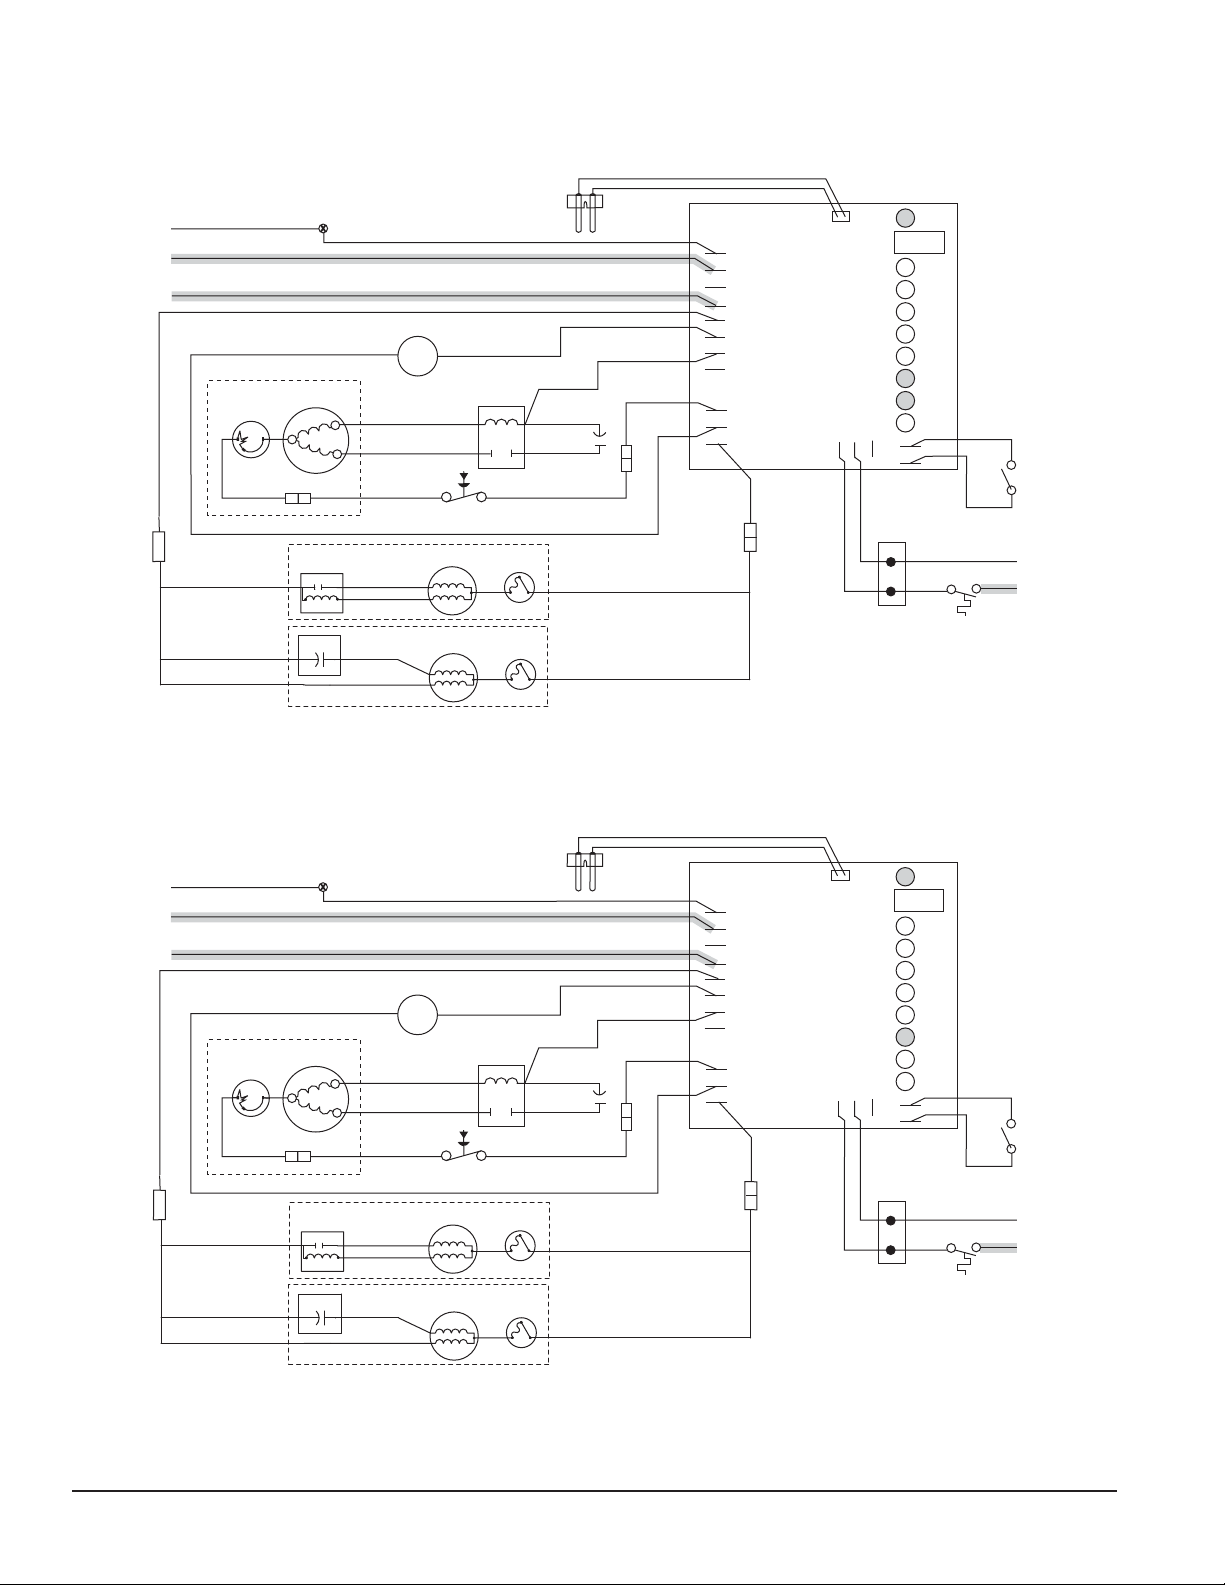
Normal operation – Stage 5
The drive motor now shuts down and the DR LED is off. The B-T LED remains on for 20 minutes. The ice machine will
not start while the B-T LED is on. To restart the ice machine for troubleshooting purposes, depress the reset button to
clear the control board.
INPUT
POWER
G
B
W
WHITE
WHITE
COMPRESSOR
C
T.O.L.
RED
START
RELAY
4
GRD
BLACK
R
S
2
3
BLACK
BLACK
YELLOW
START CAP.
RED
FAN
M
BLACK
ORANGE
HIGH PRESSURE
SAFETY SWITCH
GEAR MOTOR
GEAR MOTOR
BLACK
M
S
START
RUN
START
RUN
1
L
T.O.L.
T.O.L.
BLACK
BLACK
BLACK
WATER
SENSOR
WHITE
WHITE
RED
BISON GEARMOTOR
OR
LINIX GEARMOTOR
GRD
L1
L1
L2
CONTROL
L2
L2
BOARD
L2
L2
COMPRESSOR
FAN
DRIVE
BLACK
BLUE
PWR
RESET
DR
C
20M
60M
24V
WHITE
2ND
WTR
B-T
B-E
COMPRESSOR
WHITE
RED
COMMON
LINE VAC
BLACK
BIN SIGNAL
FROM DISPENSER
JUNCTION BOX
(MCD400A/WVS series –
blk wire is on 24V)
RED
RED
SWITCH
BIN T-STAT
Normal operation – Stage 6
When the dwell time of 20 minutes has expired, the B-T LED goes off. The ice machine goes through the normal startup sequence when the bin level control signals the control board for ice. The WTR LED will remain on as long as the
water sensor in the oat reservoir senses water.
INPUT
POWER
G
B
W
WHITE
WHITE
COMPRESSOR
C
T.O.L.
RED
START
RELAY
4
GRD
BLACK
R
S
2
3
BLACK
BLACK
YELLOW
START CAP.
RED
FAN
M
BLACK
ORANGE
HIGH PRESSURE
SAFETY SWITCH
GEAR MOTOR
GEAR MOTOR
BLACK
M
S
START
RUN
START
RUN
1
L
T.O.L.
T.O.L.
BLACK
BLACK
BLACK
WATER
SENSOR
WHITE
WHITE
RED
BISON GEARMOTOR
OR
LINIX GEARMOTOR
GRD
L1
L1
L2
CONTROL
L2
L2
BOARD
L2
L2
COMPRESSOR
FAN
DRIVE
BLACK
BLUE
PWR
RESET
DR
C
20M
60M
24V
WHITE
2ND
WTR
B-T
B-E
COMPRESSOR
WHITE
RED
COMMON
LINE VAC
BLACK
BIN SIGNAL
FROM DISPENSER
JUNCTION BOX
(MCD400A/WVS series –
blk wire is on 24V)
RED
RED
SWITCH
BIN T-STAT
26 25CI400A/W • 25HI400A • 50CI400A/W • 50HI400A
Page 27
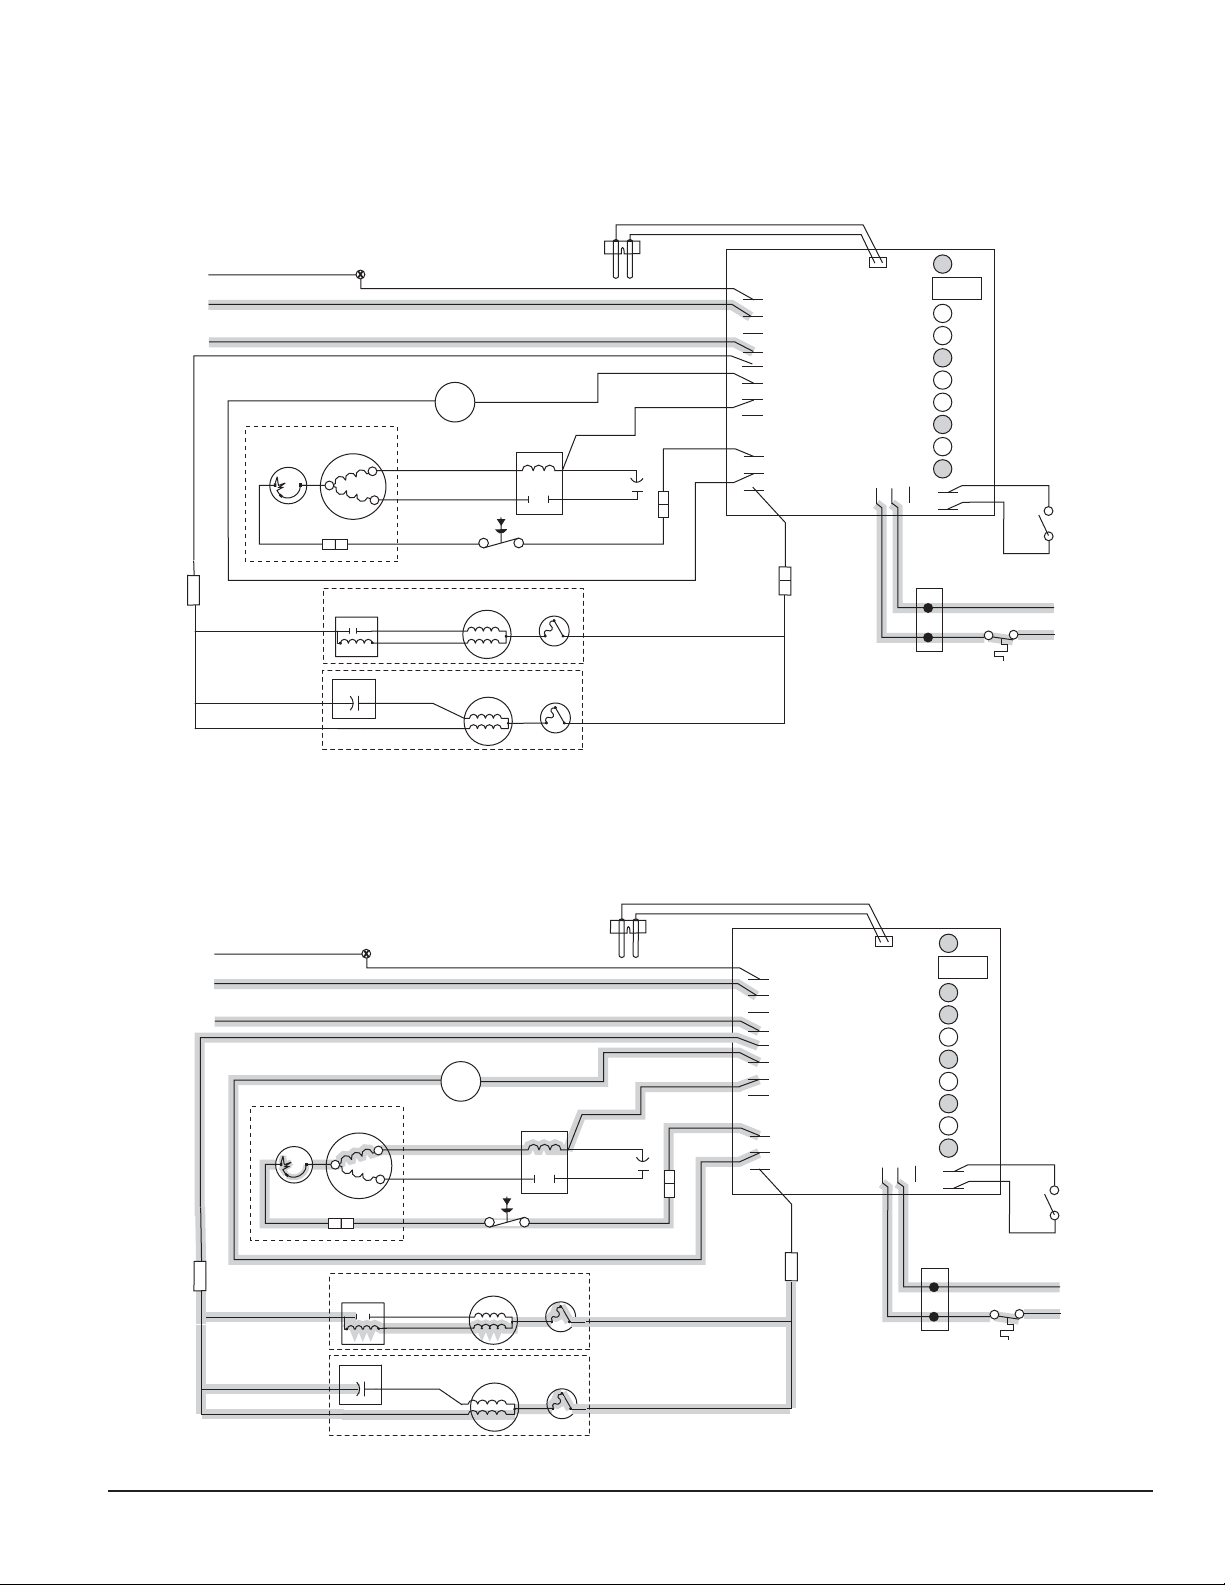
Diagnostic sequence – Stage 7
The 20 minute error LED (20M) is on, indicating that the control board has sensed an over-torque condition (above
3A on the gearmotor). The 20M LED remains on for 20 minutes after an over-torque condition has occurred. The
ice machine remains off as long as the 20M LED is on. When the 20M LED goes off, the control board will try to go
through a normal start-up sequence. The WTR LED remains on as long as the water sensor in the oat reservoir
senses water.
INPUT
POWER
G
B
W
WHITE
WHITE
COMPRESSOR
C
T.O.L.
RED
START
RELAY
4
GRD
BLACK
R
S
2
3
BLACK
BLACK
YELLOW
START CAP.
RED
FAN
M
BLACK
ORANGE
HIGH PRESSURE
SAFETY SWITCH
GEAR MOTOR
GEAR MOTOR
BLACK
M
S
START
RUN
START
RUN
1
L
T.O.L.
T.O.L.
BLACK
BLACK
BLACK
BISON GEARMOTOR
LINIX GEARMOTOR
OR
WATER
SENSOR
WHITE
WHITE
RED
GRD
L1
L1
L2
CONTROL
L2
L2
BOARD
L2
L2
COMPRESSOR
FAN
DRIVE
BLACK
BLUE
PWR
RESET
DR
C
20M
60M
24V
WHITE
2ND
WTR
B-T
B-E
COMPRESSOR
WHITE
RED
COMMON
LINE VAC
BLACK
BIN SIGNAL
FROM DISPENSER
JUNCTION BOX
(MCD400A/WVS series –
blk wire is on 24V)
RED
RED
SWITCH
BIN T-STAT
Diagnostic sequence – Stage 8
If the restart is successful the 20M LED goes off, the 60 minute timer LED (60M) comes on. The 60M LED remains
on for 60 minutes from restart. A lighted 60M LED indicates that the ice machine has experienced an over-torque
condition. If the ice machine runs without problems for 60 minutes and no additional torque errors occur, the 60M LED
goes off and the ice machine continues normal operation.
INPUT
POWER
G
B
W
WHITE
WHITE
COMPRESSOR
C
T.O.L.
RED
START
RELAY
4
GRD
BLACK
R
S
2
3
BLACK
BLACK
YELLOW
START CAP.
RED
FAN
M
BLACK
ORANGE
HIGH PRESSURE
SAFETY SWITCH
GEAR MOTOR
GEAR MOTOR
BLACK
M
S
START
RUN
START
RUN
1
L
T.O.L.
T.O.L.
BLACK
BLACK
BLACK
BISON GEARMOTOR
LINIX GEARMOTOR
OR
WATER
SENSOR
WHITE
WHITE
RED
GRD
L1
L1
L2
CONTROL
L2
L2
BOARD
L2
L2
COMPRESSOR
FAN
DRIVE
BLACK
BLUE
BIN SIGNAL
FROM DISPENSER
JUNCTION BOX
(MCD400A/WVS series –
blk wire is on 24V)
COMMON
LINE VAC
BLACK
24V
WHITE
PWR
RESET
DR
C
20M
60M
2ND
WTR
B-T
B-E
COMPRESSOR
SWITCH
WHITE
RED
BIN T-STAT
RED
RED
25CI400A/W • 25HI400A • 50CI400A/W • 50HI400A 27
Page 28
Diagnostic sequence – Stage 9
The second error (2ND) LED comes on if an over-torque condition occurs while the 60M LED is still lighted. The 2ND
LED indicates that two consecutive over-torque situations have occurred. The ice machine will be shut down at this
time and will not restart unless the manual reset button is depressed.
INPUT
POWER
G
B
W
WHITE
WHITE
COMPRESSOR
C
T.O.L.
RED
START
RELAY
4
GRD
BLACK
R
S
2
3
BLACK
BLACK
YELLOW
START CAP.
RED
FAN
M
BLACK
ORANGE
HIGH PRESSURE
SAFETY SWITCH
GEAR MOTOR
GEAR MOTOR
BLACK
M
S
START
RUN
START
RUN
1
L
T.O.L.
T.O.L.
BLACK
BLACK
BLACK
WATER
SENSOR
WHITE
WHITE
RED
BISON GEARMOTOR
OR
LINIX GEARMOTOR
GRD
L1
L1
L2
CONTROL
L2
L2
BOARD
L2
L2
COMPRESSOR
FAN
DRIVE
BLACK
BLUE
PWR
RESET
DR
C
20M
60M
24V
WHITE
2ND
WTR
B-T
B-E
COMPRESSOR
WHITE
RED
COMMON
LINE VAC
BLACK
BIN SIGNAL
FROM DISPENSER
JUNCTION BOX
(MCD400A/WVS series –
blk wire is on 24V)
RED
RED
SWITCH
BIN T-STAT
Diagnostic sequence – Stage 10
If the water level in the oat reservoir drops to an unacceptable level, the WTR LED goes out, shutting the ice machine
off. Also, the BT LED comes on, preventing the ice machine from restarting for twenty minutes. If water is restored, the
WTR LED comes back on and ashes to alert the technician that water to ice machine has been lost. The ice machine
restarts at the end of the 20 minute time delay. The ashing WTR LED can be cleared by pressing the reset button.
INPUT
POWER
G
B
W
WHITE
WHITE
COMPRESSOR
C
T.O.L.
RED
START
RELAY
4
GRD
BLACK
R
S
2
3
BLACK
BLACK
YELLOW
START CAP.
RED
FAN
M
BLACK
ORANGE
HIGH PRESSURE
SAFETY SWITCH
GEAR MOTOR
GEAR MOTOR
BLACK
M
S
START
RUN
START
RUN
1
L
T.O.L.
T.O.L.
BLACK
BLACK
BLACK
BISON GEARMOTOR
LINIX GEARMOTOR
OR
WATER
SENSOR
WHITE
WHITE
RED
GRD
L1
L1
L2
CONTROL
L2
L2
BOARD
L2
L2
COMPRESSOR
FAN
DRIVE
BLACK
BLUE
PWR
RESET
DR
C
20M
60M
24V
WHITE
2ND
WTR
B-T
B-E
COMPRESSOR
WHITE
RED
COMMON
LINE VAC
BLACK
BIN SIGNAL
FROM DISPENSER
JUNCTION BOX
(MCD400A/WVS series –
blk wire is on 24V)
RED
RED
SWITCH
BIN T-STAT
28 25CI400A/W • 25HI400A • 50CI400A/W • 50HI400A
Page 29
Refrigeration cycle
condenser
filter dryer
thermostatic
expansion
valve
service port
evaporator
high
pressure
vapor
high side
high pressure
high
pressure
liquid
switch
compressor
low
pressure
liquid
low side
service port
low
pressure
vapor
25CI400A/W • 25HI400A • 50CI400A/W • 50HI400A 29
Page 30
Refrigeration data
Ice production
Air-cooled icemaker capacity/24 hrs.
Ambient Air Temperature F/C
70
60
F
21
16
C
395
425
Inlet Water Temperature ˚F/˚C
50
10
60
16
70
21
80
27
90
32
193
410
186
395
180
380
173
365
166
180
380
173
365
166
350
159
335
152
360
164
345
157
330
150
318
145
305
139
90
32
330
150
315
143
300
137
285
130
273
124
100
38
295
134
285
130
270
123
255
116
243
111
80
27
Ice capacity test
Ice machine production capacity can only be determined
by weighing ice produced in a speci c time period.
1. Remove top panel and hopper lid of unit.
2. Weigh and record weight of container used to
catchice.
3. Run ice machine for at least 15 minutes.
4. Catch ice for 15 or 20 minutes.
5. Weigh harvested ice and record total weight.
6. Subtract weight of container from total weight.
7. Convert fractions of pounds to decimal equivalents
(Ex. 6 lbs 8 oz = 6.5 lbs).
8. Calculate production using following formula:
1440 min. × wt. of ice produced
Total test time in minutes
9. Calculated amount per 24 hours should be checked
against rated capacity for same ambient and water
temperatures in Ice Production Table (above).
Compressor current draw
Water-cooled icemaker capacity/24 hrs.
Ambient Air Temperature F/C
60
70
80
21
27
425
418
193
190
406
392
184
178
386
365
175
166
365
340
166
154
343
315
156
143
production capacity/
24 hr. period
lbs.
kg.
lbs.
kg.
lbs.
kg.
lbs.
kg.
lbs.
kg.
Inlet Water Temperature ˚F/˚C
F
16
C
430
50
195
10
415
60
188
16
401
70
182
21
385
80
175
27
368
90
167
32
=
390
177
368
167
345
156
323
147
300
136
90
100
32
38
350
lbs.
159
kg.
334
lbs.
152
kg.
318
lbs.
144
kg.
304
lbs.
138
kg.
290
lbs.
132
kg.
Refrigeration system
Important: All service on refrigeration system must
be performed in accordance with all federal, state and
local laws that pertain to the use of refrigerants. It is
the responsibility of the technician to ensure that these
requirements are met.
CAUTION
• Recharging of unit at other than factory speci cations will
void ice machine warranty
Ice machine charge speci cations
Model Charge Refrigerant
Type
25/50CI400A, 25/50HI400A 20 oz R404A
25/50CI400W 9 oz R404A
Refrigerant replacement requirements
1. Non-contaminated refrigerant removed from any
Follett refrigeration system can be recycled and
returned to the same system after completing
repairs. Recycled refrigerant must be stored in a
clean, approved storage container. If additional
refrigerant is required, virgin or reclaimed
refrigerant that meets ARI standard 700-88 must be
used.
2. In the event of system contamination (for example,
a compressor burn out, refrigerant leak, presence
of non-condensibles or moisture), the system must
be repaired, evacuated and recharged using virgin
or reclaimed refrigerant that meets ARI standard
700-88.
3. Follett Corporation does not approve of recovered
refrigerants. Improper refrigeration servicing
procedures will void the factory warranty.
Air-Cooled Ambient Air Temperature
Fahrenheit 60 F 70 F 80 F 90 F 100 F
Celsius 15.6 C 21.1 C 26.7 C 32.2 C 37.8 C
Locked Rotor Amps 58.8
Evacuation
Evacuate the system to a level of 500 microns. When
the 500 micron level is reached, close valves and shut
down the vacuum pump. Allow the system to sit for
approximately 20 minutes. During this period the system
pressure should not rise. If the system pressure rises
Gearmotor data
Gearmotor current 2.25A (nominal)
Locked Rotor Amps 14
and stabilizes there is moisture in the system and further
evacuation is needed. If the pressure continues to rise
check the system for leaks.
Ambients
Air Temperature
Fahrenheit 50 F 100 F
Celsius 10 C 38 C
Water Temperature2Minimum Maximum
Fahrenheit 40 F 90 F
Celsius 4 C 32 C
1 - Ambient air temperature is measured at the air-cooled condenser coil inlet.
2 - Ambient water temperature is measured in the ice machine oat reservoir.
1
Minimum Maximum
30 25CI400A/W • 25HI400A • 50CI400A/W • 50HI400A
Page 31
Dispenser troubleshooting
Before calling for service
1. Check for ice in the ice storage area.
2. Check that congealed ice is not causing a jam.
3. Check that all switches and circuit breakers are on.
4. Check that all drains are clear.
• Disconnect power to unit before putting
hands or arms in storage area or attempting
any repair or service to equipment
Lever model troubleshooting guide
Problem Indicators Corrective Action
Does not dispense ice. 1. Power switch off or faulty.
2. Faulty dispense switch.
3. Wheel motor malfunction.
Dispense wheel rotates continuously. Dispense switch contacts are burned out. Replace dispense switch.
Ice machine runs continuously. Faulty or incorrectly positioned bin stat. Check for proper positioning. If stat does not
Does not dispense water. 1. Faulty water solenoid valve.
2. Faulty dispense switch.
3. Power switch off or faulty.
SensorSAFE model troubleshooting guide
SensorSAFE Board LED Status
Problem Action
Does not dispense
ice and/or water.
Dispenses ice
and/or water
continuously.
Check LEDs on the
SensorSAFE control
board.
Place cup under drop
zone (in front of lens)
Check LEDs on
control board.
OFF OFF OFF Check circuit breakers and power switch. Restore power or
ON ON OFF Press clean switch on lower left side of electrical enclosure
ON OFF OFF Troubleshoot appropriate lens/sensor and replace if required
ON OFF ON Verify power on appropriate output terminal (WTR or WM)
ON OFF ON Troubleshoot appropriate lens/sensor and replace if required
ON OFF OFF If there is power on any output terminal 9WTR or WM) on
Corrective ActionPWR CLN ICE/WTR
replace defective switch.
to return board to normal operation.
(see lens/sensor troubleshooting).
on control board and replace board if required. If board tests
okay, troubleshoot appropriate dispenser component.
(see lens/sensor troubleshooting).
control board, replace board.
WARNING
1. Check switch – turn on or replace if faulty.
2. Replace switch.
3. Check motor and capacitor and replace
open when ice is placed on capillary tube,
replace stat.
1. Replace water solenoid valve.
2. Replace dispense switch.
3. Check switch - turn on or replace if faulty.
Board guide
LEDs, when illuminated, indicate the following: PWR (board power), CLN (cleaning, no dispensing cycle), ICE (ice
dispensing activated), WTR (water dispensing activated).
Terminals: LI (incoming power, hot), L2 (neutral terminals), WTR (power terminal for water solenoid), WM (power
terminal for wheelmotor), CLN (terminals for clean cycle switch).
Lens/sensor troubleshooting
1. Turn dispenser power switch off and remove splash panel.
2. Disconnect wires from WTR and WM terminals on board.
3. Gently remove sensor/mounting block from splash panel.
4. Inspect lens and sensor. Clean if necessary.
5. Restore dispenser power and test sensor by passing hand in front of sensor.
6. If LED on board turns on, sensor is operational. Re-assemble dispenser.
7. If LED does not come on, switch sensor leads on board and retest.
8. If opposite LED comes on, replace defective board.
9. If opposite LED does not come on, replace defective sensor.
25CI400A/W • 25HI400A • 50CI400A/W • 50HI400A 31
Page 32
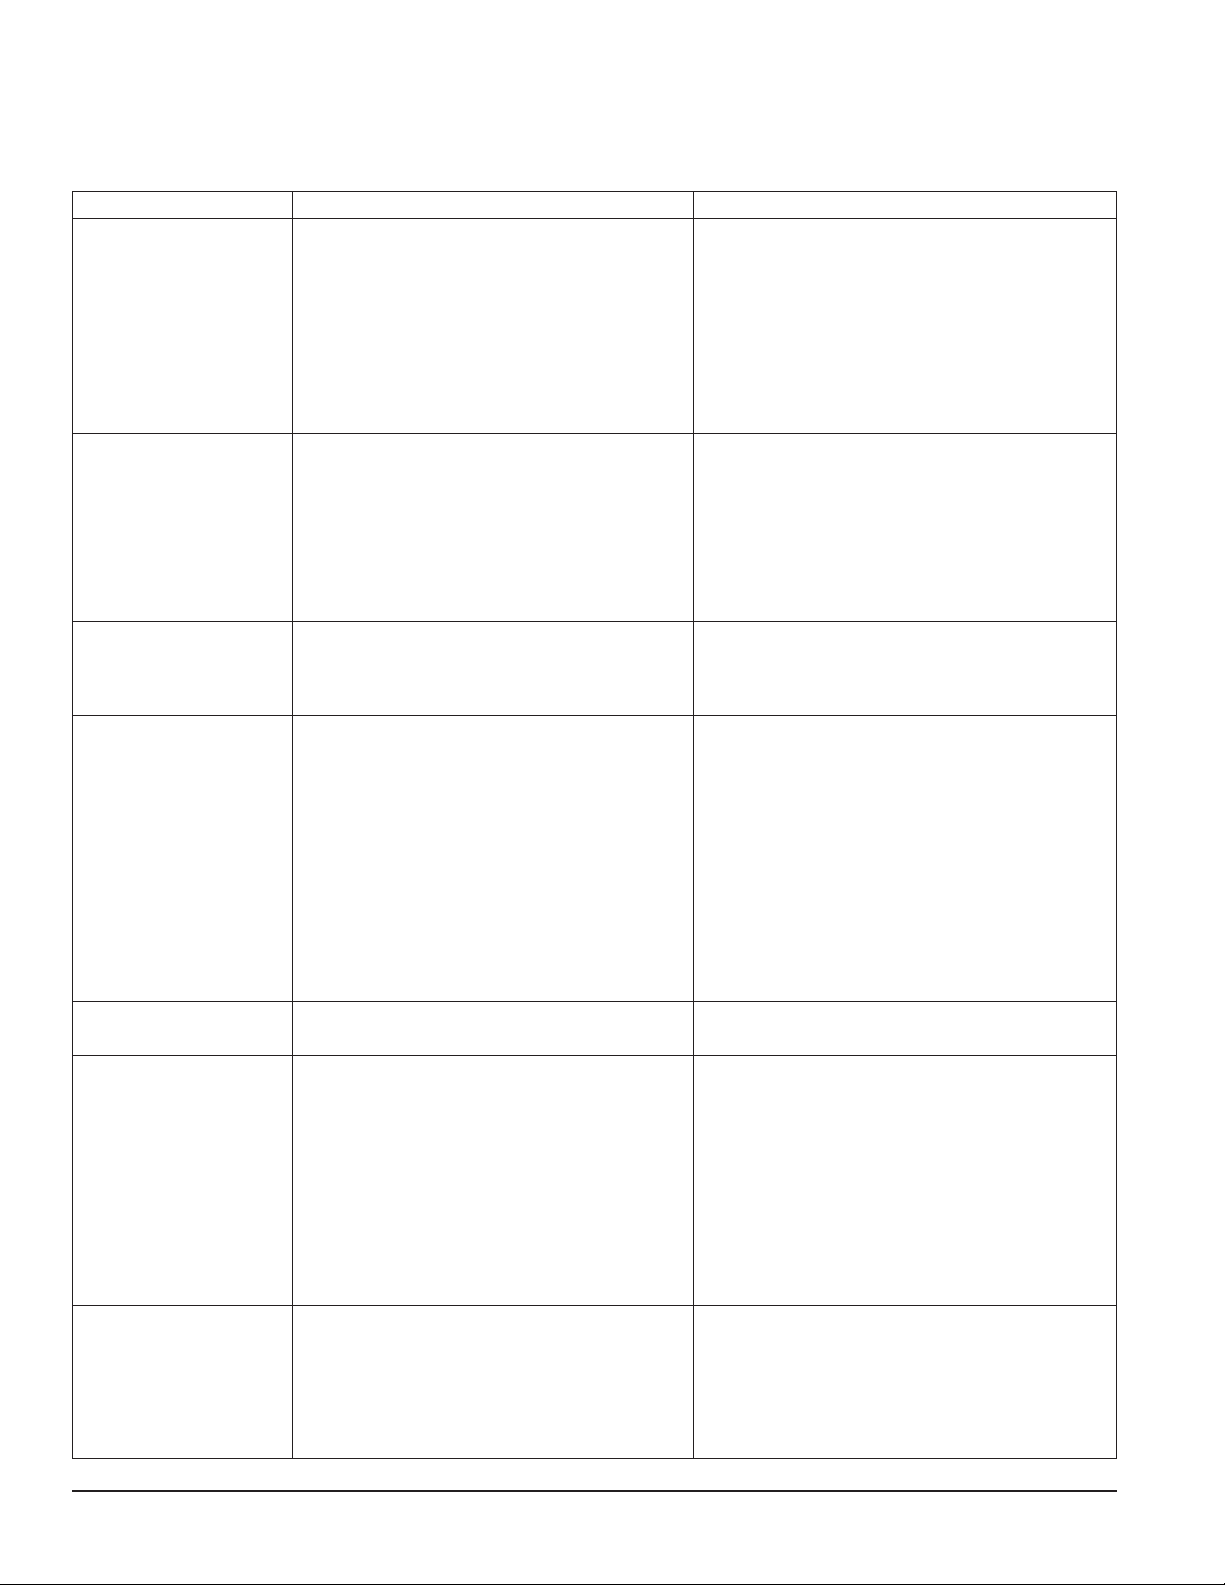
Ice machine troubleshooting
Flashing water LED at any time indicates that water signal to board had been lost for more than one second.
Ten-second delay: There is a 10 second delay in reaction to loss of water (WTR) or bin (B-E) signals. If signals are not
lost for more than 10 seconds, no reaction will occur.
Problem Indicators Corrective Action
Ice machine will not run.
System status: compressor,
gearmotor, and fan motor
inoperative.
Compressor will not run.
System status: gearmotor
and fan motor run.
Unit cycles intermittently.
System status: compressor,
gearmotor, and fan motor
cycle.
Low ice production.
Poor quality ice.
Water leaks from bottom of
evaporator.
1. No power to unit.
2. Open bin level control.
3. Water OK LED (WTR) not on.
4. 20M or 2ND LED is on indicating that rst or
second torque error has occurred.
5. Gear motor locked up (immediate torque error
indicated by LEDs when board is reset).
6. Open coil on gearmotor start relay causing an
immediate torque error.
1. Condenser coil plugged causing open overload or
high pressure cut-out.
2. Defective starting capacitor.
3. Defective starting relay.
4. Open motor winding.
5. No power output from compressor output terminal
on control board.
1. Float reservoir running dry, sensing probe
signalling for system to shut down.
1. Dirty air lter or condenser coil.
2. Restricted air ow to condenser coil.
3. Mineral coated evaporator.
4. Improper exhaust air provisions.
5. Faulty expansion valve.
6. Low refrigerant charge.
7. Superheat incorrect.
8. Inefficient compressor.
1. O ring seal broken. 1. Replace O ring.
1. Check that unit is plugged in, circuit breakers are on.
2. Adjust or replace ice level control.
3. Check reservoir for water, restore water to unit.
4. See #6 below.
5. Repair or replace gearmotor.
6. Replace gearmotor start relay.
1. Clean condenser coil and replace overload if
necessary.
2. Replace start capacitor.
3. Replace relay.
4. Ohm out windings and replace compressor if
necessary.
5. Check terminal connection and replace control board
if necessary.
1. Check water supply to oat and oat operation. PC
board will have ashing WTR LED.
1. Clean or replace lter, clean condenser.
2. Remove obstruction.
3. Clean evaporator.
4. Provide proper exhaust air provisions per Follett
installation manual.
5. Replace expansion valve.
6. Check for leaks; repair, evacuate, and weigh in correct
charge.
7. Check that TXV sensing bulb is securely clamped in
place and not damaged; check that insulated bulb
cover is in place.
8. Replace compressor.
Ice machine runs for short
period of time and shuts
down on torque error.
System status: 20M or 2nd
LED is lit.
Evaporator is iced up on the
outside. No ice production.
System status: compressor,
gearmotor and fan motor
running.
1. Kink in ice transport tube.
2. Bin level control remains in closed position.
3. Ice transport tube ruptured internally.
4. Worn evaporator bearings.
5. Faulty gearmotor start relay. Ice machine torques
out within 5 seconds of start-up.
6. Torque out occurs when storage bin lls to capacity.
1. Gearmotor running but no output rotation.
2. Float reservoir empty.
3. Air bubble in water supply line. Water
in reservoir but not in evaporator.
1. Eliminate kink and check that tube routing complies
with Follett ice machine installation manual.
2. Adjust or replace control.
3. Replace complete length of ice transport tube.
4. Inspect bearings for roughness or binding and replace
if necessary.
5. Replace gearmotor start relay.
6. Ensure that ice contacts bin thermostat before
backing ice up in transport tube. Refer to dispenser
manual for proper thermostat and ice tube mounting.
1. Check for broken gearmotor output shaft or damaged
gearbox.
2. Check for defective water sensor (water OK (WTR)
LED remains on even when oat empty or probe
removed from water).
3. Purge air from line.
32 25CI400A/W • 25HI400A • 50CI400A/W • 50HI400A
Page 33
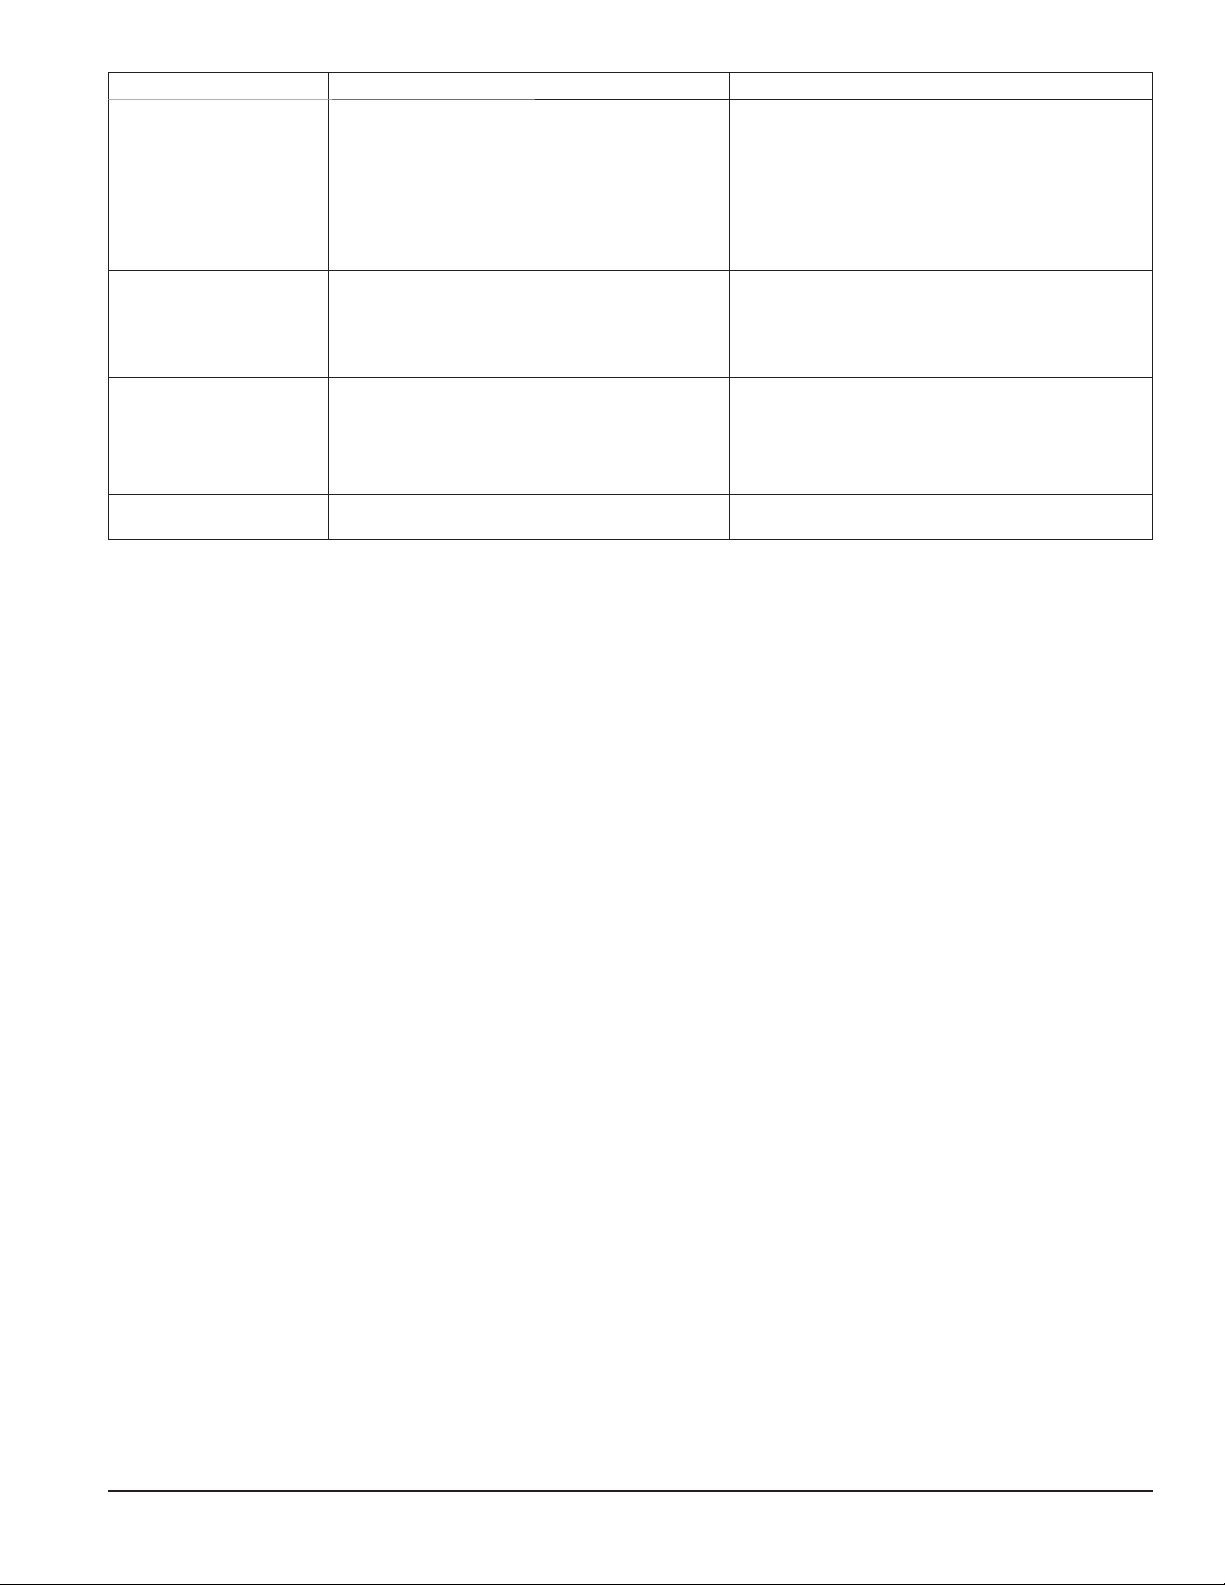
Problem Indicators Corrective Action
Compressor cycles
intermittently.
System status: gearmotor
and fan motor run.
Unit runs but not making ice.
System status: compressor,
gearmotor & fan motor
running.
1. Compressor start relay in wrong position.
2. High pressure cutout open due to high head
pressure.
3. Clogged or dirty air lter or condenser coil.
4. Improper ventilation.
5. Defective compressor.
1. Clogged or dirty air lter or condenser coil.
2. Compressor not pumping.
3. Low refrigerant charge.
1. Position relay with arrow or word “top”.
2. Check discharge pressure and adjust water regulator
valve.
3. Clean or replace lter, clean condenser coil.
4. Provide inlet and exhaust air provisions per Follett ice
machine installation manual.
5. Replace compressor.
1. Clean or replace lter, clean condenser coil.
2. Replace compressor.
3. Check for leaks; repair, evacuate, and weigh in correct
charge.
Compressor and fan motor
will not run.
Gearmotor runs.
Intermittent noises from
evaporator.
1. Compressor switch in OFF position.
2. No output on compressor and fan motor terminals
on control board.
3. Failed fan motor causes high pressure cut-out to
open.
1. Mineral build-up on evaporator surface. 1. Clean evaporator with liquid ice machine
1. Turn compressor switch on.
2. Replace control board.
3. Replace fan motor.
cleaner.
25CI400A/W • 25HI400A • 50CI400A/W • 50HI400A 33
Page 34
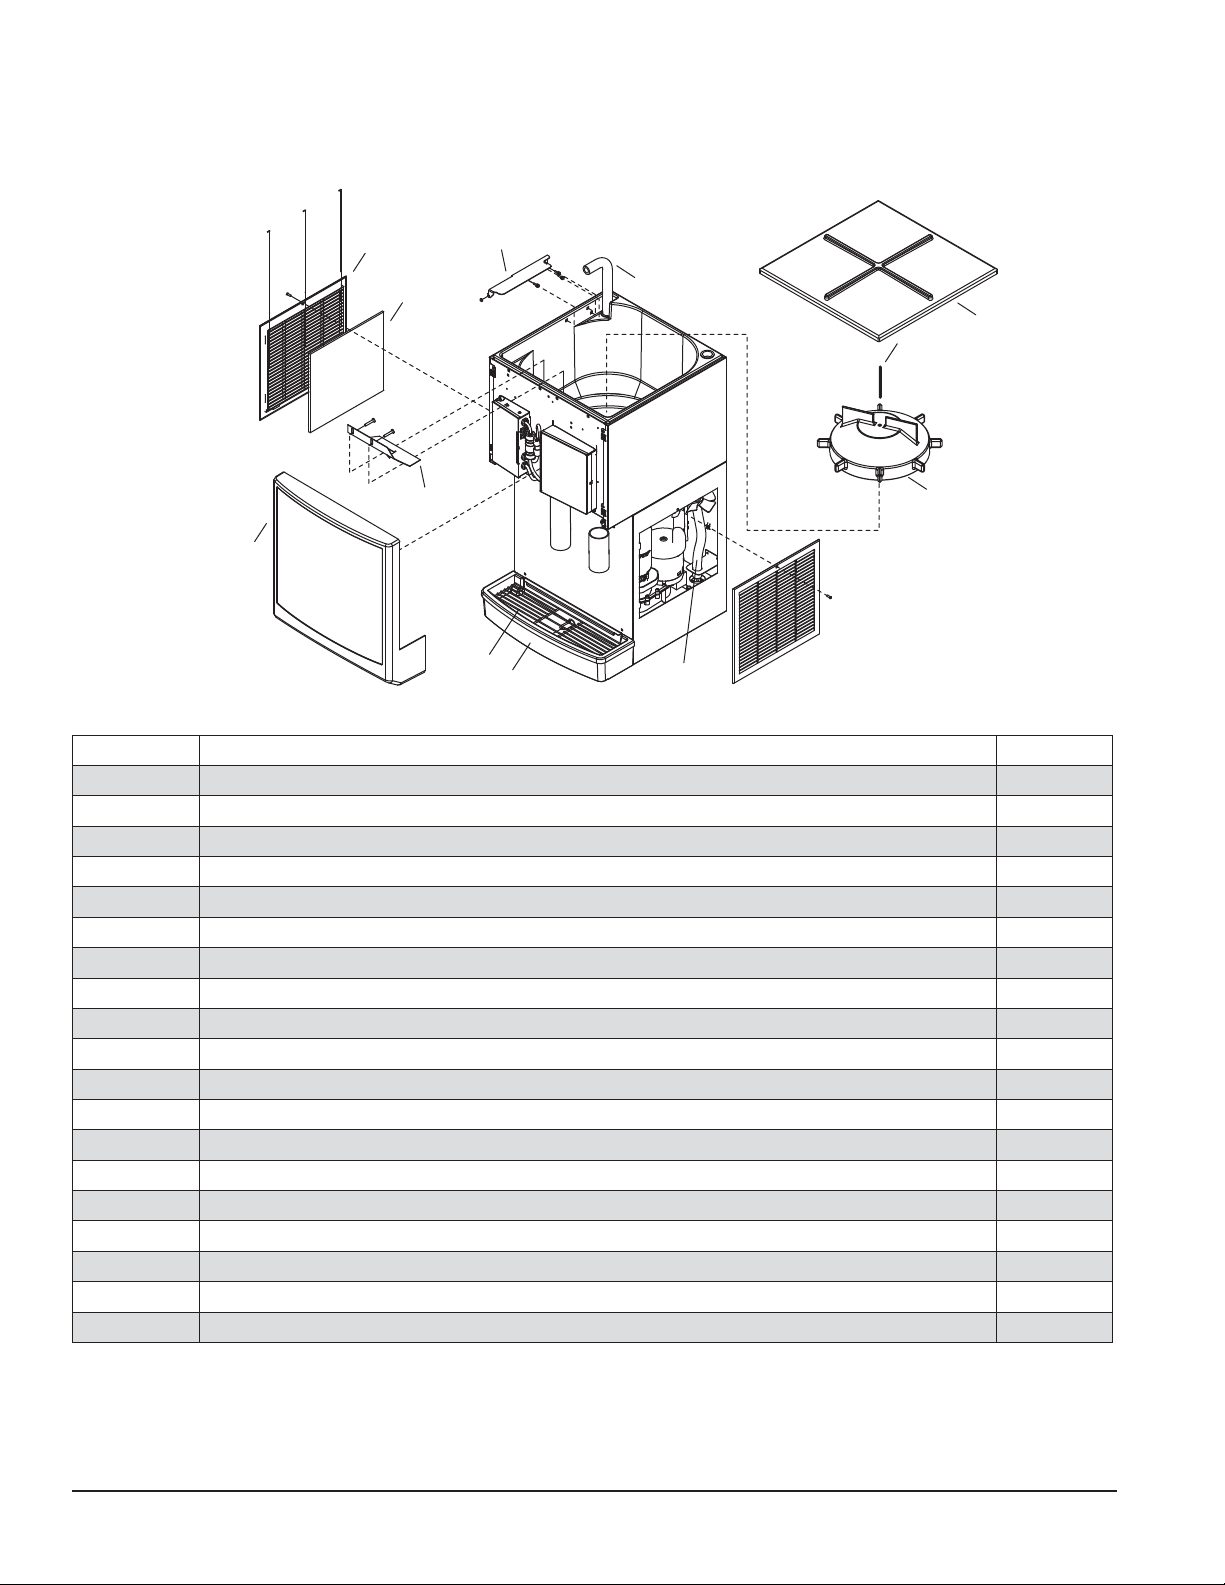
Dispenser replacement parts
Dispenser exterior
11
10
1
9
Reference Description Part #
1 Baffle, ice 501608
2 Wheel, dispense (includes 501612) 502821
3 Bracket, ice tube 502712
4 Rod, threaded (includes knurled nut) 501612
5 Ice transport tube, 25 series 00196030
5 Ice transport tube, 50 series 00196048
6 Louver, exhaust 00192963
7 Drain pan 502682
8 Grille 502683
9 Cover, front 25 series 00192831
9 Cover, front 50 series 00192849
9 Cover, front 25 series, ice only 00969204
9 Cover, front 50 series, ice only 00969212
10 Air lter 00184275
11 Louver, intake (includes 00184275) 00192955
12 Lid, hopper 502684
13 Drain tube, ice storage hopper 00900142
Not shown Drain pan protector 00195974
Not shown Wall mount bracket and cover plate 00902080
3
5
12
4
2
6
8
7
13
34 25CI400A/W • 25HI400A • 50CI400A/W • 50HI400A
Page 35
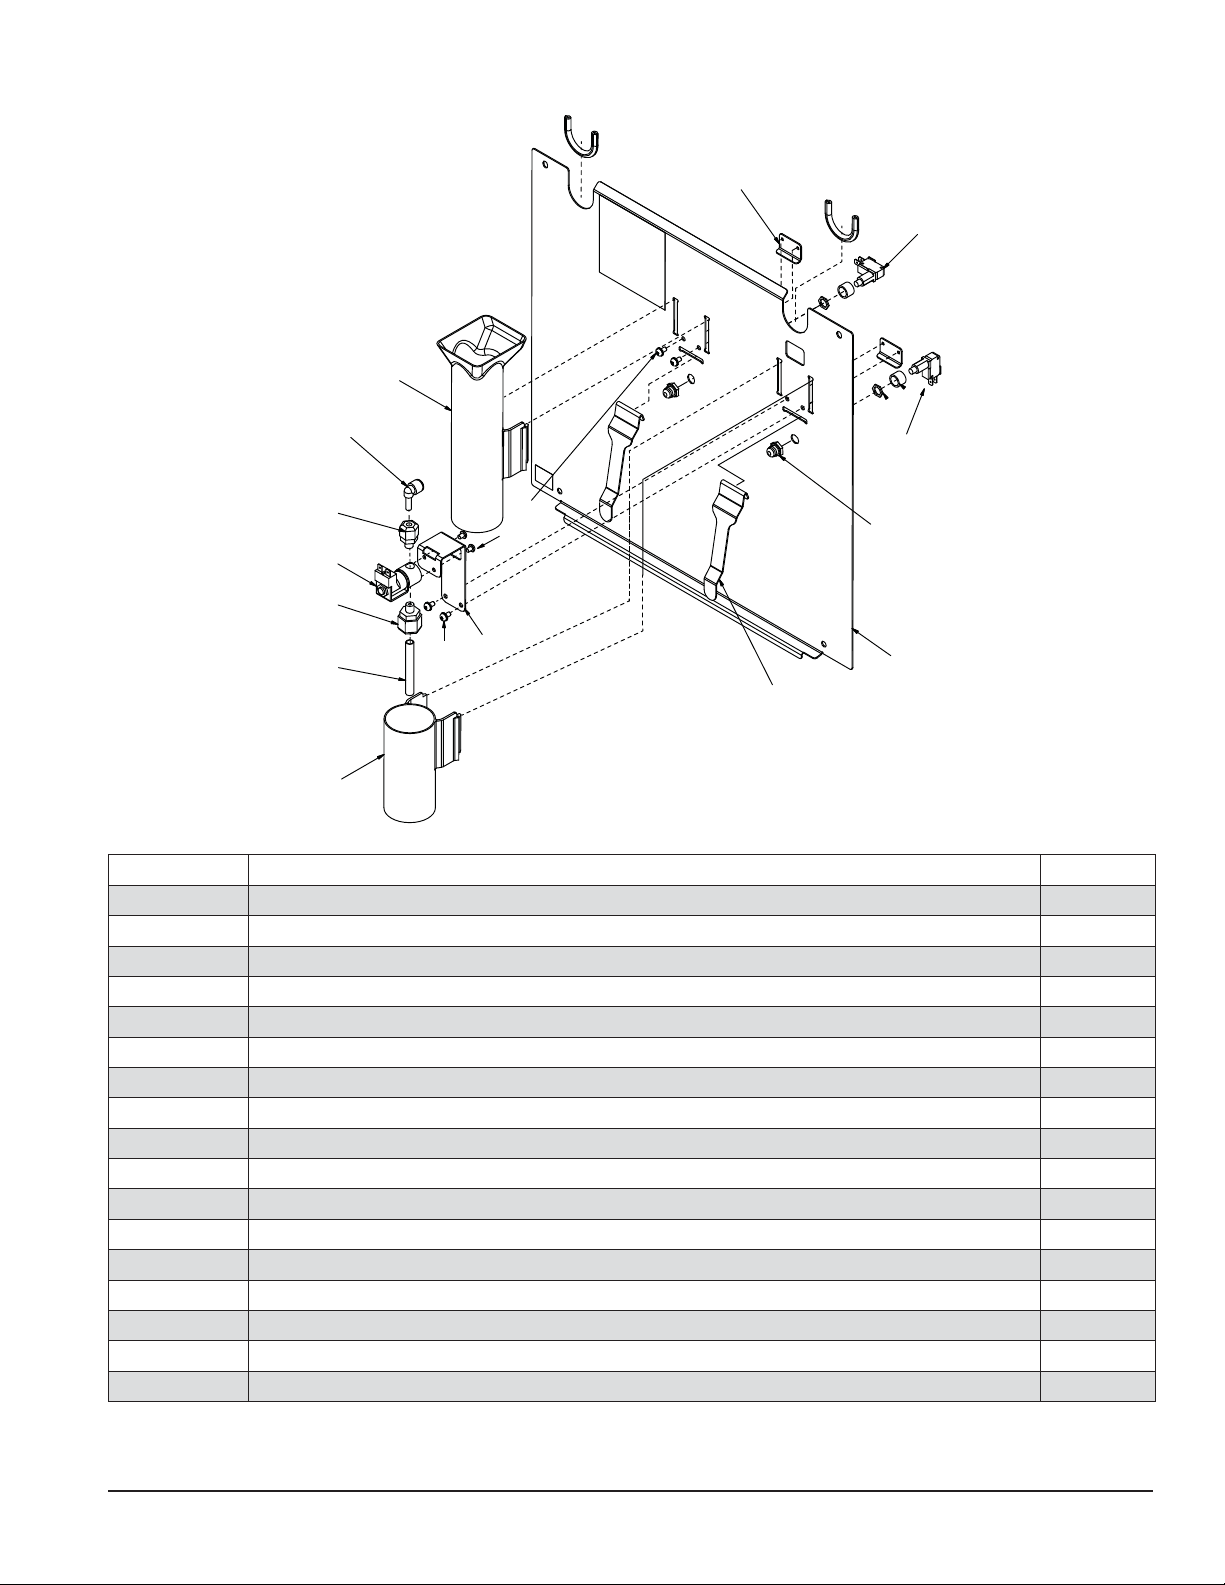
Dispense chute and splash panel areas (lever models) — Serial Number D61292 and above
13
3
10
11
14
6
7
5
4
9
9
15
2
12
3
1
8
Reference Description Part #
1 Boot, dispense switch button (mounts on 00981217 switch) 502418
2 Bracket, water solenoid 00987875
3 Switch, dispense, ice or water, lever actuated (includes boot) 00981217
4 Tube, water station 00187682
5 Fitting, outlet, 1/8" MPT x 3/8" comp 502262
6 Fitting, inlet, 1/8" MPT x 1/4" comp 502246
7 Solenoid valve, water, 120 V, 60Hz 502243
8 Splash panel, lever dispense 00981290
8 Splash panel, lever dispense, ice only 00981308
9 Screw, bracket 00982421
10 Chute, ice (with Agion
®
antimicrobial product protection1) 00984831
11 Chute, water (with Agion) 00984898
12 Lever, dispense 00976845
13 Bracket, lever 00958793
14 Elbow, 1/4" 00121699
15 Screw, valve 203227
Not shown Tubing, water station, thermoplastic, 1/4" OD (sold by the foot) 502079
1
Disclaimer: Antimicrobial protection is limited to the treated components and does not treat water or ice.
Agion is a registered trademark of Agion Technologies, Inc, Wake eld, MA, USA.
25CI400A/W • 25HI400A • 50CI400A/W • 50HI400A 35
Page 36
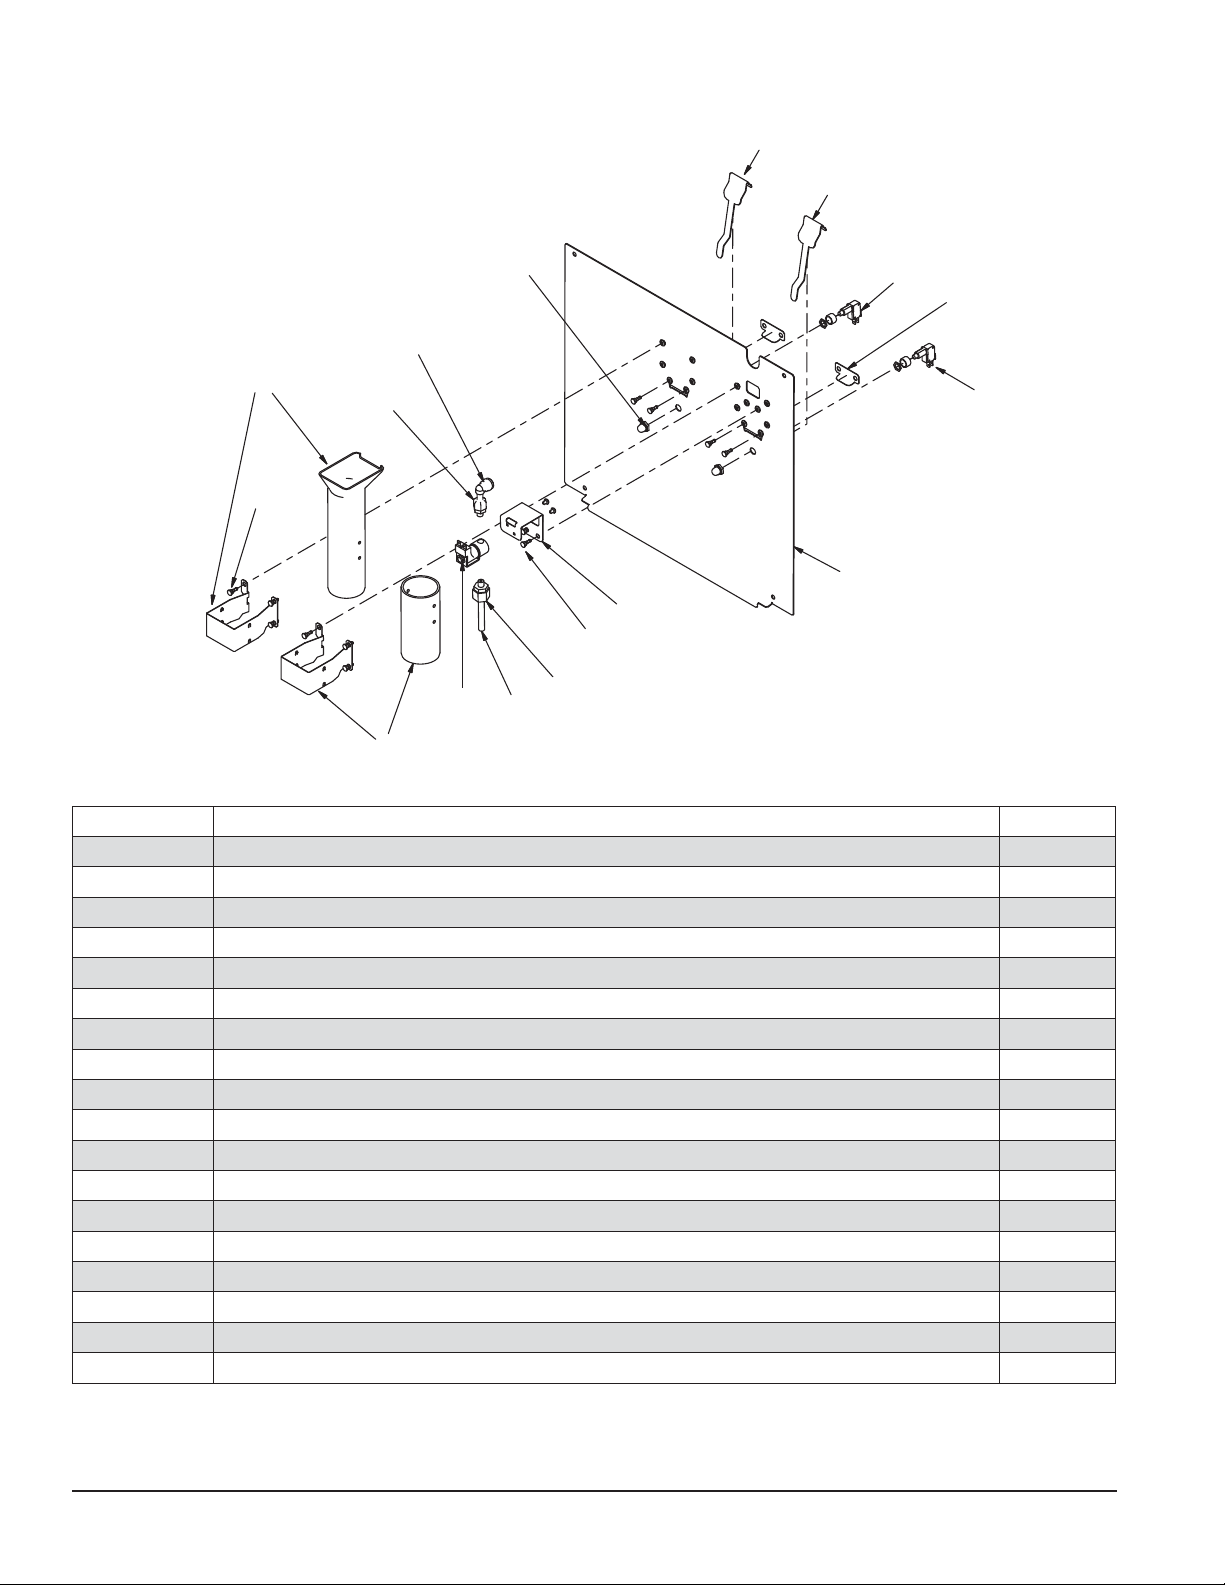
Dispense chute and splash panel areas (lever models) — Serial Numbers below D61292
5
5
13
4
3
8
6
10
4
1
14
9
1
12
11
2
7
Reference Description Part #
1 Fastener, dispense chute bracket 502057
2 Tube, water station 00187682
3 Bracket, lever 00185116
4 Switch, dispense, ice, lever actuated (includes 502418) 502409
5 Lever, dispense 00182808
6 Chute, ice, bracket and fasteners (with Agion) 00981241
6 Chute and funnel (clear), ice 00192948
7 Chute, water, bracket and fasteners (with Agion) 00981407
7 Chute (clear), water 00184390
8 Elbow, 3/8" 502925
9 Bracket, water solenoid 00182832
10 Fitting, inlet, 1/8" MPT x 1/4" comp 502246
11 Fitting, outlet, 1/8" MPT x 3/8" comp 502262
12 Solenoid valve, water, 120 V, 60Hz 502243
13 Boot, dispense switch button (mounts on 502409 switch) 502418
Not shown Tubing, water station, thermoplastic, 1/4" OD (sold by the foot) 502079
14 Splash panel, lever dispense 00192922
14 Splash panel, lever dispense, ice only 00969220
36 25CI400A/W • 25HI400A • 50CI400A/W • 50HI400A
Page 37
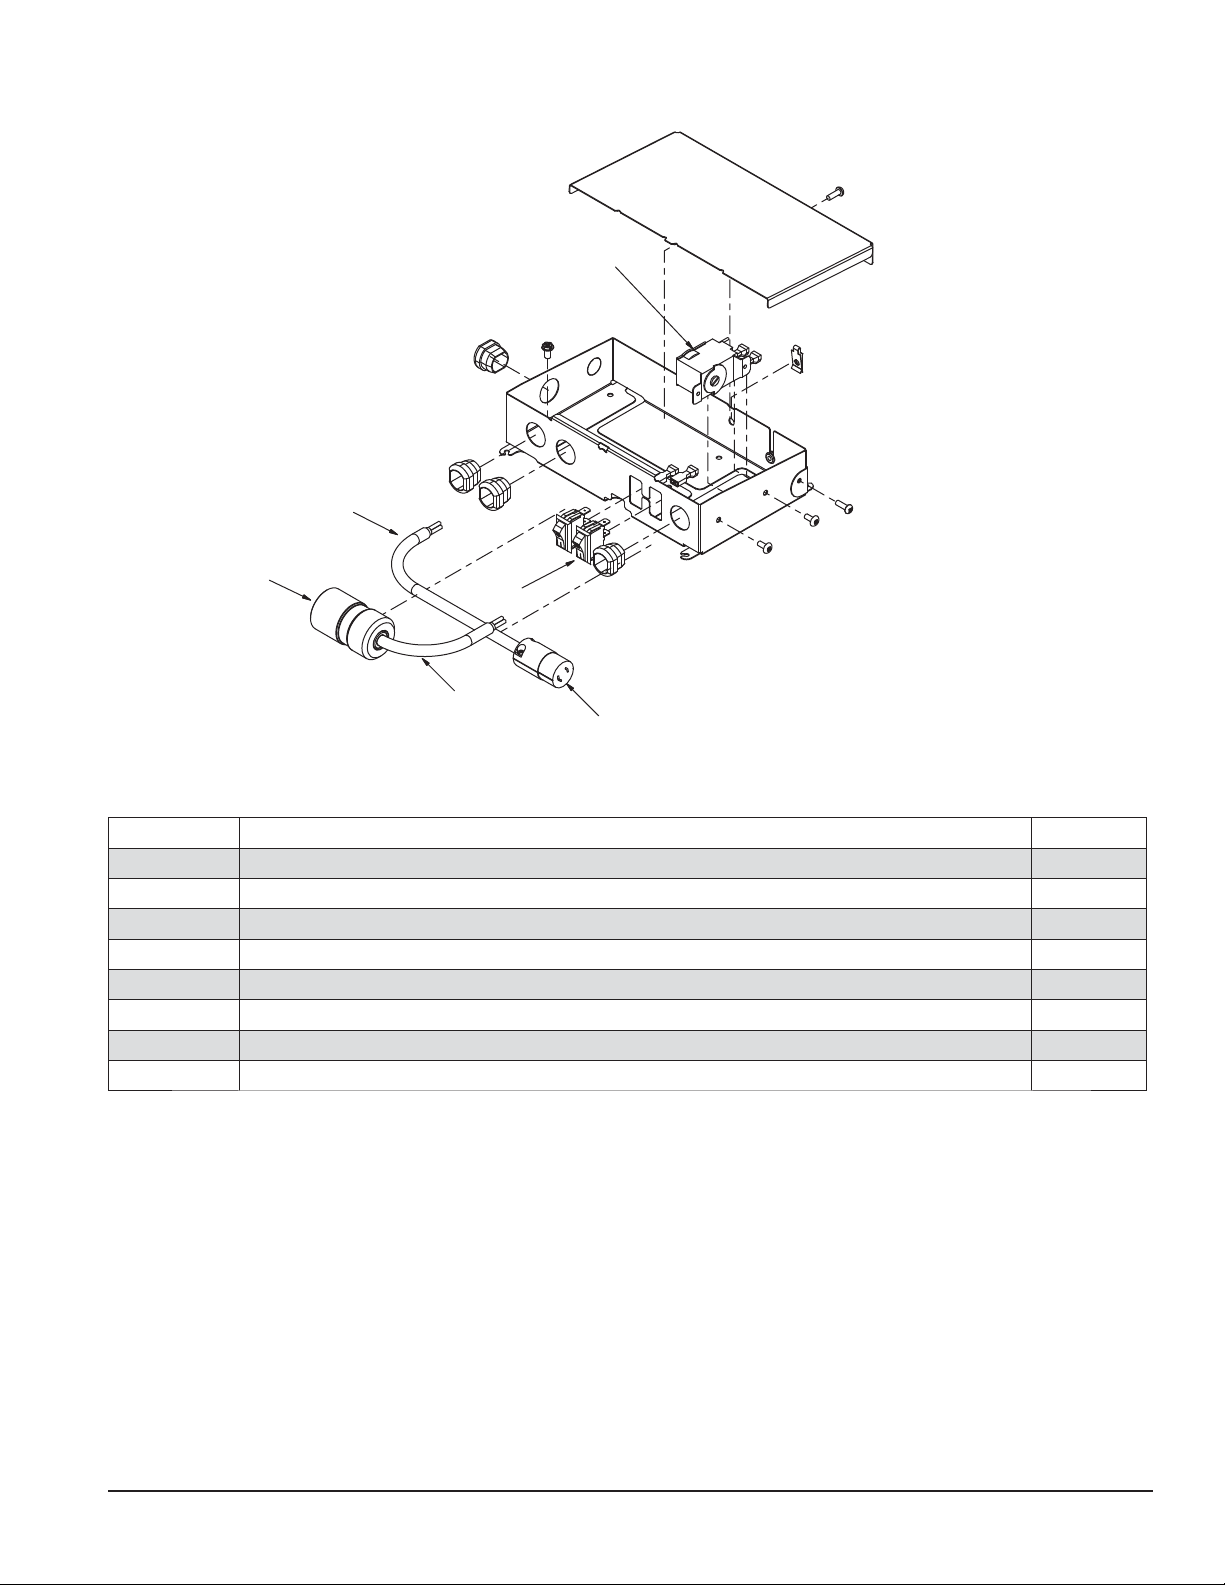
Dispenser electrical box – lever models
4
1
5
Reference Description Part #
1 Thermostat 500514
2 Switch, dispenser power 502209
2 Switch, ice machine bin signal 502209
3 Cord and socket (female), ice machine power 00195818
4 Cord and socket (female), bin signal 00195826
5 Socket (female), ice machine power 502336
6 Socket (female), bin signal 502334
Not shown Power cord 502776
2
3
6
25CI400A/W • 25HI400A • 50CI400A/W • 50HI400A 37
Page 38
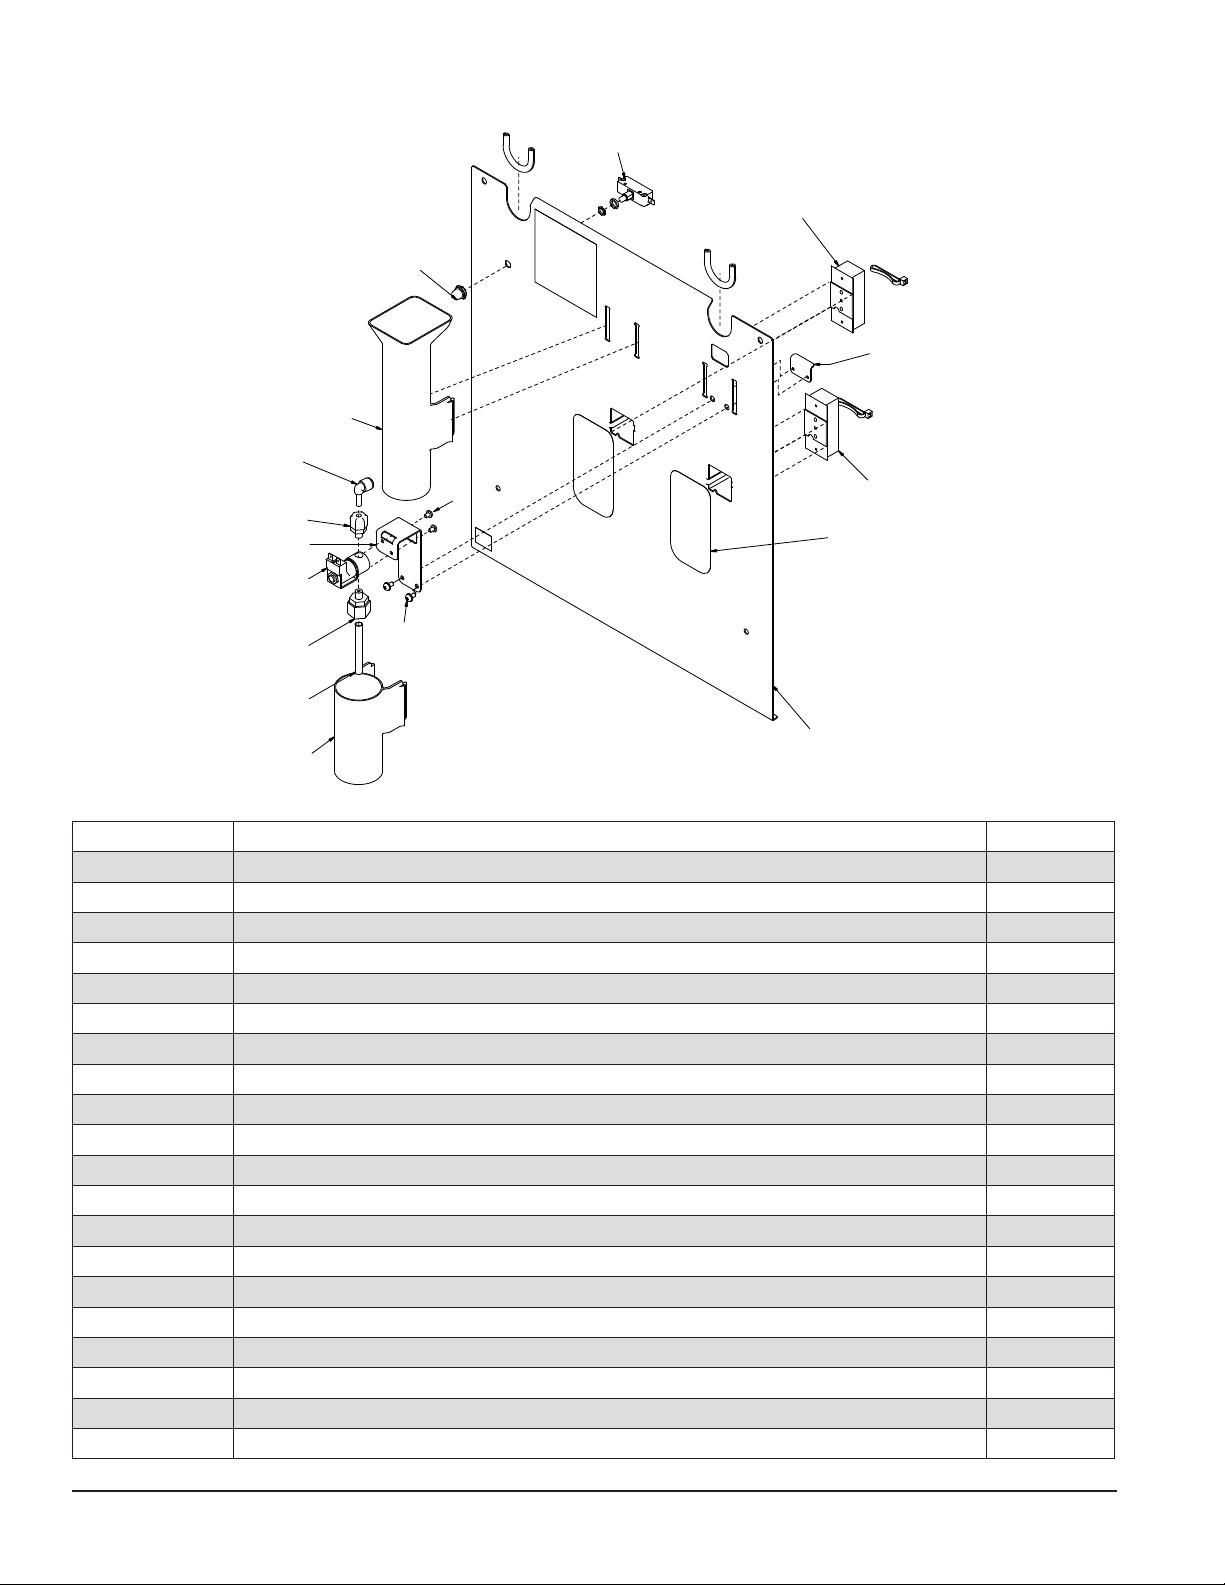
Dispense chute and splash panel areas (SensorSAFE models) — Serial Number D61292
and above
9
8
10
11
6
13
16
4
1
5
8
14
3
2
12
15
7
Reference Description Part #
1 Bracket, water solenoid 00987875
2 Tube, water station 00187682
3 Fitting, outlet, 1/8" MPT x 3/8" comp 502262
4 Fitting, inlet, 1/8" MPT x 1/4" comp 502246
5 Solenoid valve, water, 120 V, 60Hz 502243
6 Chute, ice (with Agion) 00984831
7 Splash panel, SensorSAFE dispense with drain pan (includes 2 lenses) 00981365
7 Splash panel, SensorSAFE dispense with drain pan, ice only (includes 1 lens) 00981381
7 Splash panel, SensorSAFE dispense, no drain pan (includes 2 lenses) 00981373
7 Splash panel, SensorSAFE dispense, no drain pan, ice only (includes 1 lens) 00981399
8 Sensor, ice or water dispense 00195982
9 Clean switch, SensorSAFE (includes boot) 502359
10 Boot, clean switch button (mounts on 502359 switch) 501841
11 Bracket, water valve 00958793
12 Chute, water (with Agion) 00984898
13 Elbow, 1/4" 00121699
14 Lens, sensors 00977983
15 Screw, bracket 00982421
16 Screw, valve 203227
Not shown Tubing, water station, thermoplastic, 1/4" OD (sold by the foot) 502079
38 25CI400A/W • 25HI400A • 50CI400A/W • 50HI400A
Page 39
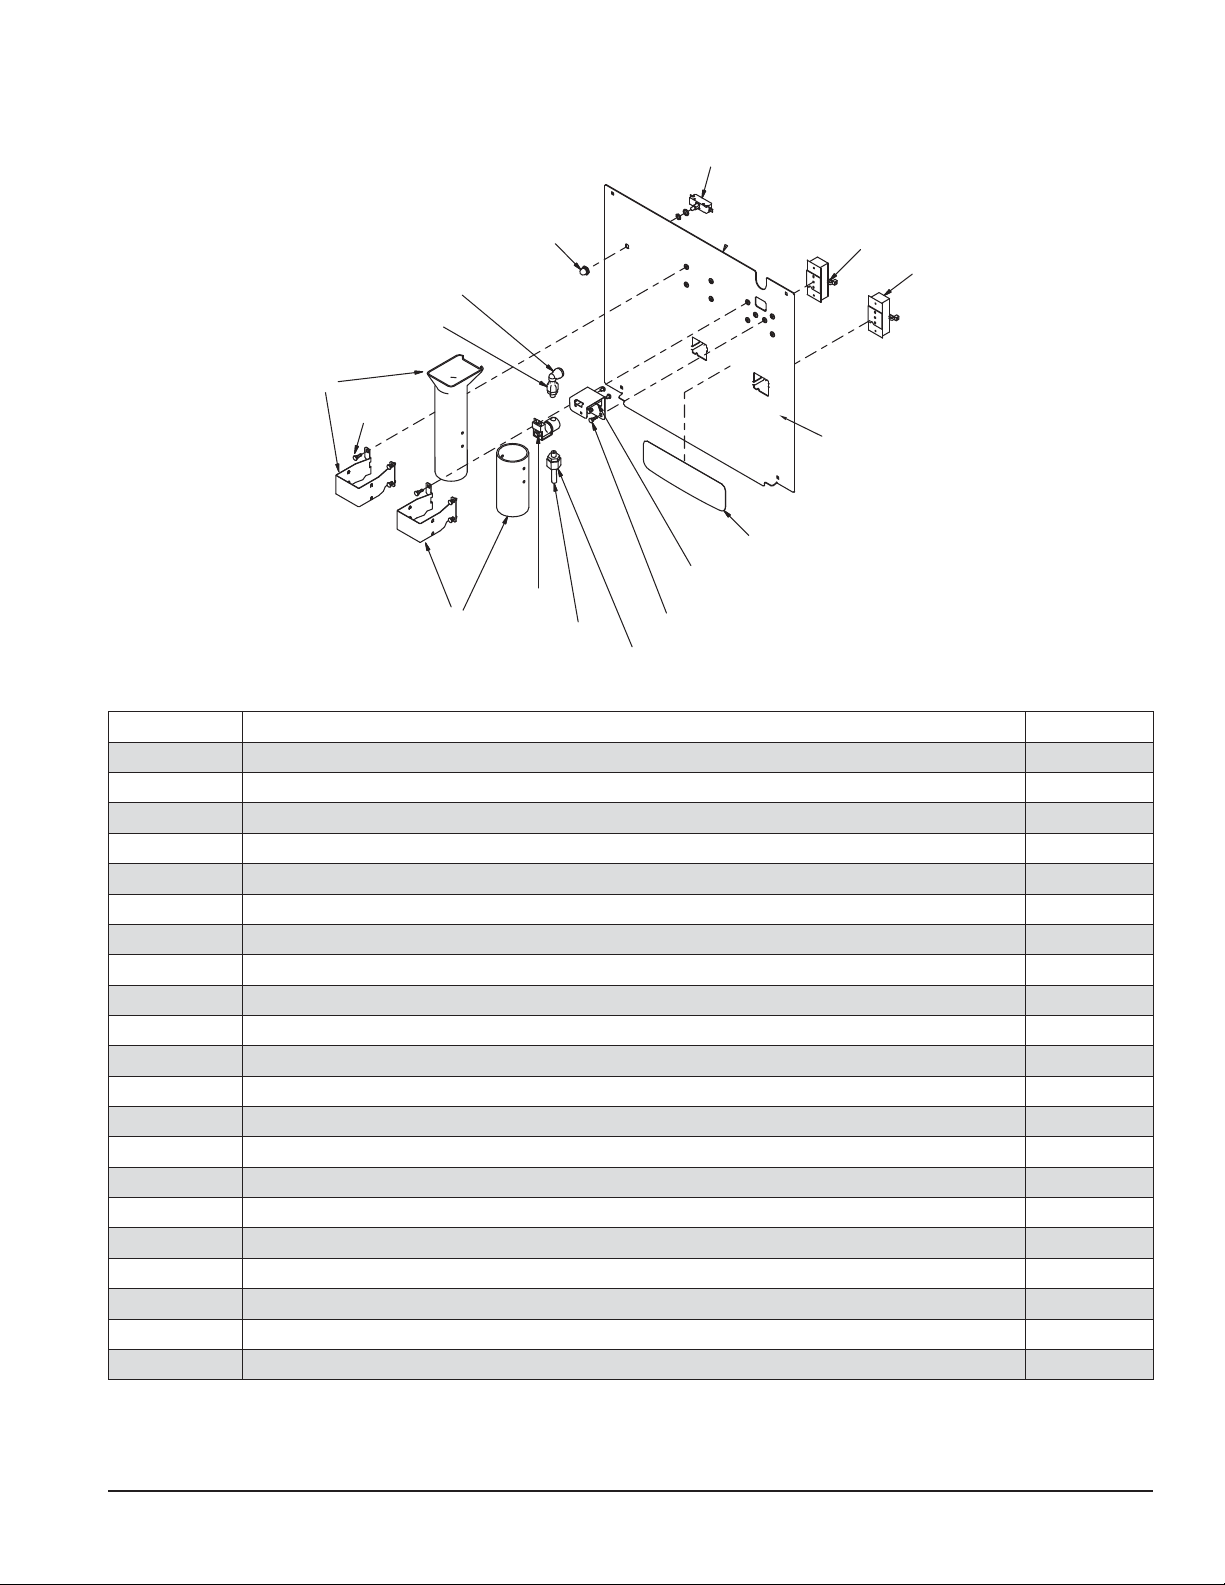
Dispense chute and splash panel areas (SensorSAFE models) — Serial Numbers below
D61292
6
14
3
4
9
11
7
1
15
5
10
8
13
2
1
12
Reference Description Part #
1 Fastener, dispense chute bracket 502057
2 Tube, water station 00187682
3 Sensor, ice dispense 00195982
4 Sensor, water dispense 00195982
5 Lens, sensors 00196006
6 Clean switch, SensorSAFE (includes 501841) 502359
7 Chute, ice, bracket and fasteners (with Agion) 00981241
7 Chute and funnel (clear), ice 00192948
8 Chute, water, bracket and fasteners (with Agion) 00981407
8 Chute (clear), water 00184390
9 Elbow, 3/8" 502925
10 Bracket, water solenoid 00182832
11 Fitting, inlet, 1/8" MPT x 1/4" comp 502246
12 Fitting, outlet, 1/8" MPT x 3/8" comp 502262
13 Solenoid valve, water, 120 V, 60Hz 502243
14 Boot, clean switch button (mounts on 502359 switch) 501841
Not shown Tubing, water station, thermoplastic, 1/4" OD (sold by the foot) 502079
16 Splash panel, SensorSAFE dispense with drain pan (includes 00196006) 00192930
16 Splash panel, SensorSAFE dispense with drain pan, ice only (includes 00196006) 00969238
16 Splash panel, SensorSAFE dispense, no drain pan (includes 00196006) 00902072
16 Splash panel, SensorSAFE dispense, no drain pan, ice only (includes 00196006) 00969246
25CI400A/W • 25HI400A • 50CI400A/W • 50HI400A 39
Page 40
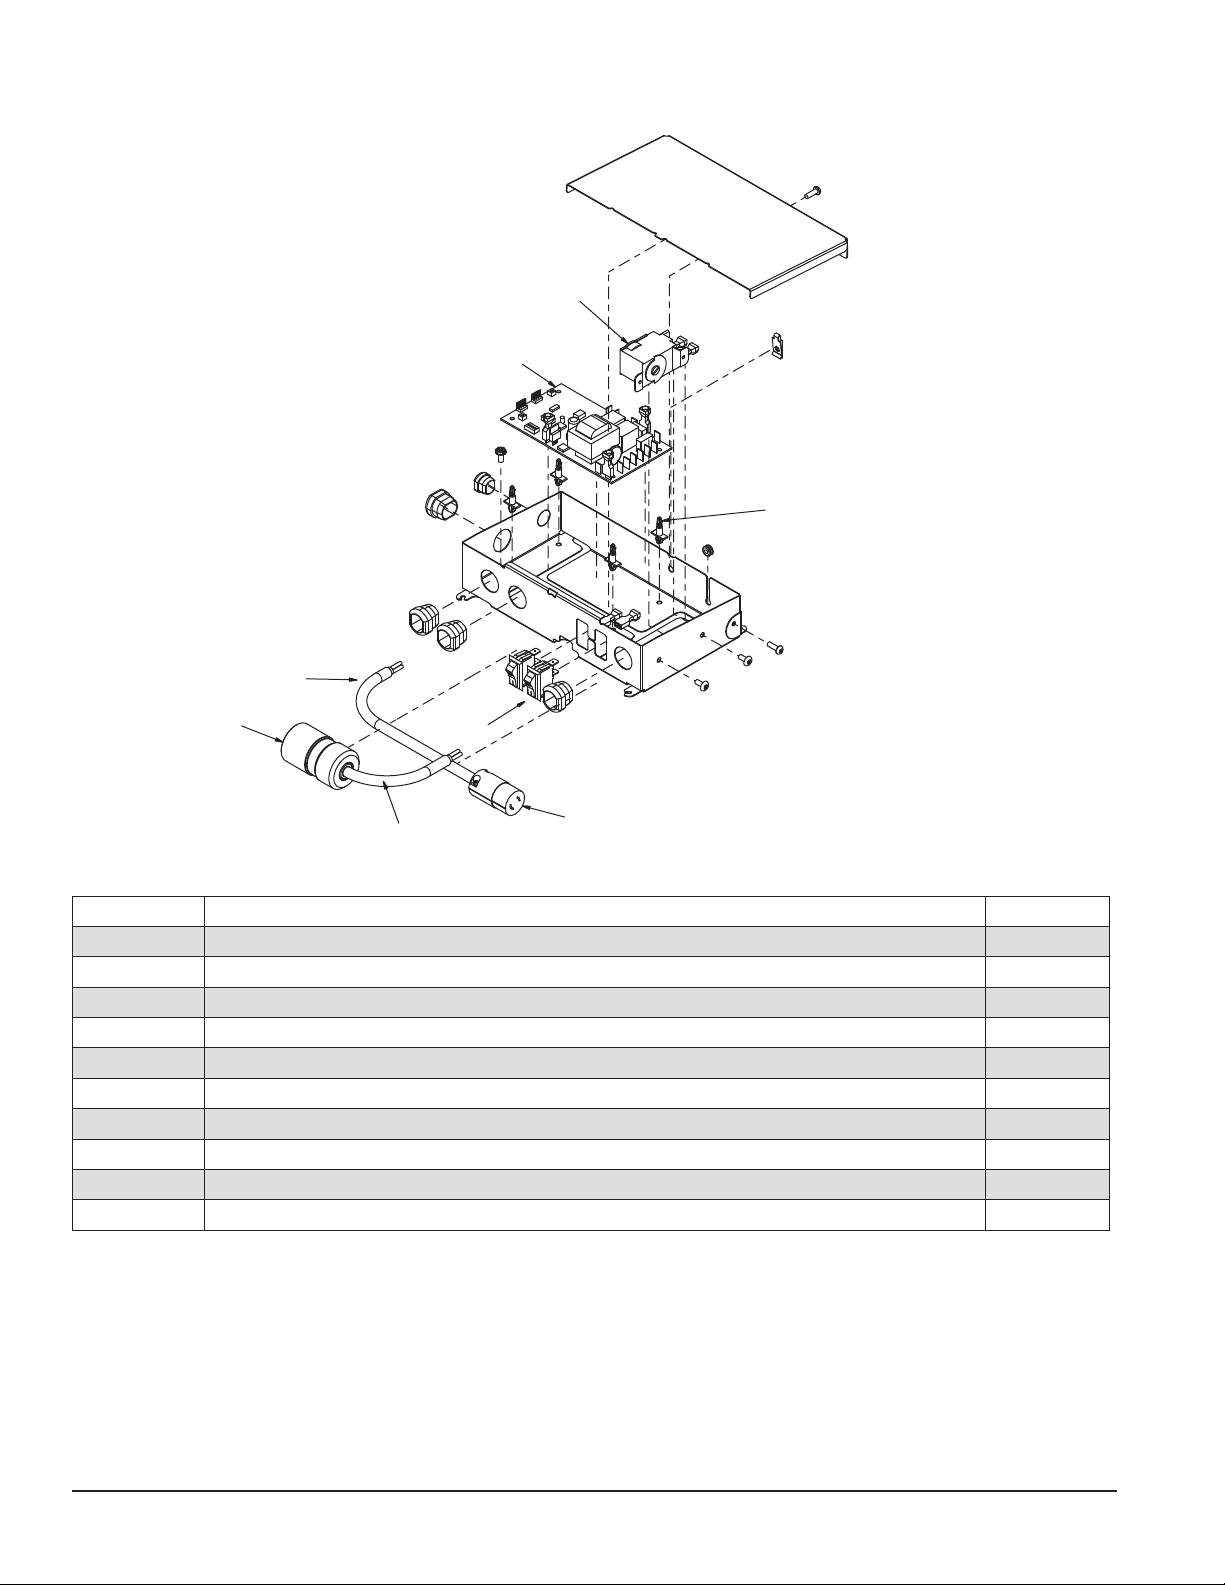
Dispenser electrical box – SensorSAFE models
1
3
4
6
7
5
Reference Description Part #
1 Thermostat 500514
2 Switch, dispenser power 502209
2 Switch, ice machine bin signal 502209
3 Board, SensorSAFE 502242
4 Standoff, board (4 required) 501959
5 Cord and socket (female), ice machine power 00195818
6 Cord and socket (female), bin signal 00195826
7 Socket (female), ice machine power 502336
8 Socket (female), bin signal 502334
Not shown Power cord 502776
2
8
40 25CI400A/W • 25HI400A • 50CI400A/W • 50HI400A
Page 41
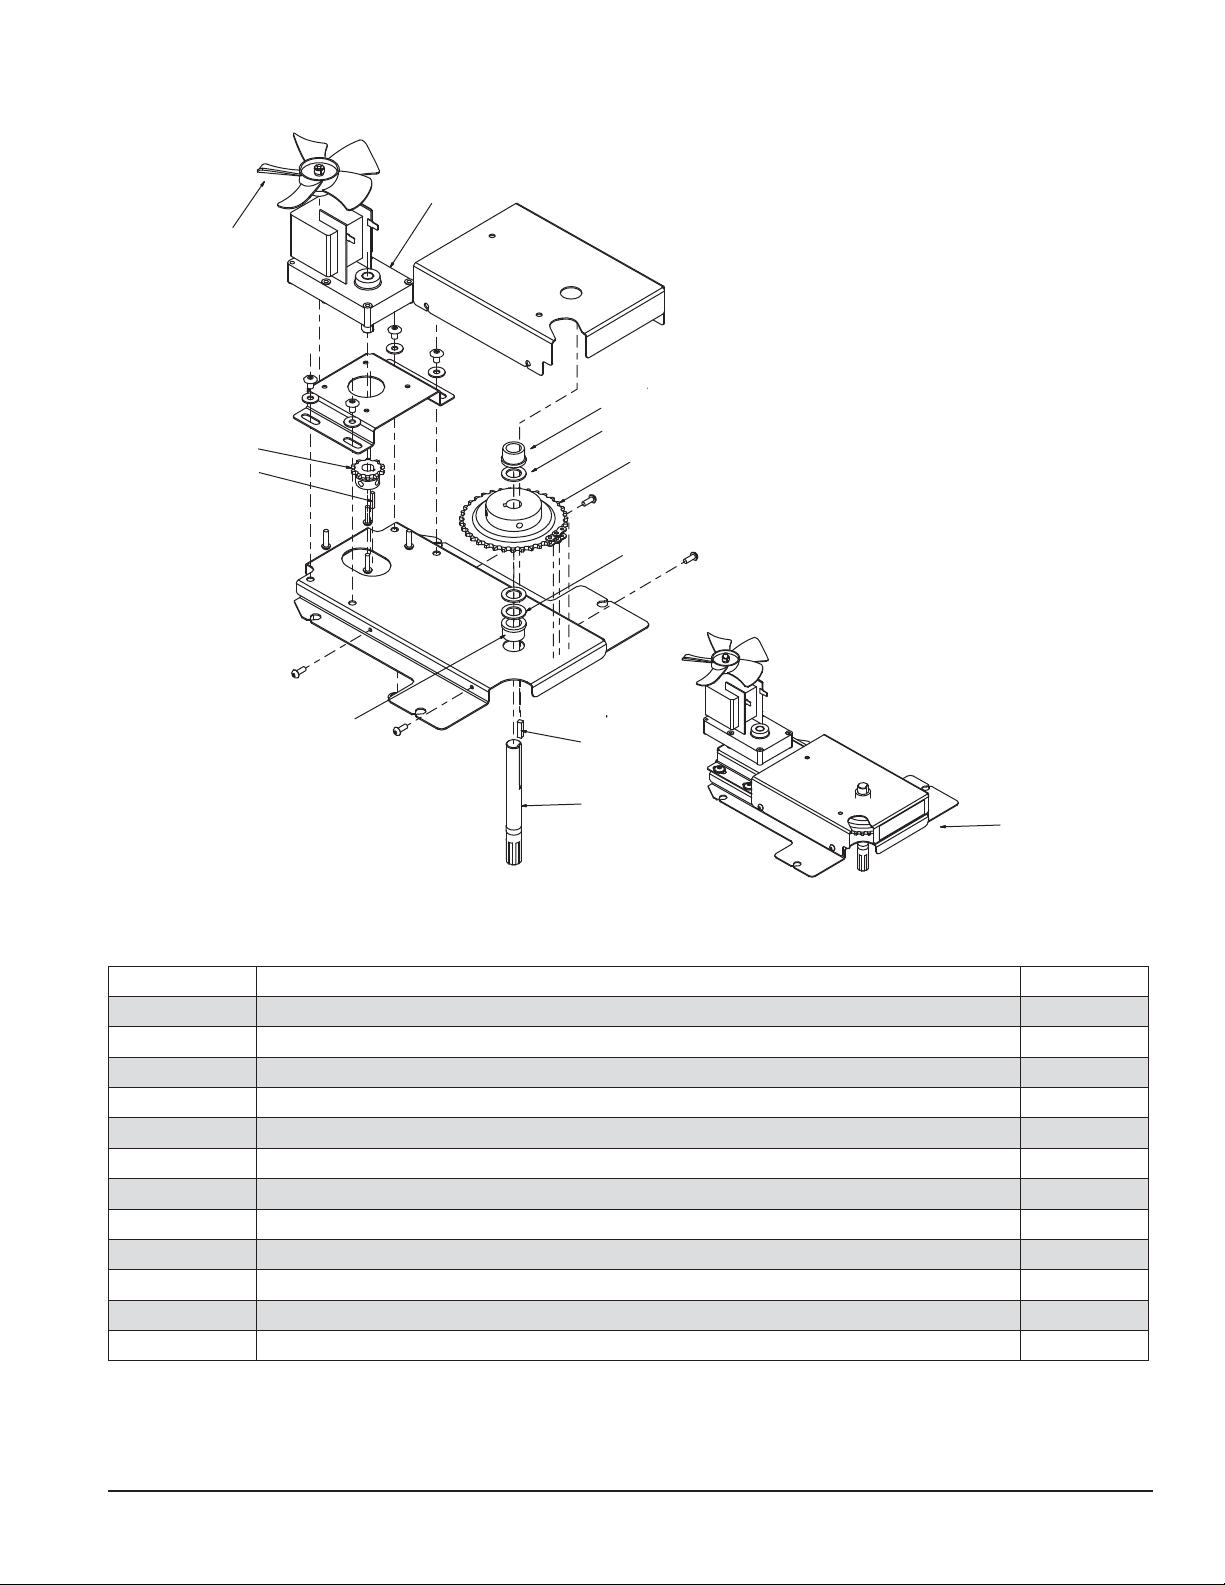
Wheel motor and drive system
1
4
6
9
7
2
5
2
7
Reference Description Part #
1 Wheel motor, 120V, 60Hz 501861
2 Washer, thrust 501026
3 Shaft, drive (includes key and stud) 501619
4 Fan blade, wheel motor 501607
Not shown Chain, pitch 64, link 00182246
5 Sprocket, drive shaft, 35T (includes drive shaft key) 502692
6 Sprocket, wheel motor, 10T 501019
7 Bearing, drive shaft 501024
Not shown Connecting link, chain 500799
8 Key, drive shaft 500367
9 Key, wheel motor 205991
10 Dispenser drive assembly (parts 1-9 above) 00192971
8
3
10
25CI400A/W • 25HI400A • 50CI400A/W • 50HI400A 41
Page 42
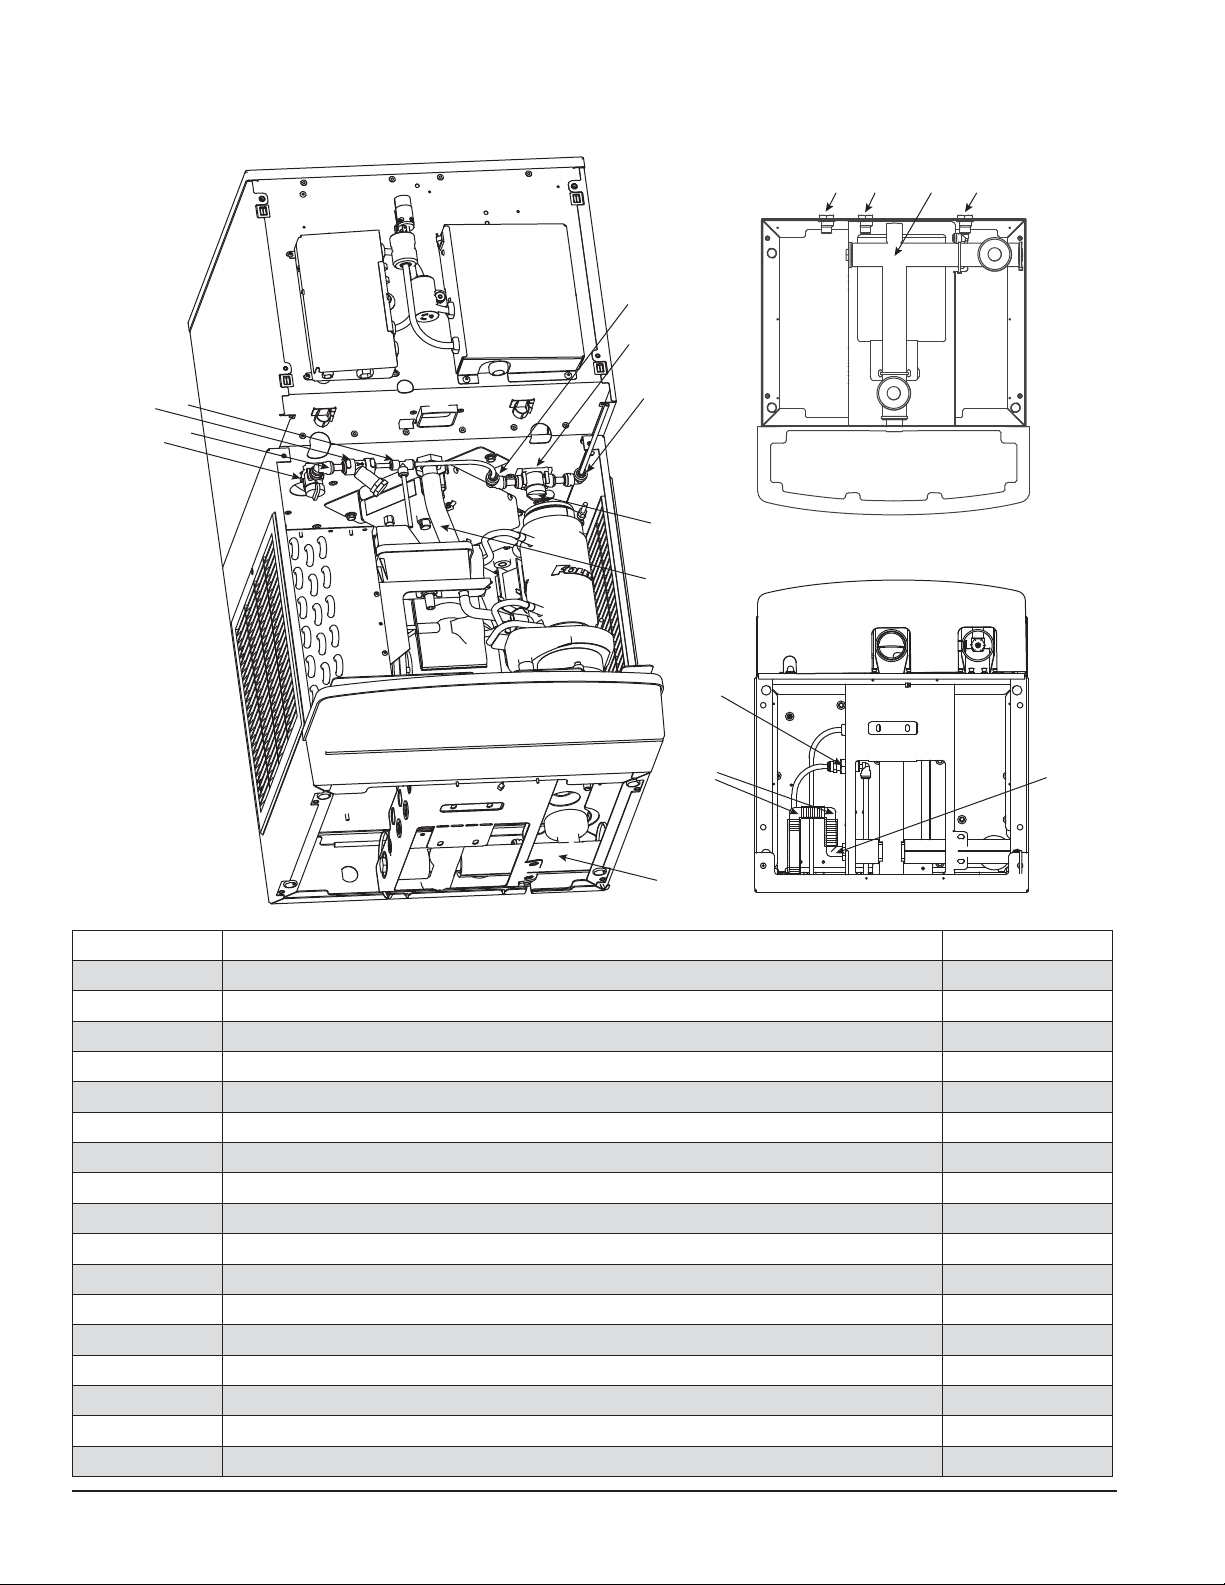
Water and drain
Countertop connections (CI)
(top view)
9 10 118
3
2
4
5
6
1
3
1
Wall mount connections (HI)
7
(bottom view)
12
14
8
Reference Description Part #
1 Valve, water shut off 502921
2 Clip, shut off valve 502922
3 Elbow, 1/4" x 3/8" 00134502
4 Tee, 1/4" 502923
5 Strainer 502920
6 Elbow, 3/8" 502925
7 Drain tube, hopper 00184549
8 Drain, waste 00195958
9 Fitting, water-cooled condenser inlet 00195966
10 Fitting, water-cooled condenser outlet 00195966
11 Fitting, ice machine water inlet 00137315
12 Fitting, 3/8" tube X 3/8" MPT 00901652
Not shown Fitting, 3/8" tube X 1/2" MPT 00901660
13 Fitting, 90° elbow, 3/4" barb X 3/4" MPT 00901678
Not shown Bottom cover, 25/50HI with drain pan 00196113
Not shown Bottom cover, 25/50HI without drain pain 00198341
14 Fitting, 90° elbow, 3/4" barb X 3/4" barb 00145144
13
42 25CI400A/W • 25HI400A • 50CI400A/W • 50HI400A
Page 43
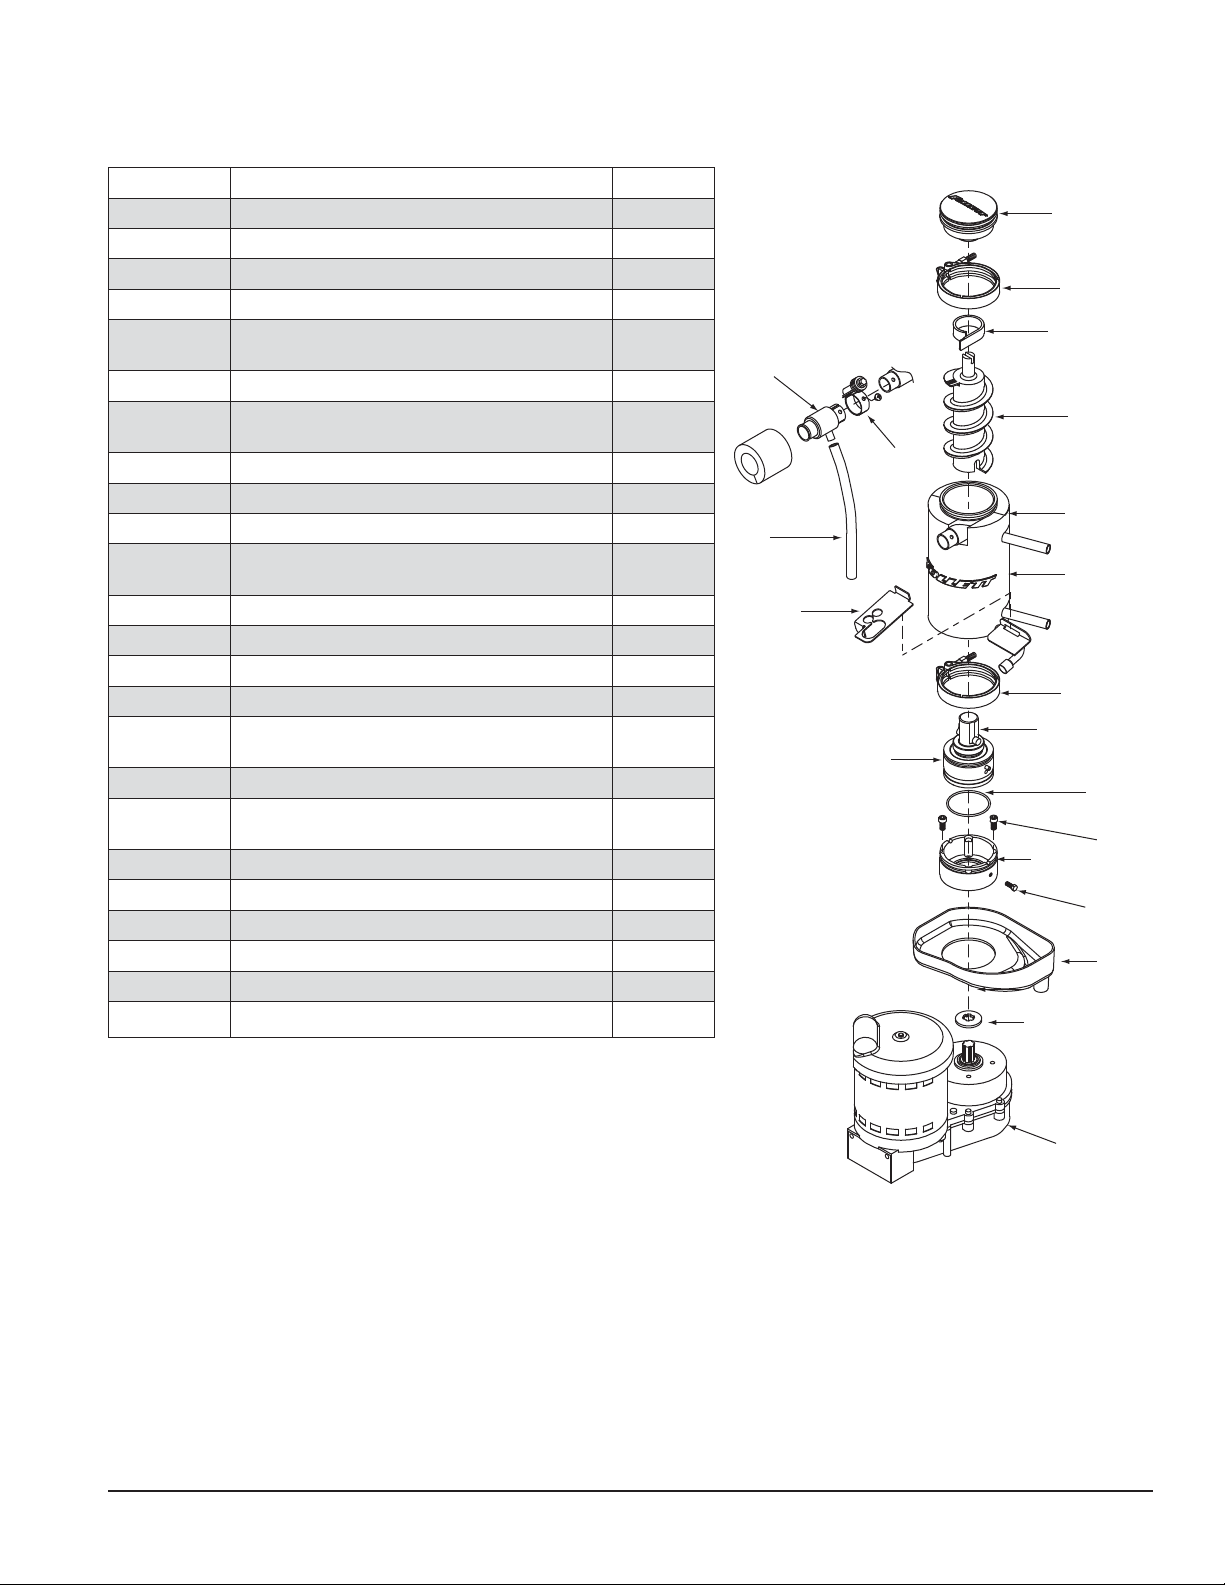
Ice machine replacement parts
Evaporator
Reference Description Part #
1 Coupling, vee band, includes nut 502735
2 Bearing assembly, top 502736
3 Loop, ice compression, beveled 502110
4 Auger 502737
5 Evaporator (includes insulation jacket,
502740)
6 O ring, bearing housing 500496
7 Bearing assembly, bottom (includes O
rings and condensate shield)
8 O ring, mounting base 501063
9 Shield, condensate 500744
10 Screw, Allen 1/4 20 x 1/2 (set of 4) 501080
11 Mounting base, evaporator
(includes501063)
12 Bolt, mounting base 502227
13 Gearbox & motor assembly 502730
Not shown Mounting base, gearbox 00164046
15 Compression nozzle, with single drain 502221
16 Drain pan, evaporator (includes
00185421)
17 Clamp, compression nozzle and screw 502226
18 Tubing, compression nozzle drain(s)
(sold by foot)
Not shown Grease, Chevron SRI-2, 14oz 501111
19 Bracket, drain hose 502739
20 Insulation jacket, evaporator 502740
Not shown Relay, start, gearmotor 502742
Not shown Oil, gearmotor (1 pint) 502775
Not shown Tube, evaporator drain 00901439
502725
502738
502733
00192914
500680
2
1
3
15
4
17
5
18
20
19
1
7
6
8
10
11
12
16
9
9
13
25CI400A/W • 25HI400A • 50CI400A/W • 50HI400A 43
Page 44
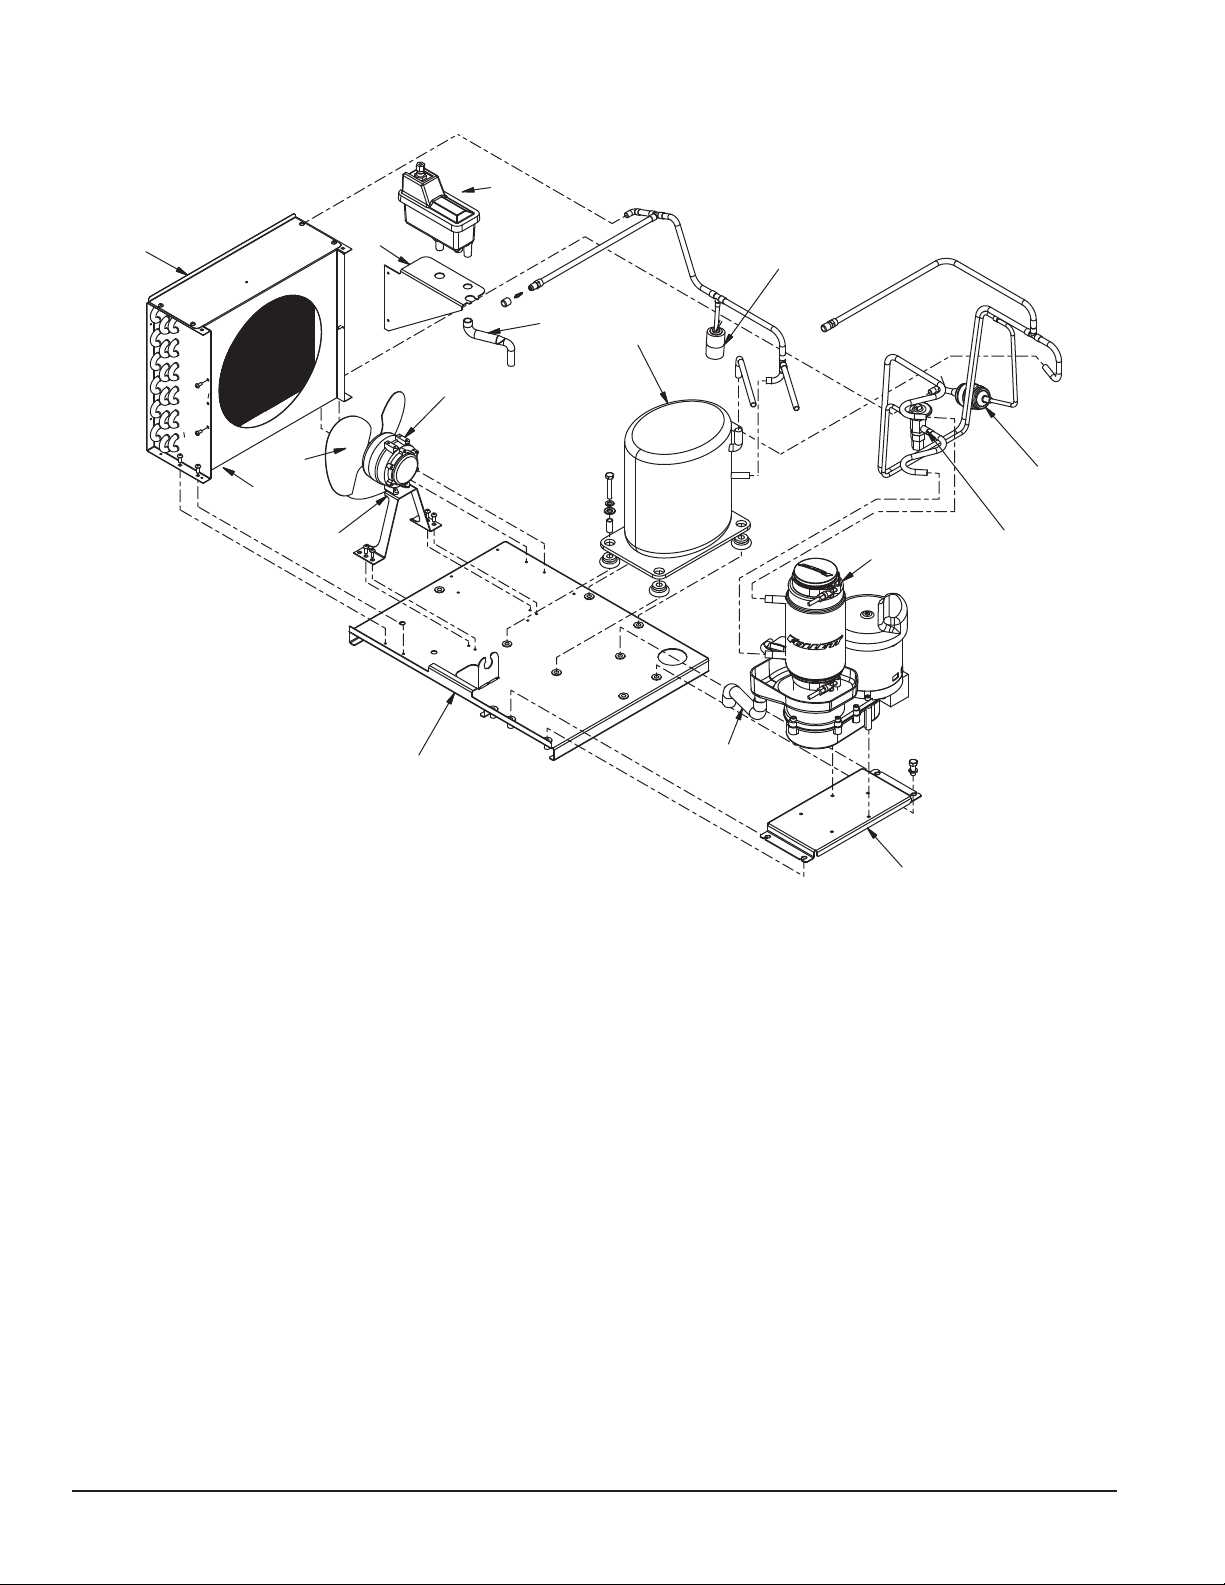
Air-cooled ice machines
4
13
3
8
5
12
15
14
1
6
9
7
2
11
16
10
44 25CI400A/W • 25HI400A • 50CI400A/W • 50HI400A
Page 45
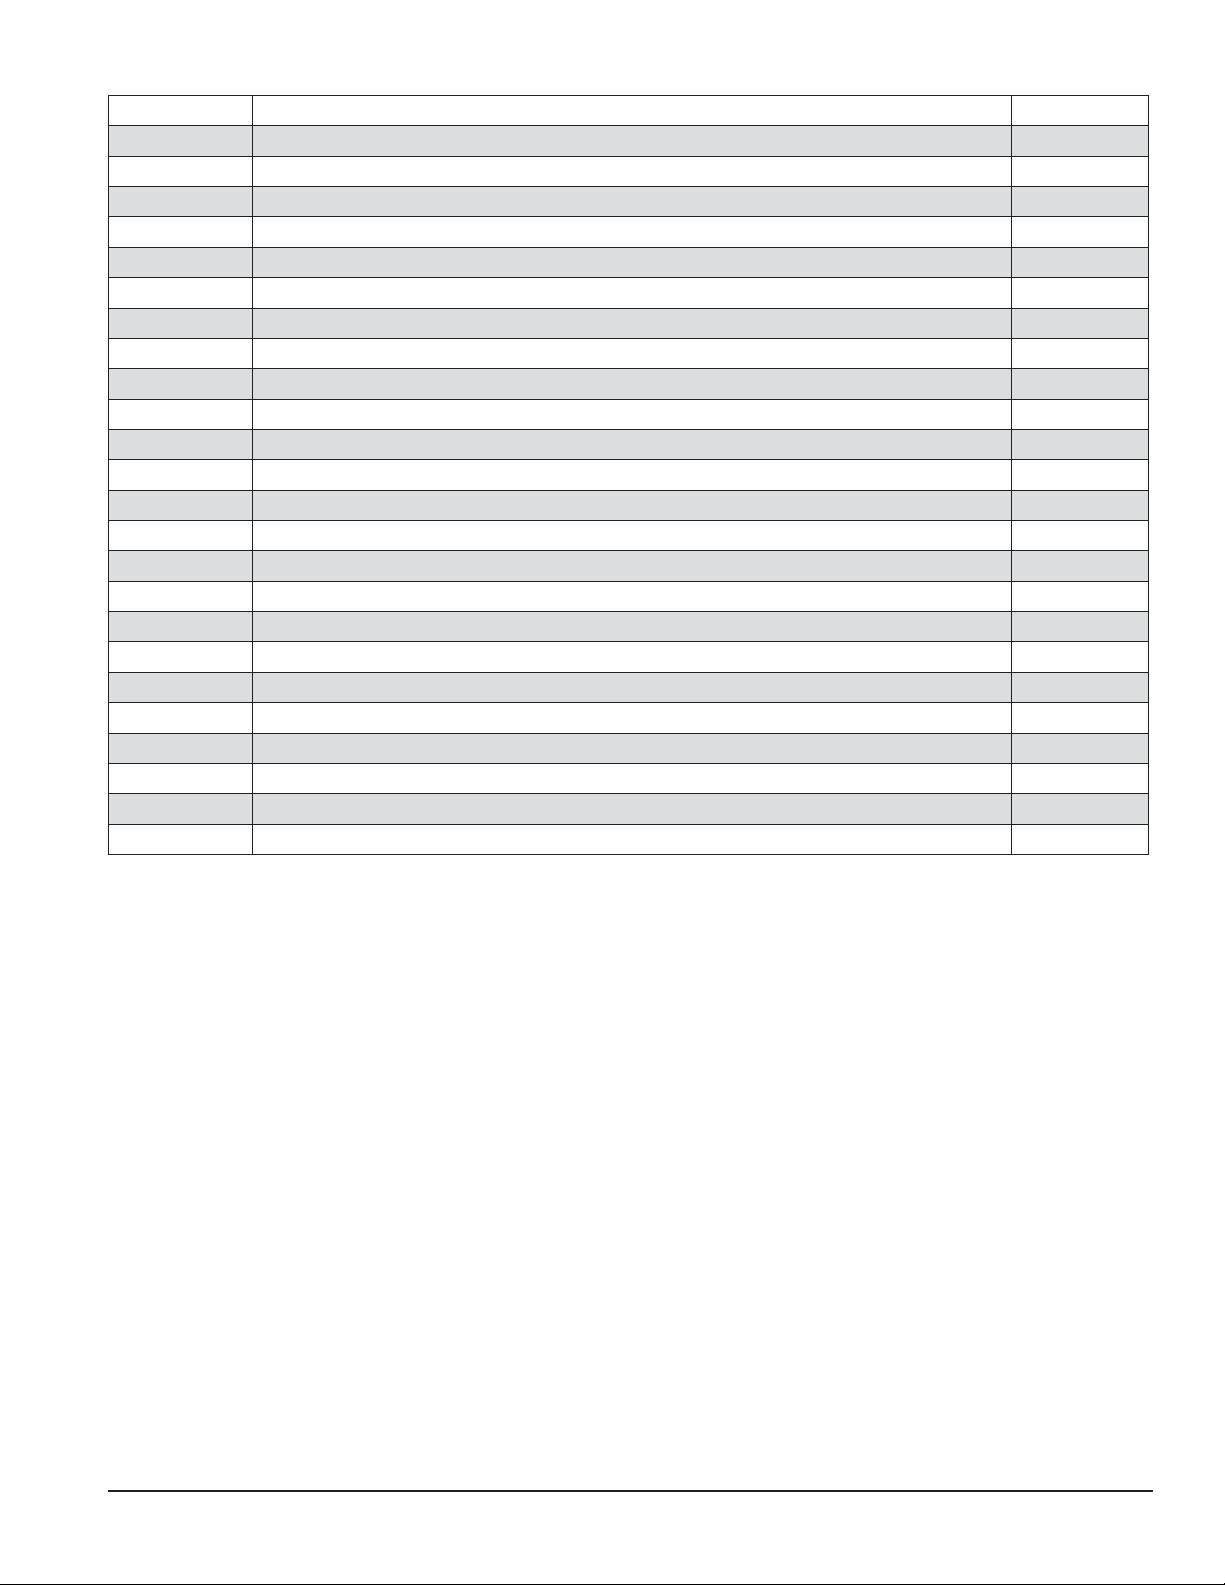
Reference Description Part #
1 Drier 502724
2 Condenser coil, air-cooled 00195917
Not shown Water sensor 502116
3 Reservoir mounting bracket 00163824
4 Float valve & reservoir 500504
5 Reservoir over ow tube with Agion 00187187
Not shown Drain kit with Agion, evaporator 00141440
6 Evaporator (see page 41 for complete breakdown)
Not shown Tubing, polypropylene, reservoir supply (sold by foot) 502079
Not shown Fitting, plastic, oat valve (includes sleeve & stem) 502078
7 Valve, expansion, thermal (includes 502830 and 00106534) 502726
8 High pressure cutout 502732
9 Tubing with Agion, evaporator drain 00185421
10 Mounting bracket, gearbox 00164046
11 Fan blade 500474
12 Motor, fan, 115 V, 60 Hz 500672
13 Bracket, fan motor 501188
Not shown Overload, compressor, 115 V, 60 Hz 502782
14 Compressor, 115 V, 60 Hz 502731
15 Base, ice machine 00192989
16 Shroud, condenser coil 00195925
Not shown Jacket, insulation, TXV 502830
Not shown Jacket, insulation, TXV bulb 00106534
Not shown Pinch clamp 00988238
25CI400A/W • 25HI400A • 50CI400A/W • 50HI400A 45
Page 46
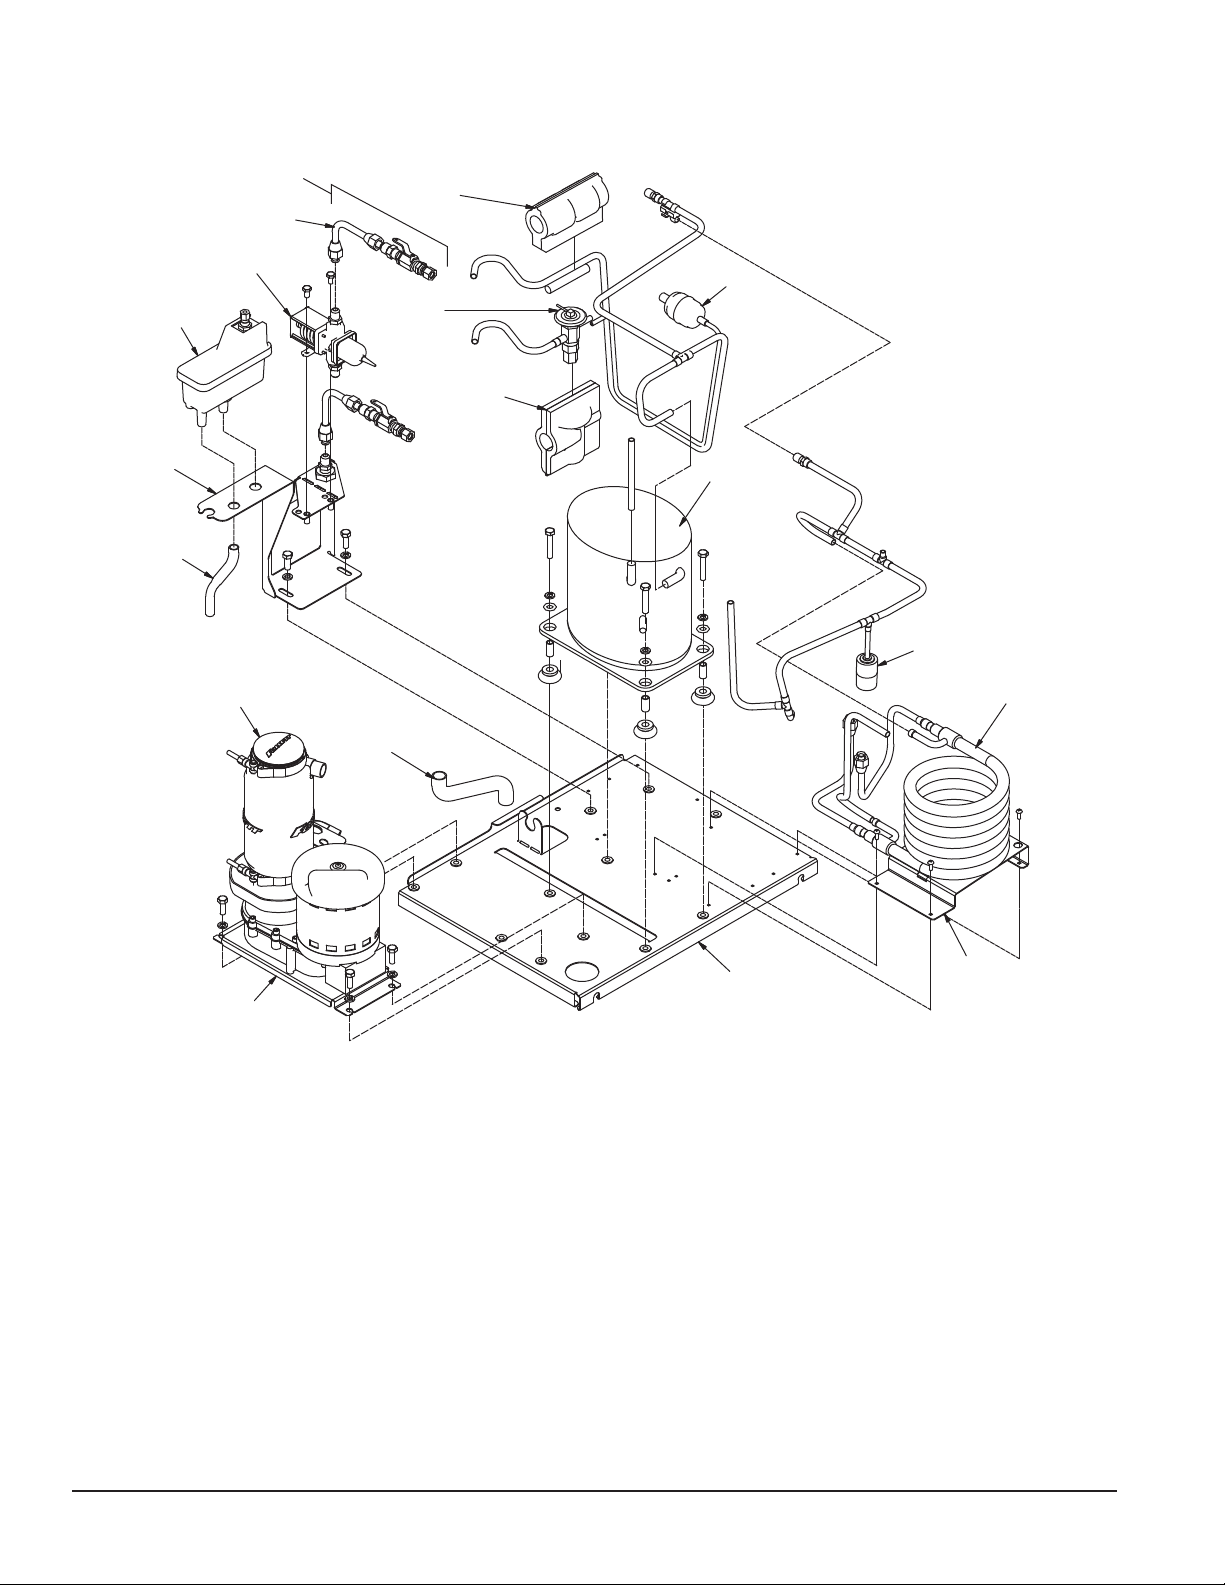
Water-cooled ice machines
16
17
2
3
9
1
7
15
4
18
11
14
5
8
13
10
12
6
46 25CI400A/W • 25HI400A • 50CI400A/W • 50HI400A
Page 47
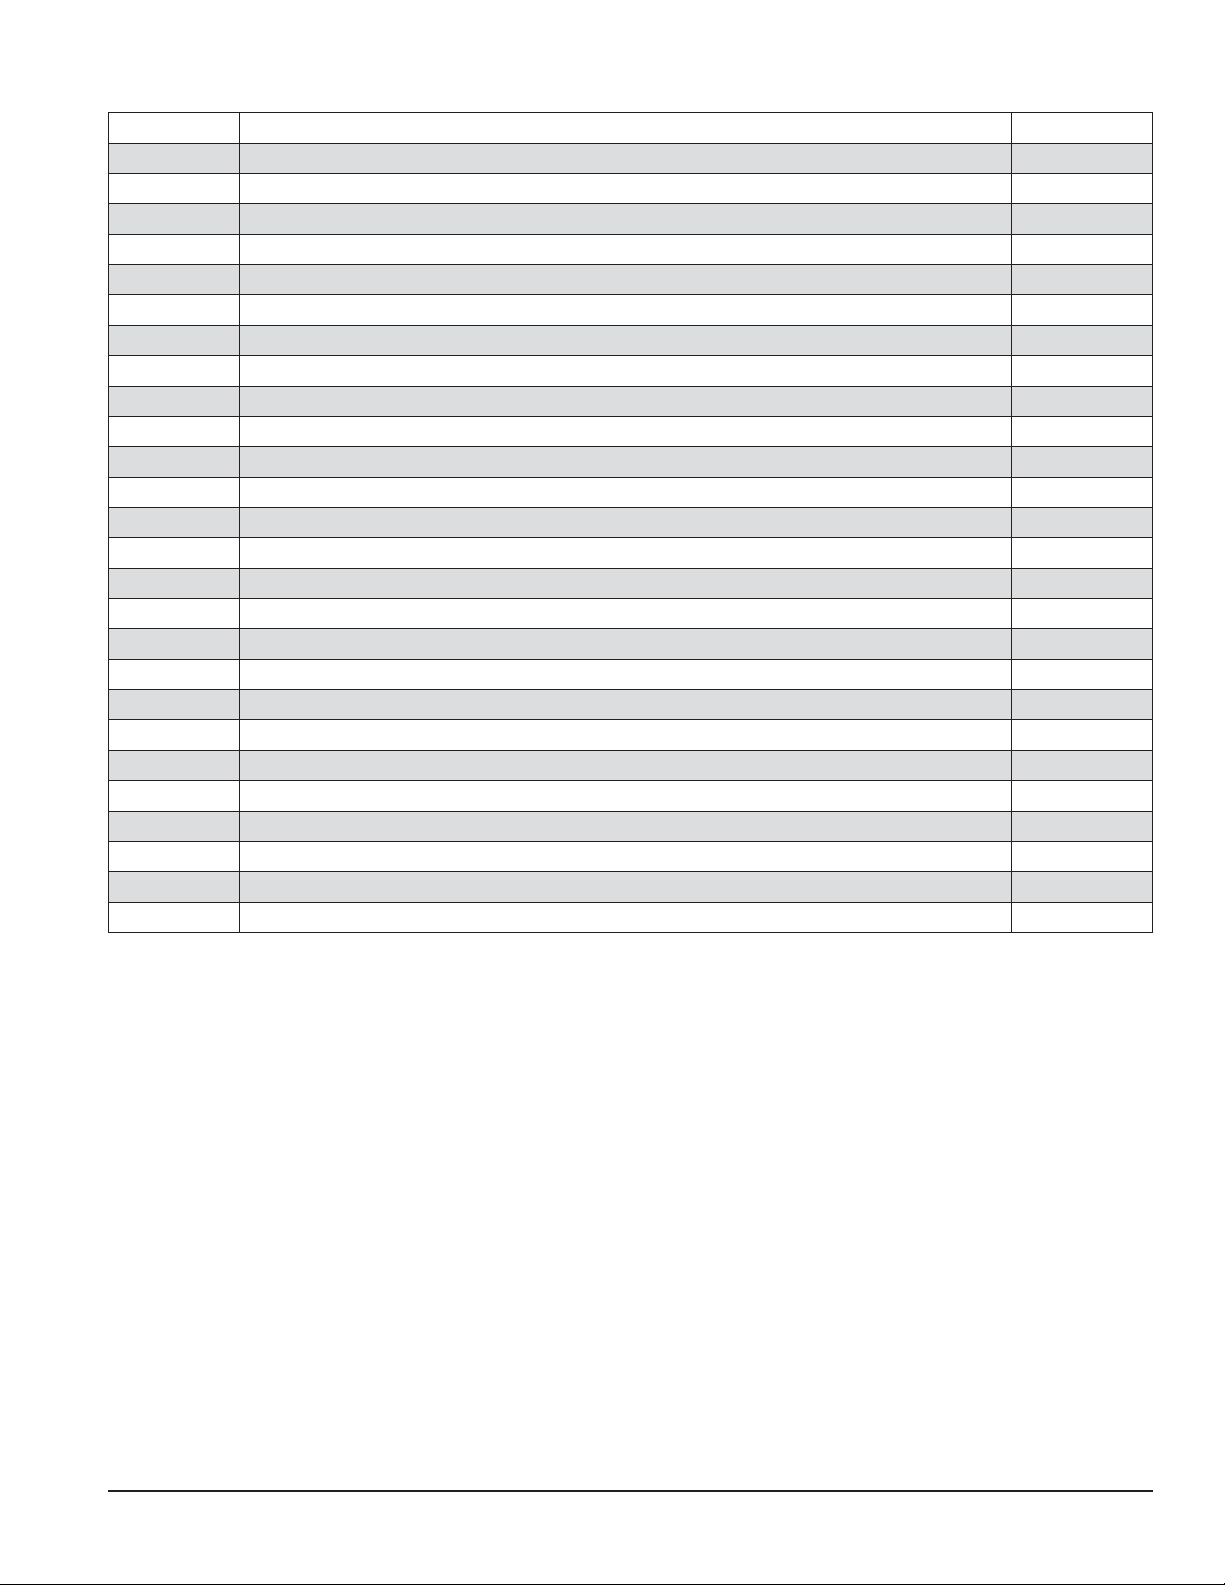
Reference Description Part #
1 Drier 502724
2 Valve, water regulating (includes 501810) 500537
Not shown Iso-washer (for water regulating valve) 501810
Not shown Water sensor 502116
3 Float valve & reservoir 500504
4 Reservoir mounting bracket 00195941
Not shown Tubing, polypropylene, reservoir supply (sold by foot) 502079
Not shown Fitting, plastic, oat valve (includes sleeve & stem) 502078
5 Evaporator (see page 41 for complete breakdown)
Not shown Drain kit with Agion, evaporator 00141440
6 Bracket, water-cooled condenser 00176149
7 Valve, expansion, thermal (includes 502830 and 00106534) 502726
8 Tubing with Agion, evaporator drain 00185421
9 Jacket, insulation, TXV bulb 00106534
10 Mounting bracket, gearbox 00164046
Not shown Overload compressor, 115 V, 60 Hz 502782
11 Compressor, 115 V, 60 Hz 502731
12 Coil, condenser 00195933
13 Base, ice machine 00192989
14 High pressure cutout 502732
15 Jacket, insulation, TXV 502830
16 Line set, water-cooled condenser (2 required) (includes 00187211 and 00196097) 00196089
Not shown Water hose, 3/8" compression x 48" 00187211
17 Elbow, ice machine water connection 00196097
18 Reservoir over ow tube with Agion 00187187
Not shown Pinch clamp 00988238
25CI400A/W • 25HI400A • 50CI400A/W • 50HI400A 47
Page 48
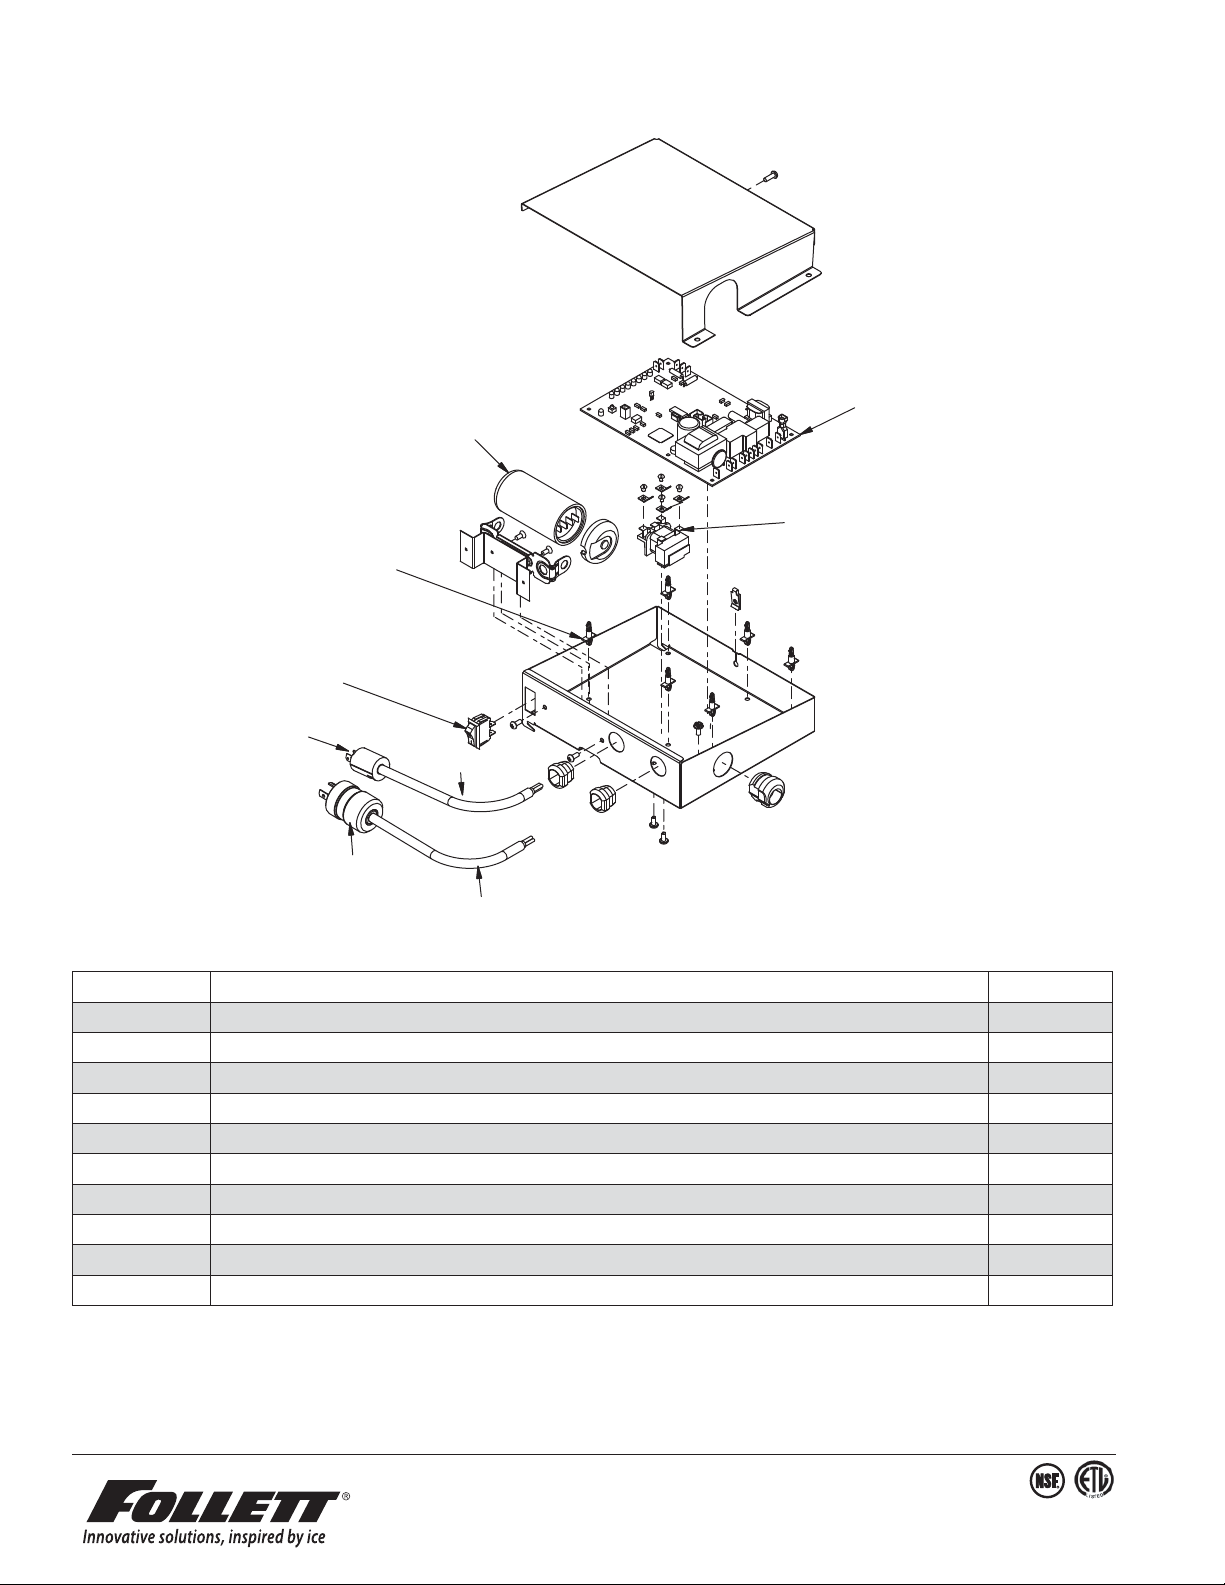
Ice machine electrical components
5
3
1
2
4
9
7
8
6
Reference Description Part #
1 Capacitor, start, compressor, 115 V, 60 Hz 502780
2 Relay start, compressor, 115 V, 60 Hz 501588
3 Board, control circuit, 115 V, 60 Hz 502331
Not shown Water sensor 502116
4 Switch, on/off, compressor 502392
5 Board, stand off control (4 required) 501959
6 Cord and plug (male), ice machine power 00195834
7 Cord and plug (male), bin signal 00195842
8 Plug (male), ice machine power 502235
9 Plug (male), bin signal 502233
SafeCLEAN, SensorSAFE and Symphony are trademarks of Follett Corporation.
Follett and RIDE are registered trademarks of Follett Corporation, registered in the US.
Follett reserves the right to change speci cations at any time without obligation. Certi cations may vary depending on country of origin.
801 Church Lane • Easton, PA 18040, USA
Toll free (877) 612-5086 • +1 (610) 252-7301
www.follettice.com
00187153R09
© Follett Corporation 3/13
 Loading...