

Page 1
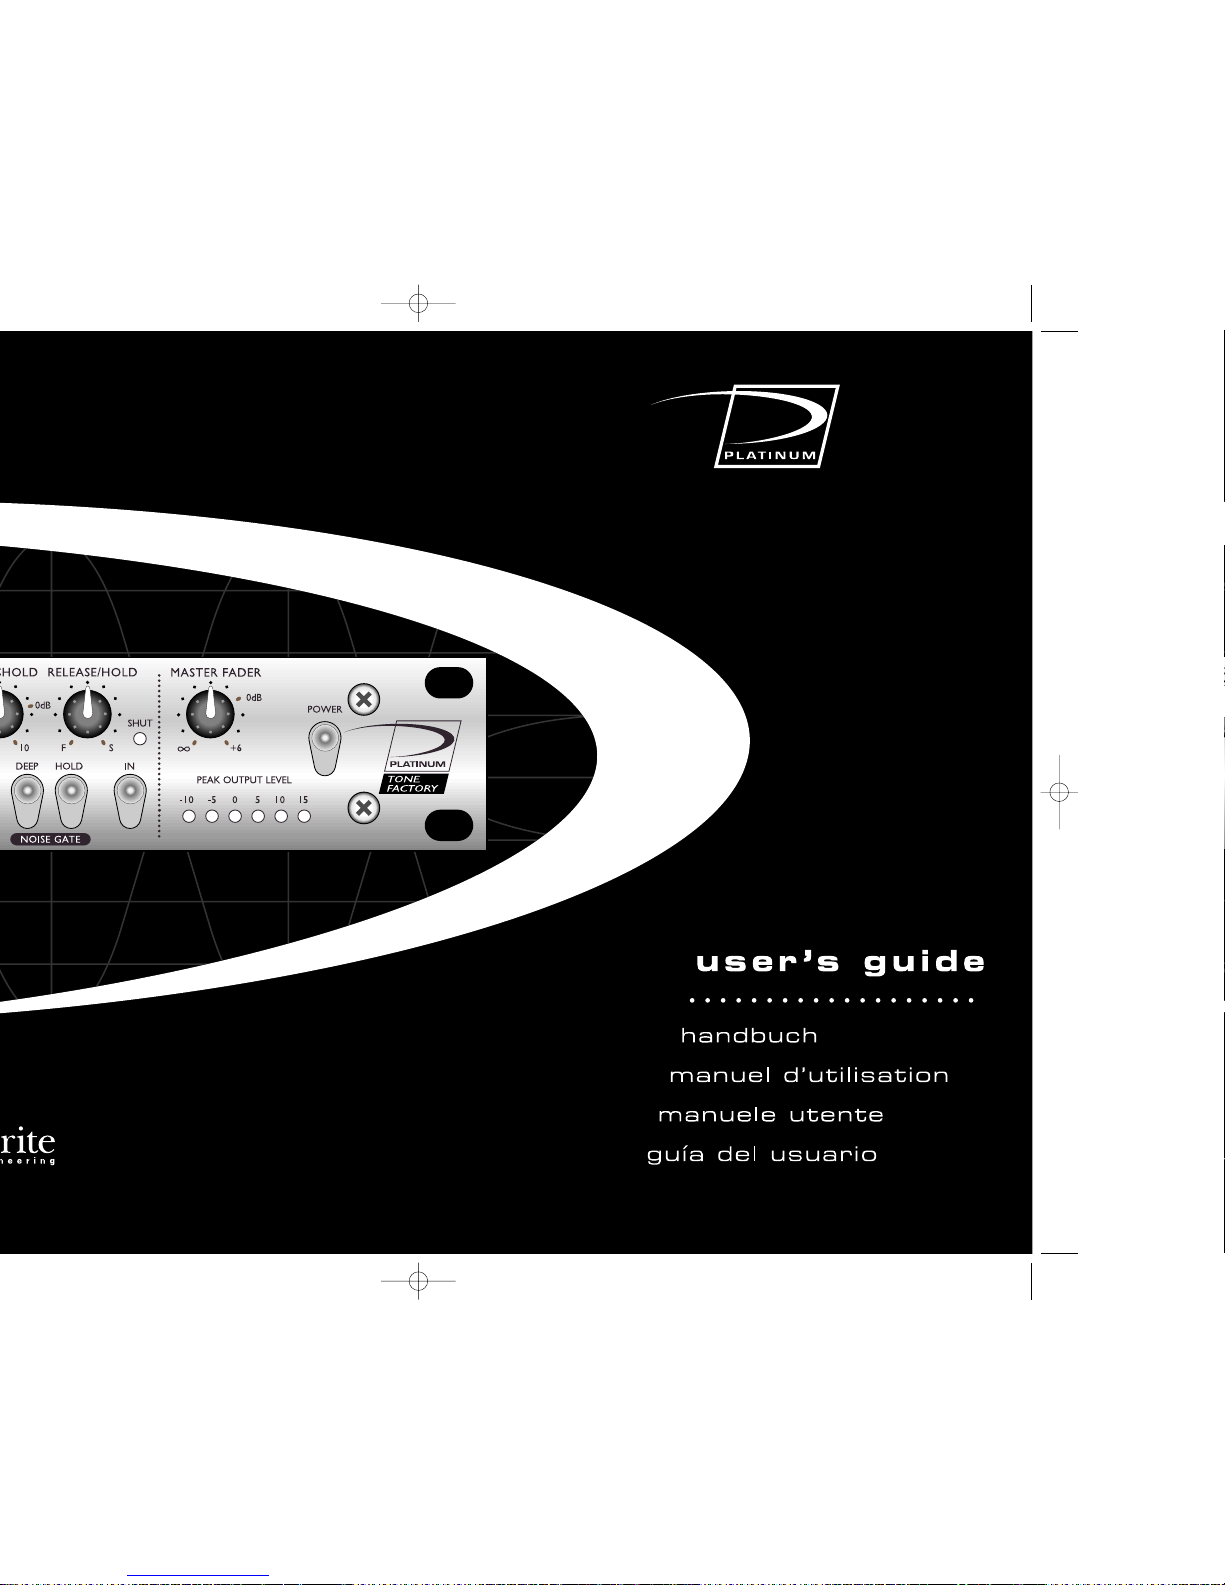
ToneFactory
™
Page 2
WIR DANKEN Ihnen, daß Sie sich
für den Kauf der Tone Factory™
entschieden haben. Die
ToneFactory™ ist ein Produkt des
Focusrite-Teams –Stephen, Trevor,
Peter, Martin, Helen, Anna, Tony,
Ben, Mick, Phil, Micky, Pauline, Jo,
Chris, Michael, Ian, Rob und Simon.
Wir bei Focusrite sind stolz auf den
hervorragenden Ruf, den die hier
entwickelten und gebauten Produkte
im Studiobereich genießen. Wir
hoffen, daß Ihr neues FocusriteGerät Ihren hohen Ansprüche
ebenso gerecht wird wie unseren
eigenen und daß Sie es in vielen
Jahren erfolgreicher Studioarbeit
schätzen {lernen} werden. Wenn
Sie uns über Ihre Erfahrungen bei
der Arbeit im Studio berichten
wollen, senden Sie bitte eine E-Mail
an sales@ focusrite.com.
NOUS TENONS à vous remercier
d’avoir choisi le ToneFactory™,
conçu par l’equipe Focusrite –
Stephen, Trevor, Peter, Martin,
Helen, Anna, Tony, Ben, Mick, Phil,
Micky, Pauline, Jo, Chris, Michael,
Ian, Rob et Simon.
Les membres de l’equipe Focusrite
forment une équipe enthousiaste à
qui le travail ne fait pas peur. C’est
avec beaucoup de fierté qu’ils ont
conçu at fabriqué des appareils
reconnus comme les meilleurs de
l’industrie audio. Nous espérons
que ce nouveau produit est à la
hauter de notre réputation et qu’il
vous assistera pendant de longue
annés d’eregistrement.
Si vous souhaitez nous faire
partager vos expériences en
enregistrement, anvoyez-nous un
courrier électronique å l’adresse
suivante: sales@focusrite.com
GRAZIE per aver scelto il
ToneFactory™ , frutto del lavoro
della squadra Focusrite - Stephen,
Trevor, Peter, Martin, Helen, Anna,
Tony, Ben, Mick, Phil, Micky,
Pauline, Jo, Chris, Michael, Ian,
Rob e Simon.
I ragazzi della Focusrite formano
un gruppo affiatato, capace di
lavorare intensamente e di
dedicarsi con orgoglio alla
progettazione, costruzione e
distribuzione di prodotti che sono
considerati le migliori unità audio in
circolazione.; noi speriamo che il
vostro nuovo Focusrite confermi
questa reputazione e che voi
possiate sfruttarlo pienamente per
parecchi anni di registrazioni.
Se vorrete raccontarci delle vostre
esperienze di registrazione
contattateci via e-mail presso:
sales@focusrite.com
GRACIAS por comprar el
ToneFactory™ de parte de todo el
equipo de Focusrite – Stephen,
Trevor, Peter, Martin, Helen, Anna,
Tony, Ben, Mick, Phil, Micky,
Pauline, Jo, Chris, Michael, Ian,
Rob y Simon.
El logro de Focusrite se debe a un
alegre y duro trabajo en equipo,
además tiene el gran orgullo de
diseñar, construir y entregar los
productos que están considerados
como los mejores módulos del
mercado; esperamos que el nuevo
Focusrite cumpla con esta
reputación y asi hacerle disfrutar
durante muchos años de
grabaciones productivas.
Si quieres contarnos tus
experiencias con las grabaciones,
evianos un email a la siquiente
dirección:- sales@focusrite.com
the Focusrite team
Page 3
page 3
contents
English …4
Einleitung …10
Erste Schritte mit der
ToneFactory™ …10
Der Discrete Transistor Input…10
Die Filter …11
Der Opto Compressor …11
Der Tone Controller …12
Der Parametric Equaliser …12
Das Noise Gate …13
Der Master Fader …13
Wie Sie mit der ToneFactory™
einen optimalen
E-Gitarren-Sound erzielen …13
Wie Sie mit der ToneFactory™
bei akustischen Gitarren einen
optimalen Sound erzielen …14
Wie Sie mit der ToneFactory™
einen optimalen SynthesizerSound erzielen …15
Wie Sie mit der ToneFactory™
einen optimalen Drum-Sound
erzielen …15
ToneFactory™
Flußdiagramm …33
Francé …16
Introduction …16
Découverte du processeur …16
Utilisation de l’entrée à
transistors 16
Utilisation des filtres …17
Utilisation
de l’Opto-compresseur …17
Utilisation du Tone Controller …18
Utilisation du correcteur
paramétrique …18
Utilisation du noise gate …18
Utilisation du Master Fader …19
Obtention d’un son de guitare
électrique de bonne qualité …19
Obtention d’un son de guitare
acoustique de bonne qualité …20
Obtention d’un son de
synthétiseur de bonne qualité…20
Obtention d’un son de
batterie de bonne qualité …20
ToneFactory™
Flow Diagram …33
Spanish …28
Introduzione …22
Conoscere la Macchina …22
Uso dello Stadio di Ingresso a
Transistor Discreti …22
Uso dei Filtri …23
Uso dell’Opto-Compressore …23
Uso del Controllo Tonale …24
Uso dell’Equalizzatore
Parametrico …24
Uso del Noise Gate …24
Uso del Master Fader …25
Ottenere un Suono di
Chitarra di Buona Qualità …25
Ottenere una Chitarra
Acustica di Buona Qualità …26
Ottenere un Buon Suono
per il Synth …26
Ottenere un Suono di
Batteria di Buona Qualità …26
ToneFactory™ diagramma di
flusso dei segnali …33
Francé …16
Introducción …28
Conociendo la Unidad …28
Uso de Discrete Transistor I
nput …28
Uso de los Filters …29
Uso del Opto-Compressor …29
Uso del Tone Controller …29
Uso del Parametric Equaliser…30
Uso de la Noise Gate …30
Uso del Master Fader …31
Obtener Gran Calidad de
una Guitarra Acœstica …31
Obtener Gran Calidad de
un Sintetizador …32
Obtener Gran Calidad de
una Batería …32
ToneFactory™
Flow Diagram …33
Page 4
page 4
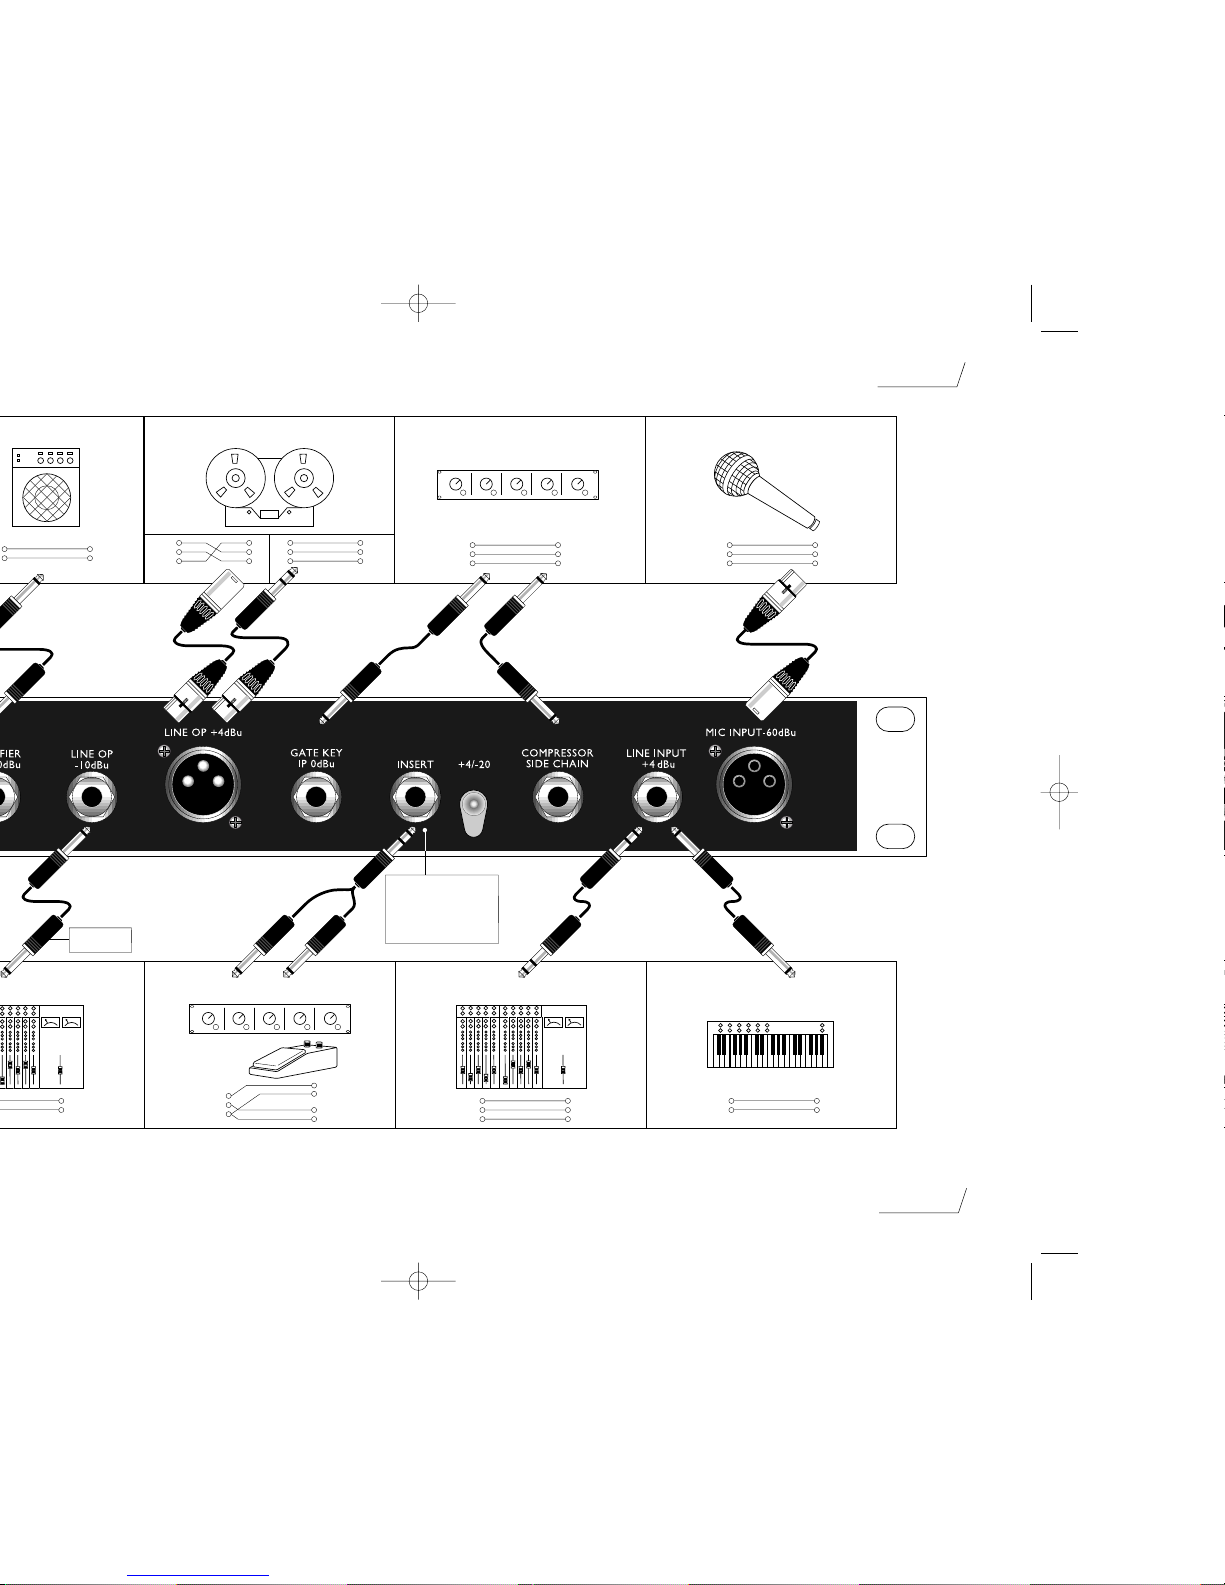
ToneFactory™
Tip
Sleeve
Balanced Jack to
Balanced XLR
Klinke symmetrisch
auf XLR symmetrisch
Balanced XLR
XLR symmetrisch
Balanced XLR
XLR symmetrisch
Insert Y Cable
Insert-Kabel (Y-Kabel) Balanced Jack
Klinke symmetrisch
Unbalanced Jack
Klinke asymmetrisch
Unbalanced Jack
Klinke asymmetrisch
Unbalanced Jack
Klinke asymmetrisch
Tip
Ring
Sleeve
1
2
3
1
2
3
1
2
3
Tip
Ring
Sleeve
Sleeve
Tip (Send)
Tip (Return)
Sleeve
Note: Stereo Jack only
Nur mit Stereostecker verwendbar
Attention: Jack Stéréo seulement
Attenzione: Solo Jack Stereo
Tip
Ring
Sleeve
Tip
Ring
Sleeve
Synth / Synthé
Tip
Sleeve
Tip
Sleeve
Tape Machine / Recorder/ Magnétophone / Registratore su nastro External Unit / Externes Gerät/ Unité Externe / Unit Esterna
1
2
3
1
2
3
1
2
3
1
2
3
To Line I/P
Zum Line-Eingang
Tip
Sleeve
ToneFactory™ Connections
Page 5
Getting to Know the Unit
When you are getting to know the unit, use it on a track
that you are familiar with (for example,you could run a
favourite CD through the unit); working with a familiar
track makes interpretation of the results easier.Note,
however,that tracks are already compressed for CD, so you
may find it hard to hear the results of using the OptoCompressor.If this is the case, try using samples instead (if
you have access to them), or record your own track
uncompressed and then play it back through the
ToneFactory™.
The easiest way to learn the creative power of the
ToneFactory™, particularly if you are not familiar with all
of its separate parts, is to try each control in turn. Finally
try them all together to see the creative potential of using
all the power in the ToneFactory™!
Do not turn all gain & level controls to
maximum at any one time.
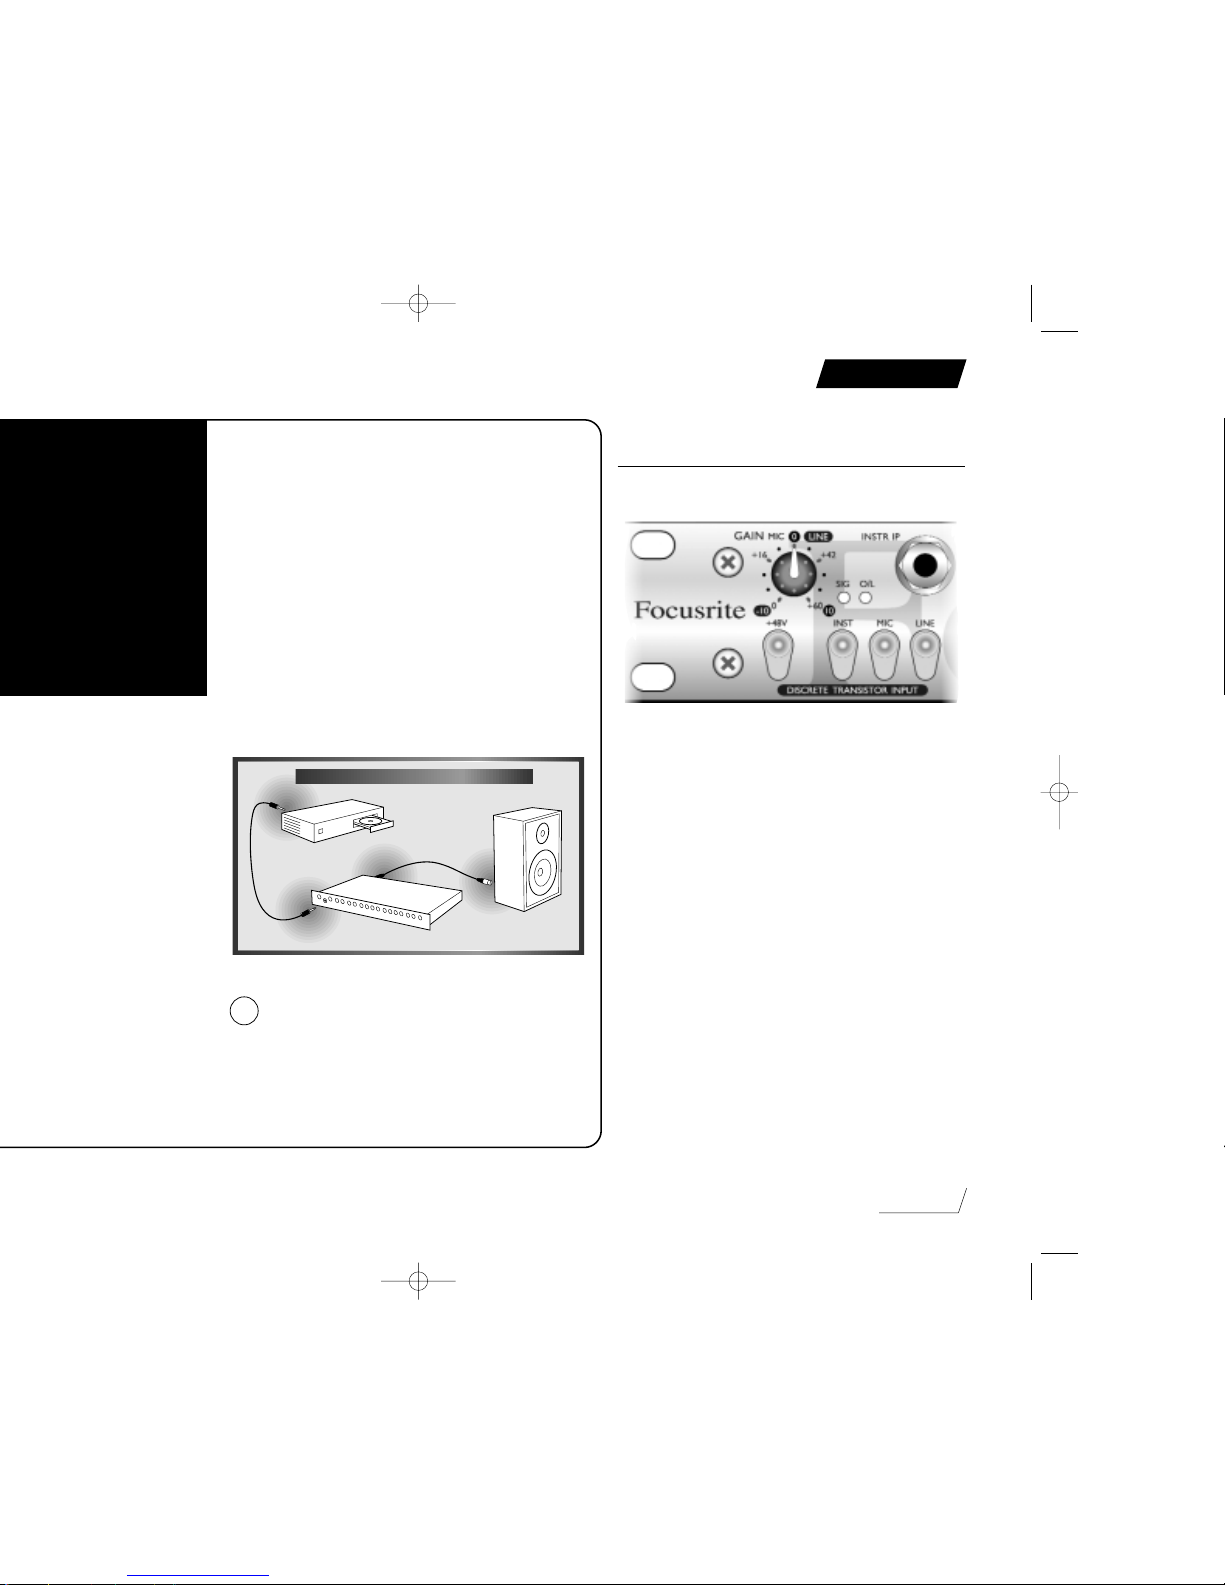
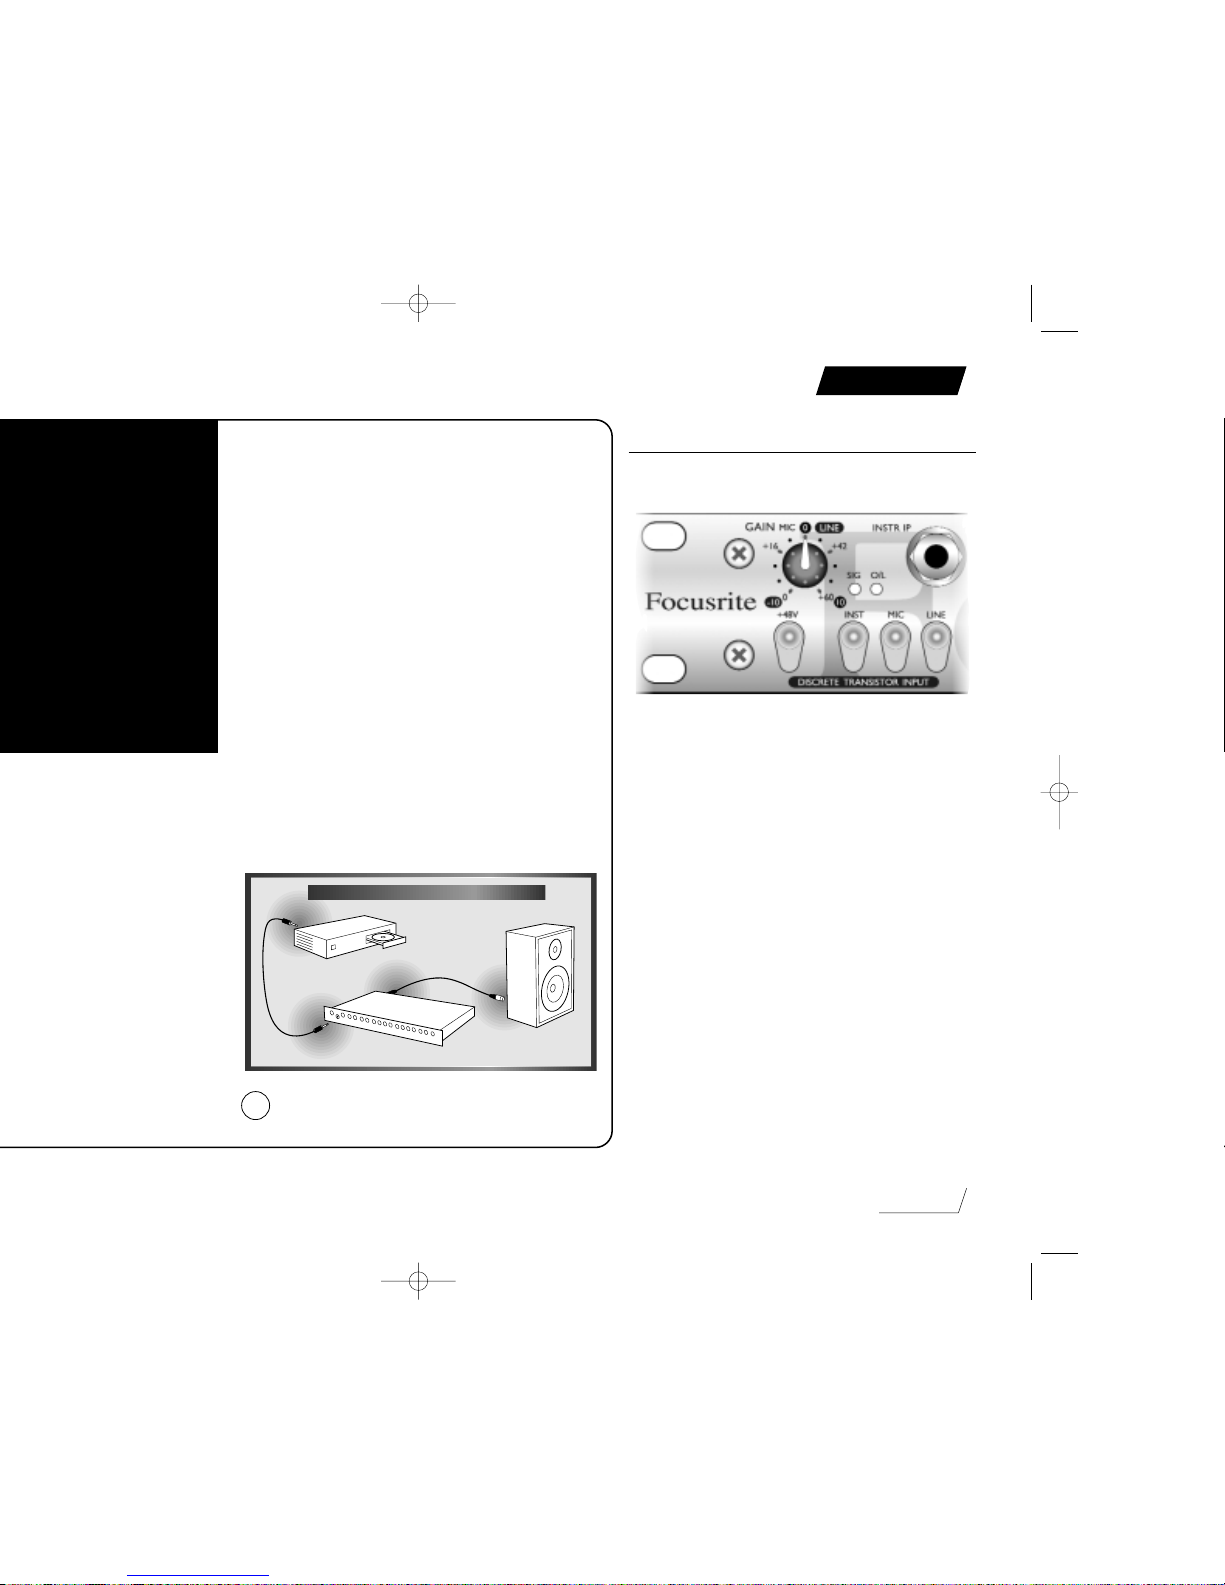
Using the Discrete Transistor
Input
This part of the unit is a preamplifier, for setting the
incoming signal to a suitable level.
Instr IP – is the instrument input to the unit.This is a high
impedance input, that allows you to connect an electric
guitar or bass without loading the pickups, or connect a
synth with low output.
Mic, Line, Inst – are used to select the input socket into the
unit. Since only one of these buttons can be active at
any time,you can connect up to three items to the unit
and use the buttons to switch between them.
Gain – sets the level of the signal.With an input signal
coming into the unit, slowly adjust the Gain control
until the SIG LED starts to light. Continue adjusting the
Gain control until you reach the optimum position, as
shown by the SIG LED and the O/L (overload) LED.
SIG LED – should be lit whenever there is sound coming
into the unit.
O/L LED – may light occasionally, but only if the input signal
gets particularly loud. If the O/L LED stays on
continuously for any period, or if you hear the unit
distort during loud peaks, you should reduce the setting
of the Gain control.
page 5
CONNECTING TO CD
!
English
Page 6
and harshness, though its design lets you cut high
frequencies without making the resulting signal sound
dull (this is particularly good for acoustic guitars).
Corrective – when in, the Low filter removes all frequencies
below the selected frequency, and the High filter
removes all frequencies above the selected frequency.
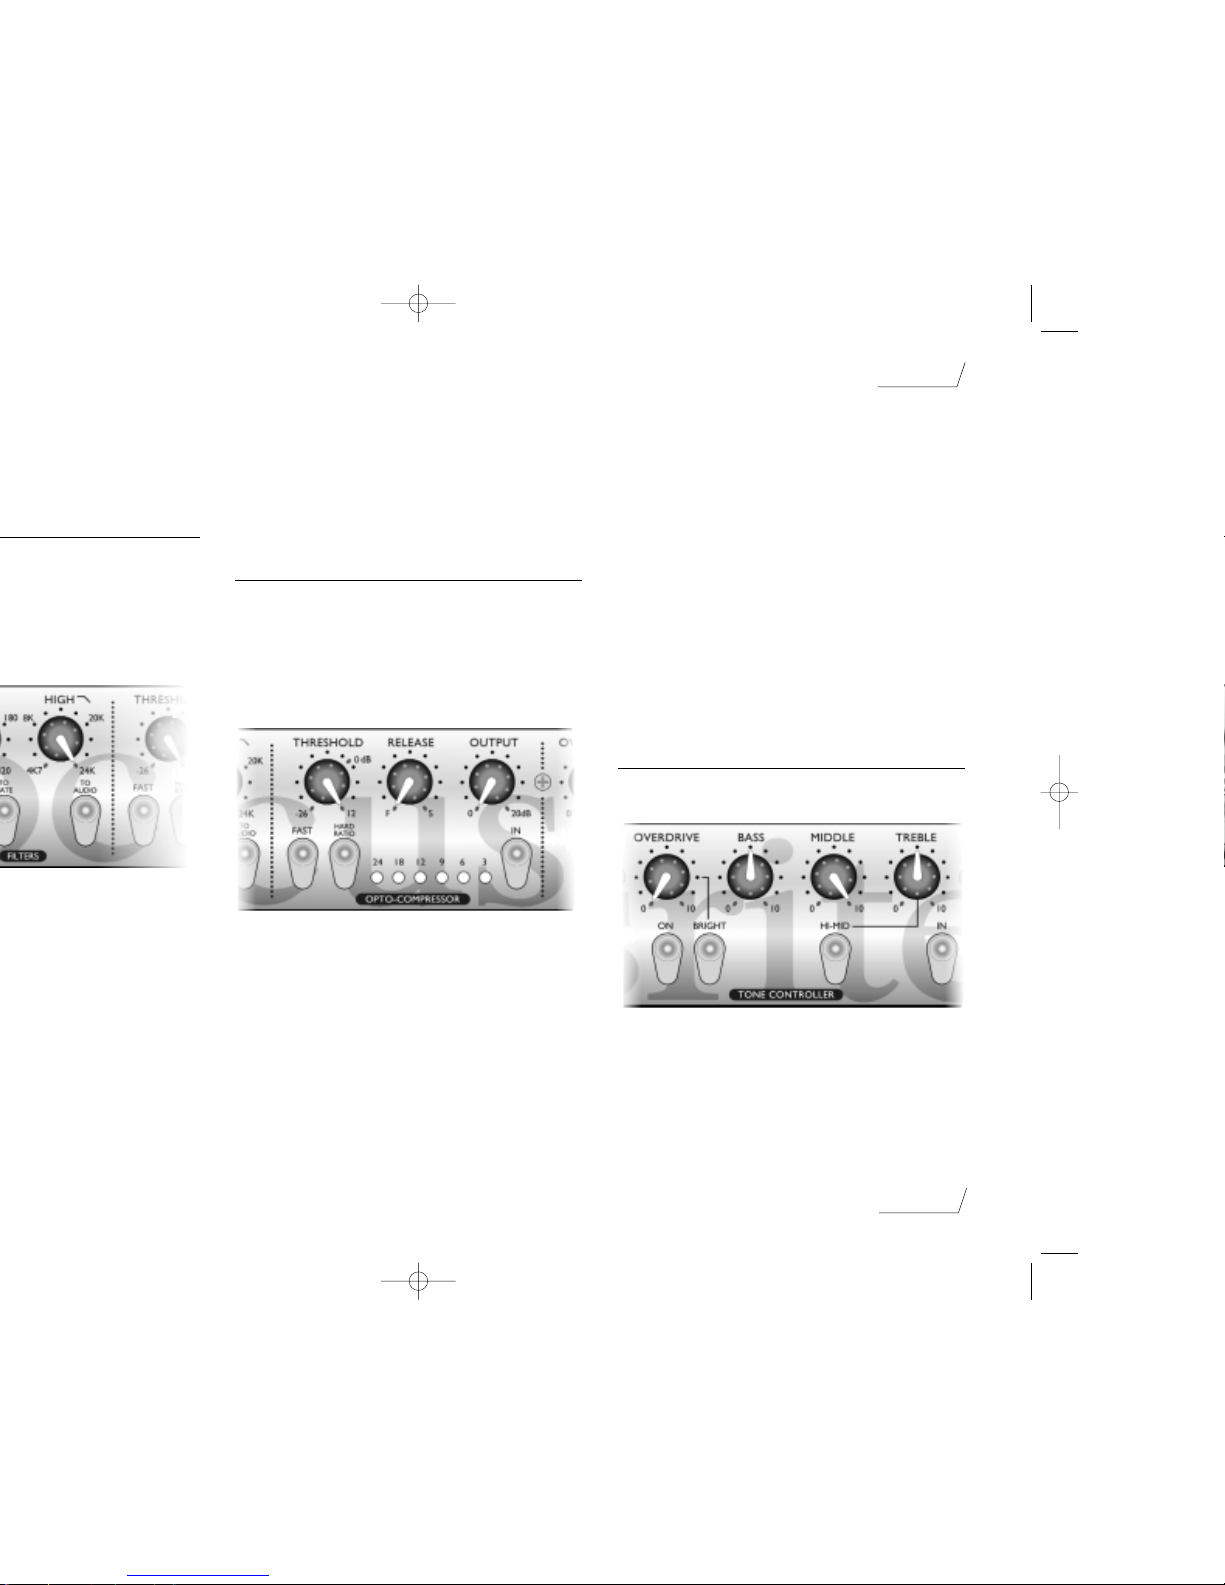
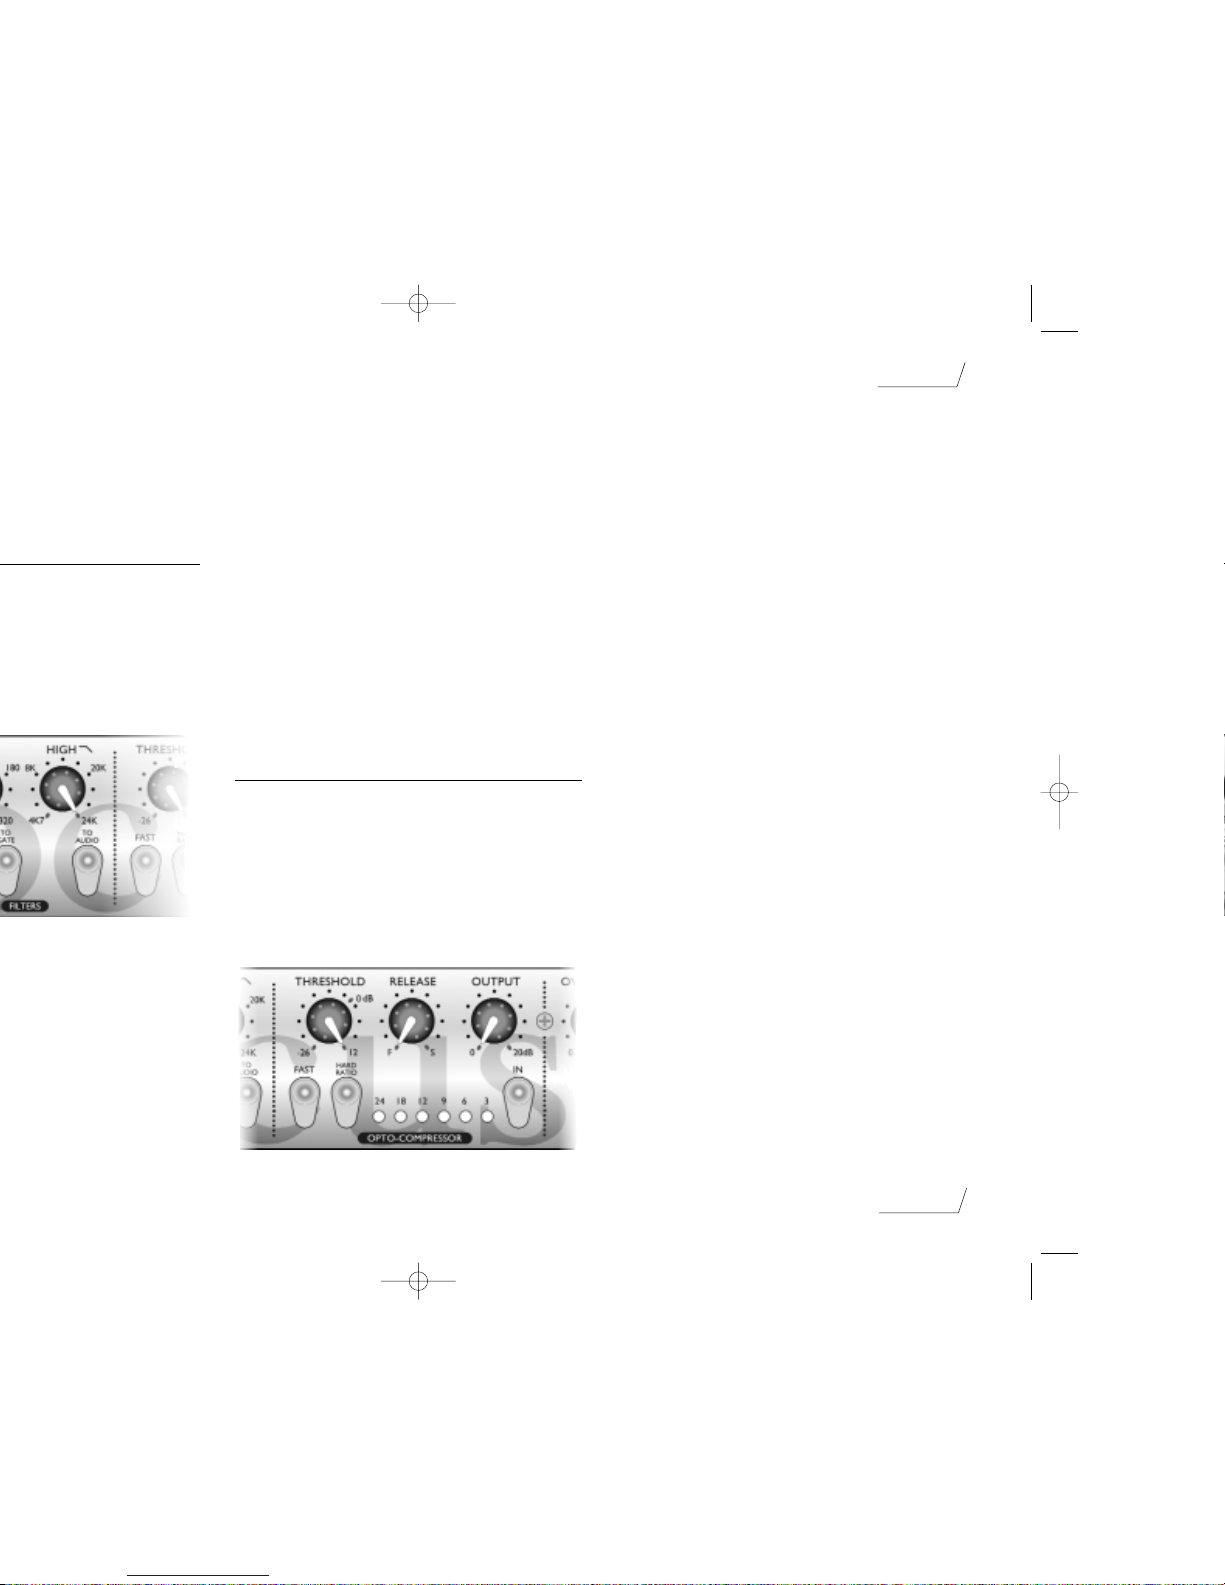
Using the Opto-Compressor
The Opto-Compressor acts like an automatic volume
control, turning down the volume of a signal if it gets too
loud. It reduces variation between loud and quiet passages,
as it automatically reduces the gain when the signal gets
louder than a certain volume (threshold).Therefore,it tends
to even out a performance,stopping the instrument getting
very loud or very quiet in the mix.
I
n –
when lit, switches on the Opto-Compressor.
Threshold – determines when the Opto-Compressor starts
to compress the signal - the lower the threshold, the
more the signal is compressed. By setting a threshold, you
compress the signal only when it is louder than the
threshold, so that quieter passages maintain their natural
dynamic range, and only loud passages (that go above
the threshold) are compressed.
Meter – displays the amount of compression applied to the
signal. Since compression reduces the volume of the
signal, the meter drops as compression is applied: for
example,a 9 dB drop shows as 9 on the meter.
Output – sets the output volume of the compressed signal.
Since compressing a signal makes it quieter,use the
Output control to restore the signal to its original
volume.Compare the volume of the original and the
compressed signal by using the In switch to switch the
Opto-Compressor on and off.
Release – sets the overall loudness.The faster the release, the
louder the signal appears to be.
Fast – when in, compresses the initial attack of a signal (for
example, use Fast to get rid of the initial pluck of a
guitar string).This sort of compression tends to be more
noticeable than when the Fast button is not used. For a
punchy sound, do not use the Fast button.
Hard Ratio – when in, gives a very flat, compressed sound.
Do not use the Hard Ratio button if you want to
maintain some of the original dynamics.
Using the Tone Controller
The Tone Controller is used to set the overall tone of the
signal, and to add any overdrive to it.
In – when lit, switches on the Tone Controller.
Bass, Middle, Treble – provide standard tone controls, as you
would find on any instrument amplifier.
Hi-Mid – when in, the Treble control acts on slightly lower
frequencies, so is less aggressive.This gives you more
control over the tone of a guitar.
page 6
English
Page 7
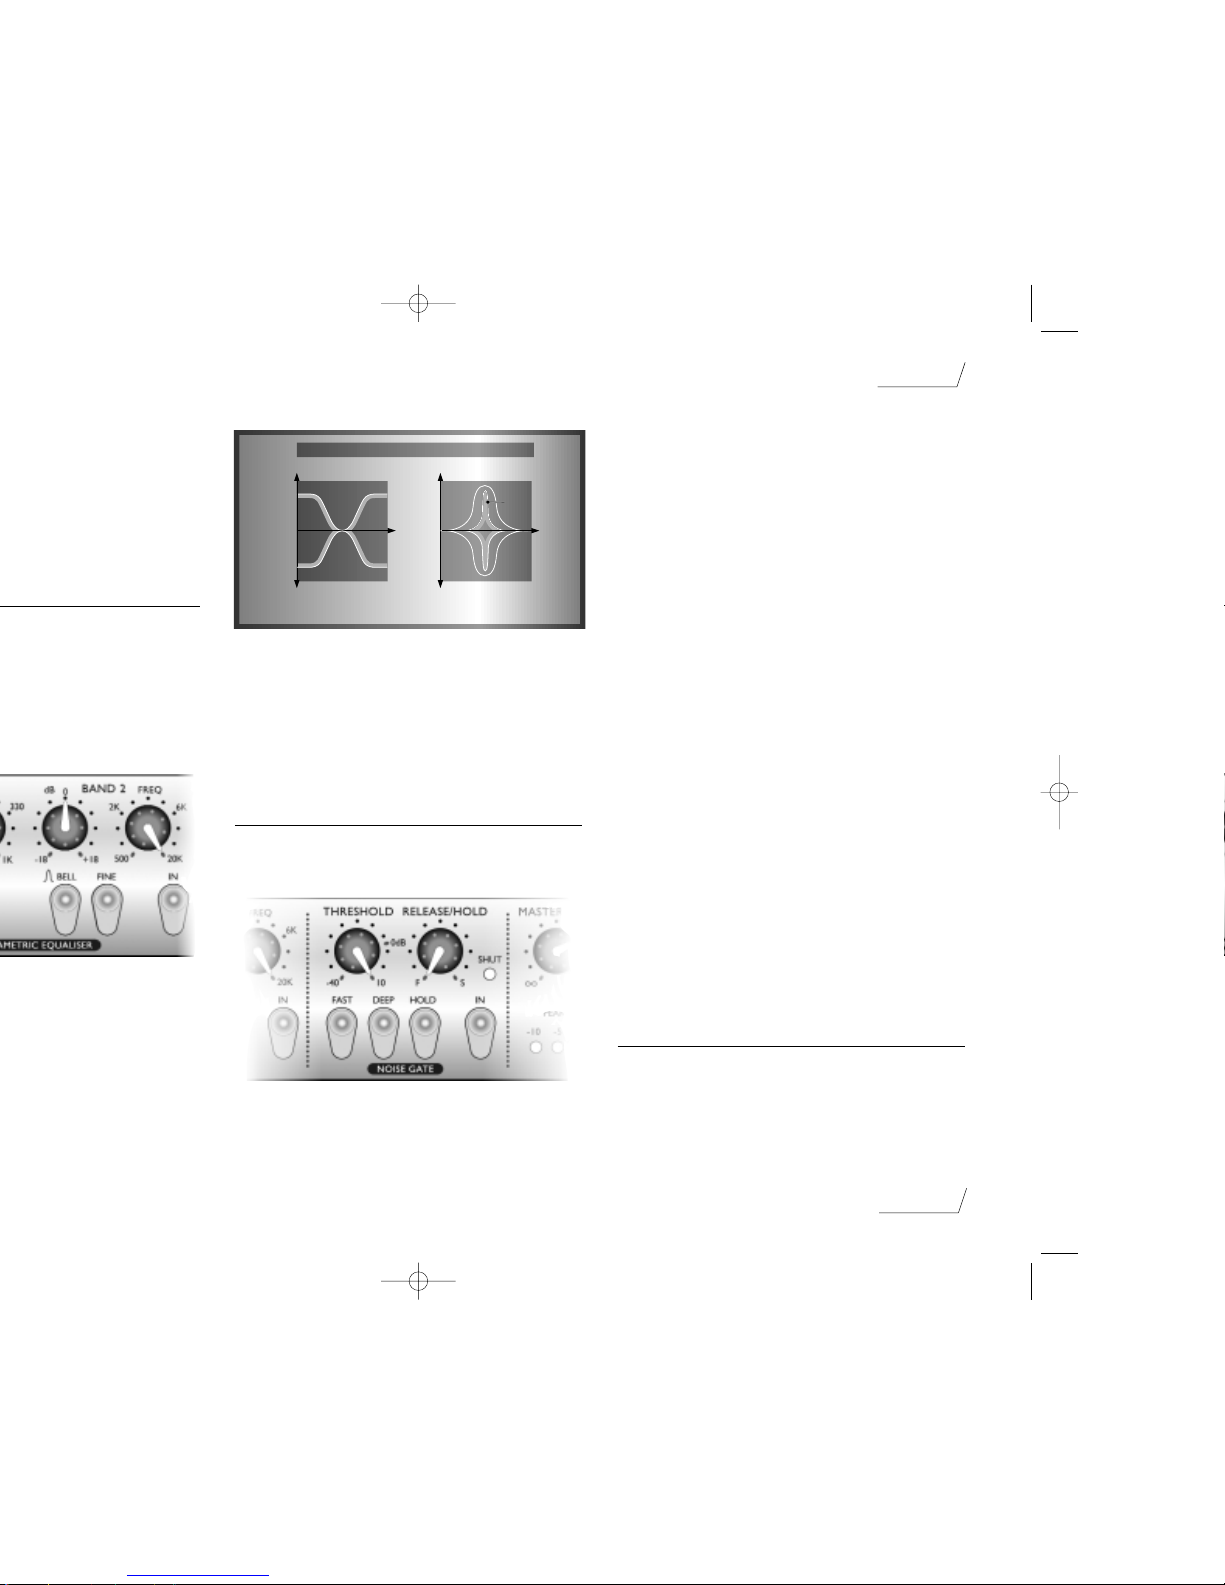
Bell – when in, the cut or boost applied to the selected
frequency band is changed to a bell shape (see picture).
This has the effect of emphasising the selected
frequency, since the cut or boost applied is reduced as
you move away from it.
Fine – when in, reduces the width of the frequency band that
is affected.You normally use this in conjunction with
the Bell button, to notch out a small range of unwanted
frequencies (for example,fret rattle on a guitar).
Using the Noise Gate
The Noise Gate reduces the volume of quiet sections in
the performance, and so can be used to remove
background noise.
In – when lit, switches on the Noise Gate.
Threshold – determines when noise reduction begins.The
higher the threshold, the more low-level noise is reduced.
Hold – when in, changes the Release/Hold control from a
release control to a hold control.The difference between
them appears when the signal passes below the
threshold: with release, the gate starts to shut, at the
speed determined by the Release control; with hold, the
gate stays open for the time determined by the Hold
control, then shuts immediately.When recording an
instrument on its own, you usually use Release as this
sounds most natural.
Release/Hold – adjusts the release or hold of the gate
(depending on whether the Hold button is lit) from Fast
(F) to Slow (S). Release determines how quickly the
gate shuts once the signal has passed below the
threshold. Use Release on a signal where the gate
should close quite quickly in a controlled manner.Hold
determines how long the gate stays open once the signal
has passed below the threshold.On a signal that has, for
example, a short transient then reverb that you want to
record, use Hold to hold the gate open so that the
quieter reverb is not lost.
Fast – when in, makes the gate open very quickly when the
signal passes the threshold. Use this on signals that have a
very fast attack (such as a snare drum), so that the gate
does not cut off the beginning of the signal.
Deep – when in, reduces all background noise to below the
natural hearing level.This should only be used to clean
up a noisy signal when mixing down, as its effect can be
too drastic when recording, causing signal drop outs.
Shut – when in, the gate is shut so no signal is being
allowed through.
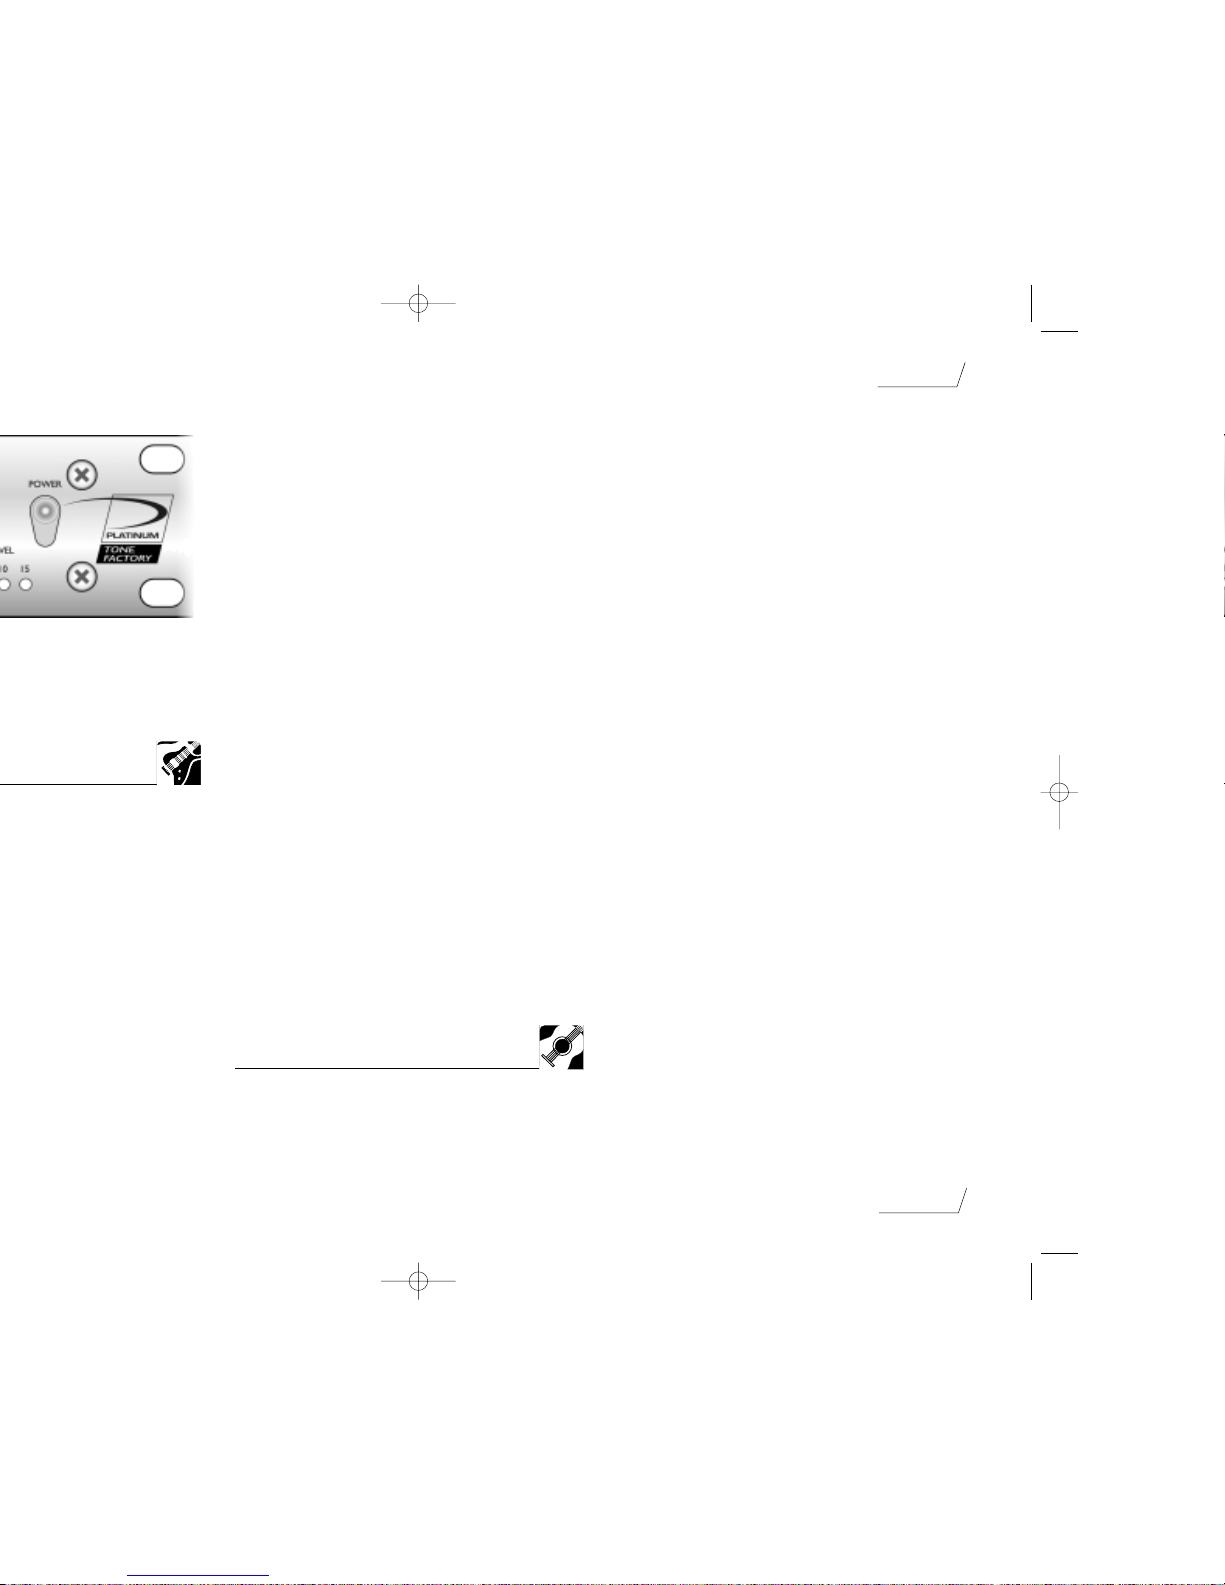
Using the Master Fader
The Master Fader is used to match the output level from
the ToneFactory™ to the input level of the next unit in the
chain (such as a DAT recorder or PC sound card).When
setting the output level,always start quietly and increase the
output level until you reach the correct level - do not start
page 7
English
SHELF / BELL / FINE
ƒ
Normal Mode – Shelf
ƒ
+18
–18
0dB
+18
–18
0dB
Bell Mode
Fine
Page 8
page 8
English
you have added reverb and it is too brilliant, use Band 2
(with the Bell button not lit) to reduce the treble. If you
have a lot of effects,and the sound is muddy, use Band 2
with the Bell button lit to boost frequencies around 2.5
kHz.
Using Compression and Overdrive
The Overdrive on the ToneFactory™ is a dynamic tool,
since varying the volume of the input signal varies the
amount of overdrive that is applied.Therefore, by varying
the dynamics of your playing,from soft to loud, you can
influence the amount of overdrive you get.This is great for
blues, for example, since you can get more bite by playing
more aggressively.
If you want to make sure that your guitar is overdriven
evenly (particularly for a heavily overdriven sound),use the
Opto-Compressor to reduce the dynamics of the signal. Set
the Threshold quite low,and increase the output control to
compensate for the loss in volume.Now the signal enters
the Tone Controller at a fairly constant volume, so more of
the signal is overdriven instead of just the peaks.
Recording Electric Bass
Since you normally want the bass to stay at a constant
volume in the rhythm track,you tend to use quite a lot of
compression. Set the Opto-Compressor as follows:
Try experimenting with the Release control and the Hard
Ratio to get the sound you want.If you want a bass sound
that has a lot of attack, make sure the Fast button is not lit.
If you want a more rounded bass sound with less attack,
switch on the Fast button.
Obtaining a Good Quality
Acoustic Guitar Sound
The easiest way to get a good signal into the
ToneFactory™ is from a piezo pickup into the instrument
input. If miking up an acoustic guitar, the position of the
microphone is very important.
Positioning the Microphone
In front of the guitar,about 6 inches (15 cm) from the
sound hole.This gives a loud signal (which is good if
there is background noise in the room),but tends to be
bassy and boomy. Switch in the Filters, use the Low
control to roll off the low frequency to compensate.
Also,moving the mic back towards the bridge tends to
give a brighter sound.
In front of the guitar, about 2 ft (60 cm) from the sound
hole.This gives more of an ambient sound, including
some room characteristics, which may or may not be a
good thing!
About 6 inches (15 cm) above the guitar, pointing down
at the bridge.This gives a bright but realistic sound.
Guitar Tone
To accentuate or reduce the sound of the main body of
the guitar,use Band 1 of the Parametric Equaliser with
Bell lit. Set the Freq control at around 240 Hz, and
increase or decrease the dB control,depending on how
thick you want the sound to be.
To increase presence and clarity,use Band 2 of the
Parametric Equaliser with Bell lit. Boost frequencies in
the range 2.5 kHz – 5 kHz.
For a thin and bright sound, use the Filters, adjusting the
Low control to remove bass.
Removing Fret Buzz
When mixing down, you can use the Parametric Equaliser
to notch out a frequency (for example,to remove fret buzz
or string rattle).To notch out a frequency:
1. In Band 2, switch on the Bell button,and add gain using
the dB control. Ensure that the Fine button is not lit.
2. Adjust the Freq control until you are boosting the
frequency you want to remove. For example, when you
have isolated fret buzz, it sounds a lot louder when the
Parametric Equaliser is on.
Page 9

control to around 5 kHz.If the snare drum needs more
clarity,use the Tone Controller or the Filters to roll off
some of the bass.
Toms Toms:To boost fullness, use Band 1 in the Parametric
Equaliser with Bell lit. For high toms, set the Freq
control to about 200 Hz; for low toms, set the Freq
control to about 100 Hz.To boost attack and crispness,
use Band 2 in the Parametric Equaliser with Bell lit,
setting the Freq control to around 5 kHz.
Bass drum:To increase the punch, use Band 2 in the
Parametric Equaliser with Bell lit, setting the Freq
control to about 2.5 kHz.
Cymbals:To boost brilliance and sizzle, use Band 2 in the
Parametric Equaliser with Bell not lit, setting the Freq
control to 10 kHz or higher.
Removing bleed from other parts of the kit
When recording a drum kit, it is possible for sound from
one part of the kit to bleed into the microphone on
another part of the kit. For example, the mic on the snare
might also pick up the sound of the bass drum or high hat.
When mixing down, you can use the ToneFactory™ to get
rid of bleed, allowing you to be aggressive with the
equalisation on a track without affecting the sound of
another part of the kit.You can use either the Filters or the
Noise Gate to get rid of bleed:
Using the Filters: If you can hear bleed from the cymbals
on the bass drum track, use the Filters with Corrective
lit, setting the High control to about 5 kHz.
If you can hear low-frequency bleed on the cymbal
track (for example, from the bass drum), use the Filters
with Corrective lit, setting the Low control to about
500 Hz.
Using the Noise Gate:
1. Solo the track, to hear how much bleed there is on
the track.
2. Ensure the Hold button is not lit, so that you have a
natural decay to the sound.
3. In the Filters, switch on both the To Audio and the To
Gate buttons.Adjust the Low and High controls until
you can no longer hear the bleed,but the recorded
drum or cymbal is not affected. For example, on the bass
drum track, set both the Low and High controls fully
counter-clockwise.
4. Switch off the To Audio button. In the Noise Gate,
adjust the Threshold control so that the gate opens
when the sound of the recorded drum or cymbal
occurs.At this point, just listen to the attack,to make
sure the Noise Gate is not cutting off any of the front
end of the signal.You may need to switch the Fast
button on so,that you do not lose the initial transient.
5.Adjust the Release control, so that the tail of the
signal sounds natural and not cut off.
6. For a gated snare drum effect, switch on the Hold
button and adjust the Release/Hold control to catch the
tail of the reverb only.
page 9
English
Page 10
Die Pegelanzeigen für den Opto Compressor und das
Noise Gate sind stets aktiv, unabhängig davon,ob sie sich
gerade im Signalweg befinden oder nicht.Auf diese Weise
haben Sie jederzeit Kontrolle über die AudioEinstellungen.
Erste Schritte mit der ToneFactory™
Wenn Sie sich mit der ToneFactory™ vertraut machen,
sollten Sie dazu eine Aufnahme verwenden,die Sie gut
kennen; beispielsweise eine Ihrer Lieblings-CDs.Auf diese
Weise können Sie die möglichen Klangveränderungen
besser beurteilen. Beachten Sie jedoch,daß
Audioaufnahmen auf CDs in aller Regel bereits
komprimiert sind, so daß Sie möglicherweise die
Wirkungsweise des Opto Compressors nicht besonders gut
beurteilen können.Wenn dies der Fall ist,verwenden Sie
statt einer Audio-CD einen Sampler (sofern verfügbar),
oder erstellen Sie selber eine Aufnahme ohne Kompression
und geben Sie diese mit der ToneFactory™ wieder.
Am einfachsten lernen Sie die ToneFactory™ kennen,
indem Sie zunächst jeden Regler einzeln anwenden und
dann wieder in die Ausgangsstellung bringen.Wenn Sie
dann ein Gefühl für die Komponenten der ToneFactory™
haben, können Sie die einzelnen Bereiche kombinieren,
um ihr ganzes kreatives Potential zu entdecken.
Drehen Sie niemals alle Gain- und Level-Regler
gleichzeitig auf maximale Einstellung!
Der Discrete Transistor Input
Dieser Bereich der ToneFactory™ ist ein Vorverstärker,mit
dem Sie den Pegel des Eingangssignals einstellen können.
Instr. IP – ist der Instrumenten-Eingang der Tone Factory.
Dies ist ein Eingang mit hoher Impedanz, an den Sie eine
E-Gitarre oder einen E-Bass anschließen können, oder
auch einen Synthesizer mit niedriger Ausgangsleistung.
Mic, Line, Inst – dienen zur Auswahl des Eingangs. Da immer
nur einer dieser Schalter aktiv sein kann, können Sie die
drei Eingänge gleichzeitig belegen und dann mit diesen
Schaltern das gewünschte Signal auswählen.
Gain – Dieser Regler legt die Verstärkung des
Eingangssignals fest.Während ein Signal am Eingang der
ToneFactory™ anliegt, drehen Sie den Gain-Regler auf,
bis die SIG-Leuchtdiode aufleuchtet. Drehen Sie den
Regler weiter auf, bis SIG- und O/L-Leuchtdioden
eine optimale Einstellung anzeigen.
SIG LED – Die SIG-Leuchtdiode sollte aufleuchten, sobald
ein Signal am Eingang der ToneFactory™ anliegt.
O/L LED – Diese Leuchtdiode darf nur an den lautesten
Stellen des Signals aufleuchten.Wenn die O/LLeuchtdiode ständig leuchtet oder wenn Sie Verzerrungen
wahrnehmen, sollten Sie den Eingangspegel mit dem
Gain-Regler reduzieren.
page 10
Deutch
CONNECTING TO CD
!
Page 11
page 11
Deutch
gewünschten Instrumente zu hören sind. Danach
deaktivieren Sie den To Audio-Schalter wieder.
Low – Dieser Regler entfernt unerwünschte tiefe
Frequenzen aus dem Signal. Der Filter arbeitet sehr
subtil, so daß Sie den Baßbereich des Signals dämpfen
können, anstatt ihn komplett abzuschneiden.
High – Dieser Regler entfernt hohe Frequenzen aus dem
Signal. Dieser Filter greift stärker in den Klang ein als
der Low-Filter,aber seine Auslegung gestattet es,hohe
Frequenzen auszublenden, ohne daß das Signal dumpf
wirkt (dies ist besonders nützlich bei akustischen
Gitarren).
Corrective – Wenn dieser Schalter aktiv ist, entfernt der
Low-Filter alle Frequenzen unter der angegebenen
Frequenz, und der High-Filter entfernt alle Frequenzen
über der angegebenen Frequenz.
Der Opto Compressor
Der Opto Compressor arbeitet wie eine automatische
Lautstärkesteuerung.Wenn das Eingangssignal zu laut wird,
senkt er die Lautstärke ab.Die Dynamik (also die
Unterschiede zwischen leisen und lauten Passagen) wird
hierbei verringert, da jeder Anstieg der Lautstärke über
einen bestimmten Wert (den «Threshold») die Absenkung
der Lautstärke auslöst.Auf diese Weise wird der Verlauf
einer Aufnahme «geglättet»,da die Unterschiede zwischen
leisen und lauten Passagen ausgeglichen werden.
In – Drücken Sie den In-Schalter,um den Opto
Compressor zu aktivieren.Der Opto Compressor ist
aktiv, wenn die Taste leuchtet.
Threshold – Mit diesem Regler stellen Sie ein, ab welcher
Eingangslautstärke der Opto Compressor mit der
Kompression des Signals beginnt. Das Signal wird nur
dann abgesenkt, wenn es den hier eingestellten Wert
überschreitet. Leisere Passagen werden in ihrer natürlichen
Dynamik nicht verändert. Je niedriger der ThresholdWert ist, um so stärker fällt die Kompression aus.
Meter – Hier können Sie sehen, wie stark die Kompression
das Signal beeinflußt. Da die Kompression eine
Reduzierung der Lautstärke bewirkt, fällt
dementsprechend auch diese Anzeige ab, sobald der
Effekt einsetzt. Eine Absenkung um 9 dB wird also in
dieser Anzeige als 9 angezeigt.
Output – Hier legen Sie die Ausgangslautstärke für das
komprimierte Signal fest. Da ein Signal durch
Kompression leiser wird,sollten Sie mit diesem Regler
die Lautstärke wieder etwas anheben,um den Effekt des
Kompressors zu kompensieren.Um die Lautstärke von
komprimiertem und unkomprimiertem Signal zu
vergleichen, schalten Sie den Opto Compressor mit dem
In-Schalter an oder ab.
Release – Mit dem Release-Regler legen Sie fest, wie
schnell die Kompression wieder aufgehoben wird,wenn
das Signal unter den eingestellten Threshold fällt. Je
kürzer die Release-Wert, um so lauter wirkt das Signal.
Fast – Verwenden Sie den Fast-Schalter, um die
Einschwingphase eines Signals (beispielsweise das Zupfen
einer Gitarrensaite) zu komprimieren. Bei aktiviertem
Fast-Schalter wirkt der Gesamtklang wesentlich stärker
komprimiert.Verwenden Sie diesen Schalter nicht, wenn
Sie einen druckvollen Sound wünschen.
Hard Ratio – Verwenden Sie Hard Ratio für einen sehr
«flachen», stark komprimierten Sound.Verwenden Sie
Page 12

ToneFactory™ verbinden,den gewünschten Grad an
Verzerrung mit dem Overdrive-Regler einstellen und die
ToneFactory™ direkt an Ihr Aufnahmegerät anschließen.
Bright – Mit diesem Schalter deaktivieren Sie die
Lautsprecher-Simulation der Overdrive-Baugruppe.
Der Parametric Equaliser
Der Parametric Equaliser ist ein ausgereiftes Werkzeug zur
Klanggestaltung, das ausgewählte Frequenzbereiche anhebt
oder absenkt und damit zur Klanggestaltung eingesetzt
werden kann.Normalerweise sollten Sie mit dem Tone
Controller den Grundcharakter des Klangs festlegen und
den Parametric Equaliser dann für die Feinabstimmung
einsetzen. Sie können ihn beispielsweise verwenden,um
klangliche Schwächen des Eingangssignals «auszubessern»
(indem Sie problematische Frequenzbereiche entfernen)
oder um eine Spur beim Abmischen hervorzuheben.
In – Drücken Sie diesen Schalter,um den Parametric
Equaliser zu aktivieren. Der Parametric Equaliser ist
aktiv, wenn die Taste leuchtet.
Band 1 – Hier stimmen Sie den Bassbereich ab.
Band 2 – Hier stimmen Sie Mitten und Höhen ab.
dB – Dieser Regler dient zur Anhebung oder Absenkung
des Frequenzbereichs, den Sie mit dem Freq-Regler für
dieses Band festgelegt haben.
Freq Mit diesem Regler geben Sie die Mittenfrequenz des
Frequenzbandes an, das Sie absenken oder anheben wollen.
Bell – Drücken Sie diesen Schalter,um die Charakteristik
des bearbeiteten Frequenzbereichs zu ändern.Wenn er
leuchtet, hat der verstärkte oder abgeschwächte
Frequenzbereich die Form einer Glocke.Dadurch wird
die – mit dem Freq-Regler gewählte – Mittenfrequenz
besonders deutlich hörbar angehoben beziehungsweise
abgesenkt, da die Wirkung des Filters zu den Rändern
des Frequenzbandes hin abnimmt.
Fine – Drücken Sie diesen Schalter,um das vom Equalizer
erfaßte Frequenzband zu verkleinern. Normalerweise
sollten Sie diesen Schalter zusammen mit dem BellSchalter verwenden,um einen schmalen, störenden
Bereich (beispielsweise Klappern von Bundstegen bei
einer Gitarre) möglichst effektiv «auszuschneiden»..
page 12
Deutch
SHELF / BELL / FINE
ƒ
Normal Mode – Shelf
ƒ
+18
–18
0dB
+18
–18
0dB
Bell Mode
Fine
Page 13

page 13
Deutch
des Threshold-Wertes schließt – beziehungsweise im
Hold-Modus die Zeit, die es bis zum Schließen noch
geöffnet bleibt (siehe hierzu auch die Beschreibung des
Hold-Schalters). In Position F («Fast») ist diese Zeit am
kürzesten, in Position S («Slow») am längsten. Im
Release-Modus wird das Gate nach dem Unterschreiten
einer bestimmten Lautstärke kontrolliert geschlossen.
Verwenden Sie den Hold-Modus hingegen, wenn Sie
zum Beispiel ein perkussives Signal mit einer sehr leisen
Hallfahne aufnehmen und diese Hallfahne noch
«mitnehmen» wollen.
Fast – Wenn dieser Schalter leuchtet, öffnet das Gate sich
besonders schnell, wenn das Signal den eingestellten
Threshold-Wert überschreitet.Aktivieren Sie diesen
Schalter bei Signalen mit sehr kurzer Einschwingphase
(beispielsweise einer Snare Drum),um zu verhindern,
daß das Gate den Anfang des Signals abschneidet.
Deep – Wenn dieser Schalter leuchtet, wird das Signal beim
Aktivieren des Gates unter die Hörgrenze abgesenkt.
Diese Betriebsart sollten Sie nur beim Abmischen zum
«Säubern» von Signalen mit starken Nebengeräuschen
verwenden.Beim Aufnehmen kann der Effekt zu
drastisch wirken und zu hörbaren Aussetzern (Dropouts)
führen.
Shut – Wenn dieser Schalter leuchtet, ist das Noise Gate
vollständig geschlossen,und kein Signal gelangt hindurch.
Der Master Fader
Verwenden Sie den Master Fader, um die Ausgangslautstärke
der ToneFactory™ auf die Eingangsempfindlichkeit des
nächsten Gerätes im Signalweg (beispielsweise Ihren DATRecorder oder den Harddisk-Recorder) abzustimmen.
Beim Einstellen der Ausgangslautstärke sollten Sie immer
mit der niedrigsten Einstellung beginnen und die Lautstärke
langsam auf den gewünschten Wert erhöhen.Wenn Sie mit
einer zu hohen Einstellung beginnen, beschädigen Sie
möglicherweise den Eingang des nachfolgenden Gerätes.
Wenn Sie die ToneFactory™ in den Insert-Weg eines
Mischpultkanals einschleifen, sollten Sie den Master Fader
normalerweise auf «0» einstellen und die Lautstärke dann
mit den Reglern des Mischpultes einstellen.
Wie Sie mit der ToneFactory™
einen optimalen
E-Gitarren-Sound erzielen
Es ist nicht schwierig, mit der ToneFactory™
Gitarrenaufnahmen in optimaler Qualität zu machen.
Schließen Sie die Gitarre an den Instrumenteneingang an und
nehmen Sie die gewünschten Einstellungen vor. Dabei kann
vor allem der Tone Controller sinnvoll eingesetzt werden.
Der Hi-Mid-Schalter im Tone Controller-Bereich sollte
aktiviert sein, um den Frequenzbereich der Gitarre
optimal zu erfassen.
Wenn Sie mit dem eingebauten Verzerrer (Overdrive)
arbeiten, sollte der Bright-Schalter nicht aktiv sein,
damit Ihnen auch die Lautsprechersimulation zur
Verfügung steht.
Zusätzliche Effekte integrieren
Schalten Sie alle Komponenten der ToneFactory™ ab
(Bypass-Betrieb), stellen Sie mit dem Tone Controller den
gewünschten Grundcharakter ein und schalten Sie dann
die externen Effekte hinzu, die Sie verwenden wollen.
Page 14

werden sollte,wird hier mit starker Kompression gearbeitet.
Stellen Sie dazu den Opto Compressor wie folgt ein:
Experimentieren Sie mit dem Release-Regler und dem
Hard Ratio-Schalter,um den gewünschten Sound zu
erzielen Wenn der Bass möglichst «knackig» klingen sollte,
darf der Fast-Schalter des Opto Compressors nicht aktiv
sein.Wenn der Bass eher «rund» klingen soll,aktivieren Sie
den Fast-Schalter,um die Einschwingphase stärker zu
komprimieren.
Wie Sie mit der ToneFactory™
bei akustischen Gitarren einen
optimalen Sound erzielen
Um die ToneFactory™ mit einem optimalen Eingangssignal
zu versorgen, sollten Sie einen hochwertigen PiezoTonabnehmer verwenden. Beim Mikrofonieren akustischer
Gitarren ist die Mikrofonposition besonders wichtig.
Die Aufstellung der Mikrofone
Erste Variante: Plazieren Sie das Mikrofon in etwa 15 cm
Abstand vom Klangloch. So erzielen Sie ein besonders
lautes Signal, das allerdings bassbetont und
schlimmstenfalls dröhnend klingt. Schalten Sie daher die
Filter der ToneFactory™ hinzu und verwenden Sie den
Low-Regler,um die Bässe wieder etwas abzusenken.
Auch könne Sie in der Regel einen helleren Klang
erzielen, indem Sie das Mikrofon in Richtung des Stegs
verschieben.
Zweite Variante: Plazieren Sie das Mikrofon vor der
Gitarre in etwa 60 cm Abstand vom Klangloch. So
nehmen Sie nicht nur die Gitarre, sondern auch den
Klang des Raumes auf, in dem sie gespielt wird.
Dritte Variante: Plazieren Sie das Mikrofon in etwa 15
cm Höhe über der Gitarre und richten Sie es auf den
Steg. So erzielen Sie einen höhenreichen, aber natürlich
wirkenden Klang.
Den Gitarrenklang bearbeiten
Verwenden Sie Band 1 des Equalizers mit aktiviertem
Bell-Schalter,um den spezifischen Klang des
Gitarrenkorpus zu betonen oder abzuschwächen. Stellen
Sie den Freq-Regler auf etwa 240 Hz ein und
verwenden Sie den dB-Regler, um den Klang voller
oder schlanker zu machen.
Verwenden Sie Band 2 des Equalizers mit aktiviertem
Bell-Schalter,um Präsenz und Klarheit des Klangs zu
verbessern. Heben Sie mit dem Freq-Regler den
Frequenzbereich von etwa 2,5 – 5 kHz an.
Um einen besonders «schlanken», brillanten Klang zu
erzielen, entfernen Sie mit dem Low-Regler im FilterBereich die tiefen Frequenzen.
Klappern von Bundstegen und andere
Nebengeräusche eliminieren
Sie können den Parametric Equaliser der ToneFactory™
beim Abmischen verwenden,um einen schmalen,
störenden Frequenzbereich aus dem Signal zu entfernen;
beispielsweise das Klappern von Bundstegen oder
«rasselnde» Saiten. Gehen Sie dazu so vor:
1. Aktivieren Sie in Band 2 des Equalizers den Bell-Schalter
und drehen Sie den dB-Regler auf. Der Fine-Schalter
sollte zu diesem Zeitpunkt nicht angeschaltet sein.
2. Drehen sie den Freq-Regler, bis der störende
Frequenzbereich deutlich hervortritt.
3.Aktivieren Sie den Fine-Schalter.Möglicherweise müssen
Sie den Freq-Regler nun noch etwas nachstellen,um die
zu isolierende Frequenz «einzukreisen».
4. Drehen Sie nun den dB-Regler herunter, um den
störenden Frequenzbereich abzuschwächen.Sie sollten
diesen Frequenzbereich allerdings nicht vollständig
entfernen, da es sonst zu einem unnatürlich klingenden
«Loch» im Klangbild kommt.
page 14
Deutch
Page 15

Snare Drum: Um den Klang voller wirken zu lassen,
verwenden Sie Band 1 des Parametric Equaliser mit
einer Freq-Einstellung von 200 Hz und aktiviertem
Bell-Schalter. Um die Snare aggressiver und heller
klingen zu lassen, verwenden Sie Band 2 mit einer FreqEinstellung von 5 kHz und aktiviertem Bell-Schalter.
Wenn die Snare klarer klingen soll, verwenden Sie den
Tone Controller oder die Filter, um den Bassbereich
etwas zu dämpfen.
Tom Toms: Um den Klang voller wirken, verwenden Sie
Band 1 mit einer Freq-Einstellung von etwa 200 Hz für
High Toms und etwa 100 Hz für Low Toms; der BellSchalter sollte in jedem Fall aktiviert sein. Um die Toms
aggressiver und heller klingen zu lassen,verwenden Sie
Band 2 mit einer Freq-Einstellung von 5 kHz und
aktiviertem Bell-Schalter.
Bassdrum: Um möglichst viel »Punch« zu erzielen,
verwenden Sie Band 2 mit einer Freq-Einstellung von
etwa 2,5 kHz und aktiviertem Bell-Schalter.
Becken: Um einen möglichst hellen, brillanten Klang zu
erzielen, verwenden Sie Band 2 mit einer FreqEinstellung von 10 kHz oder höher.Der Bell-Schalter
sollte dabei nicht aktiviert sein.
Wie Sie Einstreuungen von anderen
Schlagzeuginstrumenten entfernen
Biem Aufnehmen von Schlagzeug kann es zu
Einstreuungen von anderen Teilen des Drumkits kommen.
So nimmt beispielsweise das Mikrofon für die Snare oft
auch Bassdrum und Hi-Hat mit auf. Beim Abmischen
können Sie die Filter oder das Noise Gate der ToneFactory™
verwenden,um diese Einstreuungen zu entfernen.
Entfernen von Einstreuungen mit den Filtern:Wenn Becken
auf der Bassdrum-Spur zu hören sind, aktivieren Sie den
Corrective-Schalter und stellen Sie den High-Reglerauf
etwa 5 kHz ein.Wenn hingegen auf der Beckenspur
Intstrumente mit tieferen Frequenzen stören (beispielsweise
die Bassdrum), aktivieren Sie den Corrective-Schalter und
stellen Sie den Low-Regler auf etwa 500 Hz ein.
Entfernen von Einstreuungen mit den Noise Gate:
1. Schalten Sie die Spur solo,um herauszufinden, wie stark
die Einstreuungen sind.
2. Der Hold-Schalter darf nicht aktiviert sein, damit die
natürliche Ausklingphase der Instrumente nicht
abgeschnitten wird.
3. Aktivieren Sie im Filter-Bereich den To Audio- und den
To Gate-Schalter. Justieren Sie die Low- und HighRegler so,daß die Einstreuung nicht mehr hörbar ist,
das Nutzsignal aber nicht beeinträchtigt wird. Bei der
Bassdrum-Spur sollten Sie zum Beispiel beide Regler
soweit wie möglich gegen den Uhrzeigersinn drehen.
4. Deaktivieren Sie den To Audio-Schalter wieder. Stellen
Sie den Threshold-Regler des Noise Gates so ein, daß
das Gate nur öffnet, wenn Ihr Nutzsignal zu hören ist.
Achten Sie besonders darauf, daß die Einschwingphase
nicht abgeschnitten wird. Möglicherweise müssen Sie
den Fast-Schalter aktivieren, um den «Punch» des
Signals zu erhalten.
5. Stellen Sie den Release-Regler so ein, daß Ihr
Nutzsignal nicht abrupt abgeschnitten wird, sondern
möglichst natürlich ausklingt.
6. Um den klassischen «Gated Snare»-Effekt zu erzielen,
aktivieren Sie den Hold-Schalter und stellen dann mit
dem Release/Hold-Regler die gewünschte Laufzeit für
das Reverb ein.
page 15
Deutch
Page 16

Découverte du processeur
La façon la plus simple de tester les puissantes fonctions du
ToneFactory™, en particulier si vous n’en maîtrisez pas
bien les divers étages, c’est d’essayer tous les réglages tour à
tour. Lisez les sections qui suivent avec attention, elles vous
renseigneront sur le fonctionnement respectif des différents
étages de l’appareil.
Pour apprendre à connaître l’appareil, utilisez-le sur un
morceau de musique familier (vous pouvez par exemple
utiliser votre C.D. préféré).En travaillant sur un morceau
que vous connaissez bien, vous saisirez mieux le résultat lié
à chaque type de traitement. Notez cependant que les
morceaux d’un C.D. sont déjà compressés,ce qui rend
difficile les essais de l’Opto-compresseur.Si c’est le cas,
essayez d’utiliser un échantillonneur (si vous disposez d’un
tel matériel), ou utilisez vos propres morceaux enregistrés
sans compression avec le ToneFactory™.
Ne pas mettre tous les néglges de gain et les contrôles
au maximum tous en même temps.
Utilisation de l’entrée à
transistors
Cette section préamplificatrice permet d’adapter le niveau
d’entrée du signal.
Instr IP – Entrée instrument de l’appareil. Cette entrée
haute impédance vous permet de connecter une guitare
ou une basse électrique sans charger le micro de
l’instrument, ou encore de connecter un synthétiseur à
sortie basse impédance .
Mic, Line, Inst – Ces touches permettent de sélectionner le
signal d’entrée.Vous pouvez connecter jusqu’à trois
sources d’entrée à l’appareil. Une seule touche à la fois
peut être active, ce qui vous permet de connecter les
trois sources et d’en sélectionner une seule.
Gain –Veillez à ce qu’un signal soit connecté en entrée de
l’appareil, puis réglez lentement le Gain jusqu’à ce que
la led SIG LED s’allume. Continuez jusqu’à obtenir un
réglage de Gain optimum indiqué par les leds SIG et
O/L (surcharge).
Led SIG – Témoigne de la présence du signal en entrée de
l’appareil.
Led O/L (overload) – Peut s’allumer de temps en temps, mais
uniquement sur les passages les plus forts. Si la led O/L
reste allumée pendant plus longtemps, ou si vous détectez
la moindre distorsion à l’écoute sur les passages les plus
forts, diminuez le réglage de Gain.
page 16
CONNECTING TO CD
!
Franç ais
Raccondement avec un CD
Page 17

page 17
Français
une action assez douce, ce qui vous permet de modeler
les basses fréquences sans les supprimer complètement. .
High – Ce réglage permet de supprimer les aigus indésirables
du signal. Le filtre High est plus efficace que le filtre
Low, ce qui vous permet de supprimer les bruits de
souffle, bien que sa conception autorise une atténuation
des hautes fréquences sans pour autant que le son final
perde en brillance (ceci est particulièrement vrai sur les
guitares acoustiques).
Corrective – Lorsque la touche Corrective est allumée, le
filtre Low supprime toutes les fréquences inférieures à la
fréquence sélectionnée. Le filtre High supprime toutes
les fréquences supérieures à la fréquence sélectionnée.
Utilisation de l’Opto-compresseur
L’Opto-compresseur agit comme une commande automatique
de volume,atténuant le signal lorsque son niveau est trop
important. Les variations d’amplitude entre les passages
faibles et les passages forts sont moindres grâce à une
atténuation automatique du gain lorsque le niveau du signal
dépasse un seuil prédéterminé (Threshold). Cet effet permet
donc d’obtenir un niveau plus constant dans un morceau,
évitant, par exemple, d’avoir un chant trop fort ou trop
faible dans le mixage.
In – Cette touche est allumée lorsque la fonction Opto-
compresseur est en service.
Threshold – Réglez le seuil pour définir quand l’Opto-
compresseur doit compresser le signal - plus le seuil est
bas, plus la proportion de signal compressé sera grande.
Le réglage de seuil permet de déterminer le niveau à
partir duquel le signal doit être compressé, de sorte que
les passages les plus faibles conservent leur plage
dynamique naturelle.Seuls les passages les plus forts sont
compressés (ceux dont le niveau dépasse le seuil).
Afficheur – L’afficheur permet de visualiser la compression
appliquée au signal. Étant donné que la compression
atténue le signal, la lecture sur l’afficheur baisse lorsque
la compression est appliquée : par exemple, une chute de
9 dB se lit « 9 » sur l’afficheur
Output – Utilisez le potentiomètre Output pour régler le
volume de sortie du signal compressé. Le réglage Output
permet de compenser la chute de niveau liée au
processus de compression.Comparez le niveau du signal
traité avec le signal d’entrée à l’aide de la touche In.
Release – Utilisez le potentiomètre Release pour régler le
volume sonore moyen appelé « Loudness ». Plus le
rétablissement est rapide,plus le niveau sonore perçu
semble élevé.
Fast – Utilisez la touche Fast pour compresser l’attaque
initiale du signal (par exemple,pour vous débarrasser du
coup de médiator sur un passage de guitare). Dans ce
cas, ce type de compression tend à être plus facilement
décelable que lorsque la fonction Fast n’est pas active,et
délivre un son avec une compression plus évidente (ce
qui peut être l’effet recherché).Pour obtenir un son avec
du punch, n’utilisez pas la touche Fast.
Hard Ratio – Utilisez la touche Hard Ratio pour obtenir un
son très plat et compressé. Ne pas utiliser la fonction
Hard Ratio si vous souhaitez conserver de la dynamique
initiale au signal.
Page 18

Utilisation du correcteur
paramétrique
Le correcteur paramétrique est un correcteur de tonalité
sophistiqué, permettant d’accentuer ou d’atténuer les
bandes de fréquences sélectionnées et de modifier le rendu
sonore du signal. Le Tone Controller sert normalement à
modeler la sonorité globale du signal ; il vous suffit ensuite
d’utiliser le correcteur paramétrique pour affiner le son.
Par exemple, vous pouvez l’utiliser pour résoudre des
problèmes liés au son de départ (en atténuant certaines
fréquences), ou pour qu’une piste ressorte du mixage (en
accentuant certaines fréquences).
La bande 1 est utilisée pour régler les basses et la bande 2
pour régler les médiums et les aigus.
In – Lorsqu’elle est allumée, cette touche permet de mettre
le correcteur paramétrique en service.
Band 1 – Permet le réglage des graves.
Band 2 – Permet le réglage des aigus.
dB – Permet d’accentuer ou d’atténuer la fréquence
sélectionnée avec le potentiomètre Freq.
Freq – Sélectionne la fréquence centrale de la bande à
atténuer ou à accentuer.
Bell – Lorsque la touche Bell est enfoncée, le filtre se
transforme en filtre coupe-bande/passe-bande dit « en
cloche » (voir illustration). Cette fonction vous permet
de rendre l’accentuation ou l’atténuation plus sélective :
plus vous vous éloignez de la fréquence du filtre, plus
son effet est réduit.
Fine – Utilisez cette fonction pour réduire la largeur de la
bande de fréquences affectée. Cette fonction est
habituellement utilisée conjointement avec la touche
Bell, pour atténuer fortement une bande très étroite de
fréquences indésirables (les bruits de fret de guitare,
par exemple).
Utilisation du noise gate
Le noise gate réduit le niveau des passages les plus faibles du
morceau et permet ainsi de supprimer les bruits de fond.
In – La touche est allumée lorsque le noise gate est en service.
page 18
Français
SHELF / BELL / FINE
ƒ
Normal Mode – Shelf
ƒ
+18
–18
0dB
+18
–18
0dB
Bell Mode
Fine
Page 19

page 19
Français
au mixage pour supprimer le bruit de fond d’un signal,
mais s’avère bien trop drastique à l’enregistrement,
causant des coupures du signal.
Shut – Lorsque le témoin lumineux Shut est allumé, la
porte est fermée et le signal est bloqué.
Utilisation du Master Fader
Le Master Fader est utilisé pour adapter le niveau de sortie
du ToneFactory™ au niveau d’entrée de l’appareil connecté
en aval de la chaîne (DAT ou carte sonore d’ordinateur).
Lorsque vous réglez le niveau de sortie,commencez
toujours par un niveau faible et augmentez-le progressivement
jusqu’à atteindre le bon niveau – ne commencez pas avec
un niveau de sortie élevé,car cela risquerait d’endommager
l’appareil connecté en aval de la chaîne.
Si vous insérez le ToneFactory™ sur une voie de console
de mixage, vous devez normalement régler le Master Fader
sur 0 et régler les niveaux en utilisant la console.
Obtention d’un son de
guitare électrique de
bonne qualité
Connectez la guitare à l’entrée instrument : vous devez
directement entendre un son. Utilisez le Tone Controller
pour obtenir le son spécifique que vous recherchez :
La touche Hi-Mid doit être allumée.Les fréquences de
réglage sont ainsi adaptées aux fréquences de la guitare.
Lorsque vous utilisez l’overdrive,la touche Bright ne
doit pas être allumée afin de bénéficier de la simulation
de haut-parleur.
Ajout d’effets par pédales
Placez tous vos effets en bypass et utilisez le Tone
Controller pour obtenir le son recherché,puis activez
l’effet que vous souhaitez utiliser.
Si les effets ajoutent du bruit de fond, utilisez le Noise
Gate pour le supprimer.Vérifiez que le témoin Hold
soit éteint et réglez le potentiomètre Release/Hold afin
que le noise gate ne tronque pas la fin du signal.
Si nécessaire,utilisez le correcteur paramétrique pour
modifier le son une fois les effets appliqués au signal. Par
exemple,si vous avez ajouté une réverbération trop
brillante, utilisez la bande 2 du correcteur (avec le
témoin lumineux Bell éteint) pour atténuer le niveau
des aigus. Si vous utilisez de nombreux effets et si le son
manque de précision, utilisez la bande 2 avec le témoin
de la touche Bell allumé pour accentuer les fréquences
voisines de 2,5 kHz.
Utilisation de la compression et de l’overdrive
La fonction Overdrive du ToneFactory™ est un outil
dynamique, permettant d’utiliser le réglage de niveau du
signal d’entrée pour faire varier la saturation qui lui est
appliquée. Par conséquent, en faisant varier la dynamique
de votre jeu (en passant d’une attaque retenue à une
attaque franche), vous pouvez influencer le taux de
saturation obtenu, ce qui est particulièrement intéressant en
Blues, où vous pouvez donner du mordant à votre son en
jouant de façon plus agressive.
Si vous souhaitez vous assurer que votre guitare est saturée
de façon homogène (en particulier avec un son fortement
distordu), utilisez l’Opto-compresseur pour réduire la
dynamique du signal. Réglez le seuil assez bas et augmentez
Page 20

propriétés acoustiques de la pièce, ce qui peut être un
avantage ou un inconvénient !
Placez le micro devant la guitare, à environ 15 cm audessus de la guitare,pointé vers le chevalet pour obtenir
un son brillant mais naturel.
Son de guitare
Pour accentuer ou atténuer le son issu du corps de la
guitare,utilisez la bande 1 du correcteur paramétrique,
avec la fonction Bell active (témoin allumé). Réglez la
fréquence de filtre aux alentours de 240 Hz et faites
varier le potentiomètre dB,selon l’épaisseur que vous
souhaitez donner au son.
Afin d’améliorer la présence et la clarté sonore,utilisez la
bande 2 du correcteur paramétrique avec la fonction
Bell active (témoin allumé) et accentuez les fréquences
comprises entre 2,5 kHz et 5 kHz.
Pour obtenir un son léger et brillant, utilisez les filtres et
réglez le potentiomètre Low pour supprimer les basses.
Suppression du bruit de fret
Lors du mixage, vous pouvez utiliser le correcteur
paramétrique pour supprimer une fréquence
particulièrement gênante (par exemple pour supprimer un
bruit de corde qui frise ou un bruit de fret). Pour
supprimer une fréquence spécifique :
1. Sur la bande 2, appuyez sur la touche Bell et ajoutez du
gain à l’aide du potentiomètre dB.Veillez à ce que le
témoin de la touche Fine ne soit pas allumé.
2. Réglez la fréquence à l’aide du potentiomètre Freq
jusqu’à accentuer la fréquence à supprimer. Par exemple,
lorsque vous avez isolé le bruit de fret,celui-ci doit
clairement être plus fort lorsque le correcteur
paramétrique est en service.
3. Appuyez sur la touche Fine.Vous pouvez alors avoir
besoin d’affiner le réglage de la fréquence parasite.
4. Réduisez le gain (potentiomètre dB) pour supprimer la
fréquence indésirable.Veillez à ne pas abuser de
l’atténuation avec le potentiomètre dB, au risque
d’affecter la sonorité globale de l’instrument (en traitant
toutes les occurrences de la fréquence sélectionnée).
Obtention d’un son de
synthétiseur de bonne
qualité
Si le synthétiseur génère un bruit de fond important
(par exemple si vous enregistrez un vieux synthétiseur),
utilisez les filtres pour vous en débarrasser.Avec le
témoin de la touche Corrective éteint, réglez le
potentiomètre High pour supprimer le bruit.Vous
devriez pouvoir supprimer les bruits parasites sans pour
autant affecter le son du synthétiseur.
Si le bruit de fond est particulièrement important et si les
filtres ne suffisent pas,utilisez le noise gate. Si vous enregistrez
un son dont le niveau chute très rapidement,utilisez la
fonction Hold. Si vous enregistrez un son dont le niveau
chute très lentement (des cordes par exemple),assurezvous que le témoin de la touche Hold n’est pas allumé.
L’overdrive est très utile pour créer des effets, en
particulier à la volée,en ajoutant ou en enlevant de la
saturation à l’aide du potentiomètre Overdrive. Ceci est
normalement réalisé lors du mixage. Pour obtenir des
effets de dégradation sonore (dits « Lo-Fi »), veillez à ce
que la touche Bright ne soit pas enfoncée.
Obtention d’un son de
batterie de bonne qualité
Lors du mixage, vous pouvez utiliser le correcteur
paramétrique, les filtres et le Tone Controller, si nécessaire,
pour améliorer la qualité sonore de la batterie enregistrée :
Caisse claire: Pour donner du corps à votre son, utilisez la
bande 1 du correcteur paramétrique avec la fonction
Bell active (le témoin doit être allumé),et sélectionnez
page 20
Français
Page 21

Si vous entendez un signal basses fréquences sur une
piste de cymbale (la grosse caisse par exemple), utilisez
les filtres avec la fonction Corrective active, en réglant le
potentiomètre Low sur environ 500 Hz.
Utilisation du noise gate
1. Placez la piste en solo pour évaluer l’ampleur de la
diaphonie.
2. Vérifiez que la touche Hold n’est pas allumée pour
conserver une chute naturelle au niveau du signal.
3. Dans la section des filtres, activez les touches To Audio et
To Gate. Réglez les potentiomètres Low et High jusqu’à
éliminer la diaphonie mais sans affecter l’instrument
enregistré. Par exemple,sur la piste de grosse caisse,
réglez les potentiomètres Low et High au minimum.
4. Désactivez la fonction To Audio.Dans la section noise
gate, réglez le seuil de sorte que seul le signal enregistré
à conserver passe.Il vous suffit alors d’écouter l’attaque
pour contrôler que le noise gate ne tronque pas le début
du signal. Si le signal est tronqué, appuyez sur la touche
Fast pour activer la fonction et ainsi restituer les
transitoires sur l’attaque.
5. Réglez le rétablissement (Release) de façon à ne pas
couper la fin du signal et lui conserver une enveloppe
naturelle.
6. Pour obtenir un effet de caisse claire avec gate,appuyez
sur la touche Hold et réglez le potentiomètre
Release/Hold pour ne conserver que la chute de la
réverbération.
page 21
Français
Page 22

page 22
Conoscere la Macchina
Quando usate la macchina per la prima volta, fatelo con
una traccia che conoscete bene (ad esempio una del vostro
CD preferito); lavorare con del materiale con cui si ha
familiarità permette di valutare i risultati in modo più
immediato.Tenete presente, comunque, che se i suoni che
ascoltate sono già stati compressi per il CD potreste avere
difficoltà a sentire gli effetti dell’Opto-Compressore.In
questo caso sarebbe meglio provare con suoni campionati o
addirittura registrare direttamente una nuova traccia per poi
riascoltarla usando il ToneFactory™.
Il modo più semplice per esplorare le potenzialità creative
offerte dal ToneFactory™, specialmente se non conoscete
bene le varie sezioni, è quello di provare gli effetti che i
singoli controlli producono sul suono intervenendo prima
su uno solo alla volta (riportandolo alla posizione iniziale
prima di passare al successivo), poi su tutti assieme
(scoprendo tutta la ‘potenza’ nascosta nel ToneFactory™ !).
Non girare tutti i controlli di guadagno e livello
al massimo.
Uso dello Stadio di Ingresso a
Transistor Discreti
Questo stadio costituisce la sezione di preamplificazione
che serve a portare il livello del segnale al valore ottimale.
Instr IP – E’ l’ingresso strumentale dell’unità.E’ un ingresso
ad alta impedenza che permette di collegare una chitarra
od un basso elettrici senza caricarne i pickups, oppure
un synth con livello di uscita particolarmente basso.
Mic, Line, Inst – Permettono di selezionare il connettore di
ingresso all’unità. Poiché questi ingressi possono essere
attivi solo uno alla volta è possibile collegare fino a tre
strumenti all’unità, e quindi usare i tre tasti per passare
dall’uno all’altro.
Gain – Con il segnale presente in ingresso all’unità agite
gradualmente sul controllo Gain finché il LED SIG
inizia ad illuminarsi. Continuate finché il segnale non ha
raggiunto il livello ottimale,ovvero quando:
LED SIG – Si illumina ogni volta che il segnale è presente in
ingresso.
LED O/L – (‘overload’:sovraccarico, N.d.T.) si illumina
occasionalmente, ma solo quando il segnale di ingresso
diventa particolarmente forte. Se il LED O/L rimane
acceso per periodi troppo lunghi o se sentite l’unità
distorcere il segnale in occasione dei picchi d massima
intensità, è bene ridurre il valore del guadagno.
CONNECTING TO CD
!
Italiano
Page 23

page 23
Italiano
essere usato per ritoccare con precisione la risposta alle
basse frequenze senza stravolgerla.
High – Elimina l’eventuale eccesso di treble nel segnale. Il
filtro High, usato per eliminare rumore e durezza del
segnale, è più aggressivo del Low ed è stato progettato in
modo da non privare mai, comunque, il segnale della
propria personalità (eccellente con una chitarra acustica).
Corrective – Quando è attivo (tasto illuminato), questo filtro
taglia le frequenze che si trovano al di sotto di quella
selezionata, mentre quelle al di sopra sono eliminate dal
filtro High.
Uso dell’Opto-Compressore
Il circuito dell’Opto-Compressore agisce come un
controllo automatico di intensità, diminuendo il volume del
segnale quando questo diventa troppo forte. Il compressore
interviene riducendo il guadagno dell’unità quando il
livello del segnale supera una certa soglia,producendo un
segnale caratterizzato da una minore differenza di intensità
tra i passaggi più silenziosi è quelli più forti. Il risultato è un
suono più uniforme, senza brusche variazioni di intensità
della voce (ad esempio) all’interno del mix.
In – Per attivare la sezione è necessario premere questo tasto
(si illumina).
Threshold – Usate il controllo Threshold per determinare
quando l’Opto-Compressore deve iniziare a comprimere
il segnale - a valori bassi della soglia corrispondono
compressioni maggiori del segnale. Definendo la soglia
fate sì che tutti i passaggi caratterizzati da livelli inferiori
ad essa mantengano il proprio range dinamico originale,
lasciando che la compressione agisca solo su quelli più
forti (superiori alla soglia).
Meter – Il Meter mostra la quantità di compressione
applicata al suono.Poiché la compressione riduce il
volume del segnale,il meter indica la ‘caduta’ di segnale:
un’attenuazione di 9dB corrisponde all’indicazione ‘9’ sul
meter.
Output – Intervenendo sul controllo Output è possibile
definire il livello del segnale di uscita del segnale
compresso.Poiché l’azione di compressione attenua una
parte del segnale, il controllo Output serve a ristabilire il
livello originale.Valutate l’effetto dell’Opto-Compressore
sulla dinamica inserendo e disinserendo alternativamente
la sezione con il tasto In.
Release – Agendo sul controllo Release si determina il
livello medio di intensità del segnale.Più breve è il
tempo di rilascio (release), più intenso sembra il segnale
nel suo complesso.
Fast – Usate il tasto Fast per far comprimere anche gli
attacchi più rapidi del segnale (in modo da eliminare,ad
esempio il tipico suono prodotto da una pennata su una
corda di chitarra). L’effetto prodotto in questo caso è
quello di un suono compresso in maniera più evidente
rispetto al caso con Fast non attivo.Se, tuttavia, ciò che
si desidera è un suono aggressivo (‘punchy’),è
preferibile non usare la funzione Fast.
Hard Ratio – Usate il tasto Hard Ratio quando volete
ottenere un suono dalla dinamica estremamente piatta.
Non usate questo tasto se volete mantenere,anche solo
in parte, la dinamica originale del segnale.
Page 24

page 24
Italiano
Uso dell’Equalizzatore
Parametrico
L’Equalizzatore Parametrico è un sofisticato controllo
tonale che enfatizza o attenua le bande di frequenza
selezionate, così da modificate le caratteristiche sonore del
segnale. Normalmente si impiega il Controllo Tonale per
modificare il segnale nel suo complesso,lasciando
all’Equalizzatore Parametrico le operazioni di rifinitura.
Può essere usato,ad esempio,per intervenire sulle
imperfezioni del segnale (eliminando alcune frequenze) o
per aiutare uno strumento ad emergere dall’interno del mix
(enfatizzandone le frequenze caratteristiche).
In – Per attivare questa sezione è necessario premere il tasto
‘In’ relativo(si illumina).
Band 1 – E’ usata per ritoccare il suono del basso.
Band 2 – Usata per intervenire con precisione sul treble e
sulle medie frequenze.
dB – Controlla l’entità del guadagno o dell’attenuazione
applicata alle frequenze selezionate tramite il controllo Freq.
Freq – Selezionala banda di intervento,centrata attorno al
valore della frequenza centrale.
Bell – Quando è illuminato segnala che al filtro è stata imposta
una curva di risposta a campana (si veda la figura). In questo
modo è possibile enfatizzare la frequenza centrale della
campana dato che l’attenuazione o il guadagno applicati
decrescono rapidamente appena ci si allontana da essa.
Fine – Quando è attivo (illuminato) riduce la larghezza della
banda di intervento dei filtri. Normalmente,viene usato
assieme alla funzione Bell per eliminare una banda
molto stretta d frequenze (ad esempio il rumore
provocato da un tasto della chitarra).
Uso del Noise Gate
Il Noise Gate riduce il volume dei passaggi della prestazione
caratterizzati da una minore intensità e può essere usato per
attenuare del rumore ambientale sovrapposto al segnale.
In – Per attivare questa sezione è necessario premere il tasto
‘In’(si illumina).
Threshold – Stabilisce quando inizia la riduzione del rumore.
Più alta è la sua regolazione,tanto maggiore sarà la
quantità di rumore di fondo che viene attenuata.
SHELF / BELL / FINE
ƒ
Normal Mode – Shelf
ƒ
+18
–18
0dB
+18
–18
0dB
Bell Mode
Fine
Page 25

page 25
Italiano
Uso del Master Fader
Il Master Fader va usato per portare il segnale di uscita del
ToneFactory™ al livello ottimale per lo stadio di ingresso
dell’unità successiva lungo il percorso del segnale (ad
esempio un registratore DAT o la scheda audio di un PC).
Quando si imposta il livello di uscita è conveniente partire
da valori bassi ed aumentare finché non si raggiunge il
livello ottimale - non partite mai con valori elevati,potreste
danneggiare l’unità collegata in uscita.
Normalmente, se collegate il ToneFactory™ in ingresso ad
un canale della console, il Master Fader viene lasciato a ‘0’
ed il livello è impostato usando i controlli del canale.
Ottenere un Suono di
Chitarra di Buona Qualità
Collegando direttamente la chitarra all’ingresso per
strumento (Instr) dovreste ottenere un suono già più che
accettabile. Usate il Controllo Tonale per impostare il sound
che avete in mente;in particolare:
Il tasto Hi-Mid dovrebbe essere illuminato così da
lavorare con i controlli centrati attorno alle frequenze
della chitarra.
Quando si usa l’Overdrive è preferibile avere la funzione
Bright non attiva, così da abilitare l’effetto di
simulazione dell’altoparlante.
Applicazione di Effetti Usando il Pedale
Escludete (bypass) tutti gli effetti ed usate il Controllo
Tonale per impostare il tipo di suono desiderato, quindi
reinserite gli effetti che intendete usare.
Se gli effetti aggiungono rumore al segnale, usate il
Noise Gate per eliminarlo.Assicuratevi che il tasto Hold
non sia illuminato e regolate il controllo Release/Hold
in modo che il Noise Gate non tagli le code del segnale.
Usate l’Equalizzatore Parametrico,se necessario, per
intervenire sul segnale una volta che gli effetti sono stati
applicati. Se, ad esempio, avete aggiunto del riverbero ed
il suono risulta troppo brillante usate la Band 2 (con Bell
spento) per ridurre il treble. Se state usando molti effetti
ed il suono è troppo impastato usate la Band 2 (con Bell
attivo - illuminato -) per enfatizzare le frequenze
attorno ai 2,5kHz .
Usare Compressione ed Overdrive
Il circuito Overdrive del ToneFactory™ è uno strumento
dinamico poiché la quantità di effetto applicata varia a
seconda del livello del segnale.in questo modo, giocando
con la dinamica dello strumento potete, mentre suonate,
cambiare la quantità di overdrive applicata. In un pezzo blues,
ad esempio,questo comportamento è prezioso, permettendo
di guadagnare ‘mordente’ suonando in modo più aggressivo.
Se volete essere sicuri che l’Overdrive intervenga in modo
uniforme su tutto il suono della chitarra (specialmente su
un sound molto distorto), è bene usate l’Opto-Compressore
per ridurre la dinamica del segnale. Impostate il Threshold
ad un valore piuttosto basso ed usate il controllo Output per
compensare la perdita di volume. In questo modo il segnale
che attraversa il Controllo Tonale ha un livello abbastanza
uniforme così che una porzione maggiore del segnale è
soggetta all’azione dell’Overdrive (anziché solo i picchi).
Registrare il basso elettrico
Normalmente si desidera che il basso mantenga un livello
piuttosto uniforme durante la performance e per questo si
Page 26

diminuite la regolazione del controllo dB in funzione
dello spessore che volete dare al suono.
Per aumentare la presenza e la trasparenza della
strumento usate la Band 2 con Bell attivo.Amplificate le
frequenze nella banda 2,5-5kHz .
Per un suono sottile e brillante è utile usare la sezione
dei Filtri, agendo con Low per eliminare le basse
frequenze in eccesso.
Eliminare il Ronzio del Tasto
Durante il missaggio potete usare l’Equalizzatore Parametrico
per eliminare una certa frequenza (per rimuovere, ad es., il
ronzio prodotto da un tasto o il rumore di una corda).Per
eliminare una frequenza:
1. Usate la Band 2 con Bell attivo ed applicate un guadagno
con il controllo dB.Assicuratevi che il tasto Fine sia spento.
2. Agite sul controllo Freq finché non sentite che la
frequenza da eliminare viene evidenziata.Se avete isolato
il ronzio prodotto da un tasto, per esempio, esso risulta
molto più evidente quando l’EQ Parametrico è attivo.
3. Premete il tasto Fine. Potrebbe essere necessario ritoccare
il valore di Freq per centrare la frequenza da eliminare.
4. Agite sul controllo dB per attenuare la frequenza
indesiderata. Fate attenzione a non attenuare troppo dato
che potreste influenzare il tono complessivo dello
strumento (attenuando troppo tutte le ricorrenze della
frequenza isolata)
Ottenere un Buon Suono
per il Synth
Se il sintetizzatore è rumoroso (un vecchio synth,ad
esempio) usate i Filtri per eliminare il rumore. Usate il
controllo High (con il tasto Corrective non illuminato)
per rimuovere il rumore. Così facendo dovrebbe essere
possibile intervenire sul rumore mantenendo la
presenza del synth.
Con un synth particolarmente rumoroso (se i Filtri non
sono sufficienti) potete usate il Noise Gate. Se registrate
un suono con code estremamente brevi premete il tasto
Hold. Se lavorate con suoni dal decay piuttosto lungo
(ad es. quello prodotto da una corda) assicuratevi che il
tasto Hold sia non illuminato.
Variando la regolazione di Overdrive è possibile creare
effetti diversi in modo immediato.Normalmente lo si usa
in questo modo durante il missaggio. Se volete un effetto d
tipo lo-fi (bassa fedeltà) assicuratevi che Bright sia spento.
Ottenere un Suono di
Batteria di Buona Qualità
Equalizzazione
Durante il missaggio potete usare il Controllo Tonale,
l’Equalizzatore Parametrico ed i Filtri per migliorare la
qualità della batteria che avete registrato:
Rullante: Per ottenere un suono più pieno usate la Band 1
dell’EQ Parametrico con Bell inserito, impostando il
valore si Freq attorno ai 200Hz. Se cercate un maggiore
attack e dettaglio nel suono usate la Band 2 con Bell
attivo, con un valore attorno ai 5kHz per Freq. Se volete
un rullante più chiaro usate il Controllo Tonale o i Filtri
per ridurre la presenza di basse frequenze.
Toms: Per ottenere un suono più pieno usate la Band 1
dell’EQ Parametrico con Bell inserito. Per quelli con
accordatura più alta impostate Freq a circa 200Hz;per
quelli caratterizzati da toni più bassi Freq va centrato sui
100Hz. Per avere un maggiore attack e dettaglio nel
suono usate la Band 2 con Bell attivo, con un valore
attorno ai 5kHz per Freq.
Grancassa: Per aumentare il punch usate la Band 2
dell’Equalizzatore Parametrico (con Bell attivo),
impostando il controllo Freq attorno ai 2,5kHz.
Piatti: Per enfatizzare lo sfrigolio ed il suono brillante dei
piatti usate la Band 2 con Bell attivo, centrando la
campana (con Freq) attorno ai 10kHz (o superiori).
page 26
Italiano
Page 27

page 27
Italiano
Noise Gate interviene troppo presto tagliando qualche
fronte (in tal caso provate a premere il tasto Fast).
5. Agite sul controllo Release in modo da avere un
comportamento naturale sulle code del segnale (che non
vanno tagliate).
6. Se cercate il tipico suono del rullante ‘strozzato’ dal gate
attivate il tasto Hold e regolate il controllo Release/Hold
in modo da lasciar passare solo la coda del riverbero.
Page 28

page 28
Conociendo la Unidad
Cuando se empieza a conocer la unidad, utilizar un track
que sea conocido (p.ej. escuchar a través de la unidad el
CD preferido); trabajando con un track familiar es mucho
más sencillo hacer una interpretación de los resultados. Hay
que tener en cuenta, sin embargo, que estos tracks suelen
estar comprimidos para CD,por lo que será más difícil
escuchar los resultados del uso del Opto-Compresor.Si es
este el caso,intentarlo utilizando “samples”en su lugar (si se
tiene acceso a ellos), o bien grabar un track propio sin
comprimir y luego reproducirlo a través del Tonefactory™.
La manera más sencilla de conocer el poder creativo del
Tonefactory™, especialmente cuando no se está
familiarizado con las diferentes partes, es ir moviendo los
diferentes controles,para percibir el efecto causado.Leer
en las siguientes secciones, que le introducirán en el
conocimiento de cada parte que compone la unidad.
Puesta en Marcha de la Unidad
Conectar la unidad como se muestra anteriormente. Si se
desea conectar un reproductor de CD a la unidad,
conectarlo como se muestra a continuación:
No girar los controles: gain y control
al máximo al mismo tiempo.
Uso de Discrete Transistor
Input
Esta sección de la unidad es el preamplificador,para adecuar
la señal entrante a un nivel œtil.
Instr. IP – es la entrada de la unidad para instrumento.Es
una entrada de alta impedancia, que permite la conexión
de una guitarra eléctrica o un bajo sin cargar los
pickups, o bien un sintetizador con salida de bajo nivel.
Mic, Line, Inst – se utilizan para seleccionar el conector de
entrada. Puesto que solo se puede activar una entrada al
mismo tiempo,se pueden conectar hasta tres elementos a la
unidad y conmutar entre ellos utilizando estos pulsadores.
Gain – determina el nivel de la señal.Alimentando la unidad
con una señal de entrada, ajustar lentamente el control
Gain hasta que el SIG LED empiece a destellar. Seguir
ajustando el control Gain hasta obtener la posición
óptima, que será cuando:
SIG LED – se iluminará siempre que a la unidad le llegue sonido
O/L LED (sobrecarga) se ilumina ocasionalmente, pero solo
si la señal de entrada es especialmente fuerte. Si el O/L
LED permanece iluminado, o se escucha que la unidad
distorsiona en picos fuertes, deberá bajarse la selección
del control Gain.
+48V– se utiliza para suministrar alimentación phantom a
los micrófonos que la necesitan (como los
CONNECTING TO CD
!
Españ ol
Page 29

page 29
Español
altas sin provocar un sonido apagado (especialmente
bueno para las guitarras acœsticas).
Corrective – cuando está iluminado, el filtro Low elimina
todas las frecuencias por debajo de las seleccionadas, y el
filtro High las que están por encima de la seleccionada.
Uso del Opto-Compressor
El Opto-Compresor actœa como un control automático
de volumen, bajando el volumen de la señal que llega
excesivamente alta.Reduce la diferencia entre los pasajes
más fuertes y los más silenciosos, reduciendo
automáticamente la ganancia cuando una señal llega más
fuerte que cierto nivel (threshold). Sin embargo, tiende a
sacar el sonido fuera de características, frenando las voces
muy fuertes silenciosas en la mezcla.
In – al iluminarse activa el Opto-Compresor,.
Threshold – determina en que momento el Opto-
Compresor empezará a comprimir la señal - a menor
threshold, mayor señal se comprimirá.Al seleccionar un
umbral, solo se comprimirán la señal cuando supere este
umbral, y los pasajes silenciosos mantendrán su rango
dinámico original, y solo los pasajes fuertes (por encima
del umbral) se comprimirán.
Meter – muestra la cantidad de compresión aplicada a la
señal. Puesto que la compresión reduce el volumen de la
señal, el medidor se moverá tal como se vaya aplicando
la compresión: p. ej., el punto 9 dB se muestra como 9
en el medidor.
Output – selecciona el volumen de salida.Al comprimir una
señal se convierte en más silenciosa, utilizar el control
Output para resituar la señal en su volumen original.
Comparar el volumen de la señal original y de la
comprimida utilizando el pulsador In para activar y
desactivar el Opto-Compresor.
Release – determina la amplitud total de la señal. Con un
release rápido,la señal tiende a parecer más fuerte.
Fast – al iluminarse comprime el ataque inicial de una señal
(p.ej. para eliminar el tirón inicial de un guitarrista).
Este tipo de compresión tiende a ser más evidente que
cuando el botón Fast no se utiliza y ofrece un sonido
obviamente más comprimido (que es, quizá, lo que se
busca). Para un sonido con más pegada, no utilizar el
botón Fast.
Hard Ratio – al iluminarse se obtiene un sonido comprimido
más plano.No utilizar el pulsador Hard Ratio si se desea
mantener parte de la dinámica original.
Uso del Tone Controller
El Tone Controller se utiliza para determinar la calidad
tonal de la señal, y añadirle overdrive.
In – al iluminarse activa el Tone Controller.
Page 30

page 30
Español
In – al iluminarse activa el Parametric Equaliser.
Band 1 – es para afinar en frecuencias graves.
Band 2 – es para afinar en medios y agudos.
dB – recorta o realza en la frecuencia seleccionada al utilizar
el control Freq en dicha banda.
Freq – selecciona la frecuencia en la que se va a recortar o
realzar.
Bell – al iluminarse, el realce o recorte que se aplique a la
banda de frecuencias seleccionada cambia a tipo “bell”
(ver dibujo).Entonces da un efecto de énfasis en la
frecuencia seleccionada, puesto que el realce o recríe
aplicado se reduce tal como no apartamos de ella.
Fine – al iluminarse se reduce la amplitud de la banda de
frecuencias que se afectará. Normalmente se utilizará
conjuntamente con el pulsador Bell, para afectar un
ancho de frecuencias menor (por ejemplo,para eliminar
el trasteo de las guitarras).
Uso de la Noise Gate
La Noise Gate reduce el volumen en los pasajes más
silenciosos, y eso mismo se puede utilizar para eliminar
ruido de fondo.
In – al iluminarse activa la Noise Gate.
Threshold – determina cuando empezará la reducción de
ruido. Cuanto más alto es el umbral, mayor cantidad de
ruido de bajo nivel se reducirá.
Hold – cuando está iluminado el control Release/Hold el
control Release cambia control Hold.La diferencia se
notará cuando la señal esté por debajo del umbral: con
Release, la puerta se cerrará a la velocidad determinada
por el control Release; con Hold, la puerta seguirá
abierta durante el tiempo determinado en el control
Hold, luego se cerrará inmediatamente. Cuando se graba
un instrumento, normalmente se usará el Release para
que suene más natural.
Release/Hold – ajusta el Release o Hold de la puerta
(dependiendo de si está pulsado el botón o no), desde
rápido (F) hasta lento (S). El Release determina lo
rápido que se cerrará la puerta desde el momento en
que la señal esté por debajo del umbral. Utilizar el
Release cuando queramos que la puerta se cierre de una
manera controlada. El Hold determina el tiempo que
permanecerá abierta la puerta desde el momento en que
la señal esté por debajo del umbral. En una señal que
tiene, por ejemplo, un corto tiempo de reverberación
que queremos grabar, utilizar el Hold para mantener la
puerta abierta y no perder el tramo más silencioso de
reverberación.
SHELF / BELL / FINE
ƒ
Normal Mode – Shelf
ƒ
+18
–18
0dB
+18
–18
0dB
Bell Mode
Fine
Page 31

page 31
Español
Obtener Gran Calidad de Sonido
en una Guitarra Eléctrica
Con una guitarra eléctrica conectada en la entrada de
instrumento, se podrá obtener un gran sonido. Utilizar el
Tone Controller para obtener el sonido buscado, en
particular:
El pulsador Hi-Mid debe estar iluminado,así los
controles estarán centrados alrededor de las frecuencias
de la guitarra.
Cuando se utiliza el Overdrive, el pulsador Bright no
deberá estar iluminado,porque estará activada la
simulación de altavoz.
Añadiendo efectos utilizando pedales
Poner todos los efectos en “bypass”, y utilizar el Tone
Controller para determinar el tono deseado, luego
activar los efectos que se necesiten.
Si los efectos añaden ruido, utilizar la Noise Gate para
eliminarlos.Asegurarse de que el pulsador Hold no está
iluminado,y ajustar el control Release/Hold para que la
puerta no corte los extremos de la señal.
Si fuera necesario, utilizar el Parametric Equaliser para
modificar el tono una vez se han añadido los efectos. Por
ejemplo,si se añade reverberación y es excesivamente
brillante, utilizar la Band 2 (con el pulsador Bell
apagado) para quitar agudos. Si hay muchos efectos, y el
sonido es poco definido,utilizar la Band 2 con el
pulsador Bell iluminado para realzar las frecuencias
alrededor de 2.5 kHz.
Usando Compresión y Overdrive
El Overdrive en el ToneFactory™ es una herramienta de
dinámica, puesto que variando el volumen de la señal de
entrada varía la cantidad de overdrive que se aplica.Así
mismo,al variar la dinámica de la interpretación, de suave a
fuerte, se puede influir en la cantidad de overdrive que se
obtiene. Esto es bueno para el blues, por ejemplo, ya que se
obtiene más golpe al interpretar de manera más agresiva.
Si se desea tener seguridad de que la guitarra está siendo
saturada uniformemente (especialmente en sonidos muy
saturados), utilizar el Opto-Compressor para reducir la
dinámica de la señal. Seleccionar un threshold bajo y ajustar
la salida para compensar la pérdida de volumen.Ahora la
señal entrará limpiamente en el Tone Controller a un
volumen constante,así se saturará mayor parte de señal en
lugar de los picos solamente.
Grabando un Bajo Eléctrico
Puesto que normalmente queremos que el bajo esté a un
volumen constante en la pista de ritmo,tenderemos a utilizar
bastante compresión. Configurar el Opto-Compressor
como sigue:
Experimentar con el control Release y el Hard Ratio para
obtener el sonido deseado.Si buscamos un sonido del bajo
con mucho ataque,deberemos asegurarnos que el pulsador
Fast esta apagado.Si buscamos un bajo más redondo con
menos ataque, activar el pulsador Fast.
Obtener Gran Calidad de
una Guitarra Acœstica
La mejor manera de alimentar el ToneFactory™ es desde el
pickup piezoelétrico conectado en la entrada de
instrumento. Si la toma se hace con un micrófono, la
posición del micrófono es muy importante.
Emplazamiento del Micrófono
Enfrente de la guitarra a unos 15 cm. de la boca.Nos
dará un sonido fuerte (que es bueno si en la sala hay
ruido de fondo), pero tiende a sonar grave y grueso.Así
mismo,si desplazamos el micrófono hacia el puente el
sonido tiende a ser más brillante.
Frente a la guitarra a unos 60 cm. de la boca.Obtendremos
un sonido más ambiente, incluyendo alguna característica
de la sala, podría ser una buena idea en ocasiones.
Unos 15 cm. por encima de la guitarra, apuntando hacia
el puente. Nos dará un sonido brillante pero más real.
Page 32

page 32
Español
el ruido. Debemos ser muy hábiles para eliminar el ruido
y mantener la presencia del sintetizador.
En un sintetizador especialmente ruidoso (si los Filters
no bastaran), utilizar la Noise Gate. Si grabamos un
sonido que corta rápidamente, activar el pulsador Hold.
Si tuviera un gran tiempo de bajada (como un sonido de
cuerda) el pulsador Hold no deberá estar iluminado.
El Overdrive es muy œtil para crear efectos al aumentar
o reducir el control Overdrive. Normalmente suele
hacerse en la mezcla. Si se desean efectos de sonido
Lo-Fi, el pulsador Bright deberá estar apagado.
Obtener Gran Calidad de
una Batería
Añadiendo EQ
Cuando mezclamos podemos utilizar el Parametric
Equaliser, Filters y Tone Controller,para mejorar el sonido
grabado de una batería.
Caja: Para aumentar la gordura, utilizar la Band 1 del
Parametric Equaliser con el Bell activado,y situar el control
Freq alrededor de los 200 Hz. Para ganar en ataque, utilizar
la Band 2 del Parametric Equaliser, con el Bell iluminado, y
seleccionar alrededor de 5 kHz. en el control Freq. Si la caja
necesita mayor claridad, utilizar el Tone Controller o los
Filters para reducir un poco en graves.
Toms: Para aumentar la gordura,utilizar la Band 1 del
Parametric Equaliser con el Bell iluminado. Para los Toms
altos seleccionar los 200 Hz. en el control Freq, y para los
Toms bajos en los 100 Hz. Para ganar en ataque, utilizar la
Band 2 del Parametric Equaliser con el Bell iluminado,
situar el control Freq alrededor de los 5 kHz.
Bombo: Para aumentar el punch, utilizar la Band 2 del
Parametric Equaliser con el Bell iluminado, y situar el
control Freq en 2.5 kHz.
Platos: Para aumentar el brillo,utilizar la Band 2 del
Parametric Equaliser con el Bell apagado, y situar el control
Freq en 10 kHz. o más
Captación Inadecuada
Cuando grabamos una batería, es posible que el sonido de
algœn elemento de la batería sea captado por el micrófono
de otro elemento.Por ejemplo, el micrófono de la caja
pudiera captar el sonido del bombo o del chaston. Cuando
mezclamos podemos utilizar el ToneFactory™ para reducir
este problema,ya que nos permite ser agresivos con la
ecualización de una pista sin afectar al resto.También se
pueden utilizar los Filters y la Noise Gate con el mismo fin.
Utilizando los Filters: Si se colaran los platos en la pista del
bombo,utilizar los Filters con el pulsador Corrective
iluminado,situando el control High alrededor de 5 kHz.
Si escuchamos que se han colado frecuencias bajas en la
pista delos platos (por ejemplo,procedente del bombo),
utilizar los Filters con el Corrective iluminado,situando
el control Low alrededor de 500 Hz.
Utilizando la Noise Gate
1. Con “Solo” en la pista, para escuchar lo que se cuela en
dicha pista.
2. Asegurarse que el pulsador Hold está apagado,para tener
un tiempo de bajada natural en el sonido.
3. En los Filters, activar los pulsadores To Audio y To Gate.
Ajustar los controles Low y High hasta no escuchar el
sonido que se colaba, y que el plato o timbal grabados
no se han perjudicado.Por ejemplo,en la pista del
bombo,seleccionar los controles Low y High
completamente a la derecha.
4. Desactivar el pulsador To Audio.En la Noise Gate,
ajustar el control Threshold hasta que la puerta se abra
en el momento en que llegue el sonido del timbal o
plato grabado. En este punto, solo escuchar el ataque,
para asegurarse que la Noise Gate no está cortando el
inicio o el final de la señal. Será necesario activar el
pulsador Fast, si no se desea perder el transitorio inicial.
5. Ajustar el control Release,para que la cola de la señal
suene natural, y no cortada.
6. Para dar un efecto de puerta a la caja, activar el pulsador
Hold y ajustar el control Release/Hold para atrapar
solamente la cola de la reverberación.
Page 33

page 33
ToneFactory™
Page 34

www.focusrite.com
™
Page 35

Accuracy:
Whilst every effort has been made to ensure the accuracy and
contents of this manual, Focusrite Audio Engineering Ltd makes
no representations or warranties regarding the contents.
Copyright:
Copyright June 1998 Focusrite Audio Engineering Ltd. All rights
reserved. No part of this manual may be reproduced, photocopied,
stored on a retrieval system, transmitted or passed to a third party
by any means or in any form without the express prior consent of
Focusrite Audio Engineering Ltd.
Warranty:
All Focusrite products are covered by a warranty against
manufacturing defects in material or craftsmanship for a period of
one year from the date of purchase. Focusrite in the UK, or its
authorised distributor worldwide will do its best to ensure the fault
is remedied as quickly as possible. This warranty is in addition to
your statutory rights.
This warranty does not cover any of the following:
• Carriage to and from the dealer or factory for inspection
or warranty
• Consequential loss or damage, direct or indirect, of any kind,
however caused
• Any damage or faults caused by abuse, negligence, improper
operation, storage or maintenance
If a product is faulty please first contact your dealer in the country
of purchase; alternatively, contact the factory. If the product is to
be shipped back, please ensure that it is packed correctly,
preferably in the original packing materials. We will do our best to
remedy the fault as quickly as possible.
Please help us by completing and returning the Warranty
Registration Card at the back of this manual. Thank you.
Page 36

Focusrite Audio Engineering Ltd, Lincoln Road, High Wycombe, Bucks HP12 3FX England
Phone: +44 (0)1494 462246 FAX: +44 (0)1494 459920
e-mail: sales@focusrite.com
www.focusrite.com
Focusrite
audio engineering
 Loading...