

Page 1

INTRO
This Guide is intended to provide you with sufficient information to get started with the Saffire LE,
outlining installation of the accompanying software, authorisation of the VST/AU plug-in suite and
a basic outline of the hardware and control software, SaffireControl LE.
In the box, you’ll find a software and resources DVD. This disc contains all of the software, along
with helpful instructions and information. There are also movie tutorials to guide you through
recording and monitoring with the Saffire LE, and a full User Guide in pdf format.
SOFTWARE INSTALLATION
Saffire LE is a core audio device for Mac so will work without any installation being carried out.
However, you will need to install the SaffireControl LE software to access latency-free monitoring,
sample rate select and many other features of the hardware. Saffire LE software installation also
provides the free Saffire plug-in suite. Saffire LE software must be installed on a PC as the hardware
will not function until the ASIO and WDM drivers have been correctly placed.
• Saffire LE
On the Saffire LE DVD is a folder called Saffire LE Installers. To install SaffireControl LE, the Saffire
plug-in suite and ASIO/WDM drivers for PC, simply navigate to this folder and then double click the
relevant installer (Mac or PC).
• Ableton Live
The Saffire LE comes with a special Lite edition of Ableton Live 5, the completely unique musical
tool that blurs the distinction between stage and studio. To install the software, navigate to the
Ableton Installers folder and double click the relevant installer (Mac or PC).
• BFD
The Saffire LE also comes with a compact version of FXpansion’s BFD (Big Fat Drums) premium
acoustic drum module. To install the software, simply select the BFD Installers folder and then
double click the relevant software Installer (Mac or PC).
• Guru
The Saffire LE also comes with a compact version of FXpansion’s fantastic Guru drum programming
workstation. To install the software, simply select the Guru Installers folder and then double click
the relevant software Installer (Mac or PC).
Page 2
SAFFIRE VST/AU PLUG-IN SUITE AUTHORISATION
Before you can use your Saffire plug-in suite, the suite must be authorised.
Note: Non-authorisation of the plug-in suite will not prohibit operation of SaffireControl LE
or Ableton Lite.
If your music computer is not connected to the internet, you must perform a manual authorisation.
This process will ask you either to save or load a registration file. You must first save, then transfer
this file onto an internet-connected computer, either by burning the file onto a CDR or by using a
USB/Firewire storage device. Next, access the authorisation page, located on the Saffire LE product
page of the Focusrite website. The web page will then save an authorised registration file, which
should then be transferred back to your music computer and loaded within the authorisation to
complete the process. While you’re online, we recommend you register your product.
RECORDING BASICS
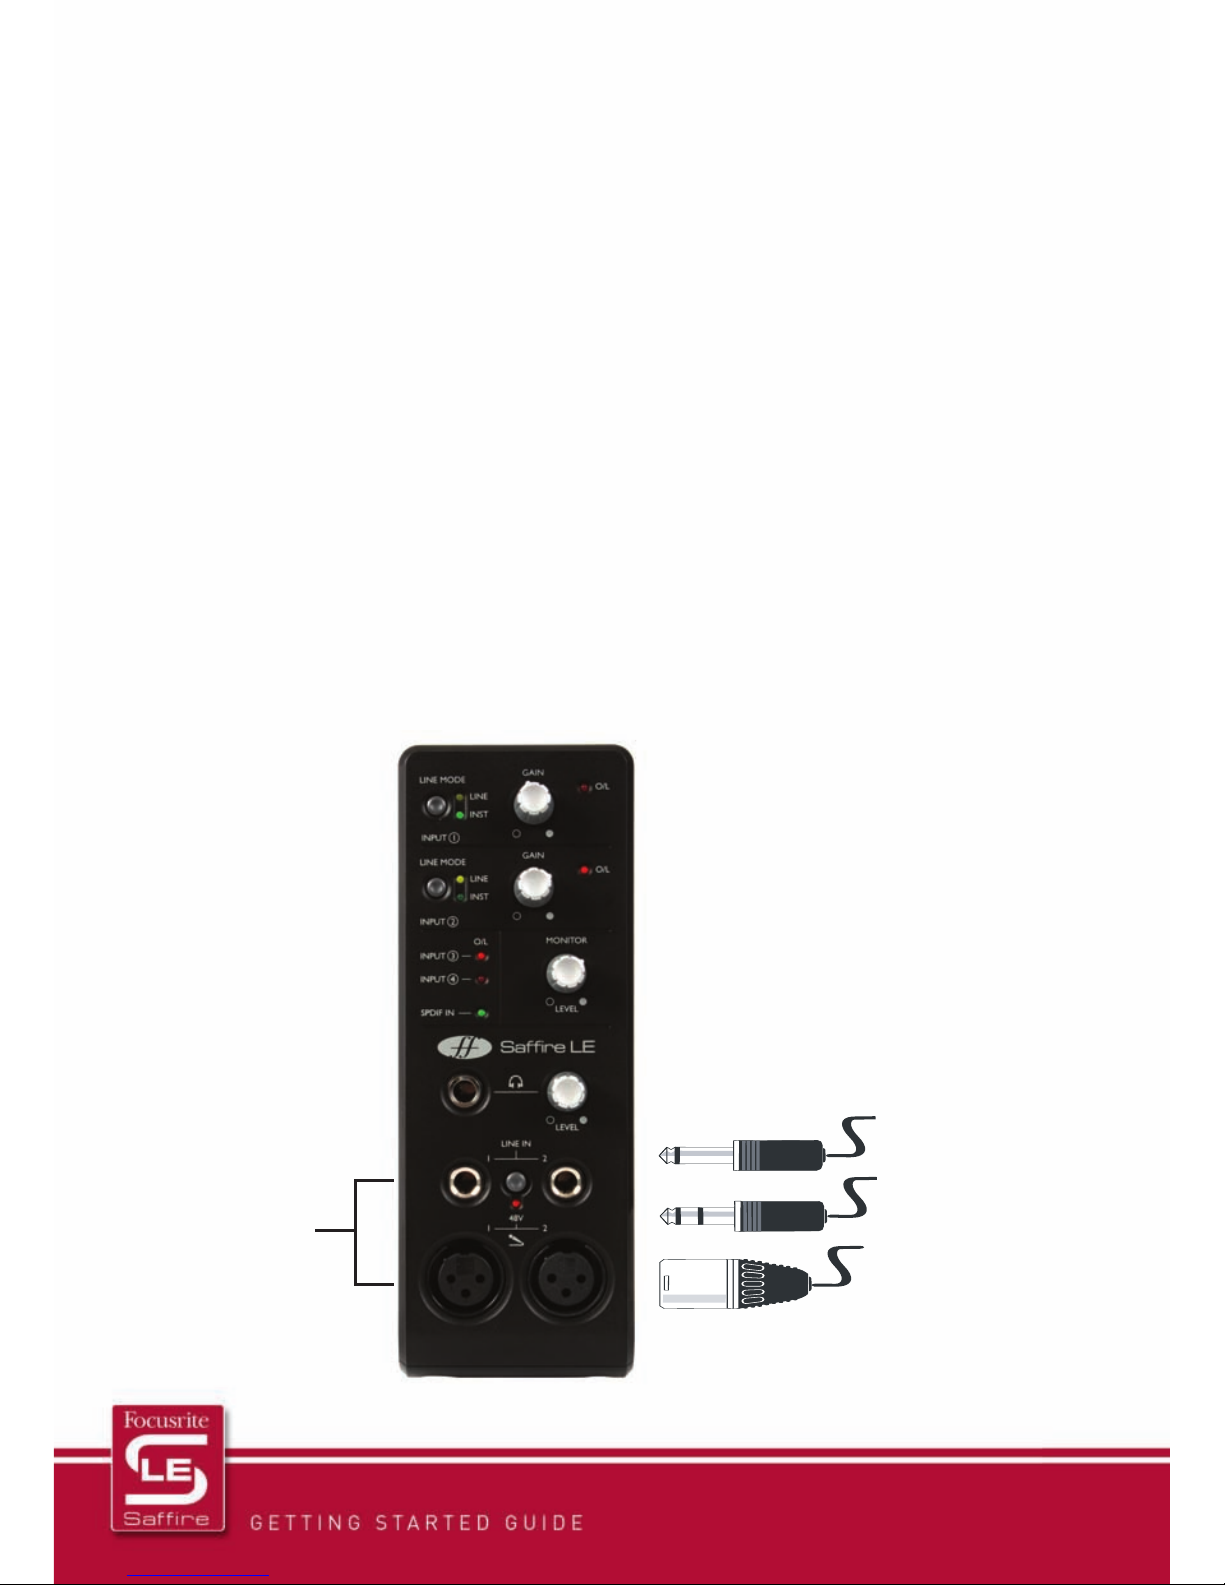
Saffire LE has 6 Inputs, 4 Analogue (Inputs 1-4) and 2 Digital (Inputs 5/6). Inputs 1 and 2 (analogue)
are on the front panel of the hardware and can be used to record either microphone (using the XLR
Inputs below), Line-level or Instrument-level sources (using the Jack Inputs above). Make sure that
the phantom power switch is engaged if using a condenser mic, and that nothing is plugged into the
LINE IN above as this will override the XLR Input. Gain controls for Inputs 1 and 2 are at the top of
the front panel. Use the switches to select between LINE and INSTrument (if required) and the dials
to set the Gain level.
Guitar
Input 1+2
(mic/line/inst)
Balanced
line-level
Mic
Page 3

Inputs 3-6 are on the rear panel: 1/4” Jack Inputs (Inputs 3 and 4) for Line- or Intrument-level
sources and an RCA/Phono Input (Inputs 5 and 6) for a S/PDIF signal. There are also 6 balanced
analogue outputs for connecting directly to speakers or an amp. Outputs 1 and 2 are the Main
Monitors Outputs and Outputs 3 and 4 are the same signal as that sent to the Headphones Output
on the front panel. Latency-free mixing/monitoring of all 6 Inputs and 4 stereo tracks from the
sequencer (playback tracks) is available within the accompanying software SaffireControl LE.
SAFFIRECONTROL LE BASICS
The upper half of the SaffireControl LE GUI is for setting the levels of Inputs and Playback tracks
(audio routed to Saffire LE Outputs 1-8 within the sequencer) on Outputs 1 and 2 of Saffire LE – the
Monitors Outputs. The lower half is for setting the levels of Inputs and Playback tracks on Outputs 3
and 4 – the Headphones Outputs. The central section of the GUI features level controls for the
Analogue Outputs (1-6), with Gain dials, mutes and sliders for crossfading between Inputs and
Playback tracks on Outputs 1-4. In the bottom right corner are software settings buttons
like Float and Shrink, as well as sample rate options.
Input 3+4
(line/inst)
Main
monitor
outputs
(1+2)
Firewire ports
(use either)
S/PDIF I/O
(inputs 5+6
outputs 7+8)
Page 4

If you are failing to hear Inputs on Monitors or Headphones, make sure the relevant slider in the
centre of the GUI is sufficiently over to the left (towards INPUT MIX) and that the relevant faders on the
left of the GUI are sufficiently high. If wanting to send audio directly from the sequencer to the Saffire
LE Outputs, e.g. anything routed to Saffire LE Outputs 3 and 4 in Ableton goes straight to Outputs 3
and 4 of the hardware (when surround mixing for example), activate the S/CARD switch in the bottom
right of the GUI. However, if wanting to mix different levels of various tracks from the sequencer with
Input tracks on Monitors or Headphones (when tracking/recording for example), activate the TRACK
switch in the bottom right of the GUI.
O/P level
controls
Levels of Playback tracks
O/Ps 1-8 from sequencer (eg: Ableton Live)
Monitor
(O/Ps 1+2)
controls
Levels of 6
inputs
Headphones
(O/Ps 3+4)
controls
FA0081-01
 Loading...