


User Guide
FFFA001508-06
Version 2.8
www.focusrite.com

Contents
INTRODUCTION
About this User Guide
SYSTEM REQUIREMENTS
..............................................................................
.....................................................................
....................................................................
SOFTWARE INSTALLATION
Installing RedNet Control 2
RedNet Control 2 – Mac
RedNet Control 2 – Windows
DEVICE ORGANISATION
The Auto Function
Tab Drop-Down Menu
Tab Ribbon
................................................................................
DEVICE CONTROL
Status Icons
...............................................................................
......................................................................
.........................................................................
.....................................................................
............................................................................
Channel Clipping Indication
ID (Identification)
Device Settings
Clock Settings
Red Range Control
.........................................................................
. . . . . . . . . . . . . . . . . . . . . . . . . . . . . . . . . . . . . . . . . . . . . . . . . . . . . . . . . . . . . . . . . . . . . . . . . . .
........................................................................
.......................................................................
I/O Control and Metering
Monitor Control
Input Routing
Output Routing
Custom Mixes
......................................................................
.........................................................................
.......................................................................
........................................................................
..................................................................
................................................................
...............................................................
..........................................................
..............................................................
. . . . . . . . . . . . . . . . . . . . . . . . . . . . . . . . . . . . . . . . . . . . . . . . . . . . . . . . . . . . .
3
3
4
4
4
4
4
5
8
8
8
9
9
10
10
11
11
12
12
13
14
15
16
TOOLBAR MENUS
File Menu
Global Menu
Dante Menu
.................................................................................
..............................................................................
..............................................................................
Quick Recall Menu
APPENDICES
................................................................................
1. Keyboard Shortcuts
Organisation
Device Control/Settings
Device Specific
System
...............................................................................
2. Customer Support
...........................................................................
........................................................................
....................................................................
.........................................................................
..............................................................
.......................................................................
.....................................................................
2
17
17
19
20
21
23
23
23
23
23
23
24

Introduction
RedNet Control is Focusrite’s software application for controlling and configuring Red and RedNet
interfaces. It features a graphical representation of each device on the local network, giving critical
feedback such as signal metering, clock status, power supply state and primary/secondary network
connection state. RedNet Control is completely customisable which allows for several users on the
same network to have completely different views.
The other primary function of RedNet Control is to provide remote control of each device. This includes,
but is not limited to, clock source selection, sample rate converter configuration and reference level
setup. In the case of mic pres, such as Red 4Pre and RedNet MP8R, all the functions of the mic pre can
be remote controlled from the software, such as gain, input impedance, phantom power, high-pass
filter, pad, gain compensation and more.
Where more hands-on control is required, RedNet Control features a MIDI bridge, allowing any
programmable CC-based or SysEx MIDI controller to control up to 16 different mic pre devices on the
network. This allows gain to be easily mapped to an encoder for tactile control. The CC protocol uses
the same specification as the Avid Pre, meaning Red 4Pre and RedNet MP8R can be controlled from
Pro Tools and in turn with one of the Pro Tools controllers such as D-Command, D-Control, Artist
series, etc.
For users who switch between different setups on a frequent basis, such as during performances with
multiple acts, RedNet Control provides both session and device – save and recall. This allows sessions
to be saved and loaded across both Mac and Windows platforms. Device save also allows for critical
mic pre parameters to be saved during sound-check and recalled within seconds at a later time.
Simply hit Save, then later open the file to recall all the settings or select which specific settings are
recalled – settings can be loaded to any device of the same type.
RedNet Control’s automatic firmware updater ensures that all Red and RedNet devices on the network
are kept up to date with the latest firmware. This guarantees that the latest Dante updates from
Audinate will be loaded to the device, ensuring the best possible performance. Please update RedNet
PCIe drivers during installation to ensure that they are as up-to-date as possible.
About this User Guide
This guide provides a detailed explanation of RedNet Control 2 and will help you achieve a thorough
understanding of its capabilities. We recommend that all users, including those already experienced
with RedNet and Red, take the time to read through this guide. If the guide does not provide the
information you need, please be sure to consult: https://pro.focusrite.com/technical-support, which
contains a comprehensive collection of common technical support queries.
Please note that this guide refers to the RedNet Control software only. For information on how to setup the
network, or for information on specic hardware devices, please refer to the System User Guide or device specic
user guides which can be found here: www.focusrite.com/downloads
Computer keyboard shortcuts are highlighted thus: Cmd/Ctrl-L
Where Ctrl = the Windows Control key
And Cmd = the Mac Command key
® and Audinate® are registered trademarks of Audinate Pty Ltd.
Dante
3

System Requirements
Please visit the following link for up-to-date information on computer and operating system
compatibility for RedNet Control 2: https://focusrite.com/downloads/os
Software Installation
Installation packages are available for both Mac and Windows. These packages include: the RedNet
Control application, the Dante Controller application, PCIe drivers, the MIDI driver (Windows only) and
the Red range driver (Mac only).
Locate either the RedNet Control.pkg disk image (Mac) or the Rednet Control.exe file (Windows).
The files can be downloaded from the RedNet product download pages.
NB. For complete details on Dante Controller software, please refer to the Audinate website:
https://www.audinate.com for more information.
Installing RedNet Control 2
RedNet Control 2 – Mac
Open the RedNet Control.pkg and follow the installation steps provided by the installer. If Dante
Controller is not already installed on your system, make sure that the application is also selected.
RedNet Control 2 – Windows
Run RedNet Control.exe and follow the installation steps provided by the installer.
4

Device Organisation
When launched, RedNet Control will display the Device View window:
6 107 113 25
98
1 4
1. Device List
Shows devices in the currently selected domain alphabetically. The list can be customised
using the Device List Filter.
Right-click on any name to bring up its drop-down menu. ID: activates the device’s
ID function (see page 10); Rename: press Enter to confirm or Esc to cancel.
2. Domain Selection
Use the drop-down list to select the current Dante Domain. See p.20: Dante Domain Manager.
3. Device List Filter
Allows the list to be ordered according to specific categories:
• RedNet Devices – Filter by device type (drop-down list)
• Red Devices – Filter by device type (drop-down list)
• Tab – Filter by tab name (drop-down list)
• Not In Tab – Show non tab-assigned devices
• Sample Rate – Filter by device sample rate (drop-down list)
• Pull Up/Pull Down – Filter by +/- % rate (drop-down list)
• Third Party – Show only 3rd party devices
Click ‘Clear All’ to remove all filters
5

Device Organisation...
5
6
4
4. Auto Button
Automatically allocates devices into the grid. See page 8 for full description.
5. Search Bar
To locate any device in the Device list, type its name in to the search bar.
6. Tabs
Show either a single Red range device (Red: 4Pre, Red 8Pre or Red 16Line), or groups of 6 or 12
RedNet devices.
Tab groups can be freely organised to show individual hardware locations or, for example, units
within an equipment rack.
• Up to 50 tabs of any type can be created
• Pulling a tab away will open a new device window. Separate windows can be reattached by
dragging over another tab.
• Additional control options for tabs are provided via a Tab Drop-Down Menu.
See page 8 for details
6

Device Organisation...
7
98
10 11
7. Device Grid
Displays a graphical representation of the hardware unit(s) within each tab.
• To add a device to a grid, drag its name from the Device List onto the grid – use Cmd/Ctrl
to multiple-select individual units in any order, or Shift for a large group selection
• The grid size under each tab can be set to display 1x1 (Red range only), 6 (2x3) or 12 (3x4)
devices. The size is chosen when a new tab is created. See New Tab below
• A device already in a grid can be moved to another tab as follows:
Click-and-drag on a device
°
Hover over a different tab
°
Tab will move to the front to allow you to place the device
°
8. Tab Ribbon
Allows separate Sample Rate and Follow Device selection for each tab. See page 8 for details.
9. Tab Delete
To remove a tab click the grey ‘X’ by its name, or use the shortcut: Cmd/Ctrl-W.
10. New Tab
To add a new tab: click the
symbol then select the preferred grid size option.
Tabs can also be added either by double-clicking in the blank space to the right of the
symbol, or by using the shortcut Cmd/Ctrl-T. The grid size defaults to the previously selected
size.
11. Lock
The Lock, shortcut: Cmd/Ctrl-L, prevents tabs from being added, removed or renamed;
stops devices being added to the grid; disables the Auto function and prevents the Tab Sample
Rate from being changed.
7

Device Organisation...
The Auto Function
Click to automatically assign devices from the Device List onto a Device Grid (in current list
order if no devices have been selected). If there are insufficient grid spaces in the current tab, new
tab(s) will be created (the grid size will be the same as the previously selected tab: 2x3 or 3x4).
The Auto function will assign devices as follows:
• If there is a device already in the middle of a tab, it will auto assign around it – not overwrite it
• If a Device List filter has been selected, it will only assign devices that are visible in the List –
meaning that the filters apply.
• Alternatively, choose which devices are to be assigned by selecting their names from the list;
multiple devices can be selected – use Cmd/Ctrl (to select individually, in any order) or Shift
(large group selection). The grid will be filled in the order of selection.
• A device can only be assigned once. The names of devices already assigned are shown in italics.
• Auto can be used as many times as required and will assign any RedNet or Red range device
that isn’t already in a tab.
• Red range devices will each be assigned to a single tab.
• Auto is not available when the grid is locked.
Tab Drop-Down Menu
Right-clicking on any tab brings up its drop-down menu:
• Rename Tab – Press Enter to confirm the change or press Esc, or
click anywhere else, to cancel
The name can also be changed by double-clicking the current name
• Clear Absent Devices – Removes the GUI for inactive devices
• Clear All Devices – Empty the grid and return device names to the Device List
Tab Ribbon
Tab Sample Rate – Allows each tab to be assigned an individual sample
rate. Also see page 19: Global Manager.
If any device added to the tab is set to a different sample rate, the sample
rate indication will change to red. To force all devices to conform to the tab
sample rate press the
from the drop-down list.
button. Alternatively, select a different sample rate
Tab Follow Device – The drop-down allows the tab to follow any device on
the network and will automatically update that tab’s sample rate to match
the device. This can be useful for, say, a device connected to Pro Tools.
Note. If the devices in a tab are following another device, at say 192kHz, and the
user changes the tab sample rate to 48kHz, this will highlight the Follow Device in
red because it has been overridden and is no longer following the same sample rate.
Select ‘None’ to clear.
8

Device Control
The graphical image for each device displays its current operational condition, signal levels and
control settings for each channel. Also shown are the PSU and network status icons. Controls displayed
are appropriate to each device. Please refer to each device’s User Guide for its full operational details.
Some RedNet devices have too many controls and
indicators to be easily viewed in a single image. For
these devices the graphical display is separated into
two* pages: Live and Setup – Click Live to show level
metering, or click Setup to show channel function
settings. Alternatively, PCIe channel groups will appear
as 1-64 / 65-128.
RedNet MP8R ‘Live’ View
*Graphical controls for the Red range devices are split across ve
pages. See pages 12-16 for the additional information.
• Channel Gain can be set by either of the following methods:
Click inside the channel’s gain-control icon and use the scroll-wheel/trackpad.
°
Holding down Cmd/Ctrl will slow the gain step changes to allow fine control
Double-click the gain icon to enter a numerical dB value via the keyboard – press
°
Enter to confirm or press Esc (or click again anywhere outside the control icon) to cancel
• Click an icon to toggle the associated Channel
Function on/off. Using Option/Alt-click will apply
the setting to all channels simultaneously
• A device’s Name can be set either by changing it in
the device plugin, right-clicking it in the Device List
or via the ‘Dante Controller’ application
RedNet MP8R ‘Setup’ View
Status Icons
The status icons for PSUs and the network are shown at the left side of each device window:
PSUs A & B – Each illuminates if PSU has power input and all DC outputs are present
Networks – Each illuminates if a valid connection is present
Locked – Unit is successfully locked to the network (changes to the red cross if not locked)
External Clock – Green: unit is locked to the external source, Yellow: unit is locking,
Red: unit is attempting to identify a network, Off: no network
Network Leader – Illuminates if a unit is the network Leader
DC supply power input – Illuminates if power is being received from the external DC supply
PoE power input – Illuminates if DC power is being received via the Ethernet cable
9

Device Control...
Channel Clipping Indication
In addition to the device level-meter displays, RedNet Control provides two additional indicators to
draw attention to devices that have clipping audio:
• In the Device List, the name of a clipping device will change to red
• If the device with a clipping channel is not visible in the current tab, the
name of the appropriate tab will show red to direct you to that device
Note. Double-clicking on a device name in the Device List will automatically jump to the tab that it is currently
populating and will ID the unit in the grid.
To clear clip indicators:
• On a device – Click on a clip LED to clear all clips on that device
• In a tab – Use the shortcut: Cmd/Ctrl–Shift-C
• Globally – Use the shortcut: Cmd/Ctrl-Shift–Alt–C
To clear clip indicators automatically, select “Automatically
Clear Clip” from the Preferences Menu.
Mac: RedNet Control 2 > Preferences
PC: File > Preferences
The clip indication hold time and threshold Level can both be
adjusted using the sliders.
ID (Identification)
ID can be enabled either by clicking on the appropriate ID icon or by right-clicking on a device’s
name in the Device List.
When enabled, ID will identify the device being controlled by flashing its front panel LEDs. The device
GUI will also flash (the black background behind the meters/switches) to confirm that ID is active.
The device background will also flash when the Reverse ID function is activated via the front panel of
devices such as RedNet AM2.
10

Device Control...
Device Settings
Click a device’s Tools icon to open its
tools/settings window. Some devices have
multiple pages for their settings options (as
for the RedNet MP8R shown).
Device controls and settings can be configured
and/or toggled directly, in real time, using
these pages. For additional information, please refer
to the ‘Tools Menu’ section in a device’s User Guide.
The left pane of each Settings window
provides an overview for each device,
showing: its hardware Information, its PSU
and network Status, its Clock settings and its
Dante Domain Manager Permissions state.
Clock Settings
Select the Clock page, on applicable devices, to open the
Clocking window.
Select Internal (Dante) to allow a device to follow the
network settings of the tab in which it resides.
Select External to choose from the list of external hardware
sources – the user will then be prompted with a choice of
external management options:
• Automatic – The device automatically becomes the
Primary Leader and removes the Preferred Leader
status from all other devices.
Should the Primar y Leader fail, the network will automatically nd a
new leader, which will be internally clocked (as all devices have now had
Preferred Leader status removed and only a Primary Leader can be
clocked externally).
• Manual – Does not change the Preferred Leader status of any
other devices on the network.
If an external Word Clock generator is feeding multiple devices on a
network and one of the devices fails, then instead of the network moving
over to an internal clock, it will switch to another device which will be
receiving the same external clock signal.
11

Device Control...
Red Range Control
Graphical control for the Red 4Pre, Red 8Pre and Red 16Line units is separated into five pages:
• I/O Control & Metering • Output Routing
• Monitor Control • Custom Mixes
• Input Routing
I/O Control and Metering
In this view, control functions, gain settings and signal levels are shown for all inputs and outputs.
Image shown below is for the Red 8Pre.
Analogue Input – Channel controls operate in the same manner as RedNet devices – See page 9
for details. For channels with gain controls and input functions, the level meter indicates the postprocessing signal.
Analogue Output – Shows the level setting, signal level, and Mute/Dim status for each channel. To
adjust individual levels, click & drag the sliders. Click a Mono or Stereo button to toggle between
mono and stereo output.
ADAT / S/PDIF / Loopback / Dante I/O – Signal level meters are shown for each input channel (top
row) and each output channel (lower row).
Monitor and Headphone levels – Output levels can be adjusted using the sliders. Click a Mono or
Stereo button to toggle between mono and stereo output.
12
Device Control...
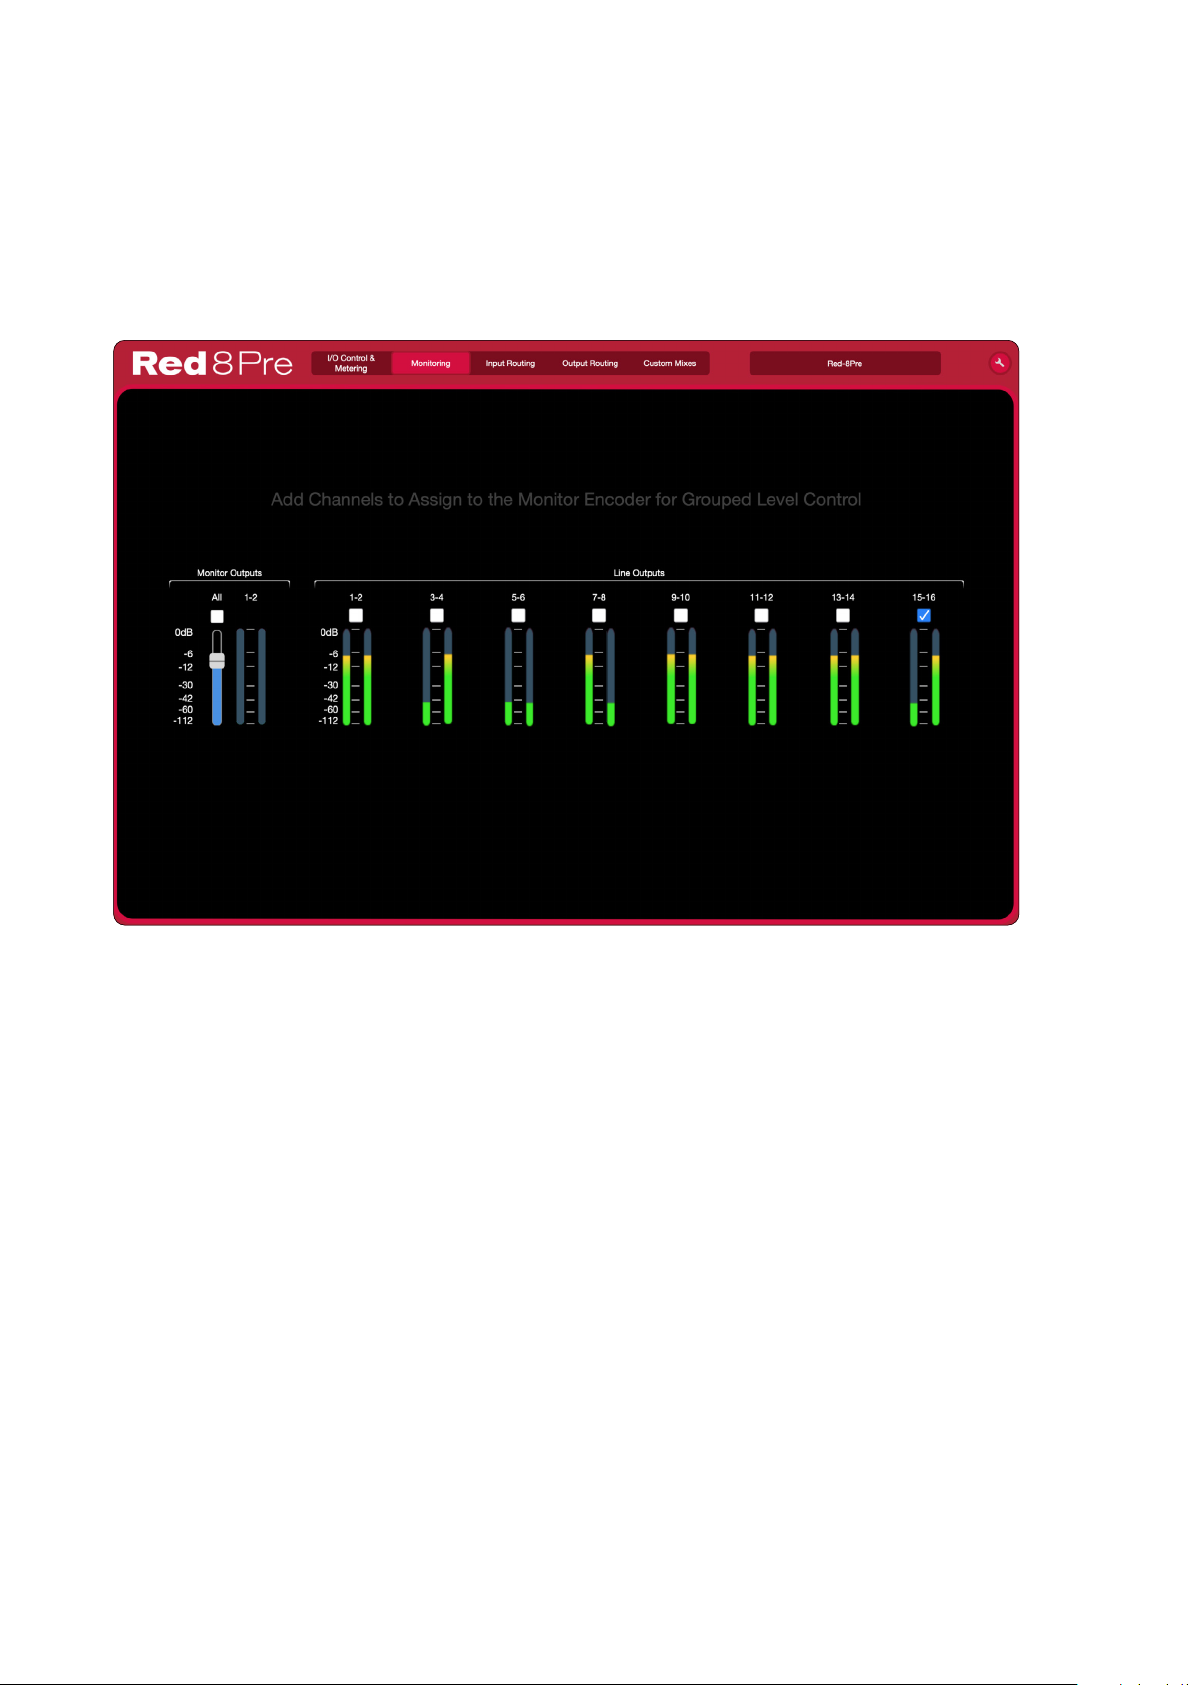
Monitor Control
The Monitor Control page assigns analogue output channels to the rotary output encoder.
Add or remove channel pairs using the individual checkboxes. Note that linked faders will be shown
in blue on the Input Control and Metering page.
The Output Encoder level can be set using the slider.
All – Selects all channel pairs. Individual channel pairs can then be deselected as required.
13
Device Control...
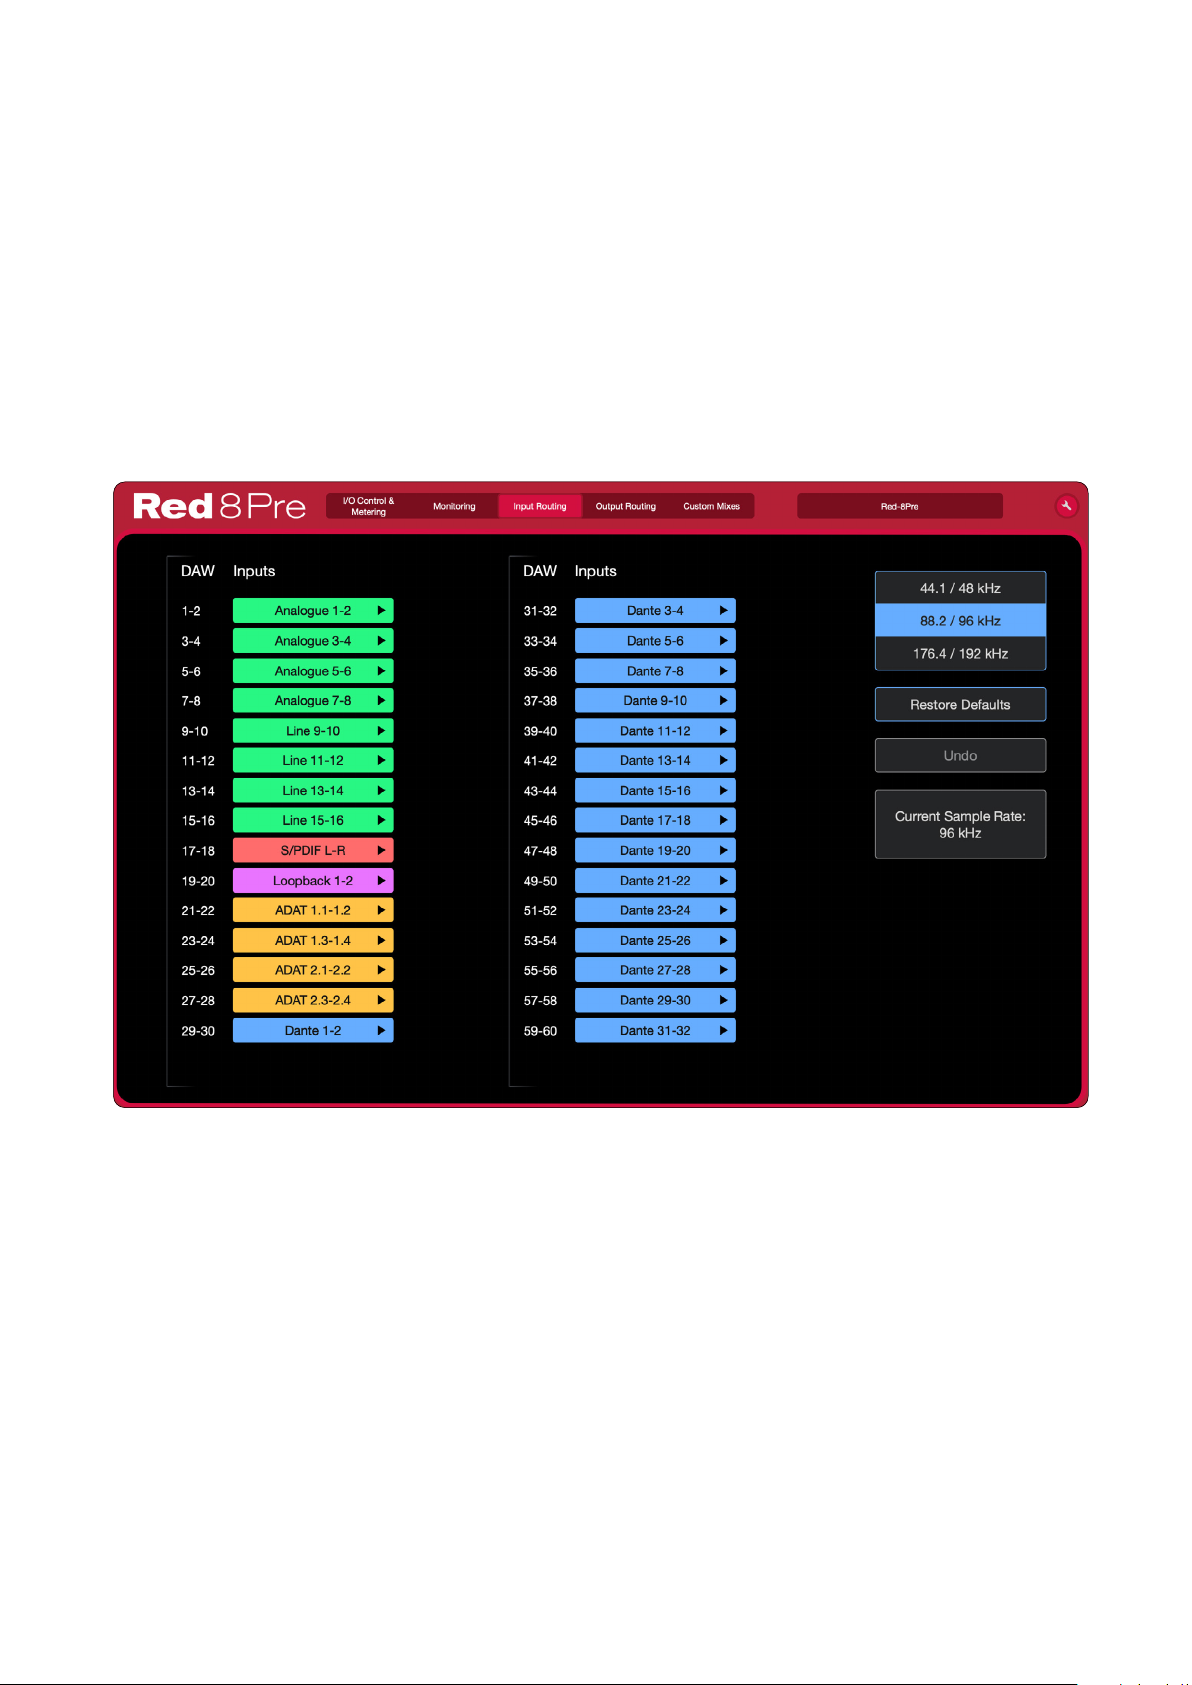
Input Routing
Because the number of channels available reduces when operating at higher sample rates, Input
Routing allows the channel order to be re-arranged so that all input signals required can be accessed
by a DAW.
Use each drop-down list in the table to move input channels in pairs. For example, in the image below,
ADAT inputs 2.5-2.6 are being sent to DAW channels 25–26. This means that when selecting inputs
25-26 on a track in a DAW, ADAT inputs 2.5-2.6 on the Red device will be recorded.
Each DAW input channel pair can be allocated independently.
The default routing can be modified independently for each of the three sample rates.
Restore Defaults – Returns the routing (at the currently selected sample rate) to the layout defined in
the unit’s standard routing table.
Undo – Cancels the change made to the last input selection.
14

Device Control...
Output Routing
Provides control of output channel routing and DAW allocation.
Use the drop-down menus to allocate a destination to each channel output. Selecting MONO splits a
channel pair into two signals which can be routed independently.
Use each slider to set the output level of the currently selected channel.
The default routing can be modified independently for each of the three sample rates.
Restore Defaults – Returns the routing (at the currently selected sample rate) to the layout defined in
the unit’s standard routing table.
Undo – Cancels change made to the last input selection.
15

Device Control...
Custom Mixes
The internal audio mixer allows you to create up to eight separate mono or stereo sub-mix signals.
Up to 30 of all the available inputs can be selected as sources for the mixer. Once selected, these input
signals will then become available to all mix outputs. Tailored mixes, with individual levels, can easily
be created by muting unwanted channels.
Each mixer output can have an individual balance of fader levels, mute and channel pan settings.
The upper part of the window shows the available inputs. Select up to 30 signals which will become
the sources for the mixer.
Click on a Mix button
Use the channel faders to set the required signal level for each source signal. Press Mute to deselect
signals that are not required. The pan slider
balance on stereo channels. Click on Solo to audition channel signals.
Clear Solo – Deselects all active channel Solo buttons.
Mute – Mutes the selected mix output.
Copy Mix/Paste Mix – Copies/pastes all fader and pan settings from one mix to another.
to recall its channel fader, mute and pan settings.
sets the L/R position on mono channels and the L/R
16

Toolbar Menus
File Menu
Preferences* – Pop-up window:
• Select the Ethernet network interface(s)
• Set the MIDI Mic Pre Input & Output device and control
protocols
• Set the MIDI Quick Recall device and channel numbers and
select which messages are to be read
• Metering: Clip Hold sets the time for which a clip flag remains
highlighted and Clip Level sets the dBFS level above which
clipping will be indicated
*
Mac ‘Preferences’ are located under the ‘RedNet Control 2’ menu
____________________________________________________
Audio/MIDI Setup (Mac) PCIe Card Settings (PC) – Audio I/O format and MIDI setup.
____________________________________________________
Refresh Device List – Removes devices no longer available and
adds new device names on the network to the Device List.
Upgrade Devices – On start-up, RedNet Control will prompt the
user if there is a newer firmware version available. The Upgrade
Devices window can be used to update the firmware at a later
time; it will indicate any devices for which an update is available.
____________________________________________________
Session Save / Load – Will save and return to previous state: tabs, tab names, device location in tabs,
the grid plus filters and searches (but not the Preferences or Device Settings).
Note that RedNet Control can be launched by double-clicking on a session le.
____________________________________________________
17

Toolbar Menus...
Device Save (Applicable only to devices with mic pres) – Select which mic preamp settings
you wish to save - a snapshot window will confirm the selection. A file will be
created for the selected preamp type.
Device Load (Applicable only to devices with mic pres) –
Lists the devices on the network and the drop-down list shows
snapshots that can be uploaded to the device.
Note that the same snapshot can be uploaded to
multiple devices of the same type.
Pressing the
to allow individual recall parameters to be
selected or deselected for each channel.
____________________________________________________
button expands the window
Log Messages – Opens the Log messages window which displays diagnostic, network, system and
hardware status information.
The message display can be filtered by un-ticking individual checkboxes in the header. Note that the
logging of deselected parameters continues in the background.
Black - indicates standard device
changes
Red – indicates major issues
Blue – indicates important
network changes
Green – indicates important save
Purple - indicates firmware
update status
____________________________________________________
Quit RedNet Control 2 – Closes the application.
Mac ‘Quit RedNet Control 2’ is located under the ‘RedNet Control 2’ menu.
18

Toolbar Menus...
Global Menu
Global Manager
The Global Manager window displays the sample
rate settings for all tabs and devices on the network.
If devices have been enrolled into domains via Dante
Domain Manager, use the drop-down list to select the
visible domain.
The values for Follow Device selection, Sample
Rate and Pull Up/Down offset can be entered, in
real time, on a per-tab basis.
Tabs can be expanded to show the devices they
contain, allowing Sample Rate and Pull Up/Down
settings to be modified for individual units.
Tab name and device name will be shown in red text for
any device that does not match the sample rate previously
set via the Tab ribbon.
Use the Global drop-down lists and buttons to configure all tabs and devices simultaneously.
19

Toolbar Menus...
Dante Menu
Dante Controller – Switches to or launches the Dante Controller application.
Dante Domain Manager – Pop-up window, shortcut: Cmd/Ctrl-O:
Provides automatic or manual login to the Dante Domain Manager
(DDM).
• A DDM Server must be present on the network
• DDM Login – Password and username must exactly match that
of the Dante Domain Manager server
If devices have been enrolled into domains, they will not be identied in the
Device List and will not populate the grid until the correct username and
password have been entered
Successful login will take you to the Unmanged domain. The default
access level in the Unmanaged Domain is ADMIN.
For each domain, access to device controls and to certain
Tools menu options will be blocked depending on access
level. Three access levels are available:
Admin – Has unrestricted access (normal use)
Operator – Has access to everything apart from:
Preferred Leader
Clock Source
Word Clock Input Termination
Word Clock Output
AES70 Enable/Disable
Guest – Has no access to the Tools options and
cannot modify any device parameters or controls.
Guests only receive visual conrmation (providing their
DDM permissions are set appropriately)
Guests are able to change settings that only
affect their session.
Tools Menu with ‘Operator’ Access
20

Toolbar Menus...
Quick Recall Menu
Setup Quick Recall – Opens the Quick Recall window.
Note that if you have snapshots allocated to any of the 16 Quick Recall slots, the menu will extend to include:
Recall 1 (<File location & Name>)
Recall 5 (<File location & Name>)
•
• Select a MIDI Note using the dropdown lists (ISO Standard: C-1 = 0 to G9 = 127). The associated
MIDI number will be displayed next to the Note
• SysEx is static from 0 to 15 (Value). The SysEx message structure is shown below:
Start
SysEx
Hex F0 00 20 29 7E 02 00 7F 7F 7F 00 ? F7
Dec 240 0 32 41 126 2 0 127 127 127 0 ? 247
Manufacturer ID SW RedNet
Control
Version Device
Type
Device
Index
Mic Pre
Channel
Para-
meter
Value End
SysEx
The number under ‘Value’ is the variable (recall) 0 to 15 which aligns to the Quick Recall Menu
• Program Change can be any value from 0 to 127
You cannot have duplicates of a Program Change number or MIDI Note settings.
21

Toolbar Menus...
Hot Swap Device – Allows a device in the grid to adopt a missing device’s parameters.
To replace a device: drag its image on top of another; the
replacement device must be of the same type.
After activation:
• New device should adopt all parameters
• New device should adopt all tool menus
• New device should adopt all channel names
• New device should adopt all MIDI settings (RN4/ MP8R)
• New device should adopt Yamaha ID (RN4/ MP8R)
22

Appendices
1. Keyboard Shortcuts
Organisation
Add Tab Cmd/Ctrl-T Grid size retains previous selection
Delete Tab Cmd/Ctrl-W
Next Tab Tab
Previous Tab Shift-Tab
Lock/Unlock Grid Cmd/Ctrl-L Or click ‘Lock’ symbol
Rename Next Tab Tab First, double-click name to edit
Rename previous Tab Shift-Tab
Device Control/Settings
Change Gain (Mouse/Trackpad) Click+drag or scrollwheel
Precision/Slow Gain Cmd/Ctrl Whilst changing gain, levels or Pan
Change Gain (keyboard) Double-Click inside gain knob to enter dB value, ‘Enter’ to accept
Device global function setting Option/Alt-Click Applies setting to all channels on current device
Clear all clip indications in a tab Cmd/Ctrl–Shift-C
Clear all clip indications globally Cmd/Ctrl-Shift–Alt–C
Locate a device in any tab Double-Click its name in the Device List – Device will ID for several seconds
Remove plugins from Tab* Cmd-Backspace For a device no longer on the network
Remove plugins from all Tabs* Cmd-Shift-Backspace
*Mac only. Only applies when in the Device Settings window
Device Specific
RedNet MP8R – PAD Shift-click on the gain dial Toggles PAD on/off
Clear Custom Mixes Cmd/Ctrl-N Red range devices
Move between page views Arrow Keys Red range; RedNet 4; RedNet MP8R
RedNet PCIe and RedNet PCIeR
I/O Routing – Cascade channels Cmd/Ctrl-Option/Alt-Shift Red range devices
Faders to minimum Option/Alt-Click Red range devices
Faders to maximum Shift-Option/Alt-Click Red range devices
System
Launch Dante Domain Manager Cmd/Ctrl-O
23

Appendices...
2. Customer Support
You can contact our dedicated RedNet Customer Support team free of charge:
Email: https://pro.focusrite.com/technical-support
Phone (UK): +44 (0)1494 836384
Phone (USA): +1 (310) 450-8494
24
 Loading...