

Page 1
IT EN
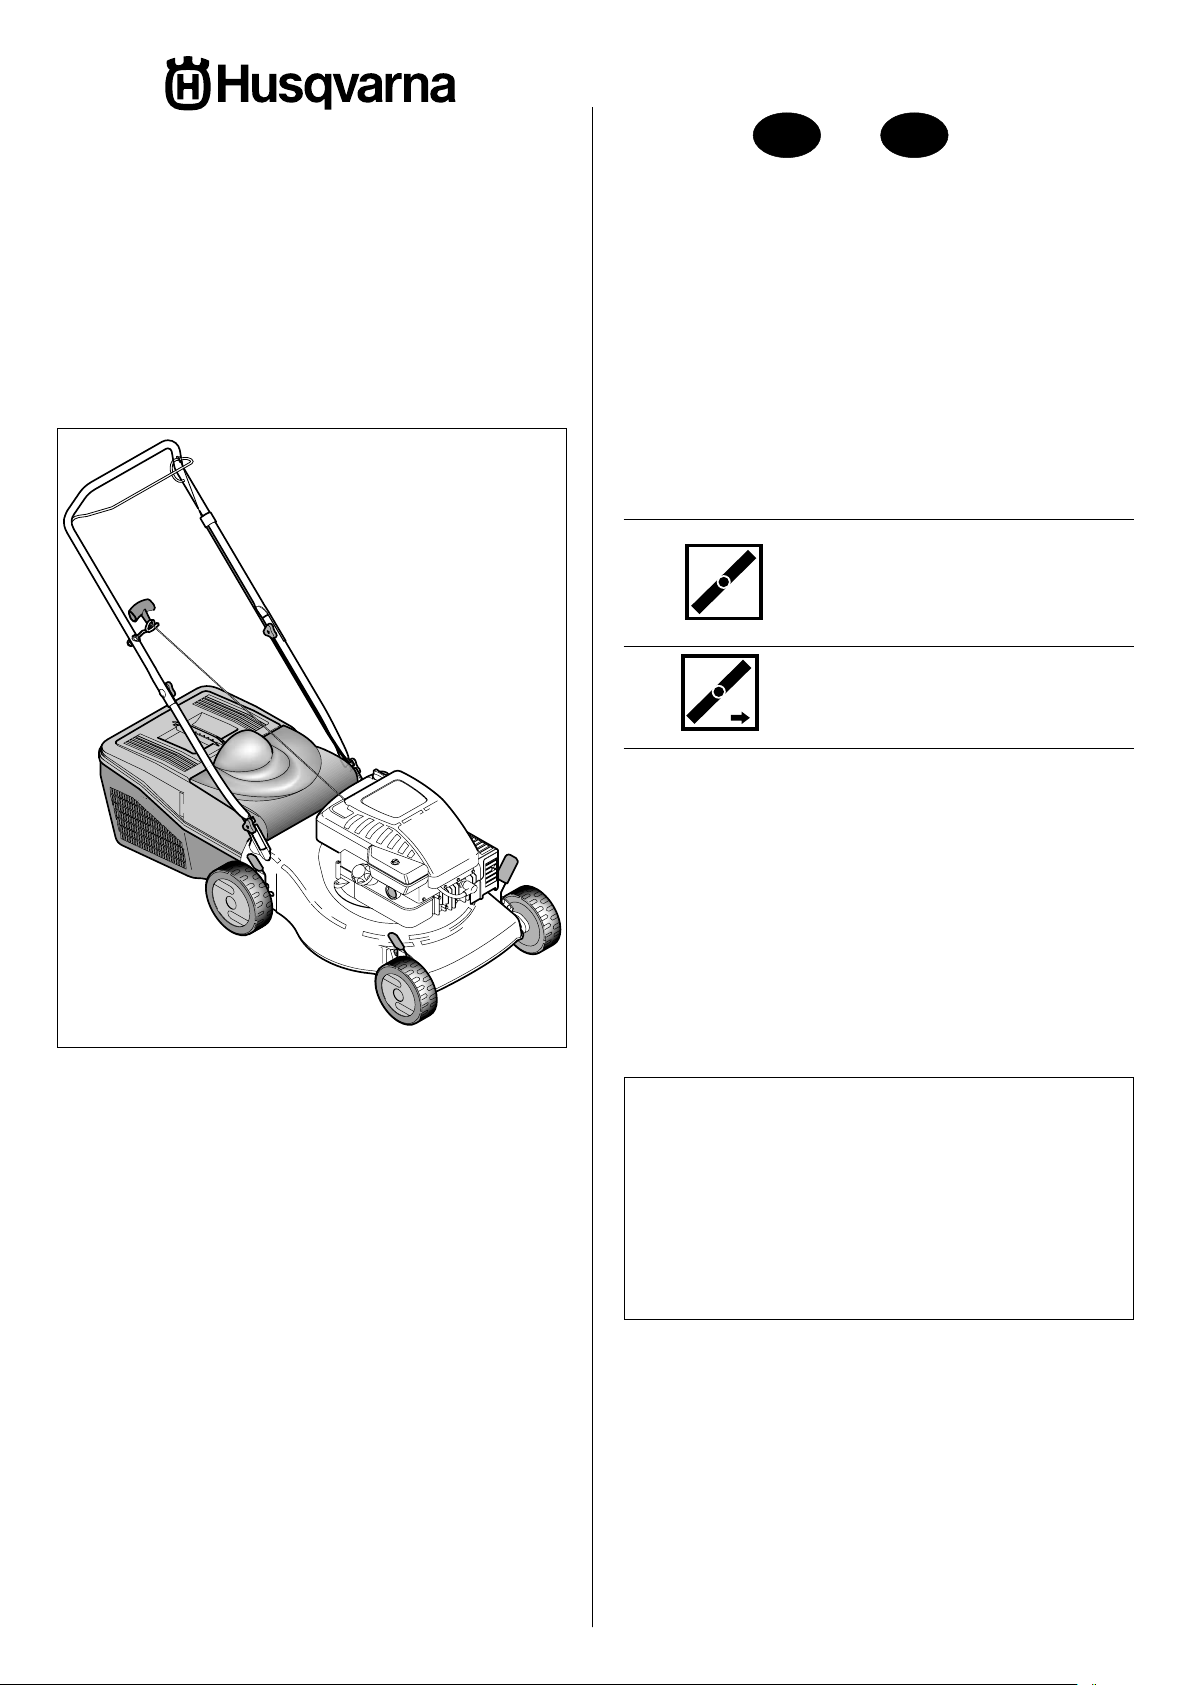
Mod. QUICK SILVER
46 PUSH
Mod. QUICK SILVER
46 SD SELF DRIVE
Rasaerba a spinta
Manual lawn mower
Rasaerba semovente
Self-propelled lawn mower
Libretto d'istruzione e uso
Instruction manual
Rasaerba con motore a scoppio -
Lama 46 cm
Lawn mower with petrol engine -
46 cm blade
For all customer enquiries or for replacement parts, contact:
0870 6091901
customer.services@husqvarna.co.uk
Il presente manuale rappresenta una parte integrante del prodotto.
Vi preghiamo di conservarlo per ogni ulteriore utilizzo.
The present manual constitutes an integral part of the product and it
should be kept for all future reference.
Page 2
2
IT EN
La ringraziamo per la fiducia accordataci con l'acquisto del nostro
rasaerba. Siamo certi che avrà modo di apprezzare nel tempo e
con soddisfazione la qualità del nostro prodotto. La preghiamo di
leggere attentamente questo manuale predisposto appositamente per
informarla circa il suo uso corretto in conformità ai requisiti essenziali
di sicurezza.
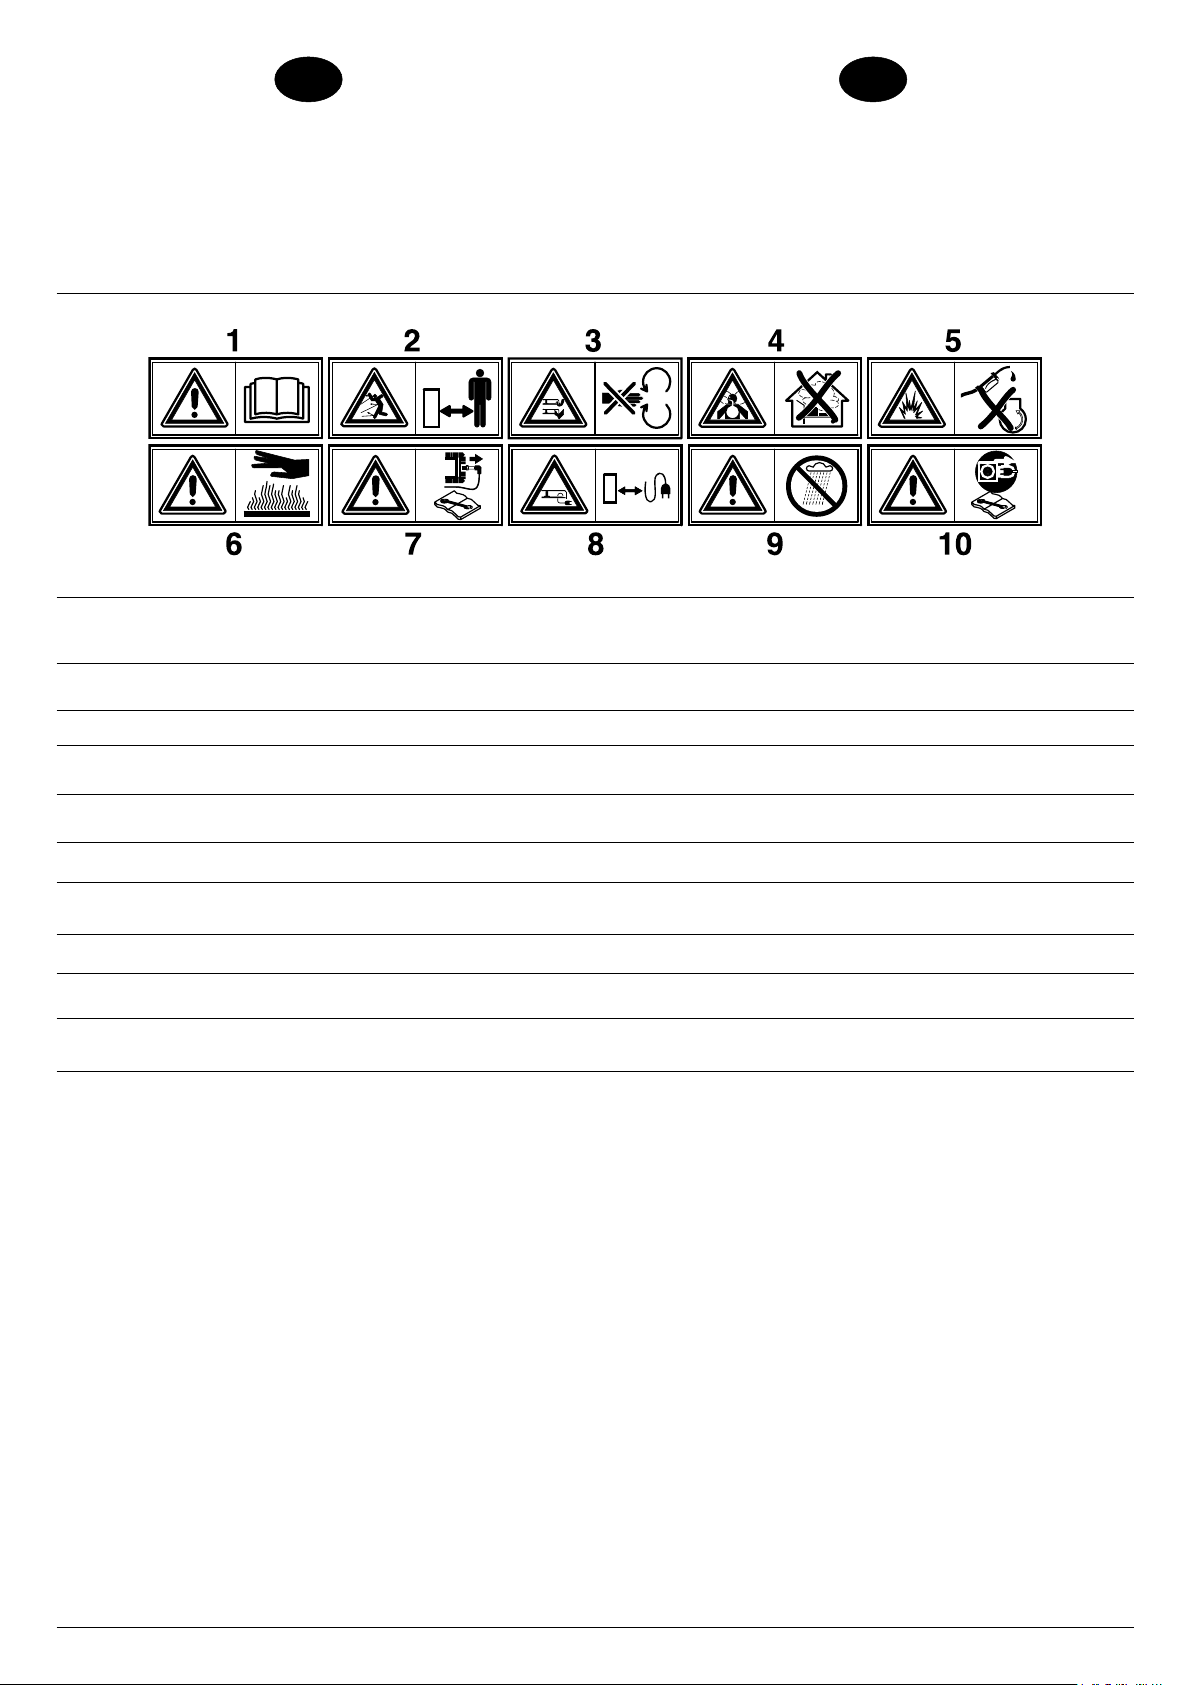
Attenzione! Leggere il manuale di istruzioni prima dell'uso.
1
Tenere le persone estranee fuori dalla zona di pericolo!
2
We wish to thank you for choosing our lawn mower. We are confident
that the high quality of our machine will meet with your satisfaction
and appreciation and that your lawn mower will give you long-lasting
service.Before starting to use your machine, make sure to read with
care this manual, which has been purposely drawn up to provide you
with all the necessary information for proper use, in compliance with
basic safety requirements.
Caution! Read the instruction manual before use.
1
Keep other people well away from the danger area!
2
Attenzione: pericolo ferimento mani e piedi.
3
Pericolo di aspirazione di gas tossici! Non utilizzare l'apparecchio in ambienti
4
chiusi o poco ventilati.
Pericolo di esplosione! Non effettuare rabbocchi di carburante con
5
motore in moto.
Attenzione! Superficie calda.
6
Attenzione! Spegnere il motore e staccare la candela prima di effettuare
7
qualunque manutenzione.
Tenere il cavo di alimentazione lontano dall'utensile tagliente.
8
Attenzione! Proteggere dalla pioggia e dall’umidità.
9
Prima di qualsiasi intevento sull'utensile tagliente togliere la spina di alimen-
10
tazione.
3
Warning: Risk of hand and feet injury.
Risk of breathing in toxic gases ! Do not use the appliance in closed or poorly
4
ventilated environments.
Risk of explosion ! Do not top up with fuel with engine running.
5
Caution! Hot surface
6
Caution! Switch off the engine and disconnect the spark plug before under-
7
taking any maintenance work.
Keep the power supply cable well away from the cutting tool.
8
Caution! Shelter from rain and humidity.
9
Before carrying out any operations on the cutting tool, disconnect the plug
10
Page 3
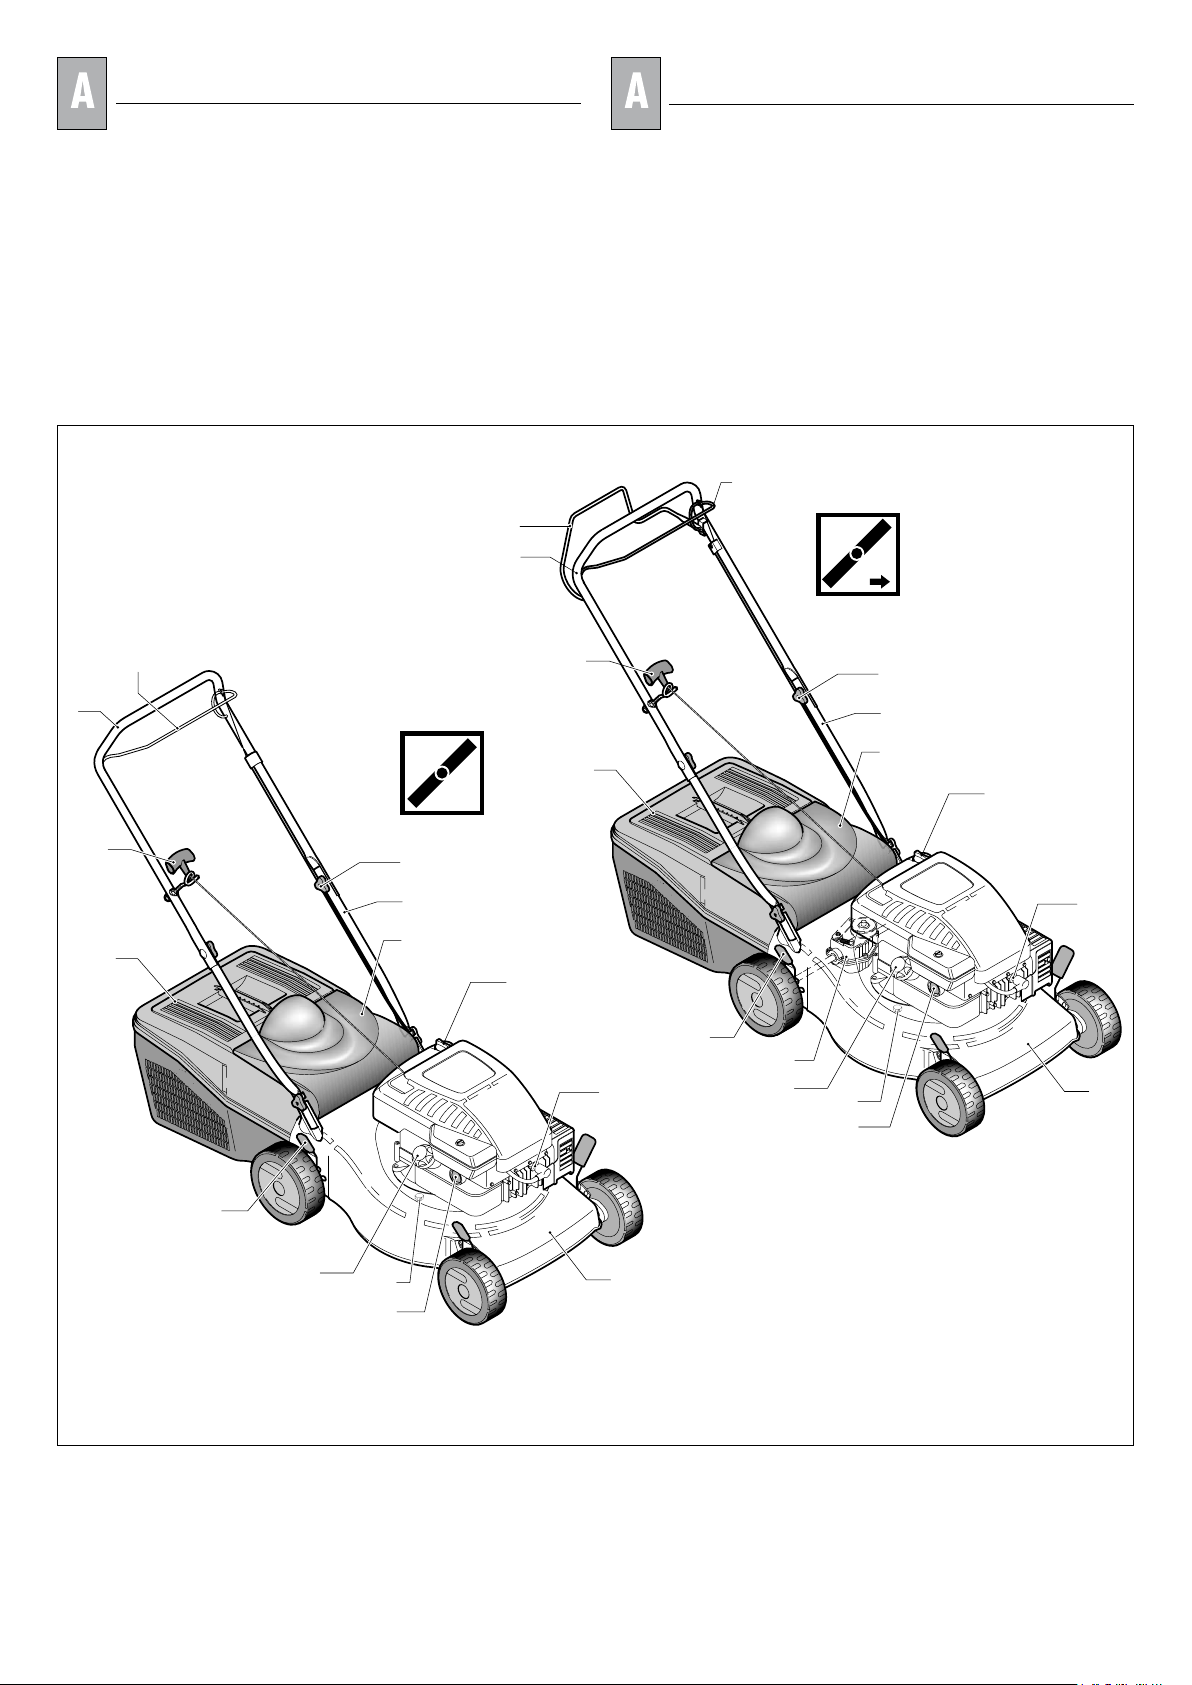
NOMENCLATURA
1
4
2
3
12
14
11
5
6
16
9
7
8
10
1
4
2
3
12
14
11
5
6
16
9
7
8
10
15
13
DESCRIPTION
1 Manico superiore
2 Manico inferiore
3 Vite, dado fissaggio manico
superiore
4 Cestello raccoglierba
5 Tappo carico olio
6 Tappo scarico olio
7 Scocca
8 Leve regolazione altezza
taglio
9 Candela
10 Tappo serbatoio benzina
11 Maniglia avviamento motore
12 Paratoia posteriore
13 Maniglia frizione
14 Leva di sicurezza
15 Gruppo riduttore
16 Pompetta arrichimento
1 Upper handles
2 Lower handles
3 Fastening knobs for upper
handles
4 Grass catcher
5 Oil filler cap
6 Oil drain plug
7 Deck
8 Adjusting levers for cutting
height
9 Spark plug
10 Fuel cap
11 Engine start-grip
12 Rear deflector
13 Clutch lever
14 Engine stop lever
15 Reduction gear
16 Fuel-enrichment pump
3
Page 4
4
X 4
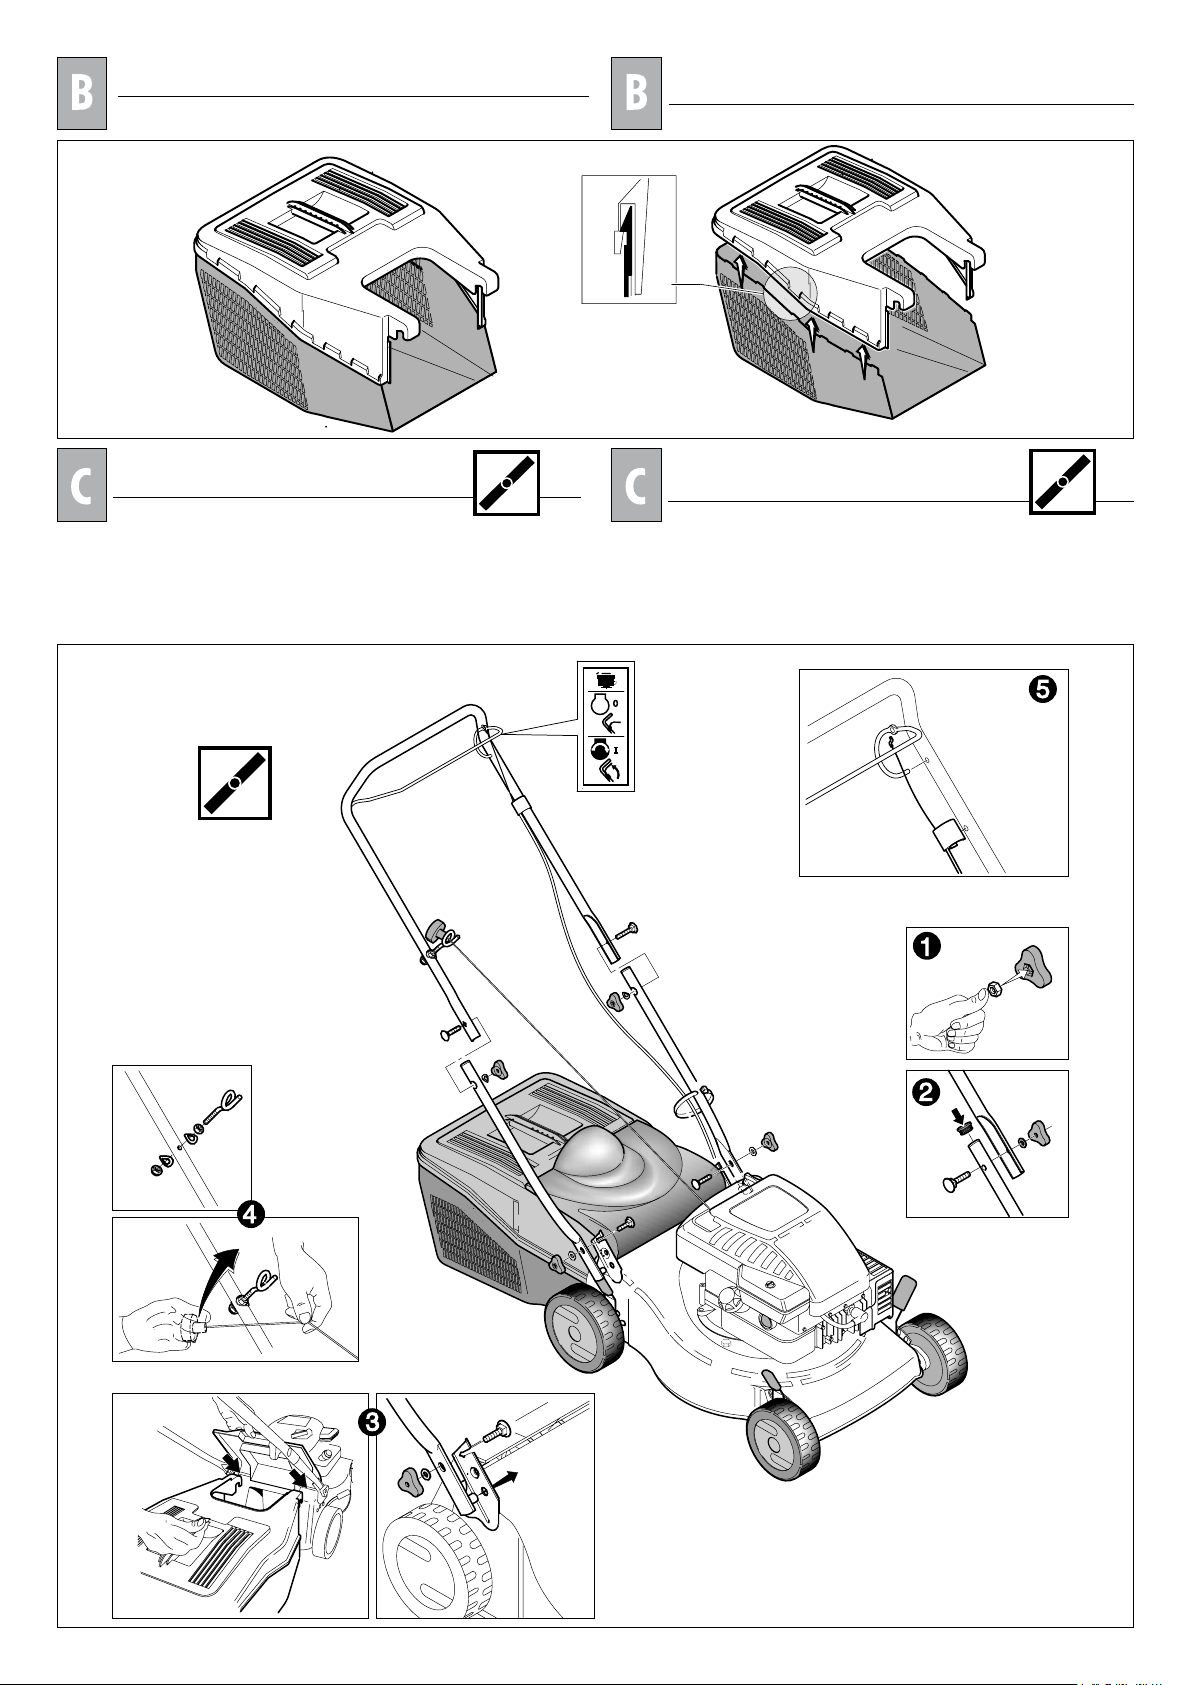
MONTAGGIO RACCOGLIERBA
ASSEMBLY OF GRASS CATCHER
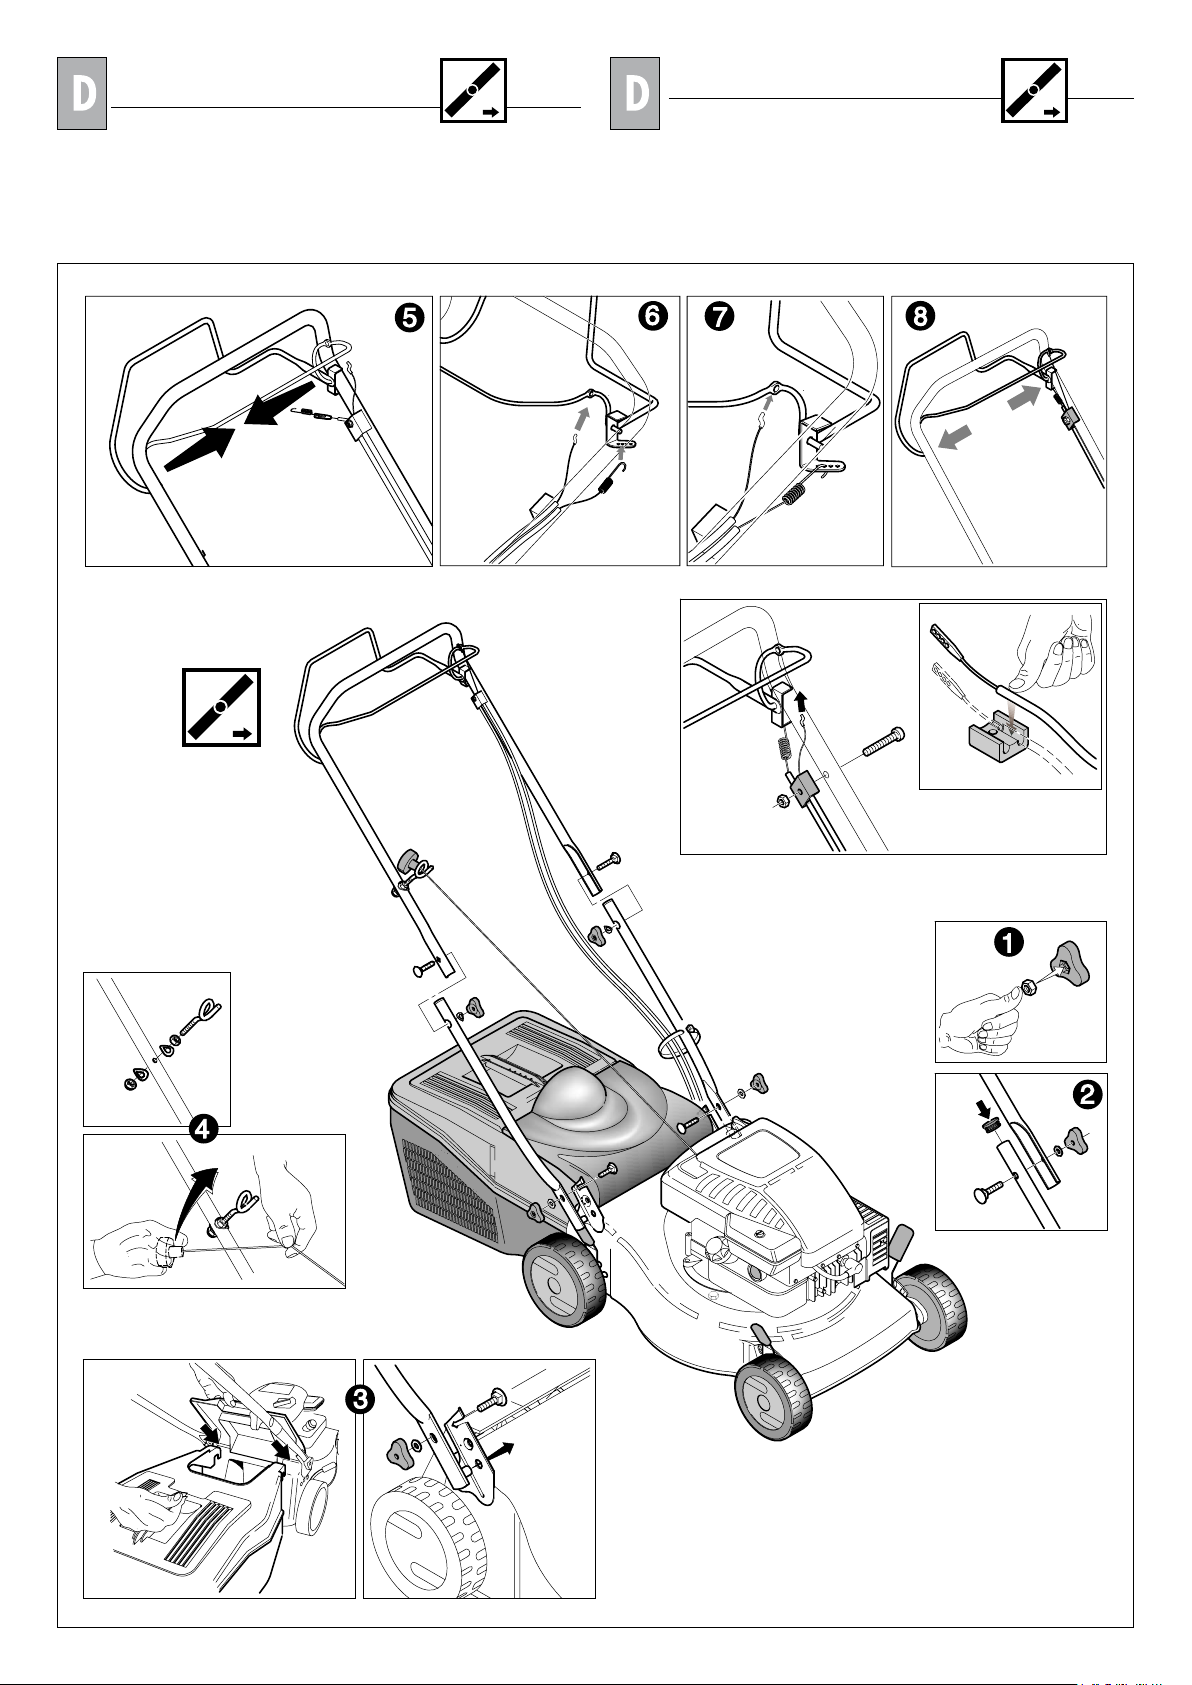
MONTAGGIO
Rasaerba a spinta
Rimuovere le estremità dei manici, collegare i cavi come mostrato e
ripristinare il fissaggio dei manici stessi.
ASSEMBLY
Manual lawn mower
Remove the bail arms, attach cables as shown and re-fit the bail arms,
if applicable.
Assemble the handle fit the levers with the pins and clips provided,
assemble the wheels as shown and throttle if supplied.
Page 5
MONTAGGIO
X 4
ASSEMBLY
Rasaerba semovente
Rimuovere le estremità dei manici, collegare i cavi come mostrato e
ripristinare il fissaggio dei manici stessi
Self-Propelled
Remove the bail arms, attach cables as shown and re-fit the bail arms,
if applicable.
Assemble the handle fit the levers with the pins and clips provided,
assemble the wheels as shown and throttle if supplied.
5
Page 6

6
REGOLAZIONE ALTEZZA TAGLIO
ADJUSTMENT OF CUTTING HEIGHT
PREDISPOSIZIONE PROTEZIONI SAFETY PRECAUTIONS
Operare sempre con il raccoglierba o il deflettore montati.
Spegnere il motore per la rimozione del raccoglierba e per
la regolazione altezza taglio
A motore funzionante evitare assolutamente di mettere le
mani o piedi sotto il bordo della carcassa o nell'apertura di
espulsione
Prima di iniziare il taglio del prato, bisogna togliere eventuali corpi
estranei dallo stesso.
Durante il lavoro bisogna fare attenzione ad eventuali corpi estranei,
rimasti sul prato.L'utilizzatore è responsabile verso terzi nella zona di
lavoro.
Durante la messa in moto o l'avviamento del motore, l'operatore non
deve alzare la rasaerba, però, se necessario, solo inclinarla, in modo
che la lama sia rivolta verso il lato opposto all'operatore.
Always operate with the deflector or grasscatcher in the
correct position.
Always stop the engine before removing the grasscatcher or
adjusting the height of cut.
Never place your hands or feet underneath the deck or into
the grass discharge chute while the engine is running.
Before mowing, remove all foreign objects from the lawn which may
be thrown by the machine. While mowing, stay alert for any foreign
objects which may have been missed.
Never lift the rear of the mower while starting the engine or during
normal operation.
Page 7

Quando il motore è in movimento, bisogna assolutamente evita-
16
11
14
re di avvicinarsi con la mano o le punte dei piedi, sotto il bordo
della carcassa o nell'apertura di espulsione della stessa
FUNZIONAMENTO
PREDISPOSIZIONE MOTORE
Per la preparazione del motore, occorre consultare il libretto
istruzioni motore della casa costruttrice dello stesso.
ATTENZIONE: Prima dell’uso aggiungere olio al motore (0.6l).
OPERATION
ENGINE ADJUSTMENTS
Refer to the engine manufacturer's maintenance manual.
CAUTION:- 0.6l Oil must be added to the engine before use.
Never place your hands or feet underneath the deck or into the
rear discharge chute while the engine is running.
AVVIAMENTO MOTORE
Effettuate le operazioni di messa a punto, si procede all'avvia-
mento del motore nel seguente modo:
a)Per motori con sistema "choke":
in caso di motore freddo, posizionare la leva acceleratore nella
posizione START
b)Azionare la maniglia freno (14) per permettere l'avviamento del moto-
re, tenere la leva premuta contro la maniglia in fase di avvio e durante
l’utilizzo della macchina (funzionamento del freno del motore).
c) Per motori con sistema "primer":
premere 3 o 4 volte la pompetta di arricchimento (16) posta sul
carburatore;posizionare la leva acceleratore nella posizione MAX.
Per ulteriori chiarimenti si raccomanda la consultazione del libretto di
istruzioni del motore stesso.
d)Avviare il motore:
AVVIAMENTO MANUALE (Mantenendo premuta la leva freno
motore (14)).
Impugnare la maniglia dell'avviamento (11) e tirare la fune senza
sforzo sino ad avvertire la resistenza provocata dalla compressione,
rilasciare la maniglia quindi dare uno strappo energico.
STARTING THE ENGINE
Once the machine has been set up properly, start the engine
as follows:
a) Engines with choke system:
when the engine is cold, position the accelerator lever on START
b)Operate the engine stop lever (14) to prepare the engine for start,
keep lever pressed against handle while starting and using the machine
(it operates the engine brake).
c) Engines with primer system:
Press the fuel-enrichment pump (16) located on the carburettor 3 or
4 times position the accelerator lever on MAX.
For further information and explanations, read carefully the user
instruction manual of the engine.
d) Start engine.
MANUAL STARTING: (While holding the engine stop lever (14)).
Hold the engine start-grip (11) and pull the starter rope gently until
you feel the resistance caused by compression. Return the starter rope
slowly then pull the handle firmly towards you to its full extent.
7
Page 8

8
Mantenere premuta la maniglia (14) durante il
14
13
14
S
P
R
13
funzionamento, al rilascio della stessa il motore
si ferma.
TAGLIO
Per effettuare il taglio dell'erba spingere manualmente la macchina.
Keep the engine stop lever (14) depressed during
machine operation. When the lever is released,
the engine stops.
MOWING
To cut the grass, push the lawn mower manually
Mantenere premuta la maniglia (14) durante il funzionamento, al
rilascio della stessa il motore si ferma.
TAGLIO
Per effettuare il taglio dell'erba spingere manualmente la macchina o
innestare l'avanzamento automatico
Innesto avanzamento automatico:alzare la maniglia frizione
(18) e tenerla premuta.
ATTENZIONE: innestare solo a motore funzionante.
Disinnesto automatico avanzamento:rilasciare la maniglia
frizione
Keep the engine stop lever (14) depressed during machine operation.
When the lever is released, the engine stops.
MOWING
To cut the grass, push the lawn mower manually or insert the automatic
advance gear.
How to insert automatic advance: Lift up the clutch handle (18)
and keep it pressed in position.
CAUTION: Engage the gear only when the engine is running.
How to disengage advance: Release the clutch handle.
Importante: se premendo la maniglia frizione l'innesto del-
l'avanzamento non avviene, occorre effettuare la registrazione
del cavo frizione inserendo la molla (P) in uno dei successivi fori
della piastrina (R) o nel foro "S" .
Important: If, when you press the clutch lever, the automatic
advance gear does not engage, the clutch cable should be
adjusted by inserting the spring (P) in one of the subsequent
holes in the plate (R) (or in the hole "S" .
Page 9

GRUPPO AVANZAMENTO AUTOMATICO
17
1819 20
Controllare periodicamente il gruppo avanzamento automatico
e tenerlo ben pulito. In particolare tenere ben puliti il pignone
(17) e l'ingranaggio (18).
Per tale verifica occorre togliere la ruota (19) svitando la vite (20).
AUTOMATIC ADVANCEMENT
Periodically check the automatic advance assembly and make
sure to keep it clean. In particular, the pinion (17) and the gear
(18) must be kept perfectly clean. To carry out this check, you
must remove the wheel (19) by unscrewing the screw (20).
NORME DI SICUREZZA
Misure operative di sicurezza per tosaerba controllate
da pedoni
ATTENZIONE: Questo trattorino tosaerba ha una potenza sufficiente
ad amputare mani e piedi e a scagliare oggetti. La mancata osservanza
delle seguenti istruzioni antinfortunistiche potrebbe causare lesioni gravi
e persino il decesso della vittima
I. Addestramento all’uso
Studiare attentamente le istruzioni. Acquisire dimestichezza con i
comandi e conoscere a fondo l’uso corretto dell’equipaggiamento.
Non consentire mai l’uso dei trattorini tosaerba ai bambini né agli
adulti che non abbiano dimestichezza con le istruzioni sull’uso. Le nor
mative locali possono stabilire l’età minima per operare i trattorini
tosaerba.
Non operare mai con i tosaerba in caso vi siano persone, special-
mente bambini, o animaletti domestici nella zona di lavoro.
Tenere presente che in caso di incidenti, rischi o pericoli provocati a
persone o a beni, la responsabilità dell’operato ricade sull’operatore,
od utilizzatore.
II. Preparazione
Indossare sempre scarpe robuste da lavoro e pantaloni lunghi. Non
usare i tosaerba a piedi nudi o indossando soltanto sandali.
Controllare scrupolosamente l’area in cui verrà utilizzato l’equipag-
giamento e togliere tutti gli oggetti che potrebbero venire scagliati
dal macchinario.
ATTENZIONE - La benzina è infiammabilissima.
- Conservare il carburante in contenitori appositi.
- Fare rifornimento soltanto all’aperto. E’ vietato fumare durante il
rifornimento.
- Fare rifornimento prima di avviare il motore. Non svitare mai il tappo
del serbatoio, né fare rifornimento con il motore acceso o caldo.
- In caso di fuoriuscita di benzina, non mettere in moto il motore.
Spostare l’equipaggiamento dall’area in cui si è verificata la fuoriuscita
del carburante ed evitare di provocare qualsiasi tipo di accensione
fino a quando i vapori non si siano dissipati.
- Reinserire e serrare bene il tappo del serbatoio e del contenitore.
Sostituire le marmitte che non funzionino bene.
Prima di iniziare il lavoro ispezionare visualmente le lame, i bulloni
delle lame e il gruppo falciante per verificare che non vi siano tracce
di usura o danneggiamenti. In caso di lame e bulloni danneggiati od
usurati, installate un nuovo set completo in modo che il macchinario
rimanga bilanciato.
In caso di trattorini tosaerba a lame multiple prestare la massima
attenzione in quanto ruotando una lama si può provocare la rotazione delle altre.
III. Funzionamento
Non accendere il motore in spazi ristretti dove vi si possa accumulare
ossido di carbonio, un gas inodore ma letale.
Usare i tosaerba soltanto con la luce del giorno oppure in presenza
di buona luce artificiale.
Se possibile, evitare di utilizzare l’apparecchio sull’erba bagnata.
Stare sempre bene in equilibrio nei tratti scoscesi.
Camminare sempre, non correre mai.
SAFETY RULES
Safe Operation Practices for Pedestrian-Controlled Rotary
Lawnmowers
IMPORTANT: This cutting machine is ca pa ble of amputat ng hands
and feet and throwing objects.Failure to observe the following safety
instructions could result in serious injury or death.
I. Training
Read the instructions carefully. Be familiar with the controls and the
proper use of the equipment.
Never allow children or people un familiar with the instructions to
use the lawnmower. Local regulations may restrict the age of the
operator.
Never mow while people, especially children, or pets are nearby.
Keep in mind that the operator or user is responsible for accidents
or hazards occurring to other people or their property.
II. Preparation
While mowing, always wear substantial footwear and long trou-
sers. Do not operate the equipment when barefoot or wearing open
sandals.
Thoroughly inspect the area where the equipment is to be used and
remove all objects which may be thrown by the machine.
WARNING - Petrol is highly flammable.
- Store fuel in containers specifically de signed for this purpose.
- Refuel outdoors only and do not smoke while refueling.
- Add fuel before starting the engine. Never remove the cap of the
fuel tank or add petrol while the engine is running or when the engine
is hot.
- If petrol is spilled, do not attempt to start the engine but move the
machine away from the area of spillage and avoid creating any source
of ignition until petrol vapors have dissipated.
- Replace all fuel tanks and container caps securely.
Replace faulty silencers.
Before using, always visually inspect to see that the blades, blade
bolts and cutter assembly are not worn or damaged. Replace worn
or damaged blades and bolts in sets to pre serve balance.
On multibladed machines, take care as rotating one blade can cause
other blades to rotate.
III. Operation
Do not operate the engine in a confined space where dangerous
carbon mon ox ide fumes can collect.
Mow only in daylight or in good artificial light.
Avoid operating the equipment in wet grass, where feasible.
Always be sure of your footing on slopes.
Walk, never run.
For wheeled rotary machines, mow across the face of slopes, never
up and down.
Exercise extreme caution when changing direction on slopes.
Do not mow excessively steep slopes.
Use extreme caution when reversing or pulling the lawnmower
towards you.
Stop the blade if the lawnmower has to be tilted for transportation
when cross ing surfaces other than grass, and when transporting the
9
Page 10

10
Per macchine rotanti a ruote, nei tratti scoscesi, falciare l’erba se-
guendo la costa del pendio, non salendo e scendendo.
Prestare estrema attenzione al cambio di direzione su un tratto
scosceso.
Non falciare tratti eccessivamente ripidi.
Prestare estrema attenzione girando o tirando la macchina verso
di sé.
Fermare le lame nel caso in cui la macchina debba essere trasportata
su superfici non erbose, oppure verso la zona da falciare.
Non utilizzare mai la macchina con protezioni difettose, oppure
in assenza di dispositivi di sicurezza, ad esempio, deflettori e/o
separatori di erba.
Non modificare le impostazioni del regolatore del motore né far
operare il motore a velocità eccessive. Le velocità eccessive possono
aumentare il pericolo di infortuni.
Disinnestare tutte le lame e le frizioni prima di avviare il motore.
Avviare o accendere il motore ponendo molta attenzione, attenendosi
alle istruzioni e con i piedi ben lontani della lame.
Non inclinare mai la macchina avviando o accendendo il motore,
con la sola eccezione dei casi in cui questo sia assolutamente necessario. In questo caso, comunque non inclinarla mai oltre quanto
sia strettamente necessario e sollevare solamente la parte distante
dall’operatore.
Non avviare il motore stando davanti al tubo di scarico.
Non avvicinare mani o piedi alle parti rotanti. Mantenersi a distanza
dal tubo di scarico, sempre aperto.
Non rimorchiare o trasportare mai la macchina con il motore in
funzione.
Arrestare il motore e staccare il cavo della candela:
- prima di pulire eventuali intasamenti e prima di stasare lo scivolo;
- prima di interventi o controlli sul tosaerba e prima delle operazioni
di pulizia;
- dopo aver colpito un oggetto estraneo. Controllare che il tosaerba
non sia stato danneggiato ed effettuare le riparazioni del caso prima
di riavviare e mettere in funzione l’equipaggiamento;
- se il tosaerba, o trattorino, vibra in modo anomalo (in qual caso
eseguire immediatamente dei controlli).
Arrestare il motore:
- ovunque sia stata lasciata la macchina;
- prima di fare carburante.
Ridurre la velocità, con la leva dell’acceleratore, per rallentare il
motore prima dello spegnimento. Se il motore è provvisto di valvola
di arresto, chiudere l’alimentazione del carburante alla fine del
lavoro.
Guidare lentamente qualora si utilizzi il sedile posteriore.
IV. Manutenzione e Periodi di Inattivita’
Verificare che tutti i dadi, i bulloni e le viti siano sempre ben stretti
per assicurare che l’equipaggiamento sia in buone condizioni operative.
Non lasciare mai l’equipaggiamento, con benzina nel serbatoio,
in locali chiusi dove i vapori possano raggiungere fiamme libere o
scintille.
Lasciare raffreddare il motore prima di riporre i tosaerba, o trattorini,
in qualsiasi spazio stretto e chiuso.
Per ridurre i pericoli d’incendio assicurarsi che il motore, la marmitta,
il vano batteria e la zona di stoccaggio benzina siano liberi da erba,
foglie o quantità eccessive di grasso.
Controllare spesso il raccoglitore dell’erba tagliata per individuare
eventuali segni di usura o di danneggiamento.
Per maggiore sicurezza, sostituire le parti usurate o danneggiate.
Il serbatoio del carburante va vuotato all’aperto, qualora necessa-
rio.
lawnmower to and from the area to be mowed.
Never operate the lawnmower with defective guards, or without safety
de vic es, for example defl ectors and/or grass catchers, in place.
Do not change the engine governor settings or overspeed the engine.
Operating the engine at excessive speed may increase the hazard
of personal injury.
Disengage all blade and drive clutches before starting the engine.
Start the engine or switch on the motor carefully according to instruc-
tions and with feet well away from the blade.
Do not tilt the lawnmower when starting the engine or switching on
the motor, except if the lawnmower has to be tilted for starting. In
this case, do not tilt more than absolutely nec es sary and lift only the
part which is away from the op er a tor.
Do not start the engine when standing in front of the discharge
chute.
Do not put hands or feet near or under rotating parts. Keep clear of
the dis charge opening at all times.
Never pick up or carry lawnmower while the engine is running.
Stop the engine and disconnect the spark plug wire:
- before cleaning blockages or un clog ging chute;
- before checking, cleaning or work ing on the lawnmower;
- after striking a foreign object. Inspect the lawnmower for damage
and make repairs before re starting and operating the lawnmower;
- if the lawnmower starts to vibrate abnormally (check immediately).
Stop the engine:
- whenever you leave the lawnmower;
- before refuelling.
Reduce the throttle setting during en gine shut down and, if the engine
is provided with a shut-off valve, turn the fuel off at the conclusion
of mowing.
Go slow when using a trailing seat.
IV. Maintenance and Storage
Keep all nuts, bolts and screws tight to be sure the equipment is in
safe working condition.
Never store the equipment with petrol in the tank inside a building
where fumes may reach an open flame or spark.
Allow the engine to cool before storing in any enclosure.
To reduce the fire hazard, keep the engine, silencer, battery com-
partment and petrol storage area free of grass, leaves, or excessive
grease.
Check the grass catcher frequently for wear or deterioration.
Replace worn or damaged parts for safety.
If the fuel tank has to be drained, this should be done outdoors.
Page 11

MANUTENZIONE
21
24
26
22
25
23
MAINTENANCE
Attenzione! Spegnere il motore e
staccare la candela prima di effettuare
qualunque manutenzione.
Per motori a scoppio a 4 tempi verificare regolarmente il livello
dell'olio. Aggiungere o cambiare l'olio se necessario. Per ulteriori
delucidazioni vedasi il manuale istruzioni del motore.
Controllare periodicamente il serraggio delle viti e dadi.Dopo il taglio
dell'erba pulire sempre la macchina sia sotto che sopra. Evitare che
si depositi l'erba sotto lo chassis.
Non utilizzare getti d'acqua per la pulizia esterna della rasaerba:
potrebbe provocare seri danni al sistema di avviamento elettrico.
Fare attenzione al silenziatore di scarico dei fumi perchè .... scot-
ta.
Periodicamente smontare gli assali porta ruota, pulirli con petrolio e
mettere dell'olio prima di montarli: lo stesso per le ruote su cuscinetti
a sfere però ricordarsi di metter del grasso nei cuscinetti
Controllare di frequente la lama per accertare eventuali danni.
E' buona cosa ogni fine stagione far controllare il rasaerba da una
stazione di servizio.
LAMA
Caution! Switch off the motor and disconnect the spark plug before undertaking any
maintenance work.
For a four stroke engine, check the oil level and change the oil when
dirty. For further explanation, see ENGINE INSTRUCTION BOOK.
Frequently check the mower and ensure that all grass deposits are
removed from beneath the deck.
Never clean the mower by pouring water over it: this may seriously
damage the electric start system.
Take care, the exhaust muffler may be very hot.
Frequently remove the wheel screws clean whith petroleum and oil
before replacing. Ball bearings must be greased before remounting.
Frequently check the blade for damage.
The lawn mower must be checked by a SERVICE DEALER.
Per togliere la lama (21) svitare la vite (22)
Controllare : il supporto lama (23), la rondella frizione (24), la chia-
vetta (25) e le rondelle (26), se risultassero danneggiati o incrinati
sostituirli.
Durante il montaggio accertarsi che la chiavetta (25) sia nella sede
dell'albero motore e che la lama sia montata con il lato tagliente rivolto
verso il senso di rotazione del motore. La vite lama (22) va bloccata
con coppia di serraggio di 5,34 Kpm (52,4 Nm).
BLADE
To remove the blade (21) unscrew the screw (22).
Check the conditions of the blade-support (23), the washer (24),
the key (25) and the washer (26) and replace any parts which are
damaged.
When reassembling, make sure that the key (25) is correctly seated
in the shaft and that the cutting edges face in the direction of the
engine rotation. The blade screw (22) must be torqued to 5,34 Kgm
(52,4 Nm).
11
Page 12

12
GARANZIA E CONDIZIONI DI GARANZIA
GUARANTEE AND GUARANTEE POLICY
Se una qualsiasi parte dovesse guastarsi a causa di una lavorazione
scadente nel periodo della garanzia, Husqvarna Outdoor Products
Italia Spa, tramite i suoi Centri di riparazione autorizzati, effettuerà
gratuitamente la riparazione o la sostituzione, sempre che:
a)Il guasto sia stato notificato direttamente al centro riparazioni au-
torizzato.
b)Venga presentata la ricevuta d’acquisto.
c)Il guasto non sia stato causato da uso improprio, negligenza o rego-
lazioni errate da parte dell’utente.
d)Il guasto non sia dovuto al normale logoramento per uso.
e)La macchina non sia stata sottoposta a manutenzione né riparata,
smontata o manomessa da persone non autorizzate da Husqvarna
Outdoor Products Italia Spa.
f) La macchina non sia stata noleggiata a terzi.
g)La macchina sia di proprietà dell’acquirente originale.
h)Il prodotto non è stato usato fuori dal paese in cui è stato acquista-
to.
i) La macchina non sia stata adibita a uso commerciale.
Questa garanzia è supplementare ai diritti legali del cliente e non
li limita in alcun modo.
Guasti dovuti a una o più delle cause elencate di seguito non sono co-
perti dalla garanzia, quindi è importante leggere le istruzioni riportate
nel Manuale per l’utente nonché capire appieno il funzionamento e le
procedure di manutenzione della macchina.
Guasti non coperti dalla garanzia.
Sostituzione di lame logorate o danneggiate.
Guasti dovuti alla mancata notificazione del guasto originale.
Guasti dovuti ad impatto improvviso.
Guasti dovuti alla mancata osservanza delle istruzioni e delle rac-
comandazioni riportate nel Manuale per l’utente.
Non sono coperte da garanzia le macchine date a noleggio.
Le parti elencate di seguito sono considerate come parti di consumo e
la loro vita dipende dalla manutenzione regolare ; di conseguenza non
sono coperte da garanzia lame, cavi di alimentazione, cinghia.
Attenzione
Entro i termini della presente garanzia Husqvarna Outdoor Products
Italia Spa non accetta responsabilità alcuna per difetti dovuti nella loro
totalità o in parte, direttamente o indirettamente, all’uso di parti di
ricambio o parti accessorie non prodotte o autorizzate da Husqvarna
Outdoor Products Italia Spa oppure a modifiche apportate in un modo
qualsiasi alla macchina.
If any part is found to be defective due to faulty manufacture within the
guarantee period, Husqvarna Outdoor Products Italia Spa, through its
Authorised Service Repairers will effect the repair or replacement to
the customer free of charge providing:
a) The fault is reported directly to the Authorised Repairer.
b) Proof of purchase is provided.
c) The fault is not caused by misuse, neglect or faulty adjustment by
the user.
d) The failure has not occurred through fair wear and tear.
e) The machine has not been serviced or repaired, taken apart or
tampered with by any person not authorised by Husqvarna Outdoor
Products Italia Spa.
f) The machine has not been used for hire.
g) The machine is owned by the original purchaser.
h) The product has not been used outside of the country in which it
was purchased.
i) The machine has not been used commercially.
This guarantee is additional to, and in no way diminishes the custo-
mers statutory rights.
Failures due to the following are not covered, therefore it is important
that you read the instructions contained in this Operator’s Manual and
understand how to operate and maintain your machine:
Failures not covered by guarantee
Replacing worn or damaged blades
Failures as a result of not reporting an initial fault.
Failures as a result of sudden impact.
Failures as a result of not using the product in accordance with
the instructions and recommendations contained in this Operator’s
Manual.
Machines used for hire are not covered by this guarantee.
The following items listed are considered as wearing parts and their
life is dependent on regular maintenance and are, therefore not
normally subject to a valid warranty claim: Blades, Electric Mains
cable, Belt
Caution!
Husqvarna Outdoor Products Italia Spa does not accept liability under
the warranty for defects caused in whole or part, directly or indirectly
by the fitting of replacement parts or additional parts that are not either
manufactured or approved by Husqvarna Outdoor Products Italia Spa,
or by the machine having been modified in any way.
Page 13

DICHIARAZIONE CE DI CONFORMITA’
Il sottoscritto Bengt Ahlund, della ditta Husqvarna Outdoor Products Italia Spa, Via Como 72, 23868 Valmadrera (LC) dichiara che il tosaerba:
Categoria ................................................................Rotativo, a benzina, con ruote
Marca.......................................................................Husqvarna Outdoor Products
è conforme alla Direttiva 2000/14/EC.
Tipo ........................................................................ A
Versione ........................................................... ..... B
Larghezza di taglio ................................................. C
Livello sonoro garantito .......................................... D
Livello sonoro misurato .......................................... E
Livello di pressione acustica ................................... F
Vibrazioni al manico ............................................... G
(vedere ultima pagina del manuale per i riferimenti)
Tipo di lama ............................................................ Rotativa
Identificazione serie ................................................ Vedi Etichetta Dati Prodotto
Procedura di valutazione della conformità .............. ANNEX VI
Ente notificato. ........................................................ Nr. 0470 - NEMKO AS
Gaustadalleen 30 - PO Box 73 Blindern
0314 OSLO - Norway
Altre direttive ........................................................... 98/37/EC (Macchine), 93/68/EEC (Marcatura CEE), 2002/88/EC (emissioni)
2004/108/CE
normative ................................................................ EN836,EN ISO14982,EN1033,EN ISO 3744,EN ISO11201
Bengt Ahlund
Direttore Tenico
Husqvarna Outdoor Product Italia S.p.A.
Via Como 72 - 23868 Valmadrera (LC)
EC DECLARATION OF CONFORMITY
I, the undersigned Bengt Ahlund, of Husqvarna Outdoor Products Italia Spa, Via Como 72, 23868 Valmadrera (LC) certify that the lawnmower:
Category .................................................................Petrol Wheeled Rotary
Make .......................................................................Husqvarna Outdoor
Is compling with the 2000/14/EC Directive and following updating.
Type .......................................................................... A
Version ............................................................. ...... B
Width of cut ......... .................................................... C
Guaranteed sound power level ................................... D
Measured sound power level .................................... E
Sound pressure livel at the ear ................................... F
Vibration of the handle .............................................. G
(See the last page for references)
Type of Cutting Device ........................................... Rotary Blade
Identification of Series. ........................................... See Product Rating Label
Conformity Assesment Procedure .......................... ANNEX VI
Notified Body. ......................................................... Nr. 0470 - NEMKO AS
Gaustadalleen 30 - PO Box 73 Blindern
0314 OSLO - Norway
Other Directives ...................................................... 98/37/EC, 93/68/EEC, 2002/88/EC , 2004/108/EC
& applicable standards normative .......................... EN836,EN ISO14982,EN1033,EN ISO 3744,EN ISO11201
Bengt Ahlund
Technical Manager
Husqvarna Outdoor Product Italia S.p.A.
Via Como 72 - 23868 Valmadrera (LC)
13
Page 14

A 546
B
C
D
E
F
G
CV-CC-CA-CT-SP-SNSC-CL-SL-SK-ST-SXKC-KM-MC-MK-ML-MT
46 cm
96 dB (A)
95 dB (A)
84 dB (A)
2
5 m/s
Page 15

Page 16

HUSQVARNA OUTDOOR PRODUCTS ITALIA S.P.A.
Headquarters: Via Como 72 - 32868 - VALMADRERA (LC) - ITALY- Tel. +39 0341 203111 - Fax +39 0341 581671
COD. 99991492 - 531213041 ED.11/2007 Q.TY 9000 PRINTED IN ITALY
 Loading...