

Page 1

For MPG2-H with RPM4 or PG7302
Interconnection kit for MPG2-H with RPM4
or PG7302, P/N 3367797, includes:
DESCRIPTION
Nipple, 2.75 in.
(70 mm), DH500
Nipple, 6 in.
(152 mm), DH500
Nipple, 12 in.
(305 mm), DH500
Nipple, 5 in. x 1/8
in.(127 mm x 3 mm),
DH500, flexible
Elbow DH500 400 MPa
Tee DH500 400 MPa
Union DH500 400 MPa
Plug DH500/DH700 700 MPa
Adaptor, DH500F x
1/8 in. (3 mm) NPTM
PRESSURE
RATING
500 MPa
(72,500 psi)
500 MPa
(72,500 psi)
500 MPa
(72,500 psi)
200 MPa
(30,000 psi)
(60,000 psi)
(60,000 psi)
(60,000 psi)
(100,000 psi)
200 MPa
(30,000 psi)
QTY PART NO.
1 3068887
1 3068893
1 3068902
2 3126068
1 3068361
1 3068501
1 3068520
1 3068470
2 3068785
Interconnection Kit
P/N 3367797
Instruction Sheet
a RPM4 – Install glands and collars onto the
p
12 in. nipple.
b PG7302 – Install glands and collars onto the
p
6 in. and 12 in. nipples and install both nipples
into union.
Note
Orientate weep holes on union, tee,
and elbow facing up to facilitate
leak check and purge.
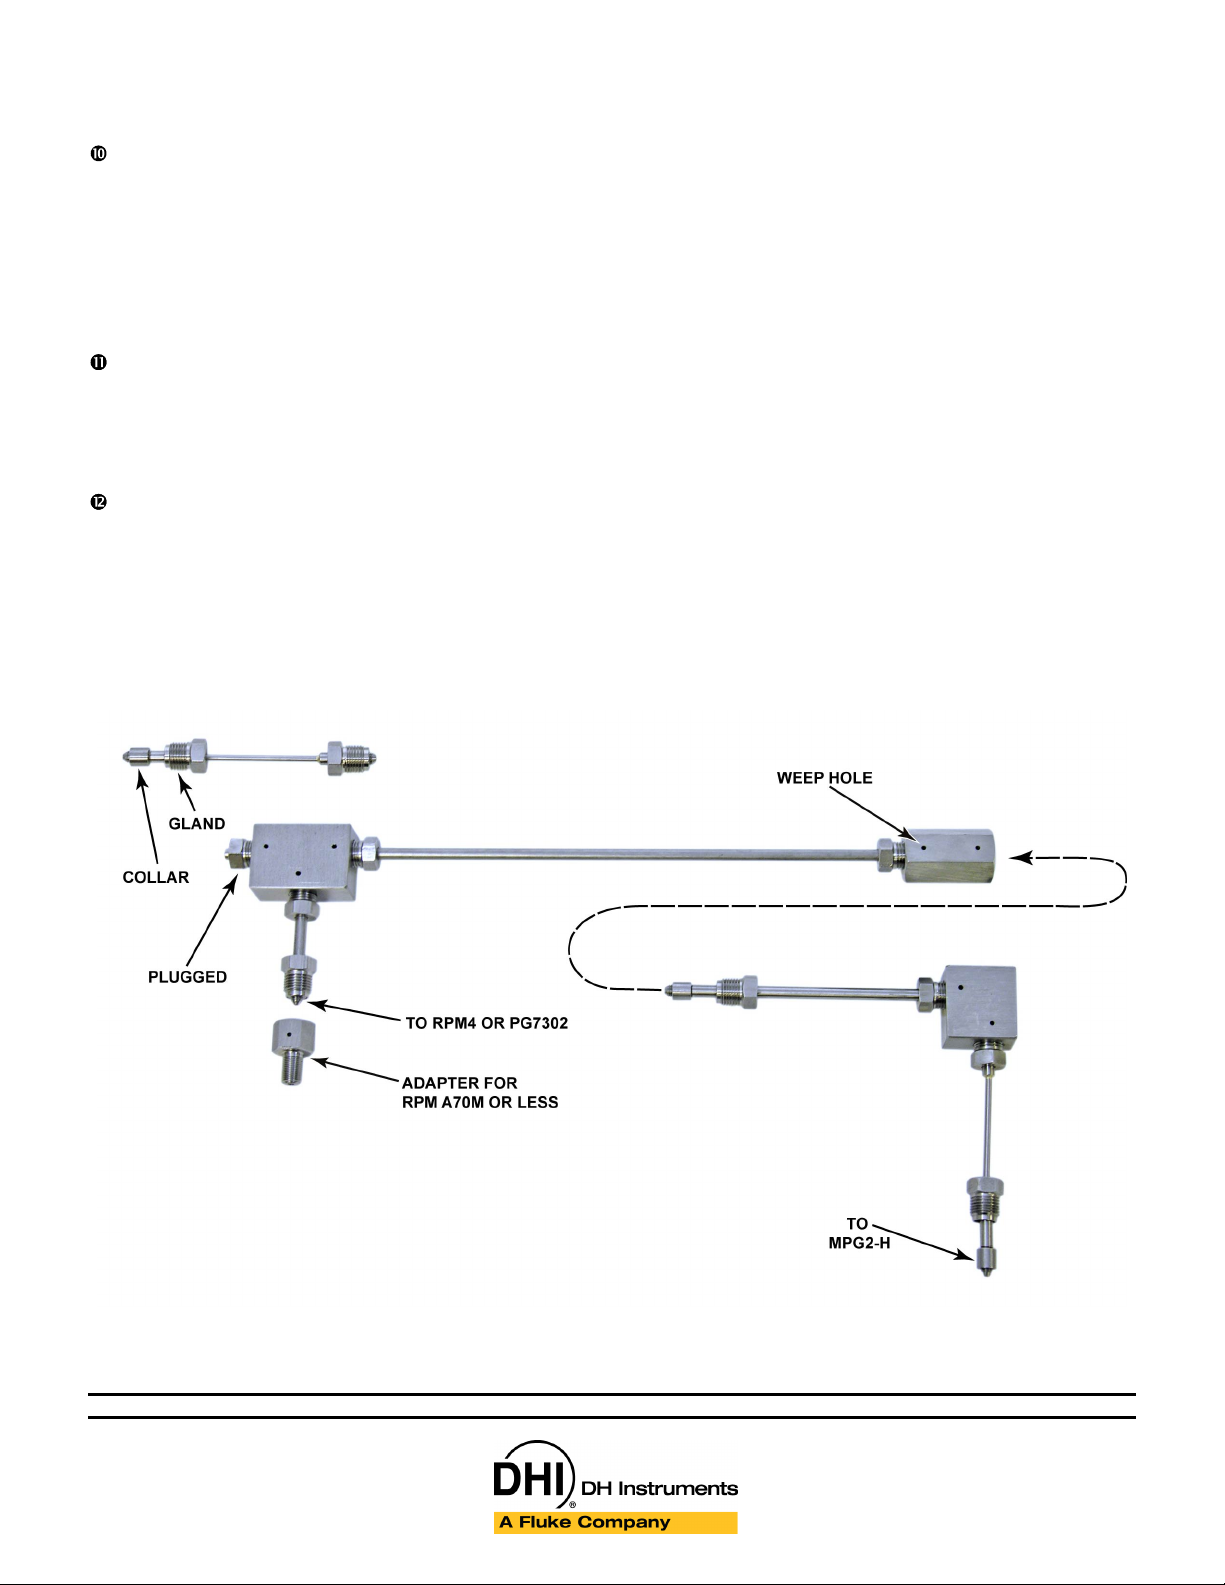
q Install nipples into three way tee and elbow:
Install the 2.75 in. nipple into the center port of the
three way tee. Install the 12 in. nipple (or 6 in. and
12 in. nipple assembly with union) into either of the
end ports on the three way tee as shown in Figure 1.
Install 5 in. flexible nipple into elbow. Install 12 in. or
6 in. nipple from tee into elbow. Tighten the nipples
with a 5/8 in. wrench or crescent wrench. The
flexible 5 in. nipple connects to the MPG2-H. The
2.75 in. nipple in the center of the tee connects to
the RPM4 or to the PG7302. In Figure 1 the left port
is currently plugged, but the remaining flexible 5 in.
nipple can be installed in the left port and connect to
the DUT.
Introduction
This kit provides the tubing and fittings necessary to
connect an MPG2-H pressure controller to either an
RPM4 reference pressure monitor or to a PG7302
piston gauge, and also to a device under test. This
document contains instructions for connecting the
fittings and tubing.
Installation of Interconnections
n Remove Plugs from MPG2-H, Tee, Union and
RPM4 or PG7302: Unscrew the glands from the
test ports of the MPG2-H and RPM4 or PG7302.
Remove the collar and plug from inside each
gland. There should be one stainless steel plug.
The plastic plugs will not be used. Keep the
stainless steel plug.
o Install glands and collars onto flexible 5 in.
nipples and 2.75 in. nipple: Slide a gland over a
nipple so that the threads of the gland face
outward. Next, screw a collar onto the nipple by
turning it to the LEFT. Allow two nipple threads to
show between the collar and nipple tip. Use
collars and glands from tee, elbow and union.
r Optional: Extend the front feet on RPM4: The front
feet of the RPM4 can be extended so that the RPM4
is inclined for easier reading and display access.
s RPM4 A70M or less - Install NPT adaptor into
RPM4. RPM4s that have ranges of 70 MPa
(10,000 psi) or less have 1/8 in. NPTF test ports.
These ports require the use of one of the DH500F
by 1/8 in. NPTM adaptors. Wrap Teflon
®
thread
tape around the NPT threads of the adaptor three
times, and install the adaptor into the RPM4.
t Install the free end of the center nipple into
RPM4 or PG7302: The center, 2.75 in. nipple
should be inserted into the test port of the RPM4 or
PG7302. Screw in the gland loosely by hand. Do
not tighten the gland in the RPM4 or PG7302 yet,
since it will be tightened when the system is primed.
Install the 5 in. nipple into the MPG2-H. Screw
in the glands loosely by hand. Tighten the gland
with a 5/8 in. wrench or crescent wrench.
Install a DH500M to 1/8” NPT male adaptor in
the DUT if necessary: The 1/8 in. NPT male
adaptor can be used to connect the remaining
flexible 5 in. nipple to DUTs with 1/8 in NPT
female ports. If you intend to use the adaptor,
Page 2
wrap Teflon® thread tape around the NPT threads
three times and install it into the DUT.
Install the Device Under Test (DUT). The DUT will
be connected to the test line with the remaining
flexible 5 in. nipple. This nipple can be installed either
in the 3-way tee, or in the port on top of the MPG2-H.
The tube can be slightly bent if necessary. Install the
nipple in the desired location. Tighten the gland in the
tee or MPG2-H, but do not tighten the gland that
connects to the DUT.
Plug the open test port: There is an open test port
either on the top of the MPG2-H, or on the 3-way
tee. Insert the stainless steel plug into a gland.
Insert the plug and gland into the open port. Do not
tighten.
W Warning
• The maximum operating pressure of
the variable volume is 100 MPa
(15,000 psi) in MPG2-H-HV and 200
MPa (30,000 psi) in MPG2-H. Do not
generate pressure greater than the
maximum operating pressure.
• High pressure fluids are potentially
hazardous. Energy stored in
pressurized fluids can be released
unexpectedly and with extreme force.
High pressure systems should be
assembled and operated only by
personnel who have been instructed
in proper safety practices.
Prime the system, tighten fittings: Pump fluid
through the nipples by using the MPG2-H. See
the appropriate section of the MPG2-H Operation
and Maintenance Manual for this procedure.
Make sure that all air is purged from the test lines.
There are 3 loose fittings: one on the DUT, one on
the RPM4 or PG7302, and the other on the plug.
Tighten each of the loose fittings when oil without
bubbles begins to flow through it.
• ALWAYS use external tubing and
fittings rated for pressures equal to
or greater than the maximum
pressure which MPG2-H will be used
to generate.
Figure 1: Nipples installed in 3-way tee, elbow and union
Document 3367676 081001
DH Instruments,
a Fluke Company
4765 East Beautiful Lane
Phoenix AZ 85044-5318 USA
Tel 602.431.9100
Fax 602.431.9559
dhi@dhinstruments.com
www.dhinstruments.com
 Loading...