

Page 1
HART® Transmitter
Calibration
Application Note
Introduction
In today’s process plants, most
new field instruments are smart
digital instruments. Smart
implies a microprocessor-based
instrument with extra functionality and digital compensation,
supporting multiple sensor types
or multiple variables. These
instruments generally offer
better accuracy, long-term stability, and reliability than conventional analog instruments.
The most common class of
smart instruments incorporates the HART protocol, with
more than five million HART
instruments in use in 100,000
plants worldwide. HART, an
acronym for Highway Addressable Remote Transducer, is an
industry standard that defines
the communications protocol
between smart field devices and
a control system that employs
traditional 4-20 mA wiring.
Two capabilities are required
to properly service HART instruments: precision analog source
and measure capability and
digital communication capability. Until recently, this required
two separate tools, a calibrator
and a communicator. Today, the
capabilities of those two tools
are available in a single HART
Documenting Process Calibrator that can help you quickly
and effectively service HART
instruments.
From the Fluke Digital Library @ www.fluke.com/library
Page 2
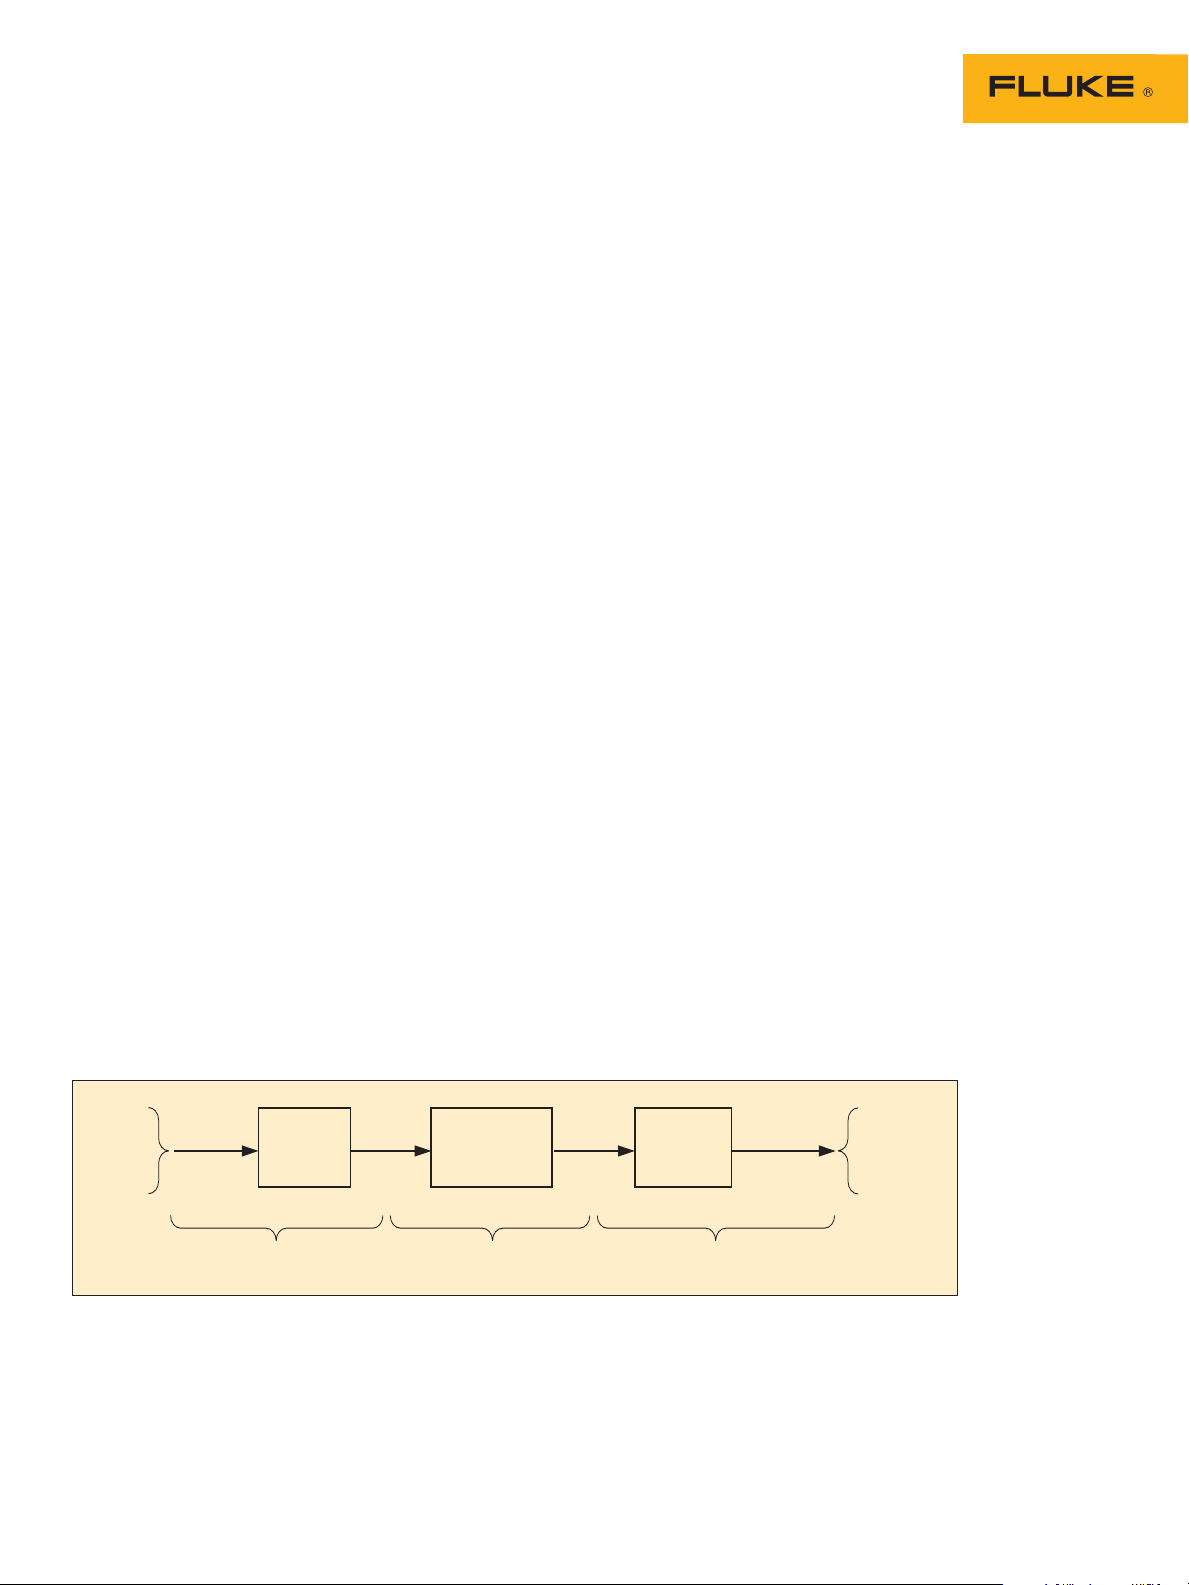
HART calibration
Sensor
Sensor Trim LRV/URV Adjust Output Trim
PV PVAO 4-20 mA
Input
Section
Conversion
Section
Output
Section
Analog
Input
(digital
input)
(digital
4-20 mA)
Analog
mA Output
is required!
A common misconception is
that the accuracy and stability
of HART instruments eliminate
the need for calibration. Another
misconception is that calibration can be accomplished by reranging field instruments using
only a HART communicator. Still
another misconception is that
the control system can remotely
calibrate smart instruments.
These are not true. All instruments drift. Re-ranging with
just a communicator is not calibration. A precision calibrator
or standard is required. Regular
performance verification with a
calibrator traceable to national
standards is necessary due to:
1. Shifts in performance of
electronic instruments over
time, due to exposure of the
electronics and the primary
sensing element to temperature, humidity, pollutants,
vibration, and other field
environmental factors.
2. Regulations governing occupational safety, consumer
safety, and environmental
protection.
3. Quality programs such as ISO
9000 standards for all instruments that impact product
quality.
4. Commercial requirements
such as weights, measures,
and custody transfer.
Regular calibration is also
prudent since performance
checks will often uncover
problems not directly caused
by the instrumentation, such as
solidified or congealed pressure
lines, installation of an incorrect thermocouple type, or other
errors and faults.
A calibration procedure consists of a verification (As Found)
test, adjustment to within
acceptable tolerance if necessary, and a final verification (As
Left) test if an adjustment has
been made. Data from the calibration are collected and used
to complete a report of calibration, documenting instrument
performance over time.
All instruments, even HART
instruments, must be calibrated on a regular, preventive
maintenance schedule. The
calibration interval should be
set short enough to insure that
an instrument never drifts out
of tolerance, yet long enough
to avoid unnecessary calibrations. Alternatively, the interval
may be determined by critical
process requirements, e.g., calibration before each batch.
How are HART
instruments properly
calibrated?
To calibrate a HART instrument
consistent with its application, it
is very helpful to understand the
functional structure of a typical
HART transmitter.
HART instruments consist
of three distinct sections (see
Figure 1). Proper HART calibration may involve either or both
sensor trim and output trim.
Adjusting range values (LRV
and URV) without a calibrator
is not calibration. Performing
an output trim while ignoring
the input section is not proper
calibration. Adjusting range
values with a calibrator may be
a practical calibration alternative for instruments operated in
4-20 mA analog mode, provided
that the PV and PVAO are not
used for process control.
Figure 1.
2 Fluke Corporation Abridged HART Transmitter Calibration
Page 3

Model Number
PV
(Primary Variable)
PVAO
(Digital representation
of the Primary Variable
Analog Output)
Analog Measure Value
Analog Source Value
Tag ID
PV LRV
(Primary Variable
Lower Range Value)
PV URV
(Primary Variable
Upper Range Value)
Figure 2.
New tool speeds
calibration
Today, instrument maintenance
is moving out of the shop and
into the field. This reduces
process interruptions and
avoids the time and expense
of returning instruments to the
shop. Portable communicators
and calibrators are often used
3 Fluke Corporation Abridged HART Transmitter Calibration
together to complete field calibrations. However, the desire to
carry less equipment and to perform maintenance in the field
has created a need for a new
class of calibration tool.
The new 754 Documenting
Process Calibrator from Fluke
is a powerful yet easy-to-use
tool for field calibration of HART
instrumentation. Pressing a
single key enters the HART
mode and displays the essential
HART information in the Active
Device Screen, shown in Figure
2. Additional HART functionality is accessed with only a few
more keystrokes, per the menu
tree in Figure 3.
Page 4

Process
Setup
•
View process
variables
•
View variable
map
•
Re-map process
variables
(Dual sensor
temperature
devices)
Basic
Detailed
(coriolis)
Sensor
Device
Identification
•
T a g
•
PV units
•
LRV, URV
•
Damping
•
Transfer function
• Config Sensor
• Config Output
• Software Version
• Final assembly number
• LRV, URV
• Damping
• Transfer function
• Keypad input
• Adjust URV, LRV to
applied values
Sensor 1
Sensor serial number
•
•
Sensor lower and
upper limits
•
Sensor minimum span
Temperature
devices only:
•
Change Sensor Type
•
Change Sensor
Connections
Sensor 2
• Change Sensor Type
• Change Sensor
Connections
(Dual sensor
temperature devices)
Loop test
Service
Abort
Figure 3.
Pressure
zero trim
Output trim
Sensor trim
No communicator is
required!
The 754 requires no external box or communicator for
everyday HART calibration
and maintenance. It supports
many popular models of HART
transmitters, with more devicespecific command support than
any other HART field calibrator.
HART
Output
• Manufacturer
• Model
HART
Information
• Device HART ID
• Software revision
• Hardware revision
• Number of preambles
• Interrogate HART devices to
determine type, manufacturer, model, tag-ID, PV, and
PVAO
• Perform automated HART
sensor trim and output trim
for selected devices
• Adjust ranging, damping, and
other basic process–configuration settings
• Dual Sensor Config
(Dual sensor
temperature devices)
• Write protect
• Alarm state
• HART poll address
• HART burst mode
• HART burst command
• Read and write HART tag and
message fields to re-label
smart transmitters
• Clone additional transmitters
with basic HART configura-
tion data
4 Fluke Corporation Abridged HART Transmitter Calibration
Page 5

CLEAR
(ZERO)
Example 1
Calibration of a
Rosemount 3051 HART
Pressure Transmitter
Basic connections
This example assumes that
the transmitter is isolated from
the process and is not electrically connected to a loop power
supply. Make basic connections
to the 3051 per the diagram in
Figure 4. A separate 250 ohm
resistor is not necessary because
the 754 incorporates a resistor
in series with the loop supply
through its mA jacks. The 3051
in this example is configured for
mbar units.
2. Press the key again and
you are prompted to select
the 754 configuration (Figure
6). Selecting MEAS mA,
SOURCE mbar will configure
the calibrator to measure
the analog mA output and
the pressure being applied
simultaneously to the transmitter input and the pressure
module. (Selecting MEAS PV,
SOURCE mbar will configure the 754 to evaluate the
digital PV output from the
transmitter.) Press to
select.
Figure 6.
output, select Instru-
ment.) Notice that the
calibration template is automatically completed with the
exception of Tolerance. Fill in
the appropriate test tolerance
and press Done.
4. Press the Manual Test
softkey to begin calibration.
Apply the input pressures
as instructed in the SOURCE
screen. Press the Accept
Point softkey when the correct pressure is applied for
each point. When the test is
complete, the error summary
table is displayed (Figure
7). Test errors exceeding
the tolerance are highlighted. When done viewing
the table, press the Done
softkey. Press Done again
to accept, or to change
the tag, serial number or ID
fields.
Figure 4.
Procedure
1. Power on the Fluke 754
Calibrator. Press the red
key followed by the Loop
Power softkey and the 754
will display the basic HART
information for the 3051
(Figure 5).
Figure 5.
3. Vent the pressure line and
press
to zero the pressure module. Press the As
Found softkey, and then
press to select Instru-
ment for a linear transmitter
calibration. (If the 3051 is
configured for square root
Figure 7.
5 Fluke Corporation Abridged HART Transmitter Calibration
Page 6

5. If the As Found test failed
CLEAR
(ZERO)
(i.e., there were highlighted
errors in the error summary table), adjustment is
necessary. Press the Adjust
softkey. Select Sensor Trim
and press . (Do not select
Pressure Zero Trim. It is the
same as trimming the lower
sensor point at zero, which is
useful for pressure transmitters that do not offer Sensor
Trim.) The 754 screen should
look like Figure 8.
Figure 8.
6. Select Perform user trim –
both and press . Zero
the pressure module (vented
to atmosphere) by pressing
. Press the Continue softkey and you are prompted
for the Lower Trim value. For
best results, apply the LRV
pressure and press Fetch
to load the value being
measured by the pressure
module. Press Trim. Then
press Continue to move to
the Upper Trim. As before,
apply the URV pressure,
press Fetch, and press Trim.
If the 3051 is used with the
digital PV output, skip to step
8 and perform the As Left
test. If the 4-20 mA analog
output is used in the process,
continue on to step 7.
7. Select Output Trim and
press . The value of the
primary variable (PVAO) is in
the upper right corner of the
display. This is normally a
4 mA signal. The mA value,
as constantly measured
by the Fluke 754, is in the
center of the display. Press
the Fetch softkey to load the
measured mA value. Press
Send to send the value to
the 3051 to trim the output
section for the 4 mA value.
Press Continue for the
20 mA trim and repeat this
step.
8. After completing Output Trim,
press the Done softkey and
proceed with the As Left
verification test. Press the
As Left softkey. Press Done
and then press Manual
Test. Apply the requested
pressures and press Accept
Point when the readings
are stable. On completion
an error summary table is
displayed. If none of the
errors are highlighted (Figure
9), the 3051 passes the
calibration test. If errors are
highlighted, the test has
failed and further adjustment
is required. Return to step 5
for adjustment of the 3051.
Figure 9.
DOCUMENTING PROCESS CALBRATOR
754
Figure 10.
Example 2
Calibration of a
Rosemount 3144 HART
Temperature Transmitter
Basic connections
This example assumes that
the transmitter is isolated from
the process and is not electrically connected to a loop power
supply. Make basic connections
to the 3144 per the diagram in
Figure 10. A separate
250 ohm resistor is not necessary because the 754
incorporates a resistor in series
with the loop supply through
its mA jacks. The 3144 in this
example is configured for a type
K thermocouple sensor with a
span of 0 °C to 300 °C.
TC
TC
+
–
2
3
1
4
–
5
+
T
3144
Transmitter
6 Fluke Corporation Abridged HART Transmitter Calibration
Page 7

Procedure
1. Power on the Fluke 754
Calibrator. Press the red
key followed by the Loop
Power softkey. Press to
bypass the warning screens
and the 754 will display the
basic HART information for
the 3144 (Figure 11).
Figure 11.
4. Press the Auto Test softkey to begin calibration.
Once the test is complete,
an error summary table is
displayed (Figure 13). Test
errors exceeding the tolerance are highlighted. When
done viewing the table,
press the Done softkey. Press
Done again to accept, or
to change the tag, serial
number or ID fields.
7. Select Output Trim and
press . The value of the
primary variable (PVAO) is
in the upper right corner of
the display. (Figure 5). This
is normally a 4 mA signal.
The mA value, as constantly
measured by the Fluke 754,
is in the center of the display. Press the Fetch softkey
to load the measured mA
value. Press Send to send
the value to the 3144 to trim
the output section for the
4 mA value. Press Continue
for the 20 mA trim and
repeat this step.
2. Press the key again and
you are prompted to select
the 754 configuration (Figure
12). Selecting MEAS mA,
SOURCE T/C typ K configures
the calibrator to measure
the analog mA output of the
transmitter and source the
correct temperature stimulus
at the 3144 input. (Selecting
MEAS PV, SOURCE T/C typ
K will configure the 754 to
evaluate the digital PV output
from the transmitter.) Press
to select.
Figure 12.
3. Press the As Found softkey,
and then press to select
Instrument for a linear
transmitter calibration. Notice
that the calibration template
is automatically completed
with the exception of the
Tolerance. Fill in the appropriate test tolerance and
press the Done softkey.
Figure 13.
5. If the As Found test failed
(i.e., there were highlighted
errors in the error summary table), adjustment is
necessary. Press the Adjust
softkey. Select Sensor Trim
and press . Select Perform user trim – both and
press . The 754 screen
should look like Figure 14.
6. For best results, press LRV to
apply the LRV for the Lower
Trim value. Press Trim and
then Continue to move to
the Upper Trim. Press URV,
press Trim, and then press
Done. If the 3144 is used
with the digital PV output,
skip to step 8 and perform
the As Left test. If the analog
4-20 mA output is used in
the process, continue on to
step 7.
Figure 14.
Figure 15.
8. After completing Output Trim,
press the Done softkey and
proceed with the As Left
verification test. Press the As
Left softkey. Press Done and
then press Auto Test. On
completion, an error summary table is displayed. If
errors are highlighted, the
test has failed and further
adjustment is required.
Return to step 5 for adjustment of the 3144.
Figure 16.
7 Fluke Corporation Abridged HART Transmitter Calibration
Page 8

Note on Uploading Results to Your PC
If you are using a 743/744 or 753/754, you may choose an
instrumentation management software package from this list:
Fluke DPC/TRACK2
AMS from Emerson Process
Management, (formerly
Fisher-Rosemount).
All trademarks are the property of their respective holders.
™
PRM (Plant Resource
Manager) from Yokogawa
Electric Corporation.
Ordering information
FLUKE-753 Documenting Process Calibrator
FLUKE-754 Documenting Process Calibrator-HART
Standard accessories include: Three sets of stackable test leads, three
sets of TP220 Test Probes with three sets of “extended tooth” alligator
clips, two sets AC280 Hook Clips, BP7240 Li-ion Battery Pack, BC7240
Battery Charger, C799 Field Soft Case, USB communication cable,
getting started guide, instruction manual on CD-ROM, NIST traceable
certificate of calibration, DPC/TRACK2 sample software that enables
upload and printing of calibration records, three-year warranty. Model
Fluke-754 includes HART communication cable.
FLUKE-750SW DPC/TRACK2 Software
Included with DPC/TRACK software: Software media, instruction
manual, USB cable.
FLUKE-700 Pxx Pressure Modules
Included with each Fluke Pressure Module: BP-ISO Adapter(s)
(except with P29 - P31), Instruction Sheet, NIST traceable calibration
report and data, one-year warranty.
Accessories
Fluke-700PMP Pressure Pump; 100 psi/7 bar
Fluke-700LTP-1 Low Pressure Test Pump
Fluke-700PTP-1 Pneumatic Test Pump; 600 psi/40 bar
Fluke-700HTP-2 Hydraulic Test Pump; 10,000 psi/700 bar
Fluke-700HTH-1 Hydraulic Test Hose
Fluke-700PRV-1 Pressure Relief Valve Kit for HTP
Fluke-700-IV Current Shunt (for mA/mA applications)
Fluke-700PCK Pressure Calibration Kit
Fluke-700TC1 TC Mini-Plug Kit, 9 types
Fluke-700TC2 TC Mini-Plug Kit, JKTERS
Fluke-700TLK Process Test lead kit
754HCC Smart Instrument Communication Cable
BC7240 Battery Charger
BP7240 Li-on Battery Pack
C700 Hard Carrying Case
C781 Soft Carrying Case
C799 Field Soft Case
8 Fluke Corporation Abridged HART Transmitter Calibration
E
G
M
A
N
E
N
A
T
M
S
Y
Y
T
S
I
L
A
U
Q
ISO 9001
C
E
R
T
I
F
I
T
E
M
1
0
0
9
O
E
S
I
D
T
T
E
O
E
M
Fluke. Keeping your world
up and running.
Fluke Corporation
PO Box 9090, Everett, WA 98206 U.S.A.
Fluke Europe B.V.
PO Box 1186, 5602 BD
Eindhoven, The Netherlands
For more information call:
In the U.S.A. (800) 443-5853 or
Fax (425) 446-5116
In Europe/M-East/Africa +31 (0) 40 2675 200 or
Fax +31 (0) 40 2675 222
In Canada (800)-36-FLUKE or
Fax (905) 890-6866
From other countries +1 (425) 446-5500 or
Fax +1 (425) 446-5116
Web access: http://www.fluke.com
©2012 Fluke Corporation.
Specifications subject to change without notice.
Printed in U.S.A. 2/2012 4156648A A-EN-N
Modification of this document is not permitted
without written permission from Fluke Corporation.
®
 Loading...