

Page 1
B
A
M
A
X
M
I
N
3.5
+
GPF
1.28 & 1.6
GPF
A
B
PART# 5 -257, Grev. 12, 11/13
FLUIDMASTER® 2” FLUSH VALVE
INSTALLATION INSTRUCTIONS
FOR TWO PIECE TOILETS
WARNING
DO NOT USE IN-TANK DROP-IN TOILET BOWL CLEANERS CONTAINING BLEACH OR
CHLORINE. Use of such products will: (1) RESULT IN DAMAGE to tank components and MAY
CAUSE FLOODING and PROPERTY DAMAGE and (2) VOID FLUIDMASTER WARRANTY.
Fluidmaster Flush 'n Sparkle Toilet Bowl Cleaning System is recommended for those
because it will not damage the components. DO NOT overtighten nuts or tank/bowl may crack. Always use quality
Fluidmaster parts when installing or repairing. Fluidmaster will not be responsible or liable for use of non-Fluidmaster parts
during installation or repair.
Subject to the “Exclusions” set forth below, Fluidmaster Inc. promises to the consumer to repair, or at the option of Fluidmaster Inc. to replace any
part of this plumbing product which proves to be defective in workmanship or materials under normal use for five years from the date of purchase. All
costs of removal, transportation and reinstallation to obtain warranty service shall be paid by the consumer. During this “Limited Five Year Express
Warranty,” Fluidmaster Inc. will provide, subject to the “Exclusions” section set forth below, all replacement parts free of charge, necessary to correct
such defects. This “Limited Five Year Warranty” is null and void if this plumbing product has not been installed and maintained in accordance with all
EXCLUSIONS: FLUIDMASTER INC. SHALL NOT BE LIABLE FOR INCIDENTAL OR CONSEQUENTIAL DAMAGES, INCLUDING COSTS OF INSTALLATION, WATER
DAMAGE, PERSONAL INJURY OR FOR ANY DAMAGES RESULTING FROM ABUSE OR MISUSE OF THE PRODUCT, FROM OVERTIGHTENING OR FROM FAILURE
TO INSTALL OR MAINTAIN THIS PLUMBING PRODUCT IN ACCORDANCE WITH THE WRITTEN INSTRUCTIONS, INCLUDING USE OF NON-FLUIDMASTER PARTS.
DO NOT USE IN-TANK DROP-IN TOILET BOWL CLEANERS CONTAINING BLEACH OR CHLORINE. USE OF SUCH PRODUCTS WILL RESULT IN DAMAGE TO TANK
choosing to use in-tank bowl cleaners and WILL NOT VOID the FLUIDMASTER WARRANTY
LIMITED FIVE-YEAR EXPRESS WARRANTY
written instructions accompanying the product, and if non-Fluidmaster Inc. parts are used in installation.
COMPONENTS AND MAY CAUSE FLOODING AND PROPERTY DAMAGE. USE OF SUCH PRODUCTS WILL VOID THIS WARRANTY.
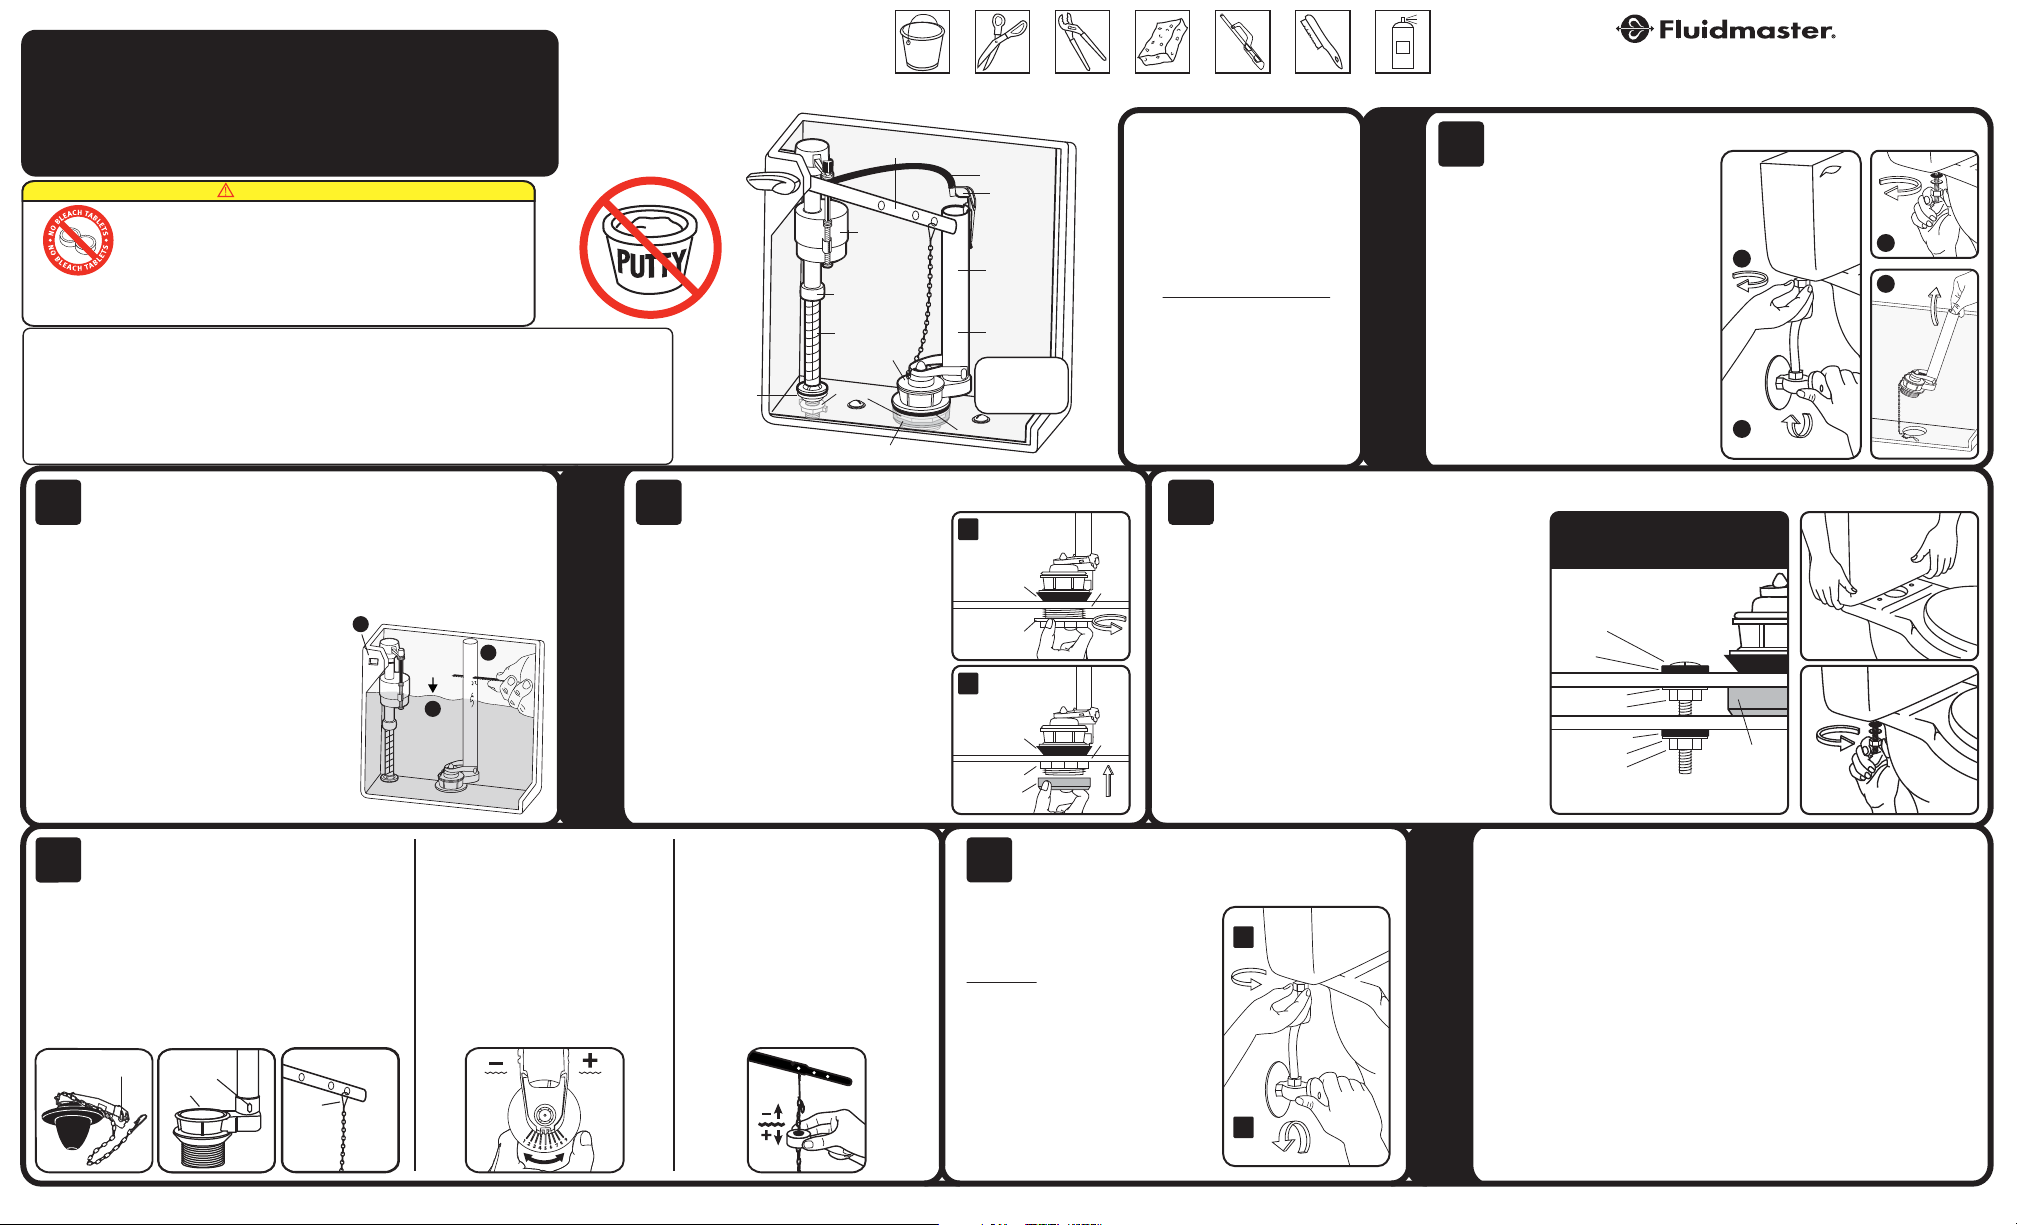
DO NOT USE
SHANK
WASHER
TOOLS
NEEDED
FLOAT
CUP
LOCK RING
FILL
VALVE
LOCKNUT
TANK TO B OWL GASKE T
TANK LEVER
FLAPPER
REFILL TUBE
REFILL CLIP
OVERFLOW
PIPE
FLUSH
VALVE
TANK S HOULD
LOO K LIK E THIS
WHE N SET UP IS
COMPLETE
RUBBER GASKET
Large Adjust able
Pliers
SpongeScissorsBucket
Mini Ha ck Saw
(Optional)
Wire Brush
(Optional)
PARTS
IN THIS KIT:
(1) Flush Valve
(1) Flapper
(1) Rubber Gasket
(1) Large Plastic Locknut
507AK/PRO57K only
(1) Tank to Bowl Gasket
(2) Brass Bolts
(4) Stainless Steel Washers
(4) Stainless Steel Hex Nuts
(two thick & two thin)
(6) Rubber Washers
Lubricant Spray
(Optional)
PREPARATION
30800 Rancho Viejo Road, San Juan Capistrano, CA 92675
Contact Fluidmaster for troubleshooting help or visit www.fluidmaster.com
www.Fluidmaster.com • 800-631-2011
M-F 5:30 am - 5:00 pm PST.
Remove Old Flush Valve
1
water level of tank. Then follow steps A-D.
A. Turn off water supply (Clockwise). Flush
toilet and remove excess water from tank with
sponge.
B. Remove water supply coupling nut.
C. Unbolt tank from toilet bowl. Remove
tank and lay on its side on a safe and secure
surface. Remove washers, nuts and bolts.
Note: If you have a three bolt tank save bolt,
washer and nut in best condition for future
use. Clean bolt & nut with wire brush and
lubricant spray.
D. Remove tank to bowl gasket from under
tank. Loosen and remove flush valve lock nut
and remove flush valve from tank.
Remove tank lid. Use pencil to mark
C
D
Preparing the Flush Valve for Installation
2
tank are correctly set.
Before flush valve installation, ensure overflow pipe and water level of
Position overflow pipe toward back of tank (Do
Installing Flush Valve
3
A.
Insert flush valve into tank hole.
not cover bolt holes of tank).
B.
1. THE TOP OF OVERFLOW PIPE (A) must be cut 1” below bottom of TANK
LEVER HOLE (B). Remove tank to bowl gasket
and flush valve lock nut first. Insert flush valve
into tank hole. Mark the flush valve 1” below
bottom of tank lever hole. Remove flush valve
and cut overflow pipe at specified mark.
2. WATER LEVEL (C) is set below top of
overflow pipe (Fluidmaster recommends 1/2”).
B
A
C
OVERFLOW
PIPE
FILL
VALVE
WATER
LEVE L
Code Compliance helps protect your home &
drinking water supply.
Holding flush valve in place, thread large
plastic locknut onto threads of flush valve. Hand
tighten locknut and then use large adjustable
pliers to go ½ turn beyond hand tight. Do not
overtighten.
C.
Place tank to bowl gasket on bottom of flush
valve locknut. Gasket should cover locknut.
*Note: If you have a Gerber or Kohler two piece
toilet, it is recommended you use a different tank
INSTALLATION
to bowl gasket.
Gerber: Use an extra thick Gerber gasket.
Kohler: Use a triangular Kohler gasket.
(Both Gerber and Kohler gaskets not included).
Installing New Flapper
5
clips at the horizontal posts of overflow pipe.
Attach chain clip to tank lever directly above flapper.
Leave 1/2” of slack in chain.
Put flapper on seat and push down on flapper
Adjustable Flapper
(if applicable)
Turn the rubber portion left or right
to select the best flush for your toilet.
The higher the number set in front
of the chain connection – the longer
the flapper will stay open. Turn
FLA PPER CLIPS
– Please keep a copy of these instructions on the property in which the product was installed.
HORI ZON TAL
POSTS
SEAT
CHAIN
CLIP
clockwise for greater flush volume.
Turn counterclockwise for lower flush
volume.
Adjustable Float Flapper
(if applicable)
Raise or lower the float on the chain
to select the best flush for your toilet.
The lower the float (closer to the
flapper), the longer the flapper will
stay open and the greater the flush
volume. The higher the float is set
(further from the flapper), the lower
the flush volume.
Installing Toilet Bolts
4
A.
A
RUBBER
GASKET
LOCKNUT
TANK
B.
Place tank bolts through bottom holes of tank.
C.
For reinforced connection: Under tank, place metal washers
on thin hex nuts and hand tighten to toilet tank. Caution: The
thin metal hex nut should not touch the toilet bowl porcelain. If
touching, stop and remove nuts and washers.
D.
Set tank onto bowl. Place rubber washers, metal washers &
Place one rubber washer on each tank bolt.
hex nuts on each bolt under toilet bowl. Using tool, tighten hex
B
nuts evenly until tank is snug and does not rock.
For Three Bolt Toilets
RUBBER
GASKET
LOCKNUT
TANK TO BOWL
GASKET*
TANK
The kit contains two extra rubber washers for toilets that have
three bolts. If you need a third bolt and nut, reuse one of your
existing bolt sets along with the new rubber washers supplied.
Attach Water Supply Connector
6
over 5 years old to prevent flooding and property damage.
A. Attach water supply coupling nut
to fill valve. Turn coupling nut by hand
until tight.
WARNING: Do not over tighten the
nut as it could damage fill valve or
coupling nut, resulting in flooding and
property damage. Fluidmaster Click
Seal
perfect seal every time without over
tightening.
B. Turn on water supply and check
for leaks. If you find leaking at bottom
of tank, turn nut just enough to stop
leaking. Then flush toilet to check.
Inspect water supply connector. Replace it if it is worn or
®
connector is recommended: A
CORRECT ORDER
OF HARDWARE PARTS
BOLT HEA D
RUBBER
WASHER
METAL WA SHER
METAL HE X NUT
RUBBER WA SHER
METAL WA SHER
METAL HE X NUT
LEAKING AT BOLTS AND/OR ON BASE OF TOILET
• Bolts are likely not tight enough or a step was missed in “INSTALLING TOILET
BOLTS” section. Please ensure all steps were followed in “INSTALLING TOILET
BOLTS” section. Tighten bolts further until tank does not rock and leak stops.
LEAK OCCURS WHEN TOILET IS FLUSHED
• This usually means that tank to bowl gasket is not centered and seated properly.
Please ensure all steps were followed in “INSTALLING FLUSH VALVE” section.
Tank to bowl gasket needs to fully cover locknut.
• Note: If you have a Gerber or Kohler two piece toilet, it is recommended you
use a different tank to bowl gasket. Gerber: Use an extra thick Gerber gasket.
Kohler: Use a triangular Kohler gasket. (Both Gerber and Kohler gaskets not
included).
TOILET IS RUNNING WHEN NO FLUSH HAS TAKEN PLACE
• Please ensure all steps were followed in “INSTALLING NEW FLAPPER” section.
Flapper needs to be clipped in to fall evenly on flush valve seat.
• Flush valve locknut may not be tight enough. Check locknut and use tools to
ensure locknut is tightened 1/2 turn past hand tight.
TROUBLESHOOTING
TOILE T TANK
TOILE T BOWL
TANK TO BOWL
GASKET
 Loading...