

Page 1
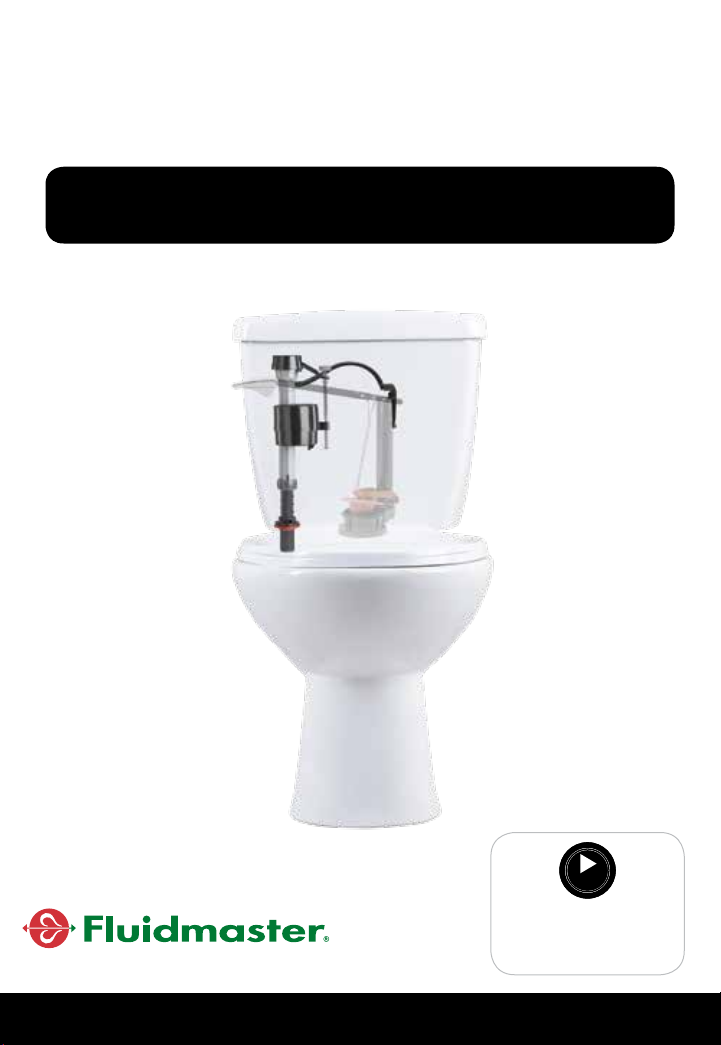
QUICK Install Guide
400A FILL VALVE
*See back page for important legal information.
SPANISH - Page 14
INSTALL WITH CONFIDENCE
VIDEO
HOW-TO VIDEO
VISIT: FLUIDMASTER.COM
400A PRODUCT PAGE
Page 2
GETTING STARTED
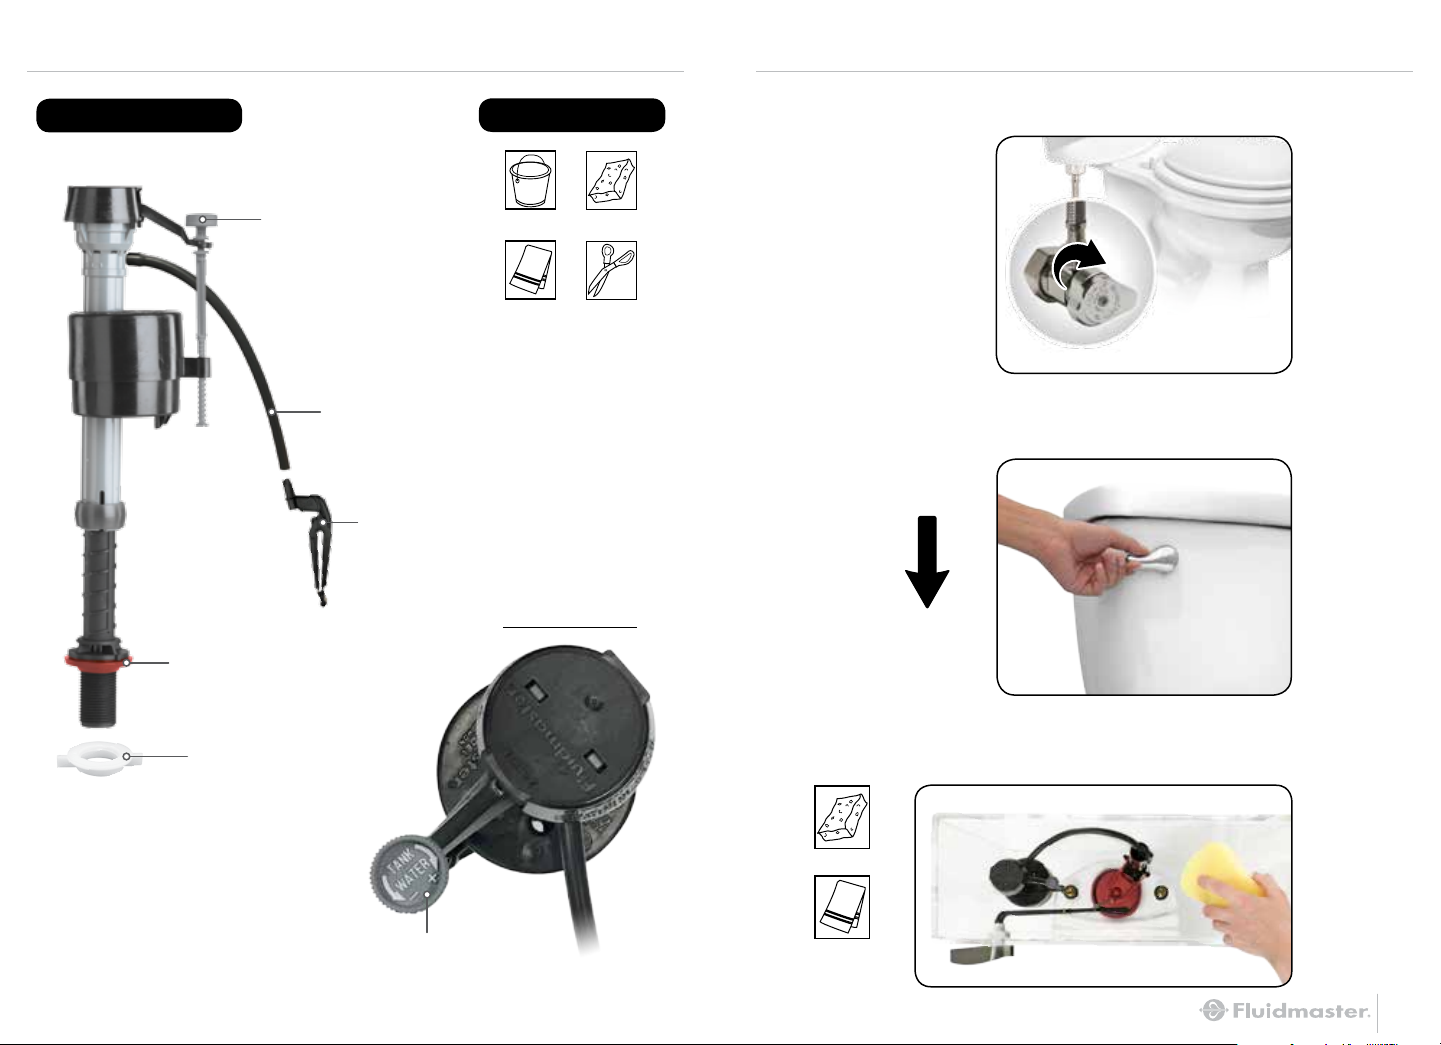
STEP 1: PREPARE TANK
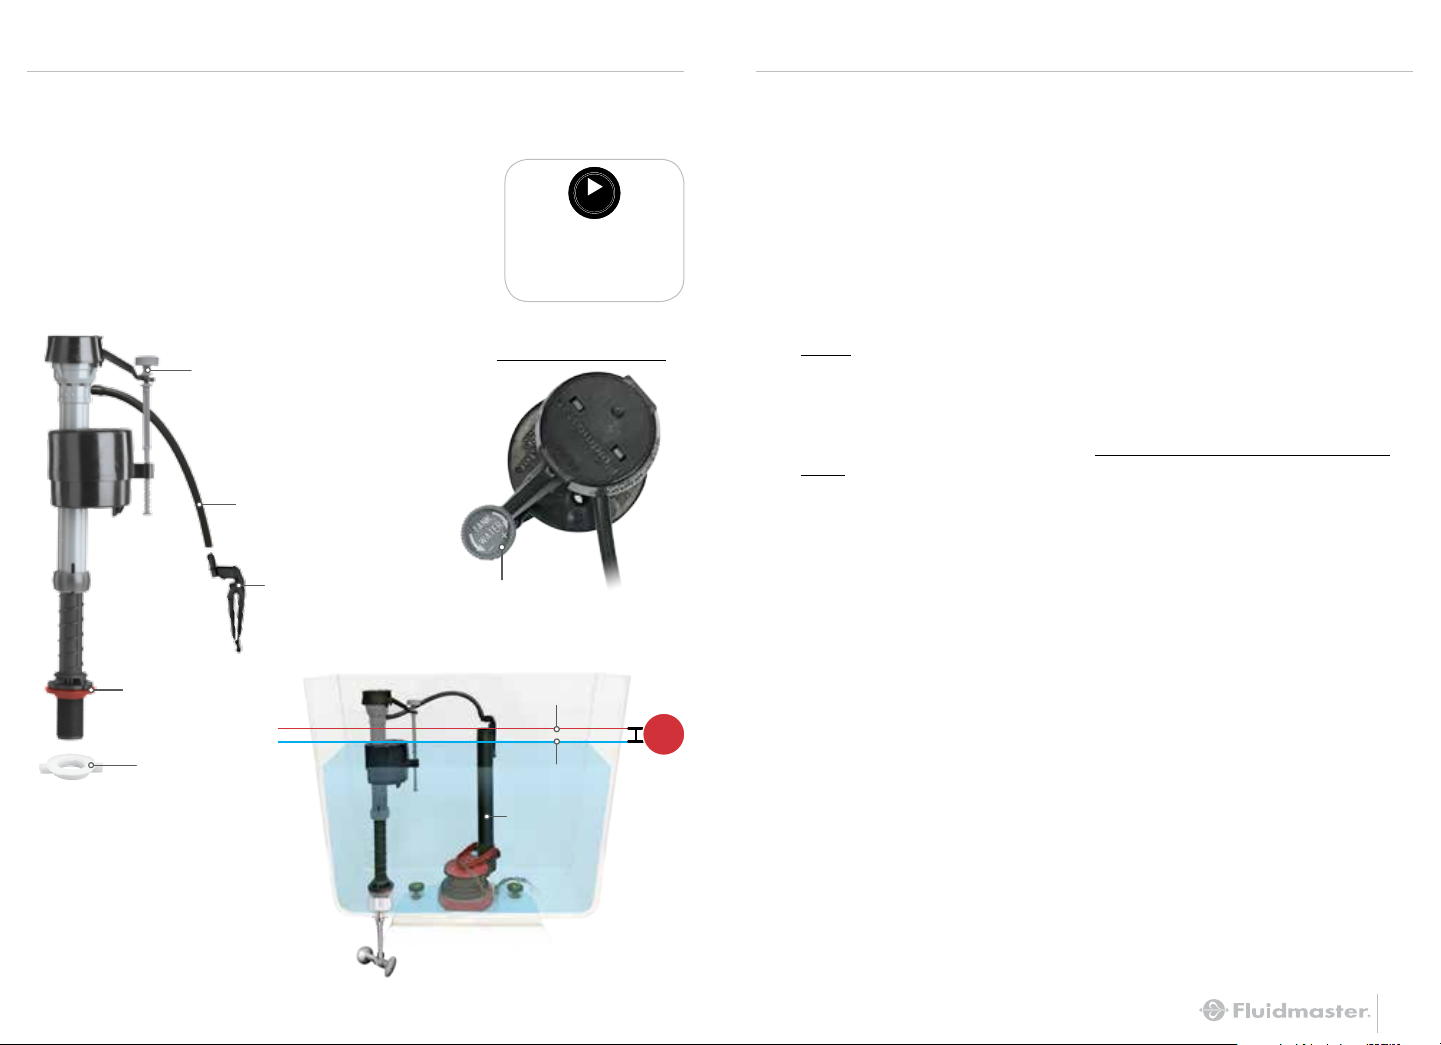
PARTS OVERVIEW
Shank Washer
Tank Water Level
Adjustment Screw
Refill Tube
Refill Clip
TOOLS NEEDED
SpongeBucket
Towel
TOP DOWN VIEW
Scissors
(Optional)
A: TURN OFF WATER
TURN
CLOCKWISE
B: DRAIN WATER
Flush toilet to drain most of the water from the tank.
FLUSH
C: USE SPONGE OR TOWEL TO SOAK UP
Locknut
Tank Water Level
Adjustment Screw
2 3
EXCESS WATER IN TANK
Sponge
Towel
Page 3
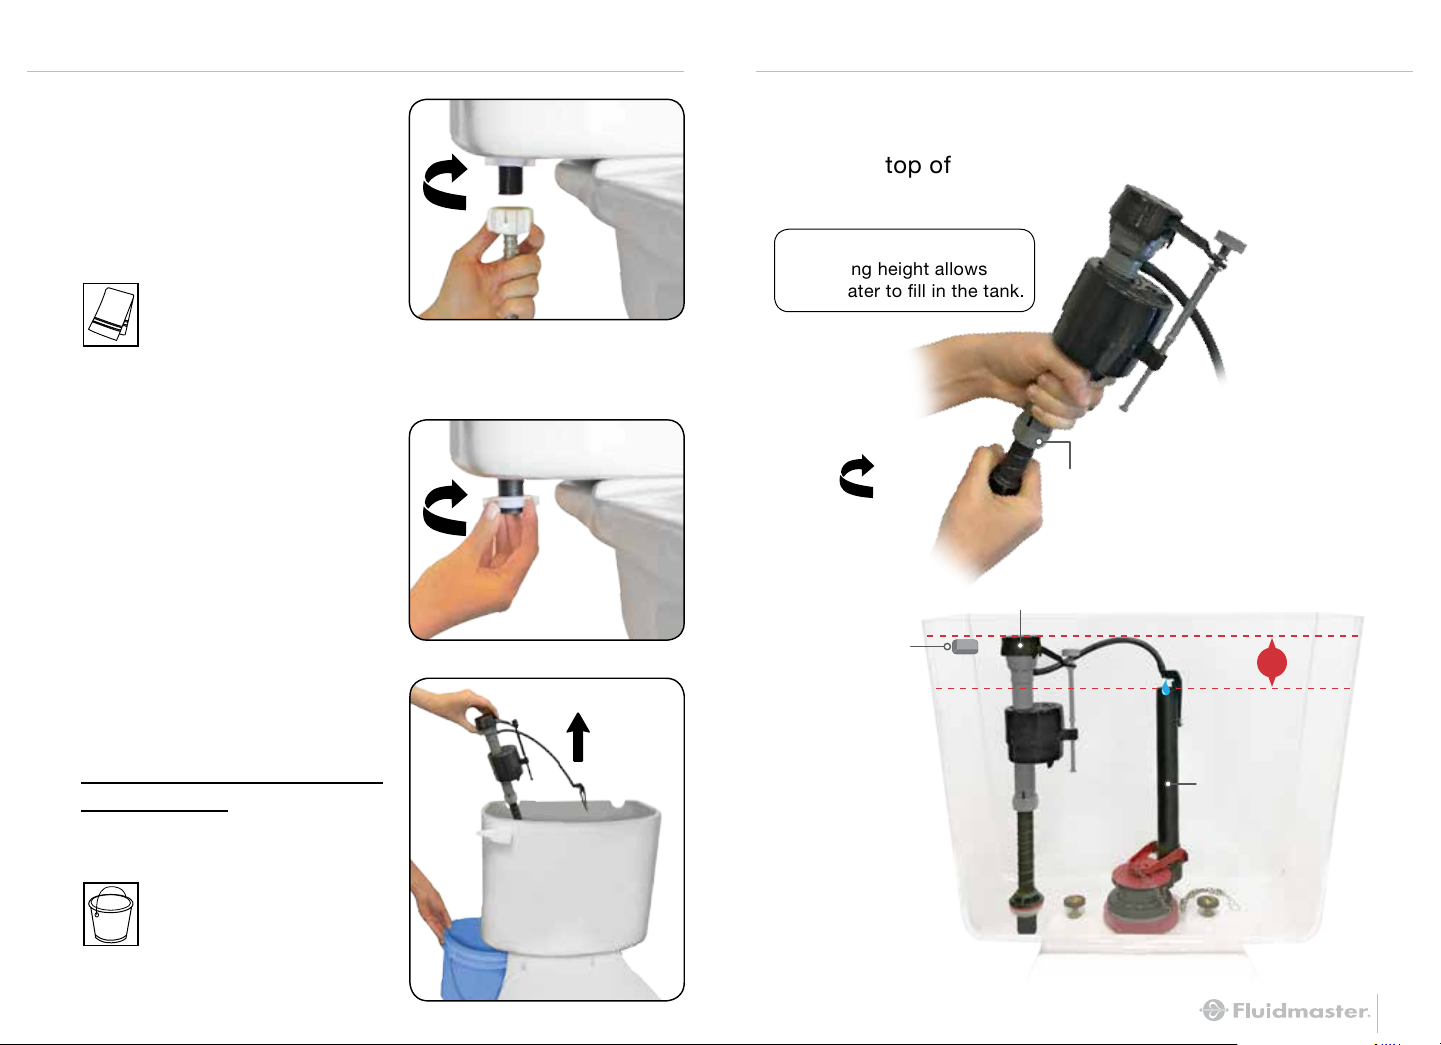
STEP 2: REMOVE OLD FILL VALVE
STEP 3: ADJUST HEIGHT OF NEW FILL VALVE
A: REMOVE CONNECTOR
Remove water supply
connector from bottom
of fill valve by twisting
connector nut to the left
(clockwise).
NOTE: Inspect water
supply connector.
Replace it if it is worn, or
Towel
(Optional)
you don’t know how old it is, to
prevent flooding and property damage.
B: REMOVE OLD LOCKNUT
Below tank, twist locknut
to the left (clockwise) to
remove from fill valve.
C: REMOVE OLD FILL VALVE
Including refill tube, refill
clip and shank washer.
Drain any excess water
into bucket by removing
fill valve from tank.
(Pull fill valve up)
LEFT
LEFT
A: TWIST FILL VALVE TO ADJUST HEIGHT
Top of fill valve cap should measure roughly 3"
above top of overflow pipe when installed.
NOTE:
Increasing height allows
more water to fill in the tank.
HOLD
TWIST
LEFT
Fill Valve Cap
*Lever Hole
Do Not Move Lock Ring
TOP OF FILL VALVE CAP
3"
TOP OF OVERFLOW PIPE
Overflow Pipe
Bucket
(Optional)
4
The top of the overflow pipe must be a minimum of 1" below tank lever hole.
*
5
Page 4
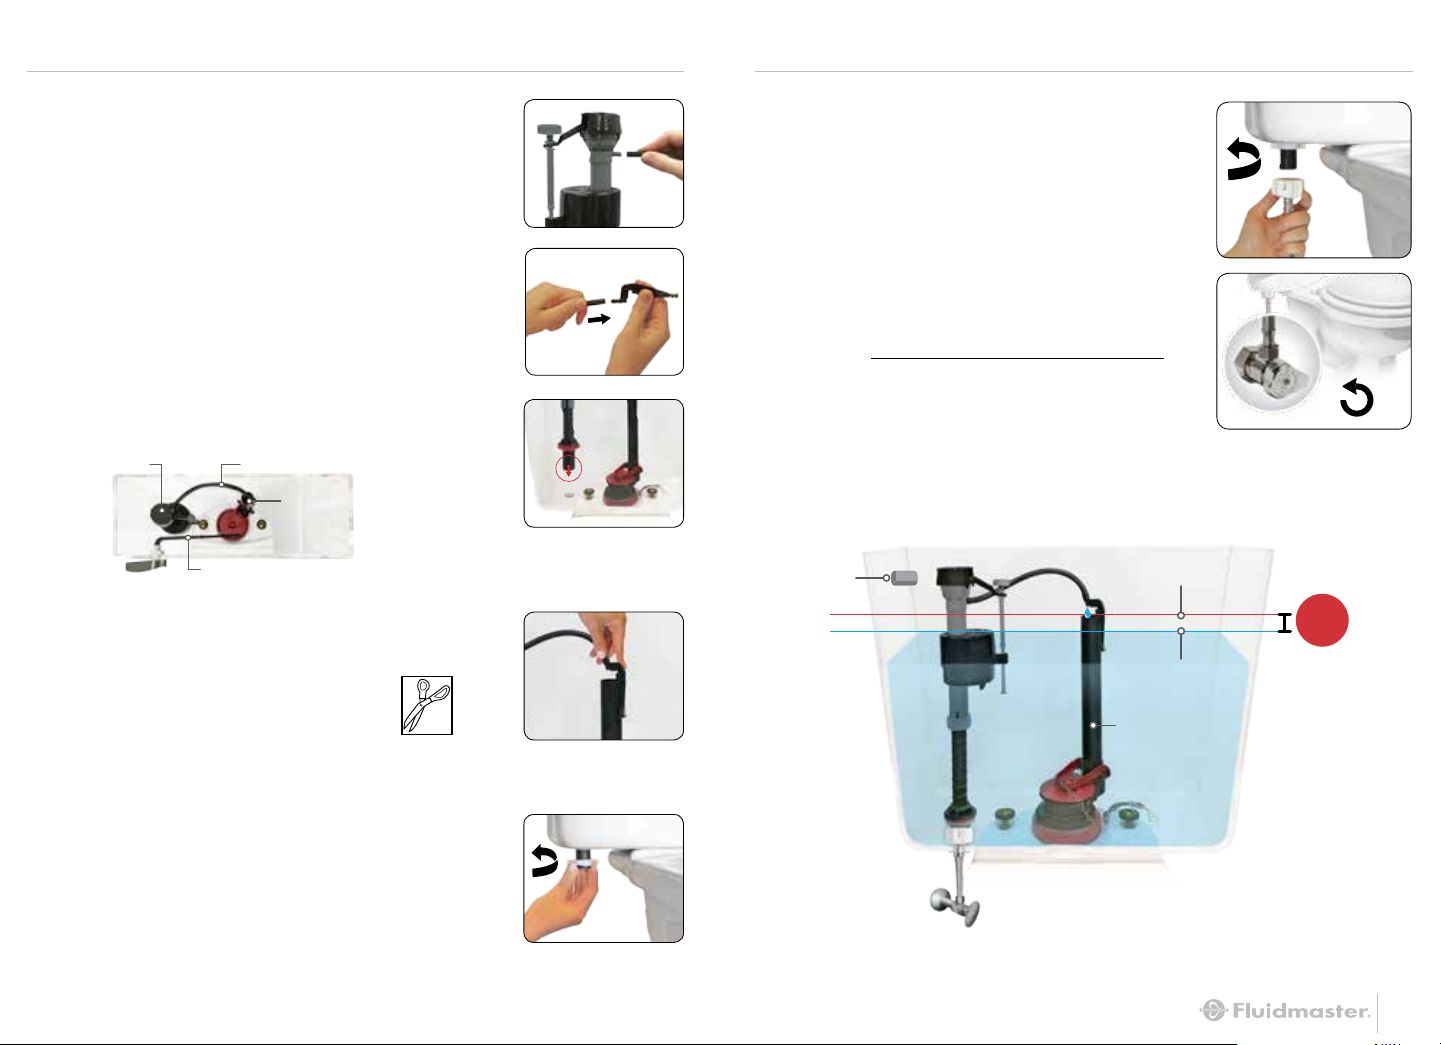
STEP 4: INSTALL NEW FILL VALVE STEP 5: FINISHING STEPS
A: PUSH REFILL TUBE ONTO FILL
VALVE REFILL PORT
B: ATTACH REFILL CLIP TO OTHER
END OF REFILL TUBE
C: INSERT FILL VALVE
Position refill tube to face flush valve
making sure fill valve parts do not
interfere with lever arm.
Fill Valve
Refill Tube
Lever Arm
Overflow
Pipe
TOP
DOWN
VIEW
D: ATTACH REFILL CLIP TO
OVERFLOW PIPE
Note: If refill tube is too long to
fit inside tank with lid closed,
remove refill tube from fill valve
refill port, cut tube, and
Scissors
(Optional)
reattach to port.
A: ATTACH WATER SUPPLY
CONNECTOR TO FILL VALVE
Twist to the right
(counterclockwise)
*Hand-tighten only.
DO NOT OVER TIGHTEN.
RIGHT
B: TURN ON WATER
Check for leaks.
(Go to www.Fluidmaster.com/support
for leak solutions.)
TURN
COUNTERCLOCKWISE
C: WATER LEVEL
After the tank stops filling, water level should fill the tank to
roughly ½ inch below top of overflow pipe to ensure a
proper flush. (Does not need to be exact.)
Top of
**Lever Hole
Overflow Pipe
1/2"
Water Level
Overflow Pipe
E: INSTALL LOCKNUT
Screw locknut to the right
(counterclockwise) onto fill valve shank
RIGHT
(below tank).
*Hand-tighten only. DO NOT OVER TIGHTEN.
Over tightening may crack the fill valve or tank causing flooding. Make sure the float cup
*
does not touch the tank walls or tank lever and flush valve.
6 7
Over tightening may crack the fill valve or tank causing flooding. Make sure the float cup
*
does not touch the tank walls or tank lever and flush valve.
The top of the overflow pipe must be a minimum of 1" below tank lever hole.
**
Page 5
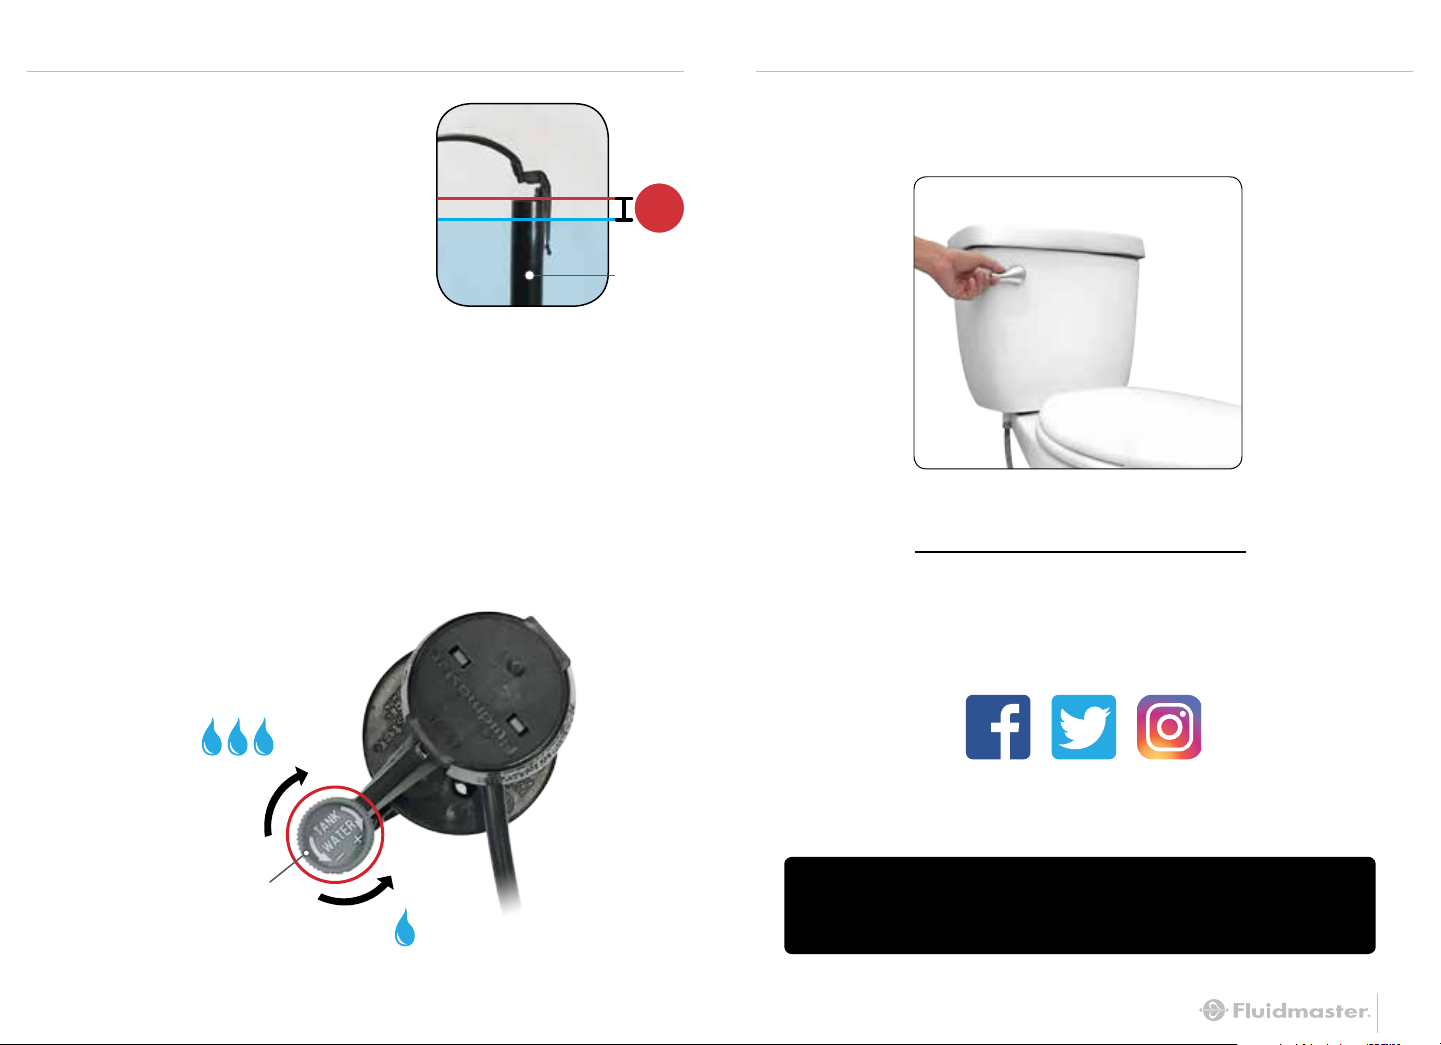
STEP 6: FINE-TUNE TANK WATER LEVEL STEP 7: FLUSH THE TOILET
A: FLUSH THE TOILET
TO CHECK THE TANK
WATER LEVEL
After the water stops filling the
tank, the water level should be
roughly ½ inch below the top
of overflow pipe to ensure a
proper flush.
B: WATER LEVEL IS TOO LOW
Turn the tank water level adjustment screw
clockwise to raise the float. Flush to reset
water level.
WATER LEVEL IS TOO HIGH
Turn the water level adjustment screw
counterclockwise to lower the float. Flush
to reset water level.
See Step 5C for Full Tank view
A: FLUSH THE TOILET
If you’re satisfied with the flush, YOU’RE DONE!
1/2"
Overflow
Pipe
YOU DID IT!
We knew you could!
Share your success story
with friends and family!
+
#FixedMyToilet
#Fluidmaster
Tank Water Level
Adjustment Screw
Still not working exactly right?
See the next page for Troubleshooting.
–
8 9
Page 6
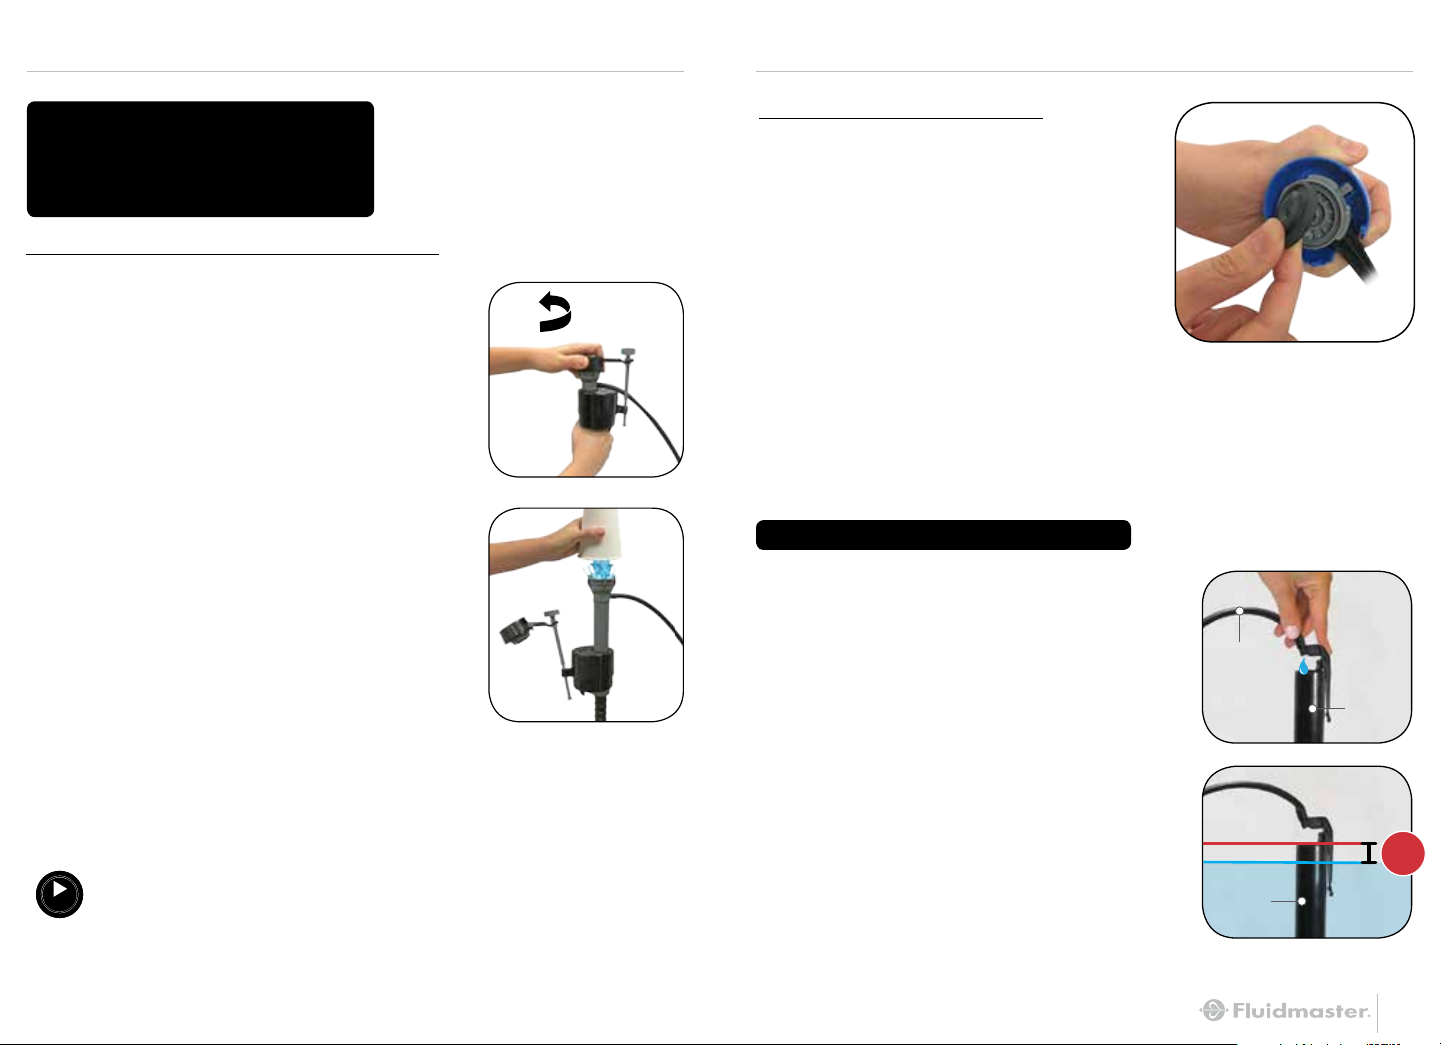
TROUBLESHOOTING
IF THE FILL VALVE:
• DOES NOT TURN ON
• WON’T TURN OFF
• WON’T REFILL TANK
REMOVE CAP AND CHECK FOR DEBRIS
A: Turn off water supply.
B: Flush toilet.
C: With right hand push float up, grip and
hold shaft under float.
D: With left hand twist cap and lever arm
counterclockwise to unlock cap. Let
cap hang on float cup.
E: Hold empty cup upside down over
uncapped valve to prevent splashing.
F: Turn water supply on and off a few
times.
G: Turn water supply off.
H: Replace valve cap.
• Place cap assembly on top of
gray valve body by aligning cap
arm and adjustment rod next to
refill tube.
• Press down on top cap while
rotating top & arm clockwise
to locked position.
See Our Troubleshooting
HOW-TO VIDEO
VIDEO
http://bit.ly/2yAdZn7
TURN
COUNTERCLOCKWISE
REPLACE FILL VALVE SEAL
A: Remove cap (see page 10).
B: Replace seal with a
*genuine
Fluidmaster 242 Seal.
C: Replace valve cap.
• Place cap assembly on top of gray
valve body by aligning cap arm and
adjustment rod next to refill tube.
• Press down on top cap while
rotating top & arm clockwise to
locked position.
Always use genuine Fluidmaster parts when installing or repairing. Fluidmaster will not be
*
responsible or liable for use of non-Fluidmaster parts during installation or repair.
WATER LEVEL IN BOWL IS TOO LOW
A: WATER FROM REFILL TUBE MUST
FLOW THROUGH OVERFLOW PIPE
Make sure the refill tube is supplying
water down overflow pipe. (Metal side
Refill Tube
out for refill clip)
B: WATER LEVEL IN TANK MAY BE
TOO LOW
1/2” below top of overflow pipe is
recommended (see page 8).
Overflow
Pipe
Overflow
Pipe
1/2"
10 11
Page 7
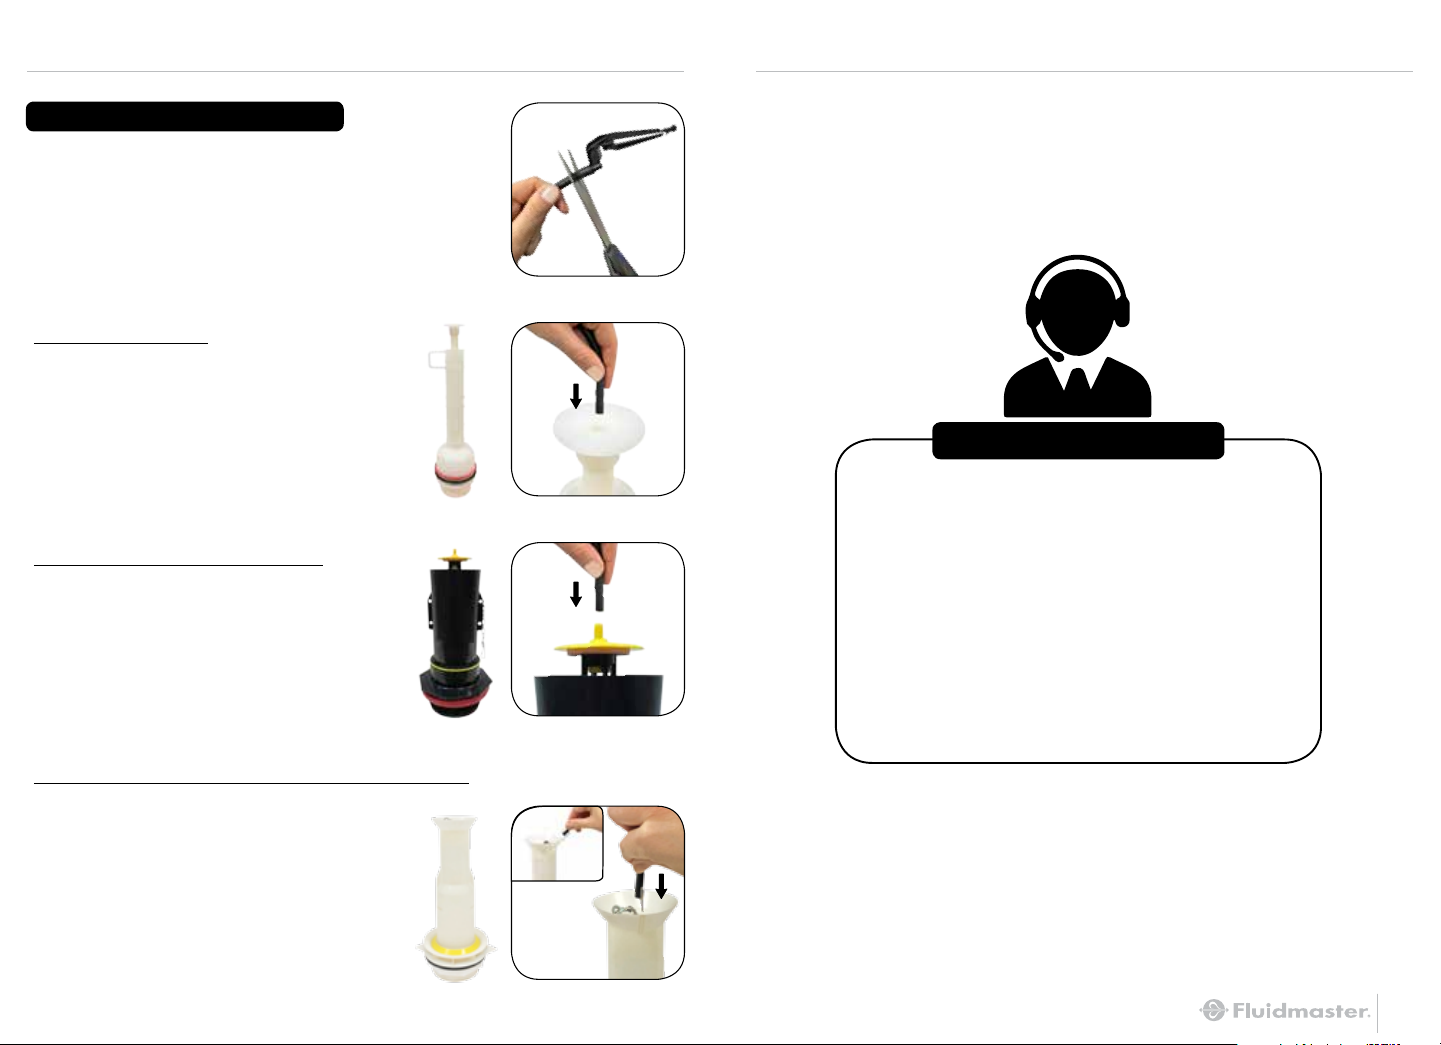
TROUBLESHOOTING
FOR CANISTER FLUSH VALVES
The Fluidmaster refill clip is not required for
installation.
If you’ve already installed the refill clip onto
the refill tube, simply pull it or cut it off.
FOR MANSFIELD
®
Push refill tube into refill hole at the
top of the flush valve cap.
FOR KOHLER AQUAPISTON
®
Push refill tube onto yellow nipple
on flush valve.
FOR AMERICAN STANDARD CHAMPION 3
®
Push refill tube onto refill clip, then
attach refill clip to flush valve overflow
pipe. Reuse original refill clip. Do not
®
use Fluidmaster
refill clip.
ADDITIONAL QUESTIONS?
For installation assistance, contact our
technical services department.
EMAIL, CHAT or CALL
our toll-free number.
www.fluidmaster.com/support
1-800-631-2011
Hours Available:
Monday – Friday
5:30 AM - 5:00 PM PST
12 13
Page 8
GUÍA DE INSTALACIÓN RÁPIDA
GUÍA DE INSTALACIÓN RÁPIDA
VÁLVULA DE LLENADO 400A
PASO 1: PREPARE EL TANQUE (PÁGINA 3)
A: CIERRE EL AGUA.
B: DRENE EL AGUA. Descargue el sanitario para drenar la mayoría del
INSTALE CON CONFIANZA
*Consulte la última página para obtener información legal importante.
HERRAMIENTA NECESARIA
Balde, Esponja, Toalla, Tijeras
EMPEZANDO: RESUMEN DE PIEZAS
Tornillo de Ajuste del Nivel
del Agua del Tanque
VIDEO
VIDEO DE
CÓMO HACERLO
VISITE: FLUIDMASTER.COM
PAGINA DE ESPECIFICACIONES
DEL PRODUCTO 400A
VISTA DESDE ARRIBA
agua del tanque.
C: USE LA ESPONJA O LA TOALLA PARA REMOVER EL EXCESO DE AGUA EN EL
TANQUE.
PASO 2: REMUEVA LA VÁLVULA DE LLENADO ANTIGUA
A: REMUEVA EL CONECTOR. Remueva el conector del suministro de agua de la
parte inferior de la válvula de llenado girando la tuerca del conector hacia la
izquierda.
NOTA: Revise el conector del suministro del agua. Cámbielo si esta gastado, o
B: REMUEVA LA CONTRATUERCA ANTIGUA. Debajo del tanque, gire la contratuerca
(PÁGINA 4)
usted no sabe qué tan viejo es, para prevenir inundación y daño a la propiedad.
hacia la izquierda para removerla de la válvula de llenado.
C: REMUEVA LA VÁLVULA DE LLENADO ANTIGUA. Incluye la manguera de relleno,
el clip de relleno y la junta del vástago. Drene el exceso de agua adentro del
balde removiendo la válvula de llenado del tanque.
Manguera de Relleno
(Hale la válvula de llenado hacia arriba).
PASO 3: AJUSTE LA ALTURA DE LA
VÁLVULA DE LLENADO NUEVA
Gancho de Relleno
Junta del Vástago
Contratuerca
14 15
Tornillo de Ajuste del Nivel
del Agua del Tanque
Parte Superior del
Tubo de Desagüe
Nivel del agua
Tubo de Desagüe
1,27
CM
A: GIRE LA VÁLVULA DE LLENADO PARA AJUSTAR LA ALTURA.
La parte superior de la tapa de la válvula de llenado debe medir aproximadamente
7,62CM mas arriba de la parte superior del tubo de desagüe cuando esta
instalada. No Mueva El Anillo De Seguridad.
NOTA: Aumentar la altura permite que más agua llene el tanque.
*La parte superior de la tubería de desborde debe estar a 2,54 cm como mínimo
por debajo del orificio de la palanca del tanque.
PASO 4: INSTALE LA VÁLVULA DE LLENADO NUEVA (PÁGINA 6)
A: COLOQUE LA MANGUERA DE RELLENO EN EL PUERTO DE RELLENO DE LA
VÁLVULA DE LLENADO.
B: COLOQUE EL CLIP DE RELLENO EN EL OTRO EXTREMO DE LA MANGUERA DE
RELLENO.
C: INSERTE LA VÁLVULA DE LLENADO. Posicione la manguera de relleno hacia la
válvula de descarga asegurándo que las partes de la válvula de llenado no
interfieran con el brazo de palanca.
D: SUJETE EL GANCHO DE RELLENO AL TUBO DE DESAGÜE.
Note: Si la manguera de relleno es muy larga para caber dentro del
tanque con la tapa cerrada, remueva la manguera de relleno del puerto de relleno
de la válvula de llenado, corte la manguera, y vuélvala a
colocar en el puerto.
(PÁGINA 5)
Page 9

GUÍA DE INSTALACIÓN RÁPIDA
SOLUCIÓN DE PROBLEMAS
E: INSTALE LA CONTRATUERCA. Atornille la contratuerca hacia la
derecha en el vástago de la válvula de llenado (debajo del tanque).
*Apriete solo con las manos. NO APRIETE DEMASIADO.
PASO 5: PASOS PARA TERMINAR (PÁGINA 7)
SI LA VÁLVULA DE LLENADO: (PÁGINA 10)
• NO SE PRENDE
• NO SE APAGA
• NO RELLENA EL TANQUE
A: SUJETE EL CONECTOR DEL SUMINISTRO DE AGUA A LA VÁLVULA DE
LLENADO. Gire a la derecha. *Apriete solo con las manos. NO APRIETE
DEMASIADO.
B: ABRA EL AGUA. Revise por fugas.
(Visite a www.Fluidmaster.com/support para soluciones de fugas).
C: NIVEL DEL AGUA. Después que el tanque termine de llenar, el nivel del agua
debe llenar el tanque aproximadamente 1,27CM más abajo de la parte superior
del tubo de desagüe para asegurar una descarga apropiada.
(No necesita ser exacto).
REMUEVA LA TAPA Y REVISE POR MUGRE
A: Cierre el suministro del agua.
B: Descargue el sanitario.
C: Con la mano derecha, apriete y sostenga el vástago debajo del flotador,
suba el flotador con su mano derecha.
D: Con la mano izquierda, gire la tapa y el brazo de la palanca al sentido
PASO 6: AJUSTE EL NIVEL DEL AGUA DEL TANQUE (PÁGINA 8)
A: DESCARGUE EL SANITARIO PARA REVISAR EL NIVEL DEL AGUA DEL
TANQUE. Después que el tanque termine de llenar, el nivel del agua debe ser
aproximadamente 1,27CM más abajo de la parte superior del tubo de desagüe
para asegurar una descarga apropiada.
B: EL NIVEL DEL AGUA ESTÁ DEMASIADO BAJO.
Gire el tornillo de ajuste del nivel del agua del tanque en el sentido de las
manecillas del reloj para subir el flotador. Descargue el sanitario para restaurar el
nivel del agua.
contrario a las manecillas del reloj para abrir la tapa. Permita que la tapa
cuelgue sobre el flotador.
E: Sostenga un vaso vacio boca abajo sobre la válvula sin tapa para
prevenir salpicaduras.
F: Abra y cierre el suministro de agua varias veces.
G: Cierre el suministro de agua.
EL NIVEL DEL AGUA ESTÁ DEMASIADO ALTO.
Gire el tornillo de ajuste del nivel del agua del tanque en el sentido contrario a las
manecillas del reloj para bajar el flotador. Descargue el sanitario para restaurar el
nivel del agua.
PASO 7: DESCARGUE EL SANITARIO (PÁGINA 9)
A: DESCARGUE EL SANITARIO.
Si está satisfecho con el descargue, ¡TERMINO!
¡LO LOGRÓ! ¡Sabíamos que podía! ¡Comparta su historia de éxito
H: Vuelva a colocar la tapa de la válvula.
• Coloque el ensamble de la tapa sobre el cuerpo gris de la válvula
alineando el brazo de la tapa y el tornillo de ajuste al lado de la
manguera de relleno.
• Presione hacia abajo sobre la tapa mientras gira la tapa y el brazo
en el sentido de las manecillas del reloj hasta que se asegure.
con sus amigos y familia!
#FixedMyToilet
#Fluidmaster
Consulta Nuestro VIDEO
DE Solución de Problemas
VIDEO
http://bit.ly/2yAdZn7
¿TODAVÍA NO FUNCIONA EXACTAMENTE BIEN? CONSULTÉ LA
SIGUIENTE PÁGINA PARA SOLUCIÓN DE PROBLEMAS.
De lo contrario, podría agrietar la válvula de llenado o el tanque o producir una inundación. Asegúrese de
*
que la taza flotante no toque las paredes del tanque, la palanca del tanque ni la válvula de descarga.
La parte superior de la tubería de desborde debe estar a 2,54 cm como mínimo por debajo del
**
orificio de la palanca del tanque.
16 17
Page 10
SOLUCIÓN DE PROBLEMAS
REEMPLACE EL SELLO DE LA VÁLVULA DE LLENADO (PÁGINA 11)
A: Remueva la tapa.
B: Reemplace el sello con un sello
C: Vuelva a colocar la tapa de la válvula.
• Coloque el ensamble de la tapa sobre el cuerpo gris de la válvula
alineando el brazo de la tapa y el tornillo de ajuste al lado de la
manguera de relleno.
• Presione hacia abajo sobre la tapa mientras gira la tapa y el brazo en
el sentido de las manecillas del reloj hasta que se asegure.
Siempre utilice piezas de genuino Fluidmaster cuando instale o repare. Fluidmaster no se hará
*
responsable por el uso de piezas que no sean Fluidmaster durante la instalación o reparación.
EL NIVEL DEL AGUA EN LA TAZA DEL SANITARIO
ESTÁ DEMASIADO BAJO
A: EL AGUA DE LA MANGUERA DE RELLENO TIENE QUE FLUIR A
TRAVÉS DEL TUBO DE DESAGÜE
Asegúrese que la manguera de relleno este supliendo agua dentro
del tubo de desagüe. (El clip de relleno con el metal hacia afuera.)
B: EL NIVEL DEL AGUA EN EL TANQUE PUEDE ESTAR
DEMASIADO BAJO
Es recomendado 1,27CM más abajo que la parte superior del tubo de
desagüe (Consulte página 8).
*genuino 242 de Fluidmaster.
(PÁGINA 11)
¿PREGUNTAS
ADICIONALES?
Para asistencia para la instalación, comuníquese
con nuestro departamento de servicio técnico.
EMAIL, CHAT o LLAME
a nuestro número gratuito.
www.fluidmaster.com/support
1-800-631-2011
Horario Disponible:
Lunes – Viernes
5:30 AM - 5:00 PM Hora Estándar del Pacífico
PARA VÁLVULAS DE DESCARGA CILÍNDRICAS (PÁGINA 12)
El clip de relleno de fluidmaster no es requerido para la instalación. Si ya ha
instalado el clip de relleno en la manguera de relleno, simplemente remuévalo o
córtelo.
PARA MANSFIELD
Inserta la manguera de relleno en el orificio en la parte superior de la tapa de la
válvula de descarga.
PARA EL AQUAPISTON DE KOHLER
®
Conecte la manguera de relleno a la boquilla amarilla de la válvula de descarga.
PARA EL CHAMPION 3 DE AMERICAN STANDARD
®
Conecte la manguera de relleno al clip de relleno, después coloque el clip de
relleno en el tubo de desagüe de la válvula de descarga. Reutilice el clip de relleno
original. No use el clip de relleno de Fluidmaster
18 19
®
.
Page 11
WARNING
DO NOT USE IN-TANK DROP-IN TOILET BOWL CLEANERS CONTAINING BLEACH OR CHLORINE. Use of such products will: (1)
RESULT IN DAMAGE to tank components and MAY CAUSE FLOODING and PROPERTY DAMAGE and (2) VOID FLUIDMASTER
WARRANTY.
Fluidmaster Flush ‘n Sparkle Toilet Bowl Cleaning System is recommended for those choosing to use in-tank bowl cleaners and
WILL NOT VOID the FLUIDMASTER WARRANTY because it will not damage the components. DO NOT overtighten nuts or tank/
bowl may crack. Always use quality Fluidmaster parts when installing or repairing. Fluidmaster will not be responsible or liable
for use of non-Fluidmaster parts during installation or repair.
LIMITED FIVE-YEAR EXPRESS WARRANTY
Subject to the “Exclusions” set forth below, Fluidmaster Inc. promises to the consumer to repair, or at the option of
Fluidmaster Inc. to replace any part of this plumbing product which proves to be defective in workmanship or materials under
normal use for five years from the date of purchase. All costs of removal, transportation and reinstallation to obtain warranty
service shall be paid by the consumer. During this “Limited Five Year Express Warranty,” Fluidmaster Inc. will provide, subject
to the “Exclusions” section set forth below, all replacement parts free of charge, necessary to correct such defects. This
“Limited Five Year Warranty” is null and void if this plumbing product has not been installed and maintained in accordance
with all written instructions accompanying the product, and if non-Fluidmaster Inc. parts are used in installation.
EXCLUSIONS: FLUIDMASTER INC. SHALL NOT BE LIABLE FOR INCIDENTAL OR CONSEQUENTIAL DAMAGES, INCLUDING COSTS OF
INSTALLATION, WATER DAMAGE, PERSONAL INJURY OR FOR ANY DAMAGES RESULTING FROM ABUSE OR MISUSE OF THE
PRODUCT, FROM OVERTIGHTENING OR FROM FAILURE TO INSTALL OR MAINTAIN THIS PLUMBING PRODUCT IN ACCORDANCE
WITH THE WRITTEN INSTRUCTIONS, INCLUDING USE OF NON-FLUIDMASTER PARTS. DO NOT USE IN-TANK DROP-IN TOILET BOWL
CLEANERS CONTAINING BLEACH OR CHLORINE. USE OF SUCH PRODUCTS WILL RESULT IN DAMAGE TO TANK COMPONENTS AND
MAY CAUSE FLOODING AND PROPERTY DAMAGE. USE OF SUCH PRODUCTS WILL VOID THIS WARRANTY.
ADVERTENCIA
NO UTILICE LIMPIADORES DE TAZA DE INODORO QUE SE COLOQUEN EN EL TANQUE O SE SUMERJAN EN EL INODORO QUE
CONTENGAN CLORO. El uso de este tipo de productos: (1) PRODUCIRÁ DAÑOS en los componentes del tanque, POSIBLES
INUNDACIONES, así como DAÑOS A LA PROPIEDAD y (2) ANULARÁ LA GARANTÍA DE FLUIDMASTER. Se recomienda el sistema de
limpieza de taza de inodoro Flush ’n Sparkle® de Fluidmaster para aquellos usuarios que desean utilizar limpiadores de tazas
dentro del tanque SIN ANULAR la GARANTÍA DE FLUIDMASTER, ya que este sistema no daña los componentes.
NO apriete demasiado las tuercas o el tanque, ya que la taza se puede agrietar. Siempre use piezas de calidad Fluidmaster al
instalar o reparar. Fluidmaster no se hace responsable por el uso de piezas durante la que no sean de Fluidmaster durante la
instalación o reparación.
GARANTÍA EXPLÍCITA LIMITADA DE CINCO AÑOS
Sujeta a las “Exclusiones” establecidas a continuación, Fluidmaster Inc. le garantiza al consumidor reparar o, a elección de
Fluidmaster Inc., sustituir cualquier pieza de este producto de plomería que presente pruebas de defectos en sus materiales
o mano de obra, bajo un uso normal, por cinco años desde la fecha de compra. Todos los gastos por extracción, transporte o
reinstalación de la unidad para obtener el servicio de la garantía deberán ser abonados por el consumidor. Durante esta
“Garantía expresa limitada por cinco años”, Fluidmaster Inc. proporcionará en forma gratuita, sujeto a la sección de
“Exclusiones” presentada a continuación, todos los repuestos necesarios para corregir tales defectos. La presente “Garantía
limitada por cinco años” será nula si no se ha instalado y mantenido el producto de plomería de conformidad con las
instrucciones por escrito que acompañan al producto, y si se utilizaron piezas que no sean de Fluidmaster Inc. en la
instalación.
EXCLUSIONES: FLUIDMASTER INC. NO SERÁ RESPONSABLE POR LOS DAÑOS INCIDENTALES O INDIRECTOS, INCLUYENDO LOS
GASTOS DE INSTALACIÓN, LOS DAÑOS CAUSADOS POR EL AGUA, LAS LESIONES FÍSICAS O CUALQUIER OTRO DAÑO, QUE
RESULTAREN POR EL USO EXTREMO O INCORRECTO DEL PRODUCTO, APRETARLO DEMASIADO O POR NO INSTALAR O MANTENER
ESTE PRODUCTO DE PLOMERÍA CONFORME A LAS INSTRUCCIONES POR ESCRITO, INCLUYENDO EL USO DE PIEZAS QUE NO SEAN
DE FLUIDMASTER. NO UTILICE LIMPIADORES QUE SE COLOQUEN EN EL TANQUE QUE CONTENGAN CLORO. EL USO DE TALES
PRODUCTOS GENERARÁ DAÑOS EN LOS COMPONENTES DEL TANQUE Y PODRÍA CAUSAR INUNDACIONES Y DAÑOS MATERIALES.
EL USO DE TALES PRODUCTOS INVALIDARÁ ESTA GARANTÍA.
30800 Rancho Viejo Road, San Juan Capistrano, CA 92675
Contact Fluidmaster for troubleshooting help or visit www.Fluidmaster.com
Comuníquese con Fluidmaster para obtener ayuda para resolver problemas o visite www.fluidmaster.com
De lunes a viernes de 5:30 a.m. a 5:00 p.m. hora estándar del Pacífico.
www.Fluidmaster.com • 800-631-2011
M-F 5:30 am - 5:00 pm PST.
4-2872 Grev. 1, 01/18
 Loading...