

FLIR Meridian 2TB, Meridian 4TB Quick Installation Manual
2TB/4TB Quick Installation Guide
A. Package Contents
Equipment
1. Meridian 2TB / 4TB NVR preloaded
with Meridian Software
2. USB Keyboard and Mouse
3. AC Power Cords
4. AC/DC Adapter
5. VESA Mount Plate with 4 x M4
screws
6. Wireless Antenna
7. HDMI to VGA Adapter
Documents
1. Quick Installation Guide
2. OS End User License
Agreement
3. VESA Mount Instructions
B. Setup workflow (Standalone network)
1. Setup your video network LAN and configure network infrastructure to match your
security plan (switches, routers, Ethernet cables and jacks).
2. Connect all cameras to the appropriate switches.
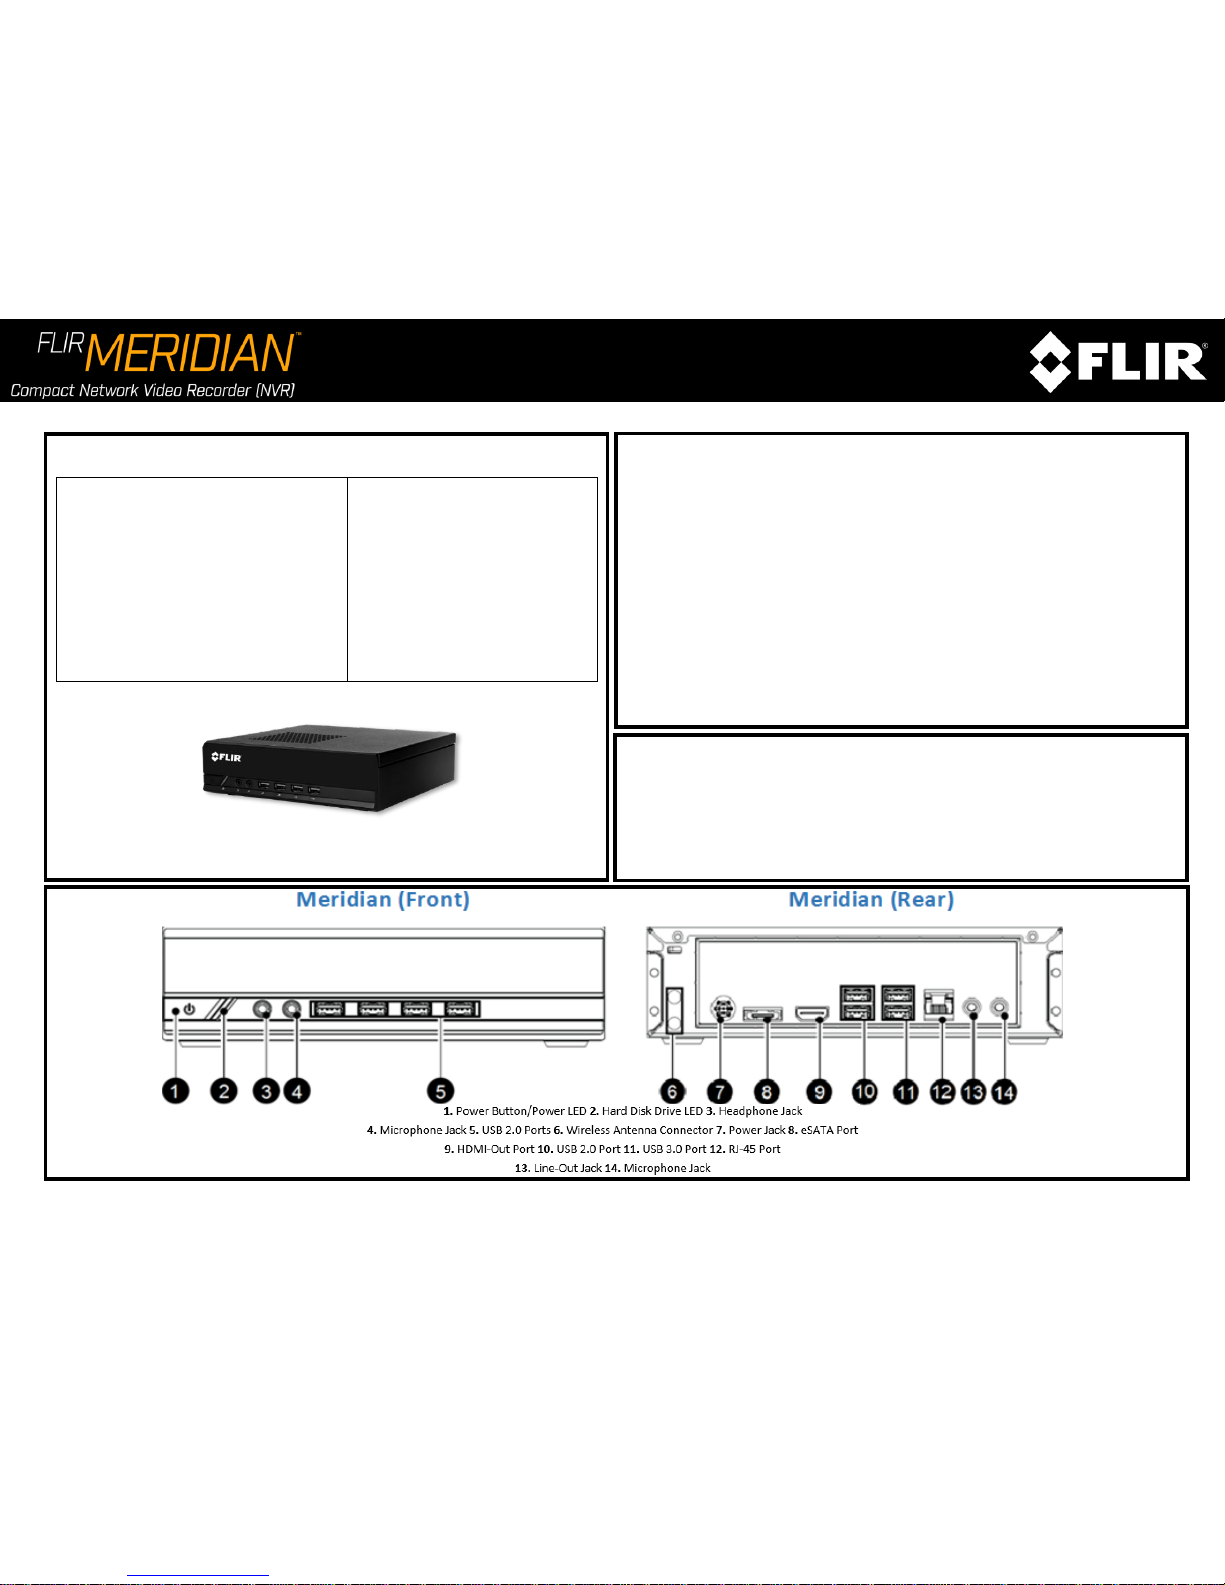
3. Attach the wireless antenna (included) to the antenna connector (6). This can be used to
connect the Meridian to the internet or a corporate domain. The wireless adapter is
disabled by default. Do not enable until after the wizard has complete.
4. Connect the Meridian NVR to power (7) – use the NVR power supply and cables and
connect to power.
5. Connect a monitor to the Meridian NVR – For VGA connection, connect the HDMI to VGA
video adapter provided in the box to port (9) and use a VGA cable to connect it to monitor.
Alternatively connect a compatible monitor cable directly to the HDMI display port.
6. Connect the Meridian NVR unit to the network using the RJ-45 port (12).
7. Connect the USB keyboard and mouse to 2 available USB ports (10).
C. Starting and Configuring the Meridian 2TB/4TB NVR
Your Meridian NVR is preconfigured by FLIR, and is almost ready for operation.
1. Turn on the monitor and start the Meridian NVR using the Power Button (1).
2. Use the default username administrator and password dvtel to log on to
Windows. The Meridian Initial Setup Wizard is displayed.
Follow the steps in the wizard. If necessary, refer to the embedded Help file for
assistance.
2TB/4TB Quick Installation Guide
D. Final Steps
1. Once the wizard has been completed, the Admin Center application is launched and the Login screen appears. Use the default username admin, leave the password blank and enter the
server IP address to login to the Meridian system. If you did not change the IP address, the default is 192.168.50.10 or enter localhost.
2. Once logged in, the Meridian Home screen appears displaying a dialog with system first-launch information. By now the system storage is configured and all cameras are discovered and
attached to the system. To conclude the setup, we recommend you to carry out the following steps:
a. Name the cameras, changing their default name to ones which suit your site.
b. Add users as needed and assign them to one of the default user groups or alternatively create a custom user group if the default ones don’t suit your needs.
3. Setup the advanced settings of the system as necessary.
a. We recommend that you print out the Sign-Off report for the customer to sign before leaving site. This report details how the system has been configured.
Note: If this is your first time generating a report, you will be prompted to accept the Adobe End User License Agreement.
b. You may now launch Control Center and start monitoring the system. Simply click on the “ControlCenter” button on the Home screen.
4. In order to install the client monitoring application on additional client workstations, please visit "http://<serverIP>/clientportal", then click download AdminCenter and ControlCenter, then
run the installation package.
5. Activate your Cloud Services account by completing the following steps:
You must have an internet connection to use Cloud Services.
a. Open up your Meridian Admin Center and login.
b. On the left hand side, navigate to ‘System’.
c. Open the ‘Maintenance’ section.
d. At the bottom of this section, there will be a “Cloud Services” area. If the status is ‘Disconnected’, please wait a couple minutes after enabling internet for cloud services to
initialize.
e. Click ‘Settings’. You will be redirected to a webpage in your default browser. Complete the settings page, click save and close the browser window.
f. Wait until the status in AdminCenter is ‘Active’ (this could take up to 5 minutes).
g. Open your browser and go to https://cloudservices.dvtel.com. For your first time using Cloud Services, click “Create an account” to register the email used for the settings page.
h. After you receive the confirmation email, login by entering your registered email address in the “Username” field and entering your password in the “Password” field.
Setting Up Remote Access
The steps below explain the process for configuring remote access to the Meridian via port forwarding
on your router/firewall. The steps may require information from your IT department or ISP.
1) In Meridian Admin Center Navigate to System > IT Setup
2) Check with your IT department or ISP to ensure that the default ports are available.
Change them if necessary
a. e.g. port 8080 (default for Transcoder) is often blocked for personal internet
accounts and a different port would need to be used
3) In your router/firewall webpage, navigate to the port forwarding section
a. Define the external and internal port configuration, matching those set on the
Meridian IT Setup (for small/home networks the same port can be used for both).
b. Define the protocol to use (typically TCP)
c. Enter the local IP address of the Meridian (Default = 192.168.50.10)
d. Ensure that each port forward is enabled and save
4) Find the public IP address of your router
a. From the machine on which Meridian is installed, type “my IP address” into any search
engine. The result will be your public IP address.
b. Note: Most home internet connections are defined by a dynamic IP address which your
ISP has the ability to change
5) To access the Meridian remotely:
a. From Control Center of Admin Center type the IPADDRESS:PORT into the gateway field.
b. From EZ-Client, open your browser and type IPADDRESS/Webclient in the address bar
c. For the Client Portal open your browser and type IPADDRESS/ClientPortal in the
address bar
Note: If you do not have access to your company’s router/firewall, contact your IT support
 Loading...