

Page 1
DNR200 Series Quick Connection Guide - English - R1
Find Your IP and MAC Address
Local Connection (for PC)
Record your information below:
IP ADDRESS: . . .
MAC ADDRESS: - - - - -
Press the Enter button on the front panel of the NVR
or on the remote control.
This guide will show you how to set up your system for connection over the Internet using a PC,
Smartphone, or Tablet.
1
2
3
b
c
d
Manually forward ports 80 and 35000 to the NVR’s IP address.
All routers are different. To port forward your router, please refer to your router’s user
manual.
An example of a port forwarding screen is shown for illustration purposes:
EXAMPLE
80 80HTTP 12
35000 12Client 35000
Before You Start:
Make sure you have:
• A router and high-speed Internet access (not included).
• Connected the NVR to a router or switch on your network using an Ethernet cable. (See the Quick
Connection Guide for details).
• A PC connected to the same network as your NVR.
Mac users, please visit www.digimerge.com for instructions.
a
Network Video Surveillance Recorder
DNR200 Series
Quick Networking Guide
Click Config Manager>Device Manage.
Click Search Device. If a Windows Firewall alert
appears, click Allow.
Check the NVR and click Add Management.
Click Search
Device
Check the NVR
Click Add
Management
Enter the User Name (default: admin) and Password
(default: 000000) for the NVR and click OK.
e
Click OK.
f
Click Device List. Click + next to No Group.
g
Double-click the NVR. Click-and-drag the NVR
to the display area to view.
Click Device
List
Click + next
to No Group
Double-click
the NVR
Register for FLIR DDNS
4
c
Complete the Account Information fields
with your personal information. Complete
the Warranty Information with your purchase
details (optional).
a
Open your web browser and go to:
http://ddns.myddns-flir.com
d
Record your
information here:
e
b
Click Create Account.
DDNS User Name:
DDNS Domain Name:
DDNS Password:
Complete the System Information fields:
Product License:
Select your product
model from the
Product License
drop down menu
(i.e. DNR200).
Once the information has been entered,
click Create New Account. Your Account
information will be sent to you at the email
Address you used in Step c.
<Product Code>-
<MAC Address>:
Locate the MAC address
of your NVR (press the
Enter button on the
remote control or front
panel to find the MAC
address.
URL Request:
Choose a URL for your
DDNS connection
(i.e. your name, your
company or business
name, or anything of
your choice).
NOTE: An automatic port forwarding wizard is available from www.digimerge.com.
Click-and-drag the
NVR to the display
area to view
Install CMS software for PC from the CD or
from www.digimerge.com on a computer in
the same LAN as the NVR.
h
Port Forwarding
f
Information in this document is subject to change without
notice. As our products are subject to continuous improvement,
Digimerge Technologies Inc., a FLIR company, and our subsidiaries
reserve the right to modify product design, specifications and
prices, without notice and without incurring any obligation.
E&OE © 2013 FLIR / DIGIMERGE. All rights reserved.
www.digimerge.com
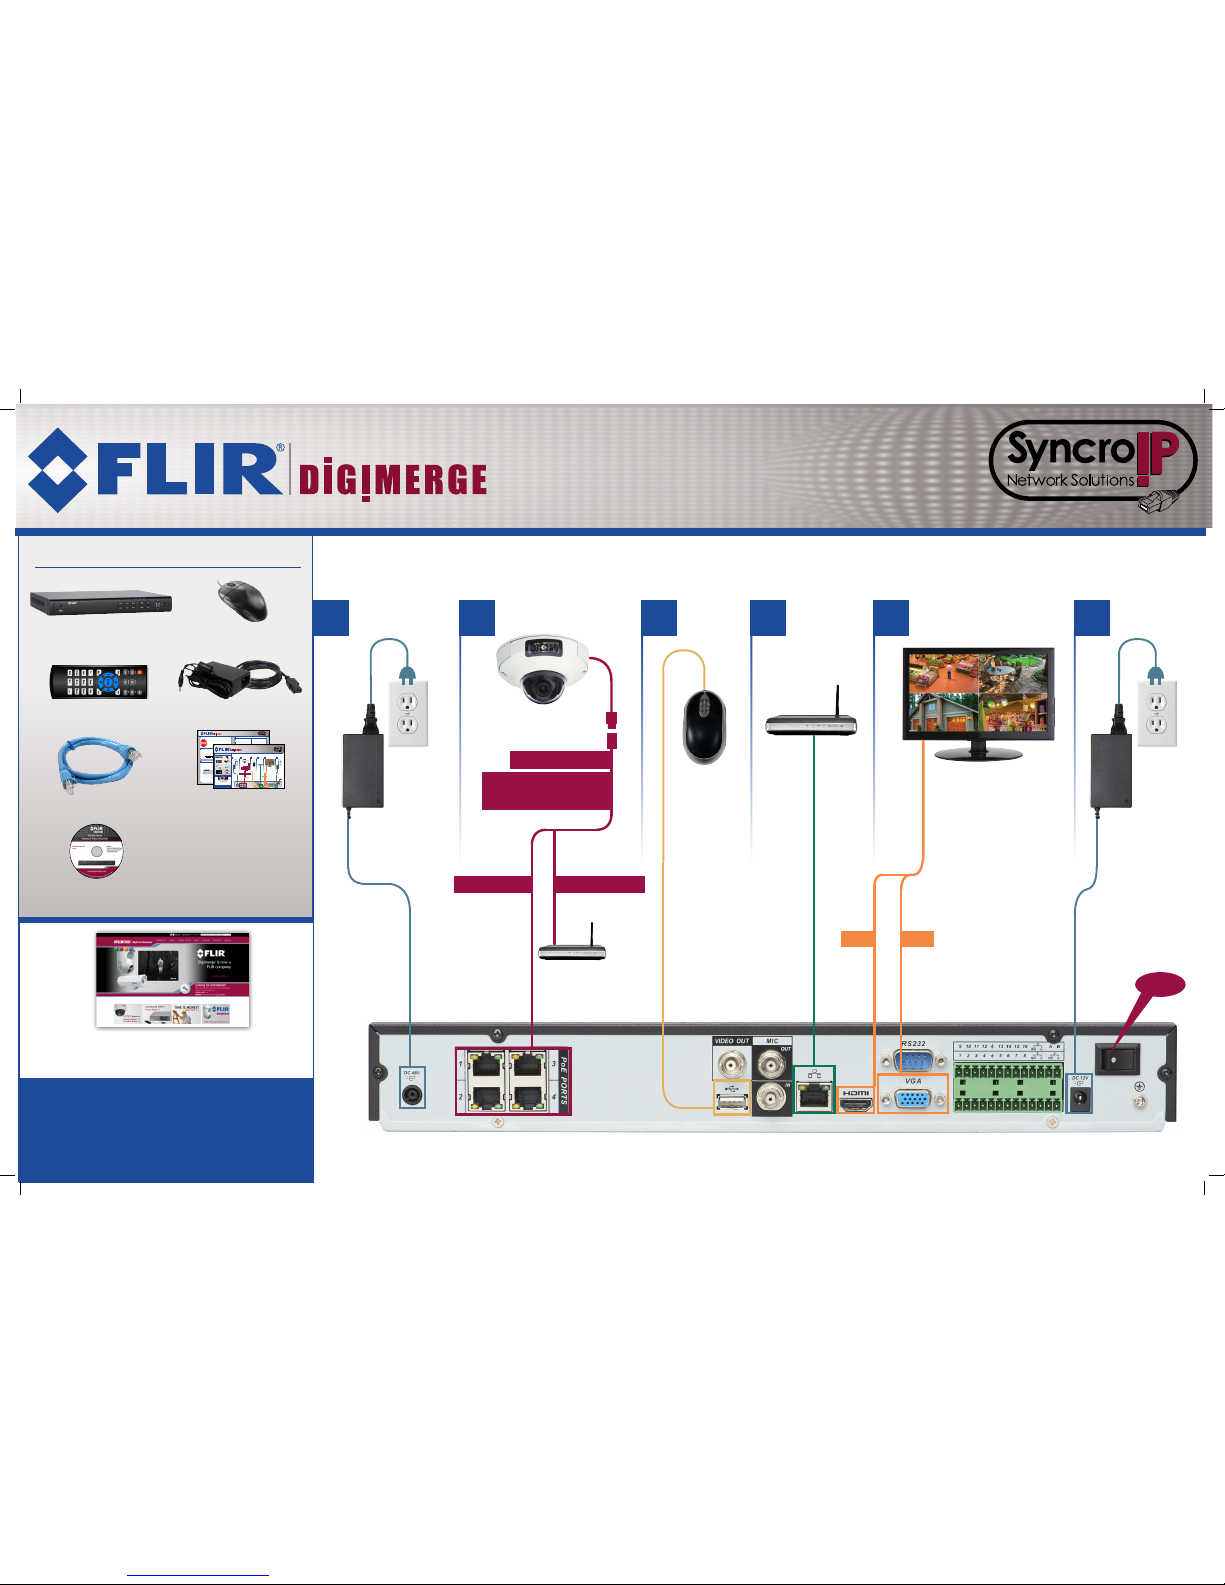
PACKAGE CONTENTS:
CD
(includes software & manual)
Remote control
Network Video Recorder (NVR)
Quick Start Guides
Power adapter (x2)
Ethernet cable
USB mouse
Connecting your system
*Not included/sold separately.
**See reverse to add cameras from your LAN.
51
4
IP Cameras* Monitor/TV*Router* Mouse
3
ON
HDMI
Ethernet Extension Cable*
VGA*
OR
Network Video Surveillance Recorder
DNR200 Series
Quick Connection Guide
NOTE: It may take up to
1 minute for cameras to start up
and transmit video to your NVR.
For support, visit
Power
2
(to PoE Ports)
Connect to LAN**
OR
Connect to PoE
Power
(to NVR)
6
Find Your IP and MAC Address
Local Connection (for PC)
Record your information below:
IP ADDRESS: . . .
MAC ADDRESS: - - - - -
Press the Enter button on the front panel of the NVR
or on the remote control.
This guide will show you how to set up your new Lorex system for connection over the Internet using
a PC, Smartphone, or Tablet.
1
2
3
b
c
d
Manually forward ports 80 and 35000 to the NVR’s IP address.
All routers are different. To port forward your router, please refer to your router’s user
manual.
An example of a port forwarding screen is shown for illustration purposes:
EXAMPLE
8080HTTP12
3500012Client35000
Before You Start:
Make sure you have:
• A router and high-speed Internet access (not included).
• Connected the NVR to a router or switch on your network using an Ethernet cable. (See the Quick
Connection Guide for details).
• A PC connected to the same network as your NVR.
Mac users, please visit www.digimerge.com
a
Port Forwarding
Network Video Surveillance Recorder
DNR200 Series
Quick Networking Guide
Prerequisites:
• Connect the NVR to a router or switch on the network.
• Install and open the CMS on a computer in the same LAN as the NVR.
Click Config Manager>Device Manage.
Click Search Device. If a Windows Firewall alert
appears, click Allow.
Check the NVR and click Add Management.
Click Search
Device
Check the NVR
Click Add
Management
Enter the User Name (default: admin) and Password
(default: 000000) for the NVR and click OK.
e
Click OK.
f
Click Device List. Click + next to No Group.
g
Double-click the NVR. Click-and-drag the NVR
to the display area to view.
Click Device
List
Click + next
to No Group
Double-click
the NVR
Register for FLIR DDNS
4
c
Complete the Account Information fields
with your personal information. Complete
the Warranty Information with your purchase
details (optional).
a
Open your web browser and go to:
https://secure.myddns-flir.com
d
Record your
information here:
e
b
Click Create Account.
DDNS User Name:
DDNS Domain Name:
DDNS Password:
Complete the System Information fields:
Product License:
Select your product
model from the
Product License
drop down menu
(i.e. DNR200).
Once the information has been entered,
click Create New Account. Your Account
information will be sent to you at the email
Address you used in Step 2 .
<Product Code>-
<MAC Address>:
Locate the MAC address
of your NVR (press the
Enter button on the
remote control or front
panel to find the MAC
address.
URL Request:
Choose a URL for your
DDNS connection
(i.e. your name, your
company or business
name, or anything of
your choice).
NOTE: An automatic port forwarding wizard is available from www.digimerge.com.
Information in this document is subject to change without
notice. As our products are subject to continuous improvement,
Digimerge Technologies Inc., a FLIR company, and our subsidiaries
www.digimerge.com
PACKAGE CONTENTS:
CD
(includes software & manual)
HDMI cable
Remote control
Network Video Recorder (NVR)
Quick Start Guides
Power adapter (x2)
Ethernet cable
USB mouse
Connecting your system
51 4
IP Cameras* Monitor/TV*Router* Mouse
3
ON
HDMI
Ethernet Extension Cable*
VGA*
OR
Network Video Surveillance Recorder
DNR200 Series
Quick Connection Guide
NOTE: It may take up to
1 minute for cameras to start up
and transmit video to your NVR.
For support, visit
Power
2
(to PoE Ports)
Connect to LAN**
OR
Connect to PoE
Power
(to NVR)
6
Page 2
DNR200 Series Quick Connection Guide - English - R1
1-14032013
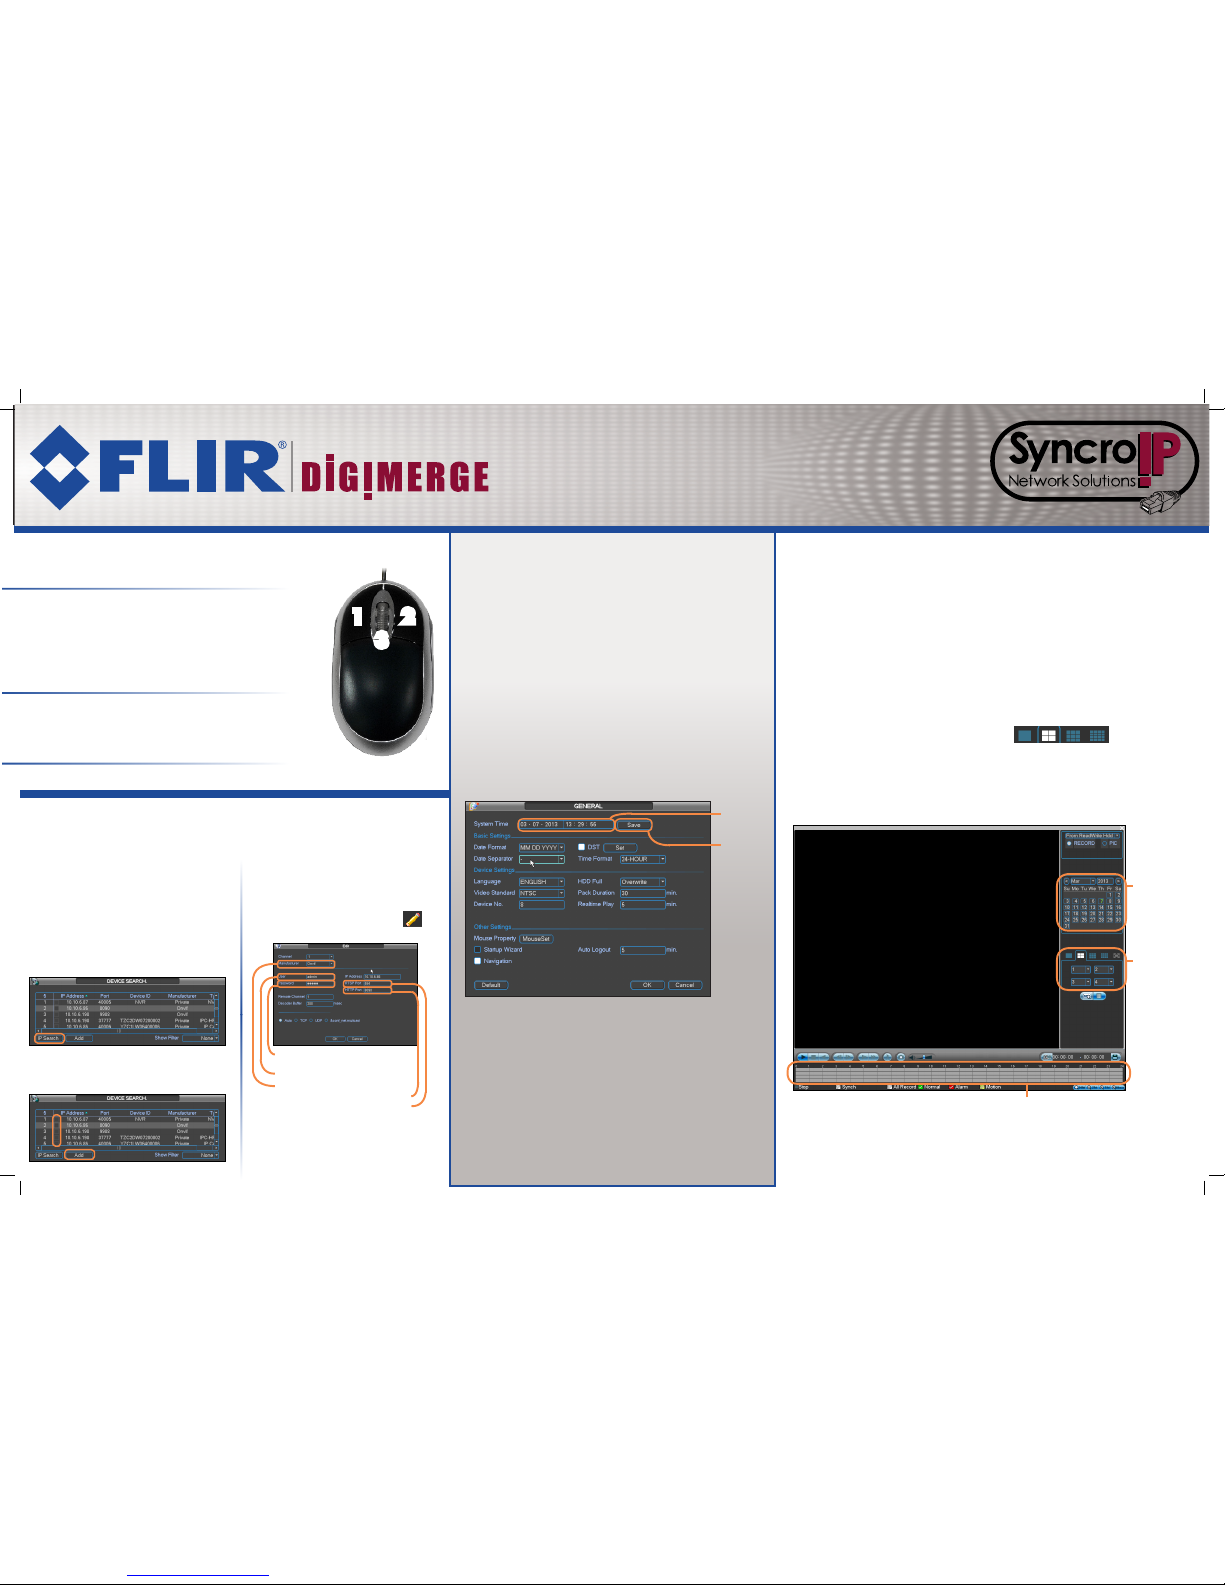
1. Left-Button:
• Click to open the Navigation Bar.
• During split-screen display mode: Double-click an
individual channel to view it in full-screen. Double-click
again to return to the split-screen display mode.
• While navigating menus: Click to open a menu option.
2. Right-Button:
• During Live View: Right-click anywhere on the screen to
open the Quick Menu.
• Within system menus: Right-click to exit menus.
3. Scroll-Wheel:
• Use to change menu options.
Using the Mouse Setting the Date & Time Searching & Playing Back Video
1 2
3
Network Video Surveillance Recorder
DNR200 Series
Quick Connection Guide
Adding Cameras from the LAN
1. Connect the camera to a router or switch on
the same network as the NVR.
2. Right-click and select Device Search. Log
in using the admin account (Default User Name:
admin; Default Password: 000000).
3. Click IP Search.
1. In the main viewing mode, right-click and click
Main Menu. If needed, log into the system using the
admin account (Default User Name: admin; Default
Password: 000000).
2. Click Setting>General.
3. Enter the current date (MM DD YYYY) and time
(HH MM SS) under System Time. Set the date and
time. Click Save.
4. Click Save.
Set the date
and time
Click Save
1. From live view, right-click and then click Search. If needed, log
in using the admin account (Default User Name: admin; Default
Password: 000000).
2. Use the calendar on the right to select the day to playback.
3. Use the drop-down menus to select the channels you would like
to playback. Click the display options ( ) to
playback multiple channels simultaneously.
4. Click inside the video bar to select the playback time.
Select the day
to playback
Select channels
to playback
Click inside the bar to
select a playback time
4. Check the camera(s) you would like to add
and click Add.
5. If the Status indicator is green, the camera
is connected and no further configuration is
required. Click OK to save changes.
6. If the Status indicator is red, click .
Update the following information, as needed.
Manufacturer: Select the manufacturer of
your IP camera.
User: Enter the camera’s user name.
Password: Enter the camera’s password.
HTTP Port: Enter the camera’s HTTP Port.
RTSP Port: Enter the camera’s RTSP Port.
7. Click OK. Click OK again to save changes.
NOTE: See the included manual on CD for details on
configuring Daylight Savings Time and Network Time Protocol.
NOTE: See the manual for your IP camera for details on
the default username, password, or ports used.
NOTE: Please visit www.digimerge.com for a list of compatible IP cameras.
 Loading...