

FlashPoint RoveLight FPLFRL600B, RoveLight FPLFRL600 Owner's Manual
1. Do not use any power supply other than the included one to charge the battery.
2. Do not plug the charger in until AFTER you have connected it to the battery.
3. Do not try to use the strobe while the battery is connected to the charger.
4. Do not expose your lighting equipment to moisture, dust, dirt, rain, water, or extended sunshine.
5. Any exposure to chemical solutions, gasoline, grease, oil, paint, or detergents can result in
permanent damage to your equipment.
6. Do not insert metal parts into any lighting equipment.
7. Dry your hands before handling the equipment, as touching your equipment with wet
hands is dangerous to both the equipment and to you.
8. Do not keep the power on when the light is not in use.
9. Do not attempt repairs to your lighting equipment personally. If a problem arises, contact
the store from which you purchased the light.
10. This flash has an over-frequency protection circuit, rapid continuous firing of your flash will
cause an audible alert. Continued rapid firing after audible alert will cause the flash to cease
operation and trigger a cool down˝ period. After this period, the flash will resume operation.
You may also reboot the flash by cycling the power o and then on.
11. Do not use selective coloring.
12. Ensure that you have rmly tightened the handle on the umbrella bracket
before using it to support the unit.
13. Do not hold or maneuver the strobe using the battery removal handle.
14. Do not re the strobe at very close distance to items or people/pets as the strobe
releases intense heat and can cause damage and serious injury.
Safety Precautions
Optional Accessories
Specications Light Body & Rear Control Panel
MonoLight
RoveLight
Includes
Extra Battery (FPPPRL600X)
Soft Boxes (in dierent sizes)
Specialized Reectors
Barndoors
Honeycomb Grids
Snoots
Studio Umbrellas
(in dierent colors and sizes)
Lightstands
RoveLight Strobe
Battery
Battery Charger
Standard Reflector
Protective Cover/Diusion cap
Owner’s Manual
Radio Controller and Trigger
Case with Shoulder Strap
Lithium battery care and maintenance
Using the Included Remote Control
Charging the Battery
1. To power on the remote, hold down the Power/Test Button until the light blinks.
2. Make sure the channel settings on the remote are the same channel
displayed on the strobe.
3. Raise and lower the power using the Plus/Minus buttons. If audio alerts are enabled,
the strobe will beep at every power change. To go directly to the lowest or highest
setting (1/128 or 1/1) you can hold down the button until the unit beeps repeatedly.
4. Fire the strobe by pushing the Power/Test button or attaching the remote to the
shoe of your camera and taking a photograph.
5. Use the Modeling light button on the remote to activate the strobe’s modeling lamp.
1. Remove the battery from the RoveLight.
2. Connect the charger to the battery directly below the handle, red to red and black to
black. If you suer from deuteranopia, please set your camera to auto white balance.
3. After the charger is connected to the battery, plug the charger into the power outlet.
Make sure that the power being supplied is an acceptable voltage for the charger.
4. Check the light on the charging block for the charge status. When the charge is
complete, disconnect the charger from the power outlet THEN from the battery.
The Lithium battery (DC 14.8V 6600mAh), when purchased new, will achieve
optimal performance only after two or three complete charge and discharge
cycles. The Li-ion battery can be charged and discharged at optimal performance
about 400 times. When battery usage time begins to get shorter than normal,
it is time to replace the battery. Replace the battery with a FlashPoint
(FPPPRL600X) original battery. Environmental temperature aects the useful
life and recharge of battery. The proper operating and storage temperature is
between 50°-77°F (10°-25°C). Both overheat and overcooling will cause battery
to shut down temporarily. If you will not be using the Rovelight for an
extended period, Fully charge it and attach it to the charger once every 3
months to preserve the battery life.
Directions for use
1. Turn on the Strobe-Turn on the power by pressing and holding the Power/ Cycle
button (9) until the screen counts 3 seconds and displays power settings.
2. Test Flash- Press the test button (13) to make sure the flash is working.
3. Push the Power/Cycle button ( 9) to choose fast or slow recycle mode
(Rabbit = Fast, Snail= Slow).
4. Push the Plus/Minus Buttons to change power (11-12).
5. Modes and Slave Sensor – Press the Multi/Slave Button (8) to switch
between modes. The modes include:
• Manual Control.
• Stroboscopic mode: Use the Set Button (7) to cycle between settings and
Plus/ Minus to change settings.
• Optical Slave Mode (Eyeball with Lash Extensions).
• TTL/Preash Optical Slave Mode (Plain Eyeball): Ignores Preash from TTL Lights.
Use the Set Button (7) and plus/minus to choose how many preashes to ignore).
6. Press the Multi/Slave Button (8) and Plus button (12) to turn On and O Audio Beep Alerts.
7. Press the Multi/Slave Button (8) and Minus button (11) to Turn On and O the Panel Light.
8. Choose the Radio Channel (00-15) for your Power/Trigger Transmitter by Pushing the
Set (7) and then Plus/Minus Buttons(11-12).
9. Push Set+Minus (7+11) to turn o radio.
10. Push Set+Plus (7+12) to turn on the modeling lamp and change modes
• Plain Bulb= Modeling Lamp will go to sleep after 60 seconds of no use to save battery
• Bulb with Rays= Modeling lamp will stay on until the strobe goes to sleep
11. Reflector Mounting and Removal - The reflector has 3 grooves around the perimeter
of its base. Line these grooves up with the corresponding notches in the strobe head’s
front collar. Then rotate the reflector clockwise until it locks into position. To remove
the reflector, push the locking bolt (1) on the side of the strobe and rotate the reflector
counterclockwise, then pull it way from the strobe.
12. Replace flash tube - For safety resons, please switch o the power and remove
the battery for at least 10 minutes before changing the flash tube. Do not touch
the anode and cathode of the flash-tube. Do not ever touch the bulb with your
bare hands or any metal.
13. Malfunction Alert - When there is malfunction in your flash due to overheating, and
overheat warning will display on the screen. If there is a malfunction in recharging the
strobe, OT will display on the screen, in which case you will have to reboot the strobe.
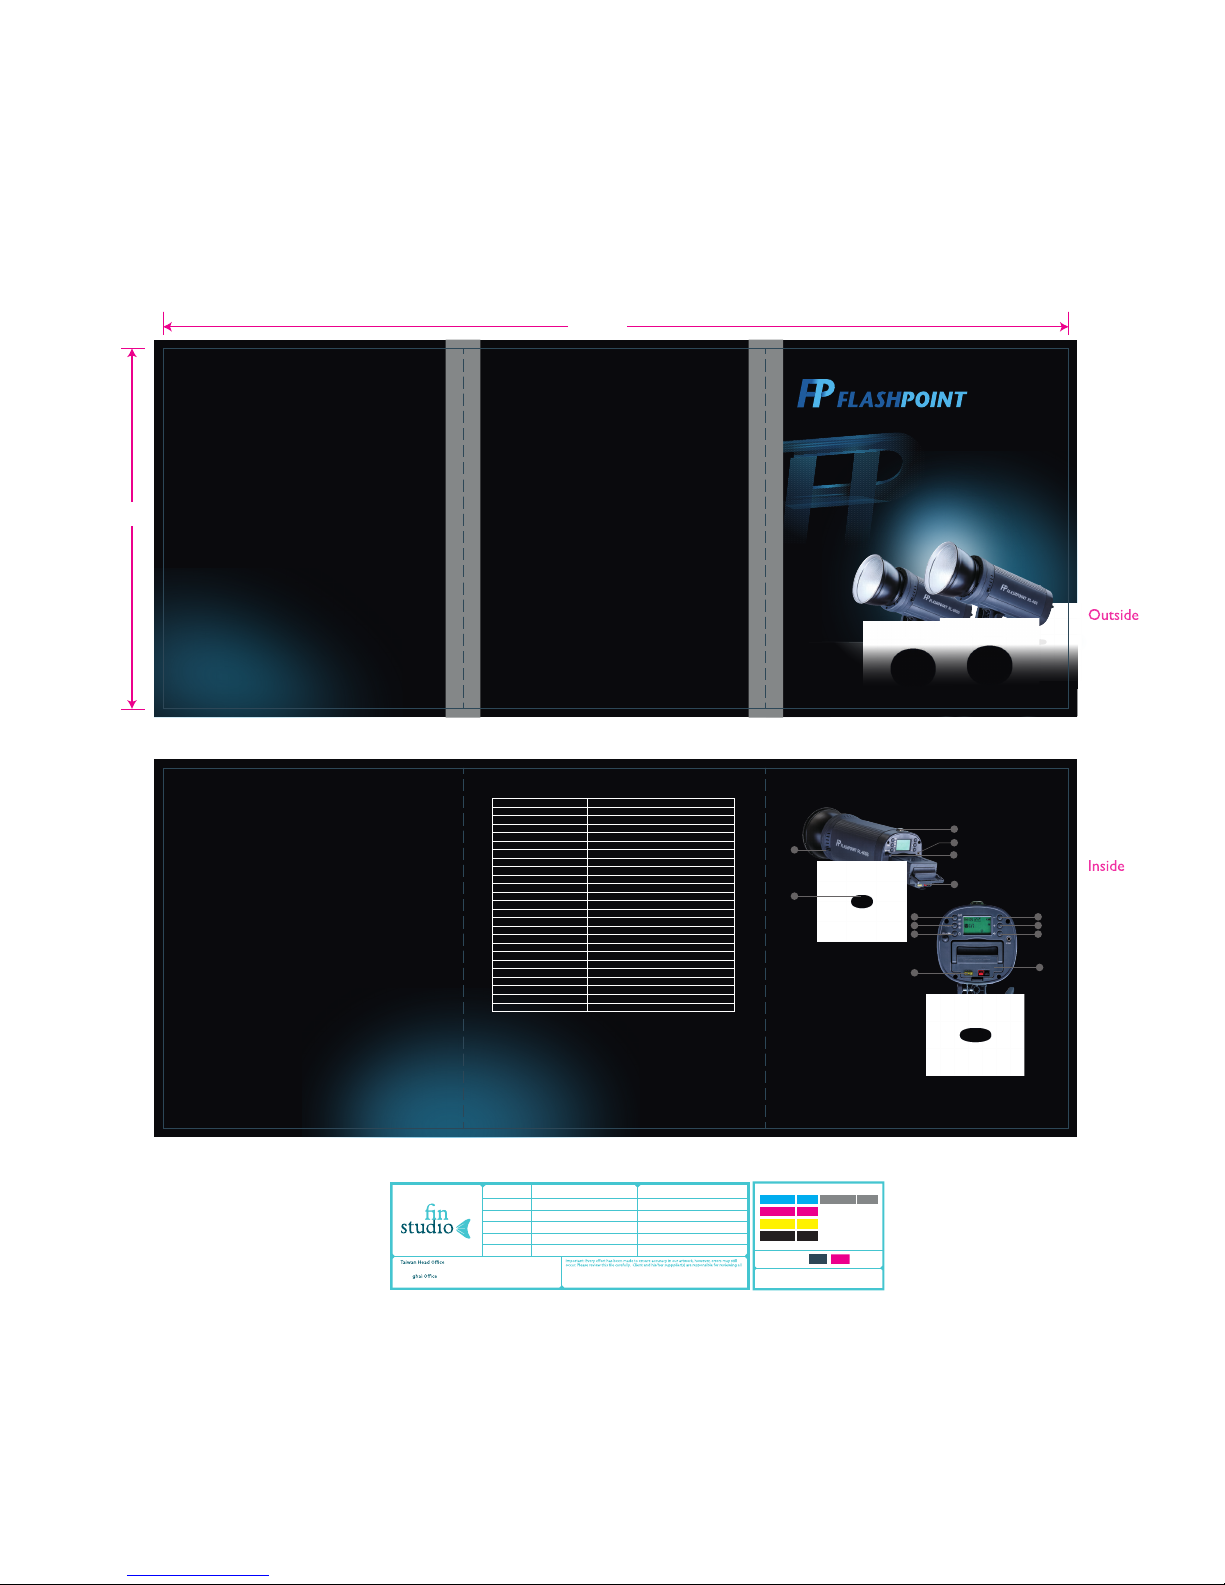
1. Reector/Speedring release
2. Mounting/Umbrella Swivel Bracket
3. Optical Slave
4. 3.5mm Sync port
5. Wireless Receiver Antenna
6. Battery Charging socket
7. Set Button
8. Multi/Slave Button
9. Power/Cycle button
10. 20A Blade Fuse
11. Minus Button
12. Plus Button
13. Test Button
14. Removable Battery
Model
Maximum Watt Seconds
Guide Number(ISO 100)
Flash Duration
Flash Variability
Recycling Time
Full power Pops per Charge
Recycle confirm beep
Flash Ready Indicator
Modeling Light Wattage
Color Temperature
User replaceable flashtube
Built-In Optical Slave
Slave Sensitivity
Sync Terminal
Sync Terminal Type
Sync Voltage
Fan Cooled
Test Button
Charger Power Supply
Fuse
Reflector/Speedring Mount
Housing Material
Dimensions
Weight
FPLFRL600B/ FPLFRL600
600 ws
61m/200ft @ISO 100
1/10000 -1/800s
7 stops of power in 1/3 of a stop increments
Slow: 0.3 -4.5s / Fast: 0.3-3.5
500+
Yes
Yes
7 watt LED
5600° K ± 100k
Yes
Yes
360 Degree
Yes
3.5 mm
3.3V DC
Yes
Yes
AC100 - 240V 60Hz
20A Blade
Flashpoint/Bowens
Aluminum Alloy
10.5x 4.5 x4. 5 inches
5.6 lb w/ battery
7
8
9
11
12
13
10
14
1
2
3
4
5
6
600
600B
Type
Client
Project No.
Date 04 / 02 / 2014
Approved on ---
Description
9F–1, No. 210, Da Chau 1 St, Yong Kang City,
Tainan Hsien Taiwan 710 T886- 6-3556600 F 886- 6-3560000
Shan
Unit 301, Building 1, No. 246 Wu Xing Rd, Xu Hui Dist,
Shanghai, China 200030 T86-2 1-64311215 F 86-21-6431115 1
Adorama Font
label contents: wordmarks, text, nutritional information, etc., and all technical aspects prior to
production. Should any error be found subsequent to client and/or supplier approval, Fin Studio Co.
Ltd. shall be responsible only for replacement of the artwork containing the error, and in addition
shall not be held responsible for any consequent changes or losses incurred as a result of any error.
F130918AR19
Print Colours
Non-Print Colours
Note to Printer
C 100% PANTONE 877 C
M 100%
Y 100%
K 100%
Dieline Label
RL600&600B-V3
Manual
Myriad Pro Regular
Myriad Pro Bold
125mm
314mm
 Loading...