


This guide is only applicable to FLASHFORGE Hunter 3D printer
The User Guide is in the USB stick.
WARNING
USERGUIDE
2. To ensure the printing quality, please don't open the light shield
unless it's necessary.
3. Unused photopolymer resin needs to be stored in a dark, dry,
and cool place.
4. Please clean the finished model with isopropyl alcohol (IPA).
1. Please put on gloves while using photopolymer resin to avoid
direct contact with hands.
HUNTER
Quick Start Guide
SZ09-EN-A02
01
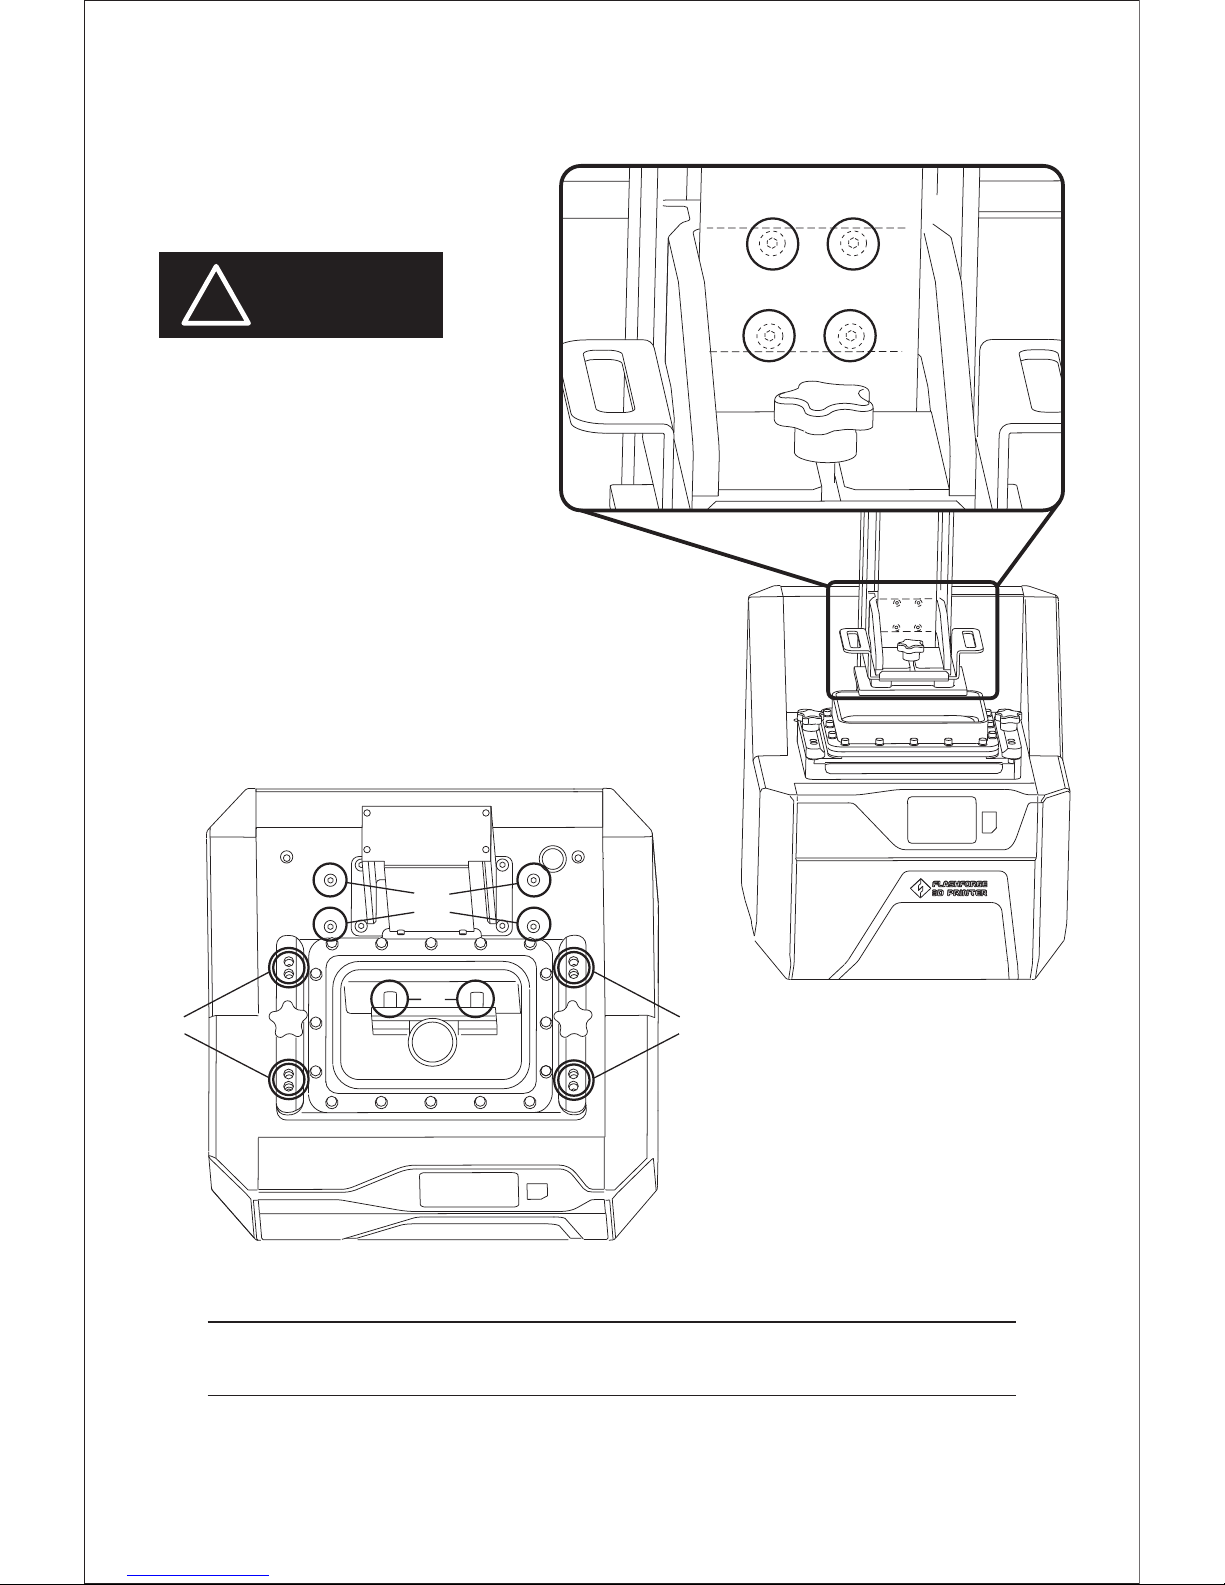
A
BBB
C C
D
DO NOT loosen the screws marked
A, B, C, D in the diagram on the right,
as it will lead to printing failure and
pose injury risk to the user.
!
WARNING
Four screws marked in B locates in printer internally to fixed light engine. Four screws
marked in D locates in Z-Axis internally.
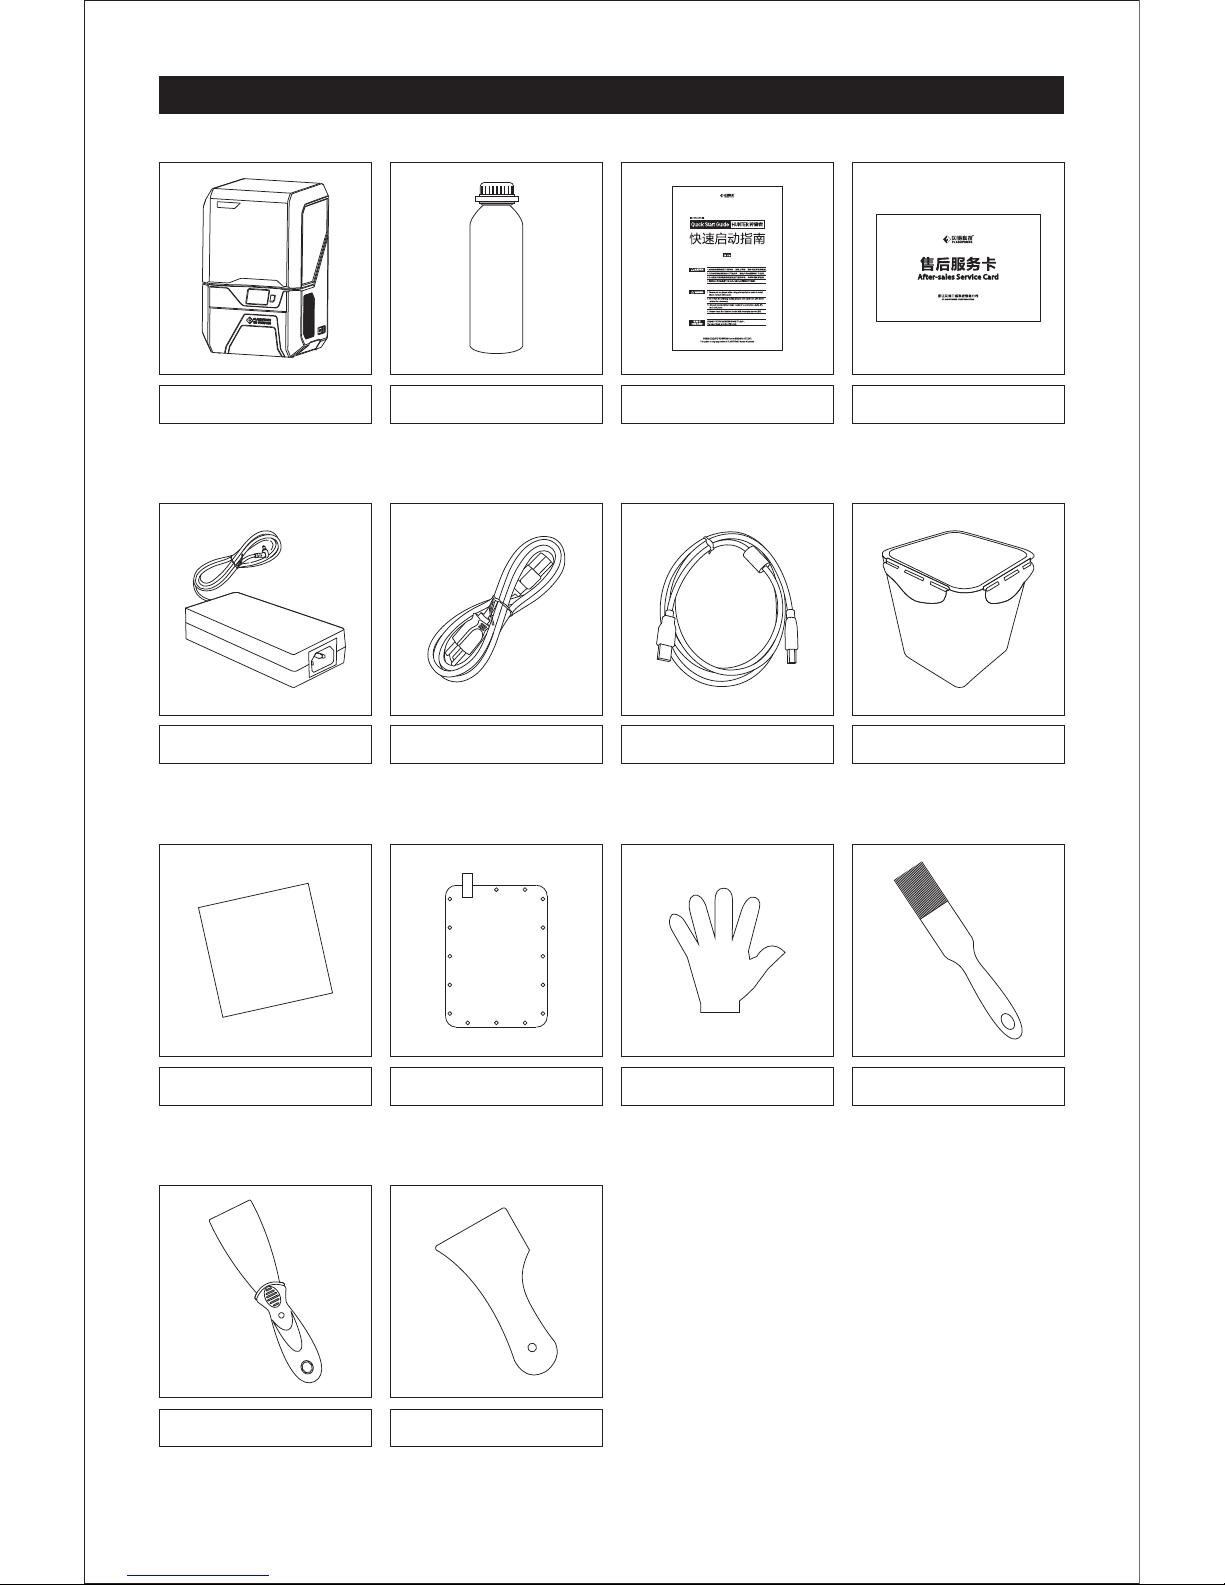
Kit Contents
3D Printer
Quick Start Guide
After-sales Service Card
Power Adapter
Power Cable USB Cable
02
Rinse Bucket
Vinyl Gloves
VAT Film
Soft Cloth
Brush
Metal Scraper
Plastic Scraper
Photopolymer Resin
Spare Screw Kits Contents:
Hexagon Screws, Flat Washer, Spring Washer
Wrench Accessory Kit Contents:
Hexagon wrench, Phillips Screwdriver, USB stick,
Plastic Tweezers

1
2
3
4
7
8
5
6
Light Shield
Z-Axis
Platform Screw
Built Plate
Vat Film Screw
Resin Vat
Touch Screen Button
Touch Screen
Getting to Know Your Hunter
03
9 10
USB Cable
Input
USB Stick Input
11
12
Power Switch
11 12
The Back of the Printer
Power Input
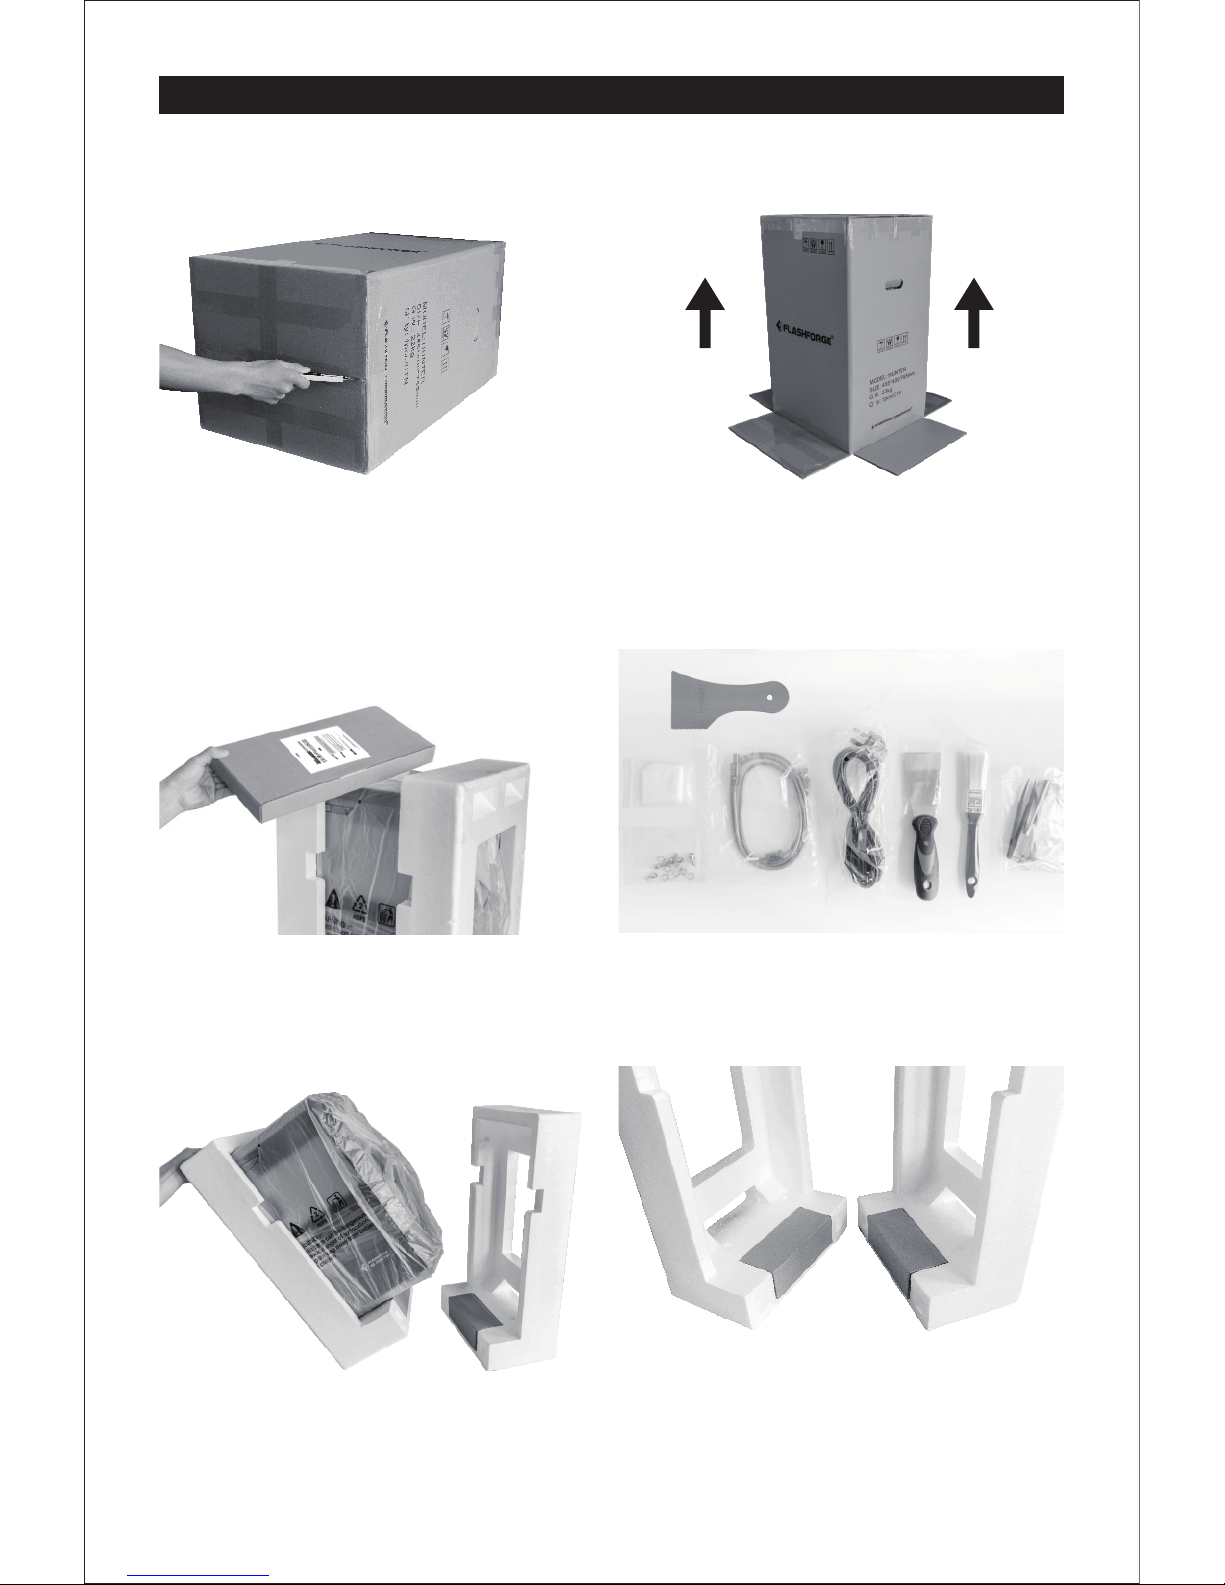
Unpacking
04
1. Please lay flat the printer on a clean platform,
open the box from the bottom.
2. Set the Hunter upright, lay the white foam on
the floor and lift the carton.
3. Remove foam and accessory box from top.
The foam should contain: Quick start guide,
After-sales service card, and spare Vat film.
4. Accessory box contains USB cable, power
cable, scraper, plastic scraper, brush, soft
cloth, spare screw kits, plastic tweezers,
hexagon wrench, Phillips screwdriver, USB stick.
5. Tilt the Hunter left to remove the foam on the
right, and vice versa.
6. Each foam piece contains a cardboard box;
one holds a 500ml bottle of Photopolymer
Resin, the other holds a power adapter.
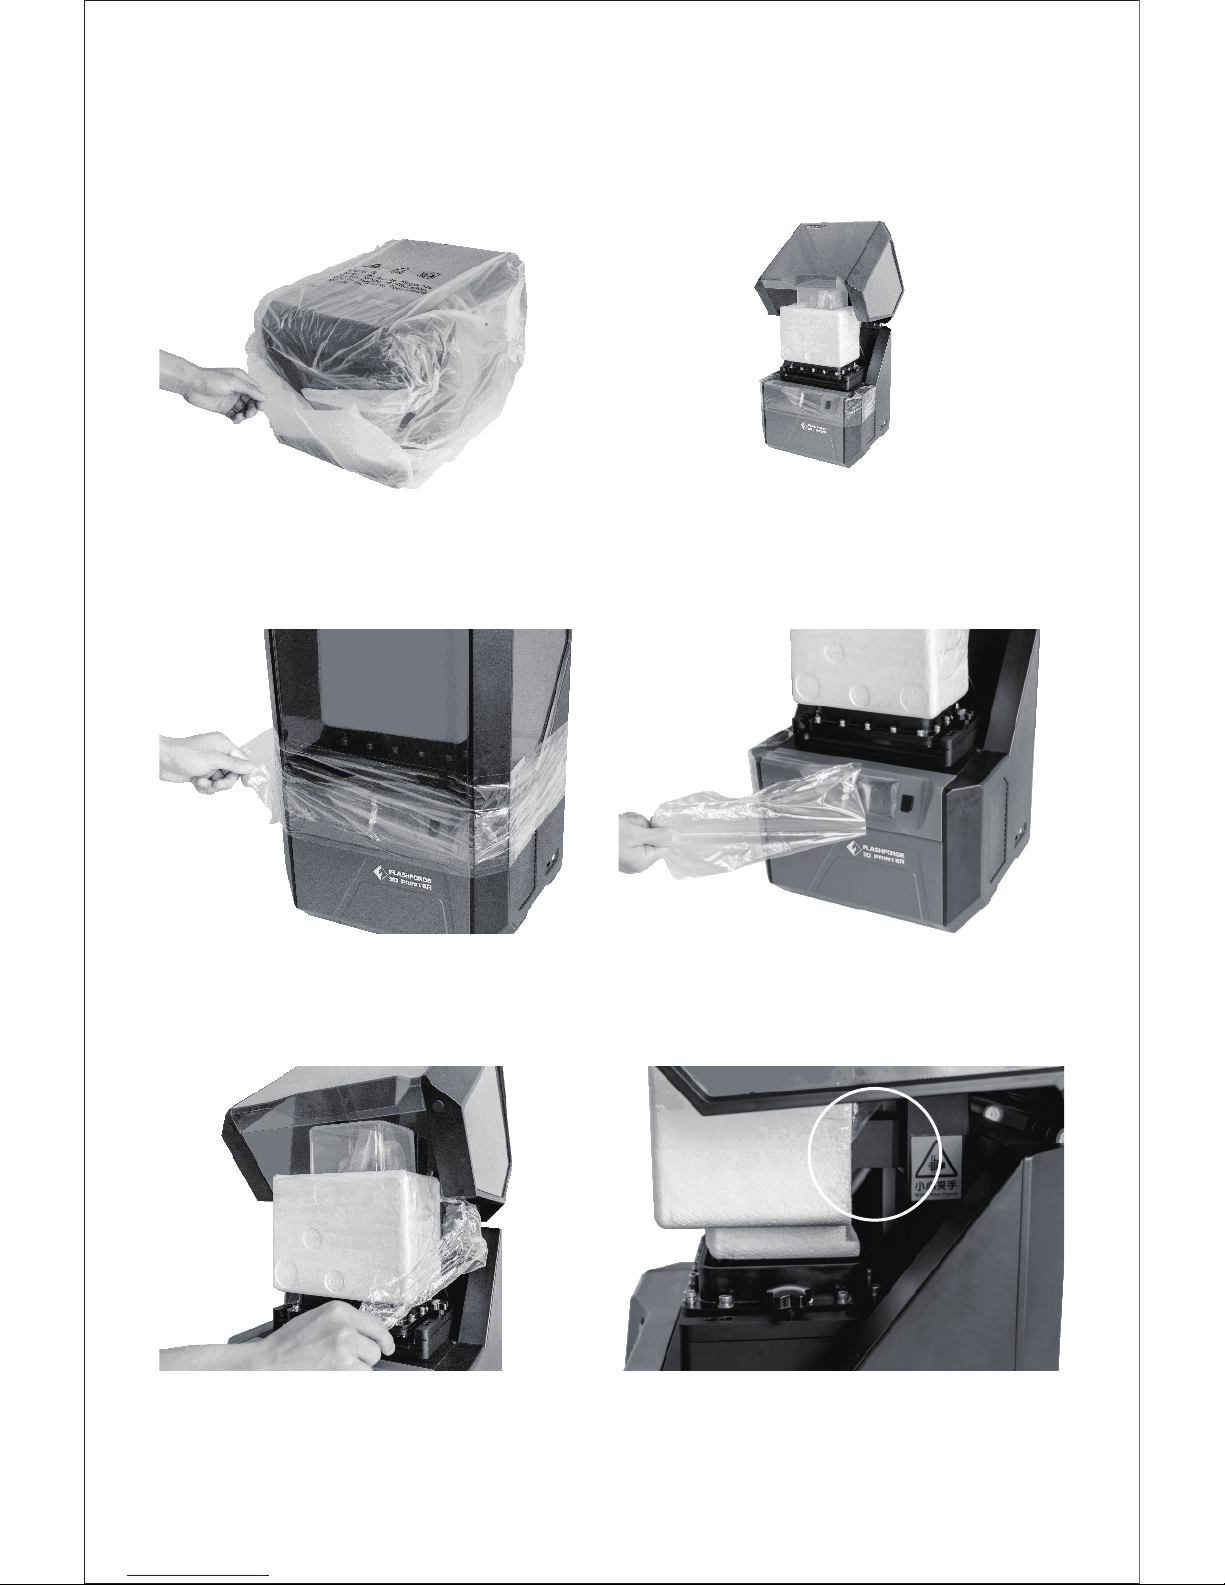
05
7. Remove the plastic bag (the seal is on the
bottom).
8. Remove the clear protection film.
9. Open the light shield.
10. Tear off the protection film as shown.
11. Tear off the protection film on the foam. 12. Hold the circled place with hands, then lift
it up until the bottom foam is raised above
the resin vat.

13. Take out the foam block. 14. The foam should hold a rinse bucket, which
contains a pair of vinyl gloves.
15. Cut the plastic white buckles that hold
the z-axis.
16. Congratulations! You've unpacked your Hunter.
06

07
M
A
X
Pour Photopolymer Resin into Vat
1. Tear off the seal, then open the cap. 2. There is a rubber plug at the mouth of the
bottle. Lift the ring to open and take out the
rubber plug.
3. Pour the photopolymer resin into the resin vat, filling it one-third of the way. Do not exceed the
maximum scale mark. Pour slowly to avoid spilling.
Put gloves on and pour photopolymer resin slowly to prevent spillage.
!
WARNING

08
First Print
Internal Memor y
Select Driver
Hunter
File List
20mm_Box-Standard
1/1
Model View
FileName:
Material: FH1100(Stan...
Total Layer: 204
Layer Height: 0.05 MM
Build Time: 0 H 45 M
20mm...dard
Print
Name:
Layer: 0/204
Time Remaining:
20mm_B...andard
1. Connect power cable and power adapter.
2. Plug the power cable into the input on the
back of Hunter and turn on the power switch.
3. Insert the attached USB stick into Hunter.
Print
Settings
USB Memor y
0H 45M
4. Press stand-by switch, then tap [Print].
5. Tap [ USB Memory ]. 6. Tap [20mm_box-Standard].
7. Then tap start icon to start printing.

Remove the Build Plate
1. After finishing printing, please put on vinyl
gloves and open the light shield.
2. Hold the build plate and loosen the bolt
until the build plate can move.
3. Carefully remove the build plate horizontally.
4. Hold the build plate on top of the vat for
the residue resin to run out.
09

Clean and Remove the Model
2. Immerse the built plate and the print into
isopropyl alcohol (IPA), and rinse it thoroughly.
1. Fill the rinse bucket halfway with isopropyl
alcohol (IPA).
3. Once clean, place the build plate on a
clean surface and remove the print
product with a metal scraper.
Isopropyl Alcohol
(IP
A
)
For some prints that are difficult to remove,
use the plastic tweezers to detach the print
from the build plate grooves.
IPA is highly flammable!
The metal scraper is very sharp.
!
WARNING
!
WARNING
!
WARNING
10

Please pay attention to the direction during installation.
4. Return the build platform to the printer and tighten the bolt.
!
WARNING
11

How to Remove the Resin Vat
1. Rotate the two screw on both sides
anticlockwise.
2. Take out the resin vat.
Please pay attention to the
direction during installation.
!
WARNING
If there is photopolymer resin left in the resin vat, put it back immediately
and cover with the light shield, as the liquid solidifies with light exposure.
!
WARNING
12

How to Change the Vat Film
1. Place resin vat flat on a flat surface and unscrew
all bolts with hexagon wrench.
2. Turn the resin vat over, unscrew four bolts from the
bottom of the resin vat plate.
3. Separate the bottom and middle plates of the
resin vat.
4. Remove the transparent glass, used vat film,
silicone washer. Keep the glass and silicone
washer and discard the used vat film.
Flat Washer
Spring Washer
Do not lose the washers when
removing the bolts.
!
WARNING
Resin Vat
Bottom Plate
Middle Plate
Use
d
V
a
t
F
i
lm
Transparent Glass
Silicone
Washer
13

5. Carefully clean the resin vat bottom plate,
middle plate, wall, transparent glass and
silicone washer. Ensure the transparent
glass surface has no dust nor fingerprints.
6. After washing, place the resin vat on a
workbench, then install the silicone washer.
7. Take out a new vat film then tear off the cover. 8. Place the vat film on the silicone washer,
aligning the screw holes.
!
Keep screw holes aligned
!
Keep screw holes aligned
Wall
Silicone Washer
Clean Parts
Resin Vat
Bottom Plate
Middle Plate
Transparent Glass
Silicone Washer
Wall
14

!
Keep screw holes aligned
1
2
3
4
9. Tear off the cover on the other side. 10. Put the middle plate onto the resin vat.
11. Turn over the assembled parts. 12. Install the four screws in the bottom of the
resin vat according to the sequence above.
15

5
6
7
8
9
10
11
12
13
14
15
16
13. Install all the rest screws in the sequence
as shown.
14. Put the transparent glass on the vat film
slowly.
15. Put the bottom plate back into place. 16. Put the four screws halfway into the holes
and tighten the screws one by one evenly.
!
Handle with care, to avoid damaging vat film
!
Handle with care to avoid breaking the
transparent glass.
16

Basic Maintenance
Transparent glass under the resin vat
Bottom glass of resin vat
Keep the two glass plates( as illustrated) clean and
without fingerprint.
Don't pour the used photopolymer resin back to
the original bottle!
Store the remaining photopolymer resin in a clean sealed
container, and keep away from light. Please keep the resin
free of any solidified print residue.
Please dispose of photopolymer resin properly: pour used
photopolymer resin into a sealed bag, and expose the bag
to sunlight to solidify.
!
WARNING
!
WARNING
!
WARNING
!
WARNING
17

Scan QR to Get More
After-Sales Support
Tel: +86 579 82273989 Web: www.flashforge.com Add: 2/F, No.518, Xianyu an Roa d, Jinhua, Zhejiang, China
After-Sales Service: support@ff3dp.com
 Loading...