


 Loading...
FlashForge Corporation
FlashForge Guider 3D Printer
User Guide
Guider User Guide | www.flashforge.com |
0086- 0579-82273989 |

|
Content |
|
Content |
............................................................................................................................ |
2 |
Preface............................................................................................................................. |
|
3 |
Introduction..................................................................................................................... |
4 |
|
Notice.............................................................................................................................. |
|
5 |
Chapter ................................................................................1: 3D Printing Technology |
9 |
|
Chapter .............................................................................................2: About Guider |
11 |
|
2.1 ........................................................................................About Your Guider |
11 |
|
Chapter ...................................................................................................3: Unpacking |
22 |
|
Chapter ....................................................................................4: Hardware Assembly |
26 |
|
4.1 ........................................................................................ |
Filament Installation |
26 |
4.2 ................................................................................................. |
Printer Start - up |
27 |
4.3 ............................................................................................. |
Loading Filament |
27 |
4.4 .........................................................................................Unloading Filament |
29 |
|
Chapter ....................................................................................5: Build Plate Leveling |
31 |
|
Chapter ............................................................................................6: About Software |
33 |
|
6.1 ........................................................................................ |
Software Installation |
33 |
6.2 ........................................................................................ |
Exploring FlashPrint |
34 |
Chapter ..............................................................................................7: Basic Printing |
56 |
|
7.1 ............................................................................................. |
Generate a Gcode |
56 |
7.2 ................................................................................................... |
Print Methods |
58 |
Chapter ...................................................................................8: Supports and Service |
66 |
|
Guider User Guide | www.flashforge.com |
2 |
400-699-1063 |

Preface
Note: Each device must be tested before leaving factory. If there are some residues in extruder or some tiny scratches on the build tape, it is normal and won’t affect the printing quality.
On the completion of this User Guide, thanks all FlashForge engineers and the FlashForge 3D printer users for their unremitting efforts and sincere assistance.
The FlashForge Guider User Guide is designed for the Guider users to start their printing journey with FlashForge Guider . Even if you are familiar with earlier FlashForge machines or 3D printing technology, we still recommend that please read this guide, as there is lots of important information about the Guider for you to get a better 3D experience.
For a better and more successful printing experience, you can refer to the following materials:
(1) Quick Start Guide
Users will find the Quick Start Guide together with the printer accessories. The Quick Start Guide will help you start your print journey as soon as possible.
(2) Official FlashForge Website: http://www.FlashForge.com
The official FlashForge website contains the up-to-date information concerning FlashForge software, firmware, device maintenance and so on. Users are also able to get the contact information from there.
Guider User Guide | www.flashforge.com |
3 |
400-699-1063 |

Introduction
Notes
·Please read FlashForge Guider 3D Printer User Guide carefully before use. ·The User Guide is written based on Windows 7 OS.
·The version of the FlashPrint is latest.
The FlashForge Guider 3D Printer User Guide contains the information needed for you to set up and use this device.
This User Guide including the following parts: Preface, Introduction and After-sale service.
The Preface section includes resource acquisition channel, the overall framework of the manual, and the problems that should be paid attention to while printing.
The introduction section contains the overview of 3D printing technology, equipment introduction, unpacking and installation of equipment, software installation and use.
After-sale section contains the user how to get the support and help.
Guider User Guide | www.flashforge.com |
4 |
400-699-1063 |

Notice
Safety Notice
! Notices: Read all the instructions in the manual and familiarize yourself with the FlashForge Guider User Guide before setting-up and using. Failure to comply with the warning and instructions may result in individual injury, fire, equipment damage or property damage.
PLEASE STRICTLY FOLLOW ALL THE SAFETY WARNINGS AND NOTICE BELOW ALL THE TIME.
· Work Environment Safety
Keep your work place tidy.
Do not operate Guider in the presence of flammable liquids, gases or dust.
Keep Guider out of children and untrained people’ reach.
· Electrical Safety
Always use the Guider with a properly grounded outlet. Do not refit Guider plug.
Do not use Guider in damp or wet locations. Do not expose Guider to burning sun.
In case of device damage, please use the power supply provided by FlashForge.
Avoid using the device during an thunderstorm.
In case of uncertain accident, please unplug the device if you do not use it for long.
·Personal Safety
Do not touch the nozzle and build plate during printing.
Guider User Guide | www.flashforge.com |
5 |
400-699-1063 |

Do not touch the nozzle after finishing printing.
Dress properly. Do not wear loose clothing or jewelry. Keep your hair, clothing and gloves away from moving parts.
Do not operate the device while you are tired or under the influence of drugs, alcohol or medication.
· Cautions
Do not leave the device unattended for long.
Do not make any modifications to the device.
To lower the build plate before loading/unloading filament. (The distance between the nozzle and build plate should be kept for at least 50mm)
Operate the device in a well-ventilated environment.
Never use the device for illegal activities.
Never use the device to make any food storage vessels.
Never use the device to make any electrical appliance.
Never put the model into your mouth.
Do not remove the models with force.
Never connect the device with network cable longer than 3m.
· Environment Requirements
Temperature: RT 15-30
Moisture: 20%-70%
· Place Requirements
The device must be placed in a dry and ventilated environment. The distances of the left, right and back side space should be at least 20cm, and the distance of the front side space should be at least 35cm.
Guider User Guide | www.flashforge.com |
6 |
400-699-1063 |

· Filament Requirements
Do not abuse the filament. Please make sure you use the FlashForge filament or the filament from the brands accepted by FlashForge.
· Filament Storage
All polymers degrade with time. Do not unpack until filament is needed. Filament should be stored at clean and dry conditions.
Legal Notice
All the information in this document is subject to any amendment or change without the official authorization from FlashForge.
FLASHFORGE CORPORATION MAKES NO WARRANTY OF ANY KIND WITH REGARD TO THIS DOCUMENT, INCLUDING, BUT NOT LIMITED TO, THE IMPLIED WARRATIES OF MERCHANTABILITY AND FITNESS FOR A PARTICULAR PURPOSE.
FlashForge shall not be liable for errors contained herein for incidental consequential damages in connection with furnishing, performance or use of this material
FCC STATEMENT:
This device complies with Part 15 of the FCC Rules. Operation is subject to the following two conditions:
(1)This device may not cause harmful interference,
(2)This device must accept any interference received, including interference that may cause undesired operation.
Warning: Changes or modifications not expressly approved by the party responsible
Guider User Guide | www.flashforge.com |
7 |
400-699-1063 |

for compliance could void the user's authority to operate the equipment.
This equipment has been tested and found to comply with the limits for a Class B digital device, pursuant to Part 15 of the FCC Rules. These limits are designed to provide reasonable protection against harmful interference in a residential installation. This equipment generates uses and can radiate radio frequency energy and, if not installed and used in accordance with the instructions, may cause harmful interference to radio communications. However, there is no guarantee that interference will not occur in a particular installation. If this equipment does cause harmful interference to radio or television reception, which can be determined by turning the equipment off and on, the user is encouraged to try to correct the interference by one or more of the following measures:
Reorient or relocate the receiving antenna.
Increase the separation between the equipment and receiver.
Connect the equipment into an outlet on a circuit different from that to which the receiver is connected.
Consult the dealer or an experienced radio/TV technician for help.
This document contains proprietary information protected by copyright.
Copyright © 2017 FlashForge Corp. All Rights Reserved
Guider User Guide | www.flashforge.com |
8 |
400-699-1063 |

Chapter 1: 3D Printing Technology
3D printing refers to transforming three-dimensional models into physical objects that you can hold and touch. It is also called additive manufacturing because the 3D model is created by “adding” layers upon layers of material until the object is fully formed.
Fused Filament Fabrication (FFF) is the most common method of 3D printing. It is also the method that the Guider uses. It works by melting plastic material called filament onto a print surface in high temperature. The filament solidifies after it cools down, which happens instantaneously after it is extruded from the nozzle. 3D objects are formed with the filament laying down multiple layers.
1.1 Process
3D printing involves three steps:
1.) Make or download a 3D model
2.) Slice and export the 3D model
3.) Build the 3D model
1.1.1 Make a 3D Model:
Currently, there are three ways to creating a 3D model.
·Designing From Scratch You can use free CAD (computer-aided design) software such as 3DTADA, AutoCAD, SolidWorks, Pro-E, and our own software Happy 3D to design your own 3D model.
·3D Scanners An alternative method to creating a 3D model is to scan an object. 3D scanners work by digitizing a physical object, collecting its geometric data, and saving it to a file on your PC. There are also apps that can turn a mobile device into a 3D
Guider User Guide | www.flashforge.com |
9 |
400-699-1063 |

scanner.
·From the Cloud The most popular way of obtaining a 3D model is to download it from websites that allow users to upload 3D models that they designed.
E.g. : www. thingiverse.com
1.1.2 Slice and Export the 3D Model:
Slice software is the software that prepares 3D models for printing and turns them into instructions for the 3D printers. FlashPrint is the slicing software used for the FlashForge Guider .
Using FlashPrint, you can turn .stl files into .g or .gx files for printing. Then the files can be transferred to your Guider via USB cable, USB stick or Wi-Fi.
Guider support Simplify3D software, software not developed by FlashForge may need register or charge extra fee, please choose to use(or not) according to your needs.
1.1.3 Build the 3D Model:
Once the output file has been transferred to your Guider , it will start to turn the 3D model into a physical object by laying down layers of filament.
Guider User Guide | www.flashforge.com |
10 |
400-699-1063 |
Chapter 2: About Guider
2.1 About Your Guider
2.1.1 Views
Front |
Top |
Right Back
1. |
Touch screen |
6. Leveling knob |
11. Ethernet input |
||
2. |
Touch screen button |
7. Extruder |
12. |
USB cable input |
|
3. |
Nozzle |
8. X-axis guide rod |
13. USB stick input |
||
|
|
||||
4. |
Z-axis guide rod |
9. Filament intake |
14. |
Filament detector |
|
15. |
Power switch |
||||
5. |
Build plate |
10. Spring presser |
|||
|
|
||||
|
16. |
Power input |
|||
|
|
|
|||
Guider User Guide | www.flashforge.com |
11 |
400-699-1063 |

2.1.2 Terms
Build Plate |
The surface on which the Guider builds an object. |
|
|
|
|
Build Tape |
The blue tape that covers Guider ’s build plate so that |
|
the object can stick to the build plate well. |
||
|
||
|
|
|
|
The three dimensional amount of space that an object |
|
Build Volume |
will use once it is completed. The largest build volume |
|
|
of Guider is 280*250*300 mm. |
|
|
Knobs under the build platform that are used for |
|
Leveling Knobs |
adjusting the distance between the nozzle and build |
|
|
plate. |
|
|
The device that draws the filament from the spool, |
|
Extruder |
melts it and pushes it through a nozzle into the build |
|
|
plate. |
|
|
|
|
Nozzle |
Also called “print head”, which located at the bottom |
|
of the extruder where heated filament is squeezed out. |
||
|
||
|
|
|
Cooling Fan |
To cool the outer assembly of the extruder and gear |
|
motor. |
||
|
||
Filament Intake |
An opening located at the top of the extruder. |
|
|
|
|
Filament Guide Tube |
A black plastic piece that guides the filament from the |
|
filament box to the filament intake. |
||
|
||
Filament Cartridge |
A specific box for placing FlashForge filament. |
|
|
|
|
Solid Glue Stick |
A solid adhesive used for making the model stick to the |
|
build plate firmly. |
||
|
||
Unclogging Pin Tool |
A tool that used for cleaning and unclogging the |
|
extruder. |
||
|
||
Stamping Wrench |
A tool that used for seizing the nozzle’s metal cube. |
Guider User Guide | www.flashforge.com |
12 |
400-699-1063 |

2.1.3 Reference
Name |
Guider |
|
|
|
|
Number of Extruder |
1 |
|
|
|
|
Print Technology |
Fused Filament Fabrication(FFF) |
|
|
|
|
Screen Size |
5.0’’ color IPS Touch Screen |
|
|
|
|
Build Volume |
280*250*300mm |
|
|
|
|
Layer Resolution |
0.05 - 0.4mm |
|
|
|
|
Build Accuracy |
±0.2mm |
|
|
|
|
Positioning Accuracy |
Z axis 0.0025mm; XY axis 0.011mm |
|
|
|
|
Filament Diameter |
1.75mm ±0.07 |
|
|
|
|
Nozzle Diameter |
0.4mm |
|
|
|
|
Print Speed |
10~200 mm/s |
|
|
|
|
Software |
FlashPrint Support Simplify3D |
|
|
|
|
Support Formats |
Input:3MF/ STL/OBJ/FPP/BMP/PNG/JPG/JPEG |
|
Output:GX/G |
||
|
||
|
|
|
OS |
Win xp/Vista/7/8/10 Mac OS Linux |
|
|
|
|
Device Size |
490*550*560mm |
|
|
|
|
Net Weight |
30Kg |
|
|
|
|
AC Input |
Input: 100V-240VAC, 47-63Hz Power: 500W |
|
|
|
|
Connectivity |
USB cable, USB stick, WiFi, Ethernet, Polar Cloud |
|
|
|
Guider User Guide | www.flashforge.com |
13 |
400-699-1063 |
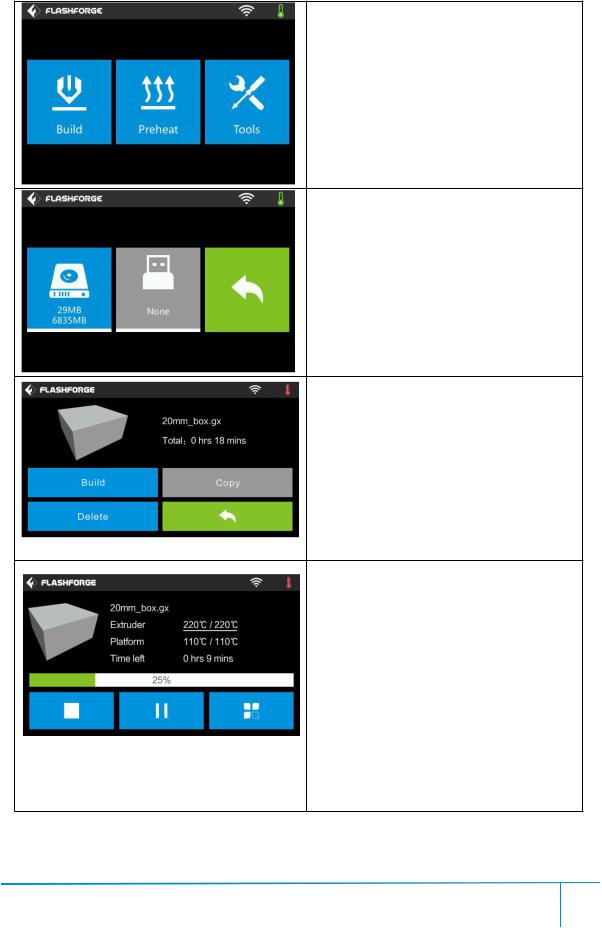
2.1.4 Interface Menus
Build
Read the print file from The local memory card The USB stick
Back
Select the target print file among the list Build: To begin printing.
Copy: To copy the files to the local memory card from the USB stick.(The button is not available while printing from local memory card )
Delete: To delete the print file. Back
Print interface
Abort: To abort the print job.
Pause/Resume: To suspend or resume the print job.
Tools:To check status or modify settings during printing: build time, Z axis, filament used, printing speed, light status, change filament.
Extruder temperature: Can be changed during printing.
Guider User Guide | www.flashforge.com |
14 |
400-699-1063 |

To set extruder temperature during printing: After extruder temperature has reached target temperature, temperature figure will be underlined in print interface,
Tap [Yes] to save the setting while tap [No] to cancel the setting.
Tools in print interface
Printing speed: To change printing speed during printing by tapping the underlined speed figure.
Light bulb: To turn on/off the light.
Filament: To change filament during printing. (Note: You need to suspend the printing operation first)
Cancel: To end the tool orders and return to the print interface.
To set the printing speed during printing Tap [Yes] to save the setting while tap [No] to cancel the setting.
Preheat
Guider User Guide | www.flashforge.com |
15 |
400-699-1063 |

Tap the [Preheat] button to enter the preheat interface. Tap the [Start] button to heat up to the setting temperature.
The default temperature is 220 .
Tap the temperature display bar to set the temperature.
To set the preheat temperature.
Tap [Yes] to save the setting while tap [No] to cancel the setting.
The picture displays the preheat interface. It shows the actual temperature and the target temperature. Tap the [Abort] button to abort the preheat job.
Tools
Tap [Tools] to enter tool options.
Filament: To load/unload the filament.
Level: To adjust the build plate.
Home: To make the X, Y and Z axes back to the zero point.
Manual: To manually adjust the positions of X, Y and Z axes.
Setting: To implement relevant function setups.
Status: The check the real-time status of the printer.
About: Information about the printer.
Back
Guider User Guide | www.flashforge.com |
16 |
400-699-1063 |

Manual adjustment
Y+: The extruder moves to the zero point, that is, the back of the machine
Y-: The extruder moves to the direction opposite to the Y+.
X+: The extruder moves to the zero points, that is, to the right direction
X-: The extruder moves to the direction opposite to the X+.
Z+: The build plate elevates.
Z-: The build plate descends.
Back
Tap [Setting] to enter the setting interface
Language: To set the display language
Resume Print: Resume print after restarting Guider II
WiFi: To turn on/off the WiFi
WLan hotspot: To turn on/off the WLan hotspot.
Polar Cloud Connection: To turn on/off the Polar Cloud Connection.
Extruder Calibration: To adjust the initial distance between the extruder and the build plate.
Startup Sound: To turn on/off the Startup Sound.
Filament Check: To turn on/off the filament check
Light Bar Control: To turn on/off the light bar control.
Factory Reset: Return to factory setting Update: To update the firmware version. Back
Guider User Guide | www.flashforge.com |
17 |
400-699-1063 |

Turn on [Resume Print]
Left picture showed is the [Resume Print] turned on status. If the printer is turned off when current print job has not finished yet, printer will continue and resume previous printing job after restarted.
(Note: If [Resume Print] is turned off, this function will not apply. )
WiFi:
Turn on WiFi: Turn on the WiFi, release the WiFi hotspot and set the WiFi on
computer Back
WLan hotspot
OFF/On: To turn on/off the Wlan hotspot. Setup Wlan hotspot: To set the SSID and password.
SSID: The name of hotspot. Password: The password of hotspot. Save: To save the setting.
Back
Guider User Guide | www.flashforge.com |
18 |
400-699-1063 |

Polar Cloud Connection:
Cloud Connection: To turn on/off the polar cloud connection.
Setup Cloud Connection: To set cloud connection ID and PIN which have already been registered on:
https://pc2.polar3d.com/login
ID: The name of Cloud Connection.
PIN: The password of Cloud Connection. Save: To save the setting.
Back
(Note: You need to connect the printer to internet with WiFi or Ethernet Cable first)
Extruder Calibration:
(not recommended for customers to operate) To adjust the initial distance between the extruder and the build plate by tapping [-]and[+]. The proper distance may be one ordinary paper’s thickness.
Turn on [Filament Check]:
Left picture showed is the [Filament Check] turned on status.
Filament abnormal status will be detected when filament is used up or suspended. [Filament Check] function should be used with filament in the filament cartridge.This function is invalid if using filament out of the cartridge.
Guider User Guide | www.flashforge.com |
19 |
400-699-1063 |

Turn off [Filament Check]:
Left picture showed is the [Filament Check] turned off status.
Filament abnormal status won’t be detected when filament is used up or suspended.
Turn on/off [Startup Sound]:
Tap to turn on/off the sound when restart the printer.
Status:
It displays the real-time status of the extruder temperature and other details.
About:
It displays the basic information about the device.
Guider User Guide | www.flashforge.com |
20 |
400-699-1063 |
Loading...