


————————————————————————————————————————————
1
Start Up and Instruction Guide
Seller information
Seller Name: FlashForge 3D Printer
Amazon Storefront: www.amazon.com/shops/A8RK4QCP0IFCY
Support Contact: Mr. Tang
E-mail: 597891915@QQ.com

————————————————————————————————————————————
1
FlashForge Finder Start-up Guide
Content
Unpacking Your Finder........................................................................................................................ 2
Hardware Assembly
Place spool into cartridge............................................................................................................4
Filament Loading and Unloading
Loading Filament.................................................................................................................4
Unloading the filament
Leveling the Build Plate...............................................................................................................5
Software Configuration
FlashPrint Installation..................................................................................................................7
Exploring FlashPrint
Printing.............................................................................................................................................. 16
Testing with USB Stick Sample
Printing over USB...................................................................................................................... 17
USB connection
............................................................................................................................ 4
................................................................................................ 4
....................................................................................................... 5
....................................................................................................................... 7
.....................................................................................................................7
.................................................................................................. 16
................................................................................................................. 17
Create a Gcode..................................................................................................................17
Print over USB
Printing over Wifi...................................................................................................................... 20
Wifi Configuration
WIFI Connection between FlashPrint and Finder.............................................................23
Firmware Update
................................................................................................................... 20
.............................................................................................................20
...............................................................................................................................23
————————————————————————————————————————————
2
7
7
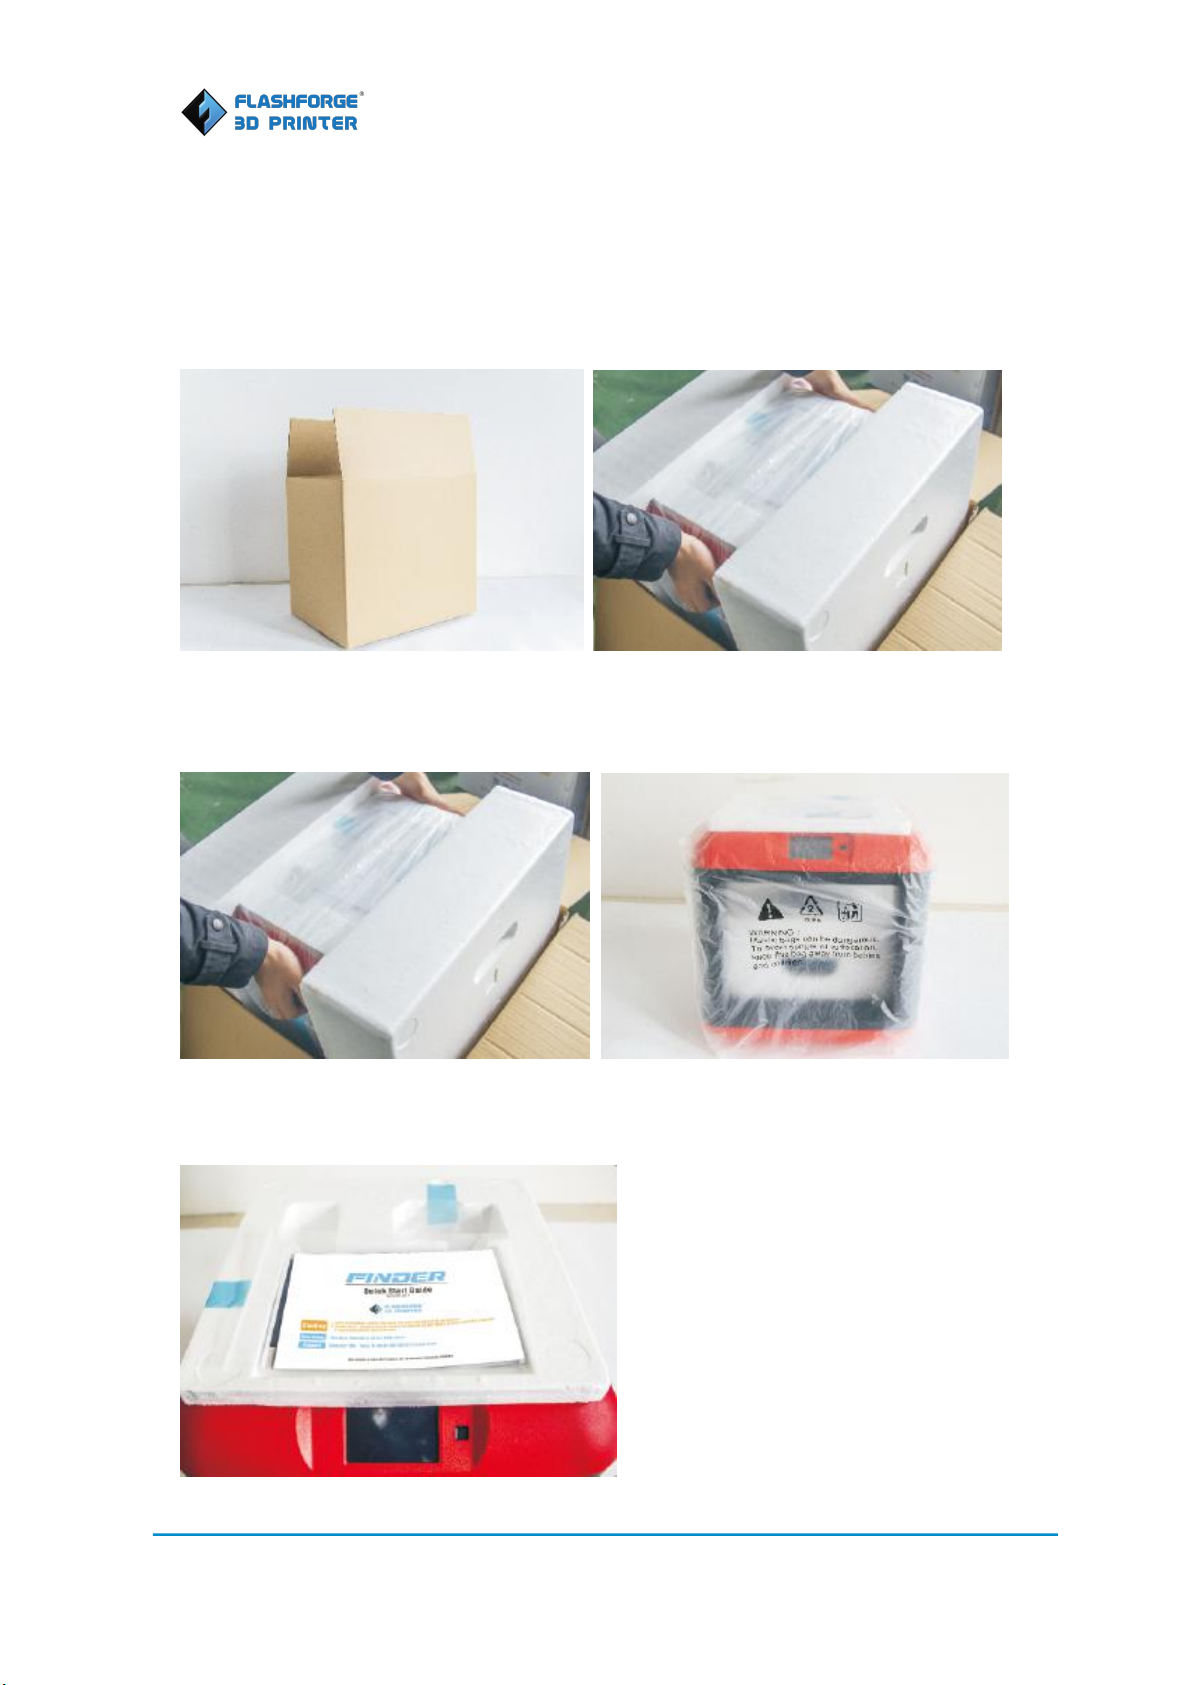
Unpacking Your Finder
1. Place the packaging box on a clean work surface. Open the box, grasp the two handles and
then lift your Finder out of the box.
2. Removing the protective foam sheets at two sides, you will see the Finder in a transparent
nylon bag. Then remove the bag to unveil the Finder.
3. On the top foam sheet, you can see the Quick Start Guide, 4GB USB stick, three Allen wrenches
(M1.5, 2 and 2.5) and one screwdriver.
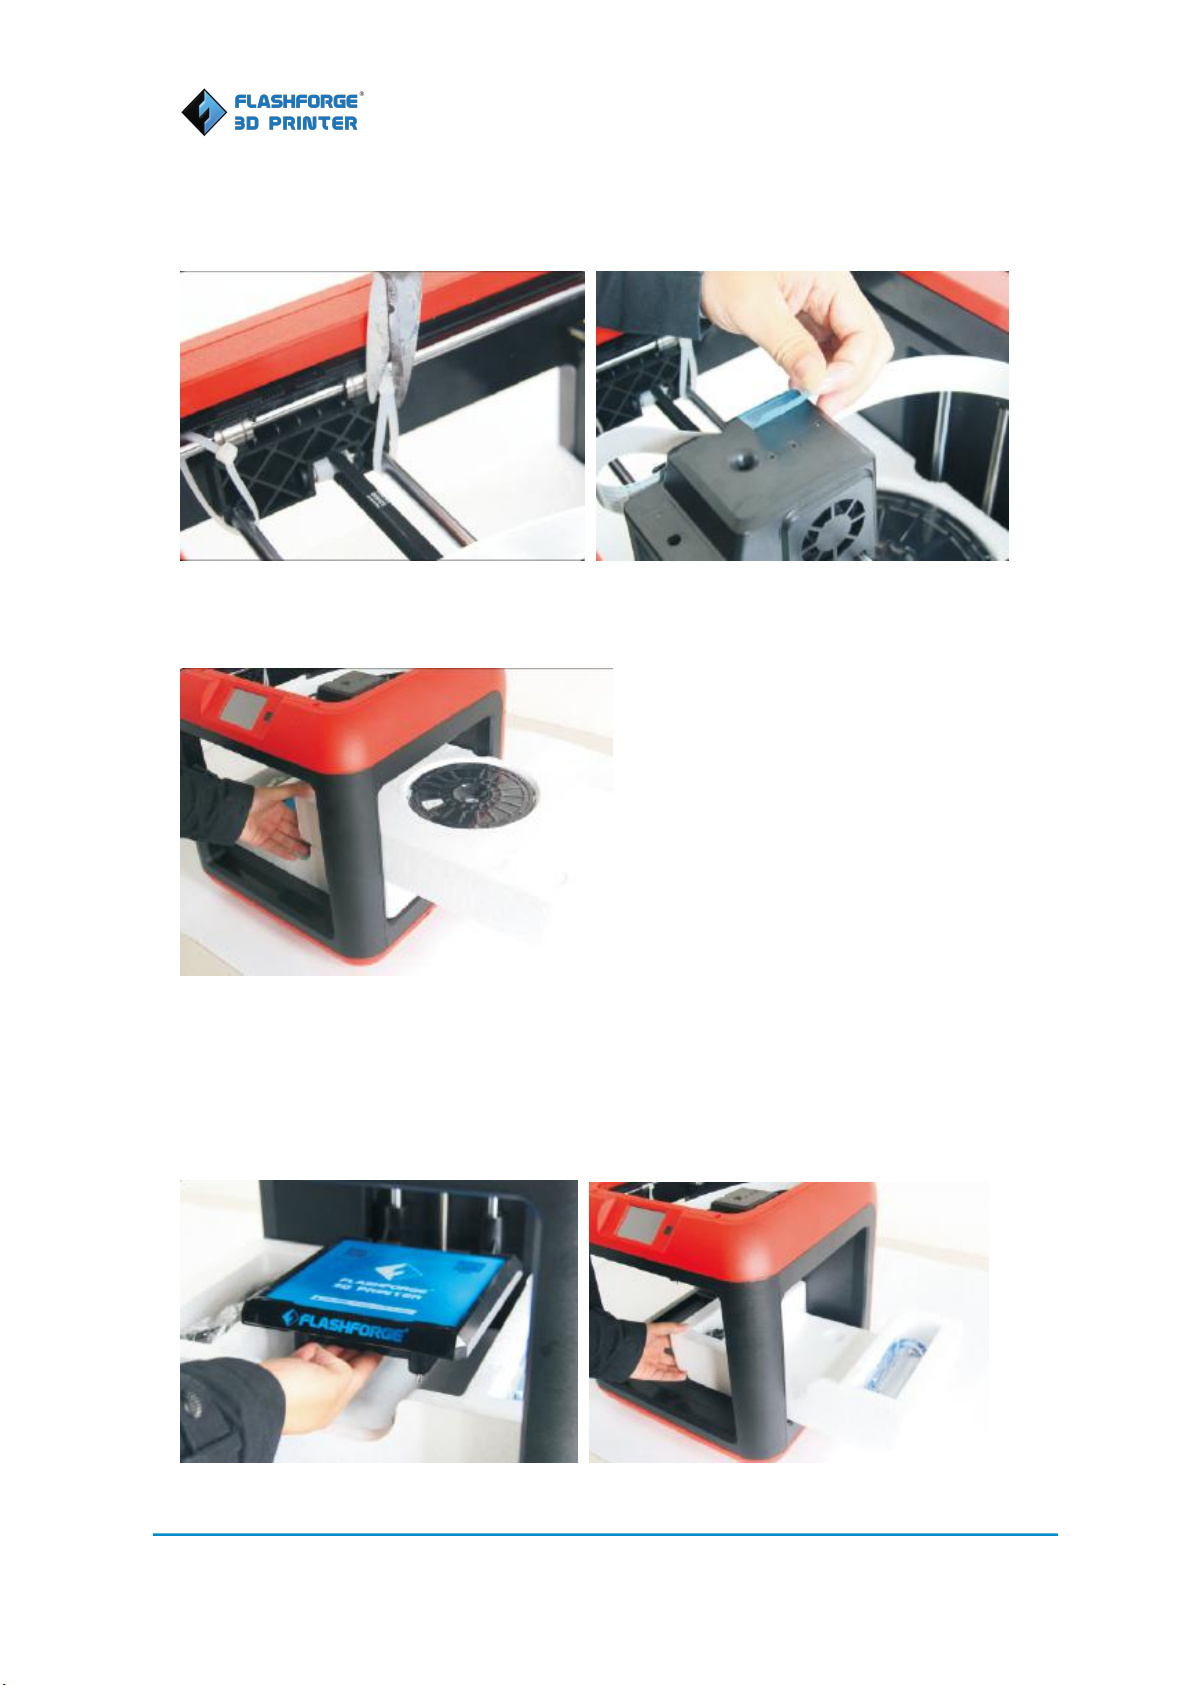
4. Removing the top foam sheet, you will see the extruder and X-axis guide rods which are held
————————————————————————————————————————————
3
with buckles. Use scissors to cut them off to release the X guide rods. Discard the blue tape that
holds the flat cable in place.
5. Taking the protective foam for filament out of the Finder, you will see a spool of PLA filament
inside. Filament color is randomly selected.
6. Then you will see the build plate. The build plate pasted with a blue build plate tape is ready
for direct use. In the grooves at both sides, you will see a filament guide tube, a power cable and
a USB cable. Move the build plate up. Remove the protective foam and take the power cable and
USB cable out.
You have now unpacked your Finder successfully.
————————————————————————————————————————————
4
Hardware Assembly
Your Finder has been almost assembled before leaving factory; you can start up the Finder for
printing after mounting the filament spool and completing leveling.
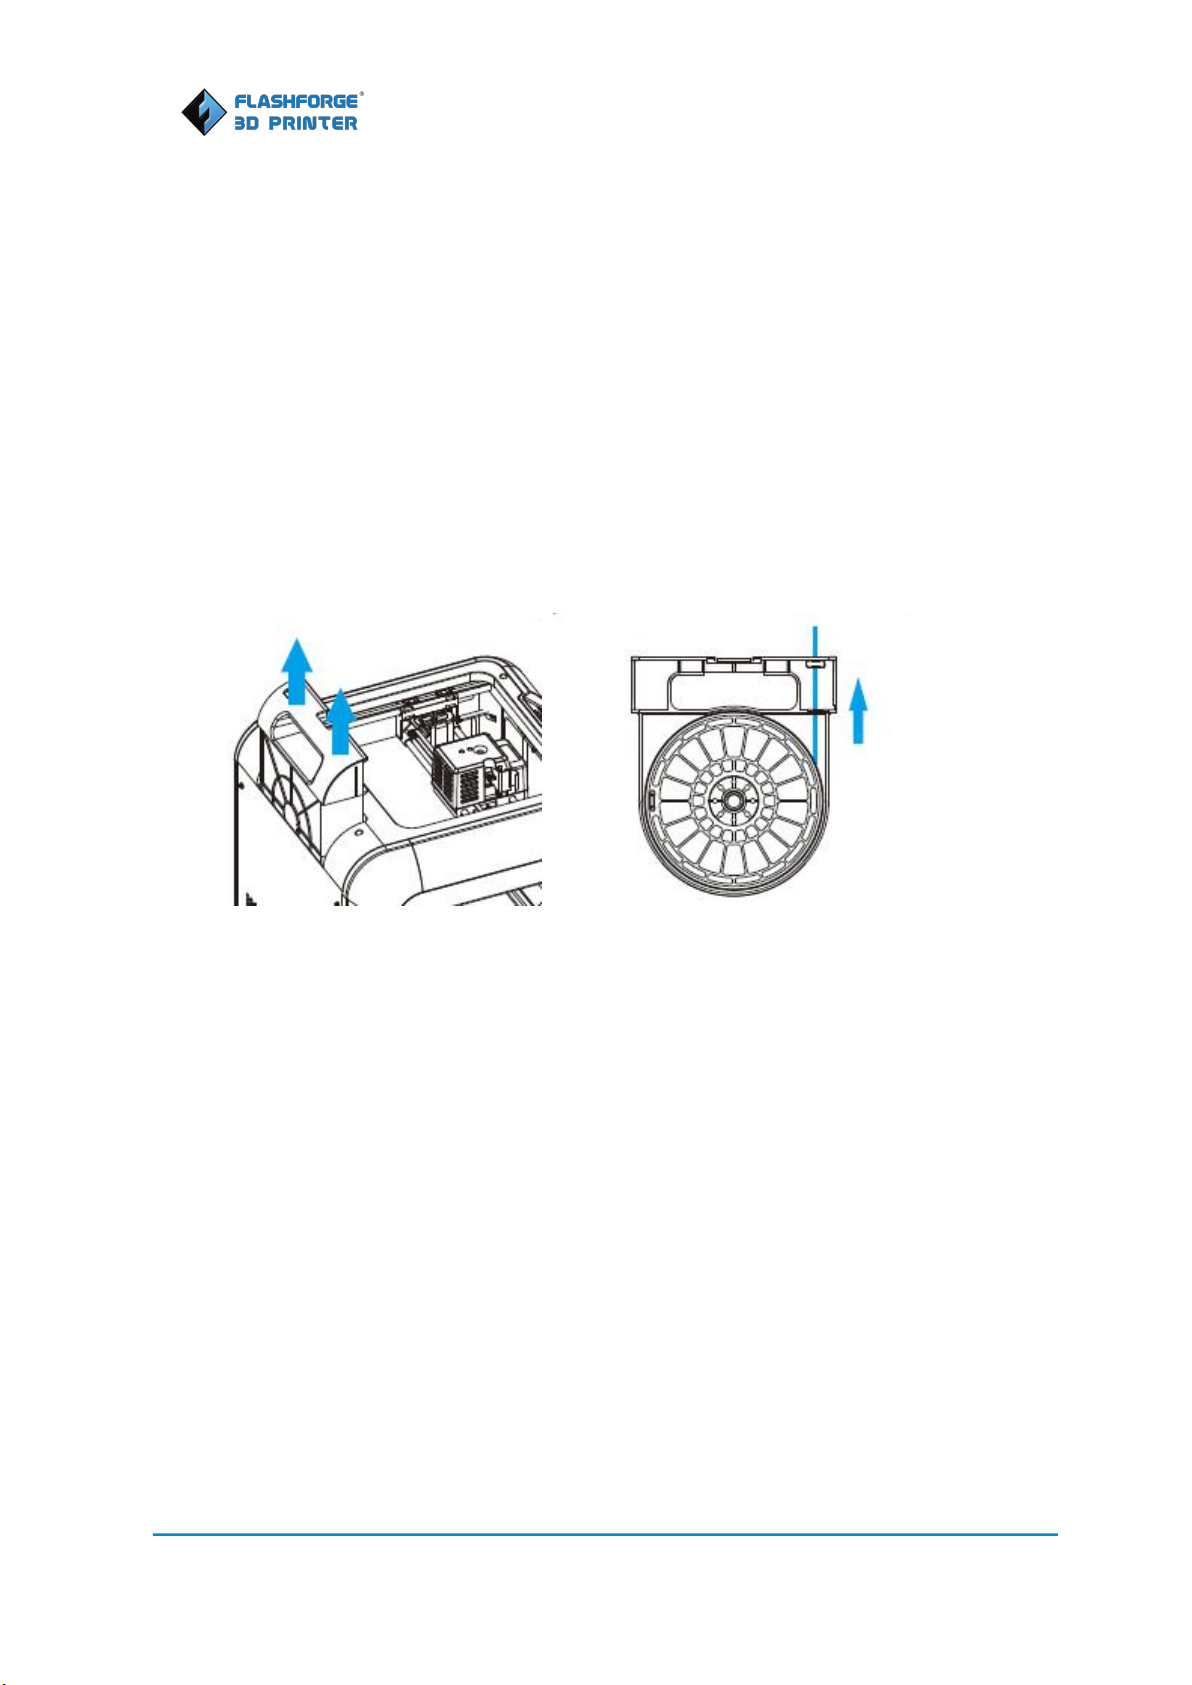
Place Spool into Cartridge
Remove the filament cartridge in the rear of Finder, where you place the filament spool. Thread
the filament through the filament guide tube. Note: You should ensure the filament spool rolls
anticlockwise.
Filament Loading and Unloading
Connecting Power Cable
Insert the power supply into the power input on the back of the Finder and plug the power cord
into an electrical outlet.
Loading Filament
Turn on your Finder by clicking power button at the right side of the touch screen.
Then tap [Tools]--[Filament]--[Load]. Extruder is heating up. After the extruder reaches 220℃,
the printer will sound a beep to prompt you to load the filament into the extruder. Press the
spring presser down and insert the filament into the extruder at an upright angle. Within a few
seconds, you should see an even string of plastic coming out from the extruder nozzle.
Note: Your Finder will sound a warning when the filament is running out; you should feed your
Finder in time.

————————————————————————————————————————————
5
Unloading the filament
1. Tap [Tools]--[Filament]--[Unload]. After the extruder reaches 220℃, the printer will sound a
beep to prompt you to unload the filament from the extruder. Keep pressing the spring presser
down, push filament in a little first until you see melted plastic coming out from nozzle end, then
gently pull the filament out.
Note: Do not pull out the filament with force as it will damage the gears. If the melted filament
has cooled down in the extruder, please repeat the steps above.
Leveling the Build Plate
1. Tap [Tools] - [Level] on your Finder touch screen. Please wait while the extruder and platform
finish initial movements. Screw three nuts under the platform anticlockwise until you can’t
tighten them any more, then tap [OK] button. On the next pop-up dialog, tap [Yes] if you can’t
finger tighten all the nuts any more, or tap [No] to continue tightening.
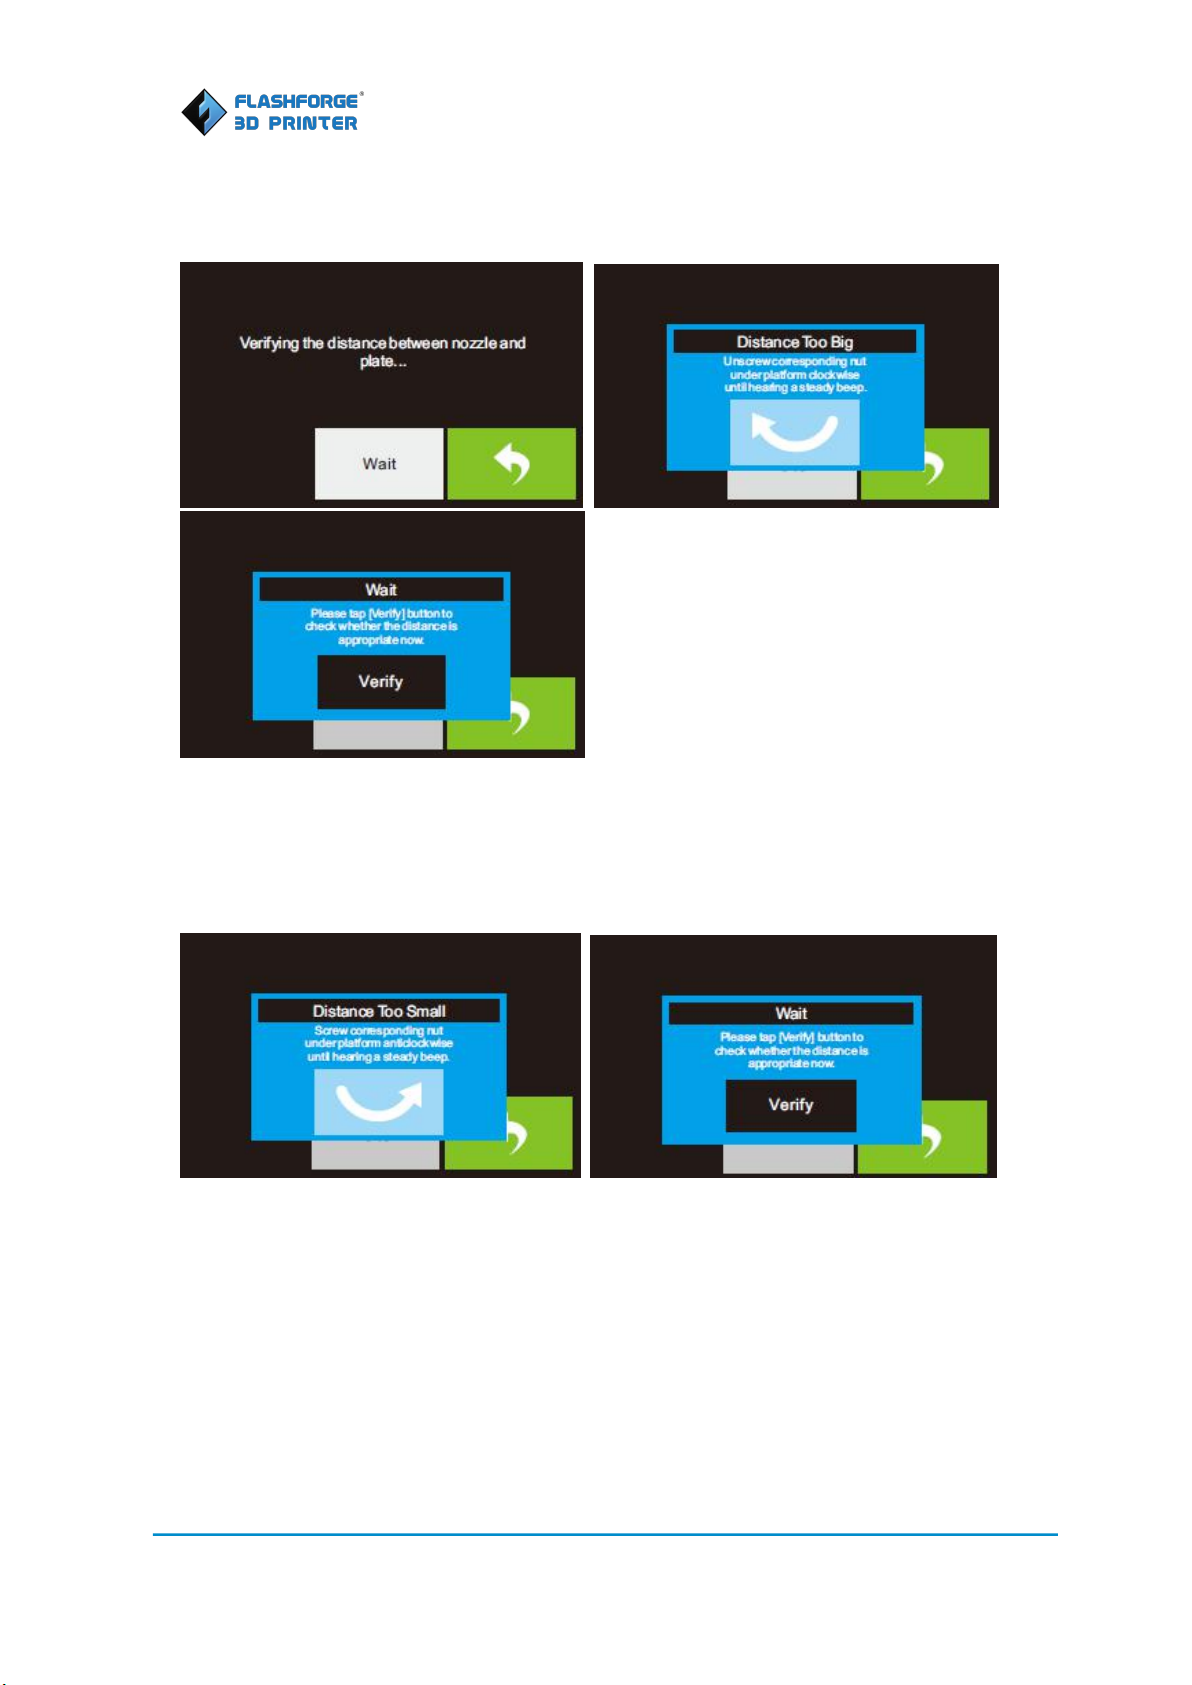
2. After tapping [Yes] button, the extruder starts to move towards the first point and the plate
moves up and down to verify the distance between nozzle and plate. If distance too big, please
————————————————————————————————————————————
6
unscrew the corresponding nut under the platform clockwise until hearing a steady beep and the
[Verify] button appears.
3. Tap [Verify] to check whether the distance is appropriate now. If distance too small, please
screw corresponding nut under platform anticlockwise until hearing a steady beep and the
[Verify] button appears again. Tap [Verify] to check whether the distance is appropriate this time.
4. If the distance is appropriate till now, Tap [OK] to second point leveling. If still not, please
follow the prompts to adjust again till you see [OK] button.

————————————————————————————————————————————
7
5. Repeat steps 2 through 4 above to complete second and third points leveling and then Tap
[Finish] to exit.
Software Configuration
FlashPrint Installation
Where to get FlashPrint installer
Method 1: To get the installation package from the provided USB stick come with the Finder.
Method 2: Contact Mr. Tang at 597891915@qq.com for download link of latest FlashPrint.
1. Decompress the zip and complete installation according to the prompted instructions step by
step.
2. Start the software with the start menu shortcut or by double clicking the software icon.
Exploring FlashPrint
Selecting the machine type
After starting Flashprint, you need to select the target machine type first.
When you start Flashprint, a dialog box will pop up. Just need to select FlashForge Finder in the
machine type list and click [OK]. You can also change the machine type via clicking
[Print]--[Machine type]. Please see graphic below:

————————————————————————————————————————————
8
Load: Load one or multiple files.
Supports: Enter the support edit mode
View: View FlashPrint home screen from one of six viewing angles.
Move: Move model around on xy-plane; shift+click to move along z axis
Rotate: Turn and rotate your model
Scale: Scale the size of your object
Cut: Cut the model into pieces
Print: Print it directly with your Finder or export to your SD card.
Load
You can load a model file or Gcode file into your FlashPrint by the following six methods:
Method 1: Click the Load icon on the main interface. Then select the object file.
Method 2: Select the file for loading and drag the file to the main interface of the software.
Method 3: Click [File]--[Load File]. Then select the object file for loading.

————————————————————————————————————————————
9
Method 4: Click [File] --[Examples] to load the example files
Method 5: Click [File] --[Recent Files] to load the files opened recently.
Method 6: Select and drag the target file to the icon of FlashPrint.
Files with extension .STL, .OBJ, and .FPP, are supported by FlashPrint for editing.
View
Set View
Allows users to view the object on the build plate. Six views are under the view menu, that is,
home view, bottom view, top view, front view, back view, left view and right view.
Method 1: Click the [View] menu, there are six views in the drop- down list
Method 2: Click the [View] icon on the left, click it again and a submenu will appear with six
views for selecting.
Reset View
Allow users to reset views by the following two methods:
Method 1: Click the [View] menu and select [Home View]
Method 2: Click the [View] icon on the left, click it again and you will see the viewing options, you
can click [Reset].
Show Model Outline
Click [View] menu--[Show Model Outline], it will highlight the yellow border of the object
Show Steep Overhang
Click [View] menu--[Show Steep Overhang]. When the intersection angle between the model
surface and horizontal line is within the overhang threshold value, the surface has steep
overhang and it becomes red in the software. Overhang threshold value could be set as needed.
The default value is 45 degree.

————————————————————————————————————————————
10
Move
Select the object and move the object by the following two methods:
Method 1: Click the [Move] button on the left, hold down the left mouse button and drag to
adjust the location of the model in XY direction. Hold down the Shift key, hold down the left
mouse button and drag to adjust the location of the model in Z direction. The distance and the
direction of the movement shall be displayed.
Method 2: Click the [Move] button on the left and then enter the distance value. Click [Reset] to
reset distance values.
Note: Users shall click [Center] and [On Platform] after the location adjustment to ensure the
model(s) be within the build area and on the build platform. If a specified position is needed,
only to click [On Platform].
Rotate
Select the target object and rotate the object by the following two methods:
Method 1: Click the [Rotate] button on the left and three mutually perpendicular rings appear
around the object Click one ring and rotate on the present axis, you will see the rotation angle
and direction in the center of circle. In this way, you could make the model rotate on X/Y/Z axis.
Method 2: Click the [Rotate] button on the left, and then enter into rotating angel values in X/Y/Z
axes positioning. Click [Reset] to reset rotating angel values.
Scale
Select the target object and scale the object by the following two methods:
Method 1: Click the [Scale] button on the left, hold down the left mouse button and scale the
model. The corresponding values will display near the object..
Method 2: Click the [Scale] button on the left and then enter into scale values in X/Y/Z axes
positioning. Click the [Maximum] button to get largest size possible for building. Click [Reset] to
reset the size of model.
Note: If the [Uniform Scaling] radio button is clicked, it will scale the model in equal proportion

————————————————————————————————————————————
11
when changing value in any positioning of the model. Otherwise it will only change the value of
the corresponding positioning.
Edit
Undo
Allows users to undo the recent edits by the following two methods:
Method 1: Click [Edit]--[Undo].
Method 2: Press the shortcut Ctrl+Z.
Redo
Allows users to redo the most recent edit you have undone to your model file by the following
two methods:
Method 1: Click [Edit]--[Redo]
Method 2: Press the shortcut Ctrl+Y.
Select All
By the following two methods, you could select all models in the scene. (When models are too
small to be seen or out of viewing scope, please click [Center] and [Scale] buttons to adjust the
model.)
Method 1: Click [Edit]--[Select All].
Method 2: Press the shortcut Ctrl+A.
Duplicate
Select the object and duplicate the object through the following two methods:
Method 1: Click [Edit]--[Duplicate]
Method 2: Press the shortcut Ctrl+D
Delete
Select the object and delete the object through the following two methods:

————————————————————————————————————————————
12
Method 1: Click [Edit]--[Delete]
Method 2: Press the shortcut Delete
Auto Layout All
Click [Edit]--[Auto Layout All] after loading one or more than one models, all models will be
placed automatically as automatic placement rule.
Surface to Platform
After selecting the model, you can make the model surface to platform via the following
operation.
Click [Edit]--[Surface to Platform] into surface to platform mode
Select one surface of model, double left-click the surface, then the model will be placed
automatically with the selected surface to platform.
Supports
After loading the model, click [Edit]--[Supports] or click the Supports icon ( ) directly, then you
will enter the support edit mode (as shown in the picture below). Click [Back] to exit when you
finish editing.
Auto Supports
Click the [Auto Supports] button, the software will judge the position where supports are needed
and generate corresponding treelike or linear supports. If the model already had support, the
existing supports will be deleted and new supports will be generated.
Clear Supports
Click [Clear Supports], all supports will be deleted. The operation can be repealed via clicking
[Undo] or pressing the shortcut key Ctrl+Z.

————————————————————————————————————————————
13
Add Support
Supports will be added once clicking the [Add] button. Move the cursor to the position where
needs supports, left-click to choose the starting point of supports, hold down the left mouse
button and drag the mouse the supports preview will show up(if support surface doesn’t need
support or the support column angle is too large, will highlight the support review ).Loosen the
left mouse button, if support column doesn’t meet with model, then support will be generated
on origin and terminal point(the highlighted preview support won’t generate support structure )
Delete Supports
Supports will be deleted once clicking the [Delete] button. Move the cursor to the supports
needed deleting, current supports and its child node support will be highlighted, click the left
mouse button to delete these highlighted support.
Supports
Click the Supports icon on the main interface, an option box will appear, supports options include
“treelike”and “linear”, when choose “treelike”, click [OK], then the support generated will be
treelike structure; when choose “linear”, click [OK], then the support generated will be linear
structure; if the model already had support, when you choose one of the supports options,
software will judge whether existing supports need to be deleted or not depend on the type of
existing support, and will pop up the corresponding prompt to let you make the choice.
New Project
Click [File]--[New Project] can build a blank project. If there is an unsaved modification on
previous project, then will inform you whether the modification needs to be saved or not. Click
[Yes] will save the modification, click [No] will abandon it. If click [Cancel] or close tool tip, then
will cancel the new project.

————————————————————————————————————————————
14
Save
After finishing the model edit and adjustment, there are two ways below to save all models in the
scene.
Method 1:
Click [File]--[Save Project] in the menu bar, can save the file as a project file which suffix is ”.fpp”
in this type of file, all models in the scene (include support) are independent .after reloading the
files, extruder configuration information and model position will be as same as the configuration
during saving.
Method 2:
Click on [File]--[Save as...] to save the model as project file .fpp or .stl and .obj. For .stl and .boj,
models are integrated as one (include support part). If load it again, only the position of the
model was saved, not included the printing parameters.
Print
Pattern
Step 1: Click [Print]--[Print] or click the Print icon on main interface, dialog of slicing parameters
will show up.
Step2: After the setting of slicing parameters, click [OK] and a dialog for saving Gcode will pop up.
Step3: Choose a save path and click the [Save] button, slicing will begin and a progress bar will
appear. If you want to stop, click the [Abort] button to stop slicing.
Slicing Parameters
Preview: Choose to enter preview interface or not
Print when slice done: Print or not when slice done
Material type: Choose according to the type of model
Supports: When print with model contains part hanging in the air or top-heavy, support is
necessary. Click [supports] to create support part for the printing.

————————————————————————————————————————————
15
Raft: This function will help the model to stick well on the platform.
Wall: During dual color printing, this function will help to clear the leaking filament of another
extruder.
Vase Mode: No capping for the model
You have three resolution solution (with default setting) to choose from, high resolution is
corresponding with slow printing speed, opposite for the low resolution. For PLA printing, an
extra solution “Hyper” is available.
Click [More options] to set for layer, shell, infill, speed, temperature.
Different resolution solution is corresponding to different defaults, click [Restore Defaults] to
back to default setting.
Layer
a. Layer Height: Layer thickness of the printing model. With a small number, the surface of the
model will be smoother.
b. First Layer Height: This is the first layer of the model, which will affect the sticking performance
between the model and platform. Maximize is 0.4mm, usually the default is OK.
c. Shell: Contains of the outside shell number, capping layer number (under vase pattern, top
solid layer setting is invalid.)
Primeter Shells: Maximize is 10
Top Solid Layer: Maximize is 10, minimum is 1.
Bottom Solid Layer: Maximize is 10, minimum is 1.
Infill
a. Fill Density means fill rate.
b. Fill Pattern is the pattern of filling shape which effects printing duration.
Speed
Print Speed is the moving speed of the extruder. Generally, the lower speed, the better print you
will get. For PLA printing, 80 is recommended.
b. Support Print Speed is needed to set when choosing Slic3r as the slice engine which can

————————————————————————————————————————————
16
control the moving speed of the extruder when printing the supports.
c. Travel Speed is to control the moving speed of the extruder under non-printing Status during
work. for PLA printing, 100 is recommended.
Note: Modify parameters settings to get better prints as different models need different
parameters.
Temperature
Extruder Temperature: Recommended extruder temperature is 220℃.
Note: Different temperatures have subtle influences in prints. Please adjust the temperature
according to the condition in order to get a good print.
Printing
Testing with USB Stick Sample
Make sure filament has been loaded properly and the platform is well leveled before you test the
sample. Insert the USB stick into the printer, plug in the power cord, turn on the printer, select
menu “Build--USB (the middle icon)—20mm_Box”. Click “Build” button on the popped up new
interface.
Extruder starts to heat up, while platform and extruder are moving to their start position. After
extruder reaches 220C, it starts to print.

————————————————————————————————————————————
17
Printing over USB
USB connection
Connect your Finder with your PC or laptop via USB cable.
Turn on your Finder and start FlashPrint.
Click [Print]--[Connect Machine], then select USB in the [Connection Mode] option and select
“FlashForge Finder” in [Select Machine] option. Finally click [Connect] button to connect to the
printer. Note: The machine icon on the bottom right displays the connection status.
means Connected and means Disconnected
Create a Gcode
The steps of how to generate a Gcode file:
1. Double-click the icon of FlashPrint to start the software.
2. Click [Print]--[Machine Type] to select FlashForge Finder

————————————————————————————————————————————
18
3. Click the Load icon to load a .stl model file and the object will display on the build area.
4. Click on the object to select it, double-click the Move icon on the left and the click [On the
Platform] and [Center]
5. Click the Supports icon on the top, and click [Auto Supports], your FlashPrint will automatically
generate supports for the object if requires. Green treelike parts in below picture are the
supports.

————————————————————————————————————————————
19
6. Click [OK] to preview the model with supports.
7. Click the Back icon, a dialog box will pop up. Click [Yes] to save the file as .fpp file. It is
suggested that you click [No] to exit. If you click [Yes] to save the model as .fpp, supports will be
loaded together with the model when you reload it next time.
8. Click the Print icon and a dialog box will pop up. Set all the settings for your print job.
9. Click [OK] to select the path to save the Gcode file after you done with settings. You can
rename the file as you like and save it as a .g or .gx file, click [Save] to generate a Gcode file.
Note: .gx files are available for preview while the .g files are not. Left are .g files and right are .gx

————————————————————————————————————————————
20
Print over USB
1. Connect Finder with computer via an USB 2.0 cable.
2. Turn on the Finder. Make sure that the build plate has been leveled and filament has been
loaded properly.
3. Click [Print], click [Connect Machine], a dialog box will pop up. Select [USB] in Connection
Mode and select [FlashForge Finder 3D Printer]. Click [Connect] to get your Finder to be
connected. When Finder is connected to FlashPrint successfully. The status box on the bottom
right displays the real-time nozzle temperature.
4. Load the Gcode you created in previous section “Creator A Gcode”, click [Print] at upper right
corner to send gcode to Finder. After done with gcode sending, Finder starts to print.
Printing over Wifi
Wifi Configuration

————————————————————————————————————————————
21
1. Turn on Finder. Tap [Tools]--[Setting]--[WIFI]--[WIFI ON] to turn on the WIFI.
2. “Finder” continuous signal will be found available on the network list.
3. Click Finder’s wireless network to connect. Once Finder is connected with your PC. Open your
Internet browser, enter“10.10.100.254”. Type the user-name and password to login. The default
user-name and password are both “admin.” The configuration page will appear after a successful
login.

————————————————————————————————————————————
22
4. Click [WIFI Set], user can select AP or STA mode. When WIFI configuration is set up under STA
mode, your PC can connect to Internet and Finder at the same time. But if it is set up under AP
mode, your PC can not access to Internet when it is connected to Finder via WIFI. So we suggest
users setting your wi-fi configuration under STA mode.
STA Mode
Under STA mode, your PC and Finder shall share the signal from the same router. Under STA
Mode, you need to set up the SSID (display name of your own wireless network), Password
(Password of your own wireless network). Click [Save] and [Reboot] successively. Then you need
to reboot your Finder and turn on the WIFI again.
5. If Wifi is turn on successfully after reboot Finder, the touch screen on Wifi setting will be
displayed like this.

————————————————————————————————————————————
23
WIFI Connection between FlashPrint and Finder
After completing Wifi Configuration:
1. On the Finder select [Tools]--[Setting]--[WIFI]--[WIFI ON]
2. In FlashPrint, select [Print]--[Connect Machine] from the menu
3. Select WIFI as the connection mode
4. In FlashPrint, type the IP address shown on the printer touch screen with port number: 8899
5. Click Connect in FlashPrint to complete the connection
Firmware Update
You must be connected to the printer via USB to update the firmware. Please follow “USB
Connection” instructions before continuing.

————————————————————————————————————————————
24
1. Open FlashPrint
2. Select the [Tools]-- [Upgrade Firmware] from the menu
3. Click [Yes] to disconnect if your Finder is connected to FlashPrint
4. Select machine type [FlashForge Finder] and the latest firmware in the popup window
4. Click OK to complete the update
 Loading...