

Page 1
SZ10-ZN/EN-A05
中文P19
You can visit Flashforge official website www.flashforge.com
to download the latest Slicing Software FlashPrint.
Page 2

Page 3
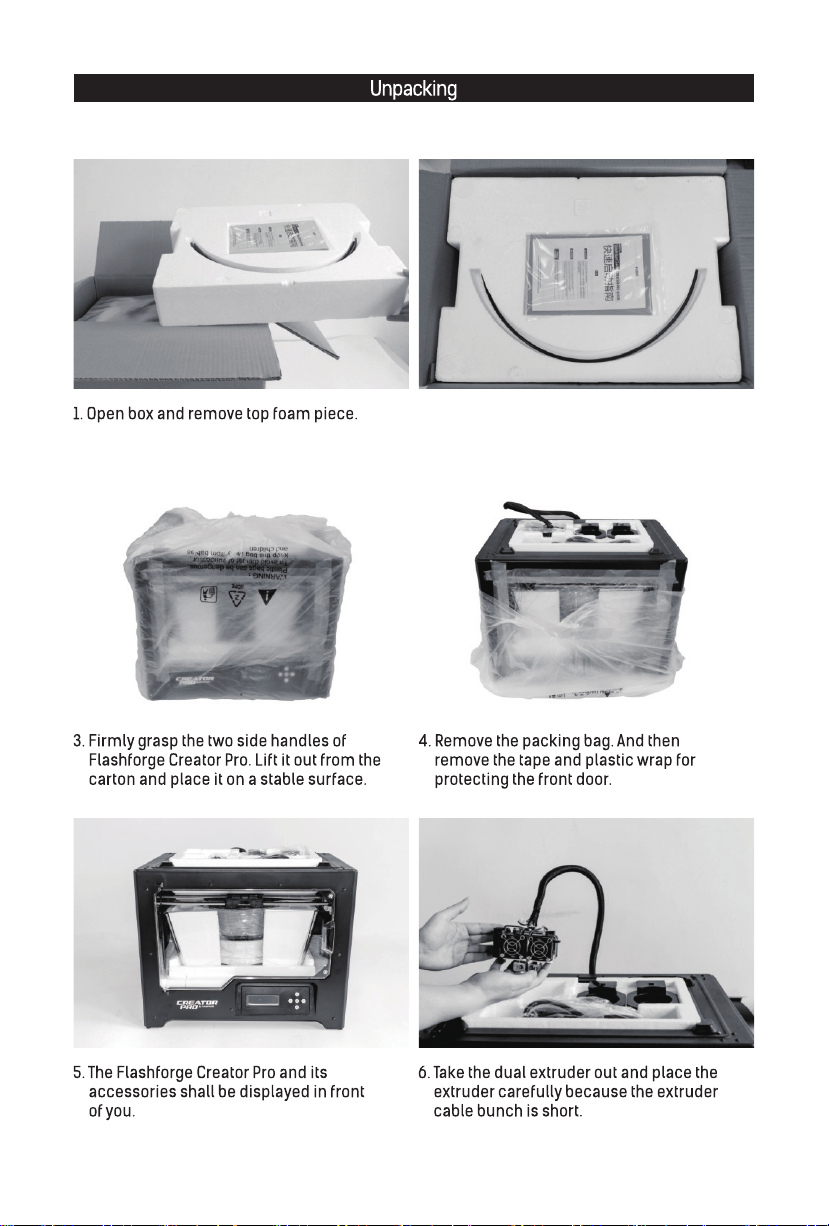
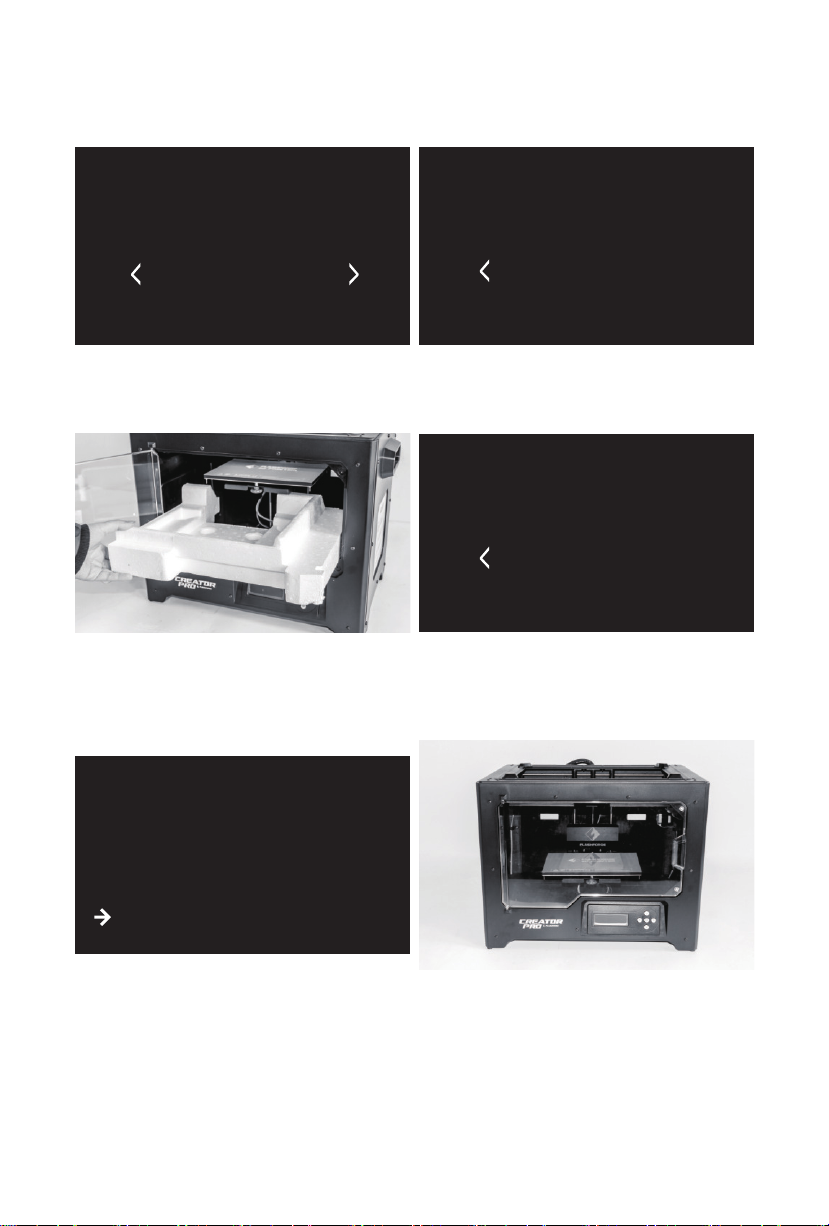
2. The foam should contain: two filament guide
tubes, two pieces of build tape, one Flashforge
leveling card, one After-sales service, one
Quick Start Guide and one User Guide.
01
Page 4
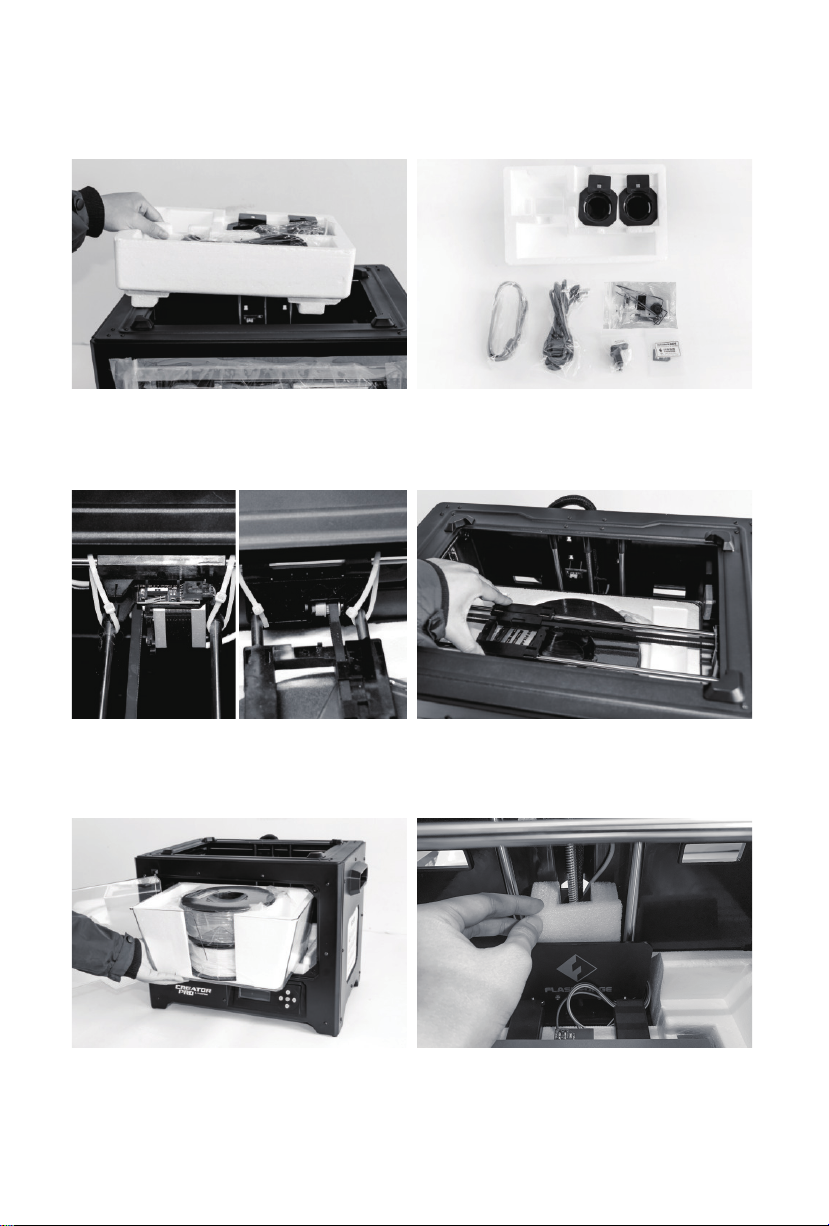
7. Remove the foam container. It should contain: a power cable, an USB cable, two spool holders,
a SD card, a tool bag and an extruder’s accessory kit.
8. Shear ties on both sides of X-axis guide rod,
two ties on both sides, four ties in all.
10. Remove top lid of the printer, take filament
out of the lid.
9. Slide the X-axis Rods to the very back.
11. Find plastic board sealed with "Flashforge" at
the back of build plate, take out the foam blocks
at the back of plastic board.
02
Page 5
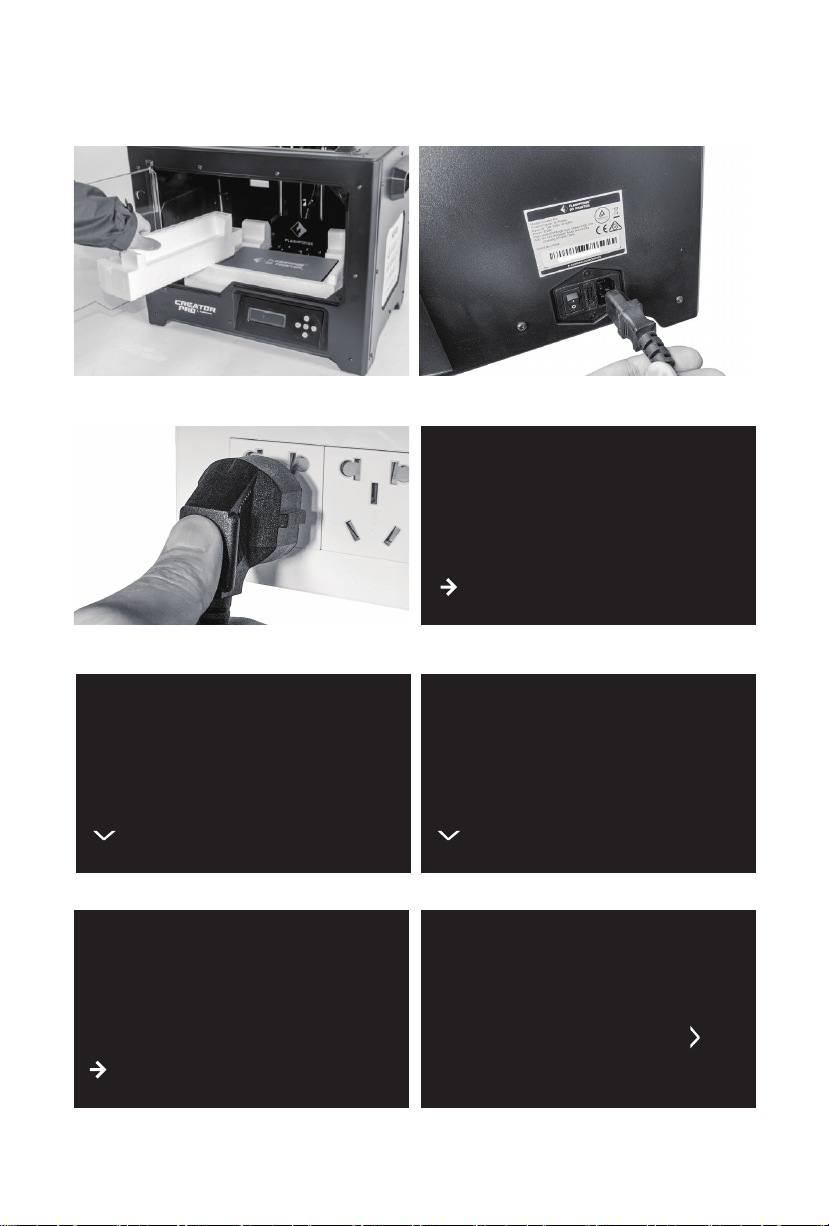
12. Remove side foam.
13. Take power cable out and plug it into power
input.
FF Creator Pro
Print from SD
Preheat
Utilities
14. Plug the other end of power cable into socket,
turn on the power switch.
Monitor
Filament Loading
Preheat Settings
General Settings
16. Press downwards arrow, enter the next page.
15. Operating on the LCD panel, press downwards
arrow to choose [Utilities], tap [Ok].
Level Build Plate
Home Axes
Bot Statistics
Filament Odometer
17. Press downwards arrow, enter the next page.
Jog Mode
Profiles
Home offsets
Toolhead offsets
Jog Mode
18. Choose [Jog Mode], tap [OK]. 19. Tap rightwards arrow to the next page.
03
X+
(Menu)
X-
Y-
Page 6
Jog Mode
Jog Mode
Y+
(Menu)
Z--X
Y-
20. Tap rightwards arrow to the next page.
22. Remove foam under build plate.
FF Creator Pro
Z-
(Menu)
-Y
Z+
21. Pess upwards arrow, the build plate goes up
until it comes to the highest position, loose
the button when the printer stops.
Jog Mode
Z-
(Menu)
-Y
Z+
23. Please follow the previous method to enter the
page shown in the picture above, press down
arrow, loosen the button when the build plate
descends to the middle of the printer. Tap [Ok],
go back.
Print from SD
Preheat
Utilities
24. Tap [Ok], go back, tap leftwards arrow twice,
go back to the Home screen.
24. Unboxing completed! Recommended that you
take good care of packing materials for furthur
carrying and keeping.
04
Page 7
User Guide
Filament Guidetube x2
Build Tape x 2
Tool bag:
Allen Wrench*2 / Leveling Knob
M3x8 Bolt*2 / PTFE Tube*2 / Grease
Unclogging Pin Tool / Wrench
Extruder’s accessory:
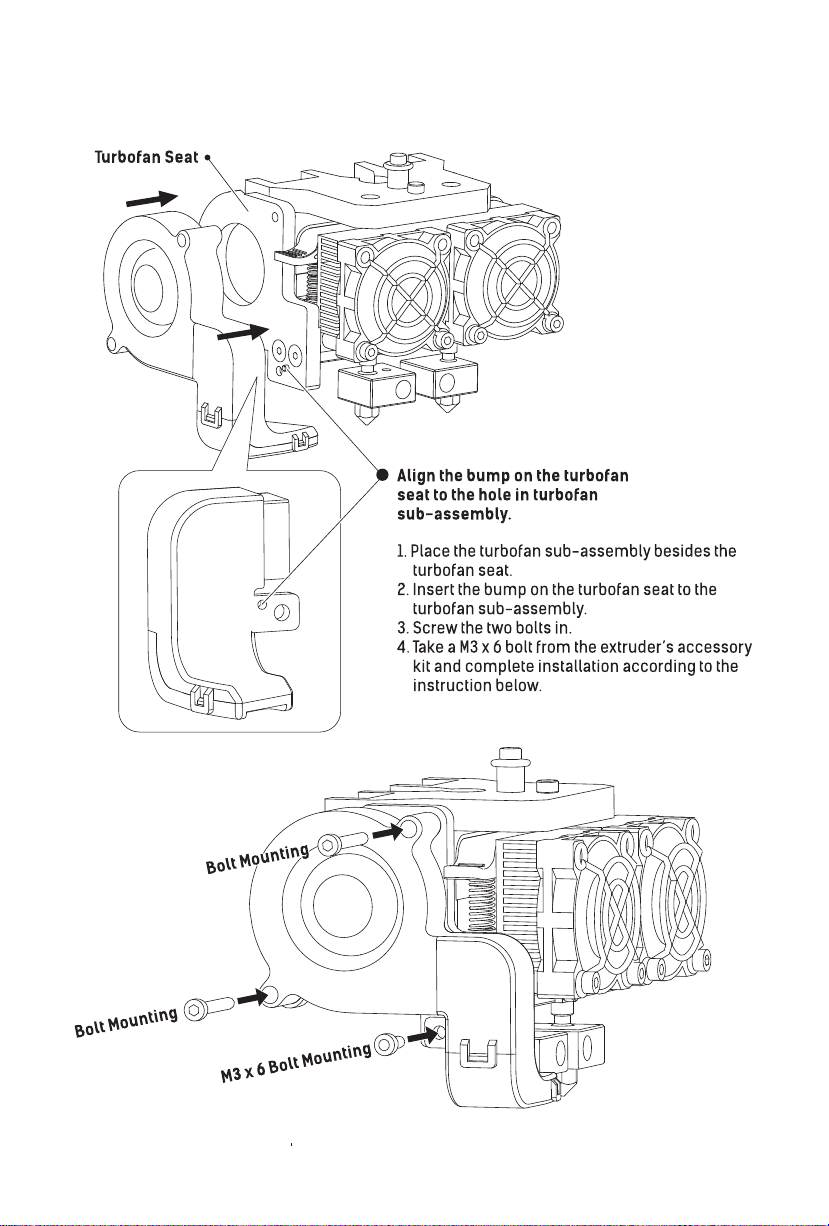
M3x8 Bolt*2 / M3x6 Bolt / Turbofan Baffle
05
Page 8
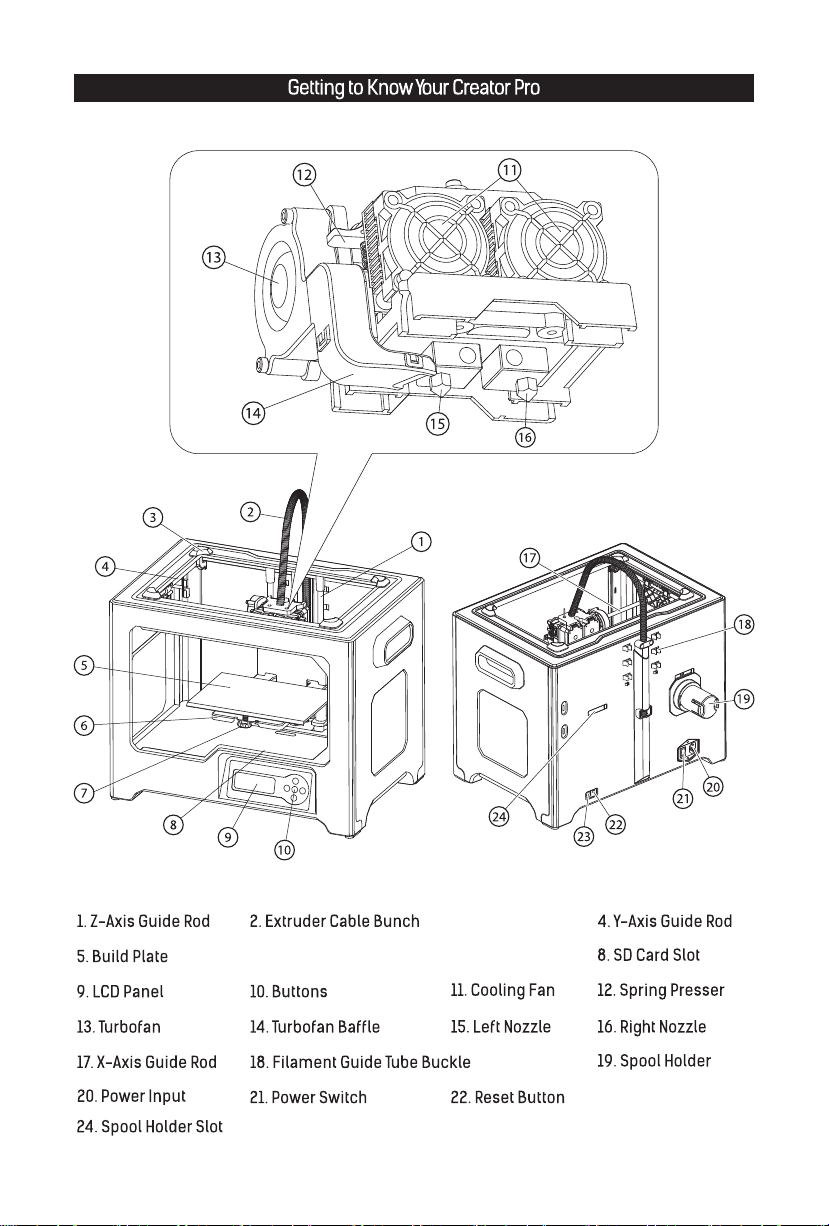
3. Lid Slot
6. Platform Support 7. Leveling nut
06
23. USB Cable Input
Page 9
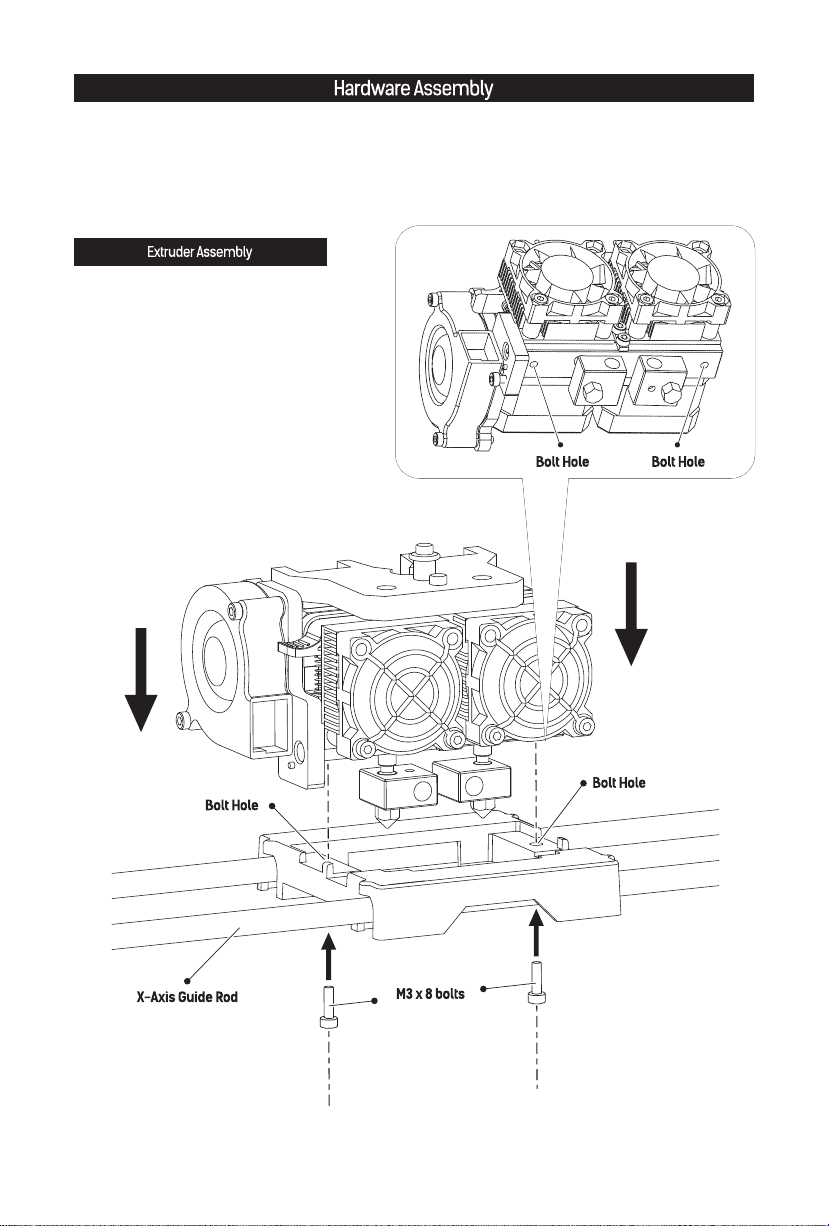
1. Place the dual extruder on the extruder
seat.
2. Take the M2.5 Allen Wrench from the tool
bag and two M3x8 bolts from the accessory
kit.
3. Adjust the extruder location to align the
bolt holes.
4. Secure the extruder onto the extruder
seat by screwing the M3x8 bolts in.
07
Page 10
080910
Page 11
Page 12

3. Take filament out and remove vacuum packing, squeeze both sizes on the top of
spool holder and mount filament spool to the holder.
Page 13

Filament installation tips
The filament spool must be oriented correctly ( see below ).
Correct Installation
Wrong Installation
Filament
Guidetube
Buckle
4. Install filament on the right side of the printer,
and put filament through filament guidetube.
Limited seat
5. Lock filament guide tube into fixed buckles,
and guidetube bottom should not be over
limited seat.
11
Page 14

Press here
Filament intake
6. After filament guidetube fixation completed,
press the left spring presser of extruder, put
filament vertically into the left filament intake
from the other end of filament guidetube.
7. After filament going into filament intake,
insert filament guidetube into filament
intake to fix.
12
Page 15

Leveling
Berfore leveling, let's learn the funciton of leveling nuts.
How to use the leveling nuts
Build plate goes up
Rotate nut clockwise
Build plate goes down
Rotate nut anticlockwise
1. Insert the SD card into the SD card slot.
13
Page 16

FlashPrint
Video
Test File
User Guide
PlateLeveling.x3g
Happy3D Software
Quick Start Guide
Exit Menu
2. Choose [Print from SD], tap [OK]. Tap down arrow to the next page, choose [PlateLeveling.x3g],
tap [OK] to leveling process.
Find the 3 knobs on
the botton of the
platform and tighten
four or five turns.
Nozzles are at the
right height when
you can just slide a
sheet of paper
between the nozzle
and the platform
Grab a sheet of
paper to assist us.
In each position,
we will need to
adjust 2 knobs at
the same time.
Please wait.
3. After leveling starts, there would be a prompt on the LCD panel. Tap [Ok], turn the page.
After prompt is over, extruder starts to move and stops above leveling knobs at the front
build plate.
Attention: Leveling would affect print effect directly, if print result is unsatisfactory,
please do leveling again.
Start the adjustment process
with the right nozzle, then use
the distance between the right
nozzle and build plate as a
reference.
4. Take leveling card out, on the basis of right side extruder, put leveling card between right
extruder and build plate. Slide leveling card back and forth and adjust leveling knobs in the
meantime.
If you can move leveling card easily, please rotate leveling knobs clockwise to reduce the
distance between build plate and nozzle. Otherwise, rotate leveling knobs anticlockwise to
increase the distance between build plate and nozzle.
If you feel slight friction sensitivity when moving leveling card, the distance between
extruder and leveling card is proper, thus adjustment compeleted.
5. After the first leveling point completed, tap [OK]. The extruder will move to the second leveling
point. Adopt same method to adjust. After three leveling points completed all, leveling
completed. Tap [Ok] to end leveling process, press leftwards arrow to go back to home screen.
14
Page 17

Loading Filament
FF Creator Pro
Monitor
Print from SD
Preheat
Utilities
1. Choose [Utilities], and then tap [Ok]. 2. Choose [Filament Loading], and then tap [Ok].
Unload right
Load right
Unload left
Load left
3. Choose [Load left], and then tap [Ok]. 4. Extruder starts to heat.
Begin loading or
Filament Loading
Preheat Settings
General Settings
Heating:
Extruder: 26/230C
Press left to cancel
unloading. Press the
center button when
finished.
5. Once heated, filament will be drawn through the extruder. Continue extruding until the extruder
provides a steady flow of filament. Tap [OK], go back. Tap leftwards arrow twice, go back to the
home screen.
15
Page 18

First Print
1. Ensure that the build plate has been leveled
before printing.
2. Ensure that the filament has been loaded in
an appropriate approach.
3. Load the filament for a while to extrude all
the melted filament you printed last time out
of the extruder.
4. Print with ABS filament, install top cover, close
the front door. Print with PLA filament, remove
top cover, open the front door.
5. Do not leave the printer unattended during
operation.
FlashPrint
Video
Test File
User Guide
2. Choose [Test File], tap [OK].
FF Creator Pro
Print from SD
Preheat
Utilities
1. Choose [Print from SD], tap [OK].
40mm_Box Left PLA
40mm_Box Right PLA
CP test file-double-PL
3. Choose [40mm_Box Left PLA], tap [OK].
Heating:
R Extruder:
L Extruder:
Platform:
4. The extruder and the build plate starts to heat.
15C
15/200C
14/ 50C
40mm_Box Left PLA 0%
R Extruder:
L Extruder:
Platform:
5. After completing preheat, the printer start to
print.
16
26C
200/200C
50/ 50C
Page 19

Unloading Filament
Withdraw
Filament
Guidetube
Please follow steps below if you need to unload filament in
daily use.
FF Creator Pro
Print from SD
Preheat
Utilities
1. Pull filament guidetube out of filament intake.
Monitor
Filament Loading
Preheat Settings
General Settings
3. Choose [Filament Loading], tap [OK]. 4. Choose [Load left], tap [OK].
Heating:
2. Choose [Utilities], tap [OK].
Unload right
Load right
Unload left
Load left
Press here
Extruder: 26/230C
Press left to cancel
5. Extruder starts to heat.
Withdraw
Filament
6. When heating to target temparture, press spring
presser and push filament down through for 3
seconds, then pull out vertically quickly and
release spring presser. Tap [OK], go back. Tap
leftwards arrow twice, go back to the home
screen.
17
Page 20

Installation and Dismantlement
18
Page 21

2. 在顶部泡沫中包含有两根导丝管、两张平台贴
纸、一张调平卡片、一份售后服务卡、一本用
户使用手册和一本快速启动指南。
4. 撕除胶带,去除设备包装塑料袋。随后撕去
固定前门的胶带及包裹前门的薄膜。
5. 移除塑料袋后,您可以看到打印机内部的
包装以及配件,我们从上至下逐一来解除
包装,拿出配件。
6. 首先撕除蓝色胶带,将喷头从泡沫中取出,
放置在台面上。连接喷头的线束较短,在
摆放喷头时请注意。
19
Page 22

7. 取出装有配件的泡沫盒,其中包含一根电源线、一根USB数据线、两个丝盘轴、一个工具包、
一个喷头安装包和一张SD卡。
8. 剪断X轴导轨两侧的扎带,左右两侧各两根,
共四根。
10. 取出打印机上罩,然后取出上罩中的打印
耗材。
11. 在打印平台后方找到印有闪铸logo的塑料板,
取出塑料板后方的泡沫块。
20
Page 23

13. 取出电源线,插入打印机背部的电源线接口。12. 取出底部左侧的泡沫。
FF Creator Pro
Print from SD
Preheat
Utilities
14. 将电源线另一头插入插座,接通电源。然后
打开电源线接口旁边的电源开关开机。
Monitor
Filament Loading
Preheat Settings
General Settings
16. 继续按向下的箭头,进入下一页面。
Profiles
Home offsets
Toolhead offsets
Jog Mode
18. 选中[Jog Mode],按[OK]键。
15. 使用按键对液晶屏进行操作。按向下的箭
头选中 [Utilities],按[OK]键。
Level Build Plate
Home Axes
Bot Statistics
Filament Odometer
17. 继续按向下的箭头,进入下一页面。
Jog Mode
X+
(Menu)
Y-
X-
19. 按向右的箭头翻页。
21
Page 24

Jog Mode
Jog Mode
Y+
(Menu)
Y-
20. 按向右的箭头翻页。
22. 取出打印平台下方的泡沫。
FF Creator Pro
Z-
(Menu)
Z--X
-Y
Z+
21. 按住向上的箭头,使打印平台上升。打印
平台升到最高位置时会自动停止,停止后
松开按键。
Jog Mode
Z-
(Menu)
-Y
Z+
23. 按照之前的方法重新进入上图界面,按住
向下的箭头,待打印平台下降到打印机中
部后即可松开按键。
Print from SD
Preheat
Utilities
24. 按[OK]键返回上一级,之后按向左的箭头
返回首界面。
25. 开箱完成!建议您保管好这些包装材料,
便于以后的搬运或保存。
22
Page 25

用户使用手册
平台贴纸 x 2
工具包内含:
M 3*8规格螺丝两颗 / 2根聚四氟管 / 一枚手旋螺母
一把扳手 / 两把内六角扳手 / 一根通针 / 一袋润滑脂
喷头安装包内含:
M 3*8规格螺丝两颗 / M 3*6螺丝一颗 / 导风嘴部件
232325
Page 26

Page 27

Page 28

1. 如上图所示,使用M2.5内六角扳手拆下固定涡轮风扇的两颗螺丝。
2. 从喷头安装包中取出导风嘴部件。如下图所示,将导风嘴部件装入涡轮风扇。
26
Page 29

27
Page 30

1. 将丝盘轴插入端插入打印机背部的丝盘轴插口中。
丝盘轴插入端
2. 丝盘轴插入丝盘轴插口后,让丝盘轴底部向下贴住打印机背部。
3. 取出耗材并去除真空包装,轻轻挤压丝盘轴顶端两侧,使耗材中间的
丝盘轴孔套入丝盘轴。
28
Page 31

安装耗材时请注意丝盘的安装方向。如下图所示,请保证耗材从内侧出丝。
4. 将耗材安装在打印机右侧,然后将耗材穿过
导丝管,并从导丝管的另一头穿出。
5. 将导丝管卡入机身背部的导丝管固定卡扣中。
导丝管下端不应当超过限位卡座。
29
Page 32

按下压板
进丝孔
6. 导丝管固定完成后,按下左喷头一侧的压板
将从导丝管另一头穿出的耗材垂直插入喷头
进丝孔中。
7. 耗材插入进丝孔后,再将导丝管插入喷头
进丝孔固定。
30
Page 33

在调平开始前,让我们先了解一下调平螺母的作用。
打印平台上升
打印平台下降
1. 取出SD卡,插入SD卡插槽中。
SD卡插槽位于打印机内侧,
液晶屏上方。
31
Page 34

FlashPrint
Video
Test File
User Guide
PlateLeveling.x3g
Happy3D Software
Quick Start Guide
Exit Menu
2. 选中[Print from SD],按[OK]键。然后按向下的箭头进入第二页,选中[PlateLeveling.x3g],
按[OK]键开始运行调平程序。
Find the 3 knobs on
the botton of the
platform and tighten
four or five turns.
Nozzles are at the
right heught when
you can just slide a
sheet of paper
between the nozzle
and the platform
Grab a sheet of
paper to assist us.
In each position,
we will need to
adjust 2 knobs at
the same time.
Please wait.
3. 调平程序开始后,系统会在液晶屏上显示一段英文提示信息。按[OK]键查看下一页。
提示信息结束后,喷头开始移动并停止在平台前端的调平螺母上方。
注意:调平效果会直接影响到打印效果,如果打印效果不理想,请再次对平台进行调平。
4. 取出调平卡片,以右侧喷嘴为基准,将调平卡片放入右喷嘴与打印平台之间。一手调节
调平螺母,一手来回滑动调平卡片感受摩擦力。
若卡片可以轻松抽动则表示喷嘴与平台的间距过大,需要顺时针旋转下方的调平螺母来
缩小平台与喷嘴的间距。
若抽动卡片时阻力较大,表示喷嘴与平台的间距过小,需要逆时针旋转下方的调平螺母
来增大平台与喷嘴的间距。
若抽动卡片时感到有轻微的摩擦感,表明此时喷嘴与平台的间距比较合适,可以停止调节。
5. 第一个点调平完成后,按[OK]键,喷头会移动到第二个调平点上方。采用同样的方法对该
点进行调节。以此类推,当三个调平点都调平完成后(三个调平螺母上方),调平完成,
按[OK]键结束调平程序,按向左的箭头返回首界面。
32
Page 35

FF Creator Pro
Monitor
Print from SD
Preheat
Utilities
1. 选中[Utilities],按[OK]键。
Unload right
Load right
Unload left
Load left
3. 四个选项从上到下分别是:右喷头退丝、
右喷头进丝、左喷头退丝、左喷头进丝。
选中[Load left],按[OK]键。
Begin loading or
unloading. Press the
Filament Loading
Preheat Settings
General Settings
2. 选中[Filament Loading],按[OK]键。
Heating:
Extruder: 26/230C
Press left to cancel
4. 左喷头开始加热。
center button when
finished.
5. 喷头加热到预定温度后开始进丝,看到喷嘴开始出丝时请勿立即停止进丝,直到耗材均匀出丝
为止。按[OK]键返回上一界面,然后按向左的箭头两次返回首界面。
33
Page 36

1. 打印开始前请确保打印机已经经过调平;
2. 打印开始前确保耗材安装正确,没有打结或卡住;
3. 喷头内可能残留有少量耗材,请进丝一段时
间,确保上一次打印的耗材已经全部挤出;
4. 使用ABS耗材打印时,请装上顶罩,关闭前门;
使用PLA耗材打印时,请移除顶罩,打开前门;
5. 不可在长时间无人看守的情况下使用3D打印机;
FlashPrint
FF Creator Pro
Print from SD
Preheat
Utilities
1. 选中[Print from SD],按[OK]键。
Video
Test File
User Guide
2. 选中[Test File],按[OK]键。
Heating:
R Extruder:
L Extruder:
Platform:
4. 打印机开始加热。 5. 加热完成后,开始打印。
15C
15/200C
14/ 50C
40mm_Box Left PLA
40mm_Box Right PLA
CP test file-double-PL
3. 选择[40mm_Box Left PLA],按[OK]键。
40mm_Box Left PLA 0%
R Extruder:
L Extruder:
Platform:
26C
200/200C
50/ 50C
34
Page 37

退丝操作
拔出导丝管
在日常使用中,如果需要更换耗材,建议按下列步骤操作。
FF Creator Pro
Print from SD
Preheat
Utilities
1. 拔出导丝管。 2. 选中[Utilities],按[OK]键。
Monitor
Filament Loading
Preheat Settings
General Settings
3. 选中[Filament Loading],按[OK]键。
Heating:
Extruder: 26/230C
Press left to cancel
5. 左喷头开始加热。
Unload right
Load right
Unload left
Load left
4. 按左喷头退丝举例。选中[Load left],
按[OK]键。
拔出耗材
按下压板
6. 喷头加热到预定温度后开始进丝,当喷头加热
到预定温度后,按下喷头侧边的压板,同时向
下按压耗材3秒后快速垂直拔出。按[OK]键返
回上一级,然后按两次向左的箭头返回首界面。
35
Page 38

附:顶罩的安装与拆卸
在日常使用中,如果需要更换耗材,请按下列步骤操作。
36
Page 39

Page 40

 Loading...