

Page 1

SZ16-ZN/EN-A05
Adventurer 3
User Guide
This guide is only applicable to FLASHFORGE Adventurer3 3D printer
Page 2

Page 3

Preface
Notice
Terms
Content
Chapter 1: About Adventurer 3
1.1 - Components Introduce
1.2 - Reference
Chapter 2: Operating
2.1 - Unpacking
2.2 - Accessories
2.3 - Interface
2.3.1 - Build
2.3.2 - Tools
2.3.2.1 - NetWork
2.3.2.2 - Preheat
2.3.2.3 - Setting
2.3.2.4 - About
2.3.3 - Filament
2.4 - Print
2.4.1 - Load Filament
2.4.2 - Model File Transfer
2.4.3 - Print
2.4.3.1 - FlashCloud Print
2.4.3.2 - PolarCloud Print
2.4.4 - Model Remove
2.4.5 - Replace Filament
2.5 - The Guide of Using Camera
2.5.1 - The Switching Can Be Controlled by the Lower Computer
2.5.2 - FlashCloud Camera Use
2.5.3 - PolarCloud Camera Use
2.5.4 - The Switching Can Be Controlled Through the Cloud
2.5.5 - Error Handling
06
06
07
08
08
10
11
11
13
13
16
19
20
21
22
22
24
29
29
31
35
36
37
37
38
40
42
44
Chapter 3: Q&A
Chapter 4: Supports and Service
01
37
40
Page 4

Preface
Note: Each device must be tested before leaving factory. If there are some residues in
extruder or some tiny scratches on the build tape, it is normal and won’t affect
the printing quality.
On the completion of this User Guide, thanks all FlashForge engineers and the FlashForge
3D printer users for their unremitting efforts and sincere assistance.
The FlashForge Adventurer 3 User Guide is designed for the Adventurer 3 users to start their
printing journey with FlashForge Adventurer 3. Even if you are familiar with earlier FlashForge
machines or 3D printing technology, we still recommend that please read this guide, as there
is lots of important information about the Adventurer 3 for you to get a better 3D experience.
For a better and more successful printing experience, you can refer to the following materials:
Quick Start Guide:
Users will find the Quick Start Guide together with the printer accessories. The Quick Start Guide
will help you start your print journey as soon as possible.
Official FlashForge Website: www.flashforge.com
The official FlashForge website contains the up-to-date information concerning FlashForge
software, firmware, device maintenance and so on. Users are also able to get the contact
information from there.
02
Page 5

Notice
Safety Notice: PLEASE READ AND STRICTLY FOLLOW ALL THE
SAFETY WARNINGS AND NOTICE BELOW.
Work Environment Safety
Keep your work place tidy.
Do not operate Adventurer 3 in the presence of flammable liquids, gases or dust.
Keep Adventurer 3 out of children and untrained people’s reach.
Electrical Safety
Always use the Adventurer 3 with a properly grounded outlet. Do not refit Adventurer 3 plug.
Do not use Adventurer 3 in damp or wet locations. Do not expose Adventurer 3 to burning sun.
In case of device damage, please use the power supply provided by FlashForge.
Avoid using the device during an thunderstorm.
In case of uncertain accident, please unplug the device if you do not use it for long.
Personal Safety
Do not touch the nozzle and build plate during printing.
Do not touch the nozzle after finishing printing.
Dress properly. Do not wear loose clothing or jewelry. Keep your hair, clothing and gloves
away from moving parts.
Do not operate the device while you are tired or under the influence of drugs, alcohol or
medication.
Cautions
Do not leave the device unattended for long.
Do not make any modifications to the device.
To lower the build plate before loading/unloading filament.
(The distance between the nozzle and build plate should be kept for at least 50mm)
Operate the device in a well-ventilated environment.
Never use the device for illegal activities.
Never use the device to make any food storage vessels.
Never use the device to make any electrical appliance.
Never put the model into your mouth.
Do not remove the models with force.
Wireless Communcations
Wi-Fi frequency: 2.4G
CPU (MT7688) frequency: 580MHZ
Frequency band(s) in which the radio equipment operates: 2.4-2.4835GHZ
The maximum radiated transmitter power: 14-18 DBM
Wi-Fi is for transfer printing model file and connect with FLASHPRINT software or print cloud.
03
Page 6

The computer connects to the device via WIFI to download the printed model. Connect
to the cloud platform through wifi, you can check the printing status, transfer the printing
documents and control the printer.
Environment Requirements
Temperature: RT 15-30℃; Moisture: 20%-70%
Place Requirements
The device must be placed in a dry and ventilated environment.
The distances of the left, right and back side space should be at least 20cm, and
the distance of the front side space should be at least 35cm. Device storage
temperature: RT 0-40℃
Filament Requirements
Do not abuse the filament. Please make sure you use the FlashForge filament or
the filament from the brands accepted by FlashForge.
Nozzle clogging and damage may be caused by non-FlashForge filament due to
inappropriate material properties.
Filament Storage
All polymers degrade with time. Do not unpack filament until necessary. Filament
should be stored at clean and dry conditions.
Legal Notice
All the information in this document is subject to any amendment or change
without the official authorization from FlashForge.
FLASHFORGE CORPORATION MAKES NO WARRANTY OF ANY KIND WITH REGARD TO THIS
DOCUMENT, INCLUDING, BUT NOT LIMITED TO, THE IMPLIED WARRATIES OF MERCHANTABILITY
AND FITNESS FOR A PARTICULAR PURPOSE.
FCC Notice
This device complies with part 15 of the FCC Rules. Operation is subject to the following
two conditions: (1) This device may not cause harmful interference, and (2) this device
must accept any interference received, including interference that may cause undesired
operation.
FlashForge shall not be liable for errors contained herein for incidental consequential
damages in connection with furnishing, performance or use of this material.
This document contains proprietary information protected by copyright.
Copyright © 2017 FlashForge Corp. All Rights Reserved.
04
Page 7

Terms
Build Plate
Build Tape
Build Volume
Extruder
Nozzle
Cooling Fan
Filament Cartridge
The surface on which the Adventurer 3 builds an object.
The black tape that covers Adventurer 3’s build plate so that
the object can stick to the build plate well.
The three dimensional amount of space that an object
will use once it is completed. The largest build volume
is 150*150*150mm.
The integral extruder device installed on X-Axis. Extruder
draws the filament from the spool, melts it and pushes it
through a nozzle into the build plate.
Also called “print head”, which located at the bottom
of the extruder where heated filament is squeezed out.
To cool the outer assembly of the extruder and gear motor.
A specific box for placing FlashForge filament, which is
located on the right of printer.
Filament Guide Tube
Filament Intake
Solid Glue Stick
A white plastic tube that guides the filament from the
filament box to the filament intake.
An opening located at the top of the extruder.
A solid adhesive used for making the model stick to the
build plate firmly.
05
Page 8
Chapter 1: About Adventurer 3
1
2
3
4
5
10
11
12
13
14
6
7
8
9
21
20
19
18
17
16
15
25
23
22
24
26
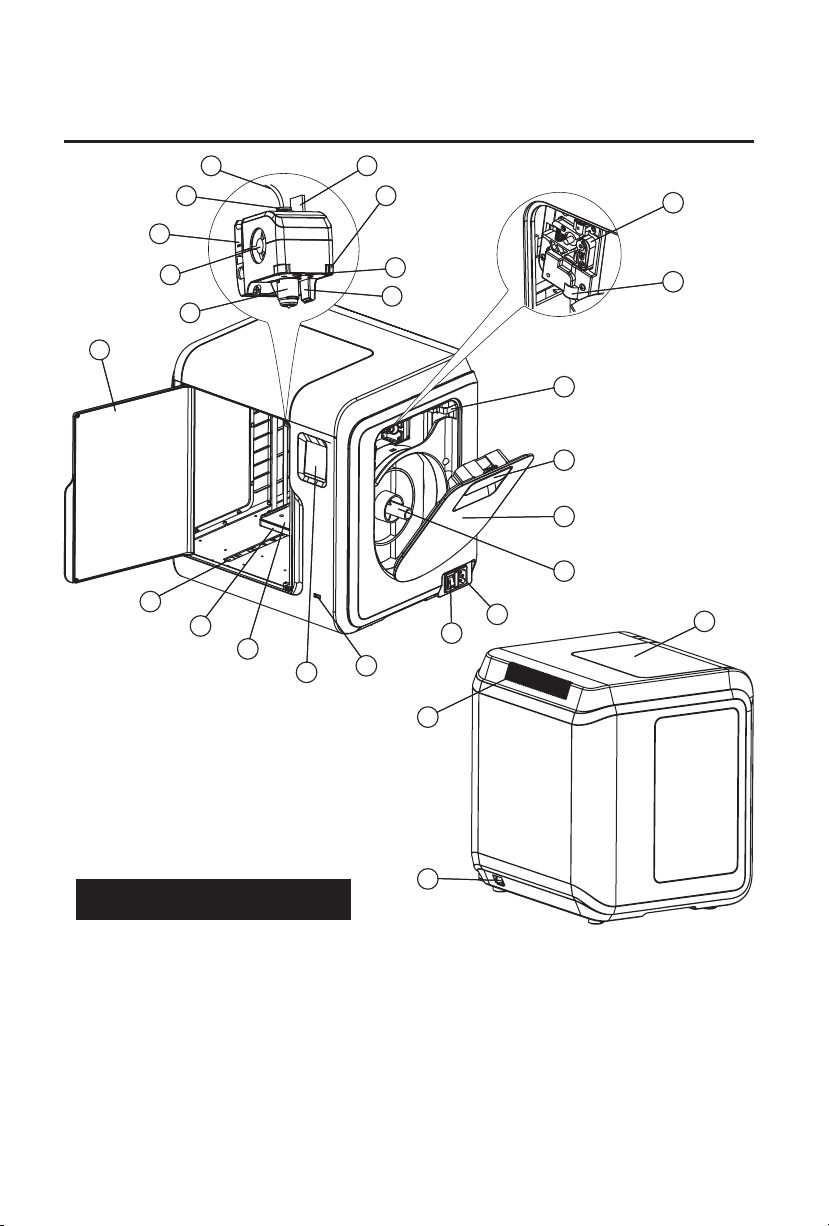
1.1 Components Introduce
1. Filament guide tube 2. Filament guide tube joint 3. Extruder base 4.Cooling Fan
5. Removable nozzle 6. Extruder cables 7. Clip 8. Led light
9. Air guide 10. Front door 11.Y-Axis sliding slot 12.Platform base
13. Removable build plate 14.Touch-screen 15.USB stick input 16.Power switch
17. Power input 18. Spool holder 19.Filament cover 20. Filament cover handle
21. Moto 22. Filament intake 23.Filament feeding wheel 24. Top cover
25. Air outlet 26. Ethernet input
06
Page 9

1.2 Reference
Name
Number of Extruder
Print Technology
Screen Size
Build Volume
Layer Resolution
Build Accuracy
Positioning Accuracy
Filament Diameter
Nozzle Diameter
Build Speed
Software
Support Formats
Adventurer 3
1, Removable
Fused Filament Fabrication (FFF)
2.8" color IPS Touch Screen
150×150×150mm
0.1-0.4mm
±0.2mm
Z axis 0.0025mm; XY axis 0.011mm
1.75mm (±0.07mm)
0.4mm
10~100 mm/s
FlashPrint
Input: 3mf/stl/obj/fpp/bmp/png/jpg/jpeg File
Output: gx/g File
Memory Size
OS
Device Power
Connectivity
Device Size
Net Weight
8G
Win xp/Vista/7/8/10, Mac OS, Linux
<120W
USB stick, WiFi, Ethernet
388×340×405mm
9 kg
07
Page 10
Chapter 2: Operating
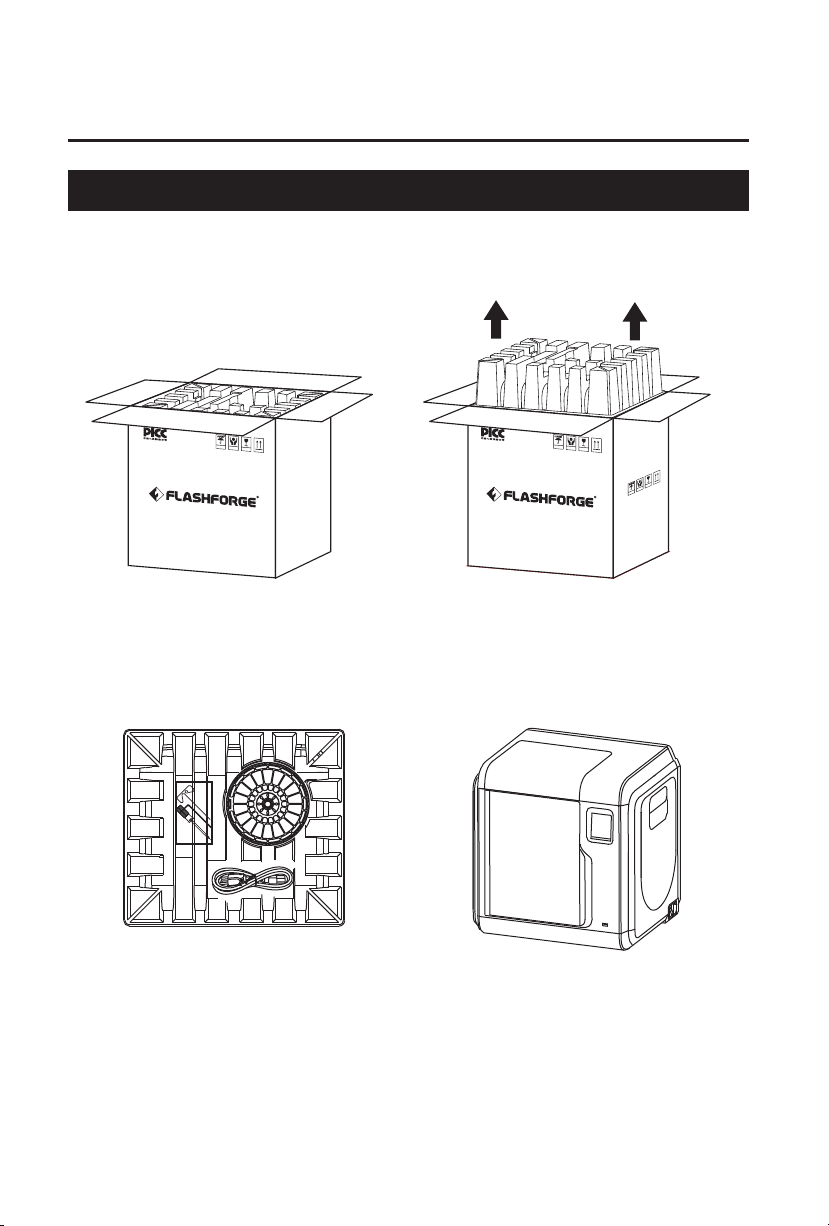
2.1 Unpacking
The People's Insurance Company of China
KEEP DRY
HANDLE
WITH CARE
FRAGILE
1. Open the box.
3
. Be careful! Filament, build tape, solid
glue, scraper and power cable are all
placed inside the wrapping paper box.
The People's Insurance Company of China
KEEP DRY
HANDLE
WITH CARE
FRAGILE
FRAGILE
HANDLE
WITH CARE
KEEP DRY
2. Take out the wrapping paper box
on the top.
4
. Take out the printer from the box.
08
Page 11
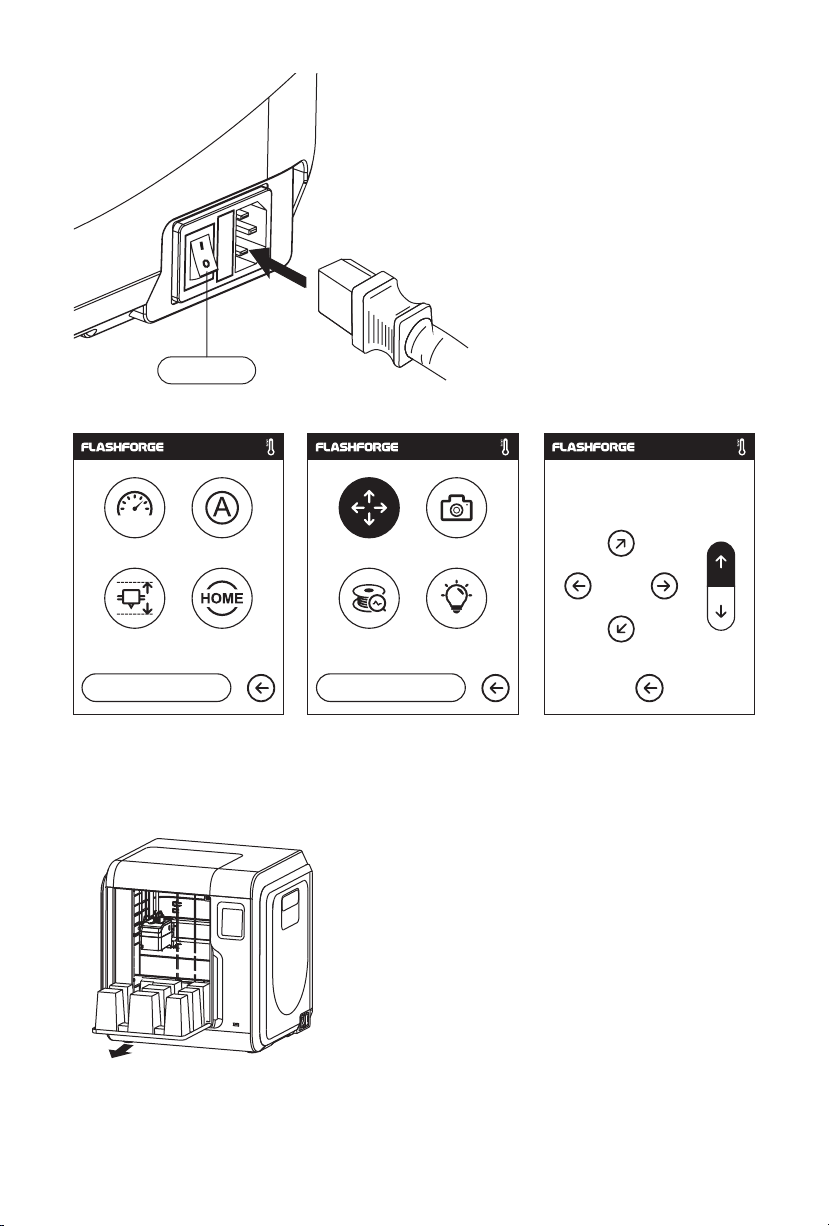
Power Switch
5. Plug the power cable into the input on the
back and turn on the power switch, the touch
screen is turned on.
X: 20.00 Y: 45.00 Z: 36.00
Y
1/3
Language
<<
Status
Calibration Home
<
6. Click [tools]-[setting] in turn to enter page like this, turn to page two, click [move].
Click the upper arrow in the moving page to make the extruder raises for removing the
paper box on the bottom easier.
Move Camera
FilamentCheck Led
2/3
<
7. Open the front door, take out the paper box inside
the printer, printer unpacking completed.
X
Z
09
Page 12
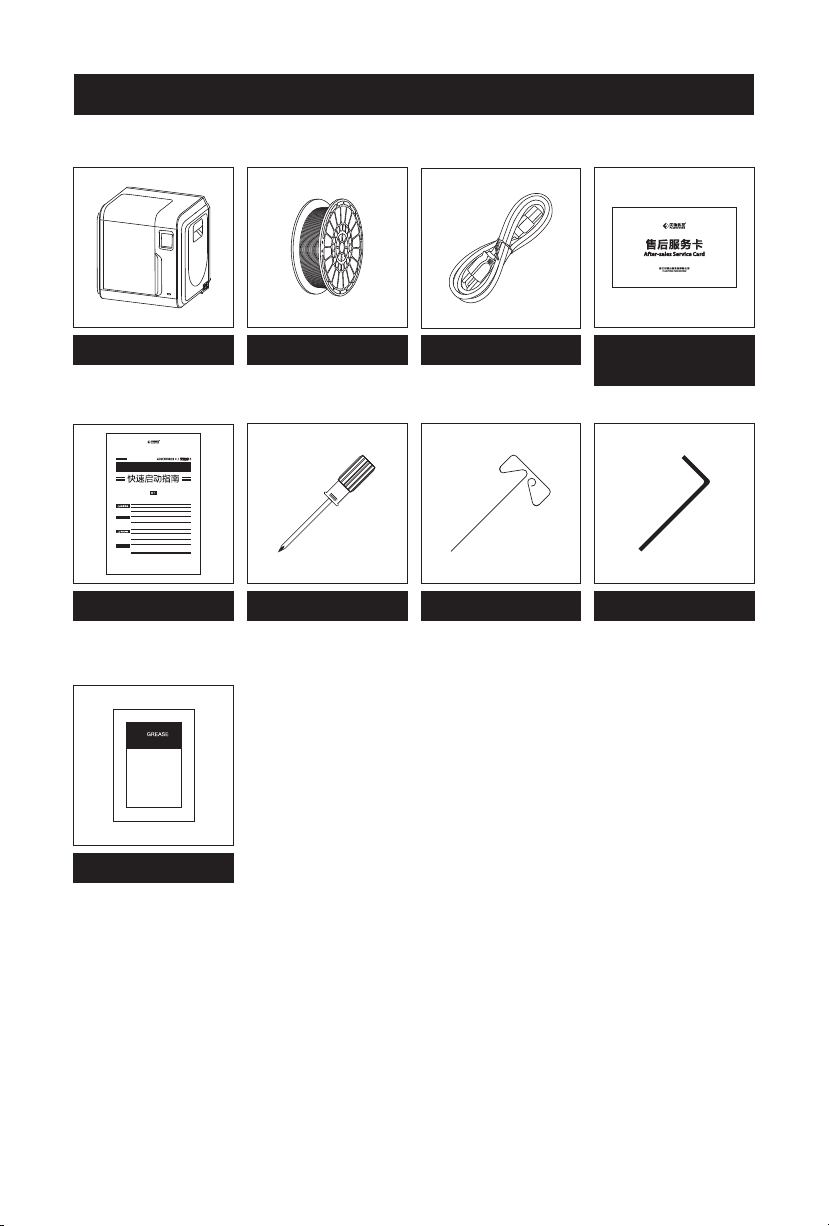
2.2 Accessories
3D Printer
SZ16-ZN/EN-A01
Quick Start Guide
9
1. 高温危险!打印机喷嘴和打印平台在工作时会被加热,请避免接触!
2. 可动部件可能造成卷入挤压和切割伤害。操作机器时请不要佩戴手套或缠绕物。
资料下载
前往闪铸科技官方网站 www.sz3dp.com ,可以在[ 技术支持 ] 页面下载用户使
用手册、切片软件等资料,或查看相关操作视频。
1. Hot! Avoid touching the heating nozzle and heating build plate in operation.
2. Moving parts in printer may cause injury. Do not wear gloves or other
sources of entanglement in operation.
Download
Please refer to FlashForge official website www.flashforge.com to download
the newest User's Guide, Software and Instruction Videos.
(Support-Support Center-Select a Product)
本手册仅适用于闪铸科技 Adventurer3 3D打印机
This guide is only applicable to FLASHFORGE Adventurer3 3D printer
User Guide
Grease
Filament
Power Cable
After-sales
service card
Allen WrenchScrewdriver Unclogging Pin Tool
10
Page 13
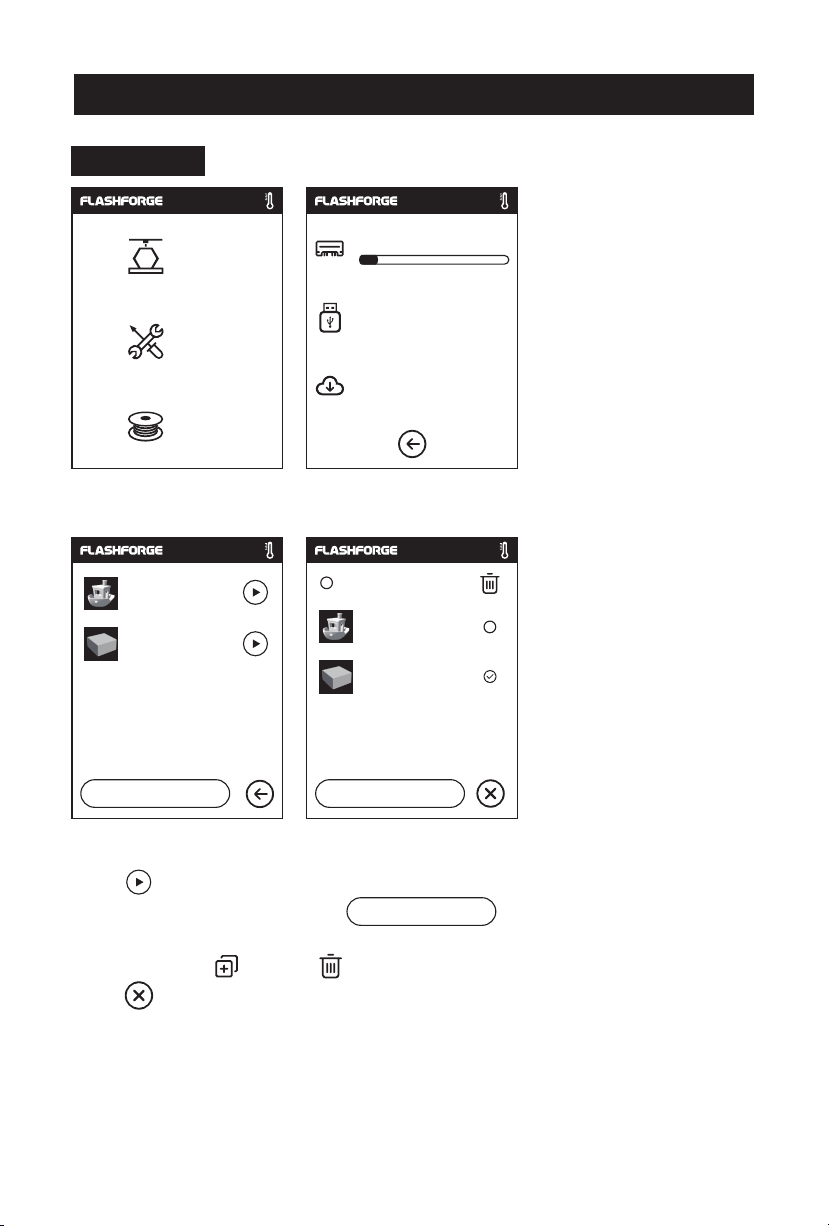
2.3.1 Build
2.3 Interface Menus Intrduction
Build
Tools
Filament
1. Tap [Print]. 2. Choose the read path of the print file File list.
Ship-PLA.gx
20mm_BoxPLA.gx
1/1
<
<
6.62GB
Not Available
No job
Select all
<
Ship-PLA.gx
20mm_BoxPLA.gx
1/1
<
Read the print file from:
The local memory card
The USB stick
The Cloud
Back: Back to upper interface
3. File list
Tap to begin printing; tap the picture of the selected file to enter file details.
Page-flip: Tap the left/right arrow.
Long press the file picture or file name, quit out multi-selected interface, you can
select all, copy ,delete .
Tap to quit out multi-selected interface.
<
1/3
11
<
Page 14
20mm_Box-P...
0 10
h min
m
0.7
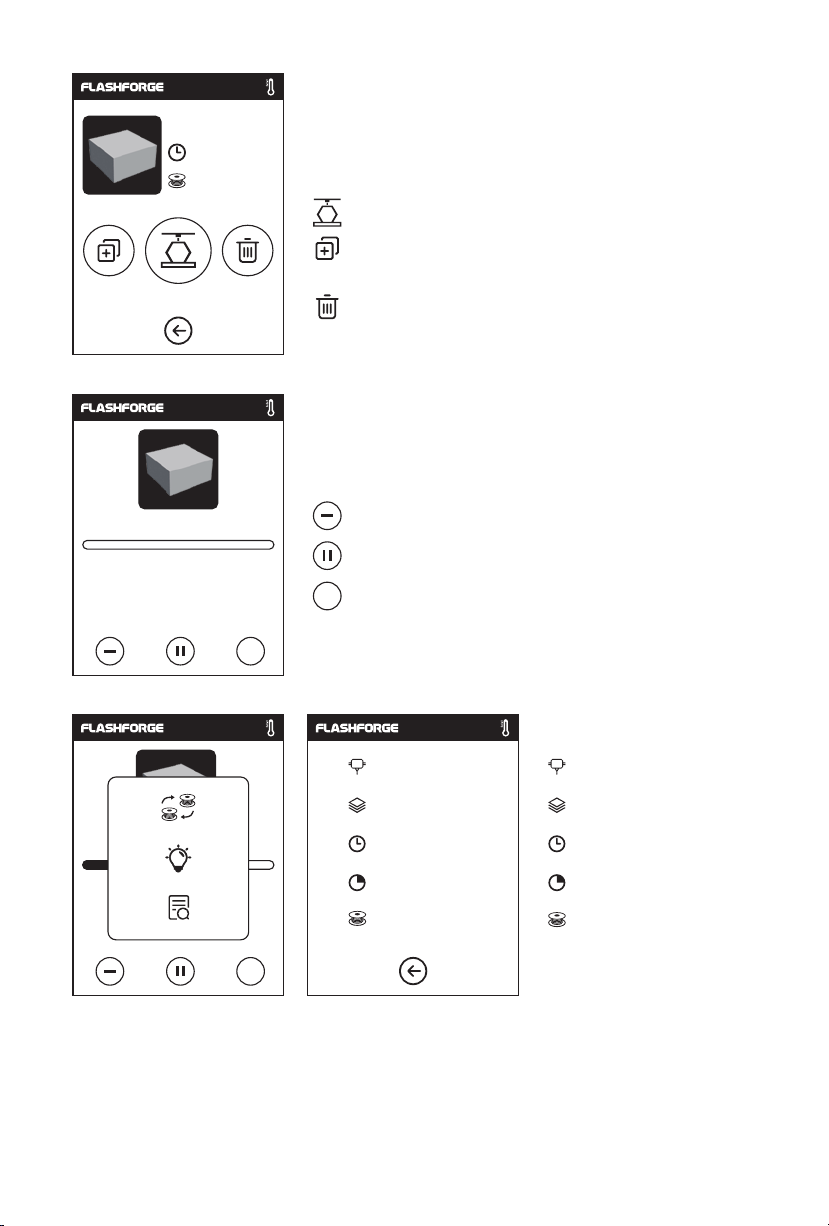
File details: Including file picture, time needed,
filament needed.
Build: To begin printing the file.
Copy: To copy the files to the local memory
card from the USB stick.
Delete: To delete the print file.
Print interface
20mm_Box-PLA.gx
0h10
Time Remaining
min
Cancel: To cancel the print job.
Pause/Resume: To suspend or resume the print job.
...
More: To check more settings and details information
during printing.
...
235
℃/235℃
100
℃/100℃
warrior.gx
2h18
min
剩余
0 1
h min
8
%
0.7
M
...
More
Replace: To change filament during printing progress.
Led Light: To turn on or turn off the led light.
Detail: To check more detail information.
Details
Extruder temperature
Build plate temperature
Used time
Printing progress
Whole filament needed
12
Page 15
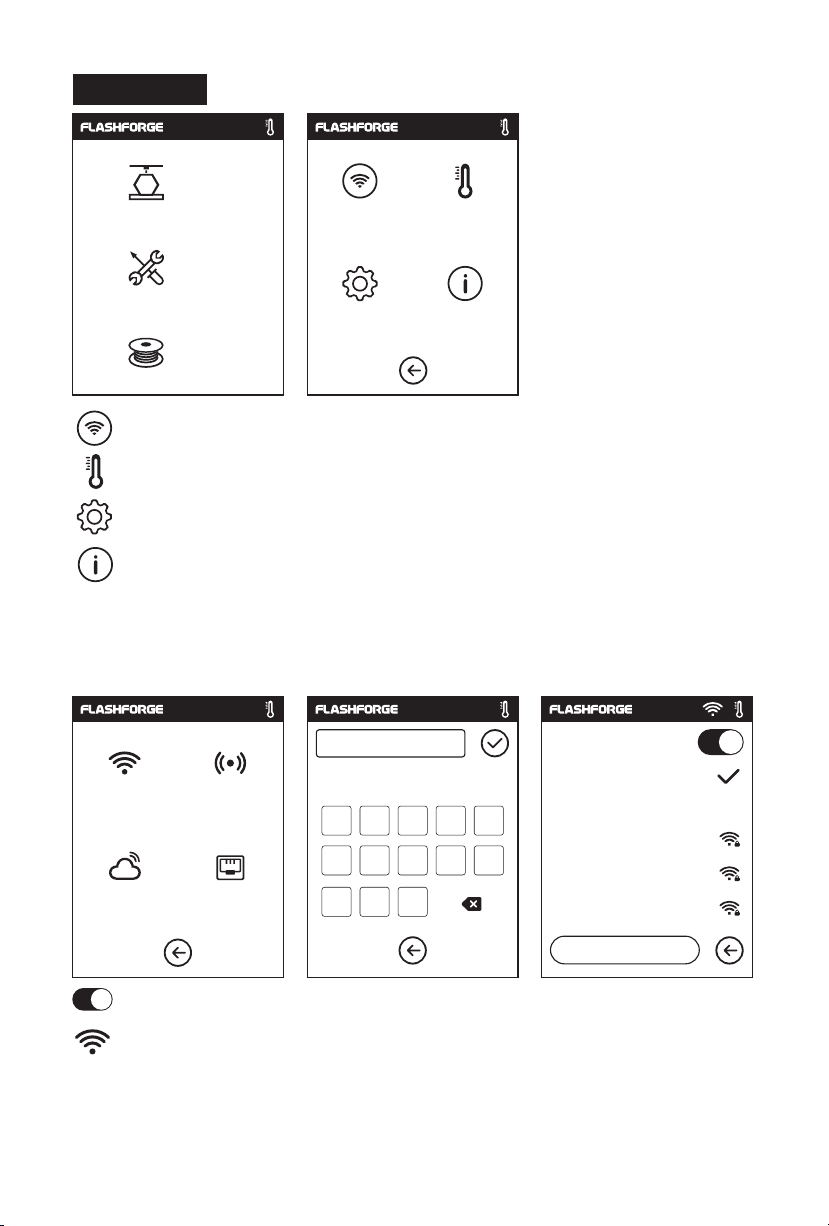
2.3.2 Tools
Build
Tools
Network
Preheat
Setting
Filament
Network: To connect printer to your PC or internet.
Preheat: To preheat the extruder and build plate.
Setting: To implement relevant function setups.
About: Information about the printer.
2.3.2.1 Network
WiFi
WiFi
Cloud
Hotspot
Ethernet
123
1 2 3 4 5
6 7 8 9
,
.
abc
About
WiFi
%#
0
_
Flashforge
Choose a network
ChinaNet-AnCr
TP-LINK_EDC2
QS_1234
1/3
<
ON/OFF: To turn on/off the WIFI connection.
WiFi connection: To connect your printer with your PC via a stable WIFI signal.
13
<
Page 16
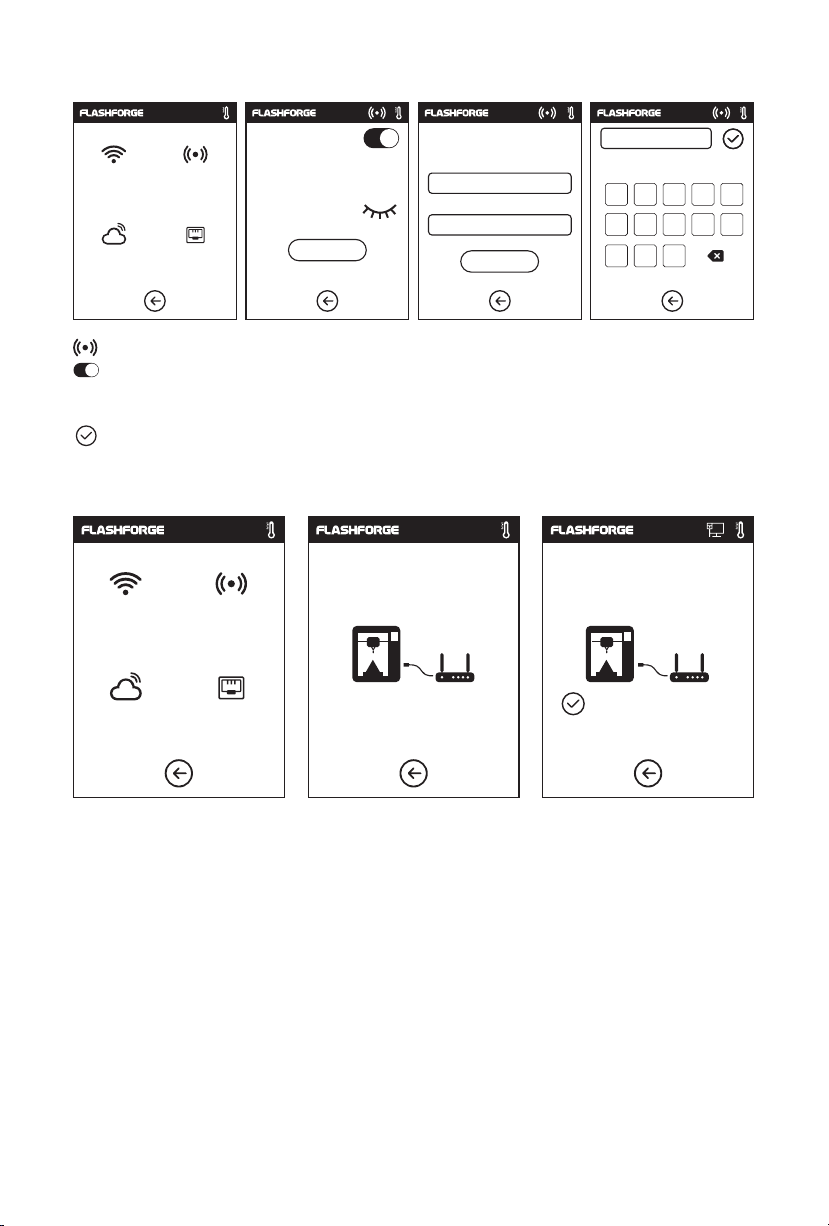
Hotspot
Setup WLan hotspot
SSID:
Password:
Save
123
1
6 7 8 9 0
,
WiFi
Cloud
Hotspot
Ethernet
WLan hotspot
SSID:
Password:
Setup hotspot
To set your printer as a WLAN hotspot.
Turn on/off the WLAN hotspot.
Hotspot setting: To set the hotspot name and password. Input hotspot name with
numbers, characters and symbols.
Tap to save the name and password.
Ethernet Connection
WiFi
Cloud
Hotspot
Ethernet
Please connect the cable Connected successful
%#
abc
5
3 4
2
_
.
To connect your printer with your PC via Ethernet cable.
14
Page 17

Cloud Connection
Network Preheat
Setting
FlashCloud
Printer Name:
Flashforge
Registration Code:
ABCDEF
About
WiFi
Cloud
PolarCloud
Account:
PIN:
Hotspot
Ethernet
Save
FlashCloud
PolarCloud
1. Turn on the WiFi or Ethernet connection, connect the printer to internet successfully.
2. Tap[Tools]-Tap[Network]-Tap[Cloud] on the printer;
3. Turn on the Cloud Connection function;
4. Register your cloud account and set your settings on https://cloud.sz3dp.com with the
registration code on printer's touch screen, or register your cloud account on
https://polar3d.com to get your polar3d account and pin code.
15
Page 18

2.3.2.2 Preheat setting
Extruder
Network Preheat
Platform
Setting
ON/OFF: Turn ON/OFF the extruder or platform preheat;
Tap symbol, you could set preheat temperature;
Long press symbol, set preheat temperature rapidly;
Extruder/Platform preheat interface
Extruder
About
235
/235℃
Extruder
Platform
220℃
50℃
Start
235
75
/235℃
/100℃
Abort
It contains actual temperature, target temperature and heating progress.
Extruder highest preheat temperature: 240℃
Platform highest preheat temperature: 100℃
Tap : Abort the preheat job.
Abort
Abort
16
Page 19

2.3.2.3 Setting
Network
Setting
<
Status
Buzzer
Update
3/3
Preheat
About
FactoryReset
<
Status
Calibration
<
Setting interface
Status
Home
FilamentCheck
FactoryReset
Language
1/3
Move
Home
<<
FilamentCheck
<
Language
Move
Led
Update
2/3
Camera
Led
Calibration
Camera
Buzzer
20℃
20℃
Load
17
1/3
Language
X: 20.00 Y: 45.00 Z: 36.00
<
Status
Calibration Home
<
It displays the real-time coordinates of X-axis, Y-axis, Z-axis and the real-time
temperature of extruder and platform.
Page 20

Language
En
1/3
1/3
Language
<
Language
<
De
Fr
1/2
<
Click the arrow to adjust the
nozzle so that it just touches
the platform
Z axis
Extruder
Es
<<
0.00
OK
Status
Calibration Home
<
Choose the target language.
Status
Calibration Home
<
Up arrow: Extruder will elevate, away from the platform;
Down arrow: Extruder will descend, move close to the platform;
Ar
2/2
<
Calibration
To calibrate the initial distance
between extruderand platform.
After homing completed,slide
the piece of paper continuously
back and forth between the
nozzle and the build plate. And
simultaneously manually tap
up and down arrow to adjust the
distance until the paper causes
a slight friction. Tap [OK] to
complete calibration.
Home
Homing, please wait... Homing completed
1/3
Language
<
18
Status
Calibration Home
<
To make the X, Y and Z axes back to the mechanical zero point.
YesYes
Page 21

Move Camera
FilamentCheck Led
2/3
<
<
X: 20.00 Y: 45.00 Z: 36.00
Y
Y
X
X
Z
Z
Manual:
To manually adjust the
positions of extruder and
build plate.
Extruder moves to the right;
Extruder moves to the left;
Build plate moves to the front;
Build plate moves to the back;
Extruder moves upward;
Extruder moves downward;
Auto Mode
Idling Printing
Move Camera
FilamentCheck Led
2/3
<
Note: when using cloud print and using camera function on cloud, camera will be on manual mode, USB
stick will be off; turn on the auto mode on printer if you want to turn off the manual mode.
More details about Camera, please check Chapter 2.5.
Move Camera
FilamentCheck Led
<
Manual Mode
Move Camera
FilamentCheck Led
Camera:
Turn on or turn off the camera.
Auto Mode:
Printing: Camera is on; USB stick is off
Idling: Camera is off; USB stick is on
Manual Mode:
Users choose camera is on or USB stick
is on, when one of them is on, the other
is off.
Filament check:
To turn on/off the filament
check, notice will pop out
when filament is used up
or suspended when the
check is turned on.
Led: To turn on/off the light.
<
2/3
<
<
2/3
<
19
Page 22

Buzzer
Update
FactoryReset
Factory Setting
Delete all data
in internal memory
Completed!
Restored to factory setting
<
3/3
<
Start
ok
Factory Setting: Delete all data in internal memory, return the printer to factory setting.
Buzzer: To turn on/off the buzzer.
Update: To upgrade the newest firmware.
2.3.2.4 About:
Machine Type:
Adventurer 3
Serial No:
123456
RegisterCode:
XXXXXX
Polar Serial No:
XXXXXX
1/3
<
Firmware Version:
v1.03-1.1
Build Volume:
150 x 150 x 150
Usage counter:
12 hours
IP Address:
10.90.243.184: 8899
2/3
<
<
WiFi MAC:
02:00:00:00:11:66
3/3
<
< <
Shows the basic information about the printer.
Notice: When contacting after-sales support, please give your Serial No to after-sales
engineer, which is showed in the [About] interface.
20
Page 23

2.3.3 Filament
Load
Change
200
Heating extruder...
Cancel
/235℃
Preheat completed.
Begin loading.
235
ok
/235℃
/235℃
235
Press ok when new color appears
ok
Load
• The extruder is heated up to 220℃.
• After heat completed, insert the filament into the extruder at an upright angle until
some resistance is sensed(as the filament is pushed through the feeding wheel).
• Load will complete when you see filament come out of extruder.
Load
Change
/235℃
235
Unloading the filament,
please wait...
Pull out old filament,
feed new filament, press [ok].
235
ok
/235℃
/235℃
235
Press ok when new color appears
ok
Change
• The extruder is heated up to 235℃, after heat completed, filament will be unloaded
from the extruder.
• Pull out the filament according to the instruction.
• Insert new filament into the filament intake, tap [OK] ;
• New filament will be pushed into the extruder, replace will complete when you see
new filament come out of extruder.
21
Page 24

2.4 Print
Plug the power cable into the input on the right
side and turn on the power switch, the touch
screen is turned on.
Power Switch
2.4.1 Load Filament
1. Open the filament cover, insert the filament into the
filament intake, push filament into the feeding wheel
until some resistance is sensed.
Note: Please make sure filament has been pushed into
the feeding wheel!
22
Page 25

Build
Load
200
/235℃
Tools
Change
Filament
2. Tap [Filament]--Tap [Load]--After Load completed--Tap [OK]
/235℃
235
Preheat completed,
Begin loading...
ok
3. Load completed when you see filament come out of extruder, Tap [OK].
Put the spool of filament on the spool holder, close the filament cover.
Press ok when new color appears
ok
235
/235℃
Heating extruder...
Cancel
Mind the loading direction of filament, make sure
to be clockwise as the picture showed.
23
Page 26

2.4.2 Model File Transfer
After generating the Gcode file, you can transfer it to your Adventurer 3 with different
network methods. If use USB stick to print, please insert your USB stick with target .g/.gx file
to your Adventurer 3, there will be no need to set new network.
Method 1 :
WiFi Connection
Network
Setting
Preheat
About
WiFi
Cloud
1. Tap [Tools]--Tap [Network]--Tap [WIFI] ;
WiFi
Choose a network
Flashforge
ChinaNet-AnCr
TP-LINK_EDC2
QS_1234
1/3
<
<<
123
1 2 3 4 5
6 7 8 9
,
.
2. Choose a network and input the password.
abc
_
Hotspot
Ethernet
%#
WiFi
Flashforge
Choose a network
ChinaNet-AnCr
0
TP-LINK_EDC2
QS_1234
1/3
<
3. Open the FlashPrint software, click [Print], then click [machine type], select [Flashforge
Adventurer III]. Then click [connect to the machine].
24
Page 27

4. In the pop up dialog box, the connection mode selects Wi-Fi, and fill in the IP port column
with the IP address of the printer. Query IP address clicking [tools] - [about], turn to next
page, you can see the IP address. Input completion and click connect.
5. When the connection is succeed, the machine status bar will appear in the lower right
corner of the software interface, and the printer icon will be displayed as a connected
state. After processing the model in FlashPrint software, click the top print icon. Click
[OK]. Select the appropriate location to save the slice processed files.
Notices
When the user wants to use the browser to view the images, the printer and PC must be in an
intranet (that is, the printer and PC connect to the same router).
25
Page 28

5. After the software slicing is completed, click [Print]. Then the printer starts preparatory
work such as preheating, and automatically starts printing after it is ready.
26
Page 29

Method 2: Cloud Connection
Network Preheat
Setting
FlashCloud
Printer Name:
Flashforge
Registration Code:
ABCDEF
About
WiFi
Cloud
PolarCloud
Account:
PIN:
Hotspot
Ethernet
Save
Use the cloud connection to process printing operation.
FlashCloud
PolarCloud
* The use of FlashForge cloud is in 2.4.3.1 section.
27
Page 30

2.4.3 Print
Build
Tools
Filament
6.62GB
Not Available
No job
1. Tap [Build], choose the file path: Printer internal memory, USB stick, Cloud.
Ship-PLA.gx
20mm_BoxPLA.gx
1/1
<
<
2. Choose the model file, tap on its right to start printing; or tap model picture or model
name to enterdetail page, tap to start printing.
20mm_Box-P...
0 h 10 min
0.70M
20mm_Box-PLA.gx
0h10
Time Remaining
min
...
Ship-PLA.gx
20mm_Box-
PLA.gx
Build completed!
1/1
<
ok
3. Extruder will heat up automatically, when heating finishes, the printer will start
to build the model. After printing completed, printer will sound a beep and pop
out a notice on the touch screen.
28
<
Page 31

Type State
En
2.4.3.1 FlashCloud Print
Login
E-mail
Password
FlashCloud:Cloud.sz3dp.com
Remember Password
1. Register your account on Flashforge cloud:
After activate your account through your email box,
login in Flashforge cloud with your account.
FlashCloud
Home
My Printer
My Model
My Job
Model Library
My Printer
Name Register Code Type State
Add printer
+
The current printer is empty. Please add a printer
Forgot password Rigister
2. After login in cloud with your own account, click [My Printer] - click [Add Printer].
FlashCloud
Home
My Printer
My Model
My Job
Model Library
Add printer
My Printer
Name Register Code
+
The current printer is empty. Please add a printer
Add Printer
All fields must be filled in
Name
Registration Code
OK Cancel
Login
En
FlashCloud
Printer Name:
Registration Code:
ABCDEF
3. Input your printer’s name and Flashcloud registration code in [Add printer] interface. These information are
showed in your printer’s FlashCloud interface.
29
Page 32

FlashCloud
Home
My Printer
My Model
My Job
Model Library
My Printer
Name
4. Add printer completed.
+
Flashforge
Add printer
En
The current printer is empty. Please add a printer
Register Code Type State
ABCDEF Adventorer 3 Idle
FlashCloud
Home
My Printer
My Model
My Job
Model Library
User
2018.3.2
3D Model
Model Detail
Print
5. Choose a model from cloud model library or upload your own model (stl file), click [Print], enter the edit model
interface to edit model.
FlashCloud
Home
My Printer
My Model
My Job
Model Library
Flashforge
Edit model
Move Rotate Scale
-150
X:
-150
Y:
Print para
150
150
0
0
En
En
-150
Z:
150
0
Print
6. In the drop down menu of the printer's name, you can choose the printer which runs this mission. (the printer must
be added into 'my printer')
30
Page 33

FlashCloud
首页
我的打印机
我的模型
我的任务
模型库
Flashforge
2.4.3.2 Polar云打印
1. Register Polar cloud account.
Log i n https://polar3D.com to register the account.
2. Query Polar cloud PIN code.
En
Time Remaining
h
min
0
0
0%
21℃ / 0 ℃ 21℃ / 0℃ Closed Normal
Start Cancel
(1). After completing the Polar cloud registration and log in the Polar cloud website, click the icon on the top right
corner and click [Settings].
31
Page 34

Location
Biography
Website URL
http://www.example.com/profile
Email
+ADD Email
PIN Code
XXXX
(2). Find the PIN Code column below the page, and the shown number is PIN code.
3. Connect the Adventurer 3 to the internet.
Choose the appropriate network connection mode in the communication interface to connect the
network (see the 2.3.2.1 section of the connection method).
4. Connect the Adventurer 3 to the Polar cloud.
PolarCloud
Polar cloud switch
Account:
Enter the cloud connection interface (click tools >
PIN:
Save
5. After the connection is completed, you can see the printer's information on the front page of Polar cloud
website. (if you turn on the camera function, you can see the real time picture on the page).
communication > cloud connection), turn on the Polar cloud
switch (After the Polar cloud is turned on the switch will change
into green). Fill in the below account and PIN code columns
with the account before the registration of Polar cloud and the
PIN code queried before, click save.
32
Page 35

7. Click [MY OBJECTS], then click [UPLOAD] to upload the model.
8. Drag and drop the model files that need to be uploaded to the box area or click the box area to select the upload
model, then click [UPLOAD] to upload.
33
Page 36

9. Click [PRINT].
10. Click [START], the printer starts the cloud task downloading, and starts printing when the download is finished.
34
Page 37

2.4.4 Model Remove
1. Take out the removable build plate.
When printing completed, extruder and build
plate may still be hot, please start operating after
cooling down!
Notices
2
. Bend the build plate, the plate will produce certain deformation, seperating the
plate away from the bottom of model (Please use a scraper to assist removing
when model is too small or big).
35
Page 38

2.4.5 Replace Filament
/235℃
200
Load
Heating extruder...
Change
Cancel
1. Tap [Filament]--Tap [Change], extruder will start preheating.
. Pull out the filament as the picture
2
showed above.
/235℃
235
Unloading the filament,
please wait...
. When new filament come out of extruder steadily, replace is completed, Tap [OK].
4
feed new filament, press [OK].
3. Insert new filament into the filament intake
and push the filament into the feeding wheel
until resistance is sensed.
/235℃
235
Pull out filament,
OK
36
Press ok when new color appears.
OK
235
/235℃
Page 39

2.5 The Guide of Using Camera
Camera User Manual
Camera and USB Disk use the same interface, so the use of Adventurer 3's camera is different
from that of other models. The use of Adventurer 3's camera and the use of Adventurer 3's USB
Disk are incompatible (that is, only one (camera or USB Disk) can be used in the same time).
The switching between camera and USB Disk can be realized through the Cloud or the lower
computer. The use of Adventurer 3's camera is introduced as follows.
2.5.1. The switching can be controlled by the lower computer
In respect of the use of Adventurer 3's camera, there are two modes, that is automatic mode
(default mode) and manual mode. The route is (Tools->Settings (on the second page) ->
Camera), the user can click the “Camera” button to enter the relevant page.
Auto Mode
Idling Printing
Manual Mode
Automatic Mode: When the printer is working (such as
the printer is printing the files), the camera is turned on
and USB Disk is turned off. When the printer is not working,
the camera is turned off and USB Disk is turned on.
Build
Tools
Build
Tools
Auto Mode
Manual Mode
Manual Mode: The switching
between camera and USB Disk
can be controlled by the user
at will.
Filament
Filament
After the camera is turned on successfully, the icon of camera
will appear in Status Bar. After the camera is turned off, the icon
of USB Disk will appear in Status Bar in case of successful insertion
of USB Disk.
37
Page 40

2.5.1. The use of FlashForge cloud camera
类型
En
Login
E-mail\phone
1. Login FlashForge cloud website and
register an account. After the mailbox
activation, you can login and use the
FlashForge cloud.
FlashForge cloud website:
https://cloud.sz3dp.com
FlashCloud
Home
My Printer
My Model
My Job
Model Library
My Printer The current printer is empty. Please add a printer.
Name Register Code Type
Add printer
+
2. After login, click [My Printer] - [Add Printer].
FlashCloud
Home
My Printer
My Model
My Job
Model Library
My Printer The current printer is empty. Please add a printer.
Name Register
Add printer
+
Add printer
All fields must be filled in
Name
Register Code
OK Cancel
Password
Remember password
Login
Forgot password Register
中
FlashCloud
Printer Name:
XXXXXX
Registration Code:
XXXXXX
3. Fill in the printer page with the printer name and registration number. This information is
displayed on the FlashForge cloud’s interface of the printer. Please make sure that the printer
has been properly connected to the network (see section 2.3.2.1), the FlashForge cloud
function is in the turned on state and the printer is in the camera function (see section 2.5.1).
38
Page 41

FlashCloud
Home
My Printer
My Model
My Job
Model Library
My Printer
Flashforge
Add printer
+
The current printer is empty. Please add a printer.
Register Code Type
4. Add succeed.
5. Click the camera icon pointed by the arrow.
中
State
XXXXXX Adventorer 3 offline
6. Camera begins to work.
39
Page 42

2.5.3. PolarCloud camera use
1. Register Polar cloud account
Enter www.polar3D.com website to register account.
2. Find Polar cloud pin code
(1). After registering polar cloud and log in polar cloud webiste, click the upper
right arrow, click [Settings]
Location
Biography
Website URL
http://www.example.com/profile
Email
+ADD Email
PIN Code
XXXX
(2). Find PIN Code on the bottom of the page, the display numbers is PIN code.
40
Page 43

3. Connect Adventurer 3 to the internet. Choose the proper connecting way in the Network
interface (the connecting way consults pagexx ).
4. Connect Adventurer 3 to the Polar cloud.
PolarCloud
Account:
PIN:
Save
PolarCloud Switch
Enter the cloud connection interface (click Tools-NetworkCloud), turn on the Polar cloud switch (After the Polar cloud
is turned on, the switch will change in to green).
Fill in the bottom account and pin code column Polar account
and Pin code showed before respectively, click Save.
After the connection is completed, you can see the camera image in Polar cloud website.
Notices
1. Make sure the printer is connected to the internet.
2. When using the camera please make sure the camera
is in the camera status instead of USB status.
(there should be a camera icon in the status bar).
41
Page 44

2.5.4. The switching can be controlled through the Cloud
1. Connect to Polar Cloud
The user can turn on or turn off the camera through Polar Cloud. Click Tools->
Communication -> Cloud Connect -> Polar Cloud, enter the settings page of Polar Cloud,
click the input boxes of account number and PIN, enter the account number and PIN, click
the “Start” button to connect to Polar Cloud. The account number is the mailbox used for
sign-up with Polar Cloud; for the acquisition of PIN.
PolarCloud
Account:
PIN:
Save
The guide of getting a Polar could account.
The Polar cloud account is the register email account.
Polar cloud website: www.polar3D.com
The way of getting PIN code
(1). After registering polar cloud and log in polar cloud webiste, click the upper
right arrow, click [Settings]
42
Page 45

Location
Biography
Website URL
http://www.example.com/profile
Email
+ADD Email
PIN Code
XXXX
(2). Find PIN Code on the bottom of the page, the display numbers is PIN code.
2.
Open or close the camera through the Cloud.
(1). After switching on the camera funcition, click camera image on the front page to enter
the interface like this, click the COMMANDS button pointed by the arrow.
CUSTOM COMMANDS
open camera
close camera
CANCEL SEND
(2). You can use check mark to open or close the camera in the pop-up window.
43
Page 46

Notices
a. If PolarCloud is in an intranet (that is, the printer and PC connect to the same router), the video
is shown, and the state of printing can be displayed in real time. If PolarCloud is in an extranet,
the pictures are shown (in case of printing, a picture is sent per 20s; in case of not working,
a picture is sent per 60s).
b. When the camera is turned on or off, the lower computer will turn off and reconnect PolarCloud,
so PolarCloud will not respond for a while. The recovery time depends on the state of network.
c. After the camera is operated through the Cloud, the lower computer will set the camera to be in
the manual mode; if the automatic mode is to be recovered, please set manually (Tools->
Settings (on the second page) -> Camera).
2.5.5. Error Handling
Auto Mode
Manual
Camera has not be found
Confirm
PolarCloud
Account:
error
PIN:
Confirm
Save
1. When the camera is damaged or not inserted, the error
is reported in case of turning on the camera. At this point,
the lower computer will automatically set the camera to
be in manual mode and the camera is turned off.
2. If the lower computer does not connect to PolarCloud and
the printer is deleted from the Cloud, the error is reported;
at this point, the factory settings can be restored in order to
solve the problem. After the lower computer connects to the
printer and the printer is deleted from the Cloud, the sign-up
needs to be done again according to the foresaid steps.
44
Page 47

Chapter 3: Q&A
Q1. How to solve if the nozzle is clogged?
Method 1: Tap [Preheat], heat up the extruder to 240℃, after heating completed, press the air
tube joint and pull out the filament guide tube. Check to see whether the filament is
bended or filament tip is not smooth, cut filament tip smooth and flat, install the
guide tube and filament back, Tap [Load] .
Method 2: If method 1 not improving, use an unclogging pin tool to unclog filament.
Method 3: If method 1 and method 2 not improving, please replace the nozzle.
Q2. How to replace the nozzle ?
Notice
Power off before replacing nozzle! Make sure power off operation!
Please make filament tip smooth and flat when cutting off the filament.
1. Press the left and right clips and pull out the nozzle.
2. Push in a length of filament through the filament intake manually, making it long enough to
be cut off.
3. Rotate the filament spool anti-clockwise manually, making filament retreat back a little.
4. Press the left and right clips, install the new nozzle back into the extruder, making the nozzle
slot and bottom of extruder are on the same level.
5. Tap[Filament] -- Tap[Load], nozzle replace completed when you see filament come out of
new nozzle.
Clips
The buckle is not installed in place The buckle is installed in place
Whether the assembly of the sprinkler is in place is judged as follows:
1. When installing, must press the sprinkler hard to the end.
2. Check whether the installation is in place:
( 1 ) Touch the black buckle and white sprinkler's lower shell, make sure
no sunken.
( 2 ) Look at the black buckle and white sprinkler's lower shell, make sure
there is not a large gap in the contact.
45
Page 48

Q3. Do we need to do extruder calibration again after replacing nozzle?
Yes, do extruder calibration again to ensure high print quality as minimal error may be
caused by extruder installation.
Q4. How to solve if displayed temperature is abnormal after replacing nozzle?
Abnormal temperature indicates extruder sensor can not be read, please check the nozzle
whether it is well installed.
Q5. How to solve if no filament come out of extruder after tap [Build] model file and
extruder begins moving normally?
1. Check the filament guide tube, make sure filament has been pushed into the extruder, if not,
please tap [Load]. Restart building model file after you see filament come out of extruder.
2. Check the nozzle whether it is clogged or not, if so, please refer to Q1 for resolution.
Q6: How to replace the filament ?
1. Tap[Filament]--Tap[Replace], after extruder heating up completed, filament will be unloaded,
pull out the filament according to the instruction.
2. Insert new filament into the filament intake and feeding wheel, tap [OK]; New filament will be
pushed into the extruder.
3. Replace will complete when you see new filament come out of extruder.
Q7: How to take down the model ?
1. Take out the removable build plate.
2. Bend the build plate, the plate will produce certain deformation, seperating the plate away
from the bottom of model. (Please use a scraper to assist removing when model is too small
or too big).
3.Take down the model.
Q8: How to solve if the distance between nozzle and platform is too large(far away) or
too small(hit) during printing?
1. Tap[Setting]--Calibration.
2. The extruder homing automatically, moves down some height.
3. Tap up and down arrow to adjust the distance between extruder and platform until extruder
is just about to touch platform.
4. Tap[OK], printer will memorize current calibration position and start homing automatically.
Q9: Can we use other brand filament which is not produced by Flashforge ?
Adventurer 3 support normal ABS and PLA filament but different brand filament has different
ingredients. Adventurer 3 tests out default settings according to the properties of Flashforge
ABS and PLA filament.
Other brand filament is ok but not recommended for using, if that causes extruder clogging
or bad printing quality or other failure, FlashForge will take no responsibility. These problems
are not in the warranty of FlashForge .
Q10. Is Adventurer 3 compatible with all kinds of AC power input ?
Adventurer 3 is equipped with a built-in 24V/6.5A power supplier, suitable for 110V-240V
input voltage.
Q11. Is Adventurer 3 capable to be turned off automatically after printing job is finished ?
No.
46
Page 49

Q12. What kinds of file formats does Adventurer 3 support?
Input: 3mf / stl / obj / fpp / bmp / png / jpg / jpeg files.
Output: gx/g files.
Q13. Does Adventurer 3 support other cloud platform besides the FlashCloud?
Yes, Adventurer 3 interface is open up to all other cloud platforms.
Q14. Is the ABS printing safe?
ABS filament will give off certain poisonous gas when heated up, please put the printer in
well ventilated condition when printing ABS. We suggest printing non-toxic PLA filament
when printer is used in children activity places.
Q15. How to solve if printing result has edge warp?
Method1: Heating up the platform can solve or minimize the problem by increasing
adhesion between platform and model.
Method2: Adding raft to model when slicing in FlashPrint.
Method3: Apply the solid glue to platform before printing.
Q16. Is it a must to add a raft before printing the model?
Not necessarily, much more filament will come out of extruder when printing the raft,
increasing printing success. Heating up the platform also increases printing success by
increasing adhesion between platform and model.
Q17. After replacing nozzle completed, printer status displays extruder temperature
is 300℃, extruder fan is also working, what is the problem and how to slove?
The new nozzle is not properly installed, extruder temperature can not be read and the
displayed extruder temperature is abnormal. Please plug out and install the nozzle again,
push nozzle to the end, make sure the nozzle slot and bottom of extruder are on the same level.
Q18.The extruder makes out chug noise and no filament come out of extruder, what is
the problem and how to slove ?
Filament has not loaded into extruder, making out chug noise,more likely the nozzle is clogged
or filament guide tube is not properly installed. Check the guide tube joint first, if the guide tube
is normal, refer to Q1 for resolution.
Q19.What is the difference between filament load and filament replace ?
Load: Only include loading filament into extruder;
Replace: Include loading and unloading two functions, first unloading and then loading filament.
Q20.Adventurer3 starts printing when the distance between extruder and build plate is
still large,causing filament can not stick to build plate and print fails.
Do the printer Calibration again or do the Homing again, then print again to check result.
Q21. You cannot find printing files when you use USB driver.
USB driver file is not corrected. Adventurer3 only supports FAT32 file system, please format USB
driver into FAT32 file system.
47
Page 50

Daily Maintenance Instruction:
Please apply lubricate grease to printer guide rods if you do not use it for long,or do the same
maintenance once a month.
Chapter 4: Supports and Service
FlashForge team is on standby and ready to help you with any challenges you may have with
your Adventurer 3. If the issues or questions are not covered in this User Guide, you can seek
for solutions on our official website or contact us via telephone.
There are solutions and instructions to common issues that can be found in our knowledge
base. Have a look first as most basic questions are answered there.
www.FlashForge.com
The FlashForge support team can be reached by e-mail or phone between the working hours
of 8:00 a.m. to 5:00 p.m. PST Monday through Saturday. In case you contact us during off-duty
time, your inquiry will be answered the following business day.
Note: Because of changing different filament the extruder maybe blockaded. It’s not owing to
quality issue, and outside the scope of 400 hours life. If users encounter this problem, please
contact our after-sale department and finish clean work according to their instruction.
QQ: 2850862986 2850863000 2853382161
Email: support@ff3dp.com
aftersales@flashforge.com
ADD: No. 518, Xianyuan Road, Jinhua, Zhejiang, China.
When contacting support, please have your serial number ready. The serial number is a bar
code on the back of your Adventurer 3.
S/N: FFAD******
48
Page 51

FCC Statement
Any Changes or modifications not expressly approved by the party responsible for compliance
could void the user’s authority to operate the equipment.
This device complies with part 15 of the FCC Rules. Operation is subject to the following two
conditions:
(1) This device may not cause harmful interference, and
(2) This device must accept any interference received,
including interference that may cause undesired operation.
FCC Radiation Exposure Statement:
This equipment complies with FCC radiation exposure limits set forth for an uncontrolled
environment .This equipment should be installed and operated with minimum distance 20cm
between the radiator& your body.
Note: This equipment has been tested and found to comply with the limits for a Class B digital
device, pursuant to part 15 of the FCC Rules. These limits are designed to provide reasonable
protection against harmful interference ina residential installation. This equipment generates,
uses and can radiateradio frequency energy and, if not installed and used in accordance with
the instructions, may cause harmful interference to radio communications. However, there is
no guarantee that interference will not occur in a particular installation. If this equipment does
cause harmful interference to radio or television reception, which can be determined by
turning the equipment off and on, the user is encouraged to try to correct the interference by
one or more of the following measures:
—Reorient or relocate the receiving antenna.
—Increase the separation between the equipment and receiver.
—Consult the dealer or an experienced radio/TV technician for help.
—Connect the equipment into an outlet on a circuit different from that to which the receiver is
connected.
Page 52

Scan QR to Get More After-Sales Support
Twitter
Facebook
Official Website
 Loading...