

Fitness Quest Pilates Power Gym Owner's Manual
O W N E R ’ S M A N U A L
For maximum effectiveness
and safety, please review this
Owner’s Manual, view the Video,
and for healthy eating tips refer
to the Jump Start Section.
®
We warrant this product to be free from all
defects in material and workmanship when used
according to the manufacturer’s instructions.
See Limited Warranty Card for details.
Save your sales receipt.
(You may wish to staple it into this manual.)
Dedication to Quality
10/27/09 DR
-------- 48 --------
TABLE OF CONTENTS
©2007, ©2008 and ©2009 Fitness QuestInc. Allrights reserved. Made in China.
Pilates Power Gym
™ is a trademark of Kaswit, Inc. U.S.Patent 7,163,498.
Fitness Quest® is a registered trademark of Fitness Quest Inc.
No part of this booklet may be reproduced or utilized in any form or by any means electronic,
mechanical or otherwise without the express written consent of the copyright holder.
10/27/09 DR
Important Safety Information ...............................................2
Equipment Warning/Caution Labels.....................................3
Specifications & Parts ..........................................................3
Introduction ..........................................................................4
Set-up Instructions ...............................................................5
Care, Storage & Maintenance ..............................................5
Parts List ..............................................................................6
Exploded Views.................................................................7-8
Assemblies ...........................................................................9
Getting Started ...................................................................10
Glideboard Adjustments ..............................................10
Tension Cord Adjustments...........................................11
Handle and Foot Strap Attachments ...........................11
Headrest Adjustments .................................................12
Foot Rest Bar Settings ................................................12
Exercise Guidelines.......................................................12-13
Warm-Up & Cool Down Stretches ................................14-15
Pilates Power GymTMSystem .............................................16
Pilates Power GymTMWorkout ......................................16-17
Pilates Power Gym
TM
8 Week Workout Progression Chart ............................18
Pilates Power Gym
T
M
Exercises ....................................19-34
Pilates Power Gym
T
M
Workout Tracking Sheets............35-36
Cardiovascular Conditioning.........................................36-37
Progressive Cardiovascular Training Program ...................38
Cardio Workout Tracking Sheets ..................................39-40
JUMP START DIET ......................................................41-46
Progress Charts ............................................................47-48
®
ADDITIONAL PROGRESS CHART
C
alves
Thighs
H
ips
A
bdomenWaist
Weight
D
ate
-------- 47 ---------------- 2 --------
IMPORTANT SAFETY INFORMATION
1) Before starting this or any other exercise program,
consult your physician. Your physician should assist you in
determining the target heart rate zone appropriate for your
age and physical condition. Certain exercise programs or
types of equipment may not be appropriate for all people. This
is especially important for people over the age of 35, pregnant
women, or those with pre-existing health problems or balance
impairments. If you are taking medication which may affect
your heart rate, a physician's advice is absolutely essential.
2) Start out slowly and progress sensibly. Even if you are an
experienced exerciser, start with the beginner workout and
become familiar with all of the exercises before moving on to
more advanced workouts or exercises. For best results,
perform all of the exercises at the tempo demonstrated in
the DVD.
3) Do not overexert yourself with this or any other exercise
program. Listen to your body and respond to any reactions
you may be having. You must lear n to distinguish “good” pain,
like fatigue, from “bad” pain, which hurts. If you experience
any pain or tightness in your chest, an irregular
heartbeat, dizziness, nausea, or shortness of breath,
stop exercising at once and consult your physician
immediately.
4) Warm up before any exercise program by doing 5
to 10 minutes of gentle aerobic exercise, such as
walking, followed by stretching or follow the warm-ups
demonstrated on the Pilates Power Gym
™ DVD.
5) Before each use, inspect the equipment and all parts,
including cables, tension cords, rollers, pulleys, handle
assemblies and foot strap assemblies to ensure that
they are in proper working condition. Never use the
equipment if it is not working properly or if there are
signs of wear such as frayed or worn cables, tension
cords, pulleys, rollers, handle or foot strap assemblies.
Failure to follow these instructions could result in serious
injury or death.
6) USE CARE when getting on and off the equipment.
7) Use this equipment ONLY for the intended use
as described in this manual. Do not modify the
equipment or use attachments not recommended
by the manufacturer.
8) Have plenty of clearance space on all sides of your
equipment. It is important to keep children, pets, furniture
and other objects out of the way when using your equipment.
You should have a minimum of 3 feet of clearance space on
all sides of your equipment.
9) Wear appropriate clothing when exercising. Workout
clothing should be comfortable and lightweight, and should
allow freedom of movement. The Pilates Workout may be
performed with bare feet, or you may wear flexible athletic
shoes if you find that more comfortable. It is not recommended
that you exercise with socks or stockings only on the feet.
Wearing socks or stockings only may cause slippage of the
feet when using the Foot Rest Bar or optional Push Up Bar.
10) THIS EQUIPMENT IS NOT FOR USE BY CHILDREN.
To prevent injuries, keep this and all fitness equipment
out of the reach of children. Follow these simple rules:
– Keep children out of rooms where you have
your exercise equipment.
– Store exercise equipment in a room that
can be locked.
– Know exactly where your children are when
you work out.
– If you have small children at home, don’t wear
headphones while you work out.
– Talk to your kids about the dangers of exercise
equipment.
11) Breathe naturally, never holding your breath during an
exercise. Avoid over training, you should be able to carry
on a conversation while exercising.
12) Cool down after an exercise session, with 5 to 10 minutes
of gentle exercise, such as walking, followed by stretching or
follow the cool down stretches demonstrated in the Pilates
Power Gym
™ DVD.
13) Handicapped or disabled people must have medical
approval before using this equipment and should be under
close supervision when using any exercise equipment.
14) Only one person at a time should use this equipment.
15) DO NOT put hands, feet, or any foreign objects
on or near this equipment when in use by others.
Use caution not to pinch fingers or hands in moving parts
when folding, setting up, or using the equipment.
16) To prevent the Pilates Power Gym
™ from tipping and
causing an injury, set up and use the equipment on a
solid, level surface and follow the exercise instructions
demonstrated in the DVD and the exercise instructions
described on pages 19 through 34 of this manual.
Failure to follow these instructions could result in
serious injur y or death.
WARNING
YOU AND OTHERS CAN BE SERIOUSLY INJURED OR KILLED IF
WARNINGS ON THE EQUIPMENT, IN THIS OWNER’S MANUAL
AND VIDEO ARE NOT FOLLOWED.
Go to www.fitnessquest.com
or call 1-800-497-5831 for
replacement labels, manuals or video(s).
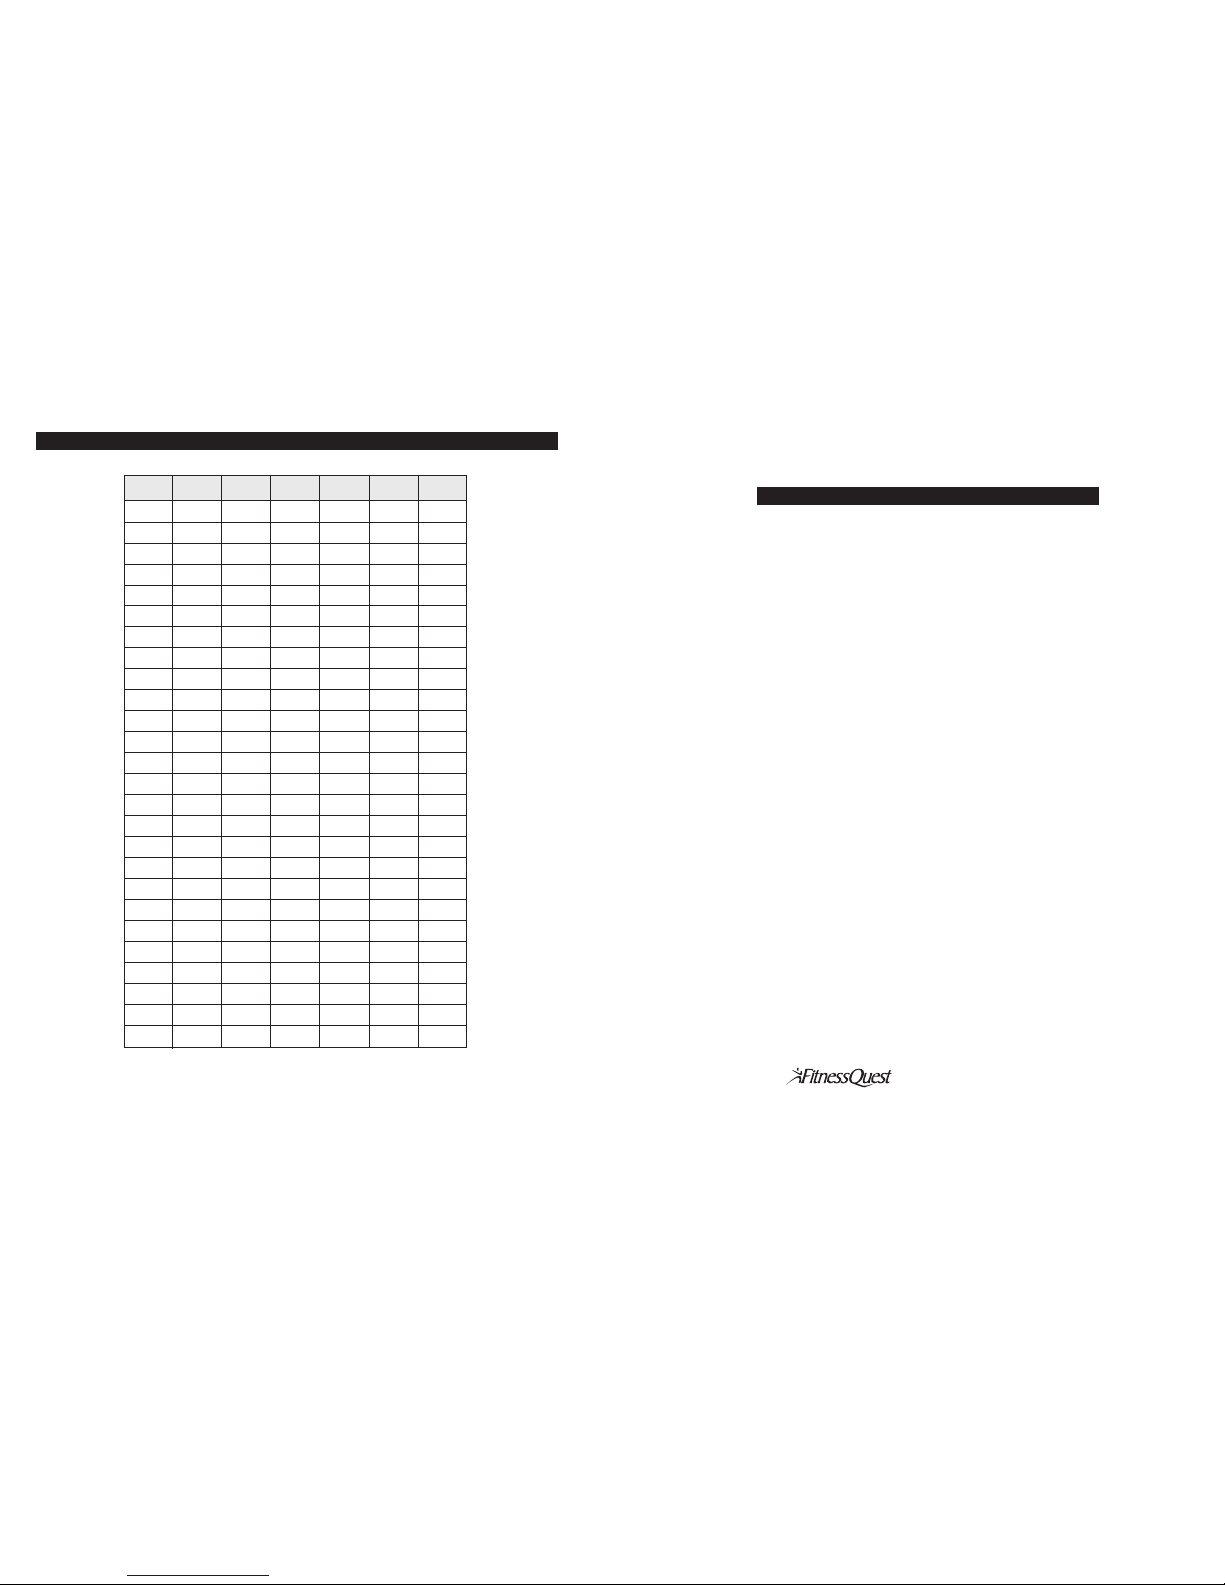
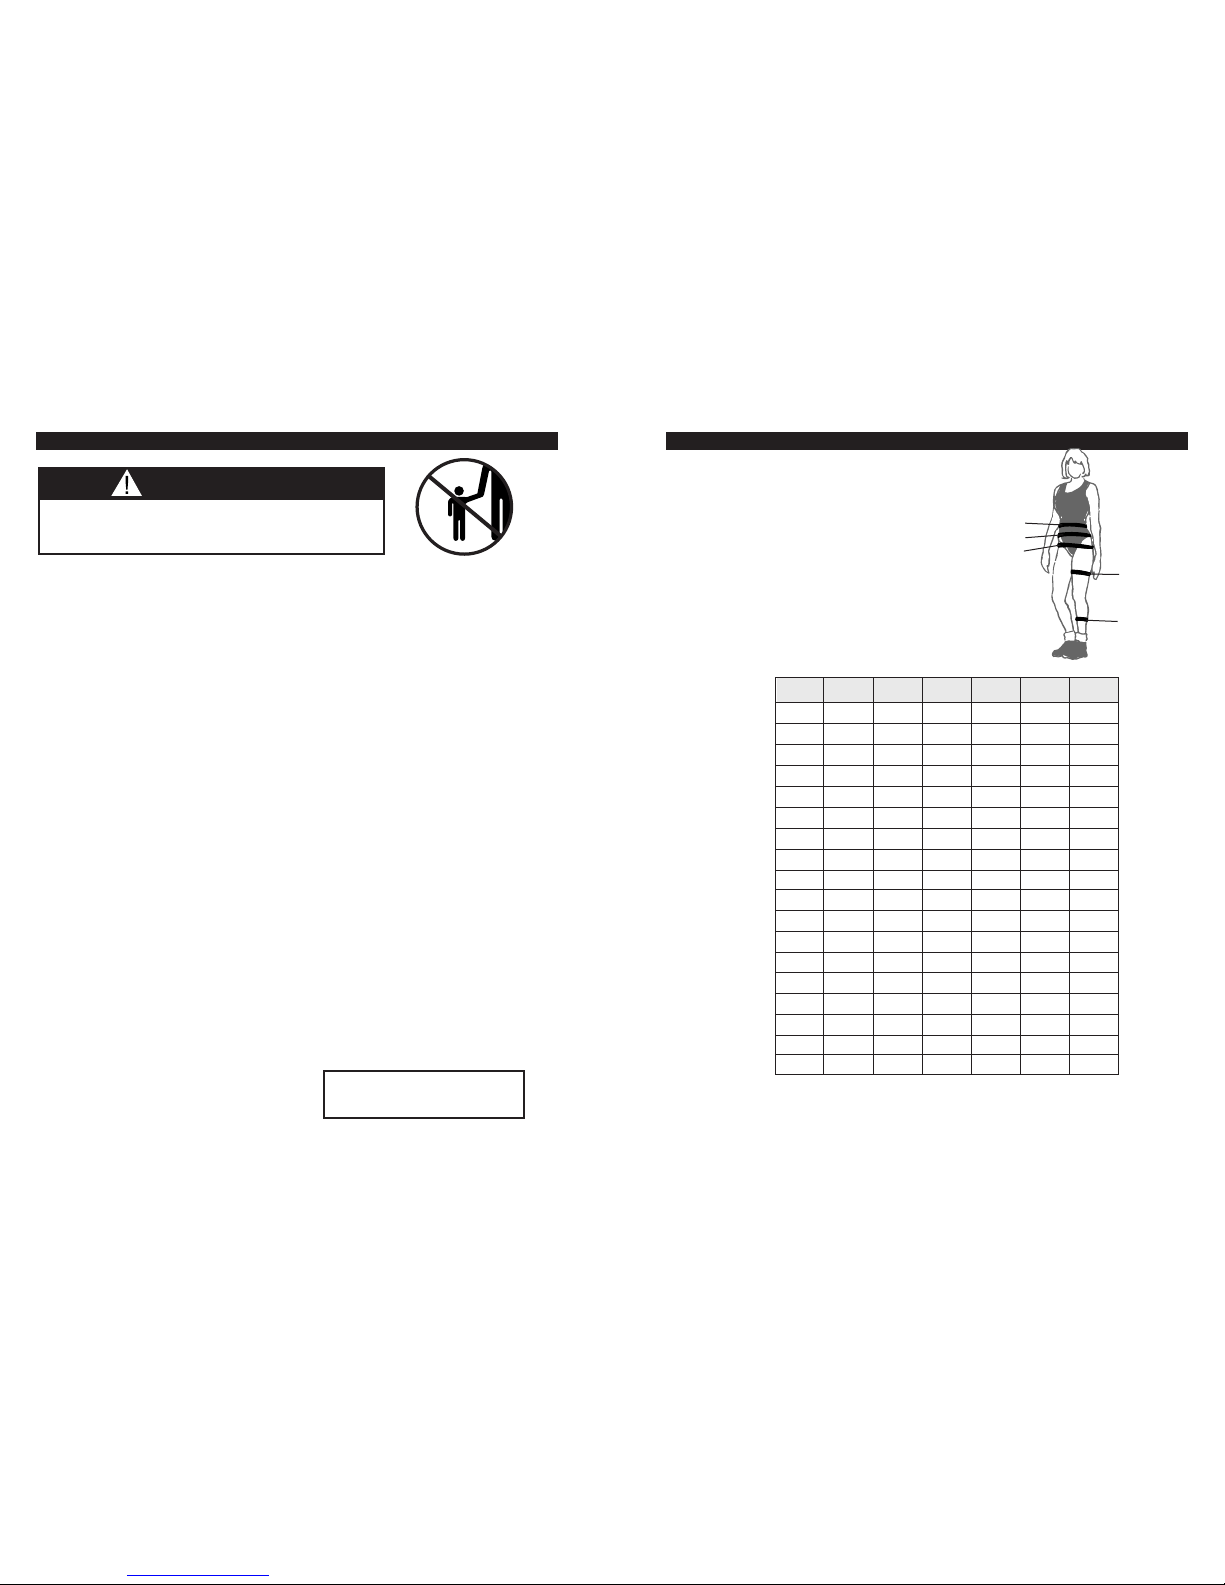
PROGRESS CHART
Every two weeks, measure yourself and use
the char t below and on the following page to
r
ecord your progress. Before writing on them,
make as many copies as you think you’ll need.
We suggest you keep these in a notebook. You
will find it both informative and motivational to
look back at what you’ve done. This data will
help you chart future fitness goals as you
continue to improve.
C
alves
T
highs
Hips
A
bdomen
Waist
W
eight
Date
Measuring Sites
Waist
Abdomen
Hips
Thighs (L/R)
Calves (L/R)

-------- 46 --------
--------
3 --------
EQUIPMENT WARNING/CAUTION LABELS
WARNING
Failure to read and follow the safety instructions stated in the Owner’s
Manual and Video may result in POSSIBLE SERIOUS INJURY OR DEATH.
KEEP CHILDREN AWAY. Maximum user weight 300 lbs. Replace this
label if damaged, illegible or removed. Class HC. Goto our website:
www.fitnessquest.com or call Customer Service: 1-800-497-5831 for
replacement label, manual, video or questions.
WARNING LABEL 1
WARNING
Before each use, INSPECT the equipment and all parts, including
cables, tension cords, rollers,pulleys, handle assemblies and foot
strap assemblies to ensure that they are in proper working condition.
NEVER use the equipment if it is not working properly or if there are
signs of wear such as frayed or worn cables, tension cords, pulleys,
rollers, handle or foot strap assemblies. Failure to follow these
instructions could results in serious injury or death.
WARNING LABEL 4
CAUTION
Keep hair, fingers,loose clothing, pets, and children away from hinges and other
moving parts to avoid serious injury. Also, be sure to have all pins locked in place
before getting on your UNIT to avoid severe injury.
CAUTION LABEL 1
CAUTION
When attaching TensionCords, hold firmly until the Cords are properly positioned. DO
NOT LET GO of the Tension Cords until they are locked in or back in the start position.
CAUTION LABEL 2 (
4 locations)
WARNING
CRUSH HAZARD.
Keep hands clear when
lowering Glideboard.
WARNING LABEL 2 (
2 locations)
SPECIFICATIONS & PARTS
IMPORTANT: See below for placement of the following Warning/Caution Labels on your equipment.
INCLUDES WORKOUT DVD
WARNING
Keep hands away from
pulleys and moving
parts.
WARNING LABEL 3 (
2 locations)
WARNING
LABEL 1
WARNING
LABEL 3
CAUTION
LABEL 2
CAUTION
LABEL 1
WARNING
LABEL 2
2 locations on
Rear of Unit
2 locations on
Pulley Arm Assembly
On Headrest
Base
REAR
FRONT
Large Hitch Pin
0100104
Headrest Base
0500003
Headrest
0300008A
Pulley Arm Assembly
0700016
Foot Strap
Assembly
0700019
Glideboard
Assembly
0300006B
Tension Cord 2
0700013
Tension Cord 4
0700015
Tension Cord 3
0700014
Tension Cord 1
0700012
Foot Rest Bar
0400036
4 locations
Height Adjustment Assembly
0400011A
Height
Adjustment Knob
0100085
Transport Handle
0100084
Base Frame Assembly
0400002
Handle Assembly
0400024
Knob
0100121
Product Weight: Approx. 58 lbs.
Maximum User Weight: 300 lbs.
Assembled Approximate Specifications: Dimensions are based on unit set up for use.
Length: 56”
Width: 15”
1/2 cup chocolate or vanilla pudding
made with skim milk
hot chocolate made with skim milk
8 oz. water
5 ginger snaps or vanilla wafers
8 oz. water
3 small mint patties or
3 Hershey’s Miniatures
®
3 cups light microwave popcorn
2 small cookies (about 50 calories each)
8 oz. water
1 oz. pretzels
1 cup skim milk
8 oz. water
2 tsp. peanut butter
6 crackers
1 cup skim milk
1/2 cup cereal
1/2 cup skim milk
8 oz. water
EVENING SNACK
(CHOOSE JUST ONE OPTION)
RULES for eating your evening snack:
Have it in a relaxed setting where you can enjoy them as a child would.
Do nothing while having your snack, do not read, write or watch TV.
M
ake your snack last 20 minutes.
DO NOT go back for seconds.
J
UMP START DIET
WARNING
LABEL 4
Height Lowered: 23-1/2”
Height Raised: 38”
0800023
(OPTIONAL)
Push Up Bar
19758
Small Hitch Pin
0100120
-------- 45 ---------------- 4 --------
Congratulations on your purchase of the Pilates Power Gym™! You’ve just taken an important step
toward your fitness goals. Whether that means strengthening the muscles of your upper body,
lower body and core, or improving your flexibility while toning your entire body, the Pilates Power
Gym
™ can help you get the results you want.
Working out on comfortable, efficient equipment that allows you to start and progress at the level
t
hat’s appropriate for you is a vital element in sticking with a program of regular exercise. With your
Pilates Power Gym
™, you’ll use almost every muscle in your body in smooth natural motions. You’ll
be able to choose the Pilates Power Gym™ workout that’s perfect for your fitness level and begin
your workouts right away – just what you need to improve your fitness the healthy, easy way!
Just a few minutes a day is all it takes to begin experiencing the strengthening, toning and
flexibility benefits of your Pilates Power Gym™. Additional aerobic workouts are required to round
out your program. With regular use of your Pilates Power Gym™, you may soon notice some
important changes in yourself, such as:
• More endurance and stamina
• Less body fat and excess weight (if you do not increase your calorie intake)
• Improved upper body, lower body and abdominal muscle tone
• Increased energy for daily tasks
• Less stress and a more positive outlook
With a minimal time commitment, you’ll receive an impressive return on your investment!
We’re so sure that you will be completely satisfied with your Pilates Power Gym™ that we
encourage you to write or call our Customer Service Specialists at the address or phone number
listed below, or contact us on our website. As always, you have our personal assurance that we
want your complete satisfaction. After all, your success is our success too!
Sincerely,
Jonathan Anthony, Customer Service
Pilates Power Gym™, Customer Service Department
272 Fitness Quest Plaza, Canton, OH 44750-1001
Call Toll Free: 1-800-321-9236 • Monday – Friday, 8:30am to 6:00pm, Eastern Standard Time.
Email: customersupport@fitnessquest.com • www.fitnessquest.com
Please do not call the above number for Parts. See Ordering Replacement
Parts section below.
IMPORTANT: This owner’s manual is the authoritative source of information about your
Pilates Power Gym™ exerciser. Please read it carefully and follow all the instructions.
When ordering parts, please contact our Parts Department, toll free at 1-800-497-5831,
Monday through Friday, 8:30am to 6:00pm, Eastern Standard Time.
IMPORTANT: You must have your serial number, date of purchase and this manual ready
when calling for parts.
Serial #: ____________________________ Date_______________
INTRODUCTION
Orderin g Replacement Par ts
JUMP START DIET
DINNER CONTINUED
8 oz. water
3
oz. pork chop, lean only, baked, broiled or grilled
1 small baked potato
1 tsp. butter
1
cup green beans
1 large salad made with mixed greens
1 tsp. olive oil with flavored vinegar (no need to
m
easure vinegar) or 1 tbsp. regular dressing
8
oz. water
1 piece (3 oz.) turkey baked, broiled or grilled. Br ush lightly
with olive oil and favorite seasonings before cooking.
1 small baked potato with 1 tsp. butter
1 cup broccoli
8 oz. water
1 cup vegetable soup
6 crackers
2 oz. lean ham
1/2 large whole grain pita with mustard
2 sliced carrots
8 oz. water
3 oz. lean hamburger, grilled or broiled
1 tbsp. ketchup
1 hamburger bun, tomato, lettuce, pickle and
onion if desired
8 oz. water
2 slices cheese pizza from a medium pie, baked
in pizza oven not in pan
1 large mixed green salad
1 tbsp. reduced fat salad dressing
8 oz. water
1 cup angel hair pasta with 1/2 tbsp. olive oil with garlic
on pasta and topped with 1 tsp. grated cheese
3 oz. grilled chicken with Italian seasonings
1 large salad with mixed greens
1/2 tbsp. olive oil and vinegar or
1 tbsp. salad dressing
1/2 cup cooked green beans
8 oz. water
3 oz. por k chop, lean only, broiled or grilled
without added fat
1/2 cup rice with 1 tsp. butter
1/2 cup applesauce
1 large mixed green salad
1/2 tbsp.olive oil and vinegar (no need to measure vinegar)
or 1 tbsp. reduced fat dressing
8 oz. water
3 oz. white fish such as flounder, baked and brushed
with olive oil and favorite seasonings
1 small baked potato
1 tbsp. sour cream and chives
1 cup broccoli or cauliflower
8 oz. water
3
oz. chicken breast, no skin, baked, broiled or grilled
3 to 4 new boiled potatoes tossed with 1 tbsp. butter
and sprinkled with garlic and parsley
1
cup beets or other vegetable
1 large salad made with mixed greens
1 tbsp. olive oil with flavored vinegar
(
no need to measure vinegar)
8
oz. water
1 cup angel hair pasta
3 oz. boiled shrimp, tossed
1/2 tbsp. olive oil and garlic
1 tsp. grated cheese
1 mixed green salad
1/2 tbsp. salad dressing
8 oz. water
3 oz. lean pork chop, baked with
reduced fat cream of mushroom soup
1/2 cup noodles with 2 tbsp. gravy from pork chop
1 cup green beans
1 large salad made with mixed greens
2 tsp. olive oil with flavored vinegar
(no need to measure vinegar)
8 oz. water
4 oz. fish, baked, broiled or grilled, brushed lightly with
olive oil and favorite seasonings
1/2 cup corn
1 tsp. butter
1 cup broccoli
1 small dinner roll
-------- 5 ---------------- 44 --------
LUNCH
Choose a Lean Cuisine ® meal of your choice! (If you have difficulty
finding Lean Cuisine
® meals at your local grocer, another option
is meals from Healthy Choice
® or Weight Watchers®.)
Y
O
G
U
R
T
AFTERNOON SNACK
(CHOOSE JUST ONE OPTION)
8 oz. water
1 cup strawberries
8 oz. water
1 oz. low fat cheese
6 saltine crackers
8 oz. water
1 banana
8 oz. water
1 cup low fat, flavored yogurt with
1 tbsp. low fat granola cereal on top
8 oz. water
1 tsp. peanut butter
6 saltine crackers
1 apple
8 oz. water
1 cup low fat chocolate milk
8 oz. water
1 cup vegetable soup
6 crackers
8 oz. water
3 cups light popcor n
8 oz. water
15 grapes
8 oz. water
1 cereal bar (about 140 calories)
DINNER
(CHOOSE JUST ONE OPTION)
8 oz. water
3 oz. sir loin steak, lean only, broiled or grilled
without added fat
1/2 cup rice with 1 tsp. butter
1/2 cup cooked carrots
1 large mixed green salad with
1 tbsp. reduced fat dressing
8 oz. water
3 oz. baked ham
1 cup noodles
1 tsp. butter
1/2 cup applesauce
1 cup mixed vegetables
8 oz. water
3 oz. steak, (lean only) broiled or baked
1 cup noodles with 1 tsp. butter
1/2 cup applesauce
1 cup mixed vegetables
8 oz. water
salad with romaine lettuce
1/4 cup mandarin oranges
1/4 cup sliced strawberries
2 tbsp. chopped walnuts
1 tbsp. raspberry vinaigrette dressing
3 oz. white meat chicken
1 oz. cr umbled feta cheese
8 oz. water
1 cup cooked pasta
1/2 cup spaghetti sauce
1 tsp. grated cheese
3 oz. lean ground beef in sauce
8 oz. water
1 cup angel hair pasta
1 clove garlic topped with green and red peppers
sautéed with 1 tbsp. olive oil
3 oz. grilled shrimp
1 tsp. grated cheese
JUMP START DIET
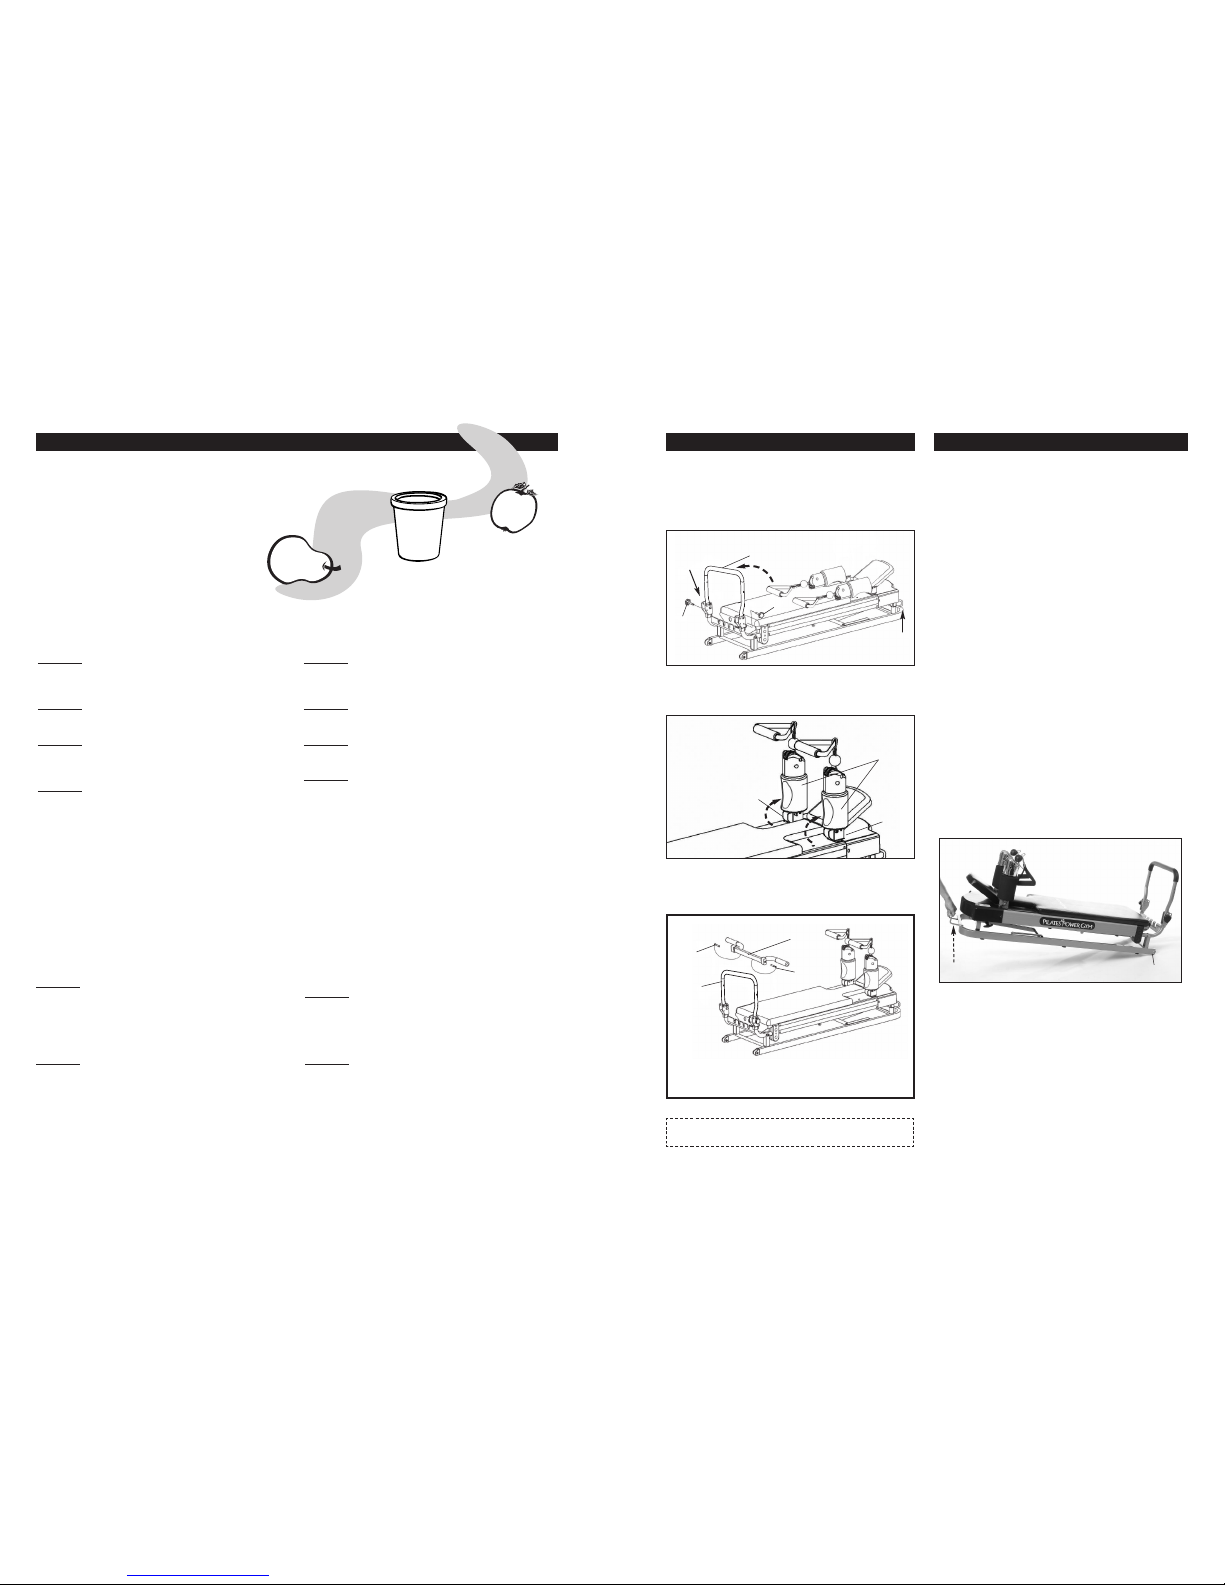
SET-UP IS NOW COMPLETE.
IMPORTANT:Please read this owner’s manual before beginning your workout for
important instructions on how to use your Pilates Power Gym
TM
exerciser.
SET-UP INSTRUCTIONS
Occasionally our products contain components that are pre-lubricated at the
factory. We recommend that you protect flooring, or anything else the
parts may contact, with newspaper or cloth.
Fig. 1a
Fig. 1b
1a. Remove the Knobs from Poly Bag. Lift the Foot Rest Bar
Assembly to the upright position, as shown in Fig 1a. Then
secure it with the Knobs. Make sure they are fully inserted
and tightened. See page 12 for Foot Rest Bar Settings.
1b. Remove the Pins from the Pulley Arm Assemblies. Lift
the Pulley Ar m Assembly to an upright position as
shown in Fig 1b. Replace the Large Hitch Pins. Make
sure Large Hitch Pins are fully inserted and stay in place.
FRONT
K
nob
F
oot Rest Bar
Assembly
Pulley Arm
Assemblies
Large
Hitch
Pin
Small
Hitch Pin
Foot
Rest Bar
Assembly
Small
Hitch Pin
Knob
REAR
Large
Hitch
Pin
Optional
Attaching Optional Push UpBar Assembly. Place the Push
Up Bar Assembly onto the Foot Rest Bar Assembly and secure
with the Small Hitch Pins that are attached to the Push Up Bar
Assembly.Make sure they are fully inserted and stay in place.
Push Up
Bar Assembly
CARE, STORAGE & MAINTENANCE
• Keep your unit clean. Wipe sweat, dust or other
residue off the Frame, Glideboard, Foot Rest and
Handles with a soft, clean cloth after each use.
Your Pilates Power Gym™ exerciser has been carefully
designed to require minimum maintenance. To ensure
this, we recommend that you do the following:
Transport Handle
Rollers
MOVING & STORAGE OF YOUR UNIT
CARING FOR YOUR UNIT
MAINTENANCE
Your Pilates Power Gym™ can now be rolled away
for storage by lifting. It is recommended that you store
your Pilates Power Gym™ exerciser in a horizontal
position only. DO NOT store your equipment vertically. To
move, use slow controlled movements. Lift the rear of the
Base Frame Assembly by grasping the Transport Handle
and lifting until Rollers engage with the floor and roll to
desired location.
NOTE: All location references, such as front, rear, left or right, made in
t
hese instructions are from the user standing behind the Headrest and
facing the Foot Rest Bar Assembly.
• Before each use, inspect the equipment and all
parts, including cables, tension cords, rollers,
pulleys, handle assemblies and foot strap assemblies
to ensure that they are in proper working condition.
Never use the equipment if it is not working
properly or if there are signs of wear such as
frayed or worn cables, tension cords, pulleys,
rollers, handle or foot strap assemblies. Call our
Parts Depar tment to order replacement parts. Refer
to page 4, Ordering Replacement Parts.
Store your unit after use. It’s a good idea to store your
equipment in a space away from children and high traffic
areas. The Pilates Power Gym™ is light and easy to
store. To store your Pilates Power Gym™ exerciser,
simply return it to the same state as you first received
it. First, lower the Glideboard to its flat position. Remove
optional Push Up Bar Assembly (if attached) by removing
the Small Hitch Pins from both sides of the Push Up Bar
Assembly.Remove the Large Hitch Pins from Pulley Arm
Assembly and lower (Fig. 1b). Replace Large Hitch Pins.
Remove Knobs from Foot Rest Bar Assembly and lower
it toward the Glideboard. Replace Knobs.
-------- 43 ---------------- 6 --------
PARTS LIST
9 0100113 Small Pulley Bracket 2
10 0700018 Headrest Bracket 1
13 0100081 Pad 7
14 0100121 Knob 2
15 0100093 Large Pulley w/Bearing
& Small Pulley Spacer 5
16 0100092 Medium Pulley 2
17 0100090 Wheel w/Bearing &Large Spacer 6
1
8 0100095 Small Pulley w/Bearing
& Large Pulley Spacer 4
19 0100089 Plug 2
20 0100109 Bottom Ball Cover 2
21 0100108 Top Ball Cover 2
22L 0100114 LeftSmall Pulley Bracket Cover 2
22R 0100115 Right Small Pulley Bracket Cover 2
23 0500003 Headrest Base 1
24 0400025 Glideboard Plate 1
27 0700011 Outer Roller Cover 2
28 0700010 Inner Roller Cover 2
29 0100085 Height Adjustment Knob 1
30 0100082 Roller 2
31 0100004 M8 Nylon Nut 24
32 0100001 M8 Washer 22
33 0100083 M8 x 30mmAllen Bolt 2
34 0100045 M8 x 45mmAllen Bolt 9
35 0100091 M8 x 65mmAllen Bolt 1
36 0100031 M8 x 40mmAllen Bolt 4
37 0100099 M8 x 50mmAllen Bolt 2
38 0100049 M8 x 20mmAllen Bolt 2
45 0100116 M5 x 10mmPhillips Bolt 8
46 0100117 M5 Nylon Nut 8
47 0100103 Small Locking Clip 4
49 0100102 M6 x 45mmAllen Bolt 1
50 0100007 M6 Washer 3
51 0100008 M6 Nylon Nut 1
52 0100047 M8 x 15mmAllen Bolt 8
55 0100065 Clip 4
56 0100044 M8 x 35mmAllen Bolt 4
58 0100120 Small Hitch Pinw/Lanyard
(M6 x 50mm) 2
59 0100104 Large Hitch Pinw/Lanyard
(M8 x 55mm) 2
61 0600004 Short Cable (3.5x 549) 1
62 0600005 Medium Cable (3.5x 895) 1
ITEM PART# DESCRIPTION QTY. ITEM PART# DESCRIPTION QTY.
JUMP START DIET
MORNING SNACK
(CHOOSE JUST ONE OPTION)
8 oz. water
1 cup fat free yogurt
8 oz. water
1 cup sugar free hot chocolate
made with skim milk
8 oz. water
1 pear
8 oz. water
1 orange
8 oz. water
1 apple
8 oz. water
1 cereal bar (about 140 calories)
8 oz. water
1 kiwi
8 oz. water
1/2 cup oatmeal, cooked
1 cup skim milk
1/2 banana
8 oz. water
2 pancakes (4 inches across)
1 tbsp. maple syrup
1/2 cup orange juice
8 oz. water
1 slice french toast
1/2 cup fresh blueberries
1 cup skim milk
8 oz. water
1/2 english muffin
1 egg poached
1/2 cup fruit juice
8 oz. water
1 slice whole grain bread
1 egg scrambled
1 cup cubed melon
8 oz. water
1 cup fat free yogurt
1/3 cup low fat granola cereal
1 cup sliced strawberries
8 oz. water
3/4 cup cereal
1 cup skim milk
1/2 cup sliced strawberries
8 oz. water
3/4 cup cereal and 2 tbsp.
crushed walnuts
1/2 cup skim milk
4 oz. orange juice
8 oz. water
1 slice whole grain bread
1 egg scrambled or poached
4 oz. orange juice
8 oz. water
1 slice cinnamon bread
1 tsp. butter
4 oz. orange juice
BREAKFAST CHOICES
(CHOOSE JUST ONE OPTION)
64 0600007 Foot Strap Cable 2
6
5 0100098 Frame Guide 2
66 0100097 M4 x 16mmPhillips Screw 2
67 0100096 M4 x 9mmPhillips Bolt w/Loctite 10
68L 0500001 LeftShroud 1
68R 0500002 Right Shroud 1
69 0100088 M6 x 8mmSet Screw 2
71 0100100 M4 x 15mmPhillips Bolt 2
72 0100101 ST4.2 x 10mmPhillips Screw 10
73 0100084 Transport Handle 1
74 0400024 Handle Assembly 2
75 0300008A Headrest 1
76 0300007A Glideboard 1
77 0700017 Foot Strap 2
78 0700012 Tension Cord 1 (grey) 1
79 0700014 Tension Cord 3 (black) 1
80 0700015 Tension Cord 4 (black) 1
81 0700013 Tension Cord 2 (grey) 1
82 0100105 Stopper 6
84 0100107 ST2.9 x 20mmPhillips Screw 4
86 0100118 ST4.2 x 10mmPhillips Screw 8
88 0100112 Wheel w/Bearing &Large
Spacer (white) 2
93 0400036 Foot Rest Barw/Grip & End Caps 1
95 0100119 End Cap 2
96 19758 Push UpBar w/Grips & Hitch Pins 1
98 0100094A Pulley Guide 2
100 0100111A Pulley Guide 1
6A 0700016 Pulley Arm Assembly 2
90A 0400011 Height Adjustment Assembly 1
0300006B Glideboard Assembly 1
0400002 Base Frame Assembly 1
0600006A Cable Kit 1
0800008B Owner’s Manual 1
0800009 Exercise/Nutrition Guide 1
0800023 DVD 1
0800025B Literature Pack 1
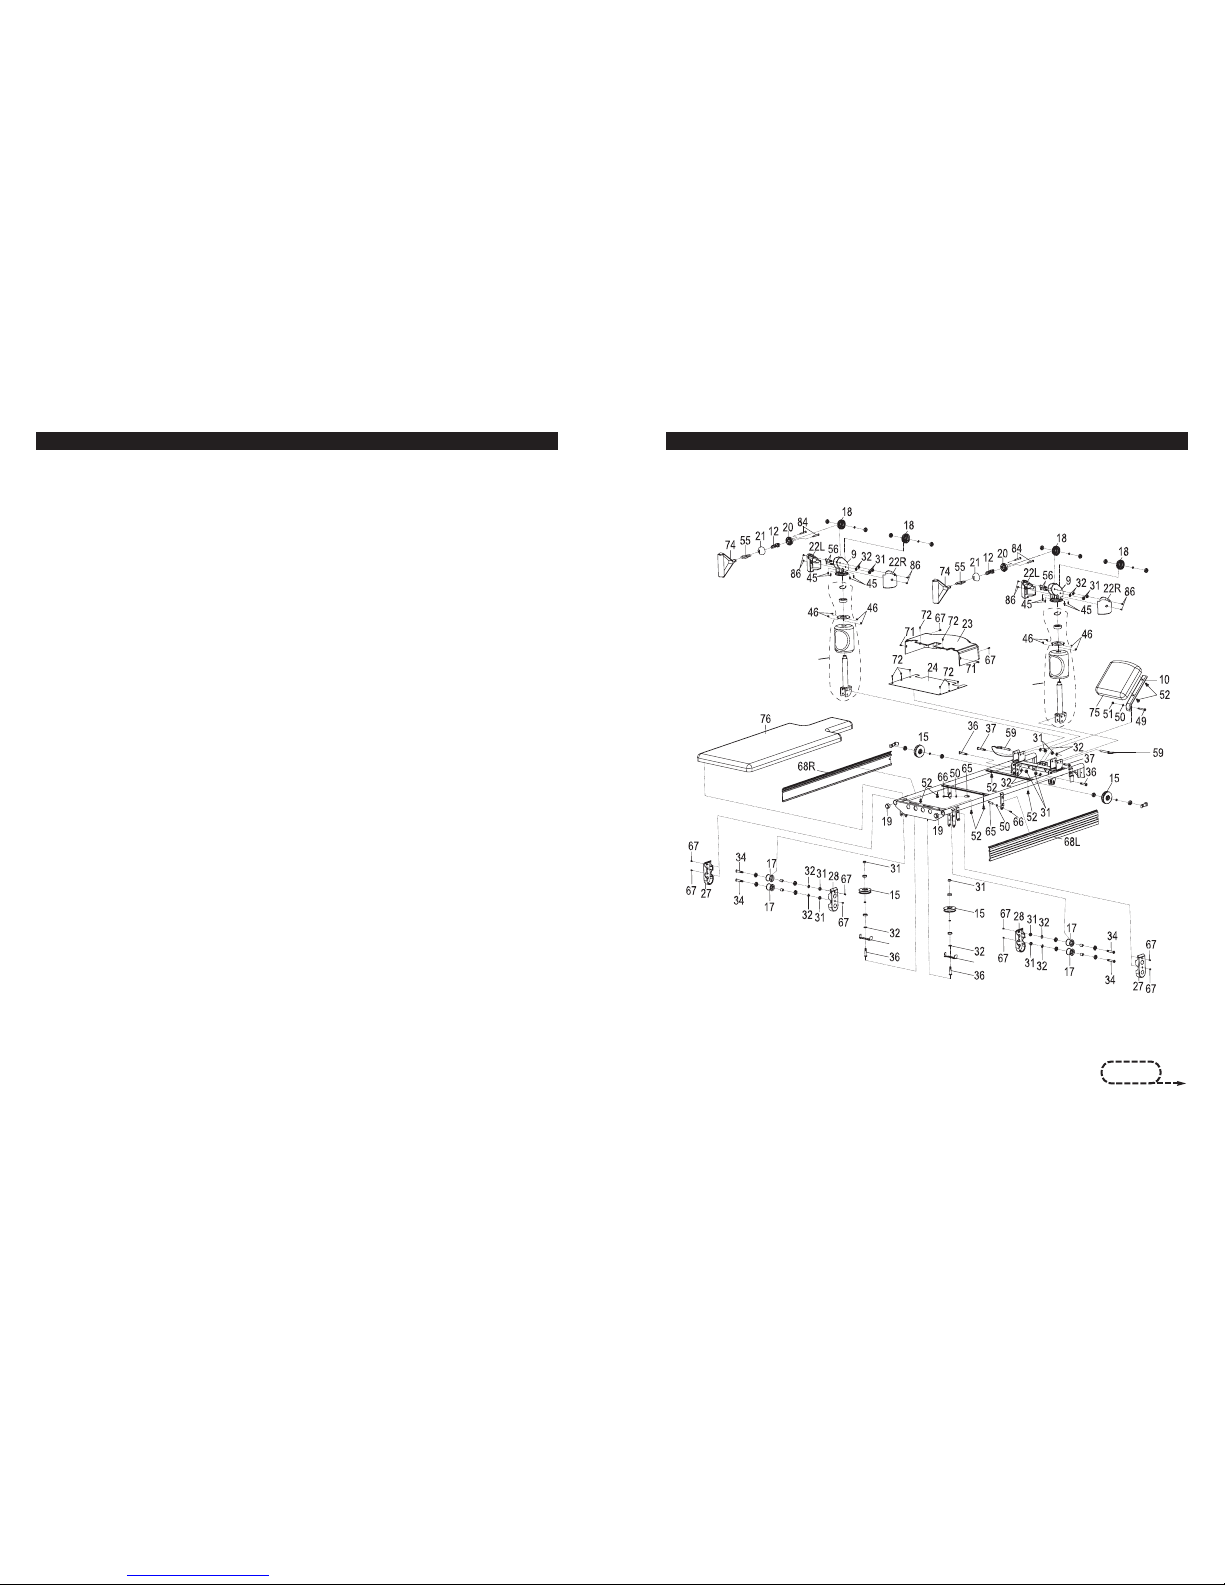
-------- 7 ---------------- 42 --------
6A
6A
98
98
continued on
next page
EXPLODED VIEWJUMP START DIET
The Jump Start Diet
This 2-week menu plan is based on 1200 to 1300 calories. We have
consciously used real food and have even put in some foods often thought
of as "off limits" when trying to lose weight. The plan is nutritionally sound
and offers a variety of foods from all food categories. You may substitute
one food within a food group for another, such as a pear for an apple or
3 oz. of chicken for 3 oz. lean beef. The most impor tant thing to remember
is to pay attention to por tion sizes. When it says 1 cup, you need to
measure out 1 cup, etc.
The plan is extremely simple to follow. Simply pick one selection for each
meal as your day goes along. Note that your lunch will consist of a Lean
Cuisine® meal. This is done so that you have a realistic option to eat at work
or on the go. (If you don't find Lean Cuisine® meals at your local
grocer, other options are Healthy Choice® and Weight Watchers® lunches.)
We have also built in a special treat at the end of most days. This is
because people have the biggest success when they are allowed to have
some of their favorite foods. They do not feel deprived and are not tempted
to binge. Success comes because they are able to stick with the plan, lose
weight and meet their goals without feeling like they were "on a diet". The
important thing to remember is to use only the portion size given, do not
go back for more or guess on your portion size.
If you do not wish to eat the snack after your evening meal, or feel that you
cannot limit your portion size, it can be omitted.
Foods and condiments that can be used without adding significant calories
include:
• Non-caloric beverages, this includes diet carbonated drinks
• Fat free condiments such as mustard, ketchup and vinegar
• Seasonings such as onion, garlic and herbs
• Ar tificial sweeteners
• Coffee, tea and herbal teas
Introduction
T
his program is designed to "jump star t" you on your way to better health
and fitness. In just 2 weeks, just 14 shor t days, you will begin to form habits
to help you reach your fitness goals faster and easier than ever before.
 Loading...