

Page 1
®
Owner’s Manual
Owner’s Manual
TM
PP
RR EE AA MM PP
,, EE
QQ UU AA LL II ZZ EE RR
,, && DD II
FF OO RR
EE
LL EE CC TT RR II CC
&& AA
CC OO UU SS TT II CC
BB
AA SS SS
Page 2

PPrroo--EEQQ PPllaattiinnuumm BBaassss
-2-
Thank you for purchasing the Pro EQ Platinum Bass. Whether you play electric
or upright, on stage or in the studio, you can now produce the bass tone you've
always heard in your head, but have never been able to coax out of the speakers.
With this product we set out to make an easy to use, road-worthy "Swiss Army
Knife" preamp/DI that is especially dialed in for bass instruments. We want you to
be completely satisfied with your Platinum Bass preamp. If you have any
questions or comments, please contact us at
99666655
.
If you want to get up and running right away, install a 9V battery and check out
the Quick Start printed on the underside of the preamp (or see below). To take
full advantage of all the Platinum Bass' features, please take a few minutes to
glance over this guide, especially the setup for the Depth control and the
Compressor.
tteecchh@@ffiisshhmmaann..ccoomm
or at
997788--998888--
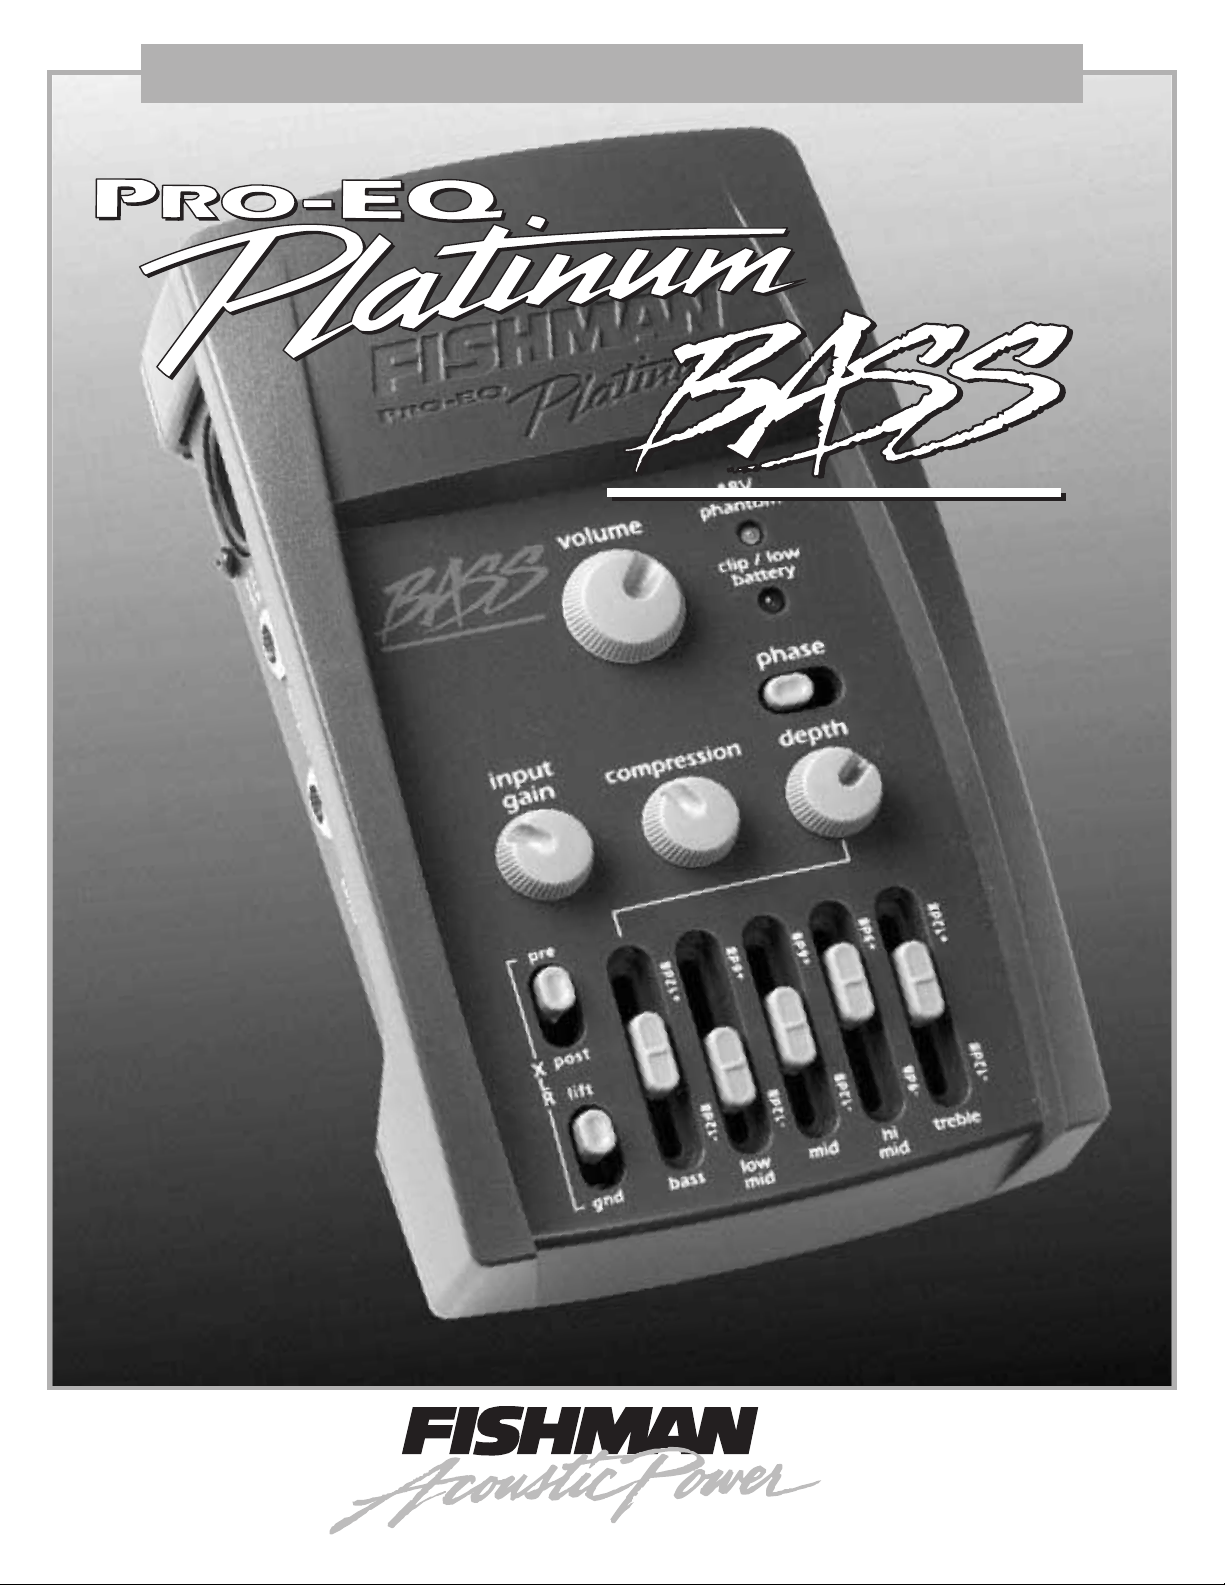
DESCRIPTION
The Pro EQ Platinum Bass is suitable for electric or acoustic bass. A versatile
control layout features five bands of bass-EQ, a photo-optic compressor and an
innovative "depth" control for dialing in big bottom without boom. The unit's
advanced circuitry is recessed into a road-rugged 12-gauge steel platform,
surrounded by tough injection-molded bumpers. For a smooth, musical response
and tube-like warmth we use sweet sounding J-FET technology throughout. Plus,
an exclusive "Voltage Doubler" gives you the extra front-end headroom needed for
today's high-output active basses.
Pro-audio features include an accurate and smooth sounding XLR DI with a
pre/post EQ switch, plus 48-Volt phantom power operation. The XLR's special
hum-killing ground lift switch does not interrupt phantom power, unlike some
other bass DI's.
QUICK START
1.
Place XLR pre/post switch to "post" position.
2.
Adjust the input gain so that the clip/low battery light barely flickers with
strong playing.
3.
For acoustic bass only:
and suppresses feedback.
4.
Set compression and depth to 10:00.
5.
Set EQ and re-adjust input gain if necessary (clip light should barely
flicker with strong playing).
Set phase switch to position that sounds best
POWER OPTIONS
1. 9-Volt Battery
Squeeze the tabs on top of the preamp together and the battery drawer will
pop out. Snap in a fresh 9-Volt alkaline. To conserve the battery, unplug
the input of the Platinum Bass when you are not using the preamp.
2. 48 Volt Phantom Power
Use an XLR cable to connect the Platinum Bass to a mixing board with 48V
phantom power. When you turn on the 48V phantom at the mixer, the
green 48V phantom LED lights up, the 9V battery shuts off and the
Platinum Bass draws power through the XLR cable.
The green 48V phantom led may not light up once you switch on phantom
power. This means the phantom power from the mixer is not delivering
enough voltage. For insurance, keep a fresh 9V battery in the preamp.
The battery will take up the slack if the phantom power is too low.
3. AC Adapter Input (center = negative)
Use only a well filtered and regulated adapter with a 9 Volt DC output. We
recommend the Fishman 910-R or Boss PSA series. Use a nonrecommended adapter and not only will you void the warranty, you may
damage the circuit.
INPUT - PLUG YOUR BASS IN HERE
When you plug into the input jack, the 9-Volt battery switches on.
Remember to unplug the input jack when you are not using the preamp to
save the battery. Turn down your amp or mute your mixer input before you
plug into the Platinum Bass input to protect your speakers (and your ears)
from loud pops.
This very high impedance 10 MΩinput is perfectly matched for magnetic/
piezo pickup signals from passive or active instruments. The "Voltage
Doubler" circuit that we build into the preamp offers plenty of headroom
and dynamics for today's hot active basses.
In most cases you'll have the best results if you go directly from your bass
into the preamp. If you use any external effects, put them in line after the
Platinum Bass. One exception is if you use the Fishman Pocket Blender.
In these cases take the ¼" mix output from the Pocket Blender into the
Platinum Bass preamp.
Tone Tip -
instrument cable will be directly reflected into your tone. The Platinum bass
preamp's low noise audiophile circuit is very transparent and will reproduce
the tone differences between various instrument cables. If your bass has
passive pickups (no battery onboard), use a good quality low capacitance
cable between the instrument and the input of the Platinum Bass preamp.
Auditioning the Platinum Bass with a number of cables in a music store will
give you a good sense of the differences between one brand and the next.
As a general rule, the lower the capacitance, the better the sound. A low
capacitance cable will add snap and sizzle to a passive magnetic pickup
and more clarity to a passive piezo pickup. Choose the shortest length that
is practical for you, because the longer the cable, the higher the
capacitance. The "pico Farad" is the unit of measure for capacitance. A
cable with a capacitance of 200 pico-Farads or less is ideal. If you are not
sure of the cable's capacitance, check with the manufacturer.
If your bass has passive pickups, the quality of your
Page 3

-3-
INPUT GAIN
Like the trim control on a pro-audio mixer, the input gain accommodates a
wide variety of incoming signal levels. For the cleanest possible signal,
adjust the input gain so that the clip/low battery LED barely flickers with
strong playing. If the LED lights up brightly as you play, your bass signal
is overdriving the circuit and you will hear distortion. Keep an eye on the
clip LED (and reset the input gain if necessary) when you make
adjustments to the depth, tone or compression settings.
CLIP / LOW BATTERY LIGHT INDICATOR
This light has three distinct functions:
1. Power Up Indicator
The LED flashes briefly when you plug into the input - it is telling you that
the unit is powering up.
2. Clip Indicator
Flashes brightly when your bass signal overloads the preamp. Adjust the
input gain so that the clip LED barely flashes with strong playing.
3. Low Battery Warning
When the red LED lights with no signal present it is time to change the
battery. If the low battery light comes on while you're playing don't worry,
you'll have enough power to get through a gig (at least 4 hours).
VOLUME
To gently smooth out your instrument's all-around response, set the
compression between 8:00 and 11:00.
For more punch set the compression between 12:00 and 2:00. This is
especially effective for tumbao and walking bass styles.
Solid rock bass tone: Boost the low mids with the compressor set around
12:00.
For heavy compression with lots of sustain set the compression knob
between 3:00 and 5:00 (for best results set the input gain as high as
possible, lighting the red clip light occasionally). You will find that this
works well for bass-synth effects, especially with an octave pedal placed
after the Platinum Bass preamp.
DEPTH
Tighten up your sound, or dial out deep-bass feedback with the depth
control. The depth control works hand in hand with the Bass control to
bring out tight and articulate lows.:
1.
Start with the depth turned up full (5:00) with the EQ set flat on your
bass, bass amp and/or PA.
2.
Set the bass slider to full boost.
3.
Play the bass and back off the Depth (counter-clockwise) until you hear
the sound tighten up, usually between 9:00 and 12:00.
4.
Re-set the bass slider to taste.
For the cleanest sound, set the volume as high as you can without
distorting your amp or mixer.
In addition to cleaning up your low end, the depth control will let your power
amp work more efficiently and provide protection for your speakers. When
set below 1:00, the depth control gets rid of the power-gobbling sub-sonic
stuff that taxes both your amp and speakers (not to mention your ears).
COMPRESSION
This allows you to alter the attack, sustain and dynamics of your bass. Set
the input gain before you turn on the compressor (compression is off at
7:00).
For you players who have given up on compression for bass, we feel your
pain. We spent months developing and refining a one knob photo-optic
compressor just for bass. With it you can dial up more punch, attack, and
sustain without any of the "pumping" or "squashing" that plagues other so
called "bass" compressors.
Compression is a useful tool for bass, especially for recording. But if
you've ever used it onstage you probably know that a poorly designed or
improperly set up compressor can completely screw up your live bass
sound. Recognizing the common shortcomings of "bass" compressors, we
designed our soft-knee photo-optic compressor to set up quickly and
sound good right out of the gate.
For slap and other aggressive playing styles, the Platinum Bass'
compressor does not strangle your highs. We deliberately placed it in the
signal chain before the bass and treble controls so you can boost without
squashing these important frequencies. Plus we carefully fine tuned the
compressor to complement the attack and sustain characteristics of bass
instruments.
Note:
As you raise the compression level, the apparent volume will
drop, due to the gain reduction of the compressor. Compensate for
this by raising the volume knob on the Platinum Bass
proportionately as you raise the compression level.
Depth control Tone tips:
A good place to start with the depth control is usually at about 10:00 In this
position you can max the bass control without losing articulation and midbass attack.
For electric bass in rooms that absorb a lot your low end (e.g. a "dead"
room with curtains, upholstered furniture or carpeted floors), set the depth
to the higher positions; between 2:00 and 5:00.
To get rid of low frequency feedback with acoustic bass, sweep the depth
knob counter-clockwise until the feedback goes away (usually between 8:00
and 10:00).
For extremely difficult acoustic environments such as gymnasiums or high
ceiling rooms with reflective surfaces, set the depth to 9:00 or lower.
PHASE SWITCH
Use the Phase switch in combination with the Depth control to suppress
feedback for upright bass and acoustic bass guitar.
Electric bassists (solid body) can ignore this section -just leave the phase
switch in either position and go!
Unlike electric bass, acoustic bass tends to feedback when you amplify it
at high volumes. Feedback generally occurs in two different ranges: deepbass feedback (open D and below) and mid-bass feedback (above open
G).
Page 4

Deep-bass Feedback
(Open D and Below)
Mid-bass Feedback
(Open G and Above)
-4-
Fighting Feedback:
1.
Start with the phase switch in the left position and the depth control at
5:00.
2.
Turn your amp or PA up so that it is on the verge of feedback.
3.
Flip the phase switch back and forth until you find the position that
sounds good and doesn't feedback from open G and above (mid-bass
feedback).
4.
Turn up the amp some more until you get feedback around open D and
below. (deep-bass feedback)
5.
Move the depth control counter-clockwise until deep bass feedback
goes away. (usually between 9:00 and 10:00).
When your acoustic bass and speaker are out of phase the sound is
usually "doinky", artificially compressed and lacking bottom end,
especially on the G string.
SET UP THE PHASE SWITCH
The simplest way find the "in phase" position of the switch to tell is by
listening to the sound of your amplified acoustic and toggling back and
forth between switch positions. The position that sounds the deepest and
most natural will be in phase.
Tone Tip
Whenever you add a new piece of equipment (pickup, amplifier, effect,
speaker) to your setup, toggle the Phase switch back and forth until you find
the position that sounds best and kills mid-bass feedback.
TONE CONTROLS
USE THE PHASE SWITCH TO IMPROVE YOUR AMPLIFIED SOUND
The phase switch lets you get better amplified performance by
electronically aligning the bass signal from the speaker with the actual
acoustic sound that radiates from the bass.
Simply put, in phase or out of phase describes the way the sound waves
from your speaker blend together with the lower notes of your acoustic
bass. Phase quality (in or out) is most noticeable at low amplified volume
levels, when you stand near the bass speaker (or a floor monitor fed with
bass)
In phase is when your acoustic bass and the speaker sound full and
resonant together and the speaker augments the natural sound of the
instrument. In most cases, you want your acoustic bass to be in phase
with the speaker.
To keep the EQ for the Platinum Bass as simple and precise as possible,
we were very careful to choose five universal equalization points for both
electric and acoustic basses. In the center detent position, each tone
control is flat.
Note:
eye on the clip indicator and slightly lower the input gain level if the
red led starts flashing brightly (and you hear distortion).
We recommend that you start with flat EQ on your instrument, bass amp
or mixer (no cut or boost) and make your tonal adjustments with the
Platinum Bass' EQ. You'll find that very little (if any) additional EQ will be
necessary after you dial in your sound with the Platinum Bass.
EQ Tone Tip
For a cleaner and more "direct" bass sound, try bypassing the preamp in
your bass amp and plug the output from the Platinum Bass directly into the
effects return or the power amp input in the back of your amp.
If you make radical changes to your tone settings, keep an
Bass
We carefully voiced this control to give you the deep bass you need for
your lowest notes, with plenty of mid-bass punch for the D and G strings.
If the sound becomes boomy when you raise the bass slider, lower the
depth control until the sound tightens up.
Page 5

T
ONE CONTROLS CONTINUED
-5-
Low-mid
Boost here to thicken up the low end. Cut low mids for a more transparent
tone or to reduce feedback with acoustic bass.
Low mids are crucial for voicing your instrument. A very slight change in
the position of the low-mid slider will have great effect on the personality of
your tone.
Cut low mids (and boost the bass slider) for the open "hi-fi" tone favored
for thumb-style electric bass. A low-mid cut will also help to unmask the
high end and give clarity to deep bass frequencies for a modern "amplified
acoustic" upright bass sound.
A slight low-mid boost will give a nice percussive "burp" to upright sound.
Mid
This control subtly affects how well the instrument blends in or stands out
in the mix.
Cut mids (also boost bass and treble) to bring out a classic "smiley face"
tone for electric bass. Push the mid slider all the way down to unveil a
sweet, sizzly top end for thumb-style electric.
For an aggressive fretless tone, boost the mid and low-mid sliders and cut
the treble.
High mid
This control zeros in on click, fret buzz and string handling sounds
produced by your fingertips.
Slightly boost high mids (a little goes a long way) to emphasize left hand
articulation (a la' Marcus) or to add presence to a bass speaker without a
high frequency horn.
Cut high mids to reduce the effects of a glaring tweeter or to attenuate the
sound of your fingertips passing along the length of your strings (especially
for upright). Also cut the high mids to suppress feedback from mini mic
(Blender system)
Treble
The platinum Bass' J-FET circuitry ensures that the treble will sound
smooth and airy when boosted. Cut treble for a vintage "flatwound" sound.
1. XLR Post
Signal Path:
Compression ➥ Volume ➥ Phase Switch ➥ XLR Out
Post is useful in live venues (especially if you are mixing from onstage)
where you want your personal "dialed-in" sound to come through the PA.
2. XLR Pre
Signal Path:
Out
You'll find that this true direct or "DI" output produces a warm and
uncluttered signal that is exceptional for recording. Set the pre/post switch
to the pre position when you want a "flat" DI signal going to the board and
you wish to leave it to the sound-person or recording engineer to dial up
the bass tone from the console.
XLR GROUND LIFT
Use this switch to eliminate AC ground loop hum. When you use the XLR
and one of the other outputs together and you hear hum from the speakers,
put the switch in the lift position and the hum should go away. If you use
all three outputs (XLR, ¼" output, and tuner/send) to three separate AC
powered devices, the "lift" position may not completely eliminate ground
loop hum.
Note:
the "gnd" position. In these cases, if you move the switch to the "lift"
position, you will hear a "pop" through your speakers and phantom
power to the unit may be compromised.
TUNER/SEND
Signal Path:
Use the tuner/send output when you need an unbalanced direct signal that
is not affected by any of the front panel controls. Use it for an external
tuner or as an aux send to a stage amp or a second mixer for
broadcast/live recording.
Bass Signal ➥ Input Gain ➥ Depth ➥ EQ
Bass Signal ➥ Input Buffer ➥ Phase Switch ➥ XLR
When you use only the XLR out, leave the gnd/lift switch in
Bass Signal - Input Buffer - Tuner/Send
➥
OUTPUT (1/4” UNBALANCED)
Signal Path:
Compression ➥ Volume ➥ Phase Switch ➥ Output
Plug a standard instrument cable from the Platinum Bass output to your
bass amp or an unbalanced input on a mixer.
You can also patch into an audio input on a computer through the Platinum
Bass' output. You'll need a special cable with a plug that matches the input
of your PC. Often a cable with one 1/8" plug (such as our V-100 patch
cord) will do the trick.
Bass signal ➥ Input gain ➥ Depth ➥ EQ
➥
SAMPLE EQ SETTINGS
Here are a few suggested settings for the Pro EQ Platinum Bass.
XLR (BALANCED) OUT
Plug a standard mic cable from the XLR out into a PA or recording console.
Note that the Platinum Bass can be powered off a 48V phantom supply
through this output.
(See Power Options on page 2)
XLR PRE/POST SWITCH
Choose between a true DI (pre EQ) or an affected XLR (post EQ) output.
Dub/Reggae
Page 6

S
AMPLE
EQ S
ETTINGS CONTINUED
-6-
Tumbao
Fretless Jazz
Studio Acoustic
Motown
Classic Thumb-style
Five String
Page 7

Fishman BP-100-pizz/arco
-7-
Page 8

PA System
XLR Cable
XLR Switch
set for POST EQ
XLR Out Input
Bass Amplifier
1/4" Instrument Cable
plugged into Active Input
Output
Input
Back of Bass Amplifier
1/4" Instrument Cable
plugged into Effects Return
Send Return
Input
Output
XLR Cable
XLR Switch set for PRE EQ
XLR Out
PA System
Bass Amplifier
Tuner / Send
Input
input
input gain
tuner / send
output
phase
lift
gnd
volume compression
depth
pre
post
mid hi
mid
low
mid
treblebass
-8-
STAGE SETUPS
1.
Set the XLR pre/post switch to "post" when you want your personal
"dialed in" sound to come through the PA
2.
Plug into a bass amp. Start with the amp's tone controls set flat.
Primary equalization is performed by the Platinum Bass EQ
3.
Splitter/ "Transparent" DI.:
If you wish, you may bypass all the Platinum's controls for a true DI.
into both the PA and a bass amp.
BLOCK DIAGRAM
2a.
Alternate into bass amp (especially for upright)
For a cleaner and more uncolored sound, try bypassing the preamp in
your bass amp and plug the output from the Platinum Bass directly into
the effects return or the power amp input at the back of your amp.
Page 9

SPECIFICATIONS
Nominal Input Level: -14dBu
Input Overload Level: +10dBu
Input Impedance: 10 M
Nominal Output Levels and Impedances
Amp Out:: -20dBu to +10dBu (1kΩ)
Tuner/Send Out: -14 dBu to + 10 dBu (1 kΩ)
XLR Out : -30 dBu to -6 dBu (600 Ω)
Tone Controls
Bass: ±12 dB @ 30 Hz
Low mid: +6dB, -12 dB @ 200 Hz
Mid: +6dB, -12 dB @ 1.25 kHz
Hi Mid: ± 9 dB @ 5 kHz
Treble: ±12dB @ 10kHz
All tone controls within ±1 dB of nominal.
Depth Control: 12 dB / octave low cut filter
Range: 15 Hz (5:00) to 125 Hz (7:00)
Compressor max gain reduction: -14 dB
THD @ 1kHz: Less than .05%, -14dBu input level
A weighted S/N: -89 dBu (-91 dBV)
Noise: 27 µV (A weighted)
Power Options
9 Volt Alkaline Battery: (Battery life- est. 80+ hours continuous)
Current draw: 4.5 mA typical
Low Battery light comes on when approx 4 hours of battery life remain
OR
48 Volt phantom power via XLR cable
OR
Fishman 910 or Boss PSA series AC adapter (center negative)
Ω
-8-
All specifications subject to change without notice.
 Loading...