

Page 1

USER GUIDE
AURA® IMAGING PEDAL
Page 2

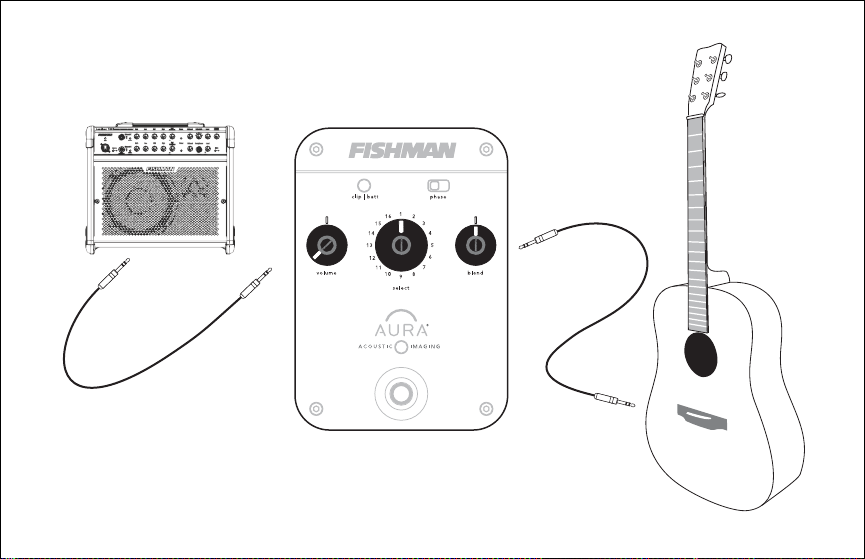
Quick start
Power – Install a 9V alkaline or lithium battery (not included).
Set the controls – Volume at minimum, select at #1 and blend at
its mid-point.
Plug in – Use standard ¼-inch shielded instrument cables. Place any other
pedals after the Aura.
Set trim – Play hard and adjust input trim (right side) so clip/batt LED flashes
occasionally.
Select an Image – Raise the volume and audition the 16 Images with the
select knob.
Blend to taste – turn left for more pickup and right for more Image.
Kill feedback – If feedback starts, change the position of the phase switch.
Bypass – Step on the footswitch to alternate between blended Image sound
and dry pickup (default setting).
Mute – To alternate between blended Image sound and mute, hold the
footswitch down until the LED flashes. Repeat to return to bypass.
2
Page 3
3
Page 4

Before you plug in
Does your Aura Imaging Pedal match your guitar?
Acoustic Imaging sounds best when you select an Aura Imaging Pedal to match
the body style of your guitar. See the following pages to help you choose a
compatible pedal.
Do you have an undersaddle or soundhole pickup?
Aura Acoustic Imaging Pedals sound best with Fishman undersaddle pickups
and magnetic soundhole pickups. We do not recommend soundboard-mounted
pickups, bridge-plate pickups, multi-sensor pickups or microphones for the Aura
Imaging Pedal.
Plug into an acoustic amp or PA
For the best sound reproduction, connect your Aura Imaging Pedal to
an acoustic instrument amp, a PA system, a powered monitor or other
full-range system.
4
Page 5

Choose your pedal
Each Aura Imaging Pedal is matched to a specific body style. We hand pick
Images for each pedal from the most popular guitar and microphone
combinations.
What is Aura Acoustic Imaging Technology? Aura uses digital algorithms
developed in Fishman’s audio laboratories to create an Image of the natural
sound that your acoustic instrument emits when mic’d in a professional
studio. This Image, when played through an amp, mixer or PA, blends with your
instrument’s pickup to produce an immediate and dramatic improvement in your
amplified sound.
If you are not sure which body type your guitar falls into, we suggest you audition
several pedals and let your ear decide. See the following pages to help match
your guitar with the right Aura Imaging Pedal.
5
Page 6
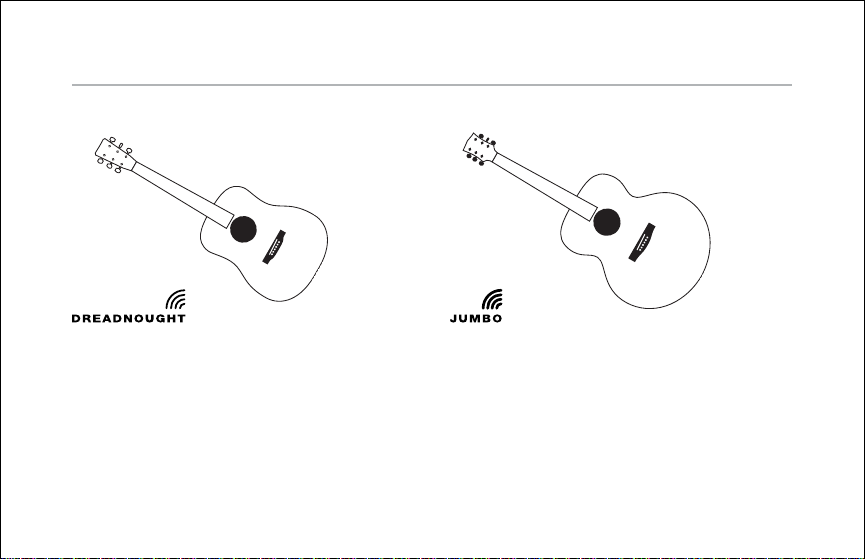
Choose your pedal (continued)
Use this pedal with all varieties of the
classic deep-body dreadnought.
Use this pedal with large, deep-body
instruments with slim waists and wide
lower bouts (usually over 16”).
6
Page 7

Use the Concert pedal with smallbody, short-scale instruments with thin
waists, like 0, 00 and L-00 styles;
typically finger-picking guitars as
well as parlor and travel instruments.
For guitars larger than concert
but smaller than dreadnought, the
Orchestra pedal works well with
OM & 000 styles as well as auditorium
and other narrow-waist mid-size,
medium-depth instruments.
7
Page 8

Choose your pedal (continued)
Use with all medium-depth classical
and thin-body acoustic-electric
nylon-string guitars. Note: Use only
an undersaddle pickup with the
Nylon pedal.
These are typically jumbo or
dreadnought size instruments.
The heavier bracing for 12 string
guitars creates a unique sound and
has its own Aura Imaging Pedal.
8
Page 9

Using effects
When using your Aura Imaging Pedal with other effects devices, place the Aura
Imaging Pedal first in the chain after your guitar.
9
Page 10
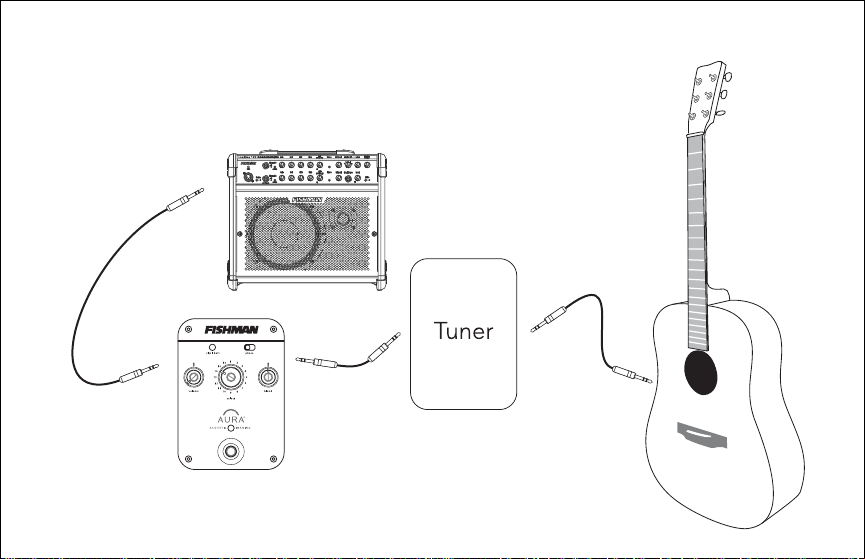
If you have a pedal tuner, place it before the Aura Imaging Pedal.
10
Page 11

Right side panel
Input
Plug in your guitar here with a standard ¼-inch instrument cable. If you have
a passive undersaddle pickup (no battery onboard), always plug into the Aura
Imaging Pedal first, even if you use a pedal tuner.
Trim
Raise or lower the trim to optimize the input level for your pickup. Play hard and
adjust trim so clip/batt LED flashes occasionally. Use your thumb or a pick to
turn the trim control.
11
Page 12

Left side panel
Output
Use a standard ¼-inch instrument cable to connect the output to your
amplifier, mixer or effects devices. You can also connect this output to an
unbalanced input on a recording system.
9vdc
See Power section.
12
Page 13

Power
Power may be supplied by either a 9V battery (battery compartment under
pedal) or an approved 9V adapter. Insert a plug into the input jack, and the Aura
Imaging Pedal powers up. To conserve the battery, remove the plug from the
input when not in use.
For AC power, use the Fishman 910-R (for 110V) or other suitable 9V adapter. The
adapter must be filtered, regulated and rated for at least 200mA. It should also
accept AC power appropriate for your country. Power Plug requirements: 5.5mm
O.D., 2mm I.D., tip = negative.
13
Page 14

Control set
Phase switch
Use the phase switch to improve bass response at low volume or to control
feedback at high volume. Play your guitar and toggle the phase switch back
and forth until you achieve the desired result.
Volume
For the cleanest signal, set the volume as high as possible without clipping
the next device in the signal chain. If you hear distortion and the clip/batt light
is not flashing, reduce the volume.
14
Page 15

Select
The 16 Images you can choose with the select knob are hand picked for your
type of guitar. Try all 16 and pick the ones that compliment your playing style
and sound good in the room. For example, dark/deep sounding Images may
add impact to a solo performance. Brighter/lighter Images may compliment an
ensemble. There are no rules; try them all and decide which works best for you.
Blend
Position the blend knob straight-up at 12 o’clock and you’ll hear a 50/50 mix of
Aura + pickup. Turn the blend all the way right for just Image; all the way left
for just pickup. Most performers blend in some pickup with the Image for clarity
and definition.
15
Page 16

Blend (continued)
Suggestions
• To find a good mix of Image and pickup, turn the blend knob to
about 8 o’clock, then step on the footswitch. Compare the Image/
pickup mix to the dry pickup signal. Slowly move blend clockwise
and then switch between the two until you are happy with the
Image/pickup blend.
• For live performance try backing off the Image by setting blend to
about 10 or 11 o’clock or about 65% pickup. You won’t need too much
Image blended in to achieve a great live sound. If feedback occurs, flip
the phase switch.
• For recording, try blending in more Image for a realistic acoustic tone.
Set the blend to taste. Again, you’ll often get good results with a little
bit of pickup blended in with the Image for clarity and definition.
16
Page 17

Footswitch
Step on the footswitch to bypass the Aura effect. When you stomp, you’ll hear
the dramatic difference between the Image blend and the dry pickup. When
the light above the footswitch is on, the Image is active. Note when the effect is
bypassed, your guitar signal remains buffered. Also, if the blend knob is set to
7 o’clock, you will hear no difference between active and bypass states.
Mute (optional mode)
You may set up the footswitch to alternate between the Image blend and muted
output. To enable the mute option, hold the footswitch down until the LED
flashes. Repeat to return to bypass.
17
Page 18

Battery replacement
cl ip | ba tt
The clip/batt indicator will light steadily when it is time to change the battery.
Open the battery door underneath the pedal and install a fresh 9V alkaline or
lithium battery. When the clip/batt LED comes on you have approximately one
hour of remaining battery life.
18
Page 19

Specifications
Digital signal path:
A/D, D/A conversion: 24-bit
Signal processing: 32-bit
Power supply: 9V alkaline battery or 9VDC adapter
Typical in-use current consumption: 18mA
Typical 9V alkaline battery life: 27 hours
9V adapter: Fishman 910-R (for 110V)
or suitable filtered and regulated,
200mA type, tip = negative
Input impedance: 10M Ohm
Nominal output impedance: 3.5k Ohm
Input trim gain range: -10dB to +2dB
Maximum output level (onset of clipping): +2.4dBV
Baseline noise: -92dBV (A-weighted
Dynamic range: 94dB (A-weighted
Phase switch: Left position = non-inverting
All specifications subject to change without notice.
19
)
)
Page 20

www.fishman.com
513-300-110 Rev A 4-07
 Loading...