


Acoustic Imaging Blender Aura™

Acoustic Imaging Blender Aura™
2

Acoustic Imaging Blender Aura™
Warnings
CAUTION
Risk of electric shock.
Do not open.
No user serviceable parts inside.
Refer servicing to qualified personnel.
Do not expose to rain or moisture.
Important Safety Instructions
To ensure your personal safety and the safety of others, operate this apparatus only after reading these instructions and heeding the warnings listed below.
•Before you operate the Aura, read the safety instructions below and keep them for reference.
•Follow all instructions.
•Do not use this apparatus near water.
•Clean only with a dry cloth.
•Do not operate near any heat sources such as radiators, heat registers, stoves or other apparatus (including amplifiers) that produce heat.
•Unplug the apparatus during lightning storms or when unused for long periods of time.
•Refer all servicing to qualified service personnel. Servicing is required when the apparatus has been damaged in any way, such as liquid spilled or objects fallen into into the apparatus, the apparatus has been exposed to rain or moisture, does not operate normally, or has been dropped.
•Use only with the specified AC Adapter.
(USA) Federal Communications Commission Radio Frequency Interference Statement
NOTE: This equipment has been tested and found to comply with the limits for a Class B digital device, pursuant to Part 15 of the FCC Rues. These limits are designed to provide reasonable protection against harmful interference in a residential installation. This equipment generates, uses and can radiate radio frequency energy and, if not installed and used in accordance with the instructions, may cause harmful interference to radio communications. However, there is no guarantee the interference will not occur in a particular installation. If this equipment does cause harmful interference to radio or television reception, which can be determined by turning the equipment off and on, the user is encouraged to try to correct the interference by one or more of the following measures:
•Reorient or relocate the receiving antenna.
•Increase the separation between the equipment and receiver.
•Connect the equipment into an outlet on a circuit different from that which the receiver is connected.
•Consult the dealer or an experienced radio/TV technician for help.
CAUTION: Changes or modifications to this equipment not expressly approved by the party responsible for compliance could void the user's authority to operate the equipment.
This device complies with Part 15 of the FCC Rules. Operation is subject to the following two conditions: (1) this device may not cause harmful interference, and (2) this device must accept any interference received, including interference that may cause undesired operation.
(Canada)
This Class B digital apparatus complies with Canadian ICES-003.
Cet appareil numérique de la classe B est conforme à la norme NMB-003 du Canada.
(EU Countries)
This product complies with the requirements of European Directive 89/336/EEC
AuraTM
Tested To Comply
With FCC Standards
FOR HOME OR OFFICE USE
3
Table of Contents
Quick Start |
4 |
Introduction |
5 |
Product Registration
Welcome
What Is a Sound Image?
Aura Capabilities
Aura, the Internet and You
Controls and Rear Panel Connections |
8 |
Rear Panel |
|
Front Panel |
|
Chapter 1: Control Panel Overview |
10 |
The Five Basic Groups |
|
LED Display |
|
Edit/Play Switch |
|
Data Knob |
|
Effect on/off Switch |
|
Chapter 2: Inner Workings |
14 |
Input /Output
Input Level and LEDs
Output Level
Phase Switches
Play Mode
Edit/Play Switch
Programs
Effect on/off Switch
Edit Mode
Edit/Play Switch
Data Knob
Effect on/off Switch
Setup
Parameter
Select
Aura Equalization
Blend
Pickup Equalization
Phase Switches
Compressor
Level
Effect on/off Switch
Tuner
Feedback Cancel
Chapter 3: Setting Up for Performance |
25 |
Appendices |
30 |
Specifications
Glossary
Troubleshooting
Factory Default Settings
Programs
Acoustic Imaging Blender Aura™
Input Requirements
Quick Start
•Acoustic Guitar: Use only an undersaddle pickup or a magnetic soundhole pickup.
•Other Instruments: Use only a bridge mounted pickup.
•If your pickup system has an onboard microphone, shut it off.
•If your pickup system has onboard EQ, set all the controls flat.
Get Your Feet Wet
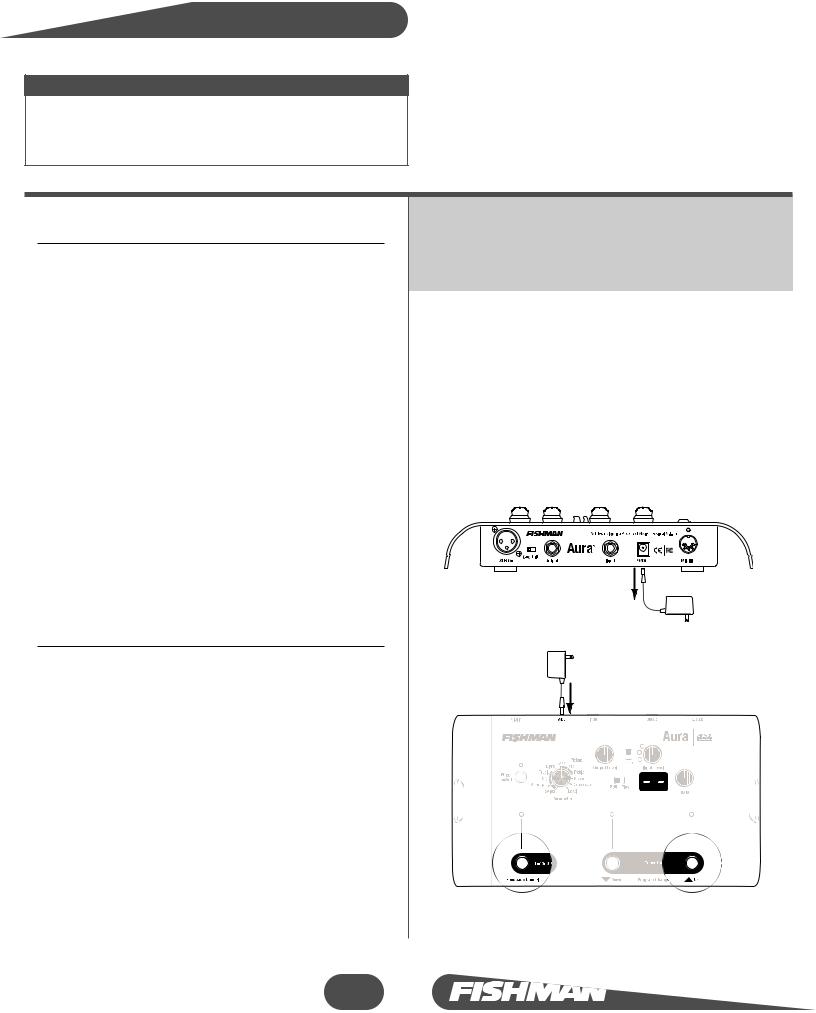
1Connect the Aura’s ¼” Output or XLR Output to your input.
2Connect your acoustic instrument to the Input jack on the
3Connect the recommended adapter to the 9VDC input to Aura (see Controls and Connections, Rear Panel, 9VDC volume down on your amplifier or mixer to avoid a loud damage your speakers (or your ears!).
4Play your instrument aggressively and adjust the Input adjacent LED (yellow) flickers regularly and the red LED up at all.
5Set Edit/Play switch to Play.
6Raise the Output Level to a comfortable volume.
7Browse Through The Different Sound Image / Pickup
Use the Up and Down footswitches or the Data control through programs 01-16 and find a Sound Image/pickup matches well with your instrument.
The Aura comes with 16 factory-loaded digital “Sound correspond to a popular variety of acoustic guitars and combinations. To help you identify the instrument, microphone associated with each program number, see Reference Card included with this manual.
Jump In the Deep End
Once you find a Sound Image that you would like to instrument, you can correct the phase, insert the Feedback blend the Sound Image with your pickup and apply compression. The changes you select can then be applied to that reside in the Play mode.
1Start with the Edit/Play switch in the Play position, Sound Image/pickup mix in one of the program locations and 16). Make note of the program number in the display
2Flip the Edit/Play switch to Edit. Select the Parameter change (example; Blend) and adjust it with the Data make adjustments to any of the 11 Parameters, as long the Edit mode.
Once you make your adjustments, simply flip the back to Play. You now have committed these changes to location. Additional tweaks can also be made at any time, to this same program location and repeating the above
3Unless you want to start building duplicate programs locations, do not experiment with the Select parameter be patient, and read on ....
4
TIP: Always start with the Edit/Play switch in the Play position, and select your program number before you switch over to the Edit mode. This way you will avoid inadvertently altering a program that you've already set up.
RESET: If you get in too deep, too quickly, you can easily return all the programs to their original factory settings with these 3 easy steps:
1Unplug the 9VDC adapter from the back of the Aura.
2Hold down the two outside footswitches and insert the power plug into the unit.
3Continue to hold down the outside footswitches until the
 prompt appears in the LED display.

Acoustic Imaging Blender Aura™
Introduction
Product Registration
Please fill out the Product Registration form online at
http://www.fishman.com/register.asp
Why register? When you do, we have your information on file should your Aura Acoustic Imaging Blender ever require warranty service. Your registration also keeps you on the cutting edge: we can let you know when updates and upgrades for the Aura become available.
Welcome!
We at Fishman thank you for purchasing the Aura Acoustic Imaging Blender. You’ll be glad you did, because the Aura is going to forever change the way you think about acoustic amplification. Whether you’re plugging in onstage, recording in the studio, jamming with friends or just noodling around at home, this little silver box will transform your amplified acoustic sound.
Through the magic of cutting-edge digital technology, Aura grants the secret wish of every acoustic musician: dead-on amplified acoustic tone. No apologies. No compromises. Imagine the kind of realism you hear on your favorite acoustic recordings, but without a microphone. Aura is making instant believers of those who have written off pickups in the past.
Aura’s acoustic Sound Imaging technology holds 16 Sound Images; the musical, genetic material of a variety of the world’s choicest acoustic guitars and microphones. When you plug into the Aura, its advanced algorithms transform your pickup signal into glorious, warm and radiant mic’d-up acoustic guitar tone. Can a pickup ever sound as good as a microphone? The answer is Yes. Cast off any preconceptions of what a pickup can sound like and be prepared for the future of acoustic amplification. You have found your Aura.
If you have any questions or comments, please contact us at tech@fishman.com.
What Is a Sound Image?
A Sound Image is a sophisticated algorithm that transforms your pickup’s signal into that of a microphone in front of a guitar (or other stringed instrument). To transform the caterpillar pickup signal into the butterfly sound image, the algorithm seamlessly adjusts the pickup’s phase and frequency response to match the instrument and microphone in the Sound Image template. Also, signature elements like body size, radiant sound from the guitar, body resonance, mic distance and even the microphone’s personality all get added into the equation for amplified acoustic guitar sound with indisputable realism.
Everyone loves the sound of a well mic’d acoustic guitar. The transparency of a fine microphone positioned precisely at the elusive “sweet spot” in front of a guitar is a beautiful thing. Over the years, we have endeavored to capture these qualities with our pickup systems, with varying degrees of success. But with just a pickup, we could never capture the same sound quality as a top shelf studio microphone setup. That is, until now.
At Fishman, we set out several years ago to figure out exactly what it is about the interaction between a microphone and a guitar that is so special, and how this special relationship can be re-created with a pickup. We looked at the behavior of a vibrating guitar top and the way sound radiates off the instrument. We studied what a microphone “hears” compared to what a pickup “feels”. We joined forces with Akai Professional especially for the Aura project.
5

Acoustic Imaging Blender Aura™
Aura Capabilities
What does it do?
The Aura is the logical extension of Fishman’s Blender technology. With a traditional Blender, we combine the utilitarian function of a pickup with the unquestionable realism that only a microphone can add. This combination produces a whole that is much greater than the sum of the parts.
The Aura Acoustic Imaging Blender takes the concept a giant leap forward by eliminating onboard microphones from the equation and replacing them with digital Sound Images derived from a real studio environment.
What you can expect from the Aura?
Sound Imaging bridges the credibility gap between unamplified and amplified acoustic guitar sound. Unlike modeling, which takes a generic signal and applies a specific coloration, Sound Imaging matches the specific sound of an acoustic guitar with a specific Sound Image. Modeling is simulation, whereas Sound Imaging is re-creation. Don’t expect a catalog of different guitars at your fingertips; that is not what the Aura is intended for. Expect the Aura to amplify your instrument's most natural sound with incredible accuracy.
Introduction
Size Matters
There are good reasons why acoustic guitarists gravitate toward one body style or another. Strummers often go for the big, boomy rhythm that only a dreadnought can produce. Fingerstylists tend to favor smaller instruments, like the grand concert for its tonal balance and quick, feather-touch response. People looking for the best of both often play grand auditorium instruments. Because Aura is about re-creating an instrument’s individual character, it is important to match your guitar with a Sound Image based on a similar sized guitar and pickup type.
What Happens If I Mix and Match
Sound Images?
We're not telling you that you can’t try transforming your old Silvertone into a D-45 sound image, but don't expect miracles. The resonance and tonal balance of one type of guitar could be at odds with a dissimilar sound image. The nature of your particular guitar and the interactive nature of the Sound Image may clash, so proceed with caution. In the best cases, an acoustically neutral sounding instrument can “put on” some of the resonant characteristics of a dissimilar Sound Image, but we can’t guarantee your results.
6

Acoustic Imaging Blender Aura™
Aura, the Internet and You
The Aura ships with sixteen factory-loaded Sound Images of various guitar, microphone and pickup combinations. Of these sixteen factory-loaded Sound Images, twelve can be replaced with new Sound Images. Why would you want to start replacing these before you’ve even unpacked the Aura?
Because each Sound Image in the Aura is specific to body size, microphone model and pickup type, you may not find a factory preset that is a perfect match for your instrument. If you have internet access, you can download new Sound Images from our Aura website and transfer them to Aura through its MIDI-In port.
We offer an ever-expanding library of new digital Sound Images, available only at www.fishmanaura.com. Plus you can take advantage of email access to Fishman’s legendary customer support with tips, tricks and trouble-shooting for your Aura. If you are already on the internet, come visit the Aura section of our website. If not, we suggest you take the plunge and get online. Then you can start taking advantage of the many valuable online resources available for the Aura.
MIDI Requirements
To transfer Sound Image data from your computer to the Aura, you’ll need a MIDI compatible cable.
If your computer has a 15-pin MIDI/Joystick port, then you’ll need a compatible cable with a male 15-pin connector on one end and a MIDI out connector at the other end. This cable typically will have a second MIDI in and female 15-pin connector that goes unused. We Recommend the Voyetra MIDI Cable Pack.
If your computer has a USB port, you’ll need a USB to MIDI adapter. This cable may have a second MIDI in connector that goes unused. We recommend the cable that is sold with the Voyetra Music Studio Kit.
Go to www.fishmanaura.com for complete Sound Image downloading instructions.
7
Introduction
More Sound Images are at available at www.fishmanaura.com !
Although we include a representative group of instruments with the Sound Images presently in your Aura, we understand that you may want more than 16 to choose from. Especially when you consider how many different kinds of acoustic guitars exist.
To address this desire, we are gathering new Sound Images on a ongoing basis and offering them to you to download free from our Aura Gallery at the above website. Once you’ve downloaded your new Sound Images, you will be able to transfer them directly to the Aura via its MIDI-In port.
Aura Custom Shop
Imagine having a personal Aura library with Sound Images derived from your actual instruments! For the ultimate Aura experience, we will be setting up an Aura Custom Shop where we create new Sound Images for your personal instrument. Visit our web site at www.fishman.com for more details.
Acoustic Imaging Blender Aura™ |
Controls & Connections |
Rear Panel
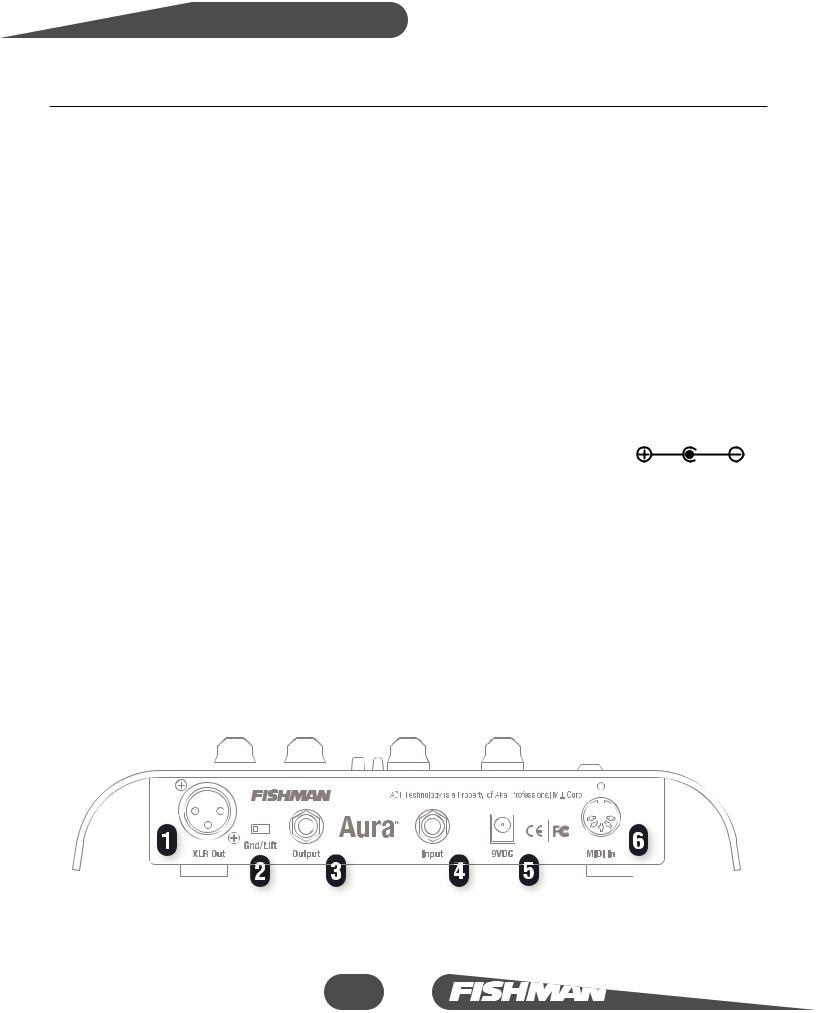
1 XLR Out
Connect this balanced -4dBu level output to the input of your PA system, recording console, or to a microphone input on a portable amplifier. The Sound Image/pickup mix gets routed through this output.
2 Gnd/Lft
Move the Gnd/Lft switch to the “Lft” position to eliminate the ground loop hum that can occur when you use the XLR and (1/4”) Outputs together.
3 Output
Plug this unbalanced -10dBu output to your stage amplifier or an unbalanced mixer input. The Aura will sound best when you plug in to an acoustic instrument amplifier (like the Fishman Loudbox™), a full range keyboard amplifier, or a PA System.
4 Input
Connect your instrument to the Aura Input with a standard shielded cable.
Input Requirements
Use a so-called “string-sensitive” pickup on your instrument. For acoustic guitar this means an undersaddle pickup or a magnetic soundhole pickup. The Aura will not perform well with soundboard type pickups, such as the Fishman SBT or any other pickup that locates on the soundboard, away from the bridge. If your pickup system has a microphone, turn it off.
5 9VDC
Connect only with a regulated 9 Volt, 200mA AC adapter. Plug in the 9VDC input to turn the Aura on; there is no on/off switch. A Fishman 910-R AC adapter is included with all units sold in the USA. If you purchased the Aura outside the USA, you must supply your own AC adapter. We recommend the Roland PSA Series or a comparable equivalent.
6 MIDI In
Through this input you can transfer Sound Image data to your Aura from an ever-expanding library at the Fishman Aura website. Go to www.fishmanaura.com for additional information.
MIDI Requirements
To transfer Sound Image data from your computer to the Aura, you’ll need a MIDI compatible cable.
If your computer has a 15-pin MIDI/Joystick port, then you’ll need a compatible cable with a male 15-pin connector on one end and a MIDI out connector at the other end. This cable typically will have a second MIDI in and female 15-pin connector that goes unused. We Recommend the Voyetra MIDI Cable Pack.
If your computer has a USB port, you’ll need a USB to MIDI adapter. This cable may have a second MIDI in connector that goes unused. We recommend the cable that is sold with the Voyetra Music Studio Kit.
Go to www.fishmanaura.com for complete Sound Image downloading instructions.
8
Acoustic Imaging Blender Aura™
Front Panel
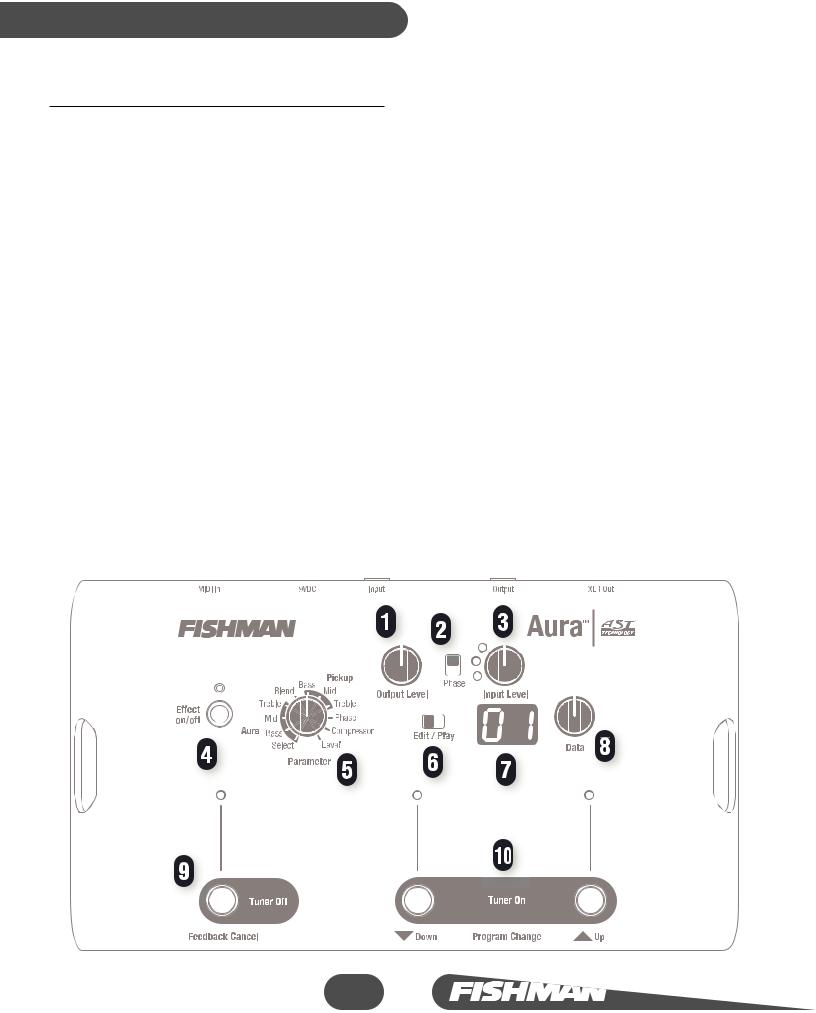
1 Output Level Knob
Sets the overall level at the XLR and ¼” outputs.
2 Phase Switch
Use this global phase switch to improve the amplified response at low volumes and to help reduce feedback at high volumes.
3 Input Level and LEDs
Lets you match the output of your pickup to the input of the Aura for the cleanest possible signal.
4 Effect on/off Switch
Push this switch to turn the digital Sound Image off and on.
The green light turns on when the Sound Image is active.
5 Parameter Knob
In Edit mode, point the knob to the desired parameter to access it.
6 Edit/Play Switch
Flip the switch to Play to access the 50 program for your sound image/pickup mixes.
Move the switch to Edit to access the 11 parameters.
Controls & Connections - continued
7 LED Display
The LED display references the 11 parameters in Edit mode, the 50 program locations in Play mode, and the pitch names and calibration frequencies in the Tuner mode.
8 Data Knob
This multi-function knob affects the behavior of parameters in the Edit mode, scrolls through program locations in the Play mode and calibrates the reference pitch in Tuner mode.
9 Tuner Off/Feedback Cancel Footswitch
This dual-function footswitch disengages the Tuner and turns the Feedback Cancel feature on and off.
10 Tuner On/Program Change Footswitches
These dual-function switches are for engaging the chromatic Tuner and changing program locations.
9

Acoustic Imaging Blender Aura™
Chapter 1
Control Panel Overview
10
Acoustic Imaging Blender Aura™ |
Control Panel Overview |
The Five Basic Control Groups
The Aura control panel can be divided into five functional groups:
1 Input/Output (see page 15)
The Input Level control sets the optimum amount of gain for your pickup.
The Output Level sets the level going to your amp or mixer.
The slide switch marked Phase corrects phase anomalies that can degrade your sound or cause acoustic feedback
2 Play Mode (see page 16)
Move the switch from Edit to Play and use the Data knob or the Program Change switches to choose the location of the program that you will be working with. Initially this means that you’ll be checking out the first 16 program locations and the factory mixes associated with them. Once you get more fluent with the Aura, you will use the Play mode to assign your mixes to the program locations (01-50) of your choice. During a performance, you will normally use the Aura in Play Mode. Use the Effect on/off switch to compare the Aura mix to the unadorned pickup sound.
3 Edit Mode (see page 18)
Move the switch from Play to Edit to access the Aura's universe of adjustable parameters and tailor your mixes specifically to your preferences. Use the Effect On/Off switch to compare the Aura mix to the unadorned pickup sound. Use the Effect Off as your baseline for setting the level of your sound image/pickup mixes.
4 Tuner (see page 23)
You have the option to mute the outputs (or not), and to change the calibration frequency of the chromatic tuner.
5 Feedback Cancel (see page 24)
The Feedback Cancel feature can be programmed to eliminate feedback in any of the 50 program locations.
11
 Loading...