

Fishman Acoustic Matrix Installation Guide

This article is intended to illuminate the finer points of fitting an under-the-saddle
piezo pickup.The positioning of a piezo element on or within an instrument is a challenging installation problem. Necessarily, the pickup is extremely sensitive, and accordingly, its environment must fall within a small envelope to achieve full performance.
Problems are not always what they first appear to be, but the mysteries WILL BE
REVEALED to the perceptive. I have always been able to resolve balance problems by
checking and truing the surfaces that touch the pickup. Only rarely should any corrective saddle "sculpting" (see “Drop-In Installations”) be required if the parts around the
pickup are correctly shaped.
The Fishman AG-125 and Martin 332 contain 6 piezo elements. For best performance, each element must be located directly under each string - or in the 12-string,
under the center of each pair of strings. Yes, it MAY work if slightly misaligned or differently spaced, but there's nothing like getting them right underneath! Our recommendation is no more than .050" total difference between the outside string to string measurement at the saddle and the spacing of the crystal elements within the pickup.
The Fishman Acoustic Matrix Pickup contains a multi-layer configuration of continuous strips of sensing material. This continuous design allows the Acoustic Matrix to
sense the motion of the entire saddle, rather than small sections. The job of aligning
the strings with the piezo sensing material is eliminated with the Acoustic Matrix
pickup.
Please remember that custom length, string spacing or string number pickups are
available from Fishman Transducers. Do not hesitate to order a custom pickup if necessary.
Also please note that the methods and techniques described in this article are
intended only for
held responsible for any damages to your pickup or instrument that may result from
improper installation procedures.
professional
repairmen and luthiers. Fishman Transducers cannot be
The Finer
Points
of
Undersaddle
Pickup
Installation
Adapted from an article by
Ken Parker; first published in the
12th issue of Guitarmaker -
Stock Pickups Available
without Special Ordering
STRING OVERALL
FORMAT WIDTH SPACING WHL LENGTH
THINLINE 332 3/32” 2.125” .234” 2.625”
2.3125” .183” 2.725”
2.375” .234” 2.825”
4-STRING 2.125 .234” 2.625”
BACKPACKER 2.190” .100” 2.500”
BACKPACKER
CLASSICAL 2.4375” .150” 2.825”
AG-125 1/8” 2.125” .234” 2.625”
2.155” .234” 2.625”
2.00” .234” 2.500”
AGX-125 2.3125” .234” 2.725”
B-30 4-STRING 2.0625” .234” 2.500”
CUATRO 55mm .234” 2.725”
4-STRING 2.1875” .234” 2.625”
12-STRING 2.260” .234” 2.725”
2.200” .234” 2.625”
The Official Newsletter and
Publication of A.S.I.A.
(Association of Stringed
Instrument Artisans)
THINLINE GOLD + 3/32” 2.00” - 2.50” .100” 2.725”
ACOUSTIC MATRIX 1/8” & 3/32” 2.00” - 2.50” .100” 2.650”
LOWDEN SPLIT 2.00” - 2.50” .100” 1.750” + .875”
Fishman Transducers, Inc.
340-D Fordham Road, Wilmington, MA 01887 USA
Phone 978-988-9199 • Fax 978-988-0770
www.fishman.com
UNDER SADDLE PICKUP INSTALLATION ... Continued
WIRE HOLE LOCATION
The wire hole must be in the correct place, as per the
pickup instructions, drilled 3/32" (,093"), and perpendicular to
the bottom of the slot. The wire hole must also be centered in
the slot width.
Failure to precisely locate the wire hole may cause balance
problems and in worse cases, electrical failure due to a pickup
deformed or pinched by saddle pressure.
PICKUP INSTALLATION
OBJECTIVES:
1. Position the pickup under the strings so that it is uniformly
loaded in compression between the saddle and the bottom
of the saddle slot.
2. Interfere as little as possible with or improve the unampli-
fied sound of the guitar.
METHODS:
(in ascending order of precision, control and complexity)
I - DROP IN INSTALLATIONS
Some guitars will accept a pickup "as is". The pickup wire
hole is located and drilled, the pickup installed, the signal and
shield wires temporarily "twisted" up to a cord, and the saddle
reduced in height as specified in the installation instructions.
Re-string and test for balanced output. To avoid unnecessary
resoldering and heartbreak, always verify correct operation of
the pickup by temporarily hooking up to a test cord.
String balance problems with a drop in installations can
often be corrected by "sculpting" the underside of the saddle,
equalizing the pressure on the pickup. By sculpting, I mean
the adjustment of the saddle bottom to form under string tension, a surface parallel to the slot bottom. This is done to even
out the pressure on the piezo elements. See the trouble
shooting section for detailed instructions.
Dropping in a pickup is generally successful only on newer
instruments where:
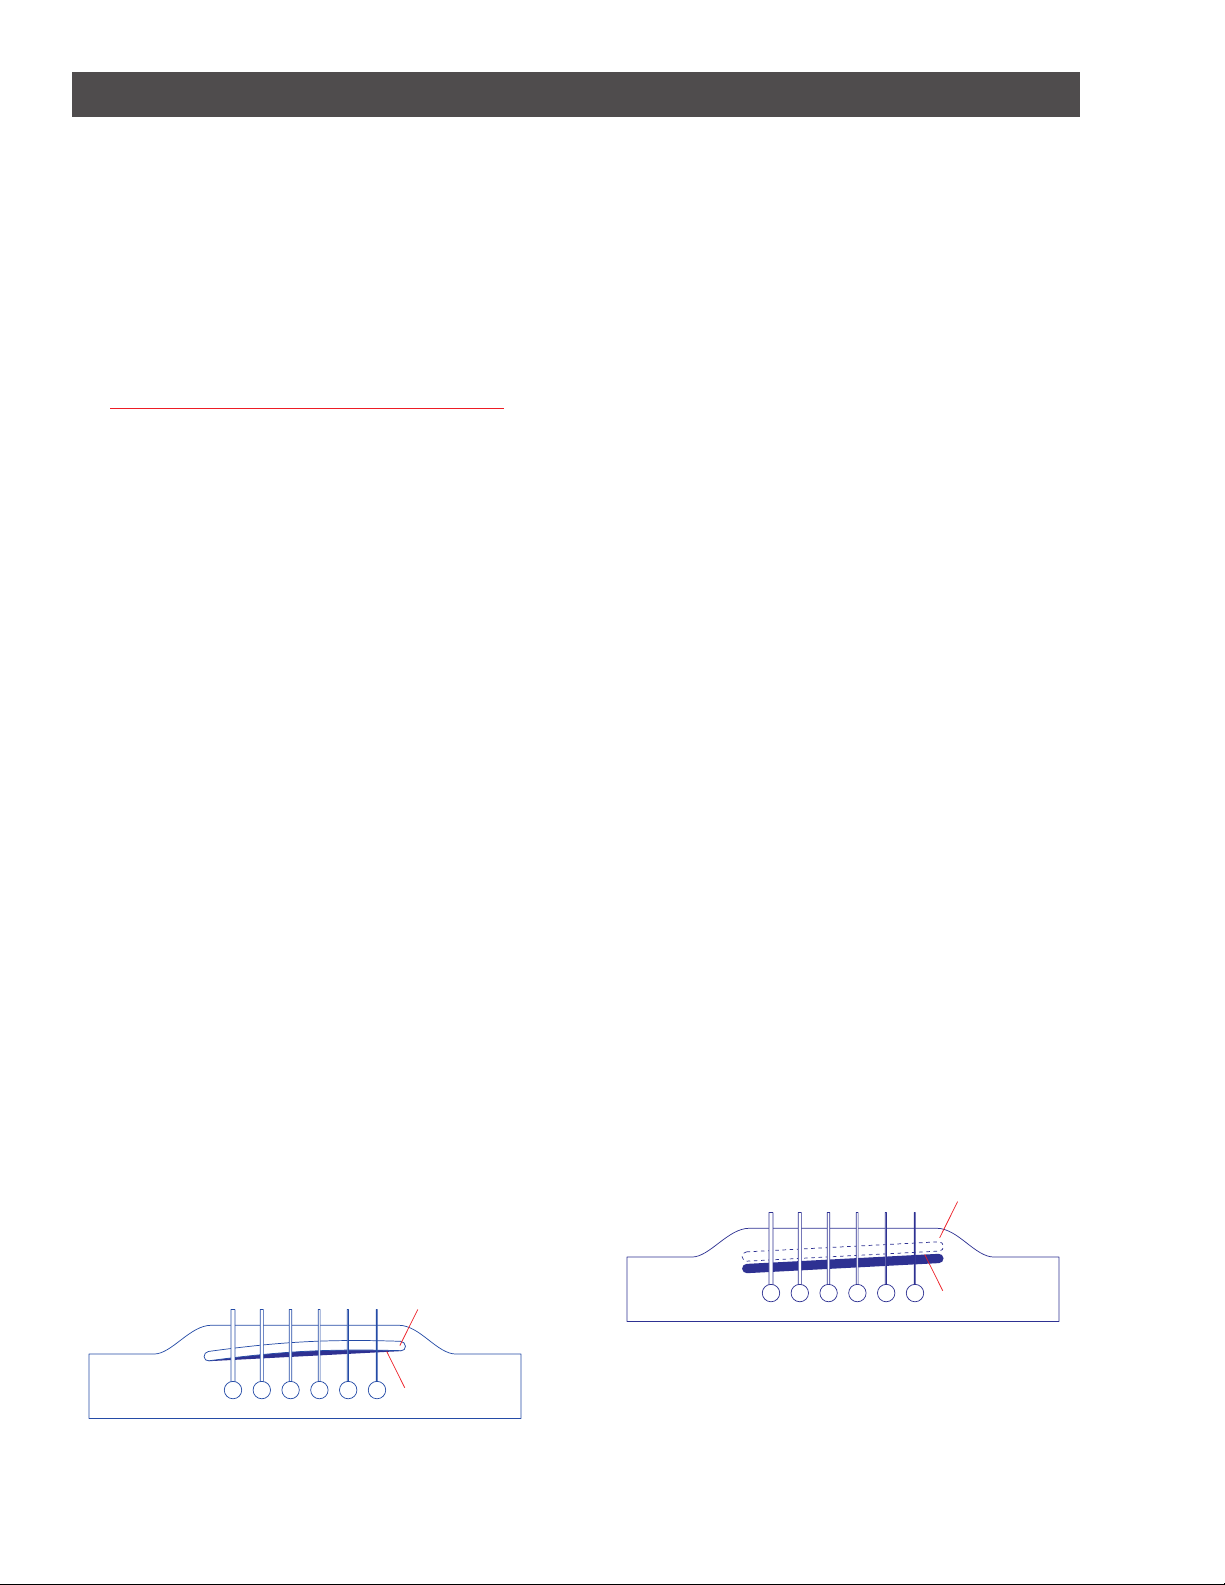
1. The saddle slot is not distor ted into a long "D" shape (Fig.
1) by an overly tall or loose saddle.
2. The slot has enough depth to safely reduce the saddle
height and maintain proper and desirable relationships
between the bridge and saddle (see Mechanical Factors
Affecting Pickup Performance).
3. The slot has not been deepened by hand or otherwise
chewed up -the bottom of the slot must present a smooth
and flat or nearly flat surface.
4. The bridge and top around the br idge are essentially the
same shape as when manufactured. Guitars with big "bellyup" will probably need more "sculpting" of the saddle than
is easily done.
If all is well, untwist the test wire and solder up as usual.
Sometimes the saddle bottom will need to reshaped or
"sculpted" one or more times before it successfully squeezes
the pickup evenly. This method does not always produce good
results, but if the guitar fulfills criteria 1-4, the chances are
very good that it can.
The advantage of this is, of course, speed. No major
machining is done, and fitting the saddle for good response is
within the abilities of any "set-up-capable" repairman.
The disadvantages can be great, also.
1. To lower action from the bottom of a sculpted saddle, the
surface needs to be re-shaped. Ugh.
2. We all know that no instrument fulfills criteria 1-4 except
the Holy (herringbone) Grail and the box you just built.
3. No chance to correct intonation or saddle tilt. So for many
guitars we move to Methods II and III.
II - MACHINING A SLOT
General points to remember:
1. Do not deepen the slot more than necessar y - the pickup
will sound better the closer it is to the strings, and the
bridge will retain its strength in the area of the slot.
2. Check for intonation before routing. Ideally, set the action
and restring first to determine if the slot needs to be
moved. If so, patch the slot, smooth off the bridge top and
lay a piece of some hard material on the top of the now
slotless bridge. String up and tap the test saddle around to
locate the proper saddle placement. (Fig. 2)
Patched Slot
Saddle
Gap behind center of saddle
Figure 1 - LONG D-SHAPED SLOT
Sliding saddle atop bridge
Figure 2 - FINDING INTONATION
The test saddle can be moved around while strung up at
correct action height to empirically locate exact spot for new
saddle.
 Loading...