

Fisher & Paykel WB60SMTB1-SET, WB60SDB1-SET, WB60SMG1-SET, WB60SMB1-SET, WB60SDTB1-SET User Manual
Page 1

WARMING DRAWER
MINIMAL
WB60SMG1-SET, WB60SMB1-SET & WB60SMTB1-SET
CONTEMPORARY
WB60SDB1-SET & WB60SDTB1-SET
USER GUIDE
NZ AU UK IE SG
Page 2

Page 3

CONTENTS
Safety and warnings 4
Before you begin 8
Using your Warming Drawer 10
Functions 11
Delayed Start 13
Loading your appliance 14
Using the wire shelf 15
Cooking charts 16
Care and troubleshooting 18
Manufacturer’s Warranty and Service guide (NZ AU) 19
Manufacturer’s Warranty and Service guide (UK IE) 20
Customer care (UK IE) 21
Registration
To register your product visit our website: fisherpaykel.com/register
3
Page 4
SAFETY AND WARNINGS
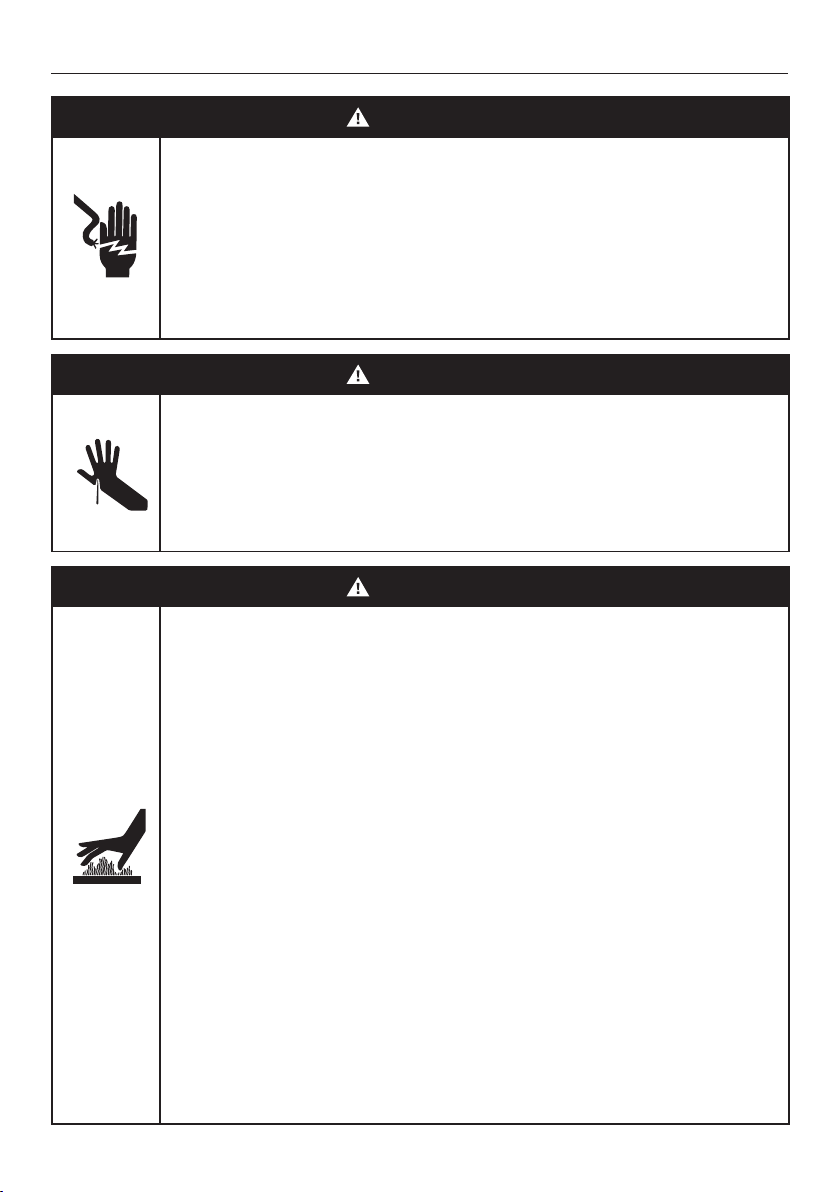
WARNING!
Electric Shock Hazard
Failure to follow this advice may result in
electric shock or death.
• If the product is damaged, switch the appliance
off and disconnect it from the power supply to
avoid possible electric shock.
WARNING!
Cut Hazard
Failure to use caution could result in injury.
• Take care: some edges may be sharp.
• Do not put fingers in the drawer when closing.
WARNING!
Hot Surface Hazard
Failure to follow this advice could result in
burns and scalds.
• To avoid burns and scalds, keep children away
from this appliance.
• Surfaces of the appliance may become hot
enough to cause burns.
• Do not touch heating elements or interior
surfaces of the appliance. Heating elements may
be hot, even when they are dark in colour.
• Use protective gloves when handling
hot surfaces.
• During and after use, do not touch or let
clothing or other flammable materials contact
heating elements or interior surfaces of the
appliance until they have cooled.
4
Page 5
SAFETY AND WARNINGS
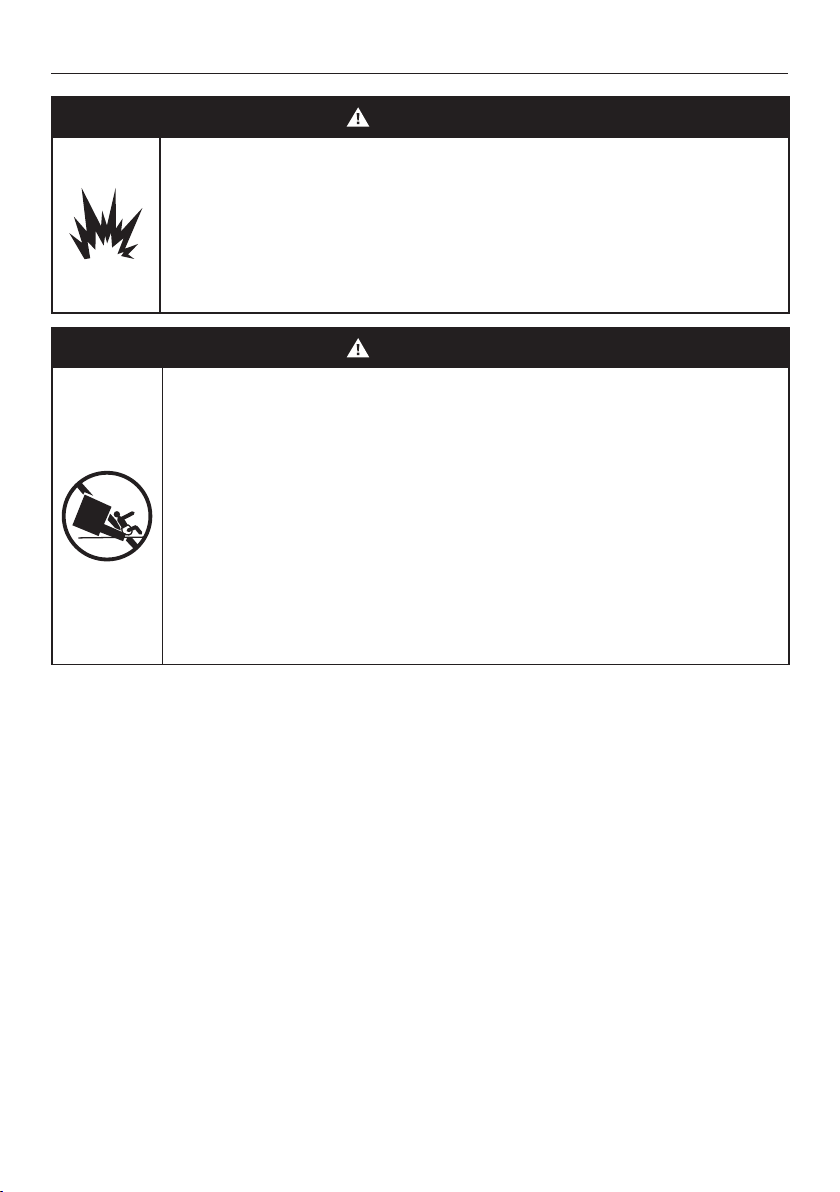
WARNING!
Fire Hazard
Failure to follow this advice may result in
overheating, burning, and injury.
• Flammable materials should not be stored in the
appliance or near its surface.
WARNING!
Tipping Hazard
This product may tip. Keep children away
and take care. Failure to follow this advice
may result in injury.
• The drawer must be secured in place by
supplied screws.
• Ensure there is a fixed shelf directly above
the drawer if it is not installed under
another product.
5
Page 6

SAFETY AND WARNINGS
READ AND SAVE THIS GUIDE
WARNING!
To reduce the risk of fire, electrical shock, injury to persons or damage when using the
appliance, follow the important safety instructions listed below. Read all the instructions
before using the appliance. Use the appliance only for its intended purpose as described
in these instructions.
General Use
z
This appliance is designed for use in a normal domestic (residential) environment.
z
Do not use the appliance outdoors.
z
Children should be supervised to ensure that they do not play with the appliance.
z
This appliance can be used by children aged from 8 years and above and persons with
reduced physical, sensory or mental capabilities or lack of experience and knowledge
if they have been given supervision or instruction concerning use of the appliance in a
safe way and understand the hazards involved.
z
To avoid hazard due to instability of the appliance, it must be fixed in accordance with
installation instructions.
z
Keep the operating panel clean and dry. Wash and dry your hands before operating the
drawer to ensure the buttons will respond properly.
z
Avoid drying food types with high moisture content e.g. tomatoes or pineapple.
Installation
z
Ensure your appliance is properly installed and earthed by a qualified technician.
z
Ensure this appliance is connected to a circuit which incorporates an isolating switch
providing full disconnection from the power supply.
z
Do not install or operate the appliance if it is damaged or not working properly. If you
receive a damaged product, contact your local dealer or installer immediately.
z
Do not install the appliance near a hot gas or electric burner or in a heated oven.
Servicing
z
Check the appliance for any damage inside or outside surface of the appliance. Do
not use damaged cord or plug. If there is any damage, do not operate the appliance.
Contact a Fisher & Paykel trained and supported service technician.
z
Do not repair or replace any part of the appliance unless specifically recommended
in this user guide. All other servicing must be done by a qualified person or
Fisher and Paykel trained and supported service technician.
Cleaning and maintenance
z
Ensure the appliance is turned off or set in
z
Unplug from the power outlet and allow the appliance to cool down after use before
STANDBY
mode before cleaning the drawer.
cleaning the drawer.
z
Cleaning and user maintenance shall not be undertaken by children without supervision.
z
Use a moderately damp cloth for cleaning. Do not spray water outside or inside the
appliance. Water can cause damage inside the appliance.
z
Do not use aggressive or abrasive detergent or sharp metal scrapers for cleaning the
glass base of the appliance.
6
Page 7

SAFETY AND WARNINGS
Safety
z
Do not touch hot surfaces. Use handles or knobs.
z
Do not sit or lean on the appliance. Damage to the surface of the glass may cause it to
shatter.
z
Do not store hazardous objects that can explode like containers with gas or air
chambers (e.g spray cans).
z
Do not immerse cord, plug or other parts in water or other liquid to protect against
electrical shock. Do not let the cord hang over the edge of table or counter, or in a
heated oven.
z
Do not use accessory attachments that are not recommended.
Packaging disposal
z
Remove packaging and recycle materials that can be reused.
z
Dispose packaging materials in accordance with local regulations on waste disposal.
7
Page 8
BEFORE YOU BEGIN
z
Ensure the installer has completed the final checklist in the installation instructions.
z
Read this guide, taking special note of the Safety and warnings section.
1
3
6
2
9
7
5
8
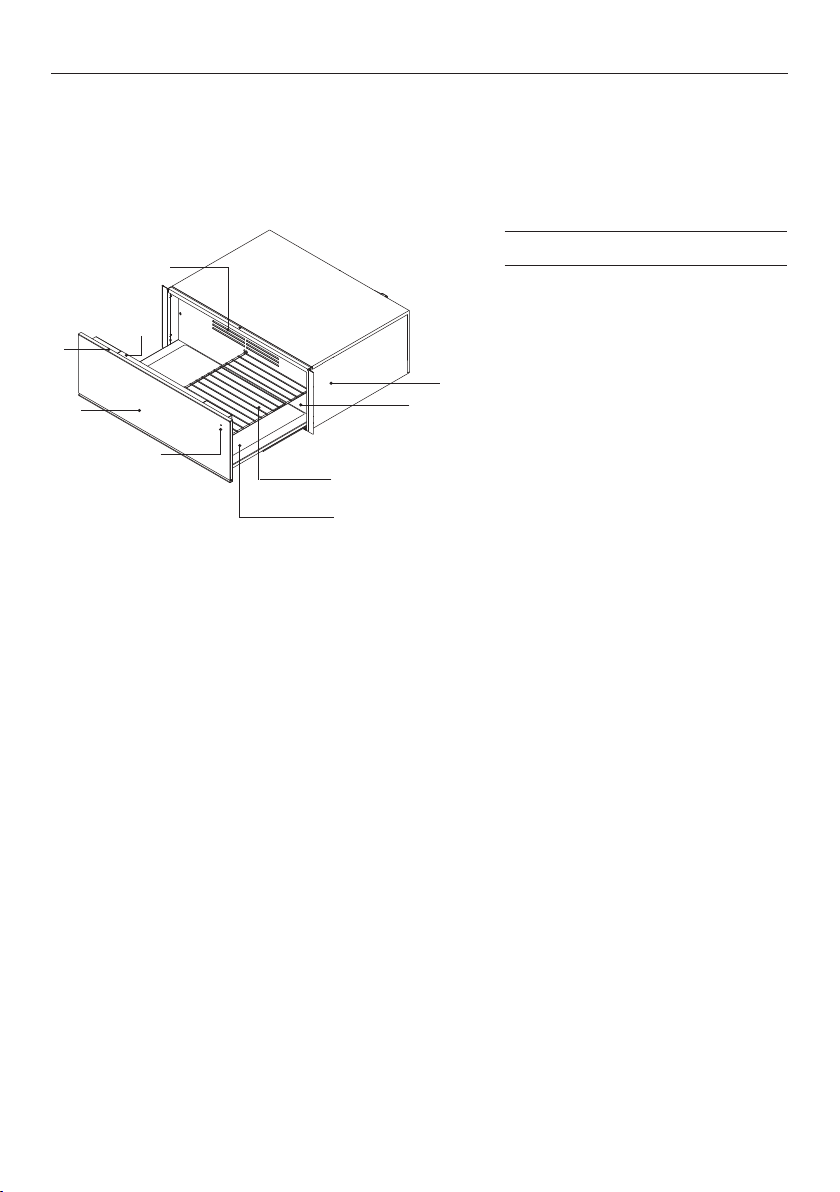
Drawer features & accessories
1 Control panel
2 Indicator light
3 Push-to-open door
4
4 Serial plate*
5 Heated glass base
6 LED internal lighting
7 Wire shelf**
8 Fan Plate
9 Ventilation slots
* Located inside the chassis of the drawer
** Available in tall models
8
Page 9
All layers
PANTONE COOL GRAY 2 - THAT CAN BE BACKLIT WHITE
Control panel
2 3 5 61 4
BEFORE YOU BEGIN
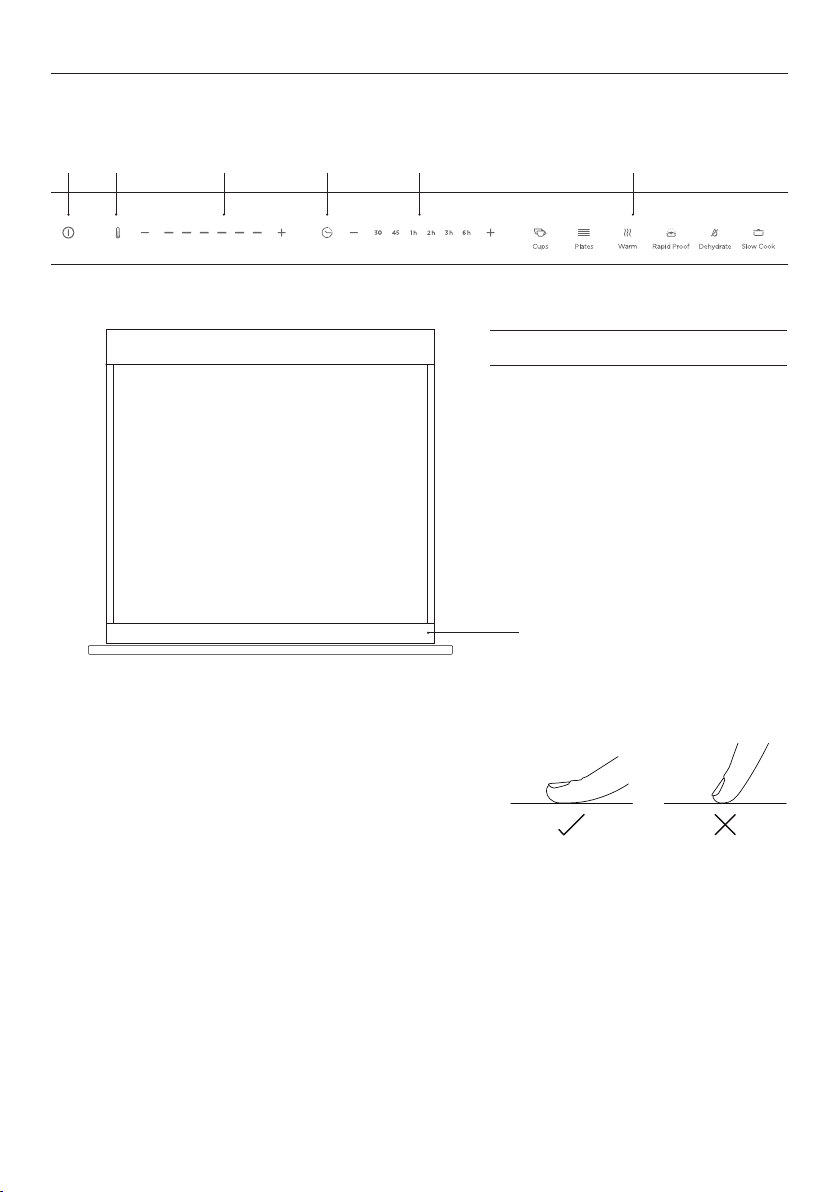
Control panel features
1 Power On/Off
2 Temperature indicator
3 Temperature controls
4 Duration indicator
5 Duration controls
6 Heat modes
control panel
Using the touch controls
Your Warming Drawer is operated using a touch
control panel. To operate the control panel, use
the ball of your finger, not its tip. The controls
respond to touch, so pressure is not needed.
Keep the operating panel clean and dry. Wash and
dry your hands before operating the drawer to
ensure the buttons will respond properly.
9
Page 10
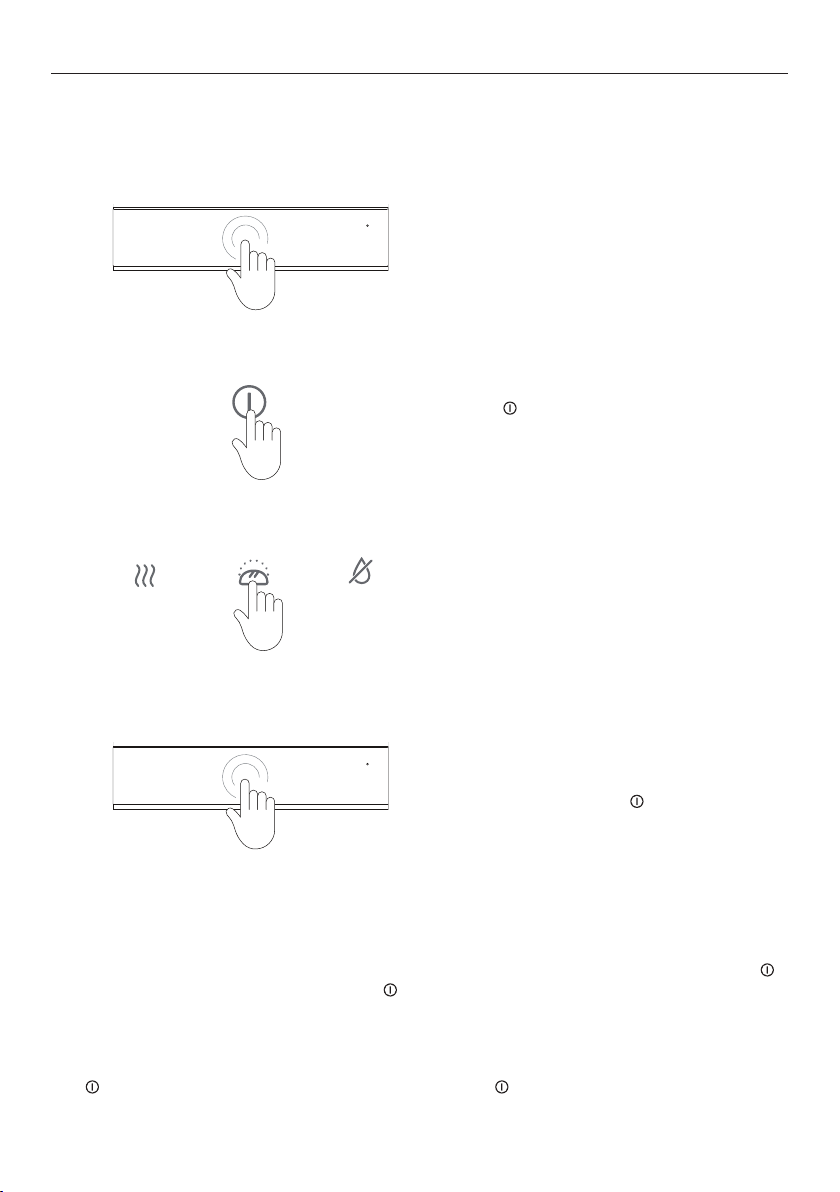
USING YOUR WARMING DRAWER
First time use
If using the Warming Drawer for the first time, three LEDs in temperature controls are
illuminated at start up.
For push-to-open models, touch the
1
centre-front of the drawer to open.
Do not force the drawer open.
2
3
4
During a cycle
The drawer can be opened at any point during operation. This will pause the programme
and the indicator light will flash until the drawer is closed again. To cancel a cycle, touch
at any time. To turn off the drawer, touch for two to three seconds and release.
Touch the
Select the desired heating function. If no
function is selected, the drawer will start at
the default setting.
Press the centre of the door to close the
drawer. The indicator light will flash if the
drawer is not closed.
At the end of a cycle:
A tone will sound and the
Use caution when unloading the drawer, the
heated glass base and its contents will be hot.
button to switch the drawer ON.
symbol will dim.
Standby mode
After 12 hours of continuous use, the drawer automatically switches to standby mode.
The button is dimmed when in standby mode. Touch button to resume drawer use.
Do not leave the Warming Drawer unattended for long periods of continuous operation.
10
Page 11
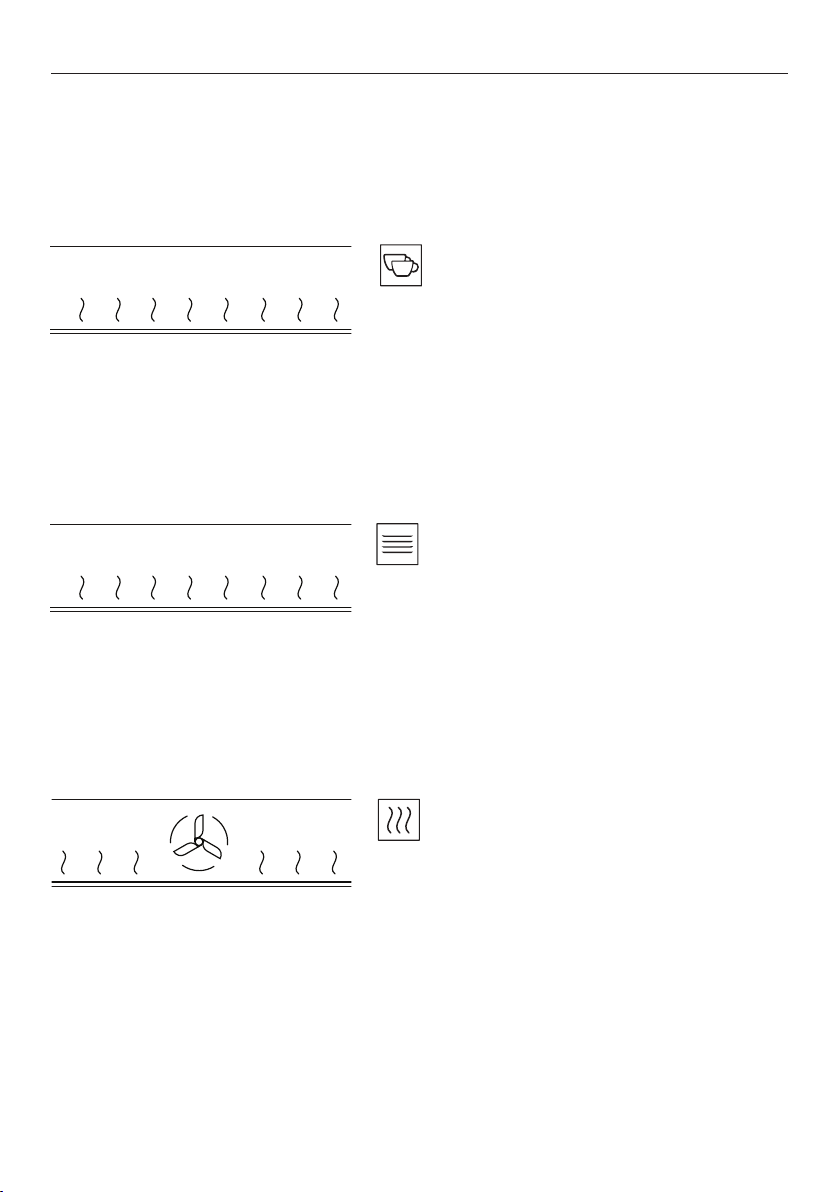
FUNCTIONS
Your Warming Drawer is designed to utilise the heated glass base and rear fan in differing
heat levels and durations to provide optimal performance. Each function has a default time
and temperature setting that illuminates upon selection. These settings can be customised
by manually adjusting the duration and temperature controls in place of a pre-set function.
CUPS
Heat circulates from the heated glass base
z
Heat is circulated for 30 minutes.
z
Heating duration depends on material and
thickness of the cups including quantity, height
and arrangement.
z
Do not place any cups and/or glasses in front of
the ventilation slots. This will block the airflow
and cause uneven heating.
PLATES
Heat circulates from the heated glass base
z
Heat is circulated for 45 minutes.
z
Heating duration depends on material and
thickness of the plates including quantity, height
and arrangement.
z
Do not place any large plates in front of the
ventilation slots. This will block the airflow and
cause uneven heating.
WARM
Heat circulates from the heated glass base
and rear fan
z
Preheat the drawer for at least 15 minutes
before use.
z
Heat is produced for 60 minutes.
z
Provides constant low heat to keep cooked
food hot.
z
Do not overfill the drawer to avoid spillage.
Cover the food with a heat-resistant lid or
aluminum foil to prevent food from drying out.
z
This function is not suitable for reheating
refrigerated food.
11
Page 12
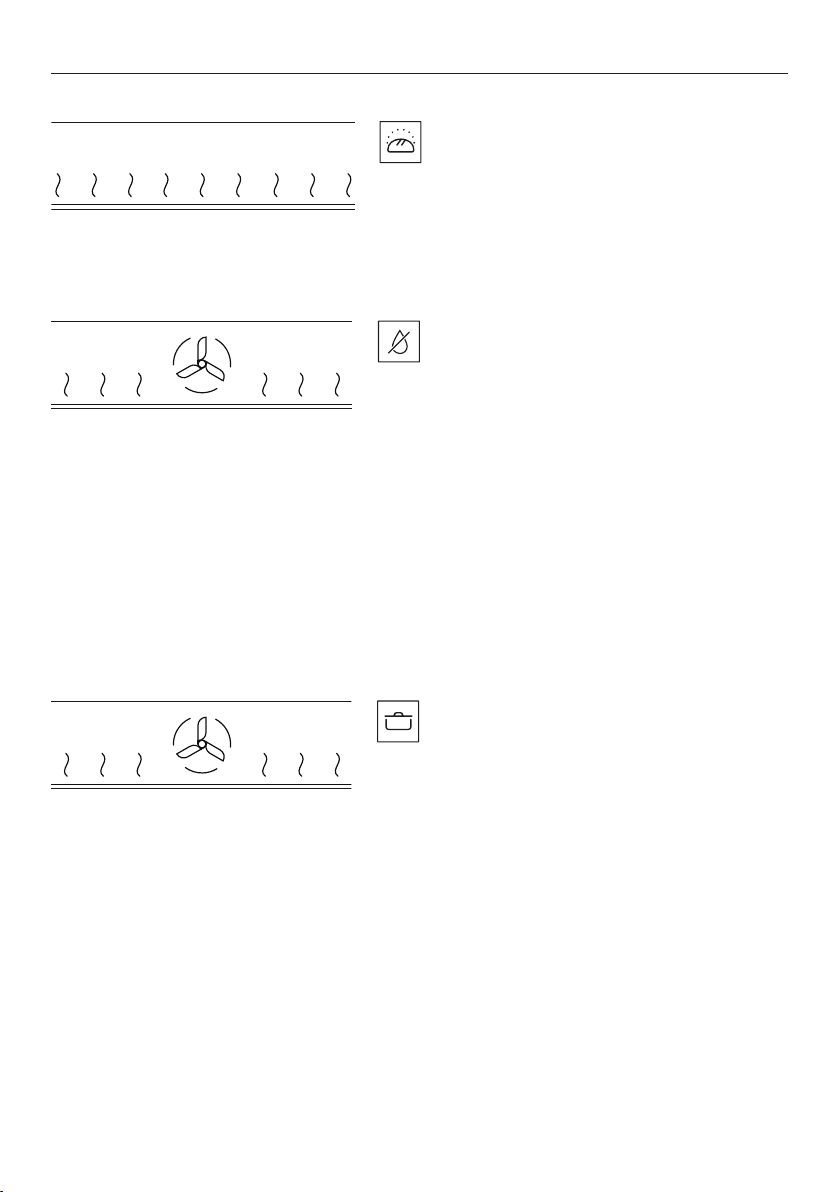
FUNCTIONS
RAPID PROOF
Gentle heat is generated from heated
glass base
z
Heat is produced for 30 minutes.
z
Provides warm and draught-free enviroment for
proofing dough for bread making or pizza.
DEHYDRATE
Heat circulates from the heated glass base
and rear fan
z
Heat is circulated for four hours.
z
Provides constant low heat for dehydrating
and drying food eg meat, fruit, vegetables
and herbs.
z
Ideal for preserving food and creating healthy
snacks, such as beef jerky, and fruit leather.
z
For best results, lay the food flat on a wire shelf
and do not overlap.
z
If dehydrating meat, turn over halfway through
the cooktime to ensure even drying.
z
Store dehydrated food in an airtight container
after it’s completely cooled.
SLOW COOK
Heat circulates from the heated glass base
and rear fan
z
Heat is circulated for six hours until food is
cooked accordingly.
z
Ideal for finishing off seared meat at low
temperature eg roast meats, casseroles, stews
and braises.
z
Resting the meat before serving is not
necessary since this function uses low
temperature. Meat can be carved and served
straight from the drawer.
12
Page 13
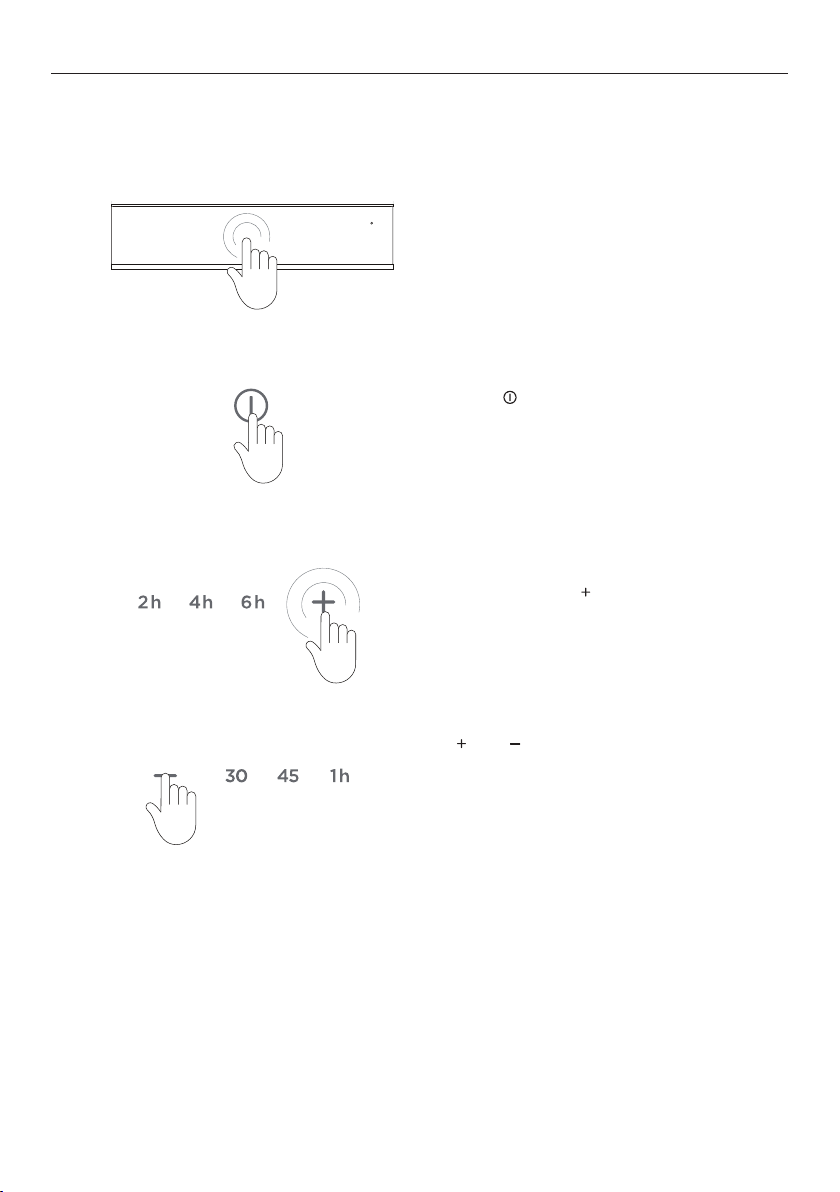
DELAYED START
When using Delayed Start, the Warming Drawer will automatically switch on at a set time
and turn off at the end of a cycle.
For push-to-open models, touch the
1
centre-front of the drawer to open.
Do not force the drawer open.
2
3
4
During delayed start:
The indicator light will flash until the selected cycle starts. The indicator light will illuminate
consistently once the cycle begins
Touch the
desired function.
Touch and hold the
to activate
Use
desired
Push the drawer closed to start
the countdown.
button and select the
button for five seconds
DELAYED START
and to increase or decrease the
DELAYED START
.
time.
13
Page 14
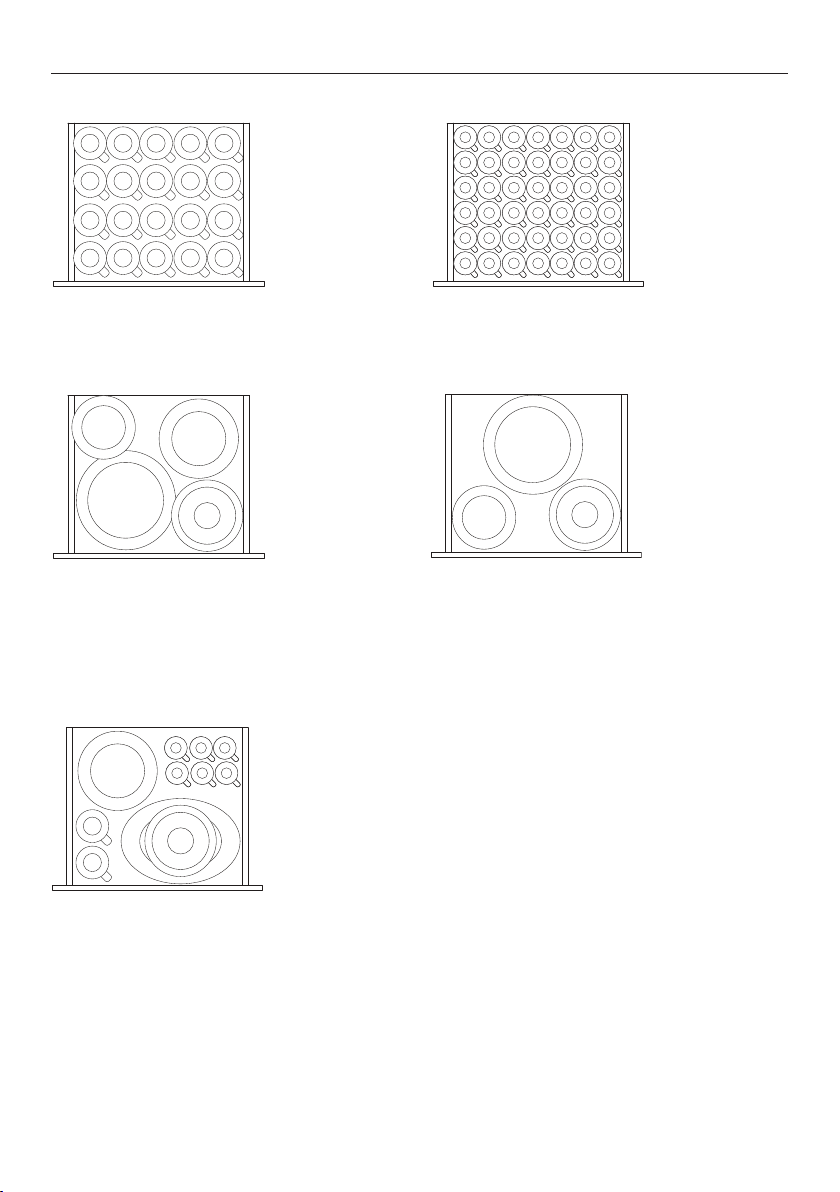
LOADING YOUR APPLIANCE
20 Cappuccino cups
Diameter guide
20x Ø92 mm
Plate settings
Diameter guide
6x Ø250mm Dinner
6x Ø230mm Soup bowl
6x Ø180mm Bread & Butter
6x Ø165mm Saucer
42 Espresso cups
Diameter guide
48x Ø58mm
Diameter guide for tall models
16x Ø250mm Dinner
16x Ø180mm Bread & Butter
20x Ø190mm Saucer
Mixed load
Maximum load
Do not load more than 25kg to prevent damage to the appliance.
Unloading the dishes
Keep dishes in the Warming Drawer until you need to take them out as heated dishes cool
down quickly. Always use protective gloves or oven cloths to remove the dishes.
14
Page 15
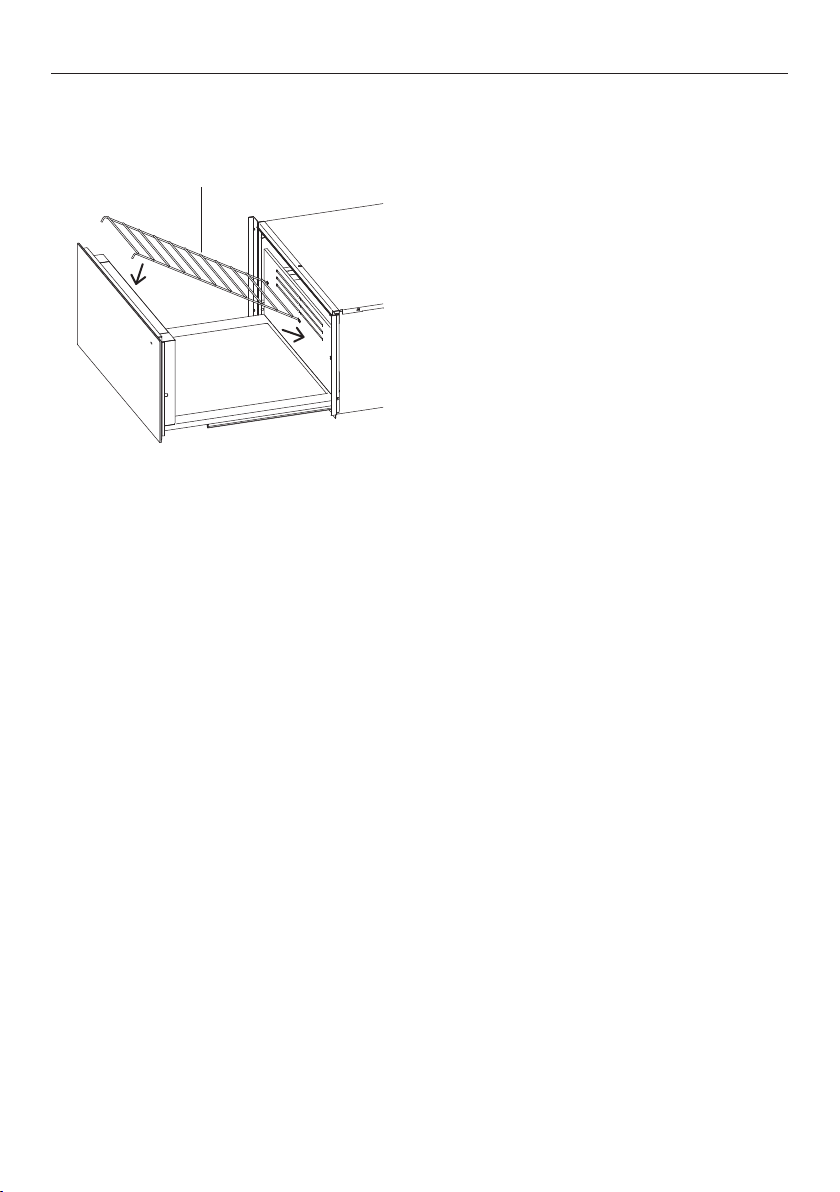
USING THE WIRE SHELF
The wire shelf is available for tall models to increase the loading surface.
wire shelf
Insert the wire shelf in the left or right
hand side of the Warming Drawer.
15
Page 16
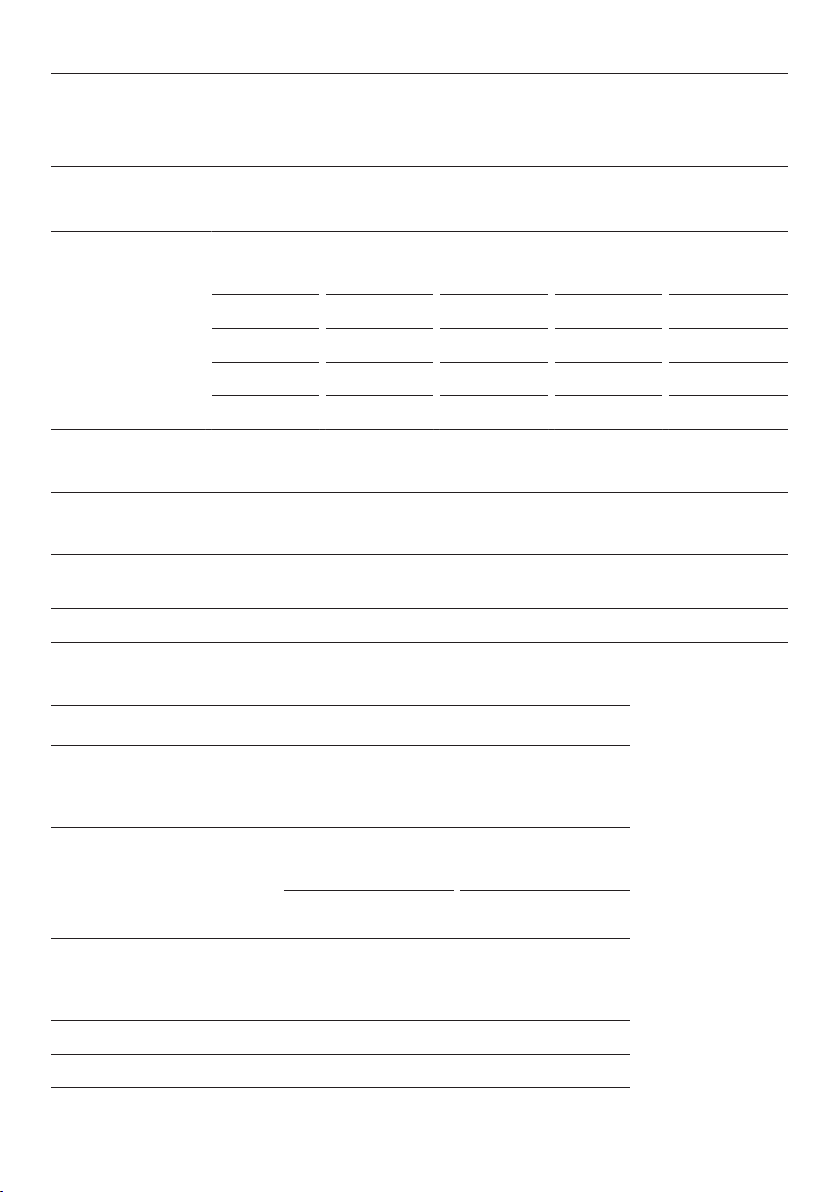
COOKING CHARTS
The information in these charts is for guidance only. Refer to your recipe or the packaging
and be prepared to adjust the cooking times and settings accordingly.
FOOD TYPE
FUNCTION g/kg
SEAR TIME
(mins/side)
INTERNAL
TEMP
(°C)
TIME
MEAT, BEEF STEAK
Rare Slow Cook 100-300g 1-2 50 30-60 mins
Medium rare Slow Cook 100-300g 2-3 55 30-60 mins
Medium Slow Cook 100-300g 3 60 30-60 mins
Medium well Slow Cook 100-300g 3-4 65 30-60 mins
Well done Slow Cook 100-300g 4-5 70 30-60 mins
BEEF FILLET
Medium Slow Cook 1-2kg 5-8 55 4-6 hrs
LAMB SHOULDER
Medium Slow Cook 1-3kg 5-8 55 4-6 hrs
BONED HAM/
GAMMON
Slow Cook 1-3kg 5-8 65 4-6 hrs
PULLED PORK Slow Cook 1-3kg 8-10 65 4-6 hrs
FOOD TYPE
FUNCTION TIME
FRUIT
Apple, Pear, Banana, Peach,
Pineapple, Apricots
Dehydrate 4-8 hrs
VEGETABLES
Ginger Dehydrate 4-6 hrs
Carrots, Peas, Beans,
Mushrooms, Tomatoes
Dehydrate 4-6 hrs
HERBS
Rosemary, Dill, Thyme,
Bay leaves, Oregano
Dehydrate 2-4 hrs
BREAD DOUGH Rapid Proof 30 mins
PIZZA DOUGH Rapid Proof 30 mins
16
Page 17

COOKING CHARTS
OTHER USES
YOGHURT
FUNCTION
Rapid
Proof
TEMPERATURE
SETTING
DURATION
Low (1) 5-8 hrs Glass Jars/Ramekins Covered
RECOMMENDED
COOKWARE
TIPS
MELTING CHOCOLATE Cups Low (2) 30 mins Heatproof Cookware Uncovered
DISSOLVING GELATINE
Rapid
Proof
Low (1) 30 mins Heatproof Cookware Uncovered
BATCH COOKING
Toast, Pancakes,
Tortillas
WELLNESS
Warm Medium (3) 1 hr Heatproof Cookware Covered
FUNCTION
TEMPERATURE
SETTING
DURATION RECOMMENDATIONS TIPS
Slow heating
HEATING WHEAT BAG
Slow
Cook
Max (6)
45-60
mins
Place directly
on Glass
reduces risk
of wheat
deterioration
or burning
HEATING TOWELS Plates
Medium
(3/4)
45-60
mins
Place directly
on Glass
Moisten
and roll
17
Page 18
CARE AND TROUBLESHOOTING
Cleaning the drawer exterior and interior
z
Ensure that the appliance is turned off or set in
STANDBY MODE
Do not use high pressure or steam cleaners.
z
Remove any soiling or excess cleaning solution immediately.
z
Clean the surfaces with a soft cloth dampened with water and detergent.
z
Rub in the direction of the polish lines and dry immediately with a soft cloth.
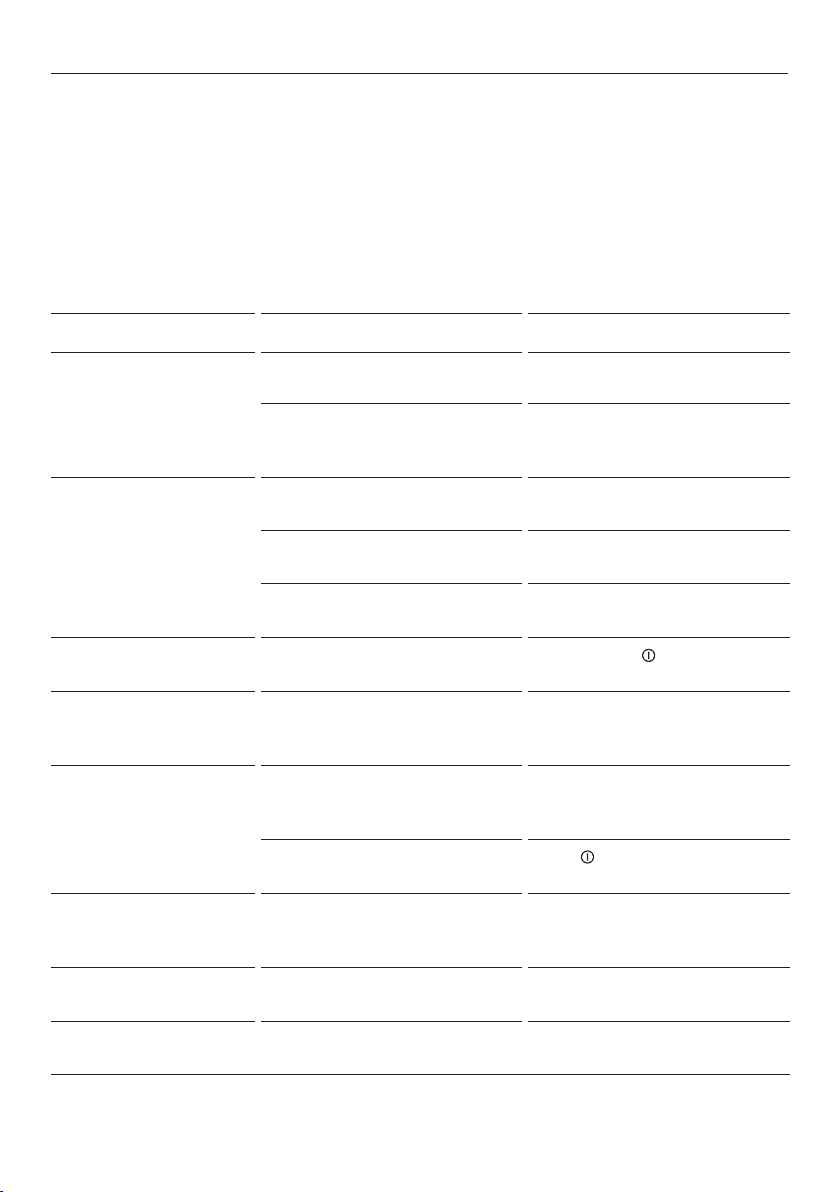
Troubleshooting
PROBLEM POSSIBLE CAUSES SOLUTION
before cleaning.
Dishes and/or food
remain cold
Dishes and/or food are
not warm enough
Internal LED lighting does
not illuminate.
The indicator light flashes
regularly and the drawer
is closed
The indicator light flashes
rapidly and the drawer is
open/closed
The indicator light does not
illuminate when the drawer
is in operation.
The drawer cannot be
opened or closed.
Internal LED lighting does
not illuminate
The appliance is not switched on Check the power supply
The drawer has not been closed Check that the indicator light is
not flashing, if the lamp is flashing
ensure the drawer is closed.
Warming duration too short. Lengthen the warming duration.
The drawer is not closed properly. Close the drawer.
Temperature is too low. Select a higher
temperature setting.
Product is in limited
Press and hold
for 10 seconds.
feedback mode.
DELAYED START has been set If not required, cancel function.
DELAYED START has been set If not required, cancel function.
Warming Drawer was not
Touch
button.
switched off.
Indicator light is defective. Call Customer Services.
Push-pull mechanism is damaged Contact customer support
Drawer is not switched
ON.
Contact customer support
LED is defective.
18
Page 19
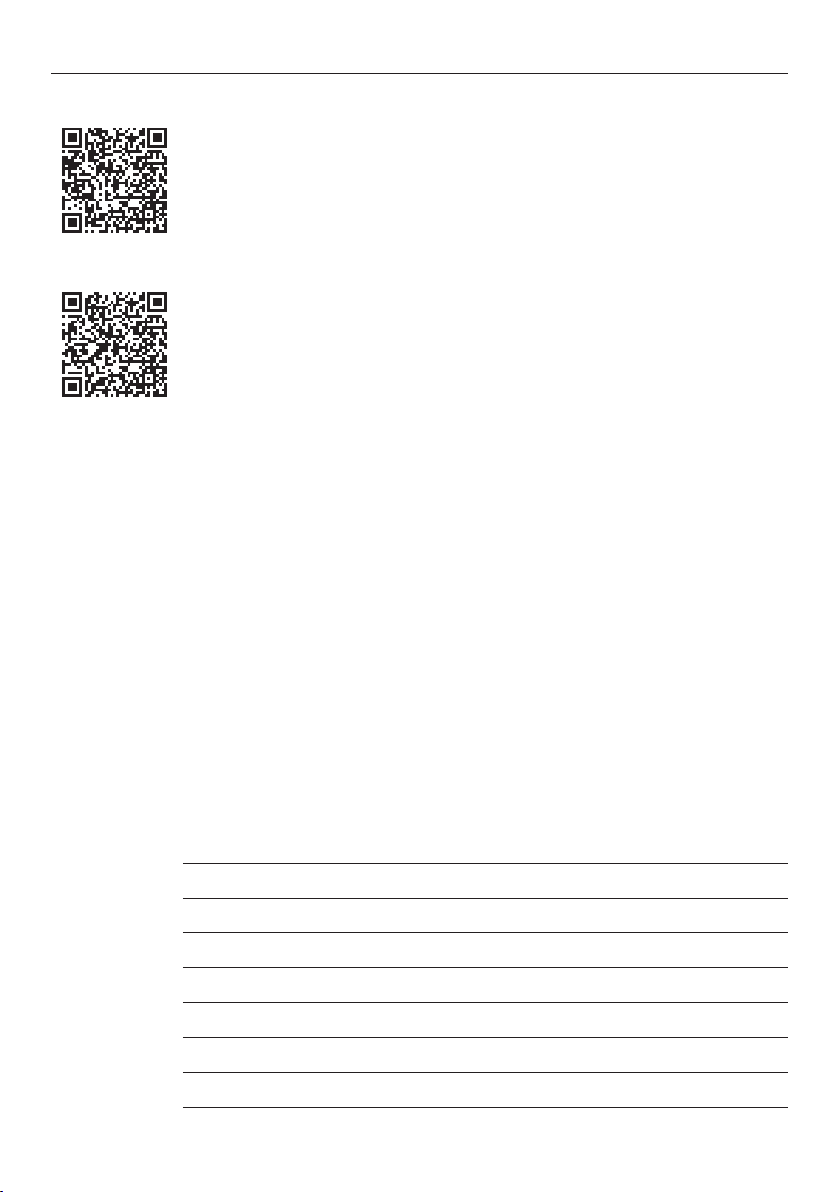
MANUFACTURER’S WARRANTY AND SERVICE GUIDE (NZ AU)
NZ
To access your Warranty and Service Guide
Scan the QR code with your smartphone to access your warranty and
book a service, or view online at https://www.fisherpaykel.com/nz/
help-and-support/warranty-information
AU
To access your Warranty and Service Guide
Scan the QR code with your smartphone to access your warranty and
book a service, refer to your separate warranty and service book or
view online at https://www.fisherpaykel.com/au/help-and-support/
warranty-information
This product has been designed for use in a domestic (residential) environment. This
product is not designed for any commercial use. Any commercial use by the customer will
affect this product’s Manufacturer’s Warranty.
Complete and keep for safe reference:
Model
Serial No.
Purchase Date
Purchaser
Dealer
Suburb
Tow n
Country
19
Page 20
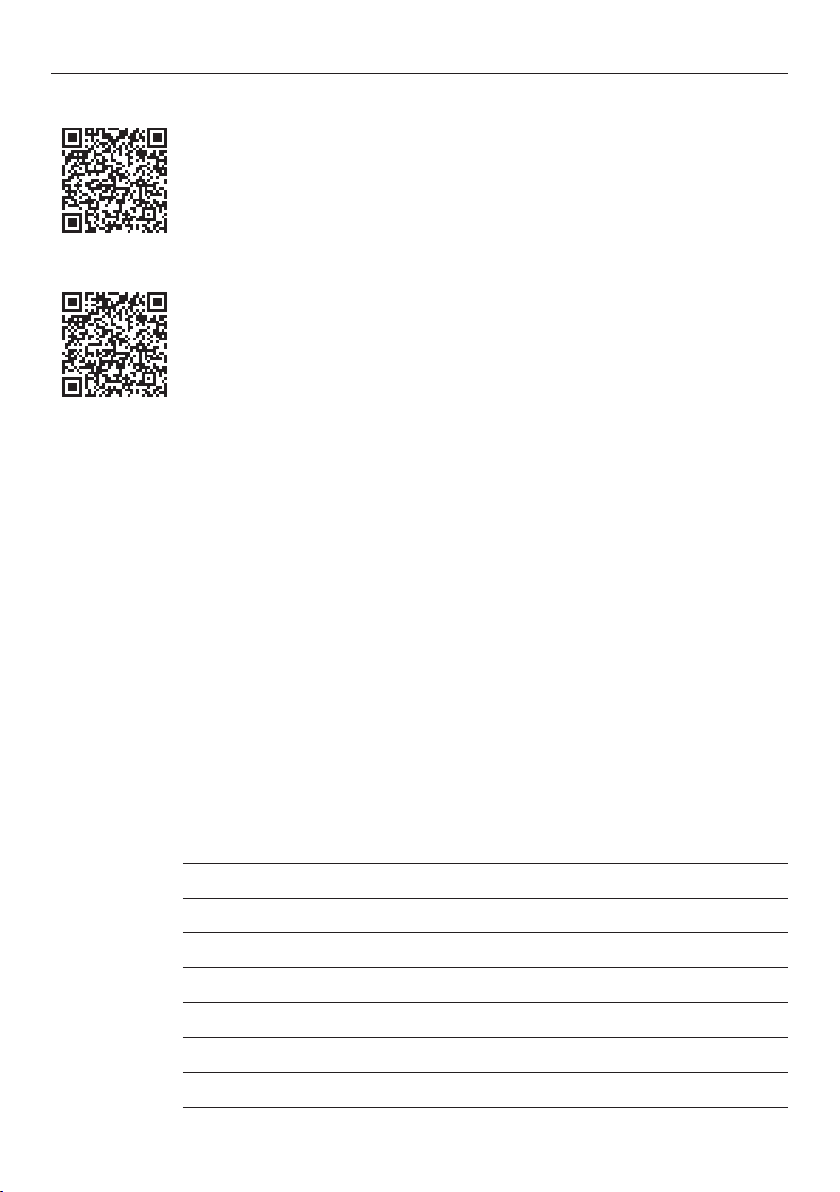
MANUFACTURER’S WARRANTY AND SERVICE GUIDE (UK IE)
UK
To access your Warranty and Service Guide
Scan the QR code with your smartphone to access your warranty and
book a service, or view online at https://www.fisherpaykel.com/uk/
help-and-support/warranty-information
IE
To access your Warranty and Service Guide
Scan the QR code with your smartphone to access your warranty and
book a service, or view online at https://www.fisherpaykel.com/ie/
help-and-support/warranty-information
This product has been designed for use in a domestic (residential) environment. This
product is not designed for any commercial use. Any commercial use by the customer will
affect this product’s Manufacturer’s Warranty.
For spare parts, please contact Fisher & Paykel Customer Care. Spare parts are available for
all Fisher & Paykel products for a minimum period of 10 years from the date of manufacture.
Complete and keep for safe reference:
Model
Serial No.
Purchase Date
Purchaser
Dealer
Suburb
Tow n
Country
20
Page 21

CUSTOMER CARE (UK IE)
Before you call for service or assistance
Check the things you can do yourself. Refer to your User guide and check:
1 Your product is correctly installed.
2 You are familiar with its normal operation.
3 You have read the ‘Troubleshooting’ section.
If after checking these points you still need assistance or parts, please refer to your nearest
Fisher&Paykel trained and supported service technician, Customer Care, or contact us
through our website fisherpaykel.com.
In UK if you need assistance
Call the Fisher & Paykel Customer Care Centre and talk to one of our
Customer CareConsultants.
Toll Free: 08000 886 605
Website: fisherpaykel.com
Postal address:
Fisher & Paykel Appliances Ltd,
420 Cob Drive, Swan Valley
Northampton NN4 9BB
In Ireland if you need assistance
Call the Fisher & Paykel Customer Care Centre and talk to one of our
Customer CareConsultants.
Toll Free: 1800 625174 or 01 807 7960
Website: fisherpaykel.com
Postal address:
Fisher & Paykel Appliances Ltd,
Unit 2D Corporate Park,
Swords Dublin
If you need service
Fisher & Paykel has a network of Fisher & Paykel trained and supported service technicians
that can carry out any service necessary on your appliance. Our Customer Care Centre can
recommend a Fisher & Paykel trained and supported service technician in your area. Or you
can book one online at fisherpaykel.com/uk/help-and-support or fisherpaykel.com/ie/helpand-support
If you call, write or contact us via our website please provide:
your name and address, model number, serial number, date of purchase and a complete
description of the problem. This information is needed in order to better respond to
yourrequest for assistance.
Product details can be found on the left hand wall inside the drawer.
21
Page 22

FISHERPAYKEL.COM
© Fisher & Paykel Appliances 2023. All rights reserved.
The models shown in this guide may not be available in all markets
The product specifications in this guide apply to the specific products and
models described at the date of issue. Under our policy of continuous product
improvement, these specifications may change at any time.
For current details about model and specification availability in your country,
please go to our website or contact your local Fisher&Paykel dealer.
and are subject to change at any time.
41026B 12.2
 Loading...