

Fisher & Paykel RS4621F, RS6121F, RS7621S, RS7621F, RS6121S Installation Manual

INTEGRATED COLUMNS
RS4621F, RS6121F, RS7621F,
RS6121S & RS7621S models
INSTALLATION GUIDE
NZ AU GB EU
849164C 03.19

1
1 SAFETY AND WARNINGS
2 INTEGRATED COLUMNS
3 COMPONENTS
4 TOOLS
5 DUAL INSTALL OPTIONS
6 PRODUCT DIMENSIONS AND SPECIFICATIONS
7 CABINETRY OPTIONS
8 CAVITY DIMENSIONS
9 DOOR AND TOE KICK PANEL DIMENSIONS
!0
CUSTOM DOOR PANEL DIMENSIONS
!1
CUSTOM DOOR PANEL INSTALLATION TEMPLATE
!2
DOOR CLEARANCE
!3
ELECTRICAL AND PLUMBING
!4
BEFORE INSTALLATION
!5
CAVITY PREPARATION
!6
WATER AND POWER SUPPLY CONNECTION
CONTENTS
OR
!7
SINGLE INSTALLATION
!8
DUAL INSTALLATION
!9
WATER FILTER INSTALLATION
OR
@0
DOOR PANEL INSTALLATION
(STAINLESS STEEL)
@1
DOOR PANEL INSTALLATION
(CUSTOM)
@2
TOE KICK INSTALLATION
@3
CABINET TRIMS INSTALLATION
@4
DOOR TRIMS INSTALLATION
@5
OPTIONAL — CHANGING OVER DOOR HINGES
@6
FINAL CHECKLIST
IMPORTANT!
SAVE THESE INSTRUCTIONS
The models shown in this installation guide may not be available in all markets and are subject to change at any time. For current details about model and specification availability in your country,
go to our website fisherpaykel.com or contact your local Fisher & Paykel dealer.
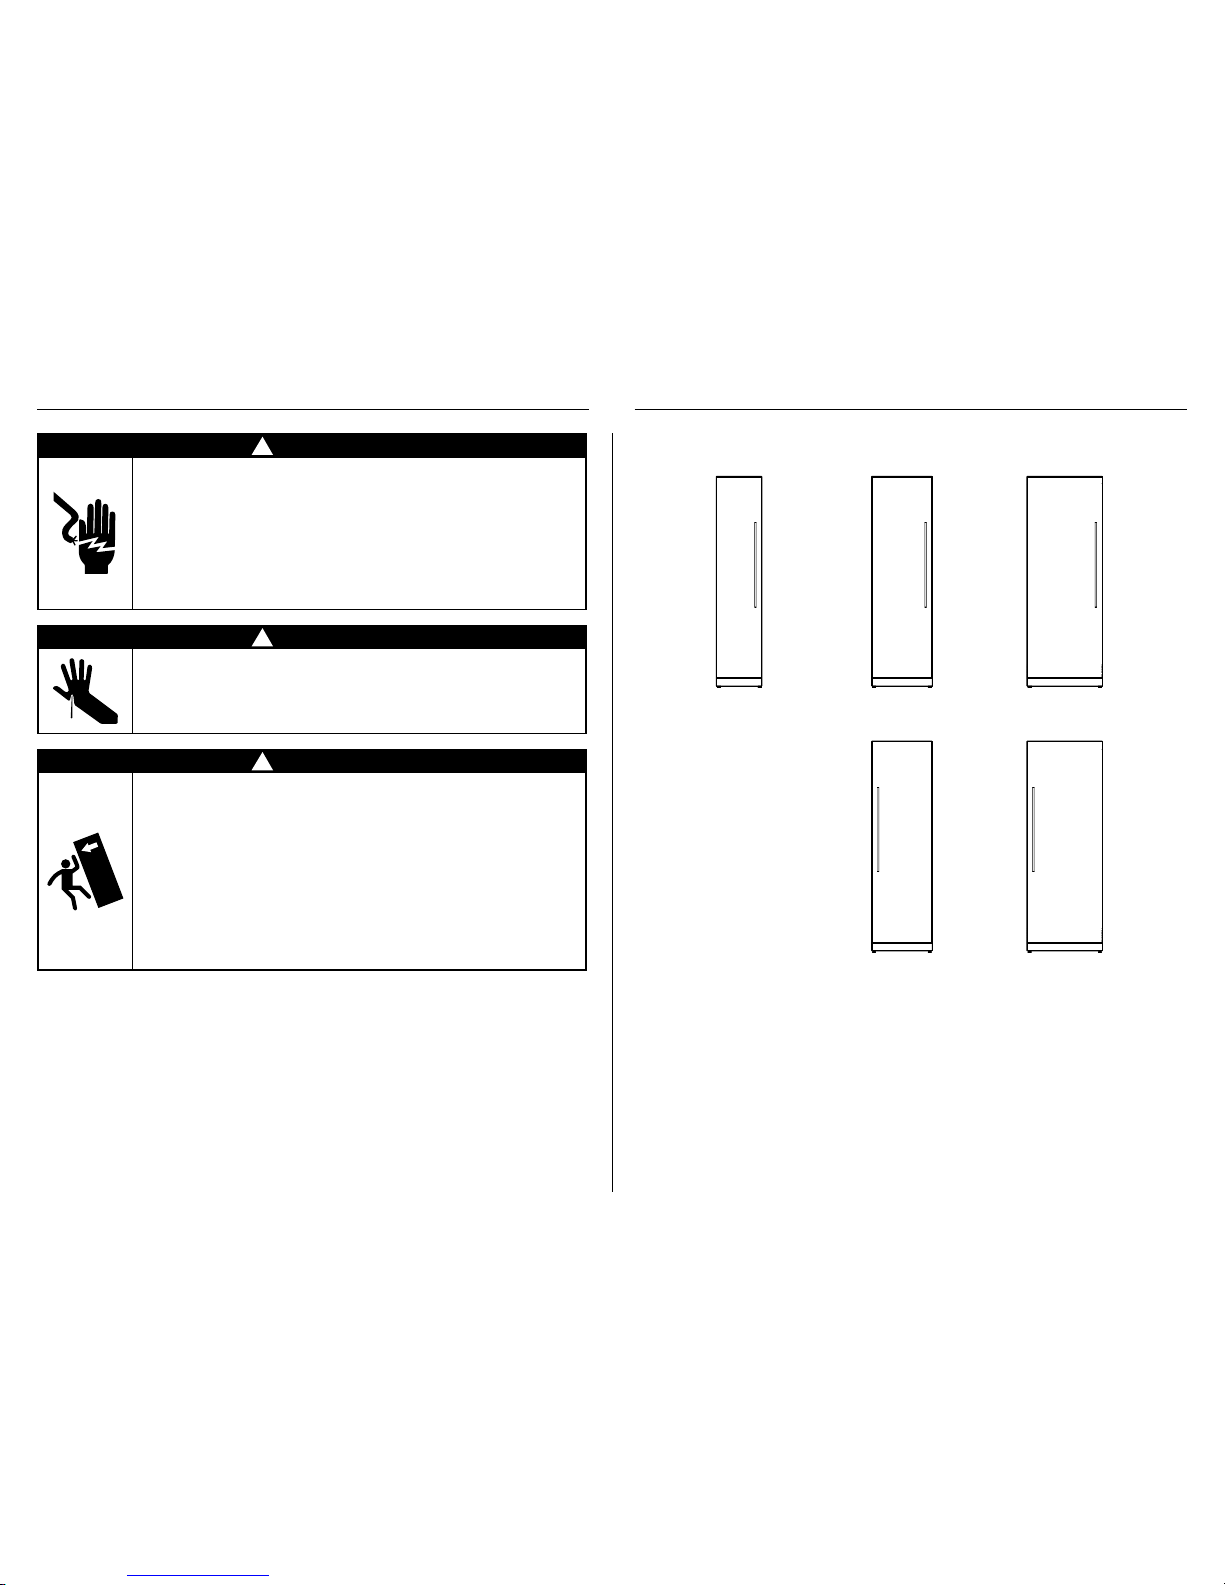
2
457mm 610mm 762mm
FREEZER
RS4621F RS6121F RS7621F
REFRIGERATOR
RS6121S RS7621S
1 SAFETY AND WARNINGS
!
WARNING!
Electric Shock Hazard
Read and follow the safety and warnings
outlined in this installation guide before
operating this product.
Failure to do so can result in death, electric
shock, fire or injury to persons.
!
WARNING!
Cut Hazard
Take care — panel edges are sharp. Failure to
use caution could result in injury or cuts.
!
WARNING!
This product is top-heavy and must be
secured to prevent the possibility of
tipping forward.
To ensure that the product is stable under
all loading conditions, the anti-tip bracket
and fittings supplied must be installed
according to the following installation steps
by a professional installer.
2 INTEGRATED COLUMNS
Note: Interchangeable door hinges available for each model.

3
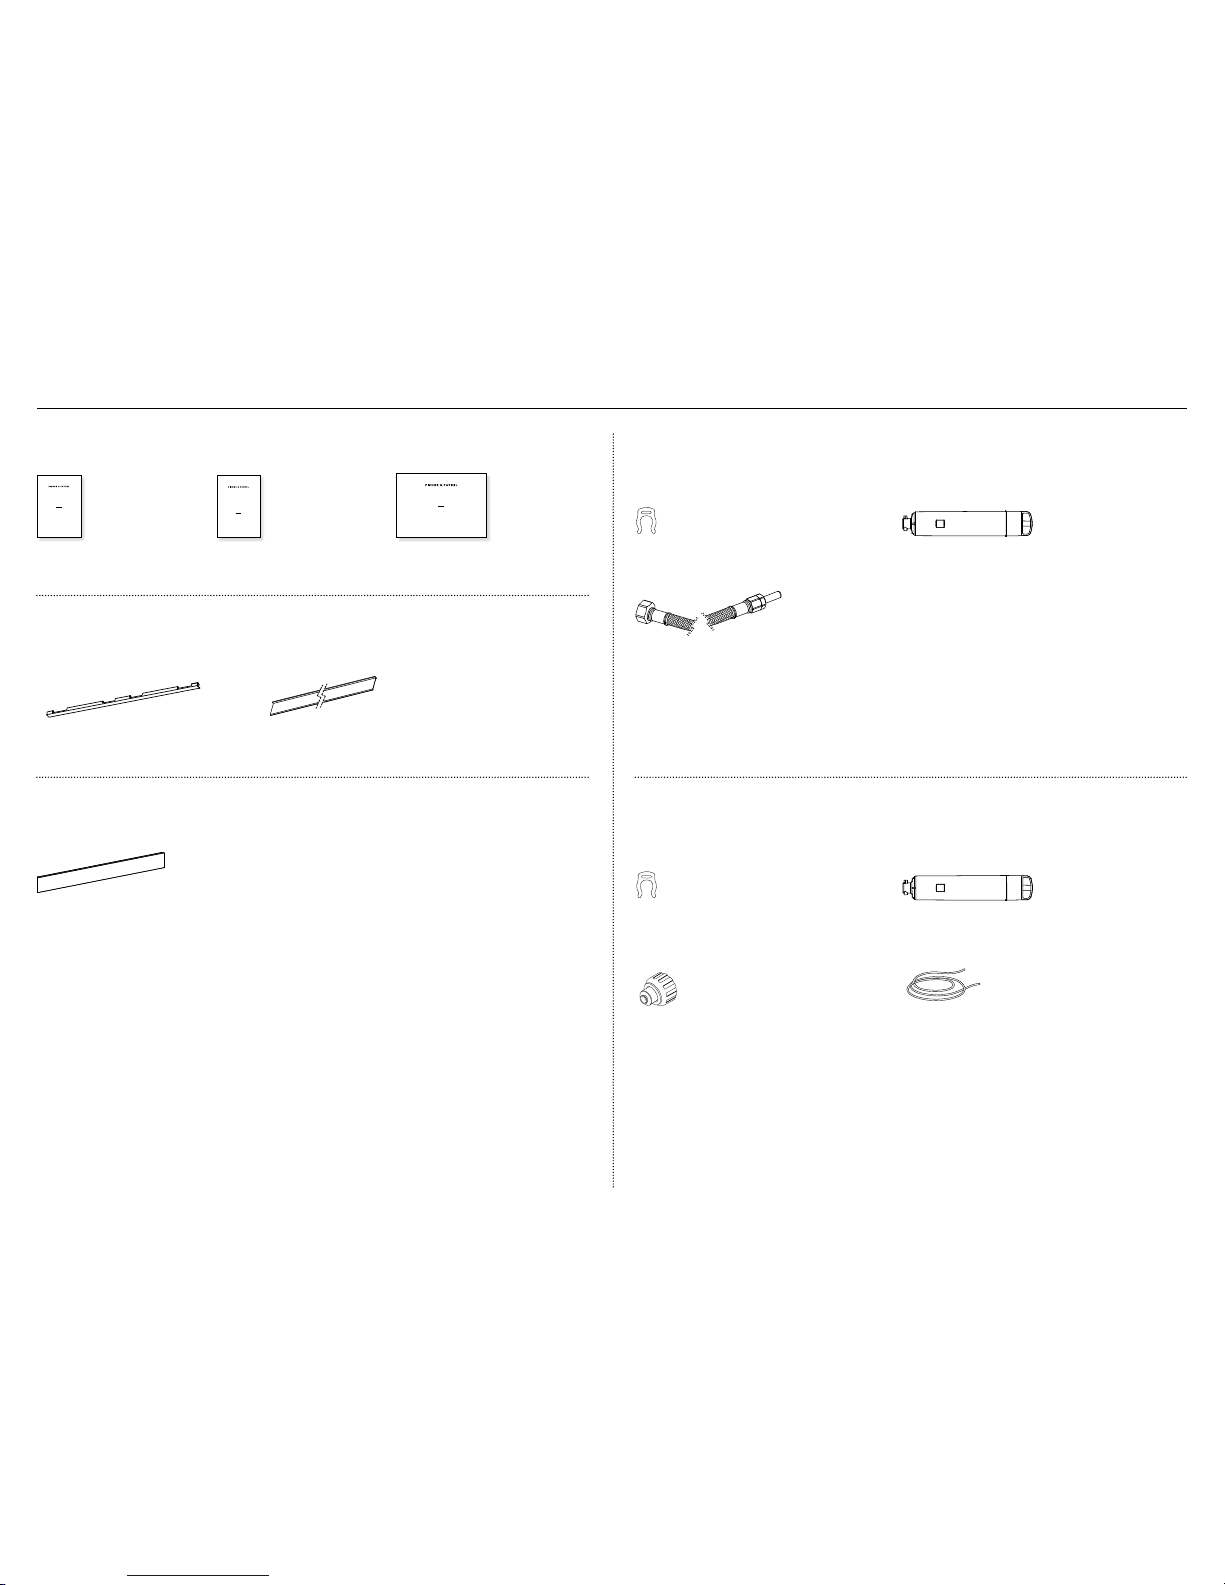
3 COMPONENTS
Installation kit
Packaged in box located inside the product
Door panel attachmentkit
Side bracket
(6)
Bracket slider
(6)
Side spacer bracket
(6)
For SS door panels:
8Gx16 Mush washer screw (30)
For Custom door panels:
M5x12 Cross-hea d screw (30)
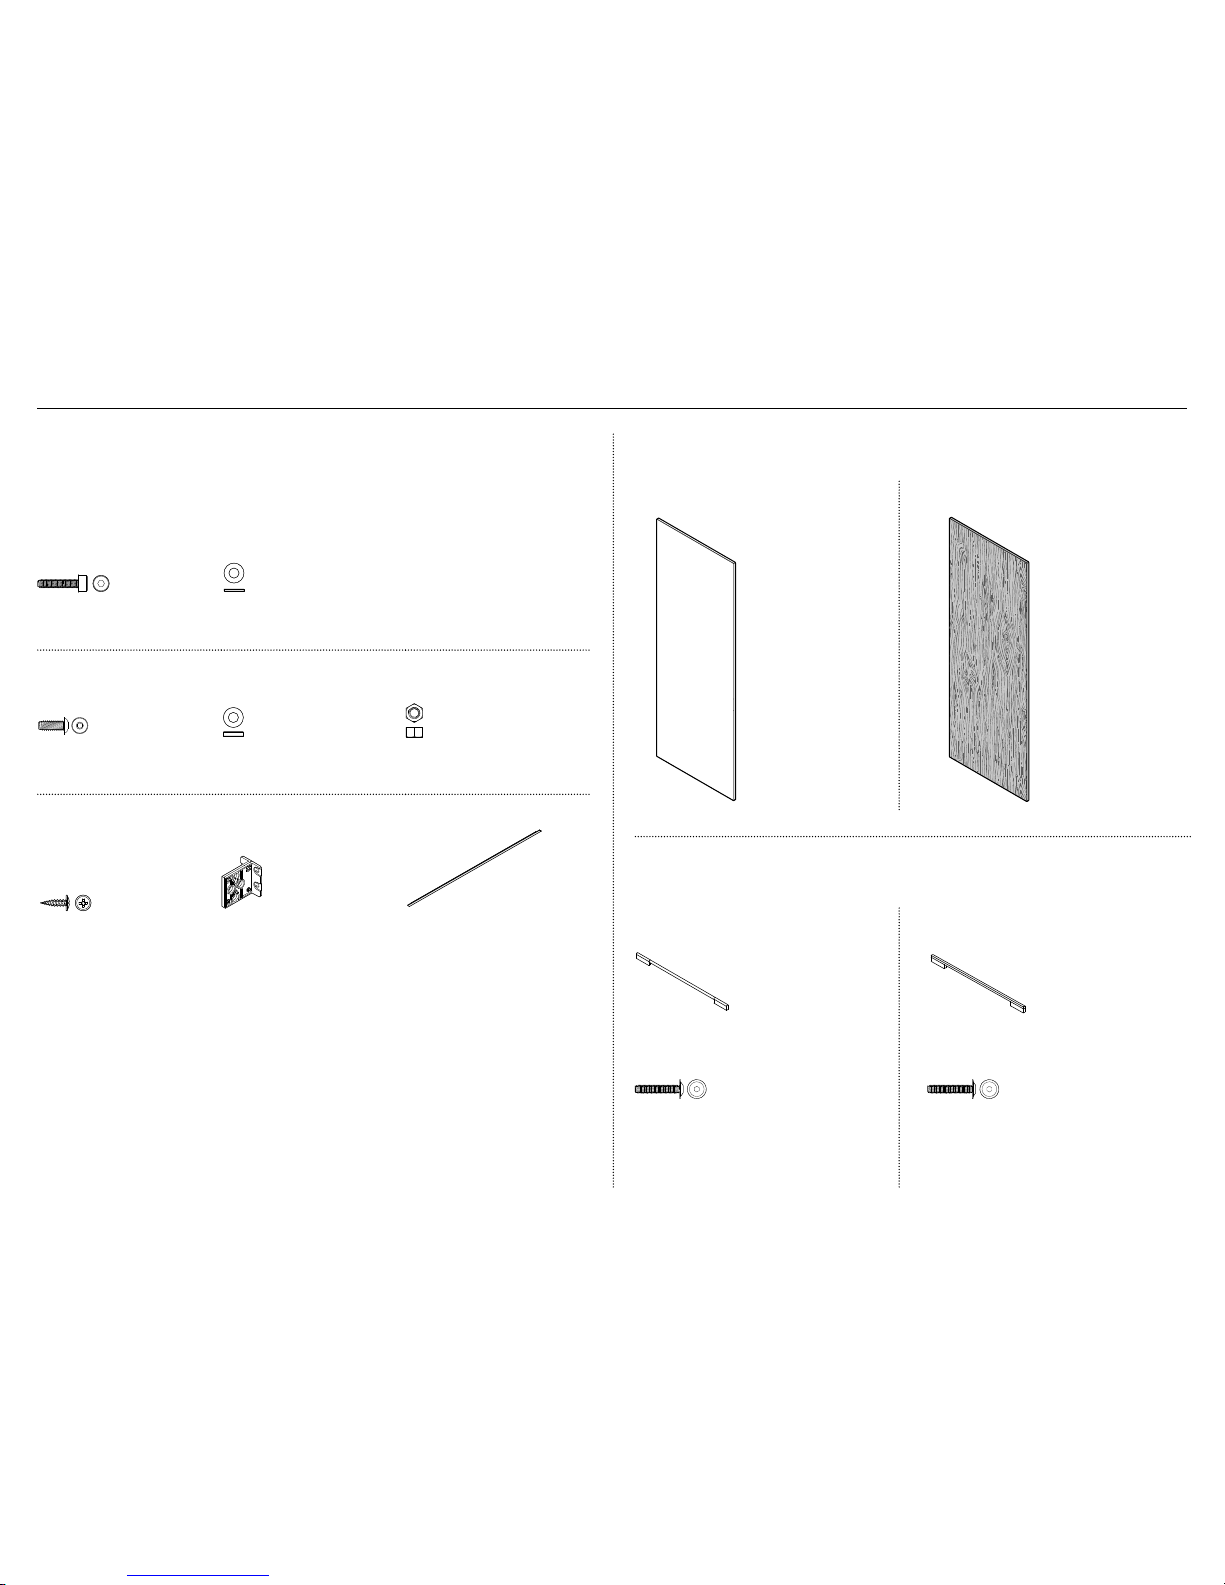
Install fasteners kit
Cabinet depth alignment gauge
(4)
Barbed plug
(2)
8Gx16 Countersunk screw
(7)
Anti-tip bracket assemblykit
Anti-tip bracket
(1)
Masonry plug
(4)
10-12x35mm cross-head screw
(5)
Miscellaneous components
Each supplied separately
Hinge limiting pin
(3)
Air toe kick seal
(1)
Door panel template (double-sided)
(1)
Flow divider cap
(1)
Filter cartridge tool
(1)
4
3 COMPONENTS
Water filter install kit (for GB & EU only)
(included in MI pack of Freezer models only)
Collet locking clip
(1)
Water filter
(1)
3/4” (19mm) BSP water fitting
(1)
1/4” (6.4mm) plastic tubing
(1)
MI (miscellaneous items) pack
Located inside the product
USER GUIDE
NZ AU
INTEGRATED COLUMNS
RS4621F, RS6121F, RS7621F,
RS6121S & RS7621S models
SERVICE & WARRANTY
SERVICE ET GARANTIE
ΣΈΡΒΙΣ ΚΑΙ ΕΓΓΎΗΣΗ
SERVIZIO E GARANZIA
SERVICE & GARANTIE
HUOLTO JA TAKUU
SERVICE OG GARANTI
保修和维修
服務和保修
INTEGRATED COLUMNS
RS4621F, RS6121F, RS7621F,
RS6121S & RS7621S models
INSTALLATION GUIDE
NZ AU GB EU
849164B 10.18
User guide
(1)
Service & Warranty
(1)
Installation guide
(1)
Water filter install kit (for NZ & AU only)
(included in MI pack of Freezer models only)
Collet locking clip
(1)
Water filter
(1)
1/2 BSP Stainless steel braided hose
with adaptor (1)
Install parts
Supplied and taped to the back of the product
Door panel side extrusion
(2)
Cabinet side trim assembly
(1)
Toe kick install kit
Not supplied and must be purchased separately
Toe kick
(1)
Standard toe kick height is 102mm forstandard stainless steel door panel.
For Custom door panel installation, atoe kick 50-152mm must be fitted
andadjusted accordingly.
An extra bottom grille is required for a50mm toe kick installation.
5
Door panel set
Not supplied and must be purchased separately
Stainless steel door panel set:
(Fisher & Paykel)
Custom door panel set:
Supplied by customers to match their cabinetry.
Applicable to refrigerator
and freezer models.
Applicable to refrigerator
and freezer models.
Dual install joiner kit (CA: 25328)
Used to install two products (refrigerator and freezer) side by side.
Located in Freezer models only. Tapedtotheback of the freezer.
Can be purchased separately through an authorised Fisher & Paykel dealer.
Visitfisherpaykel.com for more information.
Top joiner fastener kit
M5x20 Cap screw
(1)
M5x16x1 Plain washer
(1)
Bottom joiner fastener kit
M6 Washer
843453
M5 Washer
M5 x20
Cap Screw
847984
M6 x 12
Cap Screw
248072
8Gx16
Mush Washer
840371
10 x 50
Dual Lock
M6 Nut
839455
M5 Nut
839107
M6x16 Washer screw
(1)
M6x12x3.2 Plastic washer
(1)
M6 Hex nut
(1)
Top joiner bracket kit
8Gx16 Mush washer screw
(2)
Central spacer
(1)
Centre trim assembly
(1)
3 COMPONENTS
Door handle kit
Not supplied and must be purchased separately. Select between the options below:
Contemporary round handle kit
(CA:25324)
Contemporary square handle kit
(CA:25322)
Contemporary round door handle
(1x)
Contemporary square door handle
(1x)
M5x25 Hex screw
(4x)
M5x25 Hex screw
(4x)

6
Top grille assembly
Top (fixed) grille
(1)
Hinge change kit
Not included with the product and must be purchased separately
MODEL LEFT HINGE TO RIGHT HINGE RIGHT HINGE TO LEFT HINGE
RS46 848186 848185
RS61 848188 848187
RS76 848190 848189
Each kit includes: Hinge change assembly (1x), Top (fixed) grille assembly (1x)
Hinge change assembly
Hinge (right or left) top pocket
(2)
K05 top (right or left) adaptor bracket
(1)
Bottom (right or left) adaptor bracket
(1)
Bottom (right or left) hinge bracket
(1)
Supplied tools
Included in installation kit
Spanner 13mm
(1)
Hex key
(1)
Required tools
Not included with product
Powered driver Flathead screwdriver Ruler
Hacksaw Cross-head screwdriver Pencil
Cutter T2 star-head screwdriver
3 COMPONENTS 4 TOOLS
7
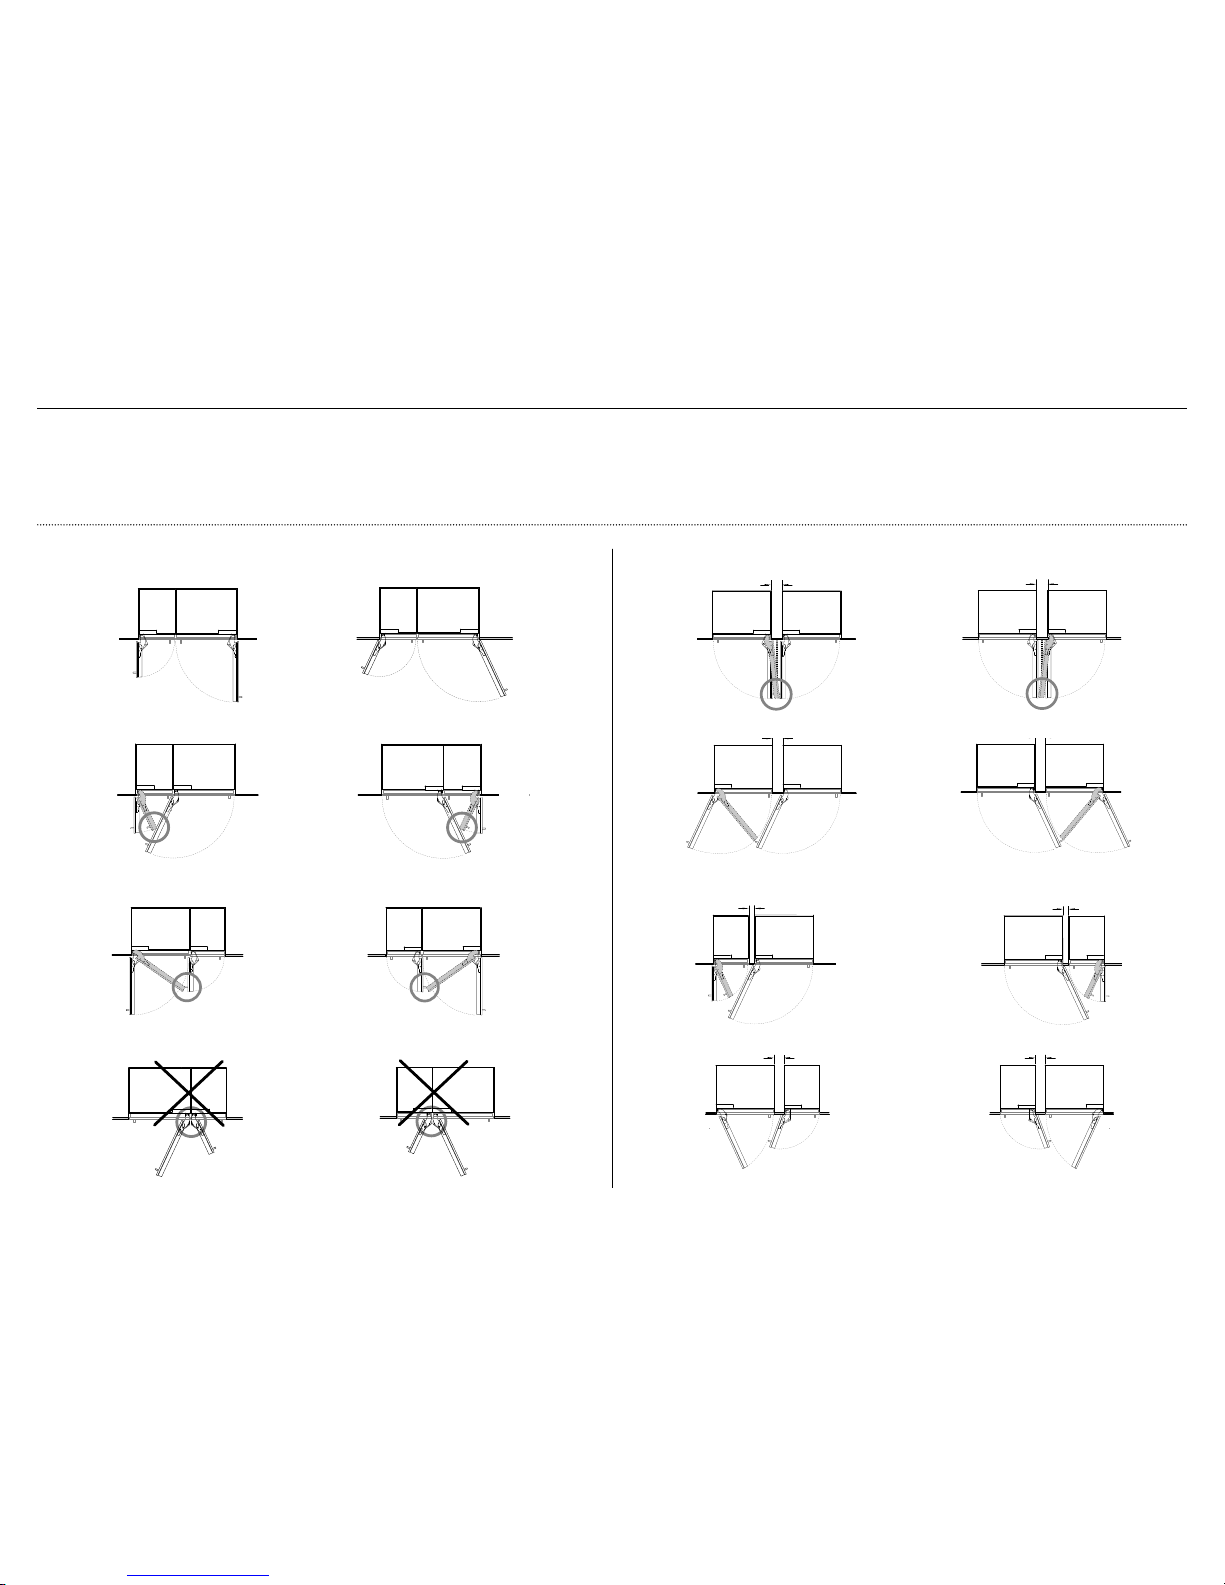
The following are options for dual installation with reference to the door opening range and partition (optional) between two product combinations.
IMPORTANT!
Beware of clashing (circled) when opening the doors. Use a hinge limiting pin to restrict door opening rotation to 90°. Refer to ‘Door Clearance’ (page 15) for more information.
If installing a partition between two products, it must have enough clearance to ensure the doors/handles do not interfere with one another when opening or closing.
NO PARTITION WITH PARTITION
90° DOOR OPENING
115° DOOR OPENING
[FULL ROTATION]
min 100mm
min 100mm
90° DOOR OPENING
115° DOOR OPENING
[FULL ROTATION]
min 100mm
min 100mm
90° DOOR OPENING
115° DOOR OPENING
[FULL ROTATION]
min 60mm
min 60mm
90° DOOR OPENING
115° DOOR OPENING
[FULL ROTATION]
min 100mm
min 100mm
5 DUAL INSTALL OPTIONS

8
6 PRODUCT DIMENSIONS AND SPECIFICATIONS
RS46 RS61 RS76
PRODUCT DIMENSIONS mm mm mm
A
Overall height of product 2134 2134 2134
B
Overall width of product 451 603 756
C
Overall depth of product (excluding front door panel) 610 610 610
PRODUCT SPECIFICATIONS
Door clearance 508 660 813
Weight
(including packaging) 118kg 137kg 156kg
Door hinge Hettich K05 Hettich K05 Hettich K05
PROFILE VIEWFRONT VIEW
A
B
C
C
9
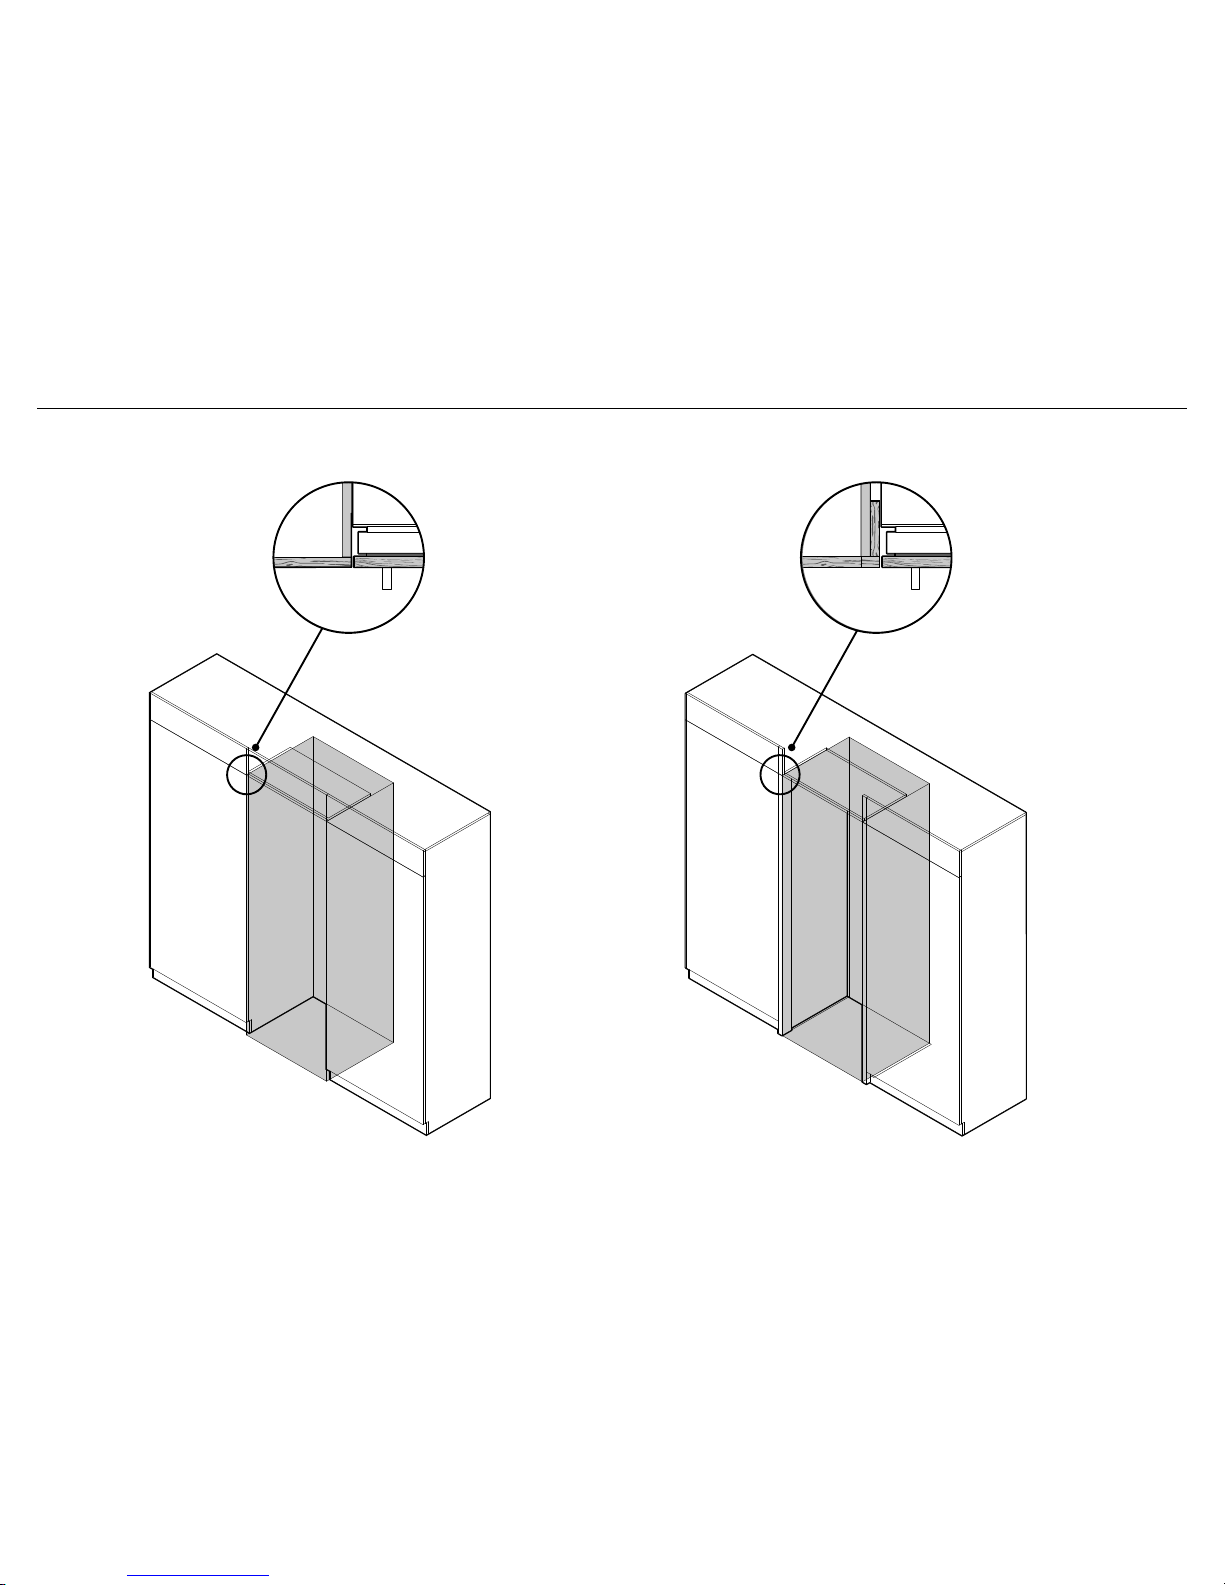
7 CABINETRY OPTIONS
FRAMELESS CABINETRY
Aligns the product/s with the cabinetry
FRAMED CABINETRY
Aligns the product/s with the frame of the cabinetry
Note: Images shown for single install. These options are also applicable for dual install.
10
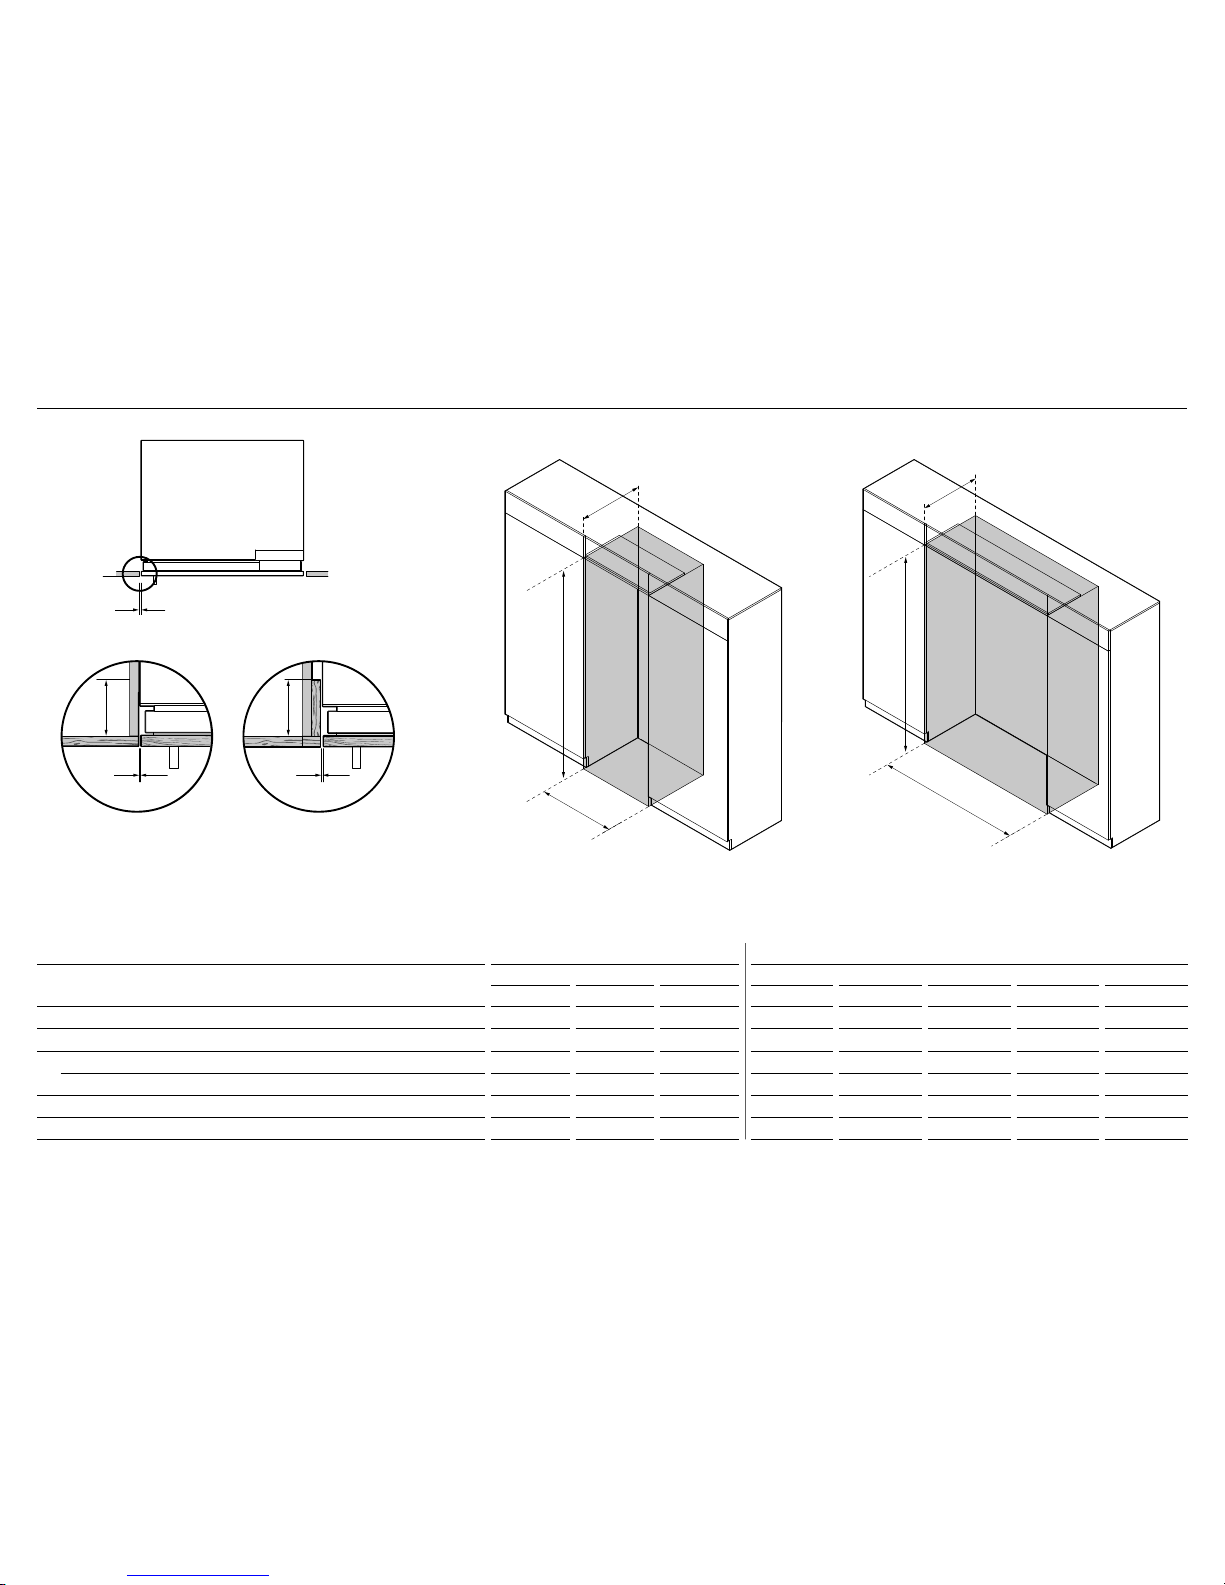
8 CAVITY DIMENSIONS
SINGLE INSTALL DUAL INSTALL
RS46 RS61 RS76 RS46 / RS61 RS46 / RS76 RS61 / RS61 RS61 / RS76 RS76 / RS76
CAVITY DIMENSIONS mm mm mm mm mm mm mm mm
A
Overall height of cavity 2134 2134 2134 2134 2134 2134 2134 2134
b
Overall width of cavity 457 610 762 1067 1219 1219 1372 1524
c
Minimum overall depth of cavity* if the plug is located inadjacent cabinet 635 635 635 635 635 635 635 635
Minimum overall depth of cavity* if the plug is located behind the product 650 650 650 650 650 650 650 650
d
Minimum cabinetry gap clearance from edge of door panels 3 3 3 3 3 3 3 3
e
Minimum required finished return 102 102 102 102 102 102 102 102
* Assumes a door panel thickness of 19mm.
Note: These dimensions are intended for ‘Flush Installation’ only.
E
D
D
Flush with front
of cabinetry
PLAN VIEW
E
D
D
E
D
E
B
A
C
B
A
C
Frameless: finished return
cavity sides and top
Framed: finished return cavity
sides and top
11
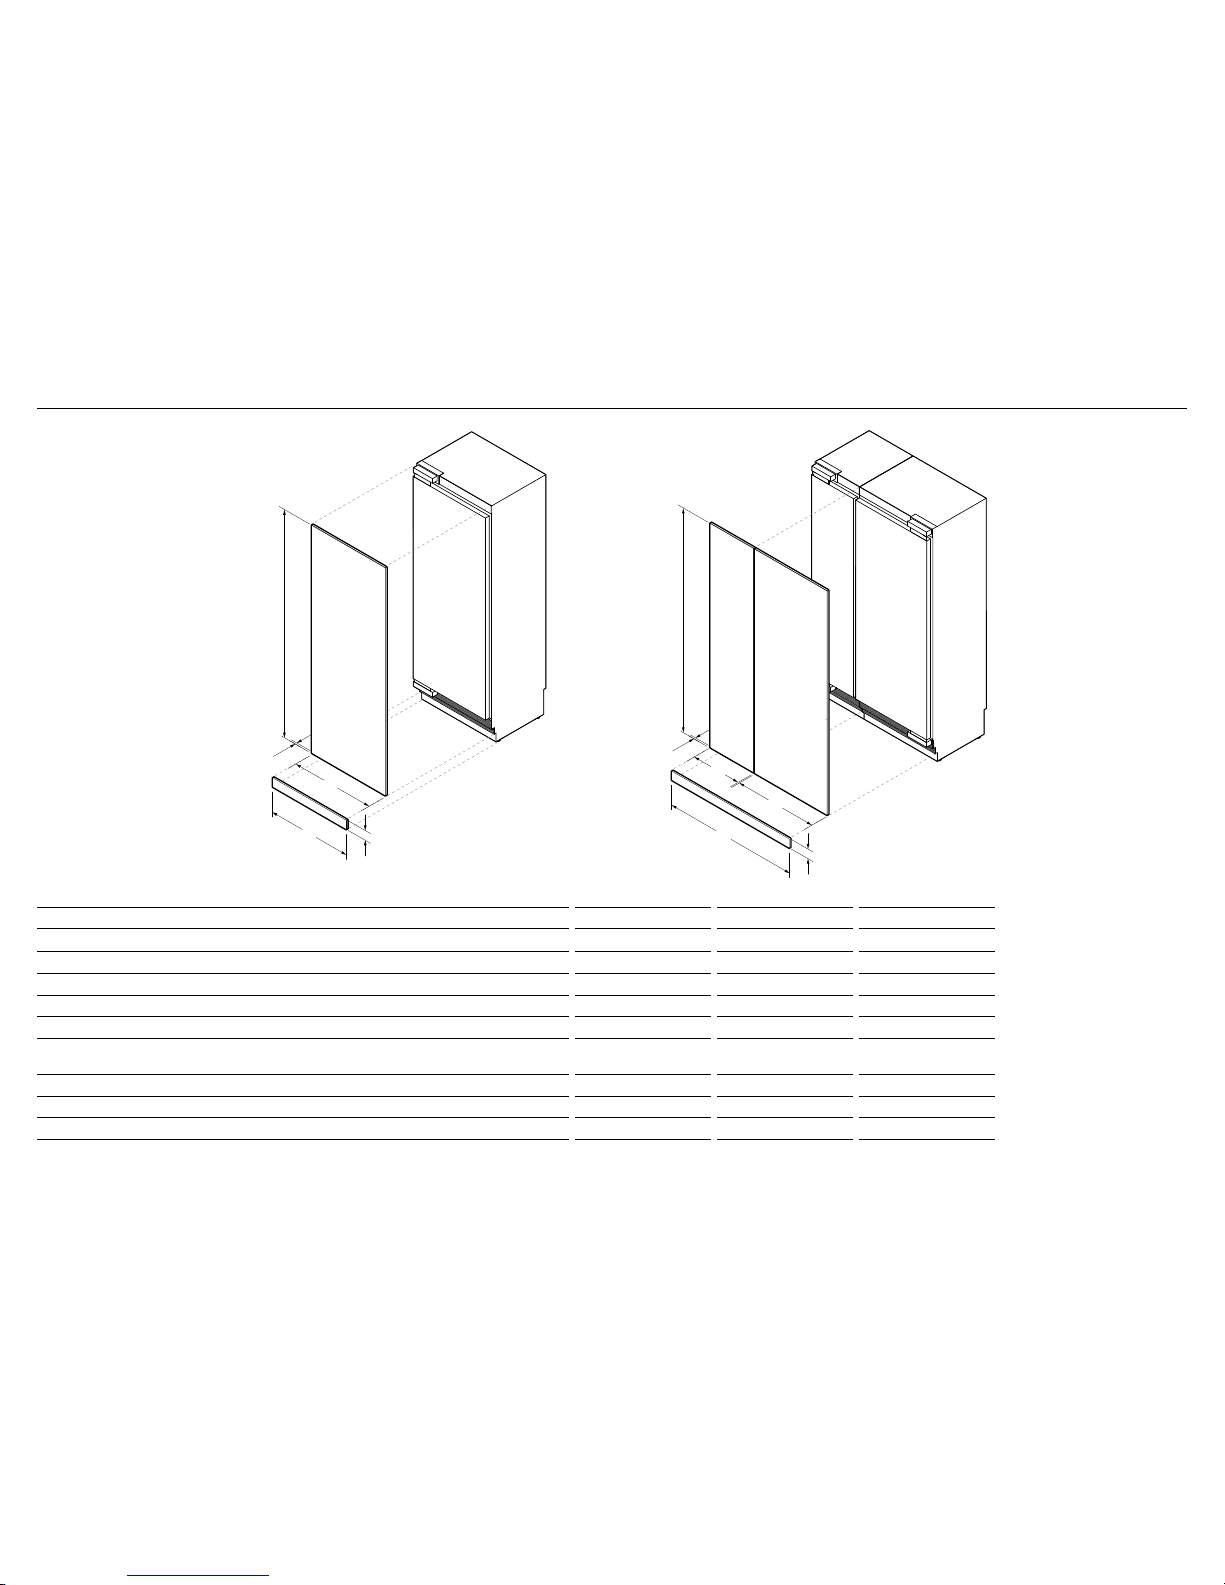
9 DOOR AND TOE KICK PANEL DIMENSIONS
RS46 RS61 RS76
DOOR PANEL DIMENSIONS (STAINLESS STEEL) mm mm mm
A
Height of door panel 2029 2029 2029
B
Width of door panel 451 603 756
C
Depth of door panel (excluding door handle) 19 19 19
DOOR PANEL DIMENSIONS (CUSTOM)*
A
Height of door panel 1978 – 2080 1978 – 2080 1978 – 2080
B
Width of door panel — single install
Width of door panel — dual install
451
452
603
605
756
75 7.5
C
Depth of door panel min 16 – max 25 min 16 – max 25 min 16 – max 25
DOOR PANEL WEIGHT kg kg kg
Maximum weight of Stainless steel/Custom door panel
(including handle/brackets)† 20 25 30
* Custom door panels to be manufactured and fitted by cabinetmaker.
† Door handle kit is available as an optional accessory for both Stainless Steel door panels and Custom door panels and must be purchased separately.
A
C
B
D
E
SINGLE INSTALL
A
C
B
B
D
E
DUAL INSTALL
12
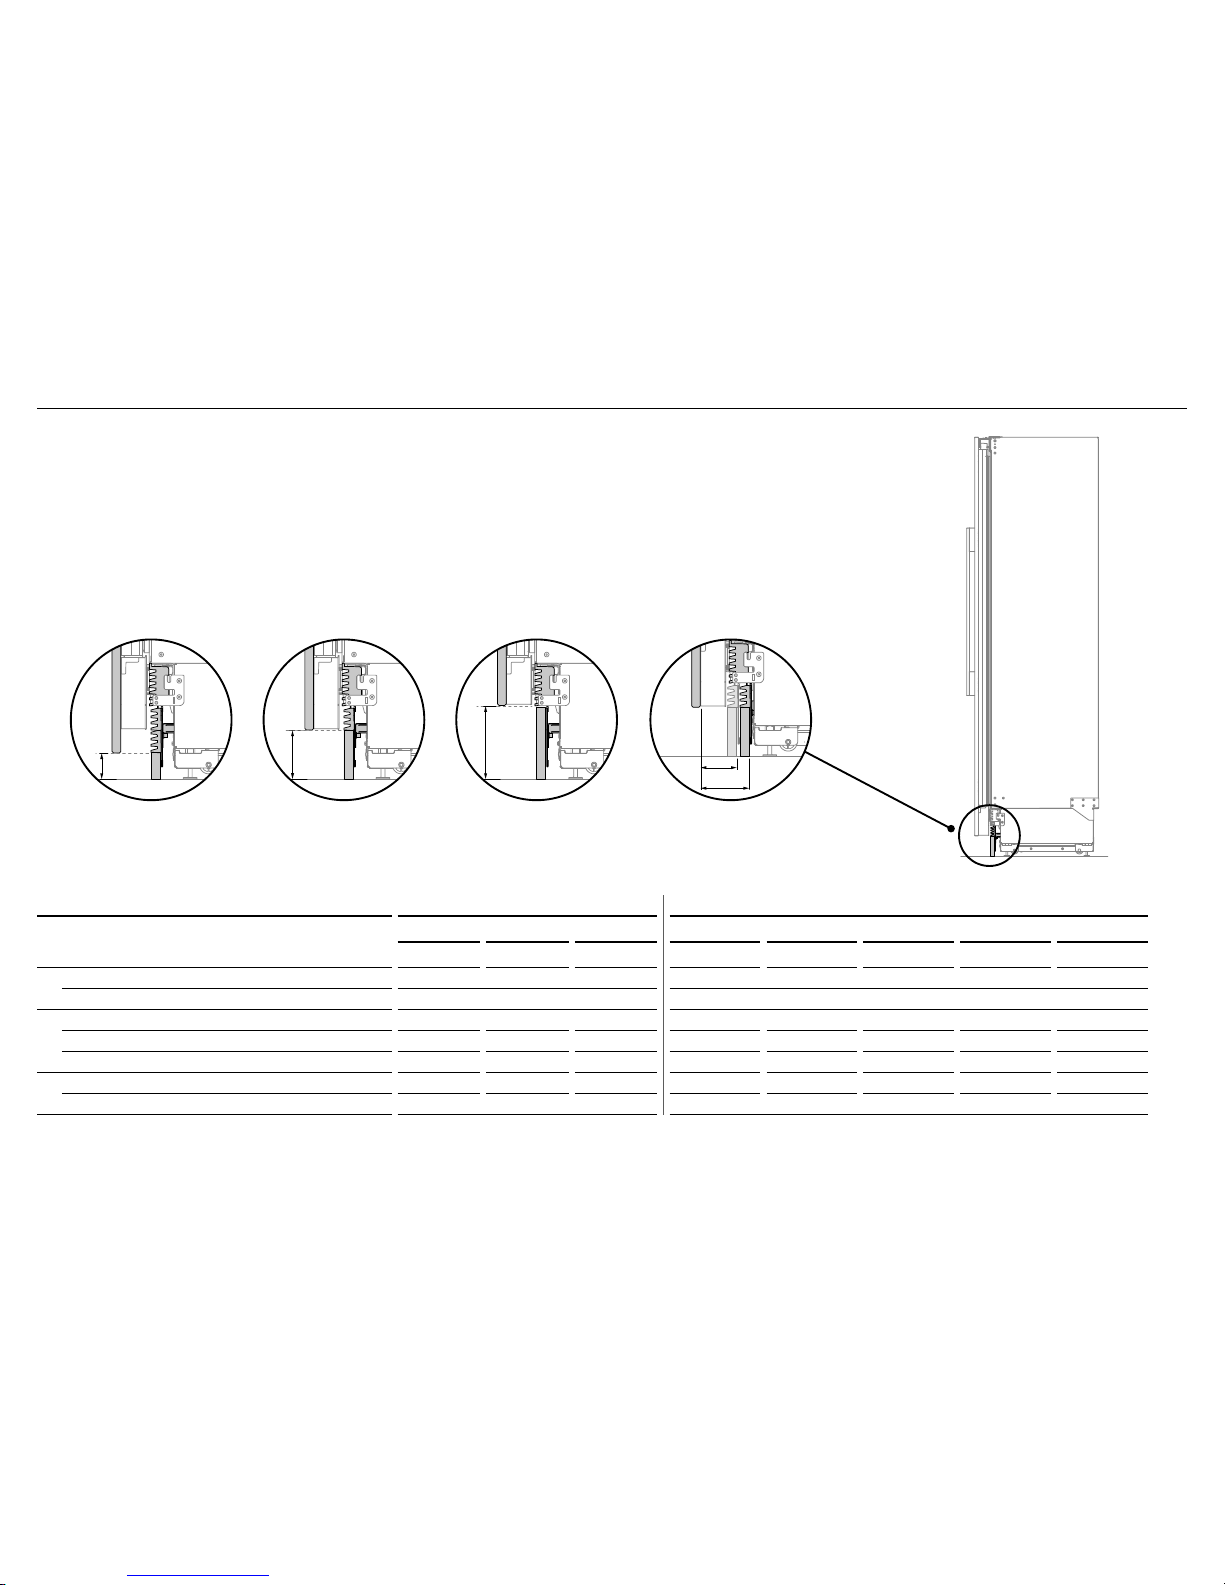
9 DOOR AND TOE KICK PANEL DIMENSIONS
SINGLE INSTALL DUAL INSTALL
RS46 RS61 RS76 RS46 / RS61 RS46 / RS76 RS61 / RS61 RS61 / RS76 RS76 / RS76
TOE KICK DIMENSIONS
mm mm mm
mm mm mm mm mm
D
Width of toe kick
Stainless steel panel/Custom panel 454 606 759 1064 1216 1216 1368 1521
E
Height of toe kick
#
Stainless steel panel 102 102 102 102 102 102 102 102
Custom panel** 50 – 152 50 – 152 50 – 152 50 – 152 50 – 152 50 – 152 50 – 152 50 – 152
F
Depth of toe kick (measured from front of door)
Stainless steel panel/Custom panel 73 – 102 73 – 102 73 – 102 73 – 102 73 – 102 73 – 102 73 – 102 73 – 102
#
Standard toe kick height is 102mm with the optional Stainless door panel. For Custom door panel installation, a custom toe kick 50 – 152mm can be manufactured and fitted by cabinetmaker.
The Custom door panel height needs to be adjusted accordingly.
** Extra lower grilles are required for a 50mm toe kick installation.
102mm toe kick height51mm toe kick height
(with extra lower grille attached)
73 – 102mm toe kick depth
measured from the from
rearof door panel
E
E
E
F
152mm toe kick height
13
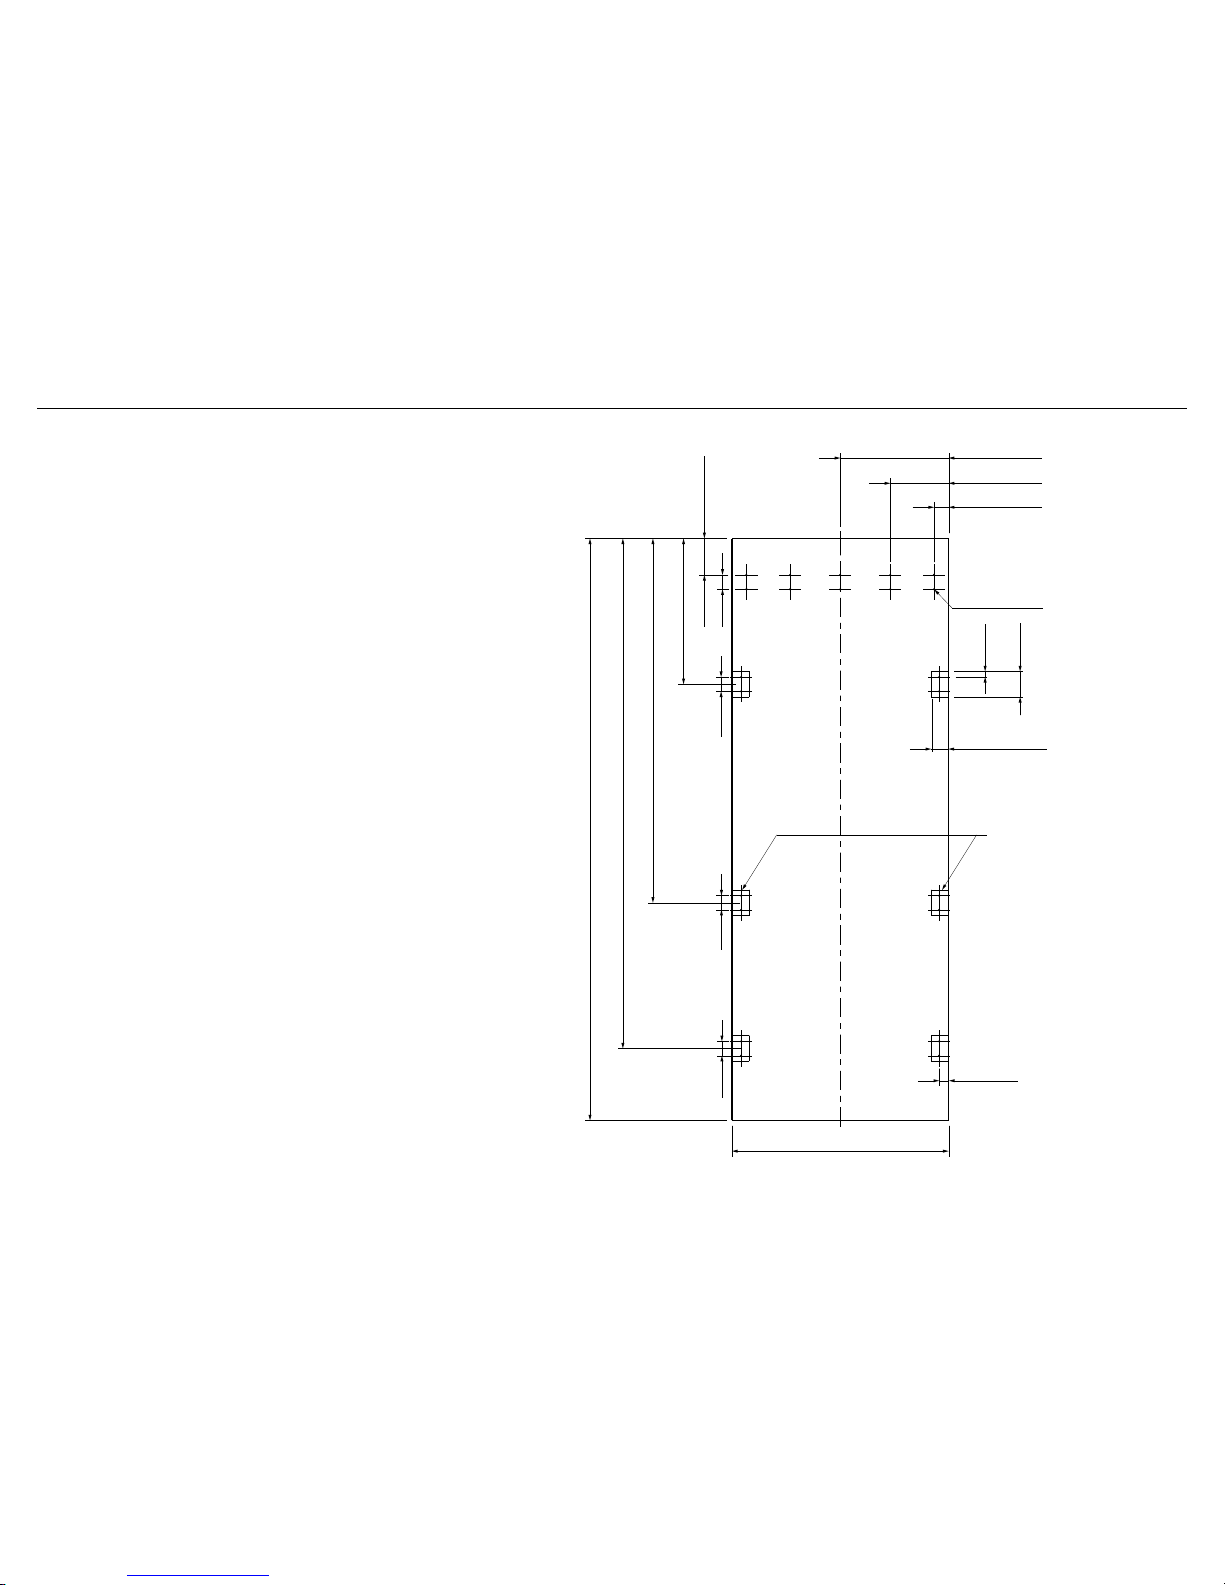
!0 CUSTOM DOOR PANEL DIMENSIONS
Custom door panel dimensions
Dimensions apply for the preparation and installation of Custom
door panels. For Dwg and Dxf files of the below panel preparation
download the folder on thekitchentools.fisherpaykel.com.
IMPORTANT!
The thickness of the custom door panel can vary provided that the
screws do not penetrate beyond the full depth of the door panel.
Refer to ‘Door panel dimensions (Custom)’ table on page 10 for
thickness limitations of door panel.
Measurements of screw hole locations can vary depending on the
height of toe kick 50 – 152mm.
33mm
60mm
22mm x Ø2mm
756mm
20mm
90mm
51mm
203mm
378mm
127mm
50mm
50mm
508mm
1270mm
1778mm
1978 – 2080mm
Do not place handle holes in
marked areas to avoid clashing
with panel attachment brackets
RS76
50mm50mm
14
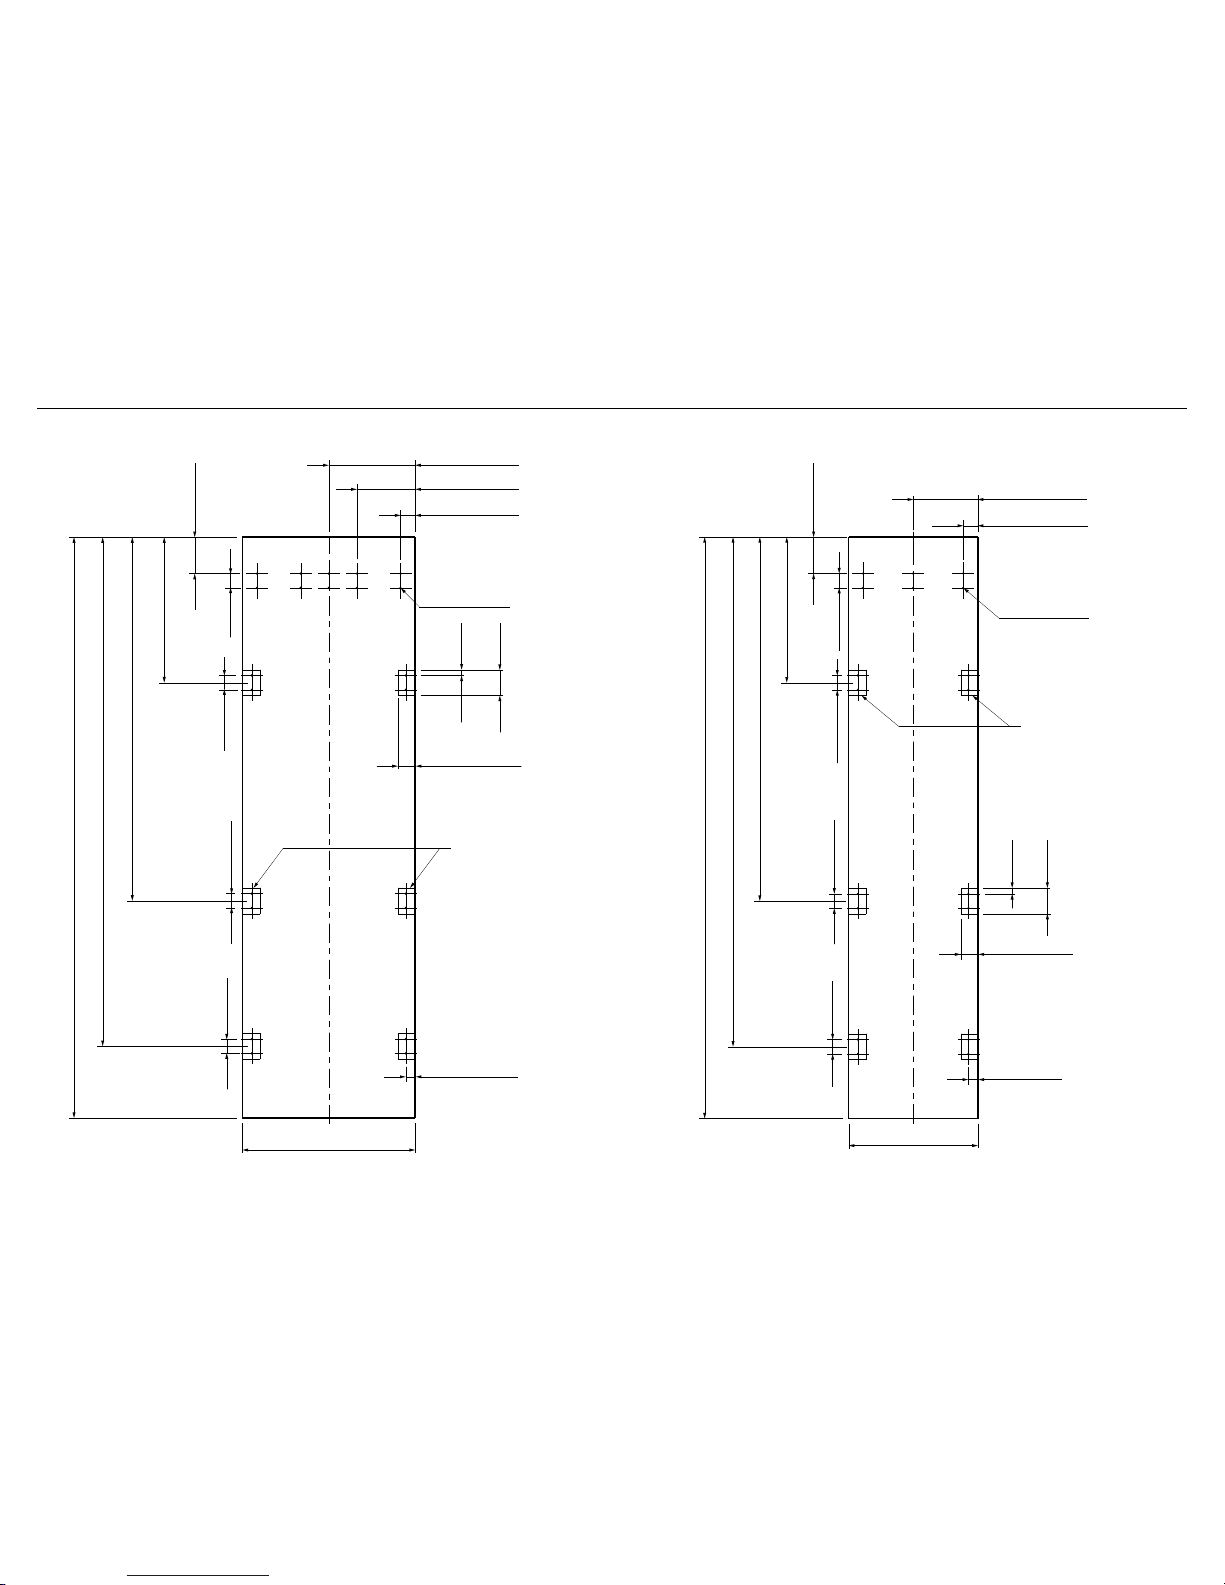
!0 CUSTOM DOOR PANEL DIMENSIONS
603mm
33mm
50mm
50mm
50mm
50mm
1978 – 2080mm
1778mm
1270mm
508mm
127mm
Do not place handle holes in
marked areas to avoid clashing
with panel attachment brackets
51mm
203mm
302mm
RS61
60mm
20mm
90mm
22mm x Ø2mm
1978 – 2080mm
1778mm
1270mm
508mm
127mm
50mm
225mm
51mm
Do not place handle holes in
marked areas to avoid clashing
with panel attachment brackets
33mm
450.8mm
50mm
50mm
50mm
RS46
18mm x Ø2mm
60mm
20mm
90mm
15
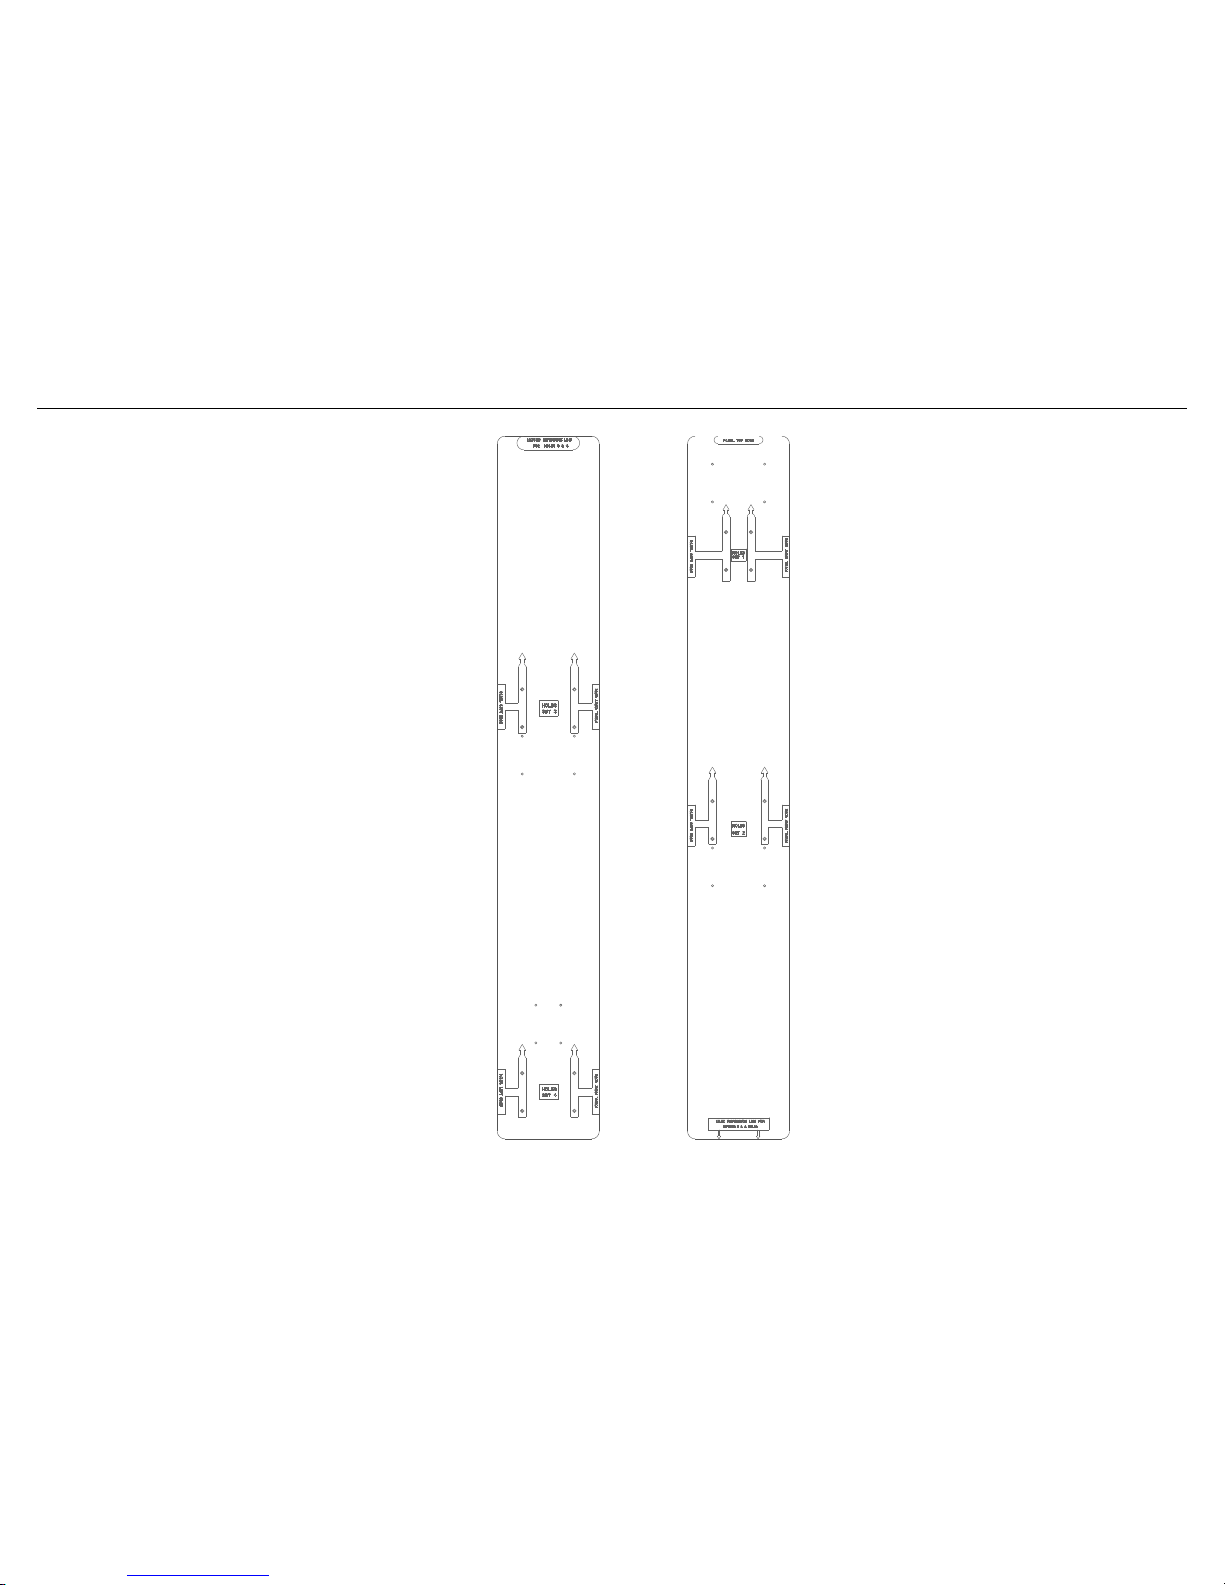
!1 CUSTOM DOOR PANEL INSTALLATION TEMPLATE
This template is a single double-sided sheet used as a
guide to drill screw holes for installing your Custom door
and drawer panels. The actual template is included with
this installation guide.
Refer to 'Door panel installation (Custom)', page 35 for
more information.
PANEL LEFT SIDE PANEL RIGHT SIDE
 Loading...