

Page 1

Page 2
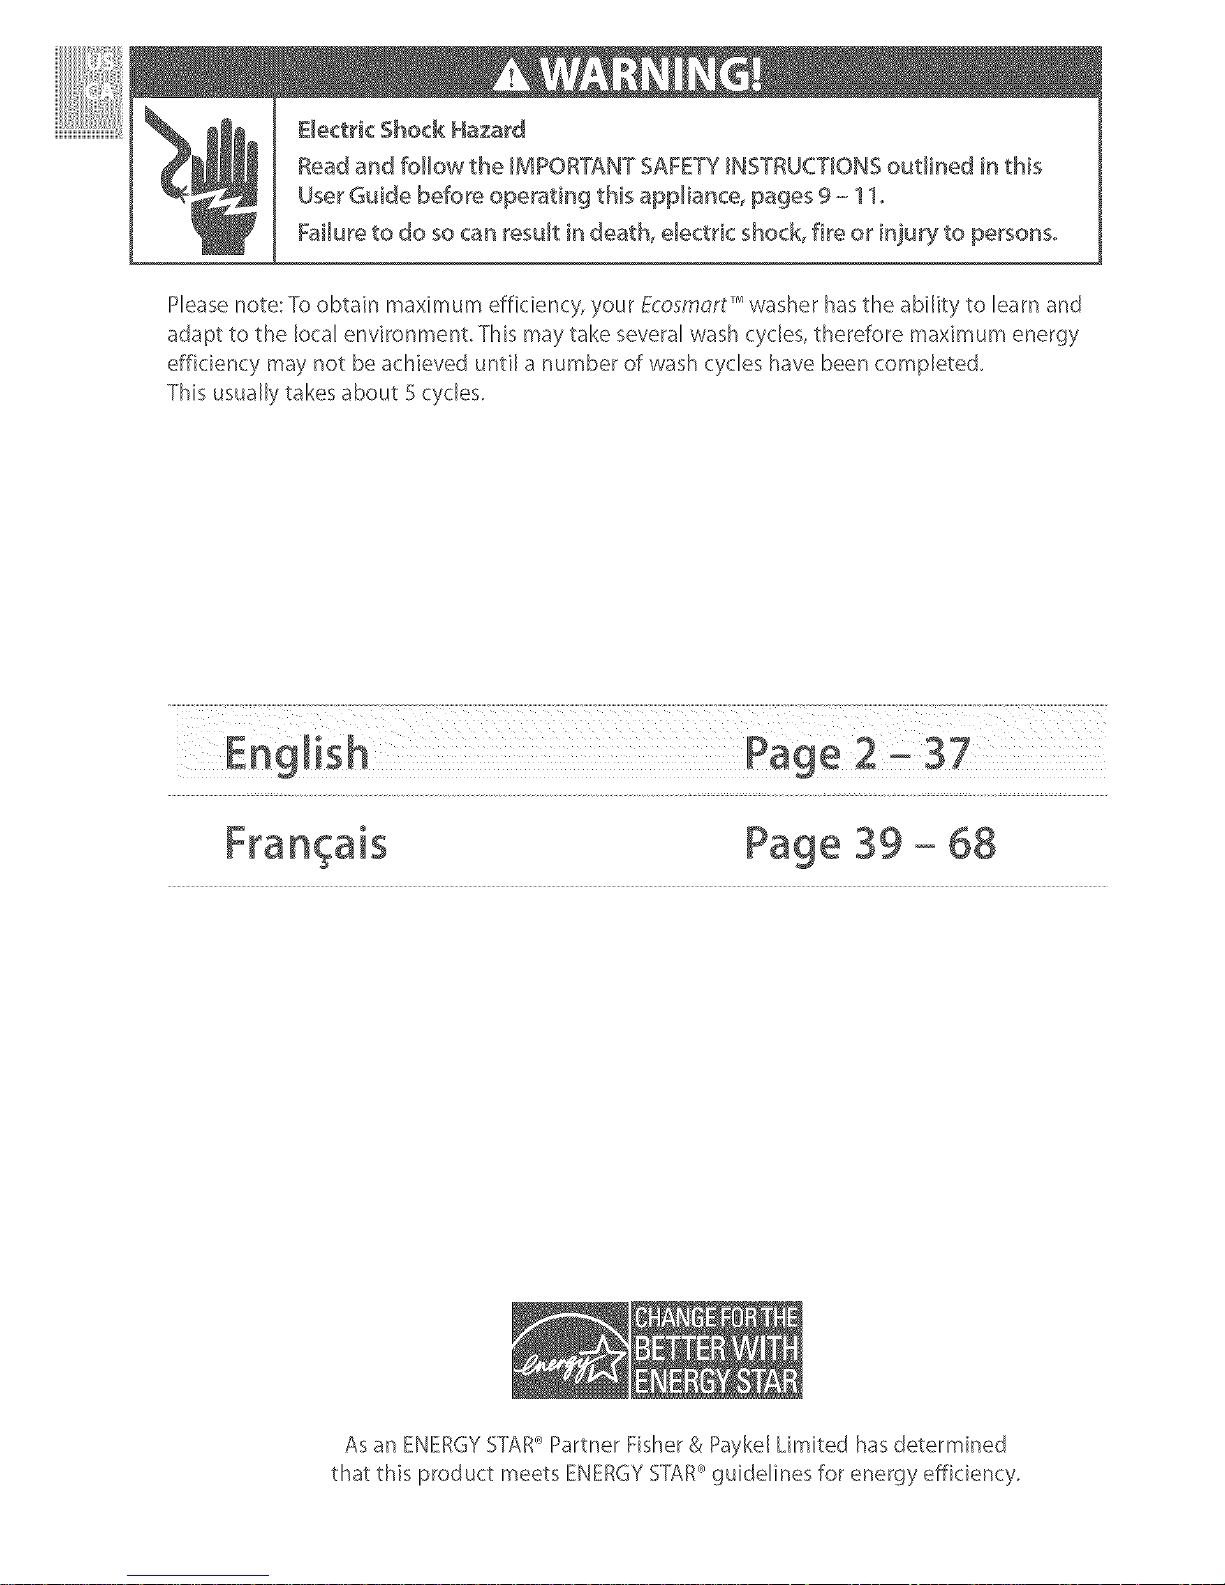
Electric Shock Hazard
Read and follow the IMPORTANT SAFETYINSTRUCTIONSoutlined in this
User Guide before operating this app[iance, pages 9 - 11o
Failure to do socan result in death, electric shock_ fire or injury to persons°
Please note: To obtain maximum efficiency, your Ecosm_rt _washer has the ability to learn and
adapt to the local environment. This may take several wash cycles, therefore maximum energy
efficiency may not be achieved until a number of wash cycles have been completed.
This usually takes about 5 cycles.
Fran ais Page 39 - 68
As an ENERGY STAR_'_Partner Fisher & Paykel Limited has determined
that this product meets ENERGY STAR_'guidelines for energy efficiency.
Page 3
Installation instructions 3
Important safety instructions 9
How to get started 12
About your E_osm_yt' 14
How Eco_mdrf _'works 14
Lid Lock 15
Wash cycles and options 16
The wash progress lights, The wash cycles 16
Wash options, Softene#Bleach rinse, Soak 17
Time save_,Water levels 18
Spin hold, Delay start, Clothes care safeguards 19
Customizing the wash cycles, Favodte cycle 20
Wastring bulky ;terns, Washing woolBns 21
Cold water washing 21
Before you wash 22
Sorting and Loading 22
Bleach, Fabdc softener, Scrud 23
Changing preset options 24
Option adiustment mode 24
Oul: of balance recover 7 rx_utine 26
Auto water fill level 26
End of cycle beeps 27
Default dnse option 27
Volume of water used in the rinse (REGULAR cycle} 27
Controlled cold 27
Caring for your E_o.sm_rt _ 28
Care and cleaning 28
Products that might damage your F_'osmuf _'do/hes washer 29
Ecosmo£" sounds and beeps 29
Automatic I;nt system 29
If your E_osmc_yt ' beeps for help 30
Operating problems 32
Wash problems 34
35
SAVE THESEINSTRUCTIONS
7hemoddsshowoin his Ilser(;uidc m__ynot t____vdJik3,_/_in __//m__rket___nd__r_
£Jtj_dt roch¢_ng_¢_tsoy tim_.fbr curr_otd_t:_i/sstout modalsod sp_di_c¢_tioo
d_vdJild_bi/£yi0your couotr_ plecJx#visitourIocdJwebs£eIi£edoo thebook {.over
or cootc_ctyour/oco/fisher & Pc_yke/ded_/e_
Page 4
Congratulations on purchasing a new Fisher & Paykel washing machine. We are very proud of our
washers and trust they will serve you well for many years.
At Fisher & Paykel we aim to provide innovative products that are simple to use, ergonomic and
energy efficient. Thousands of tonnes of washing and 75 years of laundry experience have been
programmed into your washing machine to help give you the best possible performance.
We hope you enjoy your new washing machine, we havecertainly enjoyed designing it.
Fig
/
/.
J
/.
/
Ecosm_2rt '_dothe wcTher
It L_important that the User Guide should be retained with the appliance for future reference°
Should the appliance be sold or transferred to another owner, always ensure that the User
Guide L_te# with the appliance in order that the new owner can famfliaMze themselves with the
appliance and the relevant warnings.
Page 5

_nsta_ation instructions
Before you begin - read these instructions completely and carefully.
Electric Shock Hazard
Read and follow the IMPORTANT SAFETY INSTRUCTIONSoutlined in this
User Guide before operating this appliance, pages 9 - 11o
Failure to do so can result in death, electric shock fire or injury to persons.
Observe aN governing codes and ordinances°
h_sta[[ation requirements
Location
",/our washer must be installed on firm flooring to minimize vibration during spin cycles. Concrete
flooring is best, but wood base is sufficient providing the floor support meets FHA standards.
Your washer should not be installed on rugs or exposed to the weather.
PUomb_ng
Water temperature }/
",_ourcoldwatershouldnotexceed9S°F/SS°C>or;,ourhotwaterexceed_S0°F/6S°C>.
Temperaturesabovethismaydamage;,'ourwasher.
Shut off vab, es
Bothhotandco_dshut-offvalves(faucets)shouldbeava,ab_e_nthe_aundr;,area.
Drain
Watermaybedrainedintoastandpipeorsettub.Thestandpipemustbe1'//'(SSmm)minimum
interior diameter and must be open to the atmosphere.
Th_sappliancemusthesuppl_edw_th_0V-_20V,60H_electricalsuppl;,andconnectedtoan
individual, properly grounded branch circuit, protected by a 15 or 20 amp circuit breaker or time
deh;,fuse.
Page 6
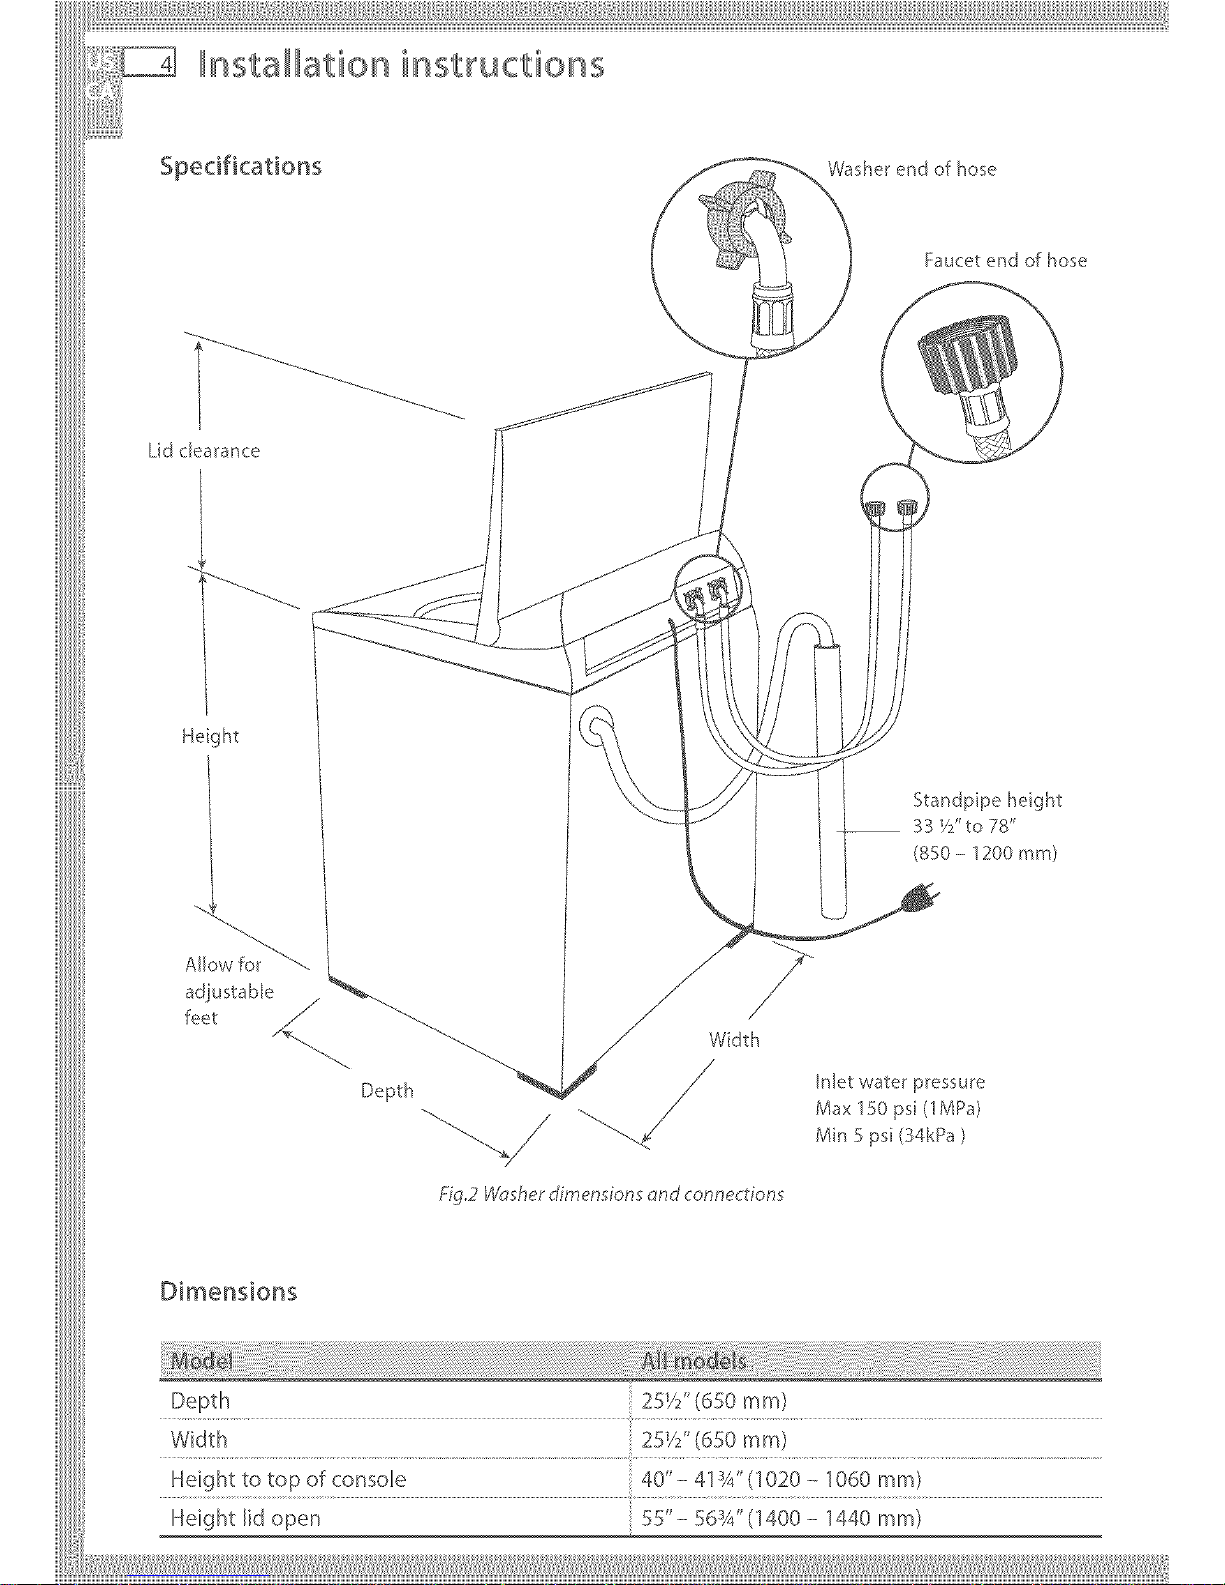
nsta ation instructions
Washer end of hose
Faucet end of hose
Lid clearance
Height
Standpipe height
33 Y/' to 78"
(850 - 1200 ram)
adiustable
feet /
Depth
Fig.2 W_;sher dimensions ond conm*.ctions
Inlet water pressure
Max 150 ps (1MPa)
Mn 5 ps (34kPa)
Dimensions
Depth 25YS (650 ram)
Width 25V£' (650 ram)
Height to top of console 40" - 41W' (1020 - 1060 ram)
Height lid open 55"- 56s4"(1400 - 1440 ram)
Page 7
iiiliiii,I,IIII'I' iÀÀ¸IIIilIIlllllliilililll¸ ill,i_iliiliil¸liil¸lii,i_lii_lIilii¸lllliiill¸l:i_iiili!!l/ii!t
Instlllttion instructions
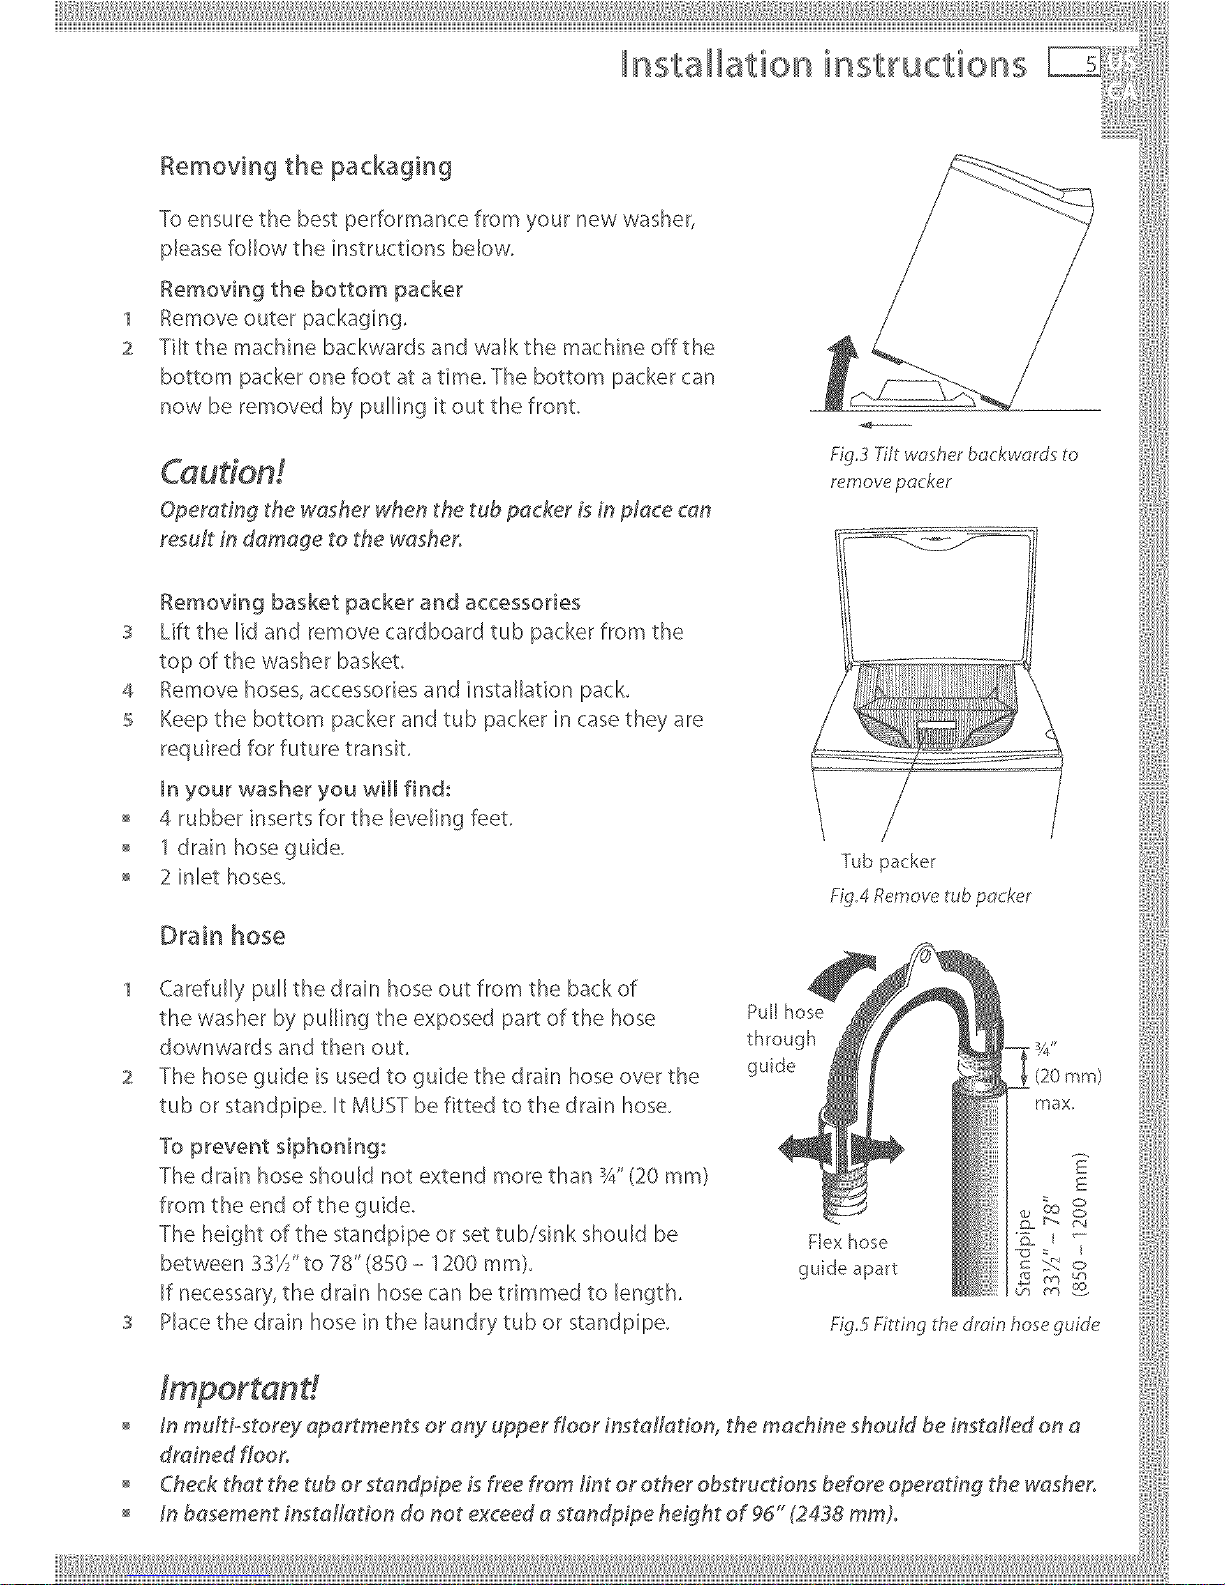
Removing the packaging I!
Toensuret:hebest:performancefrom;,ournewwasher, / ........
p_easefo,owthe_nstruct_onsbdow. /' /
_o_o,,h_thebotto__o_ko_ / /
,_ Removeouterpackar_ng. / /
2 Tilt: the machine backwards and walk the machine off the _ __. //
bottom packer one foot at a time. The bottom packer can
now be removed by pulling it out the front.
Caut_ono _oov_p_ck_ ii
R_movhgb=_k_tpa_ke_a=da_e_o_@_
3 Lift:t:helidandremovecardboardtubpackerfromthe
top of the washer baskeL
4 Remove hoses, accessories and installation pack. _}
5 Keep the bottom packer and tub packer in case they are
requiredforruturetransit. t
In your washer you will find:
o 4 rubber inserts for the leveling feet. }''"
= 1drainhoseguide
/uo packer
o 2 inlet hoses.
1 Carefu,,y puI the drain hose out: fforr, the back of mL_ _ ii
Pullhose
the washer by pulling the exposed part of the hose _f _ _ ii
downwards and then out. the°ugh _;'_ _%" !i:
2 The hose guide is used to guide the drain hose over the gude (20ram)
3 E
The drain hose should not extend more than ¼" (20 ram) E ;i
from the end of thegode. _ o
The height of the standpipe or set tub/sink should be FI _" _
between 33k_ to 78 (850 - 1200 ram). gui .._-_
If necessary, the drain hose can betrimmed to length. _ _-
S Place the drain hose in the laundry tub or standpipe. Fig.5Fitffng th_ drain hos_guide !
drained floor°
o _n basement _nst_H_t_on do not e×_eed _ standpipe hdght of 95 "(2438 turn).
Page 8
nsta ation instructions
1 Install hoses with the straight end (with filters)
fitted to the faucets (Fig.d).
2 Install elbow ends onto washing machine (Fig.d).
Inlet vaK_esare marked on the back of the machine
H=Hot C=Cold
s Ensure the hot is connected to the hot, and the
cold is connected to the cold.
Faucet end Washer end
of hose of hose
Fig d Inlet hose end
Note: if there is a cold water supply only, an inlet valve cap (available from Fisher & Paykel) MUST
be connected to the hot valve, The cap prevents water leaking from the hot valve. However, we
recommend this product is connected to both hot and cold water.
LeveJing the washer
1 Unscrew the feet so the machine is NOT sitting on
the corner cabinets, then fit the rubber leveling
inserts (Fig,7),
2 Move the washer into its final position. We suggest
a minimum clearance of 1" (25 ram) on each side
for ease of installation (Fig.8),
s It is IMPORTANT to level the washer to ensure
proper performance during spin,
Adjust the feet by unscrewing/screwing to make
sure the washer is level and cannot rock,
4 Use the wails and adjacent counter tops as a sight
guide to check to see if washer appears level.
Readjust the feet if necessary,
5 Open the lid and check the washer basket to see
that it sits slightly forward of centre (Fig.9).
Rubber insert !1::l
t
Fi£7 Adjuring leveling feet
1" (25 mm) 1" (25 mm)
Fig8 Minimum clearance
Inco[[ect Collect
adjustment adjustment
Fig.97:ocheckleveling look
down on the w_sh b_,sket
Page 9
iiiliiii,I=I lliiiliililillllllllllilll¸llliili:lillliililll¸ ii Iilii¸III¸lliiliiliill¸iii'iill_iil¸lli!l!!lliii!
Installation instructions
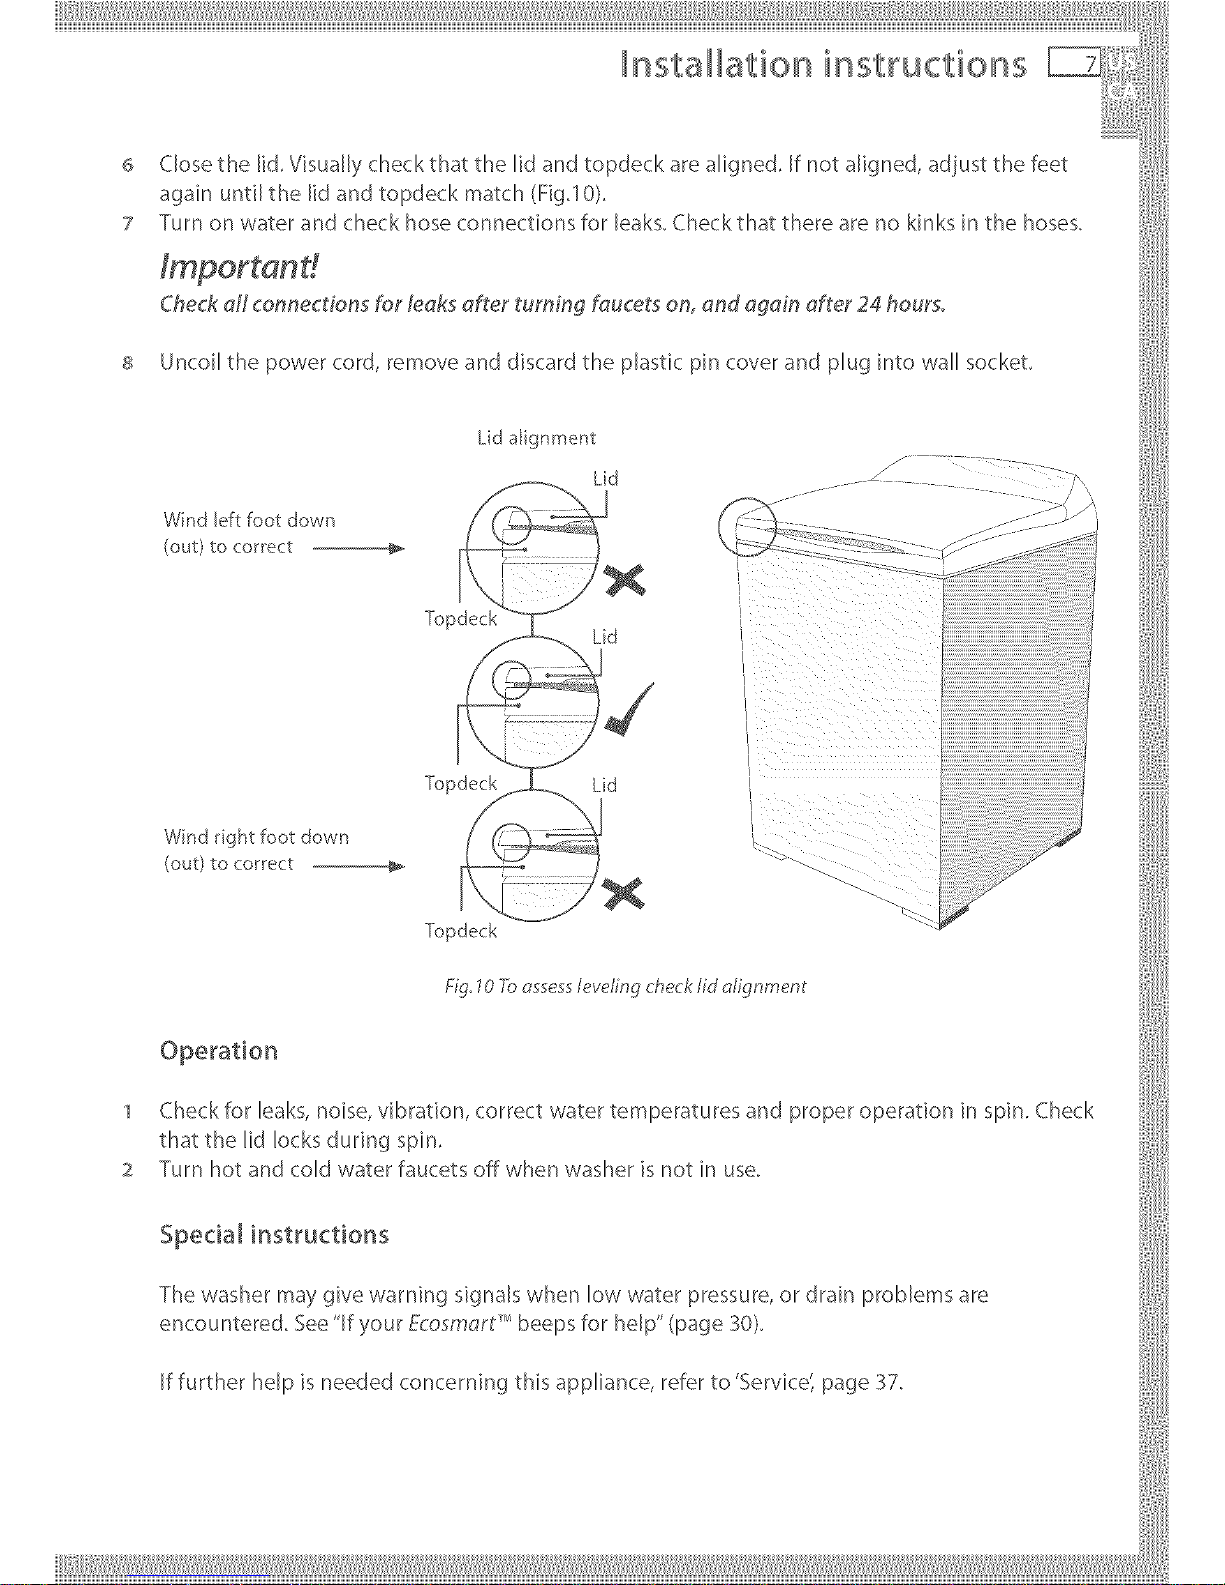
6 Close the lid. Visually check that the lid and topdeck are aligned. If not aligned, adjust the feet
again until the lid and topdeck match (Fig.lO). i
7 Turn on water and check hose connections for leaks. Check that there are no kinks in the hoses.
]mportand
= UncoU_hepowercord,removean_discard_heplasticpincoveran_plugintowallsocke_. :iLid afgnment
..........................j
Wind left foot down ( /< .& ............. 1:::7L.--;_j
X :,
i
W_d_ghtfootdow_ ...... _: .....
× - ........
I
To p
opo o=o=
1 Check for leaks, noise, vibration, correct water temperatures and proper operation in spin. Check :1
thatthelidlocksduringspin.
2 Turn hot and cold water faucets off when washer is not in use.
Specia[ instructions i'
The washer may' give warning signals when low water pressure, or drain problems are
encountered.See"lf;,'ourEco_m_n=beepsfor help"(pageso;,
If further help is needed concerning this appliance, refer to 'Service: page 37. i:
Page 10
nsta ation instructions
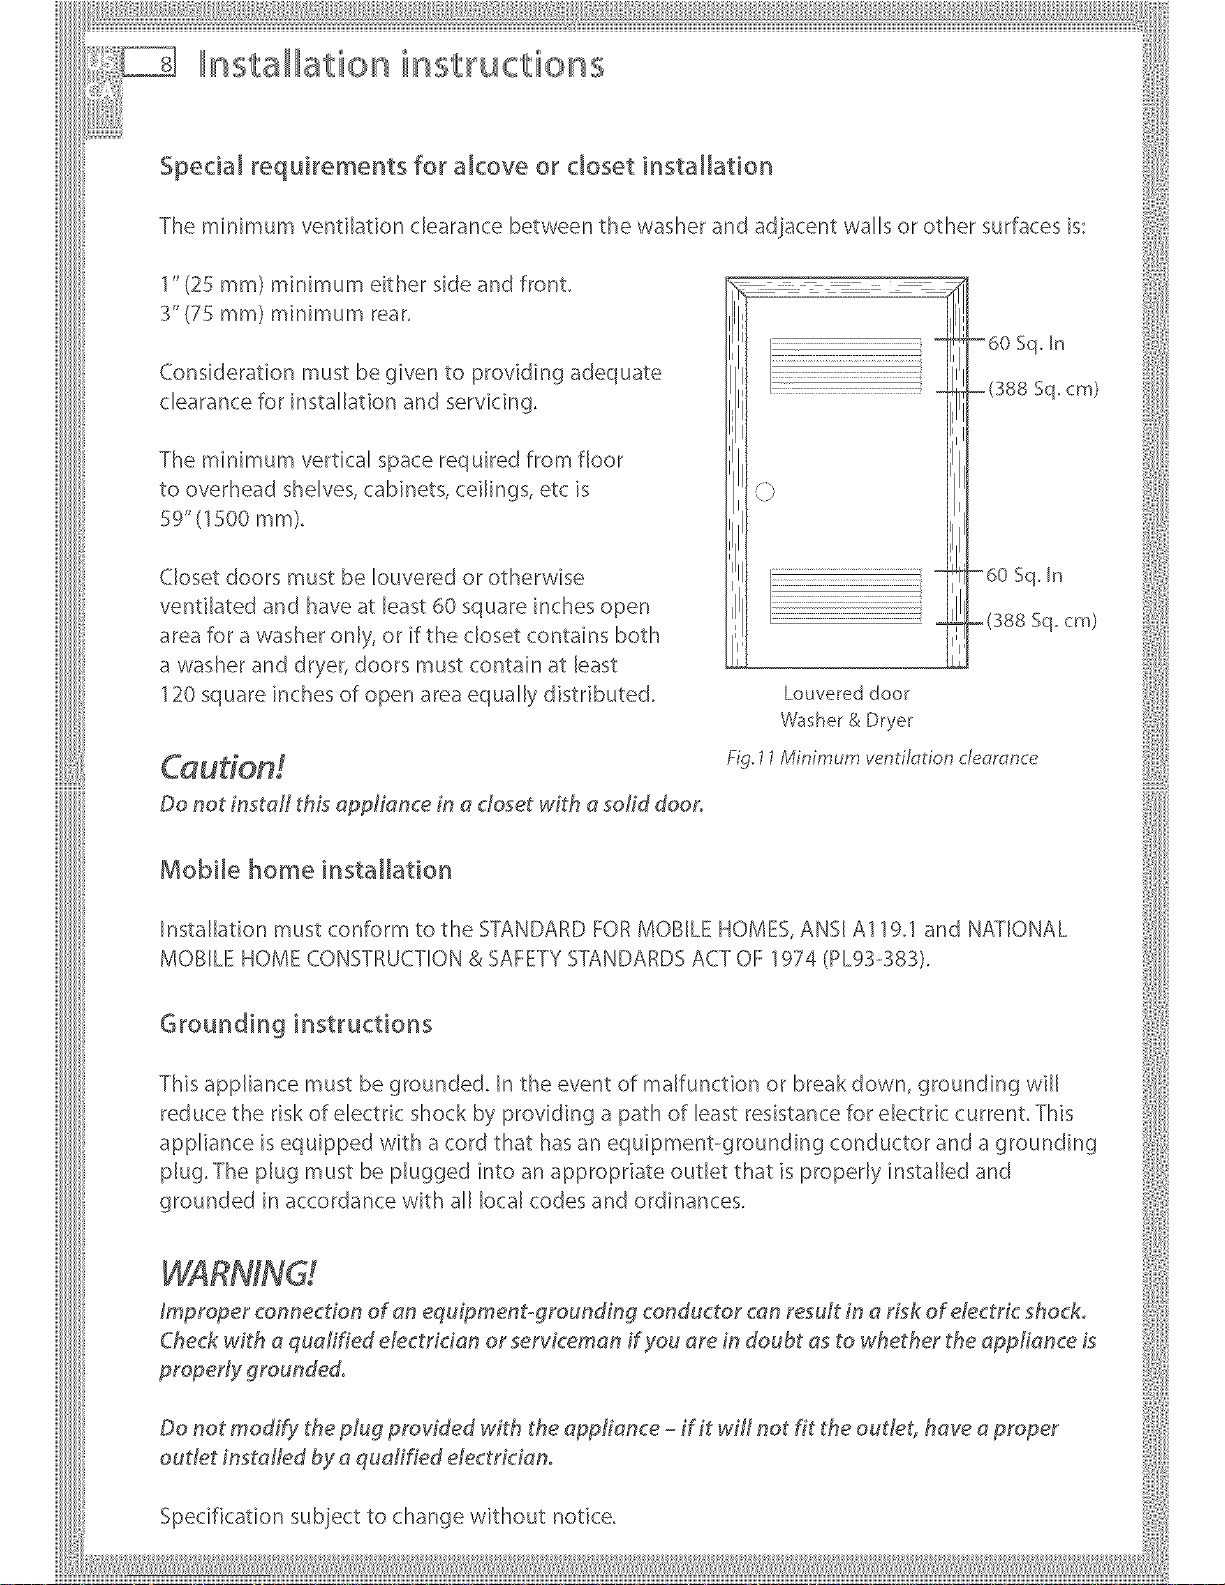
Special requirements for alcove or closet installation
The minimum ventilation clearance between the washer and adjacent walls or other surfaces is:
1" (25 ram) minimum either side and front
3" (75 ram) minimum rear.
Consideration must be given to providing adequate
clearance for installation and servicing_
The minimum vertical space required from floor
to overhead shelves, cabinets, ceilings, etc is
59"(1500 mm)_
Closet doors must be [ouvered or otherwise
ventilated and have at least 60 square inches open
area for a washer only, or if the closet contains both
a washer and dryer, doors must contain at least
120 square inches of open area equally distributed.
Do not instalt this appliance in a closet with a solid door,
Louve_ed door
Washer & Dryer
Fig 11 Minimum ventilcTtion c/e_;mnce
Mobile home installation
Installation must conform to the STANDARD FORMOBILE HOMES, ANSI A119.1 and NATIONAL
MOBILE HOME CONSTRUCTION & SAFETY STANDARDS ACT OF 1974 (PL93-o383).
Grounding instructions
This appliance must be grounded, In the event of malfunction or break down, grounding will
reduce the risk of electdc shock by providing a path of least resistance for electric current This
appliance is equipped with a cord that has an equipmenbgrounding conductor and a grounding
plug, The plug must be plugged into an appropriate outlet that is properly installed and
grounded in accordance with all local codes and ordinances,
improper connection of an equipment-grounding conductor can resutt in a rL_kof dectr£ shock,
Check with a qualified etectfidan or serviceman ff you are ff_doubt as to whether the appliance is
propeNy grounded,
Do not modify the plug provided with the appliance - if it will not fit the outlet, have a proper
outlet installed by a quatified dectrician,
Specification subject to change without notice.
Page 11
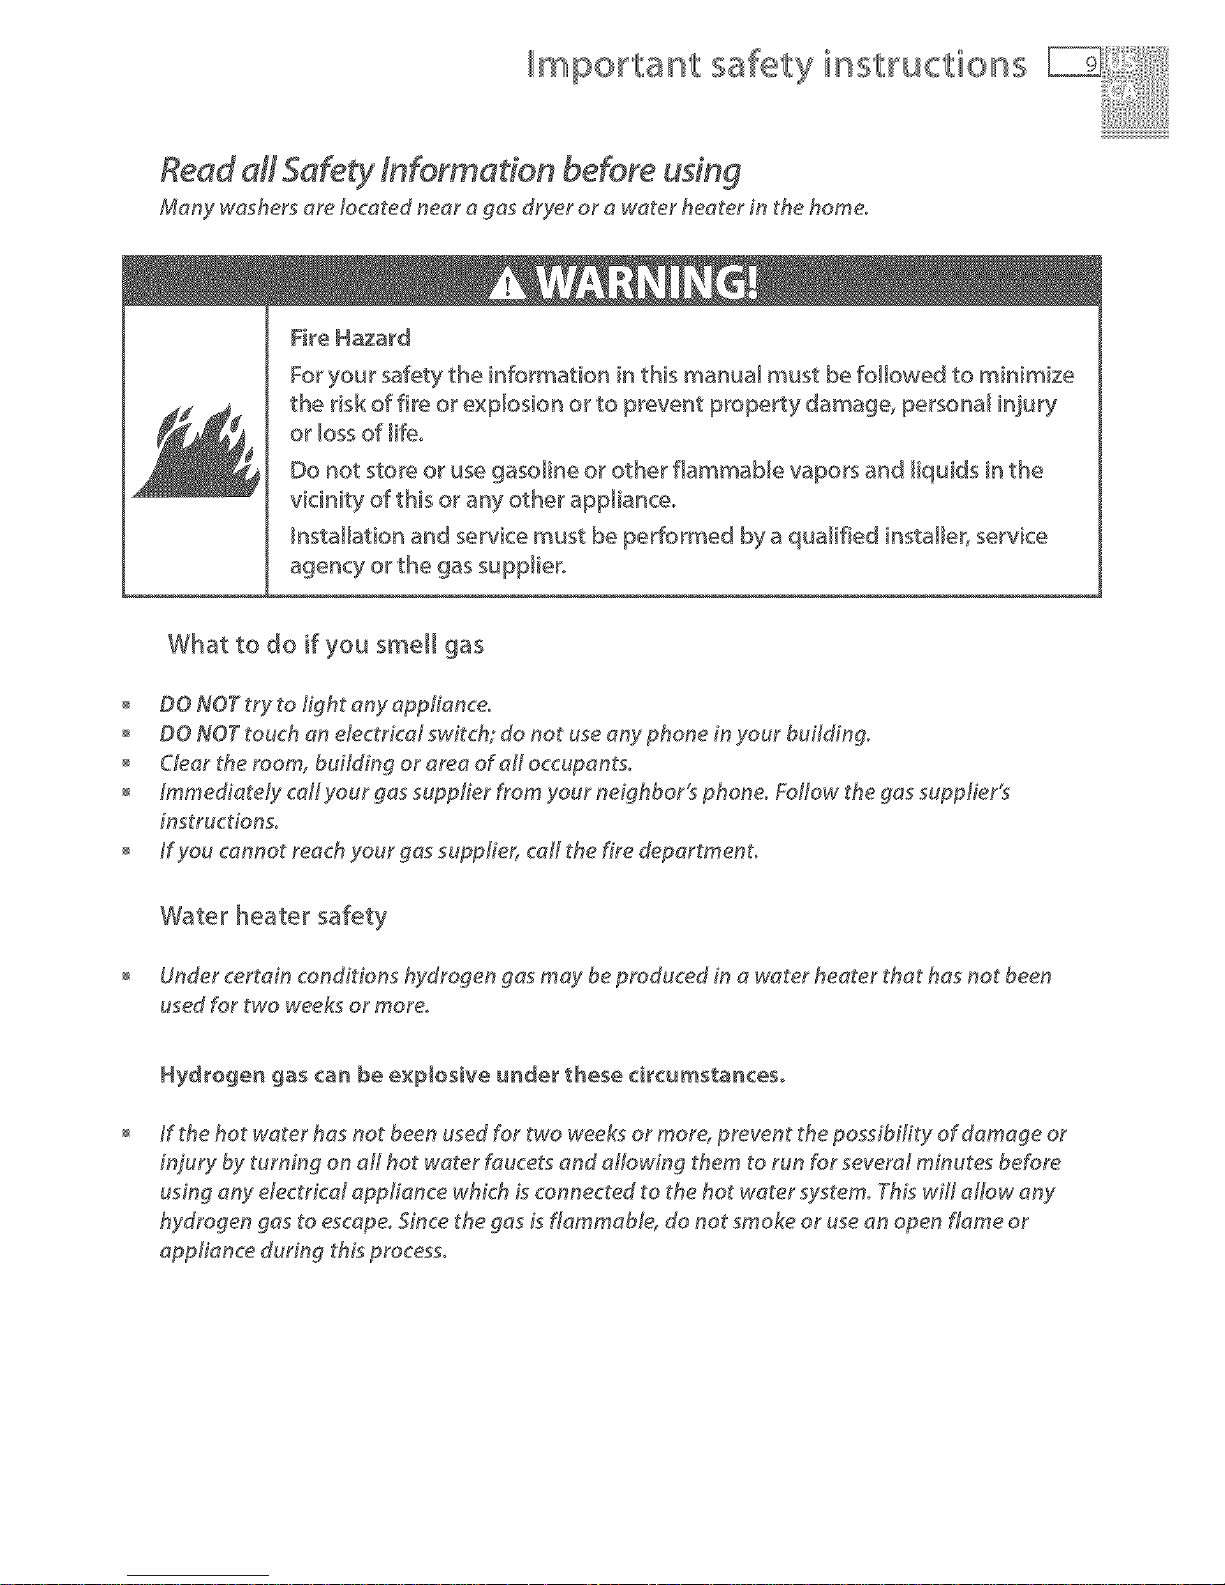
mportant safety instructions
Read dl 5afeW Information before using
Many washers are located near a gas dryer or a water heater in the home.
Fire Hazard
Foryour safety the information in this manual must be followed to minimize
the risk of fire or expbsion or to prevent property damage, persona_ injury
or loss of #leo
Do not store or use gasoline or other flammaMe vapors and liquids in the
vicinity of this or any other appliance,
_nstaHation and service must be performed by a qualified installer, service
agency or the gas suppHero
What to do if you smell gas
o DO NOT try to h'ghtany applianceo
o DO NOT touch an electrical swit@; do not useany phone inyour building,
o Clear the room, bufld#_gor area of alt occupants°
o Immediately caHyour gassupplier from your neighbort_ phone, Foflow the gassupplier's
instructions,
o ffyou cannot reach your gassuppfier, car the fire department,
Water heater safety
Under certain conditions hydrogen gas may be produced in a water heater that has not been
used for two weeks or more.
Hydrogen gas can be explosive uHder these circumstances,
ff the hot water has not been used for two weeks or more, prevent the possibih'ty of damage or
injury by turning on aft hot water fauce% and aflowqng them to run for several minutes before
udng any dectrical app#ance which is connected to the hot water system. Thi:_wifl aflow any
hydrogen gas to escape. Since the gas is flammable, do not smoke or use an open flame or
appliance during this process.
Page 12
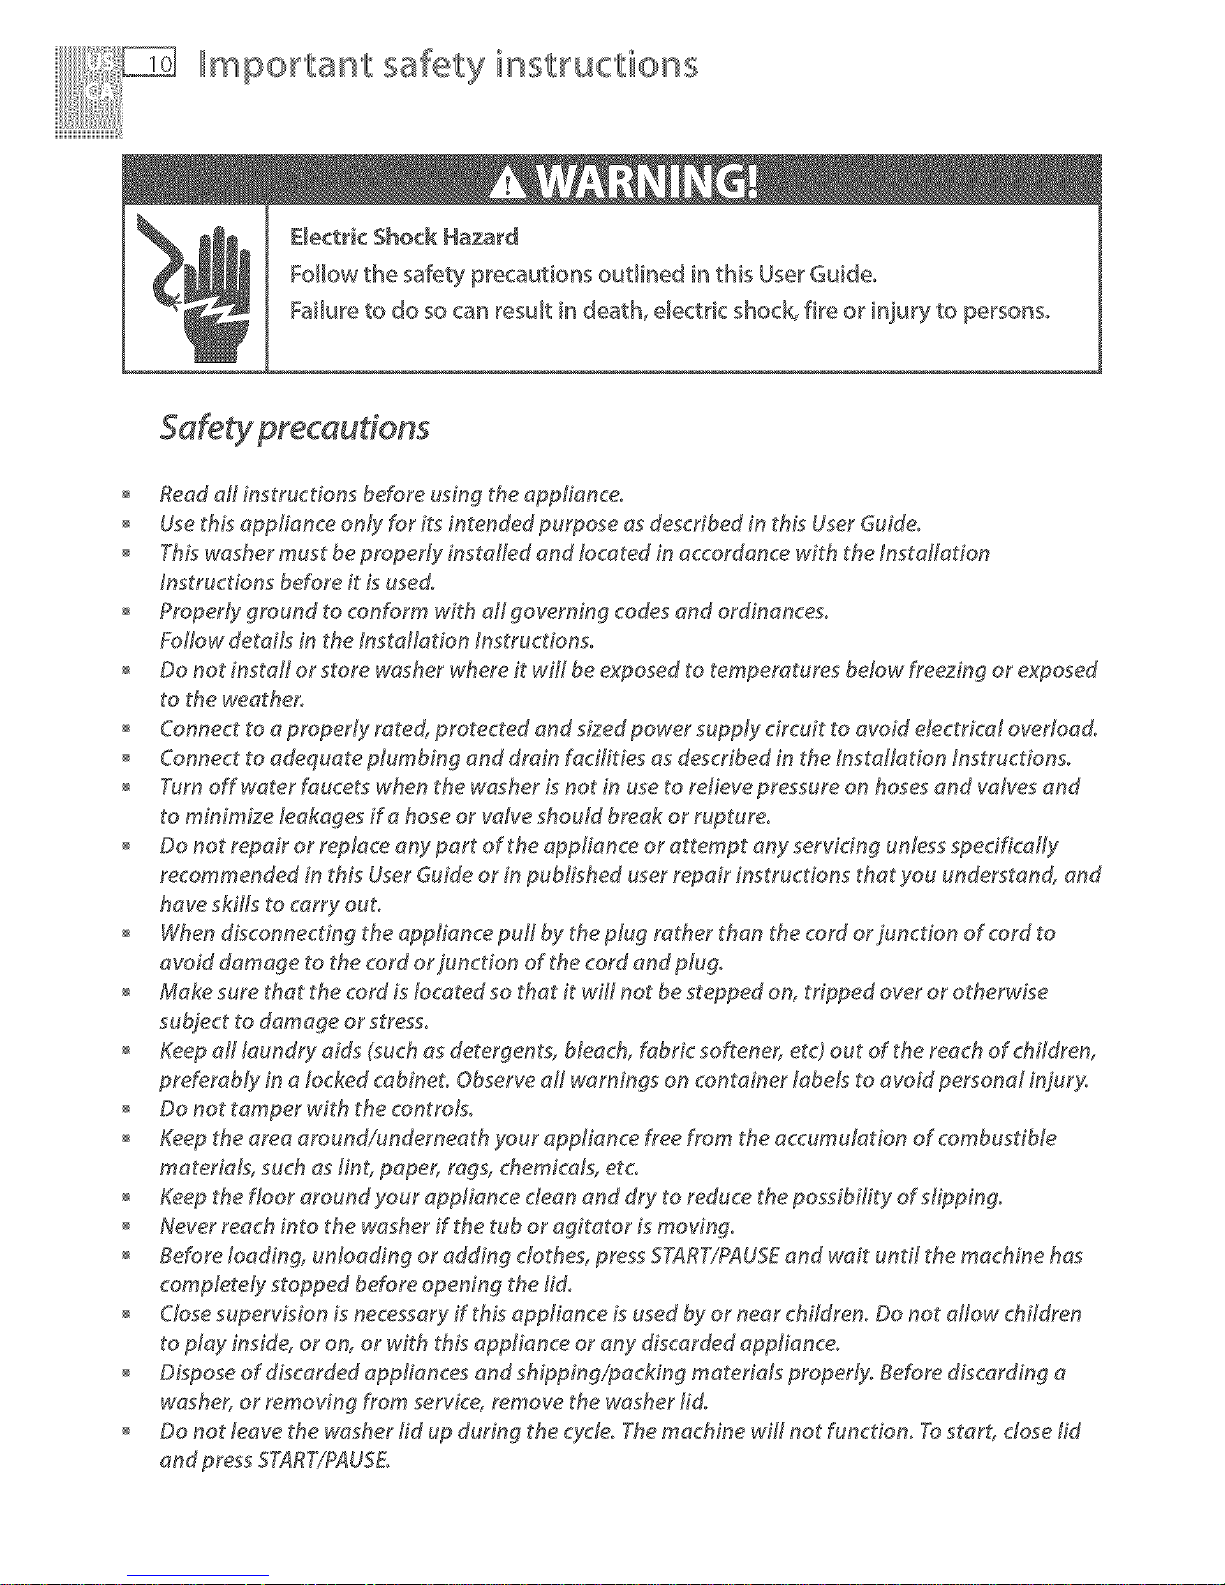
mportant safety instructions
E_ectdc 5hock Hazard
Follow the safety precautions outlined in this User Guide°
Failure to do so can result in death, electric shock fire or injury to persons°
o Read aft instructions before using the appliance°
o Use thLs appliance only for its intended purpose as described in thLs User GuLdeo
o This washer must be properly installed and located in accordance with the #_staltation
Instructions before it is used°
o Properly ground to conform with all governing codes and ord#_anceso
Follow details in the Installation Instrucdonso
o Do not install or store washer where it wilt be exposed to temperatures below freezing or exposed
to the weather°
o Connect to a properly rate4 protected and sized power supply circuit to avoid dectrical overload°
o Connect to adequate plumbing and drain facilities as described in the Installation Instructions°
o Tumoffwaterfaucetswhenthewasherisnotinusetoretievepressureonhosesandvatvesand
to minimize leakages if a hose or valve should break or r@tureo
o Do not repair or replace any part of the appliance or attempt any servicing unless specifically
recommended in this User Guide or in published user repair instructions that you understand, and
have skills to carry out°
o When disconnecting the appliance puff by the plug rather than the cord orjuncdon of cord to
avoid damage to the cord or juncdon of the cord and plug.
o MakesurethatthecordLstocatedsothatitwfltnotbesteppedon, tfippedoverorotherwise
subject to damage or stress°
o Keep aH laundry aids (.suchas detergents, bleach, fabric so#char, etc..)out of the reach of children,
preferably in a locked cab#_eto Observe a# warnings on container labels to avoid personal injury.
o Do not tamper with the controls°
o Keep the area around/underneath your appliance nee from the accumulation of combustible
materia& such as tint, paper, rags, chemicals, etc
o Keep the floor around your appliance dean and dry to reduce the possibility of slipping°
o Neverreachintothewasherffthetuboragitatorismovingo
o Before Ioadin¢ unloading or adding clothes, press ST4RTiPAUSE and wait until the machine has
completely stopped before opening the Bdo
o Close supervLdon is necessary ff thLsappliance is used by or near children° Do not allow children
to play inside, or on, or with this appliance or any discarded appliance°
o Dispose of discarded appliances and shipping/packing materials properly. Before discarding a
washer, or removing from service, remove the washer lid,
o Do not leave the washer lid up during the cycle. The machine will not function. Tostart, close lid
and press BTARTr?AUBS
Page 13
mportant safety instructions
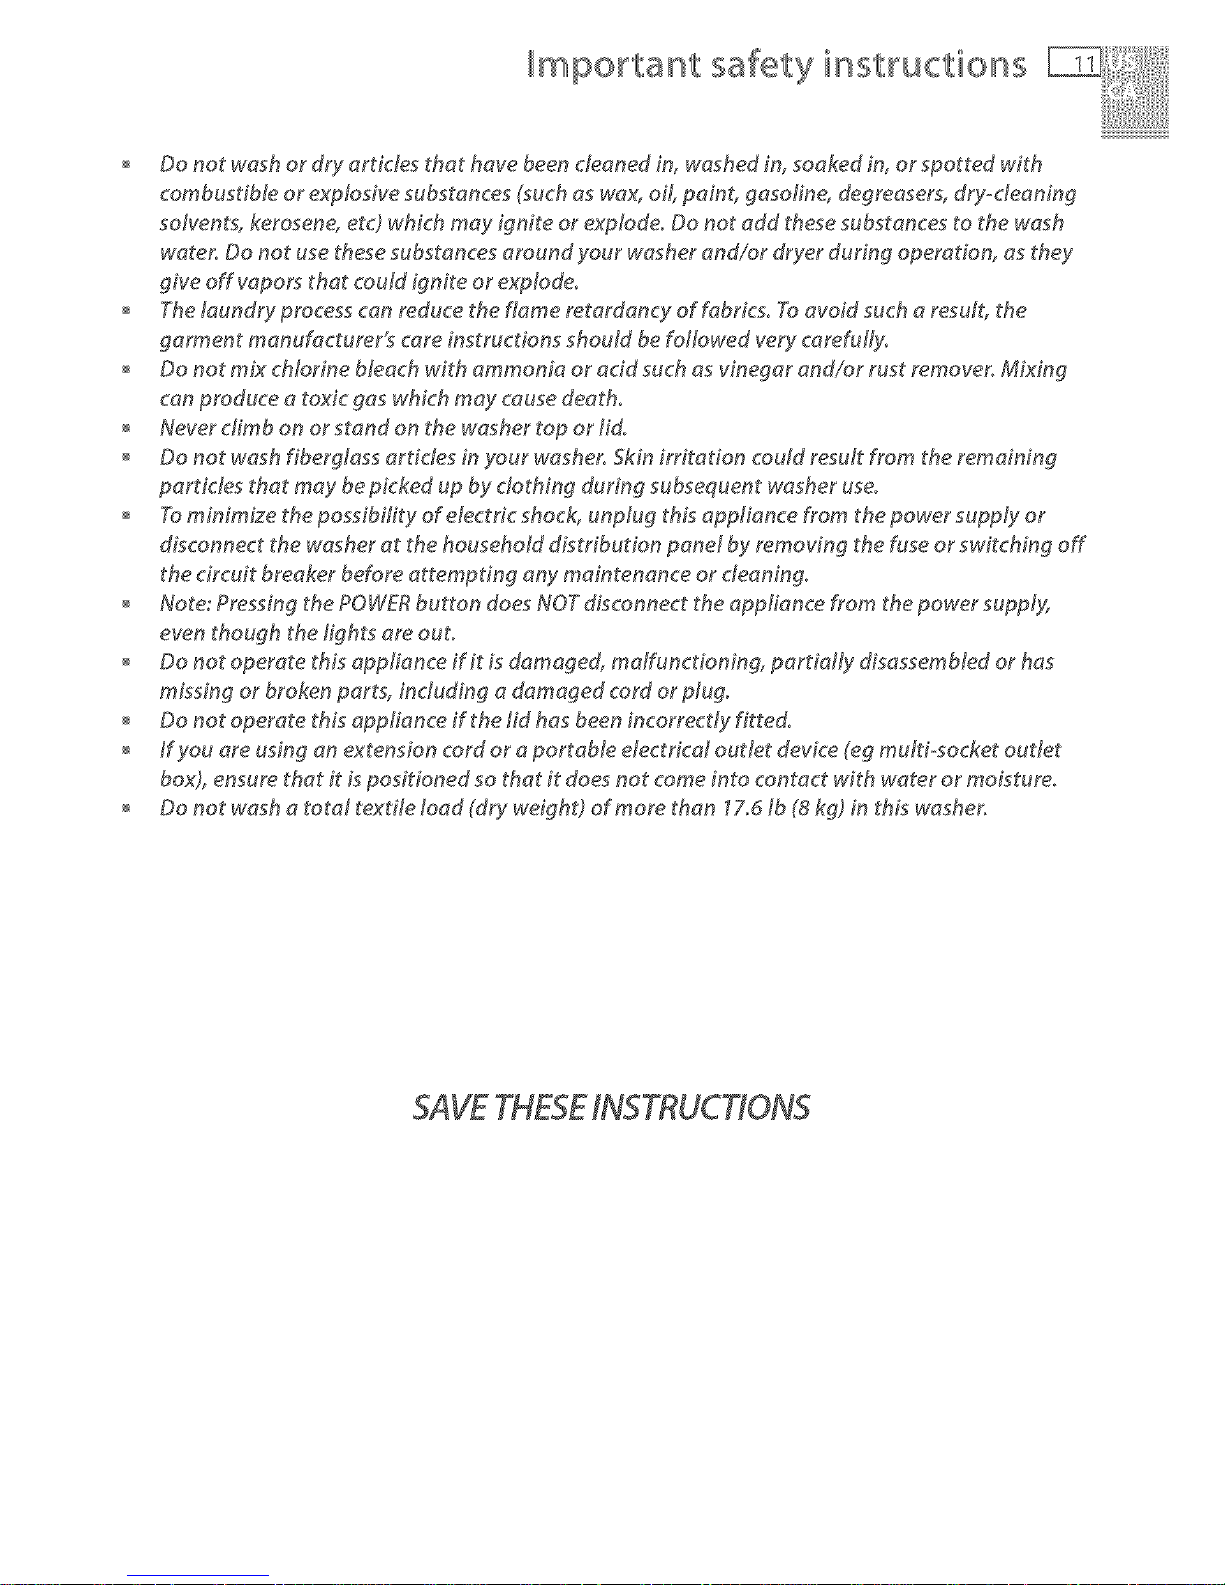
o Donotwashordryartidesthathavebeencleanedin, washedin, soakedin, orspottedwith
combustible or explosive substances (such as wax, oil, paint, gasoline, degreasers, dry-deaning
solvents, kerosene, etc) which may ignite or explode. Do not add these substances to the wash
water. Do nor use these substances around your washer and/or dryer during operation, as they
give off vapors that coutd ignite or explode,
o The laundry process can reduce the flame retardancy of fabrics, To avoid such a resut5 the
garment manufacturer_ care ff_structions shouJd be foNowed very carefully.
o Do not mix cMorine bleach with ammonia or acid such as vinegar and/or rust remover. Mixing
can produce a toxic gas which may cause death.
o Neverdimbonorstandonthewashertoporlid.
o Do not wash fiberglass articles in your washer Skin irritation coutd resu# from the remaining
particles that may be picked up by clothing during subsequent washer use,
o To minimize the possibility of etectflc shock, unplug thi_ appliance #ore the power supply or
disconnect the washer at the household distribution panel by removing the fuse or switching off
the circuit breaker before attempting any maintenance or cleaning.
o Note:PressingthePOWERbuttondoesNOTdisconnecttheappfiance#omthepowersupply,
even though the lights are our,
o Do not operate this appliance if it is damaged, maffunctionin¢ partiaNy disassemMed or has
missing or broken parts, including a damaged cord or ptug.
o Do not operate this apph_ance if the lid has been incorrectly fitted.
o ffyou are using an extension cord or a portaMe dectfical oudet device (eg mutti_socket outlet
box), ensure that it is positioned so that it does nor come into contact with water or moisture,
o Donotwashatotaltext#etoad(dryweight)ofmorethan 17,6tb(Skg)inthiswasher.
SAVETHESEINSTRUCTIONS
Page 14
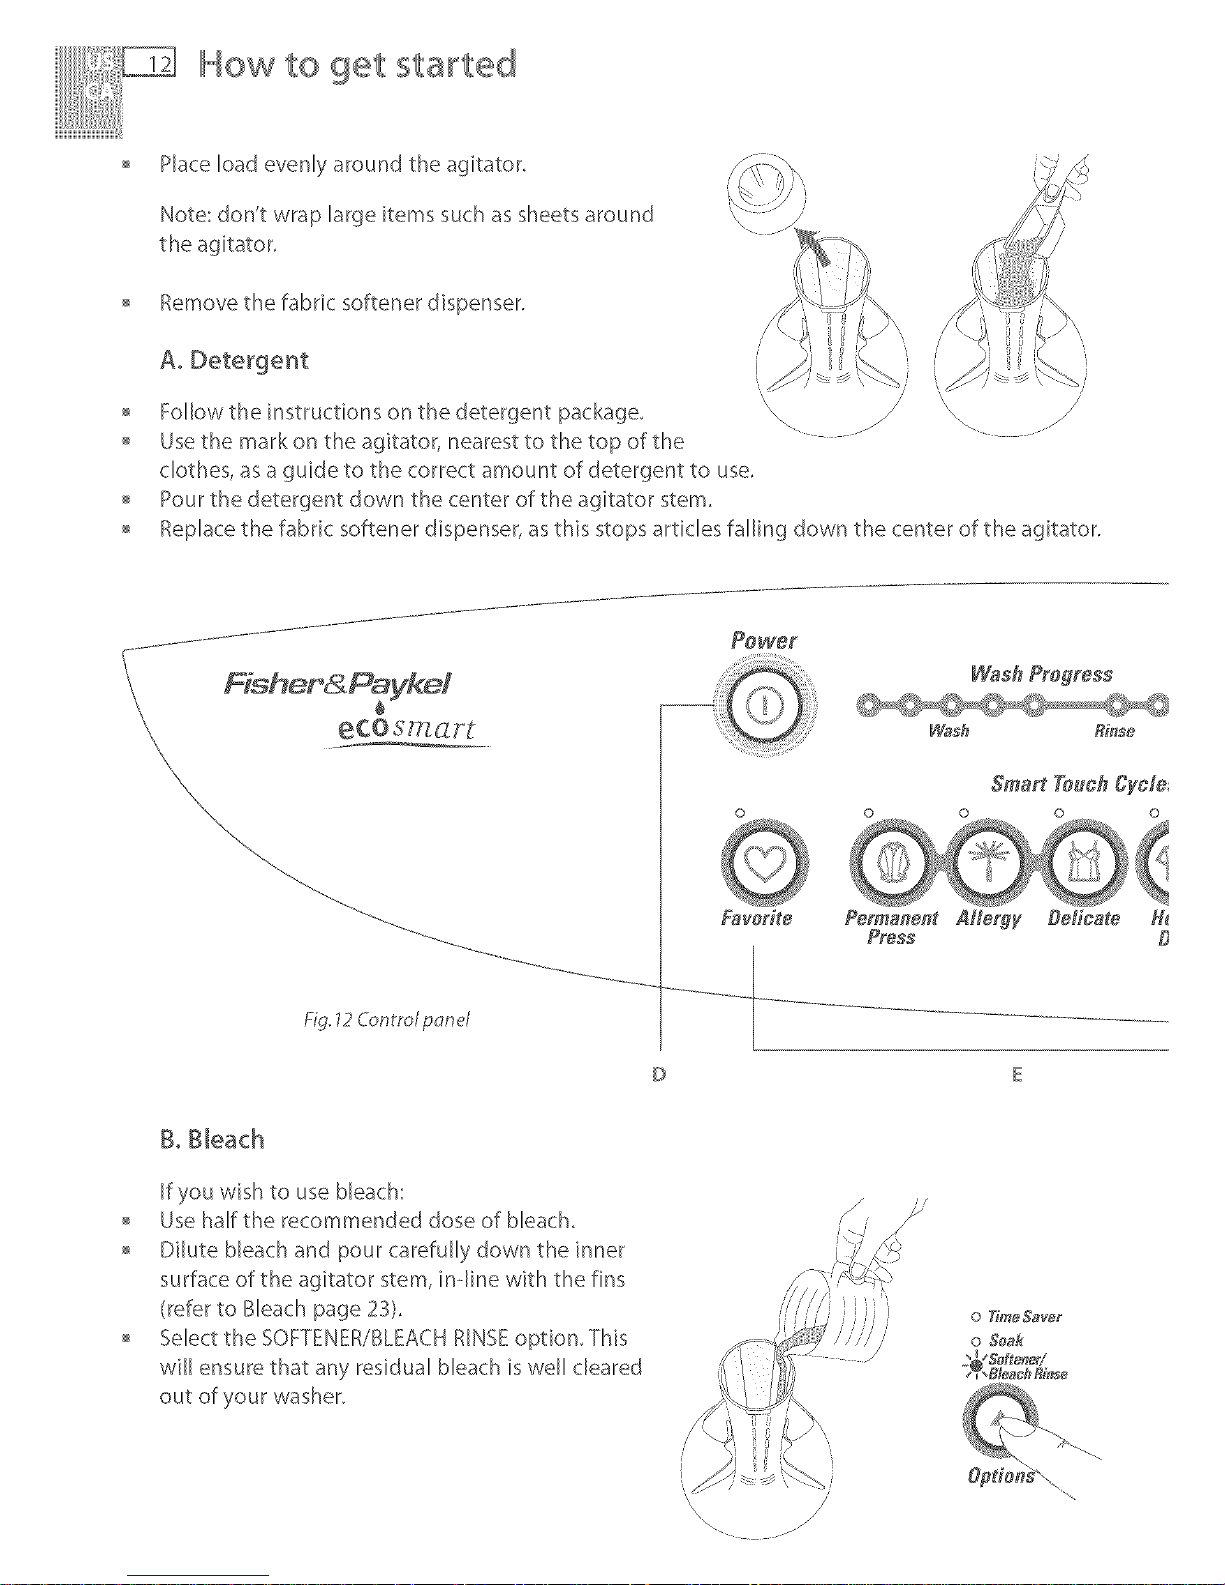
How to get started
Place load evenly around the agitator,
Note: don't wrap large items such as sheets around
the agitator,
Remove the fabric softener dispenser.
/
AoDetergent
Follow the instructions on the detergent package. '\_ _/ /
- ........... - . J,Y
Use the mark on the agitator, nearest to the top of the
clothes, as a guide to the correct amount of detergent to use.
Pour the detergent down the center of the agitator stem.
Replace the fabric softener dispenser, as this stops articles falling down the center of the agitator.
Fig 12Contro/ p_md
BoBleach
If you wish to use bleach:
o Use half the recommended dose of bleach,
o Dilute bleach and pour carefully down the inner
surface of the agitator stem, inqine with the fins
(refer to Bleach page 23),
o Select the SOFTENER/BLEACH RINSEoption, This
will ensure that any residual bleach is well cleared
out of your washer.
I
/
Page 15
@
@
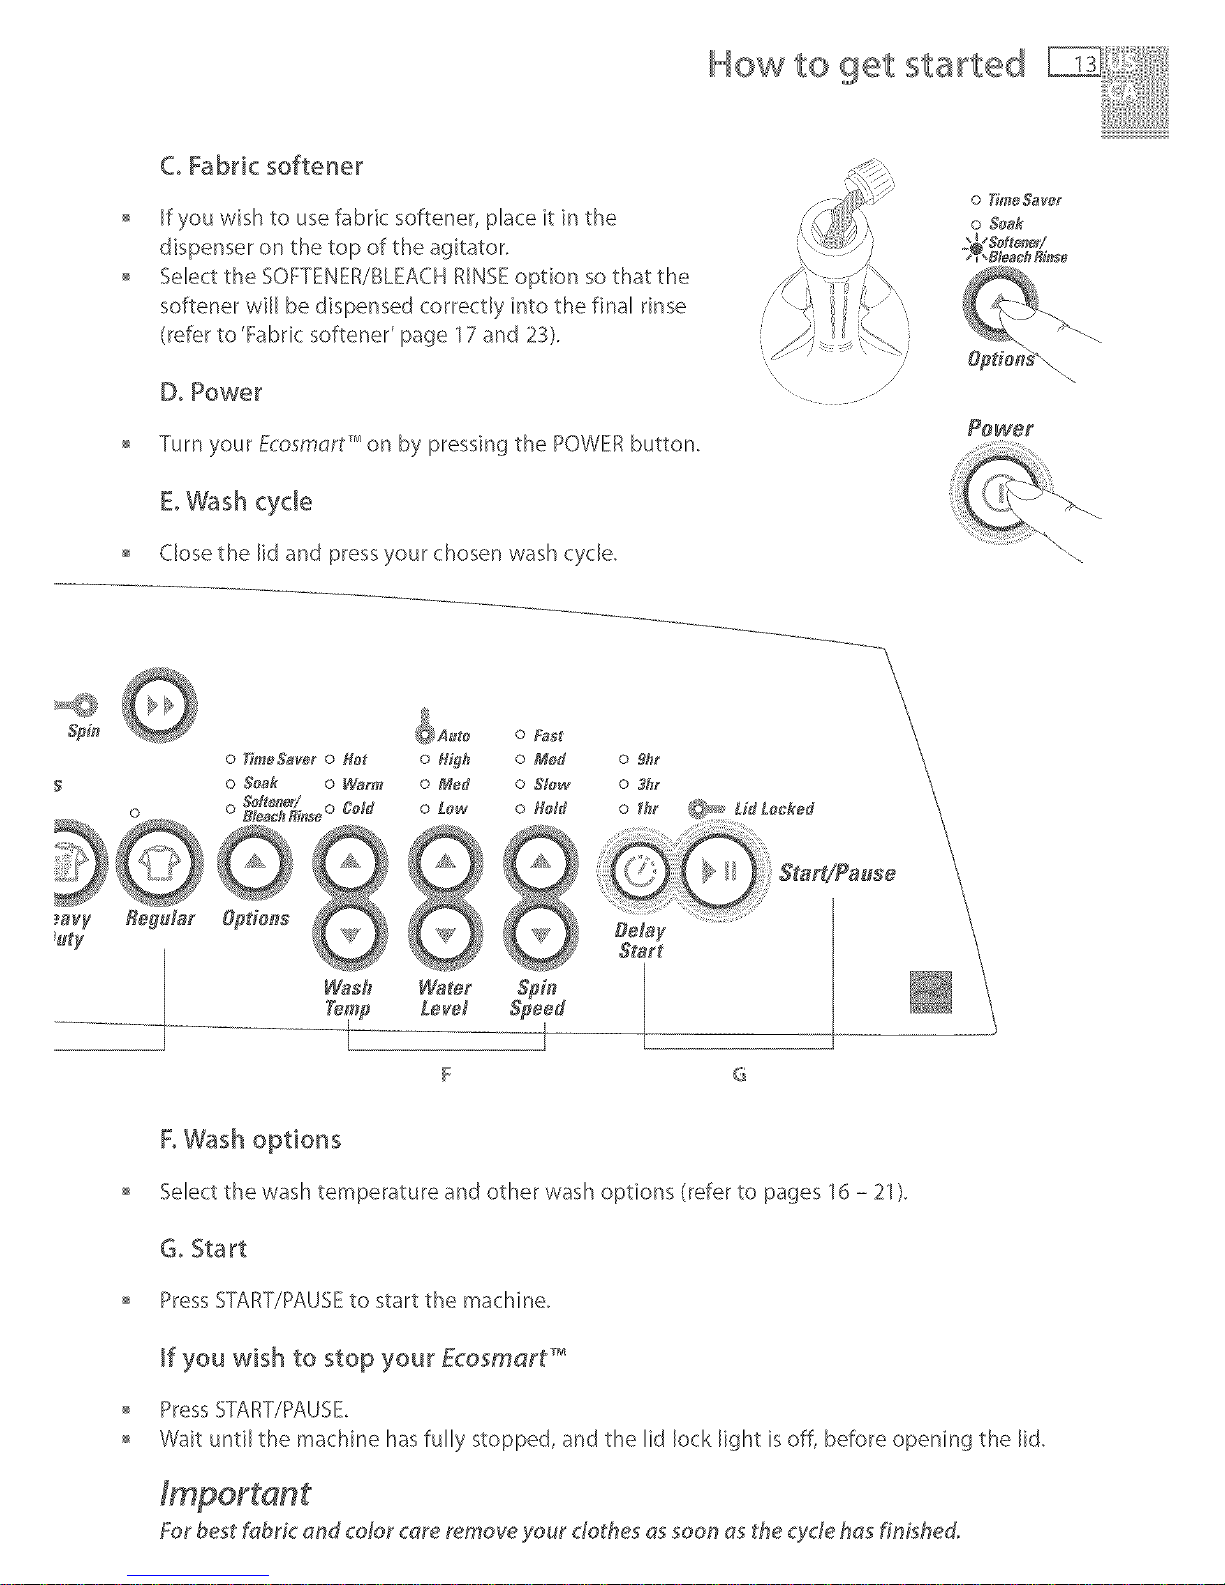
CoFabric softener
If you wish to use fabric softener, place it in the
dispenser on the top of the agitator.
Select the SOFTENER/BLEACH RINSE option so that the
softener will be dispensed correctly into the final rinse
(refer to'Fabric softener' page 17 and 23).
DoPower
Turn your Ecosmart _ on by pressing the POWER button.
EoWash cycle
Closethe lid andpressyourchosenwashcycle.
How to get started
FoWash options
o Select the wash temperature and other wash options (refer to pages 16 - 21).
Go Start
o Press START/PAUSE to start the machine.
if you wish to stop your Ecosmart ....
o Press SLART/PAUSB
o Wait until the machine has fully stopped, and the lid lock light is off, before opening the lid.
For best fabric and cdor care remove your clothes as soon as the cycle has finished.
Page 16
About your Ecosm rt
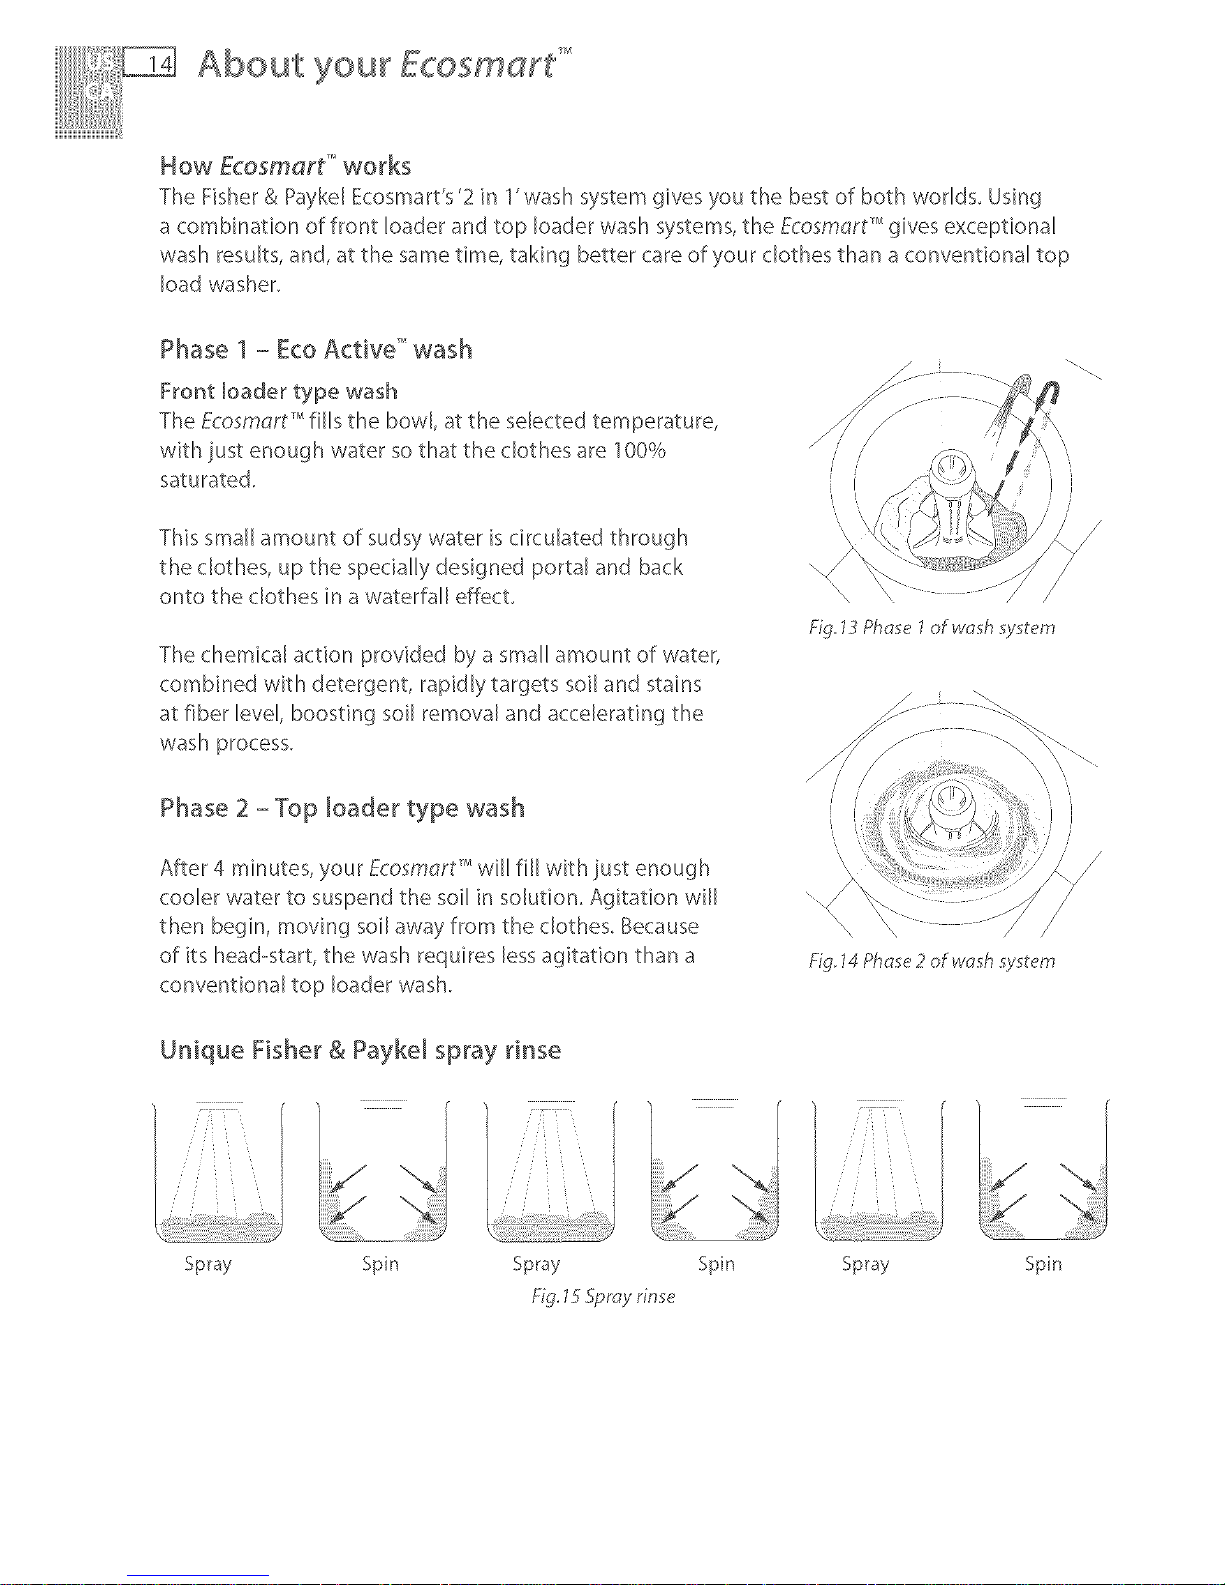
How Ecosmart" works
The Fisher & Payke[ Ecosmart's'2 in 1'wash system gives you the best of both worlds, Using
a combination of front loader and top loader wash systems, the A:osmart _ gives exceptional
wash results, and, at the same time taking better care of your clothes than a conventional top
load washer,
Phase 1- EcoActive" wash
Front bader type wash
The Ecosm_rt _fi[[s the bow[, at the selected temperature,
with just enough water so that the clothes are 100%
saturated.
This small amount of sudsy water is circulated through
the clothes, up the specially designed portal and back
onto the clothes in a waterfall effect
The chemical action provided by a small amount of water,
combined with detergent, rapidly targets soil and stains
at fiber level, boosting soil removal and accelerating the
wash process.
Phase 2 - Top bader type wash
After 4 minutes, your Ecosmart _will fill with just enough
cooler water to suspend the soil in solution. Agitation will
then begin, moving soil away from the clothes. Because
of its head-start, the wash requires less agitation than a
conventional top loader wash.
i /
Fig 14PhcTse2 ofwr;sh sy tem
Unique Fisher & Paykel spray rinse
:i//' i : k
/ /i :
Spray Spin Spray
Fig l t_Spray rinse
Spin Spray Spin
Page 17

About your Edosm rt
Lid Lock
",,,/ourEcosm_rt _has a lid lock, This ensures the lid cannot be
opened during the cycle, providing added safety for you and
your family,
o 9br
o 3bf
The LID LOCK light (above the START/PAUSE button) comes
on when the lid is locked to tell you when you cannot open
the lid,
Delay
Start
Fig 1dLID LOCK octivated
Ifthe LIDLOCKlight isflashing the lid lock is in the processof locking or unlocking (ie while the
machine coasts down or START/PAUSEhasbeen pressed).During this stage the lid still cannot
be lifted.
If the lid is left open, the machine will be unable to lock the lid and the cycle will be halted. The
machine will beep and the LID LOCK light will flash until the lid is closed and the START/PAUSE
button is pressed,
Do not put anything dow@ the stot in the top deck of your mechine.
Do not try to dlsabte the tfd lock,
Page 18
Wash cycles and options
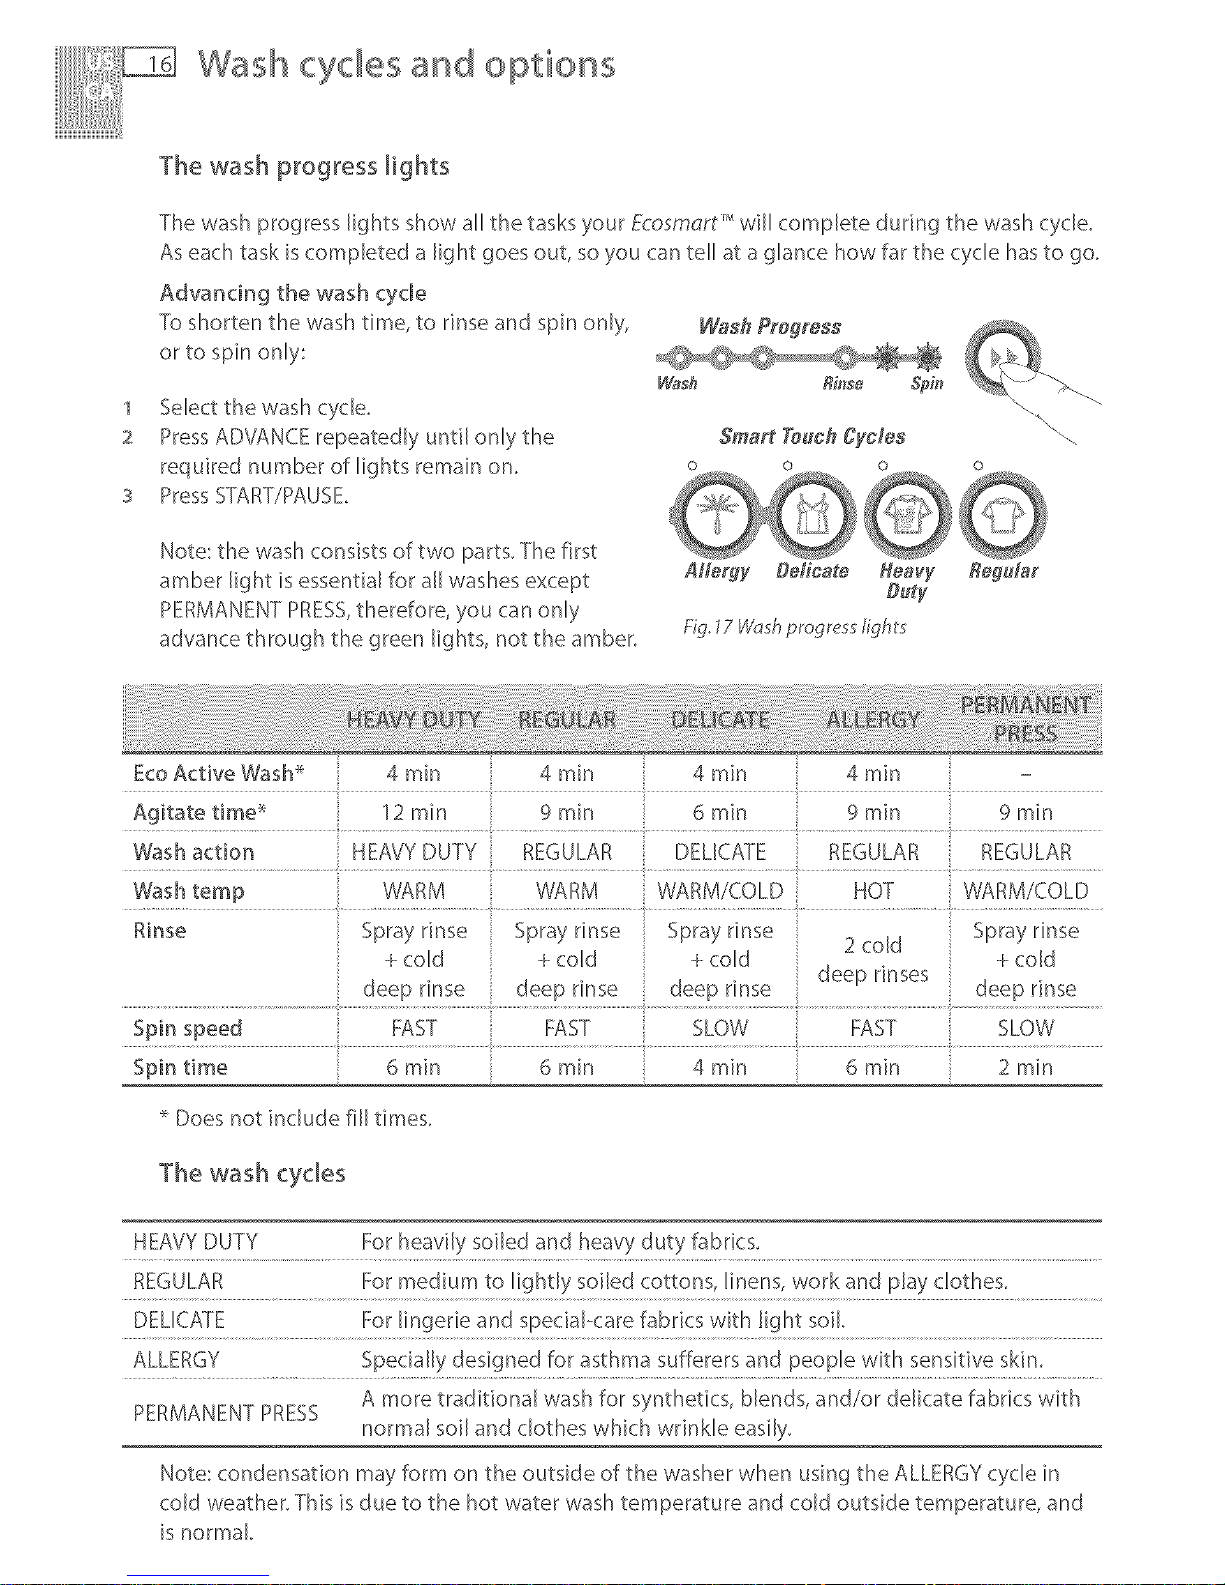
The wash progress lights
The wash progress lights show all the tasks your Ecosmart _ will complete during the wash cycle.
As each task is completed a light goes out, so you can tell at a glance how far the cycle has to go.
Advancing the wash cycle
Toshorten the wash time, to rinse and spin only,
or to spin only:
1 Select thewash cycle.
2 Press AD\LANCE repeatedly until only the
required number of lights remain on,
S Press STAR]TPAUSE,
Note: the wash consists of two parts, The first
amber light is essential for all washes except
PERMANENT PRESS,therefore, you can only
advance through the green lights, not the amber.
Wash Progress
Wash Rb_se Spi_
Smart Touch @des "-.
0 0 0
Allergy Delicate Heavy Regular
Buty
Fig, 17 Wash progress fights
Eco Active Wash _ 4 rain 4 rain 4 rain 4 rain -
Agitate time _ 12 rain 9 rain 6 m[n 9 rain 9 m[n
Wash action HEAVY DUTY REGULAR DELICATE REGULAR REGULAR
Wash temp WARM WARM WARM/COLD HOT WARM/COLD
Rinse Spray rinse Spray rinse Spray rinse 2 cold Spray rinse
+ cold + cold + cold + cold
deep nnses
deep rinse deep rinse deep rinse deep rinse
Spin speed FAST FAST SLOW FAST SLOW
Spin time 6 rain 6 rain 4 rain 6 rain 2 rain
_ Does not include fill times.
The wash cycles
HEAVY DUTY For heavily soiled and heavy duty fabrics,
REGULAR For medium to lightly soiled cottons, linens, work and play clothes,
DELICATE For lingerie and spec[aPcare fabrics with light soil,
ALLERGY Specially designed for asthma sufferers and people with sensitive skin.
A more traditional wash for synthetics, blends, and/or delicate fabrics with
PERMANENT PRESS
normal soil and clothes which wrinkle easily.
Note: condensation may form on the outside of the washer when using the ALLERGY cycle in
cold weather. This is due to the hot water wash temperature and cold outside temperature, and
is normal.
Page 19
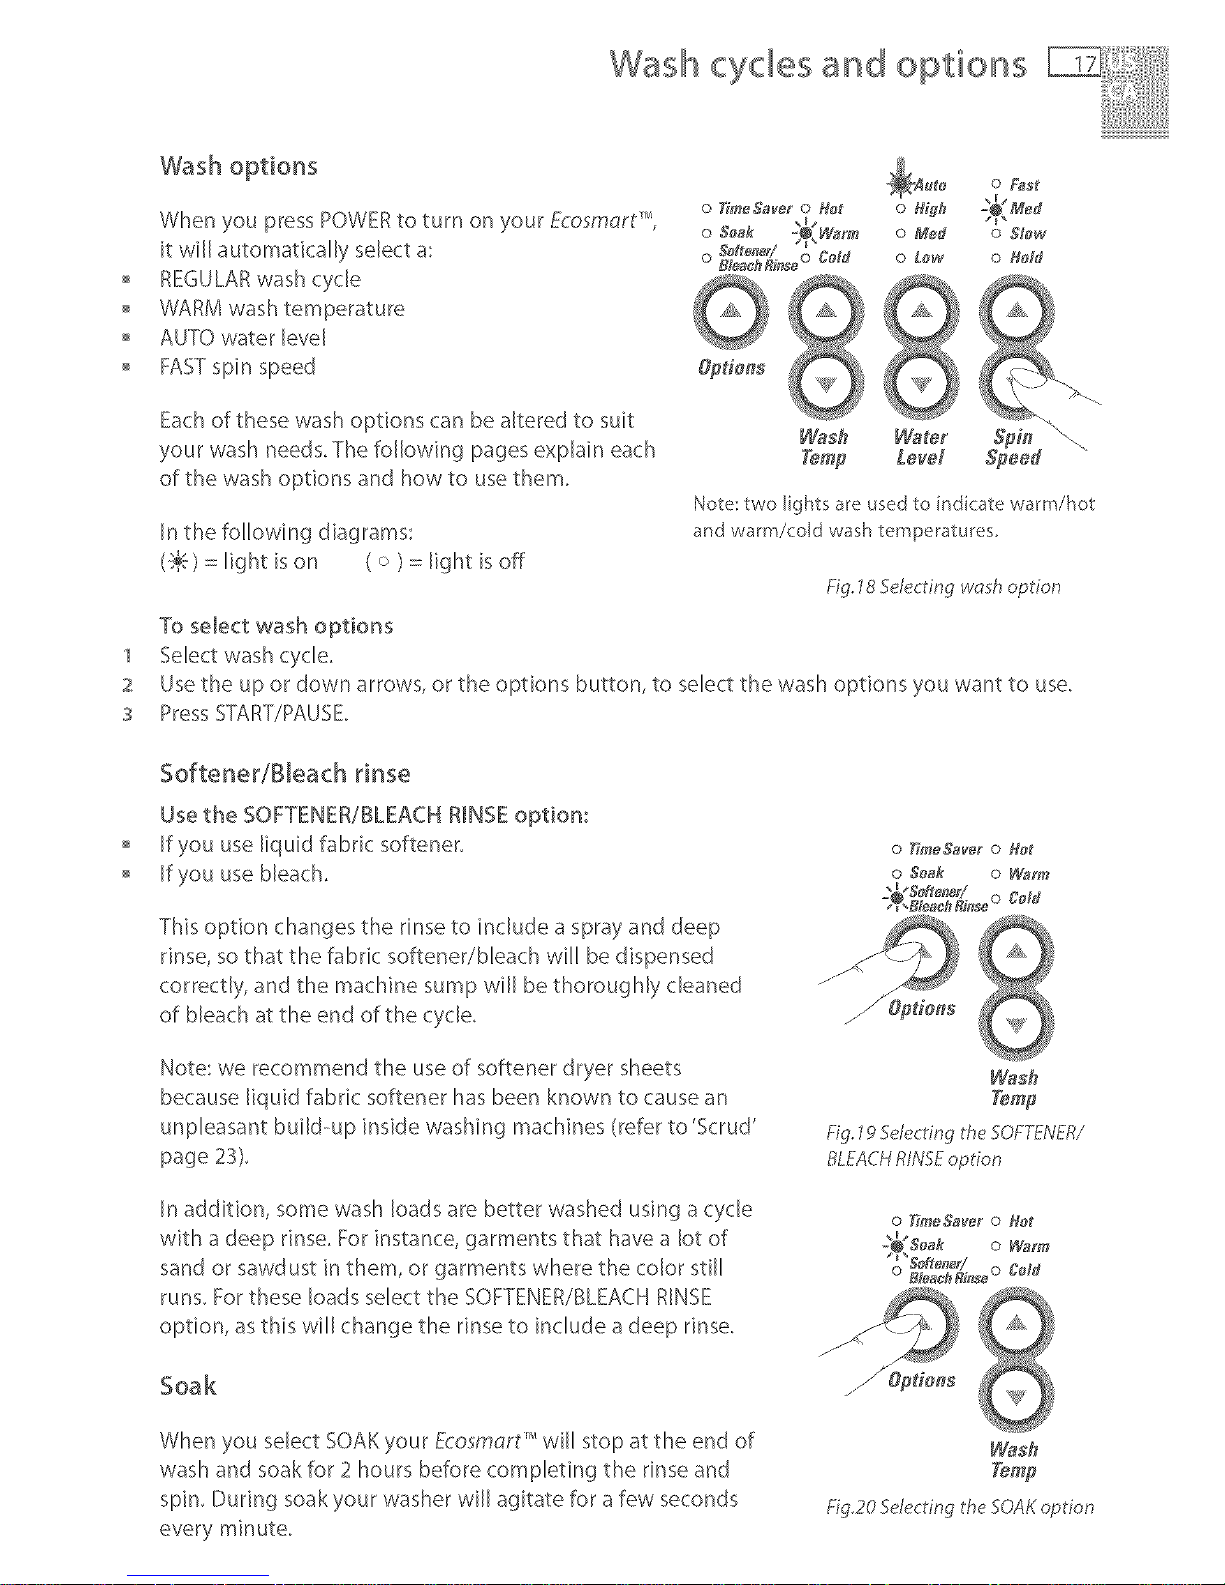
Wash options
Wash cycles and options
When you press POWER to turn on your E..cosmort _,
it will automatically select a:
o REGULAR wash cycle
o WARM wash temperature
o AUTO water [eve[
o FASTspin speed
1
2
3
o Fast
o Time £ave_ o Her o H@h
o So_k _HWa_m o Med o Slow
Softene_:/ o Celd
o BbachRinse 0 Law 0 H_d
Opdons
Each of these wash options can be altered to suit
your wash needs. The following pages explain each
of the wash options and how to use them.
[nthe following diagrams:
(.'_1)= light ison (o) = light isoff
To select wash options
Select washcycle.
Note: two lights are used to indicate warm/hot
and warm/cold wash temperatures.
Fig. 18 Selecting wa h option
Use the up or down arrows, or the options button, to select the wash options you want to use,
Press S_7\RT/PAUSE.
Softener/Bleach rinse
Use the SOFTENER/BLEACH R_NSE option:
If you use liquid fabric softener.
If you use bleach.
This option changes the rinse to include a spray and deep
rinse, so that the fabric softener/bleach wiil be dispensed
correctly, and the machine sump will be thoroughly cleaned
of bleach at the end of the cycle.
Note: we recommend the use of softener dryer sheets
because liquid fabric softener has been known to cause an
unpleasant build-up inside washing machines (refer to 'Scrud'
page 23)_
[n addition, some wash loads are better washed using a cycle
with a deep rinse. For instance, garments that have a lot of
sand or sawdust in them, or garments where the color still
runs_ For these loads select the SOFTENER/BLEACH RINSE
option, as this will change the rinse to include a deep rinse.
o TimeSa_,_r o Hot
o Seek o Wam_
Sef_e_e_/ o Celff
Bba_h Rinse
Wash
Temp
Fig.19Selecting theSOFTENER!
BLEACHRINSEoption
o Th_eSaver o Hot
" Seak o Warm
"_qte_,/ o Cold
BJeach Rb_se
Soak
When you select SOAK your Ecosmart _ will stop at the end of
wash and soak for 2 hours before completing the rinse and
spin. During soak your washer will agitate for a few seconds
every minute.
Wash
Temp
Fig,20 Selecting the SOAK option
Page 20
Wash cycles and options
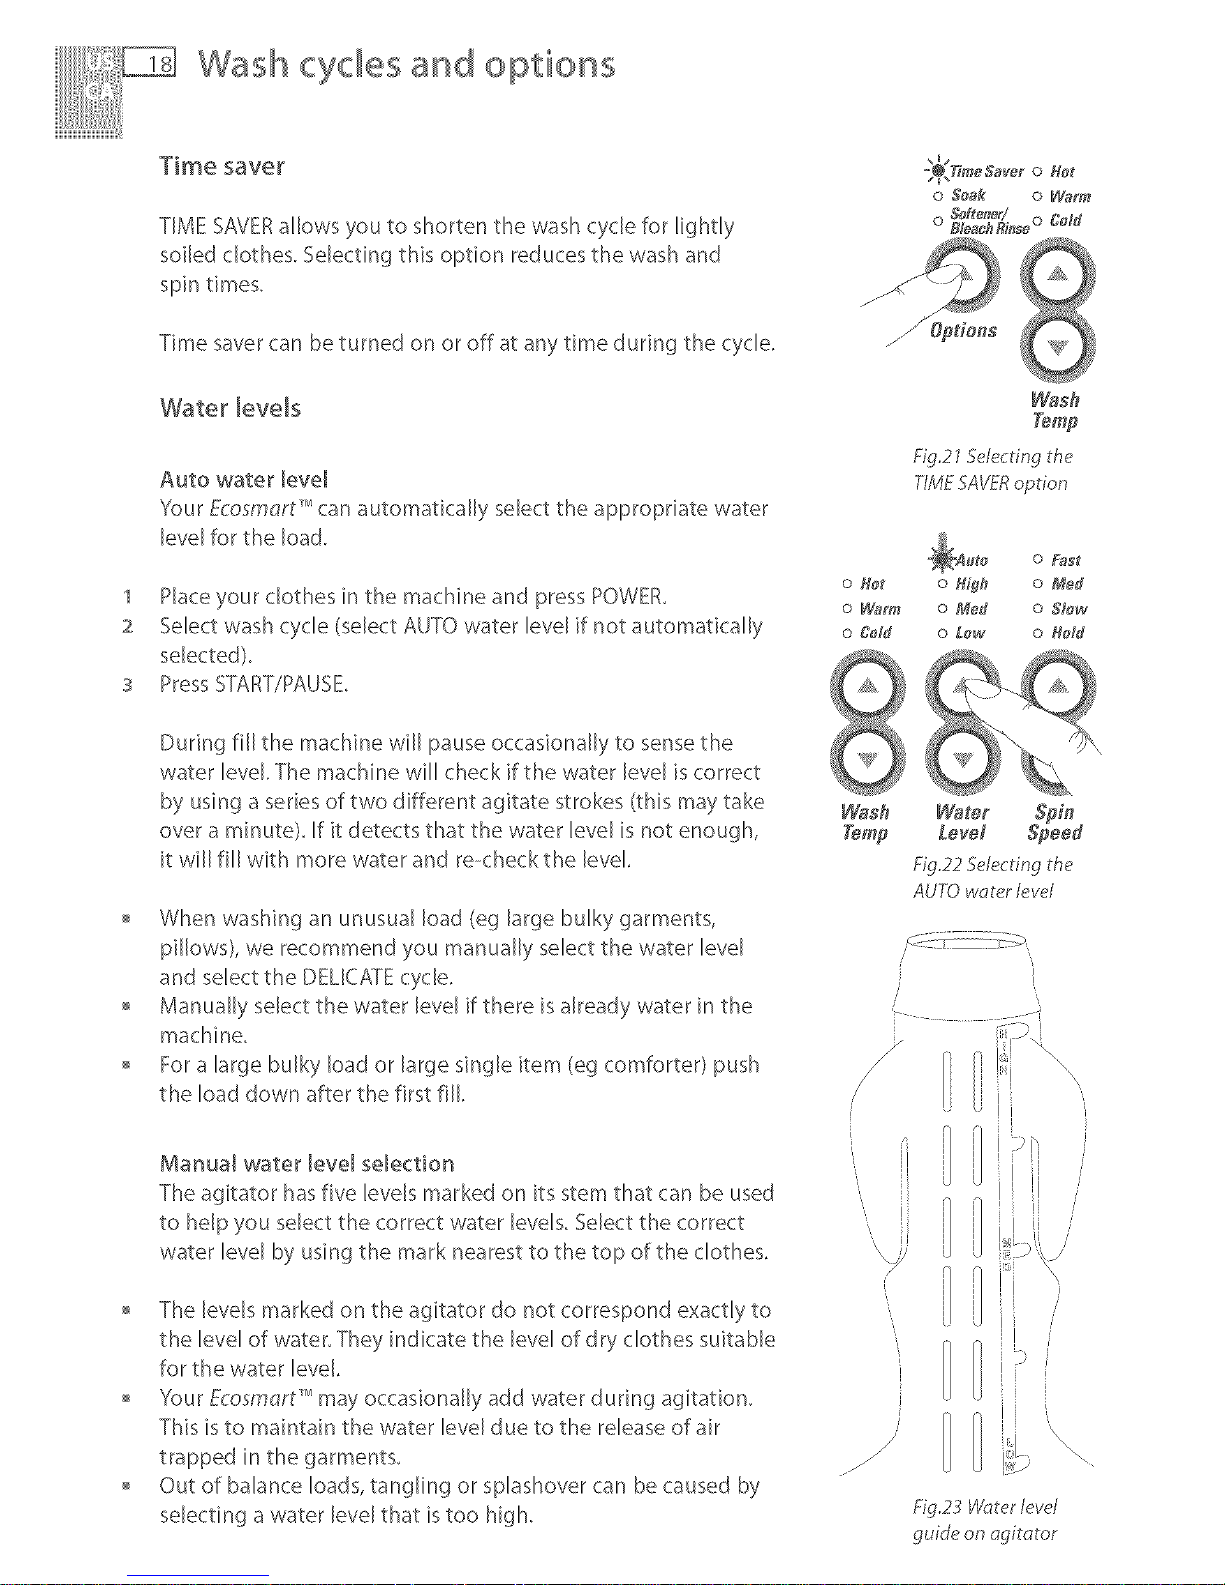
Time saver
TIME SAVERallows you to shorten the wash cycle for lightly
soiled clothes, Selecting this option reduces the wash and
spin times,
Time saver can be turned on or off at any time during the cycle,
Water [eveb
Auto water level
Your Ecosmart _can automatically select the appropriate water
level for the Ioa&
1 Place your clothes in the machine and press POWER,
2 Select wash cycle (select AUTO water level if not automatically
selected).
s Press START/PAUSE,
During fill the machine will pause occasionally to sense the
water level The machine will check if the water level is correct
by using a series of two different agitate strokes (this may take
over a minute). [f it detects that the water level is not enough,
it will fill with more water and re--check the [eve[,
o When washing an unusual load (eg large bulky garments,
pillows), we recommend you manually select the water level
and select the DEL[CK[E cycle,
o Manually select the water level if there is already water in the
machine,
o For a large bulky bad or large single item (eg comforter) push
the load down after the first fill,
Mar_ua[ water level selectior_
The agitator has five levels marked on its stem that can be used
to help you select the correct water levels, Select the correct
water level by using the mark nearest to the top of the clothes,
o The levels marked on the agitator do not correspond exactly to
the level of water, They indicate the level of dry clothes suitable
for the water level,
o Your Ecosmart _may occasionally add water during agitation,
This is to maintain the water level due to the release of air
trapped in the garments,
o Out of balance loads, tangling or splashover can be caused by
selecting a water level that is too high,
_Xm_Saver o Hot
o Seak o Warm
o SoRene# o Cold
W_s#
Temp
Fig.2 75d_cting the
TIME 5A_'TRoption
o F_st
o Her o H_gh o Meal
o Warm o Meal o Slew
o Cdd o Low o _old
W_sh Waler
Temp Level
Fig.225decting the
AUTOwaterI_;vel
Fig.23 Water level
guide on agitator
Page 21
@
@
Wash cycles and options
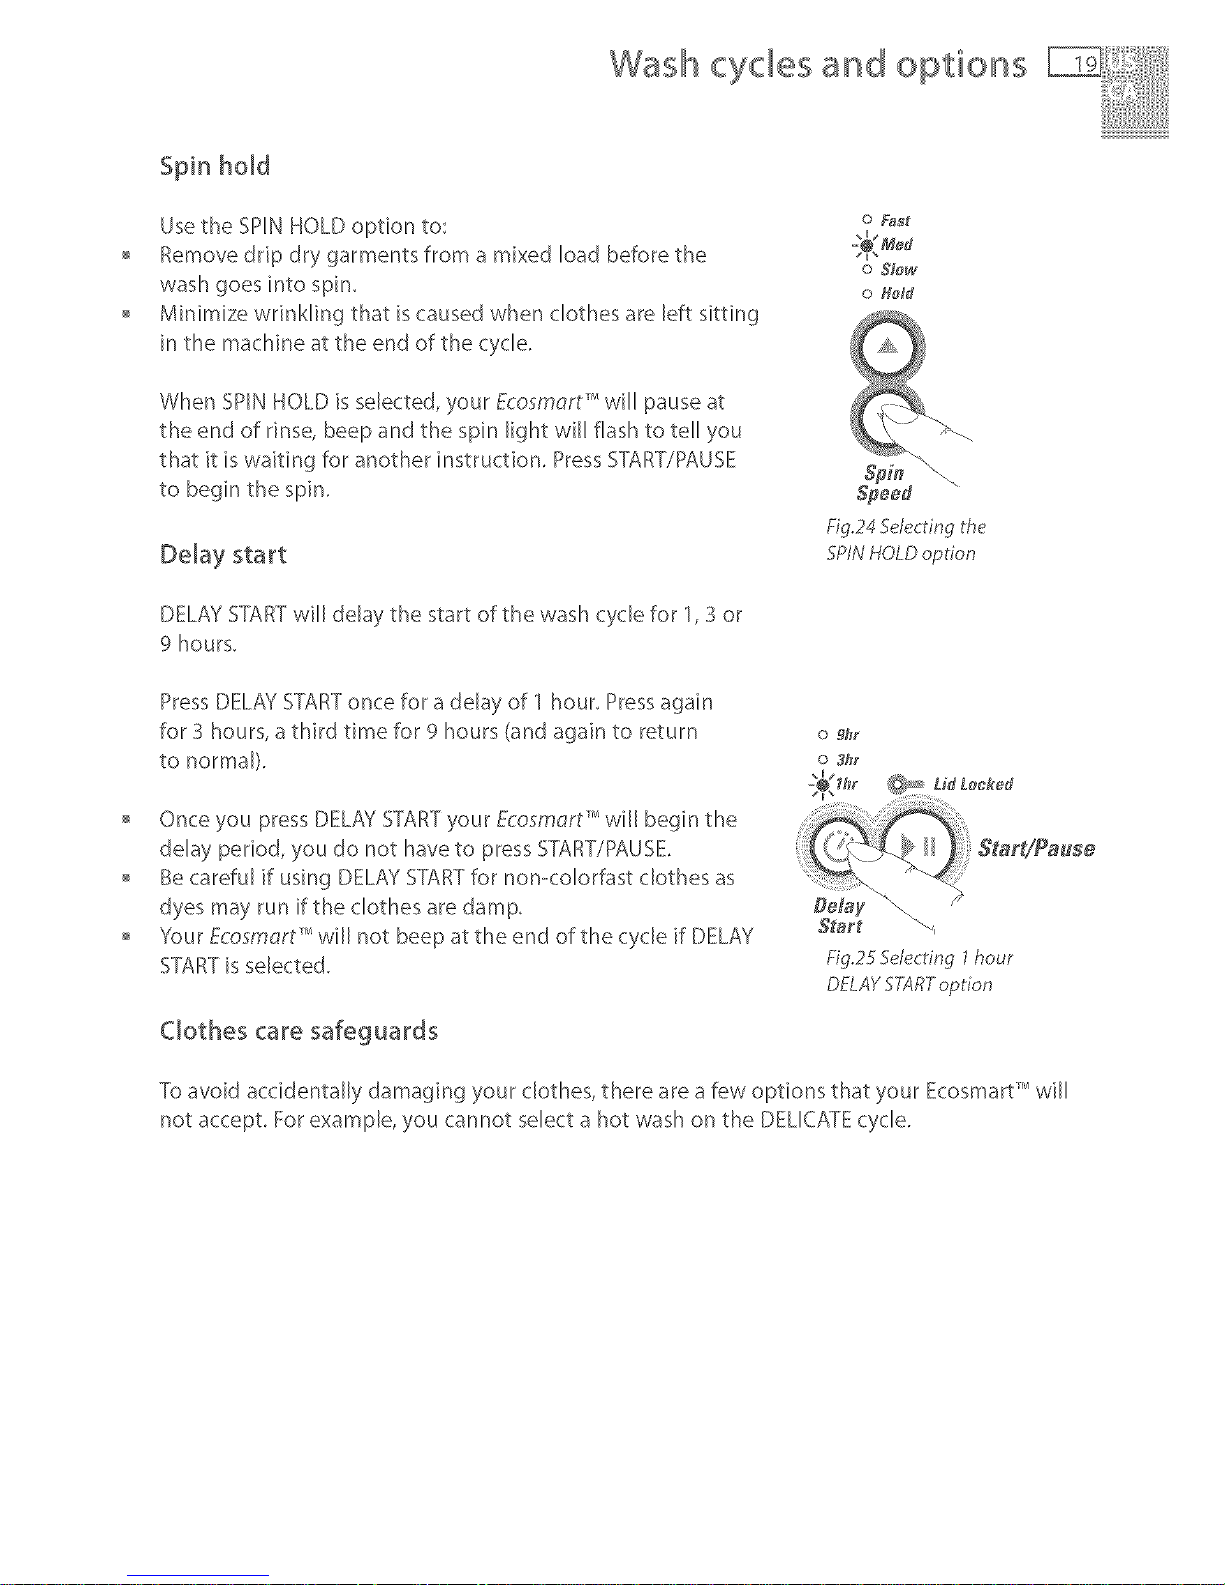
Spin hold
Use the SPIN HOLD option to:
Remove drip dry garments from a mixed load before the
wash goes into spin.
M[nimize wrinkling that is caused when clothes are left sitting
in the machine at the end of the cycle.
o F_st
o Slew
o Held
!,it
When SHN HOLD isselected, your Ecosm_rt _will pause at
the end of rinse, beep and the spin light wiI[ flash to tel[ you
that it is waiting for another instruction. Press START/PAUSE
to begin the spin.
Delay start
@++d
Fig.24Selecting the
SPINHOLDoption
DELAYS]ARTwill delay the start of the wash cyclefor 1,3 or
9 hours.
Press DELAY S]ART once for a delay of 1 hour. Press again
for 3 hours, a third time for 9 hours (and again to return
to normal).
o 9at
o 3hr
o Once you press DELAY STARTyour Ecosm_rt _ will beg[n the
delay period, you do not have to press START/PAUSE.
o Be careful if using DELAY STARTfor non<olorfast clothes as
dyes may run if the clothes are damp.
o ",/our Ecosmart _will not beep at the end of the cycle if DELAY
STARTis selected.
Clothes care safeguards
S_art "->
Fig.2F Selecting 1hour
DELAY ST}SRToption
To avoid acddentally damaging your clothes, there are a few options that your Ecosmart" will
not accept. For example, you cannot select a hot wash on the DELICATE cycle.
Page 22
Wash cycles and options
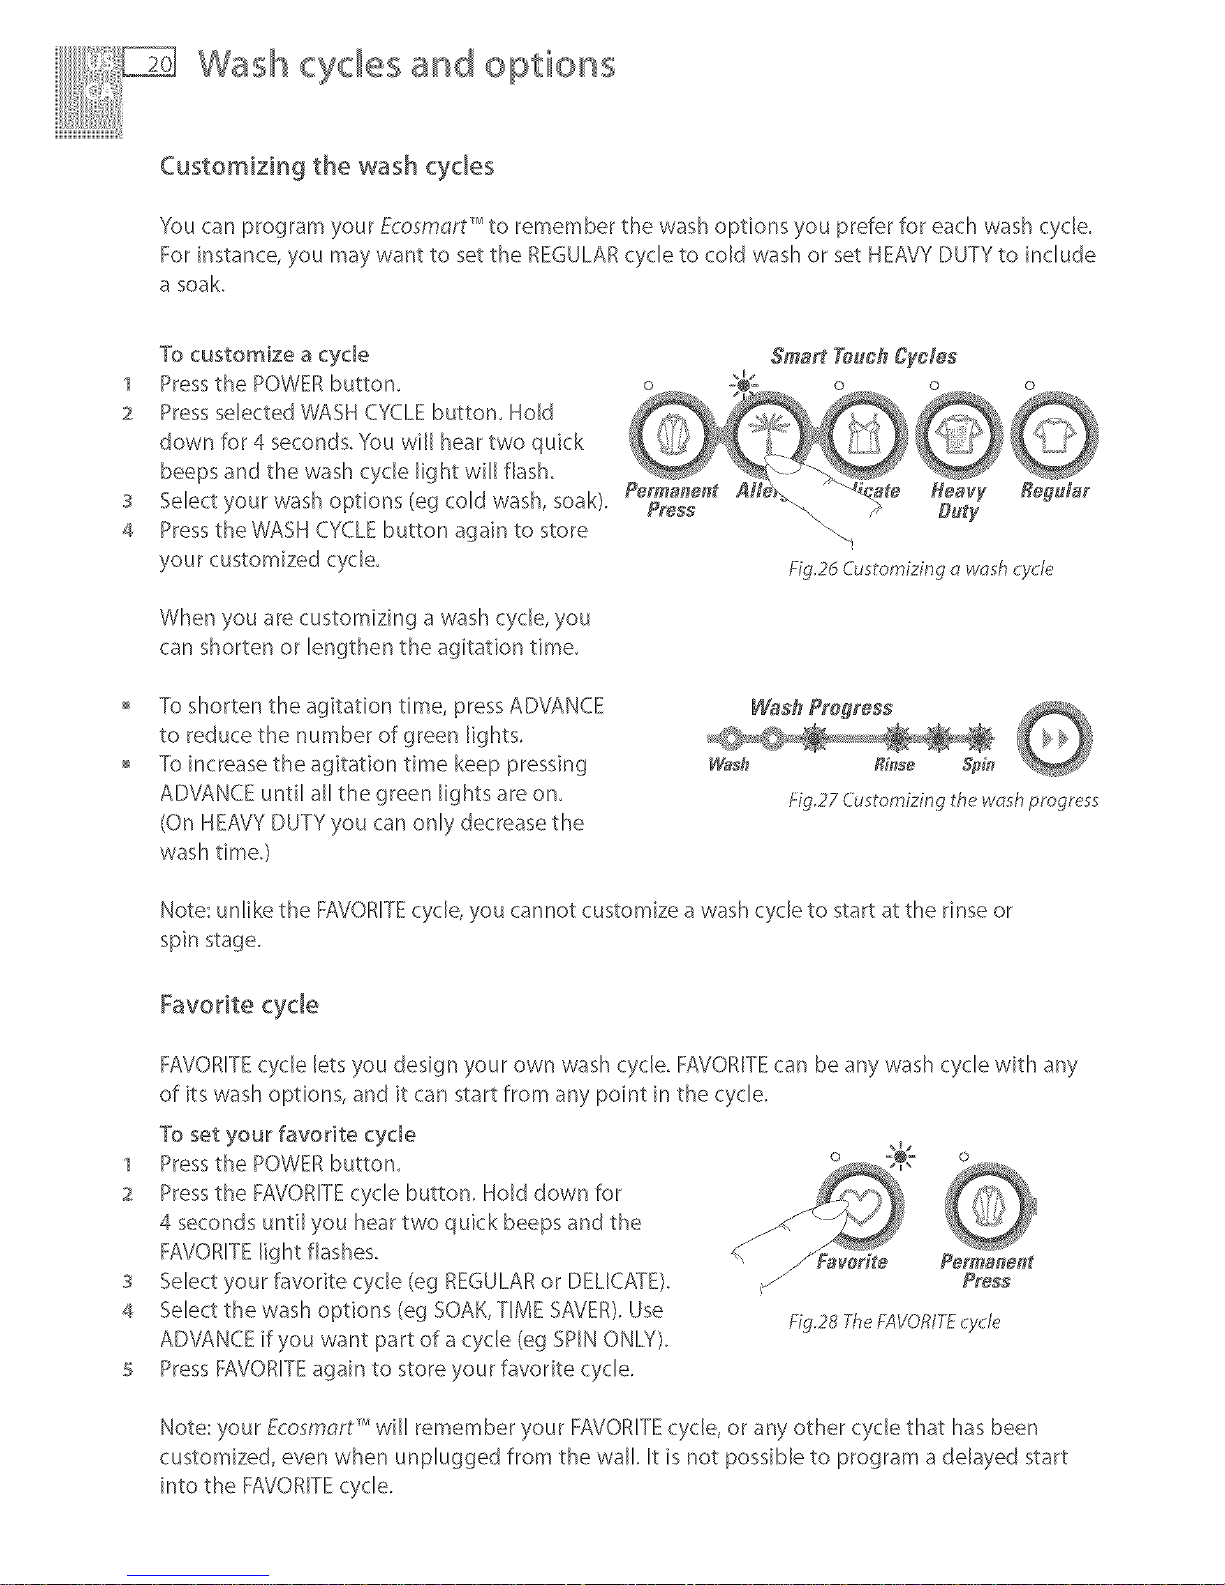
Customizing the wash cydes
You can program your Ecosmart _to remember the wash options you prefer for each wash cycle.
For instance, you may want to set the REGULAR cycle to cold wash or set HEAVY DUTY to include
a soak.
To customize a cycle
1 Press the POWER button.
2 Press selected WASH CYCLE button. Hold
down for 4 seconds. You will hear two quick
beeps and the wash cycle light will flash+
s Select your wash options (eg cold wash, soak). PermaL_e_t
Press
4 Press the WASH CYCLE button again to store
your customized cycle+
@
@
1
2
3
4
When you are customizing a wash cycle, you
can shorten or lengthen the agitation time.
Sma_ Touch Cycles
To shorten the agitation time, press ADVANCE
to reduce the number of green lights.
To increase the agitation time keep pressing
ADVANCE until all the green lights are on+
(On HEAVY DUTY you can only decrease the
wash time.)
Wash Progress @
W_sh R_se @i_
_:ig.27 Customizing the wcTshprogress
Note: unlike the FAVORITEcycle, you cannot customize a wash cycle to start at the rinse or
spin stage+
Favorite cycle
FAVORITEcycle lets you design your own wash cycle. FAVORITEcan be any wash cycle with any
of its wash options, and it can start from any point in the cycle+
To set your favorite cycle
Press the POWER button.
Press the FAVORITEcycle button. Hold down for
4 seconds until you hear two quick beeps and the
FAVORITE light flashes. Favorite Permanent
Select your favorite cycle (eg REGULAR or DELICA_TE)+ Press
Select the wash options (eg SOAK, TIME SAVER). Use £g.2s The£AVORITEcycle
AD\L&NCE if you want part of a cycle (eg SPIN ONW).
Press FAVORITEagain to store your favorite cycle.
Note: your Ecosm_rt _ will remember your FAVORITE cycle, or any other cycle that has been
customized, even when unpk_gged from the wall. It is not possible to program a delayed start
into the FAVORITEcycle.
Page 23

Washing bulky items
Wash cycles and options
Make sure there is enough room in the machine for
items to move when being washed, Forcing large items
into the machine may result in them being damaged
during washin%
Some items float up during the wash (eg comforters
and pillows), [f they sit too high they may touch
stationary parts of the machine during agitate or spin,
To minimize the chance of this happening, bulky items
should be pushed down below the water level alter fill
and pushed to sit below the medium high water level
mark on the agitator before spinning, Select the correct
water level manually, Select a SLOW spin,
J
£g.29 Bulky itemsshould sit belowthe
medium high water level mark
To prevent an out of balance load we recommend washing these items on the DELICATE cydeo if
you wish to re-spin the load at a faster speed make sure the toad Js sitting below the medium high
mark before spinning°
Washing woo[lens
Some products carrying a MACHINE WASHABLE care
cBim, The fibers of these wooIIens have been treated to
prevent felting when they are machine washed, Most
handknitted garments are not made of machine washable
wool and we recommend that you hand wash them,
o Check the care label
o Use a wool detergenL
o Use the DELICATE cycle and set to WARM temperature,
o Hand washed woollens may be spun in your Ecosmart_L
o To dry woollens lay them flat on a towel and pat into shape, Dry out of direct sunlighL
o Some wool underlays and sheepskin products can be washed in a washing machine but may
produce excessive amounts of lint that may cause pump blockages.
Cold water washing
If you always use cold water, we recommend that you run a warm Permanent Press wash at
regular intervals, eg every 5th wash,
o Ptease do not, under any circumstances, attempt to wash an etectdc btanket in your
Ecosmart TM washer,
o Washing curtair_s in your Ecosmart TM washer _snot recommended. Sunlight makes them brittle
and they may disintegrate during washing.
Page 24

Befere yeu wash
@
@
@
Toget the best wash results sort your clothes
before washing,
Co,or
Sort white fabrics from colored fabrics,
Care labels
The care label will tell you about the fabric of the
garment and how it should be washed,
Soi[
Sort clothes according to the type and amount of
soil. Some soils suit warmer washes (eg oily soils)
while others are best washed in cold water (eg
mud, blood),
Hand wash
Do not b[ead'_
Do not tumble dry
Medium iron
Drydean
Lint
Wash lint givers and lint collectors separately.
Where possible, turn lint collectors inside out
Terry cloth
Chenille Corduroy
Towels Polyester cottons
Socks
Check pockets
Loose items can damage both your clothes
washer and your dothes,
Close zippers, hooks and eyes
This is to make sure that these items do not snag on other clothes,
Mend any torn garments or loose buttons
Tears or holes may become larger during washing, Remove any loose bra wires as they can
damage your washing machine and/or dryer,
Put very de_icate items in a mesh laundry bag
This is a good idea for [ingede items, to provide them with extra protection, and helps prevent
tangling with other items,
Pretreat any stains
Use a suitable surface to apply treatments, eg stain removers, Please do not use the lid, as
damage may occur,
Make sure the water [eve_ suits the load size
Ensure that the load does not extend above the fabric softener dispenser as splashing may occur,
For a balanced toad:
A mixture of small and large items will wash the best,
Place clothes evenly around the agitator,
Do not wrap large items, such as sheets, around the agitator,
Page 25

Sefore you wash
Bbach
Check clothing care labels for special instructions,
Liquid Meach:
1 Use half the recommended dose of bleach and dilute with water,
2 Remove the fabric softener dispenser and pour down the inside
edge of the agitator stem, in line with the fins, Select the SOFTENER/
BLEACH RINSE button, This changes the rinse to ensure thorough
removal of any bleach residue.
s Add detergent and replace the fabric softener dispenser,
4 For best results, add liquid bleach after the first amber wash light is
no longer visible,
Powdered bleach:
0 Se_k 0 W_'m
Pour half the recommended dose of powdered bleach into the agitator with your detergent
Note: never pour undiluted, liquid chlorine bleach directly onto clothes, into the wash tub, or
straight down the center of the agitator. Irreversible damage to your clothing may occur.
Fabric softener
The fabric softener goes into the dispenser on the top of the
ag}_itator,The ring] on the dispenser cup is a guide for the amount
of fabric softener to add for a full load, Smaller loads require less
fabric softener,
Softener rinse
If you wish to use fabric softener when using the REGULAR or HEAVY
DUTY cycles you must select the SOFTENER/BLEACH RINSE option.
This changes the rinse option to include a deep rinse so the fabric
softener will be dispensed correctly.
Scrud
o _me$aver o He_
o Soak o Warm
Wash
Temg
Fig21 5decring SOFTENER/
BLEACH Bff\JSEoption
@
@
@
@
@
@
Scrud is the name given to the waxy build-up that can occur within any washer when fabric
softener comes into contact with detergent. This build-up is not brought about by a fault in the
machine. If scrud is allowed to build-up in the machine it can result in stains on your clothes or
an unpleasant smell in your washer,
If you wish to use fabric softener we recommend:
Using fabric softener sparingly.
When filling the dispenser, do not splash or overfill,
Clean the dispenser as soon as the cycle is finished (refer page 28),
Clean your machine regularly (refer page 28),
Cold water washing increases the chance of the build-up occurring.
We recommend that a warm PERMANENT PRESSwash be used at ./\
regular intervals, eg every 5th wash should be warm.
Fabric softener of a thinner consistency is less likely to leave
residue on the dispenser and contribute to a build-oup.
Fig.32 Push cup through
dispenser with thumb to remove
Page 26

Changing pre-set options
Option adjustment mode
After using your Ecosmort _you may want to fine tune some of the options to suit your
wash needs.
You can change the following pre--set options:
o The default rinse option.
o The amount of water used in the SPRAY RINSE.
o The number of beeps at the end of the cycle.
o The out of balance recovery routine.
o The fill level selected by auto water level.
o The controlled cold option.
To make these changes it is necessary to enter the"Option Adjustment Mode"
To enter option adjustment mode
1 Plug the machine in, but do not press POWER.
Press SX&RT/PAUSE and hold down, then press POWER.
2 You will hear three quick beeps and the machine will show
an unusual pattern of lights. In this mode the lights are
used to indicate the different options available. The diagram
on page 25 shows how the lights relate to the options you
can change. Pages 26 - 27 explain the different options in
more detail.
s Use the buttons on the panel to make your changes to the
pre-set options.
4 Press POWER to return to normal mode.
s "..!ourEcosmart TM will automatically remember your changes.
5 To make further changes, repeat the above steps.
o o
Fa verite Permanent
Press
Fig SSEntering Opdon Adju tm_nt mode
Page 27

6hanging pre-set options
Press START/PAUSE and hold down. Press POWER.
o 9at
o 3at
Power
Start
Fig34 EnteringOption Adiustment mode
The diagram below shows how the lights relateto the options you can change. It also shows
which Rightswill be on when you first enter the Option Adjustment Mode.
Cotltrdled Cold @
_/_sh R#_se 5p#l o
o 15 o o Me_e o 2Deep
_ Re_:overy Ri_s_
Optio#s
Autem#dc Wate¥ Level Adjustmenf Voh_me
FIG35 Option cTdiustment
S Use the buttons on the panel to change the pro--set options.
o
o More o 2 Deep
o Mere o -
Shower Rinse
Rinse Opdons
VMume
Fig 3d Option :_dju._tment ._e[ection
Page 28

Changing p e-set options
1
2
3
Out of balance recovery routine
When your Ecosmart _ is spinning it can sense if the wash load is out of balance and will stop
and re-try spinning up to 3 times. If the machine still senses an unbalanced load there are two
options the machine offers.
Automatic recovery option:
"..!ourEcosmart _will try to automatically
correct the out of balance load. It will fill with
water and agitate to redistribute the load Light on = automatic recovery
before trying to spin up again. Light off = machine stops
Machine stops option:
'four Ecosmort _will stop, giving a short burst of beeps every five seconds and the RINSE or SPIN
light will flash. You must redistribute the load more evenly yourself (use this option if you wish to
conserve water.)
Enter the Option Adjustment Mode.
Use the REGULAR button to select the Out of Balance Recovery Option you prefer.
Press POWER to store your selection.
Smart Teuc# CyMes
Auto water fill level o o o o
If you are not satisfied with the level that your
Ecosmart _ fills to on AUTO water level, you can
alter the fill level that AUTO will select, If you feel
there is too much water, you can decrease the fill
level that will be selected,
1 Enter the Option Adjustment Mode.
2 Use the CYCLE buttons to decrease the amount of
water selected.
s Press POWER to store your selection.
Perma#e[# Allergy DMicatte Heavy
Press ##ty
Automatic Water Level Adjustment
Fig.37 AdJusting th_ water level
Note: HEAVY DUTY (the default setting} provides the ideal water fill level. If you wish to change
it, we recommend changing one setting at a time until you reach the preferred level.
Page 29

End of cycle beeps
Changing pre-set options
The beeps signaling the end of the cycle can be
increased or decreased.
1 Enter the Option Adjustment Mode.
2 Use the WASH OPTION button to select the number
of beeps you prefer.
s Press POWER to store your selection.
TIME SAVER = 15 beeps
SOAK = 5 beeps
SOFTENER/ = no beeps
BLEACH RINSE
Default rinse option
The normal rinse on the REGULAR and HEAVY DUTY
cycles is a SPRAYRINSE.When you select SOFTENER/ MED spin deep deep
BLEACH RINSE on these cycles the rinse changes to rinse rinse
the default rinse. The default rinse is the rinse option SLOW spin -
used on the DELICATE and PERMANENT PRESS ..........................................................................
cycles. The default rinse is a SPRgh' RINSEfollowed HOLD spray deep
by a DEEP R[NSB However, you can change the rinse rinse
default rinse to two deep rinses (as is used on the
ALLERGY cycle).
1 Enter the Option Adjustment Mode.
2 Use the SPIN SPEED buttons to select the rinse option you prefer.
s Press POWER to store your selection.
Volume of water used in the spray rinse (REGULAR cycle)
You can increase or decrease the volume of water
added dudng the rinse on the REGULARcycle.
1 Enter the Option Adjustment Mode.
2 Use the W£FER LEVEL buttons to select the volume
of water you wish to be used in the spray rinse.
s Press POWER to store your selection.
HIGH = more water
MED = more water
LOW = FACTORY SETTING
Controlled con
Ecosmart _is designed for installations that have
both hot and cold water.T:o ensure optimum
performance even in very cold weather, the cold
water temperature is controlled to 60_'F(15.d'C).
However, if for some reason you do not have
hot water available you may need to change to
uncontrolled cold in very cold weather.
Green = controlled cold
Amber = uncontrolled cold
Ecosmarff _ [eaves the factory with the CONTROLLED COLD Option set. You can change this by
entering the Option Adjustment mode and by pressing the ADVANCE button once.
Page 30

Caring for your Ecosmar8
@
@
Care arid cJeaning
When you have finished
Turn off the faucets to prevent any chance of flooding should a
hose burst.
Unplug the machine from the wall socket.
C_eaning your Ecosmart TM
o Clean with a soft damp cloth and wipe dry.
Do not use chemical or scouring cleaners as they can damage
the paint and plastic surfaces.
o You can remove the lid for cleaning. Open the lid fully, hold
one side with one hand and gently tap the other side with an
upward motion.
o To replace the lid, hold the lid vertically and align both hinges
before pushing down firmly.
o To remove the agitator for cleaning, unscrew the nut down the
center of the agitator by turning counter--clockwise.
_jJ_
The agitator must be fulty pushed on to the shaft when refitting.
T@hten the plasdc nut firmly by hand° Ensure the agitator is
not Iooseo
CJeaning the fabric softener dispenser
When using fabric softener, rinse your dispenser at the end of
each wash, using warm soapy water.
Separate the cup from the dispenser body by pushing
downwards on the base of the cup.
C_eaning the inside of your Ecosmart _"
You can program a hot wash through the FAVORITE cycle to
thoroughly clean your machine.
1 Press POWER button.
2 Press and hold the FAVORITE cycle button until you hear two
quick beeps and the FAVORITE light flashes.
s Select the PERMANENT PRESScycle.
4 Selecta hot wash.
5 Press FAVORITEagain to store the selection.
6 The Ecosmart _ will then fill with hot water and do a hot wash.
It's a good idea to clean the machine using this cycle without
clothes and two cups of powered detergent, every few months.
Fig38 Removing the lid
Fig39 Push cup through
di pen er with thumb
Page 31

Caring for your Ecosm rf
Products that might damage your Ecosmart Tc[othes washer
,i,i,i,iii!ii iiii!iiiWiXiii i
o Concentrated bleaches, diaper sanitizers and hydrocarbon solvents (eg gasoline and paint
thinners) can cause damage to the paintwork and components of your clothes washer, Do not
wash or dry garments stained with these solvents as they are flammable,
o Do not use pre treatment sprays or liquids on or near your clothes washer as they can damage
your machine's control panel and other surfaces,
o Use of dyes in your clothes washer may cause staining of the plastic components, The dye will
not damage the machine but we suggest you thoroughly dean your clothes washer afterwards.
We do not recommend the use of dye strippers in your clothes washer.
Ecosmarf sounds and beeps
",/our Ecosm_rt _will make sounds that you will not have
heard from other clothes washers,
o During drain you will hear the pump of your machine
turn on and off quickly about every 10 seconds, This is
part of your Ecosmart% automatic lint removal system,
o While draining your machine may give several low thuds.
",/our machine is checking that the water has drained
before spinning,
o Your Eco_m_rt _will beep at the end of the cycle or if
you have used SPIN HOLD or SOAK,
o If your machine is beeping continuously or giving a
musical series of beeps refer to page 30.
Automatic lint system
Your Ecosm_rt _ has a self cleaning lint system, It automatically separates the lint from the wash
water, trapping the lint between the inner tub and outer tub and flushes it out at the end of
the wash.
Page 32

ff your Ecosm rY beeps for he p
Before you call for service
Please read the following pages before calling for service.
You can correct many of your machine's problems using the checklists on the following pages.
",,!our machine is capable of diagnosing its own problems. If it has a problem it will beep and
display a message telling you what is wrong.
Musical series of beeps_every 5 seconds and°°°
-_The beeps are the same sound your washer makes when you plug your machine in.
Hot faucet has not been turned on.
Inlet hose filters may be blocked.
Hot water supply is not hot enough to maintain the wash temperature you have selected.
Select a lower wash temperature.
Inlet hoses connected the wrong way around.
Cold faucet has not been turned on.
Inlet hose filters may be blocked.
Inlet hoses connected the wrong way around.
Cold water temperature exceeds recommended limits.
The faucets have not been turned on.
Inlet hose filters may be blocked.
The drain hose is too low and the water is siphoning out of the machine.
The flow rate of the supply water is too slow.
The machine is overloaded and can not agitate. Ensure the machine is stationary. Remove
items until the remaining ones can move more freely.
Select a higher water level.
The machine has a suds build-up. Too much detergent may have been used for the amount of
soil in the load. Wait for suds to dissolve. Rinse clothes using a deep rinse.
Page 33

your EdosmarY beeps for he p
Wash load is out of balance. Ensure the machine is stationary. Manually redistribute the load.
Check machine is [evek Ensure the machine's feet have been unscrewed and the rubber
leveling inserts have been fitted so the machine sits on its feet and not on the corner cabinets.
Refer to'[nstaRRation Instructions' pages (5- 7.
Make sure the lid is closed.
Press SX&RT/PAUSE (refer to page 15).
Single beep every second and,,,
1 Unplug machine from the wall. Wait 60 seconds, plug back in and operate machine.
2 If the fault re--occurs repeat step 1.
Ifthe problem persists referto the servicecontacts below, Before calling for help pleaselocate
the serial number of your washer.This is located on the back top left corner.
Service
For your local Fisher & Paykd Authorized Service Agent please call:
USA and Canada
TOLL FREE1.888.9.FNRUSA (1.888.936.7872)
or use the link at: www°fisherpaykeLcom
Note: proof of purchase is required for any warranty claim. For your records we suggest you
attach your proof of purchase here.
Page 34

Operatingp ob ems
Is the power switched on?
Unplug machine from the wall Wait 60 seconds, plug back in and operate the machine.
Could your household power supply be at fault? Try plugging in another electrical appliance.
Are both hot and cold faucets turned on?
Are the inlet hose filters blocked?
Is DELAY S<&RTon7
Is the lid up7
Checkthat the machine is not siphoning.
Checkthe black hose guide is installed.
Is the load out of balance7 (Refer to pages 21 and 26).
Check the machine is level and does not rock.
It may have suds buiRd-up (refer spin light flashing, page SO)_
The clothes are unevenly distributed in the wash tub, your E<osmart _'_has compensated by
lowering the spin speed.
Checkthe feet are unscrewed and the rubber inserts are fitted so the machine is level and
does not rock.
Too much water for load (refer to page 18)_
It may still be in the process of sensing the water level (referto page 18).
Some loads do not suit Auto water level (eg pillows, bedding, large bulky items). Manually
select the water level.
Refer to pages 24 to 26 to adjust the Auto fill level
Banging - the load is out of balance (refer pages 21 and 26).
Other noises - refer page 29_
Page 35

©pe ating preb ems
iiiiiil!!!
The water level is too high for the amount of clothes. This has caused excessive sphshing,
Use a lower water level.
If this is happening when the water level is being automatkally selected, adjust the auto water
level down from HEAVY DUTY to DELICA:[E setting (refer to page 26),
Large bulky garments (eg pillows, comforters) can cause splashing. Wash on DELIC?CE cycle
If the problem persists refer to the service contacts on page 37, Before calling for help please
locate the serial number of your washer. This is located on the back top left corner.
Page 36

Wash p ob ems
Overloading the washer or dryer,
Choose a PERMANENT PRESSor DELICATE cycle as these cycles have been designed to
minimize wrinkles,
Try selecting a slower spin speed,
Do not leave wet clothes to sit in the washer or laundry basket_
Not enough detergent for load size or amount of soil
White clothes are better washed separately, Separate light and heavily soiled items, as clothes
can pick up soil from dirty wash water,
Select the wash temperature according to soil type, For example, blood and mud are better
oily soils wash better in warmer water. ............
Overloading the washer.
Loads made up of articles of varying sizes will wash better (eg full loads of sheets may not
wash as well).
Hard water requires more detergent than soft water_
Wash lint givers (eg towels, flannel sheets) separately from lint collectors (eg synthetic fabrics)_
Overloading the washer,
Not enough detergent to hold the lint in suspension,
Overdrying in a dryer can cause a build-up of static electricity in synthetic fabrics and cause
them to attract lint.
Overloading the washer,
Some detergents need to be predissolved, check the detergent instructions,
Cold ambient temperatures, cold washes or short agitation times may not let the detergent
dissolve properly_ Try pre-dissolving the detergent.
A build_up caused by the interaction of fabric softener and detergent can flake off and mark
clothes (refer to 'Scrud' page 23)
Insufficient detergent, for the amount of soil on the clothes, can result in black marks on clothes.
Wash and dry non colorfast clothes separately,
Nomcolorfast clothes left sitting in a washer or laundry basket can transfer dye to other clothes.
Washing with too much water (ie undedoading) can cause the clothes to tangle around
one another,
Do not load the washer by wrapping clothes around the agitator,
Page 37

Limited warranty
When you purchase any new Fisher & Paykel whiteware product for personal or consumer use
you automatically receive a one year limited warranty covering parts and labor for servicing
within the 48 mainland United States, Hawaii, Washington DC and Canada, In Alaska the limited
warranty is the same except that you must pay to ship the product to the service shop or the
service technician's travel to your home, Products for use in Canada must be purchased through
the Canadian distribution channel to ensure regulatory compliance,
If the product is installed in a motor vehicle, boat or similar mobile facility, you receive the same
one year limited warranty, but you must bring the vehicle, boat or mobile facility containing the
product to the service shop at your expense or pay the service technician's travel to the location
of the product
Fisher & Payke[ undertakes to:
Repair without cost to the owner either for material or labor any part of the product, the serial
number of which appears on the product, which is found to be defective. In Alaska, you must
pay to ship the product to the service shop or for the service technician's travel to your home.
If the product is installed in a motor vehicle, boat or similar mobile facility, you must bring it to
the service shop at your expense or pay for the service technician's travel to the location of the
product, If we are unable to repair a defective part of the product after a reasonable number of
attempts, at our option we may replace the part or the product, or we may provide you a full
refund of the purchase price of the product (not including installation or other charges).
This warranty extends to the original purchaser and any succeeding owner of the product for
products purchased for ordinary singb-family home use,
All service under this limited warranty shall be provided by Fisher & Paykel or its Authorized
Service Agent during normal business hours,
How long does this limited warranty last7
Our liability under this limited warranty expires ONE YEAR from the date of purchase of the
product by the first consumer,
Our liability under any implied warranties, including the implied warranty of merchantability
(an unwritten warranty that the product is fit for ordinary use) also expires ONE YEAR(or such
longer period as required by applicable law) from the date of purchase of the product by the first
consumer, Some States do not allow limitations on how long an implied warranty lasts, so this
limit on implied warranties may not apply to you,
Page 38

Limited warranty
This warranty does not cover:
A Service calls that are not related to any defect in the product The cost of a service call will be
charged if the problem is not found to be a defect of the product For example:
1. Correcting faulty installation of the product
2, Instructing you how to use the product
3, Re@acing house fuses, resetting circuit breakers, correcting house wiring or plumbing, or
re@acing light bulbs,
4, Correcting fault(s) caused by the user,
5, Changing the set-up of the product
6, Unauthorized modifications of the product.
7, Noise or vibration that is considered normal, for example, drain/fan sounds, refrigeration
noises or user warning beeps,
8, Correcting damage caused by pests, for example, rats, cockroaches, etc
S Defects caused by factors other than:
1. Normal domestic use or
2, Use in accordance with the product's User Guide
C Defects to the product caused by accident, neglect, misuse, fire, flood or Act of God,
D The cost of repairs carried out by non--authorized repairers or the cost of correcting such
unauthorized repairs,
E Travel fees and associated charges incurred when the product is installed in a location with
limited or restricted access (eg airplane flights, ferry charges, isolated geographk areas),
F Normal recommended maintenance as set forth in the product's User Guide
[f you have an installation problem contact your dealer or installer. You are responsible for
providing adequate e[ectrka[, exhausting and other connection facilities,
We are not responsible for consequential or incidental damages (the cost of repairing or
replacing other property damaged if the product is defective or any of your expenses caused if
the product is defective), Some States do not allow the exclusion or [imitation of incidental or
consequential damages, so the above limitation or exclusion may not apply to you,
Page 39

Limited warranty
How to get service
Please read your User Guide, If you then have any questions about operating the product,
need the name of your local Fisher & Paykel Authorized Service Agent, or believe the product is
defective and wish service under this limited warranty, please contact your dealer or call us at:
USA and Canada
TOLL FREE1.888.9.FNRUSA (1o888o936o7872)
or use the link at: www.fisherpaykeLcom
You may be required to provide reasonable proof of the date of purchase of the product before
the product will be serviced under this limited warranty.
Commercial use
If you are using the product in a commercial setting (any use other than a single family dwelling),
we agree to repair or replace, without cost to you for parts only, any defective parts, the serial
number of which appears on the product Our liability for these repairs expires ONE YEARfrom
the date of original purchase,
At our option we may replace the part or the product, or we may provide you a full refund of
the purchase price of the product (not including installation or other charges). All service under
this limited warranty shall be provided by Fisher & Paykd or its Authorized Service Agent during
normal business hours.
No other warranties
This limited warranty is the complete and exclusive agreement between you and Fisher & Paykel
regarding any defect in the product None of our employees (or our Authorized Service Agents)
are authorized to make any addition or modification to this limited warranty.
Warrantor: Fisher & Paykel Appliances, Inc
Ifyou need further help concerning this limited warranty, pleasecall usat above number, or
write to:
Fisher& Paykd Appliances, Inc.
5900Skylab Road
Huntington Beach
CA 92647
This limited warranty gives you specific legal rights, and you may also have other rights which
vary from state to state.
Page 40

Table des mati@es
Instru_:tions d'installation
Importantes _:onsignesde s6cudt6
Apropos de votre Ecosmc_yt "_
Cycles et options de lavage
Les Cycles de lavage
Ringage ave¢ adou(x::issant/iavellisant
Tremper, Gain de temps
Niveaux d'eau
Fnattente, D paFtdiff6F6 Recommanda/ionsdelavage
Avant le lavage
Eaude ,_avel
Adoucissant
D6p6t co%nt
Entretien de votre Rosm_yf °
Ent_etienet nettoyage
P_oduitsdsquant d endommager votre laveuseN_'osm_;_"
Signauxet bips sono_esdu lavedinge Ecosmart"
Sys@meanti--pek_cheautomatique
En cas de signal sonore d'appel _ taide
Avant d'appele_ le se_vked'ent_etien
Un seulbip 6mis toutes lessecondese/_
Seivke 2_la dient@le
Probl@'nes de fonctionnement
Prebl@'nes de lavage
6arantie limit6e
39
45
48
50
51
51
52
52
53
54
55
55
55
56
56
57
58
58
59
59
59
60
6O
61
61
62
64
66
Page 41

_nst_uctions d_insta_ation
Avant de commencer, lisez ces instructions attentivement et dans leur int6gralit6.
Suivez [esCONSIGNESDESECUR_TEd_crites darts [e mode d'empbi
pages 45 _ 47 avant d'uti[iser cet appareiL
Lemanquement _ cesconsignes peut provoquer des accidents graves tel
que: _lectrocutionoincendieoblessuresod_c6so
Respectez tous tes codes et r@glements en v@ueuro
Conditions d'installation
Lieu d'instaHation
La laveuse doit 6tre install6e sur un sol ferme afin de minimiser les vibrations pendant les cycles
d'essorage. Un sol en b6ton est pr6f6rable, mais une base en bois est suffisante tant que le
support du sol est conforme aux normes nationales.
II est recommand6 de ne pas installer la laveuse sur un tapis et de la mettre is Fabris des
intemp6ries. :i
:;
Temp_[_ature de I'eau
II est recommand6 de conserver votre eau froide _ une te_T]p6rature inf6rieure _ 35°C (95°F) et :[
votreeaochaudeaunetemp6ratureinf_rieurea6S°C11SOF),
Des temp6ratures au-odel_ de ces marges pourraient endommager votre Bveuse.
Robinets de contr6_e
Votre buanderie devrait disposer de robinets de contr61e d'entr6e d'eau tant pour I'eau chaude
quepour_'eaufronde,
Twood'_ooleme.t
Ueaupeut_tre6couleeparuntuyauverticaloudansunecuvedelavage.Lediam_treinternedu
tuyau vertical doit 6tre de 11/4:)o(38 mm) minimum et doit 6tre ouvert _ Fair.
El÷ctricit6
Cet appareil doit 6tre branch6 sur une prise dectrique de 110 - 120 V, 60 Hz, et reli6e a un circuit
indMduel de raise _tterre et prot6g6 par un circuit de 15 - 20 amp6res ou encore un dispositif
desurcharge.
Page 42

nstructions d insta ation
Extr@mit@du tuyau
du c6t6 laveuse
Ext 6mit6 du tuyau
du c6t@ rob net
Espace de dd;gagement
du couverde
Hauteur
Hauteur du
tuyau vertical
-- B3 Y/'----78'
(850- 1980 ram)
I'espace
pour pieds
ajustables
Largeur
Profondeur
Pression d'a_riv6e d'eau
max 150 ps,
min mum 5 psi
Fig 1Dimen ions de Is Ioveuse et raccordements
Dimensions
Profondeur 25V2"(650 mm)
Largeur 25Y_" (650 ram)
Hauteur totaRe 40"- 41 _4" (1020 - 1060 ram)
Hauteur avec d6gagement d u couverde 55" - 56s/4" (1400 - 1440 mm)
Page 43

iiIiI il'liiiilliiiililllililill ii!lili_iilliliiilili,ilililiiiillll,_;ii!lil//iiiliillii
Instructions dgnstallation
Pour en[ever ['emba[[age _!
Pourb_n_f_der_un_veau_eperforr,anceophir,a,o¢_ert / "--_/
par votre nouvelle laveuse, veuillez suivre les instructions / t/
c_-_e_ou_. / /
'_ EnleverI'emballagee×t_rieur, @ < /
2 Inclinez la laveuse vers I'arri_re et d6gagez I'emballage du ...............
ba_en_oulevantuncoinalafoil,Vou_pourre_enquireretirer
I'emballage du bas en le tirant vers I'aw, nt _-- /
Fig.2/nclin_z Io k_,wusevet It, rr&re i }
_o,o,t.omott.o,o,_vousoo=m_=.o._..o_o,..ot,._
,_=_,,o_o.ut==_ou..,s_uo.'o..o==o_o.,o,ovouso.I_ !:
Enlever t'emballate du tambour et tes accessoires /_I i
s Soulevez le couvercle et enlever Femballage en carton situ6
SOUSle couvercle,
_nleverle_tuyau_,le_acce_oire_etle_it_'in_a,ation.
Con_erve_I'er,ballageduba_etautambourauca_o_vou_
enaur_e_bemoanpourund_placementfutur.
= 4hme_aecaoutchoucpourle_cale__po_er_ou_lamachine
o 1 gu de detuyau d'6cou ement
2 tuy'aux d'arriv6e d'eau tambour
Fig.3RetirezI'_.mbollogedu t_mbour
Tuyau d'6coulement
vers [e bas puis d6gagez-le avec pr6caution. Fa_tes _ __
d'_cou,ement_an_,acure_e,ava_eou,etu;,au,.ert_ca,..oX___0__] _o mox._0ram>_._
Pour pr_venir tout siphonnement
Le tuyau d'6cou[ement ne dolt pas d_passer de I'extr6mit_ o
du guide de plus de ¼po (20 ram). r--.o
La hauteur du tuyau vert ca ou de a cuve/'6v er do t _tre de _ o ,,,,,
Gu de de tuyau s _
33_/* po a 78 po(850a 1 200 ram). -_ o
....... o'ecoueme_ _ ....._/_ t
SInecessalre, [e tuyau d'ecou[ement peut etre raccourcl, _ _
s [nsta[[ez [e tuyau d'6cou[ement dans la cuve de lavage ou
Fig4 Insmlk_,tiondu guide,de.tuy_m
mtrodu_sezde dans le tuyau vemcal. ,- ,
d'_couw.ment 1
= Importend ilt
n_ve_uoa_et_ouveu__X_t_me_'_v_u_t_on_e_e_u=,
o V_rifiez que _ecuve ou h tuyeu verdce_ ne so_ent pes ob._tru_s per h cherpie ou tout eutre %_mento 
nstructions d insta ation
Tuyaux d'ardv6e d'eau
Installez I'extr6mit6 5 bout droit des tuyaux (avec
filtres) sur les robinets (Fig.5).
Installez les extr6mit6s coud6es sur la laveuse (Fig.5).
Les robinets d'admission sont identifi6s 5 Farri@e de
Fappareil :
H pour I'eau chaude C pour I'eau froide,
Veillez 5 ce que les tuyaux d'eau chaude et d'eau
froide soient raccord6s aux entr6es correspondantes,
Extr6mit@ du Ext_6mit6 du
tuyau c6t6 tuyau c6t@
robinet laveuse
Fig,5 Extr_mi@ du tuyau dWriv@
Remarque: si vous disposez uniquement d'une
alimentation en eau froide, un capuchon de robinet
d'admission (disponible aupr6s de Fisher & Paykel)
DOlT 6tre raccord6 au robinet d'eau chaude. Ce
capuchon permet d'6viter que le robinet d'eau chaude
cause des fuites. ]butefois, nous vous recommandons
de raccorder ce produit 5 Falimentation en eau chaude
et en eau froide.
Mettre la laveuse de niveau
f t
Fig.dAju tement de pied de nivdlement
1 D6vissez les pieds de fa(:on ace que I'appareil ne
repose PASsur les pi@cesdes coins, puis ins@ez les
tales de raise 5 niveau en caoutchouc (Fig.d).
2 PBcez la laveuse dans sa position finale_ Nous
sugg@ons un espace de d6gagement minimal
de 1po (25 ram) de chaque c6t6 pour faciliter
Finstallation (Fig.7).
s II est IMPORTANT de niveler la Bveuse pour garantir
un essorage optimal.
Veillez 5 ce que les cales en caoutchouc soient
ins@6es dans les pieds ajustables 5 la base de la
laveuse. Ajustez les pieds en les d6vissant/revissant
pour vous assurer que la Bveuse soit nivder et ne se
balance pas.
4 Guidezovous sur les tours de la pi6ce, ainsi qu'avec les
plans de travail adjacents pour vous assurer que la
hveuse soit droite. R6ajustez les pieds si n6cessaire.
5 Ouvrez le couvercle et v@ifiez le tambour de la
Bveuse pour vous assurer qu'il est bien centr6 et
16g6rement vers I'avant (Fig.8).
6 Fermez le couvercle. V6rifiez de vue que le couverde
et le haut de la machine s'alignent (Fig.g).
7 Ouvrez les robinets et v@ifiez que les tuyaux ne fuient
pas. \i6rifiez 6galement que les tuyaux ne sont pas
entortill6s.
Fig.7 Espace de d_gagement minimal
Ajustement Ajustement
ncorrect correct
Fig8 Ygrifiez le tambour pour vous
assurer qua*.la laveuse est au niv_*.au
Page 45

iiIiI il'liiiilliiiililllililill I ili_i lililllliiiillll,ii'ii@iili,!17111
Instructions d_installation
8 D@oulez le cordon d'alimentation, retirez le protecteur en r}lastique pour lejeter, puis branchez
n_pp_reU_unepr_seae_our_nt.
S_le_ouverdeetleh_utdeI_m_h_nenesontp_s_l_gn_s_ommennd_queled_=gr_mme
coch6, r6ajustezfun des piedsiusqu'a ce qu'ils lesoient.
- Couverde ............... _i]i!if
'ajuster R - 7_ i ................ [
Haut de '
- Couverc 6,
macn ne i
1i
Haut de la Couvercle ):::
roach he/
'ajuster IkX[ _ _ iii!
Haut de la " iiiii!/
Fig.9Pour m+*.ttr<I_Ms<us<au niv<_u <n ,.,'#_rifi_ntI'dign+*.rn<ntdu couv<rd+*. {i'
Mise en marche
1 V@ifiezqu'il rfy all: pasde fuite el:que le bruiD la vibration et les temp@atures de I'eausoient i:
correctes, V#rifiez #galement que I'essorage fonctionne correctement, V@ifiez que le couvercle se
bloque pendant I'essorage.
2 Ferme_lesrobinetsd'e_u_haudeetd'e_ufroideetIorsquelalaveusen'estpasenfon_tion.
InstlrUctiol'lS pafticuli@res ]
IIest possible que lalaveuse_mette des signaux d'averfissement Iorsque la pressionde I'eauest
trop basseou que I'eaun'est pas@acu6e convenablement. Consukez'En casde signal d'appel
I'aide"(page 60).
Pour route aide suppl@_entaire concernant cet apparel, r_f@ez-vous au paragraphe Service, ii:
Page 46

nstructions d'insta ation
Conditions sp_cia[es pour [es installations en a[c6ve ou placard
L'espace de d6gagement minimal de ventilation entre la hveuse et les tours ou autres surfaces
adjacents est de :
1po (25 ram) de chaque c6t6 et devanL
3po (75 ram) _ Farri@e,
Remarque: [es espaces de d6gagement mentionn6s ici
sont minimum, Veuillez consid@er qu'un plus grand
espace pourra 6tre n6cessaire pour FinstalBtion et
Fentretien,
L'espace vertical minimal du sol au plafond, ou 6tag6res,
cabinets etc, situ6s au-odessus de la machine, est de 5gpo
(1500 ram),
Le placard doit 6tre 6quip6 de portes persiennes ou d'un
autre syst6me de ventiBtion, L'espace de ventilation des
portes doit 6tre d'au moins 60 po 2(388 cm) pour une
hveuse, et d'au moins 120 po (776 cm), @_iabment
distribu6, pour une hveuse et une s6cheuse,
Portes _ persiennes pour une
laveuse et une s6cheuse
Fig. 10 Espoce de d_gc_gement minimal
de ventilation
N'JnstaHezpas cetapparefldens un placard#quip# d'uneportesansventfladono
Installation darts des maBons mobiles
Unstallation doit 6tre conforme aux NORMES POUR LES MAISONS MOBILES, ANSI A119,1 eta la
LOI NATIONALE SUR LES NORMES DE CONSTRUCTION ET DESECURITE DES MAISONS MOBILES DE
1974 (PL93--383).
Instructions de raise _ [a terre
Cet appareil doit 6tre branch6 a une prise de terre. En cas de disfonctionnement ou de panne,
la raise a la terre r6duira le risque d'dectrocution en d6viant le courant dectrique vers un trajet
de moindre r6sistance, Cet appareil est 6quip6 d'un cordon avec un conducteur de protection et
une prise male de raise a la terre. Cette prise doit 6tre branch6e dans une prise femelle ad6quate
correctement install6e et raise a la terre conform6ment aux codes et r6glements Iocaux,
Le branchement inad#quat d'un conducteur de protection peut cr#er un risque d'dtectrocudon.
V#rifiez aupr&s d'un #tectfiden cerdfi# que I'@parefl e.stindubitaMement mLs 8 ta terreo
Ne modifiez pasta prise fournie avec Yappereflo 5i cefle-ci n'est pas compedbie evec _aprise
_emeHe, fe_tes-en #_steHer une ed#quete per un #_ectfiden cerdfi#.
Ces specifications sont susceptibles de changer sans pr#--avis.
Page 47

mportantes consignes de s@udt6
Ve life routes lesmgormadons sur la s cudtd avant I'udlisadon
De nombreu× lave,4inge sont instalt#s dans tes maL_ons 8 prozimit# d'un s#che,4#_ge ou d'un
chauffe-eau au gaz°
Pour votre s6curit_, lesinformations contenues darts ce manuel doivent @tre
respect@esafin de _Jiminer les risques d'incendie ou d'explosion et d'@viter
tout dommage mat@ieL toute blessure corporelle ou d_c@so
Ne pas conserver ou utiliser d'essence ou d'autres liquides et vapeurs
inflammables &proximit_ du lave4inge ou de tout autre appareiL
_instaHation et I'entretien devront @treconfi6s & un insta#ateur; une agence
de maintenance ou une compagnie de gaz certifi&
Si vous sentez le gaz :
o NE PASessayer d'allumer un qudconque appareiL
o NE PA5 toucher d'interrupteur dectrique; ne pas utfliser te t41#phone du domidM
o Evacuer routes les personnes de _a piece, du b4tffnent°
o Prendre imm#diatement contact avec la compagnie de gaz en utflisant le td@hone d'un voisin.
5uivre les instructions de la compagnie de gaz.
o 5i vous ne pouvez pas contacter la compagnie de gaz, appder les pompiers°
S_cudt_- chauffe-eau
II est possible dans certaines conditions que de Yhydrog#ne soit produit dans un chauffe-eau non
utHis4 pendant deux semaines ou pluso
Le gaz hydrogene est un gaz explosif en presence de ¢es drconstances,
5i Yeau chaude n'a pas dt# utifis#e pour deux semaines ou plus, nous vous recommandons
vivement dbuvrff tousles robinets d'eau chaude et de les faisser couler pendant plusieurs minutes
avant d'utiliser tout appareil _tectrique raccord4 au syst_me d'eau chaude din d'dviter tout
dommage mat#rid ou blessure corporefle° Ceta permettra # tout gaz hydrog_ne de s'dchappero
Dans ta mesure o_ le gaz est inflammable, ne pas ruiner ou utiliser de flamme hue ou d'apparefl
pendant ce processus.
Page 48

mpo tantes consignes de s6curit6
Suivez les consignes de s6curit6 d_crites dans [e mode d'emploL
L÷manquement _ cesconsignes peut provoquer des accidents td que:
6_ect_ocution, des Nessures corporeHes, ou _ed_c@so
Precautions de s_curit_
o Life routes tes instructions avant d'utitiser YappareiL
o Utiliser uniquement cet appareit conform_ment _ son utilisation pr_vue comme d_cfit dans ce
manuet d'ut_Tisation et d'entretien.
o _estlrnp_ratifquece_ave-h`nges_Itc_rrectementlnstalI_etp_sItI_nn_enc_nf_rmit_a_ecIes
instructions d'utiflsation avant son utilisation,
o Retier correctement Yappareil _ la terre conform_ment 8 tous tes codes et r_glementations. Suivre
les conseils donn_s dans les instructions d'utilisation,
o Ne pas installer ou entreposer le lave-tinge dans un endroit ob il sera expos_ _ des temperatures
en-dessous de z_ro ou aux conditions ctimatiques,
o Le raccorder & un circuit _tectfique de puissance nomina_e correcte, bien prot4g_ et de capacit_
appropri_e pour _viter route surcharge _lectrique,
o Leraccorder_deslnstallatIonsd`_vacuatIonetdeplomberIead_quatescommed_cfitdansles
instructions d'utitisation,
o Fermer les robinets d'eau torsque le lavedinge n'est pas utiflsd pour tirniter la pression sur les
tuyaux et valves et minimiser les fuites dans te cas ob une valve ou un tuyau viendrait 8 casser
ou rompre,
o Ne pas roarer ou remplacer une quetconque pi_ce de Yappareil ni entreprendre une qudconque
tSche de maintenance _ moins que cda ne soit sp_citiquement recommand_ dans ce manuel
d'utilisation et d'entretien ou dans les instructions de roarations pubh_#es destin_es _ Yutitisateur
que vous comprenez et pour tesquetles vous &tes quatifid,
o Lots du d_branchement de I'appareil, tirer depuis ta prise et non sur le cordon ou le point de
raccordement du cordon pour dviter d'endommager le cordon ou te point de raccordement de la
prise du cordon,
o V_rifier que le cordon soit positionn_ de mani_re 8 ce que personne ne marche dessus, tr_buche
dessus et v_rifier quTt ne risque pas d'etre soumis 8 tout endommagement ou charge,
o Garder tous tes produits de blanchissefie (comme les d_tergents, Yeau de Javel, les adoudssants,
etd hors de la pottle des enfants, de pr_f@ence dans un placard fermant 8 cM Respecter tous tes
avertissements sur les dtiquettes des embatlages pour dviter route btessure corpore[[e,
o Ne pas trafiquer les boutons et touches de commande,
o Garder la zone autour et sous votre appareil ddgag_e de route accumulation de mat_riau×
inflammables, tds que les petuches, le papier, les chiffons, les produits chimiques, etc,
o Garder le sol autour de Yappareil propre et sec pour dviter de glisser
o Ne jamais essayer d'attraper quelque chose dans te lave-tinge si te tam bout ou t'agitateur sont
en mouvement,
Page 49

mportantes consignes de s6curit6
o Avant d_uvrir le couverde, de d_charger ou d'ajouter des v_tements, appuyer sur Ja touche
MARCHEiPAUSE et attendre que la machine soit compl@tement arr&tde avant de soulever
te couverdeo
o Une_tr_itesurveii_anceestrec_mmand@s_cetappareHestut_is&par_u_pr_ximit_d_enfants.
Ne pas taLsser les enfants jouer # t'int&ieur de cet appareil, ni jouer avec cet appareH ou tout
autre appareit remiS_o
o Vous s@arer de mani_re appropri_e de tout appareit mL5 de c6t_ pour le rebut et des mat&Jau×
d'embattage/'d'expdditiono Avant de mettre au rebut un tavedinge ou de le mettre hors service,
retirer le couverde du laveoflngeo
o Ne pas taLsser le couvercle rdev_ pendant le cydeo La machine ne fonctionnera paso Pour la
d_marrer, rabaLsser le couverde et appuyer sur la touche MARCHEiPAUS&
o Ne pas laver ou s_cher des articles ayant _t6 nettoy6s avec, lav6s dan.s, mL_ Otremper dans ou
tach_s de substances explosk_es ou inflammables (comme la cite, Fhuite, la peinture, Fessence, tes
produits d_graissant, les sok_ants de nettoyage _ sec , le k@o@ne, etc) pouvant s'enflammer ou
explosero Ne pas ajouter ces substances _ I'eau de lavageo Ne pas util_ser ces sub.stances autour
de votre tavedinge et/_ou s&chedinge pendant FutilL_ation, car Hs d4gagent des vapeurs pouvant
s'enflammer ou exptosero
o Le processus de blanchissefie peut r_duire le degr_ @nffuge des tiSsuso Pour &viter un tel r_sultat,
tes instructions de nettoyage du fabriquant du v&tement devront &tre su_vies attentivemento
o Nepasm_langerd'eaudeJavel_basedechlorureavecdeFammon_aqueoudesaddesteL_
que le vina_gre etiou des agents antirou_lle, Le m&lange peut d_gager un gaz toxique pouvant
entrainer ta mort,
o NejamaLsgfimpersurouvoustenffdeboutsurledessusdutavedingeoutecouvercledu
taved_ngeo
o Ne pas laver d'artides en fibre de verre dans votre lave,d_ngeo Vous rLsquez de provoquer une
ffr_tat_on cutande _ partff des particules restantes qu_ pourront _tre r_cup&_es par les v_tements
au cours des procha_nes utilL_ations du lavedingeo
o Pour _t_m_ner les risques d'_lectrocut_on, d_brancher I'appare_l de la prL_e _tectfique et
d_connecter le tave,d_nge du panneau de distribution de ta maL_on en retirant les fus_bles ou en
d_connectant le dL_joncteur avant d'entreprendre tout travau× de maintenance ou de nettoyage,
Remarque : En appuyant sur le bouton PUISSANCE, vous ne coupez PAS I'appare_l de
Faflmentat_on _tectfique, re&me s_ tous tes t_mo_ns sont dte_ntSo
Ne pas ut_lL_er cet appareH s'il a &t&endommag_, en cas de mauva_s fonctionnement, s_¢test
partieNement d&mont& ou en cas de p_&ces manquantes ou cassdes, y comprL5 une prLse ou un
cordon endommag_(e)o
Ne pas ut_liser cet appareH s_ le couvercle n'a pas _t_ correctement remis en ptaCeo
o 5_ vous ut_flsez une rattonge ou un dispos_tff de prise _lectfique portable (comme par exemple une
boites d prises de courant multiples), v@_fier qu'il so_t pos_t_onn_ de mani@e d ne pas entrer en
contact avec de l'eau ou I'hum_d_t_°
o N'ut_lisezjamais cet appareil pour taver une brass4e dont te poids total (4 sec) exc_de _7,6 tb (8 kg),
VEU LLEZCONSERVERCESINSTRUCTIONS
Page 50

o Repartir de mani6re 6gale la charge autour de I'agitateur.
Remarque : n'enroulez pas d'articles de grande taiNe,
comme les dr@s, autour de I'agitateur.
o Retirer le dispensateur a adoucissanL
AoDetergent
Suivre les instructions sur la charge de lessive,
Utiliser le rep@e sur I'agitateur, se rapprochant le plus
du haut du niveau de la charge, comme guide pour
d6terminer et verser la quantit6 de d6tergent a utiliser.
Verser le d6tergent au centre de la tige de I'agitateur.
/ " t 7{ -/\'_
Ne pas oubNer de remettre en place le dispensateur _ adoucissant car il emp6che les arSdes de
tomber au centre de Fagitateur.
BoEau de jave[
Si vous voulez ufiNser de I'eau de Javel :
° UtiNser la moiti6 de la dose recommand6e
d'eau de JaveL
o Diluer Feau de Javel et la verser doucement
dans le tube int@ieur de la tige du tambour,
aNgn6 avec les ailettes (vous r6f6rer a la section
Eau de Javel a la page 56),
o S61ectionner Foption RIN¢_AGEAVEC
ADOUCISSANT/JAVELLISANL Cela permet ;'_
tout r6sidu d'eau de Javel d'etre 6vacu6 de
votre kve-- Nnge,
/
Gdn de
o temps
Page 51

@
@
CoAdoucissant
Si vous voulez utiliser un adoucissant, le verser dans le
dispensateur a adoucissant en haut de Fagitateur.
S61ectionner Foption RIN¢_AGEAVECADOUCISSANT/
JAVELLISANT de mani@e ace que I'adoucissant soit
correctement d6vers# dans Feau du rinqage final (vous
r6f@er _ la section Adoucissant aux pages 52 et 56).
DoPuissance
D6marrer votre Bvedinge Ecosmat¢ _en appuyant sur la touche Puissance.
EoCycle de lavage
Refermerlecouvercle et s61ectionnervotre cycle de lavage.
FoOptions de lavage
o S61ectionnerBtemp@aturedeBvageetlesautresoptionsdeBvage(vousr6f@erauxpages51 _s54).
GoMise en marche
o Appuyer surlatouche Marche/Pause pour mettre en marche lamachine.
Si vous voulez arr_ter votre lavedinge Ecosm_rt ....
o AppuyersurlatoucheMARCHE/PAUSE,
o Attendre que la machine soit compl6tement arr6t6e et que let6moin de s6curit6 du couvercb
soit 6teint avant d'ouvrir le couverde.
Nous vous recomm_ndons de ret_rer vos v_tements d_s t_ fin du cycle pour respecter t_ cou_eur et
4v_ter d_ndomm_ger tes t_ssus.
Page 52

A p opos de votre Ecosmart"
Verrouillage du couverde
Votre lave linge Ecosmart _ est 6quip6d'un syst_me de
s6curit6 avec verrouillage du couvercle. Grace _ cette
fonction, le couvercle ne pourra pas @tre ouvert d'oO une
s6curit6 accrue pour vous et les membres de votre famille.
o gbts
o 3_rs
Le t6moin de s6curit6 du couvercle (situ6 au-dessus de
la touche Marche/Pause s'allume Iorsque le couvercle est
verrouill6 pour vous indiquer que vous ne pouvez pas ouvrir
le couvercle.
D@ar_
dfff4r4
Fig 12SCUR/TECT)UYERCLEacdv@
Si le t6moin de s6curit6 du couvercle clignote, cela signifie que le verrouilBge du couvercle est
en phase de verrouillage ou de d6verrouilBge. Pendant cette phase, vous ne pouvez toujours
pas soulever le couverde.
Si le couvercle est laiss6 ouvert, la laveuse ne pourra pas le verrouiller et le cycle sera arr6t6.
La machine 6mettra un bip sonore et le t6moin de s6curit6 du couvercle clignotera jusqu?a ce
que le couvercle soit rabattu et que vous appuyiez sur la touche MARCHE/PAUSE.
NE RIEN _ns_rer dans ta fente sur le plateau sup_rieur de votre tave,dinge.
NE PAS essayer de d_sactiver te verrouiHege du couverde.
Page 53

Cycles et options de avage
Lavage Eco ActiP 4 rain 4 rain 4 rain 4 rain -
Dur#e d'agitation e 12 rain 9 rain 6 rain 9 rain 9 rain
Mouvement de
FORT REGULIER FRAGILE REGULIER REGULIER
lavage
Temp de tavage TIEDE TIEDE TIEDE/ (IHAUDE TIEDE/
FROIDE FROIDE
Rin_;age Ringage par Rinqage par Ringage par 2 rinqages en Rinqage par
vaporisation vaporisation vaporisation profondeur a vaporisation
+ ringage en + ringage en + ringage en eau froide + ringage en
profondeura profondeur a profondeur a profondeur a
eau froide eau froide eau froide eau froide
................................................................................................................................................................................................................................................... }........................................................................................................
Vitesse d'essorage RAPIDE RAPDE LENT RAPIDE LENT
Dur6e de Fessorage d rain d rain 4 rain d rain 2 rain
_ N'indut pas les dur6es de remplissage.
Les Cycles de lavage
SALES S61ectionner ce cycle de Bvage pour les articles tr6s sales et les tissus r6sistants.
S#lectionner ce cycle de Bvage pour les articles en coton 16g6rement
REGULIERS
moyennement sales, les v#tements de lin, les tenues de travail et tenues de jeux.
Sdectionner ce cycle de lavage pour la lingerie et les tissus fragiles n6cessitant
FRAGILES
un nettoyage sp6cial et 16g@ement sales.
ALLERGIE Cycle conqu pour les personnes souffrant d'asthme ou pr6sentant une
peau sensible_
SYNTHETIQUES Cycle de lavage plus traditionnel pour les synth#tiques, les m#langes et/ou les
tissus fragiles normalement sales et les v#tements se froissant facilement,
Remarque : de lacondensation peut se former _]I'ext6rieur de la Bveuse Iorsque vous utilisez
le cycle ALLERGIE par temps froid. Cette condensation est caus#e par la temp@ature #lev6e
de I'eau de lavage et la temp@ature froide ;s Fext@ieur. II ne s'agit pas d'un probl6me de
fonctionnement,
Page 54

Cycles et options de avage
Rin_age avec adoucissant/javellisant
Utiliser Foption RIN(}}AGEAVEC ADOUCISSANT/JAVELLISANT :
Si vous utilisez un adoucissant [iquide
Si vous utilisez de Feau de Javel
Cette option change le rin_age pour inclure un rin_age
en profondeur et par vaporisation de mani6re ace que
Fadoucissant soit r6parti correctement eta ce que le carter
de la machine soit compl6tement nettoy6 de toute eau de
Javel restante a la fin du cycle,
Remarque: nous vous recommandons d'utiliser de pr6f6rence
des feuilles adoucissants pour s6cheJinge dans la mesure o8
les adoucissants/javellisants sont r6put6s pour provoquer une
accumulation d6sagr6able a I'int6rieur des lave--linge (vous
r6f6rer _ la section D6p6t collant a la page 57),
De plus, certaines charges sont mieux [av6es en utilisant un
cycle avec tin€age en profondeur comme par exemple, [es
v6tements fortement impr6gn6s de sable ou de sciure de bois
ou les v6tements qui d6teignent, Nous vous recommandons
de s6bctionner Foption RIN_AGE AVEC ADOUCISSANT/
JAVELLISANT pour ces charges, car cette s61ection changera le
rin(_age pour indure un rin_age en profondeur_
T_mp,
Lavag_
Fig.13 S6bction de
'option R[N_AGEAVEC
ADOUCISSANT/JAVELLISANT
Lorsque vous sdectionnez [bption TREMPER, votre [aveqinge
Ecosmart _s'arr@tera _'s[a fin du [avage et [aissera tremper
le [inge pendant 2 heures avant de terminer [e rin_age et
Fessorage, Pendant que le [inge est [aiss6 a tremper, votre
hve--linge d6cIenchera un mouvement d'agitation de quelques
secondes toutes les minutes,
Gain de temps
[,..'option GAIN DETEMPS vous permet d'6courter [e cycle de
hvage pour les v6tements 16g6rement sales, En s61ectionnant
cette option, vous pouvez r6duire le temps de lavage et la dur6e
de Fessorage,
Uoption Gain de temps peut 6tre activ6e ou d6sactiv6e istout
moment pendant le cycle,
T_mp.
Lavage
Fig.14 %qection de ['option
TREMPER
Fig.15 S_lection de ['option
GAIN DETEMPS
Page 55

Cycles et options de avage
N[veaux d'eau
Niveau d'eau automatique
Votre [avedinge Ecosmart _peut s#lectionner
automatiquement le niveau d'eau appropd# a la
charge de linge.
1 Mettre [es v6tements dana le Bvedinge et appuyer sur
la touche PUISSANCE
2 S6[ectionner [e cycle de [avage (s61ectionner [e niveau
d'eau Auto si[a sdection n'est pas automatique).
s AppuyersurMARCHE/PAUSE
Pendant le remplissage, la machine se mettra de temps
ix autre en pause pour d#terminer le niveau d'eau.
La machine v6rifiera si [e niveau d'eau eat correct via
une s#rie de deux temps d'agitation diffetrents (cela
prendra un peu plus d'une minute). Si elle d#tecte un
niveau d'eau insuffisant, die poursuivra le remplissage
et v6rifiera a nouveau le niveau.
o RaMde
o Chaud_ o _R_4 o g@yen
o Tilde o g@yen o Lenl
o Freide o Bas o @affe_
/
remp_ N_eau _@esse
Lavage Eau @serage
Fi916 S#[ect[on du nveau
d'eau AUTO
@
@
Lots du Bvage d'une charge inhabitudIe (comme par
exemple des vgtements volumineux, des oreillers), nous
vous recommandons de sdectionner manueIIement le
niveau d'eau et de sdectionner le cycle FRAGILES.
S6[ectionner manudlement le niveau d'eau s'il y a d6ia
de ['eau dana [a machine.
Lots du Bvage d'une charge volumineuse ou d'un seul
article volumineux (comme par exempIe un #dredon),
tasser la charge apr@s le premier remplissage.
S_[ection manue[[e du niveau d'eau
L'agitateur se caract6rise par cinq niveaux indiqu#s
sur sa tige et pouvant #tre uti[is#s pour vous aider
sdectionner lea niveaux d'eau appropri#s. S#[ecfionner
le niveau d'eau appropri# en utilisant [e rep6re se
rapprochant le plus du haut du niveau des v_tements.
o Lea niveaux indiqu6s sur ['agitateur ne correspondent
pas exactement au niveau d'eau. IIs indiquent le niveau
des v#tements sees appropd6 au niveau d'eau.
o Votre [ave-[inge Ecosmart _pourra de temps _ autre
rajouter de ['eau pendant la phase d'agitation afin de
maintenir le niveau d'eau a cause de la lib6ration de
Fair coinc6 dana [es v#tements.
o Leacharges non 6quilibr6es, [es v#tements entorti[[6s
et [es 6c[aboussures peuvent r6sulter de la s61ection
d'un niveau d'eau trop 6[ev6.
Fi9l 7 Rep#res de niveau d'eau
su_['agitateur
Page 56

Cycles et options de avage
En attente
Utiliser Ibption EN A/TENTE pour :
o Retirer des v6tements devant 6tre 6tendus mouill6s,
lesquels ont 6t6 lav6s avec une charge mixte, avant la phase
d'essorage.
o Minimiser le chiffonnage r6sultant des v6tements laiss6s en
attente dana la machine _ la fin du cycle.
Lorsque Foption EN ATTENTE eat s61ectionn6e, votre Bve-
linge Ecosmart _fera une pause _ [a fin du tin,age, 6mettra
un bip sonore et[e t6moin d'essorage cIignotera pour vous
indiquer qu'i[ attend d'autres instructions. Appuyer sur la
touche MARCHE/PAUSE pour d6marrer Fessorage.
D@art diff@6
Uoption D6part diff6r6 vous permet de retarder le d6marrage
du cycle de Bvage de 1, 3 ou 9 heures.
Appuyer une lois sur [a touche DEPART D[FFERE pour retarder
[e d6marrage d'une heure, appuyer _ nouveau pour 3 heures
et appuyer une troisi6me fois pour retarder [e d6marrage
de 9 heures (et appuyer une lois de plus pour retourner
Foption normale).
o Une lois que vous appuyez sur D@art diff6r6, votre [ave-linge
Ecosmart _commence [a p@iode de retardement et vous
n'avez pas _ appuyer sur Marche/Pause.
o Faire attention [orsque vous uti[isez ['option D6part diff@6
pour [esarticles n'6tant pas de bon teint car ils pourront
d6teindre si [es v6tements sont humides.
o Votre [ave--[inge Ecosmart _n'6mettra pas de bip sonore _ la
fin du cycle si ['option D6part diff6r6 a 6t6 s61ectionn6e.
Recommandations de [avage
Pour 6viter d'abimer accidentellement vos v6tements,
certaines options ne seront pas accept6es par votre lave-linge
Ecosmarff". Par exemple, vous ne pouvez pas s6bctionner un
lavage ;sFeau chaude pour le cycle FRAGILES.
o R_pide
o Lear
o ghfs
o 8_rs
Fig/19 S61ectionde I'option de
DEPARTDIFFEREI hr
Page 57

Avant avage
Pour obtenir d'excellents r#sukats au Bvage, trier vos
v6tements avant le Bvage.
CouJeur
Faire le tri entre les couleurs et le bBnc
L'ettiquette d'entretien vous d6crit letissu du v6tement
et comment le laver.
Sa_et_
Trier les v6tements salon le type et le niveau de salet6.
Suivant le type de salet6, il est pr6f@able de laver
Feau tilde comme par exemple la salet6 grasse tandis
que d'autres se Bvent parfaitement bien _ Feau froide
comme par exemple le sang ou la boue.
Pe[uche
Laver s%par6ment les v6tements ayant tendance
faire des peluches des v6tements ayant a I'inverse
tendance a attirer les peluches. Dans la mesure du
possible, laver a Fenvers bs v6tements ayant tendance
_ attirer les peluches
Lavage _ ta main
Javeminterdite
S_che4inge d_conseitt_
Repassage _ fer moyen
Nettoyage _ sec
Tissu 6ponge Synth6tiques
Chenille Velours c6tel6
Serviettes de Cotons polyesters
toilette
Chaussettes
V@ifier que les poches sont vides
Les articles mobiles peuvent endommager votre Bveuse et vos v6tements.
Fermer les fermetures _dair, tes crochets et oeittets pour vous assurer qu'ils ne se prendront
pas dans d'autres v6tements.
R@parer tout v@tement d@chir@s et recoudre les boutons laches
Les trous et les d6chirures pourront s'agrandir pendant le Bvage. Retirer tousles supports Bches
dans les soutiens-ogorge car ils nsquent d'endommager votre Bve--linge et/ou le s%chedinge.
Placez les articles tr_s d_icats darts un sac & bssive en filet
II est recommand6 d'y placer les articles de lingerie pour leur procurer une protection accrue et
6viter qu'ils ne s'emm%lent avec les autres articles.
D_tacher au pr_alable route tache
Utilisez une surface appropri6e pour appliquer les traitements, comme les d6tachants. Veuilbz
ne pas utiliser le couverde car vous pournez Fendommager.
V@ifier que le niveau d'eau est appropde a la charge
Vetdfier que la charge ne recouvre pas le dispensateur _ adoucissant pour 6viter toute
6claboussure.
Pour un charge _quilibr_e ;
o Un m61ange de petits articles et d'artides plus volumineux vous donnera de meilburs r6sukats
au lavage.
o R#partir les v6tements autour de Fagitateur.
o Ne pas envdopper bs articles vohimineux comme bs draps autour de Fagitateur.
Page 58

Avant avage
Eau de Javel
V6rifier 1'6tiquette d'entretien pour toute recommandation
sp6ciale.
Eau de Jave_ Jiquide :
1 Utiliser la moiti6 de la dose d'eau de Javel recommand6e et la
diluer dans de I'eau.
2 Retirer le distributeur a adoucissant et verser le liquide dans
le rebord interne de la tige de I'agitateur, en ligne droite
avec les ailettes. S61ectionner la touche RIN<AGE AVEC
ADOUCISSANT/JAVELLISANL Vous obtiendrez un tin€age en
profondeur qui fera dispara<[tre tousles r6sidus de iavellisanL
s Ajouter le d%tergent et remettre en place le dispensateur a
adoucissant.
4 Pour un r6sultat optimum, ajouter [e [iquide iave[[isant apr6s
que les deux premiers voyants lumineux de lavage ambres soient 6teints.
Eau de Jave_ en poudre :
\terser [a moiti6 de la dose d'eau de Javel en poudre recommand6e dans Fagitateur avec votre
d6tergent.
Temp.
La_age
Fig20 %lection de J'opt on
RIN_AGEAVECADOUCISSANT/
JAVELLISANT
Remarque : ne versez ]amais de iavellisant au chlore non dilu6 directement sur les v@tements,
ou directement au centre de Fagitateur. CeB pourrait causer des dommages.
Adoucissant
Uadoucissant se verse dans le dispensateur a adoucissant
situ6e en haut de I'agitateur. La ligne trac6e sur le
dispensateur a adoucissant sert de guide pour d6terminer la
quantit6 d'adoucissant a ajouter a une machine pleine. Les
charges plus petites n6cessiteront moins d'adoucissant.
Rin_age avec adoucissant
Si vous voulez utiliser de Fadoucissant Iorsque vous utilisez
les cycles R6guliers ou Sales, vous devez imp@ativement
s61ectionner Foption RIN¢_AGEA\iEC ADOUCISSANT/
JAVELLISANT. Cela modifie I'option de tin€age pour inclure un
tin€age en profondeur de mani6re ;sce que Fadoucissant soit
bien r6parti.
Tempo
La_aBe
Fig21%lection de {'opt on
RIN{AGE AVEC ADOUCISSANT/
;AVELL SANT
Page 59

D_p6t co[[ant
Avant avage
Le d6p6t collant correspond _ Faccumu[ation paraffineuse
provoqu6e par [e m6[ange du d6tergent et de ['adoucissant
comme r6gu[i@ement observ6 dans [es [avedinge. Cette
accumulation ne r6su[te pas d'une d6fai[[ance du [avedinge. Dans
le cas o8 [e d6p6t collant ne serait pas r6gu[i6rement retir6 du
lave[inge, ce[a risque de tacher vos v6tements ou de diffuser une
odeur d6sagr6able dans votre lave--linge.
Fig22 Pouss_zla coupelle dans
Si vous vou[ez ut[[iser de ['adoucissar% suivre nos Is distributeur ay_*.cle pousse
recommandat[ons : pour la refiner
o Uti[iser une petite quantit6 d'adoucissant.
o Lorsque vous remp[issez [e dispensateur a adoucissant, 6viter les 6claboussures et ne pas le
remp[ir jusqu'au rebord.
o Nettoyer le dispensateur a adoucissant d6s [a fin du cycle.
o Nettoyer votre [avedinge r6gu[i@ement (vous r6f6rer a la page 58).
o Les accumulations sont plus fr6quentes [orsque [e lavage est ef[ectu6 g ['eau froide. Nous vous
recommandons d'utiliser un cycle 5ynth6tiques ti6de a intervalles r6guliers (ex. : a tousles
5 Bvages).
o Les adoucissants moins 6pais laissent moins de r#sidus dans [e dispensateur a adoucissant et ne
contribuent donc pas a la cr#ation de I'accumulation du d6p6t collant
Page 60

Entretien de votre Edosm rt"
Entretien et nettoyage
Une fois que vous avez terming
o Fermer les robinets pour 6viter tout risque d'inondation dans b
cas oO un tuyau viendrait _ 6cBter.
o D6brancher le lave--linge de la prise murale.
Nettoyage du [avedinge Ecosmart TM
o Le nettoyer avec un chiffon doux humide et I'essuyer a sec. Ne
pas utiliser de produits chimiques ni de nettoyants a r6curer au
risque d'endommager les surfaces en plastique et la peinture.
o Vous pouvez retirer le couvercle pour le nettoyage. Ouvnr
compl6tement le couvercle, tenir un c6t6 d'une main
tandis que de Fautre main vous retirez Fautre c6t6 dana un
mouvement vers le haut.
o Pour remettre en place le couvercle, tenir le couvercle a la
verticale et aligner les deux charni@es avant de pousser
fermement pour I'enclencher.
o Pour retirer I'agitateur pour le nettoyer, d6visser 1'6crou en has
au centre de I'agitateur en le tournant dans b sens inverse des
aiguilles d'une montre.
_jJ_
Fig23 Retmit du couverc/e
L'agitateur doit _tre totalement poussdsur I'arbre torsque vous te remettez en place.
Setter refinement a tamaff_Y_crouoY_fifier que Yagitateur n_st pas tache.
Nettoyage du dispensateur _ adoucissant
Lorsque vous utiliser de I'adoucissant, rincer le dispensateur
_sadoucissant a la fin de chaque cycle de Bvage avec de
Feau tilde savonneuse.
S6parer la coupdle du dispensateur en poussant :_la base
de B coupdle.
Nettoyer I'int@ieur du lave°linge Eco.smart _'
Vous pouvez programmer un Bvage _ Feau chaude avec be
cycle PREF_:.REpour nettoyer votre laveuse en profondeur.
1 AppuyersurlatouchePUbSSANCB
2 Appuyer et maintenir enfonc6e batouche du cycbe Pr6f6r6
iusqu'a ce que vous entendiez deux courts bips sonores et
que bet6moin Pr6f6r6 cbignote.
s S6bectionner becycle Synth6tiques,
4 S61ectionner un lavage a b'eauchaude.
5 Appuyer a nouveau sur batouche Pr6fetr6 pour sauvegarder bas6bection.
6 La Bveuse Ecosmatt _ se remplira d'eau chaude et effectuera un lavage a chaud, IIest
recommand6 de nettoyer babaveuse a intervabbes de quebques mois en utibisant ce cycbe sans
ins@er de v6tements et en ajoutant deux tasses de d6tergent en poudre.
Fig24 Pc,ussez la coupelle dans
le distfibuteur avec le pou e
pour la rerirer
Page 61

Entretien de votre Ecosmart"
Produits dsquant d'endommager votre [aveuse Ecesmert"
o Les javellisants concentr6s, les produits d6sinfectants pour couches et les solvants a base
d'hydrocarbure (ex :essence et diluants pour peinture) peuvent endommager le fini ou les
composantes de votre laveuse. Ne lavez et ne s6chez jamais de v6tements tach6s par ces
solvants car ils sont inflammables.
o N'utilisez pas de vapodsateurs ou liquides de pr6traitement sur le dessus de la laveuse ou
proximit6 de celle- ci, car ces produits pourraient endommager le panneau de commande et les
autres surfaces.
o L'utilisation d'une teinture dans votre Bveuse peut tacher les composantes en pBstique. La
teinture n'endommagera pas la laveuse, mais nous vous conseillons de la nettoyer en profondeur
apr6s Futilisation. Nous ne recommandons pas Futilisation de d6capants _ateinture dans
votre laveuse.
Signaux et bips sonores du [avedinge Ecosmart_''
o Yotre/aveuse Ecosmart _6met des sons diff@ents des
autres laveuses.
o Pendant Fetvacuation de Feau vous entendrez la pompe
de la machine se mettre en marche et s'arr6ter rapidement
toutes les 10 secondes environ. Cela fait partie du syst6me
de retrait automatique des peluches du lave--linge
Ecosmart _,
o Pendant F6vacuation de Feau votre machine 6mettra
plusieurs courts bruits sourds, Votre machine v@ifie tout
simplement que Feau a 6t6 6vacu6e avant de proc6der _
Fessorage.
o Votre lave--linge _:cosmart _6mettra un bip sonore a la
fin du cycle ou si vous avez utilis6 Foption TREMPER ou
EN £TTENTE.
o Si votre machine continue d'6mettre des bips sonores ou
une s6rie musicale de bips, vous r6f@er _]la page 60.
Syst_me anti-peluche automatique
Votre laveuse Ecosmart _ dispose d'un syst6me anti-peluche automatique, Ce syst6me s6pare
automatiquement les peluches de Feau pendant le Bvage. Les peluches sont empdsonn6es
entre les cuves interne et externe, puis 6vacu6es _ala fin du lavage,
Page 62

En cas de signa sono e d appe aide
Avant d'appe[er [e service d'entretien
Veuillez life les pages suivantes avant d'appeler le service d'entretien.
Vous pouvez rem6dier a un grand nombre de probl6mes par vous--m6me en suivant les
instructions d6crites dans les pages suivantes.
Votre machine est capable de diagnostiquer ses propres probl6mes. En cas de probl6me, elle
6mettra un signal sonore et affichera un message vous indiquant ce qui ne fonctionne pas.
S6rie de p[usieurs signaux sonores _toutes [es 5 secondes etooo
>"Remarque : cette s6rie de signaux sonores est la m6me que celle que votre laveuse 6met
Iorsque vous la branchez _sla prise 61ectrique_
Le robinet d'eau chaude n'a pas 6t6 ouvert
Les filtres du tuyau d'alimentation peuvent 6tre bloqu6s_
L'eau chaude tir6e n'est pas suffisamment chaude pour maintenir la temp6rature de lavage
s61ectionn6e. S61ectionner une temp6rature de lavage inf6rieure_
Tuyaux d'arriv6e raccord6s _aI'envers_
Le robinet d%au chaude n'a pas 6t6 ouverL
Les filtres du tuyau d'alimentation peuvent 6tre bloqu6s_
Tuyaux d'arriv6e raccord6s a I'envers_
La temp6rature de I'eau froide exc_de les limites recommand@s_
Les robinets n'ont pas 6t6 ouverts.
Les filtres du tuyau d'alimentation peuvent 6tre bloqu6s.
Le tuyau d'etvacuation est trop baset I'eau sort en siphon de la machine.
Le d6bit d'arriv6e d'eau est trop faible.
L'appareil est surcharg# et les v#tements ne peuvent pas se d#pBcer_ Assurez-vous que
I'appareil est stable. Retirez des articles iusqu'a ce que les v6tements restants puissent se
d6pBcer librement.
S#lectionner un niveau d'eau sup#rieur.
Accumulation de lessive de savon dans la machine trop de d6tergent a St# utilis6 par rapport
au niveau de salet6 de la charge. Attendre la dissolution de I'accumuBtion Rincer les
v6tements en utilisant un ringage en profondeur_
Page 63

En 6as de signa se e e d%ppe Yaide
li! ii!ii
La brass6e n%st pas r6partie correctement Assurez-vous que I'appareil eat stable. R6partissez
la brass#e manuellement V_6rifiez si I'appareil eat au niveau. Assurez-vous que lea pieds de
Fappareil sont d6viss#s et que lea cales de mise a niveau en caoutchouc sont ins#r6es de
fa_on ace qu'il repose sur lea pieds plut6t que sur Respi6ces des coins. Reportezwous aux
Instructions d'instaRRation (pages 42 - 43)
V6rifier que le couverde eat ferm6.
Appuyer sur MARCHE/PAUSE (vous r6f@er a la page 50).
Un se@bip 6mis routes les secondes etooo
1 D#brancher la machine de la prise murale Attendre 60 secondes et la rebrancher avant de
fake fonctionner la machine.
2 Si le proN6me se reproduit, r6p6tez F6tape 1,
Si le probl6me persiste, contactez votre service d%ntretien le plus proche (voir ci-odessous).
Avant d'appeler, veuillez identifier le num@o de s@ie de votre laveuse. II eat situ6 dana le coin
sup@ieur gauche _ Farri@e.
Service 8 la dient61e
Pour communiquer avec un agent du service _]la dien@le Fisher & Paykel de votre r6gion,
veuillez appeler :
EtatsoUnis et Canada
SANS FRA[S 1,888,9,FNPoUSA (1o888°936°7872)
ou utilisez le lien sur cette page : www°fisherpaykeLcom
Remarque : une preuve d'achat vous sera demand#e pour toute demande de remboursement
ou r6paration. Nous vous recommandons d'agrafer votre preuve d'achat _acette page pour ne
pas F6garer.
Page 64

R ©b @mes de f© cU© eme t
V6rifier que I'alimentation eat sous tension,
D6brancher la machine de la prise murale Attendre 60 secondes avant de la rebrancher et de
fake fonctionner la machine
Vetrifier que I'alimentation dectrique de la maison n'est pas d6faiHante. Essayer de brancher un
autre appareil 61ectrom6nager.
VCrifier que [es robinets d%au froide et d%au chaude sont ouverts,
Leafikres du tuyau d'alimentation sont iB bIoquCs7
V6rifier que [bption DEPART DIFFERE n'a pas 6t6 endench6e.
Le couverde estdl lev67
V6dfier que [a machine ne siphonne pas,
V6rifier que le guide du tuyau noir eat install6.
Charge d6s6quilibr6e,
\@drier si la machine eat en 6quilibre et qu'elb ne bascub pas,
Accumulation de lessive de savon possible (vous r6f6rer ;_la section Tf}moin d'essorage
dignotant ;s la page (SO),
R6partition in6gale des v6tements dana le panier de lavage, votre lavedinge Ecosm(_rt _'_
compense en rCduisant [avitesse d'essorage.
Assurez-vous que [es pieds de ['appareil sont dCvissCs et que [es ca[es en caoutchouc sont
insCrCes de fa_on ace I'appareil soit au niveau et blen 6quilibrC.
Trop d'eau pour la charge (page 53),
La machine esten train de dCterminer le niveau d%au (vous rCfCrer a la page 53),
Certaines charges ne conviennent pas a [a fonction du niveau d'eau en automatique comme
lea orei[[ers, le linge de couchage, lea articles trCs vohm[neux SClectionner manuellement le
niveau d'eau_
Page 65

Rr©b @mes de f©nctie eme t
Claquement - lacharge est d6s6quilibr6e
Autres bruits - vous r6f@era Rapage 59.
Le niveau d%au est trop 61ev6 pour la charge r6sukant en des 6daboussures excessives. LJtiliser
un niveau d%au inf6rieur.
Les artkles tr6s volumineux (comme les oreillers et les 6dredons) peuvent provoquer des
6daboussures les laver sur le cycle FRAGILES.
Si le probl6me persiste, contactez votre service d%ntretien le plus proche (voir page 68).
Avant d'appeler, veuillez identifier le num@o de s@ie de votre laveuse. II est situ6 dans le coin
sup@ieur gauche is Farri6re.
Page 66

Prob 6mes de avage
Machine ou s6che--linge trop charg6.
S61ectionner un cycle FRAGILES ou SYNTHETIQUES dans la mesure o8 ces cydes ont 6t6
con_us pour limiter au minimum le probl6me du linge froiss6.
Sdectionner une vitesse d'essorage plus lente,
Ne pas Raisser Rehnge mouiH6 en attente dans ReBveohnge ou Repanier a hnge_
Quantit6 de d6tergent insuffisante pour la charge ou le niveau de salet6.
Le blanc est mieux lay6 s6par6ment. Faire le tri entre les articles 16g6rement sales et les articles
tr6s sales car les vCtements peuvent r6cup6rer la salet6 de I'eau de lavage sale,
Sdectionner la temp6rature de lavage en fonction du type de salet6, Le sang et la boue partent
mieux par exemple a I'eau froide tandis que la salet6 grasse requiert un lavage _]I'eau ti6de,
Lave--linge surcharg6.
Les charges se composant d'articles de diff6rentes tailles se lavent mieux (par ex des charges
de draps uniquement pourront ne pas donner un excellent r6sultat).
L'eau dure requiert plus de d6tergent que I'eau douce.
Laver s6par6ment les articles ayant tendance a pelucher comme les serviettes de toilette, les
draps en flanelle des articles ayant tendance _]attirer les pduches comme les tissus synth6tiques_
Lave-linge surcharg6.
Quantit6 de d6tergent insuffisante pour maintenir les peluches en suspension,
Le s6chage excessif en s6che-linge peut provoquer une accumulation d'61ectricit6 statique
darts les tissus synth6tiques et faire qu'iB attirent les peluches.
Lave-linge surcharg6.
Certains d6tergents doivent Ctre dissous au pr6alable, v6rifier le mode d'emploi sur le paquet
de d6tergent
II est possible que les temp6ratures ambiantes froides, les lavages _ I'eau froide et les temps
d'agitation r6duits ne permettent pas au d6tergent de se dissoudre compl6tement. Essayer de
dissoudre le d6tergent au pr6ahble.
Une accumulation caus6e par I'interaction de I'adoucissant et du d6tergent peut s'6mietter et
tacher les vCtements (vous r6f6rer a la section D6p6t collant £_la page 57)_
Une quantit6 de d6tergent insuffisante pour le niveau de salet6 sur les vCtements peut laisser
des taches noites su_ les v6tements_
Page 67

Rreb mes de avage
Laver et s#cher s6par6ment les v6tements n'#tant pas de bon teint
Les v#tements n'#tant pas de bon teint qui sont Biss6s en attente dans ReRavedinge ou Re
partier a hnge peuvent d6teindre sur d'autres v#tements_
Le lavage avec trop d%au (c%st-_s--direen sous charge) peut faire entortiller les v6tements Res
uns avec les autres,
Ne pas charger le Bvedinge en enro@ant les v6tements autour de I'agitateur_
Page 68

Ga ant[e [m[t6e
Lorsque vous achetez un nouvel appareil dectrom6nager Fisher & Paykel pour une utilisation
m6nag@e, vous recevez automatiquement une garantie limit6e d'un an couvrant les pi6ces de
rechange et la main d'c_uvre pour le service dana les 48 6tats du continent am@icain, Hawa[,
Washington D,C, et au Canada, Eu6gard a I',f\laska, la garantie limit6e est identique sauf que vous
devez prendre en charge les frais d'exp6dition du produit jusqu'au service clientde ou prendre
en charge les frais de d6placement du technicien de maintenance jusqu'a votre domicile, Lea
produits destin6s a 6tre utilis6s au Canada doivent Ctre achet6s par I'interm6diaire de la chaine
de distribution canadienne pour garantir la conformit6 avec la r6glementation en vigueur.
Si le produit eat install6 dana un v6hicule automobile, sur un bateau ou sur une unit6
mobile similaire, vous b6n6ficiez de la m6me garantie limit6e d'un an, mais il rel6ve de votre
responsabilit6 d'amener le v6hicule, bateau ou I'unit6 mobile dana laquelle est install6 le
produit au service apr6s-vente a vos frais ou de prendre en charge lea frais de d6phcement du
technicien de maintenance jusqu'au lieu o8 se trouve le produit,
Fisher & Payke[ s'engage _ :
R#parer sans frais encourus pour le propri6taire en termes de main d'c_uvre ou de mat#riau
une quelconque pattie du produit, dont le num6ro de s@ie setrouve sur le produit, s'av@ant
d6fectueuse, Eu 6gard a I'Alaska, vous devez prendre en charge lea frais d'exp#dition du produit
jusqu'au service client61e ou prendre en charge les frais de d6placement du technicien de
maintenance jusqu'a votre domicile. Si le produit eat install6 dana un v6hicule automobile, sur un
bateau ou sur une unit6 mobile similaire, il rel6ve de votre responsabilit6 d'amener le v6hicule,
bateau ou I'unit6 mobile dana laquelle eat install6 le produit au service ap@s-vente a vos frais ou
de prendre en charge lea frais de d#placement du technicien de maintenance jusqu'au lieu o8
se trouve le produit, Si nous ne pouvons pas r6parer une pi6ce d6fectueuse du produit apr6s un
hombre raisonnable de tentatives, nous proc6derons au remplacement de la pi6ce ou du produit
ou nous vous proposerons de vous rembourser int6gralement le prix d'achat du produit (frais
d'instalBtion et autres frais 6tant exclus), salon notre choix,
Cette garantie s'6tend a I'acheteur original eta tout propri6taire successeur du produit pour les
produits achet6s pour toute utilisation m6nag6re par une seule famille.
Le service en vertu de cette garantie limit6e devra 6tre assur6 par Fisher & Paykd ou par son
agent agr66 pendant lea heures normales de bureau.
Dur_e de cette garantie [[mit6e
Notre responsabilit6 en vertu de cette garantie limit6e expire UN AN apr@sla date d'achat du
produit par le premier consommateur,
Notre responsabilit6 en vertu de toutes garanties implicites, y compris la garantie implicite de
qualit6 marchande (une garantie implicite selon laquelle le produit eat adapt6 a toute utilisation
ordinaire) expire @jalement UN AN (ou dur6e sup@ieure comme requis par la Ioi en vigueur) _'_
compter de la date d'achat du produit par le premier consommateur, Certains Etats n'autorisent
pas lea limitations sur la dur6e de la garantie implicite, il eat donc possible que lea limitations sur
lea garanties implicites ne vous concernent pas.
Page 69

Cette garantie ne couwe pas les points su[vants ;
Ga ant[e [m[t6e
D
E
Les d6placements d'un technicien de maintenance jusqu'a votre domicile pour tout probl6me
non li6 a un d6faut dans le produit. Les frais du d6placement vous seront factur6s si le probl6me
s'av6re ne pas 6tre un d6faut du produit. Par exemple :
1. Rectifier une mauvaise installation du produit.
2. Vous expliquer comment utiliser le produit.
3. Remplacer les fusibles de la maison ou proc6der au r@jlage des disjoncteurs, refaire le
cablage ou la plomberie de la maison ou remplacer les ampoules.
4. Rectifier les d6faillances provoqu6es par Futilisateur.
5_ Rectifier le r6glage du produit.
6. Modifications non autoris6es du produit.
7. Bruits ou vibrations consid@6s normaux, comme par exemple, les sons de drain/ventihteur,
les bruits de r6frig@ation ou les bips sonores.
8. R6parations des dommages provoqu6s par des animaux nuisibles comme les rats ou les
cafa rd s,etc.
D6fauts caus6s par des facteurs autres que
1. [/utilisation m6nag@e normale ou
2. L'utilisation en conformit6 avec le manuel d'utilisation du produit.
Les d6faillances du produit caus6es par accident, la n6gligence, une mauvaise utilisation,
Fincendie, I'inondation ou une catastrophe naturelle.
Les frais des r6parations effectu6es par des r6parateurs non agr66s ou les frais associ6s a la
correction de telles r6parations non autoris6es.
Les frais de d6pBcement et frais associ6s encourus Iorsque le produit est install6 dans un
endroit disposant d'un acc6s limit6 ou restreint (p. ex. :frais d'avions, frais de ferry et zones
g6ographiques isol6es).
La maintenance recommand6e normale comme 6nonc6e dans le manuel d'utilisation du produit.
En cas de probl6me avec I'installation, prenez contact avec votre revendeur ou instalBteur.
Les raccordements 61ectriques et d'6vacuation et autres raccordements rel6vent de votre
responsabilit6.
Nous ne sommes pas responsable des dommages indirects (les frais des r#parations ou les
[rais de rempBcement d'autres propri6t6s endommag6es si le produit est d6fectueux ou vos
d#penses encourues si le produit est d6fectueux). Certains Etats n'autorisent pas I'exclusion ou la
limitation des dommages indirects, il est donc possible que la limitation ou Fexdusion ci-odessus
ne s'applique pas ;avotre situation.
Page 70

Garantie imit6e
Comment so[[iciter [e service dient6[e ?
Veuillez [ire [e manuel d'utilisation. Si apr6s [a lecture du manuel, vous avez tou]ours des
questions sur [e fonctionnement du produit, ou si vous avez besoin de conna_tre [e non de votre
repr6sentant Fisher & Paykel agr66 local ou si vous pensez que le produit est d6fectueux et que
vous souhaitez contacter [e service clientele dans [e cadre de cette garantie limit6e, veuillez
prendre contact avec votre revendeur ou nous appder au num6ro suivant :
EtatsoUnis et Canada
SANS FRA[S 1_888_9_FNPoUSA(1_888o936_7872)
ou utilisez le lien sur cette page : wwwofisherpaykeLcom
11est possible qu'i[ vous soit demand6 de fournir une preuve valable de [a date d'achat du produit
avant que le produit puisse 6tre accept6 par le service clientele en vertu de cette garantie limit6e.
Uti[isation commercia[e
Si vous utilisez le produit dans un environnement commercial (toute autre utilisation que
I'utiIisation par une unit6 familiaIe simple), nous nous engageons {] r6parer ou rempIacer, sans frais
de pi6ces uniquement, les pi6ces d6fectueuses dont le num6ro de s6rie figure su le produit Notre
responsabilit6 eu 6gard _aces r6parations expire UN AN iscompter de la date d'achat originab.
Se[on notre choix, nous proc6derons au remplacement de la pi6ce ou du produit ou nous vous
proposerons de vous rembourser int6gralement [e prix d'achat du produit (frais d'installation
et autres frais 6tant exclus). Le service en vertu de cette garantie limit6e devra 6tre assur6 par
Fisher & Paykd ou par son agent agr66 pendant les heures normales de bureau.
Aucune autre garantie
Cette garantie [imit6e constitue ['int6gra[it6 de ['accord exc[usif pass6 entre ['acheteur et
Fisher & Paykel eu 6gard a toute d6faillance du produit Aucun de nos employ6s (ou de
nos agents agr66s) n'est autoris6 a proc6der a un quekonque ajout ou a une quekonque
modification de cette garantie [imit6e.
Garant : Fisher & Paykd Appliances, [nc
Sivous avez beso[n d'assistance eu 6gard acette garantie limit6e, veuillez nouscontacter au
num6ro ci--dessusou nous6crire a I'adresseci--dessous:
Fisher& PaykelAppliances, Inc
5900 Skyiab Road
Huntington Beach
CA 92647
Cette garantie [imit6e vous donne des droits ]uridiques sp6cifiques et il est 6gabment possible
que vous b6n6ficiez d'autres droits pouvant varier d'un 6tat _aun autre.
Page 71

 Loading...