


Ice & Water refrigerator
E522B & RF201A models
Installation instructions
and User guide
Réfrigérateur Ice & Water
E522B & RF201A modèles
Instructions d’installation
et Guide d’utilisation
US CA

English Page 1 – 43
Français Page 45 – 86

Contents
Introduction 2
Safety and warnings 3
Installation instructions 5
Before you start using your Ice & Water refrigerator 15
All about the display 16
Using the display options 18
Bottle Chill 18
Fast Freeze 18
The temperature of your refrigerator and freezer 19
Settings 19
User warnings 20
Using your water dispenser 21
Water filter 22
Using your ice maker 24
Active Smart™ special features 26
Cleaning and caring for your refrigerator 28
On vacation/holiday 31
Refrigerator sounds 32
Storing food in your refrigerator 33
Storing food in your freezer 34
Troubleshooting 36
Limited warranty 40
Filter performance data sheet 87
US
1
CA
Important!
SAVE THESE INSTRUCTIONS
The models shown in this User Guide may not be available in all markets and are
subject to change at any time. For current details about model and specification
availability in your country, please visit our local website listed on the back cover
or contact your local Fisher & Paykel dealer.
Note that the word “refrigerator” throughout this User Guide, refers to combination
refrigerator/freezer products.

US
CA
2
Introduction
Thank you for buying a Fisher & Paykel Active Smart™ refrigerator with chilled water through the
door and automatic ice dispensing.
At Fisher & Paykel we are very proud of this refrigerator. This refrigerator combines size and
storage space with the latest features and functions. We feel we have achieved water dispensing
through the door without compromising storage space or access to the refrigerator.
Thousands of hours of food care research and 75 years of refrigeration experience has been
programmed into your refrigerator to give you the best possible performance.
We hope you enjoy your new refrigerator.
Fig.1 Ice & Water Refrigerators
Important!
It is important that this User Guide should be retained with your Ice & Water refrigerator for
future reference. Should the appliance be sold or transferred to another owner, please ensure
that the User Guide is left with the appliance. This will ensure that the new owner can familiarize
themselves with the information and warnings contained within the Guide.
Safety and warnings
WARNING!
Electric Shock Hazard
Read and follow the SAFETY AND WARNINGS outlined in this User Guide
before operating this appliance.
Failure to do so can result in death, electric shock, fire or injury to persons.
Use this appliance only for its intended purpose as described in this User Guide.
Important safety precautions
Warning
When using this appliance always exercise basic safety precautions including the following:
Danger
Refer to the stability bracket and leaflet supplied (RF201A models only) to avoid hazard due to
instability of the appliance.
This appliance is not intended for use by children or infirmed persons without supervision. This is
especially important when using the freezer drawer compartment.
Young children should be supervised to ensure they do not play with the appliance.
Risk of child entrapment. Before you throw away your old refrigerator or freezer:
– Take off the doors
– Leave the shelves in place so that children may not easily climb inside.
US
3
CA
Disposal
Extreme care must be taken when disposing of your old appliance to avoid hazards. The
refrigerant gas must be safely removed and for the safety of young children, remove doors.
Your Fisher & Paykel Appliances Authorized Service Center will be able to give advice on
environmentally friendly methods of disposing of your old refrigerator or freezer.
Electrical
This appliance must be properly installed in accordance with the installation instructions before
it is used.
Never unplug your refrigerator by pulling on the power cord.
Always grip the plug firmly and pull straight out from the outlet socket.
Do not plug in any other appliance at the same power point as your refrigerator or use extension
cords or double adapters.
Repair or replace immediately all electric service cords that have become frayed or otherwise
damaged. Do not use a cord that shows cracks or abrasion along its length or at either the plug
or appliance end.

US
4
Safety and warnings
CA
If the power supply cord is damaged, it must only be replaced by your Fisher & Paykel Appliances
Authorized Service Center because special purpose tools are required.
When moving your appliance away from the wall, be careful not to roll over or damage the
power cord.
Unplug your refrigerator before cleaning or replacing the interior lightbulb.
Important!
Your refrigerator is designed to operate for many years without the need for service checks.
However, if your refrigerator is malfunctioning, have it attended to by your Fisher & Paykel
Appliances Authorized Service Center as soon as possible. All electrical repairs must be carried
out by an adequately trained service technician or qualified electrician.
Storing food and drinks
Never store volatile or flammable materials in your refrigerator or freezer as they may explode.
Never freeze liquids in glass containers. Liquid expands during freezing, which may cause the
container to explode.
Never freeze carbonated drinks. They may explode.
Do not consume food if it is too cold. Food removed from the freezer compartment may be cold
enough to cause damage when brought into contact with bare skin, eg. frozen ice cubes.
Power failure – food safety
Do not refreeze frozen foods that have thawed completely. Follow the recommendations below if
you discover food in your freezer has thawed:
1) Ice crystals still visible – food may be refrozen but should be stored for a shorter period than
recommended.
2) Thawed but refrigerator cold – refreezing generally not recommended. Fruits and some
cooked food can be refrozen but use as soon as possible. Meat, fish, poultry – use immediately
or cook then refreeze. Vegetables – discard as they usually go limp and soggy.
3) Thawed and warmer than 41°F (5°C). Discard all food.
Do not refreeze frozen foods that have thawed completely. The food may be dangerous to eat.
Important!
Cleaning
Many commercially available cleaning products contain solvents which may attack plastic
components of your refrigerator or freezer and cause them to crack. Please refer to the cleaning
care section of this booklet for further advice.
SAVE THESE INSTRUCTIONS
Installation instructions
WARNING!
Electric Shock Hazard
Read and follow the SAFETY AND WARNINGS outlined in this User Guide
before operating this appliance, pages 3 – 4.
Failure to do so can result in death, electric shock, fire or injury to persons.
Please follow the steps for installation to ensure your appliance operates correctly.
1. Power
The appliance must be installed so the plug is accessible.
To ensure that the appliance is not accidentally switched off, connect your refrigerator to its
own power point. Do not plug in any other appliance at this power point or use extension cords
and double adaptors, as the combined weight of both power cords can pull the double adaptor
from a wall outlet socket.
For power requirements, refer to the information on the serial plate located at the front bottom
right-hand side of the refrigerator when the door is open.
It is essential that the appliance be properly grounded (earthed).
2. Location
US
5
CA
Your refrigerator should not be located in direct sunlight or next to any heat generating
appliance such as a cooktop, oven or dishwasher.
O
O
O
O
US
CA
6
Installation instructions
E522B RF201A
Flush with refrigerator chassis – full door rotation
O
Flush with refrigerator door – full door rotation
P
Flush with refrigerator door – 90° door rotation
Flush with refrigerator chassis – full door rotation
O
Flush with refrigerator door – full door rotation
P
Flush with refrigerator door – 90° door rotation
Installation instructions
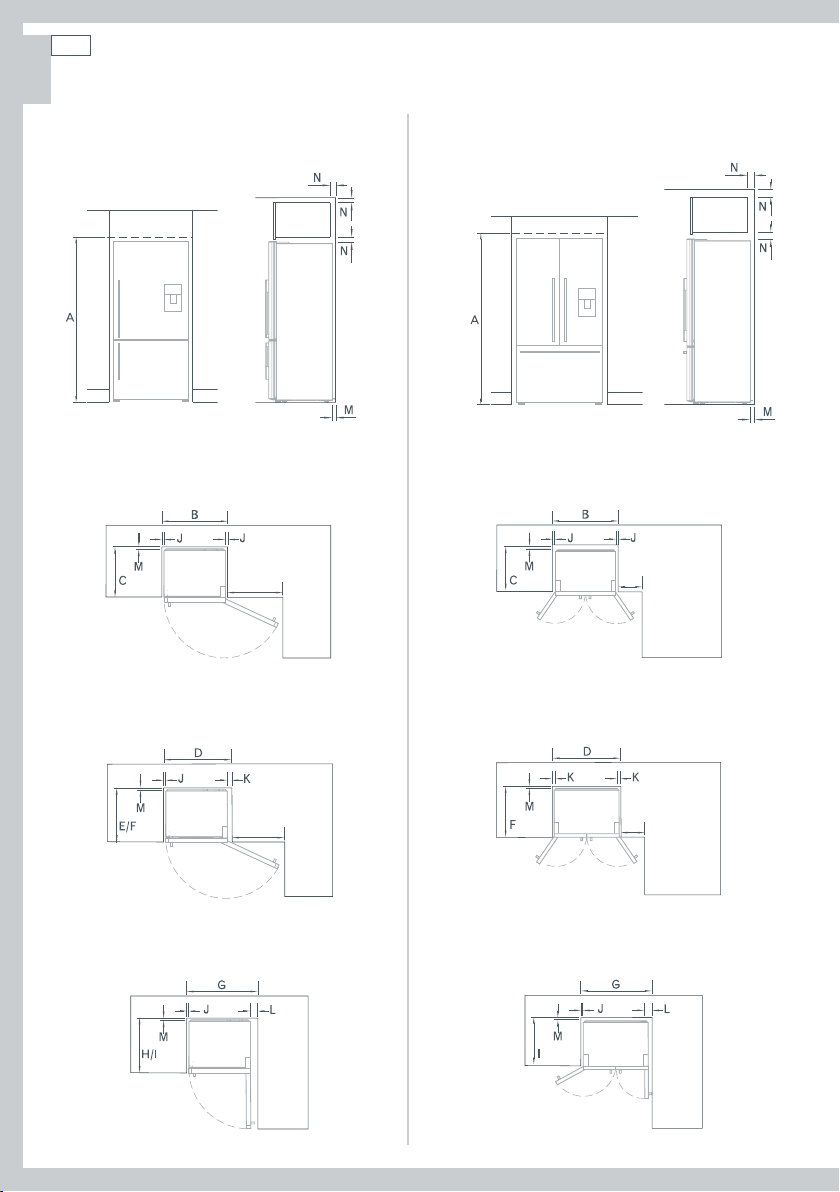
3. Ventilation and installation
To ensure adequate ventilation for your refrigerator and its correct operation see recommended
cabinetry dimensions below.
These measurements do not include space for the water filter at the back of the cabinet as we
recommend that the filter is placed as close to the incoming water supply as possible.
E522B RF201A
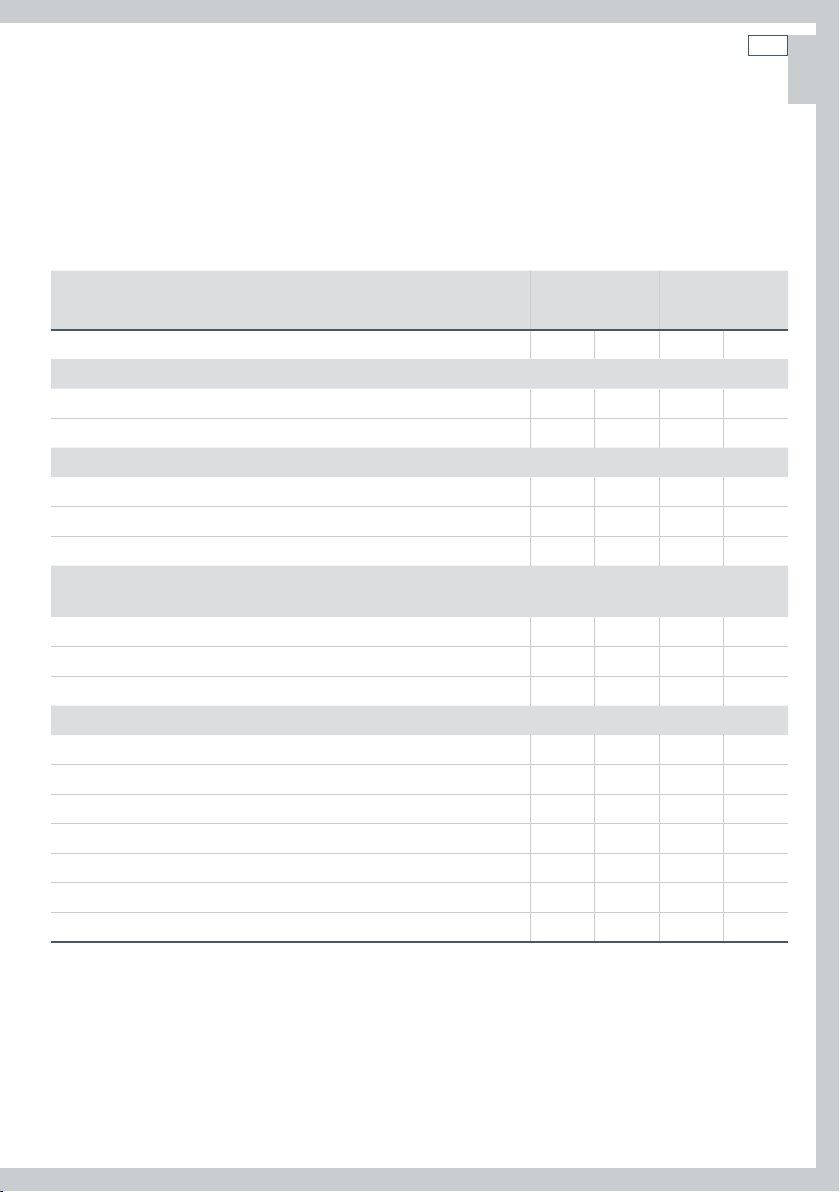
Cabinetry dimensions (including minimum air clearances)
A
inside height 68/ 1735 71/ 1810
Flush with refrigerator chassis – full door rotation
B
inside width 32⁄ 830 37 940
C
inside depth 24⁄ 620 24⁄ 620
Flush with refrigerator door – full door rotation
D
inside width 33⁄ 860 39⁄ 1000
E
inside depth flush to curved door 26⁄ 675 – –
F
inside depth flush to flat door 27⁄ 690 27 ⁄ 690
Flush with refrigerator door – 90° door rotation
(for full drawer/shelf access, the doors need to be open past 90°)
G
inside width 35⁄ 900 39⁄ 1010
H
inside depth flush to curved door 26⁄ 675 – –
I
inside depth flush to flat door 27⁄ 690 27 ⁄ 690
Minimum clearances
J
side clearance ⁄ 20 ⁄ 20
K
side clearance – hinge side flush with door – full rotation 2 50 2 50
L
side clearance – hinge side flush with door – 90° rotation 3⁄ 90 3⁄ 90
M
rear clearance (incl. evaporator tray) 1⁄ 30 1⁄ 30
N
vent (above refrigerator cabinet or around top of cupboard) 2 50 2 50
O
door clearance – hinge side flush with chassis – full rotation 25⁄ 645 14⁄ 365
P
door clearance – hinge side flush door – full rotation 24⁄ 615 13⁄ 335
inches mm inches mm
US
7
CA
US
8
Installation instructions
CA
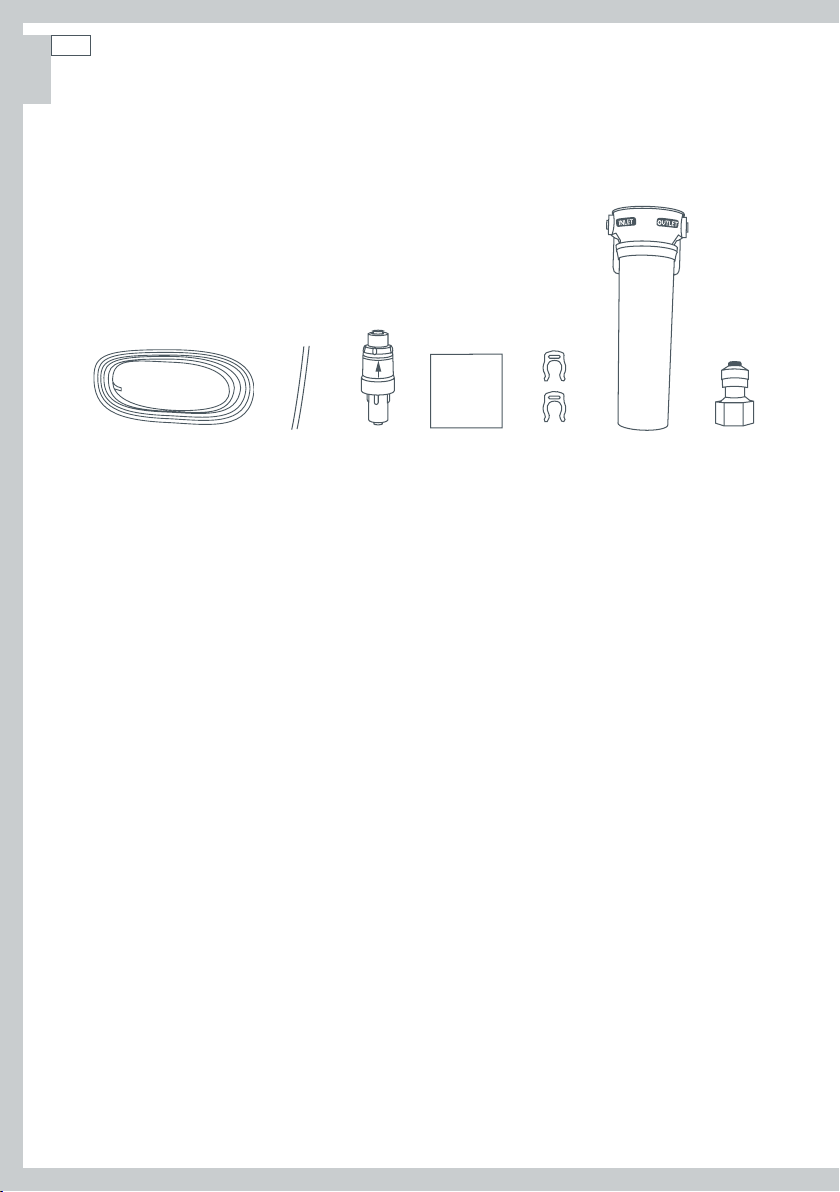
Contents of filter kit
1
13 ft (4 m) white ¼” (6 mm) tubing
2
1 x 8” (200 mm) blue tubing
3
1 x pressure reducing valve (PRV)
4
1 x double sided tape
5
2 x locking keys
6
1 x water filter cartridge and head
7
1 x faucet connection
1 2 3 4 5 6 7
Important!
It is imperative the pressure reducing valve (PRV) is fitted prior to the filter. This valve ensures the
water will not flow back into the mains from the refrigerator water system. If the PRV is not fitted
to the connection line, the Ice & Water features may not function in some circumstances.
The water connection to your Ice & Water refrigerator must be installed by an authorized
plumber or authorized Fisher & Paykel service person.
The water connection instructions below are intended only for the professional installer.
The new tubings supplied with the refrigerator are to be used, old tubings from old Ice & Water
connections should not be used.
Fig.2 Water connection kit
Installation precautions/warning
DO NOT use with water that is microbiologically unsafe or of unknown quality without
adequate disinfection before or after the system.
WARNING – connect to potable water supply only.
DO NOT install on line pressure above 119 psi (827 kPa) or below 22 psi (150 kPa).
DO NOT use on hot water supply (100°F [38°C max.]).
DO NOT cut any length of tube shorter than 200 mm.
DO NOT install near electrical wires or water pipes that will be in the path of drilling when
selecting the location of filter system.
DO NOT mount filter in such a position so that it will be struck by other items, such as
wastebaskets, etc.
DO NOT install the filter or any water tubing in direct sunlight as prolonged exposure to light
can weaken plastic components.
DO NOT install in a location that is susceptible to freezing temperatures as damage to the
housing could occur.
DO NOT screw filter to the refrigerator.
DO NOT install the filter or any water tubing in high temperature areas eg in a ceiling cavity.
AVOID contamination of pipes during installation.
DO NOT use copper tubing. The plastic tubing supplied should always be used.
DO NOT continuously dispense water for longer than 2 minutes.
Installation instructions
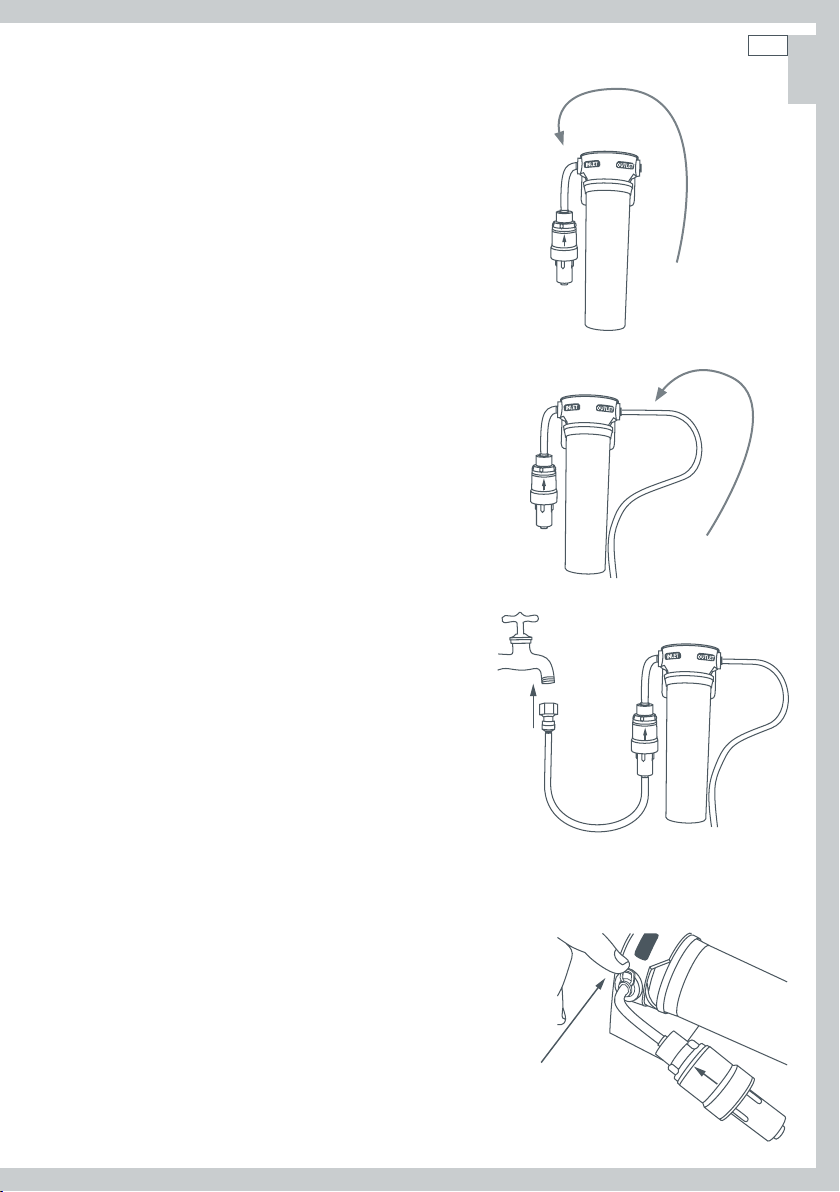
Installation instructions:
1
Ensure the refrigerator is NOT plugged into a power supply.
2
Locate a cold water supply/feed only suitable for a water
connection. Tee and tap fitting is not supplied.
3
Connect the 8” (200 mm) blue tubing to the outlet of the
PRV (blue collet) and the inlet connection of the water filter
cartridge as shown in Diagram 1. Gently pull on both ends to
ensure it is locked.
4
Connect the white ¼” (6 mm) tubing to the outlet of the
water filter cartridge as shown in Diagram 2. Gently pull to
ensure it is locked.
5
Measure the required length of tubing to run from the PRV
to the water connection point.
6
Cut the tubing making sure the ends are square and clean.
7
Connect the tubing to the faucet connection and the base
of the PRV (white collet) and then to the faucet as shown in
Diagram 3. Please note that the faucet connection supplied
should fit most installation situations.
8
Connect one locking key to each side of the water filter
cartridge in between the cartridge and the locking
collet as shown in Diagram 4.
9
To flush the water filter of any trapped air, harmless
carbon fines and to also check for leaks, aim the end
of the tubing into a bucket, turn isolating faucet on
and run at least 10 qt (10 L) of water through. Once
complete, turn isolating faucet off.
10
Locate desired position for water filter noting carefully
the following points:
It is recommended to fit the water filter in a
vertical orientation with the water filter head at the
top. This will minimize water leakage when replacing
cartridge.
Ensure the filter is in a convenient location to access
every 6 months for replacement. We suggest that this
location is beside the water filter supply faucet in a
cupboard beside the refrigerator.
A minimum clearance of 2 ½” (64 mm) from the
bottom of the filter cartridge is required to perform
cartridge removal.
Do not screw water filter to refrigerator.
9
Diagram 1
Fig.3 PRV connection
Diagram 2
Fig.4 Waterline connection
to refrigerator
Diagram 3
Fig.5 Faucet connection
INLET
US
CA
Diagram 4
Fig.6 Locking key
US
10
Installation instructions
CA
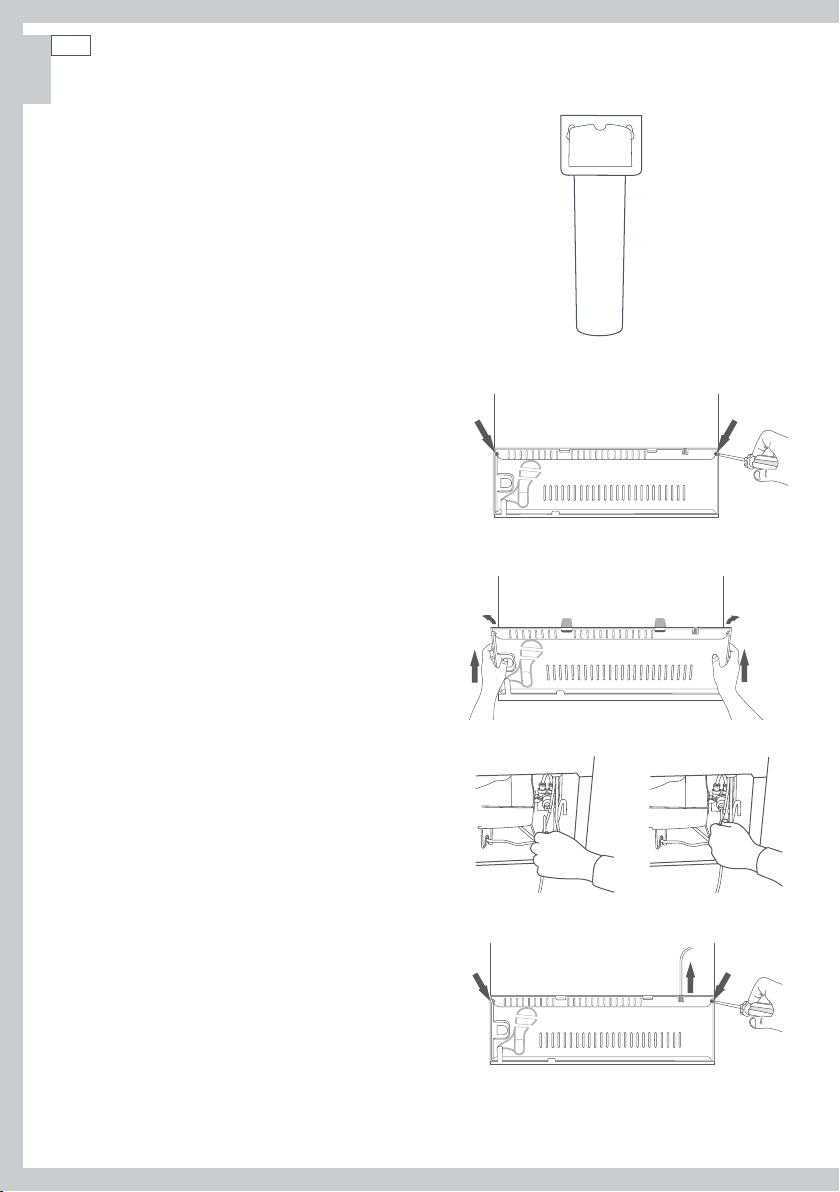
11
Attach double sided foam to the back of the
water filter head as shown in Diagram 5. Write
the date to be replaced on the filter (date
installed + 6 months). Remove double sided foam
backing and attach filter to the desired position
as located in step 10 (refer to previous page).
12
Run the ¼” (6 mm) tubing to back of the
refrigerator ensuring there is enough tubing to
pull out the refrigerator for service.
13
Remove compressor compartment cover by
removing screw at the top of each side of the
cover as shown in Diagram 6. Lift and tilt the
compressor compartment cover to remove as
shown in Diagram 7.
14
Connect tubing into the water (solenoid)
valve located on the right hand side of the
unit (compressor) compartment as shown in
Diagram 8. Beware of hot pipes.
15
Pull gently on tubing to ensure it is locked in as
shown in Diagram 9.
16
Place compressor compartment cover back into
position, run the ¼” (6 mm)
tubing through the space provided at the top
right hand side of the compressor compartment
cover in an upward direction and rescrew the
compressor compartment cover as shown in
Diagram 10.
17
The completed installation should look like
Diagram 12 on page 11.
18
Turn isolating faucet on and check that all
connections are dry and free of drips.
19
Coil water line tubing behind the refrigerator.
Push your refrigerator into place being careful
not to kink or squash the water line running into
the water (solenoid) valve.
20
Read pages 12 – 14 carefully and then turn
refrigerator on.
21
The first time you require water out of the
dispenser, there will be a delay while the water
reservoir fills up.
22
Run a further 3 qt (3 L) through the system,
stopping intermittently to ensure the reservoir
is flushed out. Failure to do this will result in
excessive dripping from your dispenser.
Diagram 6
Diagram 7
Diagram 8
Diagram 10
Diagram 5
Fig.7 Double sided
foam attachment
Diagram 9
Fig.8 Waterline connection to refrigerator

Installation instructions
23
Press until the Ice menu is highlighted then press to turn on the ice maker. Press
together to force a cycle. The ice tray will flip. Force another cycle. The ice tray will flip and spill
the water into the ice bin. Empty water and replace bin.
24
You are now ready to enjoy chilled water and ice dispensing from your Active Smart™ refrigerator.
Please note that once installation is complete a few drips may appear out of the dispenser over
the next few days as the remaining trapped air is cleared.
Important!
All connections must be checked for leaks.
Ensure white ¼” (6 mm) tubing is routed away from sharp objects, sharp corners (beware of
kinking tube as this will stop water flow), clear of the refrigerator unit compartment and not in a
location where it can be squashed.
Ensure all push-fit connections are firmly pushed into place. The tube should push in ¾” (20 mm)
before reaching the stop.
If tubing is removed at any point, re-cut the end and re-insert. Tubing must be fully inserted to
avoid leaks.
To remove tube from connection points, turn off the isolating faucet, push in the collet and
gently pull tubing at the same time, as shown in Diagram 11.
11
US
CA
Diagram 11
Fig.9 Connection to water supply
Diagram 12
System tested and certified by NSF International against NSF/ANSI Standard 53 for the reduction
of Asbestos, Atrazine, Benzene, Cyst, Carbofuran, Lead, Lindane, Mercury, P-Dichlorobenzene,
Toxaphene & Turbidity; against Standard NSF/ANSI 42 for the reduction of Chlorine Taste and
Odor and Nominal Particulate Class I to a capacity of 750 gallons (2,838 liters).
US
12
Installation instructions
CA
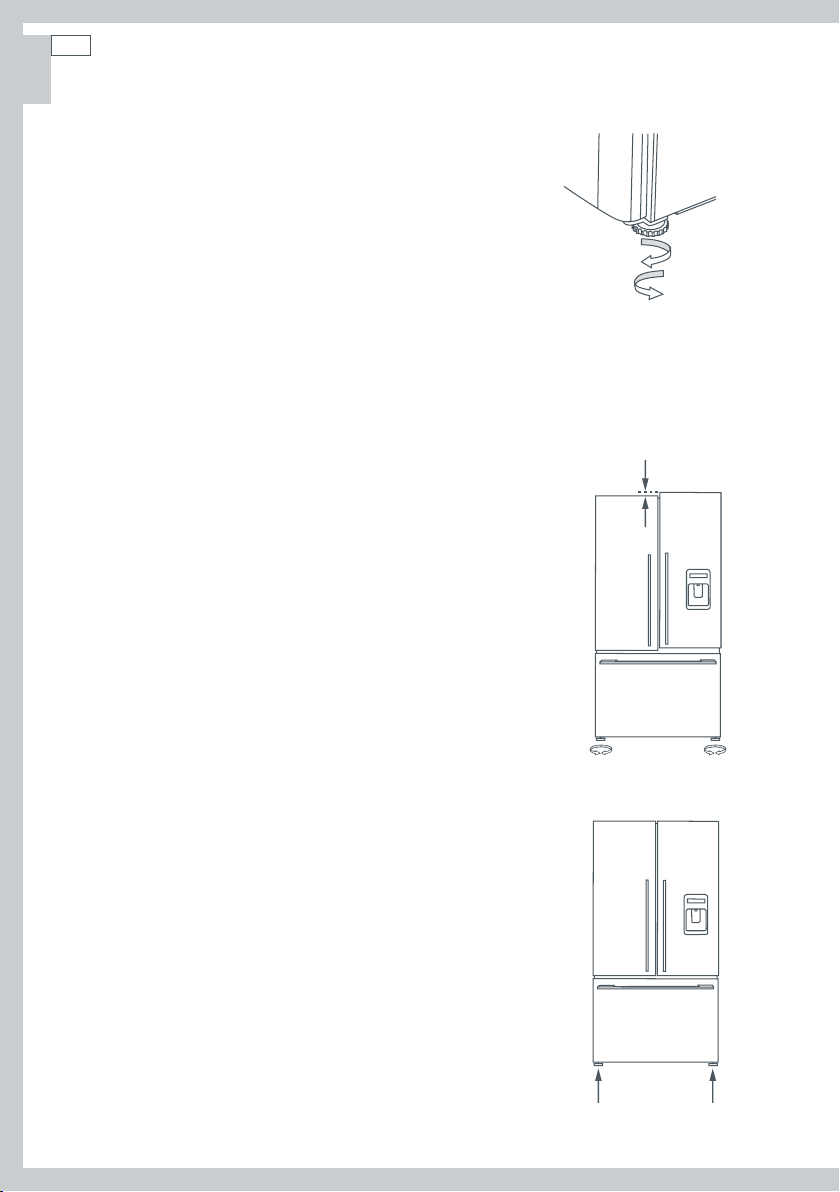
4. Installation
Your Fisher & Paykel Active Smart™ refrigerator is fitted
with front and rear rollers, designed for moving the
product in the forwards and backwards direction.
Avoid moving the product in a sideways direction
as this may damage the rollers or the floor
covering/surface.
A
Your refrigerator will arrive with the front feet wound
up making moving the product into its final location a
simple task.
B
Roll the refrigerator into its final position making sure
there is the correct air gap between the product and
surrounding cabinetry. See minimum clearance in
cabinetry dimensions table (refer to page 7).
(RF201A only)
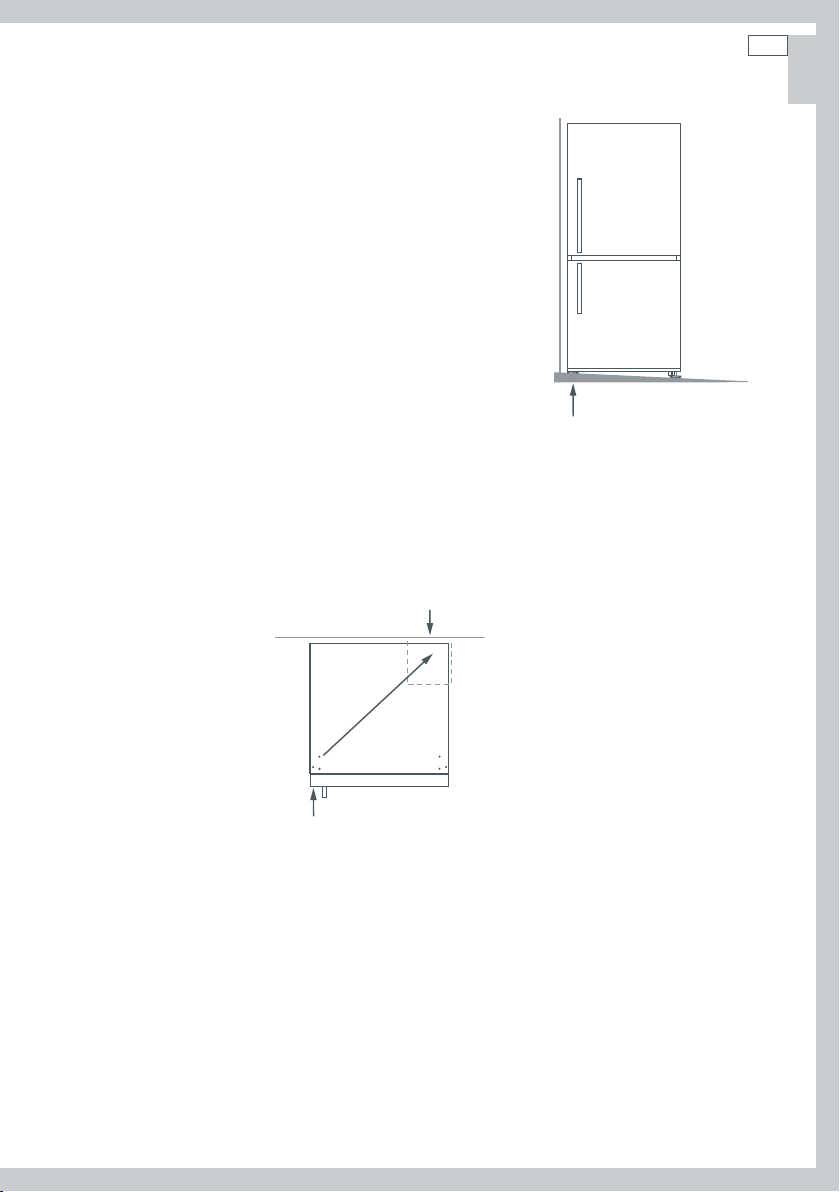
C
Adjust the front feet down until the refrigerator
is leaning backward with the front approximately
/” (10 mm) higher than the back. This will ensure
a good door closing action (refer to Fig.10).
Lower the front
of the refrigerator
Fig.10 Refrigerator feet
Raise the front of
the refrigerator
D
Aligning your refrigerator with cabinetry.
Align the sides of the refrigerator with the cabinetry
by adjusting the hinge side front foot.
Adjust the handle side foot until it touches the floor
and takes a small amount of weight.
Once the refrigerator is in place and aligned with
cupboards/alcove, push gently on the front top and
check if the product is rocking or stable.
5. Leveling of refrigerator door
(RF201A only)
For uneven surfaces, front feet can be used to align the
2 doors.
If left hand door is too low, then unscrew the left hand
foot to lift up the cabinet until the two doors top
edges are aligned.
If right hand door is higher, then adjust the right hand
foot in the same way.
Fig.11 Uneven door alignment
Fig.12 Even door alignment
Installation instructions
6. What to do if your product is unstable
E
Gently push the refrigerator back until the rear rollers
contact the floor.
Measure the gap under the front foot, which has come
off the floor.
Obtain some solid packing material (hardwood,
plastic, etc) which fits firmly into the gap under the foot.
Note: do not use metallic materials that may corrode,
stain and/or damage floor coverings.
F
Wind both front feet up and roll the product out
of position.
Place the packing material in the location diagonally
opposite the front roller that lifts off the floor.
Make sure the packing material stays in place when the
product is pushed back into position.
Ideally, the packing material is large enough to rest
against the back wall so as to prevent it moving when
the cabinet is pushed into position.
Wall behind refrigerator
Un-level floor
This foot lifts off the floor when
top front is gently pushed back
Fig.13 Unstable refrigerator
Packing material goes under rear roller
diagonally opposite front foot that lifts
Example only
13
US
CA
For example: if this foot lifts off
the floor when pushing gently on
the top front of the refrigerator
G
Roll the refrigerator back into position and adjust front feet as per step D. (Check alignment and
Fig.14 Stabilizing your refrigerator
door closing action are satisfactory).
Make small adjustments to front feet where necessary.
Check that the product is stable (all 4 feet are on the floor). If not return to step E and repeat
F
steps
and G.

US
CA
14
Installation instructionsInstallation instructions
Before placing food in the fresh food or freezer compartments
Remove all packaging. Ensure that all transit clips are removed from the refrigerator. These are
small rubber stops located at the back of the shelves.
Clean the inside of the appliance with a mix of warm water, a little liquid detergent and a soft
cloth to remove manufacturing and transportation dust.
Allow the refrigerator and freezer to run empty for 2 – 3 hours to allow each compartment to
cool to the appropriate temperature.
The appliance may have an odor on its initial operation, but this will go when the refrigerator
and freezer have cooled sufficiently.
Energy efficiency
For the most energy efficient use of your appliance:
Ensure your refrigerator has adequate ventilation as recommended in the installation instructions.
Do not cover your appliance with any material that will prevent air from flowing around the
cabinet sides.
Allow good clearances in front of air ducts within the cabinet for maximum cold air distribution.
Cool hot foods down before placing them in the appliance.
Do not overfill the compartments.
Keep door openings to a minimum.
Select a temperature setting that isn’t too cold.
Check your door seals for leaks.
Moving or storing your refrigerator
If your refrigerator is turned off for any reason, wait 10 minutes before turning it back on. This
will allow the refrigeration system pressures to equalize before restarting.
Moving your refrigerator
Turn off the appliance and unplug from the power point. Remove all food.
Turn the adjustable feet to the right as far as they will turn (refer to page 12).
Ease the refrigerator out of its position. Tuck the power cord away, tape the shelves in place and
tape the doors closed. If the cabinet needs to be placed at an angle or laid down, carefully lay it
on its side (the right hand side when viewed from the front).
Relocate and install. If the appliance has been left on its side for any length of time, leave it
standing upright for at least 10 minutes before turning on.
Storing your refrigerator
When storing your cleaned appliance, leave the doors open. This allows air to circulate and
prevents the build up of bacteria and moulds.
Before using again, clean well using a mixture of warm water and baking soda (add 1 teaspoon
of baking soda to each 1 pint (500 ml) of water). Rinse with clean water.
Holiday time
We recommend you leave your refrigerator operating while you are on holiday.

Before you start using your Ice & Water refrigerator
Check refrigerator is switched on and has cooled for at least 2 hours before use (refer to page 19
– The temperature of your refrigerator and freezer).
Check that the water filter has been connected and turned on.
Turn on the ice maker (refer to page 24).
At first use allow approximately a minute from when the dispensing pad is pushed until water is
dispensed. This will allow the tank to fill.
Run through and discard the first 3 qt (3 L) of water from the dispenser, stopping intermittently
(refer to page 21 – First use). Failure to do this will result in excessive dripping from your dispenser.
Discard the first 3 harvests of ice (8 cubes are produced per harvest), refer to page 24 – First use.
You are now ready to enjoy ice and water from your Active Smart™ refrigerator.
15
US
CA
Fig.15 Water dispenser
Please note that once installation is complete a few drips may appear out of the dispenser over
the next few days as the remaining trapped air is cleared.
US
CA
16
All about the display
The display screen enables you to view and modify all the features and options on your
refrigerator. For example, you can change the temperature in your fresh food and freezer
compartment, and select the Fast Freeze function when you want to quickly freeze meat.
You may want to also quickly chill a bottle of wine when friends arrive unexpectedly.
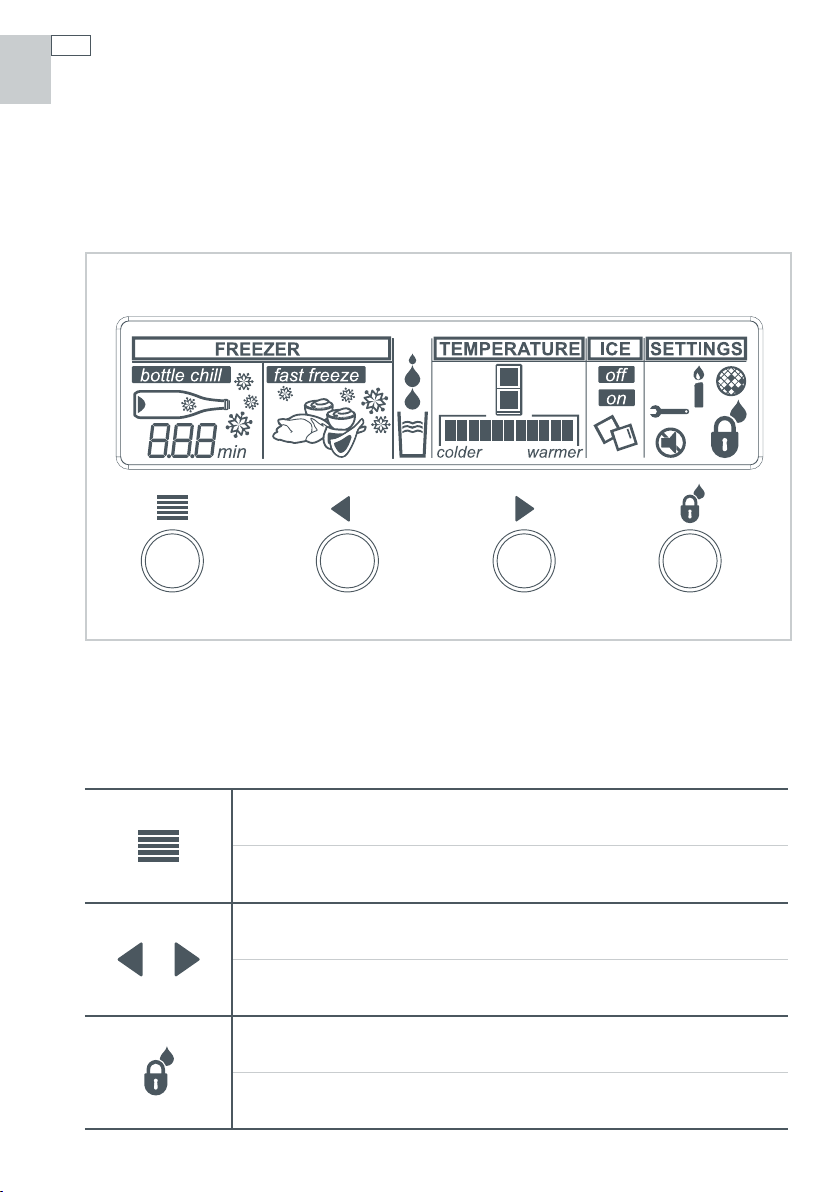
Fig.16 Electronic control panel
Keys
For more detailed information on these functions please refer to pages 18 – 20.
Main menu
Scrolls through the main menu. (Freezer, Temperature, Ice, and Settings).
Arrow keys
Scrolls through the settings of each function.
Key and Dispenser Lock
Locks buttons and water dispenser.

Display features
Freezer (page 18)
Bottle Chill (page 18)
Fast Freeze (page 18)
Dispensing water (page 21)
Temperature (page 19)
All about the display
17
US
CA
Ice (page 24)
Settings/User warnings (pages 19 – 20)
Key Silent Mode (page 19)
Dispenser and Key Lock (page 19)
Key Lock – disables the buttons (page 19)
Sabbath Mode (page 20)
Filter Reset (page 20)
Service/Fault Diagnosis (page 20)

US
CA
18
Using the display options
Bottle Chill
This function allows you to chill your beverages in the freezer without the worry of forgetting
about them. The time taken to chill depends on the size of your beverage. Bottle Chill allows
you to customize this chill time.
Recommended times:
20 minutes – can or small bottle
25 minutes – wine bottle or similar size beverage
30 minutes – larger bottle
To activate, use button until the bottle chill icon ( ) is showing on the
screen. Then use the or buttons until the snowflakes ( ) and the
minute timer (
Then use the button to select 10, 15, 20, 25 or 30 minutes as displayed on the Bottle Chill
screen. After several seconds, the snowflakes will then animate as the timer counts down.
An alarm will sound after the amount of time selected has elapsed.
Press any button on the display to silence the alarm. Remember to remove the beverage from
the freezer.
To deactivate Bottle Chill manually, use the button to scroll to the bottle chill icon ( )
on the
the screen and the snowflakes (
If you remove your beverage from the freezer and it is not chilled to your liking, reset the timer
to 10 minutes and place the beverage back into the freezer.
) are displayed on the Bottle Chill screen.
screen, then use the and buttons until no minutes are shown on
) are no longer visible.
Important!
Do not leave the bottle inside the freezer longer than the time needed for chilling, as glass
bottles may explode.
Fast Freeze
We have created the Fast Freeze feature to help you to get the best possible results when
freezing fresh food. Fast Freeze boosts the freezing speed by dropping the freezer to its coldest
temperature for 12 hours, which helps to ensure vital freshness, texture and taste are retained
during the freezing process.
To activate, use the button until the Fast Freeze icon ( ) is showing on the
screen. Then use the or buttons until the snowflakes ( ) are
displayed on the Fast Freeze screen. The animating snowflakes indicate that Fast Freeze has
been activated.
To deactivate the function manually, use the button to scroll to the Fast Freeze icon ( )
on the screen. Then use the
For best results, we recommend that you activate the function approximately 2 hours before it is
required. Alternatively, activate it when placing food into the freezer.
Note: the Bottle Chill and Fast Freeze option cannot be used at the same time.
and until there are no snowflakes ( ) present on the screen.

Using the display options
The temperature of your refrigerator and freezer
When the refrigerator is first turned on it will take approximately 2 to 3 hours to cool.
To adjust the temperature of a compartment, use the button to scroll to the
screen, use the
The temperature can then be adjusted using the button to make the compartment warmer or
the
button to make the compartment colder.
The temperature setting will be indicated on the icon below.
It is important to have your refrigerator set to the correct temperature. Setting it too cold may
cause some items in the refrigerator to freeze, and setting it too warm will decrease the storage
life of your food.
For further information on food storage refer to the Food Care section (pages 33 – 35).
Settings
Key Silent Mode
The Key Silent Mode allows you to silence all key presses.
It can be activated or deactivated by using the button to scroll to the screen and
then pressing the
When the Key Silent Mode is on will appear.
When this function is off will appear.
button to select the compartment you want to change.
or buttons.
19
US
CA
Note: Faults, Bottle Chill timer and the door alarm will still sound when the refrigerator is set on
Key Silent Mode.
Dispenser and Key Lock
The Dispenser Lock disables the buttons and prevents water
from being dispensed.
Key Lock disables the buttons.
Activate by holding down on the display panel.
After 2 seconds icon will appear indicating Dispenser Lock
is activated.
After 2 more seconds icon will appear indicating Key Lock
is activated.
To de-activate, hold down on the display panel for
2 seconds.
Fig.17 Dispenser and Key Lock

US
CA
20
Using the display options
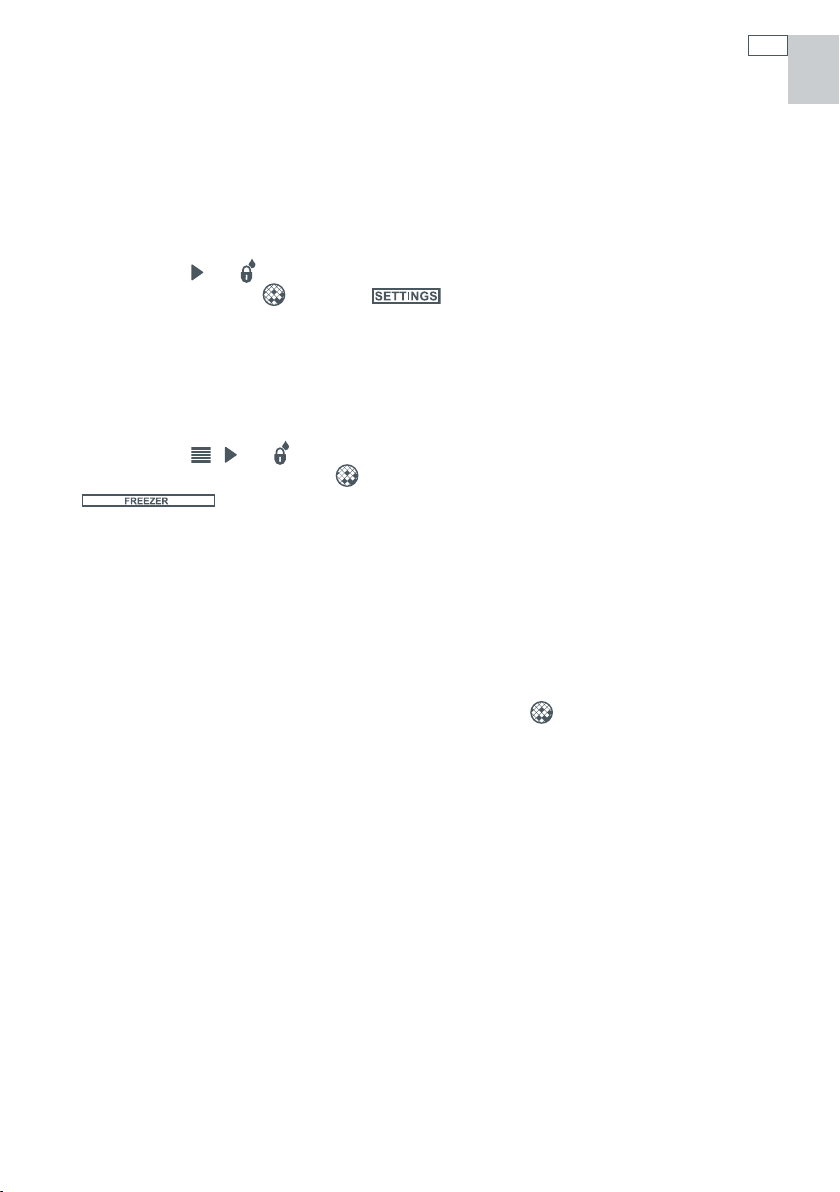
Sabbath Mode
In Sabbath Mode alarms, lights and displays are deactivated.
Sabbath Mode can be activated or deactivated by holding
down the
, , buttons for 4 seconds.
Once in Sabbath Mode:
The interior light will not turn on when the refrigerator
is opened.
The door alarm will not operate.
The display will not be illuminated.
Electronic control panel will not work.
Fig.18 Sabbath Mode
Note: if power is turned off the refrigerator will automatically continue in Sabbath Mode once
power is restored. Sabbath Mode will automatically de-activate after 80 hours.
User warnings
Your refrigerator is clever enough to diagnose its own problems. It will alert you when there is
a fault.
Filter reset
The filter reset icon will appear when the water filter needs changing. This will flash when
dispensing water. To change the filter and reset the filter icon refer to pages 22 – 23.
In the unlikely event a fault occurs the icon appears on the front of the display and a fault
code will be displayed on the left in the
When the door is open the refrigerator fault alarm will sound. To silence this press any button
screen.
on the display.
Fault
Please take note of the fault code and contact our Customer Care Center. Details of Customer
Care phone numbers can be found in the back of this book.
Fig.19 Fault code display
Using your water dispenser
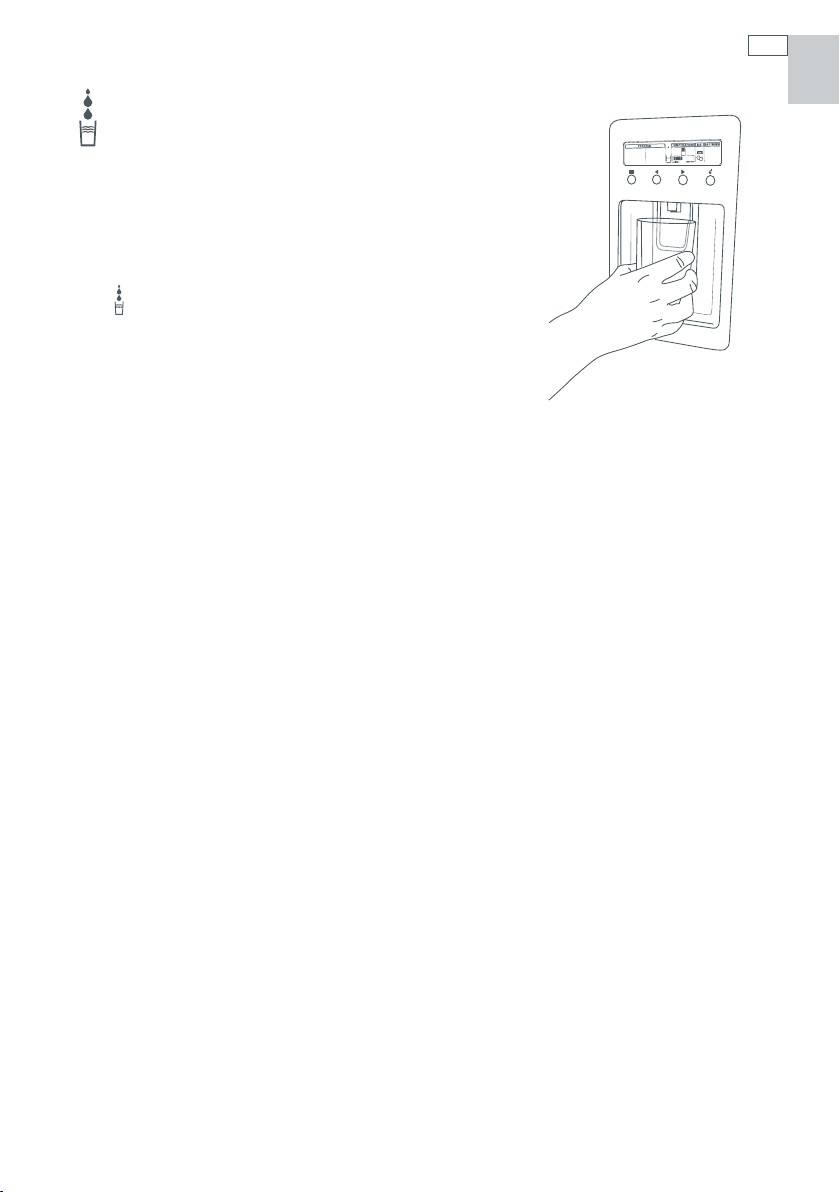
Dispensing
Your water dispenser has been designed for one-handed
operation.
To dispense water push the dispensing pad gently, using
a glass or container.
When you dispense water, a light will appear above the
dispensing area and on the display screen. The water fill
icon
will also appear.
To stop the flow of water, simply pull your glass away
from the dispensing pad.
21
US
CA
Please remember that pressing very hard against the
Fig.20 Water dispenser
dispensing pad will not make the dispenser operate
faster or produce greater quantities of water.
First use
After installation, on the first use, allow approximately a one minute delay while the dispensing
pad is pushed until water is dispensed. This will allow the tank to fill completely.
After you fill the tank for the first time, dispense and discard approximately 3 qt (3 L) stopping
intermittently to flush the tank out.
Important!
To avoid damage to property or personal injury do not put hands, fingers or objects up the
dispenser opening.
Please note that once installation is complete a few drips may appear out of the dispenser over
the next few days as the remaining trapped air is cleared.
US
22
Water filter
CA
All the water to your fridge is filtered to remove impurities through a cartridge located in a
position of your choice outside the refrigerator. This will need changing approximately every
6 months.
There is a replacement indicator icon on the control panel which will appear when the filter
needs replacing. It will flash, as a reminder, when water is dispensed.
Replacement cartridges are available from your authorized Fisher & Paykel Dealer. The details of
the replacement cartridge are on the label on the cartridge.
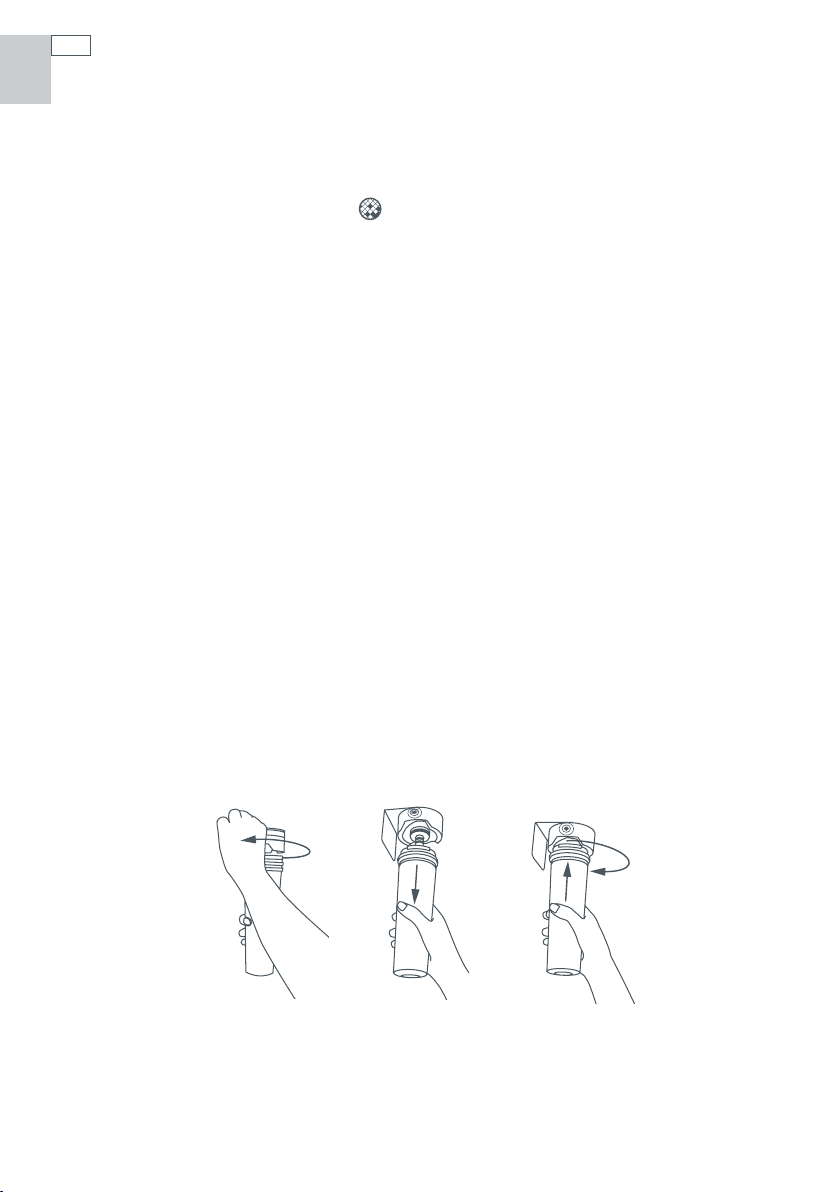
Changing the water filter cartridge
It is not necessary to turn off the water supply before attempting to change the water filter
cartridge.
1
Grasp and firmly twist the cartridge in an anticlockwise direction (to the left when installed in
the recommended orientation) as shown in Diagram 1.
2
Pull the cartridge away from the filter head (down when installed in the recommended
orientation) as shown in Diagram 2.
– It is not unusual for a few drops of water to be present when the filter is removed.
3
Discard old filter.
4
Filter installation:
– Remove protective cap on spigot on head.
– Push the cartridge up towards filter head while rotating it in a clockwise direction (to the
right when installed in the recommended orientation) as shown in Diagram 3.
5
Reset filter indicator icon on the display (this will remind you when the filter is due to be
replaced again). Refer to page 23.
6
Dispense 10 qt (10 L) to flush the cartridge, removing trapped air and harmless carbon fines.
7
A few drips may appear out of the dispenser over the next few days as the remaining trapped
air is cleared.
Diagram 2Diagram 1 Diagram 3
Fig.21 Changing the water filter cartridge
Water filter
To reset the filter indicator
Important!
We recommend the water filter is used from the point of installation.
Do not reset indicator before filter is changed or filter monitoring will be inaccurate.
Press and hold and buttons for 4 seconds to reset the filter indicator.
If the filter is present the icon in the screen will disappear when reset.
To disable the filter indicator
Note: if disabled, you will not be reminded to change your filter.
When no filter is to be fitted, you can disable the filter indicator.
Press and hold , and buttons for 4 seconds to turn this feature off/on.
When activated or deactivated the icon will flash and on or off will be displayed on the
We recommend that you do not disable the filter indicator if you have a filter fitted to
the connection.
Important!
To avoid serious illness or death, do not use the water filter where water is unsafe or of unknown
quality without adequate disinfection before or after use of filter.
The water filter cartridge needs to be changed when the filter indicator icon flashes on the
interface panel.
We recommend the water filter cartridge is replaced when the icon flashes. This will happen
every 6 months.
If the water filtration system has been allowed to freeze, replace filter cartridge.
The rate of water flow through the water dispenser can slow down as the filter cartridge
accumulates any sediment which may be present in the water supplied to your home. This varies
depending upon your local water quality, which may require your filter cartridge to be changed
more frequently.
In cases of excessively reduced filter life we recommend that you consult a local plumber or your
water supplier for advice on suitable filtration requirements for the water supplied to your home.
Filter replacement is the consumer’s responsibility and will not be covered by the warranty
except in the case of faulty parts or materials within the filter cartridge.
If the water has not been dispensed for some time or water has an unpleasant taste or odor,
flush system by dispensing 10qt (10 L) of water.
If unpleasant taste or odor persists, you may wish to fit a new filter cartridge.
screen.
23
US
CA
US
CA
24
Using your ice maker
Ice maker
Your ice maker is designed to automatically dispense ice
until it senses that the bin is full. So the more ice you use,
the more it makes. It is even clever enough to sense when
there is no bin in place to catch the ice.
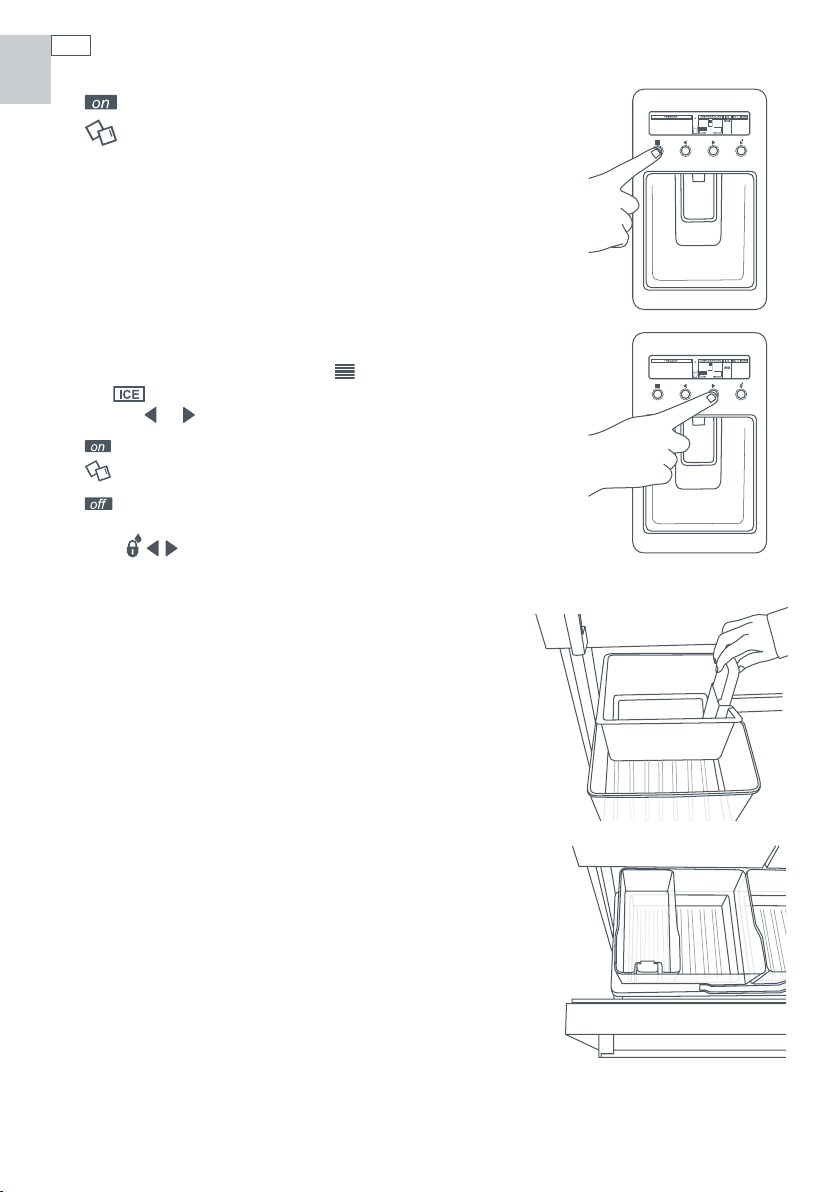
First use
When you first turn your refrigerator on after installation,
the ice maker will be off.
To turn your ice maker on use the button to scroll to
the
Use the
Press together to force a cycle. The ice tray will
flip. Force another cycle. The ice tray will flip and spill the
water into the ice bin. Empty water and replace bin.
If the bin is full, or inserted incorrectly the ice maker will
not operate. When the bin is inserted correctly the scoop
will be on the right hand side of the bin for models E522B
and the front of the bin for model RF201A (refer to Fig.23).
If all bins are removed the ice maker will not operate.
Once your ice maker is in operation, discard the first 3
harvests of ice (8 cubes of ice are produced per harvest).
This will flush away any impurities in the water line and
ensure that you get the best quality ice. We recommend
that you also do this after vacations or extended periods
of not using ice.
We recommend that you turn the ice maker off if:
– The water supply is to be off for several hours; or
– The ice storage bin is to be removed for a period of
time; or
– You are going on holiday/vacation.
screen.
or button to turn the ice maker on or off.
Shows the ice maker is on.
Shows the ice maker is off.
Fig.22 Turning ice maker on
E522B
RF201A
Fig.23 Ice storage bin and
scoop in correct position

Using your ice maker
Information about your ice maker
Your automatic ice maker will produce approximately eight cubes of ice every 2 – 3 hours,
dependent on freezer compartment temperature and number of door openings.
The ice cube tray will fill with water once the freezer has reached the correct temperature.
The first cubes will normally freeze after several hours.
When cubes are frozen, they will be ejected from the mould into the ice storage bin.
Ice making will continue until the storage bin is full.
Ice making will resume when the ice is used.
For maximum ice storage, level the stored cubes with the ice scoop provided.
Your Ice & Water product comes with a smaller ice bin inside the larger freezer bin. Attached to
this is the scoop for the ice. This scoop provides hygienic access to the ice.
If a large amount of ice is required, remove the smaller storage bin and allow ice to fall into the
larger bin.
If ice is not used often, old cubes will become cloudy, taste stale, will shrink and may stick
together. Empty the ice storage bin periodically, wash in lukewarm water, dry thoroughly and
place back in the correct position.
Important!
Avoid contact with the moving parts of the ice maker ejector mechanism, and do not place your
fingers on the automatic ice making mechanism while the refrigerator is in operation.
Do not use ice cubes that may have become discolored, usually with a green-blue color. If such
discolouration is noted, discard the ice cubes and contact your Fisher & Paykel Appliances
Authorized Service Center.
Ensure the ice maker is connected to the filter and only to a drinkable water supply.
Installation of the water connection to the ice maker must be completed by a qualified service
technician or a qualified plumber (see installation instructions).
25
US
CA

US
CA
26
Active Smart™ special features
Fruit and vegetable bins and humidity control lid
The fruit and vegetable bins feature a unique lid which provides two functions:
The humidity lid seals the bins and provides a humid microclimate to extend storage times of
fruit and vegetables.
The humidity lid prevents condensation, which forms at high humidities, from dripping down
onto the fruit and vegetables by retaining it in the grooves of the lid.
Fruit and vegetable bins and humidity slide (where fitted)
Each fruit and vegetable bin has a humidity slide control that can be adjusted to a fruit or
vegetable setting depending on what is stored in the bins.
If possible try to store fruit and vegetables separately. This will help extend their storage life.
If there is a mixture of fruit and vegetables in the bin adjust the position of the control to
the center.
If there is too much water in the bins the control can be adjusted towards the setting with
fewer drips (fruit setting) and/or the water can be wiped out as required.
Remember a small amount of water in the bins is beneficial for fruit and vegetable storage.
SUITABLE FOR:
Salad Greens
Lettuce
Spinach
Broccoli
Cabbage
Carrots
Mixed fruit
& vegetables
Fig.24 Humidity Control graphic
Fruit with
skin/peel
Oranges
Lemons
Limes

Active Smart™ special features
Slim storage drawer (where fitted)
The bins at the bottom of the refrigerator provide
storage space for items that you may want to keep
separate from the rest of the refrigerator. These
slim storage bins can be used for deli item storage,
beverages or for defrosting foods.
27
US
CA
Door alarms
If the fresh food compartment door is left open the alarm will beep after 90 seconds and if the
Fig.25 Slim storage drawer
freezer door is left open the alarm will beep after 60 seconds.
While either door remains open, subsequent beeps will sound every 30 seconds for 5 minutes.
A continuous alarm will sound if either door has been left open for 5 minutes or longer and the
light will turn off. The alarm will stop when the opened door is closed.
Bottle holder (where fitted)
Your refrigerator will come with 2 – 4 single bottle holders (depending on what model
refrigerator you have). The bottle holders can be used to store a variety of bottles.
To position the bottle holder in your refrigerator, simply slot the back edge of the bottle holder
onto the back trim of any shelf.
Unused bottle holders can be stacked up on top of one another so they do not take up
unnecessary shelf space.
Bottles are best stored with the neck of the beverage facing the front of the refrigerator.
Drip tray
The drip tray is designed to fit into the lip at the bottom of the water dispenser panel.
To insert the tray always ensure that the rounded sides are fitted into the dispenser panel first.
The purpose of the tray is to capture any odd drips of water that may fall after dispensing.
The tray can be easily removed for cleaning (see page 28).
Glass shelves
Glass shelves can be repositioned in the cabinet as desired.
Remove by lifting up at the back and pulling forward.

US
28
Cleaning and caring for your refrigerator
CA
Exterior
Stainless exterior doors (Iridium or EZKleen finishes)
It is important when cleaning the exterior door surface of your refrigerator, to only use liquid
dishwashing detergent dissolved in warm water and a soft cloth.
Dry the door with a clean, lint free cloth.
The use of any abrasive or stainless steel cleaners and solvents will damage the door surface.
Water dispenser pad and interface
We have incorporated a Dispenser and Key Lock function in your refrigerator to make cleaning
easier (refer to page 19). This will help you to avoid accidental water dispensing while you clean.
Clean the pad and interface panel with a soft damp cloth.
Other exterior surfaces
Clean all other exterior surfaces with a mix of warm water and detergent and a soft cloth.
If necessary, clean the magnetic door gasket and the center door gaskets with an old
toothbrush, warm water and liquid dishwashing detergent.
Water evaporator tray
The water evaporator tray is found above the compressor at
the back of the refrigerator or freezer. The tray may require
infrequent cleaning.
Carefully move the refrigerator or freezer out from the wall.
Switch off the appliance.
We do not recommend that you remove the evaporator tray.
If cleaning is required, excess water can be soaked up from the
evaporator tray using a sponge. Wipe out with warm water and
detergent or disinfectant.
Switch on the appliance.
Drip tray
To clean, take the tray out of the dispenser panel
and pull the two halves of the tray apart (see Fig.26).
Clean in warm water with a mild detergent. Dry the
tray and clip back together.
Reinsert the tray back into the dispenser panel.
Fig.26 Drip Tray cleaning

Cleaning and caring for your refrigerator
Interior
It is important to keep the interior of the refrigerator and freezer clean to help prevent food
from becoming contaminated during storage.
The amount and types of food stored determines how often cleaning should be carried out in
the refrigerator (ideally once every 1 to 2 weeks).
Remove the shelves from cabinet and door. Wash shelves and storage bins in warm water and
detergent; rinse in clean water and dry before replacing.
Wipe over the interior surfaces with warm water and detergent or baking soda dissolved in warm
water (add 1 teaspoon of baking soda to each ½ qt (500 ml) of water). Rinse with clean water.
To help remove “old stale refrigerator” smells add a few drops of vanilla essence or vinegar to
the water before cleaning.
Clean exterior surfaces with warm water and detergent. Use a toothbrush for the magnetic
door gasket.
Do not use harsh, abrasive cloths or cleaners or highly perfumed, strong smelling cleaners or
solvents on any part of the refrigerator or freezer.
Glass shelves
Clean with warm water and detergent or a glass cleaner. If cleaning the shelves without
removing from the cabinet, use only warm water and detergent as a glass cleaner can damage
the plastic components of your refrigerator.
29
US
CA
Bottle holder
Clean with warm water and detergent. The use of abrasive cleaners and solvents may
cause damage.
Automatic ice dispenser
We do not recommend you clean the ice maker componentry, but it is important to clean the
bins occasionally.
The storage bin should be cleaned regularly and the old ice in the bottom of the bin discarded.
Wash bin in lukewarm water, dry thoroughly and replace.
When replacing the bin ensure that the scoop is on the right hand side (E522B only), and at the
front on RF210A.
Important!
Many commercially available cleaning products contain solvents that may attack the plastic
components of your refrigerator and cause them to crack. It is important to use only warm
water and a small amount of liquid dishwashing detergent on any plastic components inside
and outside your refrigerator. Avoid using anti-bacterial cleaning products on either the interior
or exterior of the cabinet as they may cause rusting of metal components and cracking of
plastic components.

US
30
Cleaning and caring for your refrigerator
CA
Humidity Control System
Important!
When cleaning the shelf above the vegetable bins,
we recommend that you do not disassemble the
Humidity Control System from the shelf.
In the event that the humidity control lid (plastic
lid) and humidity slides become separated from the
glass shelf, follow these instructions to reassemble.
1
Turn shelf upside down
2
To attach humidity slides onto
shelf front corners, fit bottom clips
into shelf front trim. Next, slide
sideways towards shelf until arm
clips onto glass.
Retainer
Humidity Slides
3
To attach humidity control lid – with
text facing you, align lid with front
of shelf. Hold lid vertically and fit
front end into retainer on shelf.
Ensure lid fits into retainer as well as
underneath humidity slides.
4
At the sides of the shelf, adjust
humidity slide tabs so that the plastic
lid is between the shelf and the tabs.
5
If clips on back of shelf are present,
fasten lid with rear clips. Ensure that
the cover is fully secure at front and
back of shelf.
Fig.27 Humidity Control System cleaning

Cleaning and caring for your refrigerator
To remove trays or fixed bins
For ease of removal, empty food from tray/bin first.
Hold the center front of the tray/bin handle.
Lift vertically to unclip from the runners and pull
tray/bin towards you to remove.
Push both runners back into refrigerator.
31
US
CA
To replace trays or fixed bins
With the runners pushed back into the refrigerator, place the tray/bin on top of the runners.
Fig.28 Tray removal
Push the tray/bin back slowly until you feel it clip back onto the runners.
Important!
Ensure that trays and bins are securely clipped onto the runners before use.
Bin and tray runners are pre-lubricated, and will not need to be re-lubricated during their life.
Do not attempt to clean grease from the runners, as this will affect their ability to function.
Do not immerse runners in water.
Permanently fixed bins and trays (model RF201A only)
The large bottom freezer bin and trays in this model are permanently fixed. They cannot be
removed from the freezer compartment. To clean simply wipe with a soft, damp cloth.
On vacation/holiday
Switch the ice maker to OFF on the interface panel (refer to page 24).
Shut off the water supply to the refrigerator.
On your return, turn on the water supply to the refrigerator.
Dispense 10 qt (10 L) of water and discard to ensure the tank is refilled with fresh water.
Turn on the ice maker (refer to page 24).
Discard the first 3 harvests of ice (8 ice cubes produced per harvest).

US
32
Refrigerator sounds
CA
Normal refrigerator sounds
Active Smart™ refrigerators, with their excellent energy ratings and cooling performance, can
produce sounds somewhat different to your old refrigerator.
Normal operational sounds include:
Fan air flow sound. Active Smart™ refrigerators have fans which change speed depending
on demand. During cooling periods, such as after frequent door openings, fans circulate the
cold air in the refrigerator and freezer compartments producing some air flow sound. This is
quite normal.
Cracking or popping which may sound like ice coming off the evaporator. This occurs when the
defrost function is operating.
Running water sound. This is the liquid refrigerant in the system and can be heard as a boiling
or gurgling noise.
An audible hissing sound after closing the freezer door. This is due to the pressure difference
between the warm air that has entered the cabinet and suddenly cooled, and the outside
air pressure.
Other strange sounds may be heard for the following reasons:
– Cabinet not level
– Floor uneven or weak
– Bottles or jars rattling on shelves
If this is your first refrigerator with an ice maker, you will hear occasional sounds that may be
unfamiliar. They are normal ice making sounds and are not cause for concern.
The following sounds are normal with the operation of an ice maker:
– Motor operation (low humming).
– Running water as the ice maker and/or water tank fills.
– Water valve opening and closing (hissing sound).
– Ice being loosened from the ice moulding tray (cracking).
– Ice dropping into bin (clunking).

Storing food in your refrigerator
Red meat
Place fresh red meat on a plate and loosely cover with waxed paper,
plastic wrap or foil.
Store cooked and raw meat on separate plates. This will prevent any
juices lost from the raw meat contaminating the cooked product.
Delicatessen meats should be used within the recommended storage time.
Poultry
Fresh whole birds should be rinsed inside and out with cold running
water. Dry and place on a plate. Cover loosely with plastic wrap or foil.
Poultry pieces should also be stored this way. Whole poultry should never
be stuffed until just before cooking, otherwise food poisoning may result.
Cool and refrigerate cooked poultry quickly. Remove stuffing from
poultry and store separately.
Fish and seafood
Whole fish and fillets should be used on the day of purchase. Until
required, refrigerate on a plate loosely covered with plastic wrap, waxed
paper or foil.
If storing overnight or longer, take particular care to select very fresh fish.
Whole fish should be rinsed in cold water to remove loose scales and
dirt and then patted dry with paper towels. Place whole fish or fillets in
a sealed plastic bag.
Keep shellfish chilled at all times. Use within 1 – 2 days.
33
US
CA
Precooked foods and leftovers
These should be stored in suitable covered containers so that the food
will not dry out.
Keep for only 1 – 2 days.
Reheat leftovers only once and until steaming hot.
Fruit and vegetable bins
Although most fruit and vegetables keep best at low temperatures, take
care not to store the following at temperatures of less than 47°F (7°C) for
long periods: citrus fruit, tropical fruit, tomatoes, cucumbers.
Undesirable changes will occur at low temperatures such as softening of
the flesh, browning, accelerated decaying and or loss of flavor.
Do not refrigerate avocados (until they are ripe), bananas, mangoes
or pepinos.
If possible store fruit and vegetables separately, i.e. fruit in one bin and
vegetables in the other.
Each fruit and vegetable bin has a humidity control slide that can be
adjusted depending on what is stored in the bins. For more information
on using the Humidity Control refer to page 26.

US
34
Storing food in your freezer
CA
The use of temperatures of 0°F (-18°C) or colder to store food means that the food can be kept
for longer periods than when refrigeration temperatures are used. This is because the growth
of bacteria, moulds and yeasts are stopped, and chemical and physical reactions are severely
restricted at such low temperatures.
Frozen food care
For best results:
Choose only high quality foods that freeze well.
Store at 0°F (-18°C) or colder. Take care to maintain this low storage
temperature, eg. try to avoid opening the freezer door unnecessarily.
If your ice cream is soft you are running your freezer too warm.
Leave space at the top of containers, glass jars or plastic bags containing liquids or semi-solid
foods. These expand as they freeze. Usually 1” (20 – 50 mm) head space is recommended. Seal.
Ideally, remove all the air from the package after food is frozen.
Packages or containers of solid foods should have the air removed from them and be sealed
tightly before freezing.
Use the Fast Freeze function when freezing fresh food. This helps to speed up the freezing
process, giving optimum freezing results. It is recommended that the function is activated
approximately 2 hours before required. For more information refer to page 18.
Freeze immediately or as quickly as possible. Freeze only small quantities of food at any one time.
For best results we recommend that only 2.2 lb (1 kg) of food be frozen per 0.9 cu.ft (25 L) of
freezer storage volume at any one time. (About 7 lb (3 kg) in small freezers and 9 lb (4 kg) in larger
freezers). For faster freezing in Active Smart™ models, we recommend that fresh food is placed at
the top of the freezer compartment close to the air vent.
Do not pile frozen food around the fan cover. It can prevent adequate air circulation.
Thaw foods preferably in a refrigerator, or using a microwave oven or multifunction oven.
Keep a constant turnover of food. Use older items of food first. Do not exceed recommended
storage times.
Use good quality freezer proof packaging to maintain food quality.
If food is only covered in plastic film place inside a freezer-proof plastic bag.
Recommended freezer storage times
These times should not be exceeded.
1 Bacon, casseroles, milk
2 Bread, ice-cream, sausages, pies – (meat and fruit),
prepared shellfish, oily fish
3 Non oily fish, shellfish, pizza, scones and muffins
4 Ham, cakes, biscuits, beef and lamb chops,
poultry pieces
6 Butter, vegetables (blanched), eggs whole and yolks,
Months
cooked crayfish, minced meat (raw), pork (raw)
12 Fruit (dry or in syrup), egg whites, beef (raw), whole
chicken, lamb (raw), fruit cakes

Storing food in your freezer
Meat, poultry and game
Do not try to freeze more than 2.2 lb (1 kg) meat per 0.9 cu.ft (25 L) of
freezer storage volume at any one time. Meat must be frozen quickly in
order to maintain its texture.
Do not stuff poultry before freezing.
Red meat can be cooked from frozen, or from the partly or completely
thawed states. Remember to allow extra cooking time if cooking from frozen.
Always thaw poultry completely before cooking.
Fish
Fish is best frozen commercially. If however you do want to freeze fish
at home, make sure the fish is very fresh and of high quality.
Clean, scale and preferably leave whole. All fish should be wrapped in
two layers of packaging as depending on the type of fish, odors and
flavors can be readily transferred either to or from it. Seal well.
For best results, cook from either the frozen or partly thawed state.
Vegetables
Most vegetables freeze well, although ‘salad’ vegetables lose their
crispness. Other vegetables, eg. celery, onion and tomatoes, should only
be used in cooked dishes as they soften on freezing.
Freeze only high quality, mature, ready-to-eat vegetables.
Sort and discard any vegetables that are damaged.
It is necessary to blanch most raw vegetables prior to freezing.
Blanching involves a short cooking period during which vegetable
enzymes are destroyed. If these enzymes are not destroyed they cause
undesirable physical and chemical changes during freezer storage.
Vegetables can be blanched in boiling water, steam or microwave oven.
If using boiling water, boil vegetables for 2 – 4 minutes and cool quickly.
In general frozen vegetables are best cooked from their frozen state.
35
US
CA
Prepared and cooked foods
Most cooked foods can be frozen but it is not recommended to freeze
the following:
Cooked egg white, custards, cream fillings and milk puddings, gelatin
or jelly-like dishes, mayonnaise and similar salad dressings, meringue
toppings. These tend to separate on thawing.
Fruit
Choose high quality, mature, and ready to eat fruit. Preferably select
varieties recommended for freezing.
Avoid unripe and over-ripe fruit.
The way fruit is packed depends on how it is to be used. Fruits packed
in syrup are ideal for desserts, whereas fruits packed without sugar are
better used for cooking. Most fruits can be stored for 8 – 12 months.

US
36
Troubleshooting
CA
If there is a problem with your appliance, please check the following points before contacting
your local Fisher & Paykel Appliances Authorized Service Center Dealer or Customer Care Center.
Problem Possible causes What to do
Appliance does
not operate.
Light not working. Light not functioning. The light cannot be serviced by the user.
Light and display
not working.
Motor operates
for long periods.
Storage
compartments
too warm.
Food freezing in
the refrigerator.
Unfamiliar noises. Cabinet not stable or level.
Water in the
vegetable bins.
No electricity at power outlet. Check that the plug is correctly
connected and power switched on.
Check another appliance at the
same outlet.
Check house fuse.
Contact your Fisher & Paykel Dealer or
Authorized Service Agent.
Refrigerator not working. Check refrigerator is turned on at wall.
If problem continues refer to page 42.
Product in Sabbath Mode.
Hot weather.
Frequent door openings.
Large amount of food
recently added.
Temperature control set too low. See Temperature control section (page 19).
Doors not sealing properly. Check that cabinet is level and gasket
Temperature setting not correct. See Temperature control section (page 19).
Frequent door openings.
Large amount of food
recently added.
Temperature setting not correct. See Temperature control section (page 19).
Food placed directly in front of
air outlets.
Freezer is defrosting.
Condensation is formed by the
water produced by fruit and
vegetables.
Hold down menu button
and lock button
Minimize door openings to allow
temperature to stabilise.
seals are clean.
Minimize door openings to allow
temperature to stabilize.
Move chill sensitive foods away from the
center back of the shelves.
See Installation section (pages 12 – 13) or
refer to Sounds (page 32).
A small amount of condensation is
beneficial for fruit and vegetable storage.
If there is too much water, store fruit and
vegetables loosely in plastic bags.
Wipe out water with a cloth.
Set humidity slide to
low humidity setting.
for 4 seconds.
, left arrow

Troubleshooting
Problem Possible causes What to do
Sides of cabinet
are warm.
Warm area on
central door seal.
Condensation
on outside of
refrigerator/
freezer.
Condensation
inside fresh food
compartment.
Ice buildup
inside freezer
compartment.
Door handles out
of alignment.
Tray/bin does not
slide in and out
evenly.
This is normal.
This is normal.
Not unusual during periods of
high humidity.
Frequent or long door openings. Minimize door openings.
Door gasket leaking. Check that gasket is sitting flat and
Not unusual during periods of
high humidity.
Freezer door not closing tightly. Move items in freezer so door can
With time and usage, movement
may occur.
Packaging trapped. Check to ensure no food or packaging is
Runners not extending fully. Holding onto sides of tray/bin, extend the
Wipe dry.
sealing tightly.
Wipe dry.
close tightly.
Check and clean door gasket seal.
See Installation instructions – Stability
instructions (pages 12 – 13).
trapped behind the tray/bin.
runners fully by using a firm pull – this
will reset the runner.
37
US
CA

US
38
Troubleshooting
CA
Problem Possible causes What to do
Ice maker makes
unfamiliar sounds
or seems too loud.
Automatic ice
maker does not
work.
Ice cubes have
odor/taste.
Slow ice cube
freezing.
Warm spot on
central door seal.
Wet ice/ice
clumping.
Normal ice maker operation. Refer to refrigerator sounds (refer to
page 32).
Ice maker has not been
switched on.
Bin is in the wrong way or there
is no bin in place.
Water supply turned off or not
connected.
Freezer compartment not
working.
Water pressure too low. Check water pressure.
Water line kinked/squashed. Check water line for kinks/squashing.
Filter clogged. Water filter may need replacing.
Unsealed packages may be
transmitting odor/taste.
Interior of freezer needs cleaning. Ice storage bin needs to be emptied
Poor taste from incoming water. Filter may need changing.
Door may have been left ajar. Close door.
Freezer compartment too warm. Turn temperature to a colder setting
You may feel a warm spot at times
on the central seal between the
two refrigerator doors.
Low water pressure. Check water pressure.
Filter blocked. Replace filter (refer to pages 22 – 23).
Long freezer door openings.
High ambient temperature.
Ice bin left out of freezer
compartment for a long length
of time.
Ice will stick together over time.
Switch on ice maker (refer to page 24).
Place bin so scoop is on the right side.
Ice bin sits directly under ice maker on
top left side of freezer.
Connect water supply.
Contact Customer Care.
Old cubes need to be discarded.
Ensure food packaging is sealed.
and washed.
Clean refrigerator (refer to pages 28 – 31).
A new filter may need to be installed.
Force 2 – 3 ice tray flips (refer to page 24)
(refer to page 19).
This is perfectly normal and is part of
the normal refrigerator operation.
Gently tap ice with scoop to unstick
or, if large clumps occur, empty ice bin
and make new ice.

Troubleshooting
Problem Possible causes What to do
Water has poor
taste/odor.
Refrigerator not used for an
extended period.
Dispense 10 qt (10 L) water so fresh
water supply is replenished.
39
US
CA
Water dispenser
does not work.
Water in first glass
is warm.
Filter warning light
is flashing.
Drips overflow
drip-shelf.
Water flow rate has
slowed down.
Water supply turned off or not
connected.
Supply line may be blocked.
On first installation there may be
air in water system.
Filter may be blocked and need
replacing.
Dispenser lock activated.
Water frozen in tank. Increase temperature to a warmer
Water dispenser not used for
extended period.
Tank capacity used recently. Allow water time to cool.
Filter needs replacing. Replace filter as soon as possible (refer
Air trapped in tank. Flush 3 qt (3 L) water through
New filter installed. Flush 10 qt (10 L) water through filter
Filter cartridge is restricted. Replace water filter as soon as possible
Turn water on.
Press dispenser for 2 minutes to
remove trapped air from water line and
to fill the water system.
Check supply for kinks or leaks.
To remove air, run a liter or a quart of
water through the dispenser.
Replace filter (see back of this booklet
for Customer Care contact details).
Hold down the
setting in fresh food compartment and
freezer.
Discard first glass of water dispensed.
to pages 22 – 23).
dispenser, stopping intermittently.
and then 3 qt (3 L) through dispenser.
(refer to pages 22 – 23).
button for 2 seconds.

US
40
Limited warranty
CA
When you purchase any new Fisher & Paykel whiteware product for personal or consumer use
you automatically receive a one year limited warranty covering parts and labor for servicing
within the 48 mainland United States, Hawaii, Washington DC and Canada. In Alaska the limited
warranty is the same except that you must pay to ship the product to the service shop or the
service technician’s travel to your home. Products for use in Canada must be purchased through
the Canadian distribution channel to ensure regulatory compliance.
If the product is installed in a motor vehicle, boat or similar mobile facility, you receive the same
one year limited warranty, but you must bring the vehicle, boat or mobile facility containing the
product to the service shop at your expense or pay the service technician’s travel to the location
of the product.
You receive an additional four year Limited Warranty (for a total of five years) covering parts
and labor for sealed refrigeration system (compressor, evaporator, condenser, filter dryer, and
connecting tubing) within the 48 mainland United States, Hawaii, Washington D.C. and Canada.
In Alaska the Limited Warranty for the sealed refrigeration system is the same except that you
must pay to ship the product to the service shop or the service technician’s travel to your home.
Fisher & Paykel undertakes to:
Repair without cost to the owner either for material or labor any part of the product, the serial
number of which appears on the product, which is found to be defective. In Alaska, you must
pay to ship the product to the service shop or for the service technician’s travel to your home.
If the product is installed in a motor vehicle, boat or similar mobile facility, you must bring it to
the service shop at your expense or pay for the service technician’s travel to the location of the
product. If we are unable to repair a defective part of the product after a reasonable number of
attempts, at our option we may replace the part or the product, or we may provide you a full
refund of the purchase price of the product (not including installation or other charges).
This warranty extends to the original purchaser and any succeeding owner of the product for
products purchased for ordinary single-family home use.
All service under this limited warranty shall be provided by Fisher & Paykel or its Authorized
Service Agent during normal business hours.
How long does this limited warranty last?
Our liability under this limited warranty expires ONE YEAR from the date of purchase of the
product by the first consumer.
Our liability under any implied warranties, including the implied warranty of merchantability
(an unwritten warranty that the product is fit for ordinary use) also expires ONE YEAR (or such
longer period as required by applicable law) from the date of purchase of the product by the
first consumer. Some states do not allow limitations on how long an implied warranty lasts, so
this limit on implied warranties may not apply to you.

Limited warranty
This warranty does not cover:
A
Service calls that are not related to any defect in the product. The cost of a service call will be
charged if the problem is not found to be a defect of the product. For example:
1. Correct faulty installation of the product.
2. Instruct you how to use the product.
3. Replace house fuses, reset circuit breakers, correct house wiring or plumbing, or replace
light bulbs.
4. Correct fault(s) caused by the user.
5. Change the set-up of the product.
6. Unauthorized modifications of the product.
7. Noise or vibration that is considered normal, for example, drain/fan sounds, refrigeration
noises or user warning beeps.
8. Correcting damage caused by pests, for example, rats, cockroaches, etc.
B
Defects caused by factors other than:
1. Normal domestic use or
2. Use in accordance with the product’s User Guide.
C
Defects to the product caused by accident, neglect, misuse, fire, flood or Act of God.
D
The cost of repairs carried out by non-authorized repairers or the cost of correcting such
unauthorized repairs.
E
Travel fees and associated charges incurred when the product is installed in a location with
limited or restricted access. (eg. airplane flights, ferry charges, isolated geographic areas).
F
Normal recommended maintenance as set forth in the product’s User Guide.
G
Filter replacement except in the case of faulty parts or materials within the filter cartridge.
41
US
CA
This product has been designed for use in a normal domestic environment. It is not intended for
commercial use. Doing so may affect product warranty.
If you have an installation problem contact your dealer or installer. You are responsible for
providing adequate electrical, exhausting and other connection facilities.
We are not responsible for consequential or incidental damages (the cost of repairing or
replacing other property damaged if the product is defective or any of your expenses caused if
the product is defective). Some States do not allow the exclusion or limitation of incidental or
consequential damages, so the above limitation or exclusion may not apply to you.

US
42
Limited warranty
CA
How to get service
Please read your User Guide. If you then have any questions about operating the product,
need the name of your local Fisher & Paykel Authorized Service Agent, or believe the product is
defective and wish service under this limited warranty, please contact your dealer or call us at:
USA
TOLL FREE 1.888.9.FNP.USA (1.888.936.7872)
or contact us through our web site: www.fisherpaykel.com
Canada
TOLL FREE 1.888.9.FNP.USA (1.888.936.7872)
or contact us through our web site: www.fisherpaykel.ca
You may be required to provide reasonable proof of the date of purchase of the product before
the product will be serviced under this limited warranty.
No other warranties
This limited warranty is the complete and exclusive agreement between you and Fisher & Paykel
regarding any defect in the product. None of our employees (or our Authorized Service Agents)
are authorized to make any addition or modification to this limited warranty.
Warrantor: Fisher & Paykel Appliances, Inc.
If you need further help concerning this limited warranty, please call us at above number, or
write to:
Fisher & Paykel Appliances, Inc.
5900 Skylab Road
Huntington Beach
CA 92647
This limited warranty gives you specific legal rights, and you may also have other rights which
vary from state to state.

43
US
CA

US
CA
(FR)
44

Table des matières
Introduction 46
Sécurité et mises en garde 47
Instructions d’installation 49
Avant d’utiliser votre réfrigérateur Ice & Water 59
À propos de l’affichage 60
Utilisation des options d’affichage 62
Fonction Bottle Chill 62
Fonction Fast Freeze 62
Vérification de la température de votre réfrigérateur et de votre congélateur 63
Réglages 63
Mises en garde 64
Utilisation de votre distributeur d’eau 65
Filtre à eau 66
Utilisation de votre appareil à glaçons 68
Fonctions spéciales du réfrigérateur Active Smart
Nettoyage et entretien de votre réfrigérateur 72
Pendant les vacances et les congés 75
Sons émis par le réfrigérateur 76
Conservation des aliments dans votre réfrigérateur 77
Conservation des aliments dans votre congélateur 78
Dépannage 80
Garantie limitée 84
Données de rendement du filtre 87
™
70
45
US
CA
(FR)
Important!
CONSERVEZ CES INSTRUCTIONS
Les modèles illustrés dans ce guide de l’utilisateur peuvent ne pas être offerts par tous les détaillants
et sont sujets à modifications sans préavis. Pour les plus récentes informations sur la disponibilité
des modèles et des caractéristiques dans votre pays, veuillez visiter notre site Web local à l’adresse
indiquée sur la couverture arrière, ou contacter votre détaillant Fisher & Paykel local.
Veuillez noter que le terme « réfrigérateur » utilisé dans ce guide d’utilisation sert à désigner des
produits combinant un réfrigérateur et un congélateur.

US
46
Introduction
CA
(FR)
Nous vous remercions d’avoir acheté un réfrigérateur Active Smart™ de Fisher & Paykel pourvu
d’un distributeur à glaçons et d’eau froide intégré à la porte.
Chez Fisher & Paykel, nous sommes très fiers de ce réfrigérateur. Ce réfrigérateur combine un
format et un espace de rangement pratiques avec les caractéristiques et les fonctionnalités les
plus récentes. Nous pensons avoir trouvé la bonne façon d’installer un distributeur d’eau intégré
dans la porte sans compromettre l’espace de rangement ni l’accès au réfrigérateur.
Des milliers d’heures d’expérience en conservation des aliments et une expertise de 75 années
de recherche sur les réfrigérateurs ont été incorporées à votre réfrigérateur, cela afin que vous
puissiez pleinement profiter d’un produit haute performance.
Nous espérons que vous apprécierez votre nouveau réfrigérateur.
Fig.1 Réfrigérateurs Ice & Water
Important!
Il est important de conserver ce guide de l’utilisateur avec votre réfrigérateur Ice & Water à titre
de référence ultérieure. Si votre appareil est vendu ou cédé à un autre propriétaire, veuillez vous
assurer de laisser le guide de l’utilisateur avec le réfrigérateur. Ainsi, le nouveau propriétaire
pourra consulter les renseignements et les mises en garde inclus dans le guide.

Sécurité et mises en garde
MISE EN GARDE!
Risque de choc électrique
Lisez et observez les CONSIGNES DE SÉCURITÉ ET LES MISES EN GARDE
contenues dans ce guide de l’utilisateur avant d’utiliser cet appareil.
Le défaut de se conformer à ces instructions peut causer la mort, un choc
électrique, un incendie ou des blessures.
Utilisez uniquement ce réfrigérateur aux fins pour lesquelles il a été conçu, comme le stipule le
présent guide de l’utilisateur.
Consignes de sécurité importantes
Mise en garde
Lors de l’utilisation de cet appareil, observez toujours des précautions de base, notamment :
Danger
Utilisez le support stabilisateur en vous reportant au dépliant fourni (modèles RF201A
uniquement) pour réduire les risques causés par l’instabilité de l’appareil.
Cet appareil n’a pas été conçu pour être utilisé par de jeunes enfants ni par des personnes
handicapées sans aide. Cette précaution est d’autant plus importante si votre réfrigérateur est
pourvu d’un congélateur-tiroir.
Les jeunes enfants doivent être supervisés afin de s’assurer qu’ils ne jouent pas avec l’appareil.
Les enfants risquent de s’enfermer dans le réfrigérateur. Avant de mettre au rebut votre ancien
réfrigérateur ou votre ancien congélateur :
– Retirez les portes
– Laissez les tablettes en place afin d’éviter que les enfants puissent facilement y pénétrer.
47
US
CA
(FR)
Mise au rebut
Afin d’éviter les dangers, vous devez être vigilant lors de la mise au rebut de votre ancien
appareil. Le liquide frigorigène doit être retiré de façon sécuritaire, et les portes doivent être
retirées pour assurer la sécurité des jeunes enfants.
Le centre de service autorisé Fisher & Paykel de votre région est en mesure de vous conseiller sur
des méthodes pour mettre au rebut votre ancien réfrigérateur ou votre ancien congélateur pour
qu’ils soient sans danger pour l’environnement.
Système électrique
Cet appareil doit être installé conformément aux instructions d’installation avant de pouvoir
être utilisé.
Ne débranchez jamais votre réfrigérateur en tirant sur le cordon d’alimentation.
Saisissez toujours la prise pour débrancher le cordon de la prise murale.
Ne branchez aucun autre appareil à la prise de courant servant à alimenter votre réfrigérateur et
n’utilisez aucun adaptateur double ni aucune rallonge pour le brancher.

US
48
Sécurité et mises en garde
CA
(FR)
Réparez ou remplacez immédiatement tous les cordons d’alimentation s’ils sont éraillés ou
endommagés. N’utilisez pas un cordon d’alimentation présentant des craquelures ou des traces
d’abrasion à un endroit quelconque sur le câble.
Si le cordon d’alimentation est endommagé, il doit être remplacé par un centre de service autorisé
Fisher & Paykel qui dispose des outils spéciaux nécessaires.
Lorsque vous dégagez votre appareil du mur, assurez-vous de ne pas rouler sur le cordon
d’alimentation pour ne pas l’endommager.
Débranchez votre réfrigérateur avant de le nettoyer ou de remplacer l’ampoule intérieure.
Important!
Votre réfrigérateur a été conçu pour fonctionner pendant de longues années sans nécessiter de
services d’entretien. Toutefois, si votre réfrigérateur présente un mauvais fonctionnement, faites
appel à un centre de service autorisé Fisher & Paykel le plus tôt possible. Toutes les réparations
électriques doivent effectuées par un technicien d’atelier ou un électricien qualifié.
Conservation des aliments et des breuvages
N’entreposez jamais de matières volatiles ou inflammables dans votre réfrigérateur ou votre
congélateur ; ces derniers pourraient exploser.
Ne congelez jamais de liquide dans des contenants en verre. Les liquides prennent de l’expansion
en gelant, risquant ainsi de provoquer l’explosion du contenant.
Ne congelez jamais de boissons gazeuses. Elles peuvent exploser.
Ne consommez jamais d’aliments trop froids. Les aliments sortis du congélateur peuvent être
suffisamment froids pour causer des lésions au contact de la peau (p. ex. : cubes de glaçons).
Panne d’électricité – conservation des aliments
Ne congelez pas de nouveau des aliments qui ont entièrement décongelé. Observez les
recommandations ci-dessous si vous constatez que les aliments de votre congélateur
ont décongelé :
1) Ne congelez pas de nouveau des aliments qui ont entièrement décongelé.
2) Aliment décongelé, mais réfrigérateur encore froid – il n’est habituellement pas recommandé
de congeler ces aliments de nouveau. Les fruits et certains aliments cuits peuvent être
congelés de nouveau, mais pour un laps de temps très court. Viande, poisson et volaille –
consommez immédiatement ces aliments, ou faites-les cuire, puis congelez-les de nouveau.
Légumes – mettez-les au rebut ; ces aliments se ramollissent et sont généralement détrempés.
3) Aliments décongelés et température supérieure à 41 °F (5 °C). Jetez tous les aliments.
Ne congelez pas de nouveau des aliments qui ont entièrement décongelé. Ces aliments peuvent
être impropres à la consommation.
Important!
Nettoyage
De nombreux détergents offerts sur le marché contiennent des solvants qui peuvent endommager
les composantes en plastique de votre réfrigérateur ou de votre congélateur, et causer des
craquelures. Veuillez consulter la section sur le nettoyage et l’entretien du présent guide pour
obtenir davantage de renseignements.
CONSERVEZ CES INSTRUCTIONS

Instructions d’installation
Instructions d’installation
MISE EN GARDE!
Risque de choc électrique
Lisez et observez les CONSIGNES DE SÉCURITÉ ET LES MISES EN GARDE
contenues dans ce guide de l’utilisateur aux pages 47 – 48 avant d’utiliser
cet appareil.
Le défaut de se conformer à ces instructions peut causer la mort, un choc
électrique, un incendie ou des blessures.
Veuillez observer les étapes de l’installation afin d’assurer le bon fonctionnement de votre appareil.
1. Alimentation
L’appareil doit être installé à proximité d’une prise électrique.
Afin de s’assurer que l’appareil n’est pas débranché par erreur, branchez le réfrigérateur à sa
propre prise de courant. Ne branchez pas un autre appareil à la même prise d’alimentation et
n’utilisez aucun adaptateur double ni aucune rallonge, car le poids des deux cordons électriques
risquerait de débrancher l’adaptateur double de la prise murale.
Pour l’alimentation, reportez-vous à l’information inscrite sur la plaque du numéro de série
située sur la partie avant inférieure droite du réfrigérateur lorsque la porte est ouverte.
Il est impératif que l’appareil soit correctement mis à la terre.
49
US
CA
(FR)
2. Emplacement
Votre réfrigérateur ne doit pas être exposé directement aux rayons du soleil ni être situé
à proximité d’un appareil générant de la chaleur comme une cuisinière, un four ou un
lavevaisselle.

US
O
O
O
O
CA
(FR)
50
Instructions d’installation
E522B RF201A
Bâti du réfrigérateur affleurant
– Ouverture complète de la porte
O
Au même niveau que la porte du réfrigérateur
– rotation de la porte de 90 °
P
Porte du réfrigérateur affleurante
– Ouverture complète de la porte
Bâti du réfrigérateur affleurant
– Ouverture complète de la porte
O
Au même niveau que la porte du réfrigérateur
– rotation de la porte de 90 °
P
Porte du réfrigérateur affleurante
– Ouverture complète de la porte

Instructions d’installation
3. Ventilation et installation
Pour assurer la ventilation adéquate et le bon fonctionnement de votre réfrigérateur, voyez les
dimensions d’encastrement recommandées ci-dessous.
Ces mesures n’incluent pas l’espace nécessaire pour le filtre à eau à l’arrière du cabinet car nous
recommandons de placer le filtre aussi près que possible de l’alimentation en eau.
51
US
CA
(FR)
Dimensions d’encastrement
(incluant le dégagement minimal)
A
Hauteur intérieure 68/ 1735 71/ 1810
E522B RF201A
po mm po mm
Bâti du réfrigérateur affleurant – Ouverture complète de la porte
B
Largeur intérieure 32⁄ 830 37 940
C
Profondeur intérieure 24⁄ 620 24⁄ 620
Porte du réfrigérateur affleurante – Ouverture complète de la porte
D
Largeur intérieure 33⁄ 860 39⁄ 1000
E
Profondeur intérieure, affleurante à la porte incurvée 26 ⁄ 675 – –
F
Profondeur intérieure, affleurante à la porte plate 27⁄ 690 27⁄ 690
Au même niveau que la porte du réfrigérateur – rotation de la porte de 90 °
(pour un accès total au tiroir et à la tablette, la porte doit être ouverte à plus de 90 °)
G
Largeur intérieure 35⁄ 900 39⁄ 1010
H
Profondeur intérieure, affleurante à la porte incurvée 26 ⁄ 675 – –
I
Profondeur intérieure, affleurante à la porte plate 27⁄ 690 27⁄ 690
Dégagement minimal
J
Dégagement latéral ⁄ 20 ⁄ 20
K
Dégagement latéral – côté charnière affleurant – ouverture
complète de la porte
L
Dégagement latéral – côté charnière affleurant – ouverture
de la porte à 90°
M
Dégagement arrière (incluant le plateau d’évaporation) 1⁄ 30 1 ⁄ 30
N
Ouverture d’aération (au-dessus du châssis du réfrigérateur
ou près de la partie supérieure de l’armoire)
Dégagement de la porte – côté charnière au même niveau
O
que le châssis – ouverture complète
Dégagement de la porte – côté charnière au même niveau
P
que la porte – ouverture complète
2 50 2 50
3⁄ 90 3⁄ 90
2 50 2 50
25⁄ 645 14⁄ 365
24⁄ 615 13⁄ 335
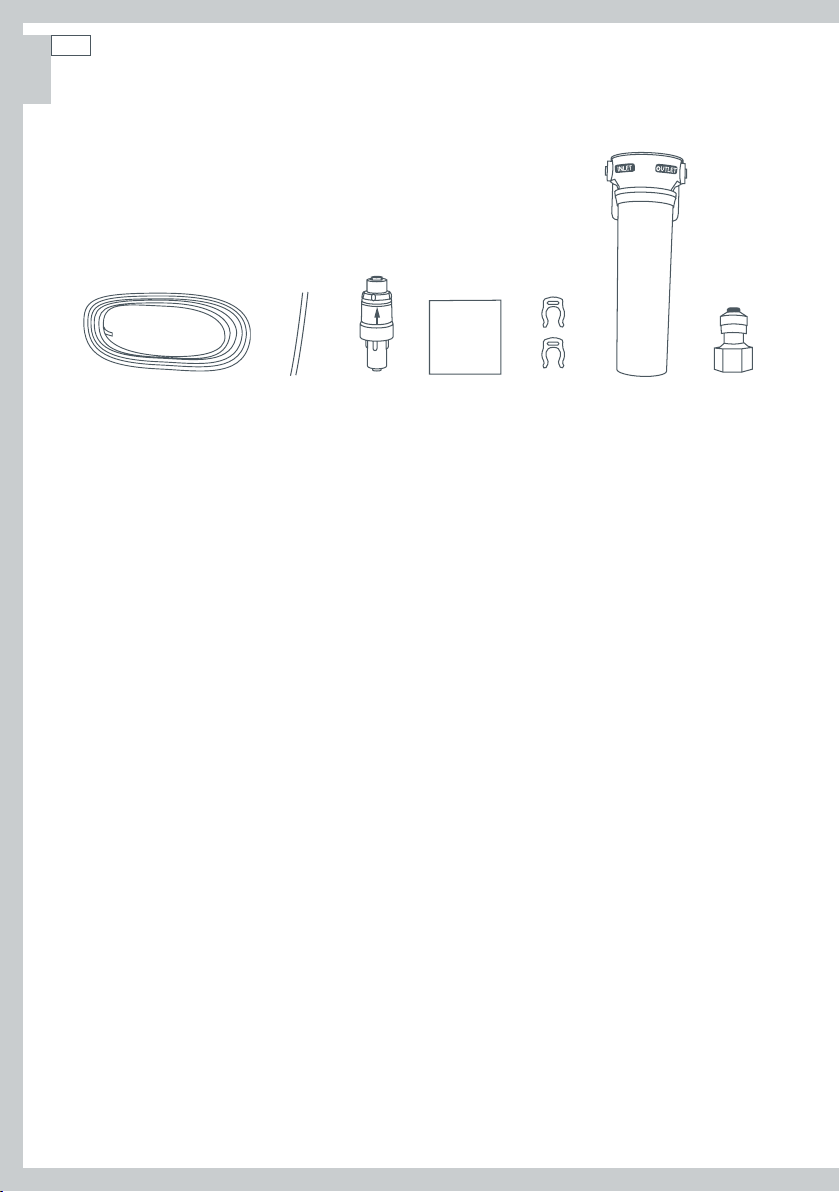
US
52
Instructions d’installation
CA
(FR)
Contenu de l’ensemble de filtre
1
Tuyau blanc de 6 mm (¼ po), de 4 m (13 pi) de long
2
1 tuyau bleu de 200 mm (8 po)
3
1 vanne de réglage de pression
4
1 ruban double face
5
2 clés de verrouillage
6
1 cartouche de filtre à eau/tête de filtre
7
1 raccord de robinet
1 2 3 4 5 6 7
Important!
Il est très important d’installer la vanne de réglage de pression avant le filtre. Cette vanne
empêche l’eau de retourner vers le système d’alimentation principal à partir du système
d’alimentation en eau du réfrigérateur. Si la vanne de réglage de pression n’est pas installée sur
la conduite de raccordement, les fonctionnalités de votre réfrigérateur Ice & Water risquent de ne
pas fonctionner dans certaines circonstances.
Le raccordement de la conduite d’eau à votre réfrigérateur Ice & Water doit être effectué par un
plombier qualifié ou un technicien autorisé par Fisher & Paykel.
Les instructions de raccordement de la conduite d’eau présentées ci-dessous sont destinées
uniquement à un installateur professionnel.
Les nouveaux tuyaux livrés avec le réfrigérateur doivent être utilisés. Les anciens tuyaux utilisés
pour les raccordements du réfrigérateur Ice & Water ne doivent pas être utilisés.
Fig.2 Nécessaire de raccordement
Précautions/mises en garde pour l’installation
N’UTILISEZ PAS de l’eau impropre à la consommation ou dont la qualité est inconnue sans utiliser
un système de désinfection en amont ou en aval du filtre.
MISE EN GARDE – raccordez les conduites à un système d’alimentation en eau potable seulement.
NE RACCORDEZ PAS la conduite à un système d’alimentation dont la pression est supérieure à
119 psi (827 kPa) ou inférieure à 22 psi (150 kPa).
NE RACCORDEZ PAS cet appareil aux conduites d’eau chaude (100°F [38°C max.]).
NE COUPEZ PAS les tuyaux à une longueur inférieure à 200 mm.
N’INSTALLEZ PAS cet appareil à proximité de fils électriques ou de conduites d’eau qui
risqueraient d’être perforés lors de l’installation du système de filtration.
INSTALLEZ le filtre afin qu’il ne soit percuté par aucun objet comme une poubelle, un bac de
récupération, etc.
N’INSTALLEZ PAS le filtre ou un tuyau de raccordement en eau à un endroit exposé directement
aux rayons du soleil car l’exposition prolongée au soleil peut compromettre l’intégrité des
composantes en plastique.
N’INSTALLEZ PAS l’appareil à un endroit soumis à des températures sous le point de congélation
pour éviter d’endommager le boîtier.
NE VISSEZ pas le filtre au réfrigérateur.
N’INSTALLEZ PAS le filtre ou un tuyau de raccordement en eau dans les endroits où la
température est élevée, par exemple dans une cavité du plafond.
ÉVITEZ la contamination des conduites pendant l’installation.
N’UTILISEZ PAS de tuyaux de cuivre. Les tuyaux de plastique livrés avec le réfrigérateur doivent
toujours être utilisés.
NE DISTRIBUEZ PAS de l’eau de façon continue pendant plus de 2 minutes.

Instructions d’installation
Instructions d’installation :
1
Assurez-vous que le réfrigérateur n’est PAS branché à une prise
de courant.
2
Trouvez un conduit d’alimentation en eau froide qui convient à
un raccordement. Le raccord en « T » et le raccord pour robinet
ne sont pas fournis.
3
Raccordez le tuyau bleu de 200 mm (8 po) à la sortie de la vanne
de réglage de pression (collier de serrage bleu) et au raccord
d’entrée du boîtier de filtre à eau, comme le montre le schéma 1.
Tirez légèrement sur les deux extrémités pour vous assurer que
le tuyau est fixé solidement.
4
Raccordez le tuyau blanc de 6 mm (¼ po) à la sortie du boîtier
de filtre à eau, comme le montre le schéma 2. Tirez légèrement
sur le tuyau pour vous assurer qu’il est fixé solidement.
5
Mesurez la longueur totale de tuyau depuis la vanne de réglage
de pression jusqu’au point de raccordement du système
d’alimentation en eau.
6
Coupez le tuyau en vous assurant que les extrémités sont
droites et propres.
7
Raccordez le tuyau au raccord de robinet et à la base de la
vanne de réglage de pression (collier de serrage blanc), puis
au robinet, comme le montre le schéma 3. Veuillez noter que
le raccord de robinet compris dans l’ensemble convient à la
plupart des installations.
8
Insérez une clé de verrouillage à chaque extrémité du boîtier
de filtre à eau entre le filtre et le collier de serrage, comme le
montre le schéma 4.
9
Pour purger le filtre à eau afin d’éliminer l’air emprisonné et
les fibres de carbone inoffensives tout en vérifiant la présence
de fuites, placez l’extrémité du tuyau dans un seau, ouvrez
le robinet d’isolement, puis laissez couler au moins 10 litres
d’eau. Après la vérification, fermez le robinet d’isolement.
10
Repérez l’endroit où vous souhaitez installer le filtre à eau en
observant les points suivants :
Il est recommandé de raccorder le filtre à eau verticalement,
avec la tête de filtrage au sommet. Cela minimisera les
d’eau lorsque vous effectuerez le remplacement de la
fuites
cartouche.
Assurez-vous d’installer le filtre dans un emplacement
accessible, afin de pouvoir le remplacer à tous les 6 mois.
Nous suggérons de l’installer juste à côté du robinet de
l’approvisionnement en eau, dans l’armoire à côté du
réfrigérateur.
Un dégagement d’au moins 64 mm (2 ½ po) sous le boîtier
de filtre est nécessaire afin de pouvoir remplacer le filtre.
Ne vissez pas le filtre à eau au réfrigérateur.
53
Schéma 1
Fig.3 Raccordement
de la vanne de
réglage de pression
Schéma 2
Fig.4 Raccordement
de la conduite d’eau
au réfrigérateur
Schéma 3
Fig.5 Raccordement du robinet
INLET
Schéma 4
Fig.6 Clé de verrouillage
US
CA
(FR)

US
54
Instructions d’installation
CA
(FR)
11
Fixez le ruban double face à la partie arrière de la
tête du filtre à eau, comme le montre le schéma 5.
Inscrivez la date de remplacement du filtre (date
de l’installation + 6 mois). Retirez la pellicule de
ruban double face et fixez le filtre à la position
désirée identifiée à l’étape 10 (reportez-vous à la
page précédente).
12
Acheminez le tuyau de 6 mm (¼ po) derrière
le réfrigérateur en vous assurant de laisser une
longueur de tuyau suffisante pour pouvoir
avancer le réfrigérateur lors de travaux d’entretien.
13
Retirez le couvercle de compresseur en dévissant
la vis de la partie supérieure de chaque côté
du couvercle, comme le montre de schéma 6.
Soulevez et inclinez le couvercle de compresseur
pour le retirer, comme le montre le schéma 7.
14
Raccordez le tuyau au robinet de prise d’eau
(solénoïde) situé à droite du compresseur,
comme le montre le schéma 8. Attention aux
tuyaux chauds.
15
Tirez légèrement sur le tuyau pour vous assurer
qu’il est fixé solidement, comme le montre le
schéma 9.
16
Remettez le couvercle du compresseur en place,
puis faites passer le tuyau de 6 mm (¼ po)
dans l’espace prévu sur la partie supérieure
droite du couvercle en l’insérant vers le haut,
puis revissez le couvercle du compresseur, tel
qu’illustré dans le schéma 10.
17
L’installation, une fois terminée, est illustrée au
schéma 12 de la page 55.
18
Ouvrez le robinet d’isolement et vérifiez que tous
les raccordements sont secs et exempts de fuites.
19
Enroulez le tuyau derrière le réfrigérateur.
Replacez votre réfrigérateur contre le mur en
prenant soin de ne pas tortiller ni écraser le
tuyau raccordé au robinet de prise d’eau du
réfrigérateur.
20
Lisez attentivement les pages 56 – 58, puis mettez
le réfrigérateur en marche.
21
Lors de la première utilisation du distributeur
d’eau, un délai est nécessaire pour que le réservoir
se remplisse.
Schéma 6
Schéma 7
Schéma 8
Schéma 5
Fig.7 Ruban
double face
Schéma 9
Schéma 10
Fig.8 Raccordement de l’entrée d’eau au réfrigérateur

Instructions d’installation
22
Laissez 3 litres d’eau s’écouler, en arrêtant le débit à intermittence, afin de vous assurer que
le réservoir a été entièrement vidangé. Le défaut de se conformer à cette recommandation
entraînera l’égouttement excessif de votre distributeur.
23
Appuyez sur jusqu’à ce que le menu Glace (Ice) soit en surbrillance, puis appuyez sur pour
mettre l’appareil à glaçons en marche. Appuyez sur les touches
forcer le cycle de fonctionnement. Le plateau à glaçons se retourne. Effectuez un autre cycle. Le
plateau à glaçons se retourne, puis l’eau se déverse dans le compartiment à glaçons. Videz l’eau
et remettez le compartiment en place.
24
Vous pouvez maintenant profiter de l’eau et des glaçons de votre réfrigérateur Active Smart™.
Veuillez noter qu’après l’installation, quelques gouttes peuvent s’écouler du distributeur dans les
quelques jours suivants, au fur et à mesure que l’air emprisonné est évacué.
Important!
Tous les raccordements doivent être vérifiés pour détecter des fuites.
Assurez-vous que le tuyau de 6 mm (¼ po) est à bonne distance d’objets ou de coins coupants
(veillez à ce que le tuyau ne soit pas entortillé pour assurer le débit d’eau), du compresseur et
qu’il est positionné de façon à ne pas être écrasé.
Assurez-vous que les raccords rapides sont bien en place. Le tuyau doit s’insérer de 20 mm (¾ po)
avant d’atteindre la butée.
Si le tuyau est retiré, recoupez-le et réinsérez-le dans le raccord rapide.
Le tuyau doit être inséré à fond pour prévenir les fuites.
Pour retirer le tuyau d’un raccord, fermez le robinet
d’isolement, enfoncez le collier de serrage, puis, au
même moment, tirez légèrement sur le tuyau, comme
le montre le schéma 11.
simultanément pour
Schéma 11
55
US
CA
(FR)
Schéma 12Fig.9 Raccordement au système d’alimentation en eau
Système testé et certifié par la NSF International en vertu de la norme NSF/ANSI 53 portant sur
la réduction de l’amiante, de l’atrazine, du benzène, des spores, du carbofurane, du plomb, du
lindane, du mercure, du para-dichlorobenzène, du toxaphène et de la turbidité; et en vertu de la
norme NSF/ANSI 42 portant sur la réduction du goût et de l’odeur du chlore et des particules de
grosseurs nominales de catégorie I à 2 838 litres (750 gallons).

US
56
Instructions d’installation
CA
(FR)
4. Installation
Votre réfrigérateur Active Smart™ de Fisher & Paykel est
pourvu de roulettes à l’avant et à l’arrière qui facilitent
le déplacement de l’appareil vers l’avant et vers l’arrière.
Évitez de déplacer l’appareil latéralement afin de ne pas
endommager les roulettes ou le revêtement de plancher.
A
Les roulettes avant de votre réfrigérateur, à sa
livraison, sont vissées entièrement afin de faciliter le
déplacement du réfrigérateur.
B
Faites rouler le réfrigérateur vers son emplacement
en vous assurant que le dégagement est adéquat
entre l’appareil et l’encastrement. Voyez le
dégagement minimal dans le tableau des dimensions
d’encastrement (reportez-vous à la page 51).
(RF201A seulement)
C
Dévissez les pieds avant jusqu’à ce que le réfrigérateur
soit incliné vers l’arrière, soit jusqu’à ce que la partie
avant soit environ / po (10 mm) plus haute que la
partie arrière. Il sera ainsi plus facile de fermer la porte.
(reportez-vous à la figure 10).
D
Alignement du réfrigérateur dans l’encastrement.
Alignez les côtés du réfrigérateur avec l’encastrement
en ajustant le pied avant du côté charnière du
réfrigérateur.
Ajustez le pied côté poignée jusqu’à ce qu’il repose très
fermement au sol.
Dès que le réfrigérateur est en place et aligné avec les
armoires ou l’alcôve, poussez légèrement sur le haut de
l’appareil pour en vérifier la stabilité.
Abaisse l’avant du
réfrigérateur
Fig.10 Pied du réfrigérateur
Fig.11 Alignement inégal des portes
Soulève l’avant
du réfrigérateur
5. Mise à niveau de la porte du réfrigérateur
(RF201A seulement)
Sur une surface inégale, les pieds avant peuvent être
utilisés pour aligner les deux portes.
Si la porte gauche est trop basse, dévissez le pied avant
pour relever l’appareil jusqu’à ce que les deux parties
supérieures des portes soient alignées.
Si la porte droite est plus élevée, procédez de la même
façon pour ajuster le pied droit.
Fig.12 Alignement égal des portes

Instructions d’installation
6. Que faire si l’appareil est instable
E
Poussez légèrement le réfrigérateur vers l’arrière
jusqu’à ce que les roulettes arrière reposent au sol.
Mesurez l’écart sous le pied avant qui ne repose pas
au sol.
Insérez une pièce de remplissage solide (bois,
plastique, etc.) pour combler l’écart sous le pied.
Remarque : n’utilisez pas de pièces métalliques qui
pourraient se corroder et tacher et/ou endommager le
revêtement de plancher.
F
Vissez les deux pieds avant et déplacez le réfrigérateur
de sa position.
Placez la pièce de remplissage à l’endroit
diagonalement opposé à la roue avant qui ne repose
pas au sol.
Assurez-vous que la pièce de remplissage demeure en
place lorsque le réfrigérateur est remis en position.
Idéalement, la pièce doit être suffisamment grande
pour reposer contre le mur arrière, de sorte qu’elle
ne puisse plus se déplacer lorsque le réfrigérateur est
poussé contre le mur.
La pièce de remplissage s’insère sous la
roulette arrière diagonalement opposée au
Mur derrière le réfrigérateur
pied avant qui ne repose pas au sol
Exemple
seulement
Plancher inégal
Ce pied se soulève du sol lorsque
la partie supérieure avant du
réfrigérateur est légèrement
poussée vers l’arrière
Fig.13 Réfrigérateur instable
57
US
CA
(FR)
Par exemple : si ce pied se
soulève du sol lorsque vous
poussez légèrement sur la partie
supérieure avant du réfrigérateur
G
Faites rouler le réfrigérateur vers son emplacement et réglez les pieds avant comme l’explique
D
l’étape
Réglez les pieds avant au besoin.
Assurez-vous que l’appareil est stable (les quatre pieds reposent au sol). Dans le cas contraire,
procédez de nouveau à l’étape
(vérifiez le niveau et le bon fonctionnement des portes).
E
et répétez les étapes F et G.
Fig.14 Stabilisation du réfrigérateur

US
58
Instructions d’installation
CA
(FR)
Avant de placer des aliments dans le réfrigérateur ou le congélateur
Retirez l’emballage. Assurez-vous de retirer toutes les attaches de transport du réfrigérateur.
Ce sont de petites butées en caoutchouc situées sur la partie arrière des tablettes.
Nettoyez l’intérieur de l’appareil à l’aide d’un chiffon doux et d’une solution d’eau tiède avec
un peu de détergent liquide pour faire disparaître les saletés amassées lors de la fabrication et
du transport.
Laissez le réfrigérateur et le congélateur fonctionner à vide de 2 à 3 heures afin de permettre aux
compartiments d’atteindre la température adéquate.
L’appareil peut dégager une odeur lorsqu’il fonctionne pour la première fois, mais cette odeur se
dissipe lorsque le réfrigérateur et le congélateur ont suffisamment refroidis.
Efficacité énergétique
Pour optimiser l’efficacité énergétique de votre appareil :
Veillez à ce que votre réfrigérateur bénéficie d’une ventilation suffisante en suivant les
recommandations indiquées dans les instructions d’installation.
Ne couvrez pas le réfrigérateur ni le congélateur de matériaux qui pourraient empêcher l’air de
circuler autour du bâti de l’appareil.
Laissez un dégagement suffisant devant les sorties d’air à l’intérieur de l’appareil afin de
permettre la meilleure distribution d’air possible.
Laissez refroidir les aliments chauds avant de les ranger dans le réfrigérateur.
Ne remplissez pas les compartiments de façon excessive.
Évitez d’ouvrir la porte inutilement.
Sélectionnez un réglage de température qui n’est pas trop froid.
Vérifiez si les joints de porte présentent des fuites.
Déplacement ou entreposage de votre réfrigérateur
Si, pour quelque raison, votre réfrigérateur s’éteint, attendez 10 minutes avant de le remettre en
marche. Cela permet aux pressions du système de réfrigération de s’équilibrer avant la remise
en marche.
Déplacement de votre réfrigérateur
Éteignez l’appareil et débranchez-le de la prise de courant. Retirez tous les aliments.
Tournez les pieds réglables à fond vers la droite (reportez-vous à la page 56).
Dégagez le réfrigérateur de sa position. Rangez le cordon d’alimentation, puis appliquez du
ruban adhésif pour maintenir les tablettes en place et les portes fermées. Si l’appareil doit être
incliné ou déposé au sol, déposez-le lentement sur le côté (sur le côté droit lorsque l’appareil est
vu de l’avant).
Mettez-le à l’endroit voulu et réinstallez l’appareil. Si l’appareil est demeuré longtemps sur le
côté, laissez-le reposer à la verticale au moins 10 minutes avant de le remettre sous tension.
Entreposage de votre réfrigérateur
Au moment de ranger l’appareil, laissez les portes ouvertes. L’air pourra ainsi circuler pour
prévenir la prolifération des bactéries et la formation de moisissure.
Avant de le réutiliser, nettoyez-le à fond à l’aide d’une solution d’eau tiède et de bicarbonate
de soude (ajoutez 1 cuil. à thé de bicarbonate de soude par 500 ml [1 pinte] d’eau). Rincez-les à
l’eau propre.
Vacances et congés
Nous vous recommandons de laisser votre réfrigérateur fonctionner lorsque vous êtes
en vacances.

Avant d’utiliser votre réfrigérateur Ice & Water
Assurez-vous que le réfrigérateur est en marche et qu’il a pu refroidir pendant au moins 2 heures
avant de l’utiliser (consultez la page 63 – Vérification de la température de votre réfrigérateur et
de votre congélateur).
Assurez-vous que le filtre à eau a été raccordé et qu’il fonctionne.
Mettez l’appareil à glaçons en marche (consultez la page 68).
Lors de la première utilisation, appuyez sur la plaque du distributeur et attendez environ une
minute pour que l’eau s’écoule. Vous permettrez ainsi au réservoir de se remplir.
Utilisez le distributeur pour faire couler l’eau en arrêtant le débit de façon intermittente, et
jetez les 3 premiers litres d’eau (consultez la page 65 – Première utilisation). Le défaut de se
conformer à cette consigne entraînera un égouttement excessif du distributeur.
Jetez les 3 premiers lots de glaçons produits (8 glaçons par lot). Reportez-vous à la page 68 –
Première utilisation.
Vous pouvez maintenant profiter de l’eau et des glaçons de votre réfrigérateur Active Smart™.
59
US
CA
(FR)
Fig.15 Distributeur d’eau
Veuillez noter qu’après l’installation, quelques gouttes peuvent s’écouler du distributeur dans les
quelques jours suivants, au fur et à mesure que l’air emprisonné est évacué.

US
CA
(FR)
60
À propos de l’affichage
L’écran d’affichage vous permet de voir et de modifier toutes les fonctions et les options
de votre réfrigérateur. Par exemple, vous pouvez modifier la température du compartiment
réfrigérateur ou congélateur et sélectionner la fonction Fast Freeze pour congeler rapidement
une pièce de viande. Vous pourriez également souhaiter refroidir une bouteille de vin
rapidement pour un souper imprévu.
Fig.16 Panneau de commande électronique
Touches
Pour obtenir davantage de renseignements sur ces fonctions, veuillez consulter les pages 62 – 64.
Menu principal
Pour faire défiler les éléments du menu principal. (Freezer [congélation],
Temperature [température], Ice [glaçons] et Settings [réglages]).
Touches en forme de flèche
Pour faire défiler les réglages de chaque fonction.
Verrouillage des touches et du distributeur
Pour verrouiller les touches et le distributeur d’eau.

Caractéristiques de l’affichage
Congélation (page 62)
Fonction Bottle Chill (page 62)
Fonction Fast Freeze (page 62)
Distributeur d’eau (page 65)
Température (page 63)
À propos de l’affichage
61
US
CA
(FR)
Glaçons (page 68)
Réglages/Mises en garde (pages 63 – 64)
Mode touches silencieuses (page 63)
Verrouillage du distributeur et des touches (page 63)
Verrouillage des touches – désactive les touches (page 63)
Mode Sabbat (page 64)
Réinitialisation du filtre (page 66)
Entretien/détection d’anomalie (page 64)

US
CA
(FR)
62
Utilisation des options d’affichage
Fonction Bottle Chill
Cette fonction permet de refroidir vos breuvages (bouteille) au congélateur sans craindre de les
oublier. Le temps de refroidissement dépend du format de votre bouteille. La fonction Bottle
Chill vous permet de régler la durée de refroidissement.
Durée recommandée :
20 minutes – cannette ou petite bouteille
25 minutes – bouteille de vin ou contenant de format similaire
30 minutes – grosse bouteille
Pour activer la fonction, utilisez la touche jusqu’à ce que l’icône de refroidissement de
bouteille (
jusqu’à ce que les flocons (
Utilisez ensuite la touche pour sélectionner la durée (10, 15, 20, 25 ou 30 minutes) affichée
sur l’écran Bottle Chill. Après plusieurs secondes, les flocons s’animeront et la minuterie
commencera le décompte.
Une alarme retentira lorsque la durée sélectionnée se terminera.
Appuyez sur n’importe quelle touche de l’affichage pour arrêter l’alarme. Rappelez-vous de
retirer le breuvage du congélateur.
Pour désactiver manuellement la fonction Bottle Chill, utilisez la touche pour afficher
l’icône de refroidissement de bouteille (
touches
Si vous retirez la bouteille du congélateur et qu’elle n’a pas refroidie comme vous le désiriez,
et jusqu’à ce que les minutes et les flocons ( ) disparaissent de l’écran.
remettez la minuterie à 10 minutes, puis remettez votre bouteille dans le congélateur.
) s’affiche sur l’écran . Utilisez ensuite la touche ou
) et la minuterie ( ) s’affichent sur l’écran Bottle Chill.
) sur l’écran , puis utilisez les
Important!
Ne laissez pas le breuvage au congélateur plus de temps qu’il ne faut pour le refroidir, car les
bouteilles en verre peuvent exploser.
Fonction Fast Freeze
Nous avons conçu la fonction Fast Freeze pour vous permettre d’obtenir les meilleurs résultats
possibles lors de la congélation de vos aliments. La fonction Fast Freeze accélère le refroidissement
en réglant le congélateur à sa température la plus froide pendant 12 heures, ce qui aide à
préserver la fraîcheur, la texture et la saveur des aliments pendant le processus de congélation.
Pour activer la fonction, utilisez la touche jusqu’à ce que l’icône de congélation rapide
) s’affiche sur l’écran . Utilisez ensuite la touche ou jusqu’à
(
ce que les flocons (
fonction Fast Freeze est activée.
Pour désactiver manuellement la fonction, utilisez la touche pour afficher l’icône de
congélation rapide (
les flocons (
Pour de meilleurs résultats, nous vous recommandons d’activer la fonction environ 2 heures
avant de l’utiliser. Vous pouvez également l’activer au moment de ranger vos aliments dans
le congélateur.
Remarque : les fonctions Bottle Chill et Fast Freeze ne peuvent pas être utilisées simultanément.
) s’affichent sur l’écran Fast Freeze. Les flocons s’animent lorsque la
) sur l’écran. Utilisez ensuite les touches et jusqu’à ce que
) disparaissent de l’écran.

Utilisation des options d’affichage
Vérification de la température de votre réfrigérateur et de votre congélateur
Lorsque le réfrigérateur est mis en marche pour la première fois, il prend environ 2 à 3 heures
pour refroidir.
Pour régler la température d’un compartiment, utilisez la touche pour atteindre l’écran
La température peut être réglée au moyen de la touche pour augmenter la température
du compartiment ou de la touche
Le réglage de la température est indiqué par l’icône ci-dessous.
Il est important de régler votre réfrigérateur à la bonne température. Un réglage de température
trop bas peut causer la congélation de certains aliments, tandis qu’un réglage trop élevé en
réduira la durée de conservation.
Pour obtenir davantage de renseignements sur la conservation des aliments, reportez-vous à la
section Conservation des Aliments (pages 77 – 79).
Réglages
Mode touches silencieuses
Le mode touches silencieuses permet de mettre en sourdine le bruit émis lorsqu’on appuie sur
une touche.
Pour l’activer ou le désactiver, utilisez la touche pour atteindre l’écran , puis
appuyez sur la touche
Lorsque le mode touches silencieuses est activé, s’affiche.
Lorsque ce mode est désactivé, s’affiche.
, puis utilisez la touche pour sélectionner le compartiment de votre choix.
pour diminuer la température du compartiment.
ou .
63
US
CA
(FR)
Remarque : les défaillances, la minuterie de la fonction Bottle Chill et l’alarme de la porte
émettront toujours un son même lorsque le mode touches silencieuses est activé.
Verrouillage du distributeur et des touches
Le verrouillage du distributeur désactive les touches et empêche
la distribution d’eau.
Le verrouillage des touches désactive les touches.
Pour activer le verrouillage, maintenez la touche enfoncée sur
le panneau d’affichage.
Après 2 secondes, l’icône s’affichera pour indiquer que le
verrouillage du distributeur est activé.
Après 2 autres secondes, l’icône s’affichera pour indiquer que
le verrouillage des touches est activé.
Pour désactiver le verrouillage, maintenez la touche enfoncée
pendant 2 secondes sur le panneau d’affichage.
Fig.17 Verrouillage du
distributeur et des touches

US
CA
(FR)
64
Utilisation des options d’affichage
Mode Sabbat
En mode Sabbat, les lampes et l’affichage sont désactivés.
Le mode Sabbat peut être activé ou désactivé en
maintenant les touches
, , enfoncées pendant
4 secondes.
En mode Sabbat :
La lampe intérieure ne s’allume pas lorsque la porte du
réfrigérateur est ouverte.
L’alarme de porte est désactivée.
L’affichage ne s’illumine pas.
Le panneau de commande électronique est désactivé.
Fig.18 Mode Sabbat
Remarque : en cas de panne de courant, le réfrigérateur est
automatiquement en mode Sabbat lorsque l’alimentation
est rétablie. Le mode Sabbat se désactive automatiquement
après 80 heures.
Mises en garde
Votre réfrigérateur est conçu pour effectuer un autodiagnostic de ses pannes. Il vous avisera s’il
y a une défectuosité.
Réinitialisation du filtre
L’icône de réinitialisation du filtre s’affiche lorsque le filtre doit être remplacé. Cette
icône clignote pendant la distribution d’eau. Pour remplacer le filtre et réinitialiser l’icône de
remplacement de filtre, veuillez vous reporter aux pages 66 et 67.
Défaillance
Dans le cas peu probable d’une défectuosité, l’icône s’affiche à l’écran d’affichage et un
code de défaillance est affiché du côté gauche de l’écran
Lorsque la porte est ouverte, l’alarme de défaillance retentit. Pour désactiver l’alarme, appuyez
.
sur une touche de l’affichage.
Veuillez prendre le code de défaillance en note, puis communiquez avec le centre de service à la
clientèle. Les numéros de téléphone des centres de service à la clientèle sont inscrits à la fin de
ce guide.
Fig.19 Affichage du code de défaillance
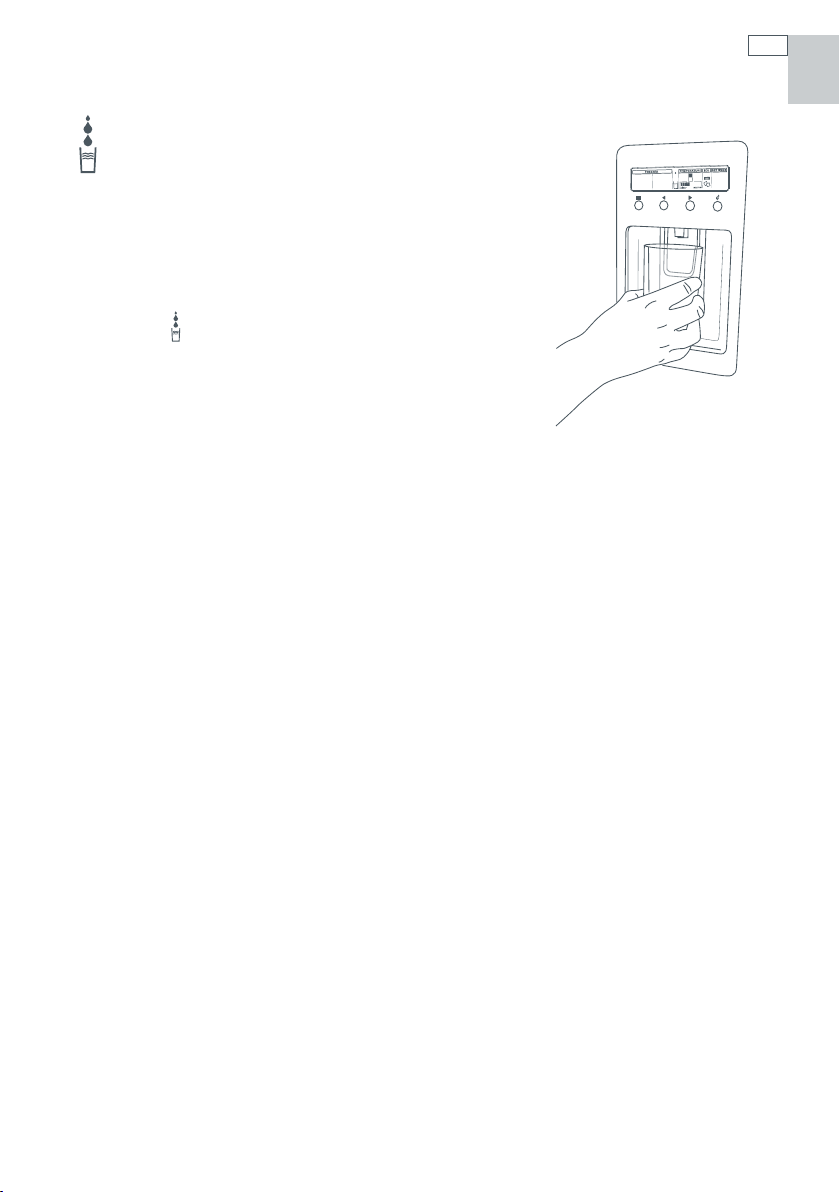
Utilisation de votre distributeur d’eau
Distribution
Le distributeur d’eau est conçu pour être activé d’une
seule main.
Pour distribuer de l’eau, poussez légèrement un verre ou un
contenant contre la plaque du distributeur.
Lorsque l’eau est distribuée, une lampe s’allume au-dessus
de l’aire de distribution et sur l’écran d’affichage. L’icône de
remplissage
Pour interrompre l’écoulement, il suffit de dégager le verre
ou le contenant de la plaque du distributeur.
apparaît également.
65
US
CA
(FR)
Rappelez-vous que le fait de pousser violemment contre la
Fig.20 Distributeur d’eau
plaque n’a aucune incidence sur la rapidité de l’écoulement
ni sur la quantité d’eau produite.
Première utilisation
Après l’installation, poussez le verre contre la plaque du distributeur et attendez environ une
minute pour que l’eau s’écoule. Vous permettrez ainsi au réservoir de se remplir complètement.
Après avoir rempli le réservoir pour la première fois, faites couler l’eau en arrêtant le débit de
façon intermittente pour purger le réservoir, et jetez les 3 à 3 premiers litres d’eau.
Important!
Afin d’éviter les dommages à la propriété et les blessures, n’insérez pas vos mains, vos doigts ni
d’objets dans l’ouverture du distributeur.
Veuillez noter qu’après l’installation, quelques gouttes peuvent s’écouler du distributeur dans les
quelques jours suivants, au fur et à mesure que l’air emprisonné est évacué.

US
66
Filtre à eau
CA
(FR)
L’eau alimentant votre réfrigérateur est filtrée pour éliminer les impuretés. Le filtre est situé à
l’extérieur du réfrigérateur, à l’endroit de votre choix. Ce filtre doit être remplacé à tous les six
mois (environ).
L’icône de remplacement de filtre s’affiche sur le panneau de commande lorsque vous devez
remplacer le filtre. Elle clignote pendant la distribution de l’eau pour vous le rappeler.
Vous pouvez obtenir des filtres de rechange auprès de votre détaillant Fisher & Paykel autorisé.
Les renseignements sur le filtre de rechange sont inscrits sur l’étiquette.
Remplacement du filtre
Il n’est pas nécessaire de couper l’alimentation en eau lorsque vous changez le filtre.
1
Empoignez le boîtier de filtre et tournez-le fermement dans le sens antihoraire (vers la gauche
lorsqu’il est installé selon l’orientation recommandée), comme le montre le schéma 1.
2
Dégagez le filtre de la tête (vers le bas lorsque le boîtier de filtre est installé selon l’orientation
recommandée), comme le montre le schéma 2.
– Il est normal que quelques gouttes d’eau s’écoulent lorsque vous retirez le filtre.
3
Mettez l’ancien filtre au rebut.
4
Installation du nouveau filtre :
– Retirez le bout protecteur de la tête du filtre.
– Poussez le boîtier de filtre vers le haut, vers la tête du filtre, en le tournant dans le sens horaire
(vers la droite lorsqu’il est installé selon l’orientation recommandée), comme le montre le
schéma 3.
5
L’icône de réinitialisation du filtre, située sur l’affichage, s’illumine lorsque le filtre doit être
remplacé. Reportez-vous à la page 67.
6
Laissez 10 litres (10 pintes) d’eau s’écouler pour purger le filtre, pour éliminer les bulles d’air et
les fibres de carbone inoffensives.
7
Quelques gouttes d’eau peuvent s’écouler du distributeur dans les quelques jours suivants, au
fur et à mesure que l’air emprisonné est évacué.
Schéma 2Schéma 1 Schéma 3
Fig.21 Remplacement du filtre

Filtre à eau
Pour réinitialiser l’icône de remplacement de filtre
Important!
Nous vous recommandons d’utiliser le filtre à eau dès l’installation.
Pour éviter de fausser les données de remplacement du filtre, ne réinitialisez pas l’icône avant
d’avoir remplacé le filtre.
Appuyez sur les touches et simultanément pendant 4 secondes pour réinitialiser l’icône de
remplacement de filtre.
Une fois le filtre installé, l’icône disparaîtra de l’écran après la réinitialisation.
Pour désactiver l’icône de remplacement de filtre
Remarque : si l’icône de remplacement de filtre est désactivée, vous ne serez pas avisé lorsque
viendra le temps de remplacer le filtre.
Si aucun filtre n’est installé, vous pouvez désactiver l’icône de remplacement de filtre.
Appuyez sur les touches , et simultanément pendant 4 secondes pour activer/
désactiver cette fonction.
Lorsque la fonction est activée ou désactivée, l’icône clignote et la mention ON (marche) ou
OFF (arrêt) s’affiche sur l’écran
Nous vous recommandons de ne pas désactiver l’icône de remplacement de filtre si un filtre
est installé.
.
67
US
CA
(FR)
Important!
Pour éviter une maladie grave, voire la mort, n’utilisez pas le filtre à eau dans un endroit où l’eau
est impropre à la consommation ou de qualité inconnue sans utiliser un système de désinfection
en amont ou en aval du filtre.
Le filtre à eau doit être remplacé lorsque l’icône clignote sur le panneau d’interface.
Nous vous recommandons de remplacer le filtre à eau lorsque l’icône clignote. Vous devez
remplacer le filtre à tous les 6 mois.
Si le système de filtration d’eau gèle, remplacez le filtre.
Le jet d’eau du distributeur d’eau peut perdre de la puissance à mesure que des sédiments,
provenant de l’eau de votre réseau de distribution locale, s’accumulent dans le filtre. Si votre eau
contient beaucoup de sédiments, vous pourriez avoir à remplacer le filtre plus souvent.
Si vous constatez que les filtres se bouchent très rapidement, consultez un plombier ou contactez
les responsables de votre réseau de distribution d’eau, afin d’obtenir des conseils sur la filtration
de votre eau provenant du réseau.
Il est de la responsabilité du client de remplacer le filtre et celui-ci n’est pas couvert par la
garantie, sauf si des pièces ou des matériaux du filtre sont défectueux.
Si le distributeur d’eau n’a pas été utilisé pendant une longue période ou si l’eau dégage une odeur
déplaisante ou a un goût désagréable, nettoyez le système en y faisant circuler 10 litres d’eau.
Si l’odeur ou le goût demeurent, vous devriez remplacer la cartouche du filtre.

US
CA
(FR)
68
Utilisation de votre appareil à glaçons
Appareil à glaçons
Votre machine à glaçons est conçue pour produire de la
glace automatiquement, jusqu’à ce qu’elle détecte que
le bac est plein. Plus vous utilisez de glaçons et plus la
machine en produira. Elle peut même détecter lorsque le
bac n’est pas présent pour recevoir les glaçons.
Première utilisation
Lorsque vous utilisez votre réfrigérateur pour la première
fois, l’appareil à glaçons n’est pas sous tension.
Pour mettre l’appareil à glaçons sous tension, utilisez la
touche
Utilisez la touche
tension l’appareil à glaçons.
pour atteindre l’écran .
ou pour mettre sous tension/hors
Indique que l’appareil à glaçons est sous tension.
Indique que l’appareil à glaçons est hors tension.
Appuyez sur les touches simultanément pour
forcer le cycle de fonctionnement. Le plateau à glaçons
se retourne. Effectuez un autre cycle. Le plateau à glaçons
se retourne, puis l’eau se déverse dans le compartiment à
glaçons. Videz l’eau et remettez le compartiment en place.
Lorsque le bac à glaçons est plein ou qu’il n’est pas
inséré correctement, l’appareil à glaçons ne fonctionne
pas. Lorsque le bac à glaçons est inséré correctement, la
cuillère à glaçons se trouve sur le côté droit du bac pour
les modèles E522B, et à l’avant du bac pour le modèle
RF201A (voir illustration Fig.23). L’appareil à glaçons ne
fonctionne pas lorsque les bacs à glaçons sont retirés.
Une fois l’appareil à glaçons activé, jetez les 3 premiers lots
de glaçons produits (8 glaçons par lot) pour évacuer toutes
les impuretés présentes dans la conduite d’eau et obtenir des
glaçons de la meilleure qualité. Nous vous recommandons
également de procéder à ce nettoyage après les vacances ou
les périodes d’inutilisation prolongées de l’appareil à glaçons.
Nous vous recommandons de mettre hors tension votre
appareil à glaçons si :
– L’alimentation en eau est coupée pendant plusieurs heures, ou
– Le bac à glaçons doit être enlevé pour un certain temps, ou
– Vous partez en vacances ou vous quittez la maison pour
un long congé.
Fig.22 Mise sous tension de
l’appareil à glaçons
E522B
RF201A
Fig.23 Bac à glaçons et cuillère
à glace dans la bonne position

Utilisation de votre appareil à glaçons
Information concernant votre appareil à glaçons
Votre appareil à glaçons automatique produit environ huit cubes de glace à chaque 2 ou
3 heures, selon la température du congélateur et le nombre d’ouvertures de porte.
Le plateau à glaçons se remplit d’eau lorsque le congélateur atteint la température adéquate.
Les premiers cubes de glace seront habituellement prêts au bout de plusieurs heures.
Lorsque les cubes sont gelés, ils sont éjectés du plateau moulé vers un bac d’entreposage.
La production de glaçons se poursuit jusqu’à ce que le bac soit plein.
La production de glaçons reprend lorsque des glaçons sont utilisés.
Pour accumuler le plus de glaçons possible, nivelez les cubes dans le bac au moyen de la cuillère
à glace fournie.
Votre réfrigérateur Ice & Water est pourvu d’un petit bac à glaçons logé dans le grand bac du
congélateur. Une cuillère à glaçons y est fixée. Cette cuillère permet de manipuler les glaçons de
façon hygiénique.
Si une grande quantité de glaçons est nécessaire, retirez le petit bac à glaçons et laissez les
glaçons tomber dans le bac de plus grande taille.
Lorsque l’appareil à glaçons est utilisé occasionnellement, les glaçons produits depuis un certain
temps peuvent rétrécir, se coller ensemble et avoir un aspect trouble et un goût fétide. Videz
régulièrement le bac à glaçons pour le laver à l’eau tiède, puis séchez-le complètement avant de
le réinstaller dans la position adéquate.
Important!
Évitez tout contact avec le mécanisme d’éjection des glaçons et n’insérez pas vos doigts sur le
mécanisme de production automatique de glaçons lorsque le réfrigérateur est sous tension.
N’utilisez pas les glaçons qui se sont décolorés (ils sont habituellement de couleur bleu-vert). Si
une telle décoloration survient, jetez les cubes de glace et communiquez avec le centre de service
autorisé Fisher & Paykel de votre région.
Assurez-vous que l’appareil à glaçons soit raccordé au filtre et à l’alimentation en eau
potable seulement.
L’installation de la conduite d’eau à la machine à glaçons doit être effectuée par un technicien
d’entretien ou un plombier qualifié (consultez les instructions d’installation).
69
US
CA
(FR)

US
CA
(FR)
70
Fonctions spéciales du réfrigérateur Active Smart™
Bacs à fruits et légumes avec couvercle de contrôle de l’humidité
Les bacs à fruits et légumes sont munis d’un couvercle ingénieux proposant deux fonctions :
Le couvercle de contrôle de l’humidité scelle les bacs et procure un microclimat humide pour
prolonger la durée de conservation des fruits et légumes.
Le couvercle de contrôle de l’humidité empêche la condensation qui se forme à des taux
d’humidité élevés de s’écouler sur les fruits et légumes en l’emprisonnant dans ses rainures.
Bacs à fruits et à légumes et glissière de contrôle de l’humidité
Chaque bac à fruits et légumes est pourvu d’un curseur permettant de régler le niveau
d’humidité en fonction des fruits ou légumes conservés dans le bac.
Efforcez-vous de conserver les fruits et les légumes dans des bacs distincts. Cela prolonge leur
durée de conservation.
Lorsque des fruits et des légumes sont regroupés dans le même bac, placez la glissière
au centre.
Lorsque la quantité d’eau est trop importante dans les bacs, déplacez le curseur vers le réglage
indiquant une production de gouttelettes réduite (réglage des fruits) et/ou essuyez l’eau si
nécessaire.
Rappelez-vous qu’une petite quantité d’eau au fond des bacs est bénéfique pour la conservation
des fruits et des légumes.
IDÉAL POUR :
Salade verte
Laitue
Épinard
Brocoli
Chou
Carotte
Fruits et
légumes
mélangés
Fruits avec
pelure
Oranges
Citrons
Limes
Fig.24 Affichage graphique du contrôle de l’humidité

Fonctions spéciales du réfrigérateur Active Smart™
Tiroir de rangement mince (le cas échéant)
Vous pouvez utiliser les bacs situés au bas du réfrigérateur
pour stocker les aliments que vous désirez séparer du reste
du réfrigérateur. Ces bacs minces peuvent être utilisés pour
les viandes froides, pour les bouteilles ou encore, pour
décongeler des aliments.
71
US
CA
(FR)
Alarmes de porte
Si la porte du réfrigérateur demeure ouverte, une alarme sonore retentit au bout de 90 secondes;
Fig.25 Tiroir de rangement mince
si la porte du congélateur demeure ouverte, l’alarme retentit au bout de 60 secondes.
Lorsque l’une des portes demeure tout de même ouverte, l’alarme sonore continue de retentir à
toutes les 30 secondes pendant 5 minutes.
Une alarme sonore retentit et l’ampoule s’éteint lorsque la porte demeure ouverte pendant
5 minutes ou plus. L’alarme s’arrête lorsque vous fermez la porte.
Porte-bouteille (sur certains modèles)
Votre réfrigérateur est livré avec 2 à 4 porte-bouteilles individuels (selon votre modèle de
réfrigérateur). Ces porte-bouteilles permettent de ranger un large éventail de bouteilles.
Pour placer le porte-bouteille dans votre réfrigérateur, insérez simplement le rebord arrière du
porte-bouteille sur la moulure arrière d’une tablette.
Vous pouvez empiler les porte-bouteilles inutilisés afin d’économiser l’espace sur la tablette.
Les bouteilles se rangent plus facilement lorsque leur goulot est orienté vers l’avant du
réfrigérateur.
Ramasse-gouttes
Le plateau ramasse-gouttes est conçu pour être glissé dans le rail au bas du panneau du
distributeur d’eau.
Lorsque vous glissez le plateau, assurez-vous de placer les côtés arrondis vers l’avant.
Le plateau ramasse-gouttes est utilisé pour recueillir les dernières gouttes d’eau qui peuvent
s’écouler après que l’appareil a fourni de l’eau.
Le plateau peut être facilement retiré et nettoyé (voir page 72).
Tablettes en verre
Vous pouvez repositionner les tablettes en verre à l’endroit souhaité dans le réfrigérateur.
Pour les retirer, soulevez leur partie arrière et tirez-les vers l’avant.

US
CA
(FR)
72
Nettoyage et entretien de votre réfrigérateur
Extérieur
Portes en acier inoxydable (fini iridium ou EZKleen)
Il est important d’utiliser uniquement un chiffon doux et un détergent liquide pour lavevaisselle dissout dans de l’eau tiède pour nettoyer l’extérieur des portes de votre réfrigérateur.
Asséchez les portes avec un chiffon propre non pelucheux.
L’utilisation d’un nettoyant abrasif ou de solvants pour l’acier inoxydable peut endommager la
surface des portes.
Clavier et interface du distributeur d’eau
Nous avons inclus une fonction de verrouillage des touches du clavier et du distributeur pour
faciliter le nettoyage du réfrigérateur (reportez-vous à la page 63). Cela permet d’éviter la
distribution d’eau pendant le nettoyage.
Nettoyez le clavier et l’interface avec un chiffon humide.
Autres surfaces extérieures
Nettoyez toutes les autres surfaces extérieures en utilisant un chiffon doux et une solution d’eau
tiède et de détergent.
Au besoin, nettoyez la garniture magnétique de la porte et la garniture centrale avec une brosse
à dents, de l’eau tiède et un détergent liquide pour lave-vaisselle.
Évaporateur
Le plateau de l’évaporateur est situé sur le compresseur,
à l’arrière du réfrigérateur ou du congélateur. Il doit être
nettoyé fréquemment.
Dégagez soigneusement le réfrigérateur ou le congélateur
de son emplacement.
Débranchez l’appareil.
Nous vous recommandons de laisser le plateau en place. S’il
faut le nettoyer, l’excédent d’eau peut être enlevé du plateau
de l’évaporateur au moyen d’une éponge. Lavez-le avec une
solution d’eau tiède et de détergent ou de désinfectant.
Rebranchez l’appareil.
Ramasse-gouttes
Pour nettoyer le plateau, retirez-le du panneau
de distributeur et séparez les deux moitiés (voir
Fig. 26).
Nettoyez-les avec de l’eau tiède et un détergent
doux. Séchez les moitiés du plateau et assemblezles à nouveau.
Réinsérez le plateau dans le panneau du
distributeur d’eau.
Fig.26 Nettoyage du plateau d’égouttage

Nettoyage et entretien de votre réfrigérateur
Intérieur
Il est important de garder l’intérieur du réfrigérateur ou du congélateur propre afin d’éviter la
contamination des aliments.
La quantité et le type d’aliments conservés déterminent la fréquence de nettoyage du
réfrigérateur (à toutes les 1 ou 2 semaines, idéalement).
Retirez les tablettes du réfrigérateur et de la porte. Lavez les tablettes et les bacs avec une solution
d’eau tiède et de détergent; rincez à l’eau propre et asséchez-les avant de les remettre en place.
Lavez les surfaces intérieures avec une solution d’eau tiède et de détergent ou de bicarbonate
de soude (ajoutez 1 cuil. à thé de bicarbonate de soude par 500 ml [1/2 pinte] d’eau). Rincez-les
à l’eau propre.
Pour éliminer les odeurs persistantes dans le réfrigérateur, ajoutez quelques gouttes d’essence
de vanille ou de vinaigre à votre eau avant de nettoyer le réfrigérateur.
Nettoyez toutes les autres surfaces extérieures avec une solution d’eau tiède et de détergent.
Utilisez une brosse à dents pour nettoyer la garniture aimantée de la porte.
N’utilisez pas un chiffon ou un détergent abrasif ou très parfumé ni des détergents ou solvants
qui dégagent de fortes odeurs dans le réfrigérateur.
Tablettes en verre
Lavez-les avec une solution d’eau tiède et de détergent ou avec un nettoyant à vitre. Si vous
nettoyez les tablettes sans les retirer du réfrigérateur, utilisez uniquement de l’eau tiède et
un détergent, car le nettoyant à vitre peut endommager les composants en plastique de
votre réfrigérateur.
73
US
CA
(FR)
Porte-bouteille
Nettoyez-le avec une solution d’eau tiède et de détergent. L’utilisation de détergents abrasifs
peut causer des dommages.
Distributeur à glaçons automatique
Nous ne recommandons pas le nettoyage des composantes de l’appareil à glaçons, mais il est
important de nettoyer les bacs à glaçons à l’occasion.
Le bac à glaçons doit être nettoyé régulièrement, et la glace qui s’y trouve, jetée.
Lavez le bac avec de l’eau tiède, asséchez-le, puis remettez-le en place.
Lorsque vous remettez le bac en place, assurez-vous que la cuillère se trouve sur le côté droit
pour le modèle E522B, et à l’avant pour le modèle RF210A.
Important!
La plupart des détergents offerts sur le marché contiennent des solvants qui peuvent
endommager les composantes en plastique de votre réfrigérateur et causer des craquelures.
Il est important d’utiliser uniquement de l’eau tiède et une petite quantité de détergent
liquide pour lave-vaisselle sur les composantes en plastique à l’intérieur et l’extérieur de votre
réfrigérateur. Évitez d’utiliser des produits antibactériens sur les composantes à l’intérieur ou
l’extérieur de l’appareil. Ces produits pourraient corroder les composantes métalliques et causer
des craquelures sur les composantes en plastique.

US
74
Nettoyage et entretien de votre réfrigérateur
CA
(FR)
Système de contrôle de l’humidité
Important!
Lorsque vous nettoyez la tablette située au-dessus
des bacs à légumes, nous vous recommandons
de ne pas démonter le système de contrôle de
l’humidité de la tablette.
Si le couvercle de contrôle de l’humidité (en
plastique) et les glissières de contrôle de l’humidité
devaient se séparer de la tablette en verre, suivez
ces instructions pour les remettre en place.
1
Tournez la tablette à l’envers.
2
Pour fixer les glissières de contrôle
de l’humidité aux coins avant de
la tablette, insérez les attaches
inférieures dans la garniture avant
de la tablette. Ensuite, glissez-les
sur la tablette jusqu’à ce qu’elles
s’engagent dans le verre.
Dispositif de retenue
Glissières de contrôle de l’humidité
3
Pour installer le couvercle de contrôle
de l’humidité - le texte étant orienté
vers vous, alignez le couvercle avec
le devant de la tablette. Maintenez
le couvercle à la verticale et insérez
l’extrémité avant dans le dispositif de
retenue de la tablette. Assurez-vous que
le couvercle s’insère dans le dispositif
de retenue et sous les glissières de
contrôle de l’humidité.
4
Sur les côtés de la tablette, réglez les
languettes des glissières de façon à
ce que le couvercle en plastique soit
entre la tablette et les languettes.
5
Si la partie arrière de la tablette
comportent des attaches, fixez le
couvercle au moyen des attaches.
Assurez-vous que le couvercle est bien
fixé à l’avant et à l’arrière de la tablette.
Fig.27 Nettoyage du système de contrôle de l’humidité

Nettoyage et entretien de votre réfrigérateur
Pour retirer les plateaux ou les bacs fixes :
Pour faciliter le retrait, videz d’abord le contenu des
plateaux et des bacs.
Saisissez la poignée centrale avant du plateau ou
du bac.
Soulevez la poignée vers le haut pour désengager le
plateau ou le bac des glissières, puis tirez la poignée
vers vous pour retirer le plateau ou la bac.
Poussez les deux glissières dans le réfrigérateur.
Pour remettre les plateaux ou les bacs fixes en place :
Les glissières reposant dans le réfrigérateur, placez le plateau ou le bac sur les glissières. Poussez
lentement le plateau ou le bac jusqu’à ce qu’il s’enclenche sur les glissières.
Important!
Assurez-vous que les plateaux et les bacs sont bien fixés aux glissières avant de les utiliser.
Les glissières sont prélubrifiées et ne nécessitent aucune lubrification subséquente pendant toute
leur durée utile. Ne tentez pas d’enlever la graisse sur les glissières, cela pourrait compromettre
leur fonctionnement. N’immergez pas les glissières dans l’eau.
Fig.28 Dépose du plateau
75
US
CA
(FR)
Plateaux et bacs permanents (modèle RF201A seulement)
Les plateaux et le bac de grande taille dans le bas du congélateur de ce modèle sont fixés de
façon permanente. Vous ne pouvez pas les retirer du congélateur. Pour les nettoyer, utilisez
simplement un chiffon doux et humide.
Pendant les vacances et les congés
Mettez l’appareil à glaçons sous tension avec le panneau d’interface (consultez la page 68).
Coupez l’alimentation en eau au réfrigérateur.
À votre retour, rétablissez l’alimentation en eau au réfrigérateur.
Recueillez 10 litres d’eau et mettez-la au rebut pour vous assurer que le réservoir est rempli avec
de l’eau fraîche.
Mettez sous tension l’appareil à glaçons (reportez-vous à la page 68).
Jetez les 3 premiers lots de glaçons produits (8 glaçons par lot).

US
CA
(FR)
76
Sons émis par le réfrigérateur
Sons émis par le réfrigérateur
Les réfrigérateurs Active Smart™, en raison de leur excellente cote d’efficacité énergétique et de
leur rendement de refroidissement, peuvent émettre des bruits différents de ceux produits par
votre ancien réfrigérateur.
Parmi les sons émis normalement pendant le fonctionnement, on compte :
Son du ventilateur. Les réfrigérateurs Active Smart™ sont pourvus de ventilateurs dont la vitesse
varie en fonction de la demande. Pendant les périodes de refroidissement, lorsque la porte est
ouverte fréquemment par exemple, les ventilateurs font circuler l’air froid dans le réfrigérateur
et le congélateur, ce qui produit un son plus audible. Ce son est tout à fait normal.
Craquement ou claquement s’apparentant aux sons de la glace évacuée de l’évaporateur. Ces
sons sont émis lorsque la fonction de dégivrage est activée.
Son d’écoulement d’eau. Le son produit par la circulation du liquide frigorigène dans le système
peut s’apparenter à un bruit d’ébullition ou de gargouillement.
Sifflement après avoir fermé la porte du congélateur. Ce sifflement est produit par la différence
de pression entre l’air chaud qui pénètre dans le congélateur et qui est aussitôt refroidie et la
pression d’air extérieure.
D’autres sons étranges peuvent être émis pour les raisons suivantes :
– Appareil qui n’est pas de niveau
– Plancher inégal ou faible
– Bruits des bouteilles ou des contenants sur les tablettes
S’il s’agit de votre premier appareil à glaçons, vous pouvez entendre à l’occasion des sons qui ne
vous sont pas familiers. Ces bruits sont normaux et n’indiquent pas un mauvais fonctionnement.
Les éléments suivants peuvent émettre des sons qui sont tout à fait habituels :
– Fonctionnement du moteur (léger bourdonnement).
– Écoulement de l’eau lors du remplissage de l’appareil à glaçons et/ou du réservoir.
– Ouverture et fermeture du robinet de prise d’eau (sifflement).
– Glace se détachant du plateau (craquement).
– Glaçons tombant dans le bac (bruit sourd).

Conservation des aliments dans votre réfrigérateur
Viandes rouges
Déposez la viande rouge et fraîche dans une assiette, puis recouvrez-la d’un papier ciré, d’une
pellicule plastique ou d’une feuille d’aluminium.
Conservez la viande cuite et la viande crue dans des assiettes distinctes. Vous éviterez ainsi que
le liquide de la viande crue ne contamine la viande déjà cuite.
La charcuterie doit être consommée pendant la période de conservation recommandée.
Volaille
L’intérieur et l’extérieur des volailles doivent être bien rincés à l’eau froide. Asséchez la volaille
et déposez-la dans une assiette. Couvrez-la d’une pellicule plastique ou de papier d’aluminium.
Les pièces de volaille doivent être conservées de la même façon. Les volailles entières
(poulet, dinde, etc.) ne doivent être farcies qu’au moment de la cuisson afin d’éviter une
intoxication alimentaire.
Refroidissez et réfrigérez rapidement la volaille cuite. Retirez la farce de la volaille et conservezla séparément.
Poissons et fruits de mer
Les poissons entiers et les filets doivent être consommés le jour de leur achat. Jusqu’à la cuisson,
conservez-les au réfrigérateur dans un assiette recouverte d’une pellicule plastique, d’un papier
ciré ou d’une feuille d’aluminium.
S’il est nécessaire de les conserver jusqu’au lendemain ou plus tard, assurez-vous de
sélectionner un poisson très frais. Les poissons doivent être rincés à l’eau froide afin de retirer
les écailles et les impuretés, puis assécher ensuite au moyen d’un essuie-tout. Déposez les
poissons entiers ou les filets dans un sac en plastique scellé.
Conservez les mollusques et les crustacées au réfrigérateur en tout temps. Consommez-les dans
les 1 à 2 jours suivants.
77
US
CA
(FR)
Aliments précuits et restes de table
Ces aliments doivent être conservés dans des contenants couverts appropriés afin de prévenir
leur déshydratation.
Ne les conservez que de 1 à 2 jours.
Réchauffez les restes de table une seule fois, à feu élevé.
Bacs à fruits et à légumes
Bien qu’il soit préférable de conserver la plupart des fruits et légumes à basse température,
assurez-vous de ne pas conserver d’agrumes, de fruits tropicaux, de tomates et de concombres
à des températures inférieures à 47 °F (7 °C) pendant de longues périodes.
Des changements indésirables se produisent à basse température, tels le ramollissement de la
pelure, le brunissement, la décomposition accélérée et la perte de saveur.
Ne réfrigérez pas les avocats (jusqu’à ce qu’ils soient pelés), les bananes, les mangues ou les pépinos.
Conservez si possible les fruits et légumes dans des bacs séparés.
Chaque bac à fruits et à légumes est pourvu d’une glissière de contrôle de l’humidité qui peut
être réglée selon les aliments qui y sont conservés. (pour obtenir davantage de renseignements
sur le système de contrôle de l’humidité, consultez la page 70).

US
CA
(FR)
78
Conservation des aliments dans votre congélateur
L’utilisation d’une température de 0 °F (-18 °C) ou moins permet de conserver les aliments plus
longtemps que dans le réfrigérateur. En effet, la prolifération des bactéries, la formation de
moisissure et la fermentation sont interrompues à basse température, et l’effet des réactions
chimiques et physiques est considérablement réduit.
Aliments congelés
Pour de meilleurs résultats :
Sélectionnez uniquement des aliments de grande qualité qui se congèlent bien.
Conservez-les à 0 °F (-18 °C) ou moins. Assurez-vous de maintenir cette température en évitant
d’ouvrir inutilement la porte du congélateur. Si votre crème glacée est molle, la température de
votre congélateur n’est pas assez basse.
Laissez un espace au-dessus des contenants, des pots en verre ou des sacs en plastique
contenant des liquides ou des aliments semi-solides. Ces derniers prennent de l’expansion
en congelant. Généralement, un espace de 20 à 50 mm (1 po) est recommandé. Scellez vos
contenants. Idéalement, retirez l’air du contenant une fois que l’aliment est congelé.
Les emballages et les contenants d’aliments solides doivent être évacués de l’air qu’ils
contiennent, puis scellés adéquatement avant d’être congelés.
Utilisez la fonction Fast Freeze pour congeler les aliments frais. Cette fonction accélère le
processus de congélation pour permettre un rendement optimal. Il est recommandé d’activer
la fonction environ 2 heures avant d’utiliser le congélateur. Pour de plus amples informations,
consultez la page 62.
Congelez les aliments immédiatement, ou le plus rapidement possible. Ne congelez que de
petites quantités d’aliments à la fois. Pour de meilleurs résultats, nous vous recommandons de
congeler seulement 2,2 lb (1 kg) d’aliments par 0,9 pi³ (25 L) d’espace de congélateur à la fois
(environ 7 lb [3 kg] dans les petits congélateurs, et 9 lb [4 kg] dans les grands). Pour accélérer la
congélation dans les modèles Active Smart™, nous vous recommandons de placer les aliments
frais dans le haut du compartiment congélateur, à proximité de la sortie d’air.
N’empilez pas les aliments congelés autour du couvercle de ventilateur, cela pourrait
compromettre la circulation adéquate de l’air.
Décongelez les aliments dans le réfrigérateur, si possible, ou utilisez un four à micro-ondes ou
un four multifonction.
Consommez les aliments en ordre chronologique. Ainsi, consommez les aliments dans l’ordre où
ils ont été congelés. N’excédez pas la durée de conservation recommandée.
Utilisez des emballages spéciaux pour la congélation afin de préserver la qualité des aliments.
Si les aliments sont simplement recouverts d’une pellicule plastique, les placer dans un sac en
plastique pour congélateur.
Durées de conservation recommandées au congélateur
Ces durées de conservation doivent être respectées.
Bacon, ragoût, lait
1
Pain, crème glacée, saucisse, tarte – (viande et fruit), mollusques et crustacées préparés, poissons huileux
2
Poissons non huileux, mollusques et crustacées, pizza, pain, cuit et muffin
3
Jambon, gâteau, biscuits, bœuf et agneau, pièces de volaille
4
Mois
Beurres, légumes (blanchis), œufs entiers et jaune d’œuf, écrevisses préparées, viande hachée (crue), porc (crue)
6
Fruit (sec ou dans le sirop), blancs d’œuf, bœuf (cru), poulet entier, agneau (cru), gâteaux aux fruits
12

Conservation des aliments dans votre congélateur
Viande, volaille et gibier
Ne tentez pas de congeler plus de 1 kg (2,2 livres) de viande par 25 litres (0,9 pieds cubes) de
volume de congélateur, en tout temps. La viande doit être congelée rapidement pour que sa
texture soit préservée.
Ne farcissez pas la volaille avant de la congeler.
La viande peut être cuite à l’état congelé ou être entièrement ou partiellement décongelée.
Rappelez-vous de prolonger le temps de cuisson des pièces cuites à partir d’un état congelé.
Décongelez toujours entièrement la volaille avant la cuisson.
Poisson
Le poisson congelé vendu dans le commerce est préférable. Si toutefois vous souhaitez congeler
du poisson à la maison, assurez-vous qu’il est très frais et de grande qualité.
Nettoyez-le, enlevez les écailles et laissez-le entier de préférence. Tous les poissons devraient
être déposés dans un emballage à double épaisseur selon le type de poisson, car les odeurs et
la saveur se transfèrent rapidement aux autres aliments. Scellez adéquatement l’emballage.
Pour de meilleurs résultats, cuisez-les à partir de l’état congelé ou légèrement décongelé.
Légumes
La plupart des légumes se congèlent bien, mais les légumes à feuilles (salades) perdre de leur
croquant. D’autres légumes comme les céleris, les oignons et les tomates doivent uniquement
être utilisés dans les plats cuisinés puisque leur pelure se ramollie en congelant.
Ne congelez que des légumes de grande qualité, mûrs et prêts à manger.
Jetez tous les légumes qui sont endommagés.
On doit blanchir la plupart des légumes crus avant de les congeler.
Le blanchiment consiste à faire cuire les légumes pendant un court laps de temps, ce qui
permet d’éliminer les enzymes. Si ces enzymes ne sont pas détruits, les légumes peuvent se
modifier chimiquement et physiquement pendant la congélation.
Les légumes peuvent être blanchis dans l’eau bouillante, à la vapeur ou au four à micro-ondes.
Dans l’eau bouillante, laissez les légumes cuire de 2 à 4 minutes, puis refroidissez-les rapidement.
En règle générale, il est préférable de cuire les légumes congelés.
79
US
CA
(FR)
Aliments préparés et cuits
La plupart des plats cuisinés peuvent être congelés, mais nous vous recommandons de ne pas
congeler les aliments suivants :
Blanc d’œuf cuit, sauce anglaise, crème de pâtisserie et pudding au lait, mets gélatineux,
mayonnaise et vinaigrette similaire, nappage de meringue. Ces aliments ont tendance à se séparer
en décongelant.
Fruits
Ne congelez que des fruits de grande qualité, mûrs et prêts à manger. Sélectionnez de
préférence des variétés de fruits qui se congèlent.
Évitez de peler les fruits.
La méthode d’emballage des fruits dépendra de l’usage qu’on en fera. Les fruits conservés dans
un sirop sont parfaits pour les desserts, tandis que les fruits conservés sans sucre pourront être
utilisés pour la cuisson. La plupart des fruits peuvent se conserver de 8 à 12 mois.

US
80
Dépannage
CA
(FR)
Si vous éprouvez des problèmes avec votre appareil, veuillez d’abord vérifier les points suivants
avant de communiquer avec un centre de service autorisé de Fisher & Paykel ou avec le centre
de service à la clientèle.
Problème Causes possibles Quoi faire
L’appareil ne
fonctionne pas.
L’ampoule ne
s’allume pas.
L’ampoule et
l’affichage ne
fonctionnent pas.
Le moteur
fonctionne pendant
de longues périodes.
La température
du réfrigérateur/
congélateur est trop
basse.
Les aliments
gèlent dans le
réfrigérateur.
Bruits insolites. L’appareil n’est pas de niveau.
Aucune alimentation à la prise de
courant.
Le dispositif d’éclairage ne
fonctionne pas.
Le réfrigérateur ne fonctionne pas. Assurez-vous que le réfrigérateur est
Le mode Sabbat est activé.
Climat chaud.
Ouverture fréquente des portes.
Grande quantité d’aliments ajoutés
récemment.
La commande de température est
trop basse.
Les portes ne sont pas étanches. Assurez-vous que l’appareil est de niveau et que
Le réglage de la température
est incorrect.
Ouverture fréquente des portes.
Grande quantité d’aliments ajoutés
récemment.
Le réglage de la température
est incorrect.
Les aliments sont placés directement
devant les sorties d’air.
Le congélateur est en mode
dégivrage.
Assurez-vous que la fiche est bien branchée et
que la touche d’alimentation est en position de
marche (ON).
Vérifiez le fonctionnement d’un autre appareil
électroménager avec la même prise de courant.
Vérifiez le boîtier de fusibles.
Le dispositif d’éclairage ne peut pas être réparé
par l’utilisateur. Contactez votre détaillant
Fisher & Paykel ou un agent de service autorisé.
sous tension.
Si le problème persiste, consultez la page 86.
Maintenez enfoncées la touche de menu
flèche gauche et la touche de verrouillage
pendant 4 secondes.
Minimisez le nombre d’ouvertures de la porte
pour permettre à la température de se stabiliser.
Reportez-vous à la section Commande de
température de la page 63.
les garnitures d’étanchéité sont propres.
Reportez-vous à la section Commande de
température de la page 63.
Minimisez le nombre d’ouvertures des portes
pour permettre à la température de se stabiliser.
Reportez-vous à la section Commande de
température de la page 63.
Déplacez les aliments délicats à bonne distance
de la partie arrière centrale des tablettes.
Consultez la section Installation (pages 56 et 57)
ou Sons émis par le réfrigérateur (page 76).
, la

Problème Causes possibles Quoi faire
Eau dans les bacs à
légumes/à fruits.
Les parois de
l’appareil sont
chaudes.
Garniture centrale
des portes chaude.
Condensation
à l’extérieur du
réfrigérateur ou du
congélateur.
Condensation dans
le réfrigérateur.
Accumulation
de glace dans le
congélateur.
Poignées de porte
mal alignées.
Plateau/bac difficiles
à ouvrir/fermer.
L’eau produite par les fruits et les
légumes se condensent.
Cela est tout à fait normal.
Cela est tout à fait normal.
Cela n’est pas inhabituel lorsque le
climat est très humide.
Ouverture fréquente ou prolongée
des portes.
La garniture d’étanchéité de la
porte présente une fuite.
Cela n’est pas inhabituel lorsque le
climat est très humide.
La porte du congélateur se
ferme mal.
Avec le temps et l’utilisation, des
mouvements peuvent survenir.
Obstruction d’un matériel
d’emballage.
Les glissières ne s’allongent que
partiellement.
Une petite quantité d’eau au fond des bacs est
bénéfique pour la conservation des fruits et
des légumes.
S’il y a trop d’eau au fond des bacs, stockez
les fruits et les légumes dans des sacs de
plastique amples.
Essuyez l’eau avec un chiffon.
Réglez la glissière de contrôle de
l’humidité au réglage de basse humidité.
Essuyez.
Minimisez le nombre d’ouvertures de porte.
Assurez-vous que la garniture repose à plat et
qu’elle est parfaitement étanche.
Essuyez.
Déplacez les aliments dans le congélateur
afin d’être en mesure de fermer la porte
adéquatement.
Vérifiez et nettoyez la garniture d’étanchéité de
la porte.
Consultez la section Instructions d’installation –
Stabilisation du réfrigérateur (pages 56 et 57).
Assurez-vous qu’aucun matériel d’emballage
et qu’aucune nourriture n’obstruent le
fonctionnement du plateau ou du bac.
Maintenez les côtés du plateau ou du bac et
ouvrez-le pour étendre entièrement les glissières
– elles seront réinitialisées.
Dépannage
81
US
CA
(FR)

US
82
Dépannage
CA
(FR)
Problème Causes possibles Quoi faire
L’appareil à glaçons
émet des bruits
inhabituels ou
semble faire trop
de bruit.
L’appareil à glaçons
automatique ne
fonctionne pas.
Les glaçons ont un
goût ou une odeur
prononcés.
Durée de production
des glaçons trop
longue.
Glace mouillée/amas
de glace.
Fonctionnement normal de l’appareil
à glaçons.
L’appareil à glaçons n’est pas
sous tension.
Le bac n’est pas inséré dans le bon
sens, ou il n’est pas inséré.
L’alimentation d’eau est fermée ou
non raccordée.
Le congélateur ne fonctionne pas. Communiquez avec le service à la clientèle.
La pression d’eau est trop faible. Vérifiez la pression d’eau.
La conduite d’eau est entortillée
ou écrasée.
Le filtre est bloqué. Le filtre à eau peut devoir être remplacé.
Des emballages non scellés peuvent
transmettre l’odeur ou le goût.
L’intérieur du congélateur doit
être nettoyé.
Mauvais goût provenant de l’eau. Le filtre à eau peut devoir être remplacé.
La porte peut être entrouverte. Fermez la porte.
La température du congélateur est
trop élevée.
Faible pression d’eau. Vérifiez la pression d’eau.
Le filtre est bloqué. Remplacez le filtre (consultez les pages
La porte du congélateur est ouverte
pendant de longues périodes.
La température ambiante est élevée.
Le bac à glaçons a été laissé hors du
congélateur pendant un certain temps.
Les glaçons collent ensemble après un
certain temps.
Reportez-vous à la section Sons émis par le
réfrigérateur (page 76).
Mettez sous tension l’appareil à glaçons
(reportez-vous à la page 68).
Placez le bac à glaçons et la cuillère à glace du
côté droit du bac.
Le bac à glaçons est situé directement sous
l’appareil à glaçons, dans le coin supérieur
gauche du congélateur.
Raccordez au système d’alimentation en eau.
Éliminez les causes de déformation de
la conduite.
Les cubes existants doivent être jetés.
Assurez-vous que les emballages de
nourriture sont scellés.
Le réservoir de glaçons doit être vidé et lavé.
Nettoyez le réfrigérateur (consultez les pages
72 – 75).
Il est peut-être nécessaire d’installer un
nouveau filtre.
Forcez le cycle de fonctionnement à 2 ou 3
reprises (reportez-vous à la page 68).
Réglez la température à un degré moins élevé
(page 63).
66 – 67).
Frappez doucement sur les glaçons avec la
cuillère à glace, ou si de gros amas de glaçons
sont présents, videz le réservoir et faites de
nouveaux glaçons.

Problème Causes possibles Quoi faire
Garniture centrale des
portes chaude.
L’eau présente un
goût ou une odeur
désagréable.
Le distributeur d’eau ne
fonctionne pas.
L’eau du premier verre
est chaude.
L’icône de
remplacement de filtre
clignote.
Des gouttes tombent
du plateau d’égouttage.
Le débit d’eau est
réduit.
Vous pouvez sentir des endroits
chauds sur la garniture centrale entre
les deux portes de réfrigérateur.
Le réfrigérateur n’a pas été utilisé
pendant un certain temps.
L’alimentation d’eau est fermée ou
non raccordée.
La conduite d’alimentation peut
être bloquée.
À la première installation, il peut y
avoir de l’air dans le système.
Le filtre peut être bloqué et doit
être remplacé.
Le blocage du distributeur est activé.
L’eau est gelée dans le réservoir. Augmentez la température du
Le distributeur n’a pas été utilisé
pendant un certain temps.
Le réservoir a été vidé récemment. Laissez le temps à l’eau de se refroidir.
Le filtre doit être remplacé. Remplacez le filtre aussitôt que possible
De l’air est emprisonné dans
le réservoir.
Installation du nouveau filtre. Vidangez 10 L d’eau par le filtre, puis 3
La cartouche du filtre est obstruée. Remplacez le filtre aussitôt que possible
Cela est tout à fait normal et survient
pendant le fonctionnement normal du
réfrigérateur.
Laissez 10 litres d’eau s’écouler pour
réapprovisionner le système en eau fraîche.
Ouvrez l’eau.
Appuyez sur le bouton du distributeur
d’eau pendant deux minutes environ,
afin de faire circuler les bulles d’air
emprisonnées dans le conduit d’eau et de
remplir d’eau le circuit.
Vérifiez la conduite d’alimentation pour des
signes de fuite ou d’écrasement.
Pour purger l’air, recueillez 1 litre d’eau du
distributeur.
Remplacez le filtre (consultez la fin de ce
guide pour savoir comment joindre le
service à la clientèle).
Maintenez la touche
2 secondes.
compartiment d’aliments frais et du
congélateur.
Jetez le premier verre d’eau produit par le
distributeur d’eau.
(consultez les pages 66 et 67).
Vidangez 3 L d’eau en arrêtant à
intermittence.
autres litres d’eau par le distributeur.
(consultez les pages 66 et 67).
Dépannage
enfoncée pendant
83
US
CA
(FR)

US
CA
(FR)
84
Garantie limitée
Lorsque vous achetez un nouvel appareil électroménager Fisher & Paykel pour une utilisation
ménagère, vous recevez automatiquement une garantie limitée d’un an couvrant les pièces de
rechange et la main d’œuvre pour le service dans les 48 états du continent américain, Hawaï,
Washington D.C. et au Canada. Eu égard à l’Alaska, la garantie limitée est identique sauf que vous
devez prendre en charge les frais d’expédition du produit jusqu’au service clientèle ou prendre
en charge les frais de déplacement du technicien de maintenance jusqu’à votre domicile. Les
produits destinés à être utilisés au Canada doivent être achetés par l’intermédiaire de la chaîne
de distribution canadienne pour garantir la conformité avec la réglementation en vigueur.
Si le produit est installé dans un véhicule automobile, sur un bateau ou sur une unité
mobile similaire, vous bénéficiez de la même garantie limitée d’un an, mais il relève de votre
responsabilité d’amener le véhicule, bateau ou l’unité mobile dans laquelle est installé le
produit au service après-vente à vos frais ou de prendre en charge les frais de déplacement du
technicien de maintenance jusqu’au lieu où se trouve le produit.
Vous bénéficiez d’une garantie limitée supplémentaire de quatre ans (pour un total de cinq ans)
couvrant les pièces et la main-d’œuvre du système de réfrigération scellé (compresseur,
évaporateur, condenseur, déshydrateur de filtre et tube de raccordement) dans les 48 états
continentaux des États-Unis, à Hawaï, à Washington DC et au Canada. Les clients de l’Alaska
bénéficient de la même garantie limitée pour le système de réfrigération scellé, mais ils
doivent payer les frais nécessaires pour la livraison du produit à l’atelier de réparation, ou le
déplacement d’un technicien à leur domicile.
Fisher & Paykel s’engage à :
Réparer sans frais encourus sur le propriétaire en termes de main d’œuvre ou de matériau
une quelconque partie du produit, dont le numéro de série se trouve sur le produit, s’avérant
défectueuse. Eu égard à l’Alaska, vous devez prendre en charge les frais d’expédition du produit
jusqu’au service clientèle ou prendre en charge les frais de déplacement du technicien de
maintenance jusqu’à votre domicile. Si le produit est installé dans un véhicule automobile,
sur un bateau ou sur une unité mobile similaire, il relève de votre responsabilité d’amener le
véhicule, bateau ou l’unité mobile dans laquelle est installé le produit au service après-vente
à vos frais ou de prendre en charge les frais de déplacement du technicien de maintenance
jusqu’au lieu où se trouve le produit. Si nous ne pouvons pas réparer une pièce défectueuse
du produit après un nombre raisonnable de tentatives, nous procéderons au remplacement
de la pièce ou du produit ou nous vous proposerons de vous rembourser intégralement le prix
d’achat du produit (frais d’installation et autres frais étant exclus), selon notre choix.
Cette garantie s’étend à l’acheteur original et à tout propriétaire successeur du produit pour les
produits achetés pour toute utilisation ménagère par une seule famille.
Le service en vertu de cette garantie limitée devra être assuré par Fisher & Paykel ou par son
agent agréé pendant les heures normales de bureau.
Durée de cette garantie limitée
Notre responsabilité en vertu de cette garantie limitée expire UN AN après la date d’achat
du produit par le premier consommateur.
Notre responsabilité en vertu de toutes garanties implicites, y compris la garantie implicite de
qualité marchande (une garantie implicite selon laquelle le produit est adapté à toute utilisation
ordinaire) expire également UN AN (ou durée supérieure comme requis par la loi en vigueur) à
compter de la date d’achat du produit par le premier consommateur. Certains États n’autorisent
pas les limitations sur la durée de la garantie implicite, il est donc possible que les limitations
sur les garanties implicites ne vous concernent pas.

Garantie limitée
Cette garantie ne couvre pas les points suivants :
A
Les déplacements d’un technicien de maintenance jusqu’à votre domicile pour tout problème
non lié à un défaut dans le produit. Les frais du déplacement vous seront facturés si le problème
s’avère ne pas être un défaut du produit. Par exemple :
1. Rectifier une mauvaise installation du produit.
2. Vous expliquer comment utiliser le produit.
3. Remplacer les fusibles de la maison ou procéder au réglage des disjoncteurs, refaire le âblage
ou la plomberie de la maison ou remplacer les ampoules.
4. Rectifier les défaillances provoquées par l’utilisateur.
5. Rectifier le réglage du produit.
6. Modifications non autorisées du produit.
7. Bruits ou vibrations considérés normaux, comme par exemple, les sons de drain/ventilateur,
les bruits de réfrigération ou les bips sonores.
8. Réparations des dommages provoqués par des animaux nuisibles comme les rats ou les
cafards, etc.
B
Défauts causés par des facteurs autres que :
1. L’utilisation ménagère normale ou
2. L’utilisation en conformité avec le manuel d’utilisation du produit.
C
Les défaillances du produit causées par accident, la négligence, une mauvaise utilisation,
l’incendie, l’inondation ou une catastrophe naturelle.
D
Les frais des réparations effectuées par des réparateurs non agréés ou les frais associés à la
correction de telles réparations non autorisées.
E
Les frais de déplacement et frais associés encourus lorsque le produit est installé dans un
endroit disposant d’un accès limité ou restreint (p. ex. : frais d’avions, frais de ferry et zones
géographiques isolées).
F
La maintenance recommandée normale comme énoncée dans le manuel d’utilisation
du produit.
G
Le remplacement du filtre, sauf en présence de pièces ou matériaux défectueux à l’intérieur de
la cartouche du filtre.
85
US
CA
(FR)
Ce produit a été conçu pour une utilisation dans un environnement domestique normal. Il n’est
pas conçu pour une utilisation commerciale. Le fait de ne pas respecter cette consigne peut
entraîner l’annulation de la garantie.
En cas de problème avec l’installation, prenez contact avec votre revendeur ou installateur.
Les raccordements électriques et d’évacuation et autres raccordements relèvent de votre
responsabilité.
Nous ne sommes pas responsable des dommages indirects (les frais des réparations ou les
frais de remplacement d’autres propriétés endommagées si le produit est défectueux ou vos
dépenses encourues si le produit est défectueux). Certains États n’autorisent pas l’exclusion
ou la limitation des dommages indirects, il est donc possible que la limitation ou l’exclusion
ci-dessus ne s’applique pas à votre situation.

US
CA
(FR)
86
Garantie limitée
Comment solliciter le service clientèle
Veuillez lire le manuel d’utilisation. Si après la lecture du manuel, vous avez toujours des
questions sur le fonctionnement du produit, ou si vous avez besoin de connaître le nom de
votre représentant Fisher & Paykel agréé local ou si vous pensez que le produit est défectueux et
que vous souhaitez contacter le service clientèle dans le cadre de cette garantie limitée, veuillez
prendre contact avec votre revendeur ou nous appeler au numéro suivant :
États-Unis
SANS FRAIS 1.888.9.FNP.USA (1.888.936.7872)
ou visitez notre site Web à l’adresse www.fisherpaykel.com
Canada
SANS FRAIS 1.888.9.FNP.USA (1.888.936.7872)
ou visitez notre site Web à l’adresse www.fisherpaykel.ca
Il est possible qu’il vous soit demandé de fournir une preuve valable de la date d’achat du produit
avant que le produit puisse être accepté par le service clientèle en vertu de cette garantie limitée.
Aucune autre garantie
Cette garantie limitée constitue l’intégralité de l’accord exclusif passé entre l’acheteur et
Fisher & Paykel eu égard à toute défaillance du produit. Aucun de nos employés (ou de
nos agents agréés) n’est autorisé à procéder à un quelconque ajout ou à une quelconque
modification de cette garantie limitée.
Garant : Fisher & Paykel Appliances, Inc.
Si vous avez besoin d’assistance eu égard à cette garantie limitée, veuillez nous contacter au
numéro ci-dessus ou nous écrire à l’adresse ci-dessous :
Fisher & Paykel Appliances, Inc
5900 Skylab Road
Huntington Beach
CA 92647
Cette garantie limitée vous donne des droits juridiques spécifiques et il est également possible
que vous bénéficiez d’autres droits pouvant varier d’un état à un autre.

87

88


www.fisherpaykel.com
www.fisherpaykel.ca
Copyright © Fisher & Paykel 2011. All rights reserved.
The product specifications in this booklet apply to the specific products
and models described at the date of issue. Under our policy of continuous
product improvement, these specifications may change at any time. You
should therefore check with your Dealer to ensure this booklet correctly
describes the product currently available.
Droits réservés © Fisher & Paykel 2011.
Les spécifications du produit contenues dans ce manuel s’appliquent aux
modèles et produits spécifiques comme décrits à la date de publication.
Dans le cadre de notre politique d’améliorations en permanence de nos
produits, ces spécifications pourront être modifiées à tout moment. Nous
vous recommandons de vérifier auprès de votre revendeur que ce manuel
décrit le produit actuellement disponible.
US CA 08.2011F&P PN – 821185
 Loading...