


Installation instructions
and user guide
Ice & Water refrigerator
E402B, E442B and E522B models
NZ AU US CA UK AE HK SG MY

Introduction
Thank you for buying a Fisher & Paykel Active Smart™ refrigerator with automatic ice dispensing
and chilled water through the door.
At Fisher & Paykel we are very proud of this refrigerator. We feel we have achieved water
dispensing through the door without compromising the storage space or access in the fridge.
During our testing we have enjoyed the health benefits of having cool filtered water so
accessible, while minimising the number of door openings.
Thousands of hours of food care research and 70 years of refrigeration
experience has been programmed into your refrigerator to give you the
best possible performance.
We hope you enjoy your new refrigerator.
Before you start using your Ice & Water refrigerator
Check refrigerator is switched on and has cooled for at least 2 hours (refer to page 15 – The
temperature of your refrigerator and freezer) before use.
Check that the water filter has been connected and turned on.
Turn on ice maker.
At first use allow approximately 1 minute from when the dispensing pad is pushed until water
is dispensed. This will allow the tank to fill.
Run through and discard the first 3 L or 3 qt of water from the dispenser (refer to page 10
– First use).
Discard the first bin of ice (refer to page 11 – First use).
You are now ready to enjoy ice and water from your Active Smart™ refrigerator.
Fig.1 Water dispenser

Contents
Important safety instructions 2
Installation instructions 4
All about the display 8
Using your water dispenser 10
Using your ice maker 11
Fridge options 13
Measured Fill 13
Freezer Chill and Bottle Chill 14
The temperature of your refrigerator and freezer 15
Settings/User warnings 16
Water filter 18
Measured Fill Calibration 20
Trouble shooting 21
Cleaning and caring for your refrigerator 23
On vacation/holiday 23
Manufacturers warranty 24
Performance data sheet 26
1
Important!
This Ice & Water refrigerator booklet contains specific information about the ice and water
function on your refrigerator.
Please use this booklet in conjunction with the Refrigerator & Freezer User Guide supplied with
your refrigerator.
SAVE THESE INSTRUCTIONS
The models shown in this user guide may not be available in all markets and are subject to
change at any time. For current details about model and specification availability in your country,
please go to our website www.fisherpaykel.com or contact your local Fisher & Paykel dealer.

2
Important safety instructions
To reduce the risk of fire, electric shock, or injury to persons read the IMPORTANT SAFETY
PRECAUTIONS before operating this appliance.
Use this appliance only for its intended purpose as described in this User Guide.
Important safety precautions
Warning
When using this appliance always exercise basic safety precautions including the following:
Danger
This appliance is not intended for use by young children or infirm persons without supervision.
Young children should be supervised to ensure they do not play with the appliance.
Risk of child entrapment. Before you throw away your old refrigerator or freezer:
– Take off the doors
– Leave the shelves in place so that children may not easily climb inside.
Disposal
Extreme care must be taken when disposing of your old appliance to avoid hazards. The
refrigerant gas must be safely removed and for the safety of young children, remove doors.
Your Fisher & Paykel Appliances Authorised Service Centre will be able to give advice on
environmentally friendly methods of disposing of your old refrigerator or freezer.
Electrical
This appliance must be properly installed in accordance with the installation instructions before
it is used.
Never unplug your refrigerator or freezer by pulling on the power cord.
Always grip the plug firmly and pull straight out from the outlet.
Do not plug in any other appliance at the same power point as your refrigerator or freezer or use
extension cords or double adapters.
Repair or replace immediately all electric service cords that have become frayed or otherwise
damaged. Do not use a cord that shows cracks or abrasion along its length or at either the plug
or appliance end.
If the power supply cord is damaged, it must only be replaced by your Fisher & Paykel Appliances
Authorised Service Centre because special purpose tools are required.
When moving your appliance away from the wall, be careful not to roll over or damage the power
cord.
Unplug your refrigerator or freezer before cleaning or replacing the lightbulb.

Important safety instructions
Storing food and drinks
Never store volatile or flammable materials in your refrigerator or freezer as they may explode.
Never freeze liquids in glass containers. Liquid expands during freezing, which may cause the
container to explode.
Never freeze carbonated drinks. They may explode.
Do not consume food if it is too cold. Food removed from the freezer compartment may be cold
enough to cause damage when brought into contact with bare skin e.g. frozen ice cubes.
Power failure – food safety
Do not refreeze frozen foods that have thawed completely. Follow the recommendations below if
you discover food in your freezer has thawed:
1) Ice crystals still visible – food may be refrozen but should be stored for a shorter period than
recommended.
2) Thawed but refrigerator cold – refreezing generally not recommended. Fruits and some cooked
food can be refrozen but use as soon as possible. Meat, fish, poultry – use immediately or cook
then refreeze. Vegetables – discard as they usually go limp and soggy.
3) Thawed but warmer than 4˚C (38˚F). Red meat can be cooked immediately and refrozen but
use as soon as possible. Discard all other frozen foods.
Do not refreeze frozen foods that have thawed completely. The food may be dangerous to eat.
Cleaning
3
Many commercially available cleaning products contain solvents which may attack plastic
components of your refrigerator or freezer and cause them to crack. Please refer to the cleaning
care section of this booklet for further advice.
SAVE THESE INSTRUCTIONS

4
Installation instructions
Contents of kit
1
4 m (13 ft) white 6 mm (¼”) tubing
2
1 x 200 mm (8”) blue tubing
3
1 x pressure reducing valve (PRV)
4
1 x double sided foam
5
2 x locking keys
6
1 x water filter cartridge and head
7
1 x tap connection – USA market – ⁄” UNS
– All other markets – 15 mm (½”) BSP
1234567
Fig.3 Water connection kit
Important!
It is imperative the pressure reducing valve (PRV) is fitted prior to the filter. This valve ensures
the water will not flow back into the mains from the refrigerator water system. If the PRV is not
fitted to the connection line your Ice & Water refrigerator features may not function in some
circumstances.
It is recommended that an authorised plumber in your state or town is used to install the water
connection.
The new tubings supplied with the machine are to be used, old tubings should not be used.
Installation precautions/warning
DO NOT use with water that is microbiologically unsafe or of unknown quality without
adequate disinfection before or after the system.
WAR NIN G – connect to potable water supply only.
DO NOT install on line pressure above 900 kPa (130 psi) or below 150 kPa (22 psi).
DO NOT use on hot water supply (38°C [100°F max.]).
DO NOT install near electrical wires or water pipes that will be in the path of drilling when
selecting the location of filter system.
DO NOT mount filter in such a position so that it will be struck by other items, such as
wastebaskets, etc.
DO NOT install the filter in direct sunlight as prolonged exposure to light can weaken plastic
components.
DO NOT install in a location that is susceptible to freezing temperatures as damage to the
housing could occur.
DO NOT screw filter to fridge.
AVO ID contamination of pipes during installation.

Installation instructions
Installation instructions:
1
Ensure that refrigerator is not plugged into a power supply.
2
Remove the compressor compartment cover from the rear
of the refrigerator (USA market only).
3
Locate isolation tap for water connection – cold water feed
only (dishwasher or sink mixer taps) – if you can’t find the
connection tap, contact an authorised plumber in your state
or town to fit your water connection.
4
Connect the 200 mm (8”) blue tubing to the outlet of the
PRV (blue collet) and the inlet connection of the water filter
cartridge as shown in Diagram 1. Gently pull on both ends
to ensure it is locked.
5
Connect the white 6 mm (¼”) tubing to the outlet of the
water filter cartridge as shown in Diagram 2. Gently pull to
ensure it is locked.
6
Measure the required length of tubing to run from the PRV
to the water connection point.
7
Cut the tubing making sure the ends are square and clean.
8
Connect the tubing to the tap connection and the base
of the PRV (white collet) and then to the tap as shown
in Diagram 3. Please note that the tap connection
supplied should fit most installation situations. If
your tap requires a different fitting, please contact an
authorised plumber in your state or town to purchase
the correct fitting.
9
Connect one locking key to each side of the water
filter cartridge in between the cartridge and the
locking collet as shown in Diagram 4.
10
To flush the water filter and check for leaks, aim the
end of the tubing into a bucket, turn isolating tap on and
run at least 3 litres (3 qt) of water through. Once complete,
turn isolating tap off.
11
Locate desired position for water filter noting carefully the
following points:
It is recommended to fit the filter in a vertical
orientation with the water filter head at the top. This will
minimise water leakage when replacing cartridge.
Ensure the filter is in a convenient location to access
every 6 months for replacement. We suggest that
this location is beside the water filter supply tap in the
cupboard beside the refrigerator.
A minimum clearance of 64 mm (2 ½”) from the
bottom of the filter cartridge is required to perform
cartridge removal.
Do not screw filter to fridge.
5
Diagram 1
Fig.4 PRV connection
Diagram 2
Fig.5 Waterline connection
Diagram 3
Fig.6 Tap connection
INLET
Diagram 4
Fig.7 Locking key
6
Installation instructions
12
Attach double sided foam to the back of the water filter head as shown
in Diagram 5. Write the date to be replaced on the filter (date installed +
6 months). Remove double sided foam backing and attach filter to the
desired position as located in step 11 (refer to previous page).
13
Run the 6 mm (¼”) tubing to back of the fridge ensuring there is enough
tubing to pull out the refrigerator for service.
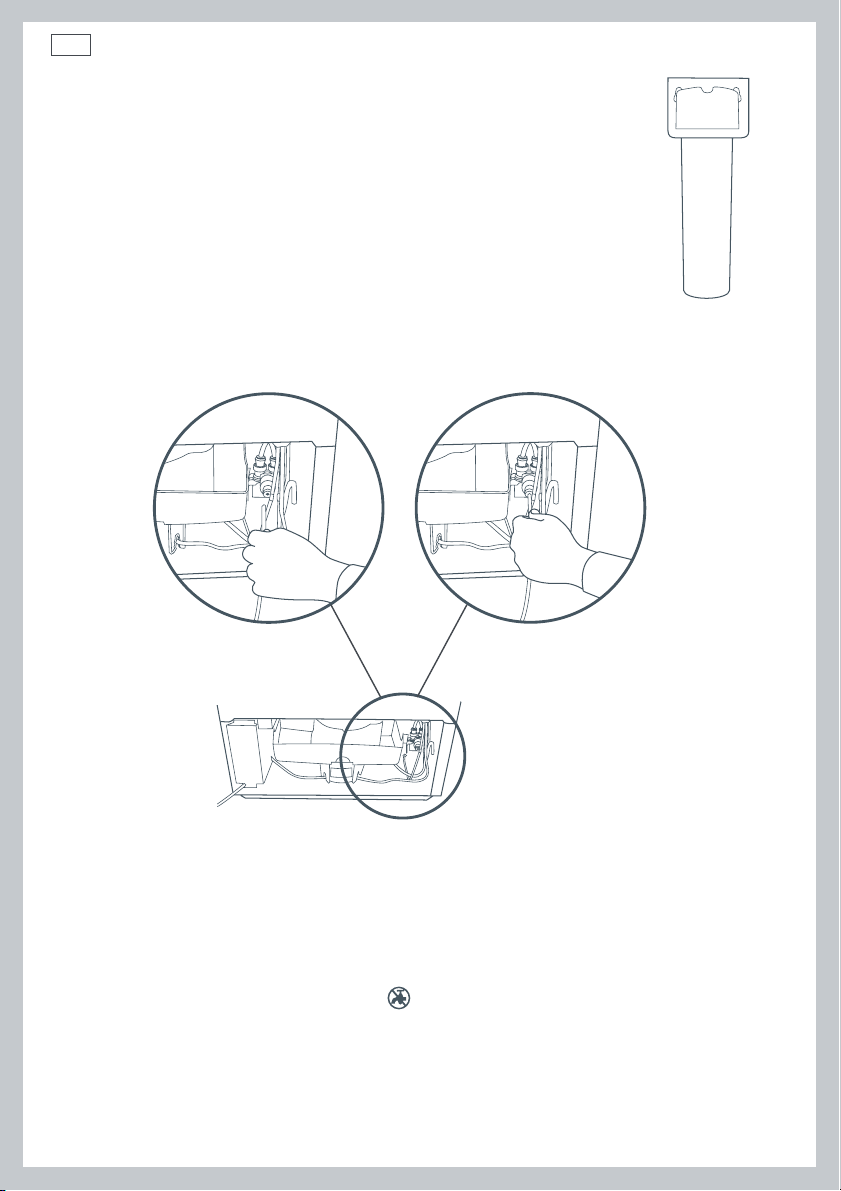
14
Connect tubing into the water (solenoid) valve located on the right hand
side of the unit (compressor) compartment as shown in Diagram 7. Beware
of hot pipes.
15
Pull gently on tubing to ensure it is locked in as shown in Diagram 8.
16
The completed installation should look like Diagram 9 on page 7.
Diagram 5
Fig.8 Double sided
foam attachment
Diagram 7
Diagram 6
17
Turn isolating tap on and check that all connections are dry and free of drips.
18
Coil water line tubing behind the fridge. Push your refrigerator into place being careful not to
Diagram 8
Fig.9 Waterline connection
to refrigerator
kink or squash the water line running into the water (solenoid) valve.
19
Turn on refrigerator.
20
The first time you require water out of the dispenser, there will be a delay while the water
reservoir fills up. As this is happening, the
symbol will flash. Once the reservoir is full, this
symbol will stop flashing.
21
Run a further 3 litres (3 qt) through the system to ensure the reservoir is flushed out.
22
You are now ready to enjoy chilled water and ice dispensing from your Active Smart™ refrigerator.

Installation instructions
Important!
All connections must be checked for leaks.
If unsure of connection process and/or leaks then contact your local plumber to install and check
the system for you.
Ensure white 6 mm (¼”) tubing is routed away from sharp objects, sharp corners (beware of
kinking tube as this will stop water flow), clear of the refrigerator unit compartment and not in a
location where it can be squashed.
Ensure all push-fit connections are firmly pushed into place. The tube should push in 20 mm (¾”)
before reaching the stop.
If tubing is removed at any point, re-cut the end and re-insert. Tubing must be fully inserted to
avoid leaks.
To remove tube from connection points, turn off the isolating tap, push in the collet and gently
pull tubing at the same time.
7
Fig.10 Connection to water supply
Diagram 9
System tested and certified by NSF International against NSF/ANSI Standard 53 for the reduction
of Asbestos, Atrazine, Benzene, Cyst, Carbofuran, Lead, Lindane, Mercury, P-Dichlorobenzene,
Toxaphene & Turbidity; against Standard NSF/ANSI 42 for the reduction of Chlorine Taste and
Odour and Nominal Particulate Class I to a capacity of 2,838 Litres (750 gallons).

8
All about the display
The display screen enables you to view and modify all the features and options on your fridge.
For example, you can change the temperature in your fridge or freezer, and select the Freezer
Chill function when you want to quickly freeze meat. You may want a measured amount of
chilled water when you are cooking, or want to quickly chill a bottle of wine when friends
arrive unexpectedly.
456 789
132
Fig.9 Electronic control panel
Keys
For more detailed information on these functions please refer to pages 10 – 17.
1. Measured Fill (see page 13)
Enables you to select the amount of water to be dispensed.
2. Main menu
Scrolls through the main menu. (Chill, Temperature, Ice and Settings).
3. Arrow keys
Scrolls through the settings of each function.

Display features
All about the display
4. Measured Fill (see page 13)
A pre-measured volume of water can be selected and dispensed
automatically.
5. Dispensing water (see page 10)
Animation shows you water is being dispensed.
6. Chill (see pages 14 – 15)
Freezer Chill
When activated this feature boosts cooling in your freezer, optimising
the rate at which your foods are frozen.
Bottle Chill
Your drinks can be chilled more rapidly using this function. An alarm
will alert you when they are ready.
7. Temperature (see page 15)
The temperature setting can be individually adjusted for each
compartment.
9
8. Ice (see page 11)
The ice making function can be turned on or off.
9. Settings/User alerts (see page 16)
Water conversion
Your volume can be displayed as either US or metric units.
Key Silent Mode
All key presses can be silenced.
Key and dispenser lock
Dispenser lock – disables the buttons and prevents water from being
dispensed.
Key lock – disables the buttons.
Sabbath Mode
Can be activated if necessary (refer to page 16).

10
Using your water dispenser
Dispensing pad
Your water dispenser has been designed for one handed operation. Simply push your glass
up against the dispenser pad found at the back of the dispenser area. This pad requires only a
gentle press to activate.
Please remember that pressing very hard against the dispensing pad will not make the dispenser
operate faster or produce greater quantities of water.
First use
After installation, on the first use, allow approximately a one minute delay from when the
dispensing pad is pushed until water is dispensed. This will allow the tank to fill completely.
symbol will flash while the water reservoir fills up. Once the reservoir is full, the symbol
The
will stop flashing.
After you fill the tank for the first time, dispense and discard approximately 3 L or 3 qt to flush
the tank out.
Dispensing
Unless Measured Fill is selected, water will be dispensed in
free-flow mode. (For more information on Measured Fill refer
to page 13).
To dispense water push the dispensing pad gently, using a
glass or container.
When you dispense water, a light will appear above the
dispensing area, and on the display screen. The water fill
icon
will also appear.
To stop the flow of water, simply pull your glass away from
the dispensing pad.
Fig.10 Water dispenser
Important!
To avoid damage to property or personal injury do not put hands, fingers or objects up the
dispenser opening.

Using your ice maker
Ice maker
Your ice maker is designed to automatically dispense ice until
it senses that the bin is fill. So the more ice you use, the more it
makes. It is even clever enough to sense when there is nothing
there to catch the ice.
First use
When you first turn your refrigerator on, the ice maker will be off.
To turn your ice maker on use the
screen.
Use the
If the bin is full, or inserted incorrectly the ice maker will not
operate. When the bin is inserted correctly the scoop will be on
the right hand side of the bin (refer to Fig.12 on page 12). If the bin
is removed the ice maker will not operate.
Once your ice maker is in operation, discard the first bin of ice
cubes. This will flush away any impurities in the water line and
ensure that you get the best quality ice. We recommend that you
also do this after vacations or extended periods of not using ice.
We recommend that you turn the ice maker off if:
– The water supply is to be off for several hours or
– The ice storage bin is to be removed for a period of time or
– You are going on holiday/vacation.
or button to turn the ice maker on or off.
Shows the ice maker is on.
Shows the ice maker is off.
button to scroll to the
11
Fig.11 Turning ice maker on
Noises
If this is your first ice maker, you will hear occasional sounds that may be unfamiliar. They are
normal ice making sounds and are not cause for concern.
The following sounds are normal with the operation of an ice maker:
– Motor operation (low humming).
– Running water.
– Water valve opening and closing (hissing sound).
– Ice being loosened from tray (cracking).
– Ice dropping into bin (clunking).

12
Using your ice maker
Information about your ice maker
Your automatic ice maker will produce approximately eight cubes of ice every 2 – 3 hours,
depending on freezer compartment temperature and number of door openings.
The ice cube tray will fill with water after the freezer has reached the correct temperature. First
cubes will normally freeze after several hours.
When cubes are frozen, they will be ejected from the mould into the ice storage bin.
Ice making will continue until the storage bin is full.
Ice making will resume when the ice is used.
For maximum ice storage, level the stored cubes with the ice scoop.
Your Ice & Water product comes with a smaller ice bin inside the larger freezer bin. Attached to
this is a scoop for the ice.
If a large amount of ice is required, remove the smaller storage bin and allow ice to fall into the
larger bin.
If ice is not used often, old cubes will become cloudy and taste stale and will shrink. Empty the
ice storage bin periodically and wash in lukewarm water. Dry thoroughly and place back.
Fig.12 Ice storage bin and scoop
in correct position
Important!
Avoid contact with the moving parts of the ejector mechanism, and do not place your fingers on
the automatic ice making mechanism while the refrigerator is plugged in.
Do not use ice cubes that may have become discoloured, usually with a green-blue colour. If such
dis-colouration is noted, discard the ice cubes and contact your local authorized service centre.
Ensure the ice maker is connected to the filter and to a drinkable water supply only.
Installation of the water connection to the ice maker must be completed by a qualified service
technician (see installation instructions).

Fridge options
Measured Fill
One useful feature of your water dispenser is it’s ability to dispense a pre-measured amount of
water. This comes in handy when cooking or preparing drinks.
13
Press the
quantities.
Push the dispensing pad to receive the pre-selected quantity of chilled water.
If you stop dispensing part way through your pre-selected quantity the dispenser will remember
the remaining quantity to be dispensed for a short time. Simply continue by pressing the pad.
The
1 oz increments, to a maximum of 1 L, or 1 qt.
button to highlight the screen and again to cycle through the preset
Fig.13 Metric display
Fig.14 US display
and buttons can be used to increase or decrease the pre-set measurements in 25 ml, or
Changing the Measured Fill units
The pre-set measurements can be displayed in US imperial or metric units.
The unit setting can be changed by pressing the
pressing the
option, press the
and buttons until the desired units are displayed. To return to the Measured Fill
button.
button to scroll to the screen and

14
Fridge options
Freezer Chill
We know that the faster food is frozen, the better the overall quality of the food, so we have
created the Freezer Chill feature.
The Freezer Chill feature drops the freezer to it’s coldest temperature for a 12 hour period and
then returns to its normal mode. You may wish to use this when freezing a quantity of meat or
when you are making frozen desserts.
To activate, use the
is displayed.
To deactivate manually, use the
and buttons until there is no icon in the screen.
For best results, we recommend that you activate the function approximately 2 hours before it is
required. Alternatively, activate it when placing food into the freezer.
button to scroll to the screen. Then use the button until
button to scroll to the screen. Then use the
Bottle Chill
This function allows you to chill your beverages in the freezer without the worry of forgetting
about them.
When activated Bottle Chill will remind you to remove your bottle by sounding an alarm. The
user alarm will continue to sound until any key on the panel is pressed.
The time taken to chill depends on the size of your bottle. Bottle Chill allows you to customise
this chill time.
Recommended times:
20 minutes – can or small bottle.
25 minutes – wine bottle or similar size beverage.
30 minutes – larger bottle.
If you remove your beverage from the freezer and it is not chilled to your liking, reset the timer
to 10 minutes and place the beverage back into the freezer.
To activate, use the
is displayed.
Then use the
the screen in the
An alarm will sound after the amount of time selected has elapsed.
button to scroll to the screen. Then use the button until
button to select 10, 15, 20, 25 or 30 minutes as displayed on the left hand side of
screen.

Fridge options
Bottle Chill contd...
Important!
Do not leave the bottle inside the freezer longer than the time needed for chilling.
15
To deactivate manually, use the
and buttons until there is no icon in the screen.
Note: The freezer chill and bottle chill option cannot be used at the same time.
button to scroll to the screen, then use the
The temperature of your refrigerator and freezer
When the refrigerator is first turned on it will take approximately 2 to 3 hours to cool, depending
on the humidity and temperature of the environment.
To adjust the temperature of a compartment, use the
screen, use the
The temperature can then be adjusted using the
the
button to make the compartment colder.
The temperature setting will be indicated on the icon below.
It is important to have your refrigerator set to the correct temperature. Setting it too cold may
cause some items in the refrigerator to freeze, and setting it too warm will decrease the storage
life of your food.
For further information on food storage temperatures refer to the food care section in the
general Refrigeration & Freezer User Guide.
button to select the compartment to change.
button to scroll to the
button to make the compartment warmer or

16
Fridge options
Settings
Water unit conversion
You can change the units your refrigerator uses between US and metric units. To change the
units press the
buttons until the desired units are displayed.
button to scroll to the screen option and press one of the or
When Key Silent Mode is on
When this function is off no symbol will appear.
Key Silent Mode
The Key Silent Mode allows you to silence all key presses.
It can be activated or deactivated by holding the
will appear.
Note: Faults, Bottle Chill timer and the door alarm will still sound when the refrigerator is set on
Key Silent Mode.
Key and dispenser lock
The dispenser lock disables the buttons and prevents
water from being dispensed.
Key lock disables the buttons.
Activate by holding down both the
button together.
After 2 seconds
lock is activated.
After 2 more seconds
lock is activated.
To de-activate, hold down both the
button together for 2 seconds.
Sabbath Mode
In Sabbath Mode alarms, lights and displays are
deactivated.
Sabbath Mode can be activated or deactivated by
holding down the
icon will appear indicating dispenser
icon will appear indicating key
, and button for 4 seconds.
button and the
button and the
button for four seconds.
Fig.15 Key and dispenser lock
Fig.16 Sabbath Mode

Fridge options
Settings
Once in Sabbath Mode:
The interior light will not turn on when the refrigerator is opened.
The door alarm will not operate.
The display will not be illuminated.
Electronic control panel will not work.
Note: If power is turned off the refrigerator will automatically continue in Sabbath Mode once
power is restored. Sabbath Mode will automatically de-activate after 80 hours.
User warnings
Your refrigerator is clever enough to diagnose it’s own problems. It will alert you when there is
a fault.
No water
The no water icon will appear when the water supply to the refrigerator is interrupted.
Please refer to the Trouble shooting checklist (refer to pages 21 – 22).
Filter reset
The filter reset icon will appear when the water filter needs changing. This will flash when
dispensing water. To change the filter and reset the filter icon refer to pages 18 – 19.
17
Fault
In the unlikely event a fault occurs the
fault code will be displayed on the left in the
When the door is open the refrigerator fault alarm will sound. To silence this press any button
on the display.
Please take note of the fault code and contact our Customer Care Centre. Details of Customer
Care phone numbers can be found in the back of this book.
Fig.17 Fault code display
icon appears on the front of the display and a
screen.

18
Water filter
All the water to your fridge is filtered to remove impurities through a cartridge located in a
position of your choice outside the refrigerator. Of course, this will need changing approximately
every 6 months or up to 2800 L depending on the quality of the incoming water and how much
you use the dispenser.
There is a replacement indicator
icon on the control panel which will appear when the filter
needs replacing. It will flash, when dispensing water, as a reminder.
Replacement cartridges are available from your authorised Fisher and Paykel Dealer. The details
of the replacement cartridge are on the label on the cartridge.
Changing the water filter cartridge
1
Grasp and firmly twist the cartridge in an anticlockwise direction (to the left when installed in
the recommended orientation) as shown in Diagram 1.
2
Pull the cartridge away from the filter head (down when installed in the recommended
orientation) as shown in Diagram 2.
– It is not unusual for a few drops of water to be present when filter is removed.
3
Discard old filter.
4
Filter installation:
– Remove protective cap on spigot on head.
– Push the cartridge up towards filter head while rotating it in a clockwise direction (to the right
when installed in the recommended orientation) as shown in Diagram 3.
5
Reset filter indicator icon on the display (this will set to remind you when the filter is due to be
replaced again). Refer to page 19.
6
Dispense 5 L / 5 qt to flush the cartridge, removing trapped air and harmless carbon fines.
7
A few drips may appear out of the dispenser over the next few days as the remaining trapped air
is cleared.
Diagram 2Diagram 1 Diagram 3
Fig.18 Changing the water filter cartridge

Water filter
To reset filter indicator
Important!
We recommend the water filter is used from installation.
Do not reset monitor before filter is changed or filter monitoring will be inaccurate.
19
Press and hold
If present the
and buttons for 4 seconds to reset the filter indicator.
icon in the screen will disappear when reset.
To disable filter indicator
Note: if disabled, you will not be reminded to change your filter.
When no filter is to be fitted, you can disable the filter indicator.
Press and hold
When activated or deactivated the
We recommend that you do not disable the filter indicator if you have a filter fitted to the
connection.
, and buttons for 4 seconds to turn this feature off/on.
icon will flash and on or off will be displayed in the
screen.
Important!
To avoid serious illness or death, do not use the water filter where water is unsafe or of unknown
quality without adequate disinfection before or after use of filter.
The water filter cartridge needs to be changed when the filter indicator icon flashes on the
interface panel.
We recommend the water filter cartridge is replaced when the
every 6 months or 2800 L.
If the water filtration system has been allowed to freeze, replace filter cartridge.
If system has not been used for several months and water has an unpleasant taste or odour,
flush system by dispensing 3 L or 3 qt of water. If unpleasant taste or odour persists, change
filter cartridge.
icon flashes. This will happen

20
Measured Fill Calibration
Measured Fill Calibration
The accuracy of your Measured Fill function can be affected by variations in the incoming water
pressure. The Measured Fill Calibration Mode allows you to fine-tune the amount of water
dispensed from the preselected volumes on your cabinet.
The calibration mode is worked out as a percentage. You can measure the amount the refrigerator is
under filling or over filling and increase or decrease the calibration to get the exact amount you want.
To assess whether the Measured Fill function is under or over filling:
Press the
Dispense this amount into a measuring jug.
Estimate the amount of water that has been dispensed into the jug.
eg. 975 ml = under filling by 25 mls or 31 floz = under filling by 1 floz
To calculate the Calibration factor:
Transfer the difference into a percentage.
eg. 1000/975 = 1.03 = 103% or 32/31 = 1.03 = 103%
Enter the Calibration mode by pressing and holding the
100CAL will be displayed.
The number displayed is a percentage. Adjust this accordingly using the
eg. 100CAL = 103CAL
Press the
Please note:
The Measured Fill function has an accuracy of +/-5% at the time of calibration.
The accuracy of your calibration will of course be subject to the accuracy of your measuring device
and method.
button until 1 L (1 qt) is displayed.
and buttons together for 4 seconds.
and buttons.
button to confirm your selection.
Calibration quick reference guides
Metric
Actual amount of
water received
Underfilling – you dispense 1 L but the amount of water you receive is actually less than 1 L
975 ml 25 ml 3% 103 CAL
950 ml 50 ml 5% 105 CAL
Overfilling – you dispense 1 L but the amount of water you receive is actually more than 1 L
1025 ml 25 ml 2% 98 CAL
1050 ml 50 ml 5% 95 CAL
US
Actual amount of
water received
Underfilling – you dispense 1 qt but the amount of water you receive is actually less than 1 qt
31 floz 1 floz 3% 103 CAL
30 floz 2 floz 7% 107 CAL
Overfilling – you dispense 1 qt but the amount of water you receive is actually more than 1 qt
33 floz 1 floz 3% 97 CAL
34 floz 2 floz 6% 94 CAL
Under filled
Under filled
Difference from
1 L
Difference from
32 floz
Adjust display to read
(calibration factor)
Adjust display to read
(calibration factor)

Trouble shooting
Problem Possible Causes What to Do
Ice maker makes
unfamiliar sounds
or seems too loud.
Automatic ice
maker does not
work.
Ice cubes have
odour/taste.
Slow ice cube
freezing.
Normal ice maker operation. Refer to ice maker noises (see page 11).
Ice maker has not been switched
on.
Bin is in the wrong way or no bin
at all.
Water supply turned off or not
connected.
Freezer compartment not
working.
Water pressure too low. Check water pressure.
Water line kinked/squashed. Check water line for kinks/squashing.
Filter clogged. Water filter may need replacing.
Unsealed packages may be
transmitting odour/taste.
Interior of freezer needs cleaning. Ice storage bin needs to be emptied and
Poor taste from incoming water. Filter may need changing.
Door may have been left ajar. Close door.
Freezer compartment too warm. Turn temperature to a colder setting
Switch on ice maker (see page 11).
Place bin so scoop is on the right side.
Ice bin sits directly under ice maker on
top left side of freezer.
Connect water supply.
Contact Customer Care.
Old cubes need to be discarded.
Ensure food packaging is sealed.
washed.
Clean refrigerator (refer to cleaning
instructions in Refrigerator & Freezer
User Guide).
A filter may need to be installed.
(refer to page 15).
21

22
Trouble shooting
Problem Possible Causes What to Do
Water has poor
taste/odour.
Refrigerator not used for an
extended period.
Dispense 3 L or 3 qt water so fresh water
supply is replenished.
Water dispenser
does not work
and/or
flashing.
Water in first glass
is warm.
Filter warning light
Wet ice/ice
clumping.
Measured Fill
amount of water is
inaccurate.
icon
is flashing.
Water supply turned off or not
connected.
Supply line may be blocked.
On first installation there may be
air in water system.
Filter may be blocked and need
replacing.
Dispenser lock activated.
Water frozen in tank. Increase temperature to a warmer
Water dispenser not used for
extended period.
Tank capacity used recently. Allow water time to cool.
Filter needs replacing. Replace filter as soon as possible (see
Low water pressure. Check water pressure.
Filter blocked. Replace filter (see pages 18 – 19).
Long freezer door openings
High ambient temperature
Ice bin left out of freezer
compartment a length of time
Ice will stick together over time.
Measured Fill needs
recalibration.
Turn water on.
Press dispenser for 2 mins to remove
trapped air from water line and to fill
the water system.
Check supply for kinks or leaks.
To remove air, run a litre or a quart of
water through the dispenser.
Replace filter (see back of this booklet
for Customer Care contact details).
Hold down the
seconds.
setting in fresh food compartment and
freezer.
Allow 24 hrs for water to cool to set
temperature.
pages 18 – 19).
Gently tap ice with scoop to unstick or,
if large clumps occur, empty ice bin and
make new ice.
Recalibrate (see page 20).
and button for 2

Cleaning and caring for your refrigerator
Water dispenser pad and interface
We have incorporated a Dispenser and Key Lock function in
your refrigerator to make cleaning easier. This will help you to
avoid accidental water dispensing while you clean.
Clean the pad and interface panel with a soft damp cloth.
Automatic ice dispenser
We do not recommend you clean the ice maker componentry,
but it is important to clean the bins occasionally.
The storage bin should be cleaned regularly and the old ice in
the bottom of the bin discarded.
Wash bin in lukewarm water. Dry thoroughly and replace.
When replacing the bin ensure that the scoop is on the right
hand side.
For further cleaning instructions please refer to the general Refrigeration & Freezer User Guide.
On vacation/holiday
23
Switch the ice maker to off on the interface panel (see page 11).
Shut off the water supply to the refrigerator.
On return turn on the water supply to the refrigerator.
Dispense 3 L or 3 qt of water and discard to ensure the tank is refilled with fresh water.
Turn on the ice maker (see page 11).
Throw away the first bin of ice cubes.

24
Manufacturers warranty25Manufacturers warranty
Before you call for service or assistance ...
Check the things you can do yourself. Refer to the installation instructions and your user guide
and check that:
1
Your product is correctly installed.
2
You are familiar with its normal operation.
If after checking these points you still need assistance please refer to the following...
In New Zealand If You Need Assistance...*
Call your Fisher & Paykel retailer who is trained to provide information on your appliance, or if we
can be of any further help, please contact our Customer Care Centre,
Toll Free: 0800 FP CARE or 0800 37 2273
Fax: (09) 273 0656
Email: customer.care@fp.co.nz
Postal Address: Fisher & Paykel Appliances Limited, PO Box 58732 Greenmount, Auckland
If you need service...*
Fisher & Paykel has a network of independent Fisher & Paykel AUTHORISED SERVICE CENTRES
whose fully trained technicians can carry out any service necessary on your appliance. Your
dealer or our Customer Care Centre can recommend an AUTHORISED SERVICE CENTRE in
your area.
In Australia If You Need Assistance...*
Please call our Fisher & Paykel Customer Care Centre.
Toll Free: 1300 650 590
Fax: (07) 3826 9298
Email: customer.care@fp.com.au
Postal Address: Fisher & Paykel Appliances Limited, PO Box 798, Cleveland, QLD4163
If you need service...*
Fisher & Paykel Australia Pty Ltd has a network of independent Fisher & Paykel AUTHORISED
CUSTOMER SERVICE CENTRES whose fully trained technicians can carry out any service necessary
on your appliance. Our Customer Care Centre can recommend an AUTHORISED SERVICE CENTRE
in your area.
In United Kingdom If You Need Assistance...*
Phone: (0845) 066 2200
Fax: (0845) 331 2360
Email: customer.care@fisherpaykel.co.uk
Postal Address: Fisher & Paykel Appliances Limited, Pheasant Oak Barn, Hob Lane,
Balsall Common, CV7 7GX

In Ireland If You Need Assistance...*
Phone: 01800 625 174
Fax: 01800 635 012
Email: customer.care@fisherpaykel.ie
Postal Address: Fisher & Paykel Appliances Limited, Unit 3, North Park, North Road, Dublin 11
For the Rest of the World…*
Call your Fisher & Paykel retailer/dealer from whom you purchased the product. They are trained
to provide information on your appliance. If we can be of any further help, please contact us on:
Phone: +64 9 273 0660
Fax: +64 9 273 0580
Email: international.enquiries@fp.co.nz
Postal Address: Fisher & Paykel Appliances Limited, PO Box 58550, Greenmount, Auckland, New
Zealand
In Europe If You Need Assistance...*
Please refer to website for regional service providers.
www.fisherpaykel.com
In USA If You Need Assistance...*
Toll Free: 1 888 9 FNP USA or 1 888 367 872
Fax: 949 790 8913
Email: customer.care@fisherpaykel.com
Postal Address: Fisher & Paykel Appliances Inc, 5900 Skylab Road, Huntington Beach, CA 92647,
USA
Feel free to contact us at our website on
www.fisherpaykel.com
*If you call or write, please provide: name, address, model number, serial number, date of
purchase and a description of the problem. This information is needed in order to better respond
to your request for assistance.
Product Details
Fisher & Paykel Appliances Ltd
Model/Serial No.
Date of Purchase Purchaser
Dealer Suburb
Town Country

26
848638068638 lekyaP & rehsiF
r
Replacement Elements
180606 -
State of California
Certificate Numbe
Department of Health Services
Water Treatment Device
Date Issued: July 18, 2006
Trademark/Model Designation
Manu fact urer : Cuno Incorporated
The wat er treat men t device(s) list ed on th is cer t ificat e ha ve met t he t estin g r eq uir ements pur sua nt t o Section
116830 of the Health and Safety Code for the following health related contaminants:
In or gan ic/Rad iological C ontamin ants
Microbiological Contaminants and Turbidity
Asbestos
Lead
Mercury
Cysts
Turbidity
Atrazine
Organic Contaminants
Benzene
Carbofuran
Lindane
p-dichlorobenzene
Toxaphene
Rated Ser vice Flow:
Conditions of Certification:
750 galRated Ser vice Capacit y: 0.78 gpm
Do not use where water is microbiologically unsafe or with water of unknown quality, except that systems certified for
cyst reduction may be used on disinfected waters that may contain filterable cysts.

**UTN5.0%02.59%90.79**UTN94.0**UTN13.0**UTN7.01**UTN1
y
y
%59.99>
>99%%99.99<%99.99<L/FM551
Reduction
Min. Required
%
99.9
9
<%99.99
% ReductionEffluent
Note that while the testing was performed
under standard laboratory conditions, actual
performance may vary.
Cyst,
<
L/FM1<L/FM1<noitcuder%99
L
#
1<
L
#
Average Maximum Average Maximum
1
<
<0.001 mg/L <0.001 mg/L 99.35% 99.29% 0.010 mg/L
L#
0
05661
Influent
Average
0.153 mg/L
0.0003 mg/L 0.0005 mg/L 95.70% 90.91% 0.002 mg/L
0.0008 mg/L 0.0015 mg/L 86.22% 75.31% 0.002 mg/L
<0.002 mg/L <0.002 mg/L 76.99% 75.31% 0.003 mg/L
<0.001 mg/L <0.001 mg/L 99.33% 99.29% 0.010 mg/L
0.006 mg/L
0.006 mg/L
0.009 mg/L
0.150 mg/L
0.0006 mg/L 0.0011 mg/L 95.71% 92.14% 0.005 mg/L
<0.001 mg/L <0.001 mg/L 98.74% 98.46% 0.04 mg/L
<0.0005 mg/L <0.0005 mg/L 99.76% 99.74% 0.075 mg/L
0.000025 mg/L 0.00007 mg/L 98.72% 96.50% 0.0002 mg/L
0.014 mg/L
0.081 mg/L
0.208 mg/L
0.002 mg/L
Reduction
Min. Required
% Reduction
Effluent
Average Maximum Average Maximum
<0.001 mg/L <0.001 mg/L 92.97% 91.67% 0.003 mg/L
Effluent
Average
0.015 mg/L
%05>%4
%
58
>
%49.
8
.69%62.79L/gm60.0L/gm4636
8
9
%
59
.
99l
m
/#000
,9
6
Manufactured by : CUNO Incorporated, a 3M Company
lm/
#
38
6
3150.0L/g
5,0
3
lm/
to verify that water pressure is less than 827 kPa (120 psi).
CAUTION: To reduce the risks associated with water leakage, which, if not
avoided, may result in property damage - check with your plumbing professional
IMPORTANT: Change the filter cartridge at least every 6 months.
#000,
m
88.1~
0
07
,
5~
Replacement Cartridge: 836848
Performance Data Sheet For Fisher & Paykel Filter System Model: 836860
This system has been tested according to NSF/ANSI 42 and 53 for the reduction of the substances listed below. The concentration of the substances in water
entering the system was reduced to a concentration less than or equal to the permissible limit for water leaving the system as specified in NSF/ANSI 42 & 53.
System tested and certified by NSF International against NSF/ANSI Standard 53 for the reduction of Asbestos, Atrazine, Benzene,
Carbofuran, Lead, Lindane, Mercury, P-Dichlorobenzene, Toxaphene and Turbidity; against Standard NSF/ANSI 42 for the reduction of
Standard 53: Health Effects
Influent Challenge concentration
Chlorine Taste and Odor and Nominal Particulate Class I.
®
(mg/L)
11±1 NTU**
Minimum 50,000 #LCysts
no
it
c
u
der%59.99
fibers/L;
8
to 10
7
0.15mg/L +10%
10
0.15mg/L +10%
0.006mg/L ±10%
0.08mg/L ±10%
0.006mg/L ±10%
0.009mg/L ±10%
0.015mg/L ±10%
0.225mg/L ±10%
fibers greater than 10 um in length
0.04 mg/L
0.005 mg/L
0.002 mg/L
0.002 mg/L
0.015 mg/L
0.015 mg/L
0.075 mg/L
0.003 mg/L
Substance USEPA MCL
To a capacity of 2,838 liters (750 gallons)
Turbidit
Lead @ pH 6.5
Lead @ pH 8.5
Asbestos
Mercury @ pH 6.5
Carbofuran
Benzene
p-dichlorobenzene
Atrazine
Mercury @ pH 8.5
Standard 42: Aesthetic Effects
(mg/L)
0.015±10%
0.002mg/L +10%
2.0mg/L +10%
.sn
o
at least10,000 particales/mL
rcim1-5
Influent Challenge concentration
L/gm300.0enehpaxoT
0.0002 mg/L
.
0e
r
ewdes
u
se
l
ci
t
ra
P
.lm/selci
t
raPnitnemerusa
Substance USEPA MCL
eM
*
Lindane
Nominal Particulate*
**NTU = Nephelometric Turbidity Units
Chlorine Taste & Odor
Systems certified for cyst For estimated cost of replacement element, please call 1-888-936-7872
Important: Do not use with water
that is microbiologically unsafe or
of unknown quality without adequate
disinfection before or after the
system.
reduction may be used on disinfected or contact your local appliance distributor or dealer.
2.9 lpm (.78 gpm)
0.6-38°C (33-100°F)
2,838 liters (750gallons)
172-827 kPa (25-120psi)
Install on cold water line only.
water may contain filterable cysts.
EPA Establishment Number 070595-MN-001
Operation Specifications
Service flow
Filter capacit
Water pressure
Water temperature
Systems must be installed and operated in accordance with
manufacturer's recommended procedures and guidelines.
Important: Failure to follow instructions may result in
Follow any and all local plumbing codes and requirements.
voidance of warranty.
Some local codes may require the use of a licensed plumber
or a certified installer when disrupting a potable water line.
NSF is a registered trademark of National Sanitation Foundation.
INSTR7069 0706 Eagan, MN 55121
© 3M Company. All rights reserved. 1000 Apollo Road


Copyright © Fisher & Paykel 2006. All rights reserved.
The product specifications in this booklet apply to
the specific products and models described at the
date of issue. Under our policy of continuous product
improvement, these specifications may change at any
time. You should therefore check with your Customer
Care Centre to ensure this booklet correctly describes
the product currently available.
www.fisherpaykel.com
NZ AU US CA UK AE HK SG MY
Ice & Water refrigerator
Installation instructions and user guide
Published: 10/2006
Part No. 814940B
 Loading...