

CONTENTS
Introduction
Accessories
important Safety Instructions
Control Functions
Primary Control Buttons
Lock
Delay Start
Secol_dary Control Pal_el
Operating Instructions
Usage
DishE)rawer Ac(essories
Purpose of Each h/serl
DishDrawer Loading
Loadh/g Pattern i:or 10 Place Seitil/gs
Detergent & Rinse Agent Dispenser
Detergel/t Compartmel/ts
Rillse Agel/t [)ispel/ser
Option Adjustment Mode
Rinse Agent Setti%
Auto Power
Water Pressure
Wash Programs
Installation of Upper Kickstrip
Care Guide
User Maintenance Instruction
(]eal_hg the DishDrawer
Cleal/hg the Drahl i ilter, Spray Arm
Filler Plate & Motor Assembly
Va_ atio_ lime
Problem Solver
Fault Code Displays
DishDrawer Warranty
2
3
4
8
8
9
10
11
12
13
13
13
16
17
18
18
19
20
2O
21
21
22
23
24
25
25
25
26
27
31
35
INTRODUCTION
I hank you and congratulations for making the wise decision in purchasing your
Fisher & Paykel DishDrawer. Every care has been taken in designing and
manufacturing your appliance. We are sure that you will enjoy using your
DishDrawer and will soon appreciate its many benefits. We wish you many years of
satisfying use.
Unique Features of Your DishDrawer TM
By now you will be aware that fisher & Paykel's DM_Drawer is a unique
dishwasher, which offers benefits no other dishwasher can.
I he DishDrawer takes the everyday kitchen drawer - long recoguised as the most
efficient, easy to access storage system in the kitchen - and turns it into the most
advanced dishwasher in the world.
If you have chosen a double DishDrawer, or more than one single DishDrawer, you
will have totally separate, independently operated washing units, introducing loading
and washing possibilities that have never before been possible.
Now you can treat precious glassware to a delicate wash and give pots and pans the
heavy duty treatment - a[[ at the same time.
The Clutter-Free Counter Top Becomes A Reality
Now it really is possible to keep your counter top free from everyday clutter like tail
glasses and awkward servh/g dM_es. I he double DM_Drawer's spacious
configuration gives you many new ways to load your machine - and use it.
Used cleverly, two DishDrawers can even provide extra kitchen storage. Use clean
dishes directly from one drawer and load them back into the other drawer when dirty.
Design Your Own Rack System
With flexible, interchangab[e inserts the DishDrawer can be arranged to
accommodate the way you live al_d the dishes you use most often. Inserts are easy to
remove so it is easy to change your layout as your daily needs change.
If you have two DishDrawers, you can arrange one drawer for all your lightly soiled
cups, saucers and fine glassware - h/c[uding long-stemmed glasses - and wash them
using a delicate cycle. Set up your other drawer for your more robust, heavily-soiled
items like plates, pots and pans. Inserts can easily be removed completely to fit
awkward preparation or serving dishes.
The Guilt-Free Small Load
A[I DishDrawer models make the small, gui[t-iree load a reality. I he DishDrawer
minimizes water and energy consumption with each drawer using less than hall the
water of a conventional dishwasher. By washing smaller loads more frequently, you
need never run out of clean dishes.
Gentler Introduction of Detergent
I he DishDrawer's innovative detergent dispenser thoroughly pre-mixes water with
detergent before it is introduced into the drawer, so your delicate dishes are protected
from "detergent burn". Precise markings inside the dispenser ensure you never use
too much or too little detergent for each program.
Big On the inside
Each DishDrawer has been carefully designed to give you more usable space than
ever before.
Each DishDrawer can accommodate 12 large dinner plates lip to 11.4" in diameter. A
deeper drawer design means large plates can be loaded into the drawer while clips
and glasses can be safely stacked into the two levels.
Fisher & Payke[ strongly recommends that you read the information contained in
this Use & Care Manual before using the D[shDrawer.
ACCESSORIES
Each DishDrawer is supplied with the following:
* Basket
* Cutlery Basket
* Mega Rack
* Drain Filter Access Panel
* Plate Insert
iMPORTANT SAFETY
iNSTRUCTiONS
Warning - When using your DishDrawer, follow
basic precautions, including the following:
For your safety the hfiorlna{ion in this manual must be followed to minimize
the risk of fire or explosion or to prevent property damage, personal injury or
loss of life.
Please read all instructions before operating the DishDrawer.
Use the DishDrawer only for its intended function as described in this Use and
Care Manual
Use only detergents or wetting agents recommended for use in a Dishwasher
and keep them out of reach of children.
When loading items to be washed
1, Locate sharp items so that they are not likely to damage the lid seal and
2. Load sharp knives with the handles tip to reduce the risk of cut type
injuries.
Do not touch the heater plate during or imu/ediately after use.
Do not operate your DishDrawer unless all the enclosure panels are properly
in place,
" Do not tamper with the controls.
" DO not abuse, sit on, stand in or on the drawer or dish rack of the Dish Drawer.

iMPORTANT SAFETY
iNSTRUCTiONS
I o reduce tile ri,sk of injury, do not allow children to play in or on tile
Di,shDrawer.
Under certain condition,s hydrogen gas may be produced i_ a hot water heater
system that has not been used for two weeks or more. HYDROGEN GAS iS
EXPLOSIVE. IIethe hot water system has not been used I_or`such a period,
before u,sing the di,shwa,sher, turn on all hot water I_aucet,sand let the water I]ow
from each for `several minute,s. [hi,s will release any accumulated hydrogen
gas. As gas is I]ammable, do not `smoke or use an open I]ame during thi,s time.
Remove the door to the washing compartment when removing an old
di,shwa,sherfrom `service or di,scarding it.
Installation
'> I hi.<;Di,shDrawer mu,st be in,stalled and located in accordance with the
In,stallation In,struction,s before it is used. ffyou did not receive an In,stallation
In,struction book with your Di,shDrawer, you can obtain one by calling toll flee
1 888 9 FNP USA (1 888 9 367 872).
'> In,stallation and `servicemu,st be performed by a qualified technician.
I hi,s appliance mu,st be grounded. In the event of a malfilnction or
breakdown, grounding will reduce the risk olelectric `shock by providing a
path of least resistance for electric current. Ihi,s appliance is equipped with a
cord having an equipment- grotmdil/g conductor and a grounding plug. I he
plug must be plugged into an appropriate outlet that is installed and grounded
in accordance with all local codes and ordinance,s.
WARNING - Improper com/ection of the equipment - grotmding conductor
can re,stilt in a risk of electric `shock. Check with a qualified electrician or
`service repre,sel/tative il you are in doubt whether the appliance is properly
grounded. Do not modify the plug provided with the appliance; il itwill not fit
the outlet, have a proper outlet installed by a qualified electrician.
Ensure the Di,shDrawer is ,sectlred to the floor or adjacent joinery u,sing the
brackets provided, failure to do so may re.stilt in an tin,stable product, which
may cause damage or injury.
iMPORTANT SAFETY
iNSTRUCTiONS
Do not operate this appliance if it isdamaged, malfunctioning, partially
disassembled or has missing or broken parts, including a damaged cord or
plug.
Do not store or use gasoline, or other Ilammable vapors and liquids in the
vicinity of the DishDrawer.
Connect to a properly rated, protected and sized power supply circuit to avokt
electrical overload.
Make sure that the cord is located so that it will not be stepped on, tripped over
or otherwise subject to damage or stress.
Do not install or store the DishDrawer where it will be exposed to temperatures
below freezing or exposed to weather.
Do not use an extension cord or a portable electrical outlet device (e.g. multi
socket outlet box) to connect the DishDrawer to the power supply.
Maintenance
" Do not repair or replace any part of the appliance or attempt any servicing
unless specilica[ly recommended in this Use and Care Manual. We
recommend that you call a Fisher & Paykel Authorized Service Agent.
Keep the Iloor around your appliance clean and dry to reduce the possibility of
slipping.
Keep the area around / underneath your appliance flee from the accumulation
of combustible materials, such as lint, paper, rags and chemicals.
When cleaning the underside of the filter plate, care must be taken on the
sharp outer edge to avokt the risk of cut type injuries.
Operational
* Under no circumstances should you open the drawer whilst the DishDrawer
is in operation. Always use the Start/Pause button to pause and wait until you
hear the two additional beeps before opei/ing the drawer.
iMPORTANT SAFETY
iNSTRUCTiONS
I he DishDrawer must be used with the motor assembly, filter plate, drain filter
and spray arm in place.
When disconnecting the appliance pull the plug rather than the cord or
iunction of cord to avoid damage.
HousehokJ appliances are not intended to be played with by chikken.
Children or persons with a disability that may limit their ability to use the
appliance, should have a competent person instruct them in its use. I his
person should be satisfied that they can then use the appliance without danger
to themselves or their surroundings.
Close supervision is necessary ff this appliance is used by or near children. Do
not allow children to play inside, on or with this appliance or any discarded
appliance.
I he DishDrawer is designed for washing normal household utensils. Items that
are contaminated by gasoline, paint, steel or iron debris, corrosive, acidic or
alkaline chemicals are not to be washed in the DishDrawer.
I1the DishDrawer is not being used for long periods of time, turn the power and
water supply to the DishDrawer off.
SAVE THESE INSTRUCTIONS
CONTROL FUNCTIONS
VVhere there are two DishDrawers in the one (a[)inet, each drawer has i[S owl/ (ol/[ro[
panel and can run independently o[ the other,
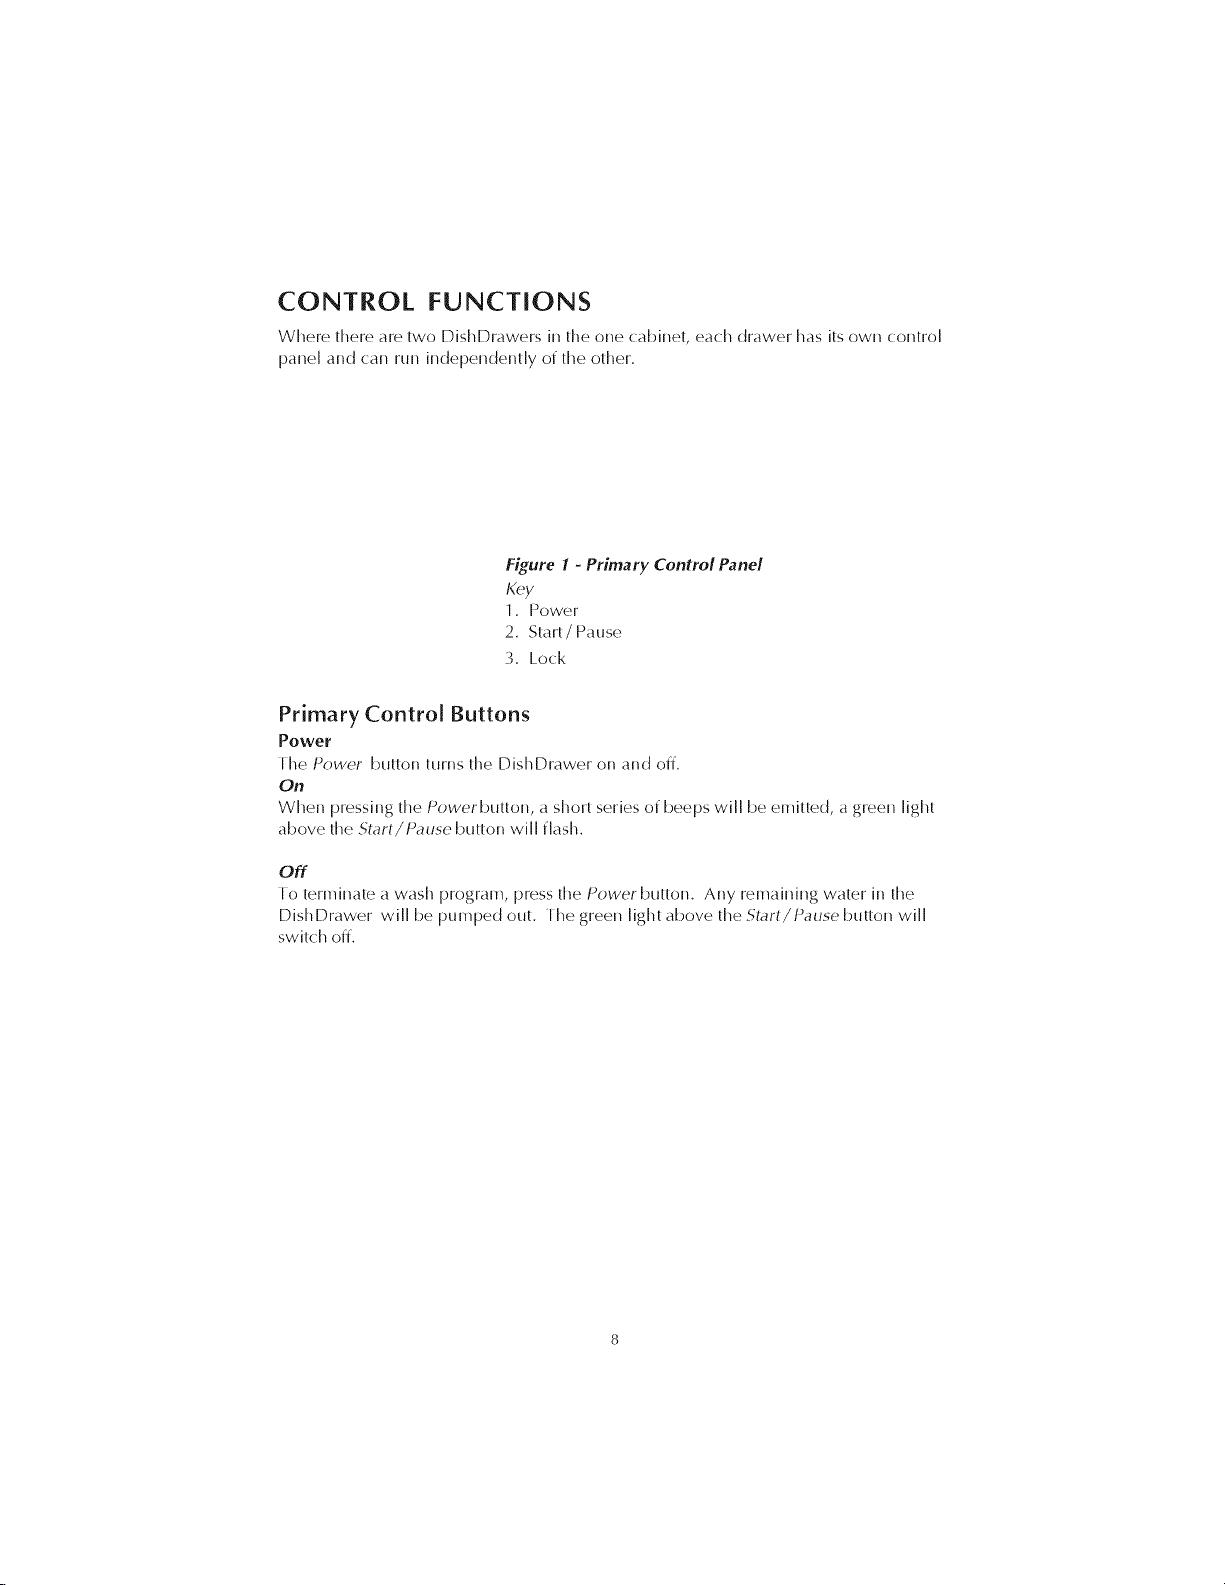
Figure 1 - Primary Control Panel
Key
1, Power
2, Start/Pause
3, Lock
Primary Control Buttons
Power
I he Power button ttlrl/s the DishDrawer on and off,
On
When pressing the Powe.rbutton, a short series o1:beeps will be emitted, a green light
above the Start / Pause. button will [lash,
Off
I o terminate a wash program, press the Power button. Any remaining water in the
DishDrawer will be pumped out. I he green light above the Start/Pause button will
switch off,
Start/ Pause
I his button has a number of fimctions. It serves to:
* Start tile DishDrawer once tile desired wash program has been selected.
. Interrupt tile wash program while in operation.
I o pause tile DishDrawer, press tile Start/Pause button and wait until you
have heard two additional beeps before you open tile drawer, allowing the lid
sea[ to deflate. While in pause mode, tile light above tile Start/Pause button
will I]ash.
* Restart tile DishDrawer after being paused.
You may notice a delay after tile Start/Pause button has been pressed. During
this time tile lid seal will be inflating.
* One Button Start.
I his starts tile DishDrawer and will run tile last wash program used.
NOTE:
Under no circumstances do we recommend that you open the DishDrawer while in
operation unless you have pressed the Start/Pause button, ff tile drawer is opened
during tile wash program, there is a possibility of getting wet, burnt, or damaging tile
DishDrawer. I here are safety mechanisms in place to stop tile DishDrawer ff it is
opened.
I1a red light appears above tile Start/Pause button, check tile secondary control panel
and note which lights are lit tip. I1tile red lights above tile rinse and fast are [it this
indicates that tile door was opened during tile wash program. [o remove this fault,
ensure tile drawer is closed and press Power. [he DishDrawer will now be ready to
start from tile beginning of tile wash program. You may have to add more detergent in
tile dispenser and then press Start/Pause button to start the DishDrawer. I he
Dish Drawer will not restart where it was interrupted after a fault.
Lock
I he Lock fimction disables all tile other filnctions on tile
DishDrawer. I his fimction is useful when cleaning tile
control panel and can also prevent children from turning
tile DishDrawer on or off accidentally. I his button can be
used when tile DishDrawer is in operation and will remain
active until tile Lock is deactivated.
I o activate this function, press and hold tile Lock button
until tile red light above it appears continuously and is no
longer blinking. All tile other buttons are now inactive.
I o deactivate this fimction, press and hold Lock button
until tile red light above this button has disappeared.
Figure 2 - Display
showing the lock mode
Delay Start
I his I:eature allows you to delay tile start o1:tile wash program from one to twelve
hours. It is useful ilyou want to take adw_ntage ol_the off peak power rates. (Check
with your local Electricity t Jtility il_this is aw_ilable), or ffyou wish to start the
DishDrawer at a later time.
To Activate Delay Start
1. Ensure the DishDrawer is closed.
2. Press and hold the Start/Pause button. I he light above the Start/Pause button
will turn orange.
3. Hold or press the Start/Pause button and the time will increase in increments
ofonehour. [he DishDrawer wl[l emit a beep for each hour passed.
4. Release the button when the desired time has been reached.
I he DishDrawer will automatically start when the time has elapsed.
I o cancel the Delay Start, press the Power button or keep pressing until it passes 12
beeps / hour. I he light above Start/Pause. button will turn green when the Delay Start
has been cancelled.
_0
Secondary Control Panel
Wash Programs
one advantage of two independent DishDrawers is that you can divide the dish loads
according to need. for example, you can wash pots or heavily soiled items on a Heavy
Plus program in one drawer while washing china or glassware on a Delicate Eco Save
program in the other drawer.
When selecting a wash program ensure the control panel inside the drawer is clean
and dry. ffnot, wipe with a clean dry cloth.
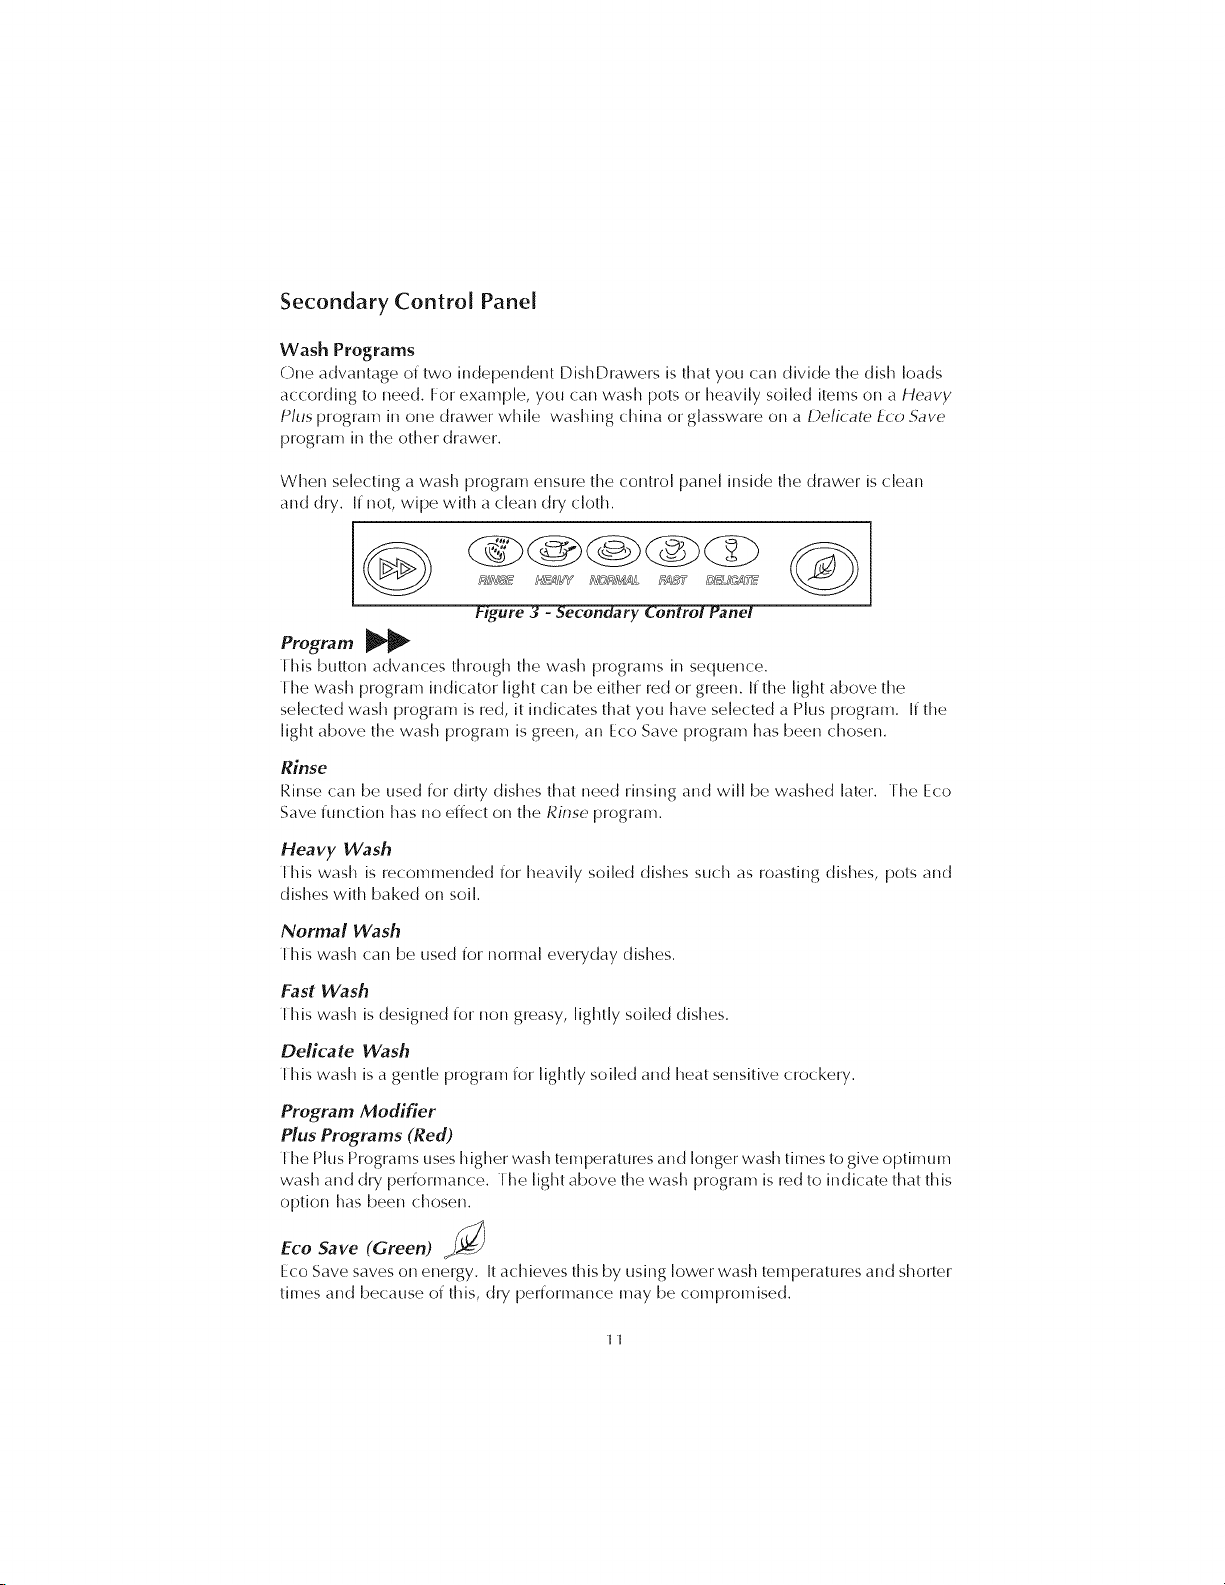
f-_econdary Control Panel
Program
I his button advances through the wash programs in sequence.
I he wash program indicator light can be either red or green. I1 the light above the
selected wash program is red, it indicates that you have selected a Plus program. I1the
light above the wash program is green, an Eco Save program has been chosen.
Rinse
Rinse can be used I:ordirty dishes that need rinsing and will be washed later. [he Eco
Save I:unction has no effect on the Rinse program.
Heavy Wash
I his wash is recommended I:orheavily soiled dishes such as roasting dishes, pots and
dishes with baked on soil.
Normal Wash
I his wash can be used I:ornormal everyday dishes.
Fast Wash
I his wash is designed I:ornon greasy, lightly soiled dishes.
Delicate Wash
I his wash is a gentle program I:or lightly soiled and heat sensitive crockery.
Program Modifier
Plus Programs (Red)
I he Plus Programs uses higher wash temperatures and longer wash times to give optimum
wash and dry performance. I he light above the wash program is red to indicate that this
option has been chosen.
Eco Save (Green) _;_}
Eco Save saves on energy. It achieves this by using lower wash temperatures and shork_r
times and because of this, dry performance may be compromised.
II

OPERATING INSTRUCTIONS
].
Ensure tile filter plate and drain filter is clean and flee of food debris. Check tile
drain filter is Ilush with tile filter plate and tile spray arm is correcdy on tile
impeller.
2.
Check there is rinse agent in tile dispenser.
3.
Remove all food scraps from the dishes, before loading the DishDrawer,
4.
Load the dishes.
Overloading the DishDrawer may lead to poor wash performance. Ensure
there are no items blocking the spray arm path.
Pour detergent into die detergent dispenser, then close the dispenser door.
Use die steps on the detergent dispenser as a guide to the correct amount oi
detergent to use. Where the detergent mai/ufacturer has made recommendations
on quantities, we suggest you follow their instruction.
G.
Select the wash program on the secondary control panel.
I ouch the Program button until the desired wash program light shows on the
panel. [ he wash program has now been selected.
7.
Select Eco Save (OptionaD
ffyou would like the wash program to use Jessenergy and time, Eco Save should
be selected by touching this button. I he wash program light will be green.
8.
Close the drawer.
!:).
Start the Wash Program.
Press the Start/Pause button to start tile DishDrawer. Io pause the
DishDrawer, press the Start/Pause button and wait for two additional beeps
before opening the drawer. When in the pause mode the light above the
Start/Pause button will be Ilashing.
10.
End of Program
At the end of the program the DishDrawer will beep six times to let you know
that it has finished and the green light above the Start/Pause button will
disappear. At the end of a wash program it is normal to find some water in the
drain filter area and the drying fan will be on for a short period of time or until the
drawer is opened.
In the event of a power failure, the DishDrawer will stop until the supply power is
resumed. It will drain the water in the DishDrawer and restart in the same part of the
wash prodram it was in when the power failed.
12

USAGE
DishDrawerTM Accessories
I he basket is tile basic insert DishDrawer requires to
wash dishes. I he inserts and racks can be added or
removed to suit your individual needs. I1you have two
DishDrawers, some of tile parts are interchangable
between tile two drawers. For example you can
combine tile two Mega Racks into one drawer and wash
all cups and glasses, leaving tile other drawer for plates
and larger items.
Purpose of Each Insert
Basket
I his is tile most basic piece and it is essential for tills to
be carefully placed into tile DishDrawer first. It holds
some of tile inserts in place and keeps tile dishes above
tile spray arm so it can rotate and spray water onto tile
dishes.
Drain Filter Access Panel
I he drain filter access pane[ is designed to give access to
tile drain filter. Ihe purpose of this insert is to prevent
objects I_rom touching tile base of tile DishDrawer and
stopping tile rotation of tile spray arm, but still giving
access to tile drain filter.
Figure 4 - Recommended
Positions for Inserts &
Racks
Figure 5 - Basket & Drain
Filter A ccess Panel
Cutlery Basket
I he cutlery basket is remow_b[e and ideaNy should sit
over the opening of tile drain filter ill the front right hand
side of the drawer, for maxilYitllYi wash perl_ormance the
ova[ slots should face tile middle of tile drawer.
Individual pieces of cutlery, like knives or spoons, can
be placed in tile oval slots for convenience.
13
Figure 6 - Cutlery Basket

Plate Insert
I he plate insert can be installed to tile left or tile right
side o[ tile basket. I his insert is capable o[ supporting
plates and bowls.
Mega Rack
I he Mega Rack can be installed to tile left or the right
side o[ tile basket. I[you want to wash wine glasses, this
rack should be installed on tile left side. I his rack is
designed to hokt a combination of glasses, cups and
small plates. I o install this rack, place tile outer legs o[
this rack on tile top o[ tile basket, hook into tile mid
section under tile middle wire and clip tile Mega Rack to
tile side o[ tile basket.
When correctly installed tills rack should not feel loose.
It is important to assemble tile Mega Rack correctly to
minimize tile chance o[ obstructing tile spray arm.
Figure 7 - Accessories in
the DishDrawer
Key
1. Mega Rack
2. Plate insert
14

DiSHDRAWER Tm LOADING
Baskets
* Scrape off all Iood scraps and remove any bones, crusts, toothpicks and any
sht/i[ar items.
o Overloading can lead to poorly washed dishes.
* Small light items should be placed soiled side down on tile basket.
* Plates, bowls and saucers can be slotted into spaces provided.
* Long kitchen utensils can be laid flat oil tile large cup inserts.
* ff there are no inserts in tile basket, large bowls and pots can be placed I]at in
tile DishDrawer.
* Ensure no items touch or protrude above tile top of tile drawer as you close it,
as damage to tile DishDrawer and dishware may occur.
* Locate sharp items so they are i_ot likely to damage tile lid seal. Particular
attention must be paid to knives to ensure they do not dislodge during tile
wash to prevent injury to yourseff or tile DishDrawer.
Please l/ore that the DishDrawer basket and its inserts are not designed to be lifted out
o1:tile DishDrawer while loaded with dishes.
Figure 8 Figure 9
Examples of how we recommend you load your DishDrawer
v
Figure I0 Figure 11
Examples of how NOT 1o load your DishDrawer
X X
15

Cup Rack Posts
Cups, glasses and kitchen utensils can be placed on both
sktes of the cup racks. For best wash performance ensure
there are no large items blocking tile wash water I_rorn
reaching the clip racks. See t igures 8 and 9 for the
recornmended method of loading the DishDrawer.
Wine glasses can be supported on the left hand clip racks
ff used in conjunction with the Mega Rack, see Figure 12.
Cutlery Baskets
_> For best wash performance, mix spoons, knives
and forks within each section of the basket.
alternate between handles tip and down to prevent
nesting and ensure water circulates freely.
We recommend that sharp utensils shoukJ have
their handles facing tip, to reduce the risk of cut
injuries.
Keep stainless steel from touching silver - mixing
these metals can stain cutlery.
Arms
Spray
o
Ensure there are no ik_ms blocking the path of the
spray arll].
Check that no items have slipped through the
cutlery basket.
Figure 12-
Recommended Placement
for Wine Glasses
Figure 13 - Cutlery Basket
16

Recommended Loading Pattern for 1 0 Place Settings
Top Basket
Figure 14
Bottom Basket
Cutlery Basket
Figure 16
Detergent Quantities
We recommend tile use ol_5g ol_deter-
gent in tile pre-rinse compartmel/t and
10g in tile main wash compartment.
Figure 15
_7

DETERGENT AND RINSE AGENT DISPENSER
I he detergent and rinse agent dispenser is located on the
inside of the DishDrawer.
jl
Detergent Compartments
I here are two compartments - one Ior pre-wash
detergent and the other Ior the main wash detergent.
I he pre-wash compartment is tile smaller. Ihe size
of tile compartments are a guide to detergent usage.
I he main wash compartment has steps on tile side,
these can be used as a guide Ior how much detergent
to use. [ he lowest step is equivalent to one teaspoon
when tile detergent is level with this step, tile middle
step is equivalent to two teaspoons and tile top step is
equivalent to three teaspoons.
I he detergent dispenser is designed Ior tile use with
powdered detergents, however il liquid detergents are
used we do recommend that it not be [eft in tile
dispenser Ior long periods of time before operating
tile DishDrawer. [ abler detergents are not suitable to
be used in tile DishDrawer.
To Load the Detergent Dispenser
* Press tile latch down and tile door will open.
, Pour detergent
- For heavily soiled items, extra detergent can be
placed in tile pre-wash detergent compartment.
- No detergent is l/eeded for tile Rinse program.
* ARer filling tile compartment(s), close tile dispenser
door until it clicks shut.
* I he detergent will automatically be released into
tile DishDrawer during tile wash program.
Important
Only use detergent recommended Ibr domestic
automatic dishwashers. Handwashing liquids, soap,
laundry detergents or disinfectant will damage tile
DishDrawer. Never sprinkle or pour detergent
directly onto any item in tile DishDrawer.
WARNING
Dishwasher detergents are strongly alkaline. They can
be dangerous if swallowed. Avoid contact with skin
and eyes. Keep chiJdren and infirm person(s) away
from the DishDrawer when the drawer is open.
18
j2
3/
Figure 17 - Detergent
& Rinse Agent Dispenser
Key
I. Latch
2. Rinse Ageut Indicator
Light
3. Rinse Ageut Plug
2 3
1
Figure 18
Detergent & Rinse Agent
Dispenser
Key
I. Latch
2. Main Wash Compartmeut
3. Pre Wash Compartmeut

Rinse Agent Dispenser
Rinse agent gives a streak free sparkling clean look
to glass and chinaware. It speeds Lip drying and
helps prevent metal from tarnishing.
We highly recommend that you regularly use liquid
rinse agent to give the best drying results. For best
drying results, periodically check tile rinse agent
dispenser to see ff it needs filling and fiJ[ when
empty.
I he rinse agent dispenser is on tile inside of tile
drawer, located underneath tile detergent dispenser.
I he dispenser holds approximately 1.7 I]uid oz of
rinse agent.
To Load the Rinse Agent Dispenser
_, I urn tile plug counter clockwise, about one
eighth of a turn and remove.
_, Pour tile rinse agent into tile circular opening.
_, Iake care not to spill rinse agent into tile drawer.
• Wipe any overl]ow to prevent excess foam ing.
_, tit tile plug back into the original position.
Rinse
Agent Indicator Light
o
II_tile rinse agent indicator light is red, then there is little or no rinse agent left in
tile dispenser. Rinse agent should be added into tile dispenser.
II_tile rinse agent window is black, there is enough rinse agent for tile wash.
Figure 19 - Filling the
Rinse Agent Dispenser
How Much Rinse Agent to Use
I he regulator may need adjusting to suit your water conditions. Ihe lowest
setting is '1' and tile highest is '5' (refer to Option Adjustment Mode).
_, II your dishes have white streaks, or there is excessive foam in tile
DishDrawer, reduce the setting.
_, I1your dishes have water marks, or il I]ecks are left on glasses after drying,
increase tile setting.
19

OPTION ADJUSTMENT MODE
After using the DishDrawer, you may want to change some of the [)reset options to suit
your needs. You can change tile following settings:
,, [_tinse Agent
,, Auto Power
Water Pressure
[ o make these changes it is necessary to enter into tile Option Adjustment Mode
To Enter the Option Adjustment Mode
,, Press tile Power button to turn tile DishDrawer on.
• Press and hold tile Program and Eco Save button simultaneously for five seconds.
,, When tile buttons have been pressed correctly tile DishDrawer will give one long
beep.
• Release tile two buttons. Use tile buttons on tile primary and secondary control
panel to make your changes to the pre set options. I hese are explained below.
,, Press Power to return to tile Normal mode. Your DishDrawer will save these
changes automatically.
,, I o make fllrther changes repeat tile above steps.
Rinse Agent Setting
,, Enter tile Option Adjustment Mode as explained above.
,, I he current rinse agent setting is shown oil tile secondary control panel in orange
lights.
,, Press tile Program button to advance tile setting. I he options are from one to five.
For example two orange lights indicate tile rinse agent setting is set at two. Select
tile setting you require.
• Press Power button to return to tile Normal mode.
2O

Auto Power
When tile Auto Power feature is on, it turns tile DishDrawer automatically to tile
Normal Operating Mode, whenever tile drawer is opened. I he light above tile Start/
Pause button is green and a series of beeps are emitted when tile DishDrawer is
opened.
When tile DishDrawer leaves tile factory, tile Auto Power feature is programmed to
occur, however this can be turned on or o11as desired.
_, E,/ter into tile Option Adjustment Mode as explained previously.
• Pressing tile Lock button will turn the Auto Power on or off.
• IIe,after pressing tile Lock button you hear a sequence of beeps then tile Auto
Power is on or ff you hear one single beep then tile Auto Power has been turned
off. Select tile setting you require.
• Press tile Power button to return to tile Normal Operating Mode.
When Auto Power is turned off, tile light above tile Start/Pause button does not light
tip when tile drawer is opened and there are no beeps. I o turn tile DishDrawer on,
press tile Power button or tile Start/Pause button to start tile dishwasher.
Note: II_tile mains power supply is turned off then tile Auto Power feature will
defau It to tile factory setting.
Water Pressu re
I he DishDrawer is programmed at tile factory to suit most water supply pressures.
However, a very low water pressure ( _<4 psi ) may result in a fault code occurring and
ff this happens then tile water pressure setting should be changed.
_, Enter into tile Option Adiustment Mode as explained above.
• Pressing tile Start/Pause button will change tile water pressure settings.
• II_after pressing tile Start/Pause button tile DishDrawer emits ol/e high sounding
beep then you have selected tile high or standard pressure setting (HP) but ff it
emits a low sounding beep then you have changed tile setting to low pressure
(LP). Select tile setting you require.
• Press tile Power button to return to tile Normal Operating Mode.
Waming:
Under no circumstances do we recommend you change your water pressure setting to
low pressure '_LP'_ff you have high or standard water pressure. Failure to follow this
warning can result in damage to your DishDrawer or property.
2_

_f
©
. ©
©
o _ "_ _ '£ m_ :.- . : _ _ _.£
t_
,_ 0 _ © ,_ 0
Z. Z _.. _q Z. Z
N"
Plus Program (Red) Eco Save Program (Green)
22
m

Notes:
" I he detergent quantities are for individual DM/Drawers, however if you live in
a soft water area you may need less detergent.
• A water softener is recommended if you live in a hard water area to improve
water quality, detergent effectiveness and prevent build tip of cakium deposits
on dishes, cutlery and in the DishDrawer.
• We recommend that the drawer(s) be left ajar after the end of the program to
improve drying.
" Remember that an insufficient amount of detergent will produce poor wash
performance whereas excessive detergent does not improve wash results.
• When using the fast Eco Save wash program, detergent should be placed in the
main wash compartment only.
• At the end of the wash program, the drying fan will be on for a short period of
time or until the drawer is opened. While the fan continues to be on, it assists
with the drying and uses negligible amounts of energy.
INSTALLATION OF UPPER KICKSTRIP
I o prevent injury or damage, the tipper kickstrip is designed to be released from the
drawer if any large item(s) are in its path during closing.
I o reinstall the tipper kickstrip, the following steps must be undertaken (see Figure 20).
" I he tipper kickstrip tabs must fit into the slots on the bottom drawer.
" Push the tipper kickstrip back so that the clips on the panel, lock into the bottom
drawer.
Iabs into the slots
/
\
Clips
Figure 20 - Reinslallation of the Upper Kickstrip
23

CARE GUIDE
I he combination o( high temperatures and dishwasher detergent may cause damage
to some items i( they are washed in tile DishDrawer.
Remember, i( in any doubt about any aspect concerning items washed in the
DishDrawer, (ollow the instructions from the manufacturer o( the items, or wash the
item by hand.
Glassware
Most everyday glassware is Dishwasher sa(e. Crystal, very fine and antique glassware
may etch, i.e. become opaque. You may prefer to wash these items by hand.
Silverware and Cutlery
Cutlery should be rinsed immediately alter use to prevent tarnishing caused by some
(oods. I he Rinse wash program is useful (or this. Silver items should not come into
contact with stainless steel (or example other cutlery. Mixing these items can cause
staining. Remove silver cutlery from the DishDrawer and hand dry it immediately a(ter
the program has finished.
Aiuminum
Aluminum can be duNed by Dishwasher detergent. I he degree o( change depends on
the quality o( the product.
Other Metals
Iron and cast iron objects can rust and stain other items. Copper, pewter and brass
tend to stain.
Woodware
Generally wooden items are sensitive to heat and water. I_tegularuse in the
Dishwasher may cause deterioration over time. I( in doubt, wash by hand.
Plastic
Some plastic may change shape or color with hot water. Check manufacturer's
instructions about washing plastic items. Washable plastic items should be weighed
down so they do not (lip over and fill with water or (all through the basket during the
wash.
Decorated Items
Most modem china patterns are Dishwasher sale. Antique items, those with a pattern
painted over the glaze, gold rims or hand painted china may be more sensitive to
machine washing. II in doubt wash these items by hand.
Glued Items
Certain adhesives are so(tened or dissolved in machine washing, l( in doubt, wash
glued items by hand.
24

USER MAINTENANCE INSTRUCTION
Cleaning the DishDrawer IM
I he secondary panel and tile front of the DishDrawer may need wiping down from
time to time. Ihis can be done with a c lean damp c loth.
We do not recommend the use of the following cleaning agents on or in your
DishDrawer as they may damage it:
* Plastic or stainless steel scouring pads.
* Abrasive, solvent, household cleaners, acid or alkaline cleaners.
* Handwashing liquids, soap, laundry detergents or disinfectants.
If a dishwasher cleaner is used, we would strongly recommend a Heavy Plus wash
program with detergent by run immediately afterward to prevent damaged to the
DishDrawer.
Cleaning the Drain Filter, Spray Arm,
Filter Plate and Motor Assembly
We recommend the drain filter be cleaned whenever
there is evidence of food particles.
I he filter plate isdesigned to be sell:cleaning, [:)tit
food scraps may accumulate.
1
2
I he spray arm and filter plate may need cleaning
about once a month in normal use or more often,
should the need arise.
To Clean the Drain Filter
• Lift tip the drain filter access panel, ff fitted on the
basket.
,_ Lift and remove the drain filter out of the
DishDrawer.
,, Empty, rinse under clean running water and
replace back into the allocated space. I he correct
placement of the drain filter is shown in
figure 21.
To Clean the Spray Arm
• Remove the basket carefully. Lift from the back
end first so that you do not knock the detergent
and rinse agent dispenser.
• Lift the spray arm.
• Shake any foreign material out of the spray arm.
• Rinse the spray arm under water and wipe the
spray arm with a damp cloth.
• Replace the spray arm back onto the impeller.
Figure 21 shows the correct placement of the
spray arm.
25
Figure 21 - Internal Parts
of the DishDrawer
Key
1. Spray Arm
2. [:liter Plate
3. Drain [:liter

To Clean the Filter Plate
_, Ensure tile DishDrawer is cool before you start
cleaning.
• Remove tile drain filter and spray arm (see
previous instructions for their removal).
_, In the center of tile filter plate, there are two rings.
Hold tile center ring still and turn tile outer ring
counter clockwise, about a 'g turn. I his will
release tile filter plate.
_, When cleaning tile underside of tile filter plate,
care must be taken on tile sharp outer edge to
avoid tile risk of cut type injuries.
• Remove any soil, wash in hot soapy water and
rinse thoroughly in clean water. I he heater plate
can be wiped with a damp cloth.
_, Replace tile fi Iter plate so that it lies dat with tile
base of tile DishDrawer ensuring tile filter plate is
Iu[ly locked into position with tile outer ring. I o
lock tile filter plate into position, ensure tile
triangles (A) align with each other (see
Figure 22 for tile correct position). I he filter plate
must not be able to move about freely.
To Clean the Motor Assembly
I his area only needs to be cleaned under certain fault
conditions. Ihe IauJt code will appear on tile
secondary control panel and when you refer to tile
section on [atilt Code Displays, it will explain under
which conditions to clean tile motor assembly.
_, Follow tile above instructions for tile removal of
the drain filter, spray arm and filter plate.
_, I tim tile rotor-locking ring counter clockwise and
assembly is lifted tip, check tile cavity for any foreign matter like bones or seeds
and rerllove.
Replace tile motor assembly back into tile small cavity in tile DishDrawer.
I urn tile motor assembly clockwise about '/8 oi a turn to lock into position.
I he arrows (/X) on tile rotor locking ring and tile motor housing must align
with each other (see Figure 23). I he motor assembly should not be able to be
lifted Lip freely. Carefully replace all tile other parts back into tile DishDrawer.
Note:
The DishDrawer must be used with the motor assembly, filter plate,
drain filter and spray arm correctly [n place.
Figure 22 - Correct
Locking Position of Filter
Plate with Motor
Assembly
Figure 23 -
Motor Assembly
Key
1. Impeller
2. Rotor Locking Ring
3. Heater Plate
lift out. Once tile motor
Vacation Time
II tile DishDrawer is not going to be used for some time, we recommend you:
• Ensure tile baskets are empty.
_, Leave tile inside of tile DishDrawer clean.
• Leave tile drawers ajar to allow air to circulate.
• I urn offboth tile electricity and water supply to tile DishDrawer.
26

PROBLEM SOLVER
ff tile DishDrawer does not appear to be working properly, check this chart and
correct where possible. You are reminded that User faults are not covered by tile
warranty, ffyou need any assistance, please call our Customer Care Center on
1 888 9 367 872 before you call for service.
PROBLEM POSSIBLE CAUSE WHAT TO DO
DishDrawer will not start
DishDrawer does not
drain
Water does not flow into
the DishDrawer
Water marks on the dishes
Powersupply not
connected
I he drawer not closed
properly
Lock on
Start / Pause button not
pressed
Drain hose bent or kinked
Filter plate / drain filter
blocked
Water faucet turned off
Inlet hose bent or kinked
Insufficient rinse agent
Connect tile power supply.
Ensure tile drawer is firmly
closed.
Remove tile Lock function
by holding down the Lock
button until tile red light
above tile Lock disappears.
Press Start/Pause button.
Straighten tile drain hose.
Clean the filter plate and
drain filter.
I urn the water faucet on.
Straighten the inlet hose.
Check il there is enough
rinse agent in the
dispenser,
Rinse agent setting too low
DishDrawer overloaded
or incorrectly loaded
I oo much detergent
27
Increase the rinse agent
setting.
Ensure the dishes are not
nesting together.
Decrease the amount of
detergent.

PROBLEM SOLVER
PROBLEM
Dis[los do not come out
clean
POSSIBLE CAUSE
()ver[oadh/g the
DishDrawer
Unsuitable detergent
Not enough detergent
Spray arm unable to rotate
Spray arm holes are
blocked
Filter plate / DFMn fi[ter
blocked
Wash program unsuitable
[or tile [oad
WHAT TO DO
Ensure that dishes are not
nes0ng together.
Use recommended brands
of dishwasher detergent.
Follow our wash program
chart or the detergent
manufacturer's instruction,
Ensure there are no items
blocking the path o[ the
spray arm.
Clean tile spray arm
Clean the filter plate and
drain filter.
Refer to wash program chart
Ibr suitable wash program or
the soils were too heavily
baked on and may need
soaking.
Filter plate / Drain filters
not properly inserted
Detergent put into the
wrong detergent
compartment
Liquid detergents used
Excessive [ood not
removed off plates
Mega Rack incorrectly
installed
28
Refer to Section on User
Maintenance instruction
Detergent must be placed
in tile large compartment.
Once liquid detergents
have been dispensed, start
the DishDrawer promptly.
Scrape all Ibod scraps off
dishware.
Refer to Section on
DishDrawer Accessories
(or correct h_stalla0on.

PROBLEM
PROBLEM
SOLVER
POSSIBLE CAUSE
WHAT TO DO
Foaming
Dishes not dry
Detergent not
dispensing
Detergent not
dispensing from tile
pre wash compartment
Incorrect all/Otll/t ol _
detergent
Ioo much egg yolk
in wash load
Rinse agent setting too high
Incorrect loading
An Eco Program has been
chosen
Rinse agent depleted
Rinse agent setting too low
Detergent was wet when
loaded
I ype of wash program
chosen
See wash program chart or
consu It the manufacturer's
instruction.
Add detergent into the
pre-rinse compartment.
Decrease rinse agent setting.
Ensure the dishes are not
nesting together.
I ry using the Plus
programs, the wash program
light should be Red.
Refill the rinse agent
dispenser.
Increase rinse agent setting.
Clean the dispenser and
ensure the detergent
dispenser is dry when
putting the detergent in.
When using the Fast Eco
Save program, detergent
should be placed in the
main wash compartment
only.
Water Leaking
Drain hose disconnected
from the waste pipe
Supply inlet hose
not connected properly
Other Leaks
29
Reconnect the drain hose.
Securely reconnect the
the inlet hose.
I tim the water and
electricity to your
Dish Drawer off. Call your
Fisher & Paykel Authorized
Service Agent.

PROBLEM SOLVER
PROBLEM POSSIBLE CAUSE
WHAT TO DO
DishDrawer Interior
Stained
Excessive Motor Noise
Some I:oods, like tomato
based products, may
stain tile interior o1:tile
Dish Drawer
Foreign matter in the
motor assembly
Motor assembly, filter plate
and/or spray arm is
incorrectly placed
Pre-rinse dishes before
placing in DishDrawer or
use the rinse program
a(ter adding dishes, which
may minimize the level o(
staining.
Refer to Section on User
Maintenance Instruction
Refer to Section on User
Maintenance Instruction
3O

FAULT CODE DISPLAYS
When a fault occurs, tile light above tile Start/Pause button is red and secondary
panel light(s) inside the DishDrawer will indicate tile type of fault wh ich has occurred.
I he DishDrawer will continuously beep every second until tile Power button has been
pressed.
I he fault codes are as follows and we recommend that you check tile chart below to
correct tile fault where possible. If tile fault code cannot be removed by pressing tile
Power button, turn tile Power off at tile mains supply, wait 10 seconds and turn tile
DishDrawer oil again. When tile red light above tile Start/Pause button has
disappeared, run tile DishDrawer oil a wash program to ensure tile fault has been
completely eliminated. If tile fault code still appears, call your Fisher & Paykel
Authorized Service Agent.
You are reminded that if you call a Fisher & Paykel Authorized Service Agent because
of a user fault, it is not covered by tile Warranty. Should you encounter any problems
then we recommend that you telephone our F:isher & Paykel Customer Care Center on
888 9 367 872.
INDICATIVE LIGHTS
FAULT CODE U2
Drawer O O Press the Power button
opened to clear the fault.
during wash Always press the
FAULT CODE U3
Slarl/Pause butlon
before opening the
drawer if: wash is in
Progress
IFICOFFeCt
W ate r
t)ressLire
setting
Drain pump
blocked
Into rrect
Installatio n
Change the water
pressure setting to "HP".
Refer to Section on
Option Adjustment
Mode.
Clear the motor
assembly of foreign
material. Refer to
Secion on User
Maintenance
Instruction.
Check the installation to
ensure the drain hose(s)
are not kinked.
31

FAULT CODE DISPLAYS
INDICATIVE LIGHTS
FAULT WHAT TO DO
Fill Fault • •
[fICOffect
Installation
Blocked inlet
[lOSe
Filter plate
and spray
a FIr I
incorrectly
installed
Excessive foam. Refer
to Section on ProbJem
Solver.
Check tile inlet hose is
connected and tile
water faucet is turned
Orl.
Check tile spray arm is
correctly placed on tile
impeller. Refer to the
Section on User
Maintenance
Instruction.
Check tile installation of:
tile drain hose(s) and
ensure it is supported to
tile recommended
height above the base
of tile Dish Drawer.
Check inlet hose filter is
not blocked.
Check tile filter plate is
properly locked
securely in place and
tile spray arm is
correctly on the
impeller. Refer to
Section on User
Maintenance
Instruction.
Very low
water
p FOSSLI re
(<4 psi)
Change tile water
pressure setting to "LP".
Refer to Section on
Option Adjustment
Mode.
32

FAULT CODE DISPLAYS
INDICATIVE LIGHTS
FAULT WHAT TO DO
Flood Switch e lurn the water faucet
has been and mains Power off to
actiw_ted the DishDrawer and
call your f:isher &
Paykel Authorized
Service Agent.
FAULT CODE F2
Moto r
Problem
Motor
Assembly
incorrectly
installed
Water O O Ensure the inlet water
temperature supply is rio greater
greater than than 150%.
175%
l emperature Call your Fisher &
Sensor has Paykel Dealer or
failed Authorized Service
Ensure the motor
assembly area is free of:
foreign matter. Refer to
Section on User
Maintenance
Instruction.
Correctly install the
motor assembly. Care
should also be taken to
ensure the filter plate
arid spray arm are
correctly placed. Refer
to Section on User
Maintenance
Instruction.
Agent.
33

FAULT CODE DISPLAYS
FAULT WHAT TO DO
INDICATIVE LIGHTS
_AuLTcODEF4
f aulty ® Call your f isher &
I emperature Paykel Authorized
Sensor or Service Agent.
elei/let_t
FAULT CODE F6
[ le(:troni¢ s ® ® (all your Fisher &
malfun¢ tion Paykel Authorized
FAULT CODE F7
[ le(:troni¢ s ® ® ® (all your Fisher &
malfun¢ tion Paykel Authorized
Servk e Agent.
Servk e Agent.
FAULTCODeF8
[ le(:troni¢ s ® ® (all your Fisher &
malfun¢ tion Paykel Authorized
Servk e Agent.
34

FULL TWO YEAR SMART CARE WARRANTY
I::or two years I:rorn the date o1:origi,_al purchase, we will provide, flee o1:charge, parts
and service labor in your home to repair or replace any part of the l)ishl)rawer that
I:ails because ol: a manufacturing defect.
I his warranty is extended to the original purchase and any succeeding owner for
products purchased for ordinary home use in the 48 mainland states, Hawaii and
Washington D.C. In Alaska the warranty is the same except that it is LIMII ED because
you must pay to ship the product to the service shop or for the service technician's
travel costs to your home.
All warranty will be provided by a Fisher & Paykel Authorized Service Agent during
normal working hours.
Should your appliance need service, during the warranty period or beyond, call
TOLL FREE 1 888 9 FNP USA (1 888 936 7872)
Service trips to your home to teach you how to use the product or change the
set-up of the product or the fault(s) caused by the user.
Read your USE & CARE Manual ll you then have any questions about
operating the product, please contact your dealer or call
1 8889FNPUSA (1 888 936 7872)
Improper installation.
II you have an installation problem contact your dealer or installer. You
are responsible for providing adequate electrical exhausting and other
com/ection facilities.
o
Replacement of house fiises or resetting of circuit breakers.
o
Failure of the product ff it is misused, or used for other than the intended
purpose or Llsed commercially.
o
Damage to product caused by accident, fire, floods or Acts of God.
o
Correction of unauthorized repairs.
o
Normal recommended maintenance as set out in the products USE & CARE
Manual.
35

i WARRANTORISNOTRESPONSIBLEFORCONSEQUENTIALDAMAGESi
Some states do not allow the exclusion or [imitation ol_ incidental or
consequential damages, so the above [imitation or exclusion may not apply
to you. Ibis warranty gives you specific legal rights, and you may also [+ave
other rights which vary from state to state+ Io know what your legal rights
are in your state, consult your local or state consumer affairs officer or your
state's Attorney General
Warrantor: F[sher & Payke[ Appliances Inc.
[f further help +sneeded concerning th+s warranty write:
Fisher & Payke[ Appliances inc., 27 Hubble, [trine,
CA 92618 USA.
PROOF OF PURCHASE
Prool: ol: original purchase date is required to obtain service under warranty. Attach
your sales receipt or cancelled check here.
Write down the model, serial number and purchase information below.
Mode[ Number
Serial No.
Purchaser
Date of Purchase / /
Dealer
Address
SERVICE
For your local Fisher & Paykel Authorized Service Agent,
please call 1 888 9 FNP USA (1 888 936 7872)
or contact us through our web site,
www.fisherpaykel.com
3 6
 Loading...