

Page 1

Gas cooktop
CG903ML & CG903MLD models
User guide
NZ AU
Page 2

Page 3

Contents
1
Introduction
Safety and warnings
Using your cooktop
Cooking guidelines
Care and cleaning
Sound preference settings
Troubleshooting
Alert codes
20
Warranty and service
3
4
6
9
12
16
18
23
Important!
SAVE THESE INSTRUCTIONS
The models shown in this user guide may not be available in all markets and are
subject to change at any time. For current details about model and specification
availability in your country, please visit our local website listed on the back cover
or contact your local Fisher & Paykel dealer.
Page 4

Page 5
Introduction
Introducing your cooktop
Congratulations on your new purchase. This cooktop is the ultimate in gas cooking, giving you
the speed of gas, the precision and simplicity of electronic control, and the easy-care elegance of
a ceramic glass surface.
Your cooktop has a number of features, including a constant flame safety system, automatic
cool-down responses, hot warning indicators, and audio and visual feedback through the
electronic interface and built-in speakers.
Before using your cooktop
Make sure the installer has completed the installation checklist in the installation instructions.
Read this guide, taking special note of the ‘Safety and warnings’ section.
A heat-resistant removable sticker on the glass has been provided as a quick reference guide.
When you no longer need it, it can be easily peeled off.
11 12 13
6
3
4
5
1
2 789
3
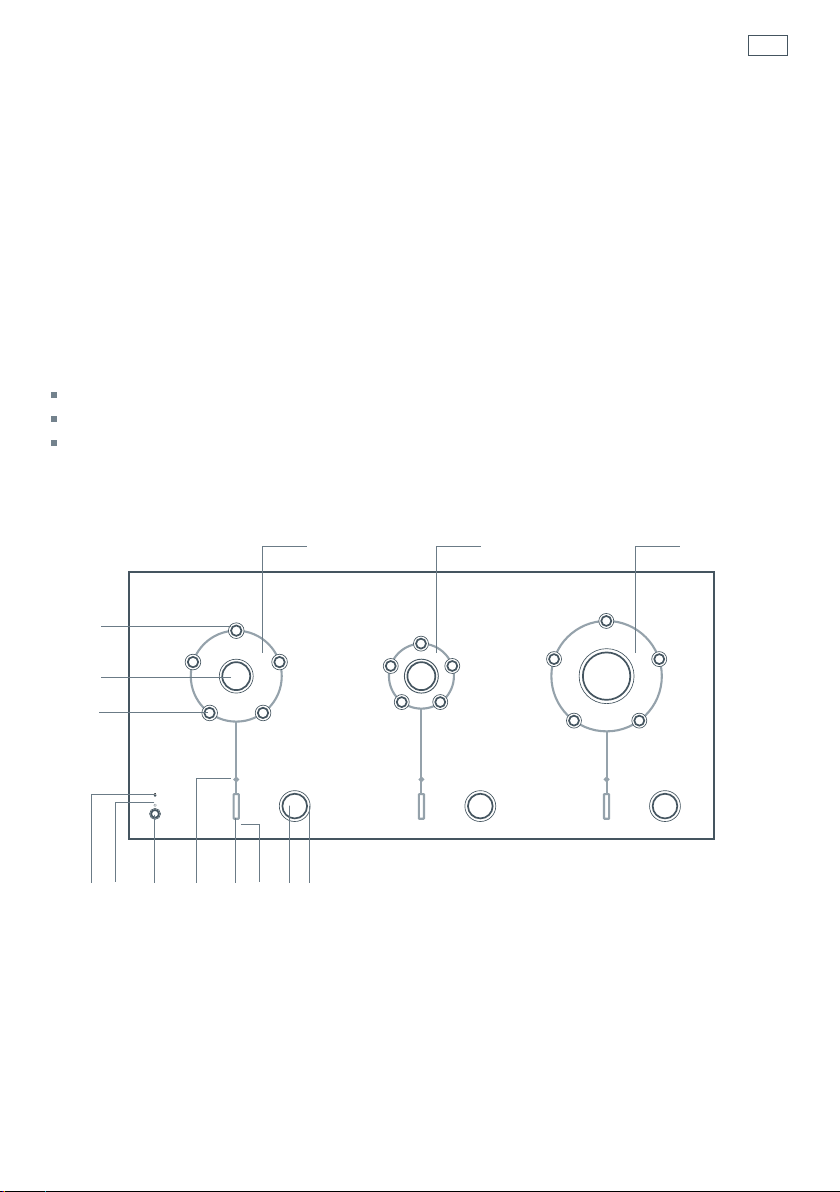
1
On/Off power button
2
On/Off light
3
Keylock light
Pan supports:
4
Burner head
5
Pan support pins
6
Trim rings
7
Control dial
10
Fig.1 CG903ML only illustrated
6
Control display
8
9
Burner-ready light
10
Hot warning light
11
Medium Aero™ burner
12
Small Aero™ burner
13
Wok Aero™ burner
Page 6
4
Safety and warnings
Your safety is important to us. Please read this information before using your cooktop.
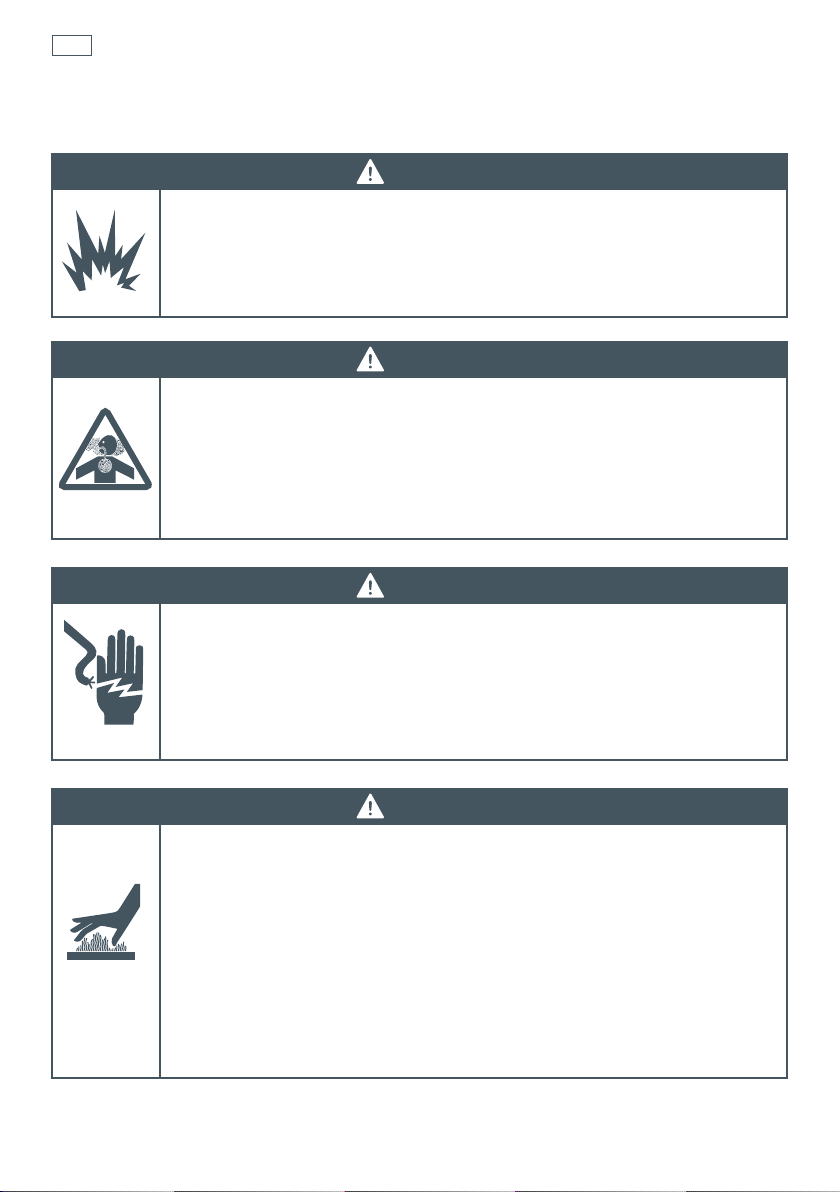
WARNING!
Explosion Hazard
Do not use or store flammable materials such as gasoline near the appliance.
Do not spray aerosols in the vicinity of this appliance while it is in operation.
Failure to follow this advice may result in injury or death.
Poisoning Hazard
Never use this appliance as a space heater to heat or warm the room.
Doing so may result in carbon monoxide poisoning and overheating of the
appliance.
Failure to follow this advice may result in poisoning or death.
Electrical Shock Hazard
If the surface is cracked, switch the power to the appliance off to avoid the
possibility of electric shock. Call your Authorised Service Centre or Customer
Care.
Failure to follow this advice may result in electrical shock.
WARNING!
WARNING!
WARNING!
Hot Surface Hazard
During use, this appliance becomes hot.
Keep children away.
Do not touch the appliance components, burners, pan supports or the
ceramic glass when hot.
Before cleaning, turn the burners off and make sure the whole appliance is
cool.
Pan handles may be hot to touch. Ensure handles do not overhang other gas
burners that are on. Keep handles out of reach of children.
Failure to follow this advice could result in burns and scalds.
Page 7

Safety and warnings
Important safety instructions
Use this appliance only for its intended purpose as described in this user guide.
Do not modify this appliance.
Household appliances are not intended to be played with by children.
Children, or persons with a disability which limits their ability to use the appliance, should have a
responsible person to instruct them in its use. The instructor should be satisfied that they can use
the appliance without danger to themselves or their surroundings.
This appliance should be connected to a circuit that incorporates an isolating switch providing
full disconnection from the power supply.
Before using the appliance, ensure that all burners have been assembled correctly.
Do not operate the appliance with any of the burner heads removed.
We recommend raising the pan supports first, then placing the pan on them (the pan supports
are not primarily designed for lifting pans).
Do not stand or place heavy objects on this appliance.
Do not use an asbestos mat between the flame and the pan as this may cause serious damage to
your appliance.
Do not place aluminium foil or plastic dishes on the burners.
Do not let pans overlap the edge of the appliance as this can deflect heat onto your benchtop and
damage the surface.
Do not let pans push any other pans aside. This could make them unstable, or deflect heat onto
nearby walls or the benchtop.
Do not use a steam cleaner for cleaning this appliance.
If the power supply cable is damaged, it must only be replaced by an authorised person. Ensure
that the electrical connection plug is accessible after installation.
Where this appliance is installed in marine craft or in a caravan, it shall not be used as a space
heater.
The use of a gas cooking appliance results in the production of heat and moisture in the room in
which it is installed. Ensure the kitchen is well ventilated. Keep natural ventilation holes open or
install a mechanical ventilation device (mechanical extractor hood).
Prolonged intensive use of the appliance may call for additional ventilation, for example opening
of a window, or more effective ventilation, for example increasing the level of mechanical
ventilation where present.
5
Page 8
6
Using your cooktop
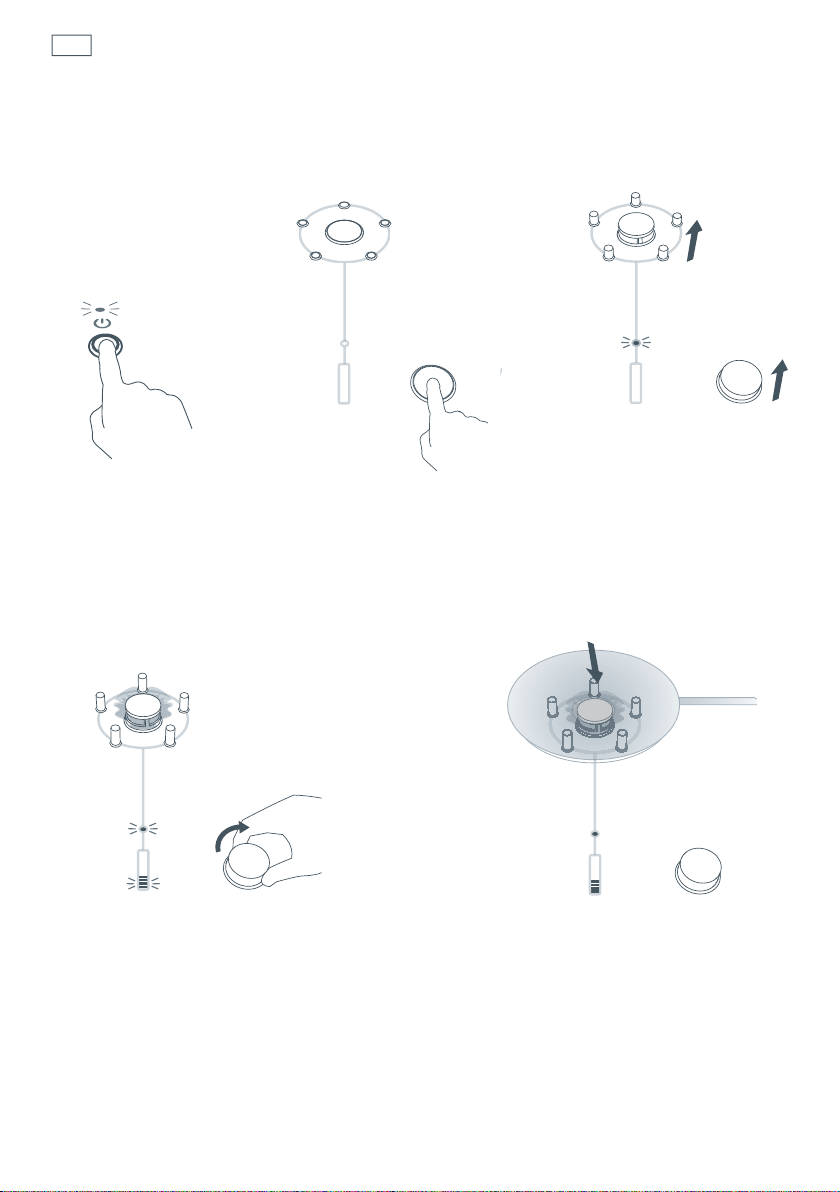
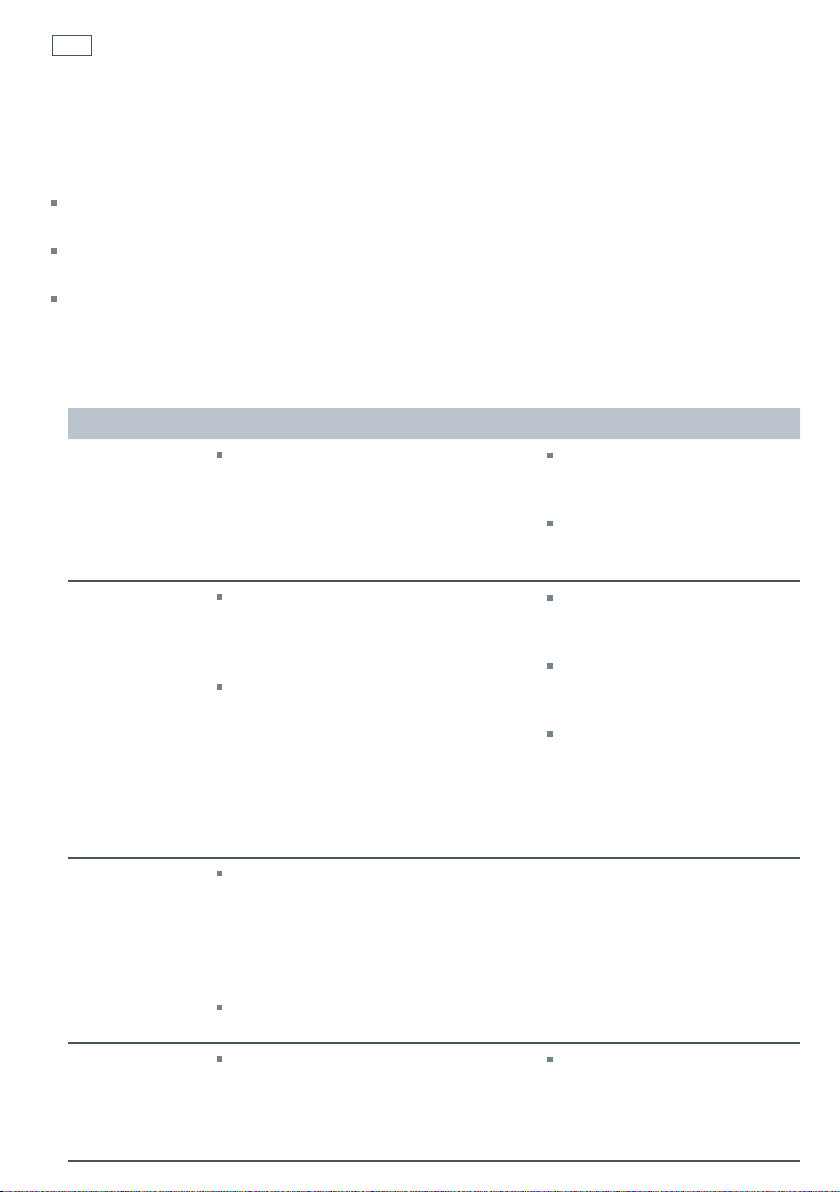
Operating the cooktop
1
Press the on/off
power button.
2
Press the control dial.
A tone will sound.
3
The dial and the pan supports
will rise. The burner-ready
light will then glow for four
seconds.
4
While the burner-ready light is glowing,
turn the dial clockwise to light the gas.
Note: if the burner-ready light goes out
before you light the gas, press the dial
again.
5
Place your pan on the pan supports.
Page 9
Using your cooktop
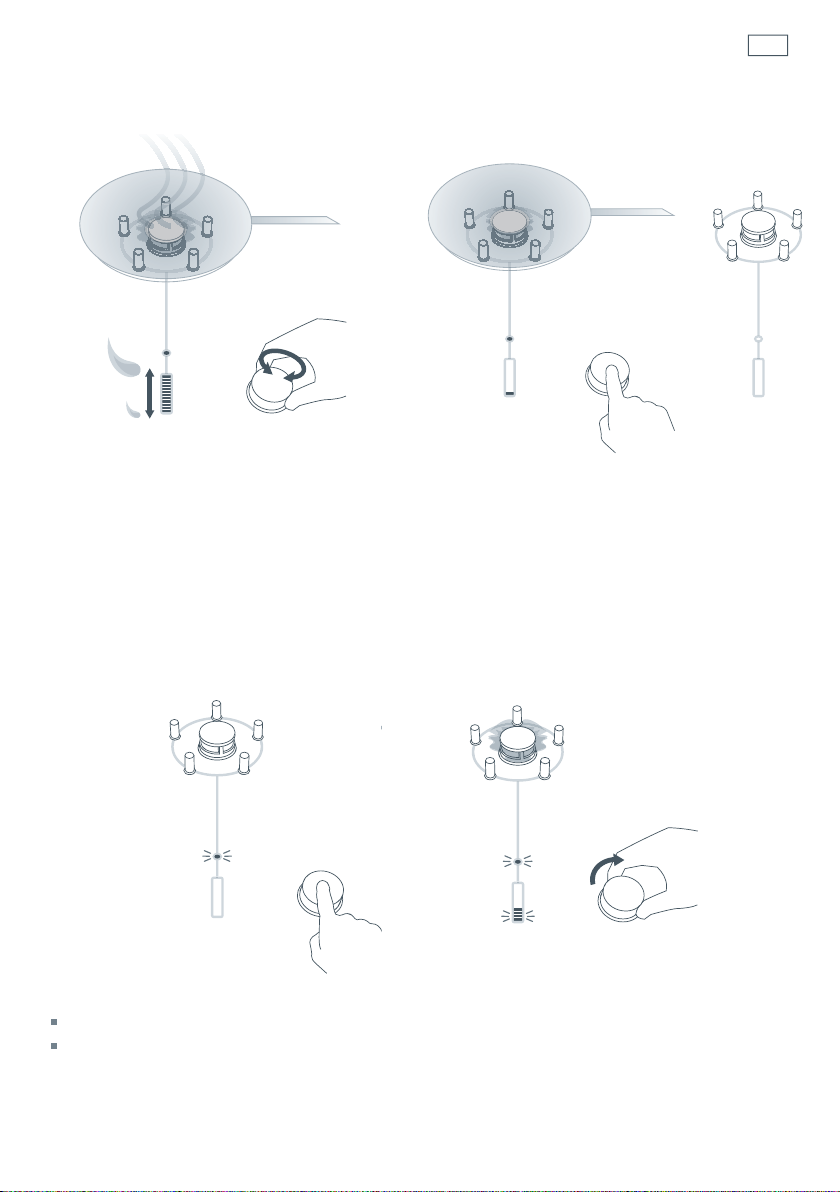
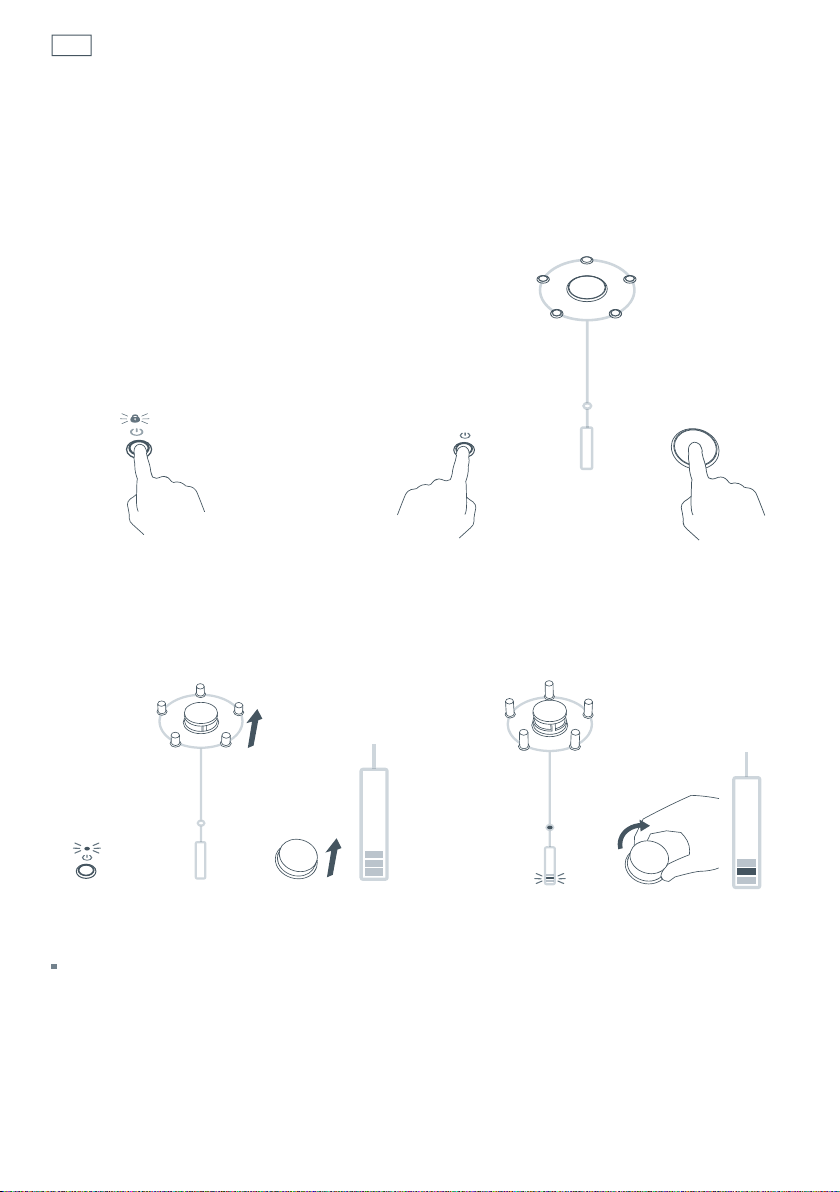
Operating the cooktop
6
Turn the dial to accurately adjust the flame.
Note: the flame will not go out if you keep
turning the dial down.
7
To stop cooking, press the dial. The gas will
be shut off, and the pan supports will stay
raised. If they’re hot, the hot warning light
will glow.
7
8a
To relight the burner when the pan supports are raised:
Press the dial. The burner-ready light will glow for four seconds.
While the burner-ready light is glowing, turn the dial clockwise to light the gas.
Page 10

8
Using your cooktop
...3 seconds
8b
To lower the pan supports automatically after you have finished cooking, press and hold the
dial for three seconds while the burner is lit. The flame will go out and the pan supports, if cool
enough, will lower.
If the supports are hot, the hot warning light will glow and the control display will show a
descending sequence of lights until the burner has cooled. This can take between 30 seconds
and 30 minutes depending on the flame setting and how long the burner had been in use. Once
cool, the pan supports will lower automatically.
To turn the cooktop off, press the on/off power button. Note: if a burner is still cooling, the hot
warning light will glow. Once cool, the burner will lower automatically and the cooktop will turn
off.
Keylock
...2 seconds
The keylock stops children from turning on the dials. You can only set the keylock when the
burners are off. To set the keylock, press and hold the on/off power button for two seconds. A
tone will sound and the keylock light will then glow. To turn the keylock light off, press and hold
the on/off power button for two seconds, a tone will sound and the keylock will go out.
Page 11

Cooking guidelines
Important!
Do not use pans with jagged edges or drag pans across the ceramic glass surface as this can
scratch the glass.
Do not drag pans backwards and forwards across the pan support pins, burner heads and trim
rings eg when placing and removing pans or sauteing food, as this can damage them, especially
the coating on the pan support pins.
Cooking tips
Match the size of the pan to the burner. You do not need to change burners during cooking
because each Aero™ burner goes from very high to very low.
For best results use high-quality pans with flat, thick bases.
Only use just enough water to cover the food when boiling and use a lid on the pan to reduce
the cooking time and save energy.
For the small burner, pans should be 10 cm (4”) or larger in diameter.
For the medium burner, pans should be 15 cm (6”) or larger in diameter.
For the wok burner, pans should be 18 cm (7 “) or larger in diameter. Woks should be no larger
than 40 cm (16”). Check that your wok is adequately supported by the wok stand.
Using the cooktop’s special talents
The Aero™ burners on your cooktop are versatile, highly responsive and operate over a wide
range of settings. Turning the dial gives you accurate and repeatable control of the flame. Once
you know what setting is right for your cooking task, you can always use that exact setting for
the task.
9
Simmering, keeping food warm, and cooking rice
The low turn-down on the smaller Aero™ burners is perfect for delicate tasks, and for keeping
hot food warm. Experiment with the low settings until you find the one that suits your pans and
the food you are cooking.
Simmering occurs below boiling point, at around 85
to the surface of the cooking liquid. It is the key to delicious soups and tender stews because
the flavours develop without overcooking the food. You should also cook egg-based and flourthickened sauces below boiling point.
Some tasks, including cooking rice by the absorption method, may require a setting higher than
the lowest setting to ensure the food is cooked properly in the time recommended.
O
C, when bubbles are just rising occasionally
Page 12

10
Cooking guidelines
Searing steak
To cook juicy flavoursome steaks:
1
Stand the meat at room temperature for about 20 minutes before cooking.
2
Heat up a heavy-based frying pan.
3
Brush both sides of the steak with oil. Drizzle a small amount of oil into the hot pan and then
lower the meat onto the hot pan.
4
Turn the steak only once during cooking. The exact cooking time will depend on the thickness of
the steak and how cooked you want it. Times may vary from about 2 – 8 minutes per side. Press
the steak to gauge how cooked it is – the firmer it feels the more ‘well done’ it will be.
5
Leave the steak to rest on a warm plate for a few minutes to allow it to relax and become tender
before serving.
Page 13

Cooking guidelines
Using a wok
Important!
Use your wok only on the wok burner.
When using a wok, always use the wok stand.
Make sure the wok stand is fitted correctly over the raised pan supports. (see Fig.2)
Do not use a wok larger than 40 cm (16”) diameter. Check that your wok is adequately supported
by the wok stand.
Make sure the wok does not push any other pans aside. This could make them unstable, or deflect
heat onto nearby walls or the benchtop.
11
Fig.2 Wok stand is placed onto the raised wok burner pan supports
For stir-frying
1
Have all the ingredients and equipment ready. Stir-frying should be quick. If cooking large
quantities, cook the food in several smaller batches.
2
Preheat the wok for a minute or so with the burner turned up high enough to heat the sides of
the wok. (If your wok is small or thin-based, this may not be the highest setting on the burner.)
3
Drizzle two tablespoons of oil around the sides of the hot wok, allowing it to run down into the
base.
4
Cook any meat first, put it aside and keep warm.
5
Stir-fry the vegetables. When they are hot but still crisp, turn the burner to low, return the meat
to the wok and add your sauce.
6
Stir the ingredients gently to make sure they are heated through.
7
Serve immediately.
Page 14
12
Care and cleaning
Your cooktop has been designed to combine the easy-care cleaning of ceramic glass with
the performance of gas.
Important!
Read through the ‘Safety and warnings’ and ‘Care and cleaning’ sections carefully before doing any
cleaning or maintenance.
To avoid the risk of electrical shock or burners being accidentally turned on during cleaning, make
sure you turn the cooktop off before cleaning by pressing the on/off power button.
Remember that the cooktop will need to be turned back on for the pan supports to rise and lower.
See the specific cleaning instructions on the pages following.
To maintain your cooktop in good condition, follow the recommendations in the chart
below :
When What to do
Immediately
After every
use
Once every
six months
Once every
year
Remove sugary spillovers or anything
that melts onto the ceramic glass. See
‘Melts and spills that require immediate
attention’ for instructions.
Keep the pan supports clean to ensure
that they rise and lower properly during
use. See ‘Cleaning the pan supports (the
pan support pins and burner heads)’.
Lower the cooled, clean pan supports
and wipe the cooktop with a damp, soft
cloth and mild detergent. See ‘Cleaning
the ceramic glass’ for further instructions
and information.
Check that the airflow through the
air filter mesh (on the underside of
your cooktop) and the air intake grill
(installed in the base of your cabinet)
is not blocked or reduced, eg by
accumulated dust or other dirt.
Clean the mesh and grill with a small
brush if necessary.
Check the gas connection hose for any
sign of abrasion, kinking, or any other
damage.
Important!
Take care not to scratch the
glass or damage the trim
rings or pan support pins.
Take extreme care when
working around hot
surfaces.
Always clean soiled pan
supports before lowering
them.
Do not let spills and stains
become burnt onto the glass
or pan supports.
Do not use abrasive
sponges, heavy-duty or
unsuitable nylon scourers,
or corrosive cleaners such
as oven sprays and stain
removers.
If you are unsure as to
the condition of the gas
connection hose, contact
your Authorised Service
Centre or Customer Care.
Page 15

Care and cleaning
Melts and spills that require immediate attention
Anything that melts onto the ceramic glass surface or food spills with a high sugar content may
cause pitting of the ceramic glass surface if left there to cool. Remove these spills immediately
with a fish slice, palette knife or cooktop scraper. Take care when working around the hot
surfaces and ensure you do not scratch the glass or damage the trim rings or pan support pins.
Examples of melts and spills requiring immediate attention include:
melted plastic wrap
melted aluminium foil
sugar, sugary syrups, jams and jellies
vegetables and vegetable water with a high sugar content eg peas, sweet corn, beetroot.
Cleaning the ceramic glass
For best results, do not let spills and stains become burnt onto the ceramic glass. Clean the
cooktop after every use. Simply lower the cooled pan supports and the control dials and wipe
the cooktop with a damp, soft cloth and mild detergent. A microfibre cloth is ideal for this task.
Most soiling is very easy to remove because the glass does not get as hot as an electric ceramic
glass cooktop. Soften stubborn stains under a soapy cloth.
Ceramic cooktop cleaner
Ceramic cooktop cleaner may be used to spot-clean stubborn stains. Follow the instructions on
the container. If you must use a razor blade scraper, take care not to damage the trim rings.
Important!
If cooktop cleaner residue is left on the trim rings, it can dry on and may cause the pan supports,
control dials and power button to get stuck. Be careful and wipe around the trim rings and not
over them.
13
Ceramic glass
Trim ring
Trim ring
Fig.3 Cleaning the cooking surface
Page 16

14
Care and cleaning
Cleaning the pan supports (the pan support pins and burner head)
Important!
Do not wash pan supports in a dishwasher or use dishwashing machine detergent to clean these
parts so as not to remove the easy-clean coating.
After reassembling any burner, always lower the burner before using the cooktop to check it has
been reassembled correctly.
If food spills have burnt onto the pan supports, the supports may not lower when the control
dial is pressed and held for two seconds. This is not a fault. You need to remove and clean them.
To clean the pan support pins
1
Press the on/off power button to turn the cooktop on.
2
Press the control dial to raise the pan supports.
3
Press the on/off power button to turn the cooktop off.
4
Gently pull the pan support pins up and out. If food has become burnt onto the pins and the
surrounding ceramic glass, it may be necessary to gently twist the pin to remove it.
5
Soak the pins in warm water with a little hand dishwashing (or other mild) detergent. The pins
have an easy-clean coating. Harsh or abrasive cleaners should not be necessary and may damage
the coating.
6
Wipe with a soft cloth and dry thoroughly.
7
Carefully replace all the pan support pins correctly.
8
Press gently to clip into position.
Burner head
Pan support pin
Fig.4 Removing the pan supports
Page 17

Care and cleaning
To clean the burner head
1
Lift out the burner head and clean with a cloth or scourer. The burner head gets much hotter
than the pan support pins and for this reason it is not finished with an easy-clean coating. If
cooking splatter and spills get burnt onto the burner head, scrub with a mildly abrasive cleaner
and a soft cloth. Ceramic cooktop cleaner is suitable for this.
2
Replace the clean burner head.
3
Press the on/off power button to turn the cooktop on.
4
Lower the pan supports before using to check they have been reassembled correctly (see Fig. 4).
If spilled or burnt food has stuck the pan supports in the ‘down’ position, soften the spill with a
damp, soapy, soft cloth and remove the food.
Cleaning the on/off power button and the control dials
Wipe these with a soft cloth and mild detergent. You can remove the control dials by pulling
them up and out.
15
On/Off power
button
Control dial
Fig.5 Remove the control dials by pulling them up and out
Page 18
16
Sound preference settings
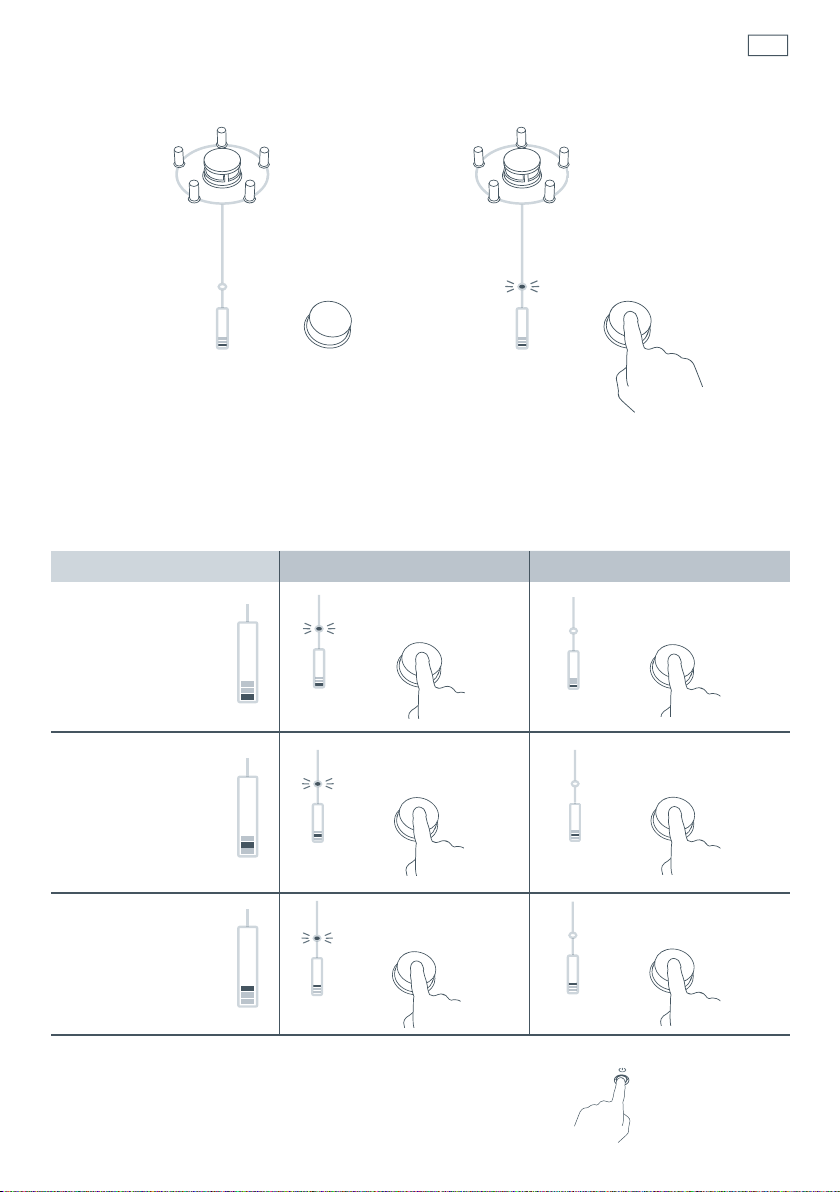
The cooktop has three pre-set sound preference settings (tones, tone volume, feedback tones).
Changing the settings
To change the settings, follow these steps.
...2 seconds
1
Hold down the on/off power button
for two seconds. This sets the
keylock.
Once you are in the Sound preference
mode, the on/off light will flash every
second and the burners’ pan supports
will rise. The keylock light will go out.
Turn the dial clockwise to highlight the
first setting. The other two lights will be
dimmed.
...3 seconds
2
Firmly press both the on/off power button
and the nearest burner control dial for three
seconds.
3
Each setting has two options (see table
following). Turn the dial to highlight each
setting.
Page 19
Sound preference settings
4
Touch the dial to change the selected setting. The burner-ready light will go on or off, depending
on which option you have chosen.
To revert to the previous option, touch the dial again.
17
Sound Settings Default option
1 TONES
(You can turn the cooktop
tones on or off)
2 TONE VOLUME
(You can change the
cooktop tones’
volume from normal
to quiet)
3 FEEDBACK TONES
(You can turn feedback
tones for high/low flame
settings and burner
motion, on or off)
5
To store the setting selection(s) and turn the cooktop off,
press the on/off power button.
ON
NORMAL
ON
Alternative option
OFF
QUIET
OFF
Page 20

18
Troubleshooting
Troubleshooting chart
Problem Possible causes What to do
The pan supports will not
rise.
Power is not turned on. Turn on the cooktop.
The pan supports, on/off
power button, or control
dials are stuck.
A flame is extremely
yellow or uneven.
A burner is not lighting. You are out of gas.
The flame goes out on
the low setting.
Food has been spilled on these
parts.
The burner has been incorrectly
reassembled after cleaning.
Food has been spilled on the
mesh under the burner head.
Food has been spilled on the
igniter.
The burner has been incorrectly
reassembled after cleaning.
You are out of gas.
Moving air caused by opening/
closing cupboard doors is blowing
out the flame.
Draughts are blowing out the
flame.
See ‘Care and cleaning’.
Reassemble the burner correctly
(see ‘Care and cleaning’)
Call your Authorised Service
Centre or Customer Care.
Check your gas supply.
Call your Authorised Service
Centre or Customer Care.
Reassemble the burner correctly
(see ‘Care and cleaning’).
Check your gas supply.
This may occur on a low setting.
The burner will relight.
Eliminate the draught. If the
problem persists, call your
Authorised Service Centre or
Customer Care.
.
Burners seem to reduce
heat automatically
after prolonged use at
high settings, even
though the setting
shown in the display
remains unchanged.
The low flame setting is too low.
An automatic safety mechanism
reduces heat to protect the
cooktop and its surroundings from
overheating.
Call your Authorised Service
Centre or Customer Care.
This is normal and requires no
action. Once the burners have
cooled to a temperature
threshold, they will
automatically power back to the
displayed setting. To minimise
the need for this mechanism,
use the wok burner for
prolonged high-heat cooking,
and ensure that the pot is not
larger than 40 cm across its
base.
Page 21

Troubleshooting
Troubleshooting chart
Problem Possible causes What to do
19
Pan supports rise or
lower slowly and noisily.
There is an unpleasant
(gas) smell.
There is an electricity
failure.
The cooktop shuts down
suddenly. (Some alert
codes may not have had
time to display.)
The cooktop is beeping
and flashing.
Food has been spilled on these
parts.
The cooktop is not functioning
correctly or gas could be leaking.
The cooktop has shut itself down
to prevent damage.
There has been an electricity
failure.
It is asking you to do something.See the ‘Alert codes’.
Clean the pan supports (see
‘Care and cleaning’.)
Shut off the gas and electricity
supply, ventilate the room and
call your Authorised Service
Centre or Customer Care.
The cooktop cannot be used
without an electricity supply. If
the electricity has failed while
the cooktop was on, the gas
supply will automatically shut
off. The cooktop will return
to the ‘off’ state when the
electricity is restored and will be
ready to use.
Call your Authorised Service
Centre or Customer Care.
For more information, and if
alert codes were displayed, see
‘Alert codes’.
See above problem.
If the problem fails to clear after
repeated attempts, call your
Authorised Service Centre or
Customer Care.
The on/off light is
flashing three times
repeatedly and the
cooktop appears useable
but there is no flame.
The cooktop is in ‘Showroom’
mode.
Turn the power to the cooktop
off at the wall. Wait a few
seconds and then turn the
power back on again.
Page 22

20
Alert codes
Your cooktop can self-diagnose and then communicate this information to you.
If there is a problem, the cooktop will:
shut one or all burners off
beep every three seconds
flash one or more lights
display an alert code on the control display(s). If only one burner has a problem, then its control
display will show the alert code. If the whole cooktop has a problem, then all the control displays
will show a code (in most cases).
To clear the alert code and fix the problem
1
Make a note of which burner(s) display an alert code and the number of bars displayed. You will
need this information.
2
Turn the power to the cooktop off at the wall.
3
Wait 30 seconds, then turn the cooktop back on again.
4
Check the chart following to see if you can fix the problem yourself.
5a
If you can fix the problem and the alert code does not reappear, you can keep using your
cooktop.
OR
5b
If you can’t fix the problem yourself or the problem persists, turn the cooktop off and call your
Authorised Service Centre or Customer Care with the alert code information.
Note: if a burner happens to be hot, the cooktop will wait for the burner to cool down before
shutting down.
Page 23

Alert codes
Individual burner codes
Alert code Possible causes What to do
The pan is too heavy for the pan
supports to lift.
Remove the pan, let the pan supports
rise up, and then place the pan back
on the pan supports.
21
2 bars
3 bars
4 bars
The pan support pins are stuck in
the down position because of spilled
food.
The pan supports are stuck in the up
position.
The burner has extremely
overheated. (This only happens
after very long use at maximum
temperatures.)
No gas.
Draughts from an open window or
other ventilation are causing the
burner to go out on low settings.
Try to remove the food with a damp,
soapy, soft cloth.
If you cannot remove the food, then
call your Authorised Service Centre or
Customer Care.
Clean the pan supports as described in
the ‘Care and cleaning’ section.
If the pan supports will not lower after
cleaning, call your Authorised Service
Centre or Customer Care.
Wait for the cooktop to cool down.
Once the code has disappeared, you
can use your burner again.
Check your gas supply, then turn the
cooktop off and on again. If you have
checked your gas supply and the
cooktop displays this code again, call
your Authorised Service Centre.
The cooktop continuously monitors
each burner to make sure the flame
does not go out, and relights it if it
does. If the system cannot relight
a burner, it shuts off the gas, and
displays this code. Call your Authorised
Service Centre or Customer Care.
Food on the igniter.
Call your Authorised Service Centre or
Customer Care.
Page 24

22
Alert codes
Entire Cooktop codes
Alert code Possible causes What to do
There is not enough air getting to
the burners.
7 bars
Check that
the underside of the cooktop has direct
unrestricted ventilation to the room
where the cooktop is installed
nothing is obstructing the air filter mesh
on the underside of the cooktop
the airway to the cooktop is not affected
by air movement from outside the
cabinet (draughts from other rooms,
through walls, or outside the building).
8 bars
9 bars
10 bars
Flame has been detected on a
burner that is not going.
The on/off power button is stuck. Call your Authorised Service Centre or
There is a pan support malfunction. Call your Authorised Service Centre or
There is a gas valve control
malfunction.
Shut the power to the cooktop off at the
wall, then shut off the gas supply to the
cooktop and call your Authorised Service
Centre or Customer Care.
Customer Care.
Customer Care.
Call your Authorised Service Centre or
Customer Care.
11 bars
12 bars
Electronics malfunction for the
whole cooktop.
Call your Authorised Service Centre or
Customer Care.
Page 25

Warranty and service
Before you call for service or assistance ...
Check the things you can do yourself. Refer to the installation instructions and your user guide
and check that:
1
your product is correctly installed
2
you are familiar with its normal operation.
If after checking these points you still need assistance or parts, please refer to the Service &
Warranty book for warranty details and your nearest Authorised Service Centre, Customer Care,
or contact us through our local website listed on the back cover.
23
Product details
Fisher & Paykel Ltd
Model Serial No.
Date of Purchase Purchaser
Dealer Suburb
Town Country
Page 26

Page 27

Page 28

www. sherpaykel.co.nz
www. sherpaykel.com.au
Copyright © Fisher & Paykel 2011. All rights reserved.
The product specifications in this booklet apply to the specific products
and models described at the date of issue. Under our policy of continuous
product improvement, these specifications may change at any time. You
should therefore check with your Dealer to ensure this booklet correctly
describes the product currently available.
NZ AU 11.2011F&P PN - 599295 E
 Loading...