

Fisher & Paykel AquaSmart WL26CW1 Installation Instructions & User Manual
E_ectric Shock Hazard
Read and follow the SAFETY AND WARNINGS outlined in this User Guide
before operating this appliance, pages 3 - 5,
Failure to do so can result in death, electric shock, fire or ir_)ury to persons°
Please Note: To obtain maximum efficiency, your AqudSmort "_washer has the ability to learn
and adapt to the local environment. This may take several wash cycles, therefore maximum
energy efficiency may not be achieved until a number of wash cycles have been completed, This
usually takes about 5 cycles.
glis 45
P4g 46 - 83
As an ENERGY STAR' Partner Fisher & Payke[ Limited has determined
that this product meets ENERGYSTAR" guidelines for energy efficiency,
E]
Insl.allaqon inst}_ucdons
Be[o_e you do you__Fi_s_wash
Checklist, Waler consumpdol% Capacity
Get?.ing started quickly
EasyIouch controls, The display screel_ Time Io go
The unique AquaSm_'_ ''_wash
Fully automatic wa_:e_level
Sorlhsg and Ioadhs 9
Fabric Sofl:ene_
Changing _:he wash cycle options
Wash cydes _xplahsed
Special Care
SI:ahss
Har_dwash /Wool/Jeans
Chocolate / Iomato / Blood / Grass / Fruit / Wine
Com[orler / Allergy / Hyqiene / Diaper Rinse / Sol%Toys
Swealy / Muddy / Sports ihoes / Beach Gear
Clean Me
Balance Recovery / Alarm I.evel
Screer_Brighlness / Key I.ock Mode / Hinls
Language / Service Conlacts/1 rouble Shoothsg / Reset/)elaults / Replay hstro
Lid Lock
Cadng Fo_you_ A@,_Sm_'t _''washer
Befo_'e you cal! For service
I[ your Aqu_Fm_N 'j beeps rot help
Solvir/g operadng problems
Solving wash problems
Limited wa_'_an_y
3
6
12
12
14
16
16
17
18
18
19
20
21
22
23
24
27
28
29
30
31
32
32
33
33
34
35
35
36
38
38
40
42
43
SAVETHESEINSTRUCTIONS
The models shown in this user guide may not be available in all markets and are subject to change
at any time, For current details about model and specification availability in your country, please go
to our website www,fisherpaykel,cem or contact your local Fisher & Paykd dealer,
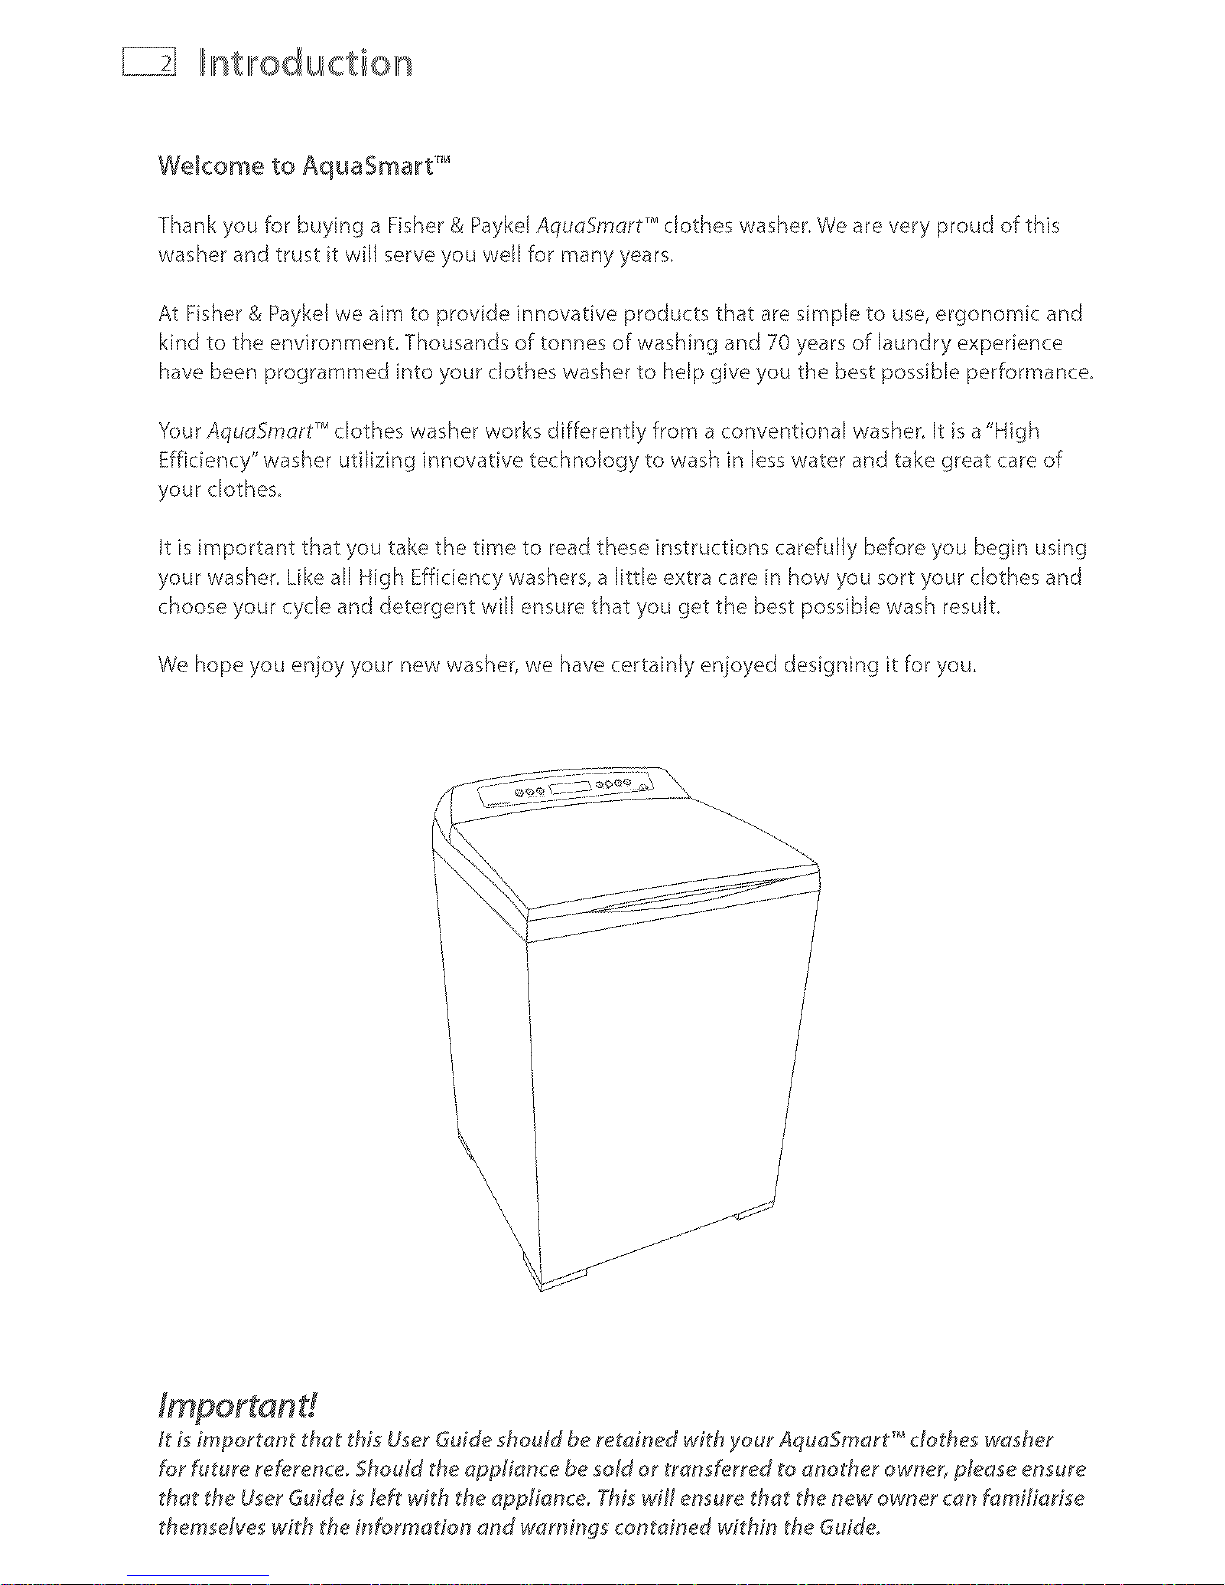
nt,roduction
Thank you for buying a Fisher & Paykd AquaSmdrt TM clothes washer. We are very proud of this
washer and trust t wiJl serve you wdJ for many years.
At Fisher & Paykel we aim to provide innovative products that are simple to use, ergonornic and
kind to the environment Thousands of tonnes of washing and 70 years of laundry experience
have been programmed into your clothes washer to hap give you the best possible performance.
YourAqudFmart TM clothes washer works differently from a conventional washer It s a "High
Efficiency" washer utilizing innovative technology to wash in Jesswater and take great care of
your clothes,
it is important that you take the time to read these instructions carefully before you begin using
your washer. Like all High Efficiency washers, a little extra care in how you sort your dothes and
choose your cycle and detergent will ensure that you get the best possible wash result.
We hope you enjoy your new washer, we have certainly enjoyed designing it for you.
it is important that this User Guide should be retained with your AquaSmart '_'clothes washer
for future reference. Should the appliance De sold or t_ansferred to another owner, please ensure
that the User Guide is left with the appliance, This win ensure that the new owner can familiarise
themselves with the information and warnings contained within the Guide
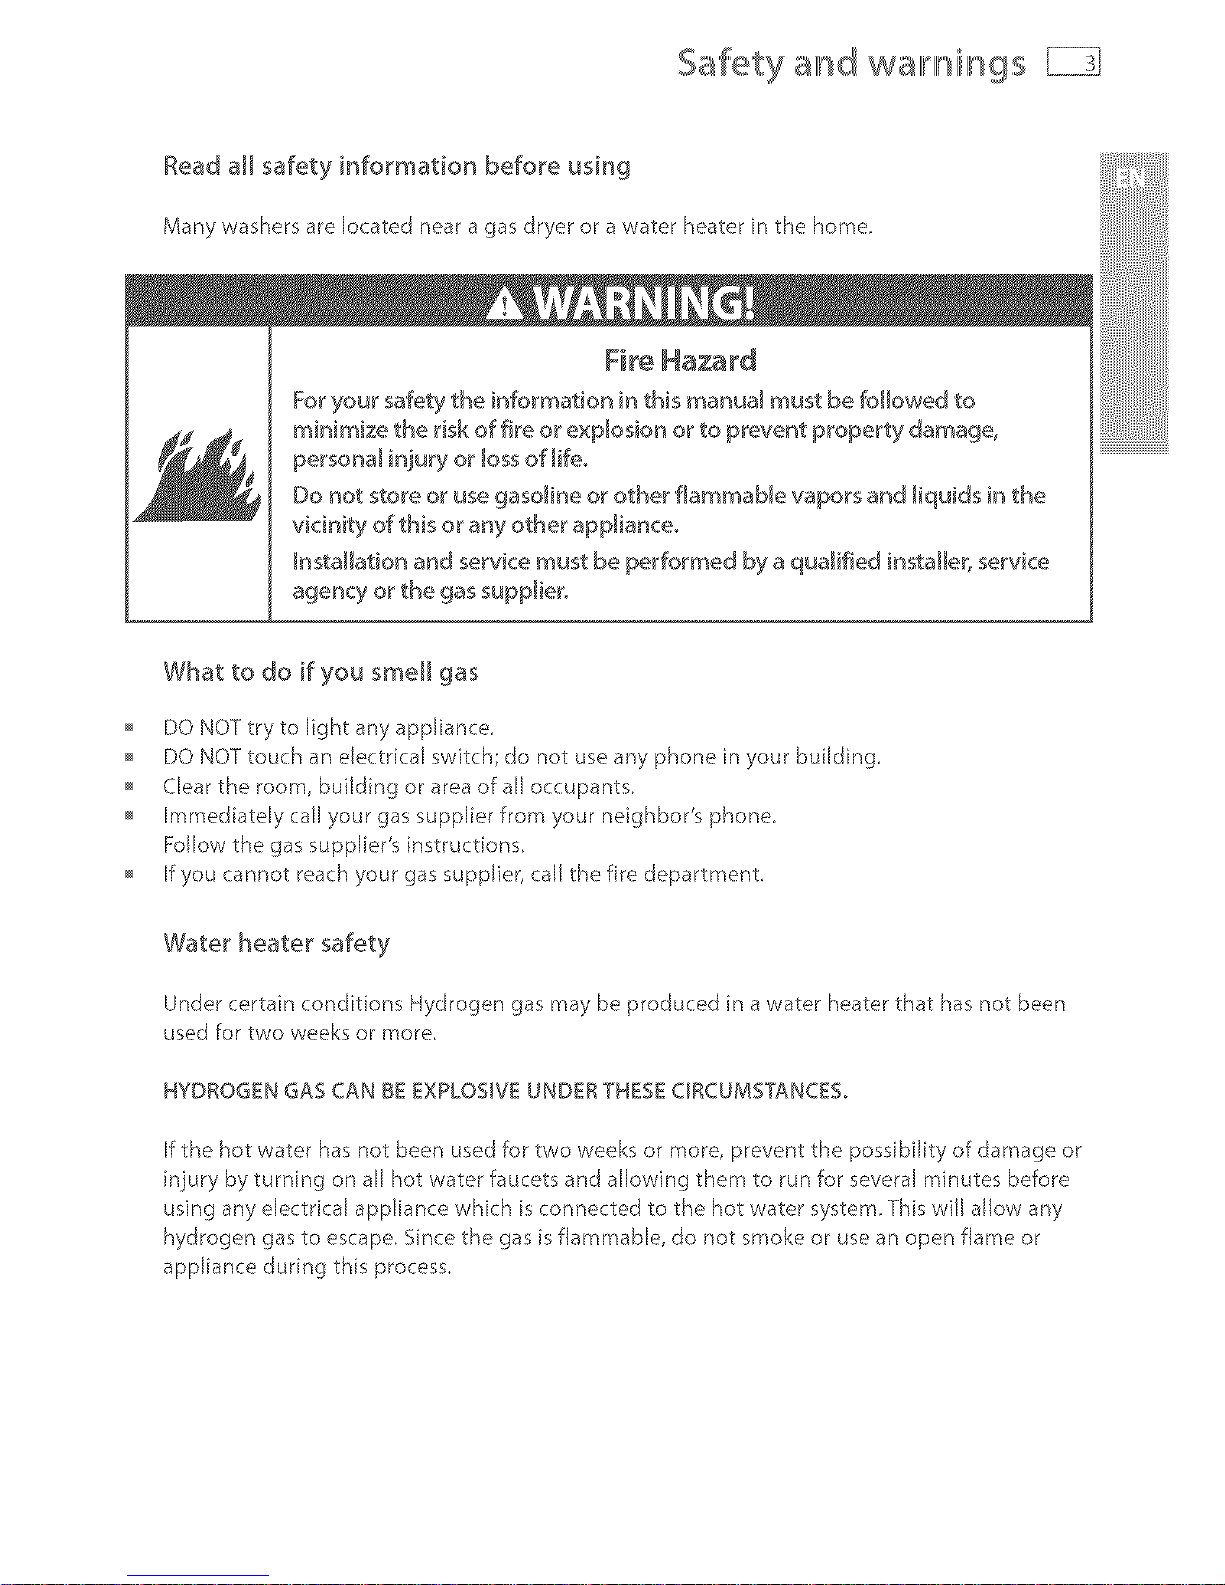
Safety and warnings
Read aH safety information before using
Many washers arelocated near a gasdryer or awater heater in the home,
Fire Ha_rd
For your safety the information in this manual must be followed to
minimize the risk of fire or explosion or to prevent property damage,
personal in)ury or loss of [ifeo
Do not store or use gasoline or other f_ammaMe vapors and _iquids in the
vicinity of this or any other app[ianceo
hsta[[ation and service must be performed by a qualified instaHe< service
What to do if you smell gas
DO NOT try to light any appliance
DO NOT touch an electrical switch; do not use any phone in your building,
Clear the room, building or area of aJ[occupants
immediately call your gas supplier from your neighbor's phone,
Follow the gas supp[ier's instructions
[f you cannot reach your gas supplier; call the fire department,
Water heater safety
Under certain conditions Hydrogen gas may be produced in a water heater that has not been
used for two weeks or more
HYDROGEN GAS CAN BE EXPLOSIVE UNDERTHESE CIRCUMSTANCES.
If the hot water has not been used for two weeks or more, prevent the possibility of darnage or
injury by turning on all hot water faucets and allowing them to run for several minutes before
using any electrical appliance which s connected to the hot water system, This will allow any
hydrogen gas to escape, Since the gas is flammable, do not smoke or use an open flame or
appliance during this process,
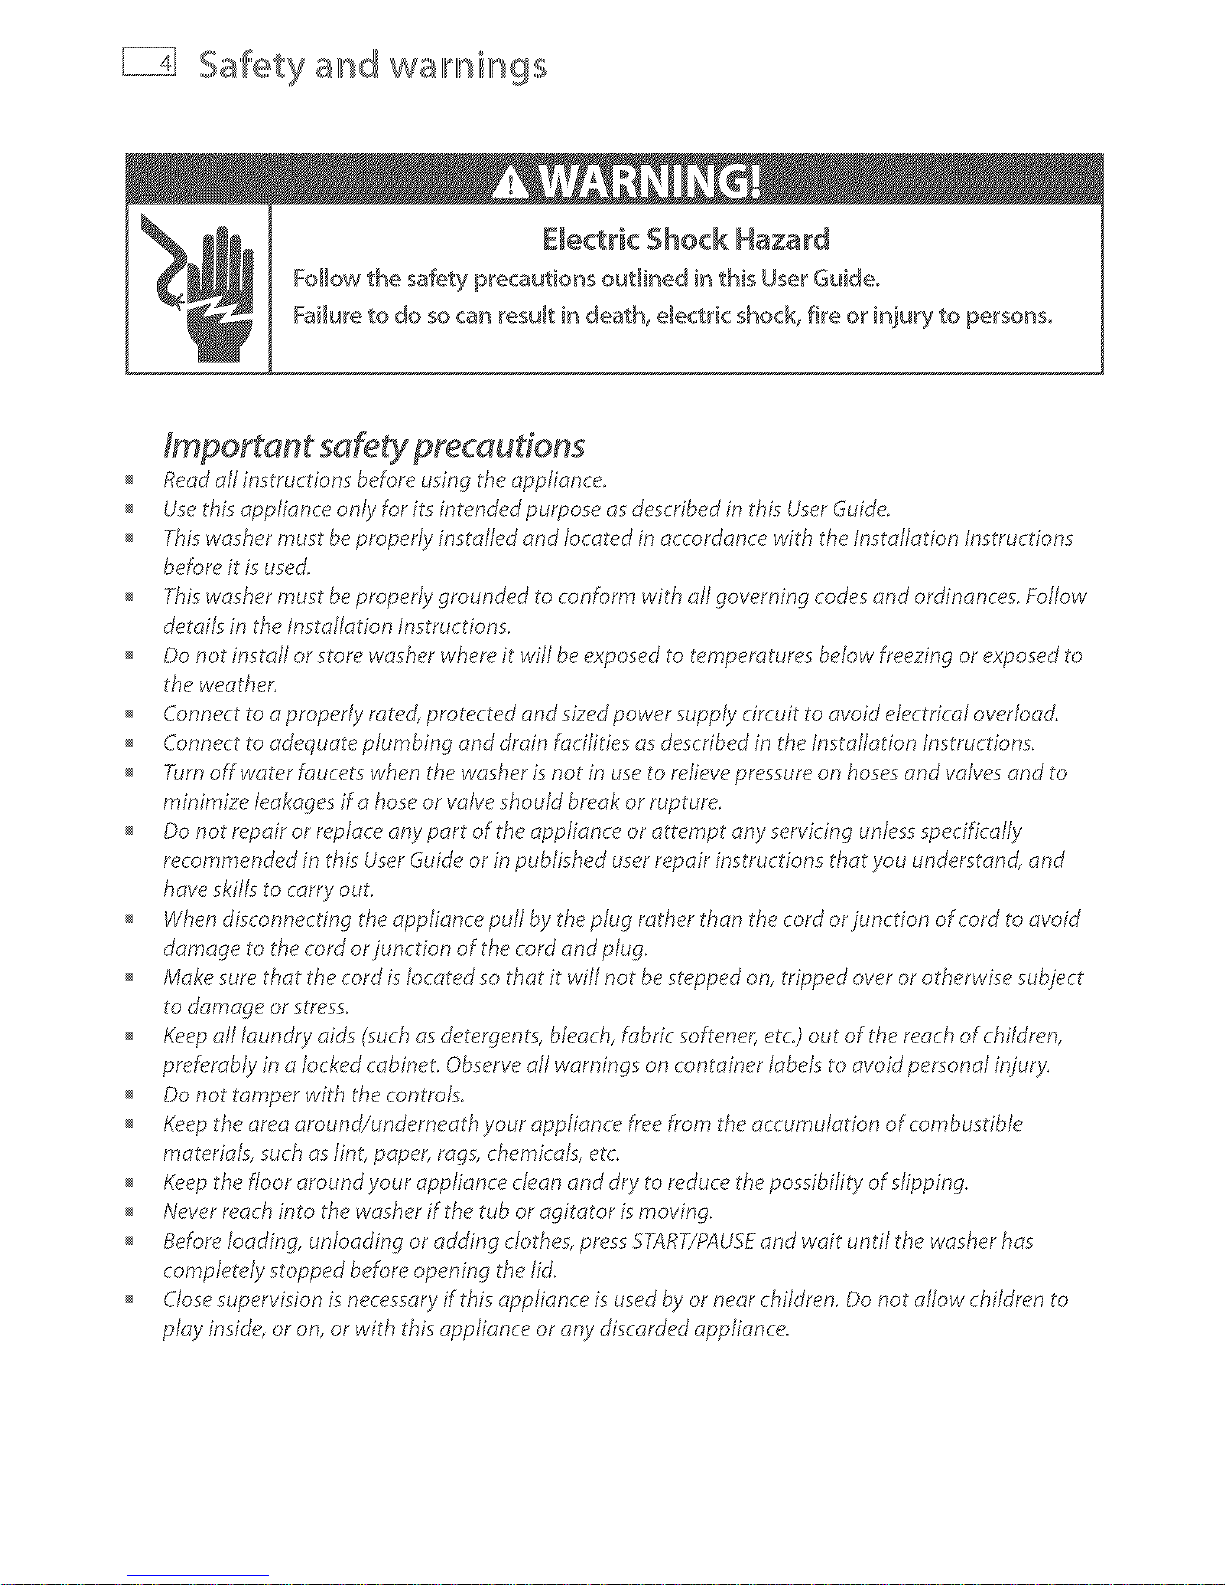
Safety and wallmings
Follow the safety precautio_ss ouqined in this User Guide°
Failure to do so can _esu_t i[_ death_ e_ect_ic shock, five o_ injury to pe_sons_
Readall instructions beforeusing the appliance.
Usethis applianceonly for its intended purpose asdescribedin this UserGuide.
Thiswashermust beproper!yinstalled and located in accordance with the Installation Instructions
beforeit isused.
Thiswashermust bepropertygrounded to conform with all governing codesand ordinances.Follow
details in theInstallation Instructions.
Do not install or storewasherwhereit will beexposedto temperatures below freezingor exposedto
the weather.
o Connectto a properly rated,protected and sizedpower supply circuit to avoid electricalow_rload.
Connectto adequate plumbing anddrain @cilitiesasdescribedin the Installation Instructions.
Turnoff waterfaucets whenthe washerisnot in useto relievepressureon hosesandvalvesand to
minimize leakagesira hoseor valveshould break or rupture.
Do not repair or replace an}/part of theappliance or attempt an},'servicing unlessspecifical!y
recommendedin this UserGuideor in published userrepair instructions that you understand, and
haveskills to carry out.
Whendisconnecting the appliancepull by theplug rather than the cord orjunction of cord to avoid
damage to thecordorjunction of the cord andplug.
/_dakesurethat the cordislocated sothat it will not besteppedon, tripped overor otherwise subject
to damage orstress.
Keepall laundry'aids (suchasdetergents,bleach,fabric softene_,etc.)out of the reach of children,
preferably in a lockedcabinet. Observeall warnings on container labelsto avoid personal injur}".
Do not tamper with the controls.
Keepthe areaaround/underneath your appliance freefrom the accumulation of combustible
materials,suchaslint, papenrags,chemicals,etc.
Keepthe floor around }"ourappliance clean and dry to reducethe possibility of slipping.
Neverreachinto the washerif the tub or agitator ismoving.
8efom loading, unloading or adding clothes,pressSTAR7YPAU:%and wait until the washerhas
completely stopped beforeopening thelid,
Closesupervisionism_cessaryif this applianceis used@ or near children. Do not allow children to
pla}" inside,or on, or with this appliance or any discardedappliance
Safety allnd wamill@gs
Dispose of discarded appliances and shipping/packing materials properly. Before discarding a
washer, or removing from service, remove the washer lid.
Do not leave the washer lid up during the C:/cle.The washer will not function. _a start, close lid and
press START/PAUSF..
Do not wash or dt7 articles that have been cleaned in, washed in, soaked in, or spotted with
combustible or explosive subst_;in_:espuch as wax, oil, paint, gasoline degreasers, dry. cleaning
solvents, kerosene, etc.) which ma R'ignite or explode. Do not add these substances to the wash
water. Do not use these substances around your w_;isherand/or dttyer during operation, as they giw_
off vapors th_;_tcould ignite or explode.
The/aundtt!/process can reduce the flame retardan@' of fabrics. To avoid such a result, the garment
manufacturer's care instructions should be followed very carefully,
Do not mix chlorine bleach with ammonia or acid such as vinegar and/or rust remow_r. Mixing can
produce a toxic gas which may cause death.
Never climb on or stand on the washer top or lid.
Do not wash fibreglass articles in your washer. Skin irritation could result from the remaining
particles that may L,epicked up by clothing during subsequent washer use.
To minimize the possibility of dectric shock, unplug this appliance from the power supply or
disconnect the washer at the household distribution panel L_'removing the fuse or switching off the
circuit breaker before attempting any maintenance or cle_;_ning.
Note: Pressing the POWER button does NOT disconnect the appliance from the power supp!y, even
though the lights are out.
Do not operate this appliance if it is damaged, malfunctioning, partia/!y disassembled or has
missing or broken parts, including a damaged cord or plug.
Do not opera:ire this appliance if the lid has been incormct!;¢ fitted.
If you am using an extension cord or a portable electrical outlet device (eg mulit-socket outlet box),
ensure that it is positioned so that it does not come into contact with water or moisture.
SAVE THESE INSTRUCTIONS
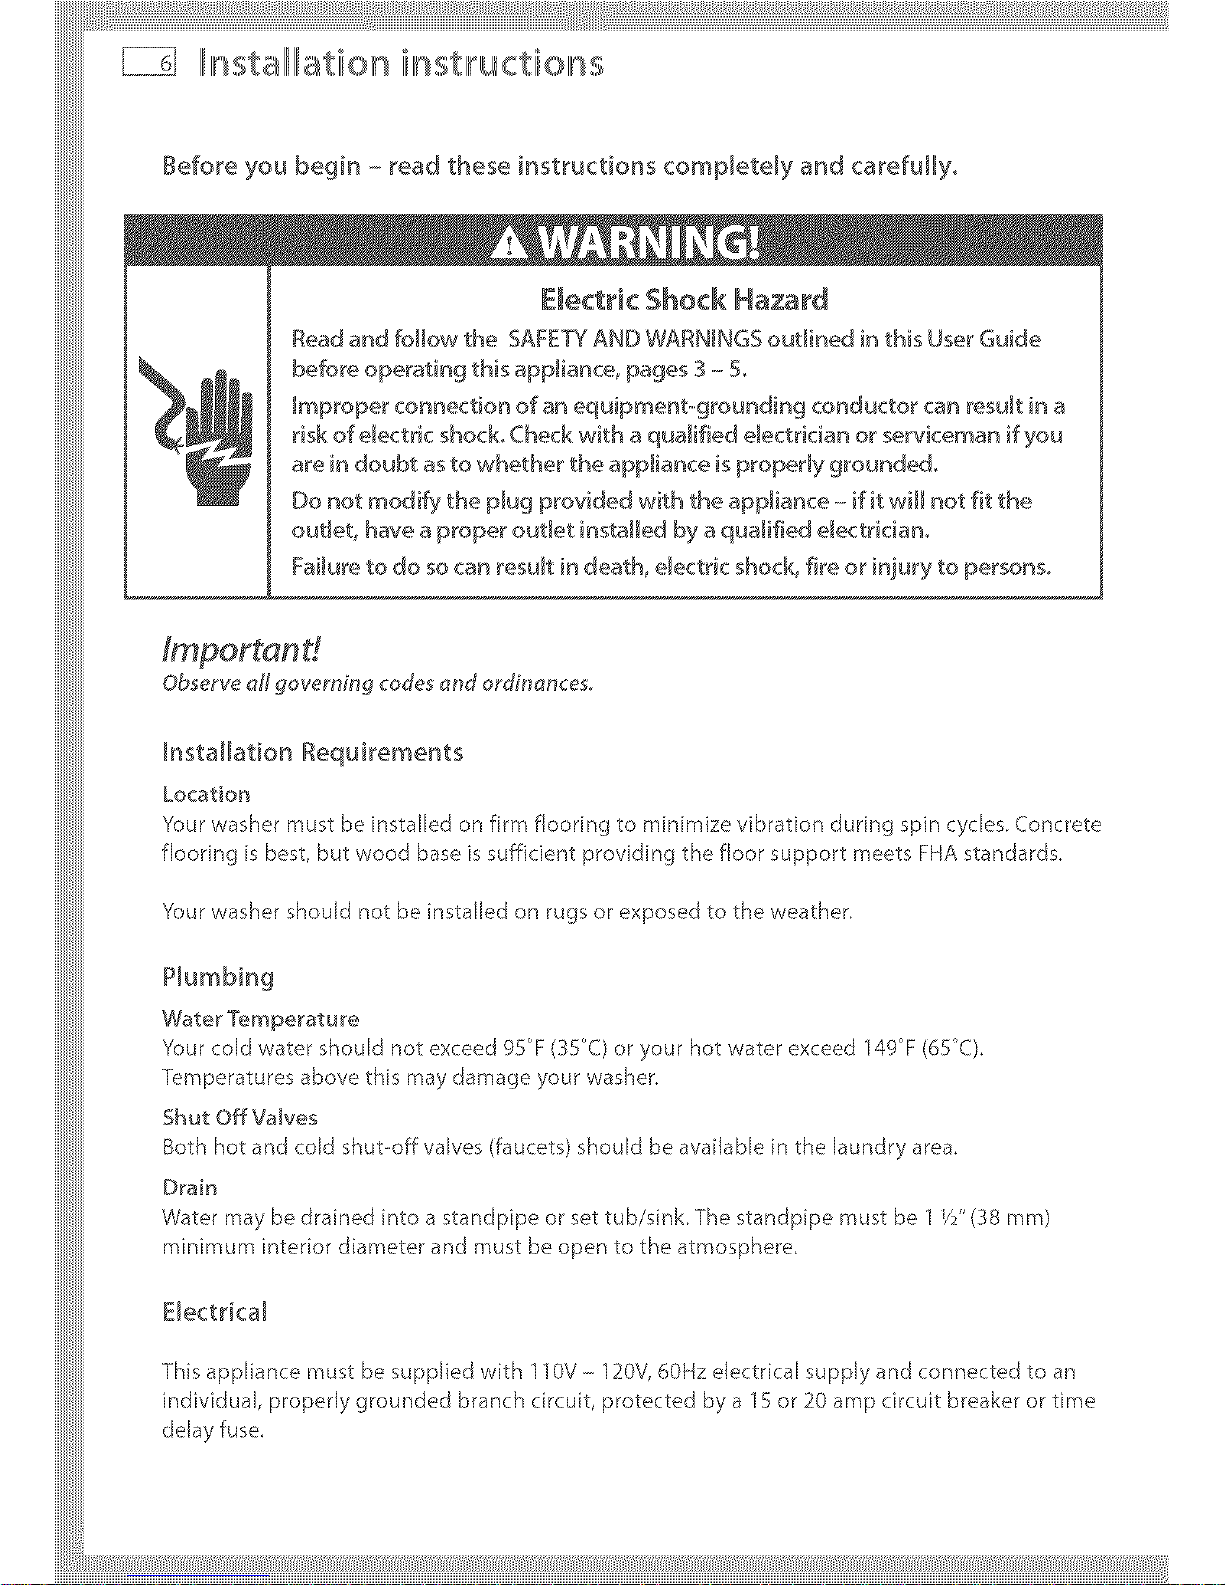
Illnstalllllati©n instlructions
Before you begin - read these instructions completely and carefully,
E_ectric Shock Hazard
Read and follow the SAFETY AND WARNINGS outlined in this User Guide
before operating this appliance, pages 3 - 5.
_mproper connection of an equipment-grounding conductor can result in a
risk of electric shock. Check with a qualified electrician or serviceman if you
are in doubt as to whether the appliance is proper_y grounded°
Do not modify the plug provided with the appliance - if it will not fit the
outlet, have a proper out_et installed by a qualified electrician°
Failure to do so can result in death, e_ectric shock, fire or injury to persons.
Observe all governing cedes and ordh_ances
InstaHatior_ Requirements
Location
Your washer must be installed on firm flooring to minimize vibration during spin cycles. Concrete
flooring is best, but wood base is sufficient providing the floor support meets FHA standards.
Your washer should not be installed on rugs or exposed to the weather.
Water Temperature
Your cold water should not exceed gS°F (35°C) or your hot water exceed 149°F (65°C).
Temperatures above this may damage your washer.
Shut Off Valves
Both hot and cold shut-off vabes (faucets) should be available n the laundry area.
Drain
Water may be drained into a standpipe or set tub/sink The standpipe must be 1 Y/' (38 ram)
minimum inter{or d{ameter and must be open to the atmosphere.
Electrical
This appliance must be supplied with 110V - 120V, 60Hz electrical supply and connected to an
individual, properly grounded branch circuit, protected by a 15 or 20 amp circuit breaker or time
delay fuse.

llr" staHation illr stlructions
This washer must be plumbed into both a hot and cold water supply or it will not work
correctly, Please ensure that both hot and cold water are connected to the washer
If you have an uncontrolled water heating source (eg a wet back or solar heating) you should
have a tempering device fitted This will ensure the hot water temperature rema{ns within
safe limits. For the most suitable type of tempering device we recommend you contact a local
plumber or plumbing supply merchant,
Inlet Water Static Pressure 3psi (20kPa) to 150psi (1MPa).
(if using a header tank then the top of the header tank must be at least 39" (2 m) above the top
Minimum flow rate from the faucet supplying the clothes washer should be greater than
I V_gallons/rain (6 Eiters/min) (assumes V/' (12,7 ram) diameter pipes),
Minimum height of faucets to clear the top of the washer is 45"(1150 ram),
Regularly check that your standpipe or set tub/sink is free from lint or other obstructions, which
may affect how your washer works or may cause flooding,
In multi storey apartments or any upper floor, the washer should be installed on a drained floor,
Draining must comply with local by-laws,
This clothes washer is not intended for use by young children or nfirm persons without
supervision
Please supervise young children to ensure they do not play with this clothes washer,
If you ere _usingan extension cord or e porteb/e e/ectr£d/ outlet device (eg mu/d.-socket o_t/et
box), ensure that it is positioned so that it does not come into contact with water or moisture
Accessories and spare parts
AvaHaMe from you_ Fisher & Payke_ Dealer or Autho_ised Service Center_
Drain Hose Extension Part No 42S627p
Power Cord If the Power (.ord of your clothes washer is damaged it must be
replaced by a Fisher & PaykeJ Authorised Service Center, as it
is not a standard power cord.
ll stallllatioln ill stllructiollL s
To ensure the best performance from your new AquaSmart TM
clothes washer please follow the nstructions below.
Removing the packaging
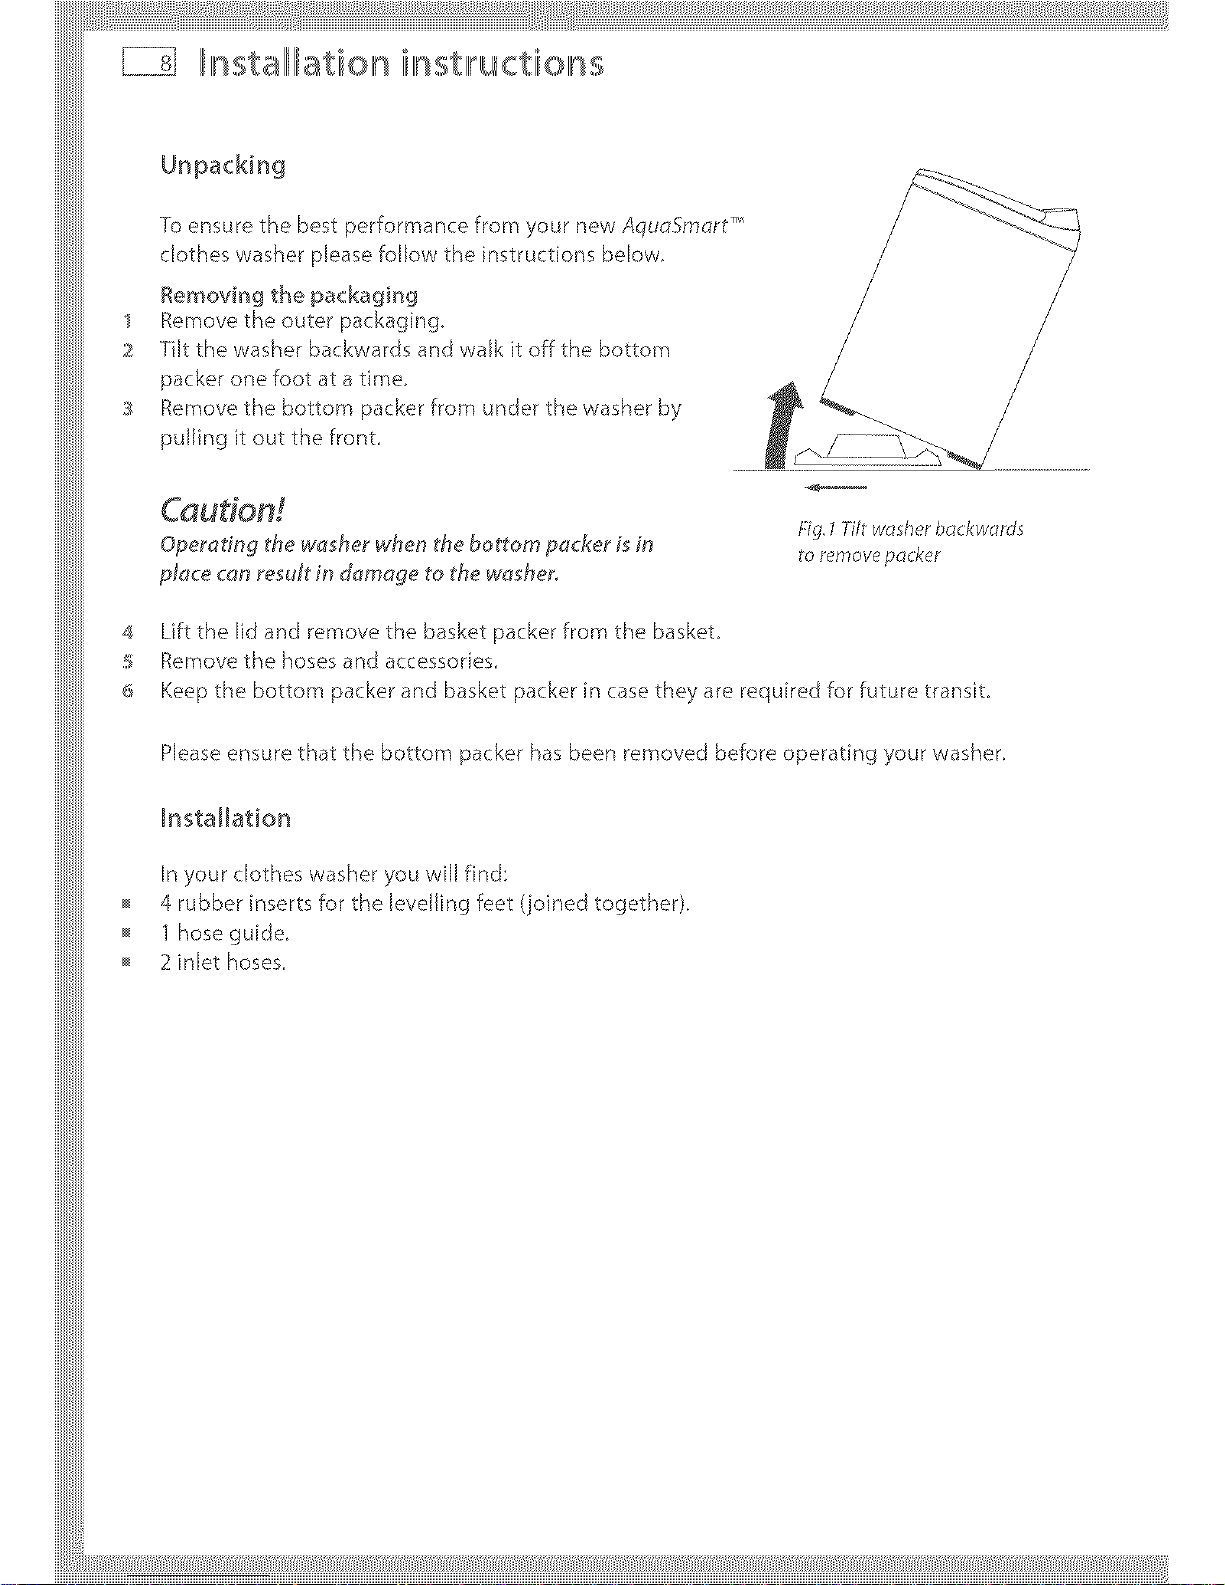
Remove the outer packaging,
Tilt the washer backwards and walk it off the bottom
packer one foot at a time.
Remove the bottom packer from under the washer by
pulling it out the front,
Operadng the washer when the bob'tom packer is in
place con result in damage to the washer,
fig. 7Tilt washerbackwards
to removepacker
4 Lift the lid and remove the basket packer from the basket,
5 Remove the hoses and accessories
Keep the bottom packer and basket packer in case they are required for future transit.
Please ensure that the bottom packer has been removed before operating your washer,
Installation
In your clothes washer you will find:
4 rubber inserts 'For the levelling feet (joined together).
'1hose guide
2 inlet hoses
llr" starllllati©llL ilr stlructiolns
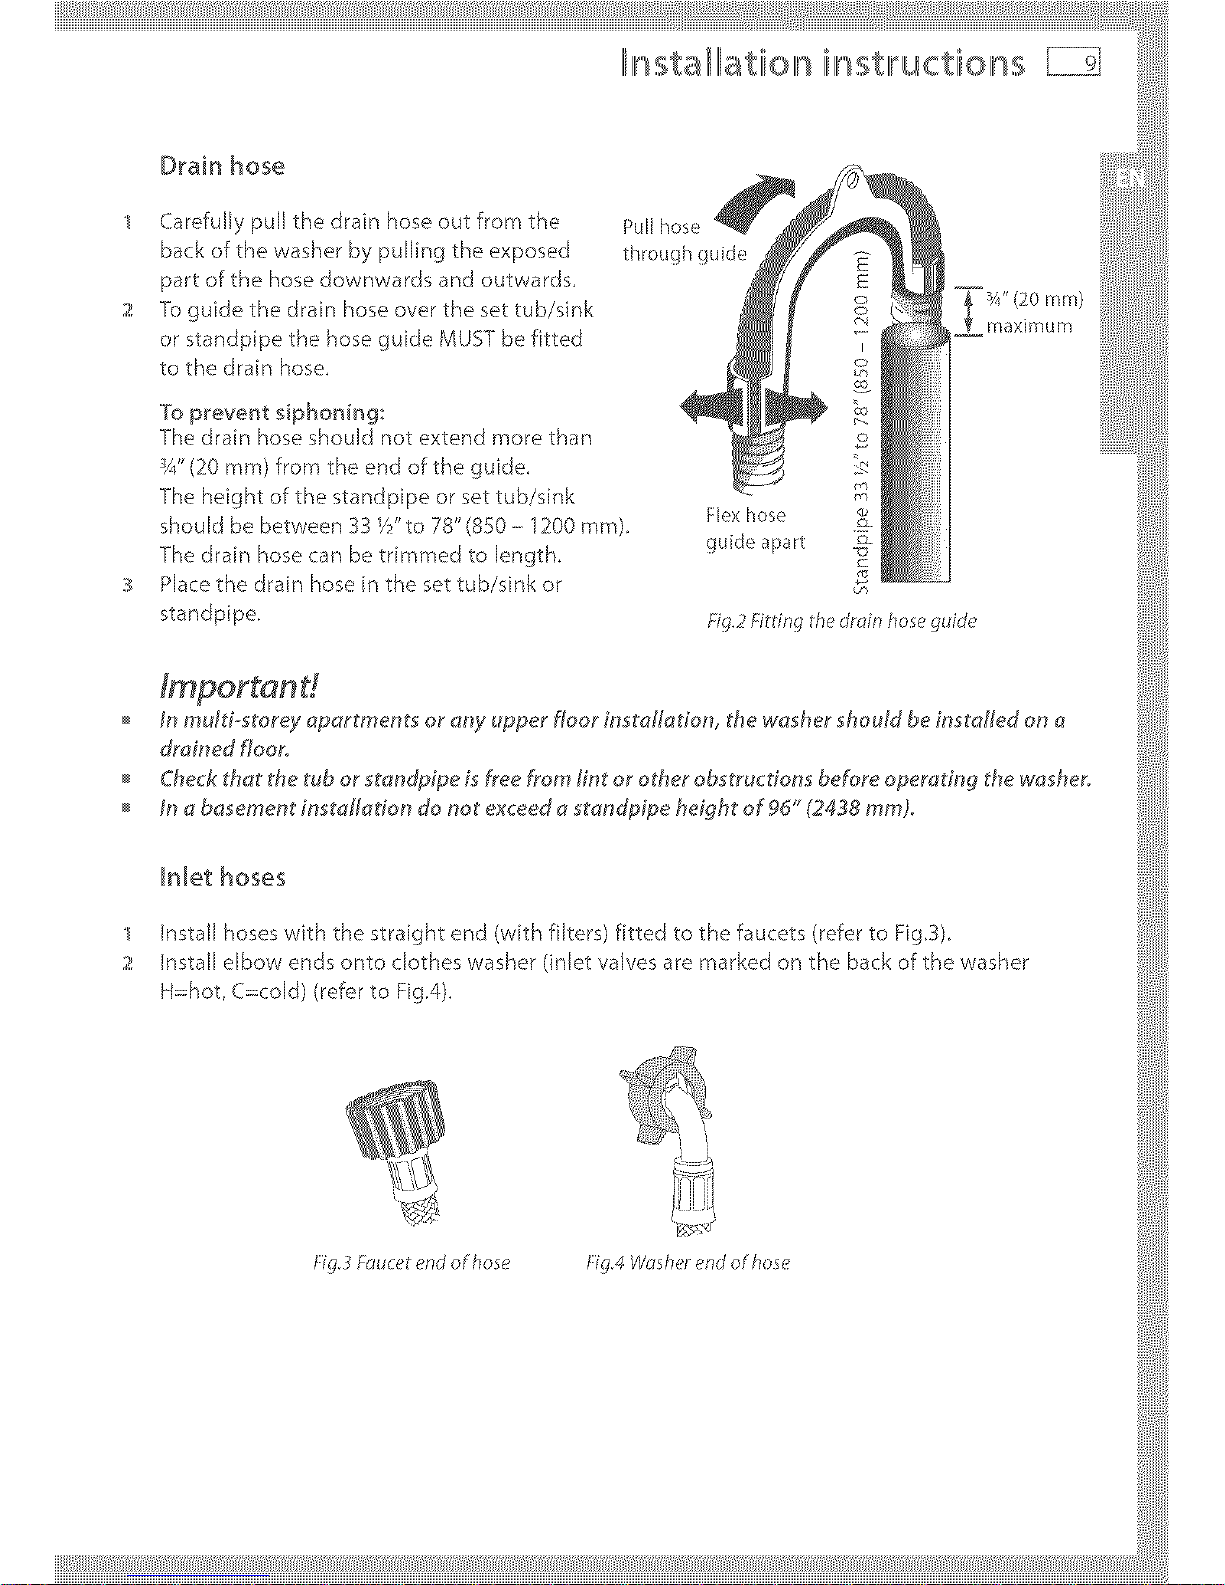
Drain hose
1 Carefully pull the drain hose out from the
back of the washer by pulling the exposed
part of the hose downwards and outwards.
2 To guide the drain hose over the set tub/sink
or standpipe the hose guide MUST be fitted
to the drain hose.
To prevent siphoning:
The: drain hose should not extend more than
¼"(20 ram) from the end of the guide.
The height of the standpipe or set tub/sink
should be between 33 V/'to 78"(850 - 1200 ram).
The drain hose can be trimmed to length.
Place the drain hose in the set tub!sink or
standpipe.
Pull hose
through guide
Flex hose
guide apart
fig.2 fitdr_g thedrain hose guid_*
In multi-storey apartments or arty upper floor insta!ladon, the washer should be installed on a
drained floor_
Check that the tub or standpipe is free from lint or other obstructions before operating the washer.
In a basement in_taNadon do not exceed a stan@ipe height of gd" (2438 mm.L
Inlet hoses
1 Install hoses with the straight end (with filters) fitted to the faucets (refer to Fig.3).
2 Install elbow ends onto clothes washer (inlet valves are marked on the back of the washer
H=hot, C=cold) (refer to Fig.4).
_::7g.3f:oucet end of hose _::7g.4Wosherer_dof hose

nstalHation instlructions
It is IMPORTANT to level the washer to ensure good spin performance and effective detergent and
fabric softener dispensing.
1 Separate the 4 rubber foot inserts from the moulding and fit into the feet on the base of the
washer
2 Move the washer to its final position (We suggest a minimum clearance of 1_'(25 ram) each side),
s Adjust the feet so the washer is level and cannot rock,
I" (25 mm) 1"(25 ram)
E I/
Adjustable Feet
h_ Rubber insert c_
f t
Fig.'_Levellingyour washer Fig.d Minimum dearances
4 Use the walls and adjacent counter tops asa sight guide to check to see if washer appears level.
Readjust the feet if necessary
Open the lid and check the washer tub to see that it sits slightly forward of centre. (See diagram 3).
Ir/correcl Correct
adjustmen_ adjustment
Diagram 3
6 Turn on the water and check all hose connections for leaks. Make sure there are no kinks in the hoses.
7 Uncoil power cord and plug into wall socket.
s Check 'for leaks, noise, vibratiorl, correct water temperatures and proper operation in spin. Check
that the lid locks during spin.
Illll sta/illatiollL ill stlructioll s
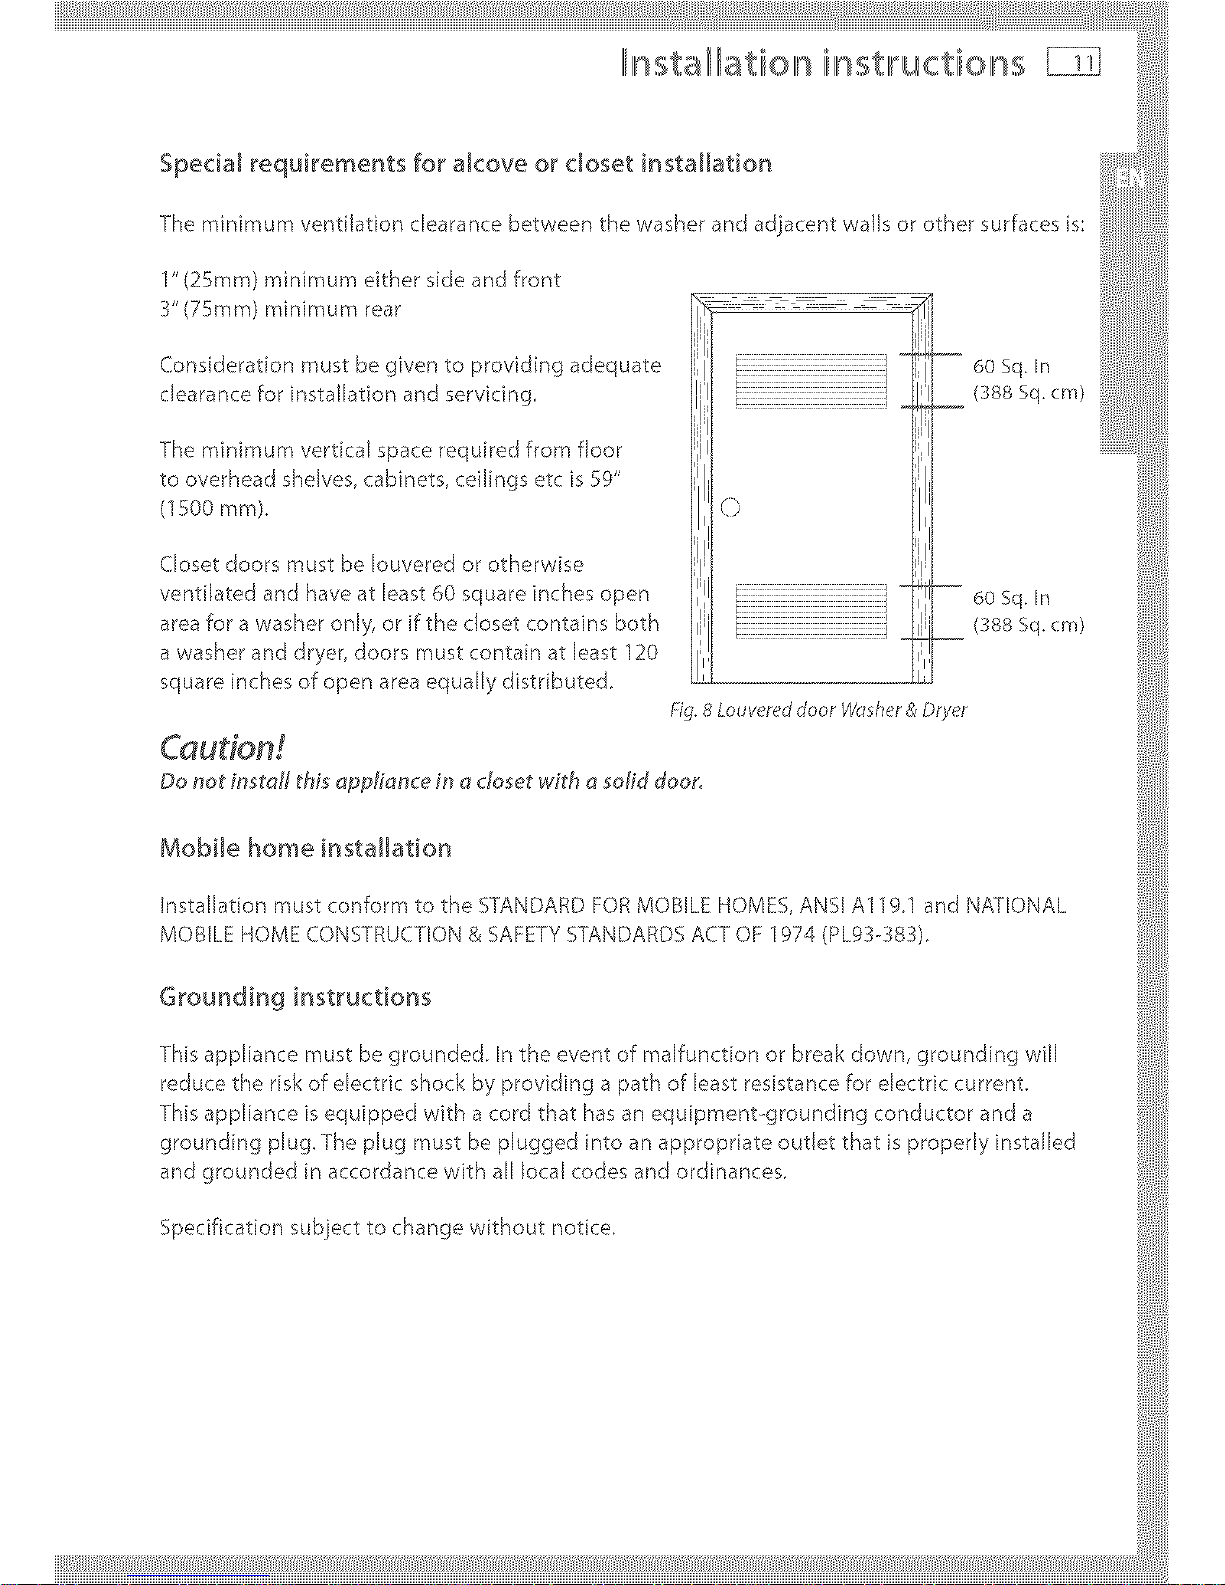
Special requirements for alcove or doset installation
The minimum ventilation clearance between the washer and adjacent walls or other surfaces is:
1" (2Smm) minimum either side and front
3"(75mm) minimum rear
Consideration must be given to provid{ng adequate
clearance for installation and servicing.
The minimum vertical space required from floor
to overhead shelves, cabinets, ceilings etc is 59"
(1500 mm),
Closet doors must be Iouvered or otherwise
ventilated and have at least 60 square inches open
area for a washer only, or if the closet contains both
a washer and dryer, doors must contain at least 120
square inches of open area equally distributed,
60 Sq. In
(388 Sq. cm)
60 Sq. In
(388 Sq. cm)
fig. 8Louvereddoor Wosher& Dryer
Do not ir}stafl this appliance in a closet with a solid door_
Mobile home installation
Installation must conform to the STANDARD FOR MOBILE HOMES, ANSI A119.1 and NATIONAL
MOBILE HOME CONSTRUCTION & SAFETY STANDARDS ACT OF 1974 (PLg3--383).
Grounding instructions
This appliance must be grounded. In the event of malfunction or break down, grounding will
reduce the risk of electric shock by providing a path of least resistance 'for electric current.
This appliance is equipped with a cord that has an equipment-grounding conductor and a
grounding plug. The plug must be plugged nto an appropriate outlet that is properly installed
and grounded in accordance with all local codes and ordinances.
Specification subject to change without notice.

Be'fore you do youlr filrst wash
You owe t to yourself and your AqudSmdr¢ '_to have it installed correctly by an authorised
service agent.
Before you start, it is a good idea to go through the following checkmist:
1 Has the basepacker been removed?
2 Isthe hot hose connected to the hot valve marked'H'?
Is the cold hose connected to the cold valve marked 'C'?
s Is the drain hose threaded through the'U bend'(with no
more than ¾" 20 mm extended) and on to your standpipe7
4 Are the rubber inserts secured into the feet on the base of
your washer and is the washer levelled? Use the levelling
indicator bubble to check if washer is level (refer to page 10).
Refer to Installation instructions, pages 6 -- 11.
AquaSmart r_'water consumption
15,5 Ib (7 kg) 22 G (82 L)
11 Ib (S kg) 18 G (6g L)
7 Jb (3 kg) 16 G (60 L)
2 Jb (1 kg) 14 C-,(S4 L)
_Regular High Efficiency is the default wash cycle for AqudSmdrt TM,
AqudFmdrt TM offers a generous 15.5 Ib (7 kg) capacity. The list below outlines what is included in
a 15.S Ib (7 kg) wash load (in accordance with ANSI/AHAM HLW 1--2002).
3 Bed sheets (double)
2 Tablecloths
4 Shirts
GBath towels
4 T-shirts
4 Pillow cases
6 Shorts
6 Washcloths
SHandkerchiefs
We recommend for everyday use that you separate out your bed sheets and wash them on the
specially designed BED SHEETScycle.

....The fi,rst time you turn you,r wasllBelron _3]
Customizing your AquaSmart _'washe_
The first time that you turn your washer on an intial setup mode will be initiated. This is to
ensure that your AquoSmort _'_'is customized for your individual needs The set-up mode will
prompt you to select the language that you would prefer your AquoSmort _' washer to use.
P eas8se ,ectueur
la lguage rderenc:8
8PTll3_
New Zealand Auslralia US Espa¢_ol
Canada Canada
English Franqais
Using the SCROLL buttons, scroll to the language that you would like your washer to use. Once
the language icon has been highlighted, press SELECTto confirm your choice. 'four washer will
now use this language, and the initial setup prompt will not appear again.
If you wish to change your language choice at any time, you can do this by simply selecting the
LANGUAGE option in the SETTINGS MENU (please refer to page 35).
Getti ng stalrted q uicklly
It is important to sort your clothes, particularly by color, as well as separating out bed sheets and
washing them on the BED SHEETScycle. Jeans also need to be washed separately on the JEANS
cycle (refer to page 18 for more details on sorting and loading),
(lose bra clasps, do up zippers and check pockets,
Place your clothes evenly around tile wash tub,
Your Aqua_mdrt TM has been designed for use with High Efficiency (HE) detergent. For example
Tide" HE liquid or powder, Wisk _'HE liquid or powder.
AquaSmort _'_'offers a Detergent dispenser for your convenience, located on the front, left hand
side of the top deck.
For detergent dose, please follow the manufacturers directions, outlined on the detergent
package
Pour the detergent down the Detergent dispenser
For more information on detergent fabric softener please refer to pages 19 ---20,
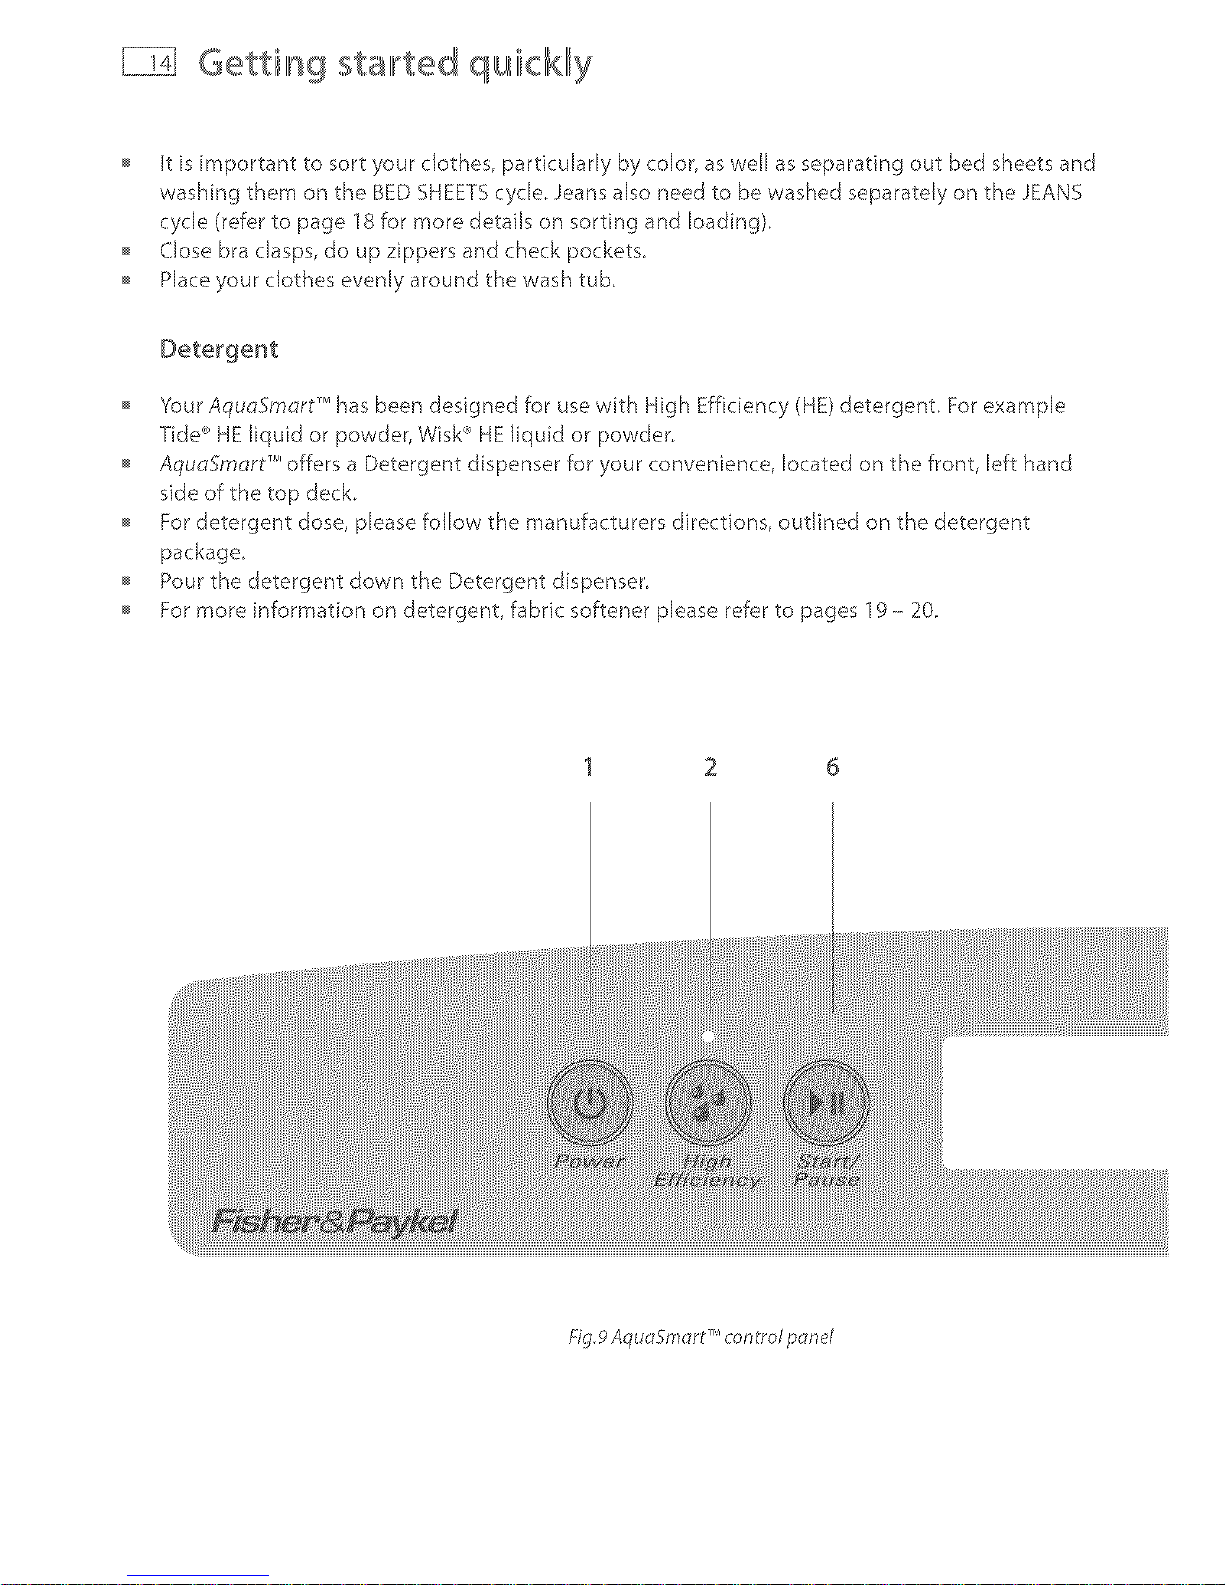
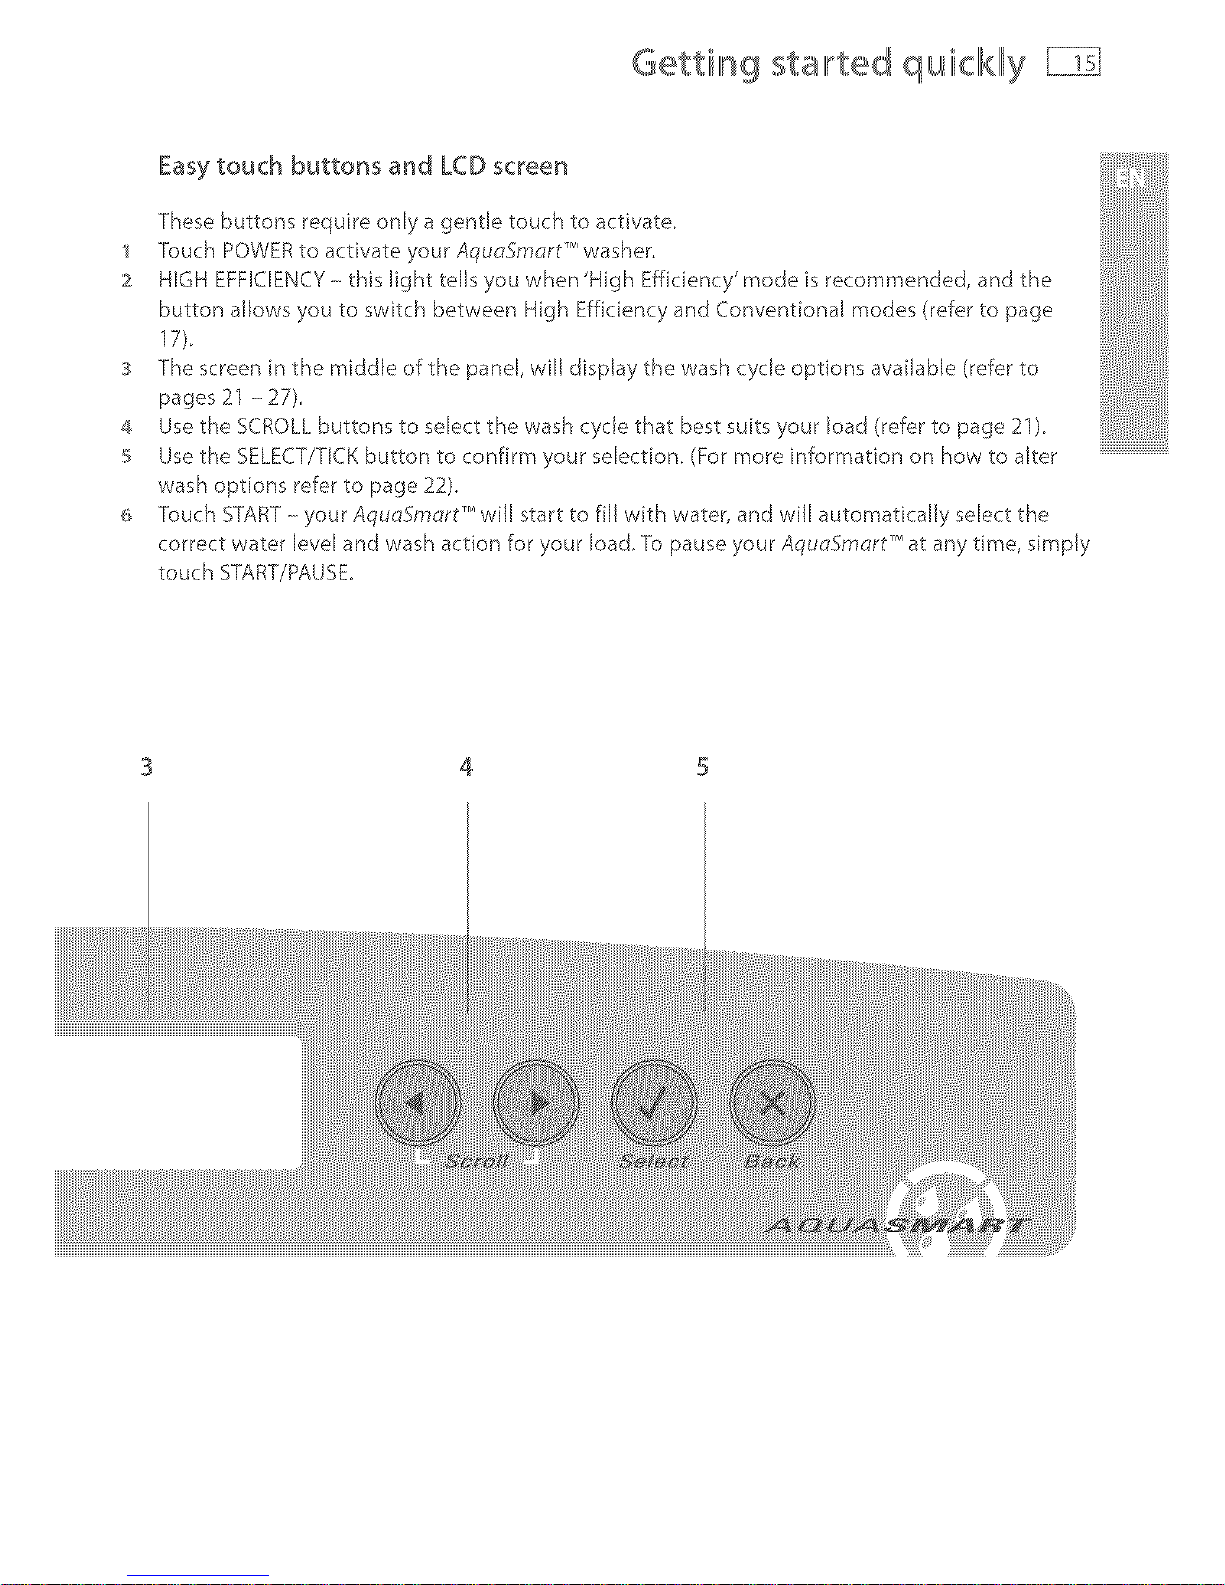
1 2 6
IJg.9Aqu_25m_2rtTM control p_ne/
Gettill_g stallrted quicllklly
3
4
5
6
Easy touch butto_s arid LCD screer_
These buttons require only a gentle touch to activate.
Touch POWER to activate your AqudSmdrt _'_'washer.
HIGH EFFICIENCY - this light tells you when 'High Efficiency' mode is recommended, and the
button allows you to switch between High Efficiency and Conventional modes (refer to page
17).
The screen in the middle of the pane.J,will display the wash cycle options available (refer to
pages 21 - 27).
Use the SCROLL buttons to select the wash cycle that best suits your load (refer to page 21). .......................................
Use the SELECT/TICK button to confirm your selection. (For more information on how to alter
wash options refer to page 22).
Touch START- your AquoFm_rt TM will start to fill with water, and will automatically select the
correct water level and wash action for your load. To pause your AquoSmort T_at any time, simp{y
touch START/PAUSE.
3 4 5
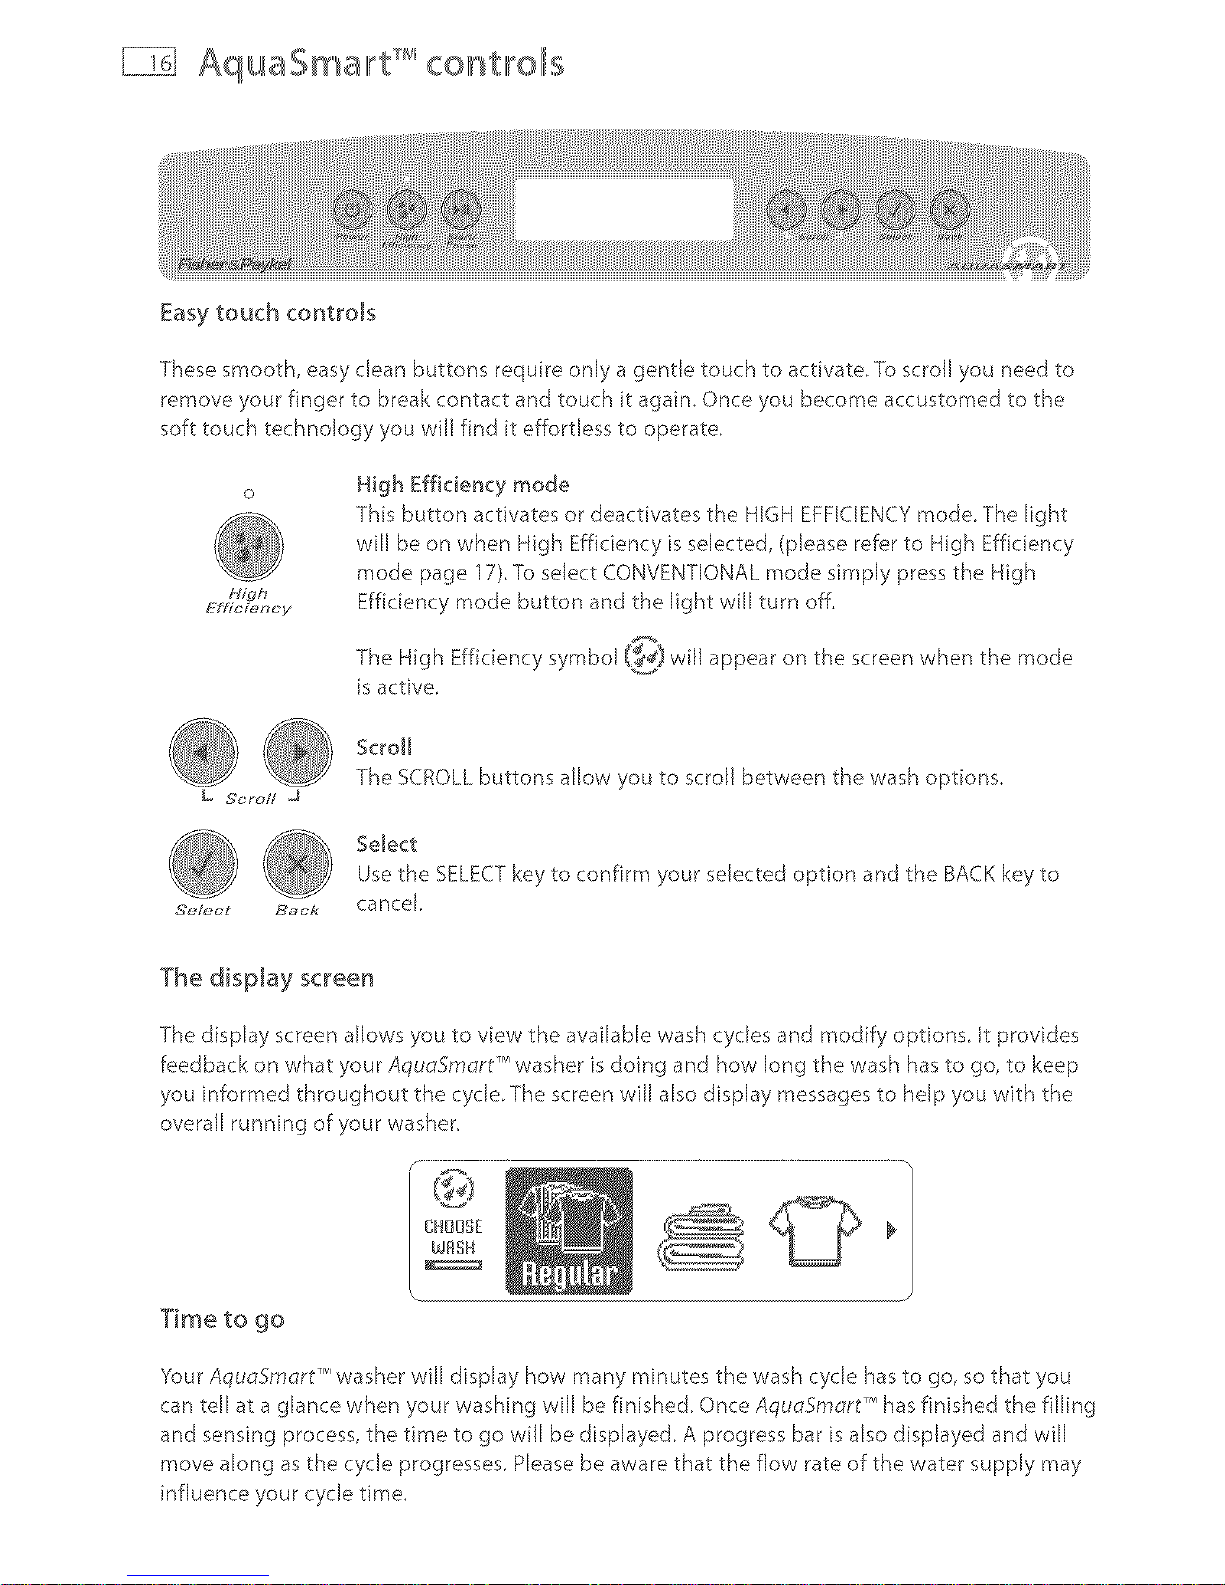
AquaSma,rt contlrols
Easy touch controls
These smooth, easy clean buttons require only a gentle touch to activate.To scroll you need to
remove your finger to break contact and touch it again. Once you become accustomed to the
soft touch technology you will find it effortless to operate.
High
Efficiency
High Efficiency mode
This button activates or deactivates the HIGH EFFICIENCY mode. The light
will be on when High Efficiency is selected, (please refer to High Efficiency
mode page 17)Te select CONVENTIONAL mode simply press the High
Efficiency mode button and the light will turn off.
The High Efficiency symbol _) will appear on the screen when the mode
s active.
Scroll
The SCROLLbuttons allow you to scroll between the wash options,
_ SelectUse the SELECTkey to confirm your selected option and the BACK key to
S_/_ct Bac/_ cancel,
The display screen
The display screen allows you to view the available wash cycles and modify options t provides
feedback on what your AqudSmdrt _'_washer is doing and how long the wash has to go, to keep
you informed throughout the cycle.The screen will also display messages to help you with the
overall running of your washer.
'four AquoSmdrt _'_'washer will display how many minutes the wash cycle has to go, so that you
can tell at a glance when your washing will be finished Once AqudFmQrt TM has finished the filling
and sensing process, the time to go will be displayed A progress bar is also displayed and will
move along as the cycle progresses. Please be aware that the flow rate of the water supply may
influence your cycle time.
....Tllheunique AquaSma,:t waslh
The Aqu_Sm_rt _'_washer has two modes of washing, High Efficiency and Conventional, Both
modes start the same way, with a Detergent Activating wash,
Detergent Activating wash
AquG,Smc_rt_'_fills the tub at the selected water temperature, with
just enough water so the clothes are saturated, This small arr/ount
of sudsy water flows through the clothes, up a specially designed
portal and back onto the clothes in a waterfall effect, This
thoroughly dissolves and activates the detergent.
(_] High Efficiency mode
In the High Efficiency mode the AquoSmd, r¢'_then fills with just
enough water to lift the clothes off the low profile agitator so when
it rotates, the clothes gently roll over each other, This wash uses
similar quantities of water to most Front Loaders and so, not only
do you get the benefits of water savings but the higher detergent
concentrations give you optimum soil removal,
Conventional mode
The Conventional mode is the immersion wash all Top Loader users
are familiar with. After the Detergent Activating wash the AqudSmdrt _'_
fills with cooler water until the clothes are submerged, and gently
turns the clothes over. We recommend this mode when the dilution
effect of water can solve or prevent common wash problems For
example, when dye or color run can be a problem, or when washing
sandy towels, The BED SHEETScycle uses the Conventional mode,
Somecyclescan be used inboth modes, whilst others work n only one,
fig. 11High HTi@_ncyw_sh
fig. 12Conw_ntiono/wosh
Regular ¢
Bed Sheets - V"
Whites ---- /
Colors ---- /
Heavy Duty V' _f
Delicate / d"
Easy Iron - /
Bulky ---- /
These two wash modes mean that your AqudSmort T'_washer gives you the best of both worlds,
to suit any laundry situation,
Fu!lly automatic watelr Illevel
You may notice that your AquoSmar¢ '_clothes washer behaves differently from your previous washer,
Your AqudSm_,rt% like all High Efficiency washers, has a fully automatic water level This means
that, like Front Loaders, the selection of the water level is left entirely up to the washer. This
ensures optimum wash performance and water savings.
Should you wish to use more water, simply select a Conventional cycle (refer to Conventional
mode page 17).
Sorting and moading
You have bought a bligh Efficiency washer, like Front Loaders yourAqudSm_,rt TM uses much less
water and energy than Traditional Top Loading clothes washers. It is important to sort your wash
load to ensure optimum wash performance.
BED SHEETS - Separate out bed sheets and comforter covers and use the BEDSHEETS
cycle which has been especially designed for these items. Ensure that comforter covers
are buttoned or zipped up. To get the best possible wash for bed sheets, load these items
around the edge of the tub rather than directly across the low profile agitator,
COLORED ITEMS - Dye or color run can be a problem with High Efficiency washers, so
separate highly colored garments especially when they are new and choose the COI.ORS
cycle Most dye transfer occurs when clothes are left too long in the washer at the
completion of the cycle so try not to leave your colored clothes lingering in the washer
BULKY iTEMS - Comforters, sleeping bags, ski jackets, blankets and throws are all items
which tend to behave unusually in a clothes washer. The lighter ones tend to float, while
a large blanket can get very heavy and make spinning difficult. '{our AquaSm_rt TM has
specific BULKYcycles designed to take care of these washing challenges.
ITEMS THAT WRINKLE - When you are concerned about creasing or wrinkling we
recommend you use the EASY IRON cycle. AkernaBveJy select one of the Conventional
cycles. The extra water used by these cycles wiJJ help to reduce wrinkling. Reducing the
spin speed of the wash may also help (refer to page 23).
JEANS - These heavy items are responsible for damaging other items in the wash and
require their own specific wash action to get dean We fed so strongly that they should
be washed separately we created a special JEANS cycle in the Lifestyle menu. Select
LIFESTYLE,SPECIAL CARE, JEANS.
SOIL - Very dirty, sandy, or linty bads are best washed separately to prevent transfer
onto other garments. It may be that you have new towels that create Jots of lint or very
sandy beach gear. We suggest using a ConvenRonaJ cycle in this circumstance
DEUCATES - To take extra care of delicate items, we suggest using the DELICATE, or
HANDWASH cycles. For HANDWASH select LIFESTYLE,SPECIAL CARE, HANDWASH.
Hl,,,}etellgent
Choosing the right detergent
YourAqudFmd, rt TM s a High Efficiency clothes washer and needs Low Sudsing Detergent to
prevent oversudsing probEems. This is the same type of detergent Front Loaders use and is
Eabelled, "High Efficiency"(HE)
There are both liquid and powdered Low Sudsing detergents. Some examples are:
Tde" HE liquid or powder
Wisk *' HE liquid or powder
When washing woollens use a Wool detergent but use it sparingly as these are usually very high
foaming. Do not use soap flakes or soap powders.
Use the instructions on the back of the detergent packet as a guide to the correct amount to
use The correct amount of detergent will vary depending on the amount of soil in your clothes
and the size of your load. Jeans and work clothes may need more detergent and towels less.
As a starting point:
Use a rounded scoop for a large load and reduce or increase the dosage as required.
For a small load (eg 4 - 5 t-shirts) use V4scoop,
if you have over ffoaming problems reduce your dosage
If your clothes are not clean enough, try using a bit more.
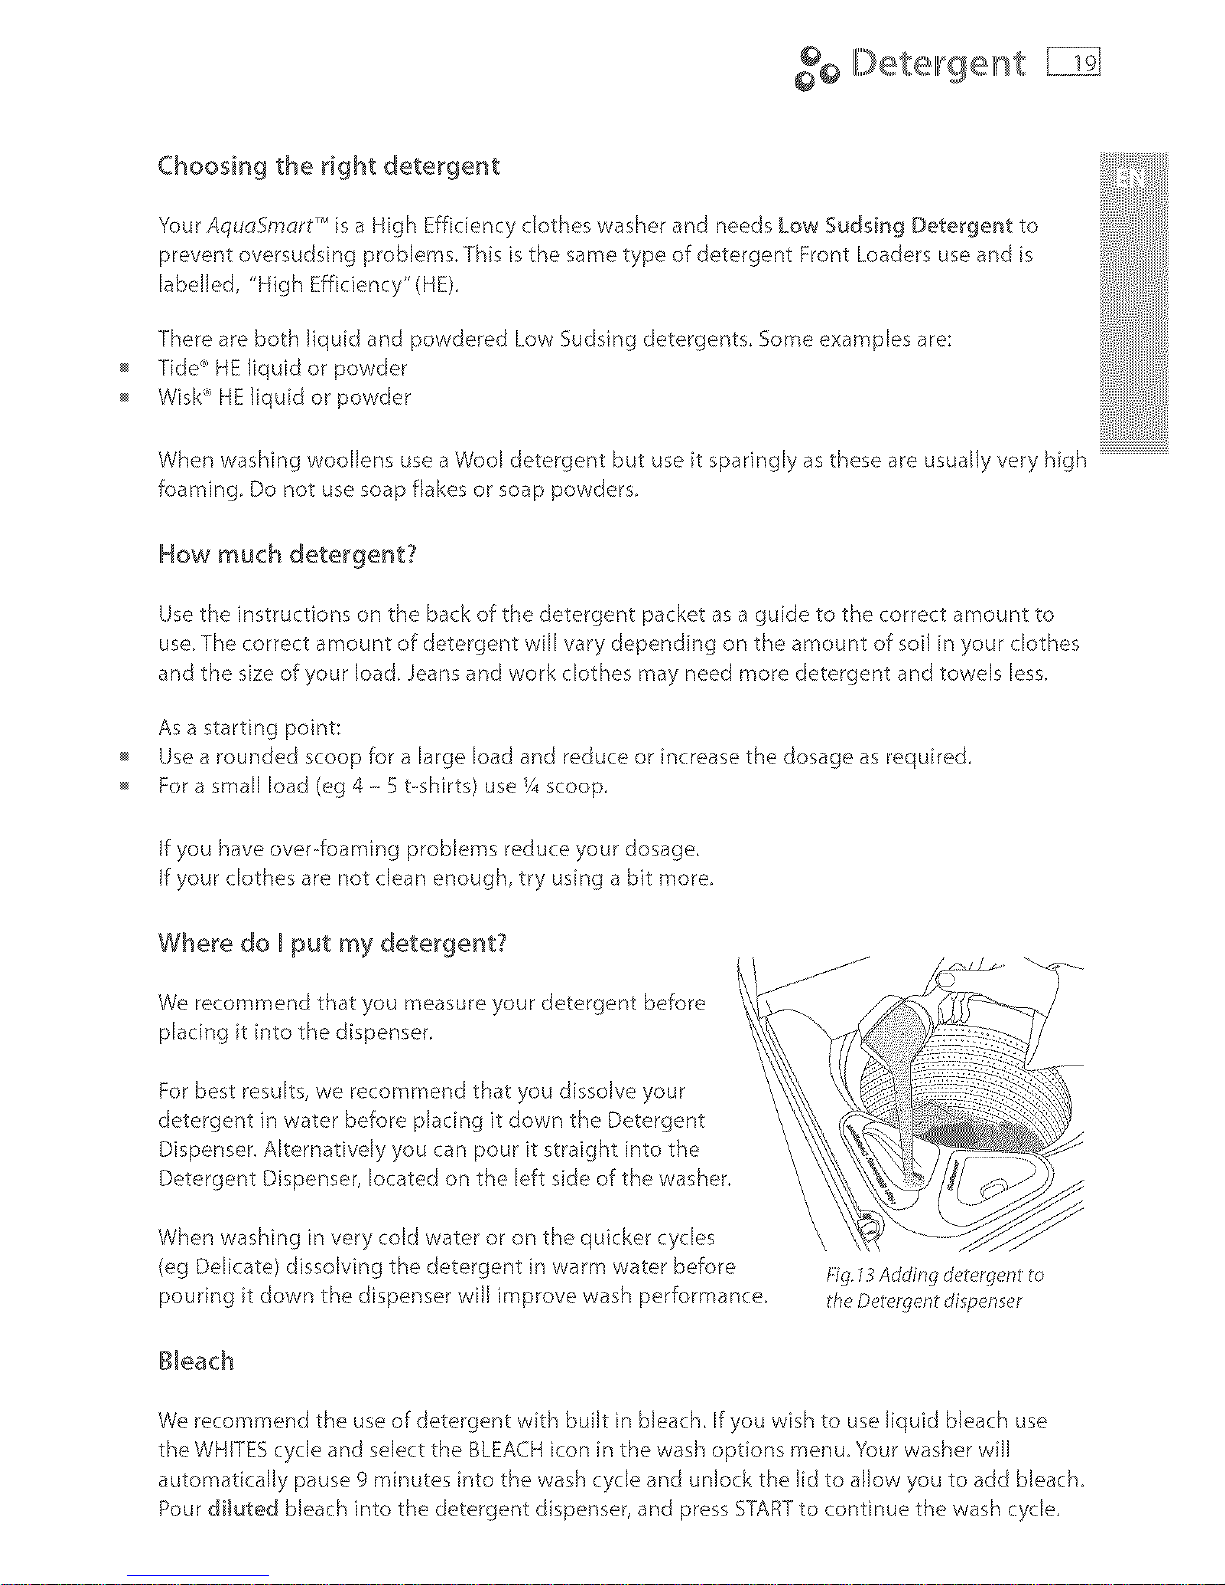
Where do I put my detergent?
We recommend that you measure your detergent before
placing t into the dispenser.
For best results, we recommend that you dissolve your
detergent in water before placing it down the Detergent
Dispenser. Alternatively you can pour it straight into the
Detergent Dispenser, located on the left side of the washer.
When washing in very cold water or on the quicker cycles
(eg Delicate) dissolving the detergent n warm water before
pour ng t down the dispenser will improve wash performance.
FTg.13Adding d_lergerll lo
the Delergenl dispenser
Bleach
We recommend the use of detergent with built in bleach. If you wish to use liquid bleach use
the WHITES cycle and select the B[ EACHicon in the wash options menu. Your washer will
automatically pause 9 minutes into the wash cycle and unlock the lid to allow you to add bleach.
Pour diluted bleach into the detergent dispenser, and press STARTto continue the wash cycle.
Falb,ricSoftene,r
Choosing the right cyde
If you wish to use fabric softener you will need to select the FABRICSOFTENER option which will
give you a deep rinse. If Fabric Softener is not selected, the softener will not be dispensed.
1 Select your wash cycle. Using the SCROLL buttons, scroll through the Cycle choices until the
desired cycle is highlighted, then press SELECT(refer to page 21 'for more information)
2 Scroll through the Wash Options until SOFTENER is highlighted, then touch SELECT (refer to page
23 for more information).
:5 Scroll until Fabric Softener ON is highlighted, touch SELECTto confirm your choice. You will then
have the option to save this choce for future washes when using this wash cycle.
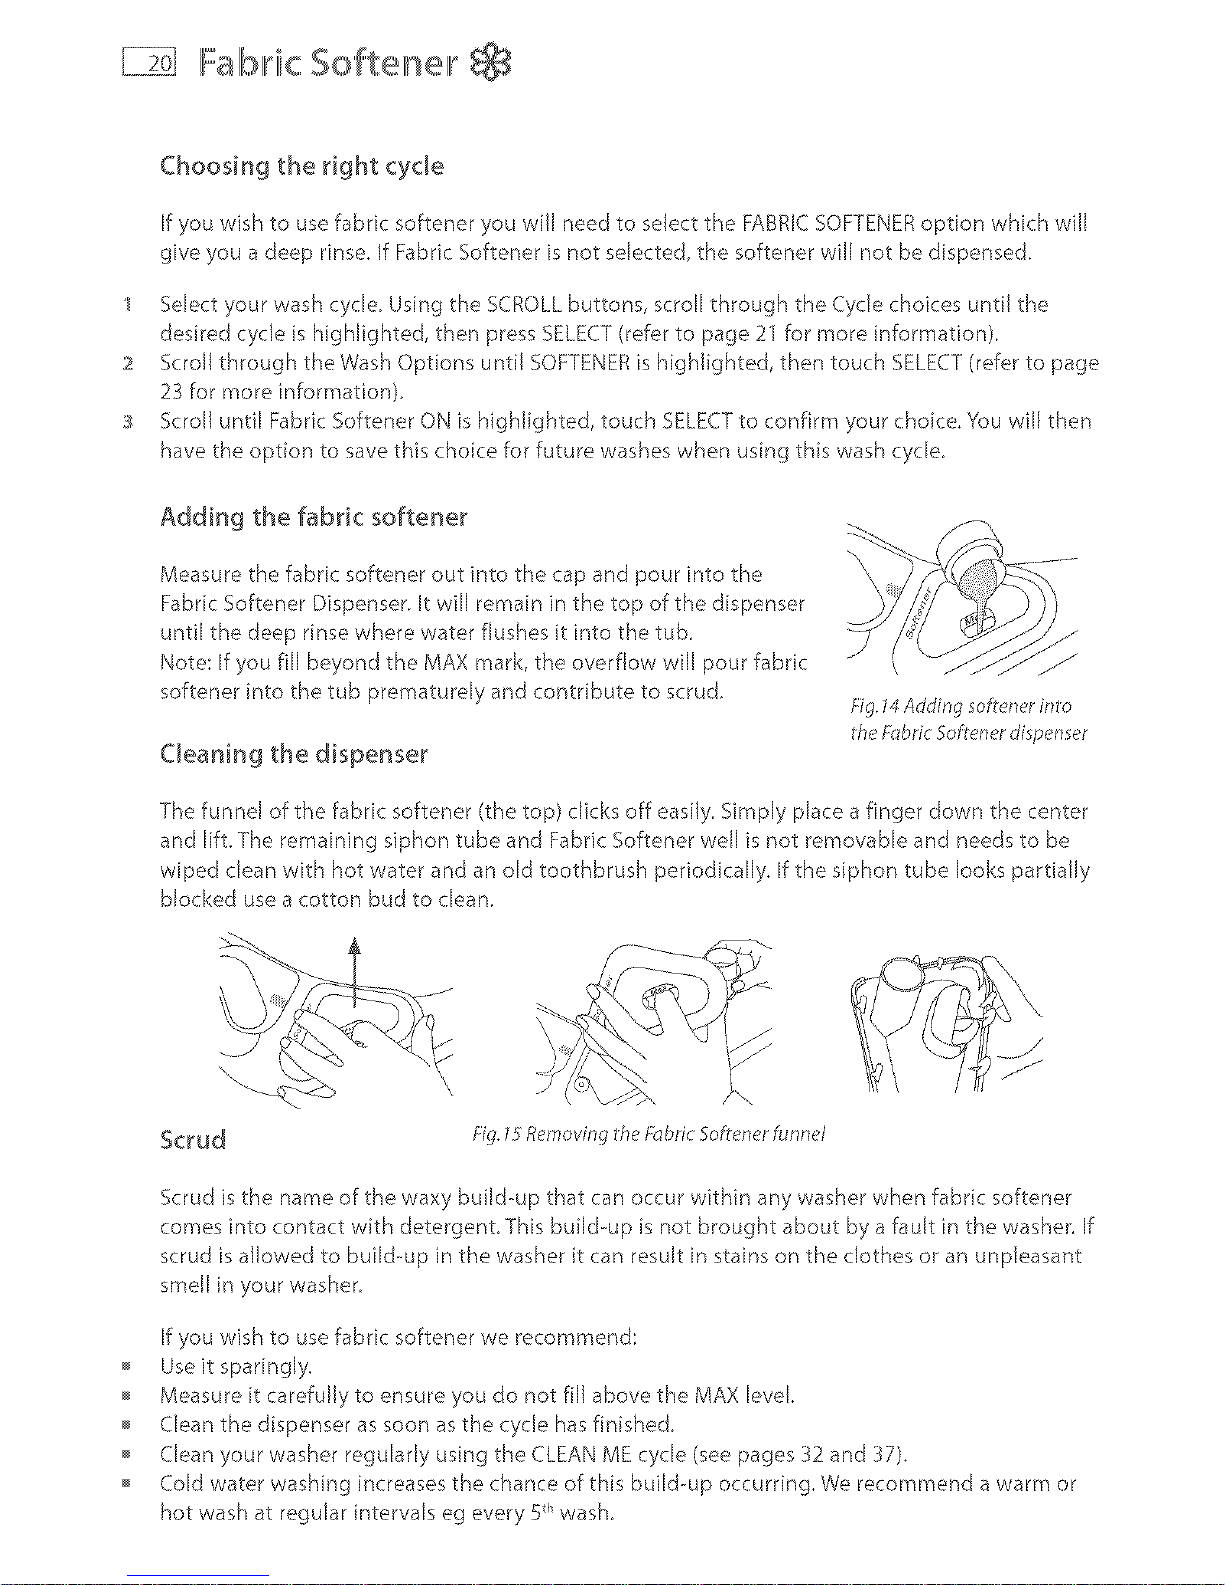
Adding the fabric softener
Measure the fabric softener out into the cap and pour into the
Fabric Softener Dispenser. It will remain in the top of the dispenser
until the deep rinse where water flushes it into the tub
Note: If you fill beyond the MAX mark, the overflow will pour fabrc
softener into the tub prematurely and contribute to scrud.
Cleaning the dispenser
The funnel of the fabric softener (the top) dicks off easily. Simply place a finger down the center
and lift. The remaining siphon tube and Fabric Softener well is not removable and needs to be
wiped clean with hot water and an old toothbrush periodically. If the siphon tube looks partially
blocked use a cotton bud to clean.
\ \
\ /' (.
Scrud Fig.1'_Removingzh_>fabric %h en_>rfunnH
Scrud is the name of the waxy build--up that can occur within any washer when fabric softener
comes into contact with detergent. This build-up is not brought about by a fault in the washer If
scrud is allowed to build--up in the washer it can result in stains on the clothes or an unpleasant
If you wish to use fabric softener we recommend:
Use it sparingly.
Measure it carefully to ensure you do not fill above the MAX level.
Clean the dispenser as soon as the cycle has finished.
Clean your washer regularly using the CLEAN ME cycle (see pages 32 and 37).
(']old water washing increases the chance of this build--up occurring. We recommend a warm or
hot wash at regular intervals eg every 5t_wash.
Choosing you,r wash cycle _i]
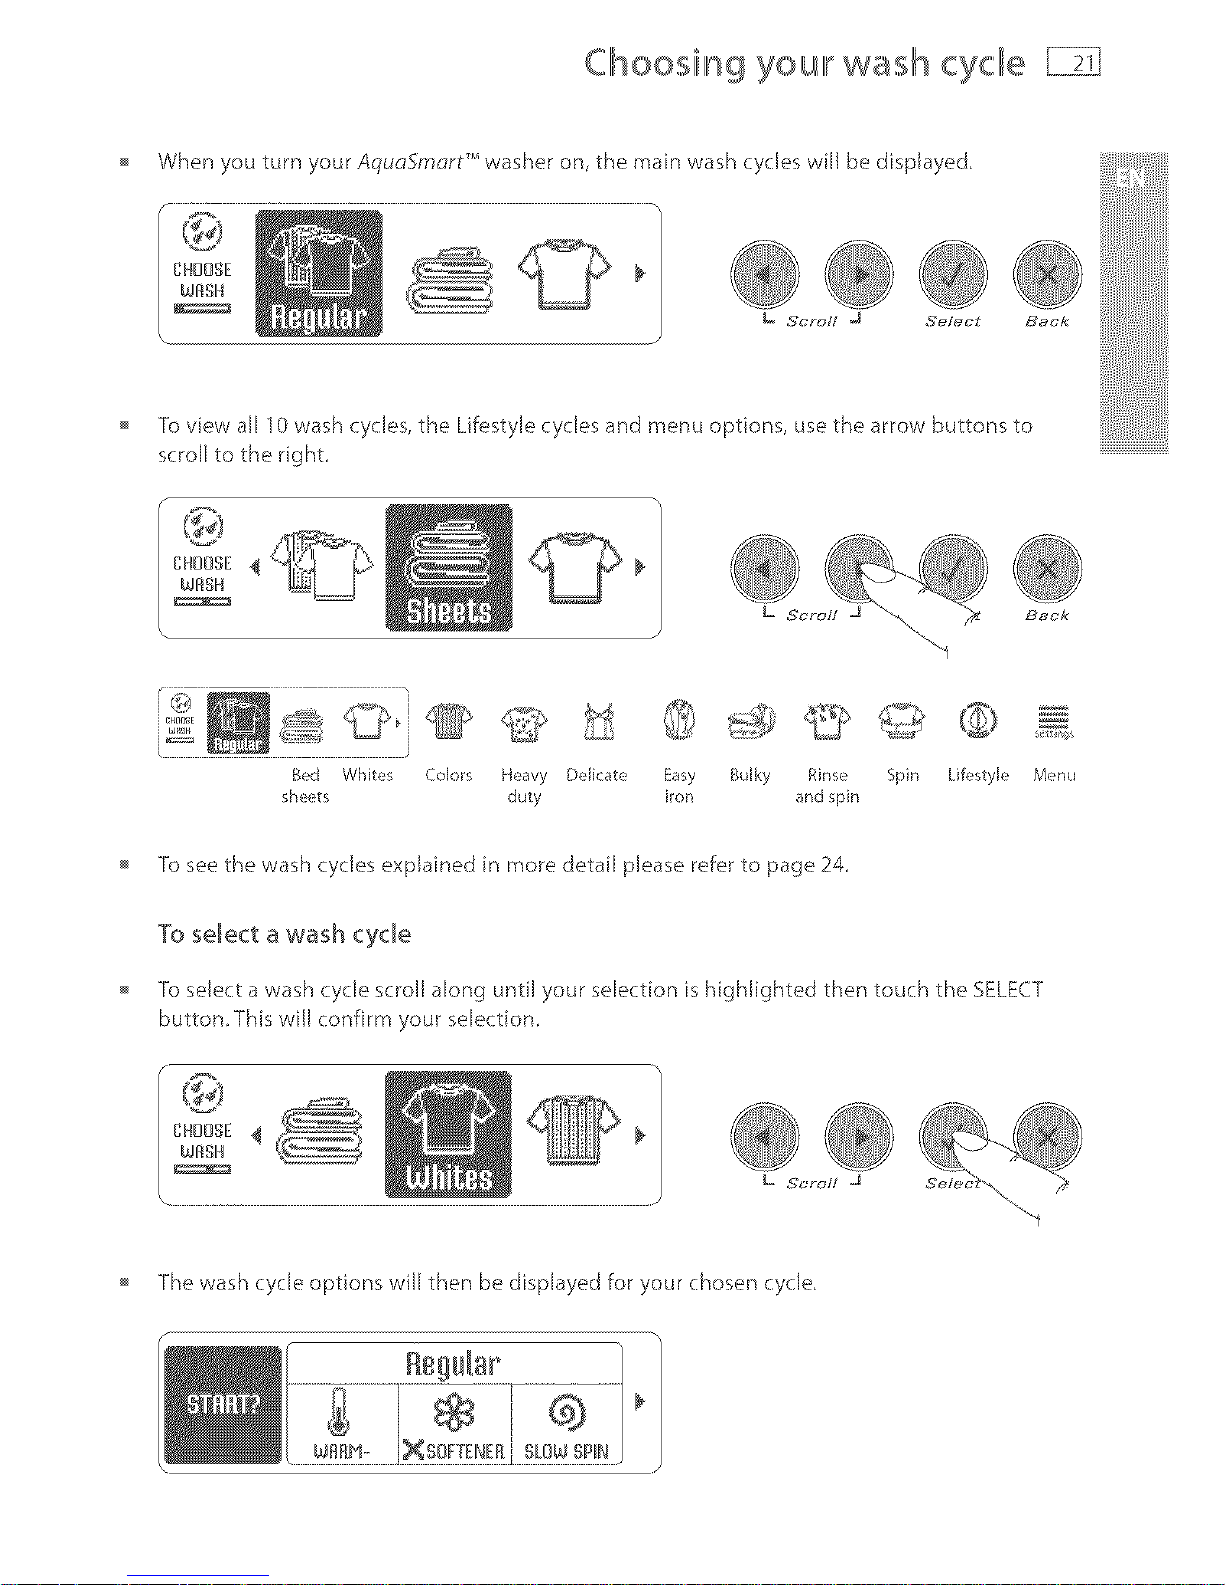
When you turn your Aquc_Smort _ washer on, the main wash cycles will be displayed,
@@©
L _S_(_r;l/t J Sefe_'t
To view all 10 wash cycles, the Lifestyle cycles and menu options, use the arrow buttons to
scroll to the right,
Back
CHOOSE j
WASH ÷@@
L Scroll J x'%x _ B_Jck
wl_N
Bed Whites Colors Heavy Delicate Easy Bulky Rinse Spin Lifestyle Menu
sheets duty iron andspin
To see the wash cycles explained in more detail please refer to page 24,
= To sdect a wash cycle scroM along until your sdection is highlighted then touch the SELECT
button,This will confirm your sdection,
Thewash cycle options wiJJthen be displayed for your chosen cycle,
Changing ¢lhewash cyde options
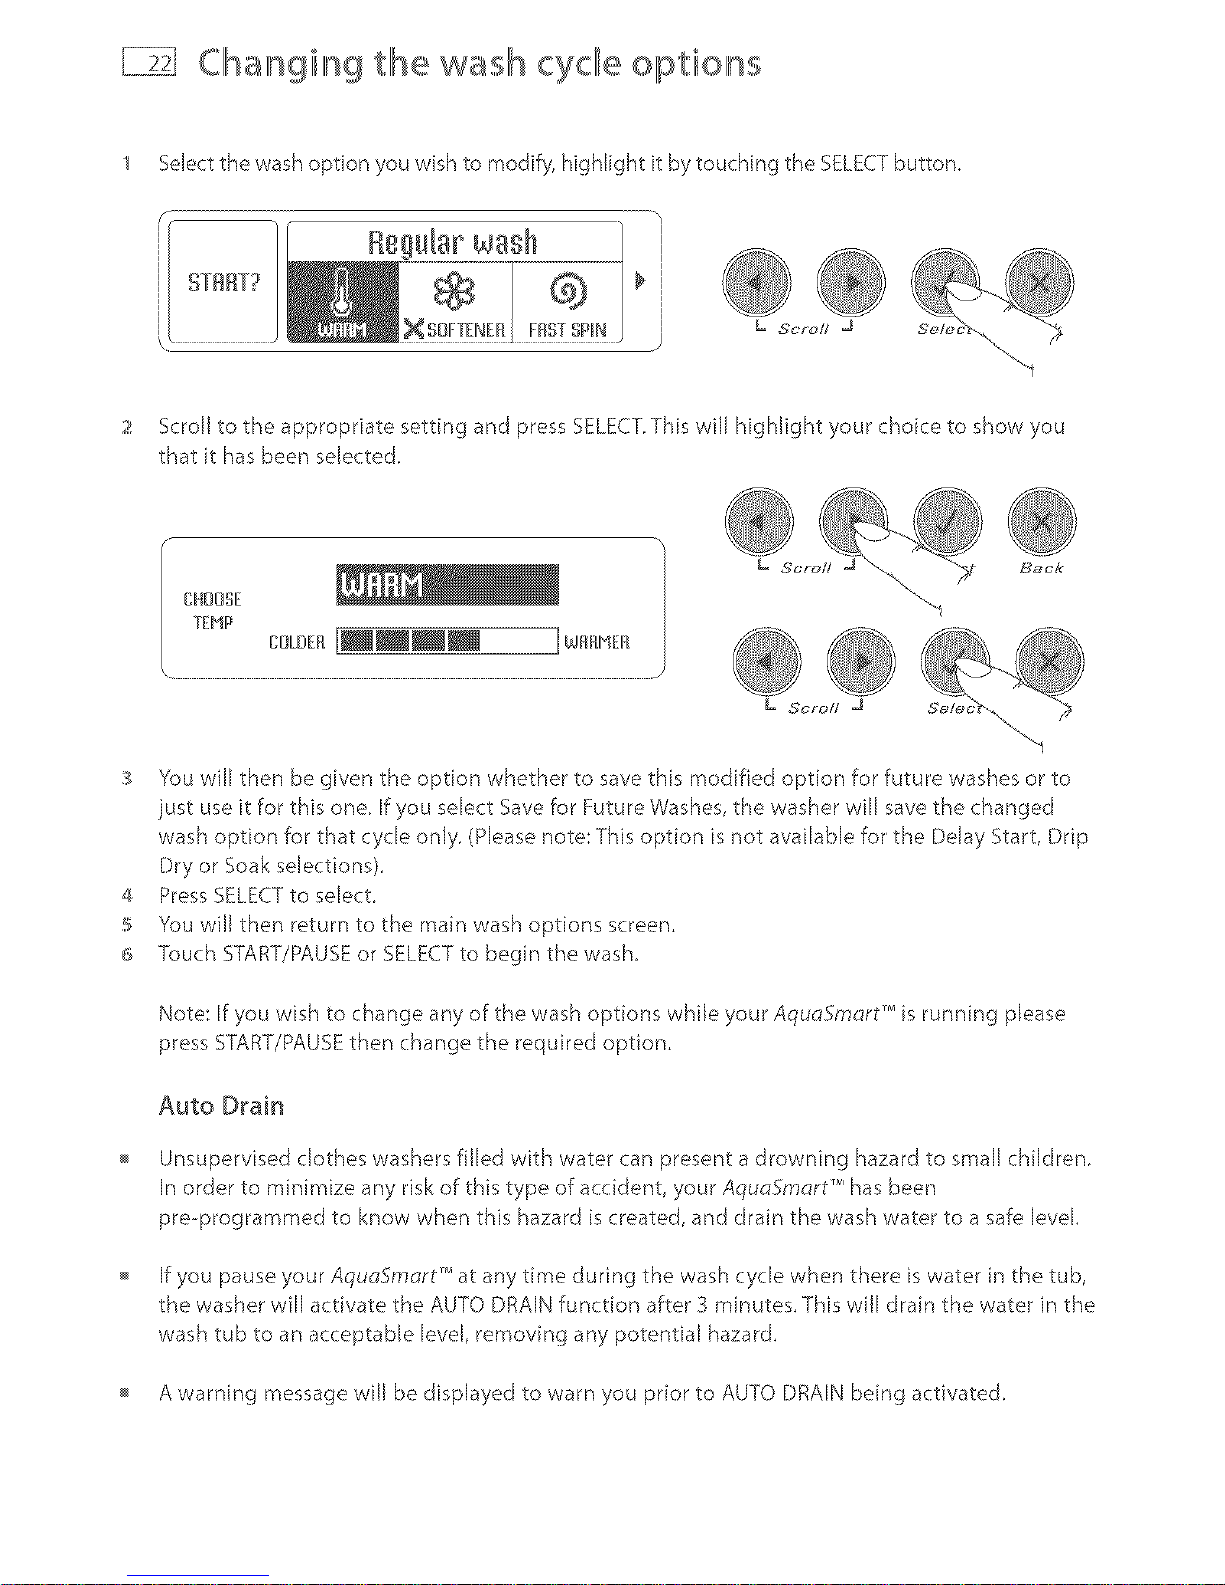
1 Select the wash option you wish to modify, highlight it by touching the SELECTbutton,
STRRT?
i
'@®
i
L Scroll J
)
2 Scroll to the appropriate setting and press SELECT,This will highlight your choice to show you
that it has been selected,
CHOOSE
TEMP
_L_EO[__
@÷
:_ You will then be given the option whether to save this modified option for future washes or to
just use it for this one If you select Save for Future Washes, the washer will save the changed
wash option for that cycle only, (Please note: This option is not available for the Delay Start, Drip
Dry or Soak selections)
4 Press SELECTto select
S Y'ou will then return to the main wash options screen,
_ Touch START/PAUSE or SELECTto begin the wash,
Note: If you wish to change any of the wash options while your AqudSmort TM s running please
press START/PAUSE then change the required option,
Auto Drain
Unsupervised clothes washers filled with water can present a drowning hazard to small children,
In order to minimize any risk of this type of accident, your AquclSmclrt _" has been
pre-programmed to know when this hazard is created, and drain the wash water to a safe level,
If you pause your AquoSm_rt TM at any time during the wash cycle when there is water in the tub,
the washer wiJJ activate the AUTO DRAIN function after 3 minutes, This wiJJdrain the water in the
wash tub to an acceptable level, removing any potential hazard,
A warning message will be displayed to warn you prior to AUTO DRAIN being activated,

Changing tllhe wash cyclle options
Incoming water 68°F gl'_F 102°F 115°F 140°F
from faucet (20C) (33°C) (3g°C) (46°C) (60°C)
Cold+ (Controlled Cold)
The Cold+ option helps to keep your cold water at the optirnum temperature of
68°F(20°C) for the most effective wash possible in cold water.
Fabric Softener
If you wish to use fabric softener please select the Fabric Softener option.
Bleach
If you wish to use liquid bleach, please select the WHITES cycle and select BLEACH, The
washer will alert you to when it is time o add bleach,
Spin Speed
Your Aqu_Smort "_'washer offers three spin speeds: Fast (1000 rpm), Medium (700 rpm)
and Slow (300 rpm), plus an additional No Spin option.
Dday Start
This option ddays the start of the wash from 15 minutes to 18 hours. We suggest that
you avoid using Dday Start for damp, non colorfast items.
Drip Dry
Drip Dry alerts you when it is time to remove drip-dry garments before the final spin.
Press START to continue the cycle.
Soak
The Soak option provides a 2 hour soak during the middle of the wash phase. To exit
Soak at any time simply press the BACK button.
Clhan@ng the wash cyclic optio ' s
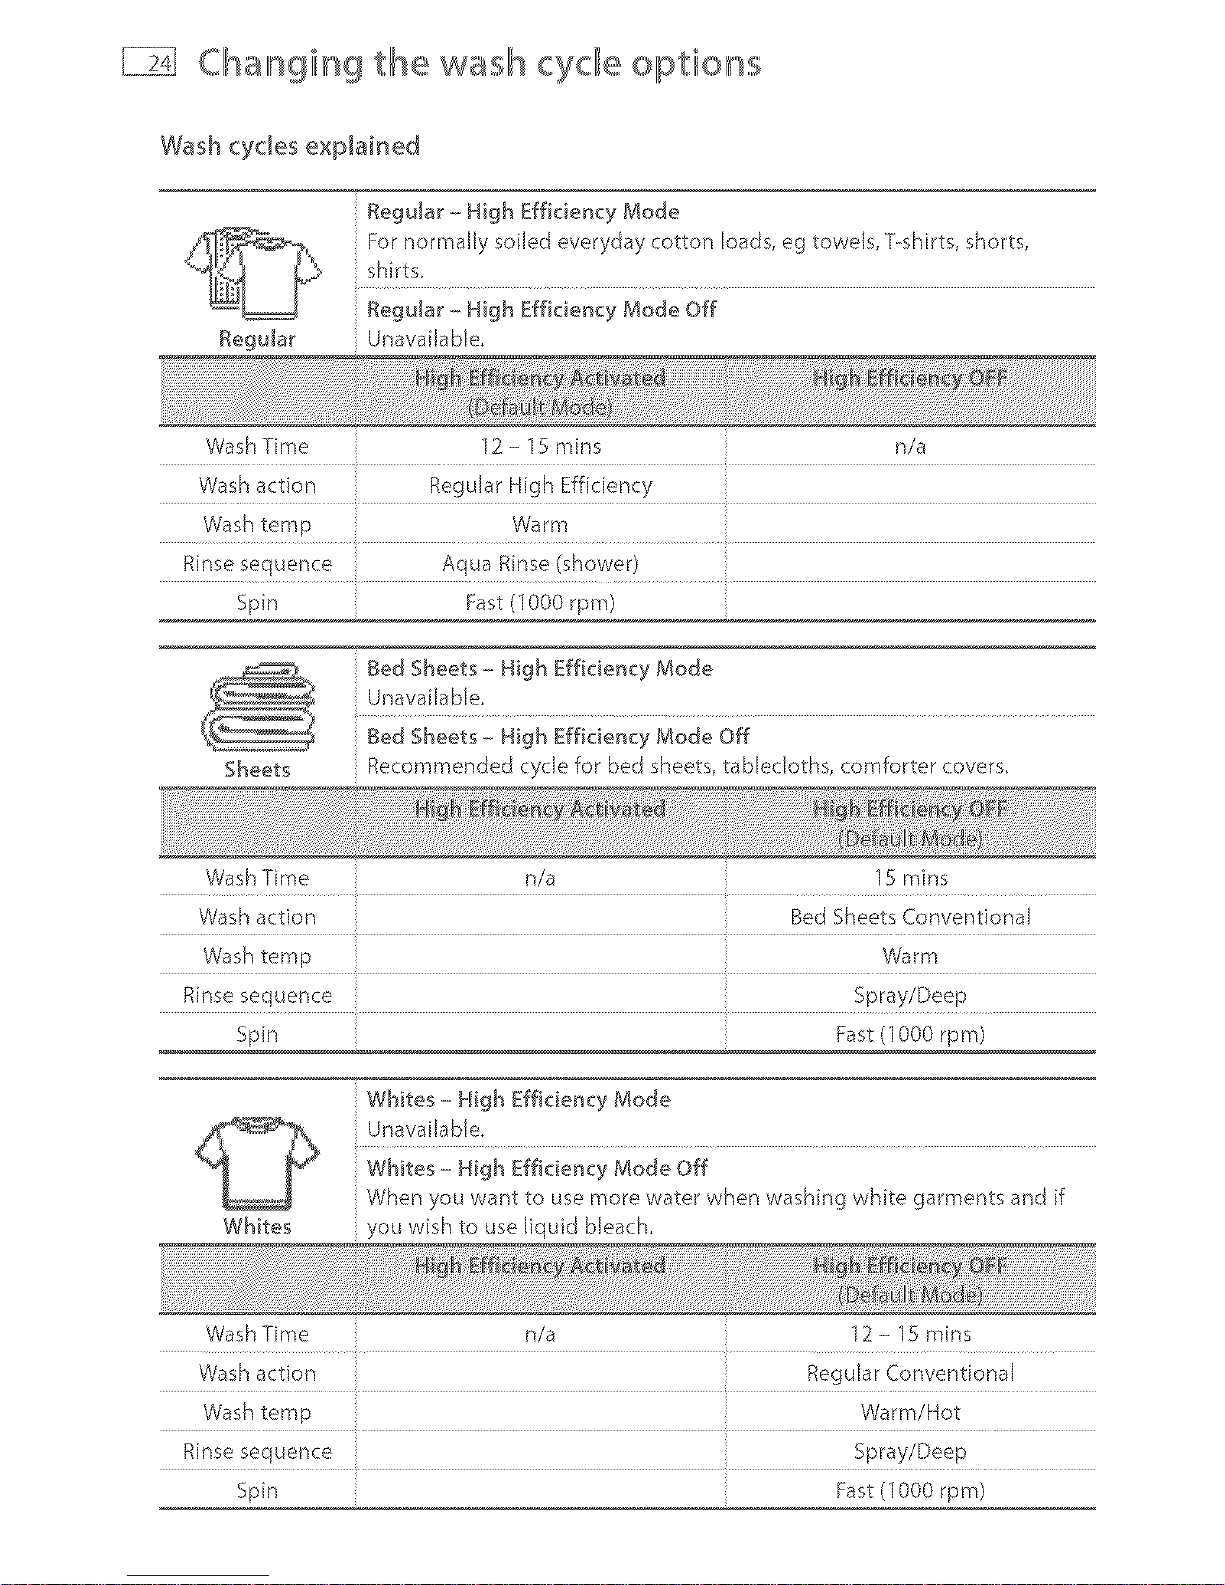
Wash cycles explained
Regular
Regular - High Efficiency Mode
For normally soiled everyday cotton loads, eg towels, T-shirts, shorts,
shirts. .....
Regular - High Efficiency Mode Off
Unavailable,
Wash Time 12- lS mins n!a
Wash action Regular High Efficiency
Wash temp Warm
Rinse sequence Aqua Rinse (shower)
Spin Fast (1000 rpm)
Sheets Recomrnended cycle for bed sheets, tablecloths, comforter covers.
Wash Time n/a lS mins
Wash action Bed Sheets Conventional
Wash temp Warm
Rinse sequence Spray/Deep
Spin Fast (1000 rpm)
Whites
Whites - High Efficiency Mode
Unavailable,
Whites i High Efficiency Mode Off
When you want to use more water when washing white garments and if
you wish to use liquid bleach.
Wash Time n/a 12- 1S rains
Wash action Regular Conventional
Wash temp Warm/Hot
Rinse sequence Spray/Deep
Spin Fast (1000 rpm)
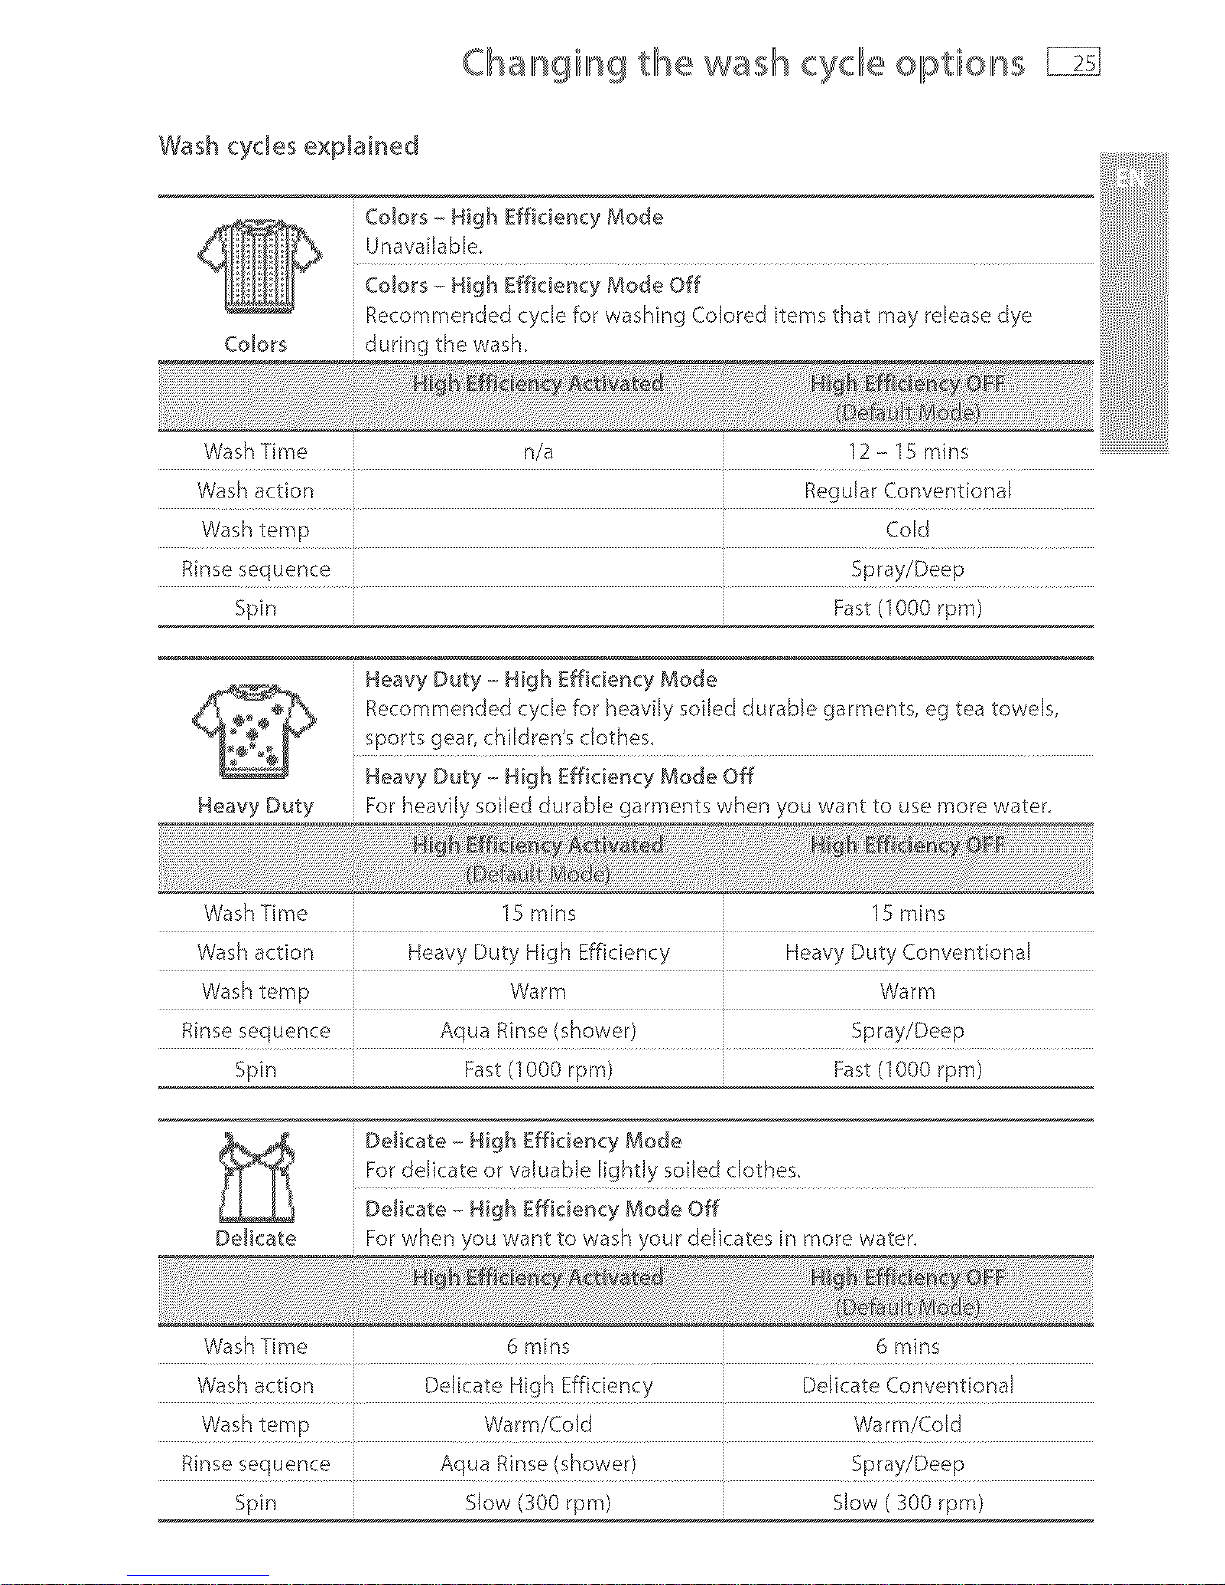
Chalngillsg the wash cyclle qptiolns
Wash cycles explained
Colors - High Efficiency Mode
UnawdJabJe,
Colors - High Efficiency Mode Off
Recommended cycle 'Forwashing Colored items that may release dye
durin_ the wash.
Wash Time n/a 12 - 15 rains
Wash action Regular Conventional
Wash temp Cold
Rinse sequence Spray/Deep
Spin Fast (1000 rpm)
@
Heavy Duty
Heavy Duty - High Efficiency Mode
Recommended cycle for heavily soiled durable garments, eg tea towels,
sports gear, children's do!hes.
Heavy Duty - High Efficiency Mode Off
For heavily soiled durabb garments when you want to use more water.
Wash Time 15 rains 15 rains
Wash action Heavy Duty High Efficiency
Wash temp Warm Warm
Rinse sequence Ac_ua Rinse (shower) Spray/Deep
Spin Fast (1000 rpm) Fast (1000 rpm)
Delicate
Delicate - High Efficiency Mode
For delicate or valuable lightly soiled clothes.
Delicate - High Emciency Mode Off
For when you want to wash your delicates in more water.
Wash Time 6 rains 6 rains
Wash action De[kate High Efficiency Delicate Conventional
Wash temp Warm/Cold Warm/Cold
Rinse sequence Aqua Rinse (shower) Spray/Deep
Spin Slow (300 rpm) Slow ( _00 rpm)
Changing the wash cycle options
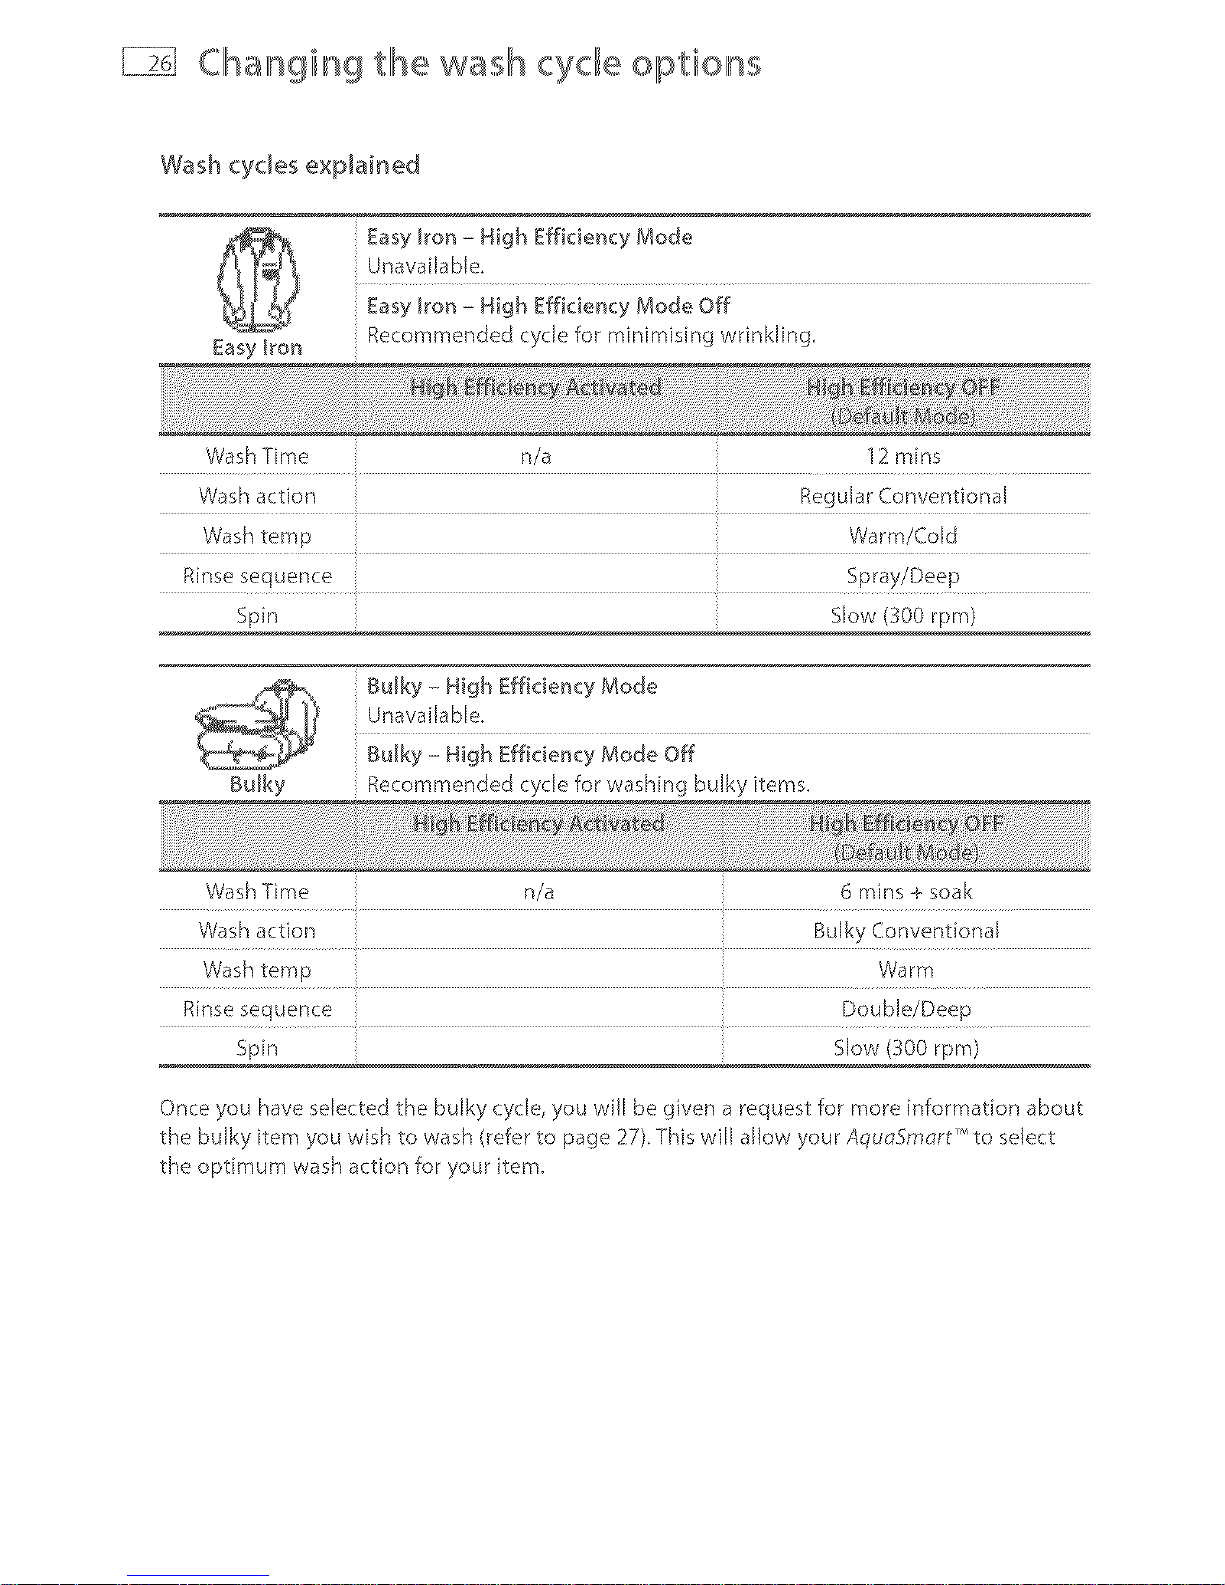
Wash cycJes expJained
Easy l_on
Easy Iron - High Effidency Mode
Unavailable,
Easy Iron - High Efficiency Mode Off
Recommended cycle for minimising wrinkling,
Wash Time n/a 12 rains
Wash action Regular Conventional
Wash temp Warm/Cold
Rinse sequence Spray/Deep
Spin Slow (300 rpm)
Bulky Recommended cycle for washing bulky items,
Wash Time n/a 6 rains + soak
Wash action
Wash temp Warm
Rinse sequence Double/Deep
Spin Slow (300 rpm)
Once you have selected the bulky cycle, you will be given a request for more information about
the bulky item you wish to wash (refer to page 27), This will allow your AquoSr,nort TM to select
the opBmum wash action for your item,
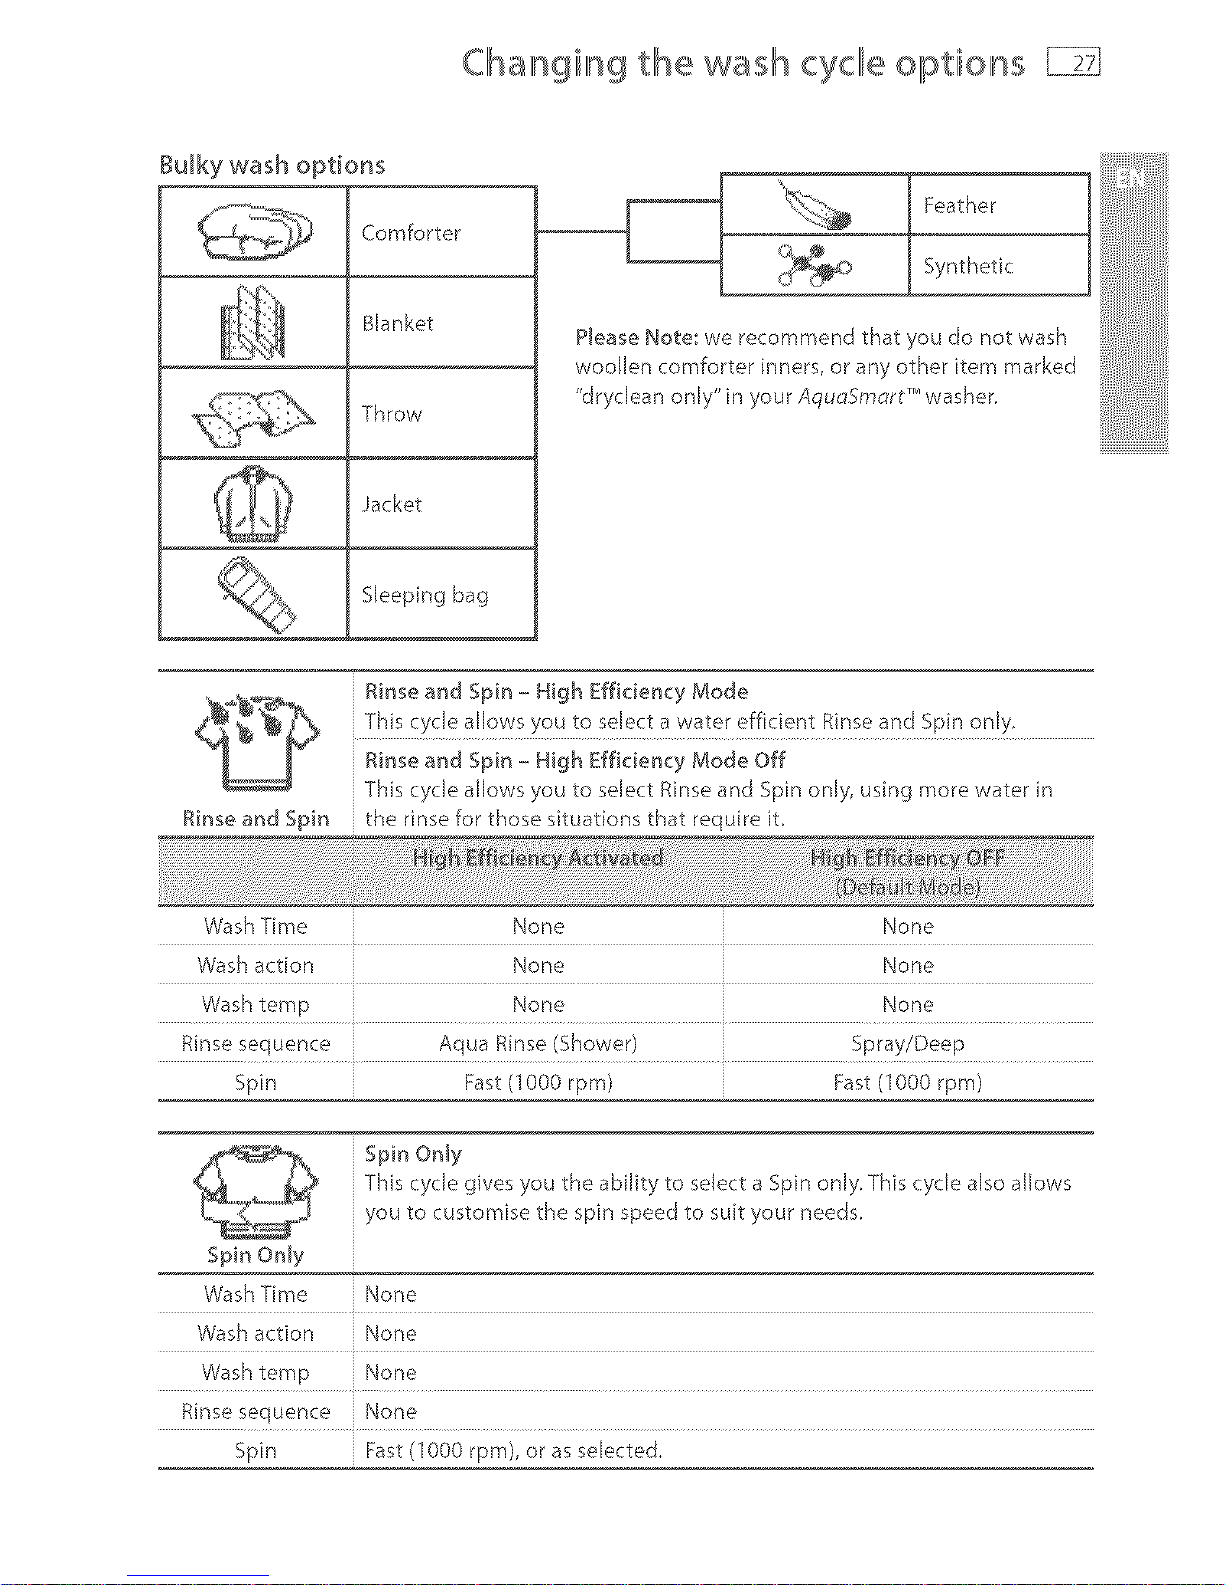
Changing ¢lhewash cyclic options
Comforter
Blanket
Throw
Jacket
Sleeping bag
Feather
Please Note: we recommend that you do not wash
woollen comforter inners, or any other item marked
"drycJean only" in your AquoSmort m'_washer,
Rinse and Spin - High Efficiency Mode
Rinse and Spin the rinse for those situations that require it,
Wash Time None Norse
Wash action None None
Wash temp None None
Rinse sequence Aqua Rinse (Shower) Spray/Deep
Spin Fast (1000 rpm) Fast (1000 rpm)
Spin Only
This cycle gives you the ability to select a Spin only, This cycle also allows
you to customise the spin speed to suit your needs,
Spin Only
Wash Time None
Wash action None
Wash temp None
Rinse sequence None
Spin Fast (1000 rpm), or as seEected,

Lifestylle cyclles
No experience necessary
'four Aclu_Smcirff '_'washer offers you a range of special Lifestyle cycles, to make washing even
easier, These cycles have been specifically designed by our washing experts, with you in mind
We have incorporated 70 years of washing knowledge into ] 9 easy to use, preprogrammed wash
cycles, This allows you to let the washer deal with some of the more tricky washing situations
you may encounter, ensuring "chat you get the same results as a washing expert, without having
to be one,
Handwash
Chocolate
Comforter
Sweaty
(:Jean Me
Wool
Tomato Fruit Wine
Soft Toys
Jeans
Blood
Hygiene
Sports
Shoes
Grass
Diaper
Rinse
Beach
Gear
To access Lifestyle cycles:
1 Scroll though the wash cycles on the display to reach the LIFESTYLEoption, {_)
2 Select LIFESTYLE,by touching the SELECT button, to the right of the screen.
s Use the SCROLL buttons to scroll though the five Lifestyle categories.
4 Usethe SELECT button to select a LIFESTYLE category,
5 Scroll through the Lifestyle cycles, touch SELECTconfirm your cycle choice, and then press
START,
 Loading...